No Wires Needed 10310308 User Manual 110
No Wires Needed 110
Contents
Pelican Hub Manual
No Wires Needed
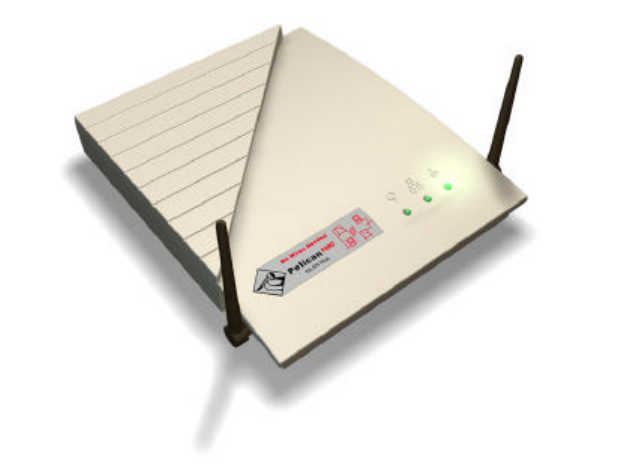
Pelican 1100 WLAN Hub
User Manual
Version 2.1.1 – October 1999
User manual
Pelican 1100 WLAN Hub
No Wires Needed
Jan Steenlaan 3-5
3723 BS Bilthoven
The Netherlands
www.nwn.com
Version 2.1.1 – October 1999
Trade marks
Copyright © No Wires Needed
The publisher reserves the right to revise this publication and to make
changes to any or all parts of this manual at any time, without obligation to
notify any person or entity of such revisions or changes.
Swallow, Parrot, Pelican, AirLock, APCenter, ASBF and Connect are
trademarks of No Wires Needed. Other product and company names are
registered trademarks or trademarks of their respective holders.
Copyright statement
No part of this publication may be reproduced, stored in a retrieval system, or
transmitted in any form or by any means, whether electronic, mechanical,
photocopying, recording, or otherwise without the prior writing of the publisher.
Printed in Amsterdam, October 1999
Free Repair Period
NWN undertakes a Free Repair Period of 12 months from the date of Invoice.
Within the Free Repair Period NWN repairs a faulty device free of charge or
replaces it in case of irreparable damage.
Excluded from the Free Repair Period are malfunctions caused by operation
outside the intended usage; by misuse or abuse; by service modifications or
repairs performed by unauthorised persons or by other conditions not arising
from defects in Product materials or workmanship.
The costs associated with physically replacing the defective part and re-
installing are to be borne by the Buyer.
Statement of Year 2000 Compliance
Detailed information about our statement is published on our website.
http://www.nwn.com

FCC Radiation Exposure Statement
This equipment complies with FCC radiation exposure limits set forth for an
uncontrolled environment. This equipment should be installed and operated
with the minimum distance between your body, excluding hands, wrists, feet
and ankles, and the antenna as shown in the table below:
WLAN Hubs which use the attached low
gain indoor antennas (1.9dBi) 20cm (7 inches)

Declaration of Conformity
This device complies with Part 15 of the FCC Rules. Operation is subject to
the following two conditions: (1) this device may not cause harmful
interference, and (2) this device must accept any interference received,
including interference that may cause undesired operation.
No Wires Needed Parrot, Pelican,
WBS, WBC 1100
Tested To Comply
With FCC Standards
FOR HOME OR OFFICE USE

No Wires Needed
User Manual Pelican 1100 WLAN Hub Page 9 of 9
1 Contents
1 Contents ..............................................................................................9
2 Introduction ........................................................................................10
3 Configuring the Pelican.......................................................................11
3.1 Installation of configuration software............................................11
3.2 Give the Pelican an IP-address ...................................................12
3.2.1 Selecting a network.............................................................14
4 Connection the devices ......................................................................15
4.1 Connect one device to the Pelican...............................................15
4.2 Connect 2-4 devices to the Pelican..............................................16
4.3 Continue installation....................................................................17
4.3.1 Resetting the Pelican...........................................................18
5 Technical specifications Pelican 1100 .................................................19
5.1 Standards supported...................................................................19
5.2 Environmental ............................................................................19
5.3 Power specifications ...................................................................19
5.4 Radio specifications....................................................................19
5.5 Specific features .........................................................................20
5.6 Physical Dimensions...................................................................20

No Wires Needed
Page 10 of 10 Pelican 1100 WLAN Hub User Manual
2 Introduction
Thank you for purchasing your No Wires Needed Pelican 1100 WLAN Hub.
This manual will assist you with the installation procedure.
The package you have received should contain the following items:
• User manual
• Pelican 1100 WLAN Hub
• Power adapter
• Diskettes containing PConfig™ Software
Note: if anything is missing, please contact your vendor
No Wires Needed
User Manual Pelican 1100 WLAN Hub Page 11 of 11
3 Configuring the Pelican
The Pelican should be configured before it is actually installed.
The settings contain the following parameters:
• IP address
• Network name
• Community string (password)
• Lock (remote management on/off)
First install Pconfig from the diskette that is shipped with the Pelican.
3.1 Installation of configuration software
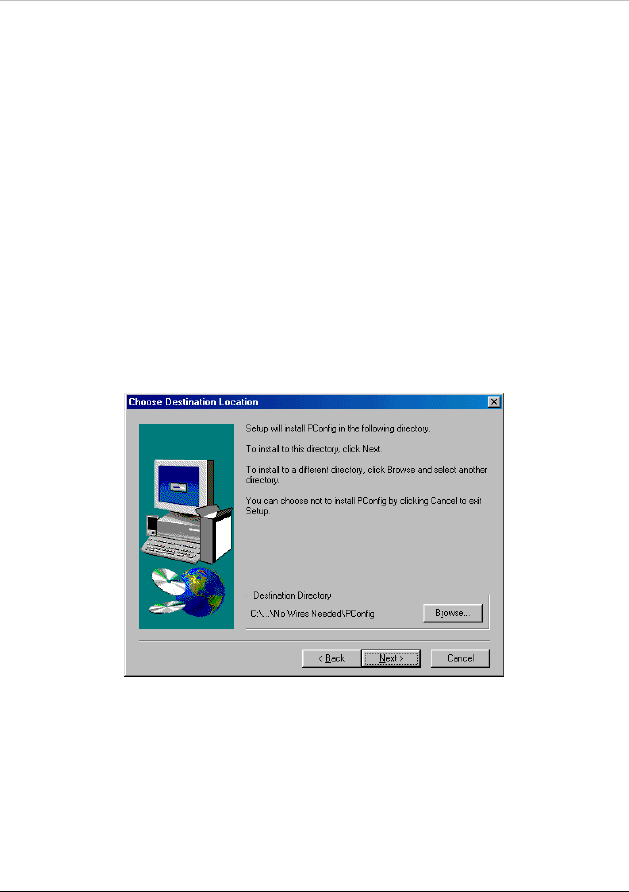
To install the PConfig program, insert disk 1 into your local disk drive and run
the PConfig setup.exe. The set-up wizard will guide you through the
installation process.
Figure 3.1 Select the directory you want to install PConfig in.
Start the PConfig program after completion of the installation.
No Wires Needed
Page 12 of 12 Pelican 1100 WLAN Hub User Manual
3.2 Give the Pelican an IP-address
The following settings should be done:
• IP address
• Network name
• Community string (password)
• Lock (remote management on/off)
Therefore you should connect the Pelican directly to a computer were Pconfig
is running on. Either use a cross cable, or a standard hub to accomplish this.
Note: You should not attach the Pelican to the same wired backbone were the Access
Points are connected to. This will result in a not-ending loop, and can cause network
problems.
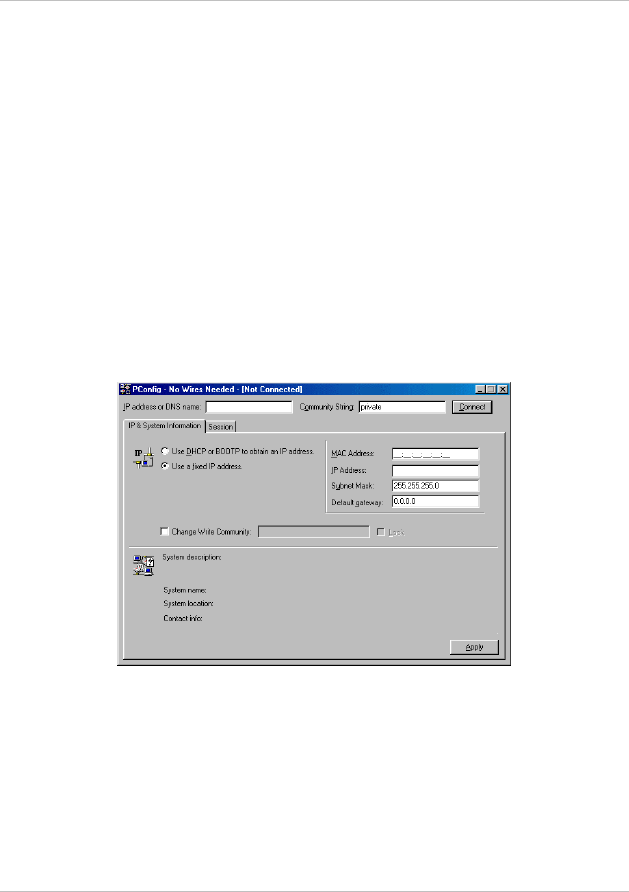
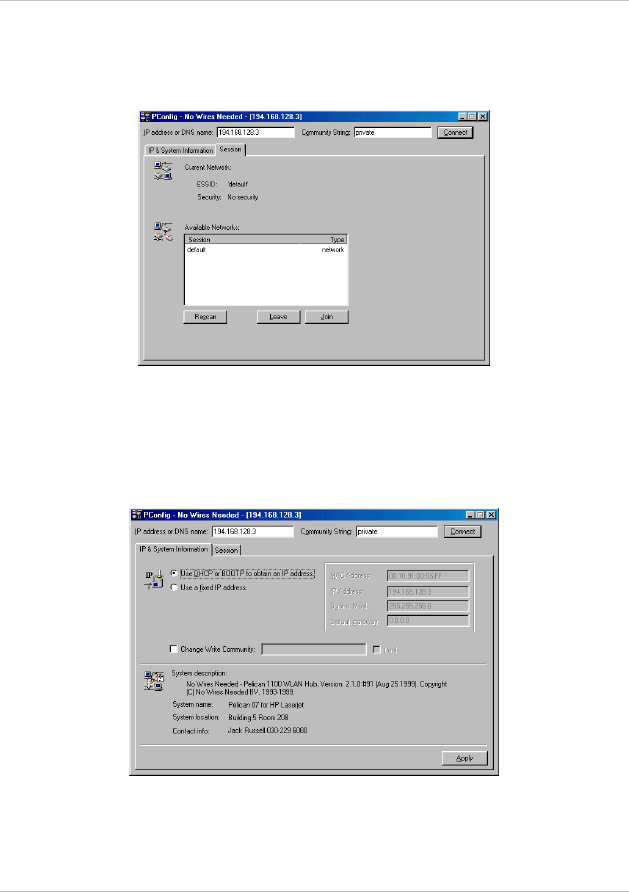
After starting Pconfig the following screen will appear.
No Wires Needed
User Manual Pelican 1100 WLAN Hub Page 13 of 13
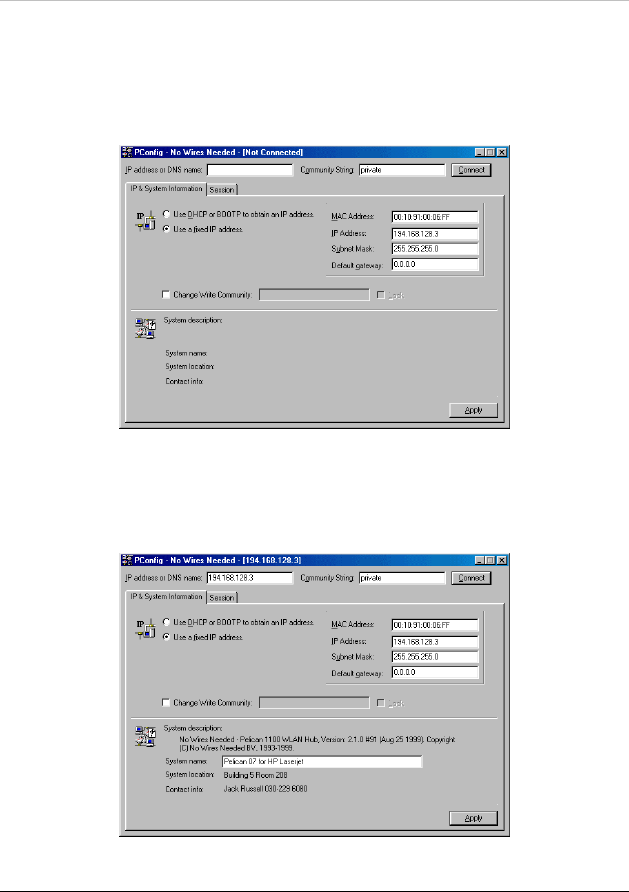
Select ‘Set a fixed IP address’. Then enter the MAC address and the IP
address manually. The MAC Address can be found at the backside of the
Pelican.
Press Apply.
You are now enabled to fill in the System name, System Location and Contact
Info. These fields are not mandatory; the information is useful when using
several Pelicans in a more complex environment. Place your cursor behind
the field you wish to change.
No Wires Needed
Page 14 of 14 Pelican 1100 WLAN Hub User Manual
3.2.1 Selecting a network
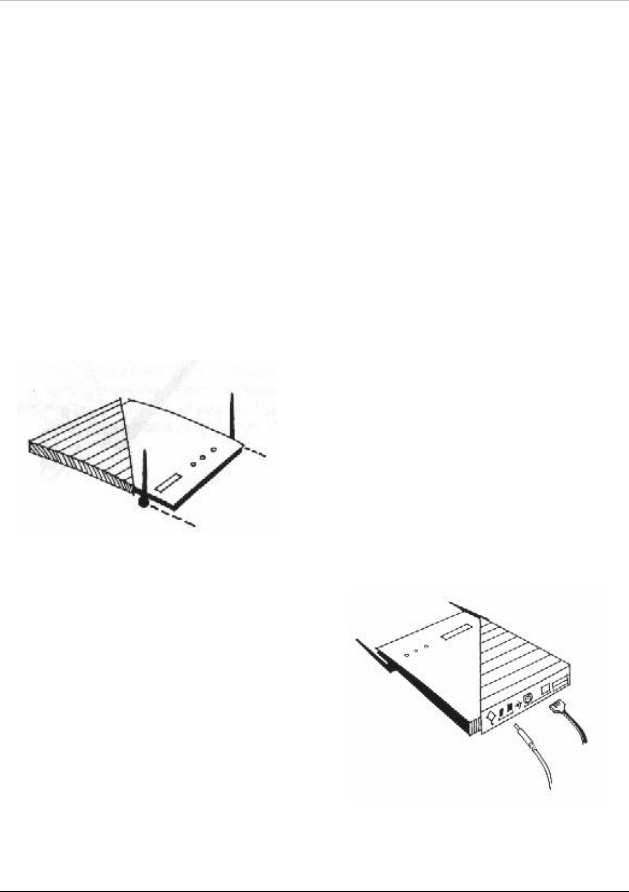
Selecting the Session tab will enable you to join a specific wireless network.
Press “Leave” and then “Rescan” to get an overview of all the available
networks, thereafter select the appropriate network and press “Join”.
You are now ready to connect your Pelican to the Ethernet device or to the
standard hub where the four devices are connected to.
Note: If you are using DHCP on your network, follow this extra step
Check the box “Use DHCP or BOOTP to obtain an IP-address” and press
“Apply”.
Note: The IP address previously entered will remain in the “IP address or DNS name”
box, even when DHCP or BOOTP is selected.
No Wires Needed
User Manual Pelican 1100 WLAN Hub Page 15 of 15
4 Connection the devices
Note: The Pelican 1100 WLAN Hub is equipped with one RJ45 connector.
Use a cross-cable if you only connect one device to the Pelican 1100 WLAN
Hub. If you want to connect four devices, be advised to use a normal standard
hub connected to the Pelican and the four devices.
4.1 Connect one device to the Pelican
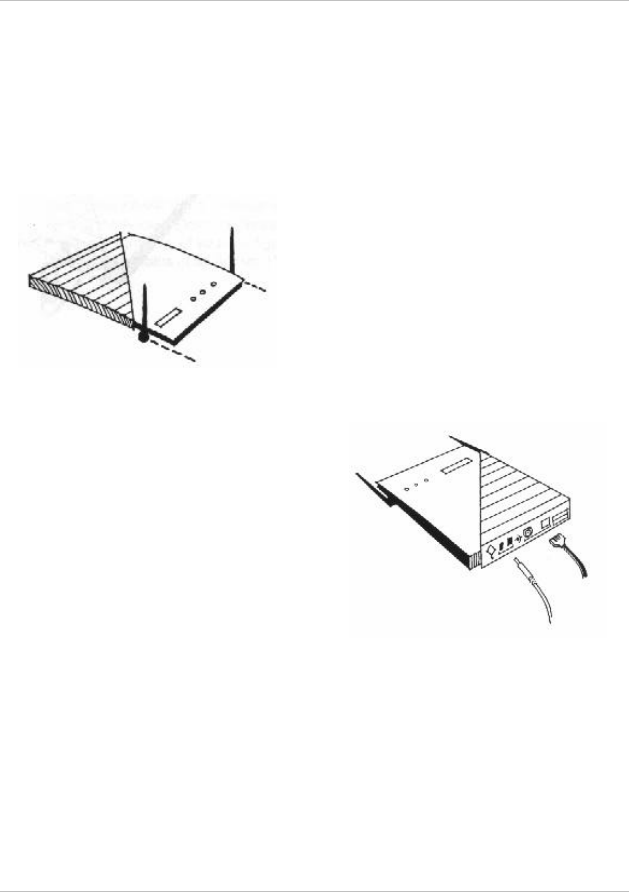
1. Place your Pelican 1100 WLAN Hub next to your device that should be
connected to it.
2. Make sure the antennas are in a vertical position (if not, rotate over 90
degrees).
3. Insert the power connector.
4. Attach the UTP Ethernet CROSS-
cable directly to the device.
5. Switch on the Pelican WLAN Hub.
Continue to Chapter 4.3
No Wires Needed
Page 16 of 16 Pelican 1100 WLAN Hub User Manual
4.2 Connect 2-4 devices to the Pelican
Place your Pelican 1100 WLAN Hub next to the standard Hub.
1. Make sure the antennas are in a vertical position (if not, rotate over 90
degrees).
2. Insert the power connector.
3. Attach the UTP Ethernet cable to
the standard Hub.
4. Connect the devices to the
standard Hub.
5. Switch on the Pelican WLAN Hub.
Continue to chapter 4.3

No Wires Needed
User Manual Pelican 1100 WLAN Hub Page 17 of 17
4.3 Continue installation
At the front of the Pelican WLAN Hub you will see three LEDs.
If all goes well, the rightmost LED (power) is green and the leftmost (WLAN)
and middle (wired network) LEDs flash whenever there is traffic on the
respective networks which is at least ten times per second for the wireless
LAN because of so-called ‘beacons’.
The WLAN Hub automatically selects the medium attached. When no devices
are detected, the network LED will turn red.
When the supplied power is too low or unstable the power LED will turn red.
The power LED will also turn red when the firmware of the Pelican WLAN Hub
has a fault condition.
Installation completed.
No Wires Needed
Page 18 of 18 Pelican 1100 WLAN Hub User Manual
4.3.1 Resetting the Pelican
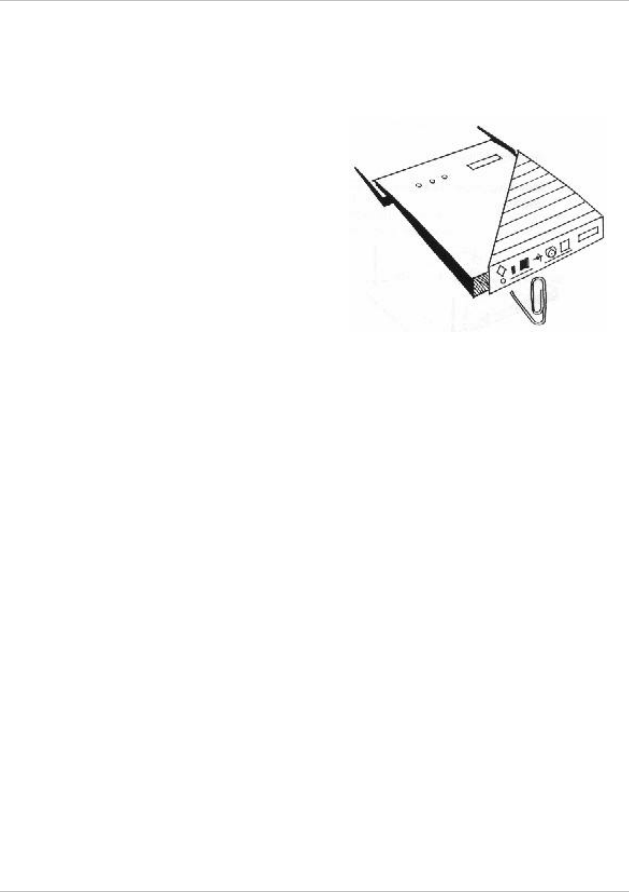
You can reset the Pelican WLAN Hub’s
settings to factory defaults by pushing
a paperclip in the little hole next to the
power switch while switching the
Pelican WLAN Hub on.
When you push a paperclip in the reset
hole while the Pelican WLAN Hub is
switched on, only the lock set by
PConfig™ is deactivated.

No Wires Needed
User Manual Pelican 1100 WLAN Hub Page 19 of 19
5 Technical specifications Pelican 1100
5.1 Standards supported
− Compliant with ETS 300 328 and ETS 300 826 (CE marked)
− IEEE 802.11 standard for Wireless LAN
− All major networking standards (including IP, IPX)
5.2 Environmental
Operating temperature (ambient):
− 0°C to 40°C (32°F to 104°F)
Humidity:
− 10% to 90%
5.3 Power specifications
DC power supply
− In 230 VAC 50 Hz 150 mA
− Out 9 VDC 1.3 A
Parrot Access Point
− In 9 VDC 1 A
5.4 Radio specifications
Range:
− per cell indoors approx. 50 meters (150 ft) or more
− per cell outdoors up to 300 meters (1000 ft)
Transmit power:
− +18 dBm
Frequency range:
− 2.4-2.4835 GHz, direct sequence spread spectrum
Number of Channels:
− Europe: 13 (3 non-overlapping)
− US: 11 (3 non-overlapping)
− France: 4 (1 non-overlapping)
Antenna system:
− Dual antenna diversity system; 2dB gain

No Wires Needed
Page 20 of 20 Pelican 1100 WLAN Hub User Manual
5.5 Specific features
Supported bit rates:
− 11 Mbps
− 5.5 Mbps
− 1 Mbps (IEEE 802.11 DSSS compliant devices, using ASBF™ )
− 2 Mbps (IEEE 802.11 DSSS compliant devices, using ASBF™ )
Data encryption:
− AirLock™ security, 128-bit key length
Utility Software:
− PConfig™ configuration tool
Key Management:
− Automatic Dynamic Key Allocation (ADKA) through public key
5.6 Physical Dimensions
180 x 220 x 40 mm

No Wires Needed
User Manual Pelican 1100 WLAN Hub Page 21 of 21

No Wires Needed
Page 22 of 22 Pelican 1100 WLAN Hub User Manual

No Wires Needed
User Manual Pelican 1100 WLAN Hub Page 23 of 23