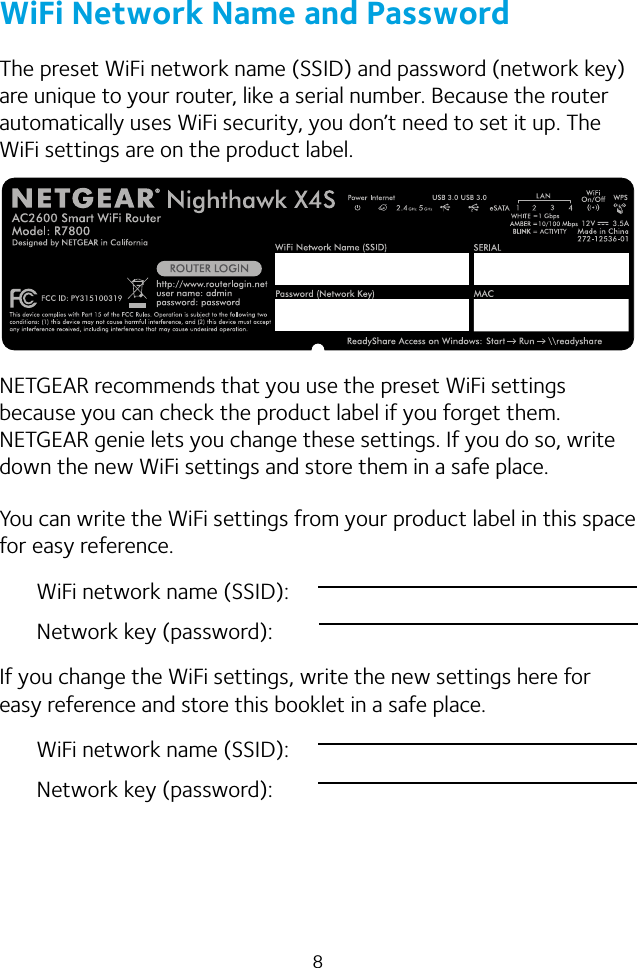
Netgear orporated 15100319 Nighthaw X4S AC2600 Smart WiFi Router User Manual

Netgear Incorporated Nighthaw X4S AC2600 Smart WiFi Router

User Manual

Quick StartPackage ContentsThe package contains the following items.In some regions, a resource CD is included in the package.Nighthawk X4S AC2600 Smart WiFi RouterModel R7800SupportThank you for purchasing this NETGEAR product. You can visit www.netgear.com/support to register your product, get help, access the latest downloads and user manuals, and join our community. We recommend that you use only official NETGEAR support resources.Trademarks© NETGEAR, Inc. NETGEAR and the NETGEAR Logo are trademarks of NETGEAR, Inc.  Any non‑NETGEAR trademarks are used for reference purposes only.ComplianceFor the current EU Declaration of Conformity, visit:  http://support.netgear.com/app/answers/detail/a_id/11621/. For regulatory compliance information, visit: http://www.netgear.com/about/regulatory/.See the regulatory compliance document before connecting the power supply.NETGEAR, Inc.350 East Plumeria DriveSan Jose, CA 95134 USAAugust 2015RouterEthernet cablePower adapter(varies by region)Antennas (4)BETA DOCUMENT
211.  Attach and position the antennas.To determine where to attach the antennas, match the labels on the antennas with the labels on the router.Attach the antennas on the threaded antenna posts.Position the antennas vertically for the best WiFi performance.2.  Prepare your modem.Unplug your modem’s power. If it uses a battery backup, remove the battery.3.  Connect your modem.Plug in your modem. Put the battery back in. Then cable the modem to the yellow Internet port on the router.4.  Power on the router.The Power LED lights amber and then turns white when the router is ready.5.  Connect a device.You can use an Ethernet cable or use WiFi to connect a device to the router.To connect with WiFi, use the WiFi network name and password on the product label.6.  Log in to the router.Launch a web browser.NETGEAR genie displays.If you do not see genie, enter www.routerlogin.net in the address field of the web browser. When prompted, enter admin for the user name and password for the password.Follow the genie steps to connect to the Internet.8.  Get the user manual.You can get the user manual online at http://downloadcenter.netgear.com or through a link in the product’s user interface.RouterEthernet cableCable or DSLInternetModem Power adapterYou can use this diagram to connect your router or follow the detailed instructions in this booklet.7.  Get free apps.During the installation process, genie prompts you to download two free apps:• genie app. A personal dashboard that lets you monitor, control, and repair your home network.• ReadySHARE Vault app. Enables automatic continuous backup of a Windows computer to a USB device that’s connected to your router.Ethernet cableComputerWiFi deviceComputer
1Hardware FeaturesTop and Side PanelsThe LEDs, buttons, and USB ports are shown in the following figure. For more information about the LEDs and buttons on the top panel, see Top Panel LEDs and Buttons on page 2.Rear PanelThe rear panel connections and buttons are shown in the following figure.LEDs WPS button with LEDReset button Ethernet ports 1–4Internet portPower On/Off buttonPower connectorLED Indicator On/Off switcheSATA portUSB 1 portUSB 2 portWiFi button with LED
2Top Panel LEDs and ButtonsThe LEDs on the top of the router light to indicate router activity:LED DescriptionPower LED • Solid white. The router is ready.• Solid amber. The router is starting.• Blinking amber. The firmware is upgrading, or the Reset button was pressed.• Blinking white. The firmware is corrupted.• Off. Power is not supplied to the router.Internet LED • Solid white. The Internet connection is ready.• Solid amber. The router detected an Ethernet cable connection to the modem.• Blinking white. The port is sending or receiving traffic.• Off. No Ethernet cable is connected between the router and the modem.2.4 GHz WiFi LED • Solid white. The 2.4 GHz WiFi radio is operating.• Blinking. The router is sending or receiving WiFi traffic.• Off. The 2.4 GHz WiFi radio is off.5 GHz  WiFi LED • Solid white. The 5 GHz WiFi radio is operating.• Blinking. The router is sending or receiving WiFi traffic.• Off. The 5 GHz WiFi radio is off.USB 1 LEDUSB 2 LEDThe USB 1 LED is for the blue USB 3.0 USB port. The USB 2 LED is for the USB 2.0 port.• Solid white. A USB storage device is connected and is ready.• Blinking. A USB storage device is plugged in and is trying to connect.• Off. No USB storage device is connected, or someone clicked the Safely Remove Hardware button in the router’s web interface and it is now safe to remove the attached USB storage device.
3LED DescriptioneSATA LED • Solid white. An eSATA device is connected and is ready.• Blinking white. An eSATA device is plugged in and is trying to connect.• Off. No eSATA device is connected.Ethernet ports 1–4 LEDs  The LED color indicates the speed: white for Gigabit Ethernet connections and amber for 100 Mbps or 10 Mbps Ethernet connections.• Solid. A powered‑on device is connected to the Ethernet port.• Blinking. The port is sending or receiving traffic.• Off. No device is connected to this Ethernet port.WiFi On/Off button with LEDPressing this button for two seconds turns the 2.4 GHz and 5 GHz WiFi radios on and off.If this LED is lit, the WiFi radios are on. If this LED is off, the WiFiWPS button with LEDThis button lets you use WPS to join the WiFi network without typing the WiFi password. The WPS LED blinks white during this process and then lights solid white.
4Install Your RouterMake sure that your Internet service is active before you install your router. ¾To install your router:1.  Attach and position the antennas:a.  To determine where to attach the antennas, match the labels on the antennas with the labels on the router.b.  Align the antennas with the antenna posts on the router.c.  Attach the antennas on the threaded antenna posts.d.  Position the antennas for the best WiFi performance.NETGEAR recommends that you position all of the antennas vertically, as shown.2.  Prepare your modem:a.  Unplug your modem’s power.b.  If the modem uses a battery backup,  remove its batteries.c.  If your modem is already connected  to another router, disconnect the  cable between your modem and that router.Make sure that your modem is turned off and is cabled only to the wall jack for your Internet service.InternetCable or DSLModem
53.  Connect your modem:a.  Plug in, then turn on your modem. b.  If you removed the batteries, replace them.c.  With the Ethernet cable that came with the router, connect your modem to the yellow Internet port on your router.4.  Add power to the router:a.  Connect the power adapter to the router and plug the power adapter into an outlet.b.  Wait for the Power LED on the front panel to light amber and turn white. If no LEDs are lit, press the Power On/Off button on the rear panel of the router.Ethernet cableInternetCable or DSLRouterPower adapterCable or DSLInternetRouterEthernet cableModemModem
65.  Check the LEDs.If the Power LED lights solid white and the other LEDs are off, press the LED button on the front panel of the router to turn on the other LEDs.6.  Connect a device.You can use a wired connection to connect a computer to the router, or you can use a WiFi connection to connect a computer or WiFi device to the router: • To connect using a wired connection, use an Ethernet cable (not included) to connect an Ethernet port on your computer to an Ethernet port on the router.• To connect using a WiFi connection, use the WiFi network name and password on the product label.Ethernet cableModemCable or DSLEthernet cableInternetPower adapterRouterWiFi deviceComputerComputer
77.  Launch a web browser.The first time that you connect to the router, the genie page displays. Follow the genie steps to connect to the Internet.If the genie page does not display, try the following:• Close and reopen the browser. • Make sure that your computer is connected to one of the Ethernet ports on the router, or that you are connected to your router’s WiFi network.• Make sure that the router is receiving power, and that its Power LED is lit.• If your computer is set to a static or fixed IP address (this is uncommon), change it to obtain an IP address automatically from the router.If you still do not see the genie page, log in to the router so that genie can detect your Internet connection. ¾To log in to the router:1.  Launch a web browser and enter www.routerlogin.net in the address field of the browser.A login window displays.2.  Enter admin for the user name and password for the password. The BASIC Home page displays. If your Internet connection is not set up yet, genie automatically detects your Internet connection.
8WiFi Network Name and PasswordThe preset WiFi network name (SSID) and password (network key) are unique to your router, like a serial number. Because the router automatically uses WiFi security, you don’t need to set it up. The WiFi settings are on the product label.NETGEAR recommends that you use the preset WiFi settings because you can check the product label if you forget them. NETGEAR genie lets you change these settings. If you do so, write down the new WiFi settings and store them in a safe place.You can write the WiFi settings from your product label in this space for easy reference.WiFi network name (SSID):Network key (password):If you change the WiFi settings, write the new settings here for easy reference and store this booklet in a safe place.WiFi network name (SSID):Network key (password):
9Join the WiFi NetworkTo join the router WiFi network, you can either use the router’s Wi‑Fi Protected Setup (WPS) function or select its WiFi network and type its password. For help with the WPS button on your computer or WiFi device, check the instructions or online help that came with that computer or device. Some older equipment cannot use WPS. ¾To join the network using WPS:1.  Press the WPS button on the router for 3–5 seconds.The WPS LED on the button blinks. 2.  Within two minutes, on your computer or WiFi device, press its WPS button or click its onscreen WPS button.The WPS LED lights solid blue when the computer or WiFi device connects to your router.3.  Repeat this process to add other computers or WiFi devices. ¾To select your network and enter its password:1.  Open the software utility that manages your WiFi connections on the computer or WiFi device that you want to connect to your router.This utility scans for WiFi networks in your area.2.  Find and select your router’s WiFi network name (SSID).The SSID is on the product label.3.  Enter the router’s password (or your custom password if you changed it) and click the Connect button.The password is on the product label.4.  Repeat Step 1 through Step 3 to add other computers or WiFi devices.
10View or Change the Router SettingsAfter you use genie to set up the router, you can log in to the router to view or change its settings.Log In to the Router ¾To log in to the router:1.  Connect a computer or WiFi device to the router.You can connect using a wired connection or a WiFi connection:• To connect using a wired connection, use an Ethernet cable (not included) to connect an Ethernet port on your computer to an Ethernet port on the router.• To connect using a WiFi connection, use the WiFi network name and password on the product label.2.  Launch a web browser.3.  Enter www.routerlogin.net in the address field of the browser.A login window displays.4.  Enter admin for the user name and password for the password. The BASIC Home page displays.Change the admin Password ¾To change the admin password:1.  Launch a web browser and enter www.routerlogin.net in the address field of the browser.A login window displays.
112.  Enter admin for the user name and password for the password. The BASIC Home page displays.3.  Select ADVANCED > Administration > Set Password.The Set Password page displays.4.  Type your old password and type the new password twice. 5.  To be able to recover the password, select the Enable Password Recovery check box.NETGEAR recommends that you enable password recovery.6.  Select two security questions and provide answers to them.7.  Click the Apply button.Your changes are saved.Recover a Forgotten admin PasswordThe default password for the admin user name is password. If you changed the password and enabled the password recovery feature, you can retrieve this password. ¾To retrieve a forgotten admin password:1.  Launch a web browser and enter www.routerlogin.net in the address field of the browser.A login window displays.2.  Click the Cancel button.If password recovery is enabled, you are prompted to enter the serial number of the router. The serial number is on the product label.3.  Enter the serial number of the router.
124.  Click the Continue button.A page displays requesting the answers to your security questions.5.  Enter the saved answers to your security questions.6.  Click the Continue button.A page displays your recovered password.7.  Click the Login again button.A login window displays.8.  With your recovered password, log in to the router.Find a Forgotten WiFi Security PasswordThe preset WiFi password is on the product label. If you changed your WiFi password and forgot what it is, log in to the router to view its current WiFi password. ¾To connect to the router and view its WiFi password:1.  Launch a web browser and enter www.routerlogin.net in the address field.A login window displays.2.  Enter the router user name and password.The default user name is admin and the default password is password. Use the default credentials if you did not change them. The BASIC Home page displays.3.  Select Wireless. The Security Options section of the page displays your WiFi password.
13Access a USB Device on the NetworkReadySHARE lets you access and share a USB storage device connected to the router’s USB ports. (If your USB device uses special drivers, it is not compatible.) ¾To access the USB storage device from a Windows computer: 1.  Connect your USB storage device to a USB port on the router.NETGEAR recommends that you use the blue USB 3.0 port on the router to get the best USB device access speed.2.  If your USB storage device uses a power supply, connect it.You must use the power supply when you connect the USB storage device to the router.When you connect the USB storage device to the router’s USB port, it might take up to two minutes before it is ready for sharing. By default, the USB storage device is available to all computers on your local area network (LAN).3.  On a Windows computer that is connected to the network, select Start > Run, enter \\readyshare in the dialog box, and click the OK button.A window displays the files and folders on the device.
14 ¾To access the USB storage device from a Mac: 1.  Connect your USB storage device to a USB port on the router.NETGEAR recommends that you use the blue USB 3.0 port on the router to get the best USB device access speed.2.  If your USB storage device uses a power supply, connect it.You must use the power supply when you connect the USB storage device to the router.When you connect the USB storage device to the router’s USB port, it might take up to two minutes before it is ready for sharing. By default, the USB storage device is available to all computers on your local area network (LAN).3.  On a Mac that is connected to the network, launch Finder and select Go > Connect to Server.The Connect to server window displays.4.  Enter the smb://readyshare in the Server Address field and click the Connect button.5.  When prompted, select the Guest radio button.6.  If you set up access control on the router and you allowed your Mac to access the network, select the Registered User radio button and enter admin for the name and password for the password. For more information about access control, see the user manual, which is available online at http://downloadcenter.netgear.com or through a link in the router’s user interface.7.  Click the Connect button.A window displays the files and folders on the device.
15Back Up with ReadySHARE VaultYour router comes with a free backup software for all the Windows computers in your home. Connect a USB hard disk drive (HDD) to the USB port on your router for centralized, continuous, and automatic backup.Note:  The following operating systems support ReadySHARE Vault: Windows XP SP3, Windows 7, Windows 8, Windows 8.1, and Windows 10. ¾To back up your Windows computer:1.  Connect a USB HDD to a USB port on the router.2.  Download ReadySHARE Vault from  www.netgear.com/readyshare and install it on each Windows computer.3.  Launch ReadySHARE Vault.The dashboard displays.4.  Use the dashboard or the Backup tab to set up and run your backup jobs.
16Print Wirelessly with ReadySHARE PrinterYou can connect a USB printer to the USB port on the router and print wirelessly. ¾To set up ReadySHARE Printer:1.  Connect the USB printer to a USB port on the router with a USB printer cable.2.  On each computer that will share the printer, do the following:a.  Install the current USB printer driver software (available from the printer manufacturer).b.  Download the NETGEAR USB Control Center utility from www.netgear.com/readyshare and install it.c.  Select the language.3.  If prompted, select the printer and click the Connect button for each computer.When the first computer connects, the status changes to Manually connected by xxx.For each computer, when you complete Step 3, the printer status displays as Available.
17More Premium FeaturesYour router lets you do the following and more:• Play music from a USB storage device with iTunes Server.• Set up a secure VPN service connection to your home network.• Create a personal FTP server with a custom URL.iTunes ServeriTunes server lets you play music from a USB device that is connected to a USB port on your router with iTunes on your Windows or Mac computer or with the Apple Remote app on your iPhone or iPad. You can also use the Apple Remote app from an iPhone or iPad to play music on any AirPlay devices, such as Apple TV or AirPlay‑supported receivers.To set up the router’s iTunes server to play music on your Windows or Mac computer, you must set up Home Sharing.To set up the router’s iTunes server to play music on your iPhone or iPad, you must download the Apple Remote app.For more information on how to set up iTunes server, see the user manual, which is available online at  http://downloadcenter.netgear.com or through a link in the router’s user interface.
18VPN ServiceVPN service allows remote access to your home network with a secure connection. After you set up VPN service, you can use VPN to access the router’s USB drive and media and to access your Internet service at home. To set up VPN service, follow these high‑level steps:1.  Specify the VPN service.2.  Install OpenVPN software on your computer.3.  Use a VPN tunnel.These steps are explained in detail in the user manual, which is available online at http://downloadcenter.netgear.com or through a link in the router’s user interface.Personal FTP ServerWith your customized free URL, you can use FTP to access your network when you aren’t home through Dynamic DNS. To set up your FTP server, follow these high‑level steps:1.  Register for a free NETGEAR Dynamic DNS (DDNS) service account.2.  Provide the account settings to your router.3.  Connect a USB hard disk to your router and set up FTP access through the Internet.These steps are explained in detail in the user manual, which is available online at http://downloadcenter.netgear.com or through a link in the router’s user interface.
19Download the NETGEAR genie AppThe free NETGEAR genie app lets you easily monitor, connect, and control your home network from a Windows or Mac computer, tablet, or smartphone. You can share and stream music or videos, diagnose and repair network issues, set up parental controls, and more:• Access your router and change its settings or diagnose and repair network issues.• Make a printer AirPrint compatible so that you can print from an iPad or iPhone.• Use MyMedia to find and play media files in your network.• Use Turbo Transfer to quickly send files from your computer or smartphone to another device on the network.• Set up parental controls.• Connect your smartphones and tablets to your home WiFi by scanning the WiFi QR code from genie.Download the free genie app from www.NETGEAR.com/genie.
20

Navigation menu