Motorola Mobility T6ZB1 PCS portable phone User Manual ZB EX08
Motorola Mobility LLC PCS portable phone ZB EX08
UserManual.wiki
>
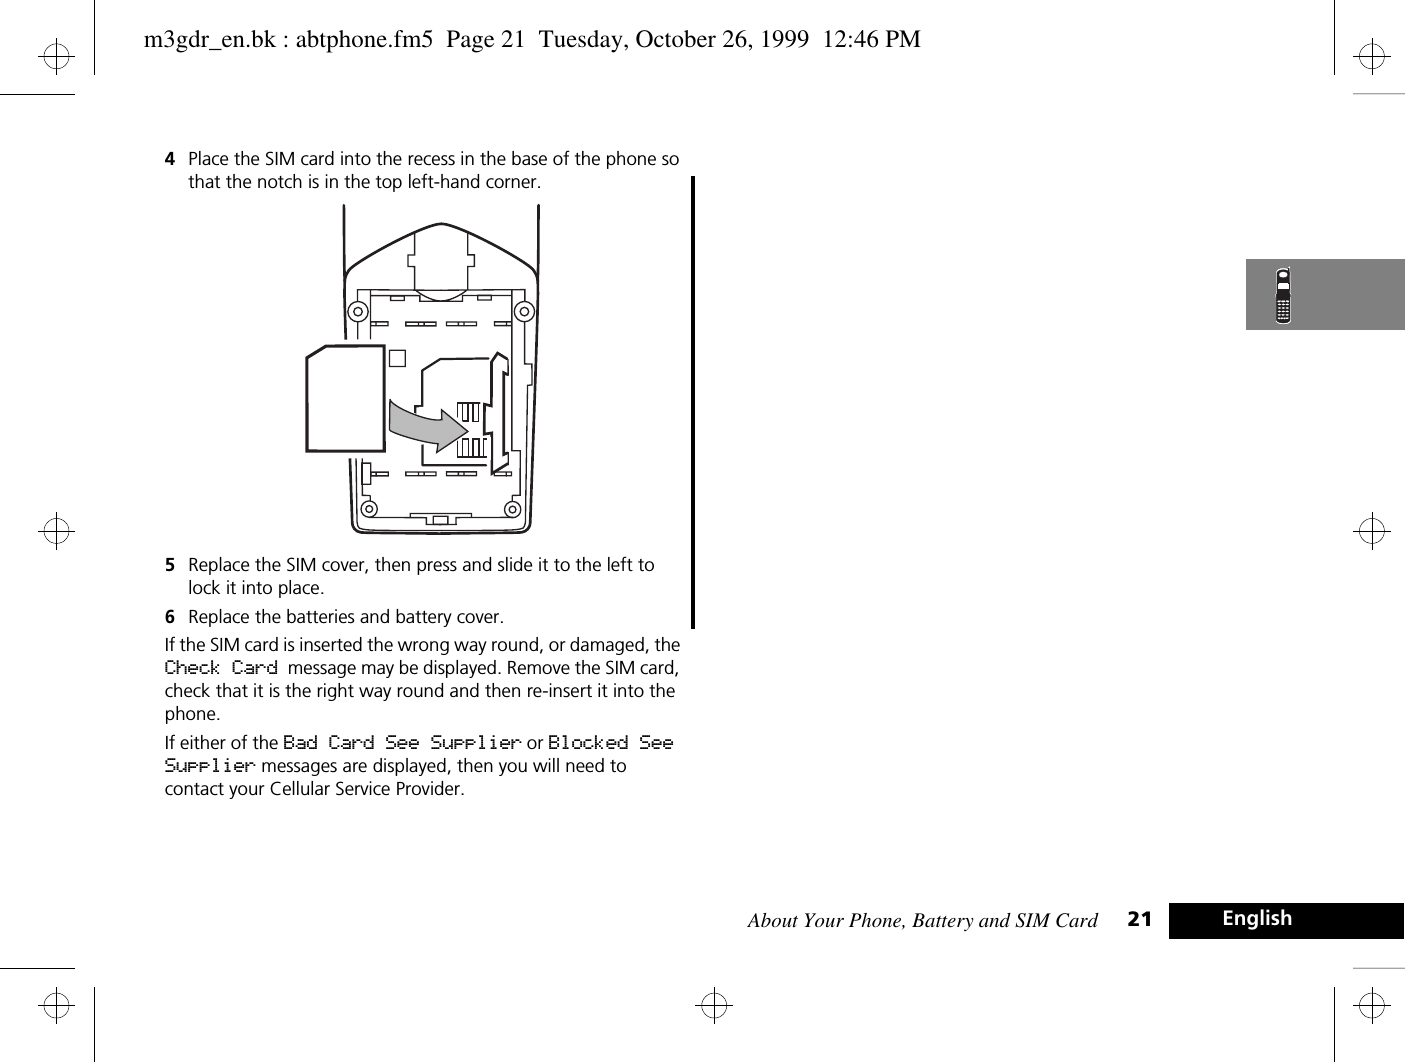
Motorola Mobility
>
T6ZB1 User Manual
Motorola Exhibit 8 Users Manual
Navigation menu
Upload a User Manual
Namespaces
Wiki Guide
HTML
PDF
Info
Views
User Manual
Discussion / Help
Navigation


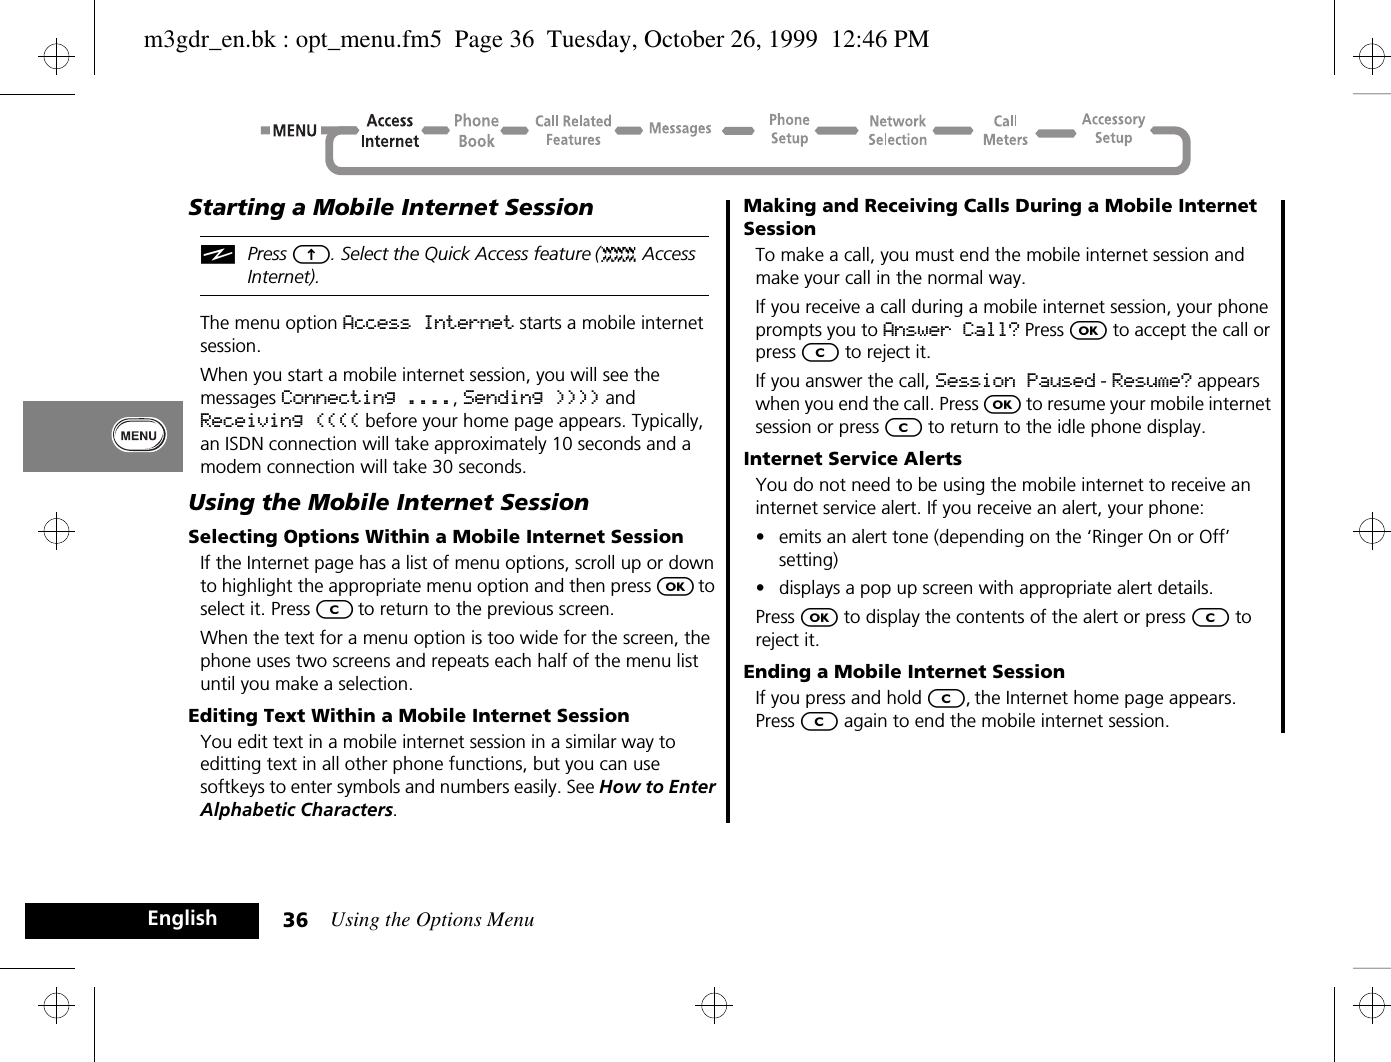
![Using the Options Menu 35 EnglishMobile Internet Icons and MessagesAThe internet service you receive determines the icons and messages that appear on the display.Setting Up for Mobile Internet AccessAYour service provider may set up your mobile internet access automatically.To set up your mobile internet access manually, you will need the following information:•Primary Data Gateway: this is the IP address of the gateway through which you will access the mobile internet. The IP address is in the format 123.456.789.123.•Phone Number: this is the number that your phone will call to access the internet; your Internet Service Provider (ISP) issues this number.•User Name: this is your user name, provided by your ISP.•User Password: this is your password, provided by your ISP.•Baud Rate: this is likely to be 9600, the standard data rate for GSM phones.•Idle Time Out: this is the time the phone will wait before hanging up if it detects no internet activity; usually 600 seconds; maximum 1000 seconds.•Line type: this is the type of call you make to your ISP, either modem or ISDN.•Connection Type: this is either Non-Transparent or Transparent, depending on your service provider.Also ensure that your mobile phone number shows when you select the menu option My Phone Number(s), under the Phone Book Main Menu. This is used as your account number by the Primary Data Gateway. If your number is not shown, add it by following the instructions in My Phone Number(s).Select the menu option Access Internet and press the O key. Press and hold the $ key until the Main Menu appears. Scroll down through the options to 6> Setup and press O key. Enter the information listed above at the appropriate menu item by first selecting the item and choosing the softkey to edit it as necessary.When you have entered all the appropriate information, exit the Main Menu by pressing the C key. Turn your phone off and then on again to make sure you register all changes. You will then be ready to start a mobile internet session.Icon or Message DescriptionSending )))))) Sending data to the internet.Receiving (((((( Receiving data from the internet. Connecting ..... Connecting to the internet.Working ..... Performing an internet activity.[struck out key symbol]Non secure internet connection.m3gdr_en.bk : opt_menu.fm5 Page 35 Tuesday, October 26, 1999 12:46 PM](https://usermanual.wiki/Motorola-Mobility/T6ZB1/User-Guide-74452-Page-38.png)
![Using the Options Menu40EnglishAvailable CharactersPress the appropriate keys to get the following characters:1Space . 1 ? ! , Ÿ Ä & : " ( ) ' ` @ % ¡ ¢Space . 1 ? ! , Ÿ Ä & : " ( ) ' ` @ % ¡ ¢2A B C 2 [ ® ± ¼ ¾ ©a b c 2 { ¯ ± ½ ¾ ©3D E F 3 ° ¿ ¤ ² d e f 3 ° ¥ ¤ ²4G H I 4 À §g h i 4 À §5J K L 5 Áj k l 5 Á6M N O 6 ] \ « ¨ µm n o 6 } | ¬ ¨ µ7P Q R S 7 Â ¾ ¸p q r s 7 Â ¾ ¸8T U V 8 ¹ ^ ¦t u v 8 ¹ ~ ¦9W X Y Z 9 º ·w x y z 9 º ·0+ - 0 x * / = > < #+ - 0 x * / = > < #The top line for each key shows the upper case characters, the lower line shows the lower case.Personal NumbersThe Personal Numbers sub-menu is used for creating and managing your list of personal numbers.Find Entry By NameThis option is used to select a telephone number from a list of alphabetically sorted Phone Book names.Once selected, this option will display the message Enter Name. You can enter a maximum of three characters from a name but you do not need to enter all three characters to begin a search.The Phone Book entries will be searched and the first alphabetically matching entry will be displayed.If there isn’t a name matching your entry, the nearest alphabetically matching entry will be displayed.If you do not enter any name information, the first alphabetical entry will be displayed.If there are no names stored, No Names Stored will be displayed.To display adjacent Phone Book entries use the ¿ key. When the desired name is displayed press the O key to select it. The phone then enters the options sub-menu for Find Entry By Name. See ‘The Options for ‘Find Entry By ...’’.m3gdr_en.bk : opt_menu.fm5 Page 40 Tuesday, October 26, 1999 12:46 PM](https://usermanual.wiki/Motorola-Mobility/T6ZB1/User-Guide-74452-Page-43.png)


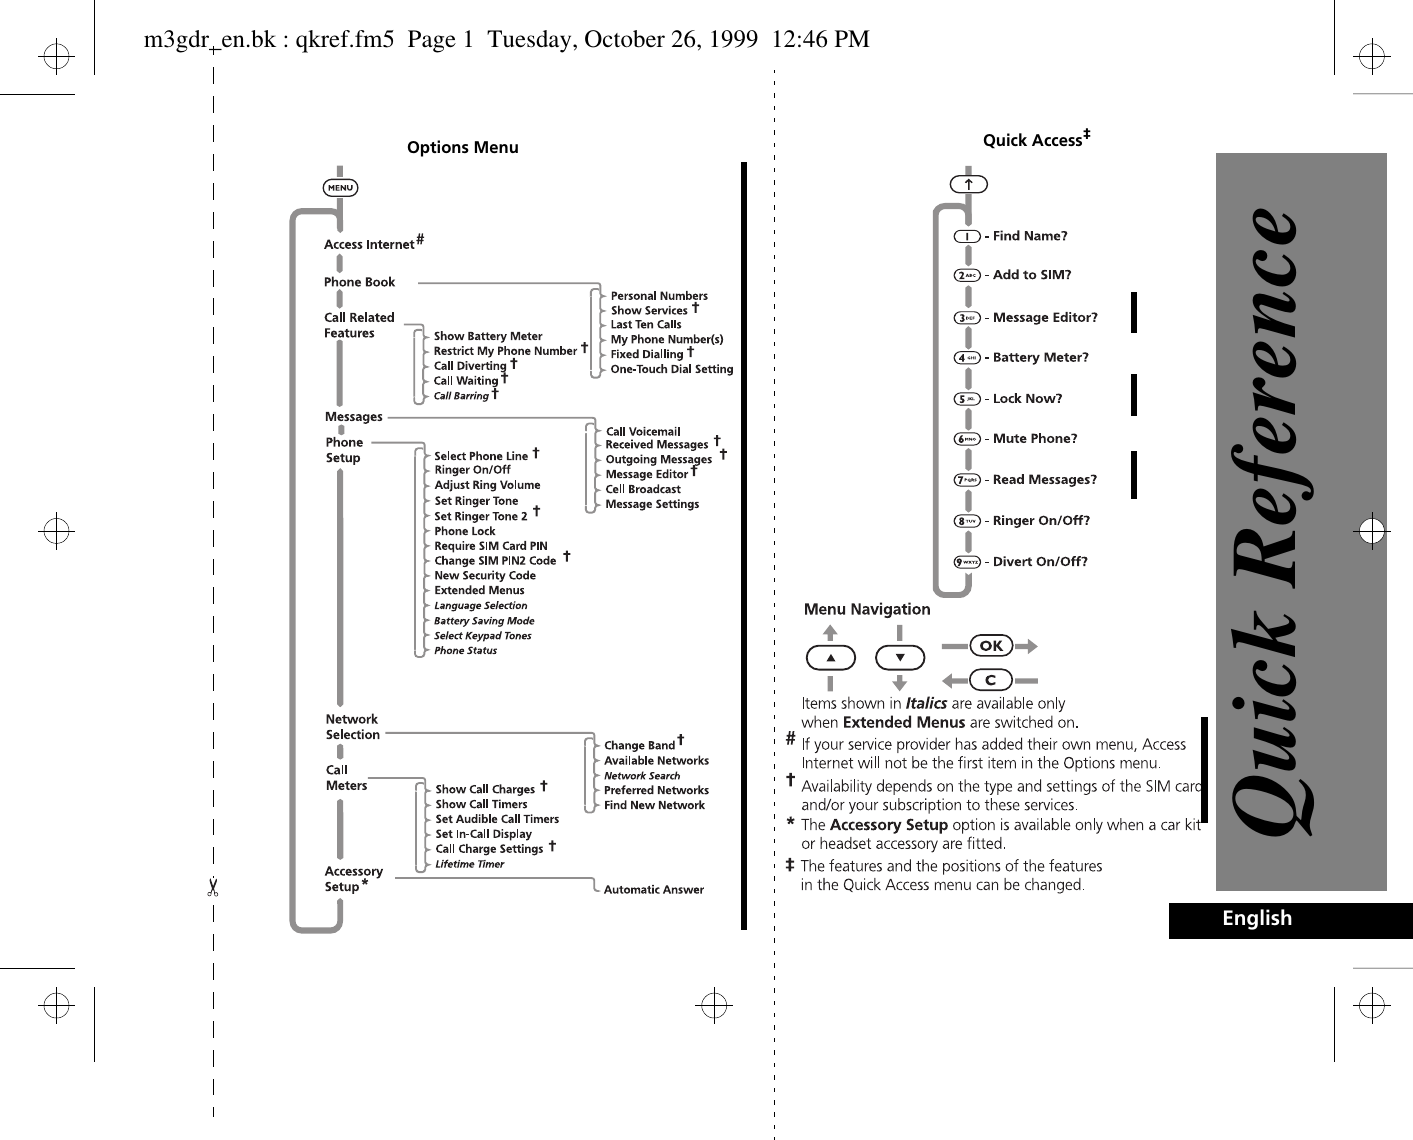
![Using the Quick Access Menu 73 EnglishUsing the Quick Access MenuAThe menu shown above represents the default setting supplied with your phone.Although the features in your phone are available through easy access menus, some of the most commonly used features are also available in the Quick Access menu. Each feature in the menu is allocated a number from 1 to 9.To use a Quick Access feature, press the quick access key (E) followed by the number of the feature, or press [ or ] to scroll through the menu and then press O.You can change the features, and the positions of the features, available in the Quick Access menu - see ‘Customising the Quick Access Menu’.Each Quick Access feature is represented by an icon as well as the feature name. The currently selected icon is shown with a dark background.B Find Name?You will be prompted to Enter Name. Enter the first three characters of the name and press O. The first matching entry in the Phone Book will be displayed. Press O to call the number.D Find Location?You will be prompted to Enter Location. Enter the location number and press O. The first matching entry in the Phone Book will be displayed. Press O to call the number.m3gdr_en.bk : qkaccess.fm5 Page 73 Tuesday, October 26, 1999 12:46 PM](https://usermanual.wiki/Motorola-Mobility/T6ZB1/User-Guide-74452-Page-76.png)