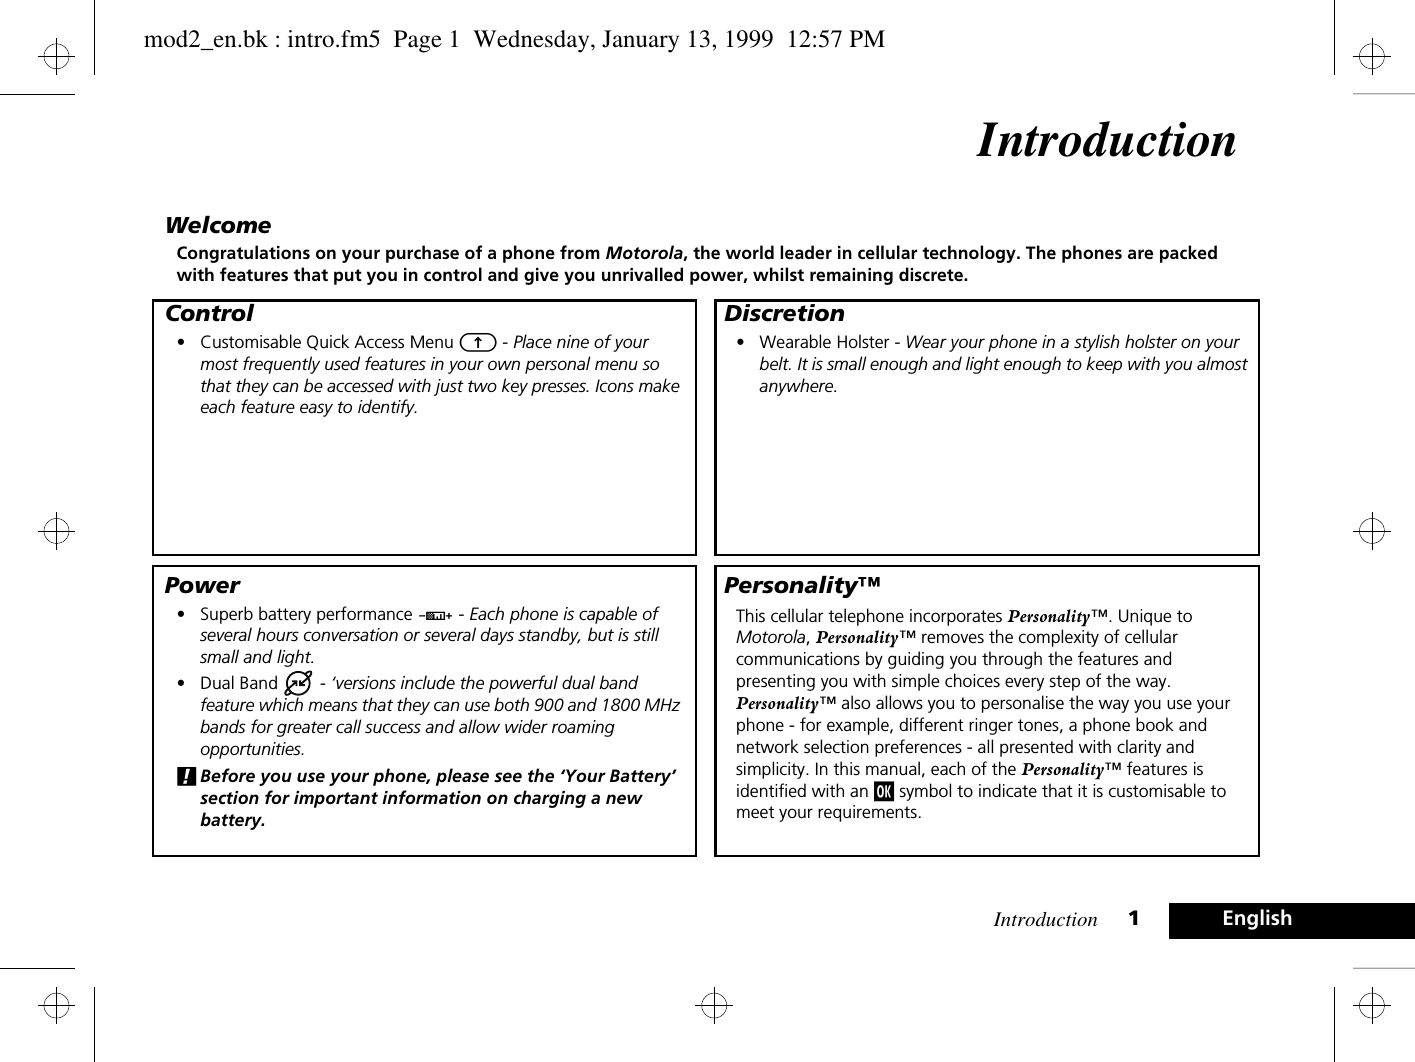
Motorola Mobility T6ZA1 Personal PCS Transceiver User Manual mod2 en bk
Motorola Mobility LLC Personal PCS Transceiver mod2 en bk
UserManual.wiki
>
Motorola Mobility
>
T6ZA1 User Manual
Motorola Exhibit 14 Instruction Manual
Navigation menu
Upload a User Manual
Namespaces
Wiki Guide
HTML
PDF
Info
Views
User Manual
Discussion / Help
Navigation

![EnglishSpecial KeysSPress to turn phone on and off.OPress to accept call, setting, option,...CPress to reject call, setting, option,... EPress to enter the Quick Access features.[] Press to move through the menu and feature choices, or to edit an SMS message.Making a CallEnter CO.Receiving a CallPress O or open the flip (only on models with flip when the ‘Key Answer Only’ feature is set to Off).Ending a CallPress O or close the flip (models with flip only).Making an Emergency CallEnter 112O. The call will be directed to a central emergency operator. Quick Access FeaturesPress E followed by the appropriate key, or press E, scroll to the feature and press O to select.Redialling the Last Number Called1Press O to display the last number dialled.2Press O to call the number.One-Touch DiallingPress and hold the appropriate digit key 1 to 9. Storing Numbers in the Phone BookPress E2 to store a number on the SIM card.Dialling Phone Book NumbersEnter G#OQuick Referencemod2_en.bk : qkref.fm5 Page 2 Wednesday, January 13, 1999 12:57 PM](https://usermanual.wiki/Motorola-Mobility/T6ZA1/User-Guide-22472-Page-3.png)
![Introduction2EnglishUnderstanding this ManualMany of your phone options are accessed by a simple menu system. A full description of the menus and how to move around them is covered in the next section Menu Navigation. When the manual describes the use of each menu item, it will be assumed that you are familiar with the menu system.Key PressesKey presses are represented in this manual using symbols so that you may locate and use the required sequence quickly. A sequence of key presses may be shown as follows:]OCThis means that you should press the ] key followed by the O key and then the C key, in sequence, not simultaneously.AThe key shapes represented in this manual may differ from the keys on your phone.Entering InformationWhen you are requested to enter information, such as the number of the phone you wish to call, this is represented in bold type. For example:C - enter the required telephone number.A - enter your Personal Identification Number.B - enter your unlock code.G - enter the Phone Book location number.Prompts and MessagesYour phone responds to key presses by displaying either easy to understand prompts that guide you to the next action, or simple messages confirming that your action is complete. Prompts and messages are represented in this manual in LCD style, for example:Enter PIN or Completed.Other SymbolsYou will find the following symbols used throughout this manual:AA Note contains additional information which is relevant to the feature/item.!A Caution contains important additional information which is relevant to the efficient and/or safe usage of your phone.iThis symbol indicates a short key sequence for the feature.mod2_en.bk : intro.fm5 Page 2 Wednesday, January 13, 1999 12:57 PM](https://usermanual.wiki/Motorola-Mobility/T6ZA1/User-Guide-22472-Page-5.png)
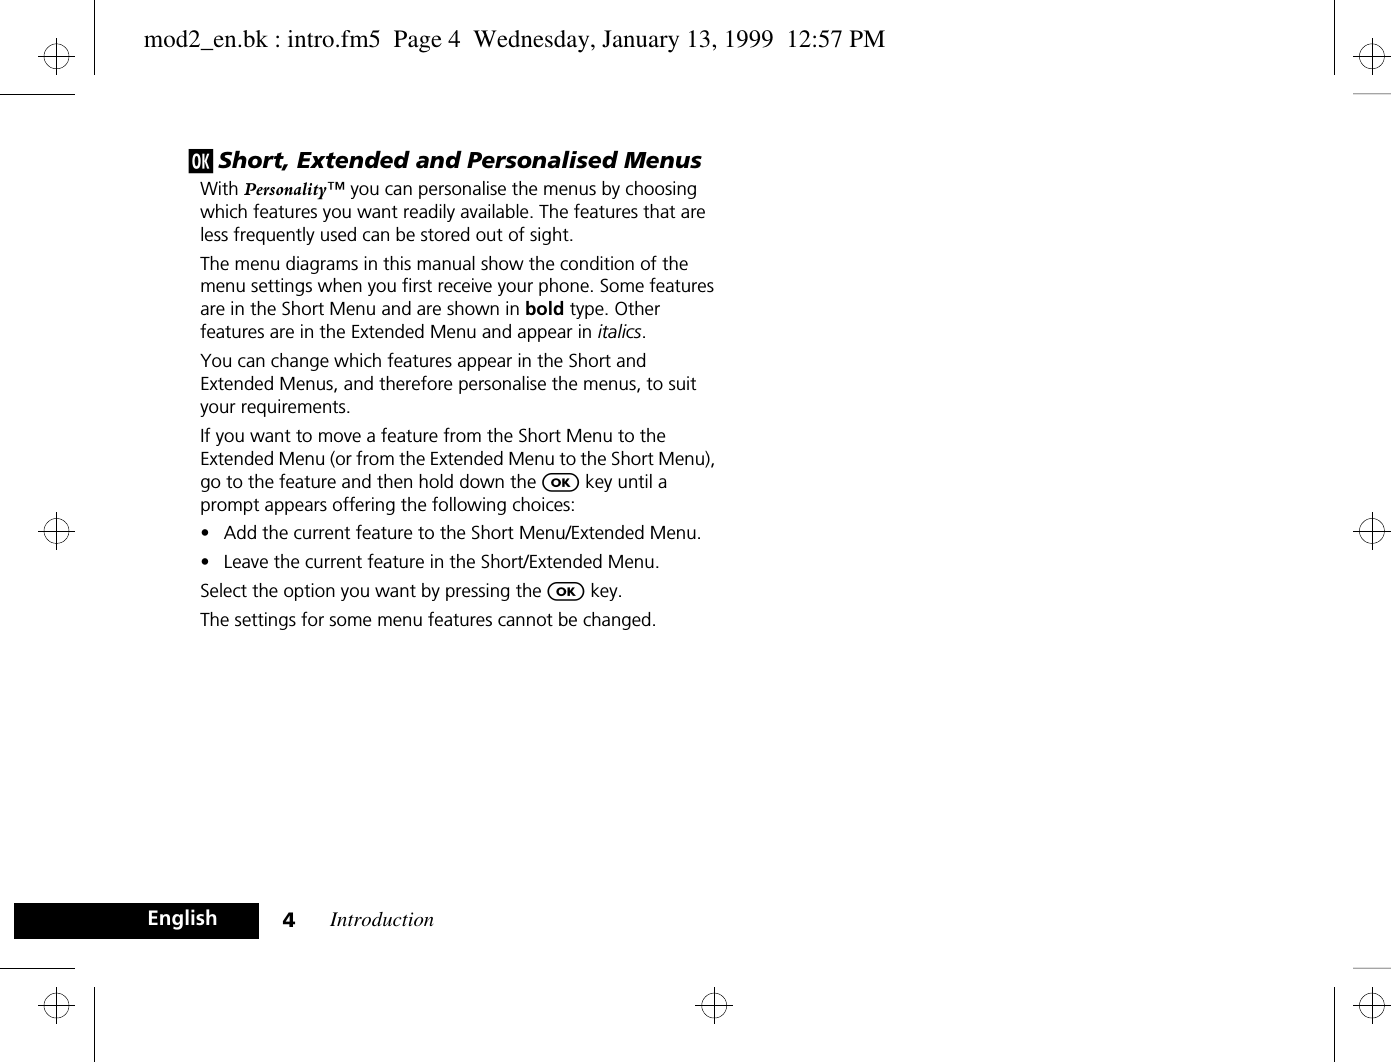
![Introduction 3EnglishMenu NavigationA large number of your phone's options are accessed by using menus which use a common approach for selection, change and cancellation.Please read this section carefully before attempting to access a menu option. When you understand the common approach to menu navigation and how the menus are shown on the page, you will be able to access and change options with ease.Entering the MenusEenters the Quick Access menu.Once entered, the menus use the [, ], O and C keys in a common manner to access, select and change individual options.Leaving the MenusTo leave any of the menus, you can either press and hold the C key or repeatedly press the C key. Both of these actions will return your phone to the standby mode.iAlternatively, a quicker way to leave the menus is to press EC.Menus and Sub-menusA menu is a simple list of options. Some of these options provide access to a further list of options called a sub-menu. When navigating through the menus you may find it is helpful to think in terms of menu levels - the ‘parent’ menu being on one level and its sub-menus being on a lower level.Moving To and Selecting a Menu OptionTo move from one option to another on the same level, use the scroll keys: the ] key scrolls forwards and the [ key scrolls backwards. When you find the option you want, press the O key to select it.Depending on the option you select, one of three things will happen:•either a brief message will be displayed confirming an action, for example Completed.•or a prompt will be displayed requesting you to enter information, for example Enter PIN or Enter Name.•or the first option of a sub-menu will be displayed. You can select this option using the O key or browse through the other options using the scroll keys.To leave an option or sub-menu, press the C key. This will take you back to the parent menu item.Menu Options with Security CodesSome options are protected from misuse by requiring you to entry one of the security codes. To use these options, you must enter the requested code before proceeding.mod2_en.bk : intro.fm5 Page 3 Wednesday, January 13, 1999 12:57 PM](https://usermanual.wiki/Motorola-Mobility/T6ZA1/User-Guide-22472-Page-6.png)


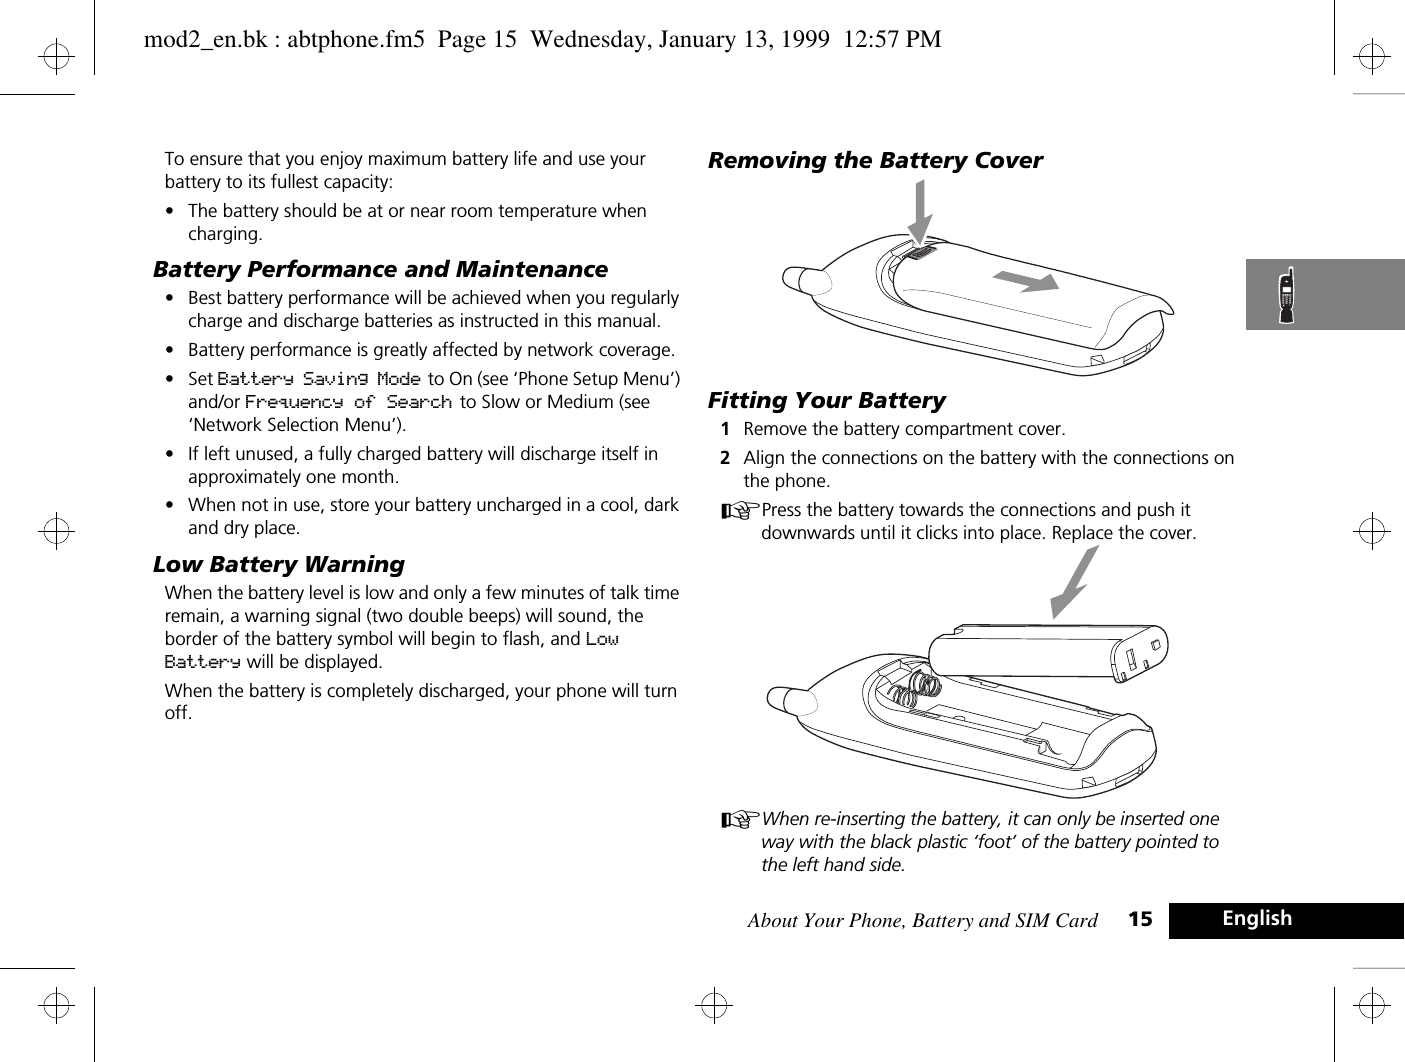
![About Your Phone, Battery and SIM Card 13 EnglishAbout Your Phone, Battery and SIM CardSpecial KeysSTurns the phone on and off.OAccept call, setting, option.CReject call, setting, option. EEnter the Quick Access menu.[ ] Press to move through the menu and feature choices, or to edit an SMS message.\Press to adjust the earpiece speaker volume. Release the key and hold it down again to change direction. The Flip (if fitted)Opening the flip answers a call (when the ‘Key Answer Only’ feature is set to Off, the default position). Closing the flip ends a call.The DisplayThe display on your phone can show alphanumeric characters as well as useful information symbols.The various elements of the display are as follows:In addition, when you are expected to press the O key, a prompt will appear in the display, for example Entry Complete?.Low Temperature UseThe liquid crystal display used in your phone will behave differently at extremely low temperatures. You may notice that the display responds slowly to key presses; this is to be expected and does not affect the phone operation in any way.ABC123 Characters are used to display messages and telephone numbers.qBattery Charge Indicator. The more segments displayed, the greater the battery charge.rx Signal Strength. The more segments displayed in the bar graph, the better the signal strength.kIn Use. Displayed when a call is in progress.lRoam. Displayed when you are registered on a system other than your home system.nHome Zone. Availability depends on your service provider.oShort Message Service. Displayed when the phone has received a message. The symbol will flash when your message storage area is full.pVoicemail Waiting Indicator. Displayed when you have a voice message waiting. The availability of this feature depends on your service provider.h Ringer On. Displayed when the call ringer is selected. If you select the No Ring option this symbol will not be displayed.mod2_en.bk : abtphone.fm5 Page 13 Wednesday, January 13, 1999 12:57 PM](https://usermanual.wiki/Motorola-Mobility/T6ZA1/User-Guide-22472-Page-16.png)

![Making and Receiving Phone Calls 19 EnglishMaking and Receiving Phone CallsSwitching the Phone On and OffTo switch the phone on or off, press and hold the S key.If you switch the phone on and there is no SIM card inserted, you will be asked to insert one. Once inserted, the phone will check that the SIM card is valid.A number of messages will then be displayed:•Enter PIN - a request to enter the SIM card PIN code (if required).•Enter Phone Unlock Code - a request to enter the phone unlock code (if required).•Searching... followed by a network name - as the phone searches and then finds a suitable network to connect to.Entering Your SIM Card PIN CodeTo enter the PIN code, enter AO.As you type in each digit of the PIN code a * character will be displayed.If you make a mistake, press and release the C key to remove the last digit. Holding the C key down will remove the entire entry.When the PIN code is complete press the O key.If the PIN code entered is incorrect, the warning message Wrong PIN will be displayed, followed by Enter PIN.!If the PIN number is entered incorrectly three times in a row, your phone will automatically lock-up and the Blocked message will be displayed. See ‘Unblocking Your Phone’ for details on unblocking your phone.The PIN code can be changed, see ‘Change SIM PIN Code’ in the Phone Setup Menu section for more details.j Entering Your Unlock CodeIf your phone displays the message Enter Phone Unlock Code you must enter your unlocking code by entering BO.The unlock code is a four digit number which is set at manufacture to 1234. The code can be changed, see ‘Change Unlock Code’ in the Phone Setup Menu section for more details.If you forget your unlock code, press the [ or ] key. This will display the ‘Change Unlock Code’ option. Enter O D, enter a new unlock code, and press O.mod2_en.bk : usephone.fm5 Page 19 Wednesday, January 13, 1999 12:57 PM](https://usermanual.wiki/Motorola-Mobility/T6ZA1/User-Guide-22472-Page-22.png)
![Making and Receiving Phone Calls 21 EnglishRedialling the Last Number CallediWhen in standby mode, press OO.Alternatively, you can retrieve the last number dialled using the ‘Last Ten Calls’ feature in the Phone Book menu.j One-Touch Dialling Phone Book NumbersTo quickly retrieve and dial a number stored in the first nine locations of your Phone Book1, press and hold the appropriate digit key. For example, pressing and holding 2 will dial the phone number stored in location 2 of your Phone Book.AYou do not need to press O to call the number.j Dialling Phone Book NumbersEnter a Phone Book G and press # O.If you don’t know the exact location, you can enter a random location and then use the [ or ] key to scroll to the number you want.Calling an Embedded Number in a MessageDetails on how to call a number embedded in a message are given in the Messages Menu section. 1. The Phone Book entries that you are able to access will depend on the One-Touch Dial Setting option in the Phone Book menu.International Phone CallsTo make an international phone call press and hold the 0 key. After a couple of seconds the international dialling prefix + will appear in the display, this allows you to call from any country without knowing the local international access code.Now enter the country code, followed by the phone number. The country code follows the conventional format, 49 for Germany, 44 for the UK, 46 for Sweden, etc.Just like a conventional international call, remove the leading '0' of the area code when you dial.Inserting Pauses Into Phone NumbersTo obtain a three second 'pause' character in a phone number, press and hold the * key for a couple of seconds, the pause symbol Ü will appear.The pause character produces a three second delay whenever it is used. However, the first pause character in a phone number is a special case, it will not begin its delay until the call is answered.Pause - A Working Example.If, for example, you have a tone-based voicemail system on 555-6911, with a mailbox number 1066 and password 2001. Then you may dial the following number:5556911Ü1066Ü2001O.The first part of the number would be used to call the voicemail system.When the call is answered the first pause will produce a delay of three seconds before the tones for 1066 are sent to select the mailbox.There will be a second pause of three seconds before the tones for 2001 are sent as the password.mod2_en.bk : usephone.fm5 Page 21 Wednesday, January 13, 1999 12:57 PM](https://usermanual.wiki/Motorola-Mobility/T6ZA1/User-Guide-22472-Page-24.png)
![Making and Receiving Phone Calls 23 EnglishIn-Call MenuThe “In-Call” menu provides access to additional functionality during a call. Entering the In-Call MenuThe “In-Call” menu is accessed by pressing the [ or ] key during a call.Leaving the In-Call MenuTo leave the “In-Call” menu press the C key.In-Call Menu OptionsThe options listed in the “In-Call” menu will dynamically change depending on the current call state. The following list contains all of the possible options in the “In-Call” menu.AOnly some of the options will appear at any given time. The order of the options may vary.Handsfree On/OffThis option is used to switch between Handsfree and normal operation if the phone is installed in a car kit that does not have an automatic presence detector.Hold CallThis option will put the active call on hold.Make a New CallThis option allows you to make another call. Restrict My NumberThis option allows you to make a call without the remote user getting advanced warning of the number.End Active CallThis option terminates the active call, and makes the call that was previously on hold, the active call. mod2_en.bk : usephone.fm5 Page 23 Wednesday, January 13, 1999 12:57 PM](https://usermanual.wiki/Motorola-Mobility/T6ZA1/User-Guide-22472-Page-26.png)
![Making and Receiving Phone Calls24EnglishEnd Held CallThis option will terminate a held call.End Active And HeldThis option will terminate all connected calls.SwitchThis option allows you to switch between the active call and the call that is on hold.Conference CallThis option connects you with up to five other telephones on one call (see ‘Making a Conference Call’).Transfer CallThis option transfers a call to another telephone (see ‘Transfer Call’ later in this section).Split CallThis option allows you to separate an individual from the main Conference Call.Reject Waiting CallThis option will reject a waiting call.Reconnect This option will make the call on hold the active call.Reconnect Held CallThis option is similar to Reconnect but will appear if you have a call on hold, and a call waiting. Reconnect Held Call will make the call on hold the active call.Turn Mute On or OffTemporarily turns the microphone off during a phone call. Reselect this option to resume your conversation.j Call Holding and Call WaitingYour phone supports the GSM options of Call Holding and Call Waiting. Using these options you can place a current phone call on hold and accept an incoming call or start a second call (See ‘Call Waiting’ in the ‘Call Related Features’ menu for details of how to control this feature).Call Holding and Call Waiting ScenariosThe display will automatically change according to the status of your current call (or calls) and will propose the option that you are most likely to want. Press O to accept this option or press [ or ] to scroll through the “In-Call” menu for the alternative options. By following this procedure you will find that even the triple combination of an active call, a held call, and a call waiting is easy to manage.The following points summarise the more common situations:•To put an active call on hold, press [ or ], the display will show Hold Call Select? - press O to put the call on hold. To reconnect the call, press O.•To put an active call on hold and make another call, first put the active call on hold, then press [ or ] and select the Make New Call option1.•To switch between an active call and a held call press O at the Two Calls Switch? prompt.1. A quicker method of making another call is to enter the number to be called directly and press O. Your phone will place the current call on hold and attempt to call the number entered.mod2_en.bk : usephone.fm5 Page 24 Wednesday, January 13, 1999 12:57 PM](https://usermanual.wiki/Motorola-Mobility/T6ZA1/User-Guide-22472-Page-27.png)
![Making and Receiving Phone Calls 25 English•To accept a waiting call during an active call, press O at the Call Waiting Answer? prompt. The active call will be placed on hold. If you prefer to end the active call before accepting the waiting call, press [ or ] and select the End Active Call option.•To reject a waiting call, press [ or ] and select the Reject Call Waiting option (or simply press the C key).AIf you have an active call, a call on hold and a call waiting, you cannot accept the waiting call until you end either the active call or the held call, or join the active and held calls.Call Holding and Call Waiting MessagesDuring Call Holding and/or Call Waiting operations, your phone may display one or more of the following messages:TryingA request to hold the active call, swap the active with a held call, or add a member to a Conference Call, has been made.orA request to reconnect the held call has been made.Hold FailedThe request to hold a call has been unsuccessful.Cannot Hold Second CallA call is already on hold, you cannot place two calls on hold at the same time.Connection FailedThe held call could not be made active again.Busy Try LaterYour phone is still working on a previous command. Wait a short time before repeating the command.AnonymousThe person who is calling you has blocked their number from appearing on your phone.UnavailableThe network is unable to provide the caller’s number.Conference UnsuccessfulThe request for Conference Call has been unsuccessful.Transferring CallA request to transfer a call has been made.Transfer UnsuccessfulThe request to transfer a call has been unsuccessful.mod2_en.bk : usephone.fm5 Page 25 Wednesday, January 13, 1999 12:57 PM](https://usermanual.wiki/Motorola-Mobility/T6ZA1/User-Guide-22472-Page-28.png)
![Making and Receiving Phone Calls26EnglishMaking a Conference CallThis option joins the active call with a held call. With Conference Call, you can have a conference with up to five other telephones. At any time during your call, you can add, disconnect or separate individuals from the Conference Call using other “In-Call” menu options. AYou must subscribe to both Conference Call and Call Waiting Supplementary Services to be able to use this feature.Initiating a Conference CallTo initiate a Conference Call, place the active call on hold, and dial another phone number. You will then have one active call and one call on hold.Press the [ or ] key to enter the “In-Call” menu and select Conference Call. The currently active call and the call on hold will then join into one Conference Call.Managing a Conference CallWhile in a Conference Call, you will have the option to add new calls to the Conference Call or separate one of the members from the Conference Call.Adding a New CallThere are a number of different ways to add new calls to the Conference Call:•Using the digit keys.•Using the Make New Call option from the “In-Call” menu.•Recalling a Phone Book Entry using Quick Access.•Answer Call Waiting.No matter which method is chosen to add a new call, the original Conference Call will be first placed on hold while the new call is being connected. You must then enter the “In-Call” menu and select Conference Call to join the New Call with the original Conference Call in progress.Separate One of the Members in the ConferenceDuring a Conference Call, you will also have the option to separate a selected member from the main Conference Call.AIn order to separate a member from the main Conference Call, there must not be any calls on hold.Press [ or ] during a Conference Call and select Split Call. You will then be presented with the phone number or name of all members of the Conference Call. Use the scroll keys to find the selected member of the Conference Call. Once the desired member is selected, press the O key and select Split Call.At this point, the selected call will be separated from the main Conference Call and private conversation between you and the selected member is possible.To re-join all the parties again, select Conference Call from the “In-Call” menu.mod2_en.bk : usephone.fm5 Page 26 Wednesday, January 13, 1999 12:57 PM](https://usermanual.wiki/Motorola-Mobility/T6ZA1/User-Guide-22472-Page-29.png)
![Making and Receiving Phone Calls 27 EnglishTransfer Call Transfer Call transfers a call to another telephone. There are two ways to transfer a call; before or after the third party is connected.AYou must subscribe to both Conference Call and Call Waiting Supplementary Services to be able to use this feature. Initiating Transfer Call Before the Third Party is ConnectedTo transfer a call to another telephone, press the [ or ] key and select Transfer Call from the “In-Call” menu. Enter the number where the call will be transferred and press O. Your phone will then attempt to transfer the call. The display will show Transferring Call followed by Call Transferred. When the call has been successfully transferred, you will be disconnected automatically. Initiating Transfer Call After the Third Party is ConnectedIf you already have an active call and a call on hold, press the [ or ] key and select Transfer Call from the “In-Call” menu. Your phone will then attempt to transfer the active call to the call on hold. The display will show Transferring Call followed by Call Transferred. Once the call has been successfully transferred, you will be disconnected automatically.mod2_en.bk : usephone.fm5 Page 27 Wednesday, January 13, 1999 12:57 PM](https://usermanual.wiki/Motorola-Mobility/T6ZA1/User-Guide-22472-Page-30.png)

![Using the Options Menu32EnglishHow to Enter Alphabetic CharactersThe 0, 1,... ...,8 and 9 keys are used to enter alphabetic characters, for example when storing names in the Phone Book or when creating messages.For example, if you press the 5 key, the first displayed character will be J. If this is not the required character, then you can press the same key again to show K. Another press will display L, another... ...will display 5. Your phone will continue to scroll through the characters available on the selected key with each new key press.A long press of any of the keys will switch all the characters to lower case, a second long press will switch back to upper case.To enter the next character press the appropriate key. If, however, the next character is on the same key as the previous character you will first need to press the ] key. Pressing the ] key a second time will produce a space.If a mistake has been made, you can go back to the incorrect character by pressing [.Characters can be removed from the display by pressing the C key.The character before the cursor (Ö) is the character which will be deleted.Press the O key to store the information.Available CharactersPress the appropriate keys to get the following characters:1Space . 1 ? ! , Ÿ Ä & : " ( ) ' ` @ % ¡ ¢Space . 1 ? ! , Ÿ Ä & : " ( ) ' ` @ % ¡ ¢2A B C 2 [ ® ± ¼ ¾ ©a b c 2 { ¯ ± ½ ¾ ©3D E F 3 ° ¿ ¤ ² d e f 3 ° ¥ ¤ ²4G H I 4 À §g h i 4 À §5J K L 5 Áj k l 5 Á6M N O 6 ] \ « ¨ µm n o 6 } | ¬ ¨ µ7P Q R S 7 Â ¾ ¸p q r s 7 Â ¾ ¸8T U V 8 ¹ ^ ¦t u v 8 ¹ ~ ¦9W X Y Z 9 º ·w x y z 9 º ·0+ - 0 x * / = > < #+ - 0 x * / = > < #The top line for each key shows the upper case characters, the lower line shows the lower case.MENUCall RelatedFeaturesPhoneBookPhoneSetupAccessorySetupCallMetersNetworkSelectionMessagesmod2_en.bk : opt_menu.fm5 Page 32 Wednesday, January 13, 1999 12:57 PM](https://usermanual.wiki/Motorola-Mobility/T6ZA1/User-Guide-22472-Page-35.png)
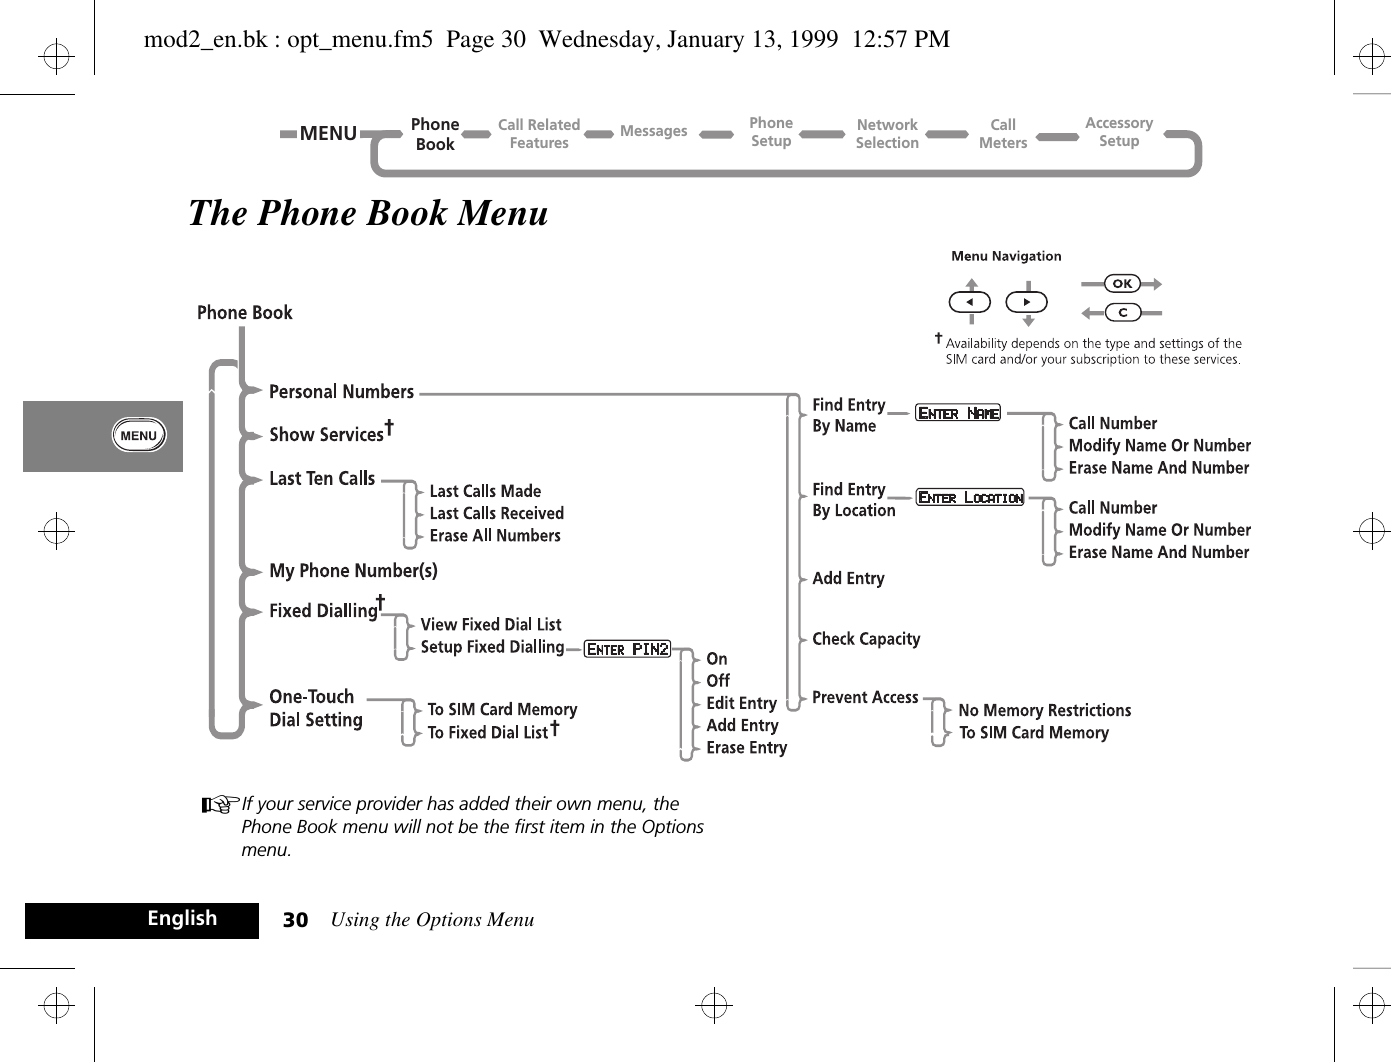
![Using the Options Menu 33 EnglishMENUCall RelatedFeaturesPhoneBookPhoneSetupAccessorySetupCallMetersNetworkSelectionMessagesPersonal NumbersThe Personal Numbers sub-menu is used for creating and managing your list of personal numbers.Find Entry By NameThis option is used to select a telephone number from a list of alphabetically sorted Phone Book names.Once selected, this option will display the message Enter Name. You can enter a maximum of three characters from a name but you do not need to enter all three characters to begin a search.The Phone Book entries will be searched and the first alphabetically matching entry will be displayed.If there isn’t a name matching your entry, the nearest alphabetically matching entry will be displayed.If you do not enter any name information, the first alphabetical entry will be displayed.If there are no names stored, No Names Stored will be displayed.To display adjacent Phone Book entries use the [ and ] keys. When the desired name is displayed press the O key to select it. The phone will now enter the 'Call Number', 'Modify Name Or Number' or 'Erase Name And Number' options sub-menu.Find Entry By LocationiG] This option is used to select a telephone number from a list of numerically sorted Phone Book locations.Once selected, this option will display the message Enter Location. You can now enter a location number. If the entered location is not valid, a timed message Range 1-XXX will be displayed and the phone will return to the Enter Location menu item.The Phone Book entries will be searched and an entry will be displayed.If you enter a location number for which there is no entry, Location Empty will be displayed and the nearest non-empty location will be selected instead.If you did not enter a location, the first numerical entry will be displayed.If there are no numbers stored, No Numbers Stored will be displayed.To display adjacent Phone Book entries use the [ and ] keys. When the desired name is displayed press the O key to select it. The phone will now enter the 'Call Number', 'Modify Name Or Number' or 'Erase Name And Number' options sub-menu.mod2_en.bk : opt_menu.fm5 Page 33 Wednesday, January 13, 1999 12:57 PM](https://usermanual.wiki/Motorola-Mobility/T6ZA1/User-Guide-22472-Page-36.png)
![Using the Options Menu 35 EnglishLast Ten CallsThese options can be used to call the most recently used phone numbers.Once an option has been selected, use the [ and ] keys to scroll through the list of phone numbers. Press the O key to call the displayed number.AYou can use postscripting to modify a number once you have retrieved it from either of the Last Ten Calls lists.Last Calls MadeThis option can be used to redial the phone number of any one of the last ten calls made.Last Calls ReceivedThis option can be used to redial the phone number of any one of the last ten calls received.AYou will only see numbers in the Last Calls Received list if you have Caller Line Identification.Erase All NumbersThis option erases all the numbers stored in your Last Ten Calls Made and Last Ten Calls Received lists.AThe Last Ten Calls lists will be erased when a new SIM is inserted in the phone.My Phone Number(s)This option allows you to access your cellular phone, fax and data numbers so that you can retrieve or modify them when required. For example, if you have difficulty remembering your cellular phone number, store it with the name My Phone and then you will be able to retrieve the number as required.The My Phone Number(s) list is stored on your SIM card.When you select this item, the first location will be displayed. Use the [ and ] keys to scroll through the phone numbers stored.To enter or change a number, scroll to the location and press O. You will be prompted to enter a phone number and then a name. Press O to store the information.ADepending on your Cellular Service Provider, you may find that one or more of the entries in the My Phone Number(s) list will have been defined. You may not be able to change these predefined entries.MENUCall RelatedFeaturesPhoneBookPhoneSetupAccessorySetupCallMetersNetworkSelectionMessagesmod2_en.bk : opt_menu.fm5 Page 35 Wednesday, January 13, 1999 12:57 PM](https://usermanual.wiki/Motorola-Mobility/T6ZA1/User-Guide-22472-Page-38.png)


![Using the Options Menu42Englishj Call WaitingThe Call Waiting menu item has two settings On or Off. If you select Off, you will be not be notified of waiting calls. The person trying to contact you will either receive the busy tone, or be diverted by the ‘Detailed Diverting - If Busy ’ option.If Call Waiting is On, you will be notified of a waiting call by an audible alert and by the message Call Waiting - Answer? . You can press the O key to accept the waiting call, or use the [ or ] key to scroll to an alternative option and then press O.AIf you have Caller Line Identification, the caller’s number or name is displayed instead of the Call Waiting message.AAvailability of this feature depends on your service provider.j Call BarringCall barring is a network feature which can be used to selectively bar outgoing and incoming calls.If you change the barring setting, you may be asked to enter your barring password. There will be a short delay while the phone notifies the network of the new setting. When the change has been made by the network, the phone will display a confirmation message.The initial password will be supplied to you by your Cellular Service Provider when you subscribe to this service.AThis option may be affected by the Fixed Dialling setting.Bar Outgoing CallsAfter selecting this option, there will be a short delay while the phone asks the network for the current setting.Int'l CallsWhen selected, this option will bar outgoing international calls.Int'l Calls Except HomeWhen selected, this option will bar outgoing international calls, except those to your home country.All CallsWhen selected, this option will bar all outgoing calls, except emergency calls.OffWhen selected, this option will disable all call barring for outgoing calls.Bar Incoming CallsAfter selecting this option, there will be a short delay while the phone asks the network for the current setting.When RoamingWhen selected, this option will bar incoming calls when you are roaming.You may wish to select this option, as some Cellular Service Providers charge an additional fee for receiving calls when you are roaming.All CallsWhen selected, this option will bar all incoming calls.Call RelatedFeaturesPhoneBookPhoneSetupAccessorySetupCallMetersNetworkSelectionMessagesMENUmod2_en.bk : opt_menu.fm5 Page 42 Wednesday, January 13, 1999 12:57 PM](https://usermanual.wiki/Motorola-Mobility/T6ZA1/User-Guide-22472-Page-45.png)
![Using the Options Menu 43 EnglishOffWhen selected, this option will disable all call barring for incoming calls.Cancel All BarringThis option can be used to set all Call Barring options to Off.Change Bar PasswordThis option can be used to change the call barring password.After selecting this option, you will be asked to enter the current password.You will then be asked to enter, and then re-enter, your new, 4 digit, barring password. When the change has been made by the network, the phone will display a confirmation message.Key Answer OnlyAThis option is only available if you have a phone with a flip.This feature has two options: On or Off.When set to On, this feature allows the flip to be opened without answering an incoming call. The call can be answered by pressing an appropriate key (O, 1 to 9, [ or ]). To reject the call press C.When set to Off, opening the flip answers an incoming call.Call RelatedFeaturesPhoneBookPhoneSetupAccessorySetupCallMetersNetworkSelectionMessagesMENUmod2_en.bk : opt_menu.fm5 Page 43 Wednesday, January 13, 1999 12:57 PM](https://usermanual.wiki/Motorola-Mobility/T6ZA1/User-Guide-22472-Page-46.png)
![Using the Options Menu44EnglishCall RelatedFeaturesPhoneBookPhoneSetupAccessorySetupCallMetersNetworkSelectionMessagesMENUMessages MenuYour phone supports the two GSM message features: Short Message Services (SMS) and Cell Broadcast.SMS MessagesThese are text messages that are sent specifically to and from your phone number.When an SMS message is received, your phone:1Makes three short alert tones (depending on the ‘Ring or Vibrate’ setting).2Displays the o (messages) icon.3Stores the message for later viewing, if there is space. If there is not enough space, the o icon will flash. One or more messages must be removed before the message can be stored.Your Cellular Service Provider will transmit a message for a limited amount of time. If a memory location is not made available before the message is removed from the network, then you will not be able to receive or read it.4Message will then be displayed with the prompt; Read Now?5If O is pressed, the phone will enter the Received Messages browser and immediately display the new message.6If C is pressed the phone will return to the screen which was displayed prior to receipt of the message.7If any other key is pressed it will perform the function linked with that key.8If no key is pressed the display will time-out after 1 minute and return to the screen which was displayed prior to receipt of the message.OnSend MessageStore Message Go to Next MessageVoicemail NumberOffSend MessageService CentreEdit MessageExpiry PeriodDelete MessageOutgoing Message TypeMessage ListMessage ListReceived MessagesCall VoicemailOutgoing MessagesMessage EditorCell BroadcastMessage SettingsMessagesSend MessageGo to Next MessageDelete MessageReturn CallEdit Message Send MessageStore MessageStore Message†††Delete All MessagesReply to Message‡‡Availability depends on the type and settings of theSIM card and/or your subscription to these services.Menu Navigation†OC][See ‘Send Message’ option in ‘Outgoing Messages’section.‡mod2_en.bk : opt_menu.fm5 Page 44 Wednesday, January 13, 1999 12:57 PM](https://usermanual.wiki/Motorola-Mobility/T6ZA1/User-Guide-22472-Page-47.png)
![Using the Options Menu 45 EnglishCell Broadcast MessagesThese are general messages, broadcast to a group of phones and can only be received when your phone is in standby mode.These messages are broadcast in numbered 'channels' and, in general, each channel will tend to carry one particular type of information.Typical cell broadcast channels could have information on local weather conditions, traffic reports or stock market prices. Please contact your network operator for a list of available channels and the information they supply.When the message has scrolled across the display, the beginning of the message will be shown until you either remove it or a new message arrives.How to Read SMS MessagesYou can use the scroll keys ([ and ]) to scroll through messages in either the Received Messages or Outgoing Messages lists.To display a specific message, enter the message number, for example press 5 to display the 5th message. If the message does not exist, Invalid Msg Number will be displayed.Alternatively, to display the next message, press O and select Go To Next Message.How to Create and Edit SMS MessagesUse the Message Editor to create or modify text messages. When you enter the editor, the last message that was edited will be displayed. Press and hold C to clear the message and start a new one, or modify the message displayed. For an explanation of how to enter text, see ‘How to Enter Alphabetic Characters’ .Press O once you have completed your message. You will then be presented with the following options:Send Message - If you select this option you will be prompted for a phone number, enter the number and then press O to send the message.Store Message - Select this option to store your edited message in your Outgoing Messages list.AIf you don’t store the message after it has been edited, you will lose all your changes as soon as you select another message to be edited.j Call VoicemailThis option will make a call to the current voicemail number. The voicemail number is entered using the ‘Voicemail Number’ option in the Message Settings menu.j Received MessagesThis option is used to view and manage any SMS messages that have been sent to your phone number.When selected, this option will display a message indicating the total number of messages and how many of these are new. If there are no messages No Messages will be displayed.Call RelatedFeaturesPhoneBookPhoneSetupAccessorySetupCallMetersNetworkSelectionMessagesMENUmod2_en.bk : opt_menu.fm5 Page 45 Wednesday, January 13, 1999 12:57 PM](https://usermanual.wiki/Motorola-Mobility/T6ZA1/User-Guide-22472-Page-48.png)
![Using the Options Menu46EnglishIf there are messages, the new messages will be displayed first, followed by the old. Repeated presses of the [ or ] key will display the whole message, when it was sent and the phone number who sent it (if available).Once you have read a new message it will automatically become old.See ‘How to Read SMS Messages’ for more information on navigating through the messages.Press the O key, when viewing any message, to enter the sub-menu.Delete MessageThis option will delete the currently viewed messageReply to MessageThis option allows you to reply with a message.Return CallThis option can be used to call the person who sent you the message, if their number has been included by the network, or a number that has been included in quotes “” in the message.Edit MessageThis option allows you to use the Message Editor to edit the selected message and then to either send the modified message and/or store it in your Outgoing Messages list. See ‘How to Create and Edit SMS Messages’ for more information on using the Message Editor.Go to Next MessageThis option will display the next received message.If you are currently reading the last message in your list then this option will take you back to the top of the list.Delete All MessagesThis option allows you to delete all received messages whether they have been read or not.AOnce deleted, messages are NOT retrievable.Outgoing MessagesThis option is used to view and manage any outgoing messages. These messages will be stored on your SIM card. When you select this option, the total number of messages will be displayed followed by the first message in the list.AYou cannot send an outgoing message until the Message Service Centre number has been set. See ‘Message Settings’.Press the O key, when viewing any message, to enter thesub-menu. See ‘How to Read SMS Messages’ for more information on navigating through the messages.Call RelatedFeaturesPhoneBookPhoneSetupAccessorySetupCallMetersNetworkSelectionMessagesMENUmod2_en.bk : opt_menu.fm5 Page 46 Wednesday, January 13, 1999 12:57 PM](https://usermanual.wiki/Motorola-Mobility/T6ZA1/User-Guide-22472-Page-49.png)
![Using the Options Menu 47 EnglishSend MessageThis option allows you to add the destination phone number using a sub-menu. Using the scroll keys you can select:Enter Number - this allows you to manually enter the phone number using the keypad and send the mesage.Find Entry by Name - this allows you to recall a phone number from the Phone Book by name and send the message (see ‘Find Entry by Name’ in the ‘Phone Book’ section).Find Entry by Location - this allows you to recall a phone number from the Phone Book by location and send the messaage (see ‘Find Entry by Location’ in the ‘Phone Book’ section).Edit MessageThis option allows you to use the Message Editor to edit the selected message and then to either send the modified message or store it in your Outgoing Messages list. See ‘How to Create and Edit SMS Messages’ for more information on using the Message Editor.Delete MessageThis option will delete the currently viewed message.Go to Next MessageThis option will display the next outgoing message.Message EditorThe Message Editor is used to edit the currently selected message and then to either send the modified message or store it in your Outgoing Messages list. See ‘How to Create and Edit SMS Messages’ for more information on using the Message Editor.Cell BroadcastThis option is used to set the cell broadcast settings. The option has two settings On or Off.If you change the setting to On, you will be asked to enter the channel you wish to receive information from.Please contact your Cellular Service Provider for a list of available channels and the information they provide.While a broadcast message is scrolling across the display you can stop and start it by pressing [. Press ] to restart the message from the beginning. If you want to remove the message from the display, press C.AIf you need to use the [ and ] keys for their normal functions while you are receiving a cell broadcast message, you must first remove the message.Call RelatedFeaturesPhoneBookPhoneSetupAccessorySetupCallMetersNetworkSelectionMessagesMENUmod2_en.bk : opt_menu.fm5 Page 47 Wednesday, January 13, 1999 12:57 PM](https://usermanual.wiki/Motorola-Mobility/T6ZA1/User-Guide-22472-Page-50.png)
![Using the Options Menu50Englishj Set Ringer ToneThis option sets the tone your phone will make when an incoming call is received on Line 1.Standard ToneYour phone makes a standard ringing tone.Single Ring Tone - Music ToneWhen selected, your phone will produce one of these alternative ringer tones.AIf you select the Single Ring Tone option, the phone will only ring once when a call is received.j Set Ringer Tone 2This option sets the tone your phone will make when an incoming call is received on Line 2.AThis option will not appear if you do not subscribe to Line 2.j Phone LockThis option is used to set, and change, the unlock code.The unlock code can be set to protect your phone from unauthorised use. It can be set to automatically lock your phone each time it is switched on.The unlock code is a four digit number which is set at manufacture to 1234. This can be changed at any time by using the 'change unlock code' option.Automatic LockThis option can be used to automatically lock your phone each time it is switched on. The option has two settings, On or Off.Lock NowThis option can be used to immediately lock your phone. Once selected, your phone will be unusable until the unlock code is entered.Change Unlock CodeThis option is used to change the unlock code.After selecting this option, you will be asked to enter the current security code before you can proceed.You can now enter a four digit code to replace the old code.ABy pressing the [ or ] key, you can access this option even when the phone is locked.Call RelatedFeaturesPhoneBookPhoneSetupAccessorySetupCallMetersNetworkSelectionMessagesMENUmod2_en.bk : opt_menu.fm5 Page 50 Wednesday, January 13, 1999 12:57 PM](https://usermanual.wiki/Motorola-Mobility/T6ZA1/User-Guide-22472-Page-53.png)

![Using the Options Menu 53 EnglishPhone StatusStatus ReviewThis option can be used to view the current setting of menu options.When selected, your phone will display a list of menu items which have been changed from the default setting. Press the [ or ] key to view the next item.Master Reset!This option should be used with caution.This option is used to restore certain phone options to their original settings.When selected, you will be asked to enter the security code. Once entered, the master reset option will perform the following operations:•Cancel Automatic Answer, Audible Call Timers, In-Call Display Meter, Battery Save (DTX), Auxiliary Alert, Automatic Handsfree, Automatic Lock, Cell Broadcast and Talk and Fax Mode.•Return Language Selection to Original.•Restore Keypad Tones to Normal, Ringer Tones to Standard, Volume Level to Medium and Network Search frequency to Medium.•Restore Extended Menus to their default settings.Master Clear!This option should be used with extreme caution, for example it will clear all the Phone Book entries from your phone memory.This option is used to restore certain phone options to their original settings.When selected, you will be asked to enter the security code. Once entered, the master clear option will perform the same operations as 'Master Reset', plus the following operations:•Clear the Phone Book entries from phone memory (not from SIM memory)•Clear the Last Calls Made and Last Calls received list•Clear the Message Editor•Reset the Resettable Call Timers.Master Clear does not clear the:•Fixed Dial list•My Number(s) list•Charge Meters•Received and Outgoing Messages list•Voicemail number•SMS Service Centre number•Lifetime timer.Call RelatedFeaturesPhoneBookPhoneSetupAccessorySetupCallMetersNetworkSelectionMessagesMENUmod2_en.bk : opt_menu.fm5 Page 53 Wednesday, January 13, 1999 12:57 PM](https://usermanual.wiki/Motorola-Mobility/T6ZA1/User-Guide-22472-Page-56.png)
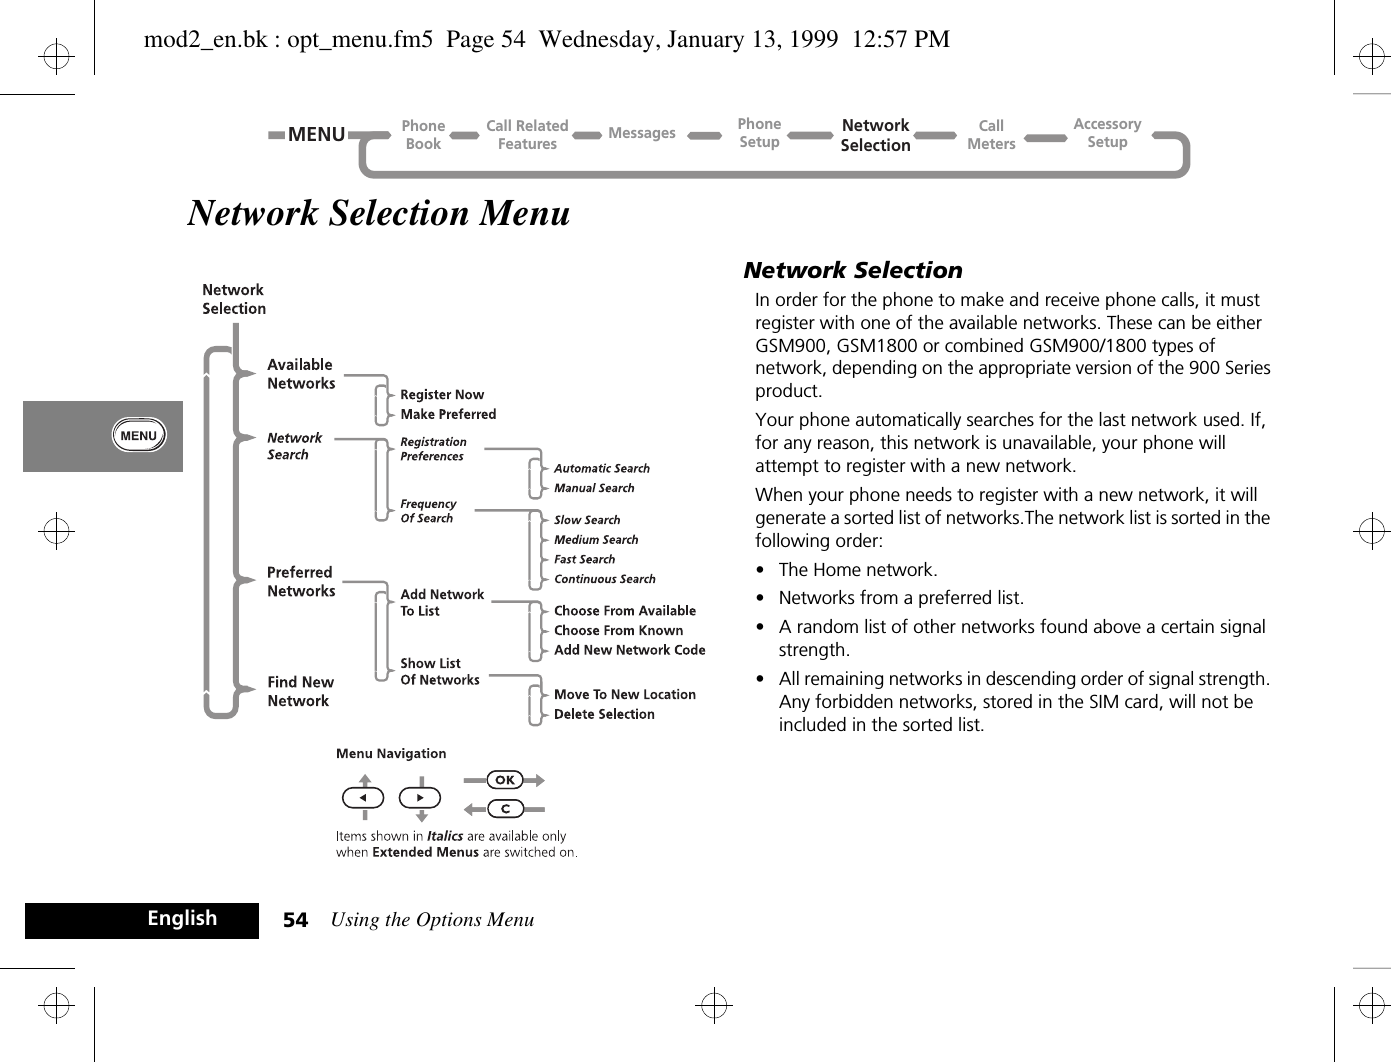
![Using the Options Menu 55 EnglishAvailable NetworksWhen selected, this option will scan to see which networks are operating in your current location. When the scan is complete, press the [ or ] key to scroll through the list. When you see a network you wish to register with or store in your preferred list, press the O key. You will now enter the 'Register Now' and 'Make Preferred' sub-menu.Register NowOnce selected, your phone will try to register with the selected network. If the registration fails, your phone will try to register in the normal way.Make PreferredOnce selected, you will be asked where the selected network is to be located in the preferred list.Network SearchThese options determine how often your phone tries to register with a network and how the attempt is made.Registration PreferencesThis option determines how the phone tries to register with a network.The option has two settings, Automatic Search or Manual Search.Automatic Search ModeIn the automatic mode, the phone will try to register with the first network in the sorted list. If this is successful, your phone will display the network name and then enter the standby mode.If registration is unsuccessful with one network in the list, your phone will try the next listed network. If your phone fails to register with any of the listed networks, it will start at the beginning of the list after a preset period. The preset period is determined by the 'Frequency Of Search' option.Manual Search ModeIn the manual mode, the phone will present you with the sorted list of networks. Use the [, ] and O keys to select one network from the list. Your phone will try to register with the selected network. If this is successful, the phone will display the network name and then enter the standby mode.If registration is unsuccessful, your phone will present the list again after a preset period. The preset period is determined by the 'Frequency Of Search' option.Frequency of SearchThis option is used to determine how long your phone waits before attempting to re-register after a registration attempt has failed.The option has the following settings: Slow Search, Medium Search, Fast Search or Continuous Search.!Fast and Continuous Search may use up a significant amount of battery power.Call RelatedFeaturesPhoneBookPhoneSetupAccessorySetupCallMetersNetworkSelectionMessagesMENUmod2_en.bk : opt_menu.fm5 Page 55 Wednesday, January 13, 1999 12:57 PM](https://usermanual.wiki/Motorola-Mobility/T6ZA1/User-Guide-22472-Page-58.png)
![Using the Options Menu56Englishj Preferred NetworksAdd Network to ListThis option enables you to add networks to your preferred list. When selected, the 'Choose From Available' option will scan to see which networks are operating in your current location. When the scan is complete, press the [ or ] key to scroll through the list. When you see a network you wish to store in your preferred list, press the O key. You will be asked where the selected network is to be located in the preferred list.The 'Choose From Known' option will, when selected, present you with a preset list of networks. Press the [ or ] key to scroll through the list. When you see a network you wish to store in your preferred list, press the O key. You will be asked where the selected network is to be located in the preferred list.Select the 'Add New Network Code' option to enter network codes directly. Once entered, you will be asked where the network is to be located in the preferred list.Show List of NetworksThis option is used to display the networks you have stored in your preferred list. In addition, pressing the O key will select the currently displayed entry and enter a move/delete sub-menu.When 'Move to New Location' is selected you will be asked to enter a new location for the selected network.When selected, 'Delete Selection' will remove the selected network from the preferred list.Find New NetworkWhen selected, the phone will try to register with a network in the normal manner, with one exception. When the registration attempt is made, your current network will be excluded from the list of those available. If the attempt fails, your phone will then try to re-register with the previous network.Call RelatedFeaturesPhoneBookPhoneSetupAccessorySetupCallMetersNetworkSelectionMessagesMENUmod2_en.bk : opt_menu.fm5 Page 56 Wednesday, January 13, 1999 12:57 PM](https://usermanual.wiki/Motorola-Mobility/T6ZA1/User-Guide-22472-Page-59.png)


![Using the Quick Access Menu 63 EnglishUsing the Quick Access MenuAThe menu shown above represents the default setting supplied with your phone.Although the features in your phone are available through easy access menus, some of the most commonly used features are also available in the Quick Access menu. Each feature in the menu is allocated a number from 1 to 9.To use a Quick Access feature, press the quick access key (E) followed by the number of the feature, or press [ or ] to scroll through the menu and then press O.You can change the features, and the positions of the features, available in the Quick Access menu - see ‘Customising the Quick Access Menu’.Each Quick Access feature is represented by an icon as well as the feature name. The currently selected icon is shown with a dark background.Find Name?You will be prompted to Enter Name. Enter the first three characters of the name and press O. The first matching entry in the Phone Book will be displayed. Press O to call the number.Find Location?You will be prompted to Enter Location. Enter the location number and press O. The first matching entry in the Phone Book will be displayed. Press O to call the number.mod2_en.bk : qkaccess.fm5 Page 63 Wednesday, January 13, 1999 12:57 PM](https://usermanual.wiki/Motorola-Mobility/T6ZA1/User-Guide-22472-Page-66.png)

![What to do if... 69 EnglishWhat to do if...You can’t switch your phone on Check the battery. Is it charged, properly fitted and are the contacts clean and dry? See ‘Important Battery Information’.You can’t make calls Check the signal strength meter in the display. If the signal is weak, move to an open space or, if you are in a building, move closer to a window.Check the Network Selection settings. Try Manual Selection, or try another network. See ‘Network Search’.Check your Operator coverage map.Is Restricted displayed? Check the Call Barring and Fixed Dialling settings.Has the call charge limit been reached? Use your PIN2 code to reset the limit or contact your Service Provider. See ‘Set Total Charge Limit’.Has a new SIM card been inserted? Check that no new restrictions have been imposed.You can’t receive calls Check the signal strength meter in the display. If the signal is weak, move to an open space or, if you are in a building, move closer to a window.Check the Call Diversion and Call Barring settings.Your phone won’t unlock Have you inserted a new SIM card? Enter the new PIN code. See ‘Entering Your SIM Card PIN Code’.Do you have a replacement phone? Enter the default phone unlock code - 1234.Have you forgotten the unlock code? Press [ or ] to change the unlock code (you will need your security code).Your PIN is blocked Enter the PIN unblocking code supplied with your SIM card (see ‘Unblocking Your Phone’).Your PIN2 is blocked Enter the PIN2 unblocking code supplied with your SIM card (see ‘Change SIM PIN2 Code’).Your SIM card won’t work Is the card inserted the right way round? See ‘SIM Card Insertion/Removal’.Is the gold chip visibly damaged or scratched? Return the card to your Service Provider.Check the SIM contacts. If they are dirty, clean them with an antistatic cloth.mod2_en.bk : notes.fm5 Page 69 Wednesday, January 13, 1999 12:57 PM](https://usermanual.wiki/Motorola-Mobility/T6ZA1/User-Guide-22472-Page-72.png)