Motorola Mobility T6FL1 PCS GSM Transceiver PCMCIA Card User Manual M2501 Electra E M2501 00 0Hyo2 E

Motorola Mobility LLC PCS GSM Transceiver PCMCIA Card M2501 Electra E M2501 00 0Hyo2 E

Contents

Exhibit 8 Users Manual 2

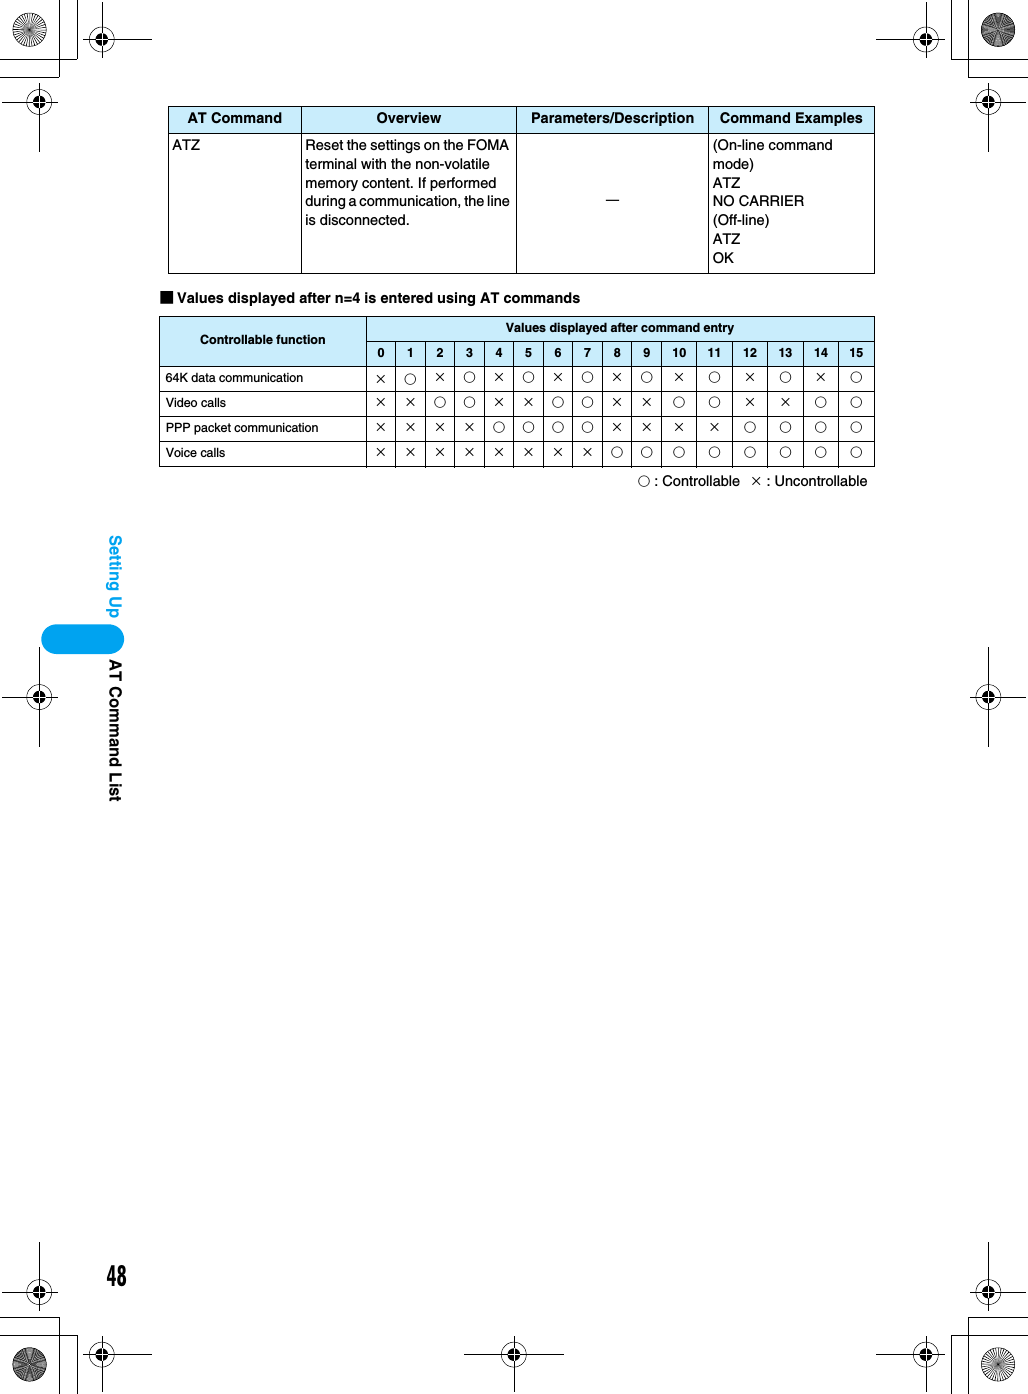
48Setting Up■Values displayed after n=4 is entered using AT commands○ : Controllable × : UncontrollableATZ Reset the settings on the FOMA terminal with the non-volatile memory content. If performed during a communication, the line is disconnected.ー(On-line command mode)ATZ NO CARRIER(Off-line) ATZ OKControllable functionValues displayed after command entry012345678910 11 12 13 14 1564K data communication ×○×○×○×○×○ × ○ × ○ × ○Video calls ××○○××○○×× ○ ○ × × ○ ○PPP packet communication ××××○○○○×× × × ○ ○ ○ ○Voice calls ××××××××○○ ○ ○ ○ ○ ○ ○AT Command Overview Parameters/Description Command ExamplesAT Command List
49Setting UpSupplementary Explanation of AT Commands■Command name : +CGDCONT• OverviewSet APN when sending packet connection.•Form+CGDCONT=[<cid>[,“<PDP type>” [ ,“<APN>”] ] ]• Parameter descriptionsSet APN when sending Packet communication. See examples in command operation lists<cid>* : X to X<PDP type>* : PPP or IP<APN>* : Optional*: <cid> is the number used to control the destination (APN) for the Packet communication to be registered in FOMA terminal. X to X can be registered.<PDP type> is a protocol for packet communication.<APN> is optional connection name that indicates each destination.• Operation without parameterAT+CGDCONT=<cid> : Set specified <cid> as defaultAT+CGDCONT=? : Display list of values that can be configuredAT+CGDCONT=? : Display list of values that can be configured• Command examplesRegistered APN named abc (When PDP type is “PPP” and cid=3)AT+CGDCONT=3,“PPP”,“abc”OK* This command, which is a setting command, is not stored in the nonvolatile memory written by [&W] and is not reset by [&F] and [Z], either.■Command name : +CGEQMIN=[Parameter]• OverviewRegister criteria value to determine if QoS sent from network when Packet communication established is permitted.•Form+CGEQMIN=[<cid>[,,<Maximum bit rate UL>[,<Maximum bit rate DL>] ] ]• Parameter description<cid>* : X to X<Maximum bit rate UL>* : None (default) or 64<Maximum bit rate DL>* : Non (default) or 384*: <cid> is the number used to control the destination (APN) for the Packet communication to be registered in FOMA terminal. X to X can be registered.In <Maximum bit rate UL> and <Maximum bit rate DL>, the minimum connection speed [Kbps] is set for both upload and download traffic between FOMA terminal download traffic between FOMA terminal and the base station. If the parameter is set to None (default), all speeds are permissible.If 64 and 384 are set, any communication at a speed except the above limit is not permitted, and the Packet communication will not be connected.• Operation without parameterAT+CGEQMIN= :Set all <cid> as default valueAT+CGEQMIN=<cid> : Set specified <cid> as default value• Command examples(1) Command used to permit all speed both upload and download both upload and download (when<cid>=2)AT+CGEQMIN=2OK(2) Command used to permit only 64Kbps upload and 384Kbps download (when<cid>=2)AT+CGEQMIN=2,,64,384OK(3) Command used to permit 64Kbps upload and all speed download (when<cid>=3)AT+CGEQMIN=3,,64OK(4) Command used to permit all speed upload and only 384Kbps download (when<cid>=3)AT+CGEQMIN=3,,,384OK* This command, which is a setting command, is not stored in the nonvolatile memory written by [&W], and is not reset by [&F] and [Z], either.■Command name : +CGEQREQ=[Parameter]• OverviewSets up QoS request to the network when Packet communication is established.•Form+CGEQREQ=[<cid>[,,<Maximum bit  rate UL>[ ,<Maximum bit rate DL>] ] ]• Parameter Description<cid>* : X to X<Maximum bit rate UL>* : None (default) or 64<Maximum bit rate DL>* : None (default) or 384*: <cid> is the number used to control the destination (APN) for the Packet communication to be registered in FOMA terminal.1 to 3 can be registered to FOMA terminal.In <Maximum bit rate UL> and <Maximum bit rate DL>, the minimum connection speed [in Kbps] is set for both upload and download traffic between FOMA terminal and the base station. If the parameter is set to None (default), all speeds are permissible.If 64 and 384 are set, any connection at a speed except the above limit is not permitted, and the Packet communication will not be connected.• Operation without parameterAT+CGEQREQ=<cid> : Set all <cid> as default.AT+CGEQREQ=<cid> : Set specified <cid> as default.• Command examplesCommand used to require 64Kbps upload and 384Kbps download (when<cid>=3)AT+CGEQREQ=3,,64,384OKAT Command ListContinued on the next page
50Setting Up* This command, which is a setting command, is not stored in the nonvolatile memory written by [&W], and is not reset by [&F] and [Z], either.List of Reasons of Disconnection(Checking the specification)Result Codes■List of Result Code■Extended Result CodesWhen &E0Show the connection speed between the FOMA terminal and the base.When &E1■Communication Protocol Result Codes■Examples of Displayed Result CodesWhen ATX0 is setRegardless of the AT Commands (P46) settings, only CONNECT is displayed after connection is established.Example of text display : ATD*99***1# CONNECTExample of numeric display : ATD*99***1#1When ATX1 is set• When ATX1, AT¥V0 is set (default)Display in the format of  CONNECT <Speed between FOMA and PC> after the connection is established.Example of text display:ATD*99***1# CONNECT 460800Example of numeric display:ATD*99***1# 121• When ATX1, AT¥V1 is setDisplay in the following format after the connection is established.CONNECT <Speed between FOMA and PC> PACKET <Destination APN>/<Maximum uplink speed (between FOMA terminal→Base)> / <Maximum downlink speed (between FOMA terminal←Base)>Example of text display:ATD*99***1# CONNECT 46080 PACKET mopera.ne.jp/64/384 (which means connection is established with mopera.ne.jp/64/384mopera.ne.jp/64/384.)Example of numeric display:ATD*99***1# 1215* If ATX1 and AT¥V1 are set concurrently, a dial-up connection may not be executed correctly. It is recommended to use only AT¥V0.No. Text display Description0 OK Operation performed properly.1 CONNECT Connected to the other party.2 RING Incoming call.3 NO CARRIER Line disconnected.4 ERROR Unable to accept command.6 NO DIAL TONE Unable to detect dial tone.7BUSY Detect busy tone. (Applied only when dialing by circuit switching.)8 NO ANSWER Completed connection timeout.100 RESTRICTION Network use is restricted.101 DELAYED Redial is delayed because of restrictions.Numeric display Text display Connection speed121 CONNECT 32000 32000bps122 CONNECT 64000 64000bps125 CONNECT 384000 384000bps133 CONNECT 3648000 3648000bpsNumeric display Text display Connection speed5 CONNECT 1200 1200bps10 CONNECT 2400 2400bps11 CONNECT 4800 4800bps13 CONNECT 7200 7200bps12 CONNECT 9600 9600bps15 CONNECT 14400 14400bps16 CONNECT 19200 19200bps17 CONNECT 38400 38400bps18 CONNECT 57600 57600bps19 CONNECT 115200 115200bps20 CONNECT 230400 230400bps21 CONNECT 460800 460800bpsNumeric displayText display Connection speed1PPPoverUD Connection with 64K data communication3AV64K Connection with video call (64K) communication5PACKET Connection with packet communicationAT Command List
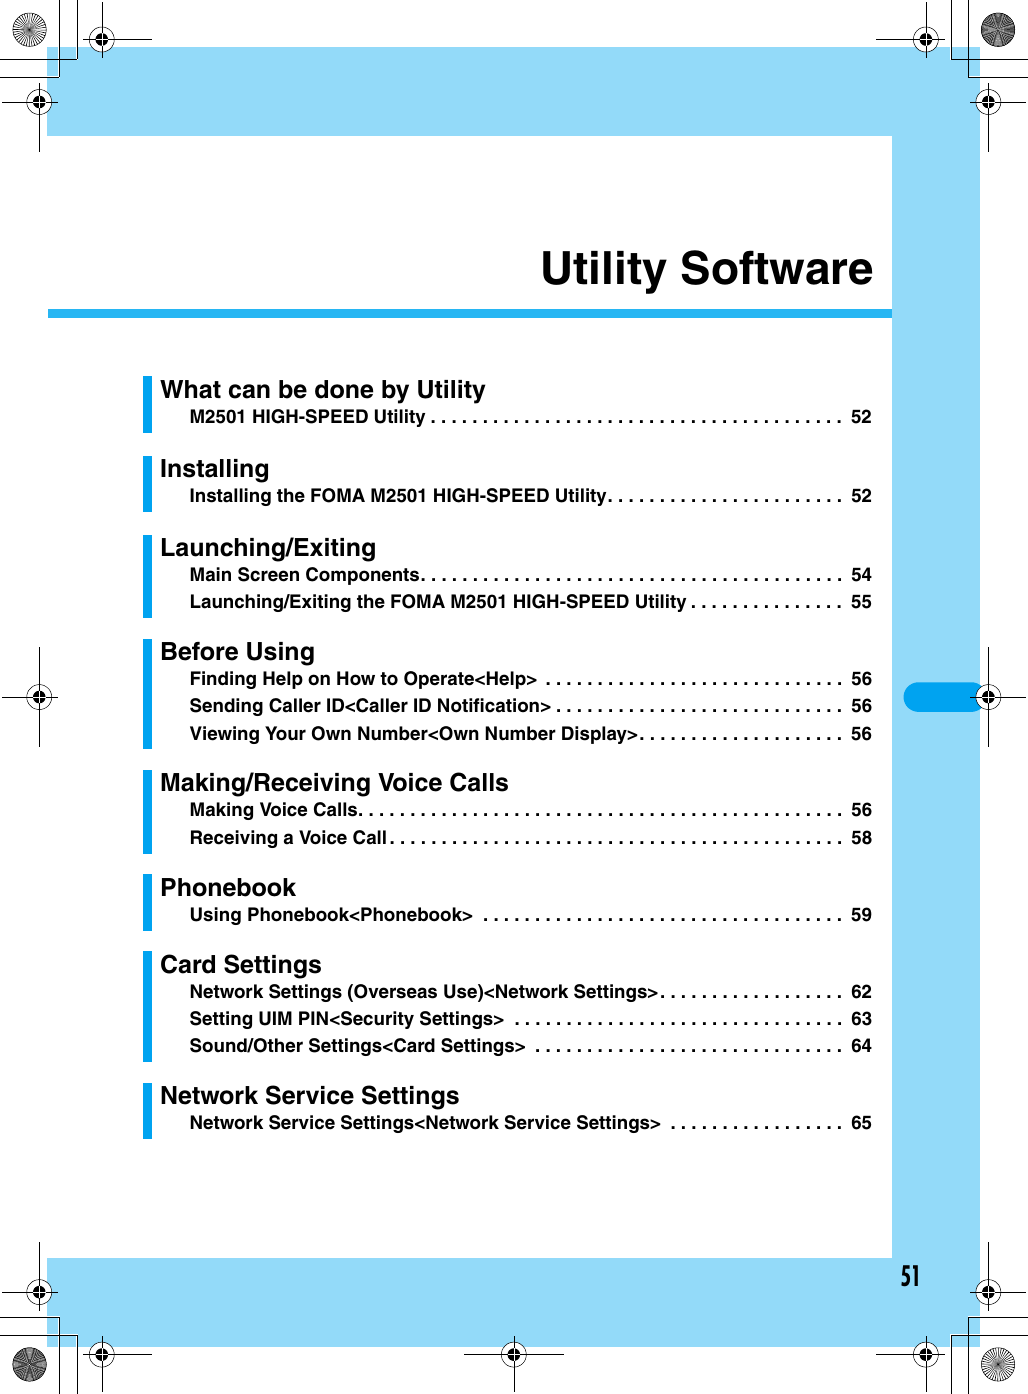
51Utility SoftwareWhat can be done by UtilityM2501 HIGH-SPEED Utility . . . . . . . . . . . . . . . . . . . . . . . . . . . . . . . . . . . . . . . .  52InstallingInstalling the FOMA M2501 HIGH-SPEED Utility. . . . . . . . . . . . . . . . . . . . . . .  52Launching/ExitingMain Screen Components. . . . . . . . . . . . . . . . . . . . . . . . . . . . . . . . . . . . . . . . .  54Launching/Exiting the FOMA M2501 HIGH-SPEED Utility . . . . . . . . . . . . . . .  55Before UsingFinding Help on How to Operate<Help>  . . . . . . . . . . . . . . . . . . . . . . . . . . . . .  56Sending Caller ID<Caller ID Notification> . . . . . . . . . . . . . . . . . . . . . . . . . . . .  56Viewing Your Own Number<Own Number Display>. . . . . . . . . . . . . . . . . . . .  56Making/Receiving Voice CallsMaking Voice Calls. . . . . . . . . . . . . . . . . . . . . . . . . . . . . . . . . . . . . . . . . . . . . . .  56Receiving a Voice Call. . . . . . . . . . . . . . . . . . . . . . . . . . . . . . . . . . . . . . . . . . . .  58PhonebookUsing Phonebook<Phonebook>  . . . . . . . . . . . . . . . . . . . . . . . . . . . . . . . . . . .  59Card SettingsNetwork Settings (Overseas Use)<Network Settings>. . . . . . . . . . . . . . . . . .  62Setting UIM PIN<Security Settings>  . . . . . . . . . . . . . . . . . . . . . . . . . . . . . . . .  63Sound/Other Settings<Card Settings>  . . . . . . . . . . . . . . . . . . . . . . . . . . . . . .  64Network Service SettingsNetwork Service Settings<Network Service Settings>  . . . . . . . . . . . . . . . . .  65
52Utility SoftwareM2501 HIGH-SPEED UtilityFollowing functions are available using the M2501 HIGH-SPEED Utility:Operating EnvironmentsThe M2501 HIGH-SPEED Utility requires the following operating environments:*1: Japanese Version Service Pack 4 or later*2: Japanese Version Service Pack 1 or later• Required memory or available hard disk space may vary depending on the system environment.• Depending on the operating environment, the software may not work. DoCoMo does not respond to any inquiries about the usage, guarantee proper operation, nor is responsible for proper operation under operating environments other than the above.• DoCoMo does not guarantee the operation under the supported OS if the OS is changed through upgrade.Installing the FOMA M2501 HIGH-SPEED UtilityInstalling• The screen images shown in this section are typical for Windows XP. Your PC may have different screen images.• Log into a user account with the Administrator or PC supervisor privileges. An error occurs if you log into an account without these privileges. For details on setting up Administrator or PC supervisor privileges, contact your computer manufacturer or Microsoft Corporation.aStart Windows and insert the FOMA M2501 HIGH-SPEED CD-ROMbClick [スタート (Start)]y“ファイル名を指定して実行 (Select file name and run)”cClick [Browse (参照)] to specify the file setup.exe, then click [OK]• Specify the file “<CD-ROM ドライブ名 (CD-ROM drive letter)>¥Utility¥XXX/setup.exe” (the CD-ROM drive name varies depending on settings of PCs).Making/Receiving Voice Calls →P56, P58You can make or receive voice calls overseas as well as in Japan.Redial/Received Calls →P57, P58You can easily make calls using Redial or Received Calls.Phonebook →P59You can store a phone number in Phonebook and easily make calls.Network Services →P65You can use network services such as Voice Mail and Call Forwarding services.Item RequirementPC Main Unit PC-AT CompatiblePC Card Slot (Type II)OS Windows 2000 Professional*1, Windows XP Professional/Home Edition*2Required Memory128Mb or moreHard Disk Space50Mb or more available spaceDisplay 800 x 600 pixels or more recommendedSound Sound function and speakerScreen to be replacedM2501 HIGH-SPEED Utility
53Utility SoftwaredClick [次へ (Next)]• Before starting the installation, make sure that no other applications are running. If there are any other applications running, click [キャンセル (Cancel)] to stop them, then start the installation.eRead the license agreement and check “使用許諾契約の条項に同意します (I agree)”, then click [次へ (Next)]fVerify the destination folder and click [次へ (Next)]•[変更 (Browse)] : You can change the destination folder. However, you can only specify folders on a local hard disk. Other folders (on a network drive or removable media) cannot be specified.gClick [インストール (Install)]hClick [完了 (Done)]• An icon appears on the Desktop screen. For the icon, see Step 1 in “Launching” (P55). Uninstalling• The screen images shown in this section are typical for Windows XP. Your PC may have different screen images.• Exit the M2501 HIGH-SPEED Utility before uninstalling.• Log into a user account with the Administrator or PC supervisor privileges. An error occurs if you log into an account without these privileges. For setting up Administrator or PC supervisor privileges, contact your computer manufacturer or Microsoft Corporation.aStart “アプリケーションの追加と削除(Add or Remove Applications)”■For Windows XPClick [スタート (Start)] y “コントロールパネル (Control Panel)” y “プログラムの追加と削除(Add or Remove Programs)” icon■For Windows 2000Click [スタート (Start)] y “設定 (Settings)” y “コントロールパネル (Control Panel)” y “アプリケーションの追加と削除 (Add or Remove Applications)” iconbSelect “FOMA M2501 HIGH-SPEED ユーティリティ (FOMA M2501 HIGH-SPEED Utility)” and click [変更と削除 (Change/Remove)]Screen to be replacedScreen to be replacedScreen to be replacedScreen to be replacedSelect “FOMA M2501 HIGH-SPEED ユーティリティ (M2501 HIGH-SPEED Utility)”Click hereScreen to be replacedContinued on the next pageInstalling the FOMA M2501 HIGH-SPEED Utility
54Utility SoftwarecClick [はい (OK)]When “M2501 HIGH-SPEED ユーティリティ (Utility)” disappears from the screen in Step 2, the installation has completed.• Uninstalling the program does not delete entries in Redial, Received Calls or the Phonebook. To delete those files, manually delete the folder to which the M2501 HIGH-SPEED Utility had been installed (default folder is “C:¥Program Files¥M2501 HIGH SPEED Utility”).Main Screen ComponentsaMinimizing Button• The Main screen closes but remains on the Task BarbExit Button• The Main screen closes and the M2501 HIGH-SPEED Utility endscStatus Indicator Area: Signal Strength (Rough Indication)…Strong…Weak…Very Weak: Out of Service Area or No Signal Reception Area: FOMA terminal is not inserted in a PC card slot: An invalid UIM or UIM is not inserted: PIN1 or PUK Code Must be Entered: Voice Call Arriving: Dialing a Voice Call: Performing a Voice Call: During a video call using another application: Performing Packet Communication: Performing 64K Data Communication: Performing Multiaccess: Missed Call(s)dNetwork Name Display Area• Displays the network name currently connected ePhonebook Entry Name Display Area• Displays the other party’s name if the name and phone number are saved in Phonebook• Displays the reason for no Caller ID if Caller ID is hiddenfPhone Number Display Area• Displays the entered phone number• Displays the Caller IDgStart Button• Makes or receives calls →P56, P58Screen to be replacedgabcdefjhiklMain Screen Components
55Utility SoftwarehClear Button• Clear the entered phone numberiEnd Button• Ends the call →P56• Ends a functionjKeypad• Enter a phone numberkMenu Icons: Received Call →P58: Phonebook →P59: Redial →P57: Settings →P62 - P70: Own Number Display →P56: Help →P56lStatus Bar• Displays communication or call status■Icons Displayed in the Task Tray: Signal Strength (Rough Indication)(Green)…Strong(Yellow)…Weak(Red)…Very Weak: Out of Service Area or No Signal Reception Area: FOMA terminal is not inserted in a PC card slot: An invalid UIM or UIM is not inserted: When the terminal:• Requires PIN1 code• Requires PUK Code• Is locked with PIN Lock• Has a completely blocked UIM Card ■Right click on the icon displayed in the Task Tray•“表示 (Display)” … Display/minimize the Main screen•“常に手前に表示 (Pin on Top)” … The Main screen is always displayed on top.•“バージョン情報 (Version Information)” … Show the version of the M2501 HIGH-SPEED Utility and the firm ware of the M2501 HIGH-SPEED terminal•“アプリケーションの終了 (Exit Application)” … Exit the M2501 HIGH-SPEED Utility■Operations from the PC KeyboardLaunching/ExitingLaunching/Exiting the FOMA M2501 HIGH-SPEED UtilityLaunching• Log into a user account with the Administrator or PC supervisor privileges.aDouble click the “M2501 HIGH-SPEED Utility” icon on the DesktopThe Main screen (P54) opens.■If the icon is not displayedClick “スタート (Start)” y “すべてのプログラム (All Programs)” / “プログラム (Programs)” y “M2501 HIGH-SPEED” y “M2501 HIGH-SPEED Utility”ExitingaClick   (Orange) on the Main screen (P54)The exiting confirmation screen appears.bClick [OK]• You cannot exit the utility under the following circumstances : (checking the specifications)- While dialing or receiving/performing a call- While the Redial/Received Calls/Phonebook screen is openOperation Keyboard OperationEntering 0 - 9, #, *Press “0” - “9”, “#”, “*” keys.Entering +, - Press “+”, “-” keys.Erasing one character at a timePress “Back Space” key.Pressing the selected buttonPress “Space” or “Enter” key.Highlighting  Press “Esc” key.Highlighting up, down, left or right key on the keypadPress “↑”, “↓”, “←”, “→” keys.Highlighting keys on the keypad in orderPress “Tab” key.Launching/Exiting
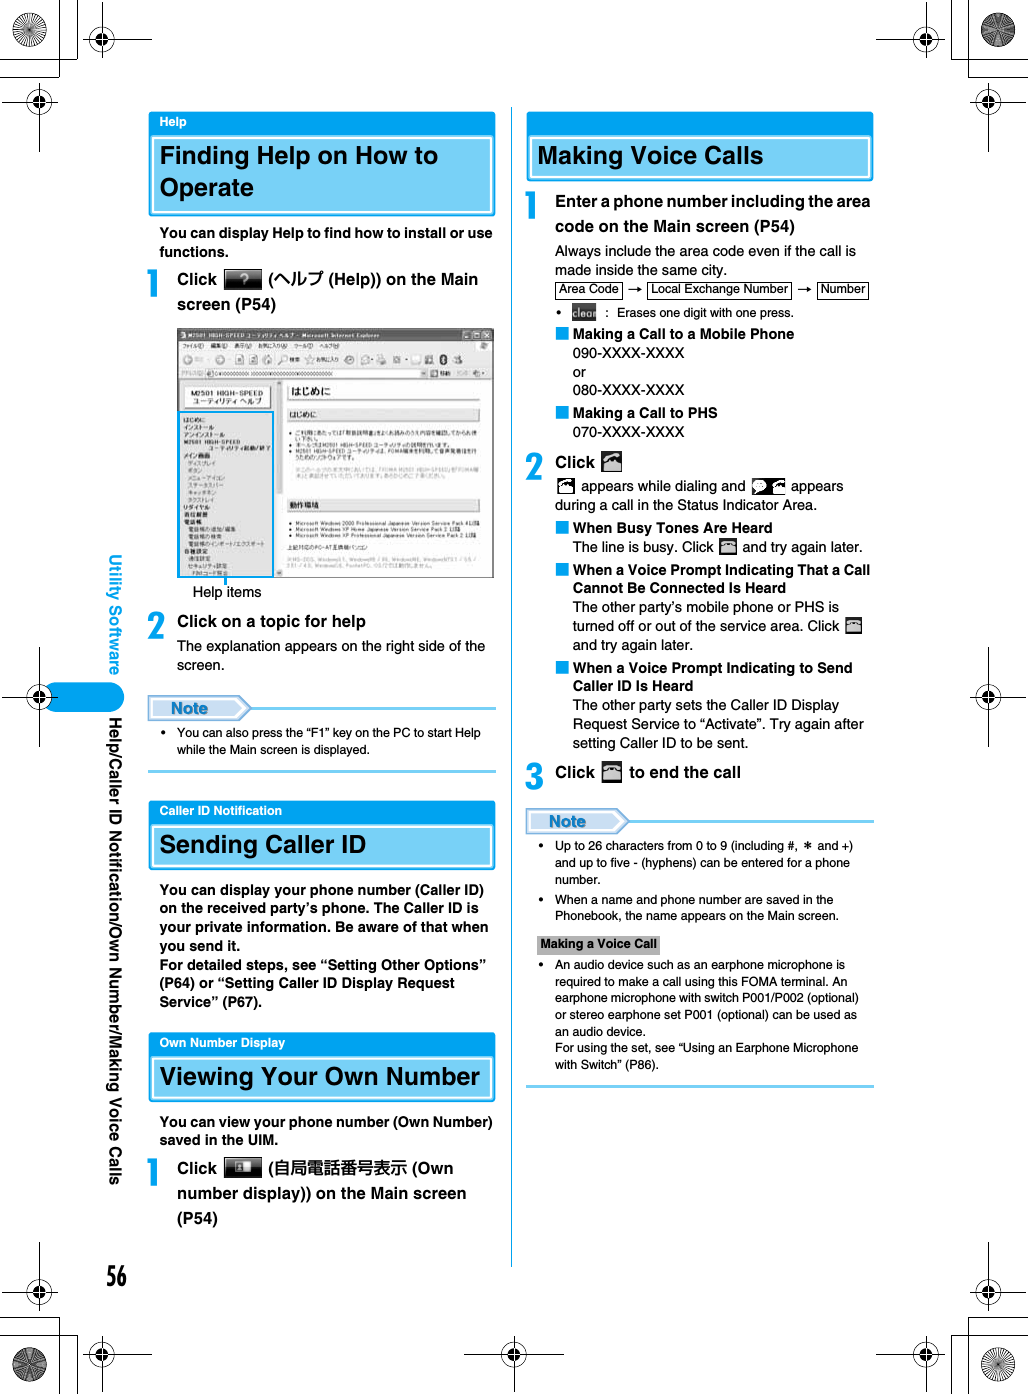
56Utility SoftwareHelpFinding Help on How to OperateYou can display Help to find how to install or use functions.aClick  (ヘルプ (Help)) on the Main screen (P54)bClick on a topic for helpThe explanation appears on the right side of the screen.• You can also press the “F1” key on the PC to start Help while the Main screen is displayed.Caller ID NotificationSending Caller IDYou can display your phone number (Caller ID) on the received party’s phone. The Caller ID is your private information. Be aware of that when you send it.For detailed steps, see “Setting Other Options” (P64) or “Setting Caller ID Display Request Service” (P67).Own Number DisplayViewing Your Own NumberYou can view your phone number (Own Number) saved in the UIM.aClick  (自局電話番号表示 (Own number display)) on the Main screen (P54)Making Voice CallsaEnter a phone number including the area code on the Main screen (P54)Always include the area code even if the call is made inside the same city. →   → • : Erases one digit with one press.■Making a Call to a Mobile Phone090-XXXX-XXXXor080-XXXX-XXXX■Making a Call to PHS070-XXXX-XXXXbClick  appears while dialing and   appears during a call in the Status Indicator Area.■When Busy Tones Are HeardThe line is busy. Click   and try again later.■When a Voice Prompt Indicating That a Call Cannot Be Connected Is HeardThe other party’s mobile phone or PHS is turned off or out of the service area. Click   and try again later.■When a Voice Prompt Indicating to Send Caller ID Is HeardThe other party sets the Caller ID Display Request Service to “Activate”. Try again after setting Caller ID to be sent.cClick   to end the call• Up to 26 characters from 0 to 9 (including #, * and +) and up to five - (hyphens) can be entered for a phone number.• When a name and phone number are saved in the Phonebook, the name appears on the Main screen.• An audio device such as an earphone microphone is required to make a call using this FOMA terminal. An earphone microphone with switch P001/P002 (optional) or stereo earphone set P001 (optional) can be used as an audio device.For using the set, see “Using an Earphone Microphone with Switch” (P86).Help itemsMaking a Voice CallArea Code Local Exchange Number NumberHelp/Caller ID Notification/Own Number/Making Voice Calls
57Utility SoftwareRedialUsing RedialDialed phone number, time and date of the call are saved in Redial.aClick  (リダイヤル (Redial)) on the Main screen (P54)• [Add to Phonebook]: “Saving Entry to Phonebook” →P59bSelect a Redial entryyClick [選択(Select)]The selected Redial entry appears on the Main screen.cClick dClick   to end the call• Up to 20 entries can be saved in “Redial”. If more than 20 entries are saved, oldest entries are overwritten first.• Clicking a header (“電話番号 (Phone Number)”, “名前 (Name)”, or “発信時刻 (Dialed Time)”) rearranges the list temporarily. Clicking again restores the original list.• When a name and phone number are saved in Phonebook, the name appears under “名前 (Name)” on the Redial screen.• If you use a FOMA terminal with different UIM card inserted or use the terminal with different user account, the same Redial list is shared.Deleting Entries from RedialaRight click the Redial entry on the Redial screen (P57)yClick [削除 (Delete)]/[全削除 (Delete All)] The deletion confirmation screen appears.bClick [OK]• Selecting entries while holding down the “Shift” key on the keyboard allows you to specify a range.• Selecting entries while holding down the “Ctrl” key on the keyboard allows you to select more than one entry.Dialing a Phone Number with Preceding “186” or “184”You can set whether to send Caller ID for each outgoing call.aDial a phone number with 186 or 184 before the number■Sending Caller ID →  → Click ■Hiding Caller ID →  → Click Redial Screena phone numbera phone numberMaking/Voice Calls
58Utility SoftwareInternational CallsWORLD CALL is an international calling service available from a DoCoMo mobile phone.FOMA service subscribers are also signed up for WORLD CALL at the time of initial subscription (except subscribers explicitly declining this service).• You can make calls to about 220 countries and regions around the world.• Charges for “WORLD CALL” are added to your monthly call charges.• No initial fee and no fixed monthly charges apply.• Changes to the International Call Dialing ProcedureThe international call dialing procedure from a cell phone has been changed due to the introduction of the “マイライン (My Line)” service. Consequently, the previous dialing procedure (Step 1 in “Making an International Call” (P58) without the prefix “010”) can no longer be used.• Some billing plans may not be applied to WORLD CALL.• For details on WORLD CALL, contact the “DoCoMo Information Center” on the back of this manual.• When using international carriers other than DoCoMo, contact the prospective carrier directly.• An “International Video Call” to an overseas party can be made using the “DoCoMo Video Call Software 2005” contained in the included CD-ROM.* For countries where such a connection can be made and carriers, see DoCoMo’s Web site.* Depending on the terminal of the other party connected via the international video call, the picture displayed by the FOMA terminal may be distorted or the connection may not be established.Making an International CallaEnter  →  → Country Code → Area Code → Phone Numbery• If the area code starts with “0”, exclude “0”. However, in some countries, such as Italy, or in some regions, the leading “0” may be required.Receiving a Voice CallaClick   on the Main screen (P54)The ring tone sounds and   (animation) appear in the Status Indicator Area on the Main screen.bClick   to end the call• When a name and phone number are saved in the Phonebook, the name appears on the Main screen.• An audio device such as an earphone microphone is required to make a call using this FOMA terminal. An earphone microphone with switch P001/P002 (optional) or stereo earphone set P001 (optional) can be used as an audio device.For using the set, see “Using an Earphone Microphone with Switch” (P86).■If you do not answer an incoming call appears in the Status Indicator Area on the Main screen. Click   to view Missed Calls. →P58•  disappears after opening the Received Calls screen.• If a call is not answered while the Received Calls screen is open,   does not appear.Received CallsUsing Received CallsThe phone number, time and date of incoming calls are saved in “Received Calls”.aClick  (着信履歴 (Received Call)) on the Main screen (P54)•[電話帳に追加 (Add to Phonebook)] : “Saving Entries in Phonebook” →P59•  appears for a Missed Call.Making a Voice CallReceived Calls ScreenReceiving a Voice Call
59Utility SoftwarebSelect a Received CallyClick [選択 (Select)]The selected Received Call appears in the Text Area on the Main screen.• : A voice call can be made to the displayed phone number.• Up to 20 entries can be saved in “着信履歴 (Received Calls)”. If more than 20 entries are saved, oldest entries are overwritten first.• Clicking a header (“不在 (Missed Calls)”, “電話番号 (Phone Number)”, “名前 (Name)”, or “着信時刻 (Incoming Time)”) rearranges the list temporarily. Clicking again restores the original list.• When a name and phone number are saved in Phonebook, the name appears under “名前 (Name)” on the Received Calls screen.• If you use a FOMA terminal with different UIM card inserted or use the terminal with different user account, the same Received Calls are shared.Deleting Entries from Received CallsaRight click the Received Call entry on the Received Calls screen (P58)yClick [削除 (Delete)]/[全削除 (Delete All)]The deletion confirmation screen appears.bClick [OK]• Selecting entries while holding down the “Shift” key on the keyboard allows you to specify a range.• Selecting entries while holding down the “Ctrl” key on the keyboard allows you to select more than one entry.PhonebookUsing PhonebookAddingSaving Entries in PhonebookaClick  (電話帳 (Phonebook)) on the Main screen (P54)bClick [追加 (Add)]cPerform the following stepsNameEnter using Kanji, Hiragana, Katakana, alphanumeric or symbols.yEnter a name• Enter characters using the keyboard of the PC.• Up to 16 double-byte or 32 single-byte characters can be entered.• An entry cannot be saved to the Phonebook until this field is filled in.ReadingEnter using double-byte katakana, single-byte alphanumeric, or single-byte symbols.yEnter a reading• Enter characters using the keyboard of the PC.• A reading is entered automatically when “名前 (Name)” is entered.• Up to 16 double-byte or 32 single-byte characters can be entered.Phone numberEnter using single-byte alphanumeric characters.yEnter a phone number• Enter characters using the keyboard of the PC.• Up to 26 characters from 0 to 9 (including #, *, and +) and up to five - (hyphens) can be entered.Phonebook ScreenPhonebookContinued on the next page
60Utility SoftwaredClick [登録 (Add)]• To save Phonebook to the PC after adding a contact, click [更新 (Refresh)] → [OK] on the Contacts screen.• Up to 1,000 entries can be saved in the Phonebook. By default, entries are saved in the “C:¥Program Files¥M2501 HIGH SPEED Utility¥XXX” folder.• Characters entered in excess of the maximum number of characters allowed will be ignored.• You cannot move/copy Phonebook to or from the UIM using the FOMA terminal.• If you use a FOMA terminal with another UIM card inserted or use the terminal with another user account, the same Phonebook is shared.• DoCoMo is not responsible for the loss of saved data.Making a Call from PhonebookaClick [検索 (Find)] on the Phonebook screen (P59)bPerform the following stepsSearch TargetsPull down menuySelect an option from the followingEnter a text string to findyEnter a part of the text to find• Enter characters using the keyboard of the PC.cClick [検索 (Find)]The Find Result screen opens.dSelect a Phonebooky[選択 (Select)]The selected entry appears on the Main screen.• This [選択 (Select)] is not displayed if “電話番号 (phone number)” of phonebook is empty.eClick fClick   to end the call• Clicking a header (“名前 (Name)”, “フリガナ (Reading)”, or “電話番号 (Phone Number)”) rearranges the list temporarily. Clicking again restores the original list.• An audio device such as an earphone microphone is required to make a call using this FOMA terminal. An earphone microphone with switch P001/P002 (optional) or stereo earphone set P001 (optional) can be used as an audio device.For using the set, see “Using an Earphone Microphone with Switch” (P86).EditEditing PhonebookaSelect a Phonebook on the Phonebook screen (P59)yClick [編集 (Edit)]Perform Step 3 in “Saving Entries in Phonebook” (P59) to edit items.bAfter editingyClick [登録 (Save)]• To save Phonebook to the PC after editing a content, click [更新 (Refresh)] → [OK] on the Phonebook screen.DeleteDeleting PhonebookaSelect a Contact on the Phonebook screen (P59)yClick [削除 (Delete)]The deletion confirmation screen appears.bClick [OK]• To save Contacts to the PC after deleting a content, click [更新 (Refresh)] → [OK] on the Phonebook screen.• Selecting entries while holding down the “Shift” key on the keyboard allows you to specify a range.• Selecting entries while holding down the “Ctrl” key on the keyboard allows you to select more than one Contact.名前 (Name) : Find an entry by nameフリガナ (Reading) : Find an entry by reading電話番号 (Phone Number) : Find an entry by phone numberMaking a Voice CallPhonebook
61Utility SoftwareImport / Export PhonebookImporting / Exporting PhonebookImporting (CSV)You can read (import) Contacts in the CSV (.csv) / text. (.txt) format. However, depending on the file, even a file in a compatible file format may not be imported.• A Phonebook entry has a format of “名前 (Name)”, “なまえ (Reading)”, and “番号 (Number)” in this order from the beginning of each line. Each field must be inside “ ” (double quotation marks)” and separated with “<Tab>” or “, (comma)”.Example using a Tab delimiter“携帯はな子 (Keitai Hanako)”<Tab>“ケイタイハナコ (Keitai Hanako)”<Tab>“090XXXXXXXX”* Each <Tab> becomes a gap between fields when entered.Example : Using a Comma delimiter“携帯はな子 (Keitai Hanako)”,“ケイタイハナコ (Keitai Hanako)”, “090XXXXXXXX”aRight click on the Phonebook screen (P59)yClick “電話帳インポート (Import Phonebook)”y“CSVファイル (CSV File)”The file selection screen appears.bSelect a fileyClick [開く (Open)]cSpecify a “Delimiter”•“タブ文字 (Tab)”…Check if importing a tab delimited CSV /text (.txt) formatted file.•“カンマ (Comma)”…Check if importing a comma delimited CSV /text (.txt) formatted file.•“先頭の行を無視する (Ignore the First Line)”…Check if ignoring the first line of the file to be imported.dClick [OK]• As many Phonebook entries can be imported as to have a combined total of up to 1,000 Phonebook entries with both the existing Phonebook entries and the new entries. Entries that exceed the limit will be ignored.The types and number of characters that can be imported are the same as for the corresponding fields for the Phonebook. →P59• If the data in the file to be imported does not have the Name field “名前 (Reading)”, the record cannot be imported even if it has “なまえ (Reading)”, or “番号 (Phone Number)” fields filled.Importing (vCard)You can read (import) Contacts in the vCard (.vcf)* format. However, depending on the file, even a file in a compatible file format may not be imported.*: Supports up to Version 2.1 vCard format.aRight click on the Phonebook screen (P59)yClick “電話帳インポート (Import Phonebook)”y“vCard”The file selection screen appears.bSelect a fileyClick [開く (Open)]• As many Phonebook entries can be imported as to have a combined total of up to 1,000 Phonebook entries with both the existing Phonebook entries and the new entries. Entries that exceed the limit will be ignored.The types and number of characters that can be imported are the same as for the corresponding fields for the Phonebook. →P59ExportingYou can save (export) all Phonebook entries in a file in CSV (.csv) or vCard (.vcf)* format.*: Supports up to Version 2.1 vCard format.aRight click on the Phonebook screen (P59) yClick “電話帳エクスポート (Export Phonebook)”y“CSVファイル (CSV File)”/”vCard”The screen for entering a name for the file to be saved appears.bEnter a file nameyClick [保存 (Save)]• Enter characters using the keyboard of the PC.• Each line in a file exported in the CSV format has a “名前 (Name)”, “なまえ (Reading)”, and “番号 (Number)” separated by commas.Phonebook
62Utility SoftwareNetwork SettingsNetwork Settings (Overseas Use)• Insert the FOMA terminal into the PC card slot before performing these steps.• While the Communication Settings screen is displayed, no operations can be performed from the Main screen. If a call arrives during the operation, the call can be answered after [閉じる (Close)] is clicked, however, the options being set will be canceled.Switching Networks ManuallySelecting and setting networks manually.• Usually, set “通信方式選択 (Communication system)” to “オート (Auto)”.aClick  (各種設定 (Settings)) on the Main screen (P54)y“ネットワーク設定 (Network Settings)” bPerform the following stepsSelect Communication SystemSelect a communication system to connect to the network.yPull down menuySelect an option from the followingy[選択 (Select)] (a)• Enter the PIN1 code using the keyboard of the PC.Selecting a NetworkSelect a network (carrier). No operations are available if “オート (Auto)” is set for “通信方式設定 (Communication system)”.yPull down menuySelect an option from the followingy[Select] (b)■If no appropriate networks were found with “Communication System”Click [ネットワーク再検索 (Search again for a Network)] on the Communication Setting screen.• After the search, found networks will be displayed in “Networks2*”.*: The names of available networks appear.• When using the FOMA terminal in Japan, set “通信方式選択 (Select Communication Method)” to “オート (Auto)”.• Depending on the network or signal status, this option may not be set.• The set network is displayed on the Main screen.Default通信方式 (Communication System): オート (Auto)ネットワーク選択 (Select Network): オート (Auto)Communication Setting Screenab“オート (Auto)”: You can connect to an available network automatically. “ネットワーク選択 (Select Network)” cannot be performed.“W-CDMA固定 (Static W-CDMA)” : Connection to a W-CDMA network will be established.“GSM固定 (Static GSM)”: Connection to a GSM/GPRS network will be established.“オート (automatic Selection)”: Available networks specified in “通信方式設定 (Communication system)” will be searched automatically.“ネットワーク1*/ネットワーク2* (Network 1*/Network 2*)” : Directly select a network found by clicking “オート (Auto)” or [ネットワーク再検索 (Search again for a Network)].*: The names of available networks appear.Network Settings
63Utility SoftwareSecurity SettingsSetting UIM PINYou can set the PIN1 code for the UIM.• Insert the FOMA terminal into the PC card slot before performing these steps.• While the Security Settings screen is displayed, no operations can be performed from the Main screen. If a call arrives during the operation, the call can be answered after [閉じる (Close)] is clicked, however, the options being set will be canceled.Entering a PIN1 Code/Changing the PIN1 CodeYou can require the PIN1 code entry each time the M2501 HIGH-SPEED Utility is launched. You can also change the PIN1 code.aClick  (各種設定 (Settings)) on the Main screen (P54)y“セキュリティ設定 (Security Settings)”bPerform the following stepsPIN Verification at Start-upYou can set to require the PIN1 code to use the utility software.yPull down menuy“有 (Yes)”/“無 (No)”y[設定 (Set)]yEnter the PIN (4 - 8 digits)yClick [照合 (Verify)]• Enter the PIN1 code using the keyboard of the PC.Changing the PINYou can change the PIN1 code. Set “起動時PIN1コード照合 (Verification at Start up)” to “有り (Yes)” before performing steps.y[変更 (Change)]yEnter the current PIN1 code (4 - 8 digits)yEnter the new PIN1 code (4 - 8 digits)yEnter the new PIN1 again for verificationyClick [変更 (Change)]• Enter the PIN1 code using the keyboard of the PC.• The PIN1 code is set to “0000” by default. However, if you are using a UIM that has been changed from the default, the PIN1 code remains the same as set previously.• If an incorrect PIN1 code is entered three times in a row, the PIN is locked automatically. Write down the PIN and keep it in a safe place.• If you intend to perform packet communication or 64K data communication, set “起動時PINコード照合 (PIN1 Code Verification at Start up)” to “(無) No”.• The PIN1 code is stored on the UIM.Unlocking a Locked PINIf an incorrect PIN1 code is entered three times in a row on the screen requiring the PIN1 code entry, the PIN1 code is locked. If this happens, you need to unlock the PIN1 code and set a new PIN1 code.aEnter the PUK code (8 digits)• Enter the PUK code using the keyboard of the PC.• For the PUK code, refer to your original FOMA subscription form (customer’s copy).bEnter the new PIN1 code (4 - 8 digits)• Enter the PIN using the keyboard of the PC.cEnter the new PIN1 code againyClick [解除 (Unlock)]• If an incorrect PUK code is entered ten times in a row, the PUK code is locked automatically. Write down the code and keep it in a safe place.• If you do not have the PUK code or the code is completely locked, you need to bring the FOMA HIGH-SPEED terminal, the UIM, and an ID (driver’s license, etc.) to a DoCoMo shop.Default 起動時PINコード照合 (PIN Code Verification at Start-up): 無 (No)Security Setting ScreenSecurity Settings
64Utility SoftwareCard SettingsSound/Other Settings• Insert the FOMA terminal into the PC card slot before performing these steps.• While the Sound/Other Setting screen is displayed, no operations can be performed on the Main screen. If a call arrives during the operation, the call can be answered by clicking [キャンセル (Cancel)], however, the options being set will be canceled.Sound SettingsSetting a Ring Tone and Earphone VolumeaClick  (各種設定 (Settings)) on the Main screen (P54)y“カード設定 (Card Settings)”y“音の設定 (Sound Settings)” tabbPerform the following stepsUsing the PC Speaker for Incoming Calls (Ring tone)yClick the check box•[再生 (Play)] / [停止 (Stop)] : You can try the ring tone.Earpiece volumeYou can adjust the earpiece volume during a call in eight levels from “小 (Low)” to “大 (High)”.yDrag the slide right or left.Earphone ring tone volumeYou can adjust the earphone ring tone volume for an incoming call in eight levels from “小 (Low)” to “大 (High)”.yDrag the slide right or left.cClick [OK]/[適用 (Apply)]• Adjust ring volume from the PC using the volume control of the PC.Other SettingsSetting Other OptionsYou can set whether to send Caller ID, turn on/off the status lamp or whether to display the Main screen at start-up.aClick  (各種設定 (Settings)) on the Main screen (P54)y“カード設定 (Card Settings)”y“その他の設定 (Other Settings)” tabDefault着信音 (Ring tone): イヤホン受信音量 (Earpiece volume): 4イヤホン着信音量 (Earphone ring tone volume): 4: The ring tone does not sound from the PC speakers.: The ring tone sounds from the PC speakers.Sound Setting ScreenDefaultユーティリティ起動時にメイン画面を表示する (Display the Main screen when launching the utility software): メイン画面を常に手前に表示する (Display the Main screen always on top): 着信時にメイン画面を手前に表示する (The Main screen opens on top at start-up): 番号通知 (Caller ID): 通知 (Notify)(LED) 点灯消灯切替 (Turn on/off the LED): ONコンピュータの電源OFF スタンバイ移行時に音声電話を切断する (Disconnect a voice call when shutting down the PC/moving to standby mode): Other Settings ScreenCard Settings
65Utility SoftwarebPerform the following stepsDisplay the Main screen when launching the utility software (Main screen operation settings)yClick the check boxDisplay the Main screen always on top (Main screen operation settings)yClick the check boxDisplay the Main screen always on top when a call arrives (Main screen operation settings)yClick the check boxSend Caller ID (Card settings)yPull down menuySelect an option from the followingsTurn on/off the LED (Card settings)yPull down menuyClick “ON” / “OFF”• Setting to “OFF” disables the LED status indicator of the FOMA terminal (P17).Disconnect a voice call when shutting down the PC/moving to standby modeyClick the check boxcClick [OK]/[適用 (Apply)]Network Service SettingsNetwork Service SettingsYou can configure necessary settings to use DoCoMo’s network services. For descriptions and instructions for using each service, refer to “Network Services” (P71).• Insert the FOMA terminal into the PC card slot before performing these steps.• While the Network Service Settings screen is displayed, no operations can be performed from the Main screen. If a call arrives during the operation, the call can be answered after [閉じる (Close)] is clicked, however, the options being set will be canceled.Caller ID NotificationSetting the Caller ID Notification Service• When   is displayed, operation is not possible.aClick  (各種設定 (Settings)) on the Main screen (P54)y“ネットワークサービス設定 (Network Service Settings)”y“発信者番号通知 (Caller ID Notification)” tab•[設定確認 (Check Settings)] : The setting of “発信者番号通知サービス設定 (Caller ID Notification Service Setting)” can be checked.bPerform the following stepsCaller ID Notification Service SettingsyPull down menuySelect an option from the followingyClick [設定送信 (Send Settings)]yEnter the network security codeyClick [OK]• Enter the network security code from the keyboard of the PC.: The Main screen is displayed as an icon in the Task tray.: The Main screen opens.: Newly opened screens are displayed on the Main screen.: The Main screen opens at start-up.: The Main screen does not open on top when a call arrives.: The Main screen opens on top when a call arrives.通知 (Display): Caller ID is sent to the other party.非通知 (Hide): Caller ID is not sent to the other party.未設定 (Not set): According to the setting in “Setting Caller ID Notification Service” (P65).: Cancels shutting down/moving to the standby mode without disconnecting a voice call.: Disconnects the voice call and shuts down/moves to the standby mode.通知する (Display)  : Caller ID is sent to the other party.通知しない (Hide) : Caller ID is not sent to the other party.Caller ID Notification Service Setting ScreenNetwork Service Settings
66Utility SoftwareVoice MailSetting the Voice Mail Service• When   is displayed, operation is not possible.• A separate subscription is required.aClick  (各種設定 (Settings)) on the Main screen (P54)y“ネットワークサービス設定 (Network Service Settings)”y“留守番電話 (Voice Mail)” tab•[設定確認 (Check Settings)] : The settings of  “留守番電話サービス (Voice Mail Service)” and “留守番電話呼び出し時間 (Voice Mail Paging Time (in seconds) [0 - 120])” can be checked.bPerform the following stepsVoice Mail ServiceyPull down menuySelect an option from the followingsyClick [設定送信 (Send Settings)]yClick [OK]Voice Mail Ring Time (in seconds) [0 - 120] (Voice Mail Service)You can set the access time to connect to the Voice Mail Service Center.This can be skipped.yPut a check in the box  yEnter the ring time (in seconds)yClick [設定送信 (Send Settings)]y[OK]• You can also enter the ring time in seconds using the keyboard of the PC.• If “留守番電話呼び出し時間(秒) (Voice Mail Ring Time (in seconds) [0 - 120])” is set to 0 (zero), a call is not saved in Received Calls. (Checking the specifications)Call ForwardingSetting the Call Forwarding Service• When   is displayed, operation is not possible.• A separate subscription is required.• Save the forwarding phone number in Phonebook before setting the service.aClick  (各種設定 (Settings)) on the Main screen (P54)y“ネットワークサービス設定 (Network Service Settings)”y“転送でんわ (Call Forwarding)” tab•[設定確認 (Check Settings)] : The setting of  “転送でんわサービス設定 (Caller Forwarding Service Setting)” can be checked.bPerform the following stepsCall Forwarding ServiceyPull down menuySelect an option from the followingsyClick [設定送信 (Send Settings)] (a)yClick [OK]Call Forwarding Ring Time (in seconds) [0 - 120] (Voice Mail Service)You can set the ring time before a call is forwarded. This can be skipped.yPut a check in the box  yEnter the ring time (in seconds)yClick [設定送信 (Send Settings)] (a)y[OK]Changing Forwarding DestinationSpecify a forwarding phone number from Phonebook.y[転送先選択 (Select Forwarding Destination)]ySelect a forwarding destinationyClick [選択 (Select)]yClick [設定送信 (Send Settings)] (b)y[OK]開始 (Activate) : Voice Mail Service starts.停止 (Deactivate) : Voice Mail Service stops.Voice Mail Service Setting Screen開始 (Activate) : Call Forwarding Service starts.停止 (Deactivate) : Call Forwarding Service stops.Call Forwarding Service Setting ScreenacbNetwork Service Settings
67Utility SoftwareConnecting to Voice Mail when the Forwarding Party is Busy (Forwarding Party Busy Setting)You can set whether to use Voice Mail when the Call Forwarding Destination is busy.yCheck boxyClick [設定送信 (Send Settings)] (c)y[OK]• You can also enter the ring time in seconds using the keyboard of the PC.• You cannot specify a toll-free number or a 3-digit phone number such as 110 as a forwarding destination.• If a PBX, pager* or FAX is set as a forwarding destination, a caller may get confused.*: From January, 2001, the DoCoMo pager service changed its name to QUICKCAST.• If a forwarding destination has already been set, you can skip the steps in “呼び出し時間(秒) [0 - 120] (Ring Time (in seconds) [0 - 120])” and “転送先変更 (Change Forwarding Destination)”.• If “呼び出し時間(秒) [0 - 120] (Ring Time (in seconds) [0 - 120])” is set to 0 (zero), a call is not saved in Received Calls. (Checking the specifications)• To use the option for “転送先通話中設定 (When the Call Forwarding Destination is Busy)”, you need to subscribe the “Voice Mail Service” and activate the service.Caller ID Display Request ServiceSetting the Caller ID Display Request Service• When   is displayed, operation is not possible.aClick  (各種設定 (Settings)) on the Main screen (P54)y“ネットワークサービス設定 (Network Service Settings)”y“番号通知お願い (Caller ID Display Request)” tab•[設定確認 (Check Settings)] : The setting of “番号通知お願いサービス (Caller ID Display Request Service)” can be checked.bPerform the following stepsCaller ID Display Request ServiceyPull down menuySelect an option from the followingyClick [設定送信 (Send Settings)]yClick [OK]Call WaitingSetting the Call Waiting Service• When   is displayed, operation is not possible.• A separate subscription is required.aClick  (各種設定 (Settings)) on the Main screen (P54)y“ネットワークサービス設定 (Network Service Settings)”y“話中着信 (Call Waiting)” tab•[設定確認 (Check Settings)] : The setting of “Call Waiting Service Setting” can be checked.bPerform the following stepsCall Waiting Service SettingsyPull down menu, select an option from the followingyClick [設定送信 (Send Settings)]yClick [OK]: A call is disconnected without using Voice Mail.: Voice Mail is used.Caller ID Display Request Service Settings Screen開始 (Activate) : Caller ID Display Request Service starts.停止 (Deactivate) : Caller ID Display Request Service stops.開始 (Activate) : Call Waiting Service starts.停止 (Deactivate) : Call Waiting Service stops.Call Waiting Service Settings ScreenNetwork Service Settings
68Utility SoftwareSwitching between Foma/movaSetting the Dual Network ServiceYou can switch to the Dual Network Service when the FOMA terminal or a mova terminal is not available. This section describes steps to switch from a mova terminal to the FOMA terminal.• When   is displayed, operation is not possible.• A separate subscription is required.aClick  (各種設定 (Settings)) on the Main screen (P54)y“ネットワークサービス設定 (Network Service Settings)”y“Foma/movaを切替 (Switch Foma/mova)” tab•[設定確認 (Check Settings)] : The status of the dual network can be checked.bClick [設定送信 (Send Settings)]yEnter Network security codeyClick [OK]y[OK]• Enter the network security code from the keyboard of the PC.• Switching during communication disconnects the communication.• To switch to use mova, perform the operation using a mova terminal. You cannot perform steps to switch to mova using the FOMA terminal. For details such as operations using mova, refer to “ネットワークサービス操作ガイド (Network Service Operation Guide)”.Voice Prompt for Incoming/Outgoing CallsSetting the Voice Prompt for Incoming/Outgoing CallsThe language of the voice prompt that explains how to set the network service or announces incoming/outgoing calls can be switched between Japanese and English. Settings for incoming and outgoing calls are specified separately.• When   is displayed, operation is not possible.aClick  (各種設定 (Settings)) on the Main screen (P54)y“ネットワークサービス設定 (Network Service Settings)”y“発着信時ガイダンス (Voice Prompt for Incoming/Outgoing Calls)” tab•[設定確認 (Check Settings)] : The settings of “発信時ガイダンス選択 (Select Voice Prompt for Outgoing)” and “着信時ガイダンス選択 (Select Voice Prompt for Incoming)” can be checked.bPerform the following stepsVoice Prompt for Outgoing (Select Voice Prompt for Outgoing)You can set the language for the voice prompt you hear.yPull down menuySelect an option from the followingyClick [設定送信 (Send Settings)] (a)yClick [OK]Dual Network Service Settings Screen日本語 (Japanese) : The voice prompt is played in Japanese.英語 (English) : The voice prompt is played in English.Voice Prompt for Incoming/Outgoing Calls ScreenabNetwork Service Settings
69Utility SoftwarePrompt for Incoming (Select Voice Prompt for Incoming)You can set the language for the voice prompt for the caller.yPull down menuySelect an option from the followingsyClick [設定送信 (Send Settings)] (b)yClick [OK]Call Barring-RoamingSetting Restrictions on Incoming Calls while RoamingYou can set to restrict incoming calls while roaming (overseas use).• When   is displayed, operation is not possible.aClick  (各種設定 (Settings)) on the Main screen (P54)y“ネットワークサービス設定 (Network Service Settings)”y“ローミング時着信規制 (Restricting Incoming while Roaming)” tab•[設定確認 (Check Settings)] : The setting of “ローミング時着信規制 (Restricting Incoming while Roaming)” can be checked.bPerform the following stepsRestricting Incoming Calls while RoamingyPull down menuySelect an option from the followingyClick [設定送信 (Send Settings)]yEnter the network security codeyClick [OK]y[OK]Nuisance Call Barring ServiceSetting the Nuisance Call Barring Service• When   is displayed, operation is not possible.• A separate subscription is required.aClick  (各種設定 (Settings)) on the Main screen (P54)y“ネットワークサービス設定 (Network Service Settings)”ythe “迷惑電話ストップサービス (Nuisance Call Barring Service)” tab•[設定確認 (Check Settings)] : The setting of  “迷惑電話着信拒否登録 (Nuisance Call Block Registration)” can be checked.bPerform the following stepsNuisance Call Block RegistrationYou can save a phone number to block from incoming calls.yPull down menuySelect an option from the followingsy[番号選択 (Select a Number)]*ySelect a phone number*y[選択 (Select)]*yVerify the selected phone number yClick [設定送信 (Send Settings)] (a) y[OK]*: These steps are not necessary if “最終着信呼指定 (Specify the Last Incoming)” is selected.日本語 (Japanese) : The voice prompt is played in Japanese.日本語+英語 (Japanese+English): The voice prompt is played in Japanese followed by English.英語+日本語 (English+Japanese): The voice prompt is played in English followed by Japanese.全着信規制を開始 (Start Restricting All Incoming): All incoming calls are restricted.データ呼着信規制を開始 (Start Restricting Data Incoming): Only incoming video calls are restricted.Call Barring-Roaming Settings Screen着信規制を停止 (Stop Restricting Incoming): Restriction on incoming while roaming stops.最終着信呼指定 (Specify the Last Incoming): The phone number of the last incoming call is specified.電話帳リスト (Phonebook List): Specify a phone number to restrict from the Contact List.リダイヤルリスト (Redial List): Specify a phone number to restrict from the Redial List.着信履歴リスト (Received Calls List): Specify a phone number to restrict from the Received Calls List.Nuisance Call Barring Service Settings ScreenabNetwork Service SettingsContinued on the next page
70Utility SoftwareCancel RegistrationThe registered phone numbers are unregistered.yPull down menuySelect an option from the followingsyClick [設定送信 (Send Settings)] (b)yClick [OK]• Phone numbers with no Caller ID can also be registered to reject.• International phone numbers may not be registered.• If 30 numbers are already registered, delete the oldest and register a new one following the message.• You cannot check or inquire about numbers registered in Nuisance call block. It is recommended that you write them down.Remote ControlSetting Remote ControlYou can set to operate the Voice Mail or Call Forwarding Service from a public phone other than the FOMA terminal.• When   is displayed, operation is not possible.aClick  (各種設定 (Settings)) on the Main screen (P54)y“ネットワークサービス設定 (Network Service Settings)”y“遠隔アクセス(Remote Control)” tab•[設定確認 (Check Settings)] : The setting of “遠隔アクセス制御 (Remote Control)” can be checked.bPerform the following stepsRemote ControlyPull down menuySelect an option from the followingsyClick [設定送信 (Send Setting)]yClick[OK]Roaming GuidanceSetting Roaming GuidanceA message informing a caller that you are overseas can be set to play to a anyone attempting to call you while you are overseas.• When   is displayed, operation is not possible.aClick  (各種設定 (Settings)) on the Main screen (P54)y“ネットワークサービス設定 (Network Service Settings)”y“ローミングガイダンス (Roaming Guidance)” tab•[設定確認 (Check Settings)] : The setting of “ローミングガイダンス設定 (Roaming Guidance Settings)” can be checked.bPerform the following stepsRoaming Guidance SettingsyPull down menuySelect an option from the followingyClick [設定送信 (Send Settings)]全件解除 (Cancel All) : All registered phone numbers are deleted.1件削除 (Delete One) : The last saved phone number is deleted.Remote Control Setting Screen開始 (Activate) : Remote Control Service starts.停止 (Deactivate) : Remote Control Service stops.有り (Yes)無し (No): Roaming Guidance is played.: Roaming Guidance is not played.Roaming Guidance Settings ScreenNetwork Service Settings
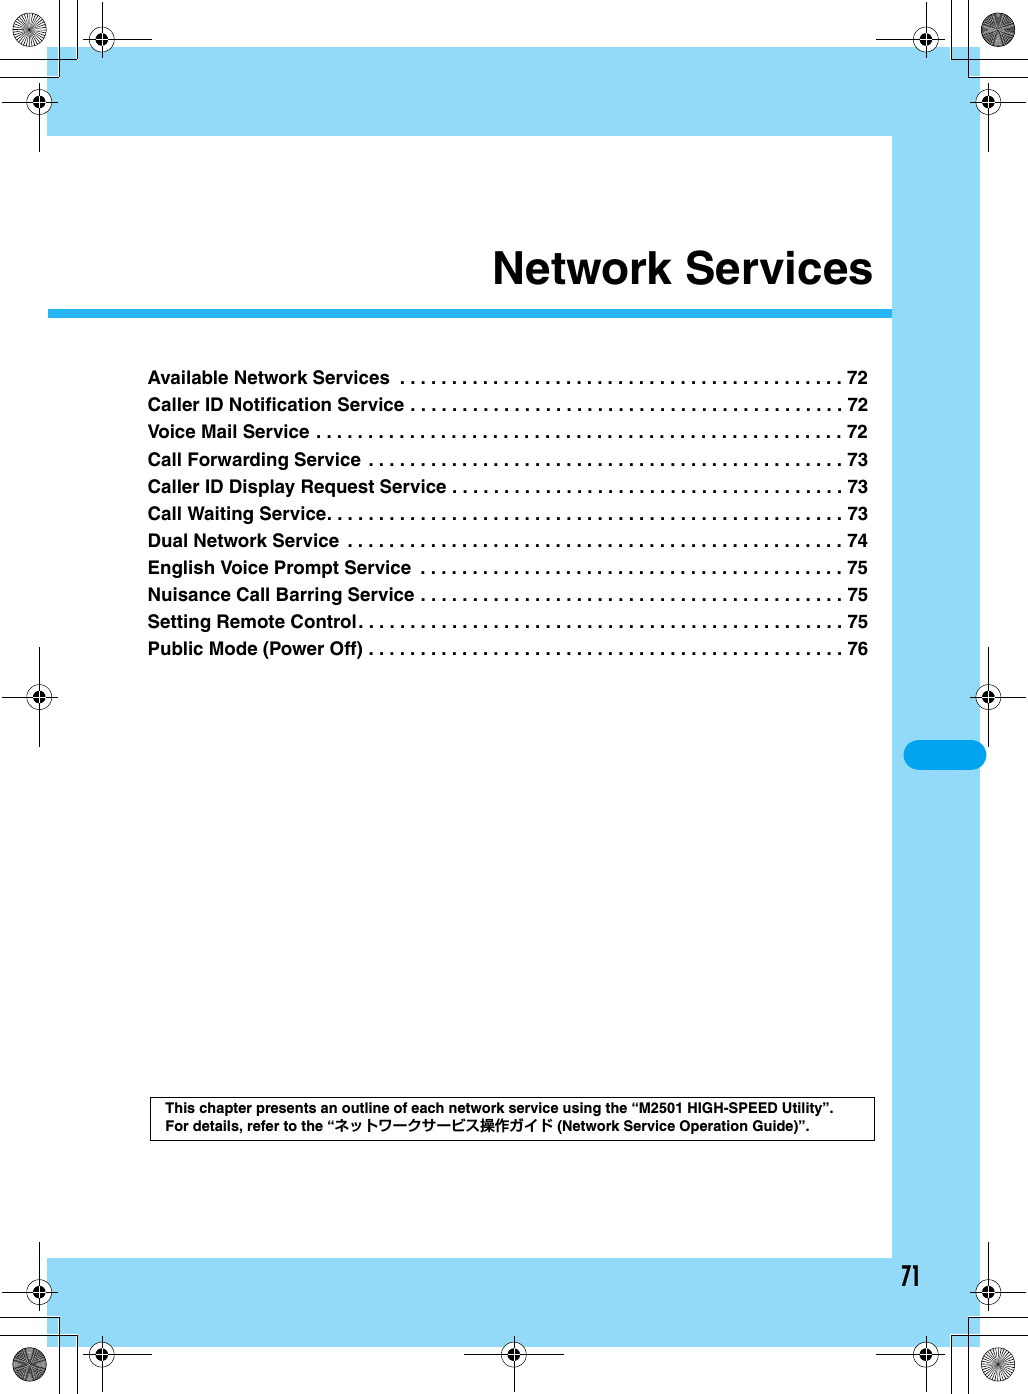
71Network ServicesAvailable Network Services  . . . . . . . . . . . . . . . . . . . . . . . . . . . . . . . . . . . . . . . . . . . 72Caller ID Notification Service . . . . . . . . . . . . . . . . . . . . . . . . . . . . . . . . . . . . . . . . . . 72Voice Mail Service . . . . . . . . . . . . . . . . . . . . . . . . . . . . . . . . . . . . . . . . . . . . . . . . . . . 72Call Forwarding Service . . . . . . . . . . . . . . . . . . . . . . . . . . . . . . . . . . . . . . . . . . . . . . 73Caller ID Display Request Service . . . . . . . . . . . . . . . . . . . . . . . . . . . . . . . . . . . . . . 73Call Waiting Service. . . . . . . . . . . . . . . . . . . . . . . . . . . . . . . . . . . . . . . . . . . . . . . . . . 73Dual Network Service  . . . . . . . . . . . . . . . . . . . . . . . . . . . . . . . . . . . . . . . . . . . . . . . . 74English Voice Prompt Service  . . . . . . . . . . . . . . . . . . . . . . . . . . . . . . . . . . . . . . . . . 75Nuisance Call Barring Service . . . . . . . . . . . . . . . . . . . . . . . . . . . . . . . . . . . . . . . . . 75Setting Remote Control. . . . . . . . . . . . . . . . . . . . . . . . . . . . . . . . . . . . . . . . . . . . . . . 75Public Mode (Power Off) . . . . . . . . . . . . . . . . . . . . . . . . . . . . . . . . . . . . . . . . . . . . . . 76This chapter presents an outline of each network service using the “M2501 HIGH-SPEED Utility”.For details, refer to the “ネットワークサービス操作ガイド (Network Service Operation Guide)”.
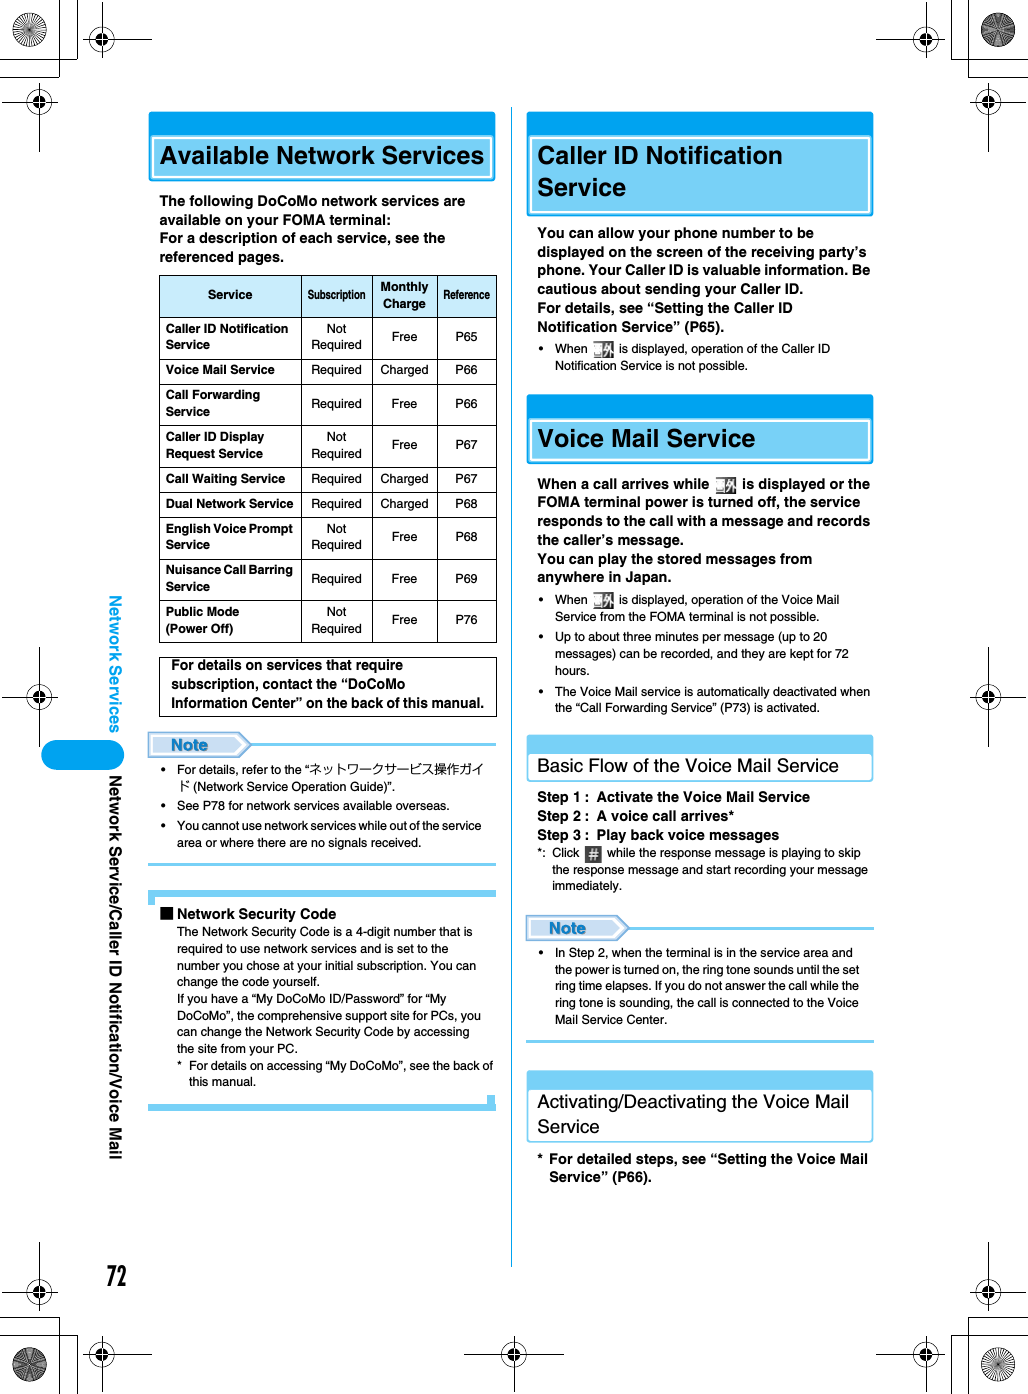
72Network Services Network Service/Caller ID Notification/Voice Mail Available Network ServicesThe following DoCoMo network services are available on your FOMA terminal:For a description of each service, see the referenced pages.• For details, refer to the “ネットワークサービス操作ガイド (Network Service Operation Guide)”.• See P78 for network services available overseas.• You cannot use network services while out of the service area or where there are no signals received.■Network Security CodeThe Network Security Code is a 4-digit number that is required to use network services and is set to the number you chose at your initial subscription. You can change the code yourself.If you have a “My DoCoMo ID/Password” for “My DoCoMo”, the comprehensive support site for PCs, you can change the Network Security Code by accessing the site from your PC.* For details on accessing “My DoCoMo”, see the back of this manual.Caller ID Notification ServiceYou can allow your phone number to be displayed on the screen of the receiving party’s phone. Your Caller ID is valuable information. Be cautious about sending your Caller ID.For details, see “Setting the Caller ID Notification Service” (P65).• When   is displayed, operation of the Caller ID Notification Service is not possible.Voice Mail ServiceWhen a call arrives while   is displayed or the FOMA terminal power is turned off, the service responds to the call with a message and records the caller’s message.You can play the stored messages from anywhere in Japan.• When   is displayed, operation of the Voice Mail Service from the FOMA terminal is not possible.• Up to about three minutes per message (up to 20 messages) can be recorded, and they are kept for 72 hours.• The Voice Mail service is automatically deactivated when the “Call Forwarding Service” (P73) is activated.Basic Flow of the Voice Mail ServiceStep 1 :  Activate the Voice Mail ServiceStep 2 :  A voice call arrives*Step 3 :  Play back voice messages*: Click   while the response message is playing to skip the response message and start recording your message immediately.• In Step 2, when the terminal is in the service area and the power is turned on, the ring tone sounds until the set ring time elapses. If you do not answer the call while the ring tone is sounding, the call is connected to the Voice Mail Service Center.Activating/Deactivating the Voice Mail Service* For detailed steps, see “Setting the Voice Mail Service” (P66).ServiceSubscriptionMonthly ChargeReferenceCaller ID Notification ServiceNot Required Free P65Voice Mail Service Required Charged P66Call Forwarding Service Required Free P66Caller ID Display Request ServiceNot Required Free P67Call Waiting Service Required Charged P67Dual Network Service Required Charged P68English Voice Prompt ServiceNot Required Free P68Nuisance Call Barring Service Required Free P69Public Mode (Power Off)Not Required Free P76For details on services that require subscription, contact the “DoCoMo Information Center” on the back of this manual.
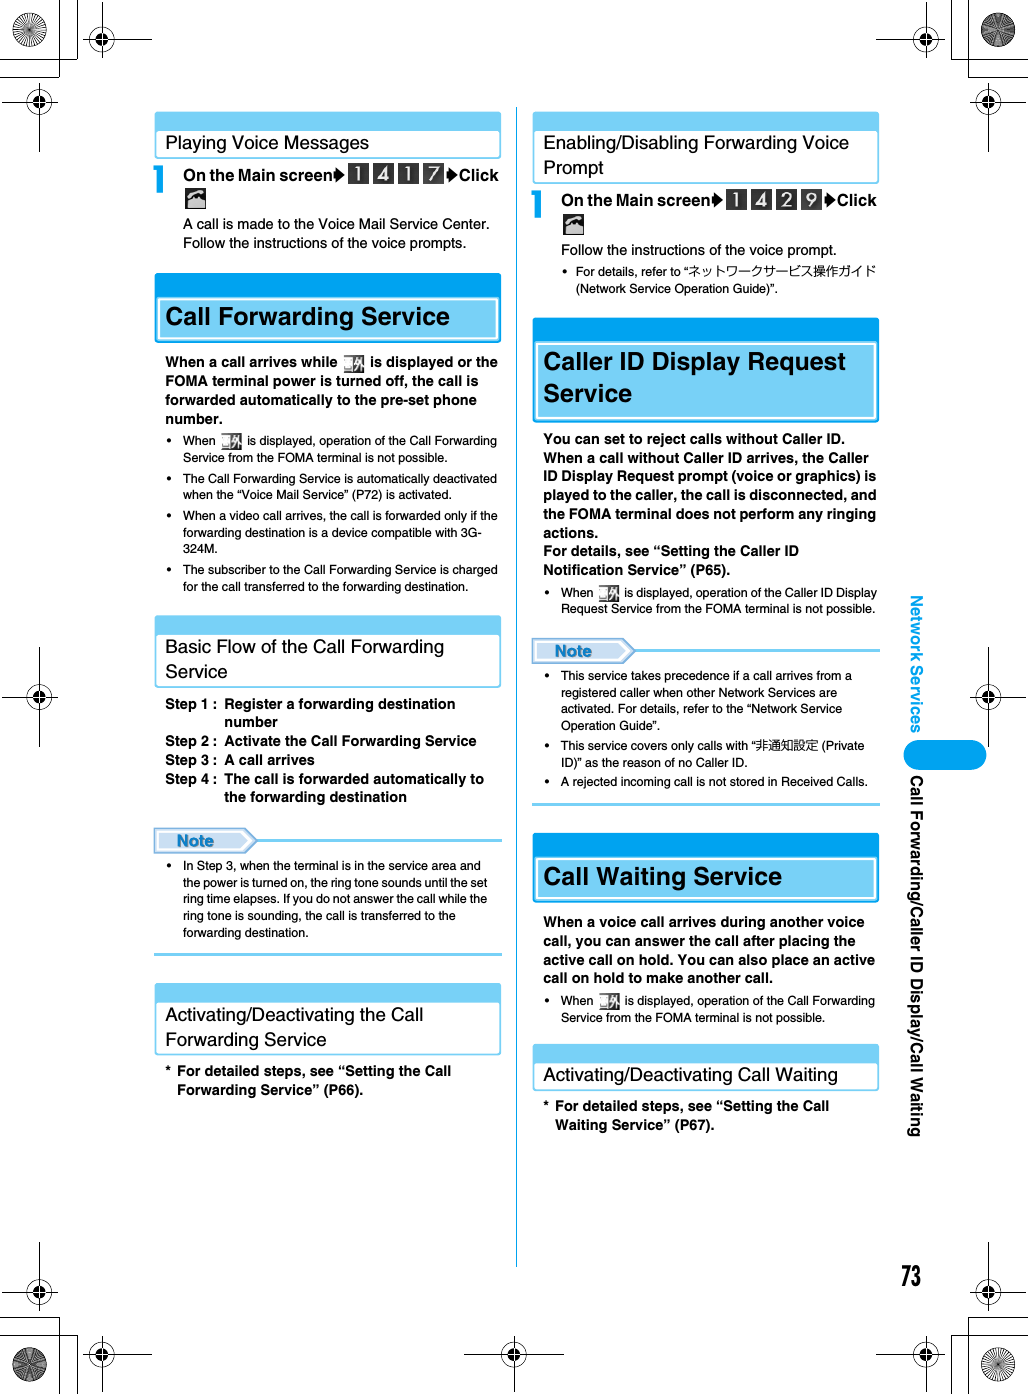
73Network Services Call Forwarding/Caller ID Display/Call WaitingPlaying Voice MessagesaOn the Main screenyyClick A call is made to the Voice Mail Service Center. Follow the instructions of the voice prompts.Call Forwarding ServiceWhen a call arrives while   is displayed or the FOMA terminal power is turned off, the call is forwarded automatically to the pre-set phone number.• When   is displayed, operation of the Call Forwarding Service from the FOMA terminal is not possible.• The Call Forwarding Service is automatically deactivated when the “Voice Mail Service” (P72) is activated.• When a video call arrives, the call is forwarded only if the forwarding destination is a device compatible with 3G-324M.• The subscriber to the Call Forwarding Service is charged for the call transferred to the forwarding destination.Basic Flow of the Call Forwarding ServiceStep 1 : Register a forwarding destination numberStep 2 : Activate the Call Forwarding ServiceStep 3 : A call arrivesStep 4 : The call is forwarded automatically to the forwarding destination• In Step 3, when the terminal is in the service area and the power is turned on, the ring tone sounds until the set ring time elapses. If you do not answer the call while the ring tone is sounding, the call is transferred to the forwarding destination.Activating/Deactivating the Call Forwarding Service* For detailed steps, see “Setting the Call Forwarding Service” (P66).Enabling/Disabling Forwarding Voice PromptaOn the Main screenyyClick Follow the instructions of the voice prompt.• For details, refer to “ネットワークサービス操作ガイド (Network Service Operation Guide)”.Caller ID Display Request ServiceYou can set to reject calls without Caller ID. When a call without Caller ID arrives, the Caller ID Display Request prompt (voice or graphics) is played to the caller, the call is disconnected, and the FOMA terminal does not perform any ringing actions.For details, see “Setting the Caller ID Notification Service” (P65).• When   is displayed, operation of the Caller ID Display Request Service from the FOMA terminal is not possible.• This service takes precedence if a call arrives from a registered caller when other Network Services are activated. For details, refer to the “Network Service Operation Guide”.• This service covers only calls with “非通知設定 (Private ID)” as the reason of no Caller ID.• A rejected incoming call is not stored in Received Calls.Call Waiting ServiceWhen a voice call arrives during another voice call, you can answer the call after placing the active call on hold. You can also place an active call on hold to make another call.• When   is displayed, operation of the Call Forwarding Service from the FOMA terminal is not possible.Activating/Deactivating Call Waiting* For detailed steps, see “Setting the Call Waiting Service” (P67).
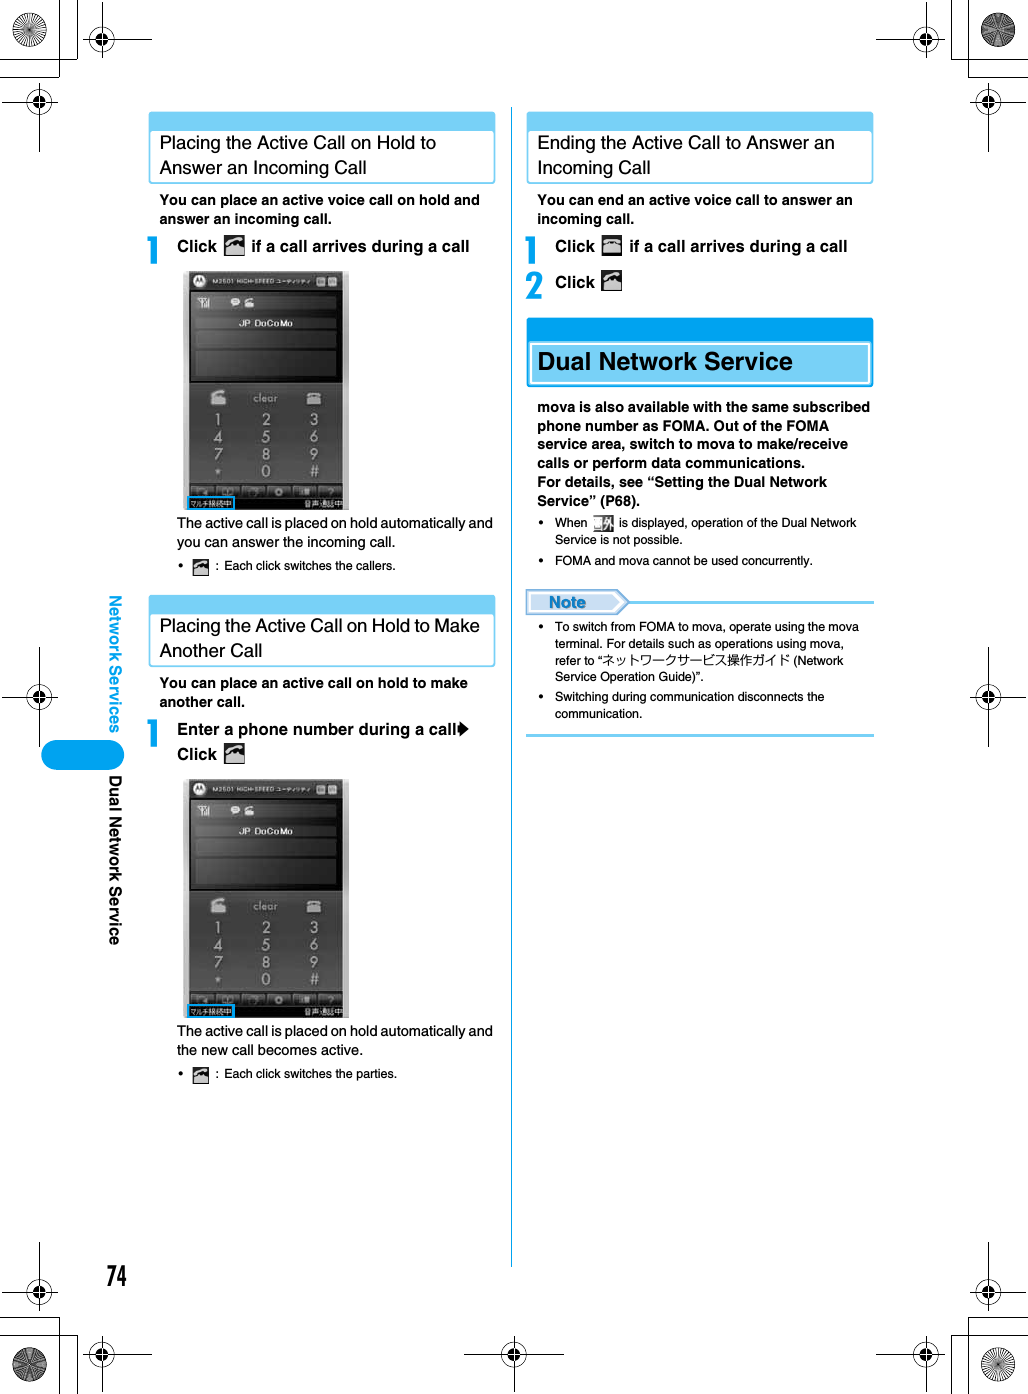
74Network Services Dual Network ServicePlacing the Active Call on Hold to Answer an Incoming CallYou can place an active voice call on hold and answer an incoming call.aClick   if a call arrives during a callThe active call is placed on hold automatically and you can answer the incoming call.• : Each click switches the callers.Placing the Active Call on Hold to Make Another CallYou can place an active call on hold to make another call.aEnter a phone number during a cally Click The active call is placed on hold automatically and the new call becomes active.• : Each click switches the parties.Ending the Active Call to Answer an Incoming CallYou can end an active voice call to answer an incoming call.aClick   if a call arrives during a callbClick Dual Network Servicemova is also available with the same subscribed phone number as FOMA. Out of the FOMA service area, switch to mova to make/receive calls or perform data communications.For details, see “Setting the Dual Network Service” (P68).• When   is displayed, operation of the Dual Network Service is not possible.• FOMA and mova cannot be used concurrently.• To switch from FOMA to mova, operate using the mova terminal. For details such as operations using mova, refer to “ネットワークサービス操作ガイド (Network Service Operation Guide)”.• Switching during communication disconnects the communication.
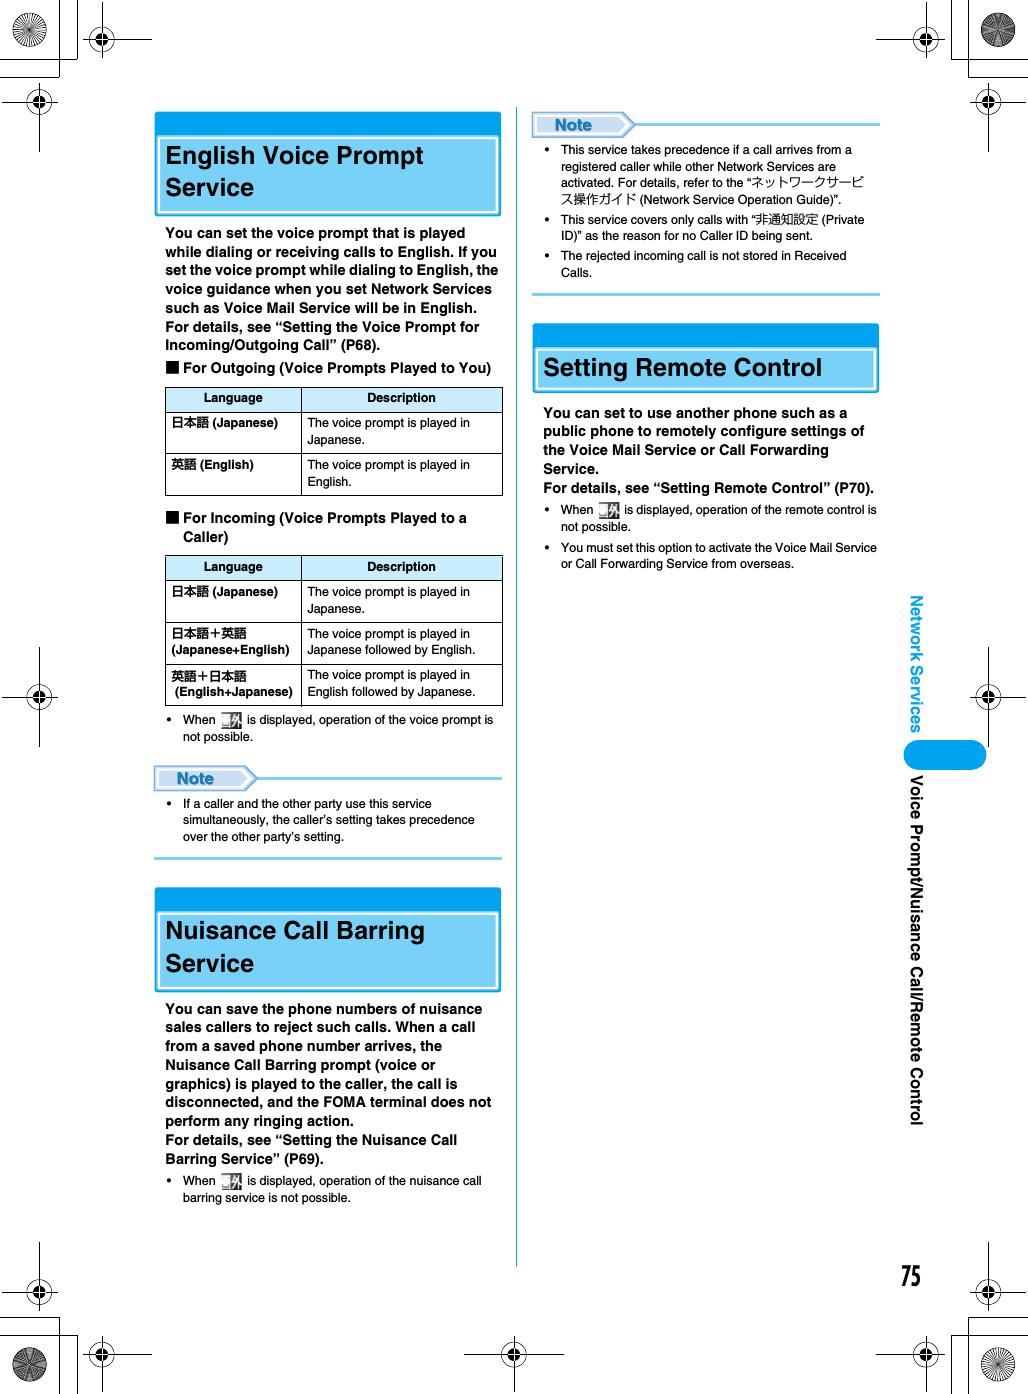
75Network Services Voice Prompt/Nuisance Call/Remote ControlEnglish Voice Prompt ServiceYou can set the voice prompt that is played while dialing or receiving calls to English. If you set the voice prompt while dialing to English, the voice guidance when you set Network Services such as Voice Mail Service will be in English.For details, see “Setting the Voice Prompt for Incoming/Outgoing Call” (P68).■For Outgoing (Voice Prompts Played to You)■For Incoming (Voice Prompts Played to a Caller)• When   is displayed, operation of the voice prompt is not possible.• If a caller and the other party use this service simultaneously, the caller’s setting takes precedence over the other party’s setting.Nuisance Call Barring ServiceYou can save the phone numbers of nuisance sales callers to reject such calls. When a call from a saved phone number arrives, the Nuisance Call Barring prompt (voice or graphics) is played to the caller, the call is disconnected, and the FOMA terminal does not perform any ringing action.For details, see “Setting the Nuisance Call Barring Service” (P69).• When   is displayed, operation of the nuisance call barring service is not possible.• This service takes precedence if a call arrives from a registered caller while other Network Services are activated. For details, refer to the “ネットワークサービス操作ガイド (Network Service Operation Guide)”.• This service covers only calls with “非通知設定 (Private ID)” as the reason for no Caller ID being sent.• The rejected incoming call is not stored in Received Calls.Setting Remote ControlYou can set to use another phone such as a public phone to remotely configure settings of the Voice Mail Service or Call Forwarding Service.For details, see “Setting Remote Control” (P70).• When   is displayed, operation of the remote control is not possible.• You must set this option to activate the Voice Mail Service or Call Forwarding Service from overseas.Language Description日本語 (Japanese) The voice prompt is played in Japanese.英語 (English) The voice prompt is played in English.Language Description日本語 (Japanese) The voice prompt is played in Japanese.日本語+英語 (Japanese+English)The voice prompt is played in Japanese followed by English.英語+日本語 (English+Japanese)The voice prompt is played in English followed by Japanese.
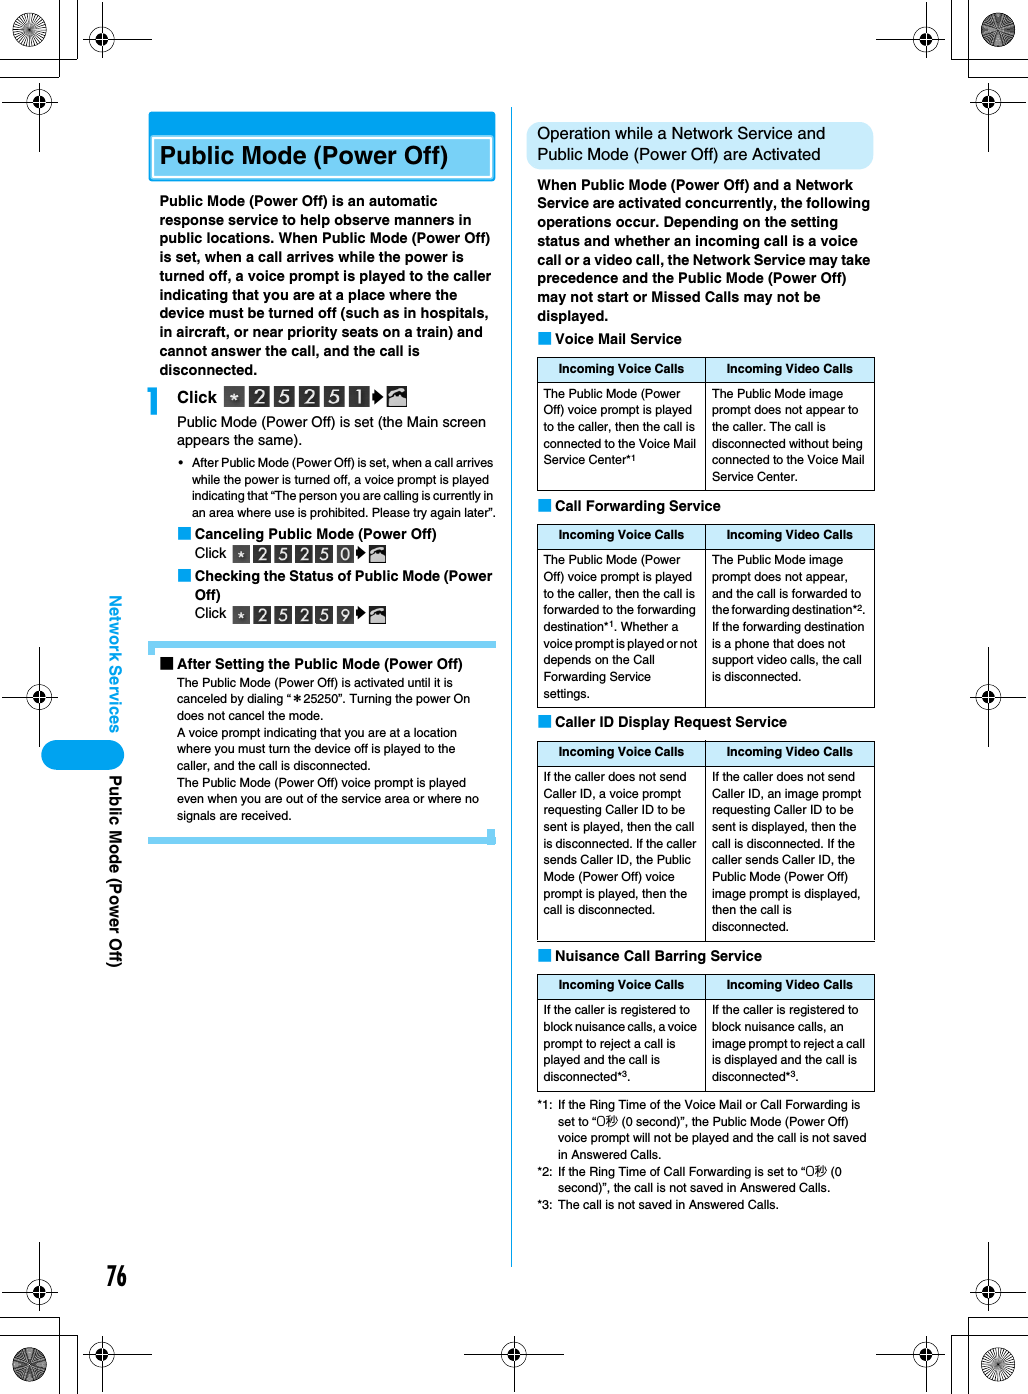
76Network Services Public Mode (Power Off)Public Mode (Power Off)Public Mode (Power Off) is an automatic response service to help observe manners in public locations. When Public Mode (Power Off) is set, when a call arrives while the power is turned off, a voice prompt is played to the caller indicating that you are at a place where the device must be turned off (such as in hospitals, in aircraft, or near priority seats on a train) and cannot answer the call, and the call is disconnected.aClick  yPublic Mode (Power Off) is set (the Main screen appears the same).• After Public Mode (Power Off) is set, when a call arrives while the power is turned off, a voice prompt is played indicating that “The person you are calling is currently in an area where use is prohibited. Please try again later”.■Canceling Public Mode (Power Off)Click  y■Checking the Status of Public Mode (Power Off)Click  y■After Setting the Public Mode (Power Off)The Public Mode (Power Off) is activated until it is canceled by dialing “*25250”. Turning the power On does not cancel the mode.A voice prompt indicating that you are at a location where you must turn the device off is played to the caller, and the call is disconnected.The Public Mode (Power Off) voice prompt is played even when you are out of the service area or where no signals are received.Operation while a Network Service and Public Mode (Power Off) are ActivatedWhen Public Mode (Power Off) and a Network Service are activated concurrently, the following operations occur. Depending on the setting status and whether an incoming call is a voice call or a video call, the Network Service may take precedence and the Public Mode (Power Off) may not start or Missed Calls may not be displayed.■Voice Mail Service■Call Forwarding Service■Caller ID Display Request Service■Nuisance Call Barring Service*1: If the Ring Time of the Voice Mail or Call Forwarding is set to “0秒 (0 second)”, the Public Mode (Power Off) voice prompt will not be played and the call is not saved in Answered Calls.*2: If the Ring Time of Call Forwarding is set to “0秒 (0 second)”, the call is not saved in Answered Calls.*3: The call is not saved in Answered Calls.Incoming Voice Calls Incoming Video CallsThe Public Mode (Power Off) voice prompt is played to the caller, then the call is connected to the Voice Mail Service Center*1The Public Mode image prompt does not appear to the caller. The call is disconnected without being connected to the Voice Mail Service Center.Incoming Voice Calls Incoming Video CallsThe Public Mode (Power Off) voice prompt is played to the caller, then the call is forwarded to the forwarding destination*1. Whether a voice prompt is played or not depends on the Call Forwarding Service settings.The Public Mode image prompt does not appear, and the call is forwarded to the forwarding destination*2. If the forwarding destination is a phone that does not support video calls, the call is disconnected.Incoming Voice Calls Incoming Video CallsIf the caller does not send Caller ID, a voice prompt requesting Caller ID to be sent is played, then the call is disconnected. If the caller sends Caller ID, the Public Mode (Power Off) voice prompt is played, then the call is disconnected.If the caller does not send Caller ID, an image prompt requesting Caller ID to be sent is displayed, then the call is disconnected. If the caller sends Caller ID, the Public Mode (Power Off) image prompt is displayed, then the call is disconnected.Incoming Voice Calls Incoming Video CallsIf the caller is registered to block nuisance calls, a voice prompt to reject a call is played and the call is disconnected*3.If the caller is registered to block nuisance calls, an image prompt to reject a call is displayed and the call is disconnected*3.
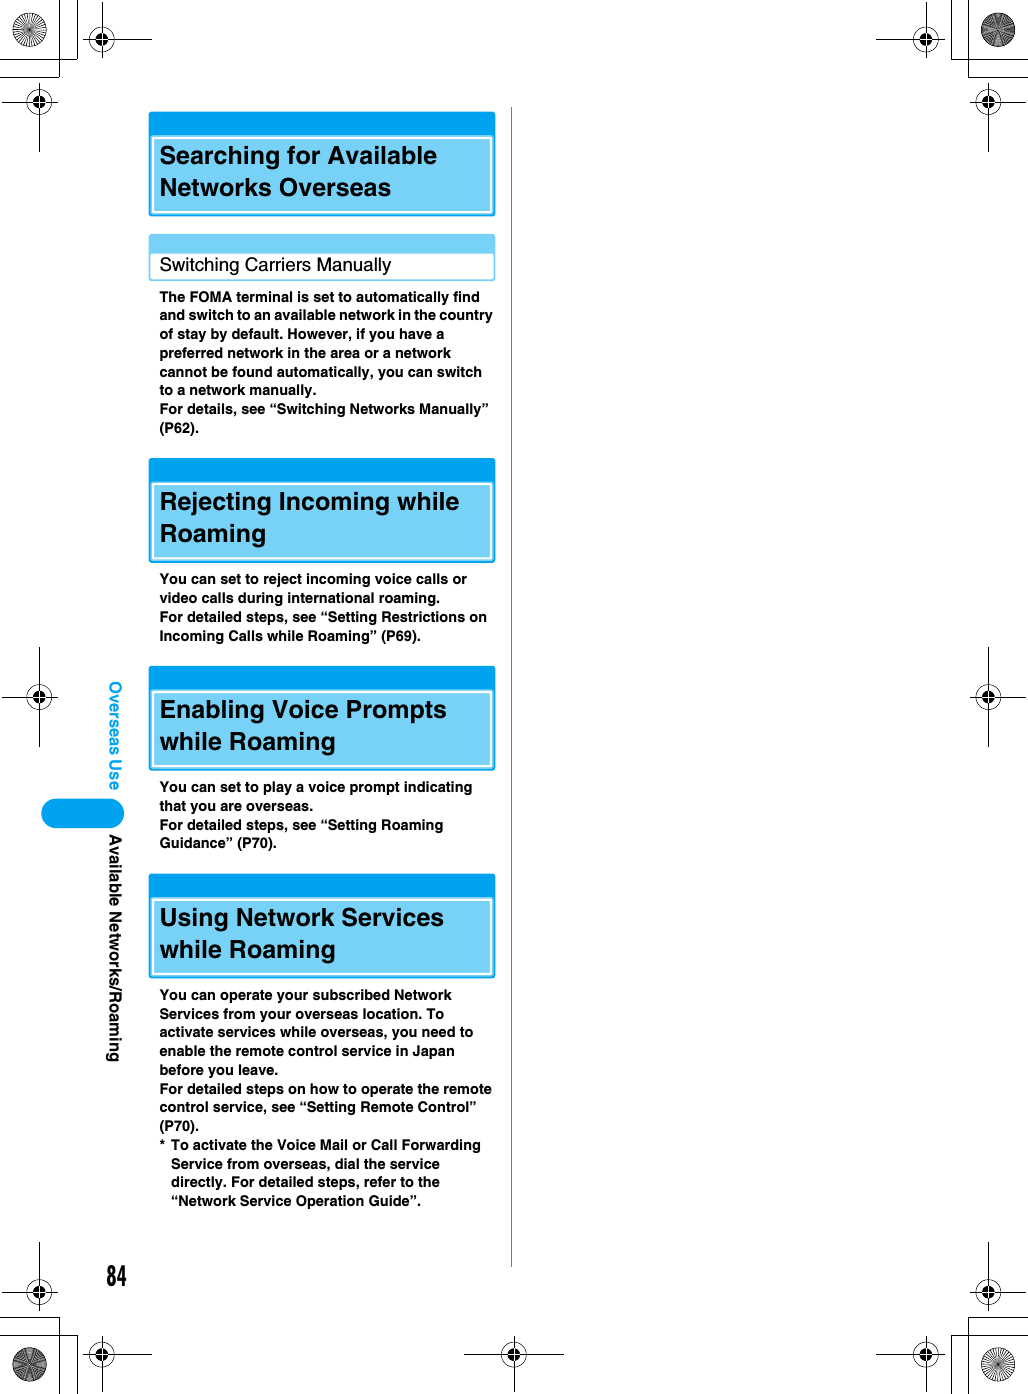
77Overseas UseInternational Roaming Service (WORLD WING) . . . . . . . . . . . . . . . . . . . . . . . . . . . 78Services Available Overseas  . . . . . . . . . . . . . . . . . . . . . . . . . . . . . . . . . . . . . . . . . . 78Before Using in Overseas . . . . . . . . . . . . . . . . . . . . . . . . . . . . . . . . . . . . . . . . . . . . . 79Making a Call in Overseas. . . . . . . . . . . . . . . . . . . . . . . . . . . . . . . . . . . . . . . . . . . . . 82Receiving a Call in Overseas . . . . . . . . . . . . . . . . . . . . . . . . . . . . . . . . . . . . . . . . . . 83Searching for Available Networks Overseas . . . . . . . . . . . . . . . . . . . . . . . . . . . . . . 84Rejecting Incoming while Roaming . . . . . . . . . . . . . . . . . . . . . . . . . . . . . . . . . . . . . 84Enabling Voice Prompts while Roaming . . . . . . . . . . . . . . . . . . . . . . . . . . . . . . . . . 84Using Network Services while Roaming . . . . . . . . . . . . . . . . . . . . . . . . . . . . . . . . . 84This chapter explains how to make calls while oversea, using the “M2501 HIGH-SPEED Utility”.
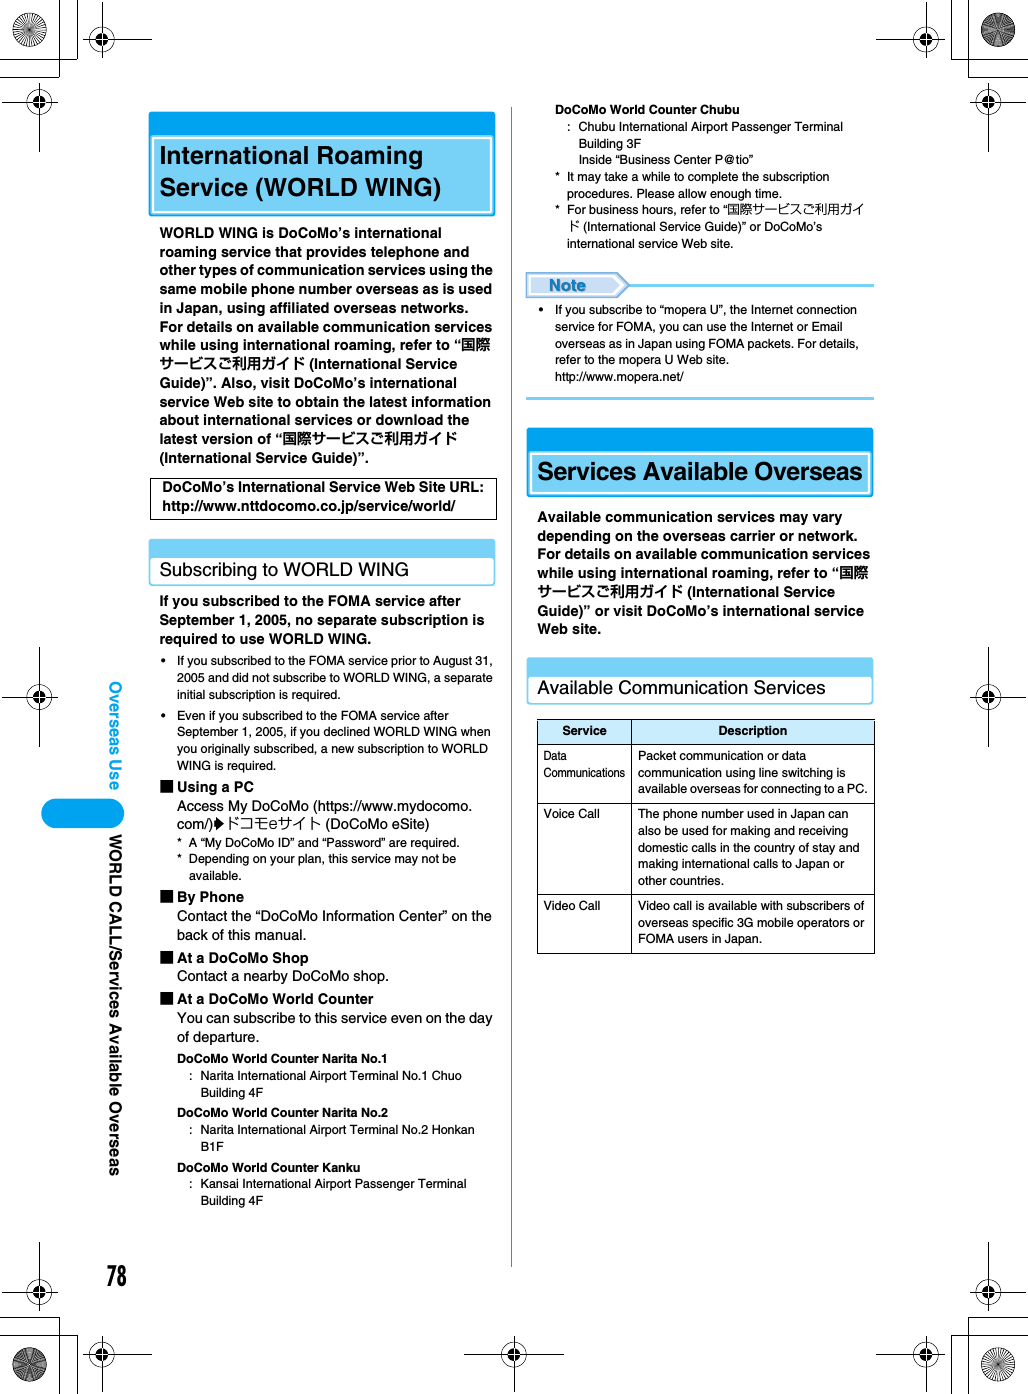
78Overseas UseInternational Roaming Service (WORLD WING)WORLD WING is DoCoMo’s international roaming service that provides telephone and other types of communication services using the same mobile phone number overseas as is used in Japan, using affiliated overseas networks.For details on available communication services while using international roaming, refer to “国際サービスご利用ガイド (International Service Guide)”. Also, visit DoCoMo’s international service Web site to obtain the latest information about international services or download the latest version of “国際サービスご利用ガイド (International Service Guide)”.Subscribing to WORLD WINGIf you subscribed to the FOMA service after September 1, 2005, no separate subscription is  required to use WORLD WING.• If you subscribed to the FOMA service prior to August 31, 2005 and did not subscribe to WORLD WING, a separate initial subscription is required.• Even if you subscribed to the FOMA service after September 1, 2005, if you declined WORLD WING when you originally subscribed, a new subscription to WORLD WING is required.■Using a PCAccess My DoCoMo (https://www.mydocomo.com/)yドコモeサイト (DoCoMo eSite)* A “My DoCoMo ID” and “Password” are required.* Depending on your plan, this service may not be available.■By PhoneContact the “DoCoMo Information Center” on the back of this manual.■At a DoCoMo ShopContact a nearby DoCoMo shop.■At a DoCoMo World CounterYou can subscribe to this service even on the day of departure.DoCoMo World Counter Narita No.1: Narita International Airport Terminal No.1 Chuo Building 4FDoCoMo World Counter Narita No.2: Narita International Airport Terminal No.2 Honkan B1FDoCoMo World Counter Kanku: Kansai International Airport Passenger Terminal Building 4FDoCoMo World Counter Chubu: Chubu International Airport Passenger Terminal Building 3FInside “Business Center P@tio”* It may take a while to complete the subscription procedures. Please allow enough time.* For business hours, refer to “国際サービスご利用ガイド (International Service Guide)” or DoCoMo’s international service Web site.note• If you subscribe to “mopera U”, the Internet connection service for FOMA, you can use the Internet or Email overseas as in Japan using FOMA packets. For details, refer to the mopera U Web site.http://www.mopera.net/Services Available OverseasAvailable communication services may vary depending on the overseas carrier or network. For details on available communication services while using international roaming, refer to “国際サービスご利用ガイド (International Service Guide)” or visit DoCoMo’s international service Web site.Available Communication ServicesDoCoMo’s International Service Web Site URL:http://www.nttdocomo.co.jp/service/world/Service DescriptionData CommunicationsPacket communication or data communication using line switching is available overseas for connecting to a PC.Voice Call The phone number used in Japan can also be used for making and receiving domestic calls in the country of stay and making international calls to Japan or other countries.Video Call Video call is available with subscribers of overseas specific 3G mobile operators or FOMA users in Japan.WORLD CALL/Services Available Overseas
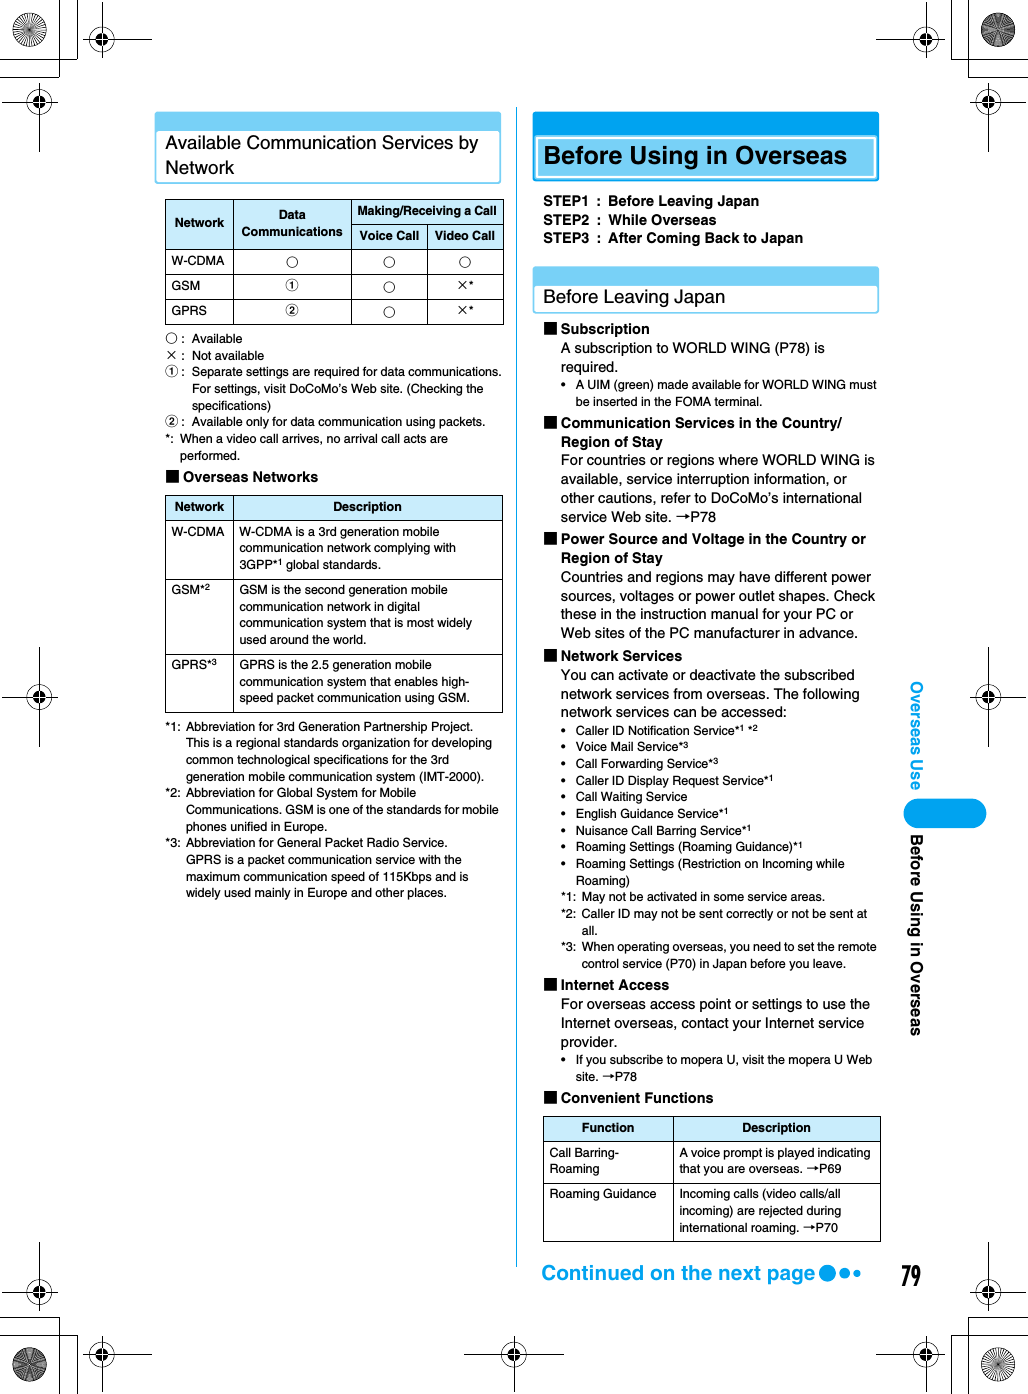
79Overseas UseAvailable Communication Services by Network○: Available×: Not availablea: Separate settings are required for data communications.For settings, visit DoCoMo’s Web site. (Checking the specifications)b: Available only for data communication using packets.*: When a video call arrives, no arrival call acts are performed.■Overseas Networks*1: Abbreviation for 3rd Generation Partnership Project. This is a regional standards organization for developing common technological specifications for the 3rd generation mobile communication system (IMT-2000).*2: Abbreviation for Global System for Mobile Communications. GSM is one of the standards for mobile phones unified in Europe.*3: Abbreviation for General Packet Radio Service. GPRS is a packet communication service with the maximum communication speed of 115Kbps and is widely used mainly in Europe and other places.Before Using in OverseasSTEP1 : Before Leaving JapanSTEP2 : While OverseasSTEP3 : After Coming Back to JapanBefore Leaving Japan■SubscriptionA subscription to WORLD WING (P78) is required.• A UIM (green) made available for WORLD WING must be inserted in the FOMA terminal.■Communication Services in the Country/Region of StayFor countries or regions where WORLD WING is available, service interruption information, or other cautions, refer to DoCoMo’s international service Web site. →P78■Power Source and Voltage in the Country or Region of StayCountries and regions may have different power sources, voltages or power outlet shapes. Check these in the instruction manual for your PC or Web sites of the PC manufacturer in advance.■Network ServicesYou can activate or deactivate the subscribed network services from overseas. The following network services can be accessed:• Caller ID Notification Service*1 *2• Voice Mail Service*3• Call Forwarding Service*3• Caller ID Display Request Service*1• Call Waiting Service• English Guidance Service*1• Nuisance Call Barring Service*1• Roaming Settings (Roaming Guidance)*1• Roaming Settings (Restriction on Incoming while Roaming)*1: May not be activated in some service areas.*2: Caller ID may not be sent correctly or not be sent at all.*3: When operating overseas, you need to set the remote control service (P70) in Japan before you leave.■Internet AccessFor overseas access point or settings to use the Internet overseas, contact your Internet service provider.• If you subscribe to mopera U, visit the mopera U Web site. →P78■Convenient FunctionsNetwork Data CommunicationsMaking/Receiving a CallVoice Call Video CallW-CDMA ○○○GSM a○×*GPRS b○×*Network DescriptionW-CDMA W-CDMA is a 3rd generation mobile communication network complying with 3GPP*1 global standards.GSM*2GSM is the second generation mobile communication network in digital communication system that is most widely used around the world.GPRS*3GPRS is the 2.5 generation mobile communication system that enables high-speed packet communication using GSM.Function DescriptionCall Barring-RoamingA voice prompt is played indicating that you are overseas. →P69Roaming Guidance Incoming calls (video calls/all incoming) are rejected during international roaming. →P70Continued on the next pageBefore Using in Overseas
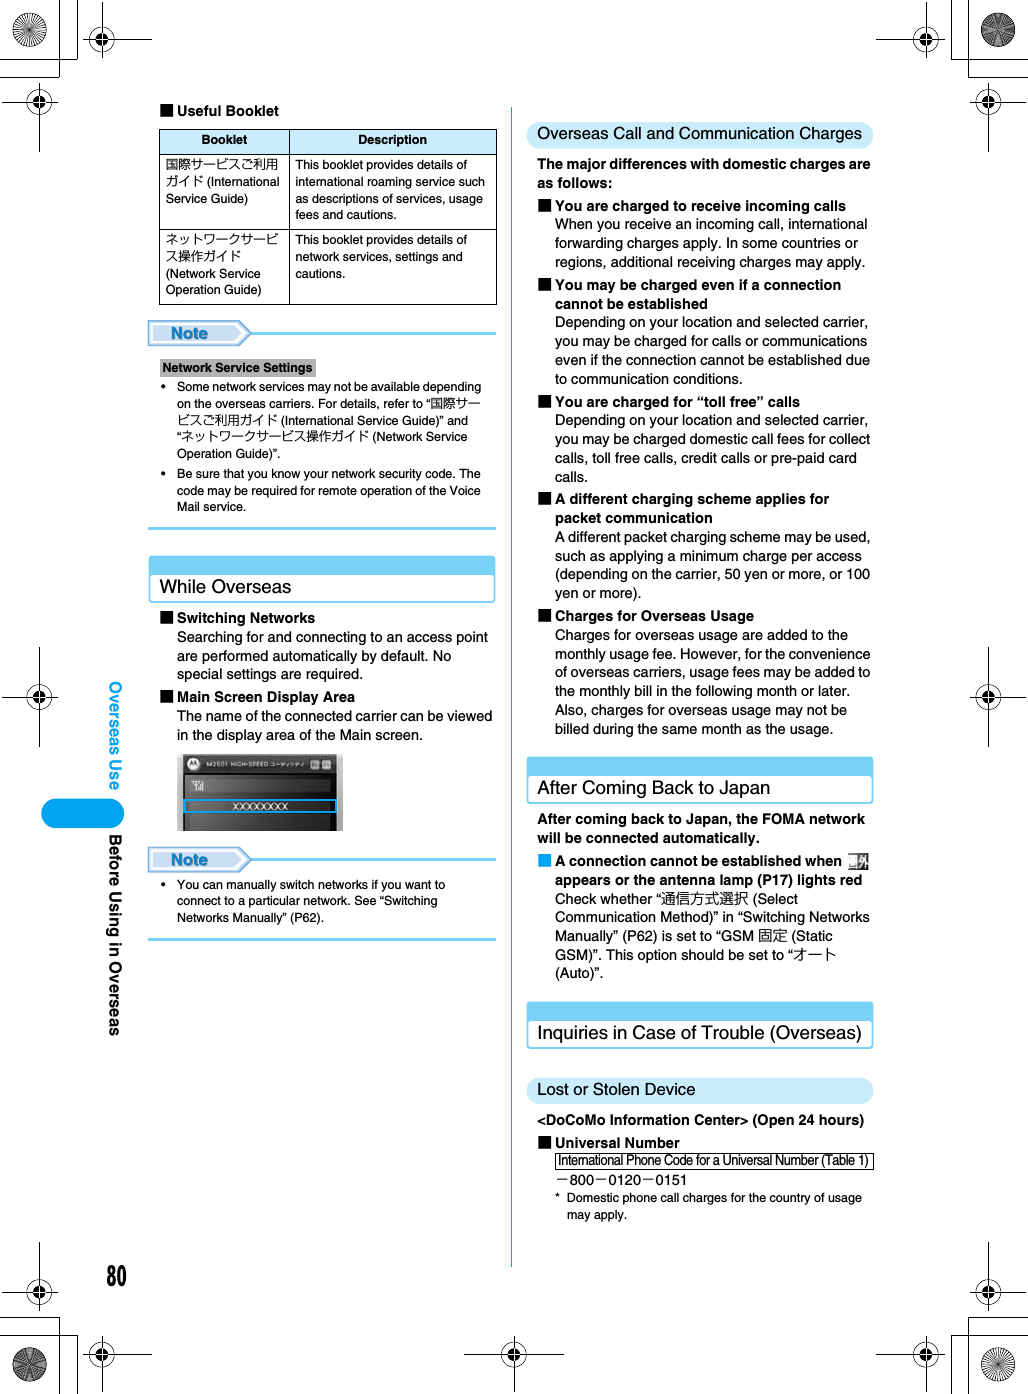
80Overseas Use■Useful Booklet• Some network services may not be available depending on the overseas carriers. For details, refer to “国際サービスご利用ガイド (International Service Guide)” and “ネットワークサービス操作ガイド (Network Service Operation Guide)”.• Be sure that you know your network security code. The code may be required for remote operation of the Voice Mail service.While Overseas■Switching NetworksSearching for and connecting to an access point are performed automatically by default. No special settings are required.■Main Screen Display AreaThe name of the connected carrier can be viewed in the display area of the Main screen.• You can manually switch networks if you want to connect to a particular network. See “Switching Networks Manually” (P62).Overseas Call and Communication ChargesThe major differences with domestic charges are as follows:■You are charged to receive incoming callsWhen you receive an incoming call, international forwarding charges apply. In some countries or regions, additional receiving charges may apply.■You may be charged even if a connection cannot be establishedDepending on your location and selected carrier, you may be charged for calls or communications even if the connection cannot be established due to communication conditions.■You are charged for “toll free” callsDepending on your location and selected carrier, you may be charged domestic call fees for collect calls, toll free calls, credit calls or pre-paid card calls.■A different charging scheme applies for packet communicationA different packet charging scheme may be used, such as applying a minimum charge per access (depending on the carrier, 50 yen or more, or 100 yen or more).■Charges for Overseas UsageCharges for overseas usage are added to the monthly usage fee. However, for the convenience of overseas carriers, usage fees may be added to the monthly bill in the following month or later. Also, charges for overseas usage may not be billed during the same month as the usage.After Coming Back to JapanAfter coming back to Japan, the FOMA network will be connected automatically.■A connection cannot be established when   appears or the antenna lamp (P17) lights redCheck whether “通信方式選択 (Select Communication Method)” in “Switching Networks Manually” (P62) is set to “GSM 固定 (Static GSM)”. This option should be set to “オート (Auto)”.Inquiries in Case of Trouble (Overseas)Lost or Stolen Device<DoCoMo Information Center> (Open 24 hours)■Universal Number−800−0120−0151* Domestic phone call charges for the country of usage may apply.Booklet Description国際サービスご利用ガイド (International Service Guide)This booklet provides details of international roaming service such as descriptions of services, usage fees and cautions.ネットワークサービス操作ガイド (Network Service Operation Guide)This booklet provides details of network services, settings and cautions.Network Service SettingsInternational Phone Code for a Universal Number (Table 1)Before Using in Overseas
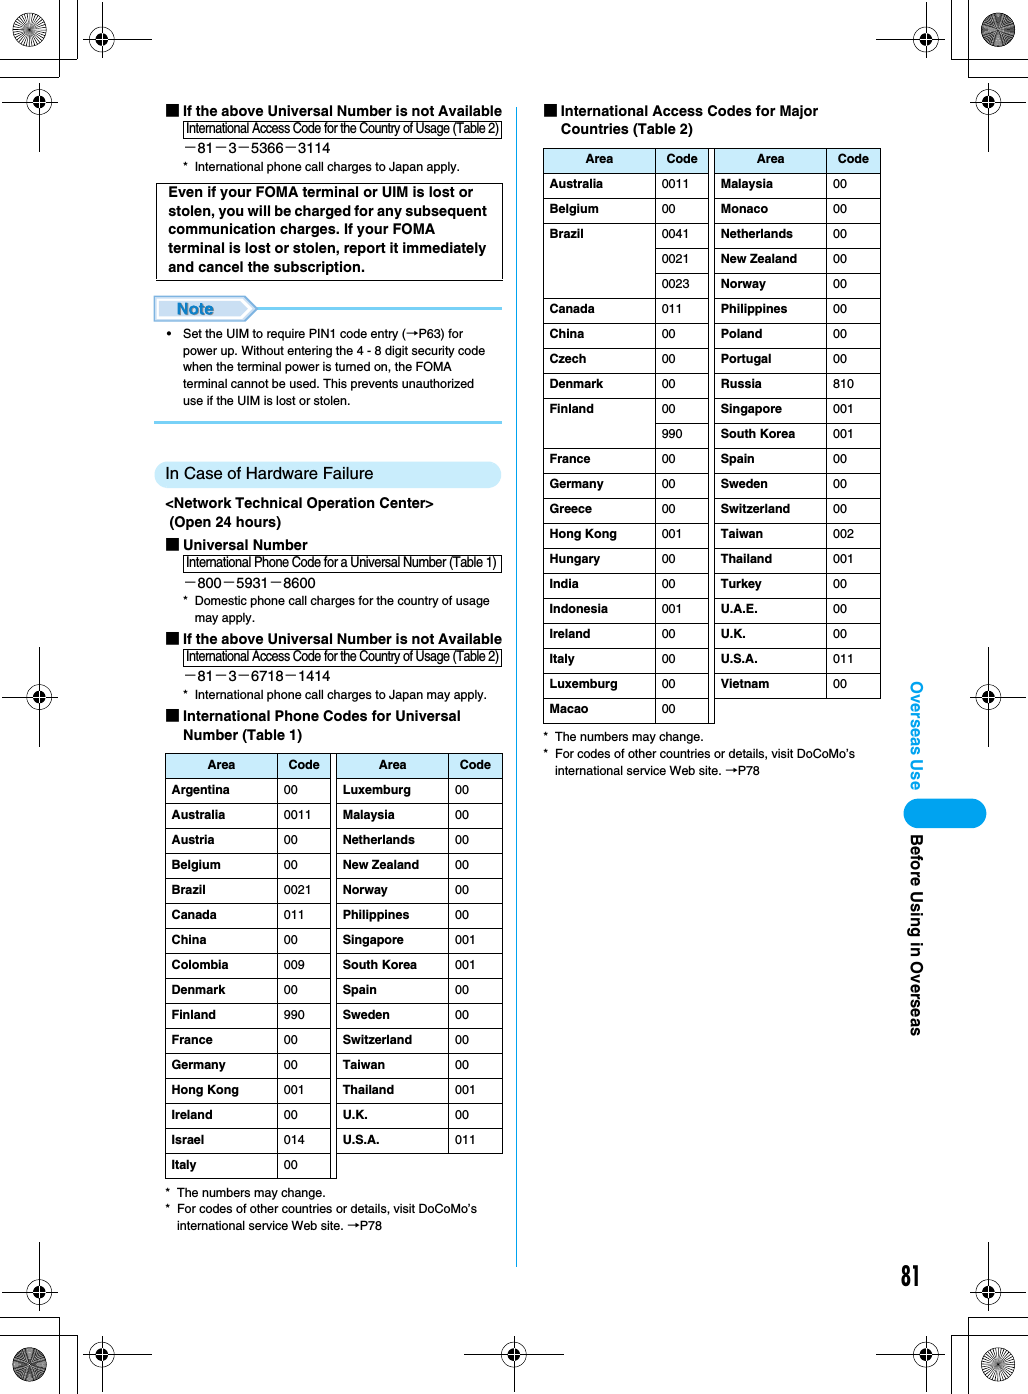
81Overseas Use■If the above Universal Number is not Available−81−3−5366−3114* International phone call charges to Japan apply.• Set the UIM to require PIN1 code entry (→P63) for power up. Without entering the 4 - 8 digit security code when the terminal power is turned on, the FOMA terminal cannot be used. This prevents unauthorized use if the UIM is lost or stolen.In Case of Hardware Failure<Network Technical Operation Center> (Open 24 hours)■Universal Number−800−5931−8600* Domestic phone call charges for the country of usage may apply.■If the above Universal Number is not Available−81−3−6718−1414* International phone call charges to Japan may apply.■International Phone Codes for Universal Number (Table 1)* The numbers may change.* For codes of other countries or details, visit DoCoMo’s international service Web site. →P78■International Access Codes for Major Countries (Table 2)* The numbers may change.* For codes of other countries or details, visit DoCoMo’s international service Web site. →P78Even if your FOMA terminal or UIM is lost or stolen, you will be charged for any subsequent communication charges. If your FOMA terminal is lost or stolen, report it immediately and cancel the subscription.Area Code Area CodeArgentina 00 Luxemburg 00Australia 0011 Malaysia  00Austria 00 Netherlands  00Belgium 00 New Zealand  00Brazil 0021 Norway  00Canada 011 Philippines  00China 00 Singapore  001Colombia 009 South Korea  001Denmark 00 Spain  00Finland 990 Sweden  00France 00 Switzerland  00Germany 00 Taiwan  00Hong Kong 001 Thailand  001Ireland 00 U.K.  00Israel 014 U.S.A.  011Italy 00International Access Code for the Country of Usage (Table 2) International Phone Code for a Universal Number (Table 1)International Access Code for the Country of Usage (Table 2)Area Code Area CodeAustralia  0011 Malaysia  00Belgium  00 Monaco  00Brazil  0041 Netherlands  000021 New Zealand  000023 Norway  00Canada  011 Philippines  00China  00 Poland  00Czech 00 Portugal  00Denmark  00 Russia  810Finland  00 Singapore  001990 South Korea  001France  00 Spain  00Germany  00 Sweden  00Greece  00 Switzerland  00Hong Kong  001 Taiwan  002Hungary  00 Thailand  001India  00 Turkey  00Indonesia  001 U.A.E. 00Ireland  00 U.K.  00Italy  00 U.S.A.  011Luxemburg 00 Vietnam  00Macao 00Before Using in Overseas
82Overseas UseMaking a Call in OverseasYou can make a call from a country or region other than Japan using the FOMA terminal.• If the other party uses a carrier compatible with a FOMA video call and uses a device that supports video calls, a video call can be made using “ドコモテレビ電話ソフト 2005 (DoCoMo Video Call Software 2005)” contained in the included CD-ROM.Making a Call from the Country of Stay to JapanaClick   for 1+ seconds to display “+”y (country code of Japan) yThe other party’s phone number excluding any leading “0 (zero)” from the regional number (area code) y<Example : Making a Call to a Ward in Tokyo (Area Code of 03)>Click   for 1+ second yyyXXXX-XXXX y• Exclude the leading “0”  from a mobile phone or PHS number in Japan.Making a Call to a WORLD WING/WORLD WALKER subscriber from the Country of StayaClick   for 1+ seconds to display “+” y (country code of Japan)ya phone number excluding the leading “0” y<Example: Making a Call to a Mobile Phone>Click   for 1+ seconds to display “+” y y y XXXX-XXXX yMaking a Call within the Country of StayaDial a phone number starting from the area code y Click Making a Call to a Mobile or Landline Phone from the Country of Stay to Another Country (Other than Japan)aClick   for 1+ seconds to display “+” yCountry Code of the Other Party yThe other party’s phone number excluding any leading “0 (zero)” from the regional number (area code) or cell phone number y■Country Codes of Major Countries* The numbers may change.* For codes of other countries or details, visit DoCoMo’s international service Web site.Area Code Area CodeAustralia  61 Maldives  960Austria  43 Netherlands  31Belgium  32 New Caledonia  687Brazil  55 New Zealand  64Canada  1Norway  47China  86 Peru  51Czech 420 Philippines  63Egypt  20 Russia  7Fiji  679 Singapore  65Finland  358 South Korea  82France  33 Spain  34Germany  49 Sweden  46Greece  30 Switzerland  41Hong Kong  852 Tahiti  689Hungary  36 Taiwan  886India  91 Thailand  66Indonesia  62 Turkey  90Italy  39 U.K.  44Japan 81 U.S.A.  1Macao  853 Vietnam  84Malaysia  60Making a Call in Overseas
83Overseas UseReceiving a Call in OverseasaClick   when a Call ArrivesHaving Someone Call You in the Country of StayFrom JapanEntering your phone number in the same way as you were in Japan allows a caller in Japan to call you overseas.a090 yxxxxx-xxxxx/080 yxxxxx-xxxxxyCallFrom a Country Other than JapanaInternational Access Code of the country of origin y81 (country code of Japan) ya phone number excluding the leading “0” yCall• For International Access Codes, see “International Access Codes for Major Countries (Table 2)”. →81Troubleshooting When Calls Are Not ConnectedCannot make/receive calls/Always out of service area/Cannot turn the power onIf you cannot make or receive calls, the signal reception level stays as out of service area or you cannot turn your FOMA terminal on, the following can be causes:• Signal reception is weak or you are out of the service area• Local switching system or base station fails, or temporarily heavy traffic• Mistakes occur during an operation of the FOMA HIGH-SPEED terminal.• OtherFor the latest information on coverage areas or out of service areas, visit DoCoMo’s international service Web site. →P78Try the following after checking the operation:• If you are indoors, try again outdoors.• Check whether your monthly usage amount exceeds your set limit.• Turn the power off and turned on again.• Switching networks manually. →P62Contact the Network Technical Operation Center (P81) if the problem persists.Usage Amount Limit• There is a limit of monthly usage for WORLD WING. When the usage limit is reached, WORLD WING becomes unavailable for the rest of month.• Please note that the amount displayed on your PC is the amount of your accumulated monthly usage before communications allowances are applied.• The usage limit includes call and communication charges and receiving charges used with international roaming, digital communication charges such as for video calls, receiving charges and packet communication charges. However, because the usage limit does not include international forwarding charges and usage fees which have not yet been billed by overseas carriers to us, the final bill may exceed the usage limit. Even in this case, please pay the all the monthly charges for services used before the service limit was encountered.• After the payment of monthly charges has been confirmed, WORLD WING again becomes available (it may take time to resume the service after the payment). You can pay with a credit card (one time charge only) while overseas.• For details, contact the “DoCoMo Information Center” on the back of this manual.Receiving a Call in Overseas
84Overseas UseSearching for Available Networks OverseasSwitching Carriers ManuallyThe FOMA terminal is set to automatically find and switch to an available network in the country of stay by default. However, if you have a preferred network in the area or a network cannot be found automatically, you can switch to a network manually.For details, see “Switching Networks Manually” (P62).Rejecting Incoming while RoamingYou can set to reject incoming voice calls or video calls during international roaming.For detailed steps, see “Setting Restrictions on Incoming Calls while Roaming” (P69).Enabling Voice Prompts while RoamingYou can set to play a voice prompt indicating that you are overseas.For detailed steps, see “Setting Roaming Guidance” (P70).Using Network Services while RoamingYou can operate your subscribed Network Services from your overseas location. To activate services while overseas, you need to enable the remote control service in Japan before you leave.For detailed steps on how to operate the remote control service, see “Setting Remote Control” (P70).* To activate the Voice Mail or Call Forwarding Service from overseas, dial the service directly. For detailed steps, refer to the “Network Service Operation Guide”.Available Networks/Roaming
85AppendixCombinations of Multiaccess Operations . . . . . . . . . . . . . . . . . . . . . . . . . . . . . . . . 86Using an Earphone Microphone with Switch  . . . . . . . . . . . . . . . . . . . . . . . . . . . . . 86Optional and Related Devices  . . . . . . . . . . . . . . . . . . . . . . . . . . . . . . . . . . . . . . . . . 87Troubleshooting. . . . . . . . . . . . . . . . . . . . . . . . . . . . . . . . . . . . . . . . . . . . . . . . . . . . . 87Error Messages  . . . . . . . . . . . . . . . . . . . . . . . . . . . . . . . . . . . . . . . . . . . . . . . . . . . . . 88Glossary . . . . . . . . . . . . . . . . . . . . . . . . . . . . . . . . . . . . . . . . . . . . . . . . . . . . . . . . . . . 90Warranty and After-Sales Service  . . . . . . . . . . . . . . . . . . . . . . . . . . . . . . . . . . . . . . 91Specific Absorption Rate of Mobile Phones . . . . . . . . . . . . . . . . . . . . . . . . . . . . . . 92Export Controls of the Product and Accessories. . . . . . . . . . . . . . . . . . . . . . . . . . 94Main Specifications . . . . . . . . . . . . . . . . . . . . . . . . . . . . . . . . . . . . . . . . . . . . . . . . . . 94Index . . . . . . . . . . . . . . . . . . . . . . . . . . . . . . . . . . . . . . . . . . . . . . . . . . . . . . . . . . . . . .95
86AppendixCombinations of Multiaccess Operations(Checking the specifications)○: Available△: Available in Some Cases×: Not Available*:Available if you subscribe to “Call Waiting” and place the active voice call on holdUsing an Earphone Microphone with SwitchBy connecting an earphone microphone with switch P001/002 (optional) or a stereo earphone set P001 (optional) to an earphone microphone jack, you can answer or make calls by simply pressing the switch.Making Calls with the Switch(Checking the specifications)You can dial the phone number listed Xth from the top of the Phonebook Screen on the M2501 HIGH-SPEED Utility (P59) simply by pressing the switch of the earphone microphone with switch.aConnect an earphone microphone with switch• Open the cover of the earphone microphone jack and insert the plug of the earphone microphone with switch.bPress the switch of the earphone microphone with switch for 1+ secondscPress the switch of the earphone microphone with switch for 1+ seconds to end the callAnswering a Call with the Switch(Checking the specifications)aPress the switch of the earphone microphone with switch for 1+ seconds when a call arrivesbPress the switch of the earphone microphone with switch for 1+ seconds to end the callCurrent StatusNewly Started CommunicationVoice Call Video CallOutgoing Incoming Outgoing IncomingDuring a Voice Call ×△*××During a Video Call ××××During Packet Communication ○○××During 64K Data Communication ××××Current StatusNewly Started CommunicationPacket Communication64K Data CommunicationOutgoing Incoming Outgoing IncomingDuring a Voice Call ○×××During a Video Call ××××During Packet Communication ××××During 64K Data Communication ××××Multiaccess/Earphone Microphone
87AppendixOptional and Related DevicesCombining the FOMA HIGH-SPEED terminal with optional devices supports a wide variety uses. Some products are not available depending on the region. For details, contact a DoCoMo sales office. For details about the optional devices, refer to the instruction manuals for respective devices.• Earphone Microphone with Switch P001/P002• Stereo Earphone Set P001Troubleshooting■The FOMA terminal Is not Recognized■Communication Problems ■Problems with AT Commands■Other ProblemsSymptom CheckFOMA HIGH-SPEED terminal is not recognizedRe-insert the FOMA terminal all the way into the slot securely. →P21Verify that the driver for the FOMA terminal is functioning properly. →P24Some energy saving PCs turn the power off to a PC terminal (FOMA terminal). Read the instruction manual of the PC and check the power source status.Symptom CheckCommunications are not possibleVerify that signals are received in the service area. →P17, P54Check the communication settings of the PC. →P32Verify that the access point and your PC use the same communication method. →P32If “デュアルネットワーク (Dual Network)” is set to mova, switch it to FOMA. →P68Cannot connect to the InternetVerify the connection settings to your Internet provider. →P36Connection is frequently terminatedTraffic may be heavy at the access point. Try connecting again later.If you are in a weak signal reception area, move to a location where the signal strength is displayed as  .Symptom Check“ERROR” appears when a command is enteredVerify that the number of characters in the command is within XXX.Verify that you entered a correct command.Check the properties of the terminal software to see whether a device other than FOMA terminal is selected.“OK” does not appear after AT command is enteredCheck the communication settings of the PC. →P32Verify that the commands start with “AT” or “at” and that upper and lower case characters are not mixed.Symptom CheckStatus lamp does not lightCheck the LED on/off setting. →P64Optional Devices/Troubleshooting
88AppendixError Messagesアプリケーションが起動できません。(Application cannot launch.)The M2501 HIGH-SPEED Utility is corrupted or deleted. Reinstall the software and try again.インストールプログラムにはディレクトリにアクセスする権限がありません。インストールを継続できません。管理者としてログインするか、またはシステム管理者にお問い合わせください。(The installation program does not have privilege to access the directory. Installation cannot continue. Log in as an administrator, or contact the system administrator.)A user without Windows Administrator privileges cannot install the software.操作できませんでした。(Operation was not possible.)• You cannot perform the operation while out of the service area or where no signals are received. Move to a location where   is displayed and try again.• Network Service settings could not be configured due to a network error.操作内容を確認してください。(Check the operation.)Incorrect Network Service Settings were sent. Try sending the correct settings again. →P65他のユーザが既に起動しています。ユーティリティは起動できませんでした。(Another user is already running the utility. The utility cannot be launched.)The M2501 HIGH-SPEED Utility is already running. Exit the application and try again.着信中のため操作できませんでした。(Operation cannot be performed due to an incoming call.)PIN1 code could not be authenticated/changed/unlocked due to an incoming call.着発信中または通話中のため終了できません。(Cannot exit because outgoing/incoming or during a call.)Because of an incoming/outgoing or during a call, the M2501 HIGH-SPEED Utility cannot be exited. Terminate the incoming/outgoing call and try again.通信方式の設定ができませんでした。(Communication method could not be set.)A network communication method failed to switch due to an error.データ編集中のため終了できません。(Cannot exit because data is being edited.)The M2501 HIGH-SPEED Utility cannot exit because an Answered Calls/Redial/Contacts screen is open. Close the Answered Calls/Redial/Contacts screen and try again.登録できませんでした。(Could not save.)An entry could not be saved due to an error.ネットワーク暗証番号が正しく入力されていません。(The entered Network Security Code is not correct.)An incorrect Network Security Code was entered.  Enter the correct Network Security Code.ネットワーク暗証番号がロックされています。(The Network Security Code is locked.)If an incorrect Network Security Code is entered three times in a row, the code is locked. Contact a DoCoMo shop.ネットワーク登録ができません。通信設定を行ってください。(The network cannot be registered. Configure communication settings.)The designated network does not serve your current location. Perform network settings (P62).ネットワーク認証番号が誤っています。(Wrong network authentication code.)An incorrect Network Security Code was entered. Enter the correct Network Security Code.ネットワークの設定ができませんでした。(Network could not be set.)A network could not be set due to signal or network status.発信できません。電波がある場所に移動してください。(Call failed. Move to a location where there is stronger signal reception.)You cannot make calls due to out of service area or in no signal reception area. Move to a location where   is displayed and try again.発着信規制中です。しばらくお待ち下さい。(Call barred. Please wait.)Outgoing/incoming calls are barred on the network. Try again later.ユーティリティが起動中です。アンインストールはできませんでした。(The utility software is running. Uninstall failed.)The M2501 HIGH-SPEED Utility could not be uninstalled because it was running. Exit the application and try again.CSVファイルではありません。読み込みできませんでした。(Not CSV file format. Could not be read.)The file could not be read because it is not in the CSV (.csv) format. Verify the file format and try again.Error Messages
89AppendixDTMF音送出に失敗しました。(DTMF sound sending failed.)DTMF (push signal) sound failed to be sent.FOMAカードの読み出しができませんでした。(The UIM could not be read.)The own number could not be read from the UIM and displayed due to an error.M2501からの応答がありません。ユーティリティはオフライン状態になります。(The M2501 does not respond. The utility will become off-line.)• Verify that the FOMA terminal is functioning (P17 and P54).• Another application is using the COM port that is used by the FOMA terminal for communication. Exit the application and try again.M2501の設定に失敗しました。以下の設定ができませんでした。(失敗した設定名を表示)(Failed to configure M2501. The following settings could not be configured. (Failed settings))The configured settings could not be applied due to an error.PINロック解除コードが正しく入力されていません。有効桁数は8桁です。(The entered PUK code is not correct. The code should be 8 digits long.)An incorrect PUK code has been entered. Enter the correct PUK code.PINロック解除コードの照合ができませんでした。(PUK code verification failed.)The PUK code could not be verified due to an error.PINロック解除コードは完全にロックされています。使用できる機能が制限されます。(The PUK code is permanently blocked. Available functions will be limited.)An incorrect PUK code has been entered ten times, the PUK code is locked. Contact a DoCoMo shop.PIN1コードが正しく入力されていません。有効桁数は 4∼ 8桁です。(The entered PIN1 Code is not correct. The code should be 4 to 8 digits long.)An incorrect PIN1 code has been entered. Enter the correct PIN1 code.PIN1コードが間違っています。(PIN1 code is incorrect.)An incorrect PIN1 code has been entered. Enter the correct PIN1 code.PIN1コードがロックされました。使用できる機能が制限されます。(PIN1 code has been locked. Available functions will be limited.)A PIN1 code was incorrectly entered three times in a row. Available functions will be limited. Enter a PUK code to cancel the PIN block. →P63PIN1コード照合ができませんでした。(PIN1 code could not be verified.)The PIN1 code could not be verified due to an error.PIN1照合をキャンセルしました。使用できる機能が制限されます。(PIN1 verification was canceled. Available functions will be limited.)When the M2501 HIGH-SPEED Utility is launched, the PIN1 code verification was canceled. Available functions will be limited.PIN1ロック解除コードが間違っています。(PIN1 PUK code is not correct.)An incorrect PUK code has been entered. Enter the correct PUK code.PIN1ロック解除コード照合がキャンセルされました。使用できる機能は制限されます。(PIN1 PUK code verification was canceled. Available functions will be limited.)When the M2501 HIGH-SPEED Utility is launched, the PUK code verification was canceled. Available functions will be limited.vCardファイルではありません。読み込みできませんでした。(Not vCard file format. Could not be read.)The file could not be read because it is not in the vCard (.vcf) format. Verify the file format and try again.2つの新しい PIN1コードが一致していません。(Two new PIN1 codes do not match.)The new PIN1 code and the entered PIN1 code for confirmation do not match. Enter the correct new PIN1 code.Error Messages
90AppendixGlossary■AAccess PointA link-up point to be connected to the Internet. A PC can be connected to the Internet via an access point using a telephone connection.Administrator PrivilegesAccess rights that allow access to all functions on a Windows XP or Windows 2000 system. A user without administrator privileges cannot install or uninstall a driver or the FOMA PC Configuration Software.APNStands for Access Point Name. Identifies the network to log into (such as an ISP) for packet communication. For example, Internet connection service for FOMA, “mopera U”, is indicated as “mopera.net” for the APN.■BbpsStands for bit per second, and is a unit to indicate the data communication speed. It expresses the number of bits (amount of data) that can be sent in one second.■CcidStands for Context Identifier, and is a registration number when saving an APN of packet communications to the FOMA terminal. The FOMA terminal can contain up to XX APNs using X - X cid.CSVStands for Comma Separated Values, and is a file format that data is separated with a comma (,). Can be edited using a text editor.■DDial-upConnecting to a network via a telephone connection.DNSStands for Domain Name System. The database system that translates a domain name address into a numerical IP address for PCs.■IIDA number to manage user information. Your ID is issued when you register as a new user.InstallCopying external data contained in a CD, etc. onto a PC so that the data can be utilized.IPStands for Internet Protocol, communication rules used over the Internet as standards.IP addressA numerical value that identifies a device connected to the Internet. Normally, it is expressed as four 3-digit numbers (0 - 255) separated with a period as “XXX.XXX.XXX.XXX”, and is assigned to every device connected to the Internet.ISDNStands for Integrated Services Digital Network, and is a comprehensive digital communication network. Enables faster communication speed than an analog telephone line.ISP (Internet Service Provider)An operator that provides a connection to the Internet. Generally, in order to use the Internet, you need to subscribe to an ISP.■MModemA device that allows a PC to communicate via a telephone connection.■PPortAn auxiliary address added under an IP address in order to connect multiple parties concurrently over the Internet. A port is identified with a numeric value from 0 to 65535 which is called the Port Number.Properties“Attributes” or “configurations” of Windows files or icons. Right-click an icon to see or change its properties.ProtocolCommunication rules used by devices to exchange data.■QQoSStands for Quality of Service, and is a measure of the quality of the service of a network. You can specify conditions of data communication speed in the FOMA terminal QoS configurations (actual communication speed varies depending on the communication conditions). →P49■VvCardA special format for exchanging business card data. Many e-mail programs support this format.■WW-CDMA3rd generation mobile communication system (IMT-2000) that is certified as one of the global standards. It employs wide-band code division multiple access, and is one of the multiple access systems for wireless communications.The FOMA terminal complies with W-CDMA standards.Glossary
91AppendixW-TCP FOMA TCP parameter used to get the full utilization of the TCP/IP transmission capability for packet communications over a network.TCP parameter must be optimized to get the most out of the communication capability of the FOMA terminal.Warranty and After-Sales ServiceWarranty• A written warranty is provided with every FOMA terminal.  Make sure that you receive it. Store the warranty in a safe place after you have read it and verified that it contains the “shop name/date” you purchased the product. If the written warranty does not contain the necessary information, contact the shop where you purchased the product. The warranty is valid for a period of one year from the date of purchase.• This product and all accessories are subject to change, in part or whole, for the sake of improvement without prior notice.After-Sales ServiceIf Problems OccurBefore requesting service, read the “Troubleshooting” section in this manual. If the problem still persists, contact one of the numbers listed in “Repairs” on the back of this manual.If the result of inquiries indicates that a repair is requiredTake your FOMA terminal to a service center designated by DoCoMo.Be sure to check the operating hours of the service center. You must present the warranty.■In the warranty period• The FOMA terminal will be repaired at no charge subject to the conditions of the warranty.• The warranty must be presented to receive warranty service.The subscriber will be charged for the repair of items not covered in the warranty or repairs of defects resulting from misuse, accident or neglect even during the warranty period.• The subscriber is charged even during the warranty period for the repair of failures caused by the use of devices or consumable items that are not DoCoMo-specified.■Repairs may not be possible in the following cases• Repair is not possible when corrosion due exposure to moisture, condensation or perspiration is detected in a moisture seal reaction or test, or if any of the internal boards are damaged or deformed. Since these conditions are outside the scope of the warranty, any repairs, if at all possible, will be charged.■After expiration of the warranty• All repairs that are requested are charged.■Replacement parts• Replacement parts (parts required to maintain production function) will be kept in stock for at least six years after termination of production. The product can be repaired during this period.Depending on the nature of the required repairs, it may still be possible to repair your terminal even after this period, so please contact one of the numbers listed in “Contacts” on the back of this manual.Notes• Do not modify the FOMA terminal, the UIM or its accessories.- Fire, injury or damage may result.- In order to prevent interference of radio waves or network breakdown, the FOMA terminal and the FOMA card are manufactured according to technical standards stipulated by law.  Do not use the FOMA terminals or the UIM that do not meet these standards.- If the FOMA terminal is modified (part replacement, modification, painting, etc.), it will be repaired only after the modified parts have been restored to the condition at the time of purchase. However, repair may be refused depending on the nature of modification.- Repair of failures or damage caused by modification are charged even during the warranty period.• Do not remove any inscription stickers attached to the FOMA terminal. The inscription stickers certify that the FOMA terminal satisfies specific technical standards. If stickers are removed intentionally or are reattached in such a way that confirmation of the sticker’s contents is impossible, repair or servicing may be refused because confirmation of whether or not the device conforms to relevant technical standards cannot be made.• The ON/OFF function settings and stored data may be cleared (reset) by failure, repair or handling processes. Should this happen, configure the functions again.• If the device has become wet or moist, bring it to a DoCoMo repair shop promptly. Depending on the conditions of the device, repair may not be possible.Contacts and Downloaded Data• Maintain a separate record of the data you save in your PC. DoCoMo is not responsible for the alteration or loss of data.Warranty and After-Sales Service
92AppendixSpecific Absorption Rate of Mobile PhonesSpecific Absorption Rate (SAR) of Mobile PhonesThe FOMA M2501 HIGH-SPEED meets the government’s requirements for exposure to radio waves. These requirements are based on scientific basis to assure that radio waves emitted from mobile phones and other handheld wireless devices do not affect human health.  They require that the Specific Absorption Rate (SAR), which is the unit of measurement for the amount of radio frequency radiation absorbed by the body, shall not exceed 2W/kg*. This limit includes a substantial safety margin designed to assure the safety of all persons, regardless of age or health, and meets the international standard set by International Commission on Non-Ionizing Radiation Protection (ICNIRP) in cooperation with World Health Organization (WHO). All phone models should be confirmed to comply with the regulation before they are available for sale to the public. The highest SAR value for the FOMA M2501 HIGH-SPEED is X.XXXW/kg. It was taken by the Telecom Engineering Center, a Registered Certification Agency on the Radio Law. The test for SAR was conducted in accordance with the MIC testing procedure using standard operating position with the phone transmitting at its highest permitted power level in all tested frequency bands. While there may be differences between the SAR levels of various phones and at various positions, they all meet the MIC’s technical regulation. Although the SAR is determined at the highest certified power level, the actual SAR of the phone during operation can be well below the maximum value.For further information about SAR, please see the following Web sites:*: The technical regulation is provided in Article 14-2 of the Ministry Ordinance Regulating Radio Equipment.Radio Frequency (RF) SignalsTHIS MODEL PHONE MEETS THE U.S.GOVERNMENT'S REQUIREMENTS FOR EXPOSURE TO RADIO WAVES.Your wireless phone contains a radio transmitter and receiver. Your phone is designed and manufactured not to exceed the emission limits for exposure to radio frequency (RF) energy set by the Federal Communications Commission of the U.S. Government.These limits are part of comprehensive guidelines and establish permitted levels of RF energy for the general population. The guidelines are based on standards that were developed by independent scientific organizations through periodic and thorough evaluation of scientific studies.The exposure standard for wireless mobile phones employs a unit of measurement known as the Specific Absorption Rate (SAR). The SAR limit set by the FCC is 1.6W/kg.* Tests for SAR are conducted using standard operating positions accepted by the FCC with the phone transmitting at its highest certified power level in all tested frequency bands. Although the SAR is determined at the highest certified power level, the actual SAR level of the phone while operating can be well below the maximum value. This is because the phone is designed to operate at multiple power levels so as to use only the power required to reach the network. In general, the closer you are to a wireless base station antenna, the lower the output.Before a phone model is available for sale to the public, it must be tested and certified to the FCC that it does not exceed the limit established by the U.S. government-adopted requirement for safe exposure.The tests are performed on position and locations (for example, at the ear and worn on the body) as required by FCC for each model. The highest SAR value for this model phone as reported to the FCC ●●when worn on the body, is ●●●0.49 W/kg. (Body-worn measurements differ among phone models, depending upon available accessories and FCC requirements). While there may be differences between the SAR levels of various phones and at various positions, they all meet the U.S. government requirement.Ministry of Internal Affairs and Communications Web Sitehttp://www.tele.soumu.go.jp/j/ele/index.htmAssociation of Radio Industries and Businesses Web Sitehttp://www.arib-emf.org/index.htmlDoCoMo Web Sitehttp://www.nttdocomo.co.jp/product/Motorola Web Sitehttp://www.motorola.com/rfhealthSpecific Absorption Rate of Mobile Phones
93AppendixThe FCC has granted an Equipment Authorization for this model phone with all reported SAR levels evaluated as in compliance with the FCC RF exposure guidelines. SAR information on this model phone is on file with the FCC and can be found under the Display Grant section at http://www.fcc.gov/oet/fccid after search on FCC ID IHDT6FL1●●●●●●●●.For body worn operation, this phone has been tested and meets the FCC RF exposure guidelines when used with an accessory designated for this product or when used with an accessory that contains no metal and that positions the handset a minimum of 1.5 cm from the body.Declaration of ConformityThis mobile phone complies with the EU requirements for exposure to radio waves.Your mobile phone is a radio transceiver, designed and manufactured not to exceed the SAR* limits** for exposure to radio-frequency (RF) energy, which SAR* value, when tested for compliance against the standard was 1.0W/kg. While there may be differences between the SAR* levels of various phones and at various positions, they all meet*** the EU requirements for RF exposure.Important Safety InformationAIRCRAFTSwitch off your wireless device when boarding an aircraft or whenever you are instructed to do so by airline staff. If your device offers a 'flight mode' or similar feature consult airline staff as to whether it can be used on board.DRIVINGFull attention should be given to driving at all times and local laws and regulations restricting the use of wireless devices while driving must be observed.HOSPITALSMobile phones should be switched off wherever you are requested to do so in hospitals, clinics or health care facilities. These requests are designed to prevent possible interference with sensitive medical equipment.PETROL STATIONSObey all posted signs with respect to the use of wireless devices or other radio equipment in locations with flammable material and chemicals. Switch off your wireless device whenever you are instructed to do so by authorized staff.INTERFERENCECare must be taken when using the phone in close proximity to personal medical devices, such as pacemakers and hearing aids.PacemakersPacemaker manufacturers recommend that a minimum separation of 15cm be maintained between a mobile phone and a pacemaker to avoid potential interference with the pacemaker. To achieve this use the phone on the opposite ear to your pacemaker and do not carry it in a breast pocket.Hearing AidsSome digital wireless phones may interfere with some hearing aids. In the event of such interference, you may want to consult your hearing aid manufacturer to discuss alternatives.*In the United States, the SAR limit for wireless mobile phones used by the public is 1.6 watts/kg (W/kg) averaged over one gram of tissue. SAR values may vary depending upon national reporting requirements and the network band.The product “FOMA M2501 HIGH-SPEED” is declared to conform with the essential requirements of European Union Directive 1999/5/EC Radio and Telecommunications Terminal Equipment Directive 3.1(a), 3.1(b) and 3.2.The Declaration of Conformity can be found on www.motolora.com*The exposure standard for mobile phones employs a unit of measurement known as the Specific Absorption Rate, or SAR.** The SAR limit for mobile phones used by the public is 2.0 watts/kilogram (W/kg) averaged over ten grams of tissue, recommended by The Council of the European Union. The limit incorporates a substantial margin of safety to give additional protection for the public and to account for any variations in measurements.*** Tests for SAR have been conducted using standard operating positions with the phone transmitting at its highest certified power level in all tested frequency bands. Although the SAR is determined at the highest certified power level, the actual SAR level of the phone while operating can be well below the maximum value. This is because the phone is designed to operate at multiple power levels so as to use only the power required to reach the network. In general, the closer you are to a base station antenna, the lower the power output.Specific Absorption Rate of Mobile PhonesContinued on the next page
94AppendixFor other Medical Devices:Please consult your physician and the device manufacturer to determine if operation of your phone may interfere with the operation of your medical device.Export/Re-export regulations of Japan and USAThe export and re-export regulations of Japan and United States apply to this product and its accessories. Exports (and re-exports) contrary to those laws and regulations, including but not limited to exports and re-exports to sanctioned countries and to restricted end uses or end users is prohibited. A user must apply for approvals or permissions for export (or re-export) to the restricted countries at the user’s expense and responsibility in accordance with such regulations. For further information, contact Japanese Ministry of Economy, Trade, and Industry or the U.S. Department of Commerce.Export Controls of the Product and Accessories(Checking the specifications)This product and its accessories fall under the category of application of Japan Export Control Regulations (Foreign Exchange and Foreign Trade Law and relevant laws and regulations) and object cargo for export control stipulated in U.S. Export Control Regulations (Export Administration Regulations: EAR).Export or re-export that violates the above-mentioned regulations, such as export or re-export to the countries or end-users to which export or re-export is prohibited, or export or re-export for the prohibited end-use purpose, are prohibited. If you wish to bring the product into a country to which export is prohibited, please follow procedures including obtaining the export permits based on the regulations at your own risk and expense. For details, contact the Ministry of Economy, Trade and Industry or the U.S. Department of Commerce.Main Specifications■Operation SystemWindows 2000 Professional Japanese version, Service Pack 4 or laterWindows XP Home Edition Japanese version, Service Pack 1 or laterWindows XP Professional Japanese version, Service Pack 1 or later■Supported NetworkW-CDMA(800/2100MHz), GSM/GPRS(900/1800/1900MHz)■Communication SpeedPacket Communications: Maximum Receiving 3.6Mbps (best effort)Maximum Sending 384Kbps (best effort)64K Data Communications: Sending/Receiving 64KbpsVideo Call: Receiving/Sending 64Kbps■Operating EnvironmentWhen OperatingTemperature : 5 °C - 35 °CHumidity : XX% - XX% (no condensation)■Power SourceSupply VoltageDC5V±5% (supplied from the PC)Power ConsumptionMaximum Power during Communication: Approx. X.XWAverage Power during Communication: Approx. X.XWStandby: Approx. X.XW*: Depending on the usage, power consumption fluctuates.■PC Card TypePCMCIA Type II■DimensionsWidth : Approx. 130mmHeight : Approx. 18mm (some sections approx. 5.2mm)Depth : Approx. 54mm■WeightApprox. 75g• The specifications and appearance are subject to change for the sake of improvement without prior notice.Export Controls/Main Specifications
95AppendixIndex64K Data Communication  . . .  19Antenna Lamp. . . . . . . . .   16, 17AT Command List . . . . . . . . .  41AT Commands  . . . . . . . . . . .  40Before Using in Overseas  . . .   79Call Barring-Roaming  . . .   69, 84Call Forwarding Service. . . . . . . . . . . . . . . . . .   66, 73Call Waiting Service  . . . .   67, 73Caller ID Display Request Service. . . . . . . . . . . . . . . . . .   67, 73Caller ID Notification Service. . . . . . . . . . . . . . . . . .   65, 72Caller ID Service Setting. . . . . . . . . . . . . . . . . .   57, 64Card Settings  . . . . . . . . . . . .  64Communication Configuration File (Driver) . . . . . . . . . . . . . . .  24Communication Settings  . . . .  3264K Data Communication . . . . . . . . . . . . . . . . . . .  32Packet Communication. . . .  32Configuring Access Points (APN). . . . . . . . . . . . . . . . . . . . .  36Connecting to a PC . . . . . . . .  21Dial-up Connection . . . . . . . .   38Dial-up Network Settings . . . .  37Driver . . . . . . . . . . . . . . . . . .  24Dual Network Service  . . .   68, 74Earphone Microphone Jack. . . . . . . . . . . . . . . . . . . . .  16Earphone Ringtone Volume. . . . . . . . . . . . . . . . . . . . .  64Earphone Volume . . . . . . . . .  64Error Messages. . . . . . . . . . .  88FirstPass. . . . . . . . . . . . .   19, 39FOMA PC Configuration Software. . . . . . . . . . . . . . . . . . . . .  29Glossary . . . . . . . . . . . . . . . .  90Importing / Exporting Phonebook. . . . . . . . . . . . . . . . . . . . .  61InstallingCommunication Configuration File . . . . . . . . . . . . . . . .   24FirstPass PC Software. . . .   39FOMA PC Configuration Software . . . . . . . . . . . .   31Utility. . . . . . . . . . . . . . . . .   52International Calls . . . . . . . . .   58International Roaming . . . . . .   78Lamp (LED) Settings. . . . . . .   64Main Screen . . . . . . . . . . . . .   54Main Screen Setting . . . . . . .   64Making/Receiving a Call. . . . . . . . . . . . . . . . . . . 56, 58Making/Receiving a Call in Overseas  . . . . . . . . . . . 82, 83Mode Lamp  . . . . . . . . . . . 16, 17mopera/mopera U . . . . . . . 19, 32Multiaccess. . . . . . . . . . . . . .   86Names of Parts and Functions. . . . . . . . . . . . . . . . . . . . .   16Network Service Settings  . . .   65Network Services . . . . . . . . .   71Network Services while Roaming. . . . . . . . . . . . . . . . . . . . .   84Network Settings (Overseas Use). . . . . . . . . . . . . . . . . . . . .   62Nuisance Call Barring Service. . . . . . . . . . . . . . . . . . . 69, 75Operating EnvironmentsCommunication Configuration File (Driver) . . . . . . . . . .   24FirstPass PC Software. . . .   39FOMA PC Configuration Software . . . . . . . . . . . .   24Utility. . . . . . . . . . . . . . . . .   52Optional and Related Devices. . . . . . . . . . . . . . . . . . . . .   87Overseas Use. . . . . . . . . . . .   77Own Number Display  . . . . . .   56Packet Communication . . . . .   18Phonebook . . . . . . . . . . . . . .   59PIN1. . . . . . . . . . . . . . . . . . .   63Public Mode (Power Off) . . . .   76Purchased Product and Accessories. . . . . . . . . . . .   14Received Calls . . . . . . . . . . .   58Redial. . . . . . . . . . . . . . . . . .   57Rejecting Incoming while Roaming . . . . . . . . . . . . . . . . . .  69, 84Remote Control . . . . . . . .  70, 75Removing from PC . . . . . . . . . 22Ringtone  . . . . . . . . . . . . . . . . 64Roaming Guidance. . . . . .  70, 84Searching for Overseas Communication Provider . . . . . . . . . . . . . . . . . .  62, 84Security Settings  . . . . . . . . . . 63Services Available Overseas . . . . . . . . . . . . . . . . . . . . . 78Setting Up . . . . . . . . . . . .  23, 24Specifications . . . . . . . . . . . . . 94Troubleshootings . . . . . . . . . . 87Types of Communication  . . . . 18UIMInserting/Removing . . . . . . . 17PIN Code . . . . . . . . . . .  18, 63Slot. . . . . . . . . . . . . . . . . . . 16Versions . . . . . . . . . . . . . . . 18UIM PIN Setting . . . . . . . . . . .  63UninstallingCommunication Configuration File . . . . . . . . . . . . . . . . .  28FirstPass PC Software  . . . .  39FOMA PC Configuration Software . . . . . . . . . . . . . 34Utility  . . . . . . . . . . . . . . . . .  53Unlocking a Locked PIN . . . . . 63Using an Earphone Microphone . . . . . . . . . . . . . . . . . . . . . 86Utility . . . . . . . . . . . . . . . .  51, 52Card Settings . . . . . . . . . . . 64Help . . . . . . . . . . . . . . . . . . 56Launching/Exiting . . . . . . . . 55Making/Receiving a Voice Call. . . . . . . . . . . . . . . . .  56, 58Network Service Settings. . . 65Network Settings (Overseas Use) . . . . . . . . . . . . . . . . 62Phonebook . . . . . . . . . . . . . 59Received Calls . . . . . . . . . . 58Redial. . . . . . . . . . . . . . . . . 57Security Settings . . . . . . . . . 63Video Calls. . . . . . . . . . . . . . .  20Voice Calls. . . . . . . . . . . . . . .  20Voice Mail Service . . . . . .  66, 72Voice Prompt for Incoming/Outgoing Calls  . . . . . . .  68, 75Voice Prompt while Roaming . . . . . . . . . . . . . . . . . .  68, 84NumericsABCDEFGILMNOPRSTUVIndex
96AppendixWORLD WING . . . . . . . . . . . . 78W-TCP Settings . . . . . . . . . . . 35WIndex
Don’t forget your FOMA terminal … or your manners!When using the FOMA terminal, be considerate and do not disturb people around you.In the following cases, be certain to remove the FOMA terminal from the PC card slot.■Where use is prohibitedBe sure to turn off your FOMA terminal in airplanes and in hospitals.* Persons with electronic medical equipment are in places other than the actual wards.Make sure you have the power switched off even if you are in a lobby or waiting room.■When in crowded places such as packed trains, where you could be near a person with an implanted cardiac pacemaker or implanted defibrillator.The implanted cardiac pacemaker or implanted defibrillator operation can be affected by radio emissions from the FOMA terminal.In the following cases, be certain to set Public Mode.■While drivingUsing the FOMA terminal interferes with safe driving and could cause danger.* Park the car in a safe place before using the FOMA terminal, or switch to Public Mode.■When in theaters, movie theaters, museums, and similar venuesIf you use your FOMA terminal where you are supposed to be quiet, you will disturb those around you.Pay attention to your surroundings and the loudness of your voice and ringer.■Do not raise your voice when using the FOMA terminal in quiet places such as in restaurants or hotel lobbies.■Use the terminal so as not to disturb pedestrian traffic.These functions help you keep from disturbing others in public places.Handy functions are available silencing tones or for setting a silent response to incoming calls.●Public Mode (Power Off)A message is played to callers advising them that you are in a place where you cannot use your phone.  Then the call is disconnected. →P76●Voice Mail Service, Call Forwarding Service, etc.You can use an optional service to record/forward a caller’s message if the call is made when you cannot answer the phone. →P72, P73

Navigation menu