Motorola Mobility T6FK1 Portable PCS GSM Transceiver with Bluetooth User Manual A732 0819

Motorola Mobility LLC Portable PCS GSM Transceiver with Bluetooth A732 0819

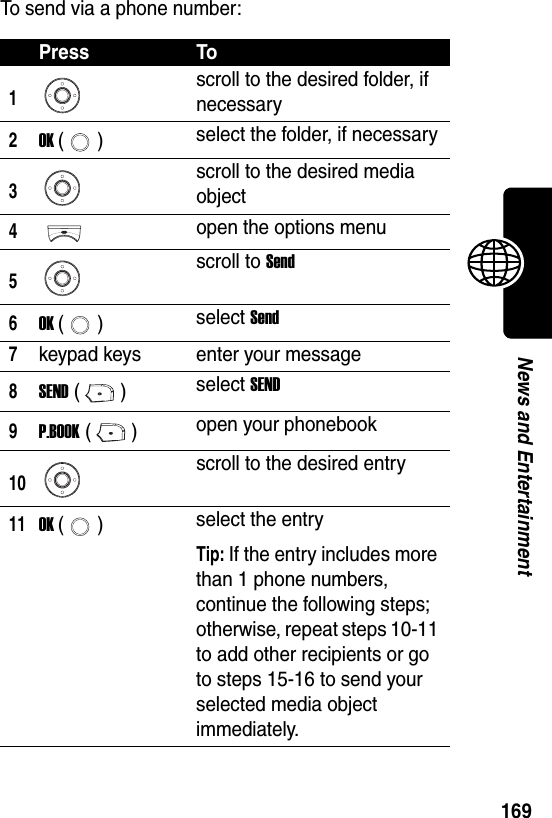
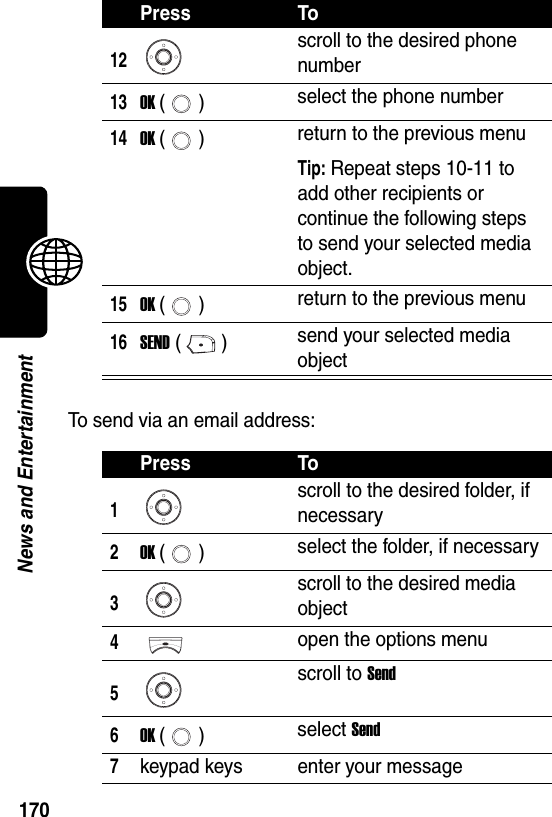
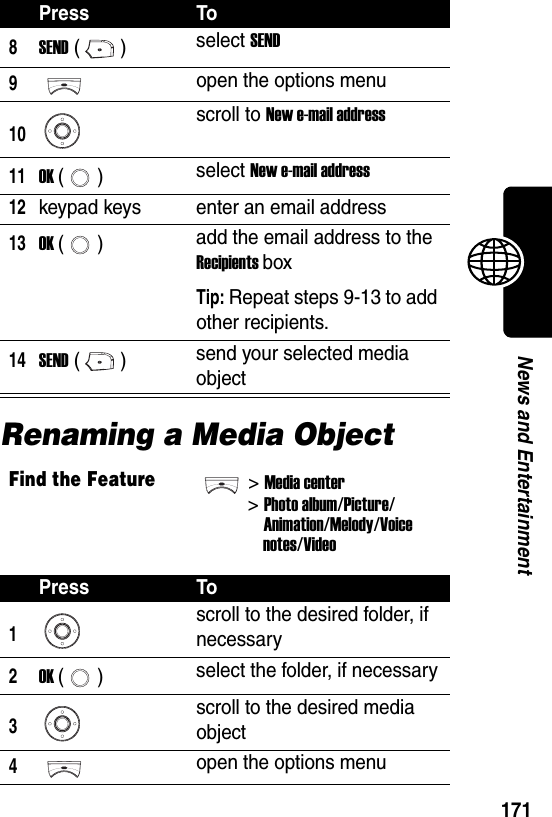
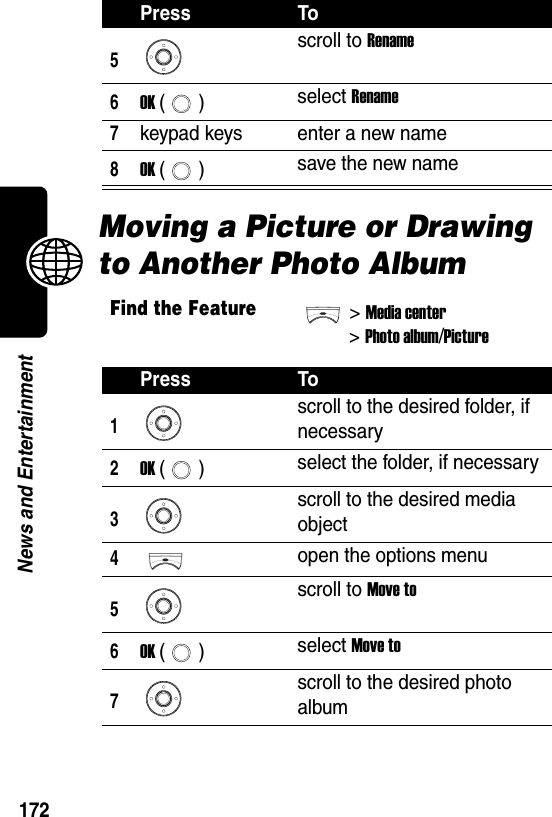
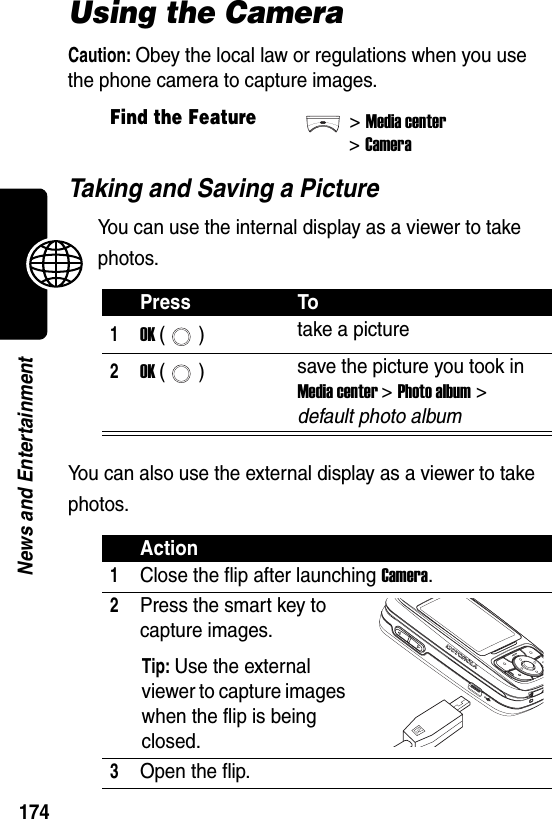
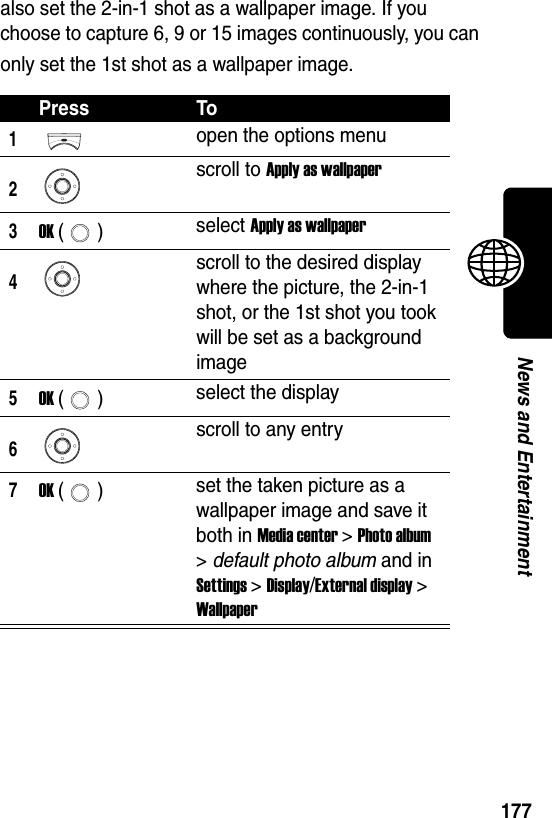
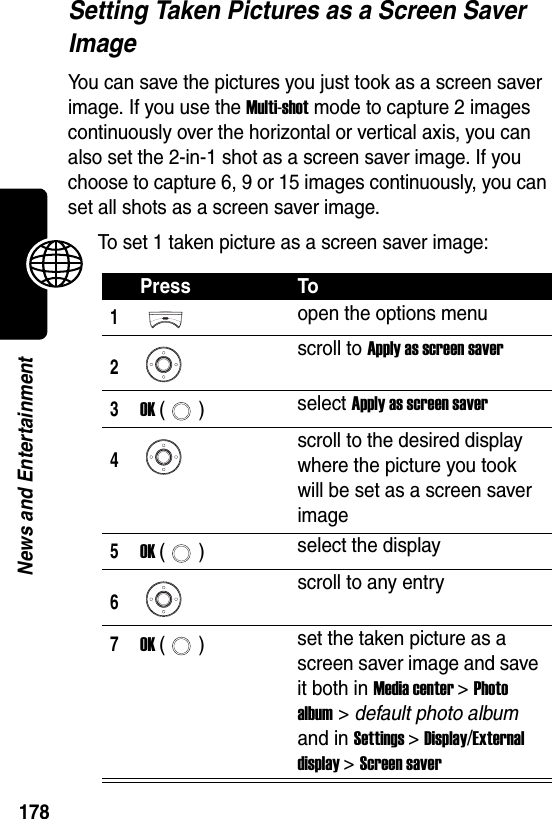
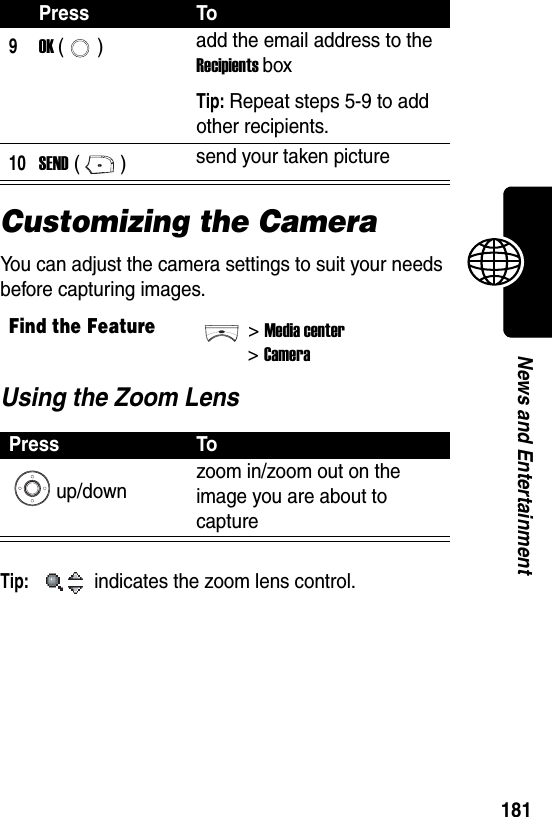
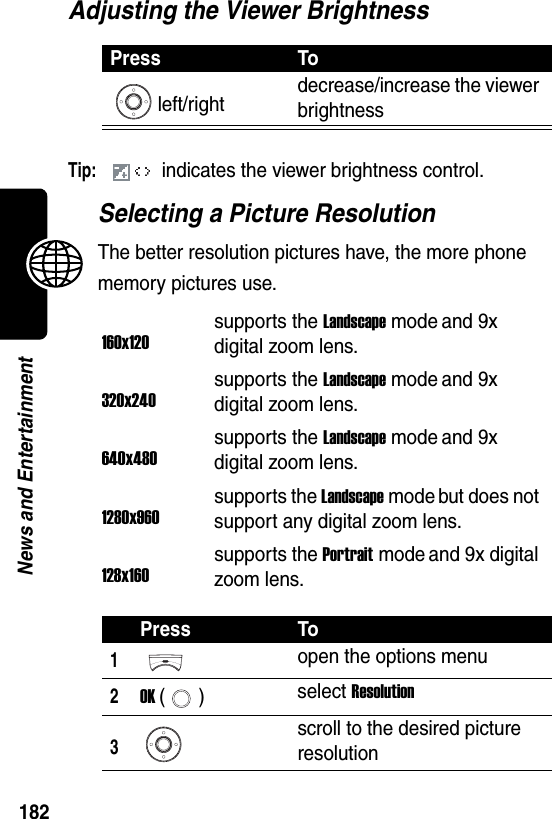
Exhibit 8 Users Manual 4

 147Personal Organizer FeaturesPlaying Voice CommandsYou can play the voice commands you recorded for voice launcher entries.4OK () select the application5right soft key ()start voice launchers and then say a command into the microphoneTip: If necessary, press START ( ) to record commands until Voice command saved displays.Find the Feature>Tools>Voice control >Voice commandsPress To1scroll to the desired voice launcher entry2OK () select the voice launcher entry3OK () play the voice command of the selected entryPress To
 Personal Organizer Features148Erasing Voice Launcher EntriesDisplaying World TimeFind the Feature>Tools>Voice control >Voice commandsPress To1scroll to the desired voice launcher entry2OK () select the voice launcher entry3scroll to Erase4OK () select Erase5OK () erase the selected voice launcher entryFind the Feature>Settings>Initial settings>Clock>World clockPress To1 scroll to the desired place2OK () display the corresponding time and other information about the selected place
 149Personal Organizer FeaturesUsing Voice NotesYou can use the voice recorder on your phone to record voice notes up to 30 seconds each.Caution: Obey the local law or regulations when you use the voice recorder.Playing a Voice NoteFind the Feature>Media center>Voice notesPress To1open the options menu2OK () select New3right soft key ()record a voice note4left soft key ()stop recording, if necessary5keypad keys enter a name6OK () save the recorded voice notePress To1scroll to the desired voice note2PLAY () play the selected voice note3BACK () stop playing the selected voice note, if necessary
 Personal Organizer Features150Tip: To turn the voice recorder off, press .Renaming a Voice NoteDeleting a Voice NotePress To1scroll to the desired voice note2open the options menu3scroll to Rename4OK () select Rename5keypad keys enter a new name6OK () save the new namePress To1scroll to the desired voice note2open the options menu3scroll to Delete4OK () select Delete5OK () delete the selected voice note
 151Personal Organizer FeaturesSending a Voice NoteYou can send voice notes to friends via either their phone numbers or email addresses.To send via a phone number:Find the Feature>Media center>Voice notesPress To1scroll to the desired voice note2open the options menu3scroll to Send4OK () select Send5keypad keys enter your message6SEND () select SEND7P.BOOK () open your phonebook8scroll to the desired entry
 Personal Organizer Features152To send via an email address:9OK () select the entryTip: If the entry includes more than 1 phone numbers, continue the following steps; otherwise, repeat steps 8-9 to add other recipients or go to steps 13-14 to send your selected voice note right away.10scroll to the desired phone number11OK () select the phone number12OK () return to the previous menuTip: Repeat steps 8-9 to add other recipients or continue the following steps to send your selected voice note.13OK () return to the previous menu14SEND () send your selected voice notePress To1scroll to the desired voice note2open the options menuPress To
 153Personal Organizer FeaturesViewing a Voice NoteYou can read the details of any voice note.3scroll to Send4OK () select Send5keypad keys enter your message6SEND () select SEND7open the options menu8scroll to New e-mail address9OK () select New e-mail address10keypad keys enter an email address11OK () add the email address to the Recipients boxTip: Repeat steps 7-11 to add other recipients.12SEND () send your selected voice noteFind the Feature>Media center>Voice notesPress To1scroll to the desired voice note2open the options menuPress To
 Personal Organizer Features154Sorting Voice NotesYou can sort voice notes by various types.3scroll to Details4OK () view the selected voice noteFind the Feature>Media center>Voice notesPress To1scroll to any voice note2open the options menu3scroll to Sort files4OK () select Sort files5scroll to the desired sorting type6OK () sort voice notes by the selected sorting typePress To
 155SecuritySecurityLocking and Unlocking the KeypadYou can lock the keypad to avoid accidental keypresses. Press to answer calls even if the keypad is locked.The keypad will be locked when no activity occurs in 20 seconds if you choose to lock it automatically.Tip: To unlock the keypad, press OK ( ) and from the idle display.Setting Closed User GroupsYou can subscribe closed user groups that are able to call you and receive your calls to the service provider. Select Preset to use the default closed user group you subscribed to your service provider.Find the Feature>Settings>Initial settings>Key lock>Lock now/AutoFind the Feature>Settings>Security>Closed user group>On
 156News and EntertainmentNews and EntertainmentPlaying a GameYou can play several fun games on your phone.Managing a Photo AlbumYou can create new photo albums, delete or rename photo albums, delete a picture(s) from photo albums, move a picture(s) to another photo album, select a photo album to create and play slide shows, and sort photo albums by name or date.Find the Feature>Games & apps>Embedded gamesFind the Feature>Media center>Photo albumPress To1scroll to the desired photo album2open the options menu
 157News and EntertainmentManaging Pictures in a Photo AlbumYou can turn the camera on to take pictures, send, rename, modify or delete pictures, set pictures as a wallpaper or screen saver image, select a picture to create a photo caller ID for phonebook entries or caller groups, move pictures to another photo album, read the details about pictures, select pictures to create and play slide shows, sort pictures by name, size or date, and customize the picture display mode in photo albums. Find the Feature>Media center>Photo albumPress To1scroll to the desired photo album2OK () select the photo album3scroll to the desired picture4open the options menu
 158News and EntertainmentDrawing a PictureYou can draw pictures on your own and use them as a wallpaper or screen saver image, or a photo caller ID for phonebook entries or caller groups.Follow the steps below if you press >Media center > Picture:Press OPTIONS ( ) or to add special effects to your drawings and save your drawings:Find the Feature>Media center>Pictureor>Tools>My picture>EditorPress To1open the options menu2OK () select NewOption DescriptionOpeninsert a background image or replace the background image or your drawing with another media objectSavestore your drawing in Media center > Picture
 159News and EntertainmentPen attribution > Pen modedraw dots/lines, add stamps, enter text by pressing ADD ( ) or erase dots/lines/stamps/textTip: Press to quickly select a Pen mode.Pen attribution > Pen colorselect a color for the pen to draw dots/lines or enter textTip: Press to quickly select a Pen color.Pen attribution > Pen sizespecify a size for the pen to draw dots/lines and also for the eraser to delete dots/lines/stamps/textTip: Press to quickly select a Pen size.Pen attribution > Pen stepdetermine how many steps for the pen and the eraser to move on the canvasZoom in/Zoom outzoom your drawing in or outOption Description
 160News and EntertainmentStamp optionsadd stamps as an overlap on your drawing (To activate, press > Pen attribution > Pen mode > Stamp > scroll to the desired stamp > press VIEW () > OK ( ) > scroll to moving the selected stamp to the desired place > press OK ( ). Repeat the last 2 steps if you want to add more stamps to your drawing.)orcreate stamps by capturing your drawing (To activate, press > Stamp options >> New >> Crop size (to specify the crop size) and/or Crop shape (to select a crop shape) > scroll to moving the crop box to the desired place > press > Save as stamp > key in the file name > press SAVE ().)Rotaterotate your drawingPicture sizespecify a size for the canvasClear screenerase all dots/lines/stamps/text from the canvasOption Description
 161News and EntertainmentTo start drawing pictures on the canvas:Cropping Pictures, Drawings or AnimationsYou can isolate a specific area of pictures, drawings or animations. A crop box will appear and everything outside of the box will be removed. You can also adjust the position, size and shape of the box or save cropped media objects as stamps by pressing OPTIONS () or .Press To1ormove the cursor to the desired direction2OK ()ordraw dots/lines and add stamps on the canvas or remove dots/lines/stamps/text from the canvasFind the Feature>Tools>My picture> Cropper
 162News and EntertainmentComposing a MelodyYou can compose melodies on your phone and use them as the ring tone for incoming calls.Creating a New MelodyYou can create a melody of your own.Tip: If you select Media center > Melody, refer to the steps below. If you select Tools > Tone editor, refer to steps 3-4 only.Find the Feature>Media center>Melodyor>Tools>Tone editorPress To1open the options menu2OK () select New3move the pointer4keypad keys compose your melody (see page 164)
 163News and EntertainmentChanging an Existing MelodyYou can adapt an existing melody to meet your needs.Tip: If you select Media center > Melody, refer to the steps below. If you select Tools > Tone editor, refer to steps 3-9 only.Press To1open the options menu2OK () select New3OPTIONS () open the options menu4OK () select Open5scroll to the desired melody6OK () select the melody7OK () insert the selected melody to the staff8left/right scroll to the desired note/rest9keypad keys change the selected note/rest (see page 164)
 164News and EntertainmentPress the following keys to compose melodies:Press Toinsert a C sharp noteinsert a D sharp noteinsert an E sharp noteinsert an F sharp noteinsert a G sharp noteinsert an A sharp noteinsert a B sharp noteincrease the length of the selected note/restmove the selected note 1 octave updecrease the length of the selected note/restmove the selected note 1 octave downinsert a restCLEAR ()remove the selected note/restup move the selected note up on the staffdown move the selected note down on the staff
 165News and EntertainmentSelecting an InstrumentYou can select an instrument to play your composed melody on the staff.Selecting a TempoYou can select a tempo to play your composed melody on the staff.Press To1OPTIONS () open the options menu2scroll to Instruments3OK () select Instruments4scroll to the desired instrument5OK () select the instrument6scroll to the desired option7OK () select the optionPress To1OPTIONS () open the options menu2scroll to Tempo3OK () select Tempo
 166News and EntertainmentPlaying Your Composed MelodyYou can play your composed melody on the staff.Saving Your Composed MelodyYou can store your composed melody in Media center > Melody.4scroll to the desired tempo5OK () select the tempoPress To1OPTIONS () open the options menu2scroll to Play3OK () play your composed melody with the selected instrument and tempoPress To1OPTIONS () open the options menu2scroll to Save3OK () select Save4keypad keys enter a name5OK () store your composed melody in Media center > MelodyPress To
 167News and EntertainmentClearing the StaffYou can delete all notes and rests from the staff.Viewing a Media ObjectMedia objects include pictures, drawings, animations, melodies, voice notes, and video clips.Press To1OPTIONS () open the options menu2scroll to Clear screen3OK () clear the staffFind the Feature>Media center>Photo album/Picture/Animation/Melody/Voicenotes/VideoPress To1scroll to the desired folder, if necessary2OK () select the folder, if necessary3scroll to the desired media object
 168News and EntertainmentSending a Media ObjectYou can send media objects to friends via either their phone numbers or email addresses.4OK () view or play the selected media objectTip: To display previous or next pictures/drawings, press up or down. To zoom in or zoom out on pictures/drawings, press OK () > scroll up or down. To navigate through the picture/drawing you zoomed in, press OK ( ) > scroll up, down, left or right. Pressing OK ( ) lets you toggle between the zooming mode and the navigation mode.Find the Feature>Media center>Photo album/Picture/Animation/Melody/Voicenotes/VideoPress To
 169News and EntertainmentTo send via a phone number:Press To1scroll to the desired folder, if necessary2OK () select the folder, if necessary3scroll to the desired media object4open the options menu5scroll to Send6OK () select Send7keypad keys enter your message8SEND () select SEND9P.BOOK () open your phonebook10scroll to the desired entry11OK () select the entryTip: If the entry includes more than 1 phone numbers, continue the following steps; otherwise, repeat steps 10-11 to add other recipients or go to steps 15-16 to send your selected media object immediately.
 170News and EntertainmentTo send via an email address:12scroll to the desired phone number13OK () select the phone number14OK () return to the previous menuTip: Repeat steps 10-11 to add other recipients or continue the following steps to send your selected media object.15OK () return to the previous menu16SEND () send your selected media objectPress To1scroll to the desired folder, if necessary2OK () select the folder, if necessary3scroll to the desired media object4open the options menu5scroll to Send6OK () select Send7keypad keys enter your messagePress To
 171News and EntertainmentRenaming a Media Object8SEND () select SEND9open the options menu10scroll to New e-mail address11OK () select New e-mail address12keypad keys enter an email address13OK () add the email address to the Recipients boxTip: Repeat steps 9-13 to add other recipients.14SEND () send your selected media objectFind the Feature>Media center>Photo album/Picture/Animation/Melody/Voicenotes/VideoPress To1scroll to the desired folder, if necessary2OK () select the folder, if necessary3scroll to the desired media object4open the options menuPress To
 172News and EntertainmentMoving a Picture or Drawing to Another Photo Album5scroll to Rename6OK () select Rename7keypad keys enter a new name8OK () save the new nameFind the Feature>Media center>Photo album/PicturePress To1scroll to the desired folder, if necessary2OK () select the folder, if necessary3scroll to the desired media object4open the options menu5scroll to Move to6OK () select Move to7scroll to the desired photo albumPress To
 173News and EntertainmentPlaying a Java GameYou can play several Java games on your phone.Tip: Before playing Java games, set the amount of time that both the display and the keypad backlights remain on to maximum. (To activate, press > Settings > Initial settings >Backlight >20 secs.)Configuring Java Settings8OK () move the selected media object to the specified photo albumFind the Feature>Games & apps>JavaFind the Feature>Games & apps>Java settingsPress To
 174News and EntertainmentUsing the CameraCaution: Obey the local law or regulations when you use the phone camera to capture images.Taking and Saving a PictureYou can use the internal display as a viewer to take photos.You can also use the external display as a viewer to take photos.Find the Feature>Media center>CameraPress To1OK () take a picture2OK () save the picture you took in Media center > Photo album > default photo albumAction1Close the flip after launching Camera.2Press the smart key to capture images.Tip: Use the external viewer to capture images when the flip is being closed.3Open the flip.
 175News and EntertainmentThe icons shown in the internal display indicate the following:Naming a Taken Picture ManuallyYou can manually name the pictures you just took and store them in your phone. The taken pictures you saved are automatically named by default.4Press OK ( ) to save the picture you took in Media center > Photo album > default photo album.press the right soft key ( ) or OK ( ) to save the pictures you took in Media center > Photo album > default photo album Tip: The taken pictures you saved are automatically named. To rename them, see page 171.press the left soft key ( ) to turn the camera offTip: You can also press to turn the camera off.Press To1open the options menu2scroll to RenameAction
 176News and EntertainmentRotating PicturesYou can rotate the pictures you just took to the desired direction.Tip: This option is available only for pictures with the 128x160 resolution.Setting Taken Pictures as a Wallpaper ImageYou can set the pictures you just took as a wallpaper image. If you use the Multi-shot mode to capture 2 images continuously over the horizontal or vertical axis, you can 3OK () select Rename4keypad keys enter a name5OK () save the picture you just tookPress To1open the options menu2scroll to Rotate3OK () select Rotate4scroll to the desired rotational direction5OK () rotate the picture you just took to the desired directionPress To
 177News and Entertainmentalso set the 2-in-1 shot as a wallpaper image. If you choose to capture 6, 9 or 15 images continuously, you can only set the 1st shot as a wallpaper image.Press To1open the options menu2scroll to Apply as wallpaper3OK () select Apply as wallpaper4scroll to the desired display where the picture, the 2-in-1 shot, or the 1st shot you took will be set as a background image5OK () select the display6scroll to any entry7OK () set the taken picture as a wallpaper image and save it both in Media center > Photo album > default photo album and in Settings > Display/External display > Wallpaper
 178News and EntertainmentSetting Taken Pictures as a Screen Saver ImageYou can save the pictures you just took as a screen saver image. If you use the Multi-shot mode to capture 2 images continuously over the horizontal or vertical axis, you can also set the 2-in-1 shot as a screen saver image. If you choose to capture 6, 9 or 15 images continuously, you can set all shots as a screen saver image.To set 1 taken picture as a screen saver image:Press To1open the options menu2scroll to Apply as screen saver3OK () select Apply as screen saver4scroll to the desired display where the picture you took will be set as a screen saver image5OK () select the display6scroll to any entry7OK () set the taken picture as a screen saver image and save it both in Media center > Photo album > default photo album and in Settings > Display/External display > Screen saver
 179News and EntertainmentTip: To set 6, 9 or 15 shots as a screen saver image (selecting Multi-shot > Continuous), see page 186. To set 2-in-1 shots as a screen saver image (selecting Multi-shot > Composite), see page 189.Sending a PictureYou can send the pictures you just took to friends via either their phone numbers or email addresses.To send via a phone number:Press To1open the options menu2OK () select Send3keypad keys enter your message4SEND () select SEND5P.BOOK () open your phonebook6scroll to the desired entry7OK () select the entryTip: If the entry includes more than 1 phone numbers, continue the following steps; otherwise, repeat steps 6-7 to add other recipients or go to steps 11-12 to send your taken picture immediately.
 180News and EntertainmentTo send via an email address:8scroll to the desired phone number9OK () select the phone number10OK () return to the previous menuTip: Repeat steps 6-7 to add other recipients or continue the following steps to send your taken picture.11OK () return to the previous menu12SEND () send your taken picturePress To1open the options menu2OK () select Send3keypad keys enter your message4SEND () select SEND5open the options menu6scroll to New e-mail address7OK () select New e-mail address8keypad keys enter an email addressPress To
 181News and EntertainmentCustomizing the CameraYou can adjust the camera settings to suit your needs before capturing images.Using the Zoom LensTip: indicates the zoom lens control.9OK () add the email address to the Recipients boxTip: Repeat steps 5-9 to add other recipients.10SEND () send your taken pictureFind the Feature>Media center>CameraPress Toup/down zoom in/zoom out on the image you are about to capturePress To
 182News and EntertainmentAdjusting the Viewer BrightnessTip: indicates the viewer brightness control.Selecting a Picture ResolutionThe better resolution pictures have, the more phone memory pictures use.Press Toleft/right decrease/increase the viewer brightness160x120supports the Landscape mode and 9x digital zoom lens.320x240supports the Landscape mode and 9x digital zoom lens.640x480supports the Landscape mode and 9x digital zoom lens.1280x960supports the Landscape mode but does not support any digital zoom lens.128x160supports the Portrait mode and 9x digital zoom lens.Press To1open the options menu2OK () select Resolution3scroll to the desired picture resolution
 183News and EntertainmentTip: indicates the options menu indicator.Selecting a Picture QualityThe better quality pictures have, the more phone memory pictures use.4OK () prepare to capture imagesFineprovides best quality.Normalprovides regular quality.Basicprovides poor quality.Press To1open the options menu2scroll to Quality3OK () select Quality4scroll to the desired picture quality5OK () prepare to capture imagesPress To

Navigation menu