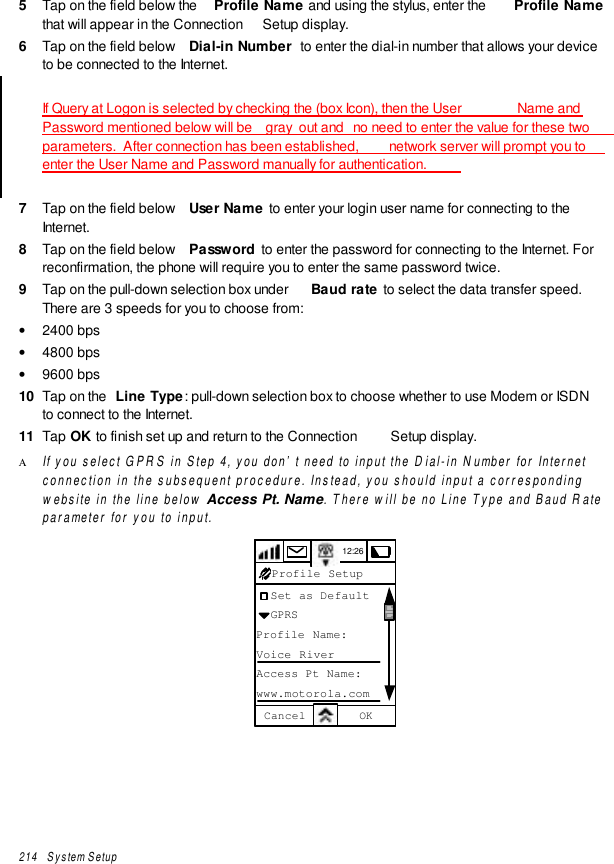
Motorola Mobility T6BK1 PCS portable transceiver User Manual BK EX08a
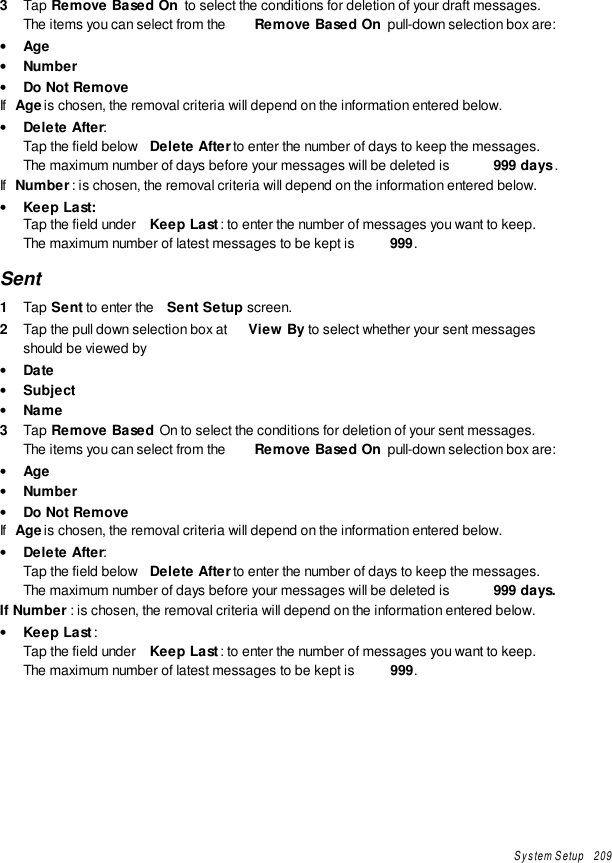
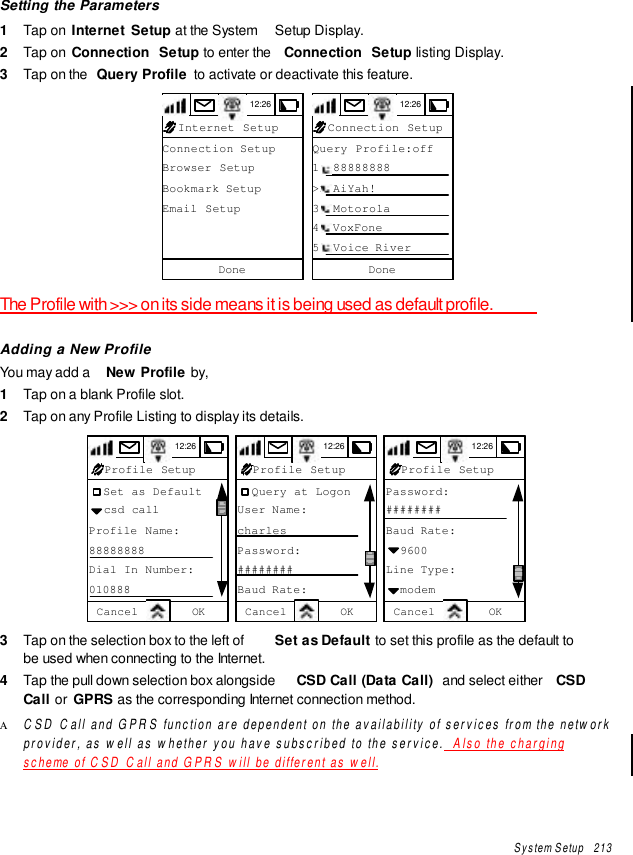
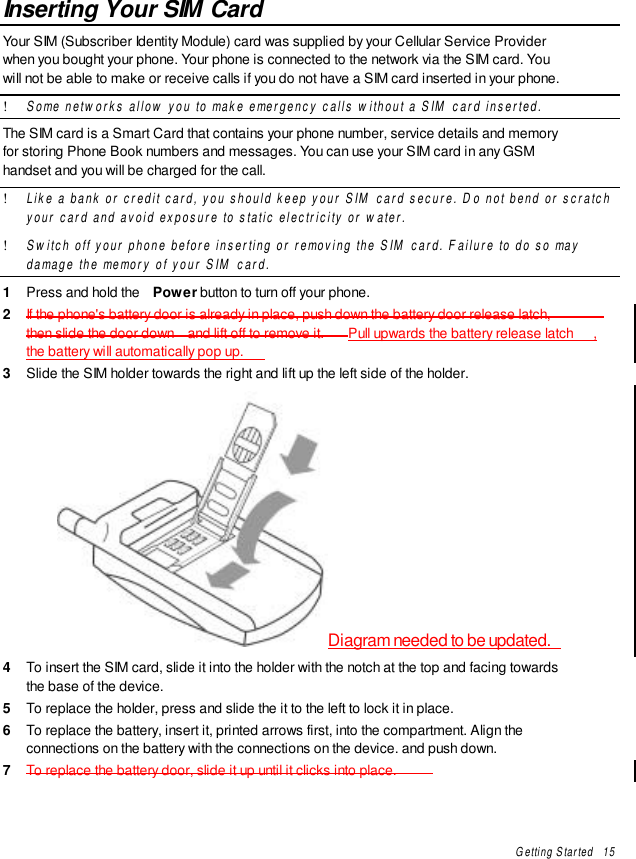
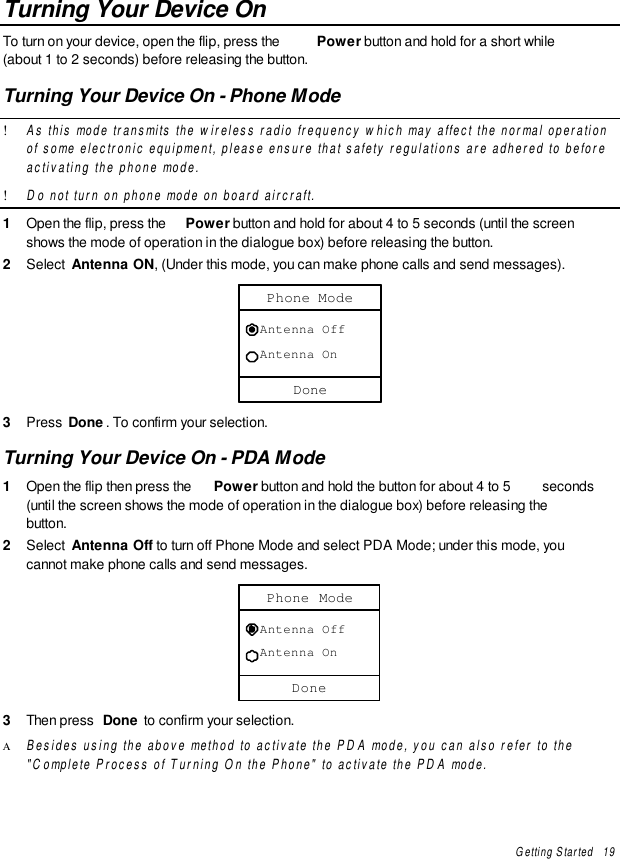
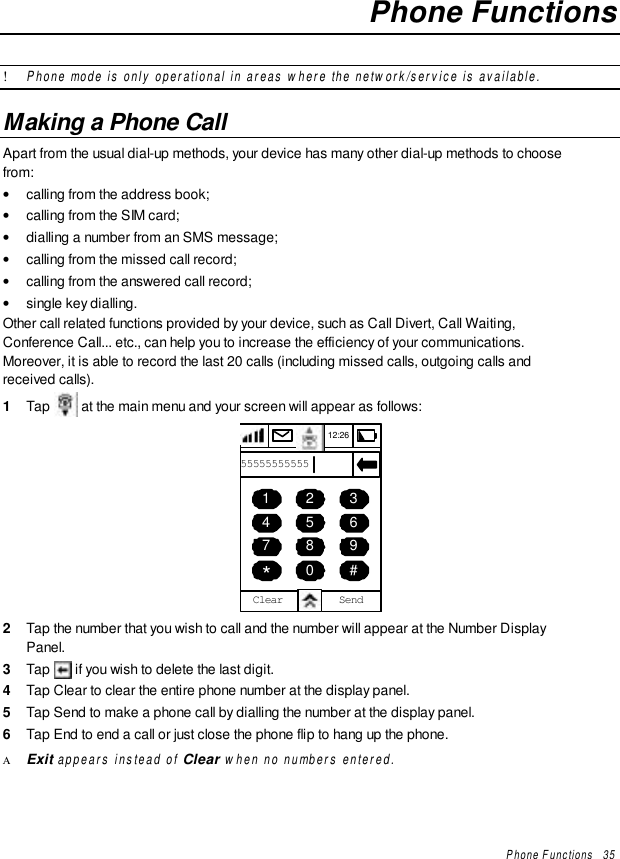
Motorola Mobility LLC PCS portable transceiver BK EX08a
UserManual.wiki
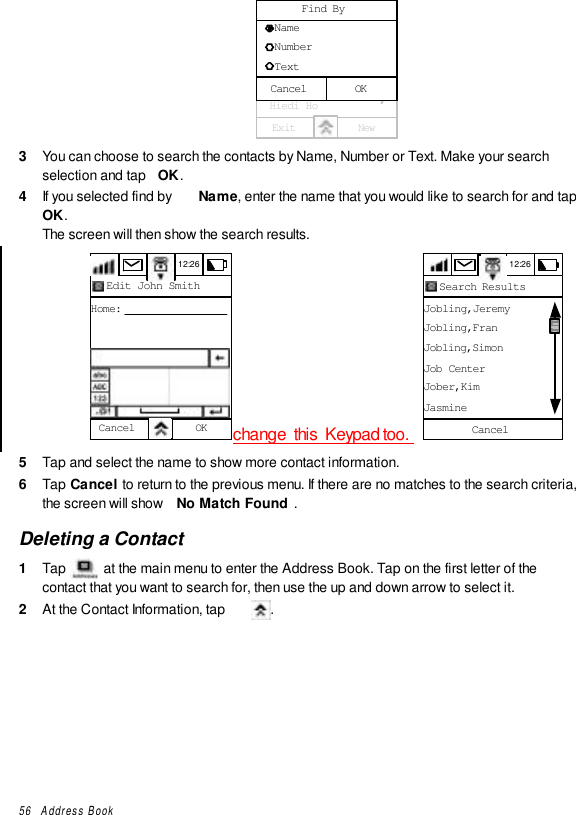
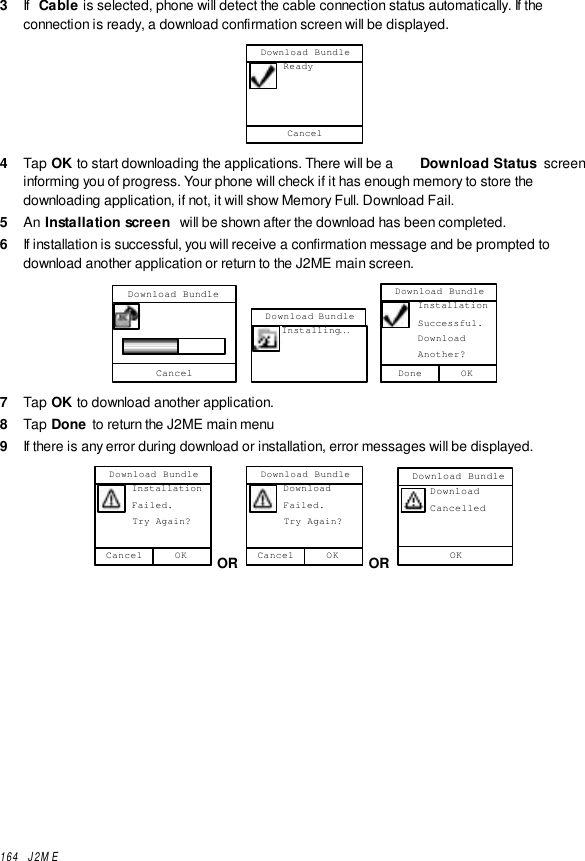
>
Motorola Mobility
>
T6BK1 User Manual
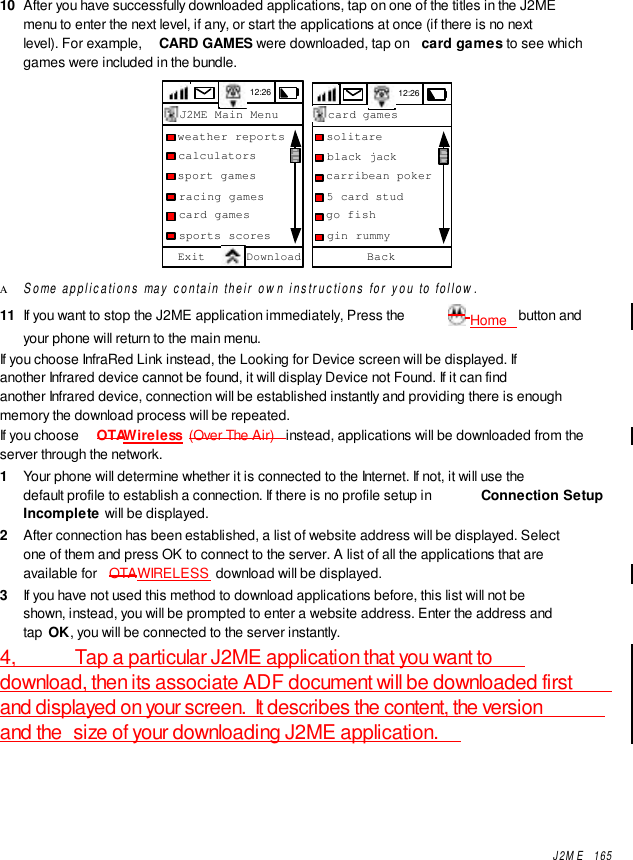
Exhibit 8 Preliminary Users Manual Draft
Navigation menu
Upload a User Manual
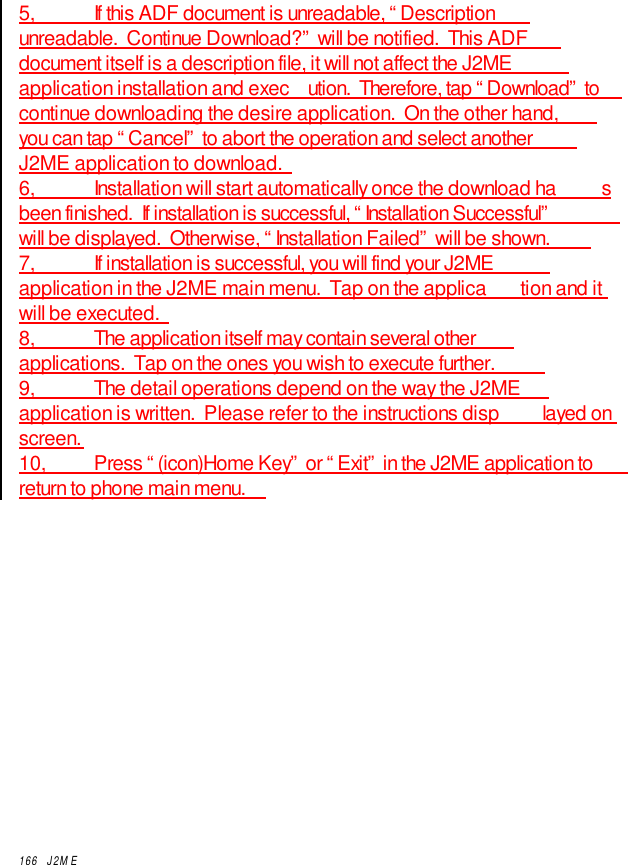
Namespaces
Wiki Guide
HTML
PDF
Info
Views
User Manual
Discussion / Help
Navigation


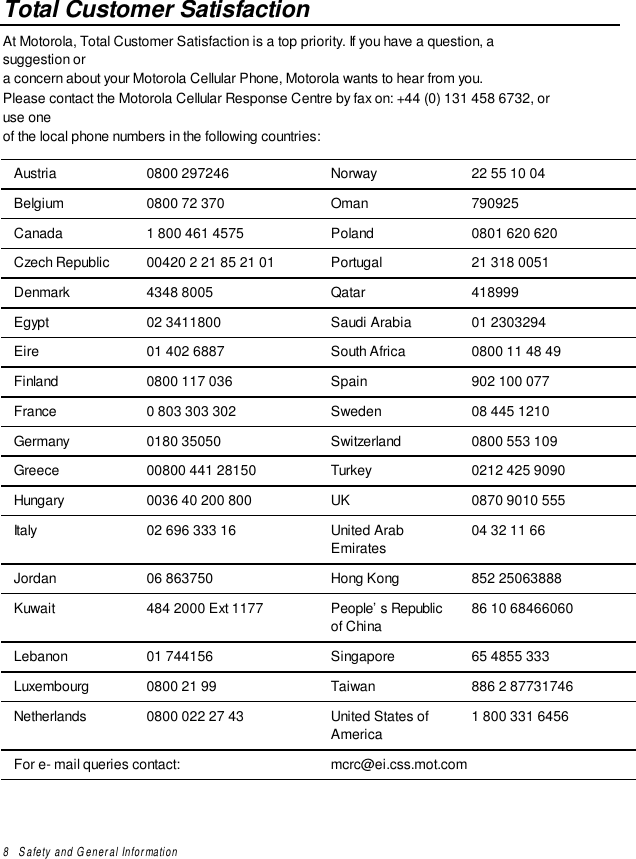
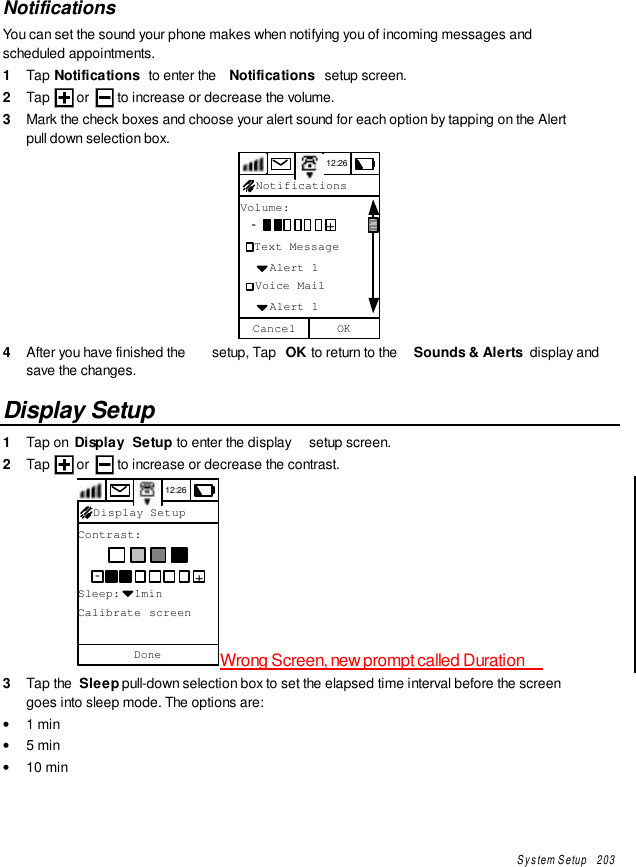
![10 Safety and General InformationWarranty InformationMotorola guarantees to you, the original purchaser, the Personal Communicator andaccessories which you have purchased from an authorised Motorola dealer (the “Products”),to be in conformance with the applicable Motorola specifications current at the time ofmanufacture for a term of [1] year from date of purchase of the Product(s) (Warranty Term).You must inform Motorola of the lack of conformity to the applicable specifications of any ofthe Products within a period of two (2) months from the date on which you detect a defect inmaterial, workmanship or lack of conformity and in any event within a term not to exceed theWarranty Term, by submitting the Product for service to Motorola. Motorola shall not bebound by Product related statements not directly made by Motorola.A list of the Motorola Call Centre numbers is enclosed with this Product.During the Warranty term, Motorola will, at its discretion and without extra charge, as yourexclusive remedy, repair or replace your Product which does not comply with this warranty;or failing this, to reimburse the price of the Product but reduced to take into account the useyou have had of the Product since it was delivered. This warranty will expire at the end of theWarranty Term.This is the complete and exclusive warranty for a Motorola Personal Communicator andaccessories and in lieu of all other warranties, terms and conditions, whether express orimplied.Where you purchase the product other than as a consumer, Motorola disclaims all otherwarranties, terms and conditions express or implied, such as fitness for purpose andsatisfactory quality.In no event shall Motorola be liable for damages nor loss of data in excess of the purchaseprice nor for any incidental special or consequential damages* arising out of the use orinability to use the Product, to the full extent such may be disclaimed by law.*This Warranty does not affect any statutory rights that you may have if you are aconsumer, such as a warranty of satisfactory quality and fit for the purpose for whichproducts of the same type are normally used under normal use and service, nor any rightsagainst the seller of the Products arising from your purchase and sales contract.How to get Warranty ServiceIn order to be eligible to receive warranty service, you must present your receipt of purchaseor a comparable substitute proof of purchase bearing the date of purchase. The PersonalCommunicator should also clearly display the original compatible electronic serial number(IMEI) and mechanic serial number [MSN]. Such information is contained with the Product. *) including without limitation loss of use, loss of time, loss of data, inconvenience,commercial loss, lost profits or savings.](https://usermanual.wiki/Motorola-Mobility/T6BK1/User-Guide-182963-Page-21.png)


![74 Address BookSending Short Messages from Through Address Book1 Repeat step 1 from Making Phone Calls Through Your Address Book.2 Tap on the mobile phone number to display the New Message screen.12:26New Message [0000] Herry HaMessage:Cancel Send3 Compose your SMS, and then tap SEND .Sending E-Mail from Your Address Book1 Repeat step 1 from Making Phone Calls Through Your Address Book.2 Tap on the email address of the recipient to display the New Message screen.3 Compose your email, then tap send.12:26New MessageTo:HaHa@yahoo.comCC:Subject:Message:Cancel SendΑ For more detail on how to add an attachment to the email, please refer to Send Attachmentfrom the Email Function section.](https://usermanual.wiki/Motorola-Mobility/T6BK1/User-Guide-182963-Page-89.png)

![SMS 77SMSYour device besides being used for normal voice calls possesses the capability of sending,managing and receiving messages to and from other devices.At the Main menu tap to enter the Message Centre display. The Message Centre iswhere your messages are organised. There are 9 default folders where messages of varioustypes can be stored. You may also create your own personal folders. A number that appearsoutside the brackets indicates the total number of messages in each folder. A number insidethe brackets indicates the number of new or unread messages.GSM Carrier12:26MESSAGE CENTREList of Folders• Voice Mail• Inbox• Info Services• Quick Text• Personal Folders (ifcreated)• SIM Card• Outbox• Sent• Draft• TrashFor example, the screen below shows that your Text Msgs. folder contains a total of 14messages of which 12 are new or unread.12:26Message CentreVoice mailInbox [12]14Info SvcQuick TextSIM card [2]5Outbox 1Exit Compose](https://usermanual.wiki/Motorola-Mobility/T6BK1/User-Guide-182963-Page-93.png)

![SMS 80Sending SMS MessagesThis option allows you to send messages to other cellular phones that support SMS service.1 At the Main menu Display, tap to enter the Message Centre Display.2 At the Message Centre Display, tap Compose to enter New Message display.GSM Carrier12:26 12:26Message CentreVoice mailInbox [12]14Info SvcQuick TextSIM card [2]5Outbox 1Exit Compose 12:26New Message[0000]Cancel SendMessage:Needed to chang eThere are two ways to input recipients particulars.3 Tap on the field alongside the To: prompt to display the numeric keypad. Use the keypadto enter the recipient's phone number and tap OK.12:26New MessageTo:15555555555Cancel Ok1 2 34 5 6 #*.7 8 9 0Alternatively, tap on the To: prompt to display a list of names. Scroll through the list to makeyour selection. This method allows multiple entries of recipients.](https://usermanual.wiki/Motorola-Mobility/T6BK1/User-Guide-182963-Page-96.png)
![SMS 8112:26Send to Fran Lang Gid E.Yup Giordano Wi Golf Group Jon Hua Sarry LuCancel OK4 Tap OK and the recipients name will be placed in the To: field.5 Tap Cancel to return to the New Message display and the To: field will remain unchanged.12:26New Message[0000]To: Fran Lang;Jon Hua;15555555555Message:Cancel Send! Only those names with mobile phone numbers stored in the Address book will be shown inthe list for selection. Names with other phone numbers will not displayed.Α Selecting multiple recipients allows one message to be sent to multiple recipients.6 Tap on the Message field to enter the text editor. Enter your message and Tap OK tosave the message and return to the New message display.](https://usermanual.wiki/Motorola-Mobility/T6BK1/User-Guide-182963-Page-97.png)
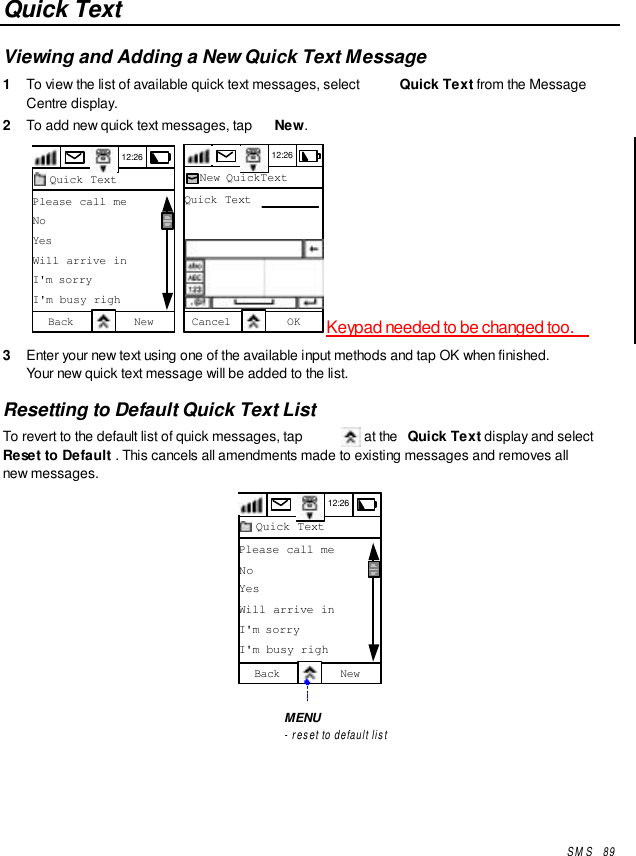
![SMS 8212:26New messageMessage:Cancel Ok Needed to be changed for the keypad7 To speed up message editing, you can also make use of the library of pre-definedphrases. At the New Message display, tap and select Quick Text. Tap any of the textto select it and place it into the message editor. Tap New to add your own words or textsinto the existing library and then tap OK to save.12:26New Message[0000]Cancel SendMessage: 12:26Quick TextPlease call meNoYesWill arrive inLater for meetWhere are youBack New 12:26New QuickTextQuick TextCancel OKMENU- QuickText- save to draft- send laterIf you want to continue entering text, go back to step 6. After you have finished enteringyour message, tap OK to save it and go back to the New Message display.If you want to save the message and work on it later, tap at the New Message displayand then tap Save to Drafts to save the message in your Draft Folder without sending it.You can still retrieve edit or send the message later.Α If you want to send the message later at a particular time instead of sending it immediately,tap at the New Message display and then tap Send Later. To set the time for sendingthe message. Use the up or down arrows to adjust the time and tap OK to set it. Yourmessage will be stored in the Outbox and will be sent automatically at the time you set.Α The time format depends upon your initial set up.](https://usermanual.wiki/Motorola-Mobility/T6BK1/User-Guide-182963-Page-98.png)
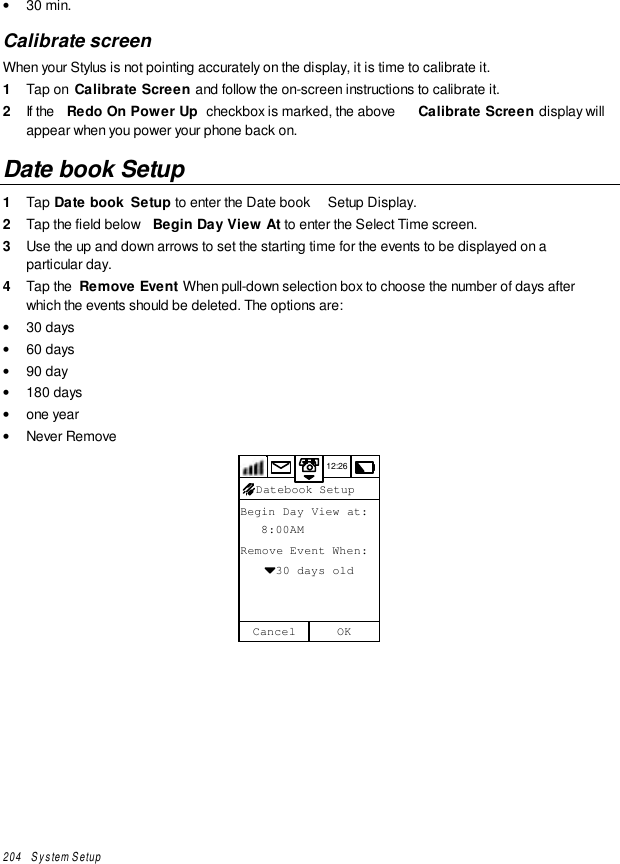
![SMS 8312:26New Message[0000]Cancel SendMessage: OKCancelSave Messageto Drafts?Cancel12Select TimeOK: 45MENU- QuickText- save to draft- send laterSendingScheduled! Scheduled sending of message will only be effective provided that you are within yourCellular Service Providers coverage and your device is turned on at the scheduled time.](https://usermanual.wiki/Motorola-Mobility/T6BK1/User-Guide-182963-Page-99.png)

![SMS 85Receiving Text Messages1 Tap Inbox to enter the Inbox display. This display lists all the messages in your textmessage folder.2 Scroll to the folder containing the messages that you want view and select it.3 Tap and tap View By to display a list of viewing options.4 Select one and tap OK and your messages will be arranged accordingly.12:26Message CentreVoice mailInbox [12]14Info SvcQuick TextSIM card [2]5Outbox 1Exit Compose 12:26Text messages I'll be late 68779933(13/05 I'm sorryI'm busy right 67997733(01/09okBack Compose OKCancelView By date subject senderMENU- view by- move all to trash- setup folder5 To view the unread message "I'll be late", select the message to display it in full.12:26Text messageFrom:139010998992000/05/07 12:35PMI'm busy rightnow, will callyou later.I'm sorry.Back Reply12:26New Message[0000]Cancel SendMessage:6 To send a reply, tap Reply to enter the New Message Display. The name or phonenumber of the sender will be entered automatically at the To: prompt. After you haveentered your message, tap Send to deliver it.7 If you want to delete all of the messages, select Move All to Trash.8 To edit setup information previously defined in Message Setup, select Setup Folder .](https://usermanual.wiki/Motorola-Mobility/T6BK1/User-Guide-182963-Page-101.png)

![SMS 87If you want to save the message, tap and select Move to Folder display. Select thefolder in which the message should be saved and tap OK to save it.12:26Text messageFrom:139010998992000/05/07 12:35PMI'm busy rightnow, will callyou later.I'm sorry.Back Reply Cancel Folder (A) Folder (B) Folder (C) Folder (D)Move to FolderOKMENU- return call- move to trash- forward message- compose message- move to folderForward a Message1 If you want to forward a message to someone else, tap and select Forward Messageto enter the Forward Message screen.12:26Message: I'm busyright now, willcall you later.01065641678.SendCancelForward Msg[0052] 12:26Send to Fran Lang Gid E.Yup Alan Green Golf Group Jon Hua Sarry LuCancel OK2 Tap on the To: prompt to display a list of names. Scroll through the list to make yourselection.This method allows multiple entries of recipients.3 Tap OK and the recipients name will be placed in the To: field in the Forward MessageDisplay.4 Tap SEND to forward the message.](https://usermanual.wiki/Motorola-Mobility/T6BK1/User-Guide-182963-Page-103.png)
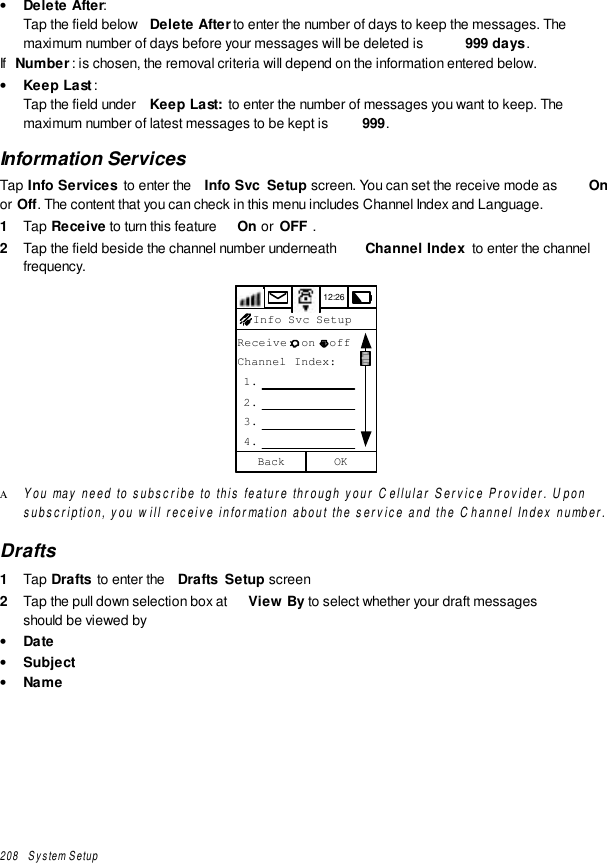
![SMS 90Adding a Quick Text Message to an SMSTo add a quick text message into your message content, select the message to be addedfrom the list of messages.12:26Quick TextPlease call meNoYesWill arrive inI'm sorryI'm busy righBack New 12:26New Message[0014]Cancel Send I'mbusy right now,will call youlater.I'm sorry.Message:Alan Green;1 Tap the message area and your message will be added at that point.2 Tap SEND to deliver the message.SIM Card1 By selecting SIM Card in the Message Centre display, you can view all messages savedin your SIM card memory. This is the default location where incoming messages aresaved. View the content ofa specific message by selecting it.2 You can reply to the sender by clicking REPLY and composing your response in the NewMessage display. Once completed, tap SEND to deliver the message.12:26Message CenterVoice mailInbox [12]14Info SvcQuick TextSIM card [2]5Outbox 1Exit Compose 12:26SIM Card I'm busy ri I'm sorry I'm on the meet me at please call the meetingBack Compose 12:26SIM CardSender: AstridSent:04/10/2001-12:03I'm busynow,will callyou laterBack Reply 12:26New Message[0000]Cancel SendMessage:](https://usermanual.wiki/Motorola-Mobility/T6BK1/User-Guide-182963-Page-106.png)


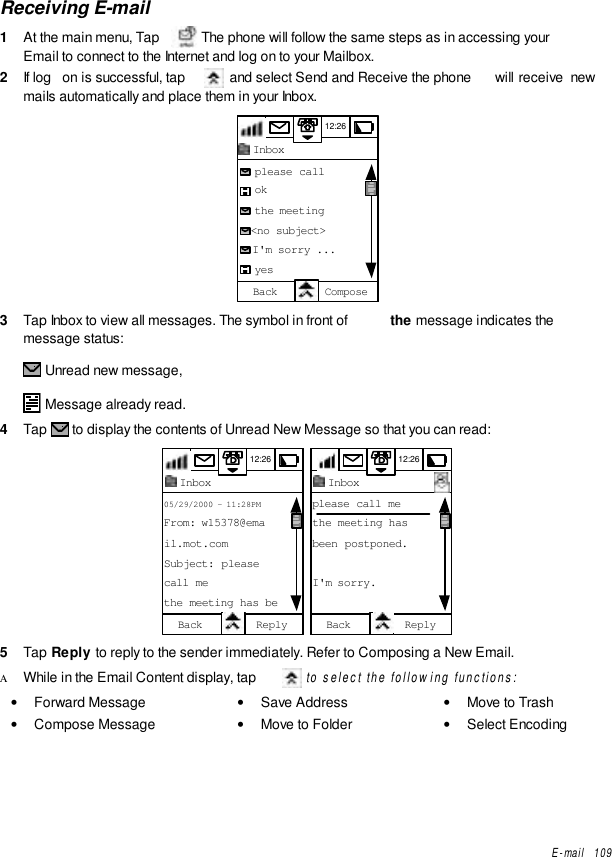
![104 E-mail1 The phone will start connecting to the Internet, and if successful will start to log on to yourmailbox. In Email Setup, you will have been given the option to set a default mailbox; it isthis mailbox that the phone is trying to access.Cancel Connecting...Your phone will display the contents of your default mailbox. It will be similar to that shown inthe example below.Α The list of folders will depend on your email service provider and whether you have createdany user-defined folders.12:26 MyMail.comInbox [23]92Family [16]31Friends [ 0] 9Proj Gold [ 1] 7Ski Pals [ 0] 0Drafts 2Exit ComposeIf during Email Setup you did not set a default mailbox,2 Tap the Single Selection Box on the left to select the mailbox.3 Tap OK to confirm selection.Cancel 88888888 AiYah! Motorola VoxFone Voice RiverSelect ProfileOK4 Your phone will start to log on to the mailbox you have selected. If log on is successful, your phone will display the con tents of this mailbox.If logon is unsuccessful the following message will be displayed.](https://usermanual.wiki/Motorola-Mobility/T6BK1/User-Guide-182963-Page-121.png)

![106 E-mailComposing a New E-mail1 At the display showing the contents of your mailbox, the numbers within the [ ] representhow many NEW Email messages you have. Numbers outside the [ ] represent the TotalNumber of Email messages present in each folder of the mailbox.For example, your user-defined folder FAMILY contains a TOTAL of 31 Email messagesof which 16 are NEW.12:26 MyMail.comInbox [23]92Family [16]31Friends [ 0] 9Proj Gold [ 1] 7Ski Pals [ 0] 0Drafts 2Exit Compose2 Tap Compose to enter the New message Display.12:26New MessageTo:CC:Subject:Message:Cancel Send 12:26New Message Andy Lee Coco Liu Double Wang Musie Vicki Du Wagon MaCancel OK3 Tap To: to display a list of those contacts for which you have entered email addresses orthat have Email addresses associated with them.4 Select the recipients of your new Email and tap OK.Α The phone can only display one Email address per recipient.5 If necessary, you may tap select CC and repeat step 4 to send copies to otherrecipients simultaneously.6 You may also Tap select BCC and repeat step 4 to send the mail privately to a thirdrecipient.Α From the received mail, the first and second recipients will not know that the mail has beensent to the third recipient.](https://usermanual.wiki/Motorola-Mobility/T6BK1/User-Guide-182963-Page-123.png)


![E-mail 111Managing your EmailThere are different options open to you for managing your Email, depending on the type offolder that you choose.The information below lists the functions that you can perform on a folder-by-folder basis.The functions are presented by tapping on at each folder display.Creating your Own FoldersFolders can be created either Online or Offline.Tap and select New folder to enter the new folder display. Refer to Folder Setup forfurther details.12:26 MyMail.comInbox [23]92Family [16]31Friends [ 0] 9Proj Gold [ 1] 7Ski Pals [ 0] 0Drafts 2Exit Compose Name:Routing:View By: subjectRemove Based On: do not removeKeep Last:New Folder12:26OKCancelEditing email in your Drafts folder1 Tap Drafts at the Main Screen display. All titles of unfinished Email title will be displayed.12:26DraftsPlease call meNoYesWill arrive inI'm sorryI'm busy righBack TrashAll](https://usermanual.wiki/Motorola-Mobility/T6BK1/User-Guide-182963-Page-128.png)


![178 System SetupMemory UsageMany of your devices functions like the Address book, Messages Centre, Date Book, NotePad, Ink Pad, etc., use the main memory of the device, while the SIM Card phone book andshort message folder use the memory of the SIM Card. When you try to save information inthe main memory and the memory is full, the following message will be displayed.12:26Message CenterVoice MailText Msgs [0]0Info SvcQuick TextSIM Card [0]0Outbox 5exit compossOK Memory Full! Action Unavailable.You may choose to delete some information from the various phone functions or transfer theinformation to a PC using data synchronisation, thus freeing up the memory space.Checking Memory Usage StatusTap at the main menu to display the System Setup list. At the System Setup menu, tapMemory Usage to enter the Memory Usage display.12:26Memory Used 75%Address Book: 2KMessage Ctr: 2KeMail: 40KNote Pad: 3KDoneMemory usage 12:26Ink Pad: 3KDate Book: 10KTasks: 2KComposer: 2KJ2ME: 35%Voice Notes: 8%DoneMemory usage 12:26Tasks: 2KComposer: 2KJ2ME: 35%Voice Notes: 8%SIM Addr Bk: 5%SIM Folder: 3%DoneMemory usageThe first display gives you a percentage used figure for phone memory as well asinformation relating to the amount of memory being used by each phone function. Use thescroll bar to view the amount of memory used by a particular function.Tap Done to return to the System Setup screen.](https://usermanual.wiki/Motorola-Mobility/T6BK1/User-Guide-182963-Page-189.png)