Motorola Mobility T5FA1 Portable Cellular CDMA Transceiver User Manual Exhibit 8 Users Manual
Motorola Mobility LLC Portable Cellular CDMA Transceiver Exhibit 8 Users Manual
UserManual.wiki
>
Motorola Mobility
>
T5FA1 User Manual
Exhibit 8 Users Manual
Navigation menu
Upload a User Manual
Namespaces
Wiki Guide
HTML
PDF
Info
Views
User Manual
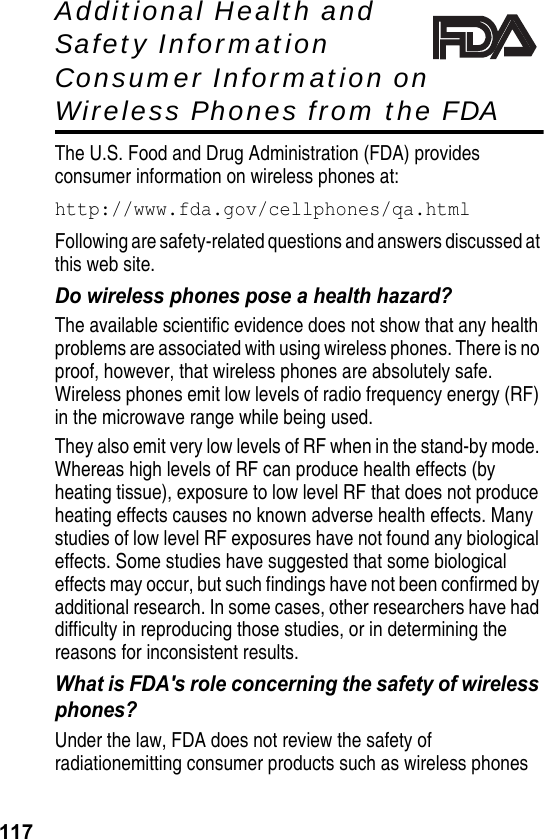
Discussion / Help
Navigation


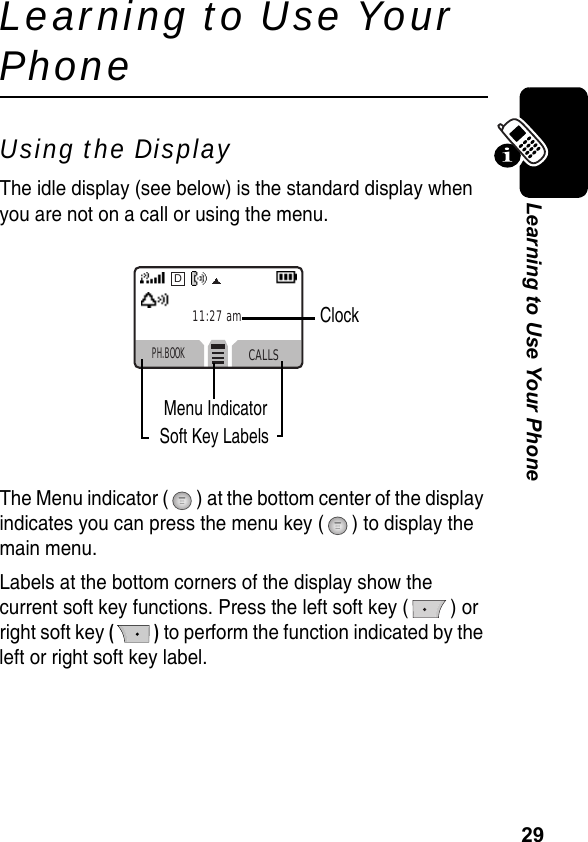


![36Learning to Use Your PhoneWhen you enter text using the standard tap method, the flashing cursor changes to a block cursor, and the soft key functions change:Choosing a Text Entry MethodYour Phone includes three methods of editing text in the text editor. The following describes how to change in these methods. Press To1enter ENTRY METHOD screenNote: In case of a text-entry screen to input text message or input datebook title . : [Menu]->Select “Entry Method” in the editor menu2 or highlight the desired Text Entry Method.3select the highlighted method.Block cursor indi-cates currentlyhighlighted char-acter.After 2 seconds,the block cursorchanges to aflashing cursorand moves to thenext position.Press DELETE ( ) to delete the character to the left of the insertion point.Press OK () to accept and store the text.DELETE OK159 Message:T](https://usermanual.wiki/Motorola-Mobility/T5FA1/User-Guide-566121-Page-37.png)

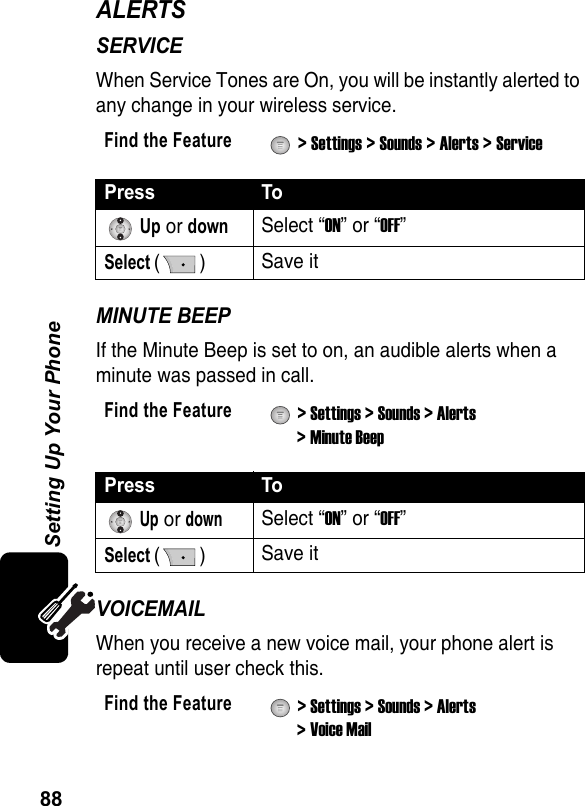
![39Learning to Use Your PhoneCharacter ChartUse this chart as a guide for entering characters with the tap method.Note: This chart may not reflect the exact character set available on your phone.Press and Hold 2 seconds to toggle from Tap method to Numeric method.Using the iTAPTM MethodiTAP TM software provides a predictive text entry method that lets you enter a word using one keypress per letter.Press ( ) Entry Method from a text entry screen and select iTAPSpace . 1 @ ? ! , & : ; “ ( ) ‘ ¿ ¡ % $ _ ~ \A B C 2 À Ã Á Â ÇD E F 3 É È ÊG H I 4 ÍJ K L 5M N O 6 Ñ Ò Õ Ó ÔP Q R S 7T U V 8 Ù Ú ÜW X Y Z 9+ - 0 * / = > < # § [ ]](https://usermanual.wiki/Motorola-Mobility/T5FA1/User-Guide-566121-Page-40.png)
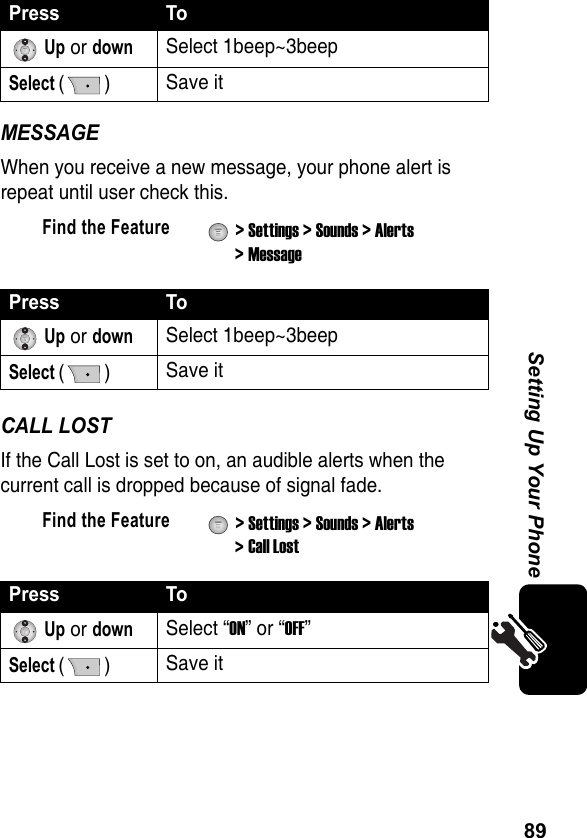
![41Learning to Use Your PhoneFor Example, to spell “art,” press .The display shows:Entering Punctuation- To add a symbol to the end of the word.Press To1+ - 0 * / > < # § [ ]2' Space . 1 @ ? ! , & : ; “ () ¿ ¡ % $ _ ~ \DELETE SELECTDArt Apt Cpu Cru159 Flashing cursorindicates insertionpoint.Press SELECT () to insert the highlighted letters.Countdown icon(only input SMS Text Message)Press ( ) to scroll and see additional choices.Press DELETE () to clear the last letter entered.](https://usermanual.wiki/Motorola-Mobility/T5FA1/User-Guide-566121-Page-42.png)
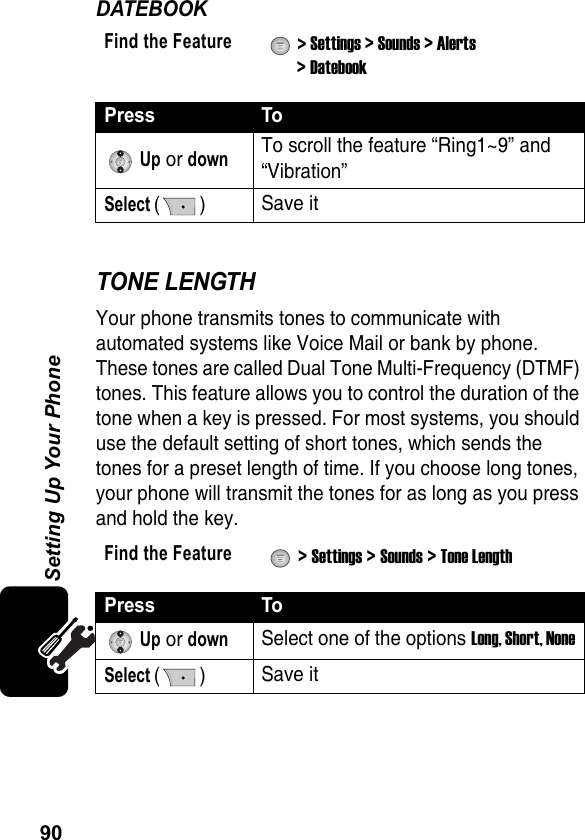
![43Learning to Use Your PhoneUsing Symbol MethodTo enter symbol characters in a message, press ( ) > Entry Method from any text entry screen and select Symbol.Symbol ChartUse this chart as a guide for entering symbols in symbol method.Press To1A number key one timedisplay a symbol at the bottom of the display.2 left or right or the number key repeatedlyhighlight the symbol you want3SELECT ()enter the symbolSpace . 1 @ ? ! , & : ; “ ( ) ‘ ¿ ¡ % $ _ ~ \@ _ \/ : ;“ & ‘( ) ( ) { }¿ ¡ ~< > =$ £ ¥# % *+ - 0 * / = > < # § [ ]](https://usermanual.wiki/Motorola-Mobility/T5FA1/User-Guide-566121-Page-44.png)


![54Tones / IMGSMy TonesThis feature allows the user to manage tones, include creating new tones and deleting tones.Tone Menu (Submenu of My tones - New Tone, Edit, Delete, Play, Help) can only be accessed from My Tones List View by pressing the ( ) key.Tone Menu is not available when (New Tone) is highlighted in the My Tones List View.Find the Feature > Tones/Imgs > Ringer Type > My ToneMy TonesTone 1[ New Tone ]EXIT EDIT Tone Menu New ToneEditDeletePlayHelp](https://usermanual.wiki/Motorola-Mobility/T5FA1/User-Guide-566121-Page-55.png)
![55Tones / IMGSNew ToneNotes•The maximum length of a tone will be 120 characters and tone names are limited to 32 characters.•If the user tried to store a tone without name a transient error message “Tone Name Required” is displayed.•If the user tried to store a tone without notes a transient error message “Tone Notes Required” is displayed.•If all user locations are full a transient error message “Memory Full” is displayed.Press To1> Tones/Imgs > Ringer Type > My Bellselect the “New Tone” and press ( )2Select Notes () Enter Notes and press ( )3Select Name () Enter the Name and press ( )EXIT SELECTTone 9Tone 10[New Tone] MemoryFullSELECT](https://usermanual.wiki/Motorola-Mobility/T5FA1/User-Guide-566121-Page-56.png)


![72MessagingViewing MessagesYour phone displays the message text, where you can see( ). If you press ( ), you see option list that depend on Box or Folder. In the message text display, you can:Find the Feature > Messaging > SMS > Inbox (or Outbox or Sent Folder or Draft Folder)ActionPress ( ) (up or down) to scroll through the list ofmessage headers.To select a message and view its contents, press ( ).Press ( ) (up or down) to scroll through the message text. Press ( ) (left or right) to scroll through the list of message text.Press To > Callcall [I, O, S, D] > Replysend message using callback number [I] > Editedit message which is saved [O, D] > Forwardsend message with same text to someone [I, O, S, D] > Resendsend failed message again [O, S] > Store numberstore callback number to phonebook [I] > GotoAccess URL if the message text include URL [I]](https://usermanual.wiki/Motorola-Mobility/T5FA1/User-Guide-566121-Page-73.png)
![73Messaging([I] Inbox, [O] Outbox, [S] Sent Folder, [D] Draft Folder)Setting Up SMSOverwrite:User can select overwrite option when inbox (or sent folder) memory buffer is full, phone can overwrite or cannot receive(or cannot send).Reminder:Messaging alerting is selectable to:- once- repeat alert (every 2 minutes)- release.Erase All Folders:If user selects Erase All Folder, All messages in the inbox, outbox, sent folder, and draft folder are deleted.Delivery Acknowledgment:If you want to receive delivery acknowledge when you send SMS message, select “Yes”.If you want to receive user acknowledge when you send SMS message, select “Yes”. (Flex Option) > Lock, Unlocklock Message or Unlock Message [I,D] > Eraseerase the message [I, O, S, D] > Erase Boxerase the box or folder [I, O, S, D]Find the Feature > Messaging > SMS > SettingPress To](https://usermanual.wiki/Motorola-Mobility/T5FA1/User-Guide-566121-Page-74.png)