Motorola Mobility T5AG1 Portable Cellular Transceiver User Manual AG EX08
Motorola Mobility LLC Portable Cellular Transceiver AG EX08
UserManual.wiki
>
Motorola Mobility
>
T5AG1 User Manual
Exhibit 8 Users Manual
Navigation menu
Upload a User Manual
Namespaces
Wiki Guide
HTML
PDF
Info
Views
User Manual
Discussion / Help
Navigation


![Pstops continuously : To enter Pafter telephone number, press . Number after Pis sent out only by pressing button.Tstop briefly : To enter Tafter telephone number, press . Number after Tis sent out after a while.To store telephone number entered electronically in phone book, press [STO] button. (See P.33~36)HOW TO USE BASIC FUNCTIONSV826031Press in initial screen.HOW TO USE BASIC FUNCTIONS V826030When using ARS, enters multiple numbers in advance for convenient use. (telebanking, paging,confirming voice mail)Electronic dialingEnter telephonenumber.Press , enter Por Tand dial number electronically.Pressingbutton connects to the phone.List of outgoing numbersThe list of telephone numbers the user called is displayed.Confirming list of outgoing numbersPress to moveto the desired list andpress [OK].Contents of the selected list of outgoing numbersis displayed (outgoingnumber, sequence, name, date and time of call)Storing list of outgoing numbersWhen contents of the selected list of outgoing numbers is displayed, press [STO]to store the list. (See P.33~36)Erasing list of outgoing numbersWhen the selected list of outgoing numbers is displayed, press [DEL] to erase the list. (See P.37)(To erase all lists of outgoing numbers, erase in Delete List . (See P.94)In case of telephone number stored in storage address, the name is displayed.](https://usermanual.wiki/Motorola-Mobility/T5AG1/User-Guide-103280-Page-17.png)
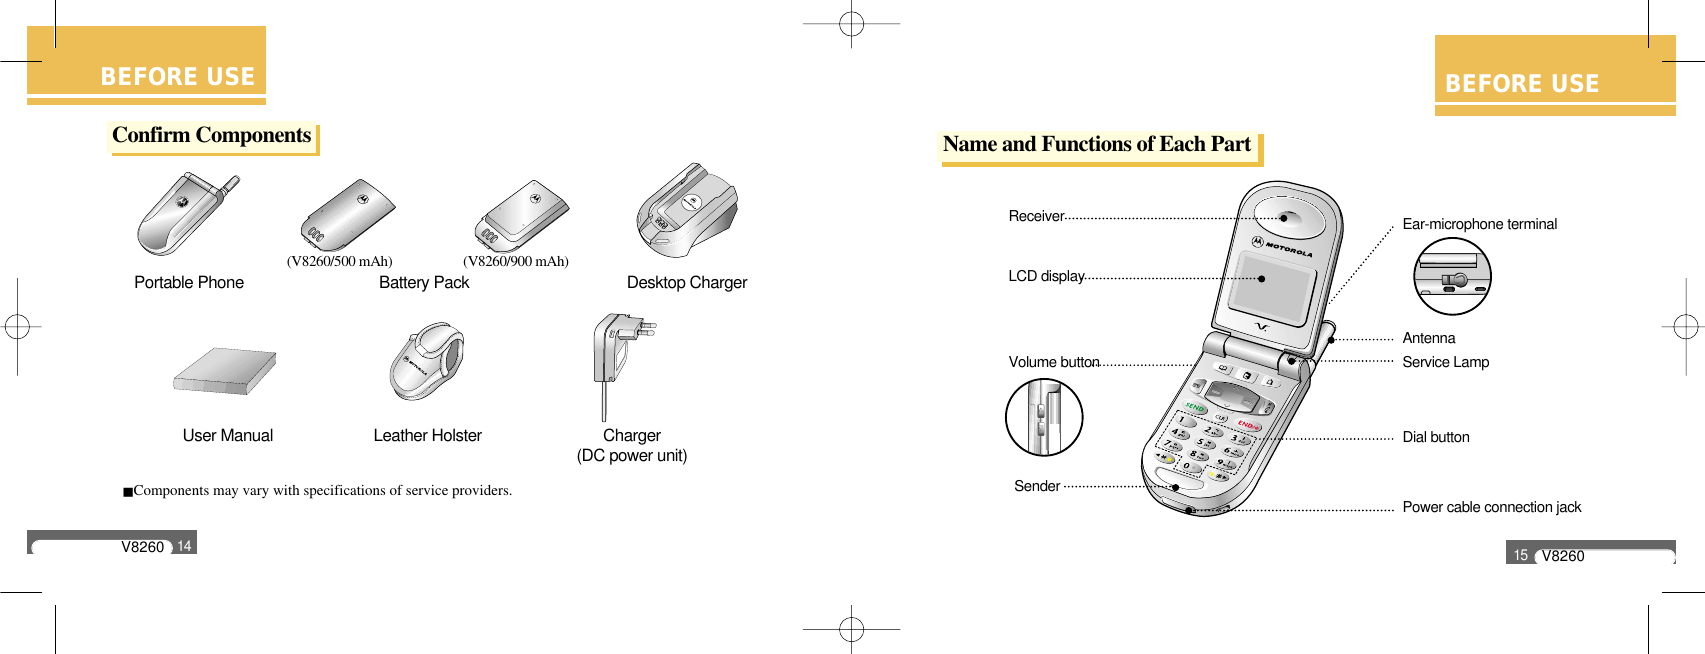
![Phone Book 33 Tone Control 46Alarm / Timer 54PIMS 69Features 80Lock / Security 90Game 102Voice Mail 104Config Data 108HOW TO USE MENU FUNCTIONSHOW TO USE MENU FUNCTIONSV826033Enter a telephonenumber and press [STO].Enter memoryaddress and press [OK].Enter the name tostore and press [OK]. (See P.114~117)After message isdisplayed, Enternext number isdisplayed.Press to moveto the icon to storeand press [OK].Phone BookStoring in phone bookThe phone can store up to 5 telephone number for a person and when you want to retrieve them, you cam make a call with various search methods.](https://usermanual.wiki/Motorola-Mobility/T5AG1/User-Guide-103280-Page-18.png)
![HOW TO USE MENU FUNCTIONSV826034After pressing telephone number, pressing [OK] can continue to store the next number.Memory address shows the latest address available.When designating memory address, the address in which telephone number is already stored is indicated as [ADD/BACK].Pressing [ADD] can additionally store telephone number in the icon not designated of five icons. (See P.36)Pressing [Dial] button or can enter the desired address.The name to store can be stored up to 10 characters and 20 alphabets.When entering name, if a name already stored exists, it isUp to 200 addresses can be stored.Home Company Portable phone Pager User customizedHOW TO USE MENU FUNCTIONSV826035Setting turbo dialWhen making a phone call, pressing long the last number of the stored address make a call to the telephone number of the icon in which turbo dial is set. Turbo dial is set only in one icon of one storage address.Only icons containing stored telephone number is displayed when setting turbo dial.Setting or clearing turbo dial completes storing telephone number.Enter the telephone number to storeand if Enter next number isdisplayed, press [DONE]Press to move to theicon in which to set turbo dialand press [OK].After message isdisplayed, move to theinitial screen](https://usermanual.wiki/Motorola-Mobility/T5AG1/User-Guide-103280-Page-19.png)
![HOW TO USE MENU FUNCTIONSV826036Correcting and editingCorrects, adds or erases telephone number and name already stored.Using phone booksearch function, find andselect the address tocorrect. (See P.38~41)Press to move to theicon to correct and name tostore and press [Edit].After message isdisplayed, moveto the previousmenu.After correctingtelephone number, press[OK].In case there are telephone numbers stored when selecting the icon to store, telephone number is displayed.Selecting the name to store can correct the name.To erase number when correcting, press button.HOW TO USE MENU FUNCTIONSV826037Erasing Erases stored contents.Using Fast Search , find and moveto the address to erase, and press [DEL]. (See P.38)After message isdisplayed, move tothe previous menu.Press to move to the desiredsetup value and press [OK].To erase stored contents of icon in address, select the icon and press long button to erase, and then press [OK].](https://usermanual.wiki/Motorola-Mobility/T5AG1/User-Guide-103280-Page-20.png)
![HOW TO USE MENU FUNCTIONSV826039HOW TO USE MENU FUNCTIONSV826038Easily searches as it is indicated in the order of address.Press[MENU].Press to move to PhoneBook and press [OK].Press to move to FastSearch and press[OK].Searching phone bookFast search Pressto move to list tosearch and press [OK].Press to select icon tosearch.If you want a call to the address found, press button in the state that the desired addressis selected. Call is connected to the telephone number of the icon in which turbo dial is set. (See P.35)In case you want to make a call to telephone number f icon in which turbo dial is not set.Press to move to the address to call to and press [OK]. Press to move to the desired icon and press button.Pressing button moves to the previous menu.](https://usermanual.wiki/Motorola-Mobility/T5AG1/User-Guide-103280-Page-21.png)
![HOW TO USE MENU FUNCTIONSHOW TO USE MENU FUNCTIONSV826040Finding by addressIf the user presses or enters the address to find with [Dial] button, information of the designatedaddress is displayed.Press [MENU].Pressto enter the address tosearch and press [OK].Pressto select icon tosearch.Press to moveto Phone Book andpress [OK].Press to move to Find byaddress and press [OK].In initial screen, entering the stored address and pressing [LOC] displays the contents of the address.In initial screen, entering telephone number and pressing [FIND] displays the address in which the entered telephone number is stored.In case there are a number of addresses relevant to the entered telephone number, all of the relevant addresses are displayed.Finding by namePressing the name to find displays information of the selected name.Press [MENU].Address of theentered name isdisplayed. Press [OK].(See P.114~117)Press toenter the name tosearch and press[OK].Press toselect icon tosearch.Pressto move toPhone Bookand press [OK].Press to move to Find byname and press [OK].In initial screen, pressing button moves to the list Find by name . Pressing button displays menu of the Phone Book .Entering the first consonant of the name to find and pressing [OK] displays all the addressesin which the name containing the entered consonant is stored.V826041](https://usermanual.wiki/Motorola-Mobility/T5AG1/User-Guide-103280-Page-22.png)
![HOW TO USE MENU FUNCTIONSV826043HOW TO USE MENU FUNCTIONSV826042Viewing memoryPress [MENU].Memory is displayed. Press[OK] / [CNCL] orbutton to move to theprevious menu.Press to moveto Phone Book andpress [OK].Press to move to Viewmemory and press [OK].Indicates state of phone book the user has set as number of memory addresses in use and thenumber of addresses available.Called Press [MENU].Called is displayed.Press to move toPhone Book andpress [OK].Press to move toCalled and press [OK].Indicates information of callers and stores up to 10 callers.(This function operates only when service provider provides service. For details, contact the service provider)To store, press [STO] to store. (See P.33~36)To erase, press [DEL]. (See P.37)](https://usermanual.wiki/Motorola-Mobility/T5AG1/User-Guide-103280-Page-23.png)
![HOW TO USE MENU FUNCTIONSV826045HOW TO USE MENU FUNCTIONSV826044UnansweredPress [MENU].Press to moveto Unanswered andpress [OK].Unanswered is displayed.Press to move toPhone Book andpress [OK].When a call is received to the telephone number stored in memory address, the name is displayed together with the number.To store, press [STO] to store. (See P.33~36)To erase, press [DEL]. (See P.37)In case the user has not received call, displays information of up to 10 received numbers.(This function operates only when service provider provides service. For details, contact the service provider)Viewing my No.Press [MENU].Press to move to View my No. and press [OK].Press display usernumber [OK] / [CNCL] orbutton to move to theprevious menu.Press to move to Phone Book and press [OK].Confirms the user s telephone number.](https://usermanual.wiki/Motorola-Mobility/T5AG1/User-Guide-103280-Page-24.png)
![HOW TO USE MENU FUNCTIONSV826047HOW TO USE MENU FUNCTIONSV826046Tone control Bell / MelodyPress [MENU].Press to move toBell / Melody andpress [OK].After messageis displayed,move to theprevious menu.Press tomove to Tonecontrol andpress [OK].Press to move tothe desired bell ormelody and press [OK].The user can change the type of ringer tone when a call is received. Four types of bells and ten types of melodies can be selected, and by downloading melodies provided by the service provider, up to 3 melodies can be used additionally. (See P.135)Bell : bell 1 ~ bell 4Melody : melody 1 ~ melody 10User : user1 ~ user 3Etiquette In meeting, lecture or in public places, changes the bell sound to vibration mode in order not to give inconveniences to others.How to set : Press long button.After Setting Etiquette function message is displayed, move to the initial screen. If Etiquette function is set, it is displayed as in the right figure.How to clear : Press long button.After Clearing Etiquette function message is displayed, move to the initial screen.When Etiquette function is set Ringer tone vibrating and lamp blinksAlarm tone vibrating and lamp blinksOne minute no soundCall alarm vibrating and lamp blinks (when setting No Sound, no sound)Button tone no soundLink tone no soundOne minute no sound](https://usermanual.wiki/Motorola-Mobility/T5AG1/User-Guide-103280-Page-25.png)
![HOW TO USE MENU FUNCTIONSV826049HOW TO USE MENU FUNCTIONSV826048Ring / VibSelects ringer tone notifying that a call and mail is received.Press [MENU].Press to moveto the desired ringertone and press [OK].After message isdisplayed, moveto the previousmenu.Press to moveto Tone control andpress [OK].Press tomove to ‘ Ring / Vib ’and press [OK].Bell : Bell rings Vibration : Vibration occurs ( is displayed on screen)Bell after vibration : Bell rings after vibration ( blinks on screen)Lamp : Only lamp blinksRinger VolAdjusts the volume of ringer tone when call is received.Press [MENU].Press to adjust to thedesired bell volume andpress [OK].Press to moveto Tone control andpress [OK].Press to move toRing / Vol and press[OK].After selecting ringer volume, move to the previous menu. Ringer volume : 5 levels](https://usermanual.wiki/Motorola-Mobility/T5AG1/User-Guide-103280-Page-26.png)
![HOW TO USE MENU FUNCTIONSV826051HOW TO USE MENU FUNCTIONSV826050Earpiece VolAdjusts earpiece volume heard during call.Press [MENU].Press to adjust to thedesired earpiece volumeand press [OK].Press to moveto Tone control andpress [OK].Press to move toEarpiece Vol and press [OK].After selecting earpiece volume, move to the previous menu. Earpiece volume: 5 levelsDuring call, Earpiece vol can be adjusted. (See P.111)Keypad ToneAdjusts button tone heard when pressing button.Press [MENU].Press to adjust to thedesired keypad tone andpress [OK].Press to moveto Tone control andpress [OK].Press to move toKeypad Tone andpress [OK].After selecting keypad tone, move to the previous menu. Keypad tone: 6 levels](https://usermanual.wiki/Motorola-Mobility/T5AG1/User-Guide-103280-Page-27.png)
![HOW TO USE MENU FUNCTIONSV826053HOW TO USE MENU FUNCTIONSV826052Link ToneNotifies that call is connected Press [MENU].Press to adjustto the desired setupvalue of link tone andpress [OK].After message isdisplayed, moveto the previousmenu.Press to moveto Tone control andpress [OK].Press to moveto Link Tone andpress [OK].Sending ToneAdjusts length of sound heard when pressing keypad button.Press [MENU].Press to adjust to the desired setup value of sending tone and press [OK].After message isdisplayed, moveto the previousmenu.Press to moveto Tone control andpress [OK].Press tomove to SendingTone and press [OK].Briefly : Pressing keypad button produces brief beep sound. Long : While pressing [Dial] button, long beep sound is heard.While keypad buttons except for [Dial] button, beep sound is heard continuously.](https://usermanual.wiki/Motorola-Mobility/T5AG1/User-Guide-103280-Page-28.png)
![HOW TO USEMENU FUNCTIONSQuick setSet AlarmSets alarm to ring in the time neares to the time set by user without designating specifc time.Ring after 10 minutes : Alarm rings after 10 minutes of alarm setting. Ring after 30 minutes : Alarm rings after 30 minutes of alarm setting. Ring after 1 hour : Alarm rings after 1 hour of alarm setting. If alarm is set, is displayed on screen.V826054V826055HOW TO USE MENU FUNCTIONSHOW TO USE MENU FUNCTIONSBy setting specific time and alarm interval, operates alarm in the desired time,Alarm / TimeAlarmPressing button moves to Quick Set menu. Pressing [CNCL] or button displays Alarm menu. To stop when alarm rings, press any keypad buttons or open and close folder.Press to move to Alarmand press [OK].Press to move to Alarm /Timer and press [OK].Press [MENU]Press to move to Alarm / Timer and press [OK].Press to move to Quick Set and press [OK].Press to select thedesired alarm time andpress [OK].After message isdisplayed, moveto the previousmenu.](https://usermanual.wiki/Motorola-Mobility/T5AG1/User-Guide-103280-Page-29.png)
![V826056V826057HOW TO USE MENU FUNCTIONSHOW TO USE MENU FUNCTIONSSet timeSets alarm to ring in the desired time by the user setting time and alarm interval. Entering alarm time Press and enter Time Press [OK] Press and enter Minute Press [OK] Press and enter am / pm Press [OK]Ring one time : Rings one time in the set time. Ring daily : Rings daily in the set time. If alarm is set, is displayed on screen. To move to the previous column, press buttonPressing time and minute using [Dial] button automatically moves to the next column.Press to moveto Set Alarm andpress [OK].Press to moveto Set Timer andpress [OK].After entering alarmtime, press[OK]. (See P.57)Press to set Alarm Interval andpress [OK].After message isdisplayed, moveto the previousmenu.](https://usermanual.wiki/Motorola-Mobility/T5AG1/User-Guide-103280-Page-30.png)
![Quick claer Claer timeIn case alarm is set with Set Time , clears alarm.V826058V826059HOW TO USE MENU FUNCTIONSClaer AlarmIn case alarm is set with Quick Set , clears alarm.If alarm is cleared, disappears from screen.HOW TO USE MENU FUNCTIONSIf alarm is cleared, disappears from screen.Press to moveto Claer Alarm andpress [OK].Press to move toClaer Quick Timer andpress [OK].Press to selectsetup value of clearquick set and press [OK].After message isdisplayed, move tothe previous menu.Press to move toClaer Alarm and press [OK].Press to move toClaer Set Timer andpress [OK].Press to selectsetup value of clear settime and press[OK].After message isdisplayed, move tothe previous menu.](https://usermanual.wiki/Motorola-Mobility/T5AG1/User-Guide-103280-Page-31.png)
![V826060V826061HOW TO USE MENU FUNCTIONSWorld timeShows times of major cities in the world.HOW TO USE MENU FUNCTIONSTo move to the previous menu, press buttonTo move to the initial screen, press buttonLos AngelesDenver, PhoenixMexico CityDallas, ChicagoDetroit, MiamiWashingtonMontreal, New YorkBostonRio de JaneiroLisbon, MadridLondonParis, AmsterdamRome, Berlin, ViennaAthens, Helsinki CairoMoscow, BaghdadTeheran, Abu DabiCalcuttaBangkok, JakhartaSingaporeBeijing, HongkongTaipeiPress[MENU].Press to move toAlarm / Timer andpress [OK].Press to moveto World Timesand press[OK].Press to moveto the desired city andpress [OK].Press tosearch the desiredcity and time.Cities for which World Times is storedSeoul, Tokyo Guam, SydneySamoaHonoluluAnchorageSeattleSan Francisco](https://usermanual.wiki/Motorola-Mobility/T5AG1/User-Guide-103280-Page-32.png)
![V826063HOW TO USE MENU FUNCTIONSV826062HOW TO USE MENU FUNCTIONSUser TimeSets the time displayed in initial screen to the time of the desired city.Cities for which World Times is storedPress and select Fast/Slow Press [OK] Press and enter Time Press[OK] Press and enter Minute Press [OK]Entering time and minute using [Dial] button automatically moves to the next column. If user time is set, it is displayed as in the right figure.Press[MENU].Press tomove to Alarm / Timerand press[OK].Press tomove to UserTimes and press [OK].Press toselect the setupvalue of usertimes and press[OK].Enter user times.(See P.63)Aftermessage isdisplayed,move to thepreviousmenu.](https://usermanual.wiki/Motorola-Mobility/T5AG1/User-Guide-103280-Page-33.png)
![V826065HOW TO USE MENU FUNCTIONSAll CallsDisplays the duration of all calls in number of calls, minute and second.All Calls is not initialized.V826064HOW TO USE MENU FUNCTIONSIndividualDisplays the duration of last call.63Press[MENU].Press to move toAlarm / Timer and press [OK].Press tomove to Individualand press[OK].Individual isdisplayed.Pressing [OK] / [CNCL] orbutton moves to theprevious menu.Press[MENU].Press to move toAlarm / Timer and press [OK].Press tomove to All Callsand press[OK].All Calls isdisplayed.Pressing [OK] / [CNCL] orbutton moves to theprevious menu.](https://usermanual.wiki/Motorola-Mobility/T5AG1/User-Guide-103280-Page-34.png)
![V826067HOW TO USE MENU FUNCTIONSReset TimerWhen Reset Timer is displayed, press [RESET] Press to select setup value of initialization and press [OK] After message is displayed, move to the previous menu.V826066HOW TO USE MENU FUNCTIONSRoam CallsDisplays duration of calls using BTS of other service provider in accumulation in number of calls, minute and second.Displays accumulated duration of calls after user resetting in number of calls, minute and second.Press[MENU].Press to move toAlarm / Timer andpress [OK].Press tomove to RoamCalls and press [OK].Roam Calls isdisplayed.Pressing [OK] / [CNCL] orbutton moves to theprevious menu.Pressing [CNCL] moves to the previous menu.Pressing [RESET] can initialize reset timer.Press[MENU].Press tomove to Alarm /Timer and press [OK].Press to move to ResetTime and press [OK].Reset Timer isdisplayed.Initializing](https://usermanual.wiki/Motorola-Mobility/T5AG1/User-Guide-103280-Page-35.png)
![V826069HOW TO USE MENU FUNCTIONSV826068HOW TO USE MENU FUNCTIONSIf the user stores schedule, alarm tone rings in the designated day and stored contents is displayed.PIMSStores and manages user s individual information and schdule.ScheduleOne MinuteChecks duration during call. Notifies by ringing alarm before 10 second to minute every minute from call connection. Press[MENU].Press to move toAlarm / Timer and press [OK].Press to move to One Callsand press [OK].Press toselect the setupvalue of one minuteand press[OK].After message isdisplayed, move tothe previous menu.Press[MENU].Press to move toPIMS and press [OK].Press to moveto Schedule andpress [OK].](https://usermanual.wiki/Motorola-Mobility/T5AG1/User-Guide-103280-Page-36.png)
![V826071HOW TO USE MENU FUNCTIONSV826070Storing ScheduleHOW TO USE MENU FUNCTIONSPress tomove to the addressto store and press [OK].Enter contents forschedule and press[OK]. (See P.114~117)Set schedule time.(See P. 71)Press toenter alarm timeand press[OK].After message isdisplayed, move tothe previous menu.Pressing button moves to Schedule .Pressing button displays PIMS menu.Entering time and datePress and enter Month Press [OK] Press and enter Date Press[OK] Press and enter Time Press [OK] Press and enter MinutePress [OK] Press and enter am / pm Press [OK]Entering date and time using [Dial] button moves automatically to the next column. To move to the previous column, press buttonFor Enter Contents for schedule, up to 16 characters of Korean alphabets and up to 32 English alphabets can be entered.](https://usermanual.wiki/Motorola-Mobility/T5AG1/User-Guide-103280-Page-37.png)
![V826073HOW TO USE MENU FUNCTIONSV826072HOW TO USE MENU FUNCTIONSConfirming schedulePress to move to the listto search and press [OK].If the entered date is displayed incalendar, press [OK].Stored date, time and scheduleis displayed.Pressing [CNCL] moves to the previous menu.Erasing schedulePress to moveto the list to erase andpress [OK].If the entered dateis displayed incalendar,press[OK].If stored date, timeand schedule isdisplayed, press [DEL].Press to selectthe desired setup valueand press [OK].After messageis displayed,move to theprevious menu.](https://usermanual.wiki/Motorola-Mobility/T5AG1/User-Guide-103280-Page-38.png)
![V826075HOW TO USE MENU FUNCTIONSV826074HOW TO USE MENU FUNCTIONSCreates and stores list of work the user plans for schedule management.Work plan Storing work planPress [MENU]. Press to move to PIMSand press [OK].Press to move to WorkPlan and press [OK].Press to moveto the list to store andpress [OK].Enter contents forwork plan andpress [OK].(See P.114~117)Press toselect the setupvalue for time andpress [OK].Enter time for workplan and press[OK]. (See P.71)After messageis displayed,move to theprevious menu.In case the user does not want to enter time for work plan, set setup value for time as NoFor contents for work plan, up to 16 characters of Korean alphabets and 32 characters of English alphabets can be entered.For work plans, up to 10 plans can be entered.](https://usermanual.wiki/Motorola-Mobility/T5AG1/User-Guide-103280-Page-39.png)
![The list of work plan to be confirmed by the user is indicated as To delete , press [UNLOC] when contents for work plan, date and time is displayed.In case alarm time is not entered, calendar is not displayed.V826076HOW TO USE MENU FUNCTIONSV826077HOW TO USE MENU FUNCTIONSConfirming work planPress to move tothe list to search and press [OK].If date for work plan isdisplayed in calendar,press [OK].If the stored work plan, date adtime is displayed, press[OK DONE].After message isdisplayed, moveto the previousmenu.Erasing work planPress to moveto the list to erase andpress [OK].If entered date isdisplayed incalendar, press [OK]. If the stored workplan, date ad time isdisplayed, press [DEL].Press to selectthe desired setup valueand and press[OK].After messageis displayed,move to theprevious menu.](https://usermanual.wiki/Motorola-Mobility/T5AG1/User-Guide-103280-Page-40.png)
![V826079HOW TO USE MENU FUNCTIONSV826078HOW TO USE MENU FUNCTIONSView calendar of the past, present and future.CalendarPerforms simple calculationsTo correct numbers, press buttonFor division, down to 3 digits below decimal point is displayed. To initialize after calculation is competed, press [=].CalculatorPress [MENU]. Press to move to PIMSand press [OK].Press to move toCalculator andpress [OK].Calculator methodEnter numbers Press to set symbols +, -, , Press +, -, , Press numbers Press [=] Calculation result is displayedPress [MENU]. Press tomove to PIMSand press[OK].Press to move to Calculatorand press[OK].After searching monthand day, pressLUNAR .Information forlunar calendar ofthe selected dateis displayed.Press , button to search month.Press to search DatePressing [CNCL] moves to the previous menu.Calendar is displayed from 1980 till 2019.](https://usermanual.wiki/Motorola-Mobility/T5AG1/User-Guide-103280-Page-41.png)
![V826080V826081HOW TO USE MENU FUNCTIONSHOW TO USE MENU FUNCTIONSBklt colorChanges the display color.FeaturesPress [MENU].Press to move toFeatures and press [OK].Press to move to Bklt Colorand press[OK].Press tomove to thedesired color andpress [OK].Color is changed to theselected color andmoves to the previousmenu.Bklt TimeSets duration of LCD.Press [MENU].Press to moveto Features andpress [OK].Press tomove to Bklt Timeand press[OK].Press to moveto the desired BkltTime and press [OK].After message isdisplayed, move to theprevious menu.5 seconds : LCD is turned off 5 minutes after opening folderWhen opening flip : While flip is open, LCD remains ON.Always off : Even when flip is open, LCD remains ON.](https://usermanual.wiki/Motorola-Mobility/T5AG1/User-Guide-103280-Page-42.png)
![V826082V826083HOW TO USE MENU FUNCTIONSHOW TO USE MENU FUNCTIONSCity CodeIf setting the often used area codes, the area code is automatically inserted every time making a call.BannerChanges contents of initial screen.Press [MENU].Press tomove to Featuresand press[OK].Press tomove to Bannerand press[OK].Entering the contents tocorrect and pressing[OK] moves tothe previous menu. (See P.114~117)In initial screen,changed contents aredisplayed.For contents for initial screen, up to 10 characters of Korean alphabets and 20 characters of English alphabets can be entered.If not entering nothing Banner , Motorola logo is displayed on initial screen.Press [MENU].Press tomove toFeaturesand press [OK].Press tomove to CityCode and press [OK].Press toselect setup valueof city code andpress [OK].Enter thenumber to storeas city codeand press[OK].After messageis displayed,move to theprevious menu.When City Code is set, opening flip displays the city code set.If pressing button, city code disappears.Pressing number displays city code set.](https://usermanual.wiki/Motorola-Mobility/T5AG1/User-Guide-103280-Page-43.png)
![V826084V826085HOW TO USE MENU FUNCTIONSHOW TO USE MENU FUNCTIONSSerice LampIn case the phone is in waiting state, displays service state in color and state of service lamp.Waiting state(Displayed when setup value ofservice lamp is set)Yellow color blinks Red color blinks Red-yellow-redblinks alternativelyWhen receiving aphone call When call isconnectedLamp stateCellularphone state Service availablestate Service unavailablestateCall state(Always displayed ) Serice LampRed color stopsbrieflyIntl.CodeWhen making an international call, shows international call using abbreviation keys.Press [MENU].Press to move toFeaturesand press [OK].Press to move to Intl.Code and press[OK].Press to select setupvalue of intl. codeand press[OK].Enter the desiredinternationalnumber andpress [OK].After messageis displayed,move to theprevious menu.When setting international code, pressing long button displays the Intl. Code set.Press [MENU].Press to move toFeatures andpress [OK].Press to move to ServiceLamp and press [OK].Press to select setup value ofservice lamp and press [OK].After message isdisplayed, move to theprevious menu.](https://usermanual.wiki/Motorola-Mobility/T5AG1/User-Guide-103280-Page-44.png)
![V826086V826087HOW TO USE MENU FUNCTIONSHOW TO USE MENU FUNCTIONSRedialWhen call is not connected due to heavy traffic or weak receiving strength, automatically redials.Auto hyphenWhen entering a telephone number, hyphen is automatically inserted.Press [MENU].Press to move toFeatures andpress [OK].Press to move to AutoHyphen and press[OK].Press to select setup value of autohyphen and press[OK].After message isdisplayed, move to theprevious menu.Press [MENU].Press to move toFeatures andpress [OK].Press to move to Redialand press [OK].Press to select setup value ofredial and press[OK]. After message isdisplayed, move to theprevious menu.](https://usermanual.wiki/Motorola-Mobility/T5AG1/User-Guide-103280-Page-45.png)
![V826088V826089HOW TO USE MENU FUNCTIONSHOW TO USE MENU FUNCTIONSLCD ContrastThe function enables the user to control the screen contrast.Call AnswerThis function enables the user to select how to make a call.Press [MENU].Press tomove toFeatures andpress[OK].Press tomove to CallAnswer and press[OK].Press tomove to thedesired way toanswer the calland press[OK].Press toset the desiredset value andthen press[OK].Move to theprevious menuafter themessageappears.Automatic Answer : When the folder is open, the answering tone rings three times and a call is automatically answered if Call Answer is set to Automatic Answer.Folder Answer : When Folder Answer is set to YES , open the folder to answer the call if a call is received. When Folder Answer is set to NO , open the folder and then press the keypad button to answer the call.Press [MENU].Press tomove to Featuresand press[OK].Press to moveto LCD Contrastand press[OK].Press to controlthe screen contrast asdesired and press[OK].Move to the previousmenu after themessage appears.](https://usermanual.wiki/Motorola-Mobility/T5AG1/User-Guide-103280-Page-46.png)
![One-touch LockV826091HOW TO USEMENU FUNCTIONSHOW TO USE MENU FUNCTIONSV826090HOW TO USE MENU FUNCTIONSPress[MENU].Press toset the value for Lock Mode and press [OK].appears on the initial screen. Press to move toLock/Security andpress [OK]. Here, enter the password.Press tomove to Lock Mode and press [OK].To enter the password after pressing [MENU] or pressing button for a while will releasethe lock.This is the function to lock the mobile phone to prevent non-owner from using it.Lock ReleaseSetting LockLock / SecurityThis function prevents any other than the mobile phone owner from using the designated information without the owner s permission. First, the user must enter the password to use the Lock/Security function. The password is 0000 when the mobile phone is purchased. After the registration for the service is completed, the last four digits of the phone number is set to the password.Lock ModeIt is possible to answer a call even in the locked state.Even when the mobile is turned off and on again, its locked state is maintained.It is possible to make a call at 112, 119, the numbers saved as an emergency number, or the memory LOC, No. 1, regardless of the lock state (See P. 92)Move to the previous menu afterthe messageappears.How to set : To push button for a while will set Lock Mode.How to release : To enter the password after pressing button for a while will release Lock Mode.](https://usermanual.wiki/Motorola-Mobility/T5AG1/User-Guide-103280-Page-47.png)
![HOW TO USEMENU FUNCTIONSHOW TO USEMENU FUNCTIONSV826092V826093HOW TO USEMENU FUNCTIONSHOW TO USE MENU FUNCTIONSHOW TO USE MENU FUNCTIONSChange PWDThis function enables the user to change the password which is used to release the locked mobile phone or use the security function.Press[MENU].Press to move to Change PWD andpress [OK].Enter the newpassword twiceaccording to themessage and thenpress [OK].Move to the previous menu after the message appears.Press to move to Lock / Securityand press[OK]. Enter thepassword.Emergency CallIt is possible to call the number saved as an emergency number even when the mobile phoneis in the locked state.Press[MENU].Press to move to Emergency Call and press[OK].Press to move to the desired list and press [OK].Move tothe previousmenu after the message appears.Press to move toLock / Securityand press [OK]. Enter the password.Enter the phonenumber and press [OK].When it is desired to make an emergency call: enter the phone number saved as an emergency number by using [Dial] button and then press button.It is possible to save up to three emergency numbers.If the user saves the emergency number at the storage location and sets it as a turbo dial, he or she can use it as a speed emergency dial (See P. 35)](https://usermanual.wiki/Motorola-Mobility/T5AG1/User-Guide-103280-Page-48.png)
![HOW TO USEMENU FUNCTIONSHOW TO USEMENU FUNCTIONSV826094V826095HOW TO USEMENU FUNCTIONSHOW TO USE MENU FUNCTIONSHOW TO USE MENU FUNCTIONSRestrictThis function enables the user to restrict the specific calls incoming.Clear CallsThis function is used to erase the saved phone numbers or contents.Press[MENU].Press to move to Clear Callsand press [OK].Move to theprevious menu afterthe message appears.Press tomove to the callsto clear andpress [OK].Press to move to theLock / Security and press [OK].Enter the password.Press toselect the valueset for clearcalls and press [OK].If there is no information to erase, the message, There is no message to delete. will appear.Press[MENU].Press to move to Restrict and press [OK].Move to the previous menu after the message appears.Press tomove to the call torestrict and press[OK].Press to move to theLock / Securityand press [OK]. Enter the password.Press toselect thedesired set value and thepress [OK].Restrict international calls : It restricts the use of international calls.Restrict 700 : It restricts the phone numbers starting with 700.Restrict memory LOC : It restricts the use of making a call and designating/erasing a phone number.](https://usermanual.wiki/Motorola-Mobility/T5AG1/User-Guide-103280-Page-49.png)
![HOW TO USEMENU FUNCTIONSThis function enables the service company to use a new number as the number dedicated to answering by giving the company another number in addition to the existing number used bythe user Press [MENU].Move to the previous menu after the message appears.Press to move to Lock / Securityand press [OK]. Enter thepassword.HOW TO USEMENU FUNCTIONSV826096V826097HOW TO USEMENU FUNCTIONSHOW TO USE MENU FUNCTIONSHOW TO USE MENU FUNCTIONSDefault ModeThis function initializes the functions of a mobile phone to the initial state. However, the information saved at the memory LOCs is not initialized.Press[MENU].Press to moveto Default Mode andpress [OK].The power will beturned off after themessage appears.Press to select the value setfor Default Modeand press [OK].Press tomove to Lock / Securityand press [OK]. Enter the password.Press to turn on the power to use the mobile phone again (See P. 27)Second Number (Number Plus Service)Second Number RegistrationPress to move to SecondNumber and press [OK].Press to move to Second NumberRegistration andpress [OK].Enter the number to useadditionally.](https://usermanual.wiki/Motorola-Mobility/T5AG1/User-Guide-103280-Page-50.png)
![HOW TO USEMENU FUNCTIONSHOW TO USEMENU FUNCTIONSHOW TO USEMENU FUNCTIONSV826098HOW TO USE MENU FUNCTIONSClear NumberPress[Menu].Move to the previous menu after the message appears.Press to move to Lock/Securityand press [OK]. Enter thepassword.Press to move to Second Number andpress [OK].Press to move to Second Number Deletionand press[OK].Select the value Second Number Deletion value set forand press[OK].HOW TO USE MENU FUNCTIONSV826099Second Number BellThis function assigns different bell sounds to the existing number and the added one so that the user can distinguish one from the other when a call is received.Press[MENU.Press to move to Second Number andpress [OK].Move to the previous menu after the message appears.Press to move to the desired bell or melody and press [OK].Press to move to theLock / Securityand press [OK].Enter the password.Press to move to SecondNumber Bell andpress [OK].Bell : Bell 1 ~ Bell 4Melody : Melody 1 ~ Melody 10User : User 1 ~ User 3 (See P. 135)](https://usermanual.wiki/Motorola-Mobility/T5AG1/User-Guide-103280-Page-51.png)
![HOW TO USEMENU FUNCTIONSHOW TO USE MENU FUNCTIONSHOW TO USE MENU FUNCTIONSV8260100V8260101NAM ChangePress[MENU].Move to the previous menu after the message appears.Press to move to Lock / Securityand press [OK]. Enter thepassword.Press to move to NAM Change and press [OK].Press to move to the desired NAMand press [OK].Press [OK]when the selected NAM appearson the screen.When the user subscribers to more than one provider, this function enables the user to select on of the subscribed phone numbers.S/W versionThe function indicates the software version of the mobile phone currently used by the user.Press [MENU].Press to move to S/W Version and press [OK].The software version appears.Press to move tothe Lock / Securityand press [OK].Enter the password.](https://usermanual.wiki/Motorola-Mobility/T5AG1/User-Guide-103280-Page-52.png)
![HOW TO USEMENU FUNCTIONSV8260102V8260103HOW TO USEMENU FUNCTIONSHOW TO USE MENU FUNCTIONSHOW TO USE MENU FUNCTIONSPress to move to Gameand press [OK].GameThe user can enjoy games by using a mobile phone.: move left and right: increase the speed: decrease the speed~ : Hold: RedealClassificationCar racePokerThe indication of the used buttonsThe indication of theinitial screen of thegameThe start of the gamePress [MENU]. Press to move to the desired game and press [OK].The user can choose any of the following three levels for the car race: beginner, intermediate, and advanced.Press any button on the keypad to start a game or move to next screen.](https://usermanual.wiki/Motorola-Mobility/T5AG1/User-Guide-103280-Page-53.png)
![HOW TO USEMENU FUNCTIONSHOW TO USE MENU FUNCTIONSHOW TO USE MENU FUNCTIONSSave voiceRegister the name of the person to call by using the voice dial.Voice DialThis function, which automatically makes a call by recognizing the user s voice, enables the user to make a call without pressing [dial] buttons.Press[MENU].Enter the name and thephone number andpress [OK].Press to move to Voice Dial and press [OK].Press to move to SaveVoice and press [OK].Move to the previous menu after the message appears.View Voice ItemThis function enables the user to verify and delete the saved voice items.The phone number appearsand the saved voice isheard.Press to move to View Voice Item and press [OK].If [NEXT] is pressed, the next name saved is heard and the corresponding phone number appears.Repeat entering the name to save twice according to the announcement and then save the phone number by entering it.It is possible to save up to 10 voices.V8260104V8260105Press[MENU].Press to move to Voice Dial and press [OK].](https://usermanual.wiki/Motorola-Mobility/T5AG1/User-Guide-103280-Page-54.png)
![HOW TO USEMENU FUNCTIONSHOW TO USE MENU FUNCTIONSHOW TO USE MENU FUNCTIONSDelete AllPress to select the value setfor Delete All andpress [OK].Move to the previous menu after the message appears.Press to move to Delete All andpress [OK].This function enables the user to delete all the contents saved in Voice Dial.Auto DialingTo open the folder prompts the question asking the name of the person to call. This function enablesthe user to make a call at the saved phone number by telling the number without pressing [Dial]buttons.Press to select the value to set for AutomaticDialing and press [OK].Move to the previous menu after the message appears.Press to move to Automatic Dialing and press [OK].Press[MENU].Press to move to Voice Dialand press [OK].It is possible to make a call by voice dialing only when Automatic Dialing is in the Set state.All the Restricts should be set to Release to use the automatic dialing function.V8260106V8260107Press[MENU].Press to move to Voice Dialand press [OK].Delete individual itemsSelect View Voice Item and then press [DEL] Select the desired set value by pressing and then press [OK]. If the saved voice is heard after the message appears, the phone number will appear.](https://usermanual.wiki/Motorola-Mobility/T5AG1/User-Guide-103280-Page-55.png)
![HOW TO USE MENU FUNCTIONSV8260109HOW TO USEMENU FUNCTIONSHOW TO USE MENU FUNCTIONSData SpeedThis function enables the user to set the speed of the data transmitted when the poweris turned on after the connection of the wireless data communication cable.Config. DataThis function enables the user to select the data speed and the receive mode.Press[MENU].Press to select the desired dataspeed and press [OK].Press to move to Config. Data and press [OK].Press to move to Data Speed and press [OK].Move to the previous menu after the message appears.After the connection between a mobile phone and PC or a notebook is established, the data transmission is performed at the data speed set on PC or a notebook.Please, contact the service provider for the details.V8260108Receive ModeThis function enables the user to set the receive mode of a mobile phone during data reception.Press[MENU].Press to select the desiredreceive mode andpress [OK].Press to move to Config. Data and press [OK].Press to move to ReceiveMode and press [OK].Move to the previous menu after the message appears.Receive calls: receive the call made to a mobile phone.Receive data: receive the call made to data communication through a general modem.Receive FAX: receive data through fax.Please, contact the service provider for details.](https://usermanual.wiki/Motorola-Mobility/T5AG1/User-Guide-103280-Page-56.png)
![HOW TO USEMENU FUNCTIONSFUNCTIONS USED DURING A CALLV8260111It is possible to adjust the volume of the opposite s voice.Adjust the call volume by pressing during a call.Call volume adjustment 111Memo during a call 111Send Out my number 112Block Sending Tone 112Functions used during a callEnter the phone number to save and then press [STO].To press button after a call will connect a call at the designated phone number.Even though the user does not save the number additionally after entering it, he or she can make a call by pressing button after a call is completed.The phone number entered as a memo during a call is saved in Calling .(See.P.31)Call volume adjustmentMemo during a callIt is possible to enter and save a new phone number during a call.](https://usermanual.wiki/Motorola-Mobility/T5AG1/User-Guide-103280-Page-57.png)
![V8260112FUNCTIONS USED DURING A CALLThis function enables the user to send out his or her phone number to leave it for a callback in a mobile phone or a pager.Press [MENU] during a call.Move to Send Out My Number by pressing and then press [OK].Return to Call Mode after sending out the user s number.Press [MUTE] during a call.Press [MUTE] again to release Block Sending ToneSend Out My NumberBlock Sending ToneIt is possible to enter and save a new phone number during a call.HOW TO USEMENU FUNCTIONSMAIL SERVICEFUNCTIONSEnter Texts 114Voice Mail 118Text Mail 120Send Mail 122Delete Mail 126Alert Method 127](https://usermanual.wiki/Motorola-Mobility/T5AG1/User-Guide-103280-Page-58.png)
![MAIL SERVICE FUNCTIONSText Entering Mode supports Korean text (icon), English text (large and small), numbers, and special characters.V8260114V8260115Enter TextsMAIL SERVICE FUNCTIONSThe initial mode is set to enter Korean.Every time that is pressed once, the change will occur in the following order: [KOR ] : Entering Korean [ENG ] : Entering English text (Large) [eng ] : Entering English text (Small) [DGIT 8] : Entering numbers.The Korean consonant and vowel indicated on each button indicate the consonant and vowel shown in the beginning on the button.Enter texts and then move to next blank by pressing button.To correct the entered texts,Correction letter by letter : Press button for a short time.Correction of the whole : Press button for a long time.Enter Korea TextKorean Entering TableEnter the consonants from to .: Press once.: Press twice.: Press three times.: Press four times.Enter the consonants from to .: Press once.: Press twice.: Press three times.: Press four times.Enter the consonants from to . : Press once.: Press twice.: Press three times.Enter the consonants from to .: Press once.: Press twice.: Press three times.: Press four times.Enter the consonants from to .: Press once.: Press twice.: Press three times.: Press four times.Enter the vowels from to .: Press once.: Press twice.: Press three times.: Press four times.Enter the vowels from to .: Press once.: Press twice.: Press three times.: Press four times.: Press five time.Enter the vowels from to .: Press once.: Press twice.: Press three times.: Press four times.: Press five times.](https://usermanual.wiki/Motorola-Mobility/T5AG1/User-Guide-103280-Page-59.png)
![Press [Dial] button once, twice, and three times for the first text, the second text, and the third text, respectively.Press the relevant [Dial] button in Number Mode to enter numbers.If a certain period lapses after a text is entered, the cursor automatically moves to next blank.To correct the entered texts,V8260117MAIL SERVICE FUNCTIONSV8260116MAIL SERVICE FUNCTIONSCorrection letter by letter: Press button for a short time.Correction of the whole: Press button for a long time.Enter English Texts and NumbersTo press in Enter Text Mode while entering Korean or English texts will show Special Character Group.The user can see the special characters on next or the previous screen by pressing .Enter special characters by pressing the [Dial] button with the corresponding number.Enter Special CharactersEnglish Entering Table: Press once.: Press twice.: Press three times.GHI: Press once.: Press twice.: Press three times.: Press four times.PQRS: Press once.: Press twice.: Press three times.ABC: Press once.: Press twice.: Press three times.JKL: Press once.: Press twice.: Press three times.TUV: Press once.: Press twice.: Press three times.DEF: Press once.: Press twice.: Press three times.MNO: Press once.: Press twice.: Press three times.: Press four times.WXYZ](https://usermanual.wiki/Motorola-Mobility/T5AG1/User-Guide-103280-Page-60.png)
![V8260119MAIL SERVICE FUNCTIONSV8260118MAIL SERVICE FUNCTIONSThis function enables the user to check the voice mails received through the voice mailbox. This function shows the number of received voice mails, the reception time, and the received phonenumber (when the caller left the number for a callback).Voice MailThe information on thereceived voice mailappears.Press [MAIL].It is indicated thata voice mail hasbeen received.Check Voice MailMove to Voice Mail bypressing and thenpress [OK].When several voice mails are received, the information on the most recent voice mail appears.When the information on the received mail is indicated, Press [CALL].When the information on the received voice mail is indicated,Press [DEL]. Press to select the desired set value and press [OK].Make a Call to the Recived MailDeleteWhen the caller s number is left: A call is made to the received number.When the caller s number is not left: A connection is made to the voice mailbox.(Press [MAIL] for a long time or press *89 by using [Dial] button on the initial screen and then press button. Then, the connection will be made to the voice mailbox.)](https://usermanual.wiki/Motorola-Mobility/T5AG1/User-Guide-103280-Page-61.png)
![V8260121MAIL SERVICE FUNCTIONSV8260120MAIL SERVICE FUNCTIONSText MailThe information on thereceived voice mail appears.Press [MAIL].It is indicated thata voice mail hasbeen received.Move to Text Mail bypressing and thenpress [OK].The most recently received text mail appears on the top.When several text mails are received, the information on the one received last appears.To press button when the number of the caller who left the mail is entered will make acall at the entered number (when the number of the caller who left the mail is not entered, the message, There is no caller s number. appears.)To press button while checking mails will make a movement to the previous menu.Text mail not checked Text mail checked Repeated mail Mail whose protection is set.When the information on the received text mail appears,Press [LOCK]. Press to select the desired set value and press [OK].The mail selected for protection is indicated by .If the information on the received text mail appears when the mail is in the protection state, press [LOCK]. Select NO for the value to set for mail protection and press [OK].Protect(Save)MailRelease Mail PotectionIf the information on the received text mail appears,Press [DEL]. Select the desired set value and press [OK].Delete MailIt is possible to make a call only when the caller s number is indicated. If the information on the received text mail appears, press button.Call to the Received Mail](https://usermanual.wiki/Motorola-Mobility/T5AG1/User-Guide-103280-Page-62.png)
![V8260123MAIL SERVICE FUNCTIONSV8260122MAIL SERVICE FUNCTIONSSend MailPress[MAIL].To SendPress to moveto Send Mail andpress [OK].Press moveto To Send andpress [OK].Enter the receiver snumber and press [OK].Enter the mailcontents and press [OK] (See P. 114 ~ 117)Select the set valuefor mail saving andpress [OK].Enter the sender snumber and press[SEND].Press to move tothe desired sendingmethod and press[OK].Press to move to theprevious menu afterthe messageappears.If a mail is saved, it is possible to send the same mail by selecting the saved mail without entering the contents again.The saved mail can be searched in Saved Mail .](https://usermanual.wiki/Motorola-Mobility/T5AG1/User-Guide-103280-Page-63.png)
![V8260125MAIL SERVICE FUNCTIONSV8260124MAIL SERVICE FUNCTIONSSend MailPress[MAIL].Recall MsgsPress to moveto Send Mailand press[OK].Press tomove to RecallMsgs and press[OK].Press tomove to the savedmail item and press[OK].Press [OK] when the mailappears.Press to selectthe set value for mailsaving and press[OK].Enter the receiver snumber and press[OK].Enter the sender snumber and press[SEND].Press tomove to the desiredsending method andpress [OK].Move to theprevious menuafter the messageappears.The system prompts a message, Sending fails, and asks if the user wants to try again. Select the set value. Select the sending method. Resend.This function enables the user to edit the saved text mails or the assigned text mails and send the edited mails. It is possible to save up to 10 mails.When sending fails,](https://usermanual.wiki/Motorola-Mobility/T5AG1/User-Guide-103280-Page-64.png)
![Once : The alarming sound is generated to notify a mail reception.2m Interval : The alarming sounds are generated every two minutes to notify a mail reception until the user checks it.Cancel Alert : The alarming sound is not heard.V8260127MAIL SERVICE FUNCTIONSV8260126MAIL SERVICE FUNCTIONSSend MailPress[MAIL].Delete MailPress tomove to DeleteMail and press[OK].Press to move toitems to delete and press[OK].Press toselect the set valuefor deleting mail andpress [OK].Move to the previousmenu after themessage appears.This function enables the user to delete the received or saved mails.It is impossible to delete the mail, for which Mail Protection is set, even by selecting Delete Mail .It is necessary to first release the mail protection to delete the mail for which Mail Protection is set (See P. 121)Alert MethodPress[MAIL].Set AlertPress to moveto Alert Methodand press[OK].Press to moveto Set Alert andpress [OK].Press to moveto the desired setvalue for Set Alert andpress [OK].Move to the previousmenu after themessage appears.When a mail is received, this function notifies the user by means of alarm sounds that a mailhas been received.](https://usermanual.wiki/Motorola-Mobility/T5AG1/User-Guide-103280-Page-65.png)
![V8260129MAIL SERVICE FUNCTIONSV8260128MAIL SERVICE FUNCTIONSPress[MAIL].Set PreviewPress tomove to AlertMethod and press[OK].Press tomove to SetPreview and press[OK].Press to moveto the desired setvalue for Set Previewand press [OK].Move to the previousmenu after themessage appears.This function enables the user to decide on what the screen shows when a mail is received.Contents : The received text mail appears on the screen immediately and it is possible to search the received contents by using .Head Line : The kind of the received mail and the sender s number appear.ConfigPress[MAIL].Init.URLPress tomove to n.TOPConfig. andpress[OK].Press tomove to Init.URL and press[OK].Press [EDIT]and enter the URL tobe used as the initialscreen. Then, press[OK].Press to selectthe set value to savethe initial URL bypressing and press [OK].Move to thepreviousmenu afterthemessageappears.This function enables the user to set and use the desired initial screen and server when using WAP function.This function enables the user to set the desired initial screen when using WAP function.](https://usermanual.wiki/Motorola-Mobility/T5AG1/User-Guide-103280-Page-66.png)
![What is Proxy URL?Being located between the user and the service server, it takes the roles of brining the desired requestsaccording to the user s request and transferring it to him or her.V8260130MAIL SERVICE FUNCTIONSPorxy URLThis function enables the service provider to set proxy URL arbitrarily when adding or deletingaddresses by extending proxy URL.Press[MAIL].Press tomove to n.TOPConfig. andpress[OK].Press tomove to ProxyURL and press [OK].Press[EDIT] and thenenter Proxy URL.Press [OK].Press toselect the set valuefor Proxy URL andpress [OK].Move to thepreviousmenu afterthe messageappears.APPENDIXRecord 132n.TOP 134Mybell Service 135Wireless Data Communication Service 136How to Use an Ear Microphone 137Before thinking it is broken 138Motorola Service Center 140Warranty 145 APPENDIX](https://usermanual.wiki/Motorola-Mobility/T5AG1/User-Guide-103280-Page-67.png)
![APPENDIXV8260132V8260133APPENDIXRecordThis function enables the user to record the call contents or the user s voice in the standby state on the mobile phone.RecordingStartIt is possible to record the call contents by pressing button for a long timeduring a call. Save the contents by pressing [STO] when the recording isdone.It is possible to record the user s voice by pressing button for a long time onthe initial screen. The recording starts with the beep sound. Save the user svoice by pressing [STO] by pressing when the recording is done.To press [CNCL] will cancel the recording.EndPress or buttonPlay RecordingPress button.It is possible to hear the recordedcontents by moving to thedesired recorded items by pressing . Press[PLAY] to hear them again.Press tomove to PlayRecording andpress[OK].Erasing Press button.Select the set value for DeleteRecording and press [OK].Press tomove to DeleteAll and press [OK].When the user wants to delete the item which is being played currently, Press [DEL] when therecording is played. Press to select the desired set value and press [OK].](https://usermanual.wiki/Motorola-Mobility/T5AG1/User-Guide-103280-Page-68.png)
![V8260135APPENDIXAPPENDIXV8260134n.TOPThis is bi-directional information service which enables the user to easily search for the desired Internetinformation with a mobile phone anytime anywhere. Because it is classified into information, economics,entertainment, my network, and TTL n.TOP, the user can search for information more easily.Connect to n.TOPPress to make a connection to n.TOP.Press to search for items.Press [OK] to select the desired item.Press button to end n.TOP.When the connection to n.TOP is made, appears.Use n.TOPMybell ServiceThis function enables the user to download desired melodies in addition to those already saved in the mobile phone and use them as the receive bell.How to Use02-700-5782 Press button.To select the desired melody according to the announcements will automatically download the melody and be registered on User 1 ~ User 3 of Bell/Melody.The melody is downloaded through Bell / Melody and select the registered User(See P. 46 ~ 47) User 1 ~ User 3.Change to the Receive Bell](https://usermanual.wiki/Motorola-Mobility/T5AG1/User-Guide-103280-Page-69.png)