Motorola Mobility T56NA1 WCDMA/GSM TRANSCEIVER WITH BT & WLAN User Manual
Motorola Mobility LLC WCDMA/GSM TRANSCEIVER WITH BT & WLAN
UserManual.wiki
>
Motorola Mobility
>
T56NA1 User Manual
>
Users Manual 1
Contents
1.
Users Manual 1
2.
Users Manual 2
Users Manual 1
Navigation menu
Upload a User Manual
Namespaces
Wiki Guide
HTML
PDF
Info
Views
User Manual
Discussion / Help
Navigation


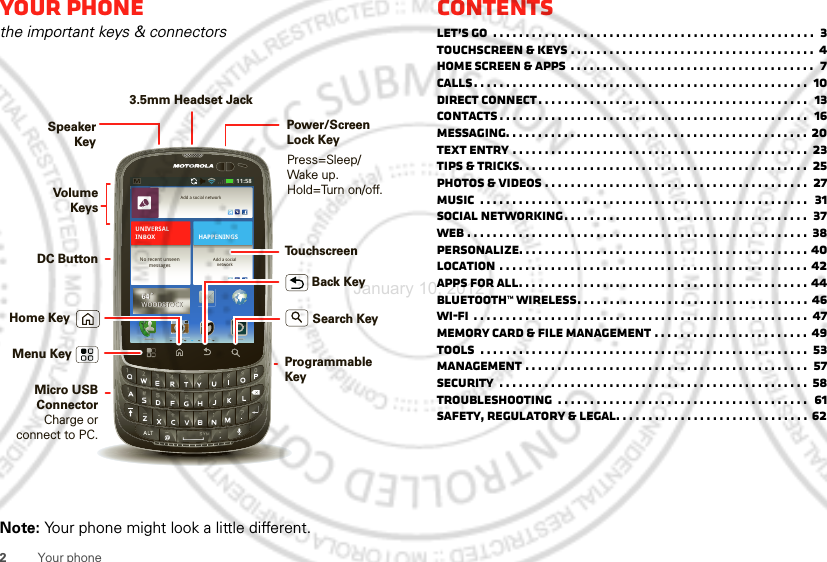


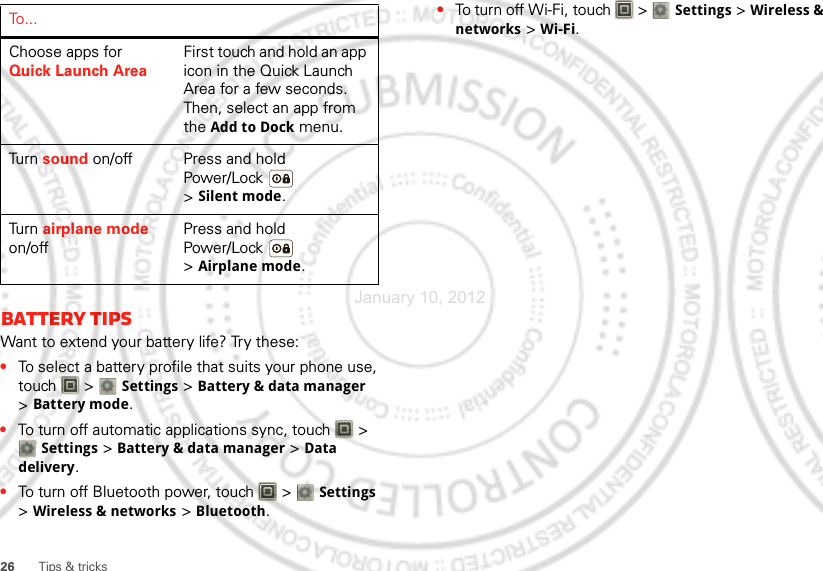
![14Direct ConnectDC resumeYou can extend the automatic timeout of a DC call by about 30 seconds.Find it: > Settings > Call settings > Direct Connect settings > Resume DCOne touch DCYou can customize the DC Button for quick access to Direct Connect functions.Find it: > Settings > Call settings > Direct Connect settings > One Touch DCOptionsOffTurn off One Touch DC.Launch DC Contacts ListOpen a list of Direct Connect contacts on your phone.Launch DC Call log listOpen the DC Call log list.DC selected contactStart a Direct Connect call with the selected contact.DC most recent numberStart a Direct Connect call with the most recent DC number in the Call log.Tip: To add a quick switch for One Touch DC, touch and hold a blank spot on your home screen, then touch Motorola Widgets > One Touch DC.AlertsUse alert to tell someone you want to speak to them.To send a call alert:•Touch Phone > Dialer, enter a DC number, and press Menu > Send Alert. When prompted, press the DC Button.•Touch > Contacts, select a contact containing a DC number, touch [Call Alert Icon], and press the DC Button when prompted.When you receive a call alert, you can:•Answer: Press the DC Button to begin a Direct Connect call with the sender.• Later: Store the call alert to Notifications.•Dismiss: Dismiss the call alert.Note: Alerts are moved to Notifications after a few minutes of inactivity. You won’t be able to make phone calls or Direct Connect calls until the call alert is moved, or you’ve chosen an option.January 10, 2012](https://usermanual.wiki/Motorola-Mobility/T56NA1.Users-Manual-1/User-Guide-1629040-Page-17.png)