Motorola Mobility T56JY1 Portable GSM/ EDGE Transceiver with Bluetooth User Manual Exhibit 8 Users Manual
Motorola Mobility LLC Portable GSM/ EDGE Transceiver with Bluetooth Exhibit 8 Users Manual
Contents
- 1. Exhibit 8 Users Manual
- 2. Exhibit 8A Supplemental Users Manual
Exhibit 8 Users Manual
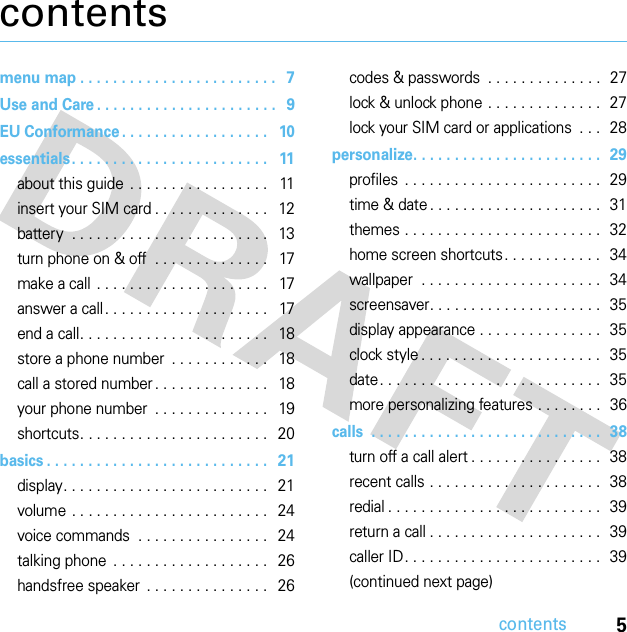
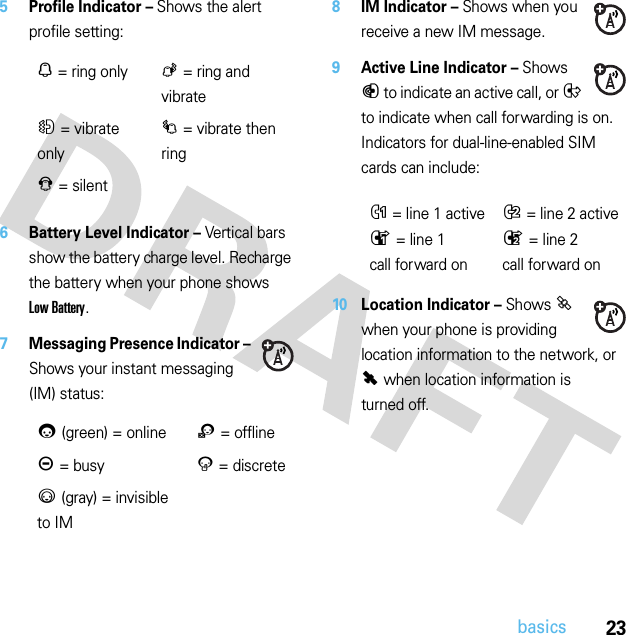
![22basicsStatus indicators appear at the top of the home screen: 1Signal Strength Indicator – Show the strength of the wireless network connection.2EDGE/GPRS Indicator – Shows when your phone is using a high-speed Enhanced Data for GSM Evolution (EDGE) network connection Z, or General Packet Radio Service (GPRS) network connection g.3Bluetooth Indicator – Shows Bluetooth status:4Message Indicator – Shows when you receive a new text or voice message. Other indicators can include:10987465321&(solid blue) = Bluetooth power on&(solid green) = Bluetooth connected&(flashing blue) = Bluetooth discoverable mode]= text message(= voicemail messageV= email message](https://usermanual.wiki/Motorola-Mobility/T56JY1.Exhibit-8-Users-Manual/User-Guide-1003439-Page-24.png)

![30personalize 1Press S left/right to select the alerts tab[, volume tabi, messages tab], or settings tab#.2Press S up/down to scroll to the alert or volume setting you want to change, then press r.3Select the setting value you want.4Press Back to exit and save your changes.To reset the default settings for an alert style:Find it: Menu >uSettings >Profiles >Alert Style >alert style, press Options >Resetcreate a new profileTo create a new profile with the ringtones and volume settings you specify:Find it: Menu >uSettings >Profiles >Alert Style >alert style 1Change alert style settings as described in the previous section.2Press Options >Save as Profile.3Enter a name for the profile, then press Save to save it.To cre at e additional profiles:Find it: Menu >uSettings >Profiles, press Options >Create ProfileNote: Profile alert settings also can be set by the theme. When you apply a new theme, you can choose to apply the theme’s alert settings to the current profile. Selecting this option changes the current profile to use the theme alert settings.edit or delete profilesTo edit a profile:Find it: Menu >uSettings >Profiles, scroll to the profile, press Options >EditNote: You can’t edit the Silent profile, or change some settings for some profiles.To delete a user-defined profile:Find it: Menu >uSettings >Profiles, scroll to the profile, press Options >Delete](https://usermanual.wiki/Motorola-Mobility/T56JY1.Exhibit-8-Users-Manual/User-Guide-1003439-Page-32.png)


![73messages(Note: File size restrictions may apply to pictures and videos sent in a message.)To insert another page, press Options >Insert >Page. You can enter more text and objects on the new page.2When you finish the message, press Options >Sending Options to set message options (such as Subject and Priority).3When you finish setting message options, press Done.4Press Send To to select message recipients. You can:•Select one or more entries from your contact list (press S to scroll to an entry, and press r to select it).•Enter a new number or email address (press Options >Enter Number or Enter Email).5Press Send to send the message.Your phone might tell you that this is a multimedia message, if it contains multiple pages or media objects. Some phones or networks don’t support multimedia messages. Press Yes to send the message.To save or cancel the message, press Options >Save to Drafts or Cancel Message.Messages that you send are stored in the Outbox. Icons next to each message show if the message was sentñ, if the send attempt was successful™, or if the send attempt failed~. Press Options to perform various operations on a message.receive a messageWhen you receive a text message, your phone plays an alert and shows New Message. The text message indicator] appears at the top of the home screen.To read the message, press View. If the message contains media objects:•Pictures and animations show as you read the message.](https://usermanual.wiki/Motorola-Mobility/T56JY1.Exhibit-8-Users-Manual/User-Guide-1003439-Page-75.png)
![74messages•Sound files play as you read the message. Press the volume keys on the side of your phone to change the sound volume.•Attached files are added to the end of the message. To open an attachment, select the file indicator or file name.To answer the message, press Options >Reply.instant messagingUse instant messaging to share messages with your friends in real time.Find it: Menu >mOffice Tools >IM, scroll to your IM account, press Log InIf you don’t have an IM account, select [New Account] to create one.To find others online, select Contact List to see a list of other users.To start a conversation, scroll to a name in the Online Contacts list and press Send IM.To open an active conversation, scroll to a name in the Conversations list and press View.To end a conversation, press Options >End Conversation.To log out from your instant messaging session, press Options >Log Out.more message featuresfeaturessend a prewritten quick noteMenu >gMessages >Messages >Templates >Text Templates > quick note, press Options>SendTo create a new quick note:Menu >gMessages >Messages >Templates >Text Templates, press Options>Create Template](https://usermanual.wiki/Motorola-Mobility/T56JY1.Exhibit-8-Users-Manual/User-Guide-1003439-Page-76.png)
![75messagessend emailMenu >gMessages >MobileMailuse a multimedia templateOpen a multimedia template with pre-installed media:Menu >gMessages >Messages >Templates >Multimedia Templatesread new message or emailWhen your display shows New Message, press Read.read old messagesMenu >gMessages >Messages >InboxIcons next to each message show if it is read>, unread], urgent<, or has an attachment*. Press Options to perform various operations on a message.featuresread old emailMenu >gMessages >MobileMailPress Options to perform various operations on a message.store message objectsGo to a multimedia message page, then press Options>Store.create folderCreate a personal folder to store your messages.Menu >gMessages >Messages >My Folders, press Options >Create Folderfeatures](https://usermanual.wiki/Motorola-Mobility/T56JY1.Exhibit-8-Users-Manual/User-Guide-1003439-Page-77.png)

![90connections3Select a recognized device name.orSelect [Search For Devices] to search for new devices, then select the device where you want to copy the object.4Press Options >Send.5If necessary, enter a mutually agreed upon passkey (such as 0000) on your phone and the device, then press OK to connect to the device.Your phone shows Sending while the file is transferred. When file transfer is complete, the phone shows Send Successful, and prompts you to press OK to continue.receive files from another deviceBefore you try to receive a file from another device, make sure your phone’s Bluetooth power is on (see page 88).Place your phone within range (approximately 10 meters/30 feet) of the other Bluetooth device, and send the file from the device.If your phone and the sending device were not previously paired, place your phone in discoverable mode so the sending device can locate it. Press Menu >uSettings >Connections >Bluetooth, press Options >Discoverable On 3 Minutes. The Bluetooth indicator & in the home screen flashes when your phone is in discoverable mode.Your phone shows Incoming Transfer while the file is transferred. When file transfer is complete, the phone shows Successful, and tells you where the file was stored.](https://usermanual.wiki/Motorola-Mobility/T56JY1.Exhibit-8-Users-Manual/User-Guide-1003439-Page-92.png)