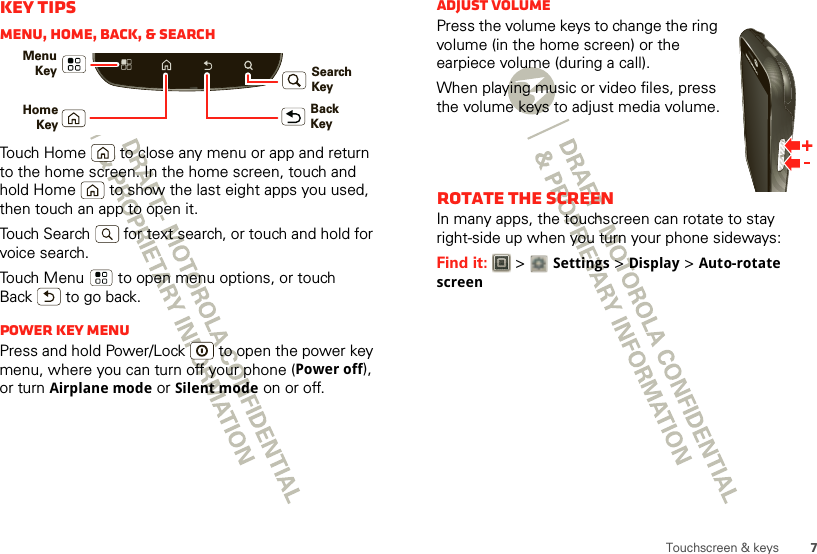
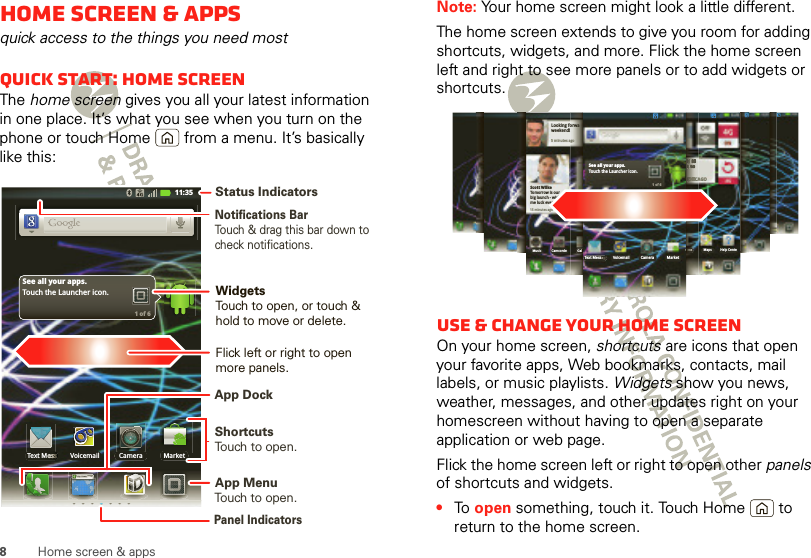
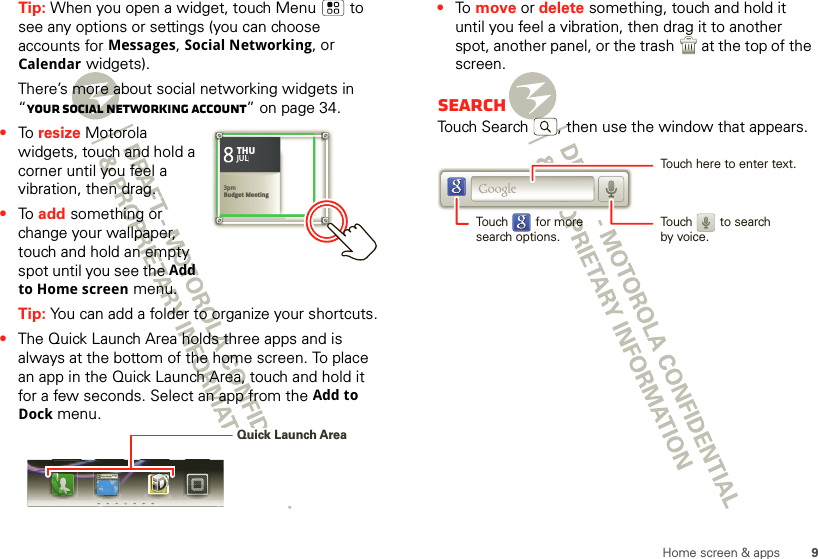
Motorola Mobility P56MD3 Portable Cellular/ PCS CDMA Transceiver with WLAN and Bluetooth User Manual

Motorola Mobility LLC Portable Cellular/ PCS CDMA Transceiver with WLAN and Bluetooth Users Manual

Contents

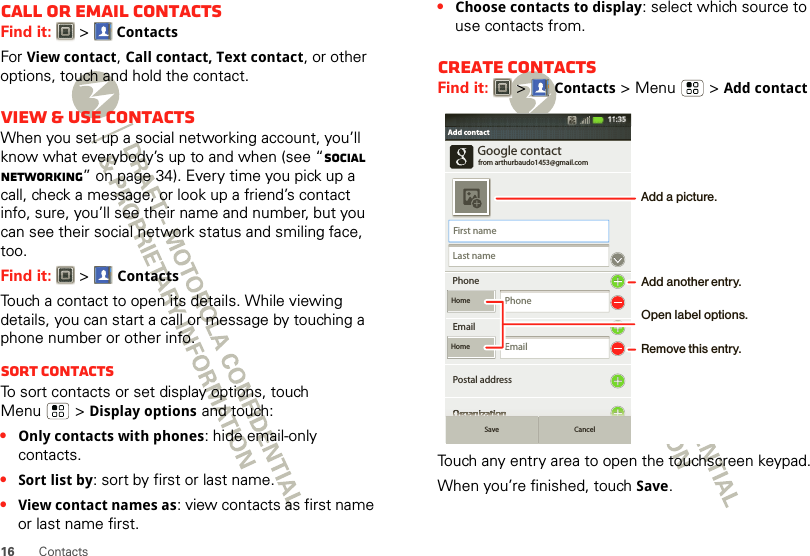
Exhibit 8 Users Manual 1
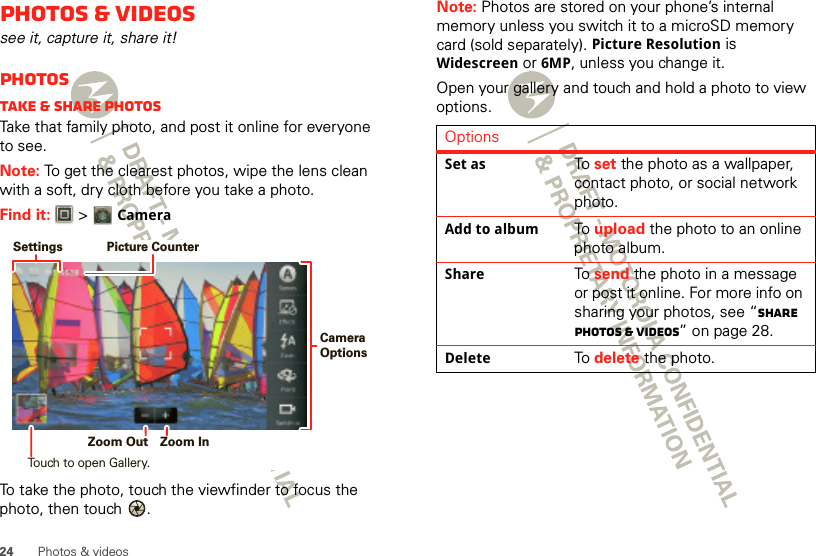
APPLICANT: MOTOROLA MOBILITY, INC.                                      FCC ID: IHDP56MD3   INSTRUCTION MANUAL  A representative version of the user's manual follows: Exhibit 8
MOTOROLA ELECTRIFY TM
1CongratulationsCongratulationsMOTOROLA ELECTRIFY™Stay connected, organize your life, and absolutely own the web with MOTOROLA ELECTRIFY.•Surf the web with a blistering fast 1 GHz dual-core processor.•International roaming lets you make calls and stay in touch wherever you travel.•Watch streaming videos on your 4.3” qHD touchscreen, or use mirror mode to view your phone on your TV screen for gaming, videos, web browsing, and more.•Capture life’s moments in full 1080p HD video. Use the gallery to gather all your photos and your friends’ online albums in one place.•Connect your phone into the optional LapdockTM or HD Station and use it as a computer. Access and manage your files, photos, emails and web on a larger screen virtually anywhere you go.Note: Certain apps and features may not be available in all countries.More•Answers: Touch   > Help Center.•Updates: Smartphone updates, computer software, user guides, online help, and more at www.motorola.com/support.• Accessories: Find accessories for your smartphone at www.motorola.com/products.Caution: Before assembling, charging, or using your phone for the first time, please read the important legal and safety information packaged with your product.
2Your phoneYour phonethe important keys & connectorsNote: Your phone might look a little different.ttp://www.htText MessText MeeeessssssssssssssssssMarketCameraVoicemailCTMMkSee all your apps.Touch the Launcher icon.1 of 611:35Front FacingCamera  3.5 mm Headset Micro USBConnectorMicro HDMIConnectorMenu KeyBack KeyHome  KeyCamera KeySearch KeyTo u chscreenVolume KeysPower/Lock ContentsLet’s go. . . . . . . . . . . . . . . . . . . . . . . . . . . . . . . . . . . . . . . . . . . . . . . . . 3Touchscreen & keys . . . . . . . . . . . . . . . . . . . . . . . . . . . . . . . . . . . .  5Home screen & apps  . . . . . . . . . . . . . . . . . . . . . . . . . . . . . . . . . . . . 8Webtop application . . . . . . . . . . . . . . . . . . . . . . . . . . . . . . . . . . .  11Calls . . . . . . . . . . . . . . . . . . . . . . . . . . . . . . . . . . . . . . . . . . . . . . . . . .  12Contacts . . . . . . . . . . . . . . . . . . . . . . . . . . . . . . . . . . . . . . . . . . . . . .  15Messaging. . . . . . . . . . . . . . . . . . . . . . . . . . . . . . . . . . . . . . . . . . . . .  17Text entry . . . . . . . . . . . . . . . . . . . . . . . . . . . . . . . . . . . . . . . . . . . . 20Tips & tricks. . . . . . . . . . . . . . . . . . . . . . . . . . . . . . . . . . . . . . . . . . . 22Photos & videos . . . . . . . . . . . . . . . . . . . . . . . . . . . . . . . . . . . . . . . 24Music. . . . . . . . . . . . . . . . . . . . . . . . . . . . . . . . . . . . . . . . . . . . . . . . . . 29Social networking. . . . . . . . . . . . . . . . . . . . . . . . . . . . . . . . . . . . 34Web . . . . . . . . . . . . . . . . . . . . . . . . . . . . . . . . . . . . . . . . . . . . . . . . . . . 35Personalize. . . . . . . . . . . . . . . . . . . . . . . . . . . . . . . . . . . . . . . . . . . 36Location  . . . . . . . . . . . . . . . . . . . . . . . . . . . . . . . . . . . . . . . . . . . . . . 38Apps for all. . . . . . . . . . . . . . . . . . . . . . . . . . . . . . . . . . . . . . . . . .   40Connections  . . . . . . . . . . . . . . . . . . . . . . . . . . . . . . . . . . . . . . . . . . 42Digital living. . . . . . . . . . . . . . . . . . . . . . . . . . . . . . . . . . . . . . . . . . 42Wi-Fi  . . . . . . . . . . . . . . . . . . . . . . . . . . . . . . . . . . . . . . . . . . . . . . . . .   44Memory card & file management . . . . . . . . . . . . . . . . . . . . . . 46Tools. . . . . . . . . . . . . . . . . . . . . . . . . . . . . . . . . . . . . . . . . . . . . . . . . . 49Management . . . . . . . . . . . . . . . . . . . . . . . . . . . . . . . . . . . . . . . . . . 54Security. . . . . . . . . . . . . . . . . . . . . . . . . . . . . . . . . . . . . . . . . . . . . . . 56Troubleshooting. . . . . . . . . . . . . . . . . . . . . . . . . . . . . . . . . . . . . . 58Safety, Regulatory & Legal. . . . . . . . . . . . . . . . . . . . . . . . . . . . 59
3ContentsLet’s golet’s get you up and runningAssemble & charge  1Cover off. 2SIM in.3microSD in. 4Battery in.5Cover on. 6Charge up.HD VIDEOHD VIDEO3HCaution: Please read “Battery Use & Safety” on page 59.Note: GSM and UMTS-based global services work only with a SIM card supplied by your service provider or by another GSM or UMTS service provider. When you set your phone to use a GSM or UMTS network (see “network mode (International)” on page 55), you may be prompted to enter a subsidy code. To get this code, contact your service provider.Tip: To save battery life, see “Battery tips” on page 23.Set up & goThe first time you turn on your phone, a setup wizard guides you through signing in to your Gmail™ account. If you don’t have one, don’t worry, the wizard will help you create one.After you log in to Gmail you can set up social networking, or you can do it later.Note: Your phone supports data-intensive apps and services. It is strongly recommended that you purchase a data plan that meets your needs. Contact your service provider for details.
4Let’s go  1Press and hold Power/Lock  on top of your phone to turn it on.2Select a language.3Follow the setup wizard to create or log in to your Gmail account.Note: If you have an existing Google Gmail account, your contacts from that account are synced to your phone.Wi-Fi connectIf you want to use a Wi-Fi network for even faster Internet access, touch  > Settings >Wireless & networks >Wi-Fi settings. TouchWi-Fi to search for and connect to wireless networks. There’s more in “Wi-Fi” on page 44.KickstandYou can use the kickstand to sit your phone upright to watch videos. To open the kickstand, use the recess to lift it up and into an open position.Tip: To set your phone to display the clock screen when the kickstand is open, touch   > Settings >Display > Kickstand Enable.Cool content & moreBrowse and download thousands of the coolest apps on the planet from Android Market™. See “Browse & install apps” on page 41.Your phone can use a microSD memory card (sold separately)—you can load it up with photos, videos, and music from your computer (see “Memory card” on page 46).
5Touchscreen & keysTouchscreen & keysa few essentialsTouchscreen on/offYour touchscreen is on when you need it and off when you don’t.•To make your touchscreen sleep or wake up, just press Power/Lock .•When you hold the phone to your ear during calls, your touchscreen sleeps to prevent accidental touches.•To change how long your phone waits before the screen goes to sleep, touch   > Settings >Display >Screen timeout.•To make the screen lock when it goes to sleep, use “Screen lock” on page 56. To unlock the screen, press Power/Lock  or open the phone. Then, drag   to the right.Note: Your touchscreen might stay dark if the sensor just above it is covered. Don't use covers or screen protectors (even clear ones) that cover this sensor.Touch tipsHere are some tips on how to navigate around your phone.TouchTo choose an icon or option, touch it.Touch & holdTo open special options, touch and hold an icon or other item. Try it: In the home screen, touch  >Contacts, then touch and hold a contact to open options.Text MessText MeeeesssssssssssssssssMarketCameraVoicemailText Mess MarketCameraVoicemailSee all your apps.Touch the Launcher icon.1 of 6Text MessssssssMarketCameraVoicemailCameraTextMesssssssssMarketSee all your apps.Touch the Launcher ico11:35ShortcutsAndroid widgetsFoldersWallpapersMotorola widgetsAdd to Home screen010203040506070809101112131415161718192021222223242526272829303131MARCHTHU010102030405060708091011121314151617181920211617181920212223242526272829303131 MARCHTHU
6Touchscreen & keysDragTo scroll through a list or move slowly, drag across the touchscreen. Try it: In the home screen, touch Contacts, then drag your Contacts list up or down.FlickTo scroll through a list or move quickly, flick across the touchscreen (drag quickly and release).Tip: When you flick a long list, touch the screen to stop it from scrolling.ZoomGet a closer look at Google Maps™ or web pages. To zoom in, double-touch (tap twice, quickly) the screen. To  z o om  ou t,  double-touch the screen again.You can also zoom in or out by pinching your fingers together or moving them apart on the screen.Messagingacker DrMarborn StN Micigan AveW Lake St W LakeE Wacker PlState/LakeLake Randolph/WabashWashington-BlueE SMMMRandolph StMessagingN Clark StWacker DrME Ohio StN Rush StN Wabash AveN Dearborn StE Grand AvN Micigan AveN Micigan AveW Lake St W Lake StE Wacker PlState/LakeGrand RedLakeRandolphSt MetraRandolph/WabashWashington-BlueE S WaterStMMMME Randolph St Ontario St E Ontario StPinch to zoom out.
7Touchscreen & keysKey tipsMenu, home, back, & searchTouch Home  to close any menu or app and return to the home screen. In the home screen, touch and hold Home  to show the last eight apps you used, then touch an app to open it.Touch Search  for text search, or touch and hold for voice search.Touch Menu  to open menu options, or touch Back  to go back.Power key menuPress and hold Power/Lock  to open the power key menu, where you can turn off your phone (Power off), or turn Airplane mode or Silent mode on or off.Menu KeyBack KeyHomeKeySearch KeyAdjust volumePress the volume keys to change the ring volume (in the home screen) or the earpiece volume (during a call).When playing music or video files, press the volume keys to adjust media volume.Rotate the screenIn many apps, the touchscreen can rotate to stay right-side up when you turn your phone sideways:Find it:   > Settings >Display >Auto-rotate screen
8Home screen & appsHome screen & appsquick access to the things you need mostQuick start: Home screenThe home screen gives you all your latest information in one place. It’s what you see when you turn on the phone or touch Home  from a menu. It’s basically like this:http://www.Text MessText MeeeeesssssssssssssssssssssMarketCameraVoicemailSee all your apps.Touch the Launcher icon.1 of 611:35Notifications BarTouch & drag this bar down to check notifications.Status IndicatorsShortcutsTouch to open. Touch to open.App MenuWidgetsTouch to open, or touch & hold to move or delete.Flick left or right to open more panels.Panel IndicatorsApp DockNote: Your home screen might look a little different.The home screen extends to give you room for adding shortcuts, widgets, and more. Flick the home screen left and right to see more panels or to add widgets or shortcuts.Use & change your home screenOn your home screen, shortcuts are icons that open your favorite apps, Web bookmarks, contacts, mail labels, or music playlists. Widgets show you news, weather, messages, and other updates right on your homescreen without having to open a separate application or web page.Flick the home screen left or right to open other panels of shortcuts and widgets.•To  open something, touch it. Touch Home  to return to the home screen.See all your apps.Touch the Launcher icon.1 of 6Text MessagMarketCameraVoicemailCHICAGOH 83L 65unts Maps Help CenteCCCCCCCCCCCHHHHHHHHIIIIIICCAHHHHHHHHHHH888888883333333LLLLLLLL 666666666555555555uuuunnnnnntttsssu15 minutes agoScott WilkeTomorrow is ourbig launch - wishme luck everyone!Looking forwaweekend! 5 minutes agoMusic Camcorde Gal
9Home screen & appsTip: When you open a widget, touch Menu  to see any options or settings (you can choose accounts for Messages, Social Networking, or Calendar widgets).There’s more about social networking widgets in “Your social networking account” on page 34.•To  resize Motorola widgets, touch and hold a corner until you feel a vibration, then drag.•To  add something or change your wallpaper, touch and hold an empty spot until you see the Add to Home screen menu.Tip: You can add a folder to organize your shortcuts.•The Quick Launch Area holds three apps and is always at the bottom of the home screen. To place an app in the Quick Launch Area, touch and hold it for a few seconds. Select an app from the Add to Dock menu.83pmBudget MeetingTHUJUL3pmBudget MeetingTHUJULhttp://www.Quick Launch Area•To  move or delete something, touch and hold it until you feel a vibration, then drag it to another spot, another panel, or the trash  at the top of the screen.SearchTouch Search , then use the window that appears.Touch here to enter text.Touch        for moresearch options.Touch        to searchby voice.
10 Home screen & appsPhone status & notificationsThe status bar at the top of the screen has icons that tell you about messages and phone status. To view your notifications, touch the status bar and drag it down. Touch a notification to select it.Tip: To see today’s date, touch the status bar at the top of the screen.Bluetooth active  network (full signal)GPS active network (roaming)Wi-Fi active airplane modedownloading sync activevibrate alarm setsilent battery (charging)mute call battery (full charge)speakerphone activeNotification lightYour phone has blinks when you receive voicemail, email, text message, have an appointment, or your battery is low.App menuYou can find all of your apps in one place. From the home screen, touch   to open the app menu.To close the app menu, press Home  or Back .All apps11:35GalleryCalendarAlarm &TimerAccounts100 HDGamesContactsCameraEmail FilesGmail GoogleSearchHelp CenterDownloadsCamcorderCalculatorGamesBlockbusterBrowserDialerAccount  Manager\\\\\\\[[[[[[[WWW]]]T^^^TTYYYYYYYYYWWWWW____YY[[[\\\\\\[[[[[[\\\\\\\\12345BooksTouch to open Market.Touch to change app tray view and create app groups.
11Webtop applicationRecent appsIn the home screen, touch and hold Home  to see the most recent apps you used. Touch an app to open it, or touch Home  to return to the home screen.Tip: You can also open recent apps from the app menu. Touch the icon on the upper left-hand corner and select Recent.Webtop applicationit’s a phone. . . no, it’s a computerConnect the webtop applicationThe webtop application lets you browse, or use web apps, on a large screen in a full Firefox browser. Create and share documents, spreadsheets, and presentations, with online tools like Google Docs.  1Connect your phone to a TV or computer with an optional dock.2Choose webtop.When you’re done using the webtop application, just disconnect your phone from the cable or dock.Control the webtop applicationIf you connect your phone to a TV or computer with an optional HD Station, you can connect your HDMI display, plus your USB keyboard and mouse. An optional Lapdock includes a full display, keyboard, and touchpad.
12 CallsTo navigate the webtop application display:•In the Phone window, you can open your phone apps.•At the bottom of the screen, you’ll see App Tray.Tip: You can open multiple Firefox browsers  .•In the top right of the screen, you’ll see icons for status and   Settings.For help in the webtop application, open   Settings > Help in the top right of the screen.Lapdock display, TV, or MonitorMobile ViewApp Tr ay Full Desktop BrowserOptional Lapdock or HD Multimedia DockCallsit’s good to talkQuick start: CallsDialing optionsFrom the home screen, touchDialer.Recent Calls ListTouch to open, then touch an entry to call.BackspaceTouch to delete digitsyou entered.Add to ContactsReturn CallVoice CallCallEnter a phone number& touch here to call it.
13CallsIn-call optionsTo use a Bluetooth™ device, touch Bluetooth. (Be sure the device is turned on and paired—see “Connect new devices” on page 43.) Call TimerMute Touch to mute orunmute the call.End Call Touch to hang up.SpeakerTouch to turn the speaker on or off.DialpadTouch to enter numbers during a call.Note: Using a mobile device or accessory while driving may cause distraction and may be illegal. Always obey the laws and drive safely.Tip: You can touch Home  or Back  to leave the active call display. To reopen it, touch Home  >Dialer, or flick down the Notifications bar and touch the Current Call notification.Make & answer callsTo make a call, touchDialer, enter a number, then touch .Tip: If the screen is locked, drag   to the right.To answer a call while the display is active, touch Answer. When the display is not active, answer by dragging   to the right.To ignore a call, touchIgnore.Note: When you hold the phone to your ear, the display goes dark to prevent accidental touches. When you move your phone away from your ear, the display lights up again.End callsTouchEnd Call.End call
14 CallsInternational callsFor international calls, dial the country code, the area code (if applicable), then the phone number.Recent callsFind it: Dialer >Recent•To call a number, touch it.•To send a text message, create a contact, view a contact, or other options, touch and hold an entry.•To clear the list, touch Menu  >Clear list.Frequent callsFind it: Dialer >Favorites•To call a number, touch it.•To send a text message, view a contact, or other options, touch and hold an entry.•To add a contact to Favorites, select the contact, and touch the star in the upper right corner. The star turns green.Three way callsTo start a conference call, call the first number. After the call connects, touchAdd Call. Dial the next number, or select it from contacts or favorites. When the next number answers, touch Merge.Your phone numberFind it:   > Settings >About phone >Status >My Phone numberSelect a networkMOTOROLA ELECTRIFY switches effortlessly between CDMA, GSM, and UMTS networks, so you can make calls worldwide.Note: To use your phone on a GSM or UMTS network, you need to insert a SIM card (see “Assemble & charge” on page 3), supplied by service provider or a compatible GSM or UMTS network service provider.To set your phone to roam globally:Find it: Touch  > Settings>Wireless & networks >Mobile networks >Network Mode >AutomaticTo manually switch your phone to a CDMA or GSM/UMTS network, see “network mode (International)” on page 55.Emergency callsNote: Your service provider programs one or more emergency phone numbers that you can call under any circumstances, even when your phone is locked. Emergency numbers vary by country. Your pre-programmed emergency number(s) may not work in all locations, and sometimes an emergency call
15Contactscannot be placed due to network, environmental, or interference issues.  1Touch Dialer (if your phone is locked, touch Emergency Call).2Enter the emergency number.3Touch   to call the emergency number.Note: Your mobile device can use GPS and AGPS signals to help emergency services find you. See “Location Services (GPS & AGPS)” on page 63.Cool downIn very limited circumstances, such as where your phone has been exposed to extreme heat, “Cool Down” message screens will appear. To avoid possible damage to your battery and phone, you should follow these instructions until the phone is within its recommended temperature range. When your phone is in “Cool Down” mode, only emergency calls can be made.Contactscontacts like you’ve never had beforeQuick start: ContactsFind it:   >ContactsContacts  ListTouch to view contact information. Touch & hold to edit, delete, and more.Press       to create, filter, and sync contacts.Touch to add a new contact.Touch to search contacts.Touch to add a new contact group.
16 ContactsCall or email contactsFind it:   >ContactsFor View contact, Call contact, Text contact, or other options, touch and hold the contact.View & use contactsWhen you set up a social networking account, you’ll know what everybody’s up to and when (see “Social networking” on page 34). Every time you pick up a call, check a message, or look up a friend’s contact info, sure, you’ll see their name and number, but you can see their social network status and smiling face, too.Find it:   >ContactsTouch a contact to open its details. While viewing details, you can start a call or message by touching a phone number or other info. SORT contactsTo sort contacts or set display options, touch Menu  >Display options and touch:•Only contacts with phones: hide email-only contacts.•Sort list by: sort by first or last name.•View contact names as: view contacts as first name or last name first.•Choose contacts to display: select which source to use contacts from.Create contactsFind it:   >Contacts >Menu  >Add contactTouch any entry area to open the touchscreen keypad.When you’re finished, touchSave.Google contactfrom arthurbaudo1453@gmail.comPhoneEmailPostal addressOrganizationFirst nameLast namePhoneHomeHome EmailAdd contactAdd contactOOOOOOOOOOOOOOOOOOOOOOOOOOrrrrrrrrrrrrrrrrrrrgggggggggggggggggggaaaaaaaaaaaaaaaaaaannnnnnnnnnnnnnnnnnniiiiiiiiiiiiiiiiiiiiiiiiizzzzzzzzzzzzzzzzzzzaaaaaaaaaaaaaaaaaaatttttttttttttttttttttttttiiiiiiiiiiiiiiiiiiiiiiiiiooooooooooooooooooonnnnnnnnnnnnnnnnnnnSave Cancel11:35Add another entry.Remove this entry.Open label options.Add a picture.
17MessagingWhere are contacts saved? Your phone saves new contacts in its memory and on the Google Server or Backup Assistant™, if you have a subscription. It also updates your social networking account.Edit or delete contactsFind it:   >ContactsTouch the contact, then touch Menu  >Edit contact or Delete contact. Synchronize contactsWhen you change one of your contacts, your phone automatically updates your other social networking accounts. Likewise, if you change a social networking friend, your phone updates your contacts.GroupsFind it:   >Contacts > > You can put your Contacts into groups that you create (like “friends”, “family”, or “work”). Then, you can find contacts faster by showing one group at a time.Tip: Touch Menu  to choose which groups to show (like All or Favorites).Messagingsometimes it’s best to text, or IM, or email . . .Quick start: MessagingFind it:   >Messaging >Universal InboxTip: To see more messages, flick or drag up.Read & reply to messagesFind it:   >Messaging >Universal InboxNote: Universal Inbox shows all of your messages together—text, email, and social networking messages. To show only one type of message, touch a message type instead of Universal Inbox.•To open a text message or social networking message and all of its replies, touch it.Universal Inbox (15)Universal Inbox (15)11:34 AMChristine FanningUPDATE:  Presentation has beenrescheduled at 11:30 instead!Heather ConnorMovie night, my pick is Younger Than EverChristine FanningPresentation tomorrow has been movedto noon in main conference room.Email with AttachmentParis Photos!Jeff Cook11:03 AM10:23 AM10:11 AM11:35Create MessageTouch to open a message. Touch & hold to move, delete, & more.Check for Messages NowMessage Type
18 Messaging•To respond to a message, just open it and enter your response in the text box at the bottom.To forward a text message, touch and hold a message in the conversation, then touch Forward message.For email, touch  to choose a reply or forward option.•To open options, touch and hold a message.Create messagesFind it:   >Messaging >Choose a message type, such as Text Messaging or Facebook. Then, enter the recipient and message. In text messages and emails, touch Menu  for options, like Insert...or Attach Files.Send & receive attachmentsTo send a file in a message, open a new message and touch Menu  >Insert.When you receive a message with an attachment, open the message and touch the file name to download it. Then, touch the name again to open it. Some file formats can be converted to HTML for faster viewing, and your phone will show Get HTML version.While viewing the attachment, touch it to save it, share it, and more.Tip: To send and receive large attachments faster, use a Wi-Fi connection (see“Wi-Fi” on page 44).Set up messagingTo add email accounts, touch   > Accounts >Add account.•Corporate Sync is for Exchange server work email accounts. Enter details from your IT administrator.Tip: You might need to enter your domain name with your user name (like domain/username).•Email is for most personal email accounts. For account details, contact the account provider.Note: To add other email accounts to your Messaging widget and Universal Inbox, touch   >Messaging, then touch Menu  >Manage accounts >Add account >Email.To change your settings, touch   >Messaging > Menu , then touch:•Manage accounts to add or remove an account.•Edit Universal Inbox to choose which accounts show messages in the Universal Inbox.•Messaging Settings to set the notification for each account type and more.Account  Manager
19MessagingGmail™Create a new emailFind it:   >Gmail > Menu  >ComposeEnter the recipient email address and message, then touch Send. Tip: Press Menu  for options, like Attach or Add Cc/Bcc.Featuressearch for emailPress Menu  >Search in a messages list.choose email notificationsPress Menu  > More >Settings >Email notifications.apply a label to a threadTouch and hold a message, then touch Change labels.Google Talk™Google Talk instant messaging lets you chat via instant message with other Google Talk users on phones or on the web.Find it:   >TalkPress Menu  to send invitations, add new friends, and more.taylormalloyOfflineheatherconnorOfflinejeffcookBusyravithakkarAvailablescottwilkeAvailableTouch to change your status.Online status:AvailableIdleBusyOfflineTouch a contact to chat with a friend.Friends listTouch to change your picture.Touch to change your online status message.
20 Text entryTip: You can also download an instant messaging app from the Android Market.VoicemailWhen you have a new voicemail,  appears at the top of your screen. Drag down the notification bar and touch the notification.If you need to change your voicemail number, in the home screen touch   > Settings >Call settings >Voicemail settings.Text entrykeys when you need themTouchscreen keypadYou can open a keypad on your screen by touching a text field, or touching and holding Menu . To close the keypad, touch Back .Input methodsTo select an input method, touch and hold a text entry area on the screen to open the Edit text menu. Touch Input method, then touch the method you want.zxcvbnmasdfghjklqwe r t yu i o p.?123thenthemthan themselvesthence theme themes themed turneddddddddddddddddddddd...DoneSee you then11:35DeleteReturnSpaceSymbols/NumbersShiftText EntryTouch to openthe touchscreenkeyboard.
21Text entrySwype™ text entryEnter words with one continuous motion. Just drag your finger over the letters in the word.Tips:•To enter several symbols, other punctuation, or numbers, touch SYM, or you can touch and hold the number on the letter keypad.•To correct a word, double-tap it. Swype shows a small menu of other word options. Swype might also show a menu if it can’t guess your word.•If Swype doesn’t know a word, you can still touch the letter keys to enter it. Swype remembers, so next time you can just drag over the letters.Send:-)asdfghj k lqwe r t y u i o pzxcvbnm@#12 3_%()!7890 /?&$456+:;“,,.SYMENTo enter a word, just trace a path through the letters.To capitalize, go above the keypad.For double letters, circle the letter.To enter a word, just trace a path through the letters.To capitalize, go above the keypad.For double letters, circle the letter.AnneAnneAnneaenaenMulti-touch text entryEnter text a letter at a time. As you type, your phone suggests words from your dictionary and chosen language.Typing tipsTo...Enter alternate charactersFrom the number keypad, touch Alternate . Touch again to return to numbers.Enter one capital letterTouch Shift .Enter only capital letters, until you touch Shift Lock  againTouch Shift Lock  twice. Touch again to revert to lowercase.Select text Touch and hold text to select it.Cut or Copy selected textTouch and hold text, then touch Cut or Copy.Paste cut or copied textTouch and hold location to paste then touch Paste.Move the cursor Touch the location you want to go toALT
22 Tips & tricksText input settingsFind it: Touch  > Settings >Language & keyboard•To edit your dictionary, touchUser dictionary.•To change the language and the style for your touchscreen keypad, touch Select locale.•To change input method and settings, touch Swype or Multi-touch keyboard.Delete a character (hold to delete more)Touch Delete .To . ..xTips & tricksa few handy hintsGeneral tipsTo...Return to home screenPress HomeSee recently dialed numbersTouch Dialer >Recent.Sleep/wake your phonePress Power/Lock .Set screen timeout Touch  > Settings >Display >Screen timeout.Search Press Search .Use voice search Press and hold Search .See recently opened appsPress and hold Home .Choose apps for Quick Launch AreaFirst touch and hold an app icon in the Quick Launch Area for a few seconds. Then, select an app from the Add to Dock menu.
23Tips & tricksBattery tipsWant to extend your battery life? Try these:•To select a battery profile that suits your phone use, touch  > Settings >Battery & data manager >Battery mode.•To turn off automatic applications sync, touch   > Settings >Battery & data manager >Data delivery.•To turn off Bluetooth power, touch   > Settings >Wireless & networks >Bluetooth.Turn   sound on/off Press and hold Power/Lock  >Silent mode.Turn   airplane mode on/offPress and hold Power/Lock  >Airplane mode.Use FM radio app Connect a wired headset. The wires in your headset act as the antenna. For best performance, use a Motorola Original headset. Indoor reception may vary.To . .. •To turn off Wi-Fi, touch   > Settings >Wireless & networks >Wi-Fi.
24 Photos & videosPhotos & videossee it, capture it, share it!PhotosTake & share photosTake that family photo, and post it online for everyone to see.Note: To get the clearest photos, wipe the lens clean with a soft, dry cloth before you take a photo.Find it:   > CameraTo take the photo, touch the viewfinder to focus the photo, then touch  . SettingsPicture Counter Zoom Out  Zoom In Touch to open Gallery.CameraOptionsNote: Photos are stored on your phone’s internal memory unless you switch it to a microSD memory card (sold separately). Picture Resolution is Widescreen or 6MP, unless you change it.Open your gallery and touch and hold a photo to view options.OptionsSet asTo set the photo as a wallpaper, contact photo, or social network photo.Add to albumTo upload the photo to an online photo album.ShareTo send the photo in a message or post it online. For more info on sharing your photos, see “Share photos & videos” on page 28.DeleteTo delete the photo.
25Photos & videosPhoto options You can make adjustments to optimize your shot. Touch the right side of the screen to see these options.OptionsScenesAdjust in different environments: Auto, Portrait, Landscape, Sport, and more. Touch the screen when finished to return to the viewfinder.EffectsChange photo look: Normal, Black and White, Negative, and more.FlashSet Flash On, Flash Off, or Auto Flash.Front/BackSwitch between the forward facing and rear facing Cameras.Switch toToggle between photo and camcorder.Camera settingsIn the viewfinder, touch Menu  >Settings to adjust these settings. Picture modesIn the viewfinder, touch Menu  >Picture modes to change picture mode. OptionsPicture ResolutionAdjust for optimal resolution.ExposureIncrease or decrease the amount of aperture time.Storage LocationSave photos to camera or memory card.OptionsSingle shotTake one shot at a time.PanoramaTake multiple shots of wide scenes and join them together to make one large image. Use Capture Direction to specify how shots will be joined: Move up, Move right, Move left, Move down.

Navigation menu