Mitsumi Electric Co DWMW028 Wireless LAN module User Manual PARTNER CTR UsersManual

Mitsumi Electric Co Ltd Wireless LAN module PARTNER CTR UsersManual

PARTNER-CTR_UsersManual
  Setup Manual for the PARTNER-CTR  Read this guide before connecting the "PARTNER-CTR" series to your computer.  This manual describes how to connect the PARTNER-CTR to the computer, install device drivers for each OS and set up the system.  Interfaces Described in This Manual  USB Interface  OSs Described in This Manual  Windows XP  Windows Vista  Windows 7             -Please note that the content and specifications of this product may be modified without prior notice. -Although every care has been taken in the production of this product, Kyoto Microcomputer Co., Ltd. cannot be held responsible for any consequences of the use of this product.      Kyoto Microcomputer Co., Ltd. KCSUP101027
 Cautions z  Do not put heavy objects on the PARTNER-CTR main unit, or apply pressure to the unit. z  Do not drop the PARTNER-CTR or apply vibration or shock to it. z  Do not pull the cord when unplugging the cable. z  Exercise great care not to damage the PARTNER-CTR with static electricity. z  Do not use or store the unit in high temperature, high humidity, dusty areas or under direct sunlight. z  Avoid rapid change of temperature and humidity. z  Be careful not to spill drinks or other liquids on the PARTNER-CTR or its accessories. z  Be careful not to plug the connector into the wrong interface card. z  Do not use anything other than the power adapter and power cable provided specifically for the PARTNER-CTR hardware.  Notice z  The module and the host must be operated with accessories which bear the FCC logo or comply with the relevant FCC/IC regulations. Following condition must be considered. 1. Example cables between monitor and host may be considered if not provided by the Monitor's manufacturer. By Manufacturer: TechCraft    Model: CDVI-MMDL2M   By Manufacturer: cablestogo    Model: 40296   By Manufacturer: cable unlimited  Model: PCM-2285-06 2. Classic KUMI C model RVL-005(-05) with the ferrite cores cable is included in the package with the host. The accessories do not comply with the FCC/IC regulations, operated with the host. Or others than the listed cables and accessories could void the user's authority to operate the equipment. module : DWM-W028(FCCID EW4DWMW028/IC 4250A-DWMW028) host  : PARTNER-CTR Debugger / Capture / CaptureDebugger KCSUP101027
Regulatory Statement --- U.S.A & Canada --- z  CAUTION: Changes or modifications not expressly approved by the party responsible for compliance could void the user’s authority to operate the equipment. z  NOTE: This equipment has been tested and found to comply with the limits for a Class A digital device, pursuant to part 15 of the FCC Rules. These limits are designed to provide reasonable protection against harmful interference when the equipment is operated in a commercial environment. This equipment generates, uses, and can radiate radio frequency energy and, if not installed and used in accordance with the instruction manual, may cause harmful interference to radio communications. Operation of this equipment in a residential area is likely to cause harmful interference in which case the user will be required to correct the interference at his own expense. This Class A digital apparatus complies with Canadian ICES-003. Cet appareil numérique de la classe A est conforme à la norme NMB-003 du Canada. z RF exposure compliance 1) To comply with FCC/IC RF exposure compliance requirements, a separation distance of at least 20 cm must be maintained between the antenna of this device and all persons. 2) This transmitter must not be co-located or operating in conjunction with any other antenna or transmitter. z  RSS-210 Low Power Device Operation is subject to the following two conditions: (1) this device may not cause interference, and   (2) this device must accept any interference, including interference that may cause undesired operation of the device. z  According to RSS-Gen 7.1.4, This device has been designed to operate with the antennas listed below, and having a maximum gain of 2.62dB. Antennas not included in this list or having a gain greater than 2.62dB are strictly prohibited for use with this device. The required antenna impedance is 50ohms. Detachable antenna: DN57 2.4GHz SMA-PR To reduce potential radio interference to other users, the antenna type and its gain should be so chosen that the equivalent isotropically radiated power (e.i.r.p.) is not more than that permitted for successful communication.  --- CE --- z  We declare, under our solo responsibility, that the products identified in this declaration are in conformity with the requirements of Council Directive: 1999/05/EC  on the harmonization of the laws of Member States relating to electrical KCSUP101027
equipment designed for use within certain voltage limits.   2006/95/EC on the harmonization of the laws of the Member States relating to Low Voltage Directive 2002/96/EC on the approximation of the laws of the Member States relating to Waste Electrical and Electronic Equipment Directive. 2002/95/EC on the approximation of the laws of the Member States relating to the restriction of the use of certain hazardous substances in electrical and electronic equipment  Safety  :  EN60950-1:2006/A11:2009 EMC   :   EN 301 498-1 V1.8.1            EN 301 498-17 V2.1.1            EN 55022:2006+A1:2007            EN 61000-3-2:2006            EN 61000-3-3:1995+A1:2001+A2:2005            EN 55024:1998+A1:2001+A2:2003 R&TTE :  ETSI EN 300 328 V1.7.1 Manufacturer  2-44 Ooenakayama-cho, Nishikyo-ku, Kyoto-city, Kyoto, Japan Phone: +81 75-335-1050 Fax: +81 75-335-1051 Kyoto Microcomputer Co., Ltd. (KMC)  z  About destruction in EU within the region.: The use of the WEEE symbol indicates that this product may not be treated as household waste. By ensuring this product is disposed of correctly, you will help protect the environment. For more detailed information about the recycling of this product, please contact your local authority, your household waste disposal service provider or the shop where you purchased the product.   --- Australia ---  ACN 060 566 083 KCSUP101027
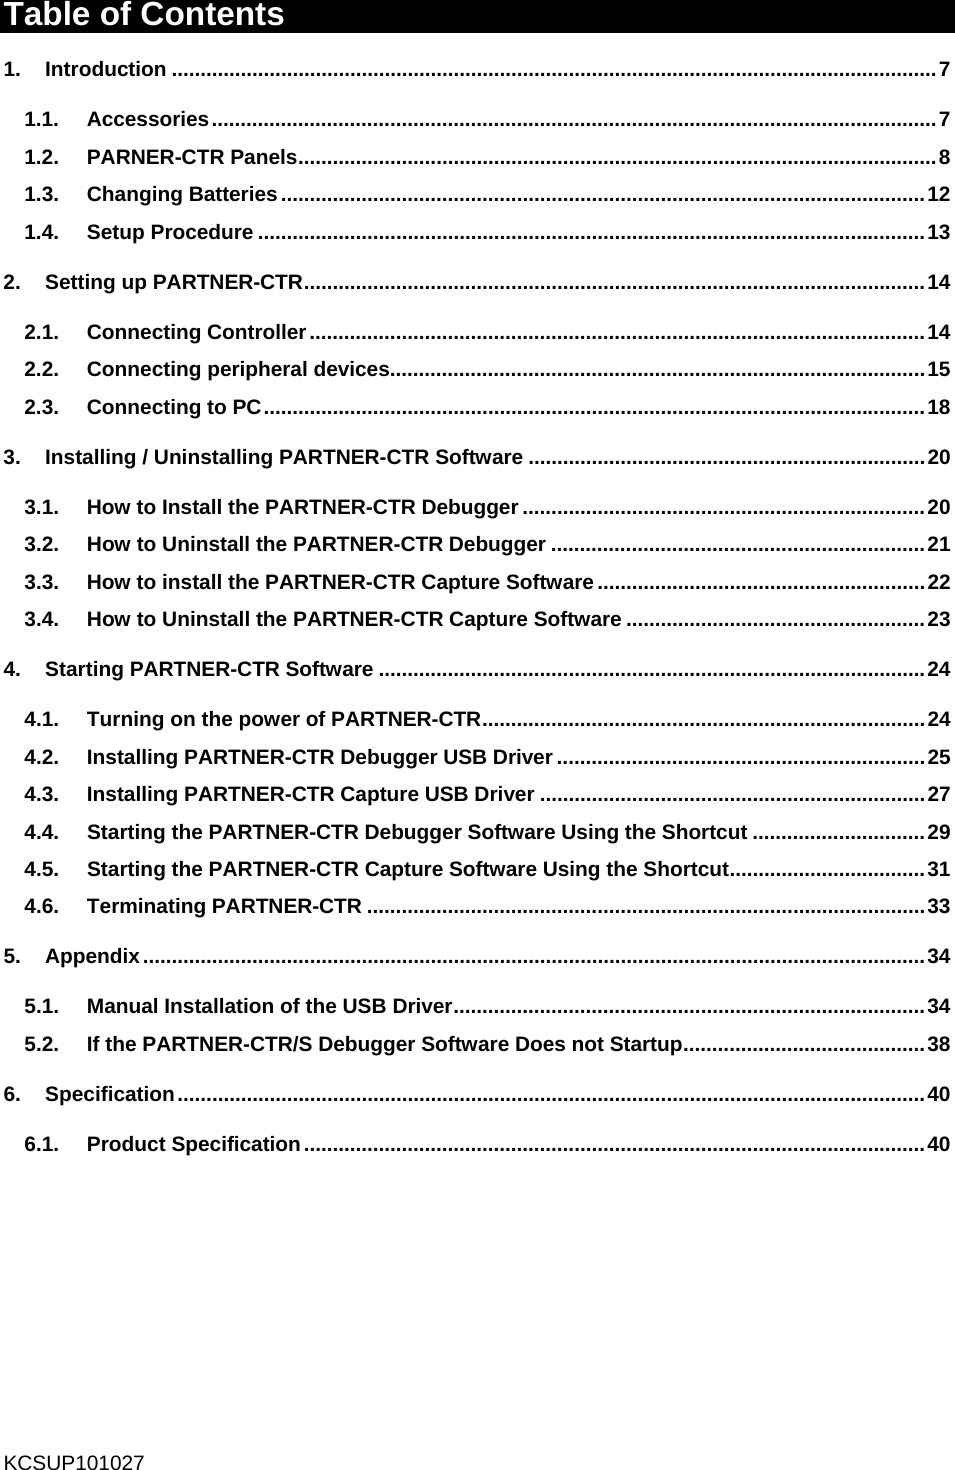
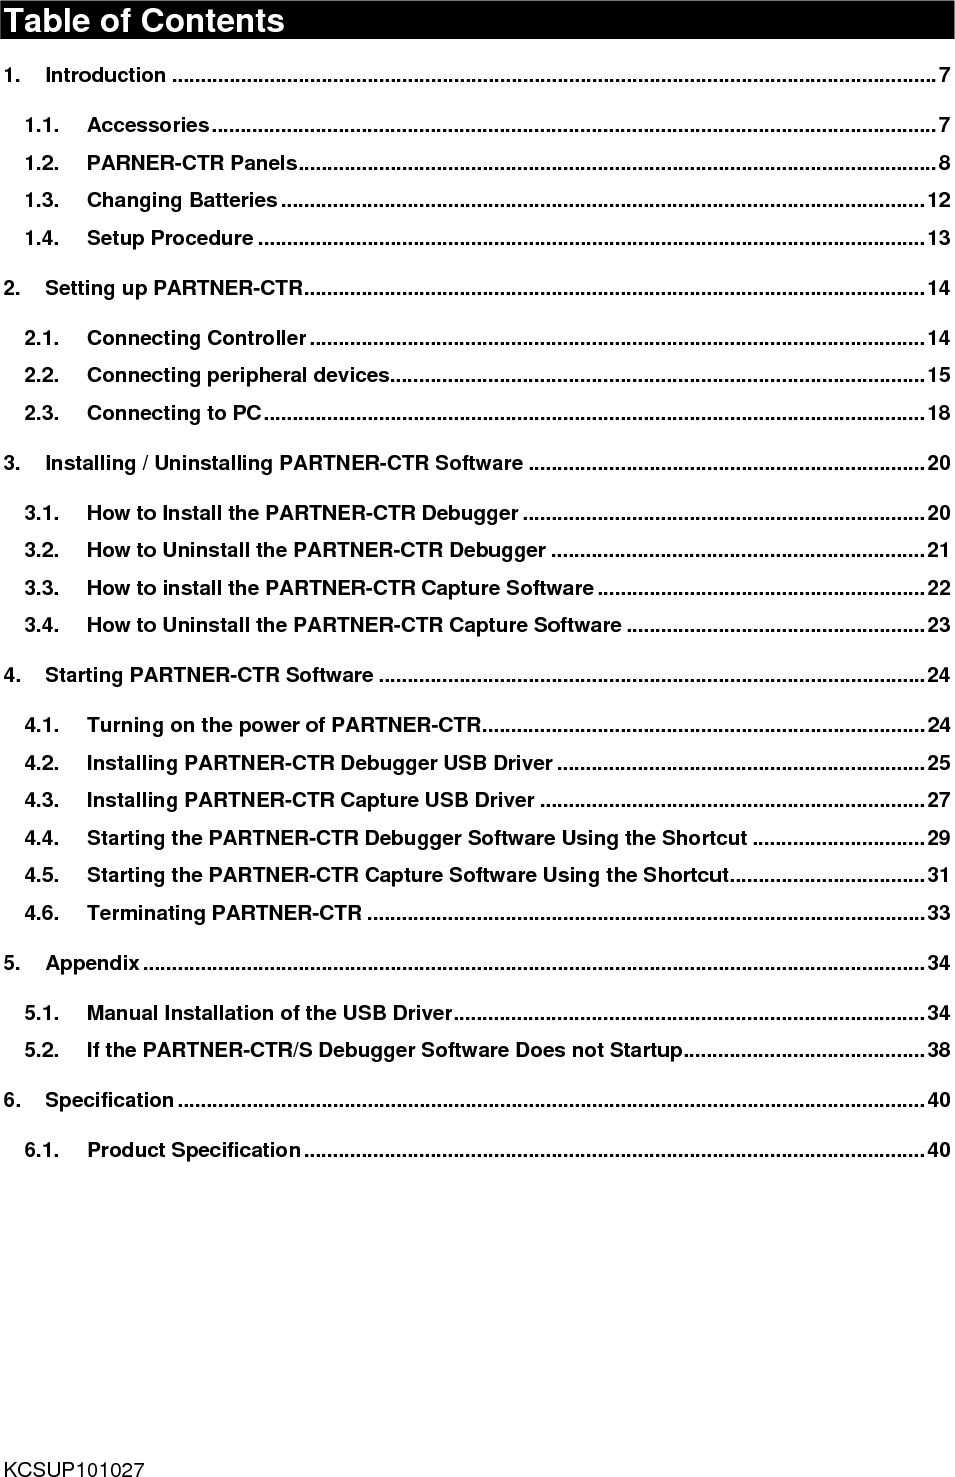
 Table of Contents 1. Introduction ..................................................................................................................................... 7 1.1. Accessories .............................................................................................................................. 7 1.2. PARNER-CTR Panels ............................................................................................................... 8 1.3. Changing Batteries ................................................................................................................ 12 1.4. Setup Procedure .................................................................................................................... 13 2.  Setting up PARTNER-CTR ............................................................................................................ 14 2.1. Connecting Controller ........................................................................................................... 14 2.2. Connecting peripheral devices............................................................................................. 15 2.3. Connecting to PC ................................................................................................................... 18 3.  Installing / Uninstalling PARTNER-CTR Software ..................................................................... 20 3.1.  How to Install the PARTNER-CTR Debugger ...................................................................... 20 3.2.  How to Uninstall the PARTNER-CTR Debugger ................................................................. 21 3.3.  How to install the PARTNER-CTR Capture Software ......................................................... 22 3.4.  How to Uninstall the PARTNER-CTR Capture Software .................................................... 23 4. Starting PARTNER-CTR Software ............................................................................................... 24 4.1.  Turning on the power of PARTNER-CTR ............................................................................. 24 4.2. Installing PARTNER-CTR Debugger USB Driver ................................................................ 25 4.3. Installing PARTNER-CTR Capture USB Driver ................................................................... 27 4.4.  Starting the PARTNER-CTR Debugger Software Using the Shortcut .............................. 29 4.5.  Starting the PARTNER-CTR Capture Software Using the Shortcut .................................. 31 4.6. Terminating PARTNER-CTR ................................................................................................. 33 5. Appendix ........................................................................................................................................ 34 5.1. Manual Installation of the USB Driver ..................................................................................  34 5.2.  If the PARTNER-CTR/S Debugger Software Does not Startup .......................................... 38 6. Specification .................................................................................................................................. 40 6.1. Product Specification ............................................................................................................ 40    KCSUP101027
KCSUP101027
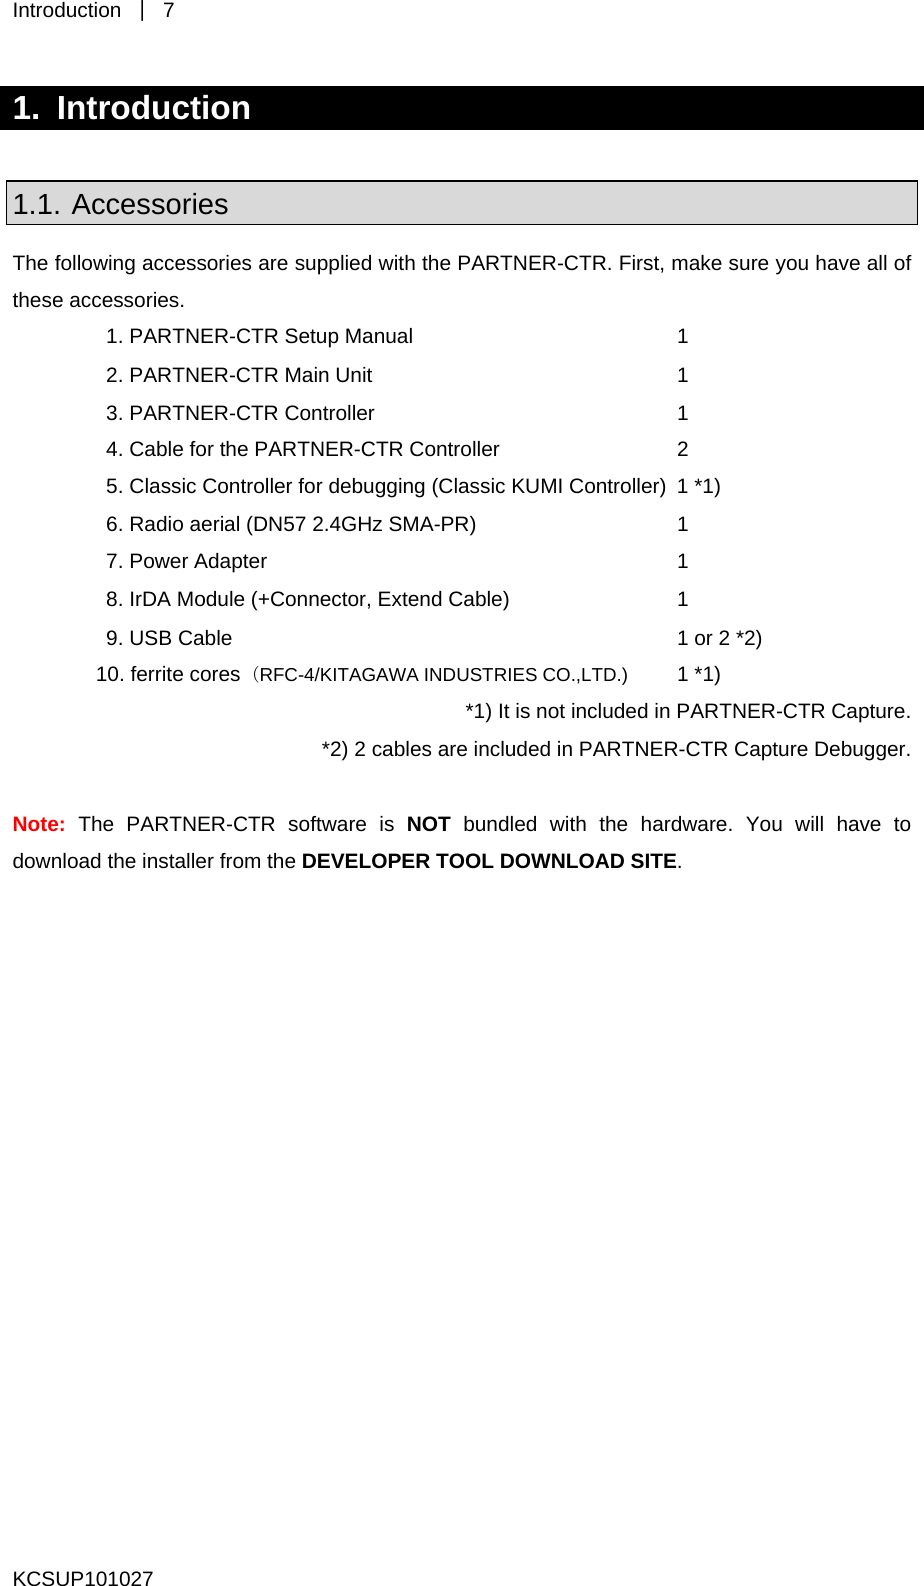
Introduction  | 7 KCSUP101027 1. Introduction  1.1. Accessories The following accessories are supplied with the PARTNER-CTR. First, make sure you have all of these accessories. 1. PARTNER-CTR Setup Manual      1 2. PARTNER-CTR Main Unit      1 3. PARTNER-CTR Controller      1 4. Cable for the PARTNER-CTR Controller      2 5. Classic Controller for debugging (Classic KUMI Controller)  1 *1) 6. Radio aerial (DN57 2.4GHz SMA-PR)      1 7. Power Adapter      1 8. IrDA Module (+Connector, Extend Cable)      1 9. USB Cable      1 or 2 *2) 10. ferrite cores(RFC-4/KITAGAWA INDUSTRIES CO.,LTD.)  1 *1) *1) It is not included in PARTNER-CTR Capture. *2) 2 cables are included in PARTNER-CTR Capture Debugger.  Note: The PARTNER-CTR software is NOT bundled with the hardware. You will have to download the installer from the DEVELOPER TOOL DOWNLOAD SITE.
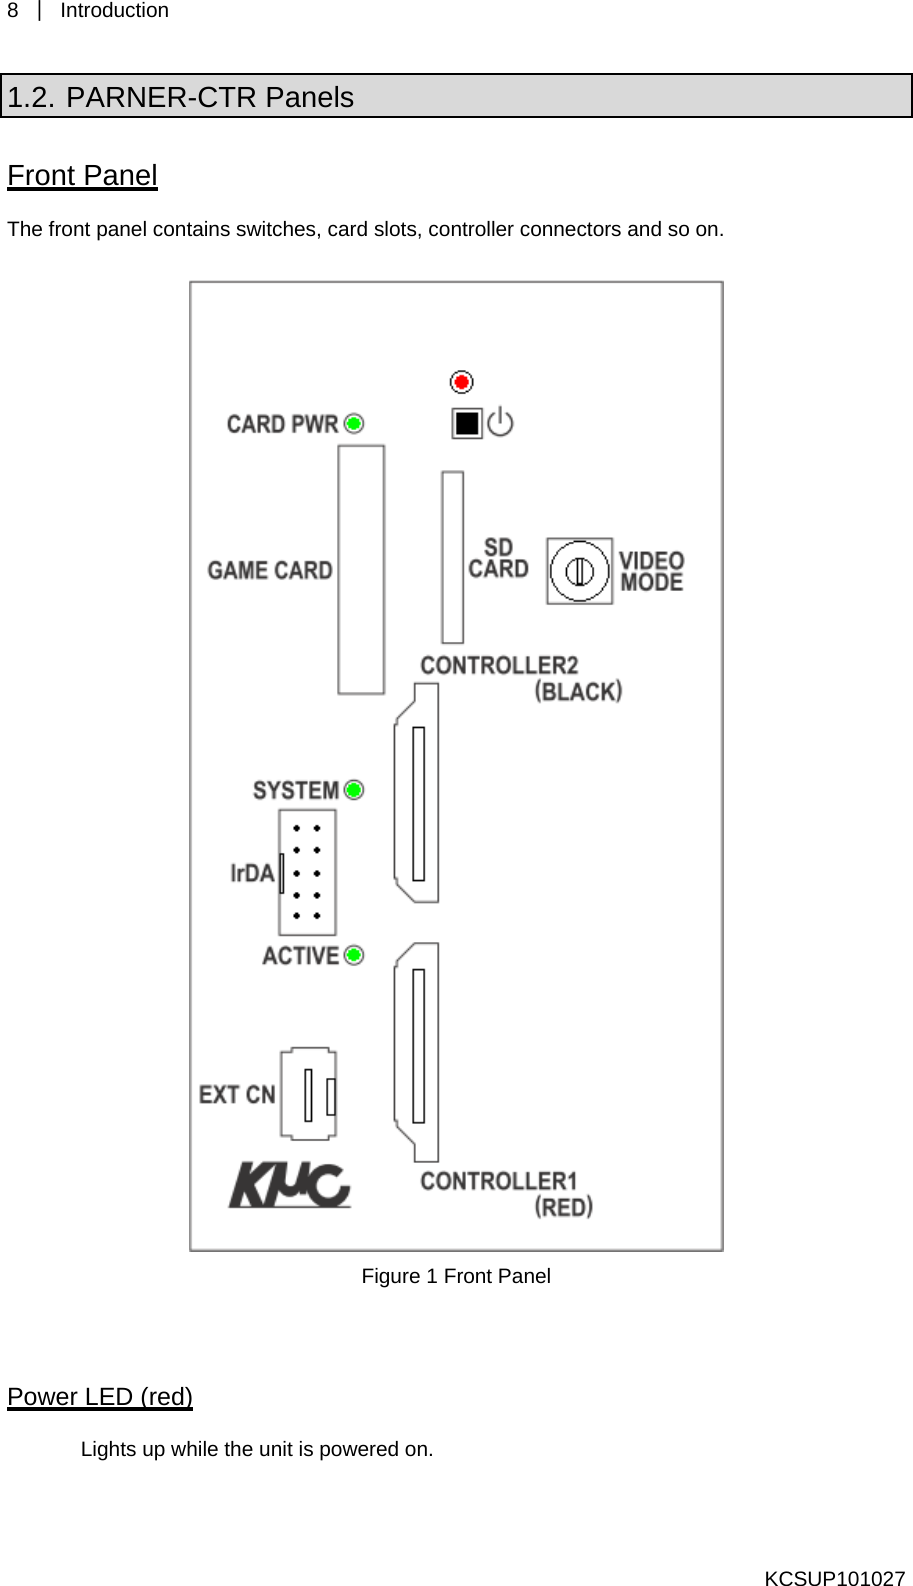
8  | Introduction  1.2. PARNER-CTR Panels Front Panel The front panel contains switches, card slots, controller connectors and so on.     Figure 1 Front Panel  Power LED (red) Lights up while the unit is powered on.     KCSUP101027
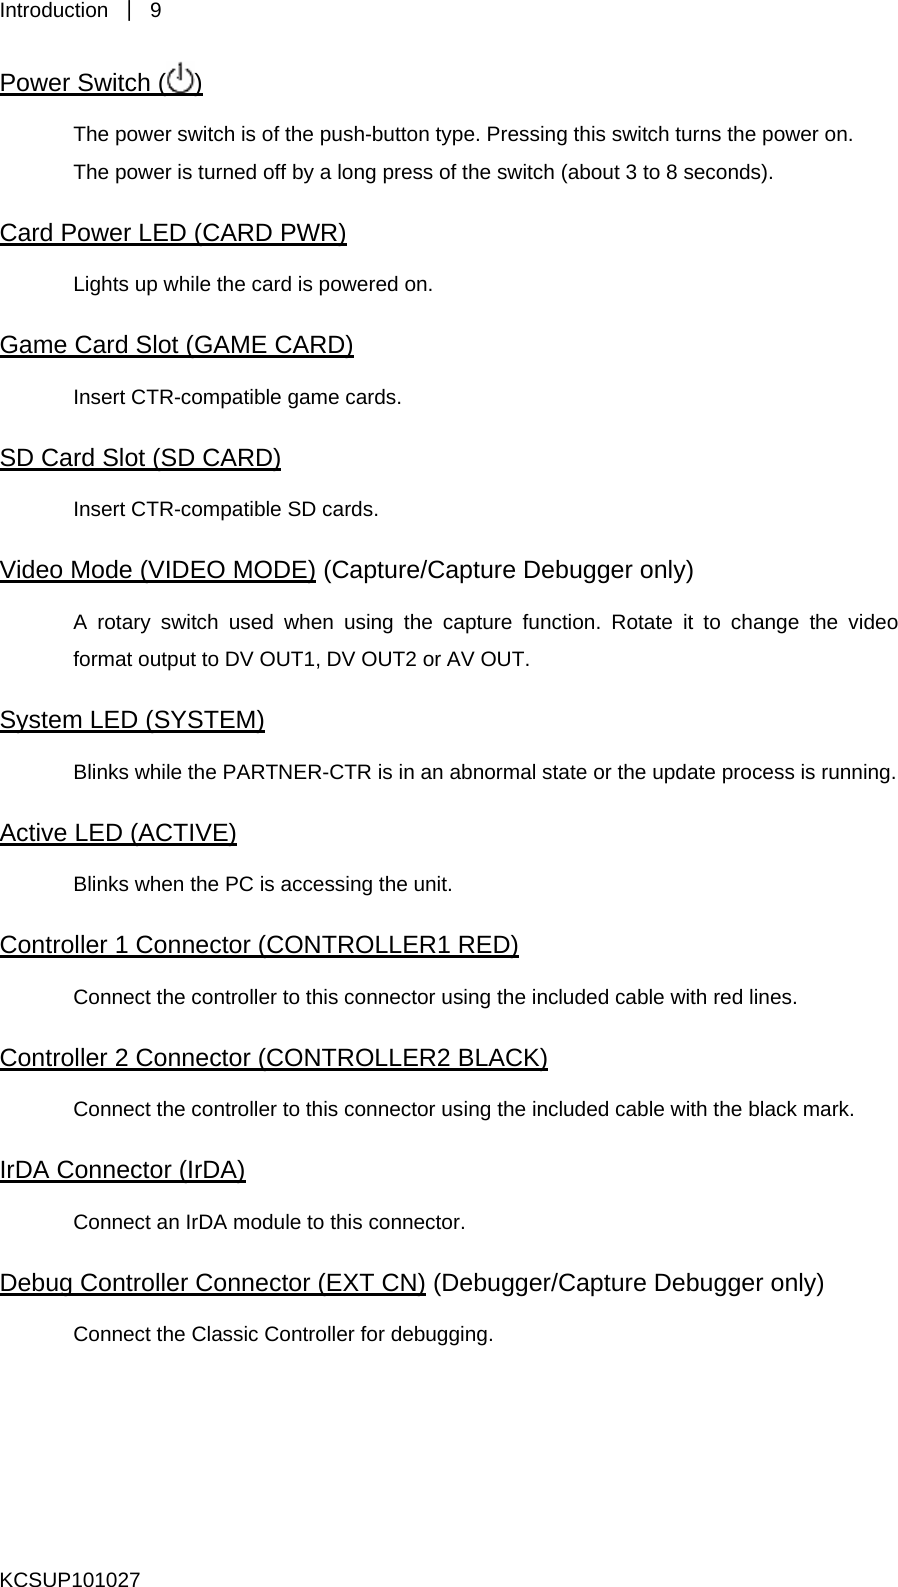
Introduction  | 9 Power Switch ( ) The power switch is of the push-button type. Pressing this switch turns the power on.   The power is turned off by a long press of the switch (about 3 to 8 seconds).   Card Power LED (CARD PWR) Lights up while the card is powered on.   Game Card Slot (GAME CARD) Insert CTR-compatible game cards. SD Card Slot (SD CARD) Insert CTR-compatible SD cards. Video Mode (VIDEO MODE) (Capture/Capture Debugger only) A rotary switch used when using the capture function. Rotate it to change the video format output to DV OUT1, DV OUT2 or AV OUT.   System LED (SYSTEM) Blinks while the PARTNER-CTR is in an abnormal state or the update process is running.   Active LED (ACTIVE) Blinks when the PC is accessing the unit.   Controller 1 Connector (CONTROLLER1 RED) Connect the controller to this connector using the included cable with red lines.   Controller 2 Connector (CONTROLLER2 BLACK) Connect the controller to this connector using the included cable with the black mark.   IrDA Connector (IrDA) Connect an IrDA module to this connector.   Debug Controller Connector (EXT CN) (Debugger/Capture Debugger only) Connect the Classic Controller for debugging.   KCSUP101027
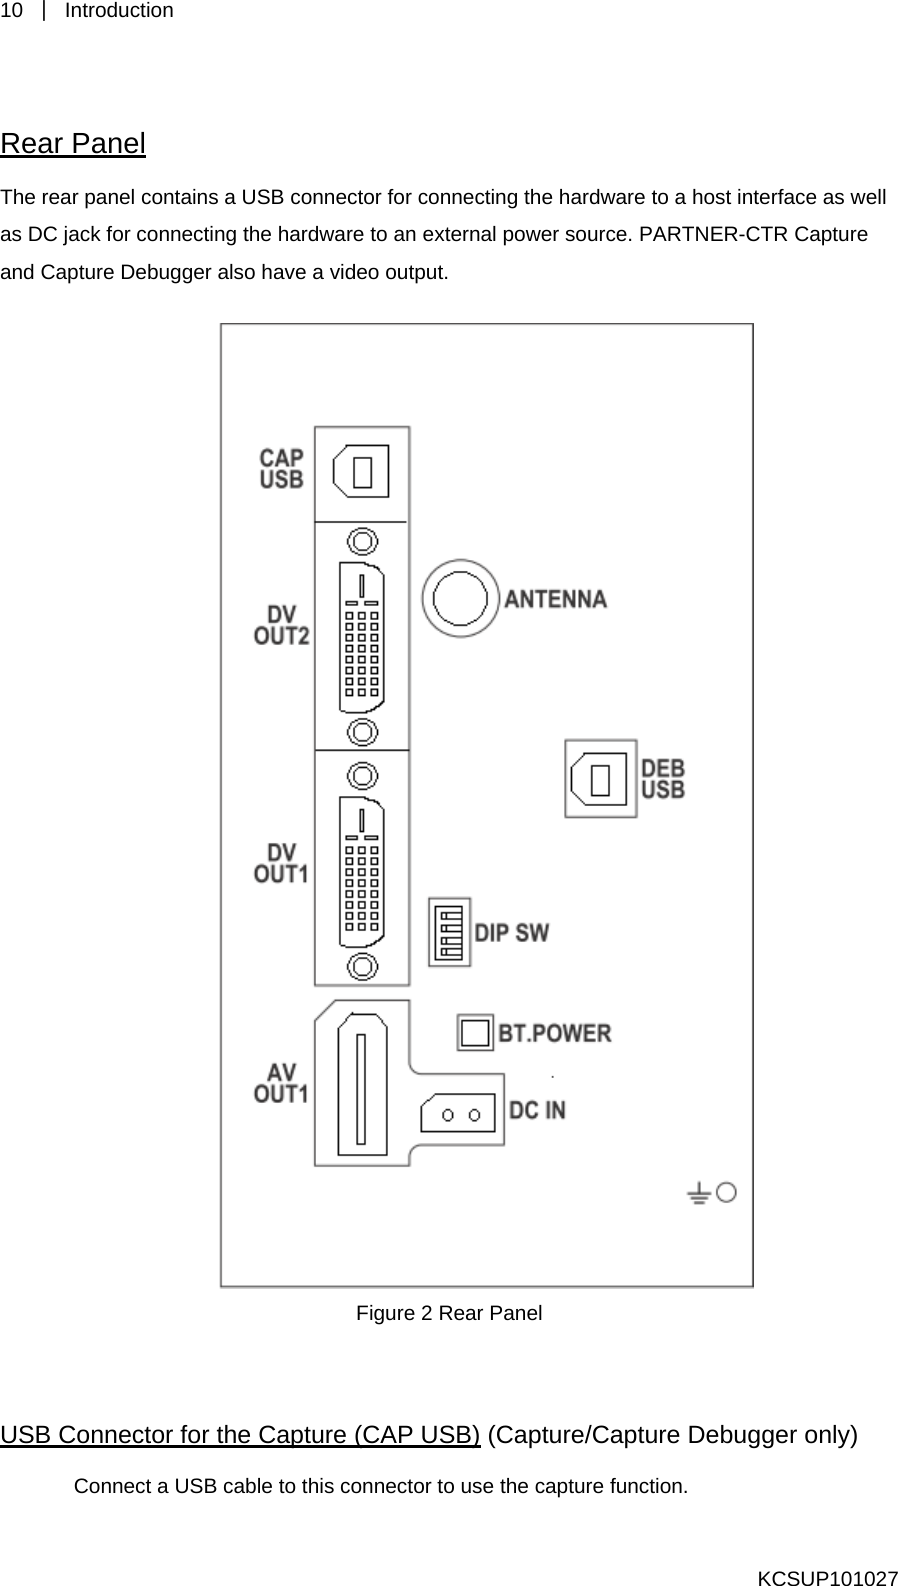
10  | Introduction   Rear Panel The rear panel contains a USB connector for connecting the hardware to a host interface as well as DC jack for connecting the hardware to an external power source. PARTNER-CTR Capture and Capture Debugger also have a video output.     Figure 2 Rear Panel  USB Connector for the Capture (CAP USB) (Capture/Capture Debugger only) Connect a USB cable to this connector to use the capture function.    KCSUP101027
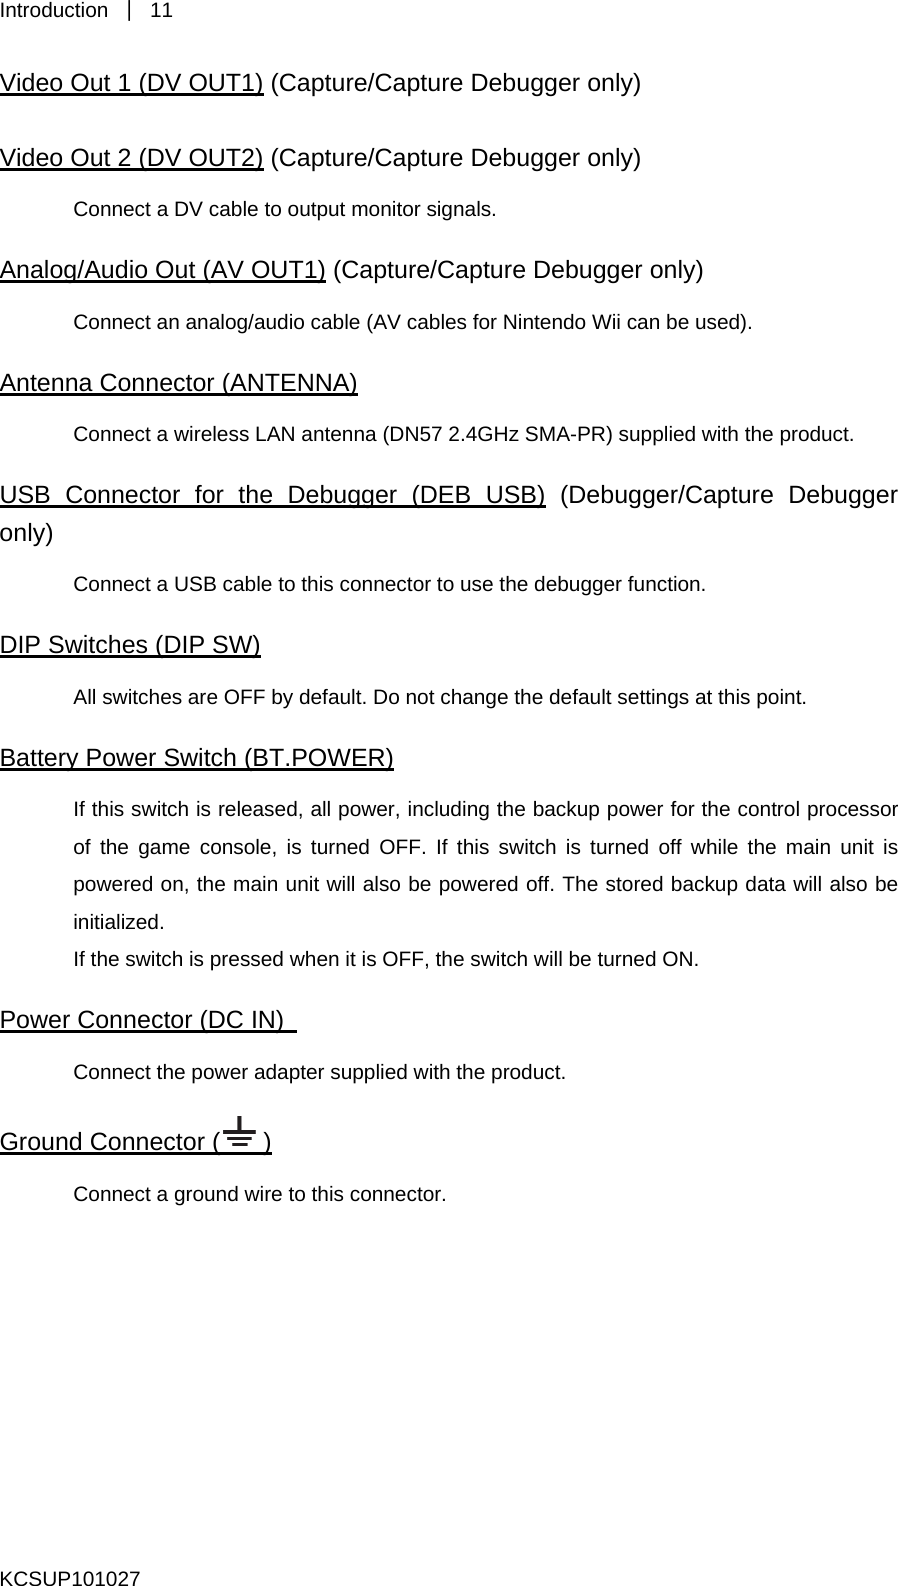
Introduction  | 11 Video Out 1 (DV OUT1) (Capture/Capture Debugger only) Video Out 2 (DV OUT2) (Capture/Capture Debugger only) Connect a DV cable to output monitor signals.   Analog/Audio Out (AV OUT1) (Capture/Capture Debugger only) Connect an analog/audio cable (AV cables for Nintendo Wii can be used). Antenna Connector (ANTENNA) Connect a wireless LAN antenna (DN57 2.4GHz SMA-PR) supplied with the product.   USB Connector for the Debugger (DEB USB) (Debugger/Capture Debugger only) Connect a USB cable to this connector to use the debugger function.   DIP Switches (DIP SW) All switches are OFF by default. Do not change the default settings at this point.   Battery Power Switch (BT.POWER) If this switch is released, all power, including the backup power for the control processor of the game console, is turned OFF. If this switch is turned off while the main unit is powered on, the main unit will also be powered off. The stored backup data will also be initialized.  If the switch is pressed when it is OFF, the switch will be turned ON.   Power Connector (DC IN)   Connect the power adapter supplied with the product.   Ground Connector ( ) Connect a ground wire to this connector.        KCSUP101027
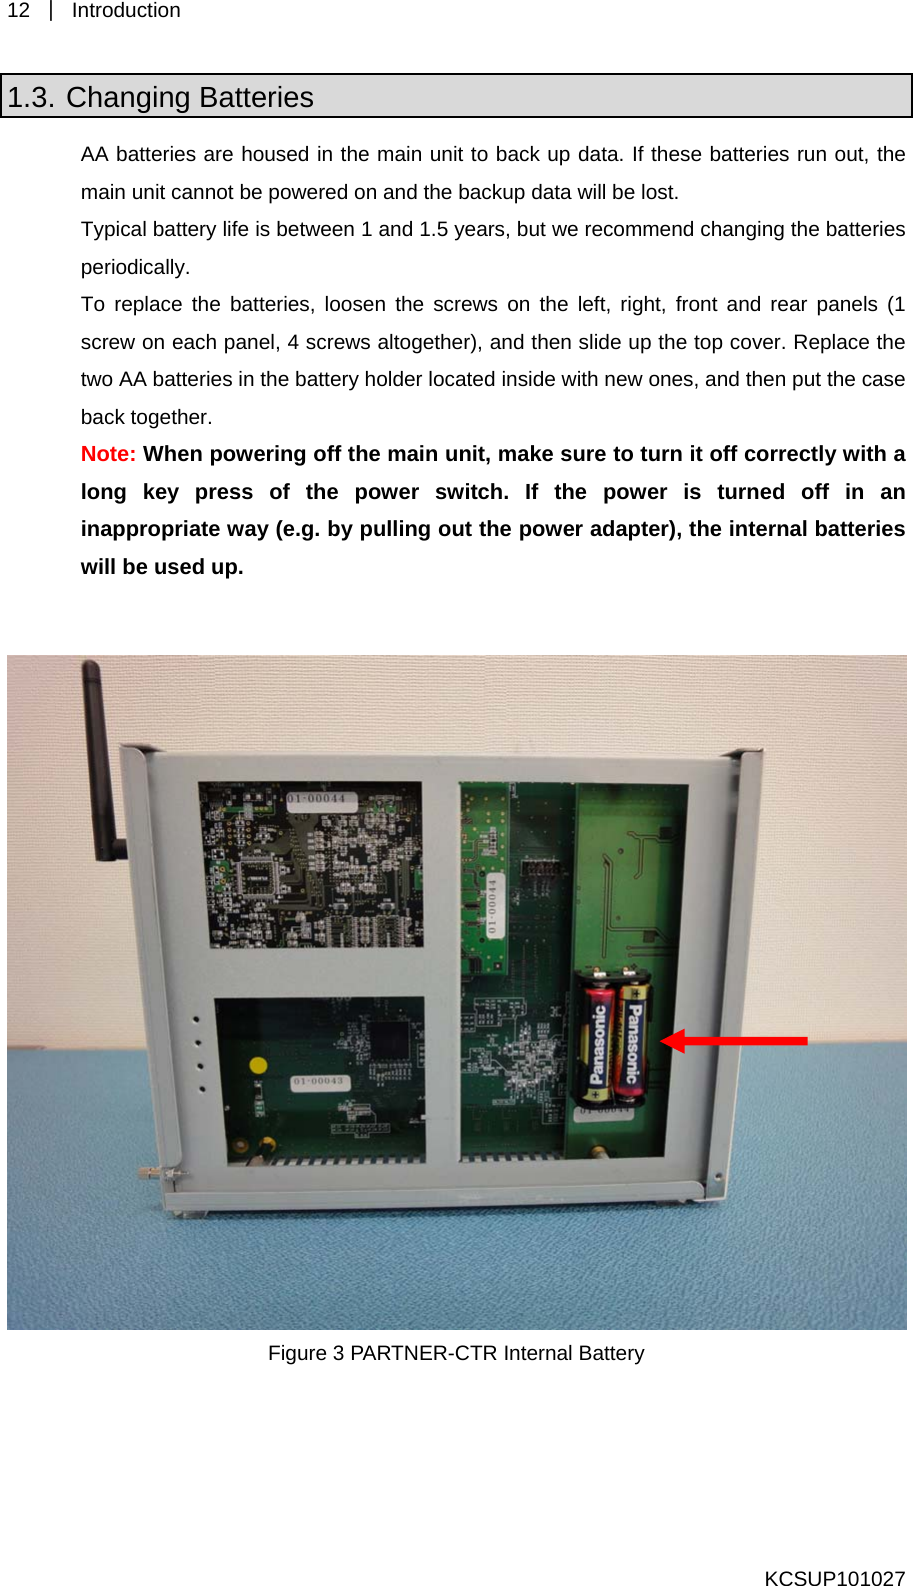
12  | Introduction  1.3. Changing Batteries AA batteries are housed in the main unit to back up data. If these batteries run out, the main unit cannot be powered on and the backup data will be lost.   Typical battery life is between 1 and 1.5 years, but we recommend changing the batteries periodically.  To replace the batteries, loosen the screws on the left, right, front and rear panels (1 screw on each panel, 4 screws altogether), and then slide up the top cover. Replace the two AA batteries in the battery holder located inside with new ones, and then put the case back together.   Note: When powering off the main unit, make sure to turn it off correctly with a long key press of the power switch. If the power is turned off in an inappropriate way (e.g. by pulling out the power adapter), the internal batteries will be used up.      Figure 3 PARTNER-CTR Internal Battery    KCSUP101027
Introduction  | 13 KCSUP101027 1.4. Setup Procedure The following text describes the overview of the PARTNER-CTR setup procedure for first-time users. Follow the procedure below to set it up  1.  Setting up PARTNER-CTR Connect the PARTNER-CTR to peripheral devices, and to a PC via USB. In detail, please refer to “2. Setting up PARTNER-CTR”(page14)..  2.  Setting up Software For debugging, the debugger software should be installed. For capturing, the capture software should be installed. In detail, please refer to “3 Installing/Uninstalling PARTNER-CTR Software”(page20)..  3. Starting Software To use debugger software or capture software, the driver should be installed. After that, they can start by shortcut in start menu. In detail, please refer to “4  Starting PARTNER-CTR Software”(page24)..
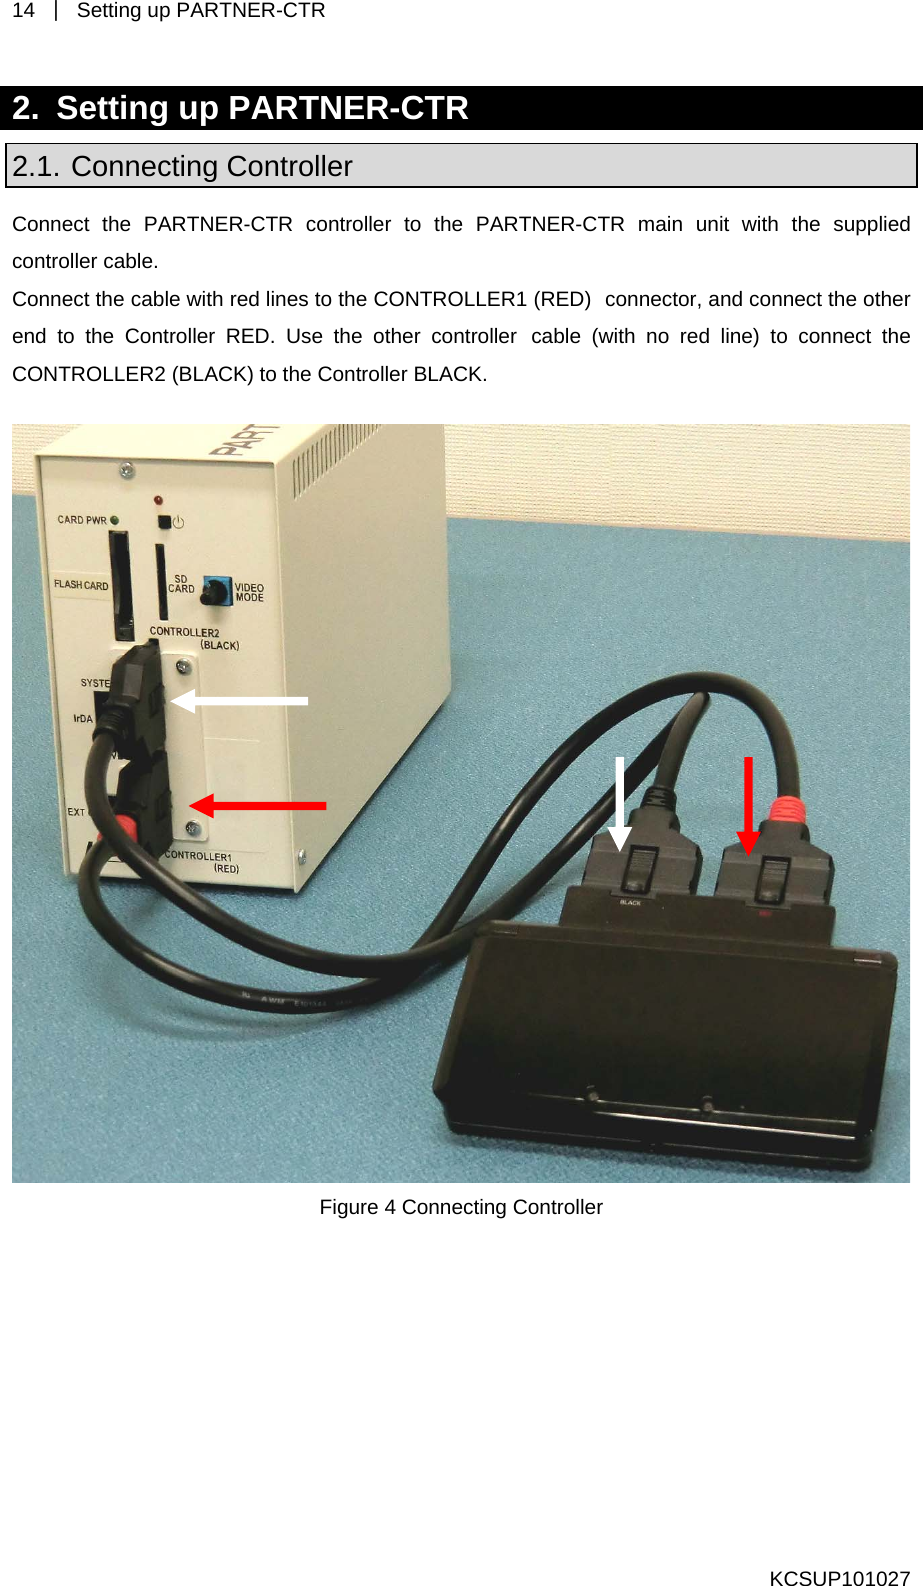
14  |  Setting up PARTNER-CTR   2.  Setting up PARTNER-CTR 2.1. Connecting Controller Connect the PARTNER-CTR controller to the PARTNER-CTR main unit with the supplied  controller cable. Connect the cable with red lines to the CONTROLLER1 (RED) connector, and connect the other end to the Controller RED. Use the other controller cable (with no red line) to connect the CONTROLLER2 (BLACK) to the Controller BLACK.   Figure 4 Connecting Controller  KCSUP101027
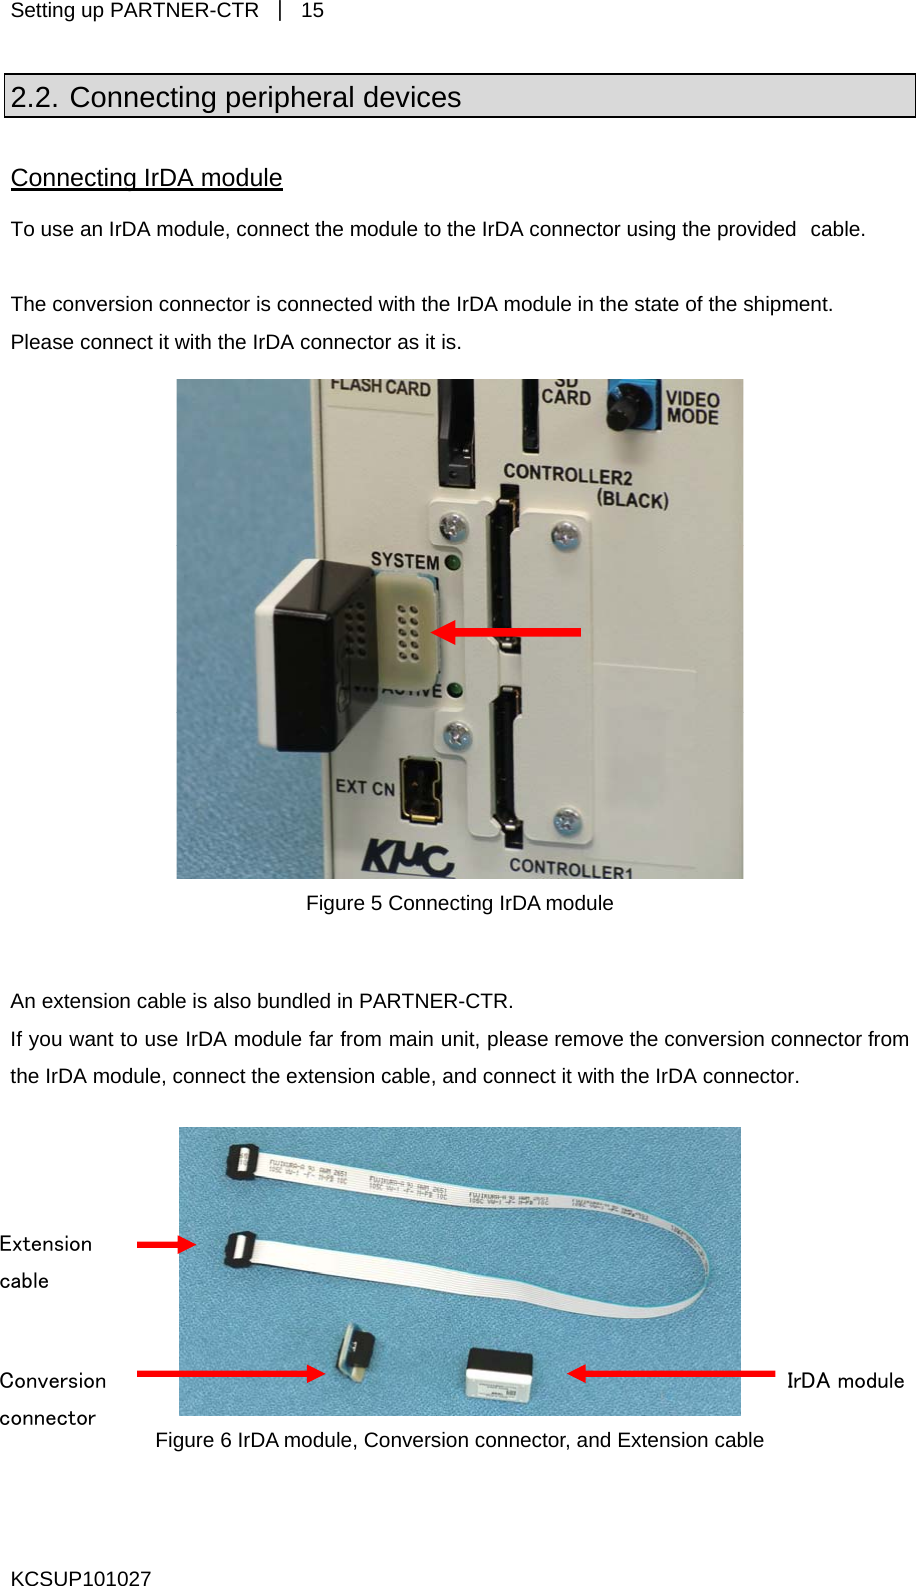
Setting up PARTNER-CTR  | 15 2.2. Connecting peripheral devices Connecting IrDA module To use an IrDA module, connect the module to the IrDA connector using the provided cable.  The conversion connector is connected with the IrDA module in the state of the shipment. Please connect it with the IrDA connector as it is.   Figure 5 Connecting IrDA module  An extension cable is also bundled in PARTNER-CTR. If you want to use IrDA module far from main unit, please remove the conversion connector from the IrDA module, connect the extension cable, and connect it with the IrDA connector.   Extension cable IrDA module Conversion connector  Figure 6 IrDA module, Conversion connector, and Extension cable  KCSUP101027
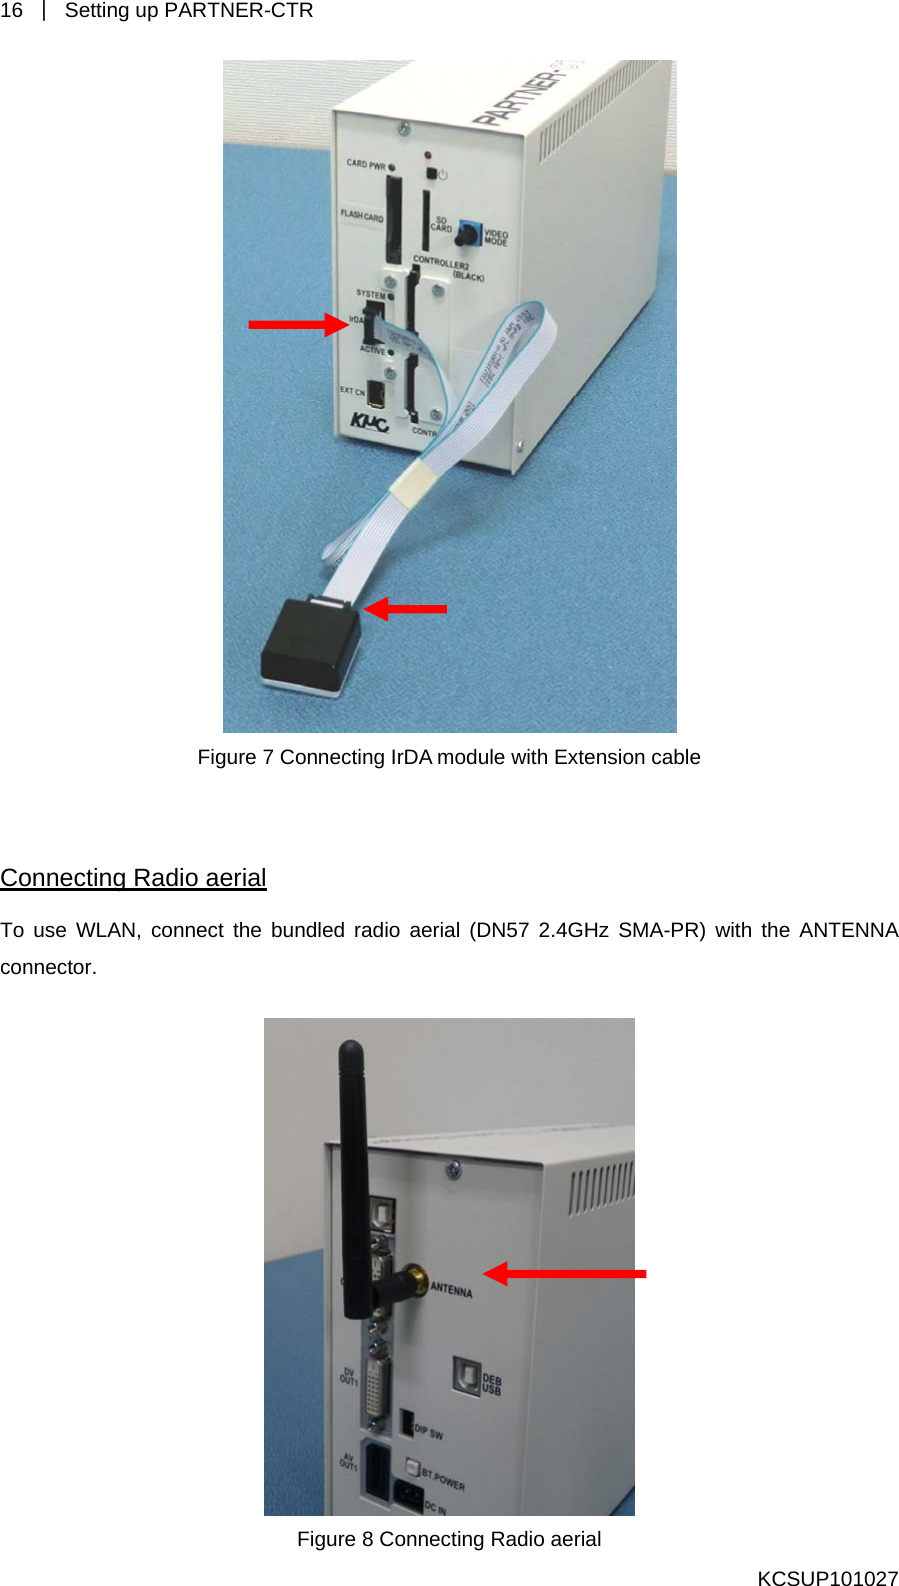
16  |  Setting up PARTNER-CTR    Figure 7 Connecting IrDA module with Extension cable  Connecting Radio aerial To use WLAN, connect the bundled radio aerial (DN57 2.4GHz SMA-PR) with the ANTENNA connector.   Figure 8 Connecting Radio aerial KCSUP101027
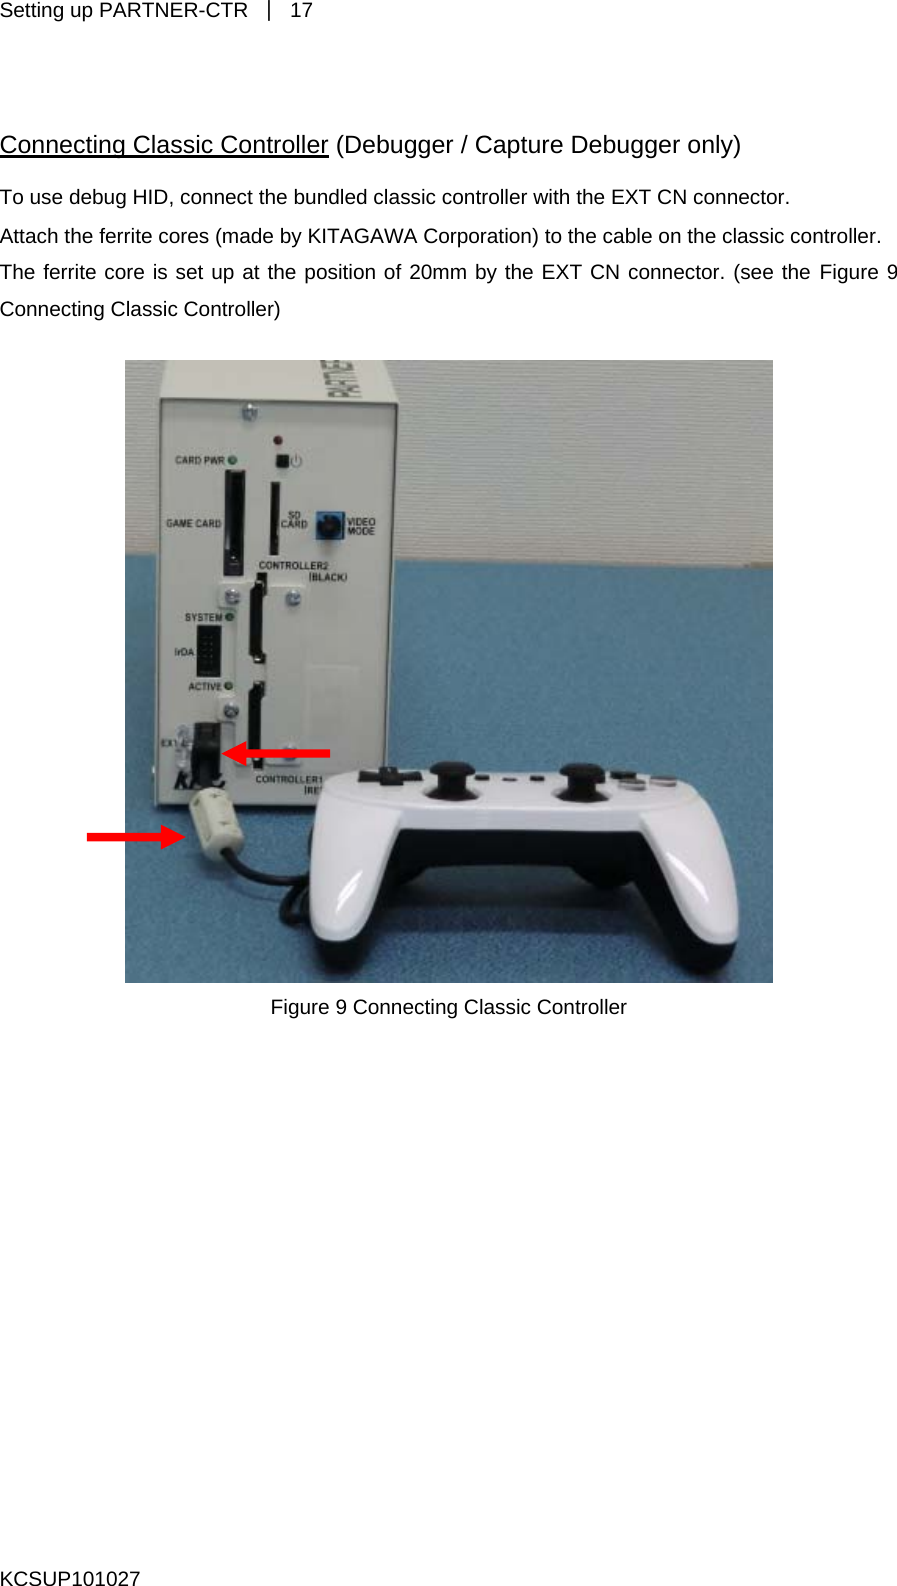
Setting up PARTNER-CTR  | 17  Connecting Classic Controller (Debugger / Capture Debugger only) To use debug HID, connect the bundled classic controller with the EXT CN connector. Attach the ferrite cores (made by KITAGAWA Corporation) to the cable on the classic controller. The ferrite core is set up at the position of 20mm by the EXT CN connector. (see the Figure 9 Connecting Classic Controller)   Figure 9 Connecting Classic Controller   KCSUP101027
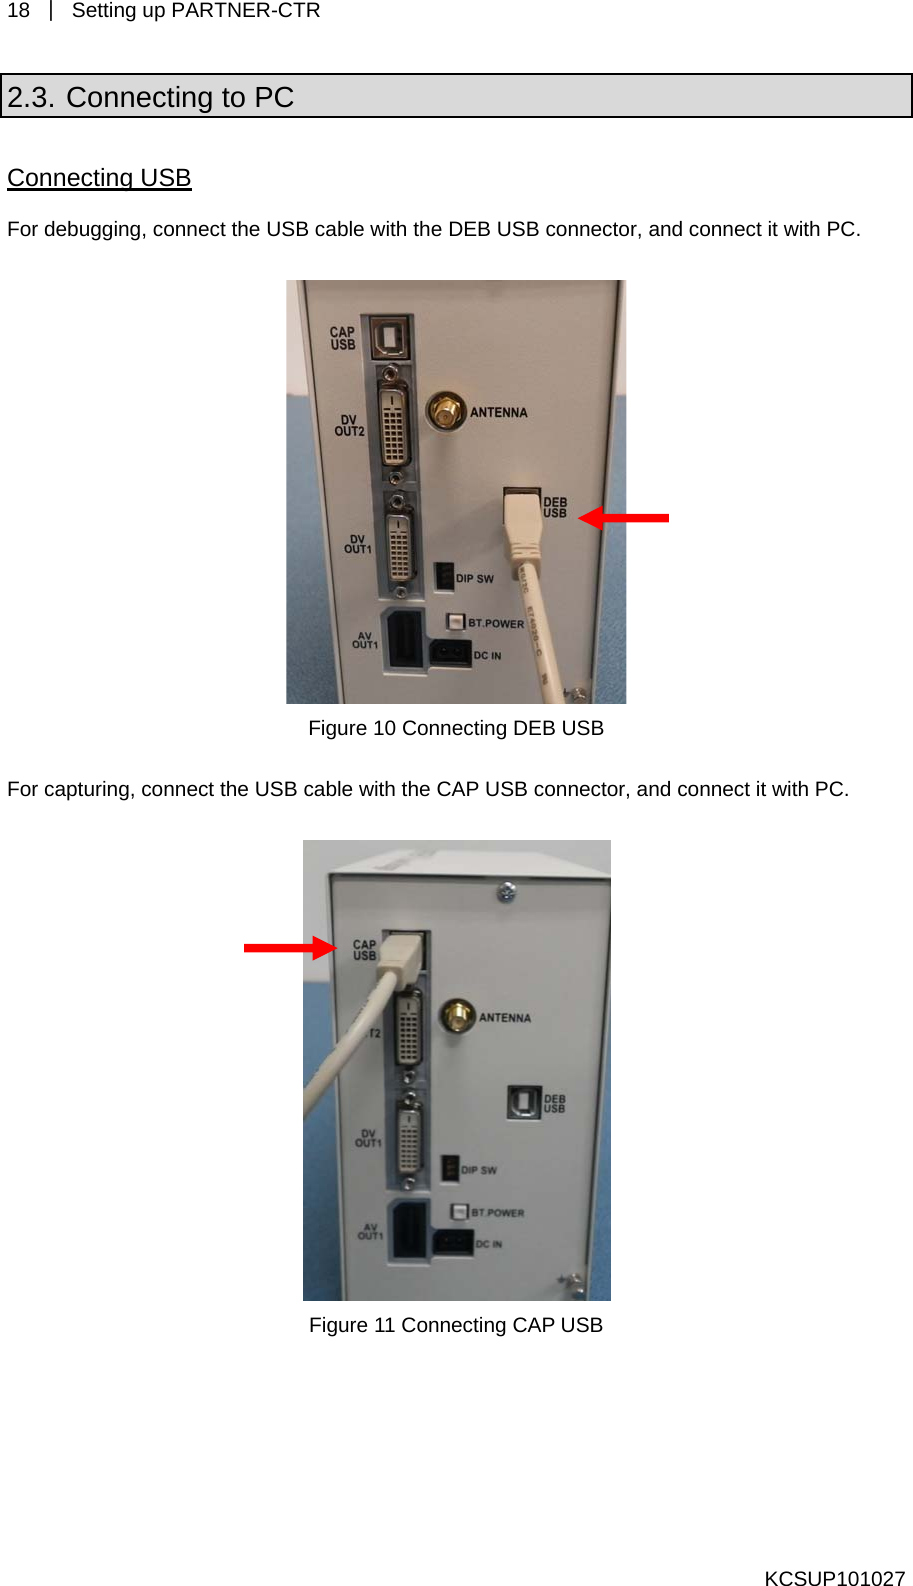
18  |  Setting up PARTNER-CTR   2.3. Connecting to PC Connecting USB For debugging, connect the USB cable with the DEB USB connector, and connect it with PC.   Figure 10 Connecting DEB USB   For capturing, connect the USB cable with the CAP USB connector, and connect it with PC.   Figure 11 Connecting CAP USB     KCSUP101027
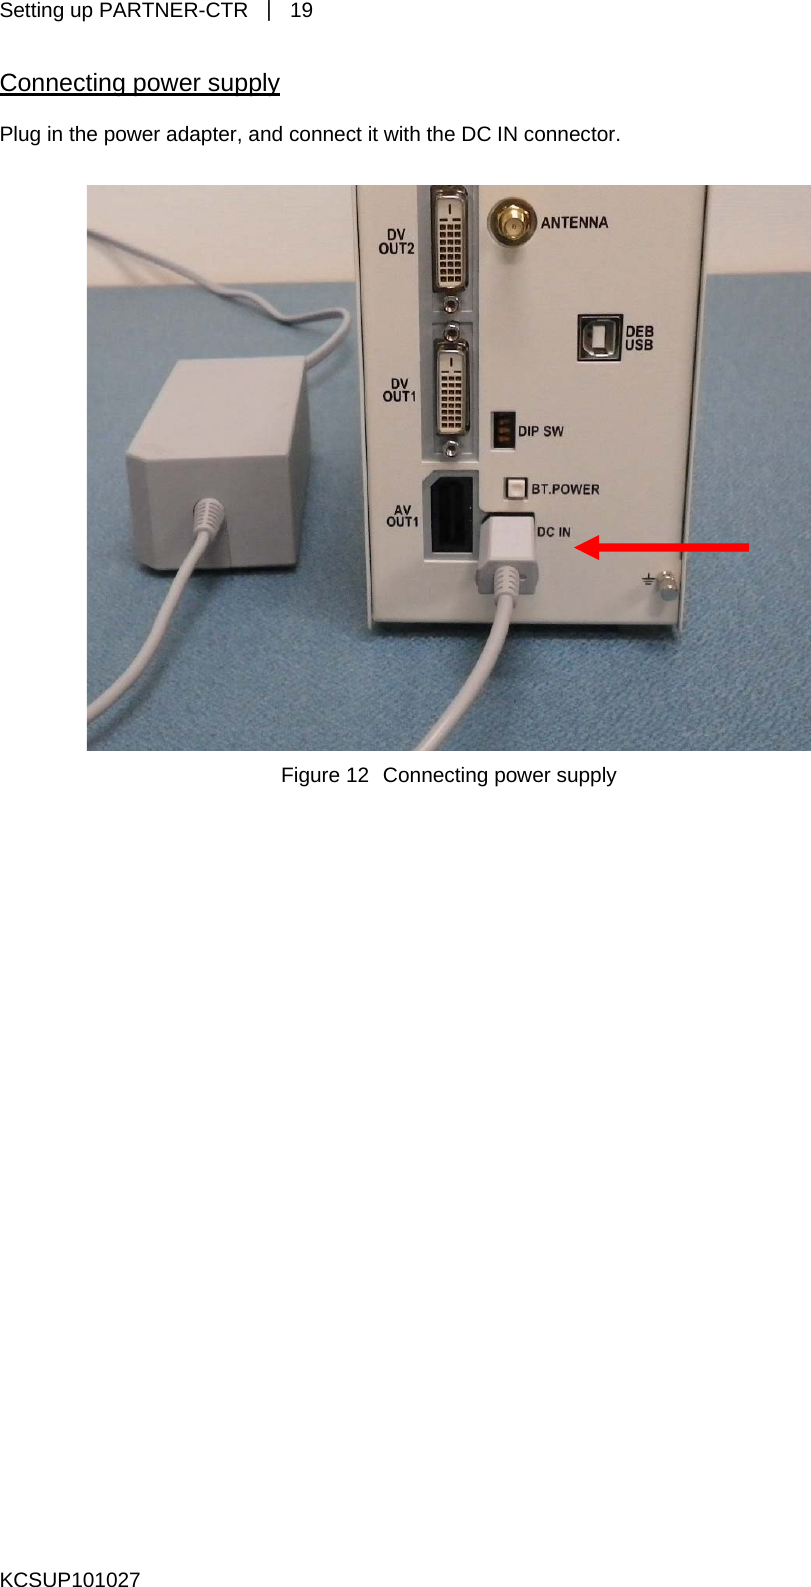
Setting up PARTNER-CTR  | 19 Connecting power supply Plug in the power adapter, and connect it with the DC IN connector.   Figure 12 Connecting power supply  KCSUP101027
20  |  Installing / Uninstalling PARTNER-CTR Software   3.  Installing / Uninstalling PARTNER-CTR Software You will have to install the debugger software to perform source debugging, and the capture software to perform capturing on PARTNER-CTR.  3.1. How to Install the PARTNER-CTR Debugger Start up Windows XP/Vista/7 and install the PARTNER-CTR. Downloading the Setup Program The PARTNER-CTR/S software is NOT bundled with the hardware. You will have to download the setup program from the DEVELOPER TOOL DOWNLOAD SITE.  Starting the Setup Program To install the PARTNER-CTR, run the setup program (PARTNER_CTR_XXX.EXE) that you downloaded in the previous step. (Refer to “Figure 13 Screen Displayed During Installation”.) Perform installation following the instructions given by the setup program. Once the installation process is complete, a shortcut icon for the PARTNER-CTR is created in the Start menu. [Note]  Be sure to store the PARTNER-CTR installer you used somewhere safe after the installation has completed.   Figure 13 Screen Displayed During Installation KCSUP101027
Installing / Uninstalling PARTNER-CTR Software  | 21 If the user performing the setup procedure does not have administrator rights, a message shown in “Figure 14 Message Displayed During Setup” may appear and the USB drivers may not be installed. To install the USB driver in such a case, refer to "5.1 Manual Installation of the USB Driver"(page34)   Figure 14 Message Displayed During Setup  3.2. How to Uninstall the PARTNER-CTR Debugger Double-click the [Add or Remove Programs] icon in the Control Panel and select "PARTNER-CTR" from the list, then click “Remove”.   Figure 15 Screen Displayed During Uninstallation  KCSUP101027
22  |  Installing / Uninstalling PARTNER-CTR Software   3.3. How to install the PARTNER-CTR Capture Software Start up Windows XP/Vista/7 and install the Capture software. Downloading the Setup Program The Capture software is NOT bundled with the hardware. You will have to download the installer from the DEVELPER TOOL DOWNLOAD SITE.   Starting the Setup Program To install the PARTNER-CTR, run the setup program (PARTNER-CTR-CAPTURE_XXXX.exe) that you downloaded in the previous step. (Refer to “Figure 16 Screen Displayed During installation”.) Perform installation following the instructions given by the setup program. Once the installation process is complete, a shortcut icon for the Capture software is created in the Start menu.  [Note]  Be sure to store the PARTNER-CTR Capture installer you used somewhere safe after the installations has completed.   Figure 16 Screen Displayed During installation If the user performing the setup procedure does not have administrator rights, a message shown in “Figure 17 Message Displayed During Setup” may appear and the USB drivers KCSUP101027
Installing / Uninstalling PARTNER-CTR Software  | 23 may not be installed. To install the USB driver in such a case, refer to "5.1 Manual Installation of the USB Driver" (page34)   Figure 17 Message Displayed During Setup  3.4. How to Uninstall the PARTNER-CTR Capture Software Double-click the [Add or Remove Programs] icon in the Control Panel and select "PARTNER-CTR Capture" from the list, then click “Remove”.   Figure 18 Screen Displayed During Uninstallation     KCSUP101027
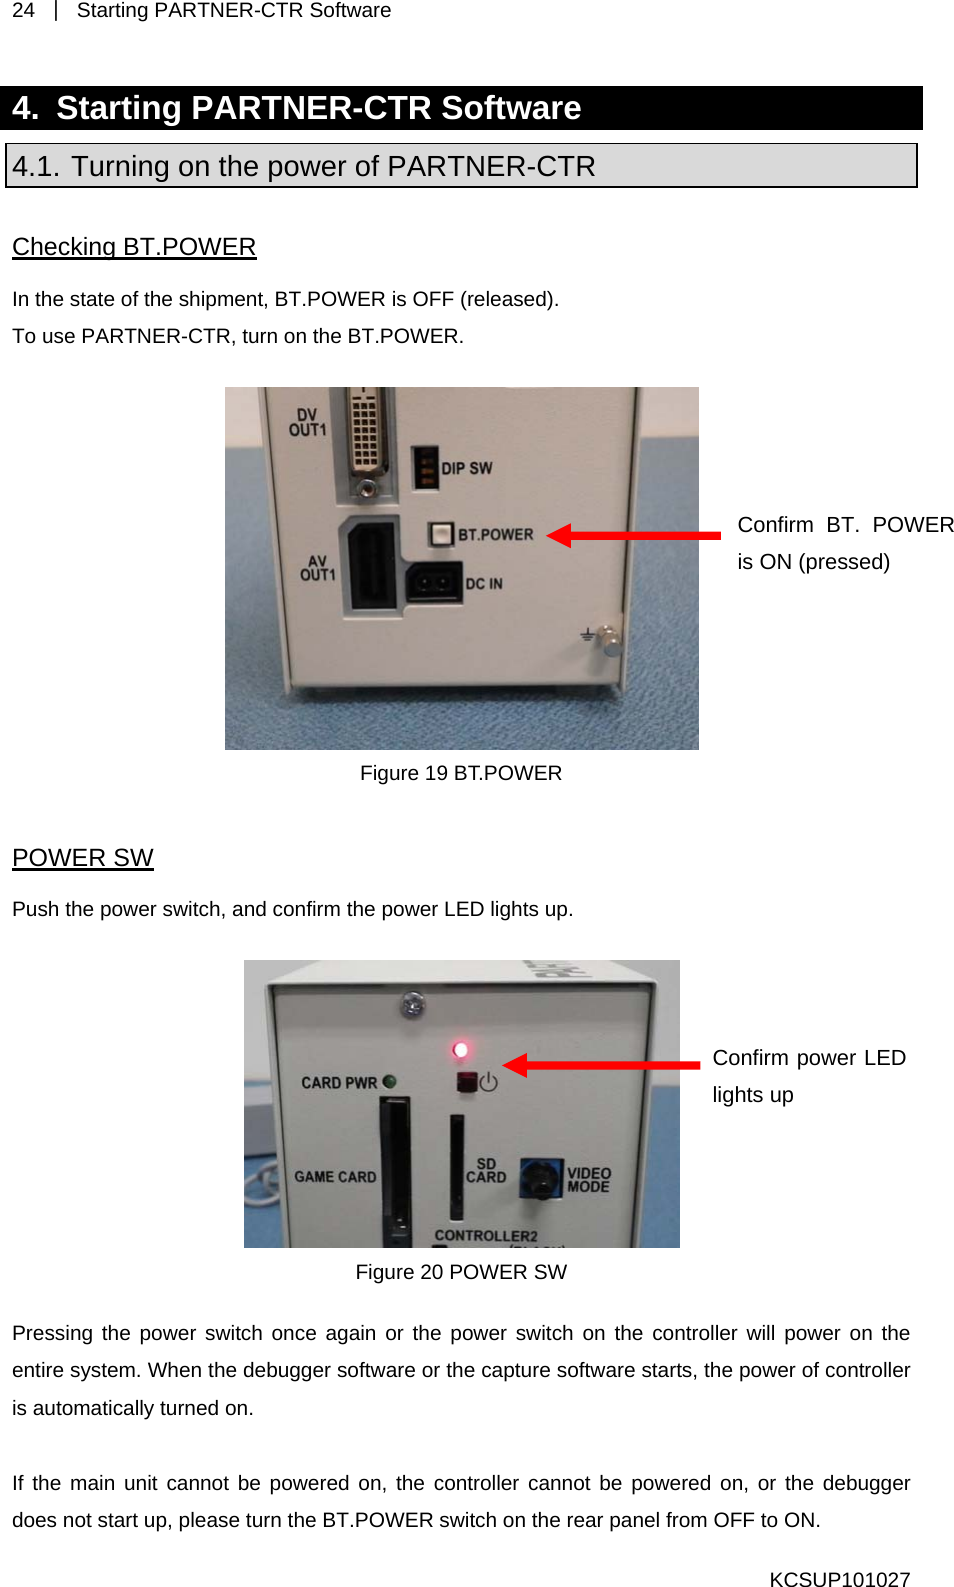
24  | Starting PARTNER-CTR Software   KCSUP101027 4.  Starting PARTNER-CTR Software 4.1. Turning on the power of PARTNER-CTR Checking BT.POWER In the state of the shipment, BT.POWER is OFF (released). To use PARTNER-CTR, turn on the BT.POWER.   Confirm power LED lights up Confirm BT. POWER is ON (pressed) Figure 19 BT.POWER POWER SW Push the power switch, and confirm the power LED lights up.   Figure 20 POWER SW Pressing the power switch once again or the power switch on the controller will power on the entire system. When the debugger software or the capture software starts, the power of controller is automatically turned on.  If the main unit cannot be powered on, the controller cannot be powered on, or the debugger does not start up, please turn the BT.POWER switch on the rear panel from OFF to ON.
Starting PARTNER-CTR Software  | 25 KCSUP101027 main unit may be dead. Refer to If the unit still does not function correctly, the batteries in the “1.3 Changing Batteries” (page12)  When PARTNER-CTR is turned on and it is the first time to connect with PC or newly connected USB driver installation starts.  with different USB port, the 4.2. Installing PARTNER-CTR Debugger USB Driver The PARTNER-CTR USB driver is automatically installed when the debugger setup procedure is performed using an administrator account. If the setup procedure is performed using a non-administrator account, refer to "5.1 Manual Installation of the USB Driver" (page34) to install the driver.  [Installation under Windows Vista, Windows 7] The USB driver is automatically installed.   Figure 21 Installing the USB Driver Follow the procedure below to install the USB driver under Windows XP.   [Installation under Windows XP] Select [No, not this time] and click [Next] to continue.
26  | Starting PARTNER-CTR Software   Select [Install the software automatically] and click [Next] to continue. The USB driver installation is complete.  KCSUP101027
Starting PARTNER-CTR Software  | 27 4.3. Installing PARTNER-CTR Capture USB Driver The PARTNER-CTR Capture USB driver is automatically installed when the debugger setup procedure is performed using an administrator account. If the setup procedure is performed using a non-administrator account, refer to "5.1 Manual Installation of the USB Driver" (page34) to install the driver.  [Installation under Windows Vista, Windows 7] The USB driver is automatically installed.   Figure 22 Installing the USB Driver  [Installation under Windows XP] Follow the procedure below to install the USB driver under Windows XP.  Select [No, not this time] and click [Next] to continue. KCSUP101027
28  | Starting PARTNER-CTR Software   Select [Install the software automatically] and click [Next] to continue. The USB driver installation is complete.  KCSUP101027
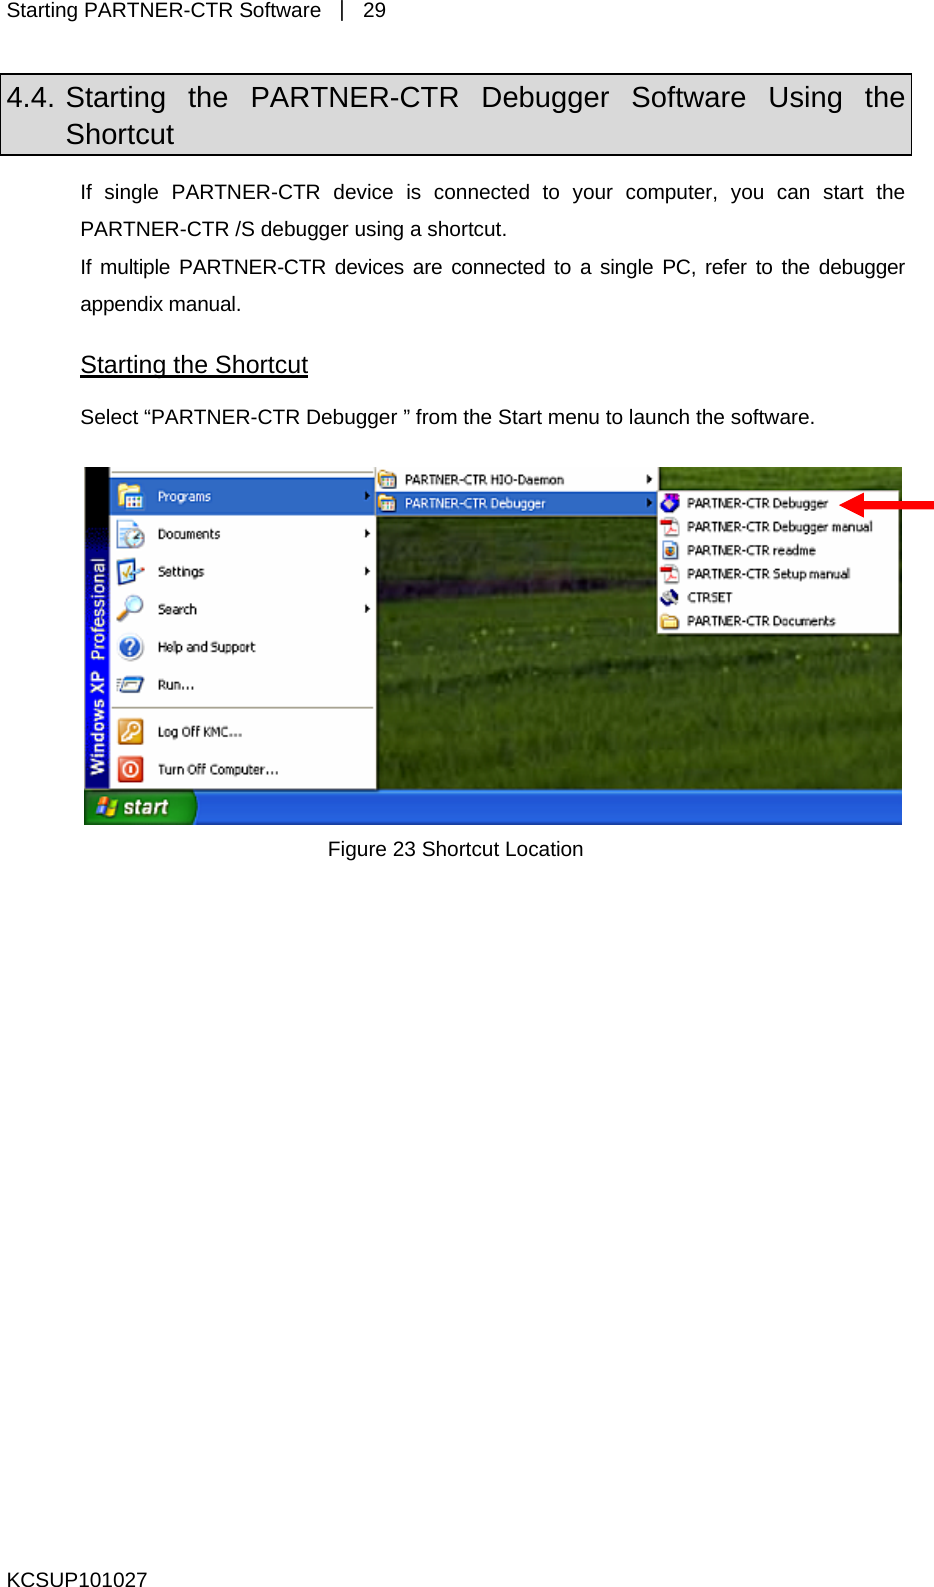
Starting PARTNER-CTR Software  | 29 4.4. Starting the PARTNER-CTR Debugger Software Using the Shortcut If single PARTNER-CTR device is connected to your computer, you can start the PARTNER-CTR /S debugger using a shortcut.   If multiple PARTNER-CTR devices are connected to a single PC, refer to the debugger appendix manual. Starting the Shortcut Select “PARTNER-CTR Debugger ” from the Start menu to launch the software.   Figure 23 Shortcut Location  KCSUP101027
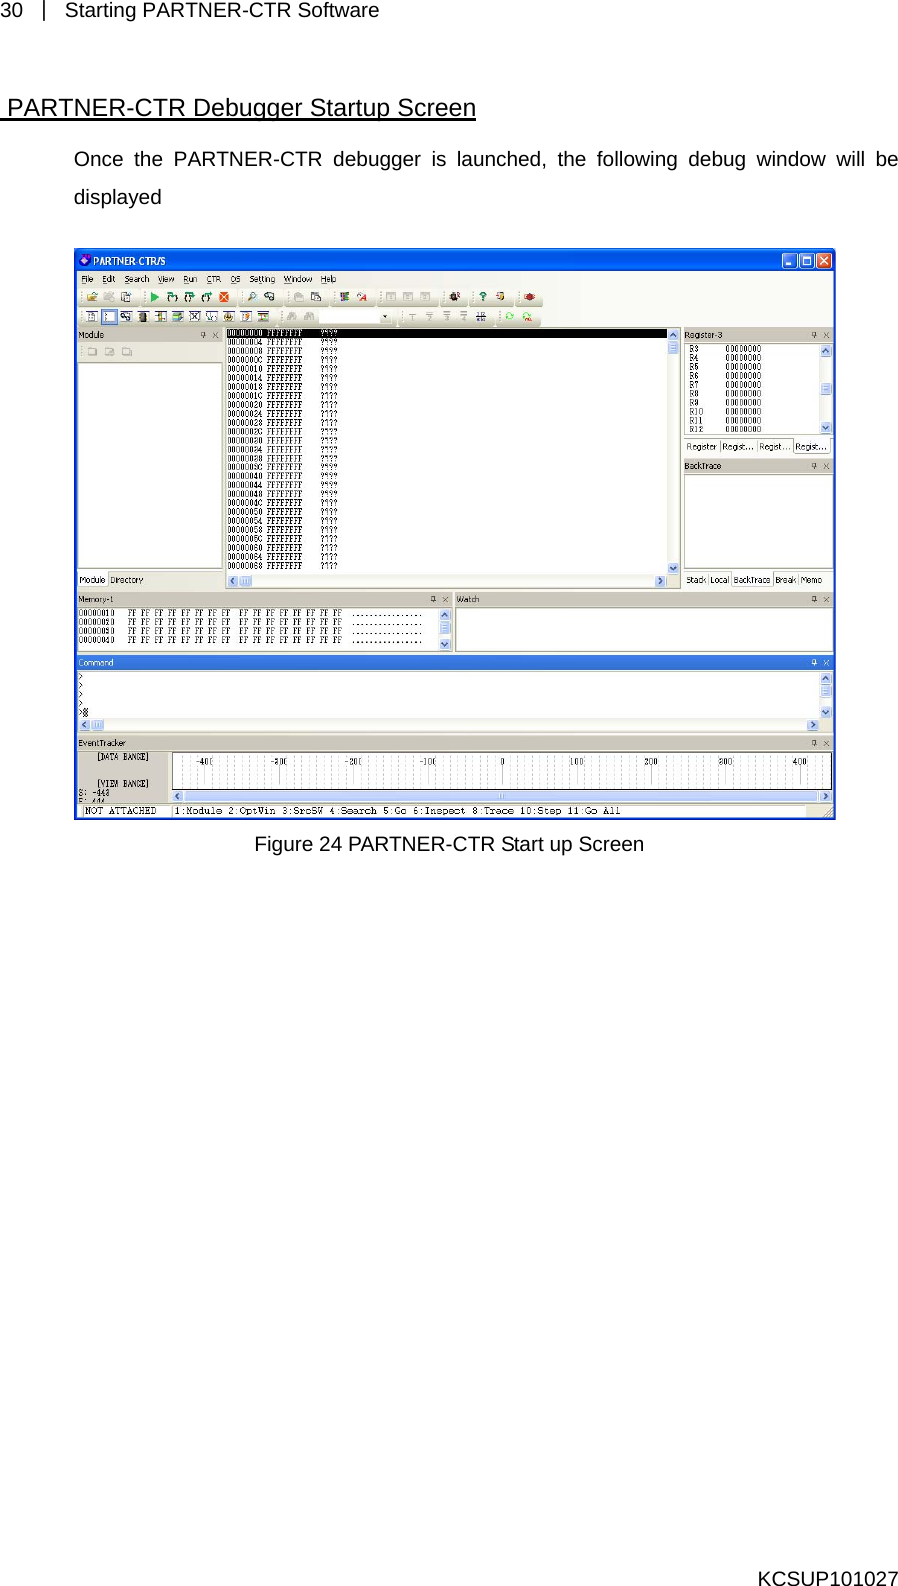
30  | Starting PARTNER-CTR Software    PARTNER-CTR Debugger Startup Screen Once the PARTNER-CTR debugger is launched, the following debug window will be displayed    Figure  creen 24 PARTNER-CTR Start up S KCSUP101027
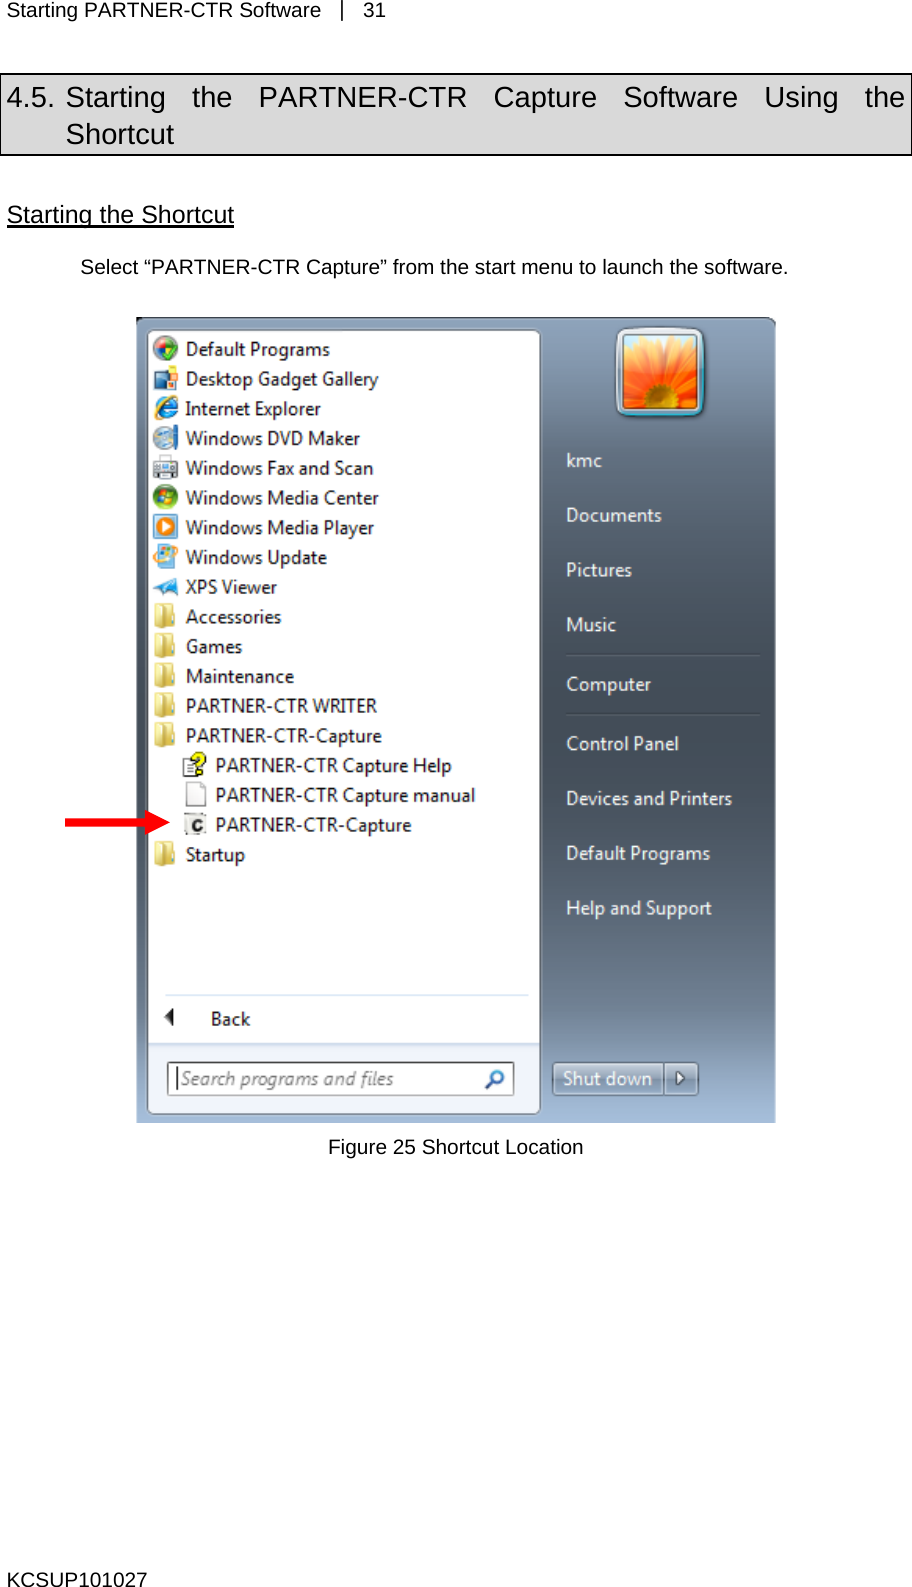
Starting PARTNER-CTR Software  | 31 4.5. Starting the PARTNER-CTR Capture Software Using the Shortcut Starting the Shortcut Select “PARTNER-CTR Capture” from the start menu to launch the software.     Figure 25 Shortcut Location KCSUP101027
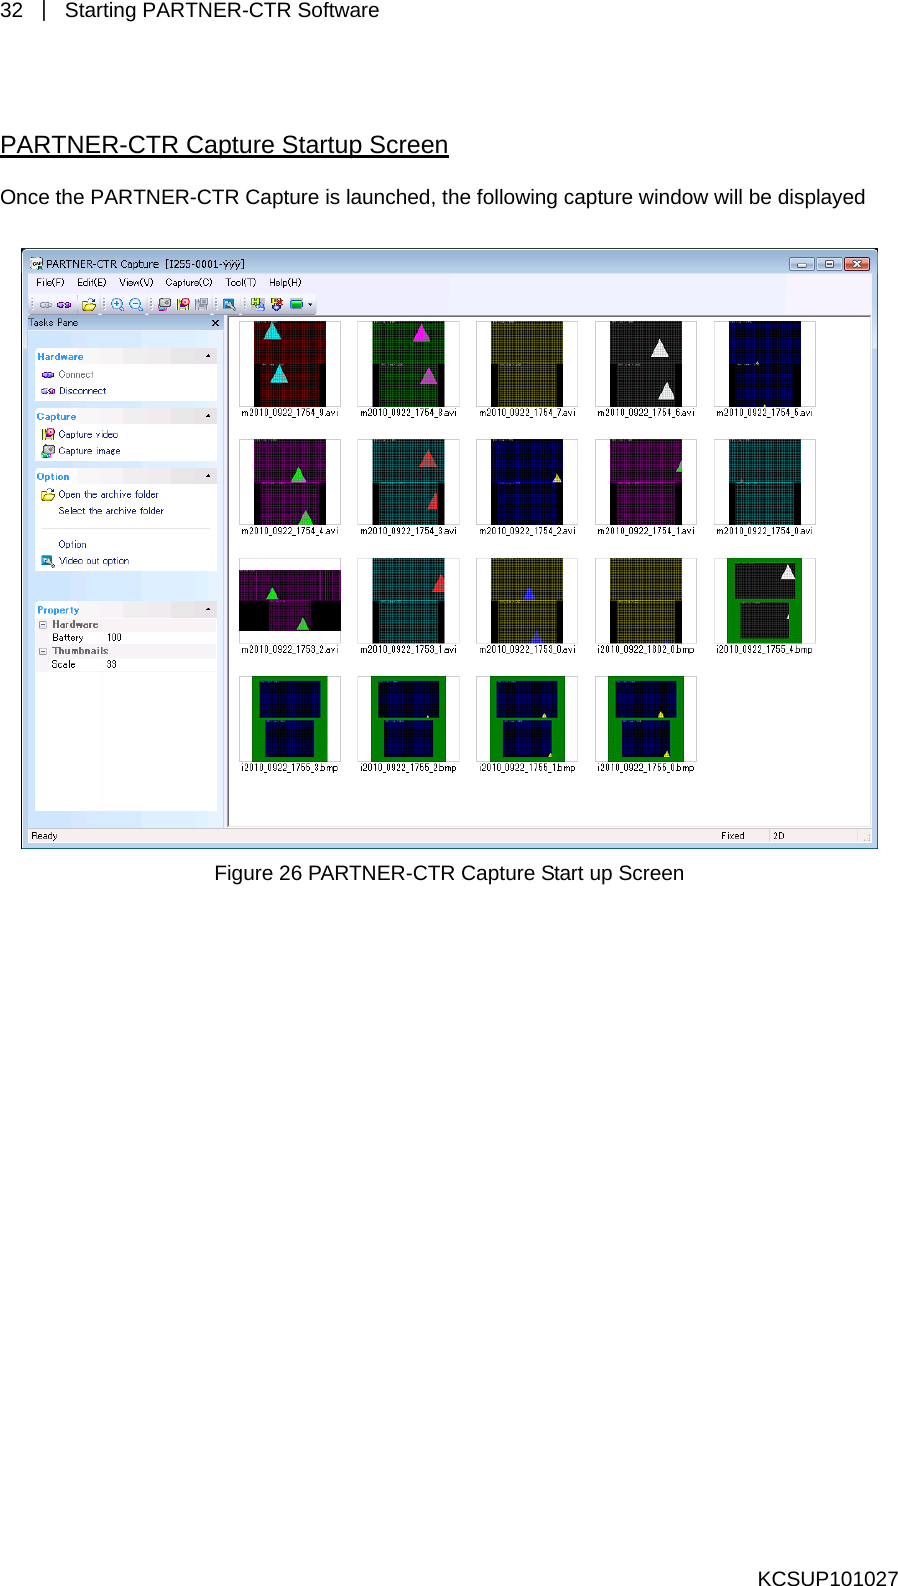
32  | Starting PARTNER-CTR Software   KCSUP101027 Capture Startup Screen PARTNER-CTR    Capture is launched, the following capture window will be displayed   Once the PARTNER-CTR  Figure 26 PARTNER-CTR Capture Start up Screen
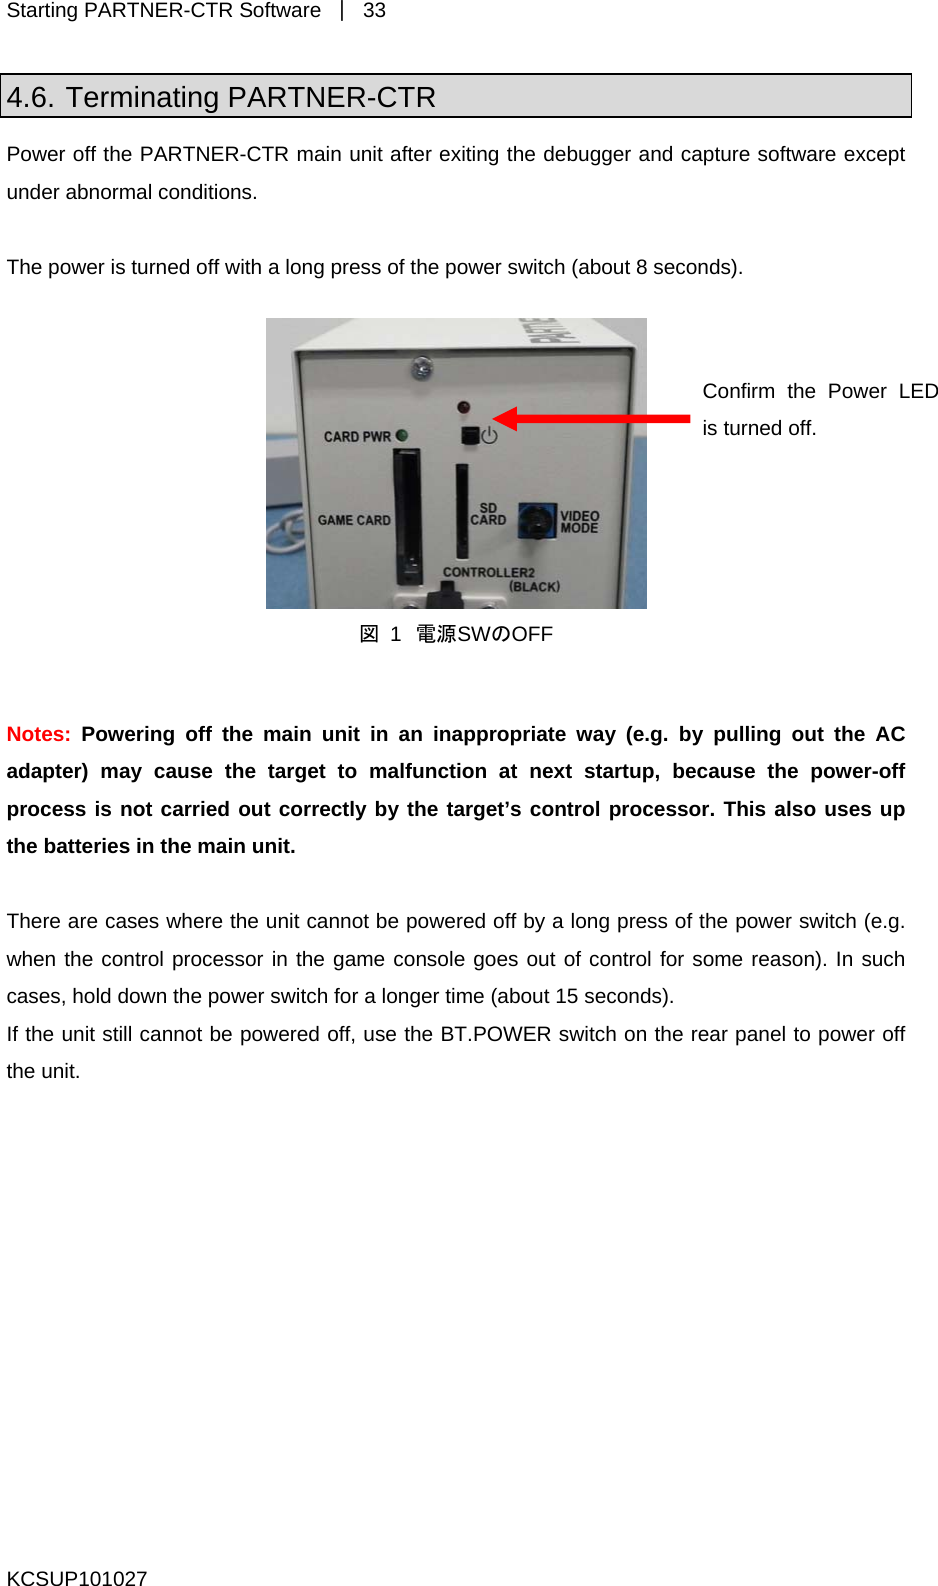
Starting PARTNER-CTR Software  | 33 4.6. Terminating PARTNER-CTR Power off the PARTNER-CTR main unit after exiting the debugger and capture software except The power is turned off with a long press of the power switch (about 8 seconds).  under abnormal conditions.   Confirm the Power LED is turned off. 図 1 電源SWのOFF  Notes:  Powering off the main unit in an inappropriate way (e.g. by pulling out the AC adapter) may cause the target to malfunction at next startup, because the power-off process is not carried out correctly by the target’s control processor. This also uses up the batteries in the main unit.  here are cases where the unit cannot be powered off by a long press of the power switch (e.g. hen the control processor in the game console goes out of control for some reason). In such ases, hold down the power switch for a longer time (about 15 seconds).  the unit still cannot be powered off, use the BT.POWER switch on the rear panel to power off the unit.  TwcIfKCSUP101027
34  | Appendix  5. Appendix 5.1. Manual Installation of the USB Driver If the USB driver was not automatically installed, follow the procedure below to manually  the PARTNER-CTR to the PC with the USB cable using, "2 Setting up PARTNER-CTRinstall the USB driver for the PARTNER-CTR. To start installer, connect" (page14) for reference, then power on the hardware.  Installation Procedure for Windows Vista and Windows 7  Once PARTNER-CTR is detected by the OS, the alog shown on the left will be displayed. To Proceed, click [Locate and install driver software]. di Select [I don't have the disc. Show me other options]. KCSUP101027
Appendix  | 35  Click [Browse my computer for driver software (advanced)]  S  ti"P oftware", then click [Next] to continue. pecify the Driver folder*1hat is located in the nstallation folder created in Installing / Uninstalling ARTNER-CTR SIinstalled successfully, you will see the screen shown on the left. f the USB driver was KCSUP101027
36  | Appendix  KCSUP101027 *1 The default installation folder of the PARTNER-CTR/S s  and Capture software differdepending on the user account used during installation. [Administrator Account]   PARTNER-CTR/S: C:\Program Files\KMC\WJETCTR09S   Capture Software: C:\Program Files\KMC\PTCTRCap [Normal User Account]    PARTNER-CTR/S: C:\Users\User Name\AppData\Roaming\KMC\WJETCTR09S   Capture Software: C:\Users\User Name\AppData\Roaming\KMC\PTCTRCap   Installation Procedure for Windows XP   Select [No, nclickot this time] and  [Next] to continue.  Select [Install from a list or spe ck the cific location] and then cli[Next] to continue.
Appendix  | 37  these locations], Then choose the [Include this location in the ion. Specify the [Driver 2 within your PARTNER-CTR installation directory, then Select [Search for the best driver in search] optfolder]*click the [Next] to continue. If the USB driver was installed ss 2 The default installation folder of the PARTNER-CTR/S and Capture software differs uccessfully, you will see the creen shown on the left. *depending on the user account used during installation. [Administrator Account]    PARTNER-CTR/S: C:\Program Files\KMC\WJETCTR09S   Capture Software: C:\Program Files\KMC\PTCTRCap [Restricted Account]     PARTNER-CTR/S: C:\ Documents and Settings\User Name\Application Data\KMC\  WJETCTR09S   Capture Software: C:\ Documents and Settings\User Name\Application Data\KMC\  PTCTRCap   KCSUP101027
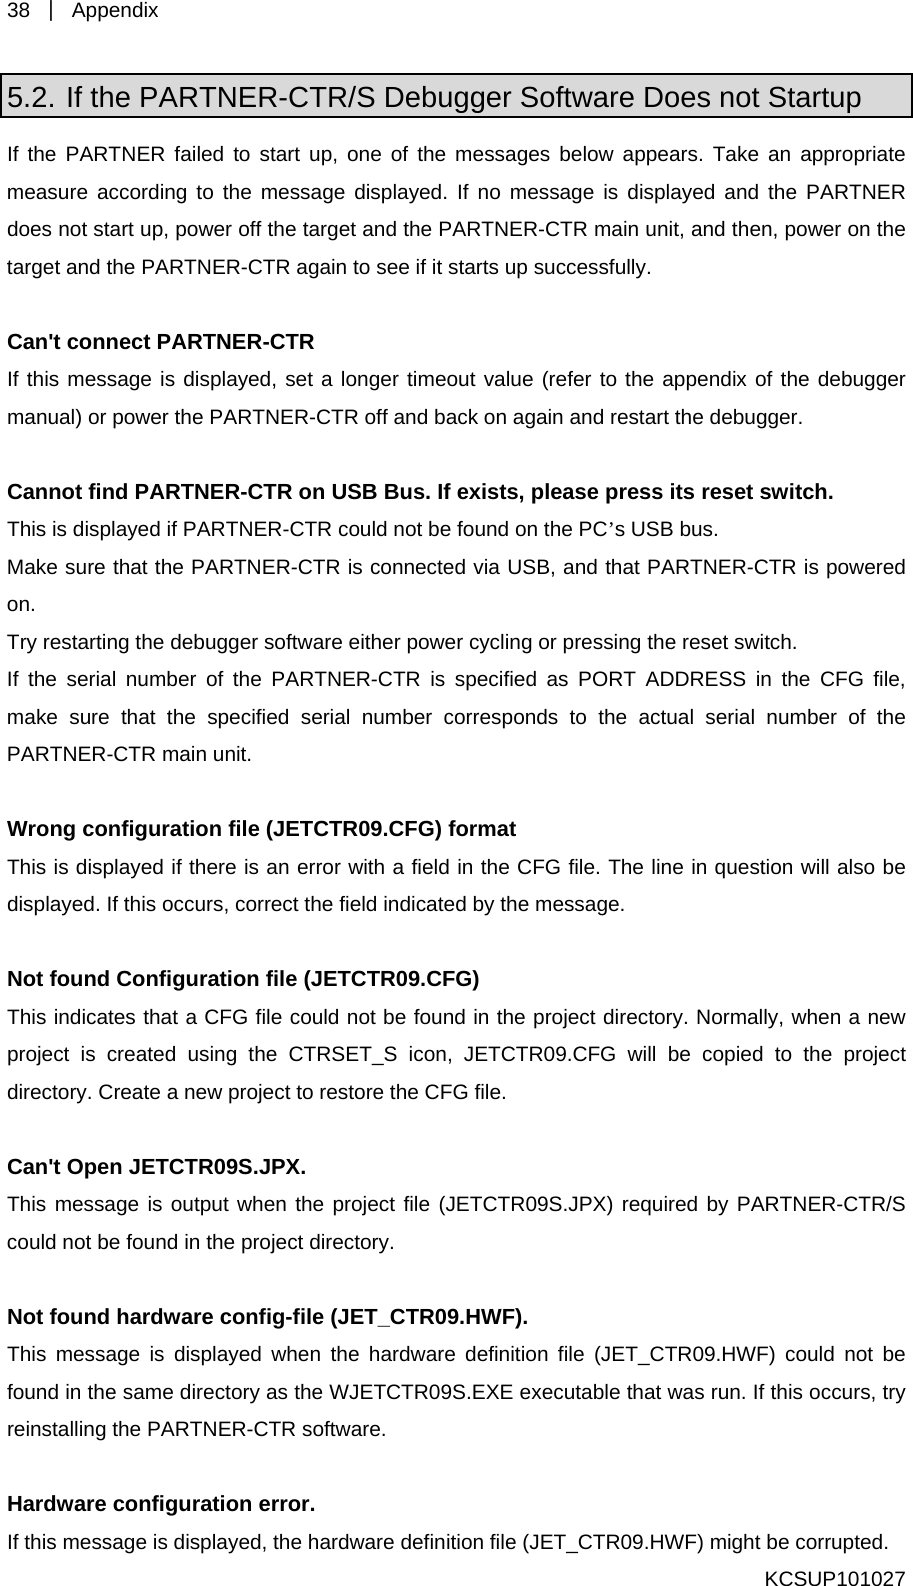
38  | Appendix  KCSUP101027 5.2. If the PARTNER-CTR/S Debugger Software Does not Startup If the PARTNER failed to start up, one of the messages be iate measure according to the message displayed. If no messag  does not start up, power off the target and the PARTNER-CTR he target and the PARTNER-CTR again to see if it starts up succ Can't connect PARTNER-CTR If this message is displayed, set a longer timeout value (refer to the appendix of the debugger manual) or power the PARTNER-CTR off and back on again and restart the debugger.    Cannot find PARTNER-CTR on USB Bus. If exists, please press its reset switch. his is displayed if PARTNER-CTR could not be found on the PC’s USB bus. Make sure that the PARTNER-CTR is connected via USB, and t red on. Try restarting the debugger software either power cycling or pressing the reIf the serial number of the PARTNER-CTR is specified as PORT ADDRESS in the CFG file, make sure that the specified serial number corresponds to the actual serial number of the PARTNER-CTR main unit.  Wrong configuration file (JETCTR09.CFG) format This is displayed if there is an error with a field in the CFG file. The line in question will also be displayed. If this occurs, correct the field indicated by the message.    Not found Configuration file (JETCTR09.CFG)   Tp09.CFG will be copied to the project d ject to restore the CFG file.    C n't OT when the project file (JETCTR09S.JPX) required by PARTNER-CTR/S could n N t fouT en the hardware definition file (JET_CTR09.HWF) could not be und in the same directory as the WJETCTR09S.EXE executable that was run. If this occurs, try installing the PARTNER-CTR software.    Hardware configuration error. If this message is displayed, the hardware definition file (JET_CTR09.HWF) might be corrupted.   low appears. Take an appropre is displayed and the PARTNER main unit, and then, power on tessfully. That PARTNER-CTR is poweset switch. his indicates that a CFG file could not be found in the project directory. Normally, when a new roject is created using the CTRSET_S icon, JETCTRirectory. Create a new proa pen JETCTR09S.JPX. his message is output ot be found in the project directory. o nd hardware config-file (JET_CTR09.HWF). his message is displayed whfore
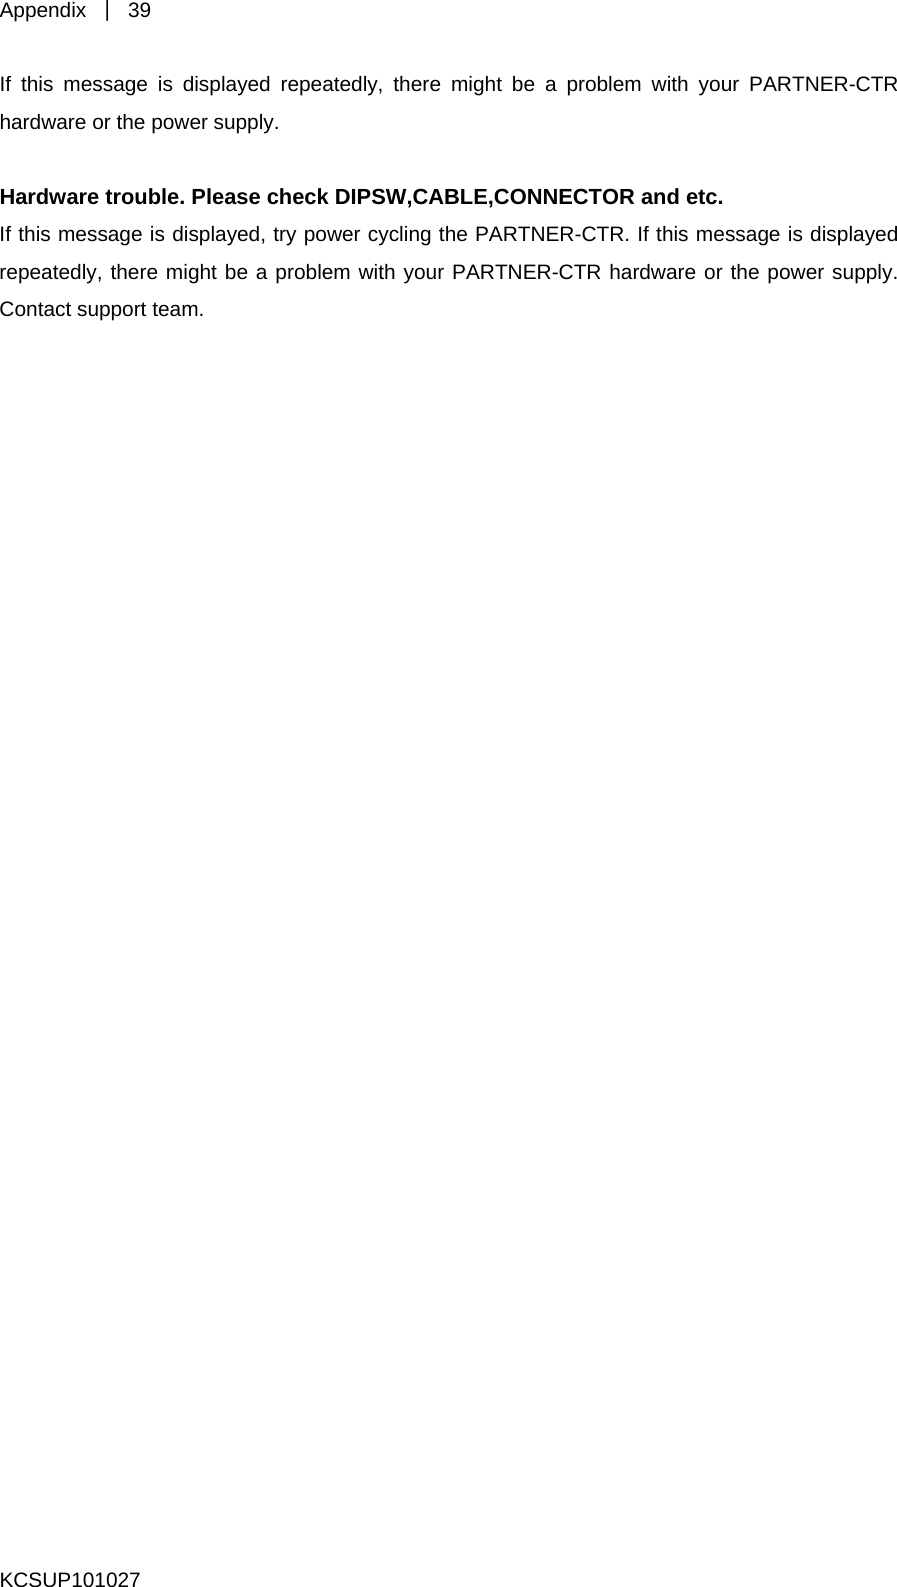
Appendix  | 39 KCSUP101027 TR hardware or the power supply.   are or the power supply. ontact support team. If this message is displayed repeatedly, there might be a problem with your PARTNER-C  Hardware trouble. Please check DIPSW,CABLE,CONNECTOR and etc. If this message is displayed, try power cycling the PARTNER-CTR. If this message is displayed repeatedly, there might be a problem with your PARTNER-CTR hardwC
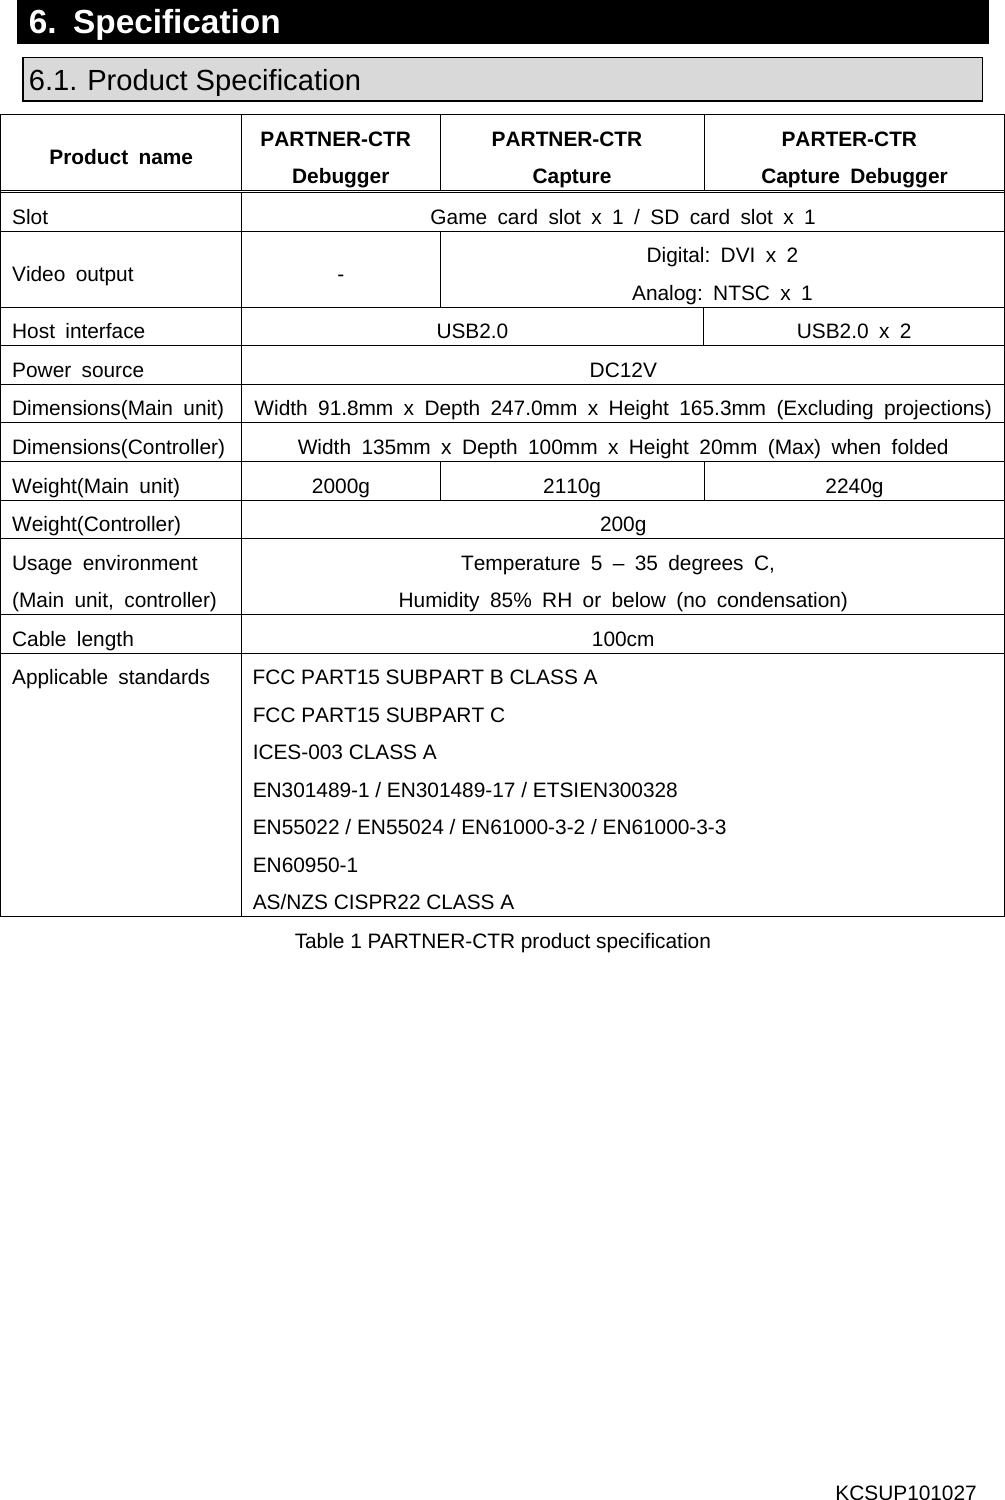
 6.  Specification 6.1. roduct Specification  PProduct name  PARTNER-CTR Debugger PARTNER-CTR  Capture PARTER-CTR  Capture Debugger Slot  Game card slot x 1 / SD card slot x 1 Video output  -  Digital: DVI x 2 Analog: NTSC x 1 Host interface  USB2.0  USB2.0 x 2 Power source  DC12V Dimensions(Main unit)  Width 91.8mm x Depth 247.0mm x Height 165.3mm (Excluding projections)Dimensions(Controller)  Width 135mm x Depth 100mm x Height 20mm (Max) when folded Weight(Main unit)  2000g  2110g  2240g Weight(Controller) 200g Usage environment (Main unit, controller) Temperature 5 – 35 degrees C,  Humidity 85% RH or below (no condensation) Cable length  100cm Applicable  standards  FCC PART15 SUBPART B CLASS A FCC PART15 SUBPART C ICES-003 CLASS A EN301489-1 / EN301489-17 / ETSIEN300328 EN55022 / EN55024 / EN61000-3-2 / EN61000-3-3 EN60950-1 AS/NZS CISPR22 CLASS A Table 1 PARTNER-CTR product specification             KCSUP101027
 KCSUP101027     PARTNER-CTR Setup Manual ber 2010               Second Edition, Issued in Septem  Kyoto Microcomputer Co., Ltd.

Navigation menu