Mitsubishi Electric CP-W5000DW Digital Color Printer User Manual CP W5000DW QUICK GUIDE enu 141021 1of4
Mitsubishi Electric Corp Digital Color Printer CP W5000DW QUICK GUIDE enu 141021 1of4
UserManual.wiki
>
Mitsubishi Electric
>
CP W5000DW User Manual
User Manual
Navigation menu
Upload a User Manual
Namespaces
Wiki Guide
HTML
PDF
Info
Views
User Manual
Discussion / Help
Navigation
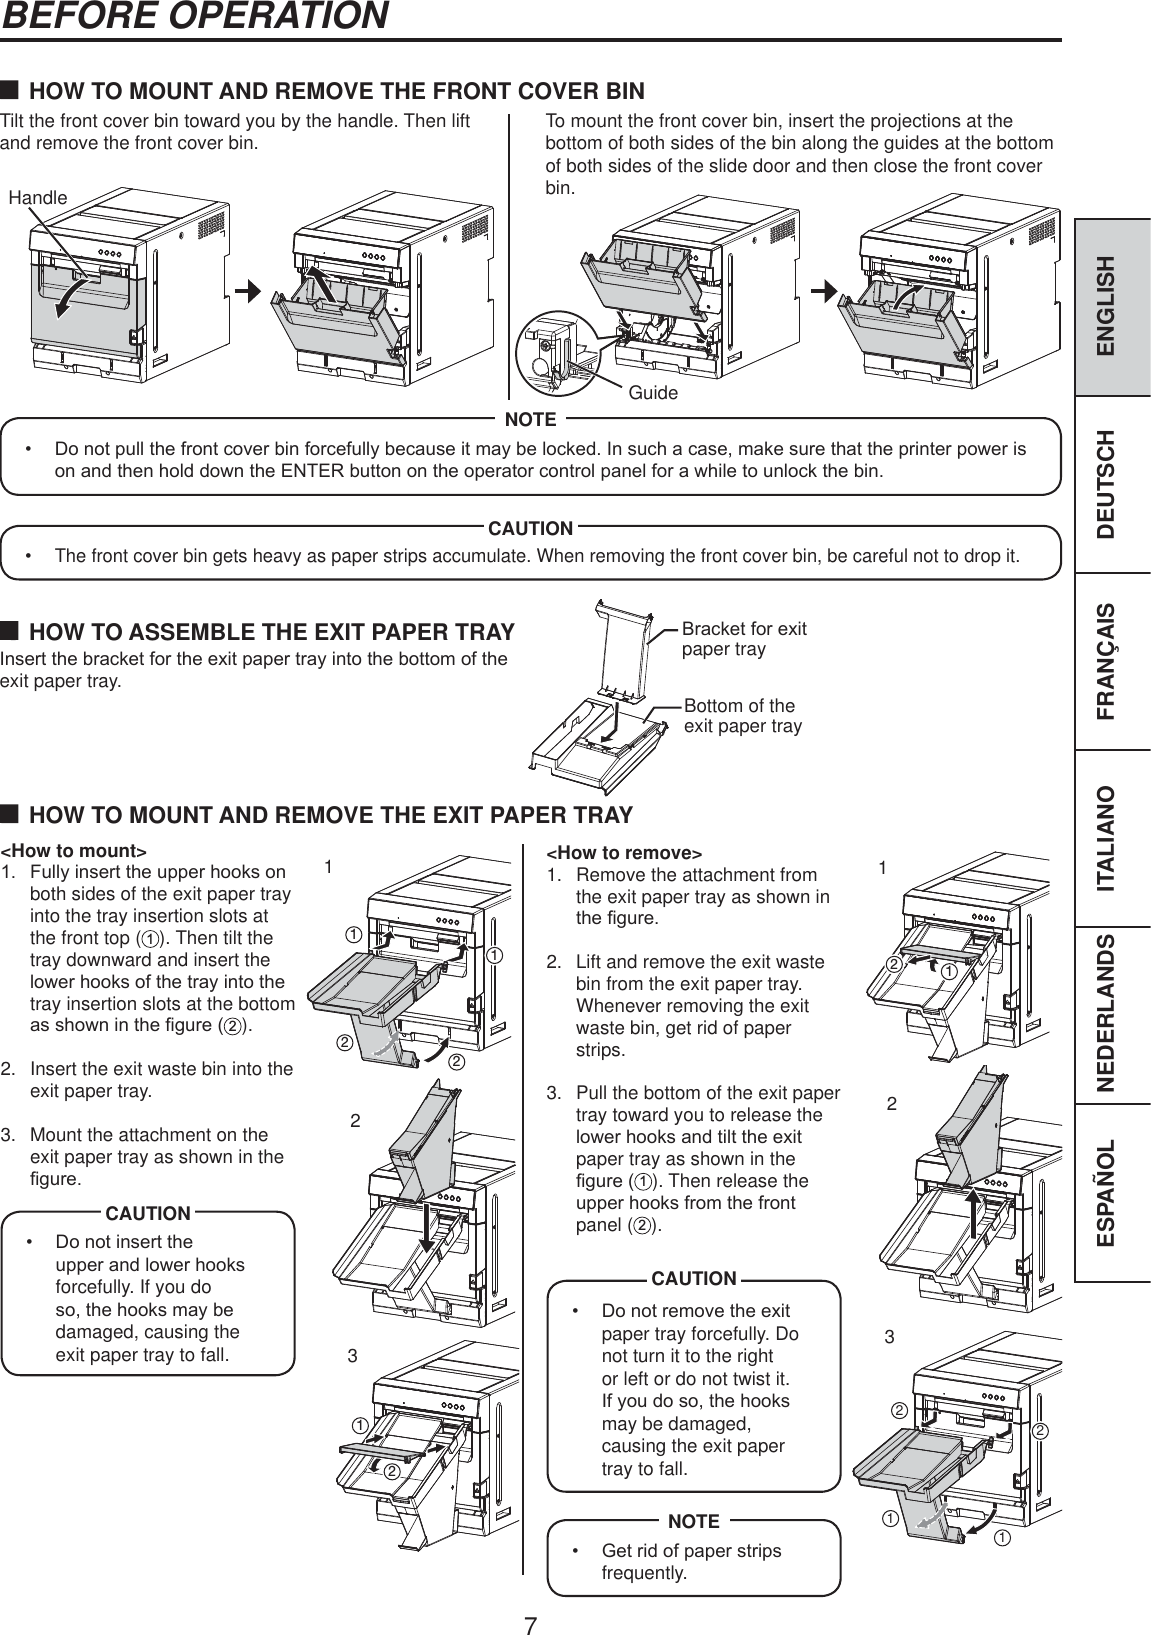
![4In the interest of safety, please observe the following precautions:POWER REQUIREMENTThis Digital Color Printer is designed to operate on 120 V AC 50/60 Hz in the U.S.A. and Canada, and 220 V - 240 V AC 50/60 Hz in Europe. Never connect to any outlet or power supply having a different voltage or frequency. In addition, be sure to supply power to the printer from a receptacle with a ground fault circuit interrupter.WARNING : THIS APPARATUS MUST BE EARTHED.PROTECTIVE MEASURESSAFETY PRECAUTIONSIF ABNORMALITIES ARISE, .....8VHRIWKHSULQWHUGXULQJHPLVVLRQRIVPRNHRUDEQRUPDOsounds (without adopting countermeasures) is dangerous. In such a case, unplug the power cord from the source outlet immediately, and request maintenance service from the sales dealer.NEVER INSERT ANY OBJECT INTO THE PRINTER)RUHLJQREMHFWVRIDQ\NLQGLQVHUWHGLQWRWKLVSULQWHUconstitute a safety hazard and can cause extensive damage.DO NOT PLACE ANYTHING ON THE DIGITAL COLOR PRINTERHeavy objects placed on the Digital Color Printer can cause damage or obstruct proper ventilation.PROTECT THE POWER CORD'DPDJHWRWKHSRZHUFRUGPD\FDXVH¿UHRUVKRFNKD]DUGWhen unplugging, hold by the plug only and remove carefully.DO NOT PLACE WATER CONTAINERS ON THE PRINTER'RQRWSODFHÀRZHUYDVHVDQGRWKHUZDWHUKROGLQJcontainers on the printer. If, for some reason, water seeps to the inside of the printer, unplug the power cord from the source outlet, and contact the sales dealer. If used without corrective measures, the printer may be damaged.“In the interest of safety, avoid handling of liquids near the printer.”DO NOT REMOVE THE CABINETTouching internal parts is dangerous, besides, it may lead to malfunction. Contact the sales dealer to carry out internal FKHFNVDQGDGMXVWPHQWVUNPLUG THE POWER CORD DURING A LONG ABSENCETurn off the main power switch and unplug the power cord during a long absence.WHEN TRANSPORTING THE PRINTER:KHQWUDQVSRUWLQJWKHSULQWHUUHPRYHWKHLQNULEERQDQGprint paper from the printer.WHEN MOVING THE PRINTER&KHFNWKDWWKHVOLGHGRRULVFORVHG¿UPO\$QGSD\DWWHQWLRQnot to press the front release button accidentally. When the VOLGHGRRULVQRWFORVHG¿UPO\RU\RXSUHVVWKHIURQWUHOHDVHbutton accidentally, the slide door may open. It can cause injury or damage.BE CAREFUL AROUND PAPER EXIT SLOTDon’t insert your hand or any material into the print output slot and the waste output slot during printing. If you do so, \RXU¿QJHUZLOOEHLQMXUHGDO NOT PUT YOUR HAND OVER THE PRINT PAPER HOLDER,I\RXGRVR\RXU¿QJHUZLOOEHLQMXUHGDO NOT TOUCH THE THERMAL HEAD EXCEPT WHEN CLEANINGDo not touch the thermal head (located inside the top cover) except when cleaning.They are heated to high temperature and may cause burns or injury when touched.Also, malfunction caused by static electricity may occur.WHEN PLACING THE PRINT PAPER, KEEP THE PRINT PAPER UPRIGHTWhen you put the print paper sideways on a table, etc., it may roll and fall. This may cause injury.CONNECTION CABLESUse the provided power cord.DO NOT LEAVE THE SLIDE DOOR OPENWhen the printer is moved with the slide door open, it may cause injury or damage.CLOSE THE SLIDE DOOR FIRMLY7DNHFDUHQRWWRSLQFK\RXUKDQGZKHQFORVLQJWKHVOLGHGRRU:KHQWKHVOLGHGRRULVQRWFORVHG¿UPO\LWPD\RSHQduring transportation and it may cause injury or damage.DO NOT PUSH DOWN ON THE SLIDE DOORIf you push down on the slide door when they are open, this printer may fall and it can cause damage or injury.DO NOT LEAN ON THE EXIT PAPER TRAY, DO NOT APPLY PRESSURE TO IT FROM ABOVE, OR DO NOT PUT A HEAVY OBJECT ON ITThe exit paper tray may be damaged, causing injury.](https://usermanual.wiki/Mitsubishi-Electric/CP-W5000DW/User-Guide-2425134-Page-4.png)
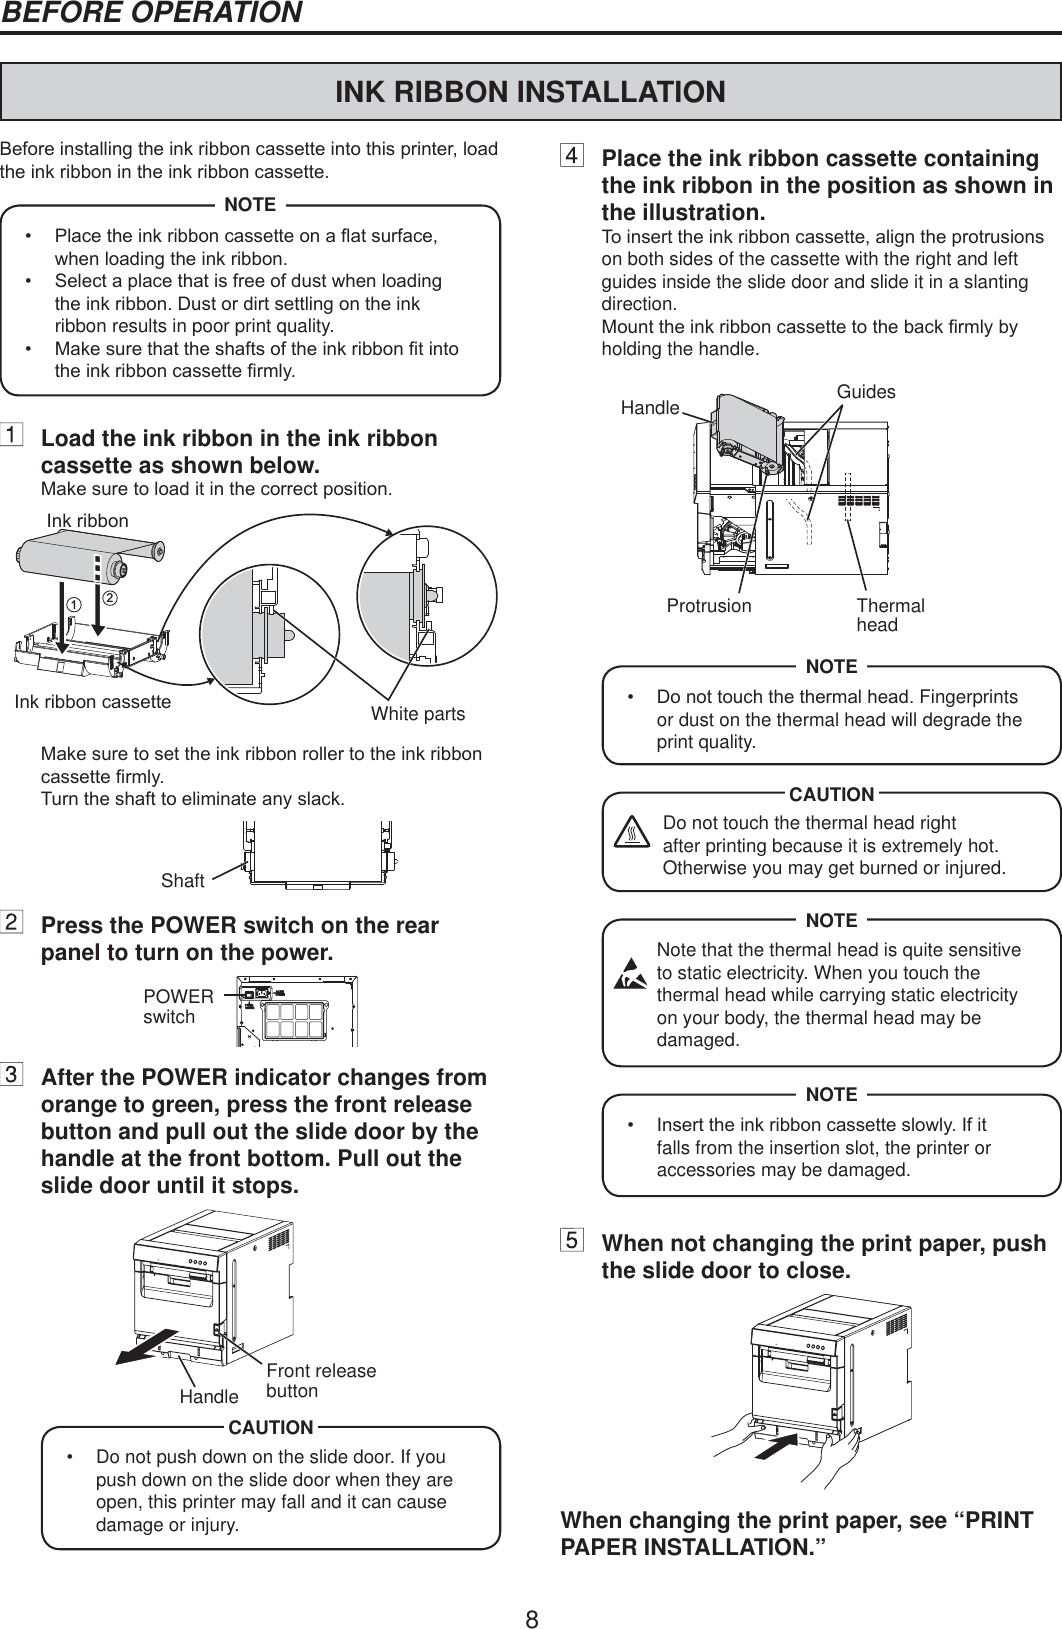
![6UNPACKING7DNHWKHSULQWHURXWRIWKHER[E\WKHIROORZLQJSURFHGXUHV0DNHVXUHWRFKHFNWKHDFFHVVRULHV CONTENTS7KHDFFHVVRULHVLWHPVDUHSODFHGLQWKHWRSFXVKLRQ&KHFNDOOLWHPVDUHLQFOXGHG,QNULEERQFDVVHWWH7KHLQNULEERQFDVVHWWHLVcontained in the printer.4XLFNVHWXSguide CD-ROM 3DSHUÀDQJHVPower cords Exit paper tray Exit waste bin %UDFNHWIRUH[LWpaper tray Attachment for exit paper tray PAPER / INK RIBBON:KHQXVLQJWKLVSULQWHUPDNHVXUHWRXVHWKHIROORZLQJW\SHVRIWKHSDSHULQNULEERQProduct name Print size Number of prints3.7ZRLQNULEERQVLQFOXGHG [0D[LPXPVL]H 'XSOH[SULQWLQJCK5000 (Paper) 8 x 12 (Maximum size) 250 (Duplex printing)Using the ManualsThe Operation Manual and the Operation Manual for the Printer driver are prepared in the Portable Document Format (PDF) in the CD-ROM. Adobe® Reader® is required to open the Operation Manual.Opening the Operation Manual1. Load the CD-ROM into the CD-ROM drive.2. Open CD-ROM “CP-W5000D”.'RXEOHFOLFNRQ³,1'(;KWPO´ZLWKLQWKH&'520$ODQJXDJHVHOHFWLRQOLVWIRUWKH2SHUDWLRQ0DQXDOZLOOEHGLVSOD\HG0RYHWKHPRXVHSRLQWHUWRWKHGHVLUHGODQJXDJHDQGFOLFNThis will launch Adobe Reader and the Operation Manual will open. $GREHWKH$GREHORJRDQG5HDGHUDUHHLWKHUUHJLVWHUHGWUDGHPDUNVRUWUDGHPDUNVRI$GREH6\VWHPV,QFRUSRUDWHGLQWKHUnited States and/or other countries.0DNHVXUHWRUHPRYHWKHSURWHFWLYHPDWHULDOVIURPWKHLQNULEERQFDVVHWWHSDSHUÀDQJHVDQGH[LWSDSHUWUD\ Open the box and take out the accessories. Remove the top cushion. Hold and release the joint parts (6 pieces) at the bottom of the box to remove the upper box. Unwrap the packing.Remove the protective materials for transportation such as protective sheet. Take out the printer.+ROGWKHSULQWHUE\WKHKROGLQJVORWVLQWKHVLGHVDQGEDFNDVVKRZQLQWKH¿JXUH 7KHSULQWHUZHLJKVDERXWNJ,WVKRXOGEHFDUULHGFDUHIXOO\E\two people.NOTE 'RQRWFDUU\WKHSULQWHUE\WKHIURQWSDQHO7KHIURQWFRYHUELQPD\be removed and fall. It may cause injury or damage. :KHQWKHVOLGHGRRULVQRWFORVHG¿UPO\RU\RXSUHVVWKHIURQWrelease button accidentally, the slide door may open. It can cause injury or damage.CAUTIONAccessories3DFNLQJJoint partsHolding slots](https://usermanual.wiki/Mitsubishi-Electric/CP-W5000DW/User-Guide-2425134-Page-6.png)
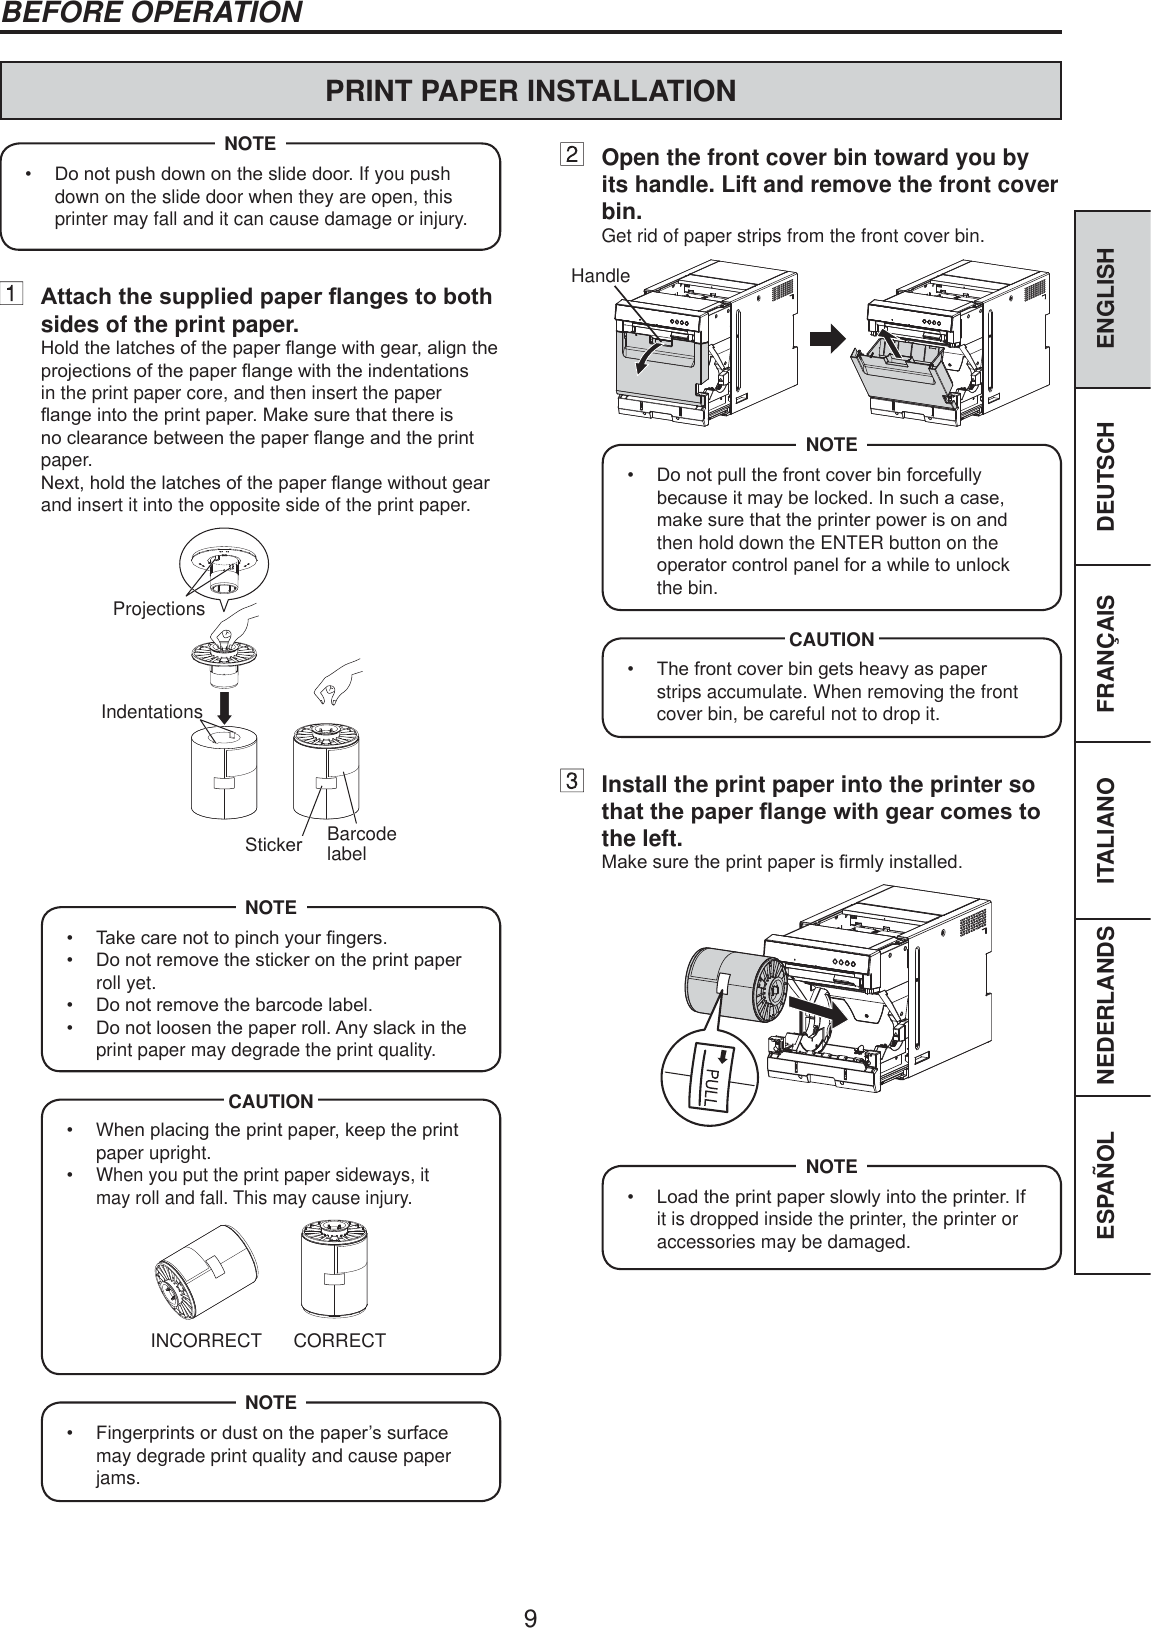
![10Remove the sticker and insert the print paper between the rollers to feed it as VKRZQLQWKH¿JXUH,QVHUWWKHSULQWSDSHUuntil the blue indicator at the front bottom of the slide door illuminates.5HPRYHWKHVWLFNHUEHIRUHLQVHUWLQJWKHSULQWSDSHUEHWZHHQWKHUROOHUV0DNHVXUHWRLQVHUWWKHSDSHUstraight.RollersBlue indicatorPrint paper .HHSWKHUROOHUVFOHDQ'LUWRQWKHUROOHUVmay produce poor print quality.NOTE :KHQWDNLQJWKHSULQWSDSHURXWSXOOLWXSWRZDUG\RXE\KROGLQJWKHSDSHUÀDQJHV 0DNHVXUHWRWXUQRQWKHSRZHUEHIRUHreplacing the print paper. 0DNHVXUHWRHOLPLQDWHDQ\VODFNIURPWKHprint paper. If you carry out the followingVWHSVZLWKRXWHOLPLQDWLQJWKHVODFNWKHSULQWpaper may be damaged. 'RQRWUHPRYHWKHEDUFRGHODEHONOTEMount the front cover bin.Insert the projections at the bottom of both sides of the front cover bin along the guides at the bottom of both sides of the slide door and then close the front cover bin.Guide 0DNHVXUHWKDWWKHIURQWFRYHUELQLVmounted correctly. Incorrect mounting maycause paper jam.NOTEBEFORE OPERATIONPush the slide door to close.Hold the holding slots in both sides and push the front of the printer with both hands to close the slide door as VKRZQLQWKH¿JXUHWhen a new paper is loaded and the slide door is closed with the power turned on, the paper will be automatically fed and cut. The printer ejects two pieces of paper and displays “Ready 8x12” on the LCD. :KHQFORVLQJWKHVOLGHGRRUEHFDUHIXOQRWto get your hands caught between the printerand the slide door. Otherwise, you may getinjured.CAUTION :KHQFORVLQJWKHVOLGHGRRUSXVKLWXQWLODFOLFNLVKHDUG ,IWKH$/$50LQGLFDWRULOOXPLQDWHVZKHQWKHslide door is closed, the print paper mayhave not been installed correctly.,QWKLVFDVHRSHQWKHVOLGHGRRUWRPDNHsure that the print paper has been installedcorrectly. Then close the slide door again. 7KHSULQWHUWDNHVVRPHWLPHWR¿QLVKinitialization before starting the feed-and-cutoperation. This is not a malfunction. Wait forWKHSULQWHUWR¿QLVKLQLWLDOL]DWLRQNOTEInstallation of the print paper and the ink ribbon is completed. (PSW\WKHIURQWFRYHUELQIUHTXHQWO\WRprevent jamming the strips at the print outputVORW:KHQHYHU\RXUHSODFHWKHSDSHUPDNHsure to throw away the paper strips in thefront cover bin. :KHQHYHU\RXUHSODFHWKHLQNULEERQFOHDQthe thermal head and the platen roller. 7KH/&'RQWKHRSHUDWRUFRQWUROSDQHOPD\display “PAPER END” even when some printpaper still remains. This is not a malfunction.NOTE](https://usermanual.wiki/Mitsubishi-Electric/CP-W5000DW/User-Guide-2425134-Page-10.png)
![MITSUBISHI ELECTRIC EUROPE B.V.UK Branch7UDYHOOHUV/DQH+DW¿HOG+HUWV$/;%(QJODQG8.Phone +44 (0) 1707 276100 FAX +44 (0) 1707 278755German BranchGothaer Strasse 8, 40880 Ratingen ; Postfach 1548, 40835 Ratingen ; GermanyPhone +49 (2102) 486-9250 FAX +49 (2102) 486-7320French Branch25, Boulevard des Bouvets - 92741 NANTERRE cedex, FrancePhone +33 (1) 55 68 55 00 FAX +33 (1) 55 68 57 31Benelux BranchNijverheidsweg 23a, 3641 RP Mijdrecht, The NetherlandsPhone +31 (0) 297-282461 FAX +31 (0) 297-283936Spanish Branch (Barcelona)Ctra. de Rubí, 76-80 - Apdo. 42008190-Sant Cugat del Vallés - (Barcelona) SpainPhone +34 93 565 3154 FAX +34 93 589 4388MITSUBISHI ELECTRIC US. INC.Visual and Imaging Systems5900-A Katella Ave.Cypress, CA 90630-5019, U.S.A.Phone 888-307-0309Manufactured by Mitsubishi Electric (Malaysia) Sdn. Bhd.3/2.DZDVDQ3HULQGXVWULDQ6HQDL,,6HQDL-RKRU'DUXO7DN]LP0DOD\VLDPlease contact the nearest Mitsubishi sales branch to get DOC (Declaration of Conformity) of the EC Directive 1999/5/EC.](https://usermanual.wiki/Mitsubishi-Electric/CP-W5000DW/User-Guide-2425134-Page-12.png)