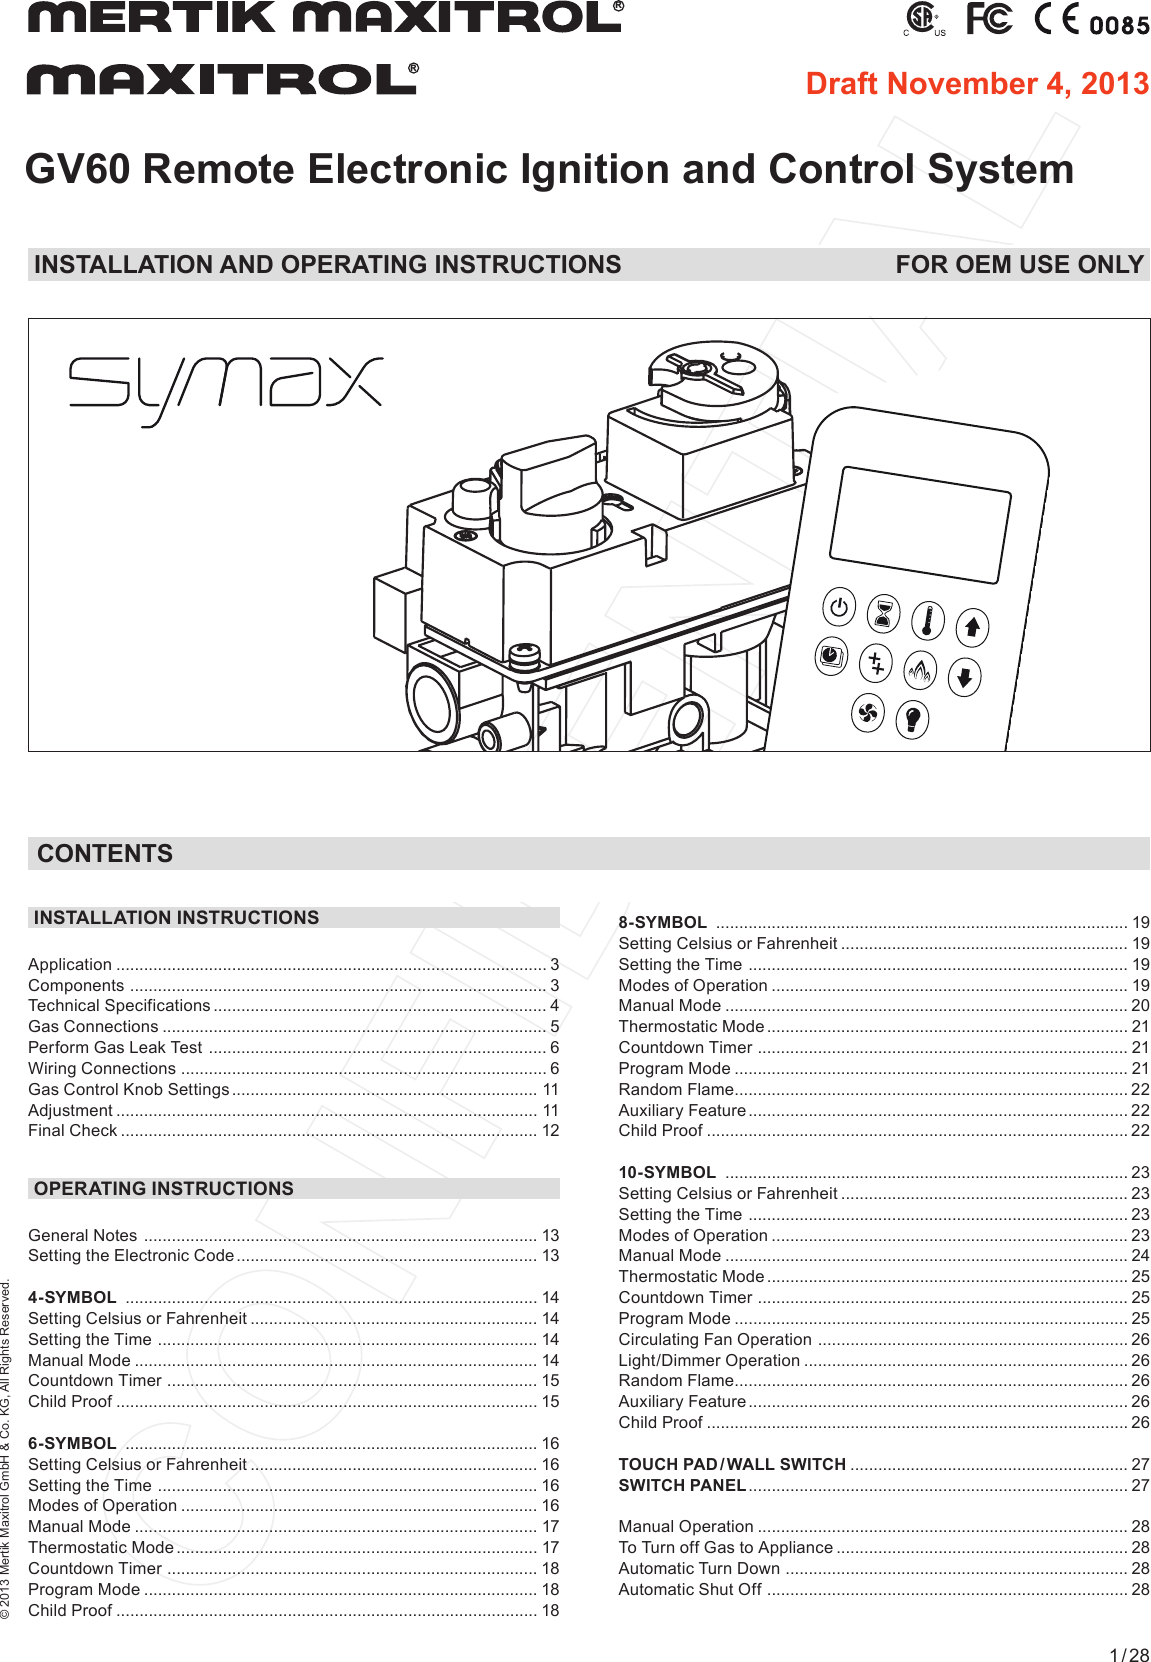
Mertik Maxitrol and KG B6R Handset of remote electronic ignition and control system for gas applications User Manual GV60 symax II OI EN 28 10 2013 Draft indd

Mertik Maxitrol GmbH & Co. KG Handset of remote electronic ignition and control system for gas applications GV60 symax II OI EN 28 10 2013 Draft indd

Contents

Instructions part 1

© 2013 Mertik Maxitrol GmbH & Co. KG, All Rights Reserved.1 / 28GV60 Remote Electronic Ignition and Control SystemRR8-SYMBOL  ......................................................................................... 19Setting Celsius or Fahrenheit  .............................................................. 19Setting the Time  .................................................................................. 19 Modes of Operation  ............................................................................. 19 Manual Mode  ....................................................................................... 20 Thermostatic Mode .............................................................................. 21Countdown Timer  ................................................................................ 21 Program Mode ..................................................................................... 21Random Flame ..................................................................................... 22Auxiliary Feature .................................................................................. 22 Child Proof ........................................................................................... 22 10-SYMBOL  ....................................................................................... 23Setting Celsius or Fahrenheit  .............................................................. 23Setting the Time  .................................................................................. 23Modes of Operation  ............................................................................. 23 Manual Mode  ....................................................................................... 24 Thermostatic Mode .............................................................................. 25Countdown Timer  ................................................................................ 25 Program Mode ..................................................................................... 25Circulating Fan Operation  ................................................................... 26 Light/Dimmer Operation  ...................................................................... 26 Random Flame ..................................................................................... 26Auxiliary Feature .................................................................................. 26 Child Proof ........................................................................................... 26 TOUCH  PAD / WALL  SWITCH  ............................................................ 27SWITCH PANEL .................................................................................. 27Manual Operation  ................................................................................ 28 To Turn off Gas to Appliance  ............................................................... 28 Automatic Turn Down  .......................................................................... 28 Automatic Shut Off  .............................................................................. 28 INSTALLATION INSTRUCTIONSApplication ............................................................................................. 3Components  .......................................................................................... 3Technical Specifications  ........................................................................ 4Gas Connections  ...................................................................................  5Perform Gas Leak Test  ......................................................................... 6Wiring Connections  ............................................................................... 6Gas Control Knob Settings  ..................................................................  11Adjustment  ...........................................................................................  11Final Check  .......................................................................................... 12OPERATING INSTRUCTIONSGeneral Notes  .....................................................................................  13Setting the Electronic Code ................................................................. 13 4-SYMBOL  ......................................................................................... 14Setting Celsius or Fahrenheit  .............................................................. 14Setting the Time  .................................................................................. 14 Manual Mode  ....................................................................................... 14Countdown Timer  ................................................................................ 15 Child Proof ........................................................................................... 156-SYMBOL  ......................................................................................... 16Setting Celsius or Fahrenheit  .............................................................. 16Setting the Time  .................................................................................. 16 Modes of Operation  ............................................................................. 16 Manual Mode  ....................................................................................... 17 Thermostatic Mode .............................................................................. 17Countdown Timer  ................................................................................ 18 Program Mode ..................................................................................... 18Child Proof ........................................................................................... 18 CONTENTSINSTALLATION AND OPERATING INSTRUCTIONS  FOR OEM USE ONLYDraft November 4, 2013
© 2013 Mertik Maxitrol GmbH & Co. KG, All Rights Reserved.2 / 28IMPORTANT SAFETY INFORMATION   FOR OEM USE ONLYRead these instructions carefully and completely before installing or operating. Failure to follow them could result in a fi re or explosion causing property damage, personal injury, or loss of life. Service and installation must be performed by a trained/experienced service technician.WHAT TO DO IF YOU SMELL GAS▪ Do NOT operate any appliance.▪ Do NOT touch any electrical switch; do NOT use any phone in your building.▪ Immediately evacuate the area and contact the gas supplier. Follow the gas supplier’s instructions.▪ If you cannot reach the gas supplier, call the fi re department.Installation and service must be performed by a qualifi ed installer, service agency, or the gas supplier. Installation shall conform with local codes, or in the absence of local codes, in accordance with the National Fuel Gas Code ANSI Z223.1/NFPA 54 or the IFGC or CSA B149.1. All piping and tubing must comply with local codes and ordinances.Use only your hand to push in or turn the gas control knobs. Never use tools. If a knob will not push in or turn by hand, do not try to repair it. Call a qualifi ed service technician. Force or attempted repair can result in a fi re or explosion.Do NOT use a product if you suspect it has been subjected to high temperatures, damaged, tampered with, or taken apart. Do NOT use a product if you suspect it has been under water or that liquid has seeped into the product. Any of these incidents can cause leakage or other damage that may affect proper operation and cause potentially dangerous combustion problems.Damper position must be in accordance with Manufacturer’s Installation Instructions and all applicable standards. Failure to follow them could result in a fi re or explosion causing property damage, personal injury, or loss of life.Use only your hand to push in or turn the gas control knobs. Never use tools. If a knob will not push in or turn by hand, do NOT try to repair it. Call a qualifi ed service technician. Force or attempted repair can result in a fi re or explosion.Do NOT store or use gasoline or other fl ammable vapors and liquids in the vicinity of this control or other appliances. ELECTRIC SHOCK HAZARD▪  Read these instructions carefully. Failure to follow them could result in property damage, personal injury, or loss of life.▪  This control must be electrically wired and operated in accordance with all codes and local regulations. Service and installation must be performed by a trained, experienced service technician.▪  Do NOT use the control if you suspect it may be damaged. IMPORTANT SAFETY INFORMATION
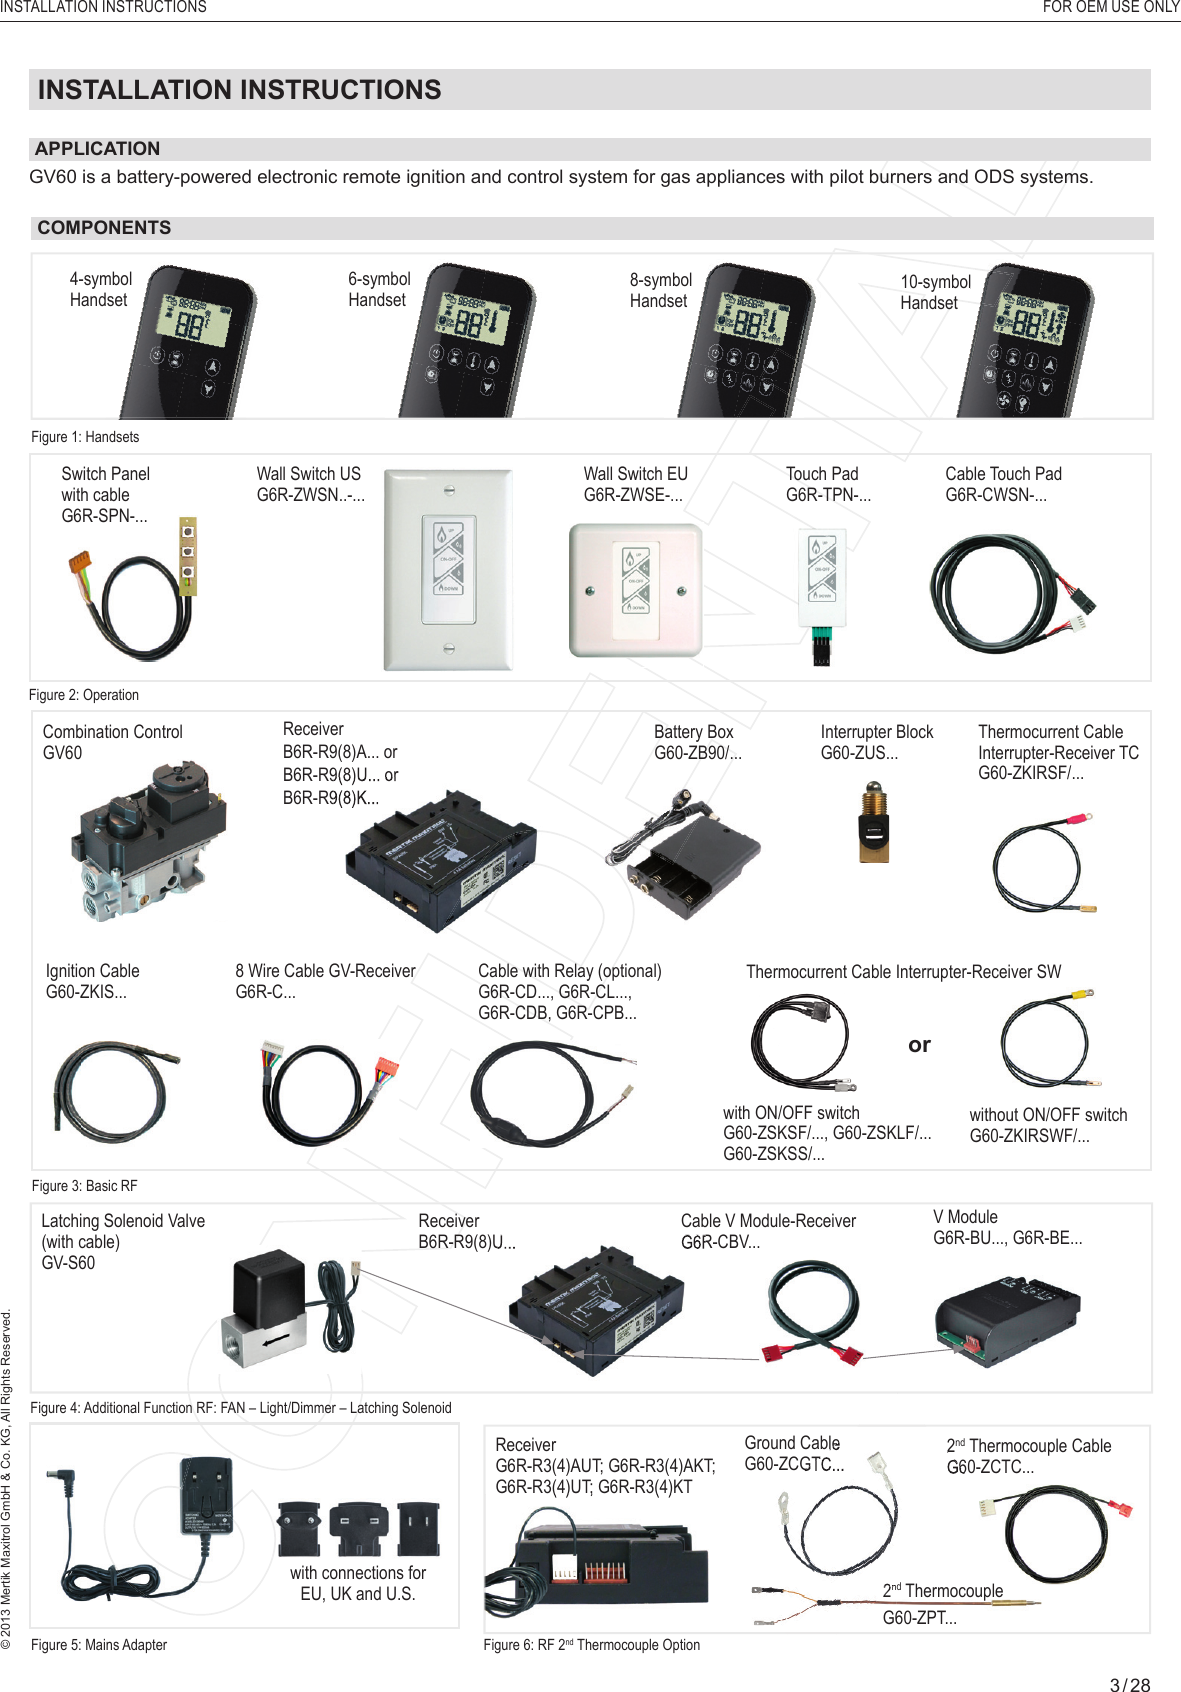
INSTALLATION INSTRUCTIONS   FOR OEM USE ONLY© 2013 Mertik Maxitrol GmbH & Co. KG, All Rights Reserved.3 / 28INSTALLATION INSTRUCTIONSAPPLICATIONGV60 is a battery-powered electronic remote ignition and control system for gas appliances with pilot burners and ODS systems.COMPONENTSFigure 2: OperationSwitch Panel with cableG6R-SPN-...Wall Switch USG6R-ZWSN..-...Wall Switch EUG6R-ZWSE-... Touch Pad G6R-TPN-...Cable Touch PadG6R-CWSN-...Figure 4: Additional Function RF: FAN – Light/Dimmer – Latching SolenoidLatching Solenoid Valve(with cable)GV-S60Cable V Module-ReceiverG6R-CBV...V ModuleG6R-BU..., G6R-BE...ReceiverB6R-R9(8)U...G6R-CBV...6R-R9(8)U...Figure 6: RF 2nd Thermocouple OptionFigure 5: Mains Adapterwith connections forEU, UK and U.S.ReceiverG6R-R3(4)AUT; G6R-R3(4)AKT;G6R-R3(4)UT; G6R-R3(4)KTG6R-R3(4)UT; G6R-R3(4)KT2nd Thermocouple CableG60-ZCTC...Figure 1: HandsetsFigure 3: Basic RFThermocurrent Cable Interrupter-Receiver SWwithout ON/OFF switch G60-ZKIRSWF/...orwith ON/OFF switch G60-ZSKSF/..., G60-ZSKLF/...G60-ZSKSS/...Receiver B6R-R9(8)A... orB6R-R9(8)U... orB6R-R9(8)K...Interrupter BlockG60-ZUS...Thermocurrent Cable Interrupter-Receiver TC G60-ZKIRSF/...Combination Control GV60Ignition CableG60-ZKIS...8 Wire Cable GV-ReceiverG6R-C...Cable with Relay (optional)G6R-CD..., G6R-CL..., G6R-CDB, G6R-CPB... 6R-R9(8)U... or6R-R9(8)K...Battery BoxG60-ZB90/...4-symbol Handset6-symbol Handset10-symbolHandset8-symbolHandset8-symbolHandset10-symbol2nd ThermocoupleG60-ZPT...Ground CableG60-ZCGTC...2G60-ZCTC...22ndndGround CableG60-ZCGTC...
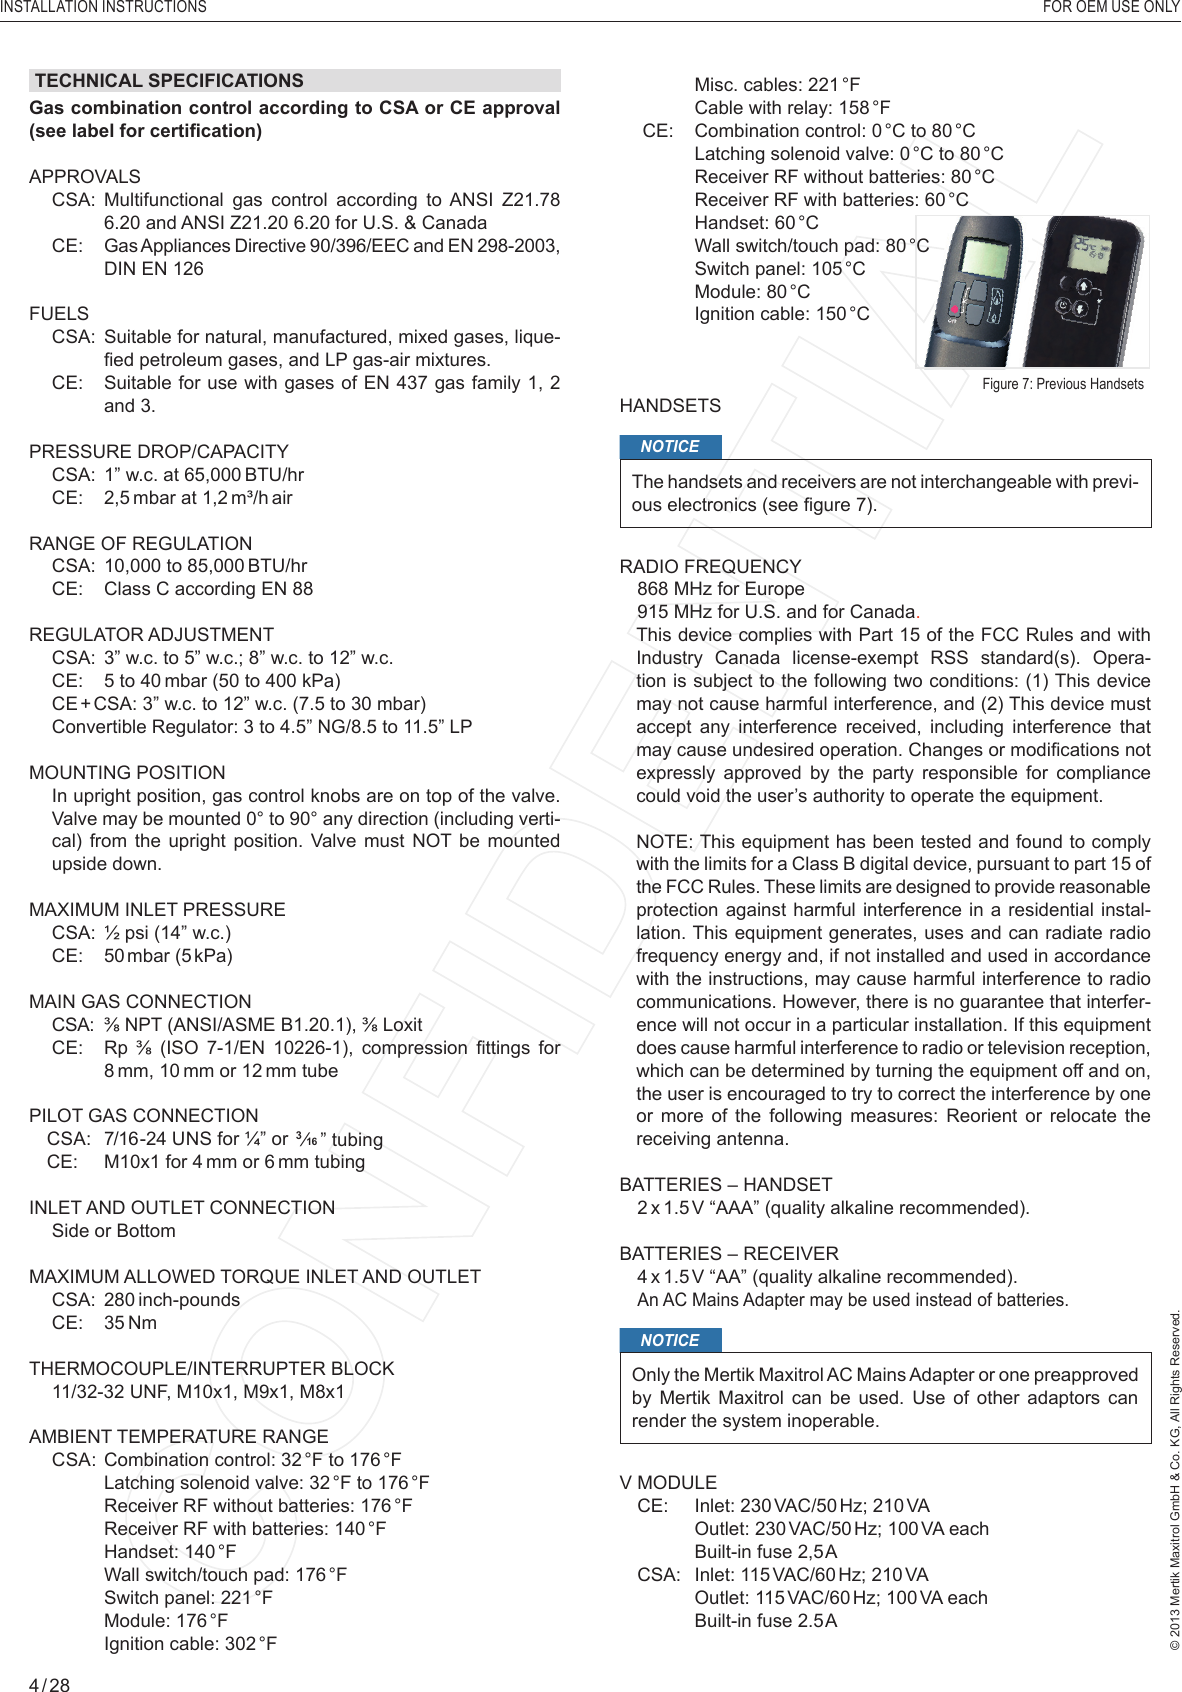
INSTALLATION INSTRUCTIONS   FOR OEM USE ONLY© 2013 Mertik Maxitrol GmbH & Co. KG, All Rights Reserved.4 / 28    Misc. cables: 221 °F    Cable with relay: 158 °F  CE:  Combination control: 0 °C to 80 °C    Latching solenoid valve: 0 °C to 80 °C    Receiver RF without batteries: 80 °C    Receiver RF with batteries: 60 °C    Handset:  60 °C    Wall switch/touch pad: 80 °C    Switch panel: 105 °C    Module:  80 °C    Ignition cable: 150 °CHANDSETSNOTICEThe handsets and receivers are not interchangeable with previ-ous electronics (see fi gure 7).RADIO FREQUENCY   868 MHz for Europe  915 MHz for U.S. and for Canada.  This device complies with Part 15 of the FCC Rules and with Industry  Canada  license-exempt  RSS  standard(s).  Opera-tion is subject to the following two conditions: (1) This device may not cause harmful interference, and (2) This device must accept any interference received, including interference that may cause undesired operation. Changes or modifi cations not expressly approved by the party responsible for compliance could void the user’s authority to operate the equipment.    NOTE: This equipment has been tested and found to comply with the limits for a Class B digital device, pursuant to part 15 of the FCC Rules. These limits are designed to provide reasonable protection against harmful interference in a residential instal-lation. This equipment generates, uses and can radiate radio frequency energy and, if not installed and used in accordance with the instructions, may cause harmful interference to radio communications. However, there is no guarantee that interfer-ence will not occur in a particular installation. If this equipment does cause harmful interference to radio or television reception, which can be determined by turning the equipment off and on, the user is encouraged to try to correct the interference by one or more of the following measures: Reorient or relocate the receiving antenna.BATTERIES – HANDSET   2 x 1.5 V  “AAA” (quality alkaline recommended).BATTERIES – RECEIVER   4 x 1.5 V “AA” (quality alkaline recommended). An AC Mains Adapter may be used instead of batteries.NOTICEOnly the Mertik Maxitrol AC Mains Adapter or one preapproved by Mertik Maxitrol can be used. Use of other adaptors can render the system inoperable.V MODULE  CE:   Inlet: 230 VAC/50 Hz; 210 VA    Outlet: 230 VAC/50 Hz; 100 VA each    Built-in fuse 2,5 A  CSA:   Inlet: 115 VAC/60 Hz; 210 VA    Outlet: 115 VAC/60 Hz; 100 VA each    Built-in fuse 2.5 ATECHNICAL SPECIFICATIONSGas combination control according to CSA or CE approval (see label for certifi cation) APPROVALS  CSA:   Multifunctional  gas  control  according  to  ANSI  Z21.78 6.20 and ANSI Z21.20 6.20 for U.S. & Canada   CE:   Gas Appliances Directive 90/396/EEC and EN 298-2003, DIN EN 126 FUELS  CSA:   Suitable for natural, manufactured, mixed gases, lique-fi ed petroleum gases, and LP gas-air mixtures.  CE:   Suitable for use with gases of EN 437 gas family 1, 2 and 3.PRESSURE DROP/CAPACITY  CSA:  1” w.c. at 65,000 BTU/hr  CE:  2,5 mbar at  1,2 m³/h airRANGE OF REGULATION   CSA:  10,000 to 85,000 BTU/hr  CE:  Class C according EN 88REGULATOR ADJUSTMENT   CSA:   3” w.c. to 5” w.c.; 8” w.c. to 12” w.c.  CE:  5 to 40 mbar (50 to 400 kPa)  CE + CSA: 3” w.c. to 12” w.c. (7.5 to 30 mbar)  Convertible Regulator: 3 to 4.5” NG/8.5 to 11.5” LPMOUNTING POSITION    In upright position, gas control knobs are on top of the valve. Valve may be mounted 0° to 90° any direction (including verti-cal)  from the  upright  position. Valve must  NOT be  mounted upside down. MAXIMUM INLET PRESSURE  CSA:  ½ psi (14” w.c.) CE: 50 mbar (5 kPa)MAIN GAS CONNECTION CSA:  ⅜ NPT (ANSI/ASME B1.20.1), ⅜ Loxit CE:  Rp  ⅜  (ISO  7-1/EN  10226-1),  compression  fi ttings  for 8 mm, 10 mm or 12 mm tubePILOT GAS CONNECTION  CSA:  7/16-24 UNS for ¼” or 3/16 ” tubing  CE:  M10x1 for 4 mm or 6 mm tubingINLET AND OUTLET CONNECTION  Side or BottomMAXIMUM ALLOWED TORQUE INLET AND OUTLET  CSA:  280 inch-pounds  CE:  35 Nm THERMOCOUPLE/INTERRUPTER BLOCK   11/32-32 UNF, M10x1, M9x1, M8x1AMBIENT TEMPERATURE RANGE CSA: Combination control: 32 °F to 176 °F    Latching solenoid valve: 32 °F to 176 °F    Receiver RF without batteries: 176 °F    Receiver RF with batteries: 140 °F    Handset:  140 °F    Wall switch/touch pad: 176 °F    Switch panel: 221 °F    Module:  176 °F    Ignition cable: 302 °FFigure 7: Previous Handsets
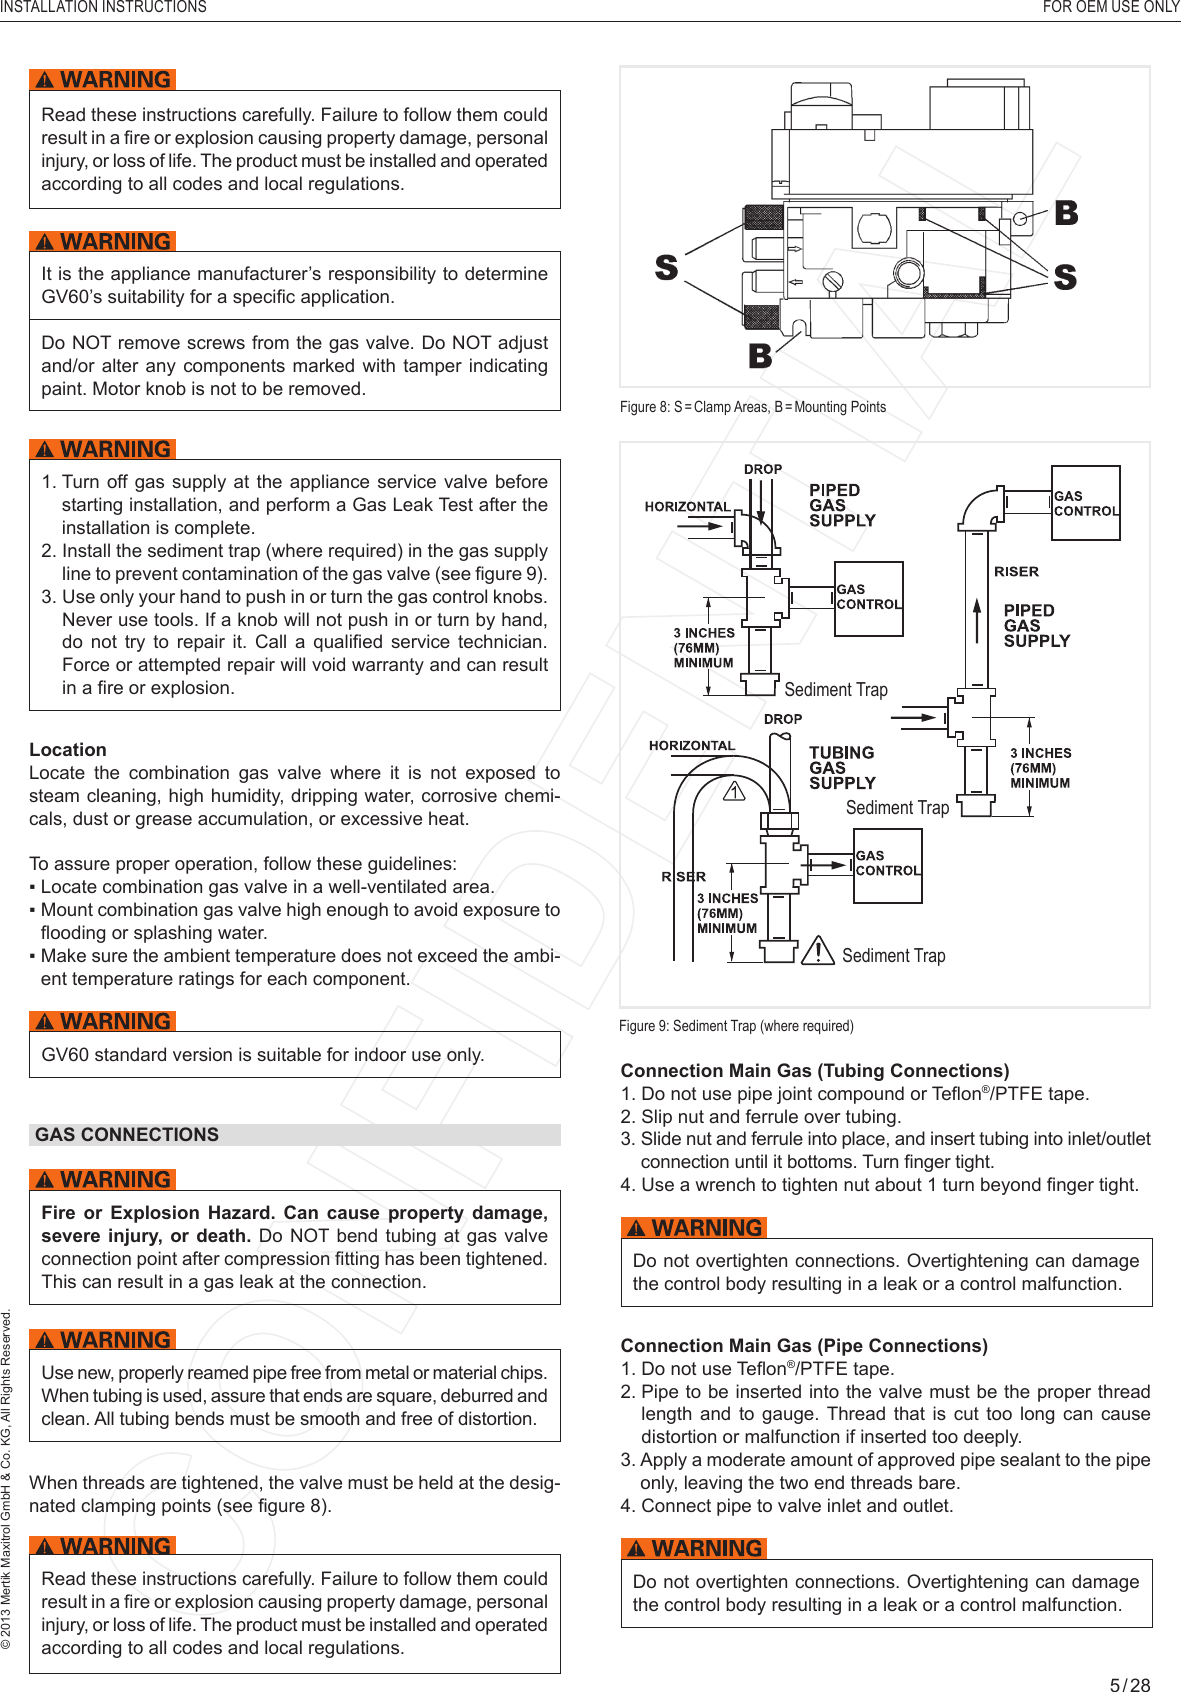
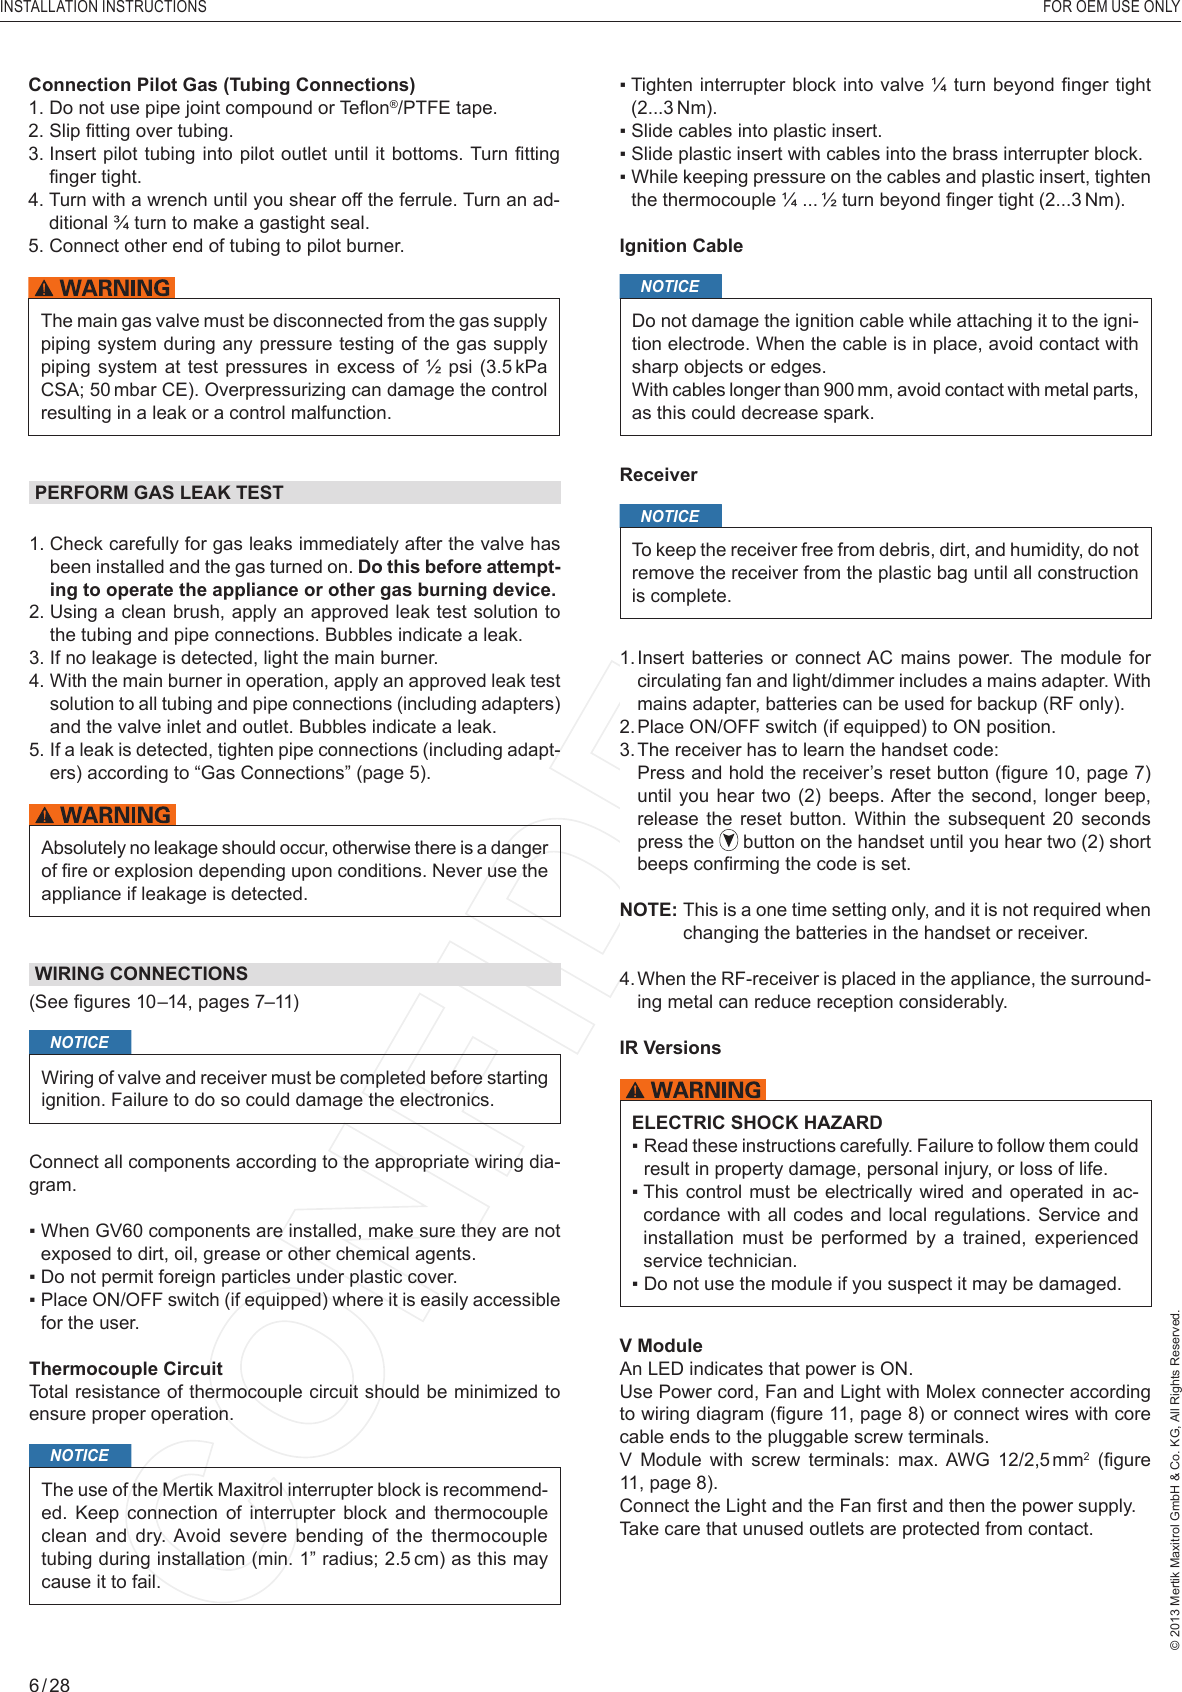
INSTALLATION INSTRUCTIONS   FOR OEM USE ONLY© 2013 Mertik Maxitrol GmbH & Co. KG, All Rights Reserved.5 / 281.  Turn off gas supply at the appliance service valve before starting installation, and perform a Gas Leak Test after the installation is complete.2.  Install the sediment trap (where required) in the gas supply line to prevent contamination of the gas valve (see fi gure 9).3.  Use only your hand to push in or turn the gas control knobs. Never use tools. If a knob will not push in or turn by hand, do  not  try  to  repair it.  Call  a  qualifi ed  service  technician. Force or attempted repair will void warranty and can result in a fi re or explosion.LocationLocate the combination gas valve where it is not exposed to steam cleaning, high humidity, dripping water, corrosive chemi-cals, dust or grease accumulation, or excessive heat. To assure proper operation, follow these guidelines:▪  Locate combination gas valve in a well-ventilated area. ▪   Mount combination gas valve high enough to avoid exposure to fl ooding or splashing water.▪  Make sure the ambient temperature does not exceed the ambi-ent temperature ratings for each component.GV60 standard version is suitable for indoor use only.GAS CONNECTIONSFire or Explosion Hazard. Can cause property damage, severe injury, or death. Do NOT bend tubing at gas valve connection point after compression fi tting has been tightened. This can result in a gas leak at the connection.Use new, properly reamed pipe free from metal or material chips. When tubing is used, assure that ends are square, deburred and clean. All tubing bends must be smooth and free of distortion.When threads are tightened, the valve must be held at the desig-nated clamping points (see fi gure 8). Read these instructions carefully. Failure to follow them could result in a fi re or explosion causing property damage, personal injury, or loss of life. The product must be installed and operated according to all codes and local regulations.It is the appliance manufacturer’s responsibility to determine GV60’s suitability for a specifi c application.Do NOT remove screws from the gas valve. Do NOT adjust and/or alter any components marked with tamper indicating paint. Motor knob is not to be removed.Figure 8:  S = Clamp Areas, B = Mounting PointsSediment TrapSediment TrapSediment TrapFigure 9: Sediment Trap (where required)Connection Main Gas (Tubing Connections)1.  Do not use pipe joint compound or Tefl on®/PTFE tape. 2. Slip nut and ferrule over tubing.3.  Slide nut and ferrule into place, and insert tubing into inlet/outlet connection until it bottoms. Turn fi nger tight. 4.  Use a wrench to tighten nut about 1 turn beyond fi nger tight.Do not overtighten connections. Overtightening can damage the control body resulting in a leak or a control malfunction.Connection Main Gas (Pipe Connections)1. Do not use Tefl on®/PTFE tape. 2.  Pipe to be inserted into the valve must be the proper thread length and to gauge. Thread that is cut too long can cause distortion or malfunction if inserted too deeply.3.  Apply a moderate amount of approved pipe sealant to the pipe only, leaving the two end threads bare. 4. Connect pipe to valve inlet and outlet.Do not overtighten connections. Overtightening can damage the control body resulting in a leak or a control malfunction.Read these instructions carefully. Failure to follow them could result in a fi re or explosion causing property damage, personal injury, or loss of life. The product must be installed and operated according to all codes and local regulations.
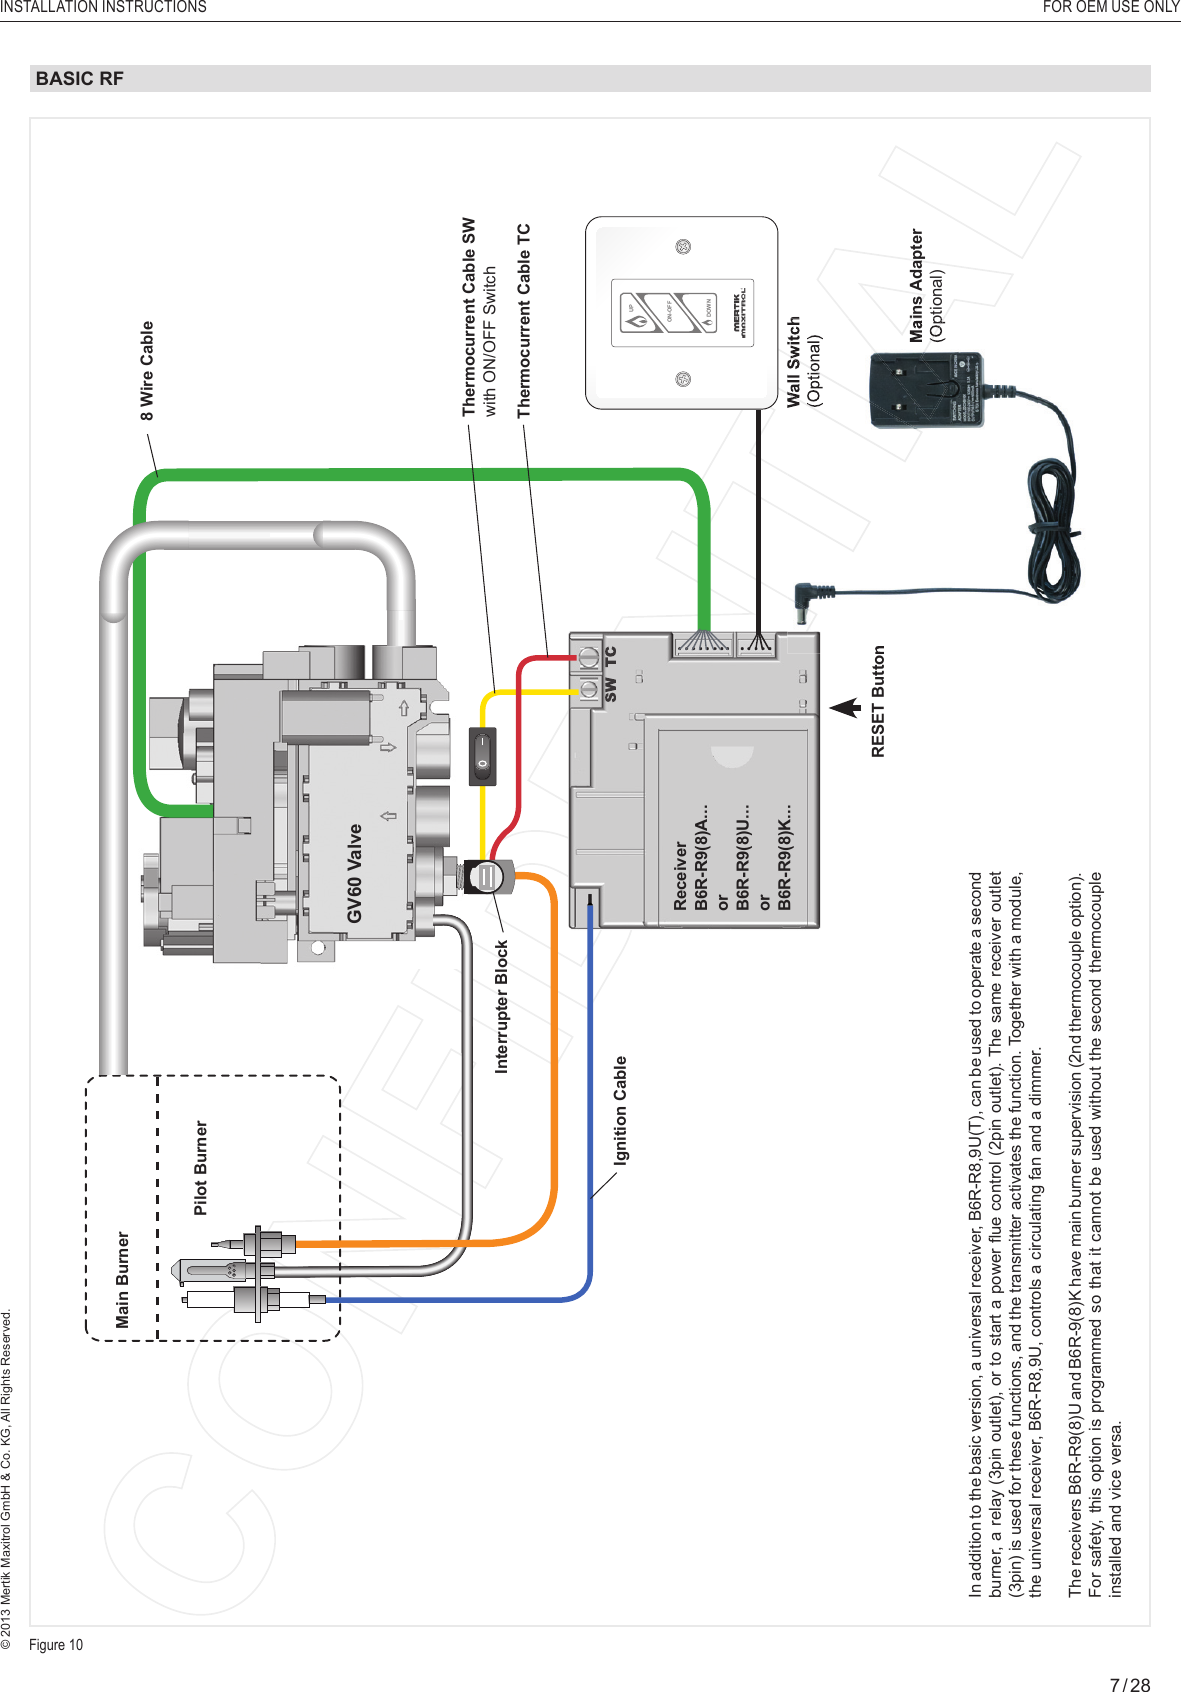
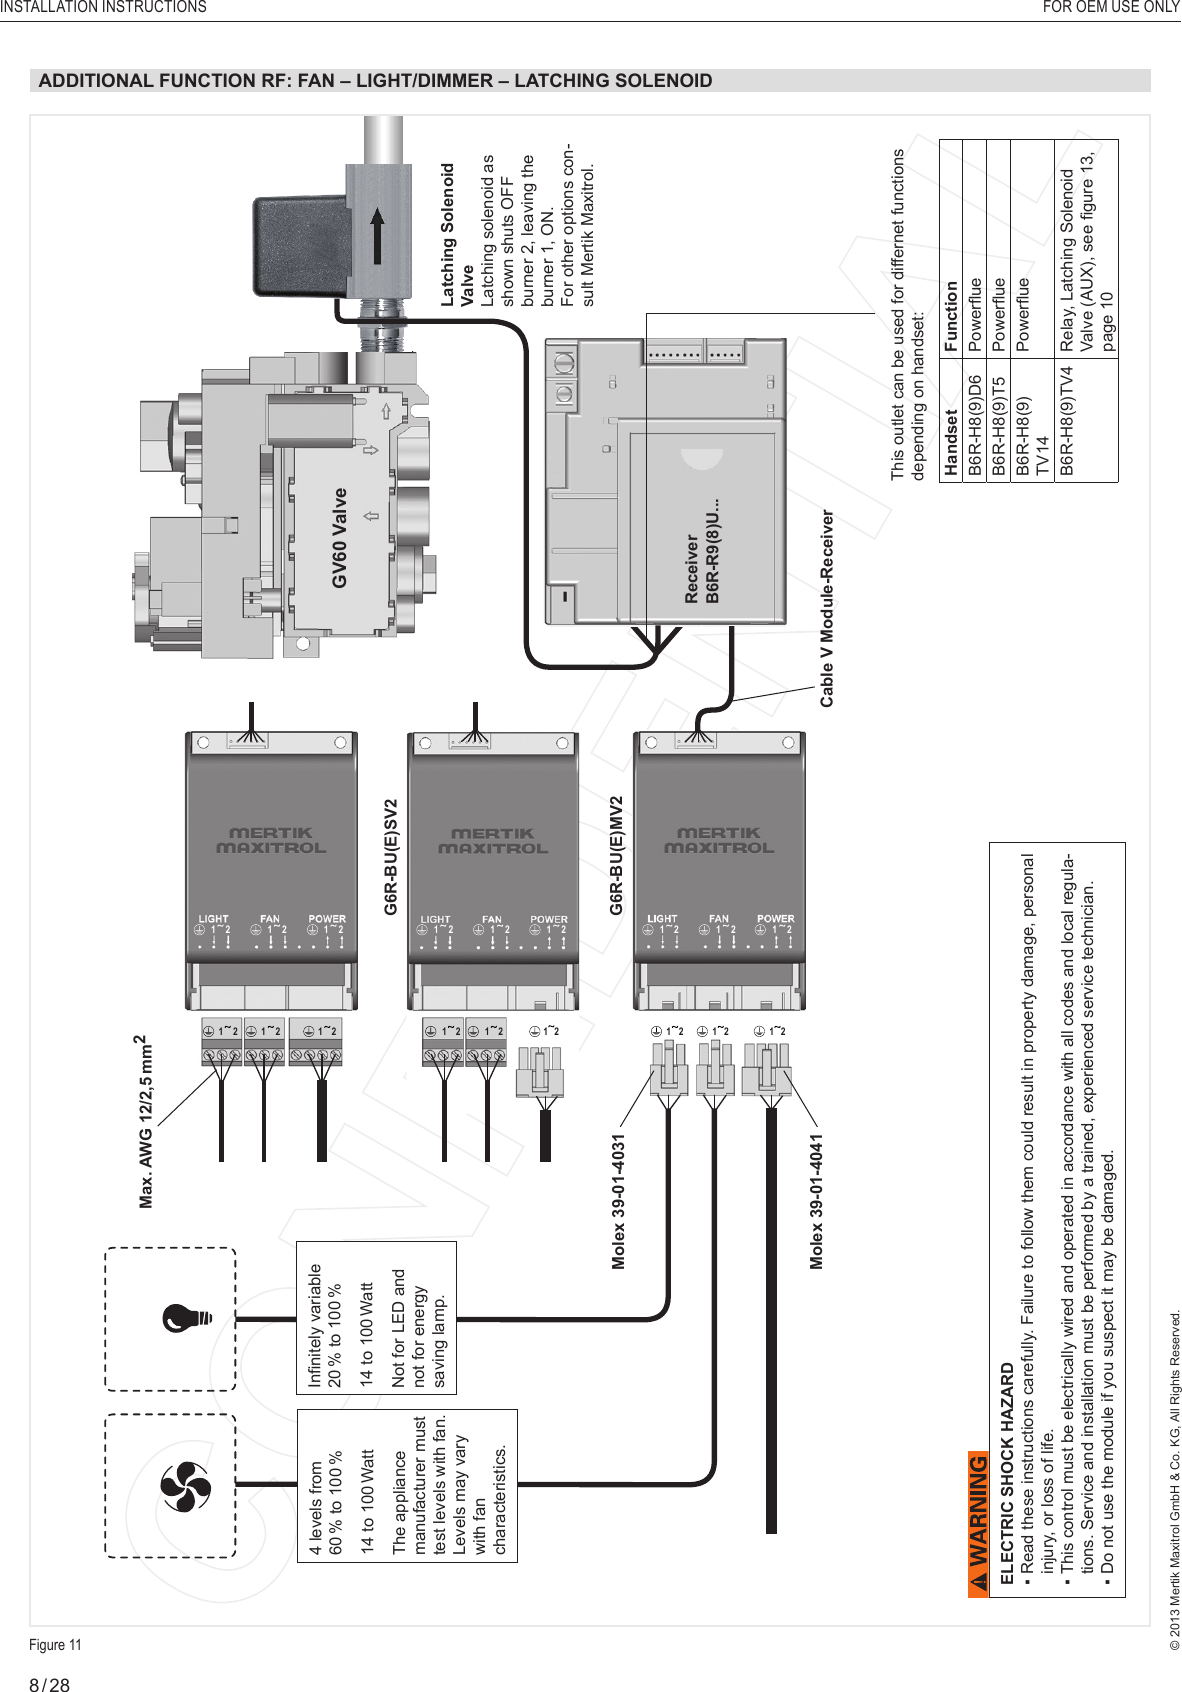
INSTALLATION INSTRUCTIONS   FOR OEM USE ONLY© 2013 Mertik Maxitrol GmbH & Co. KG, All Rights Reserved.6 / 28PERFORM GAS LEAK TEST1.  Check carefully for gas leaks immediately after the valve has been installed and the gas turned on. Do this before attempt-ing to operate the appliance or other gas burning device.2.  Using a clean brush, apply an approved leak test solution to the tubing and pipe connections. Bubbles indicate a leak.3.  If no leakage is detected, light the main burner.4.   With  the  main burner in operation, apply an approved leak test solution to all tubing and pipe connections (including adapters) and the valve inlet and outlet. Bubbles indicate a leak.5.  If a leak is detected, tighten pipe connections (including adapt-ers) according to “Gas Connections” (page 5).Absolutely no leakage should occur, otherwise there is a danger of fi re or explosion depending upon conditions. Never use the appliance if leakage is detected.▪  Tighten interrupter block into valve ¼  turn beyond fi nger tight (2...3 Nm).▪  Slide cables into plastic insert.▪  Slide plastic insert with cables into the brass interrupter block.▪  While keeping pressure on the cables and plastic insert, tighten the thermocouple ¼ ... ½ turn beyond fi nger tight (2...3 Nm).Ignition CableNOTICEDo not damage the ignition cable while attaching it to the igni-tion electrode. When the cable is in place, avoid contact with sharp objects or edges.With cables longer than 900 mm, avoid contact with metal parts, as this could decrease spark.ReceiverNOTICETo keep the receiver free from debris, dirt, and humidity, do not remove the receiver from the plastic bag until all construction is complete.1.  Insert  batteries or  connect AC  mains power. The module  for circulating fan and light/dimmer includes a mains adapter. With mains adapter, batteries can be used for backup (RF only).2.  Place ON/OFF switch (if equipped) to ON position.3. The receiver has to learn the handset code:   Press and hold the receiver’s reset button  (fi gure 10, page 7) until you  hear two  (2) beeps. After the  second, longer  beep, release  the  reset  button.  Within  the subsequent  20  seconds press the   button on the handset until you hear two (2) short beeps confi rming the code is set.NOTE:  This is a one time setting only, and it is not required when changing the batteries in the handset or receiver.4.  When the RF-receiver is placed in the appliance, the surround-ing metal can reduce reception considerably. IR VersionsELECTRIC SHOCK HAZARD▪  Read these instructions carefully. Failure to follow them could result in property damage, personal injury, or loss of life.▪  This control must  be  electrically wired and operated in  ac-cordance with all codes and local regulations. Service and installation must be performed by a trained, experienced service technician.▪  Do not use the module if you suspect it may be damaged. V ModuleAn LED indicates that power is ON.Use Power cord, Fan and Light with Molex connecter according to wiring diagram (fi gure 11, page 8) or connect wires with core cable ends to the pluggable screw terminals.V Module with screw terminals: max. AWG 12/2,5 mm2  (fi gure 11, page 8).Connect the Light and the Fan fi rst and then the power supply.Take care that unused outlets are protected from contact.WIRING CONNECTIONS(See fi gures 10–14, pages 7–11) NOTICEWiring of valve and receiver must be completed before starting ignition. Failure to do so could damage the electronics.Connect all components according to the appropriate wiring dia-gram.▪  When GV60 components are installed, make sure they are not exposed to dirt, oil, grease or other chemical agents.▪  Do not permit foreign particles under plastic cover.▪  Place ON/OFF switch (if equipped) where it is easily accessible for the user.Thermocouple CircuitTotal resistance of thermocouple circuit should be minimized to ensure proper operation.NOTICEThe use of the Mertik Maxitrol interrupter block is recommend-ed. Keep connection of interrupter block and thermocouple clean and dry. Avoid severe bending of the thermocouple tubing during installation (min. 1” radius; 2.5 cm) as this may cause it to fail.Connection Pilot Gas (Tubing Connections)1.  Do not use pipe joint compound or Tefl on®/PTFE tape. 2. Slip fi tting over tubing.3.  Insert pilot tubing  into  pilot outlet until it bottoms. Turn fi tting fi nger tight. 4.  Turn with a wrench until you shear off the ferrule. Turn an ad-ditional ¾ turn to make a gastight seal.5. Connect other end of tubing to pilot burner.The main gas valve must be disconnected from the gas supply piping system during any pressure testing of the gas supply piping system at test pressures in excess of ½ psi (3.5 kPa CSA; 50 mbar CE). Overpressurizing can damage the control resulting in a leak or a control malfunction.
INSTALLATION INSTRUCTIONS   FOR OEM USE ONLY© 2013 Mertik Maxitrol GmbH & Co. KG, All Rights Reserved.7 / 28ON-OFFUPDOWNFigure 10BASIC RFPilot BurnerWall Switch (Optional)ReceiverB6R-R9(8)A...orB6R-R9(8)U... orB6R-R9(8)K...Thermocurrent Cable SWwith ON/OFF SwitchThermocurrent Cable TC8 Wire CableInterrupter BlockMains Adapter(Optional)Ignition Cable RESET ButtonGV60 ValveWall Switch Wall Switch (Optional)(Optional)Mains AdapterMains Adapter(Optional)(Optional) RESET ButtonIn addition to the basic version, a universal receiver, B6R-R8,9U(T), can be used to operate a second burner, a relay (3pin outlet), or to start a power fl ue control (2pin outlet). The same receiver outlet (3pin) is used for these functions, and the transmitter activates the function. Together with a module, the universal receiver, B6R-R8,9U, controls a circulating fan and a dimmer.The receivers B6R-R9(8)U and B6R-9(8)K have main burner supervision (2nd thermocouple option). For safety, this option is programmed so that it cannot be used without the second thermocouple installed and vice versa.Main Burner
INSTALLATION INSTRUCTIONS   FOR OEM USE ONLY© 2013 Mertik Maxitrol GmbH & Co. KG, All Rights Reserved.8 / 281 21 2 1 2 1 21 2 1 21 2 1 2 1 21 2 1 2 1 21 2 1 21 21 2 1 2 1 2Figure 11ReceiverB6R-R9(8)U...GV60 ValveCable V Module-ReceiverG6R-BU(E)SV2G6R-BU(E)MV2Molex 39-01-4031Molex 39-01-4041Max. AWG 12/2,5 mm2ELECTRIC SHOCK HAZARD▪  Read these instructions carefully. Failure to follow them could result in property damage, personal injury, or loss of life.▪  This control must be electrically wired and operated in accordance with all codes and local regula-tions. Service and installation must be performed by a trained, experienced service technician.▪  Do not use the module if you suspect it may be damaged. 4 levels from60 % to  100 %14 to 100 WattThe appliance manufacturer must test levels with fan. Levels may vary with fan characteristics.Infi nitely variable20 % to  100 %14 to 100 WattNot for LED andnot for energysaving lamp.This outlet can be used for differnet functions depending on handset:Handset FunctionB6R-H8(9)D6 Powerfl ue B6R-H8(9)T5 Powerfl ueB6R-H8(9)TV14Powerfl ueB6R-H8(9)TV4 Relay, Latching Solenoid Valve (AUX), see fi gure 13, page 10Latching SolenoidValveLatching solenoid as shown shuts OFF burner 2, leaving the burner 1, ON.For other options con-sult Mertik Maxitrol.ADDITIONAL FUNCTION RF: FAN – LIGHT/DIMMER – LATCHING SOLENOID
INSTALLATION INSTRUCTIONS   FOR OEM USE ONLY© 2013 Mertik Maxitrol GmbH & Co. KG, All Rights Reserved.9 / 28Figure 12▪  A 2nd thermocouple is placed in the main burner to check that the main gas is ignited within a certain time after opening.▪  The voltage will be measured T1 (22 sec) after the motor has turned in high fi re direction (after ignition and after increasing fl ame height).▪  If the voltage is lower than 1.8 mV, the electronics shut off the gas completely.▪  A new start is blocked for T2, which is 2 minutes after ignition failure and 1 minute after failure while opening main gas.▪  Receivers for 2nd thermocouple are identifi ed with a yellow sticker on the back. They will not operate without the thermocouple connected. Other versions will not operate if the thermocouple is connected.▪  The 2nd thermocouple function is certifi ed as safety level “B” according to EN 13611.▪  To use Wall Switch, Switch Panel or External Operation Cable, the additional cable G60-ZCTCR/2000 is needed.Installation steps1.  Remove cable G60-ZCTC/2000 and replace with cable G60-ZCTCR/2000.2.  Insert the Molex crimp terminal into the open connector hole of the plug. Listen for a "click".3.  Insert the insulated receptacle into the insulated 2nd thermocouple terminal.4. Insert the plug connector into the receiver (see fi gure 2).NOTICETo connect the 2nd thermocouple make sure that the insulated connector is connected to the con-nection cable. The non-insulated connector must be connected to the ground cable.RF 2ND THERMOCOUPLE OPTION2nd thermocoupleReceiverG6R-R3(4)AUTG6R-R3(4)AKTG6R-R3(4)UTG6R-R3(4)KTMain BurnerCable for 2nd thermocouple (insulated)G60-ZCTCR / 2000 orG60-ZCTC / 2000Ground cable (non-uninsulated)GV60 valveinsulatednon-insulated
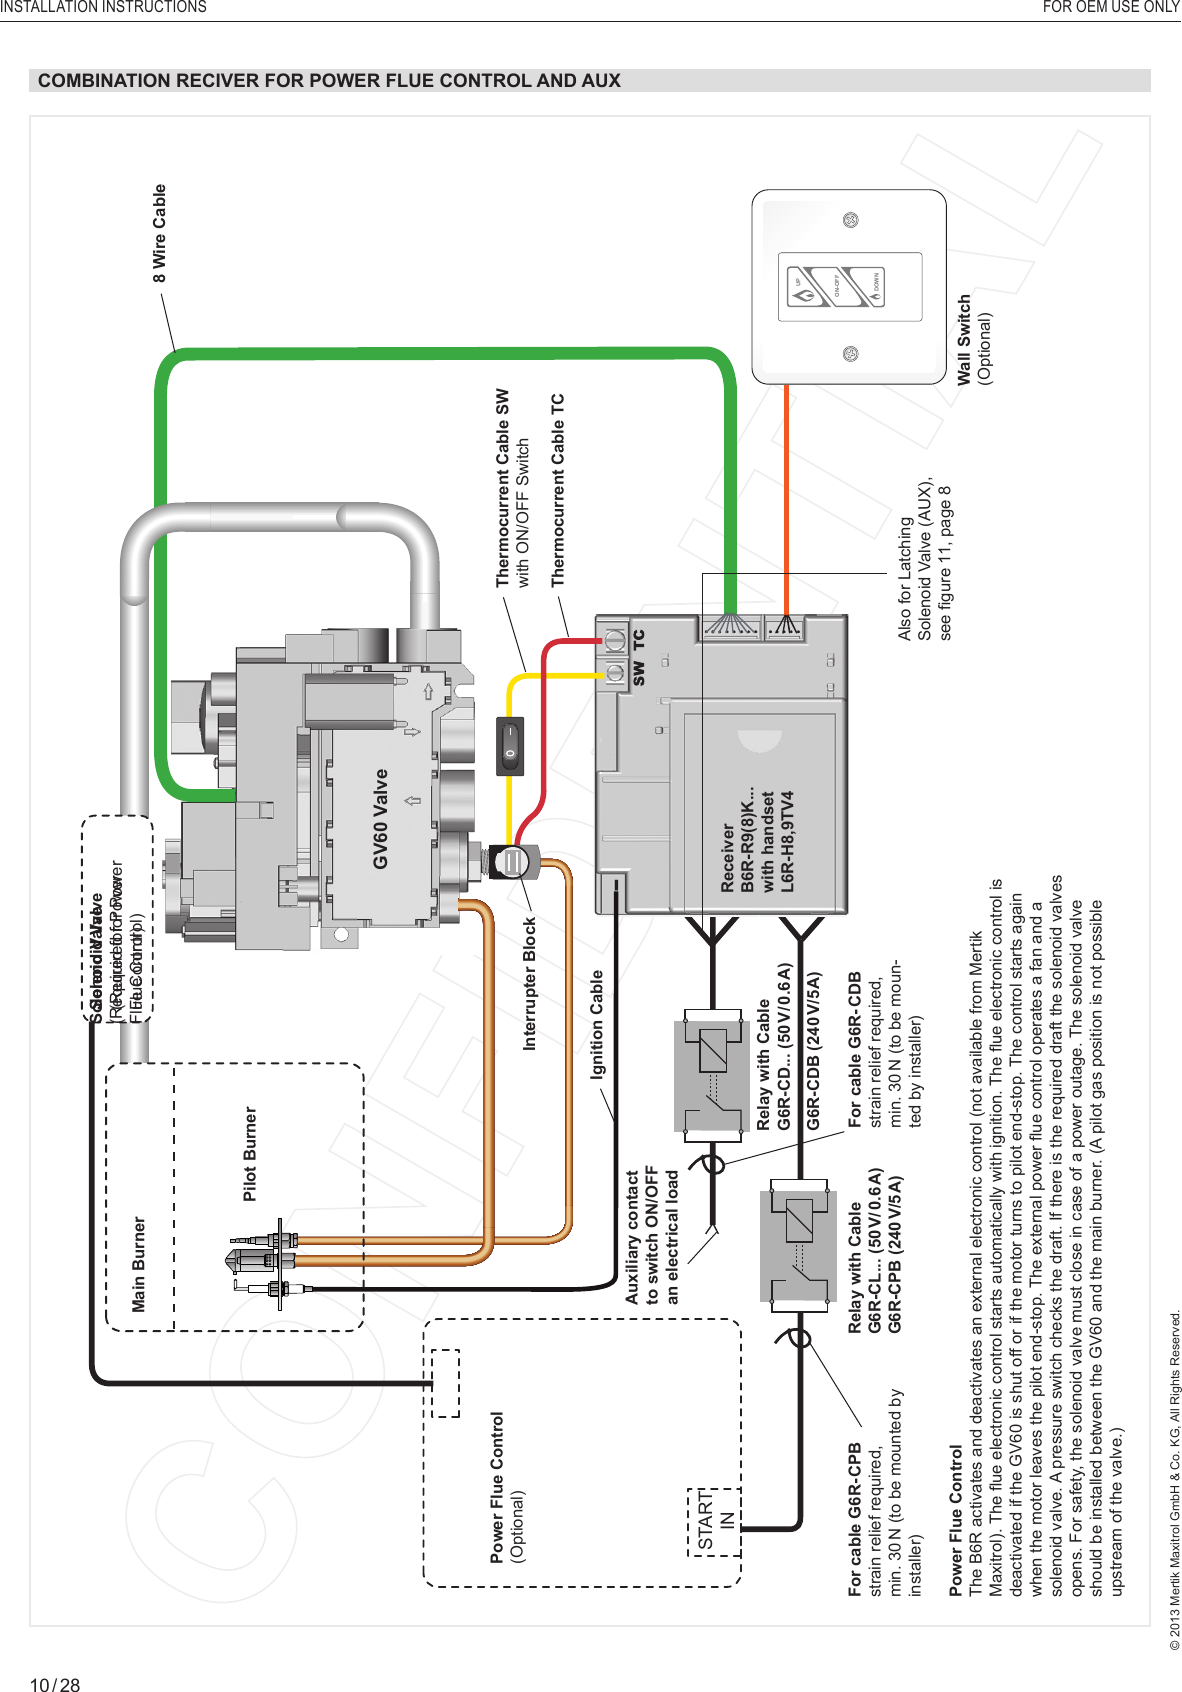
INSTALLATION INSTRUCTIONS   FOR OEM USE ONLY© 2013 Mertik Maxitrol GmbH & Co. KG, All Rights Reserved.10 / 28ON-OFFUPDOWNRelay with CableG6R-CD... (50 V/ 0.6 A)G6R-CDB (240 V/5 A)START INPilot BurnerSolenoid Valve(Required for Power Flue Control)Wall Switch(Optional)Power Flue Control(Optional)ReceiverB6R-R9(8)K...with handsetL6R-H8,9TV4Thermocurrent Cable SWwith ON/OFF SwitchThermocurrent Cable TC8 Wire CableInterrupter BlockIgnition CableCOMBINATION RECIVER FOR POWER FLUE CONTROL AND AUXRelay with CableG6R-CL... (50 V/ 0.6 A)G6R-CPB (240 V/5 A)GV60 ValveFor cable G6R- CPB strain relief required, min. 30 N (to be mounted by installer)Auxiliary contact to switch ON/OFF an electrical loadMain BurnerFor cable G6R- CDB strain relief required, min. 30 N (to be moun-ted by installer) Also for Latching Solenoid Valve (AUX), see fi gure 11, page 8Power Flue ControlThe B6R activates and deactivates an external electronic control (not available from Mertik Maxitrol). The fl ue electronic control starts automatically with ignition. The fl ue electronic control is deactivated if the GV60 is shut off or if the motor turns to pilot end-stop. The control starts again when the motor leaves the pilot end-stop. The external power fl ue control operates a fan and a solenoid valve. A pressure switch checks the draft. If there is the required draft the solenoid valves opens. For safety, the solenoid valve must close in case of a power outage. The solenoid valve should be installed between the GV60 and the main burner. (A pilot gas position is not possible upstream of the valve.)Solenoid Valve(Required for Power Flue Control)Main Burner
INSTALLATION INSTRUCTIONS   FOR OEM USE ONLY© 2013 Mertik Maxitrol GmbH & Co. KG, All Rights Reserved.11 / 28Pilot Flame Adjustment(Vented Units Only)The  pilot fl ow adjustment  is  preset to  maximum at  the  factory. The pilot fl ame should envelope ⅜” to ½” of the thermocouple – vented only (see fi gure 16).1.  The adjustment screw can be reached through a hole in the MANUAL knob (see fi gure 15).2.  Turn the MANUAL knob to the ON position.3.  It is now possible to pierce through a fi lm on the cover with a screwdriver to reach the adjustment screw beneath.4.  Turn the adjustment screw clockwise   to decrease or counterclockwise   to increase pilot fl ame.Outlet Pressure Adjustment(Vented Units Only)STANDARD REGULATOR OR THROTTLE(Throttle CE only)1.  Connect a pressure manometer to the valve outlet pressure tap. Pressure tap is opened by turning the screw counterclock-wise  .   Pressure regulator or throttle are located under the cover and can be reached by removing the plug (see fi gures 16 and 18).2.  Turn MANUAL knob and main valve knob to the ON position.3.  Turn  pressure  regulator  adjustment  screw  to  set  required burner pressure  (high fi re). Pressure  is increased by turning clockwise   (pressure regulator models), or decreased by turning counterclockwise  .Vented Gas AppliancesFigure 16: Proper Flame Impingement on Thermocouple⅜ to ½ in.(10 to13 mm)ThermocoupleFigure 15: GV60, Connections and Adjustment OptionsSide OutletSide InletMain Valve Knob MANUAL KnobBottom OutletBottom InletPressure Regulator(remove plug fi rst)Inlet Pressure TapOutlet Pressure TapPilot Gas AdjustmentScrew (turn with screwdriver)Magnet UnitMinimum Rate Orifi ceConnection Piezo IgniterTab 2.8 x 0.8 mmNOTE:  Throttle model’s pressure is increased by turning coun-terclockwise  ;  or  decreased  by  turning  clockwise .4. After adjustment, replace the plug.5.  If no other adjustments are required, close pressure tap(s) by turning the screw(s) full clockwise  .  Check all connections/pressure tap(s) for leaks.6.  If  the desired  outlet pressure  or  fl ow  cannot be  achieved by adjusting the gas valve, check the gas valve inlet pressure us-ing  a  manometer  at  the  valve  inlet  pressure  tap.  If  the  inlet pressure is in the normal range, replace the gas valve; other-wise, take necessary steps to assure proper gas pressure to the valve.CONVERTIBLE PRESSURE REGULATOR(Optional)Convertible regulators are designed to deliver either of two fi xed outlet  pressures  for  Natural  Gas  (NG)  or  LP  Gas.  To  change from one gas to the other, turn the conversion plug (see fi gure 18) counter clockwise to remove. Unsnap and remove the plas-tic part, rotate it 180°, and then slide it back on the conversion plug until it snaps. Turn the conversion plug clockwise until it bottoms out. Gas control knobs function as follows (see fi gure 15):KNOB POSITION FUNCTIONMain valve OFFPrevents main gas fl ow through valve.Main valve ONPermits main gas fl ow through valve if the pilot is lit and thermocouple is generating suffi cient power.MANUAL knob MANAllows the pilot to be manually ignited and prevents main gas fl o w .MANUAL knob ON Allows for automatic ignition.GAS CONTROL KNOB SETTINGSADJUSTMENTFigure 17: Combination Control GV60, CoverPressure Regulator or Throttle(remove plug fi rst)It is the appliance manufacturer’s responsibility to determine GV60’s suitability for a specifi c application.Do not attempt to remove screws from the top of gas valve. Do not change any adjustments marked with tamper indicating paint. Motor knob is not to be removed.
INSTALLATION INSTRUCTIONS   FOR OEM USE ONLY© 2013 Mertik Maxitrol GmbH & Co. KG, All Rights Reserved.12 / 28FINAL CHECKObserve several complete ON/OFF cycles to ensure proper op-eration. During these cycles the electronics will determine the optimum ignition sequence timing.1.  STOP! Read the safety information included before proceeding.2.  Turn main valve knob to the OFF, full clockwise   position.3.  Place ON/OFF switch (if equipped) to the O (OFF position).4.   Wait  a minimum of fi ve (5) minutes to clear out any gas. Verify that no gas is in the area around the appliance, including near the fl oor. If you detect gas STOP! Follow “What to do if you smell gas” in the safety information (page 2). If no gas  is present, proceed according to the Mertik Maxitrol Operating Instructions.Minimum Gas Flow Adjustment (Vented Units Only)1.  Set the control into low fi re setting by turning the motor knob to OFF position and back until the valve opens.2.  The minimum rate can be set either by screwing in a calibrated minimum rate screw (fi xed orifi ce) or an adjustable minimum rate screw. Controls with adjustable screws without a custom-er specifi c setting are factory set at maximum fl ow.3.  Turn the screw clockwise   to decrease the minimum fl o w .4.  Care should be taken to screw the fi xed orifi ce until it stops.5.  Close  pressure  tap(s)  by  turning  the  screw(s)  full  clockwise . Check all connections/pressure tap(s) for leaks.Changing the Fuel Type (Vented Units Only)GV60 is suitable for all gas types and can be converted to meet the manufacturer’s requirements for a specifi c gas type. Adjust-ments of pressure regulator, minimum rate and pilot gas are according to above-mentioned instructions. To convert for LPG CE it is necessary to block the pressure regulator by turning the regulator adjustment screw fully to the bottom limit (or the throttle adjustment screw fully to the upper limit). Figure 18: Conversion from one gas to anotherConversion PlugFire or explosion hazard. Attempted disassembly or repair can cause property damage, severe injury or death. Do not disas-semble the gas valve; it contains no serviceable components.Natural Gas: NG positionLiquefi ed Petroleum Gas: LP position180°
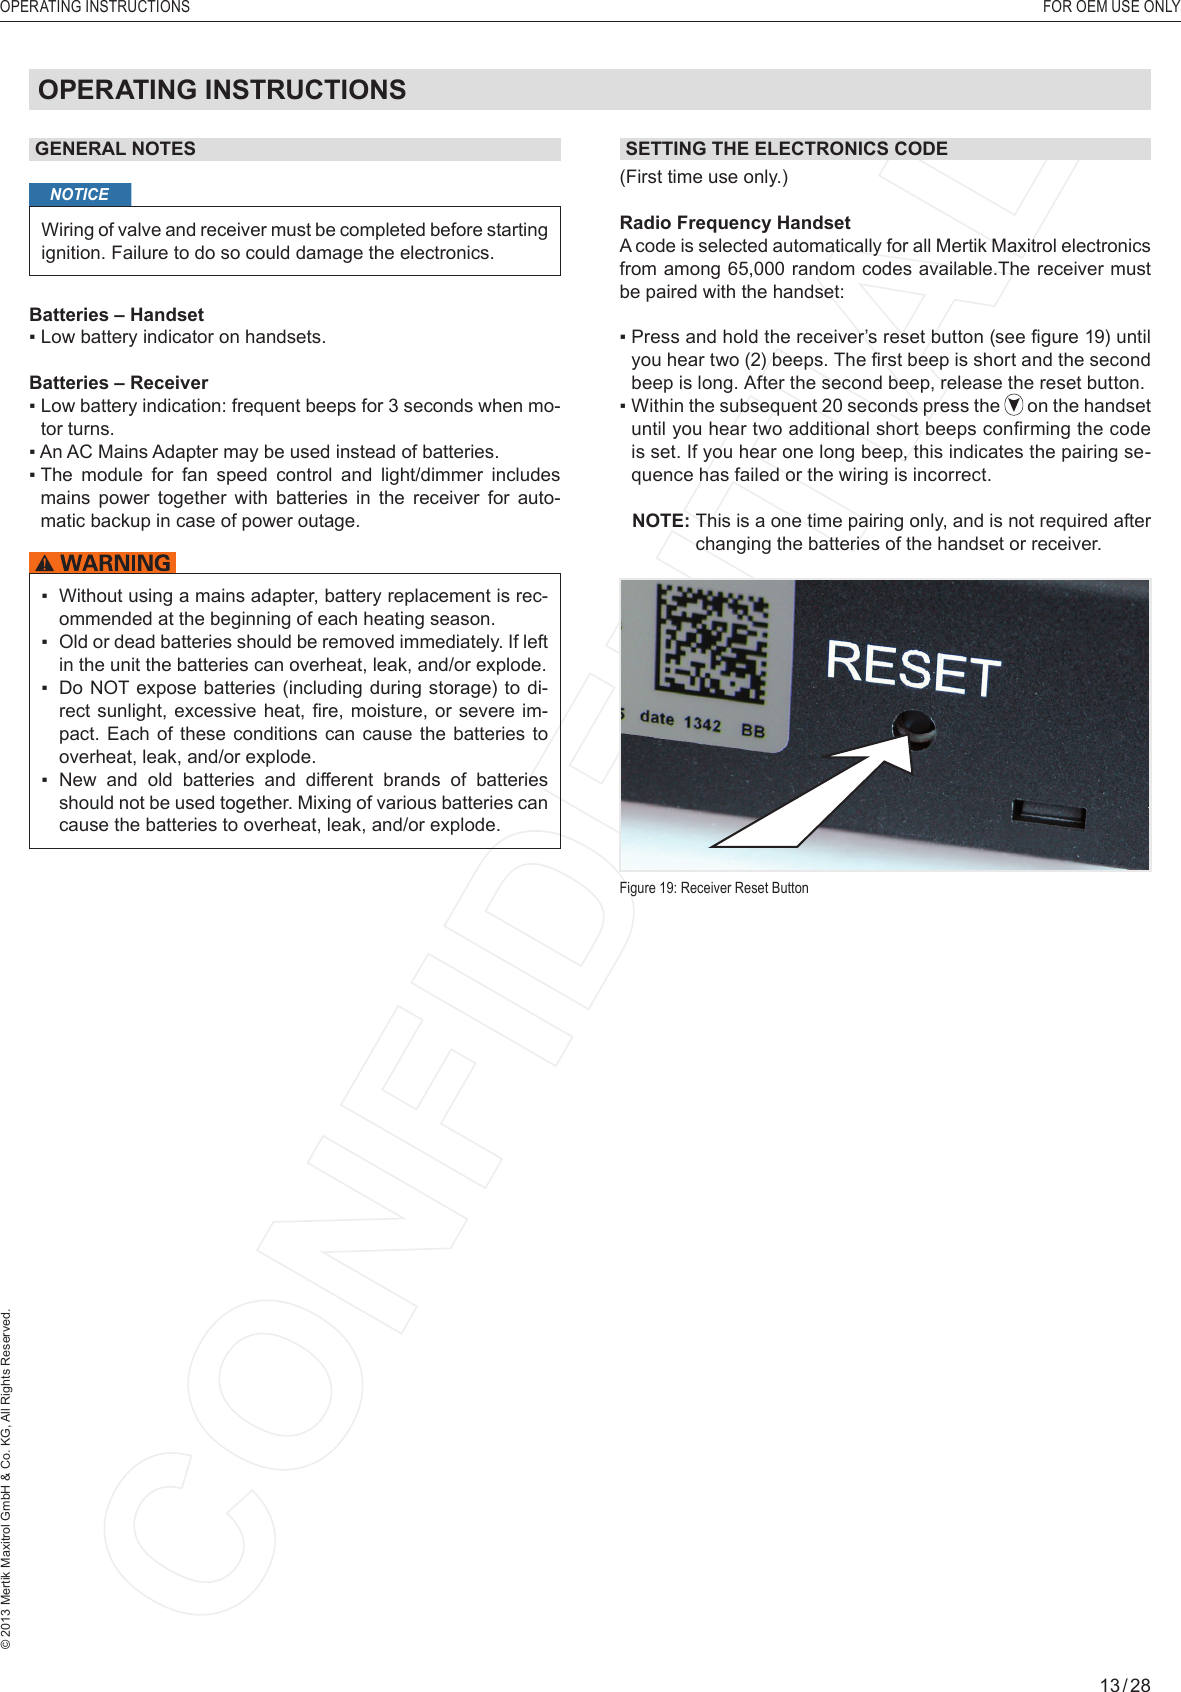
OPERATING INSTRUCTIONS  FOR OEM USE ONLY© 2013 Mertik Maxitrol GmbH & Co. KG, All Rights Reserved.13 / 28SETTING THE ELECTRONICS CODE(First time use only.)Radio Frequency HandsetA code is selected automatically for all Mertik Maxitrol electronics from among 65,000 random codes available.The receiver must be paired with the handset:▪  Press and hold the receiver’s reset button (see fi gure 19) until you hear two (2) beeps. The fi rst beep is short and the second beep is long. After the second beep, release the reset button.▪  Within the subsequent 20 seconds press the   on the handset until you hear two additional short beeps confi rming the code is set. If you hear one long beep, this indicates the pairing se-quence has failed or the wiring is incorrect. NOTE:  This is a one time pairing only, and is not required after changing the batteries of the handset or receiver.Figure 19: Receiver Reset ButtonGENERAL NOTESNOTICEWiring of valve and receiver must be completed before starting ignition. Failure to do so could damage the electronics.Batteries – Handset▪  Low battery indicator on handsets.Batteries – Receiver▪  Low battery indication: frequent beeps for 3 seconds when mo-tor turns.▪  An AC Mains Adapter may be used instead of batteries.▪  The  module  for  fan  speed  control  and  light/dimmer  includes mains power together with batteries in the receiver for auto-matic backup in case of power outage.OPERATING INSTRUCTIONS▪   Without using a mains adapter, battery replacement is rec-ommended at the beginning of each heating season.▪   Old or dead batteries should be removed immediately. If left in the unit the batteries can overheat, leak, and/or explode.▪   Do NOT expose batteries (including during storage) to di-rect sunlight, excessive heat,  fi re, moisture, or severe  im-pact. Each of these conditions can cause the batteries to overheat, leak, and/or explode.▪   New  and  old  batteries  and  different  brands  of  batteries should not be used together. Mixing of various batteries can cause the batteries to overheat, leak, and/or explode.
OPERATING INSTRUCTIONS    FOR OEM USE ONLY© 2013 Mertik Maxitrol GmbH & Co. KG, All Rights Reserved.14 / 28SETTING CELSIUS OR FAHRENHEIT1  2ONAMPMOFFTo change between °C and °F, press   and   buttons simultaneously.NOTE:  Choosing °F results in a 12 hour clock. Choosing °C results in a 24 hour clock.SETTING THE TIME1  2ONAMPMOFF1.   Press   and   buttons simultane-ously. Hour fl ashes.2.   To select hour press   or   button.3.   Press   and   buttons simultane-ously. Minutes fl ash.4.   To select minutes press   or   but-ton.5.  To confi rm press   and   buttons simultaneously or wait.MANUAL MODE (HANDSET)NOTICEBEFORE OPERATING1.  Make sure MANUAL knob on the GV60 Valve is in the ON, full counterclockwise   position. 2.  Place the ON/OFF switch (if equipped) in the “I” (ON position).TO TURN ON FIRE When pilot ignition is confi rmed, motor turns automatically to maximum fl ame height.1  2ONAMPMOFFHandset▪   Press   button until a short beep con-fi rms  the  start  sequence  has  begun; release button. ▪   Beeps continue while ignition is in pro-cess.▪   Rotating circle is shown on display un-til ignition sequence is complete.▪   Main  gas  fl ows once pilot ignition is confi rmed.▪   Handset automatically goes into Man-ual mode after main burner ignition.If the pilot does not stay lit after several tries, turn the main valve knob to OFF and follow the instructions “TURN OFF GAS TO APPLIANCE” (page 28).Standby Mode (Pilot Flame)Handset▪  Press and hold   button to set appliance to pilot fl ame.4-SYMBOLFigure 20: 4-symbol DisplayTemperatureCountdown TimerBattery StatusSignal Indicator Child ProofAMPMTime°F or °C
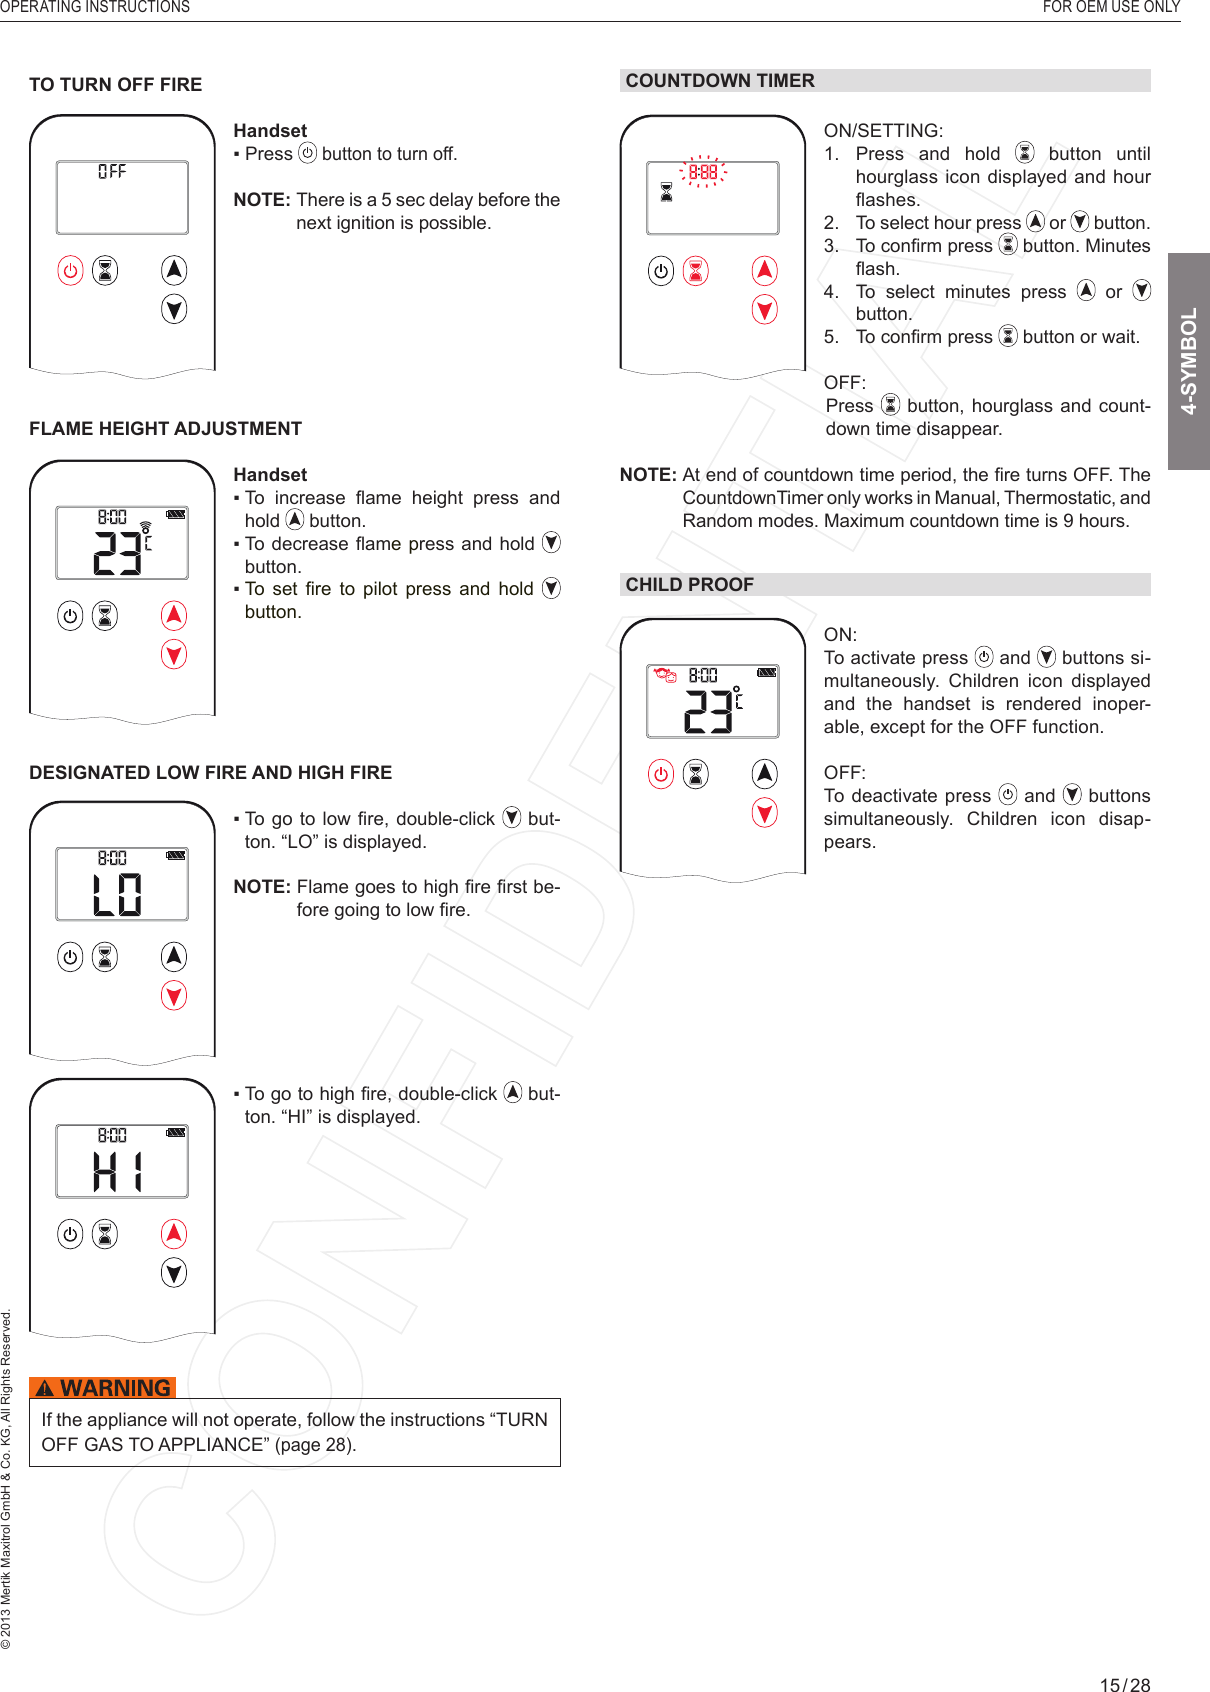
OPERATING INSTRUCTIONS  FOR OEM USE ONLY© 2013 Mertik Maxitrol GmbH & Co. KG, All Rights Reserved.15 / 284-SYMBOLTO TURN OFF FIRE1  2ONAMPMOFFHandset▪  Press   button to turn off.NOTE:    There is a 5 sec delay before the next ignition is possible.FLAME HEIGHT ADJUSTMENT1  2ONAMPMOFFHandset▪   To  increase  fl ame  height  press  and hold   button.▪  To decrease fl ame press and hold   button.▪  To  set  fi re  to  pilot  press  and  hold  button.DESIGNATED LOW FIRE AND HIGH FIREAM▪   To go to  low  fi re, double-click   but-ton. “LO” is displayed.NOTE:  Flame goes to high fi re fi rst be-fore going to low fi re.AM▪   To go to high fi re, double-click   but-ton. “HI” is displayed.If the appliance will not operate, follow the instructions “TURN OFF GAS TO APPLIANCE” (page 28).COUNTDOWN TIMER1  2ONAMPMOFFON/SETTING: 1.  Press and hold   button until hourglass icon displayed and hour fl a s h e s .  2.   To select hour press   or   button.3.  To confi rm press  button. Minutes fl ash.4.    To select minutes press   or   button.5.  To confi rm press   button or wait.OFF:       Press  button,  hourglass and count-down time disappear.NOTE:  At end of countdown time period, the fi re turns OFF. The CountdownTimer only works in Manual, Thermostatic, and Random modes. Maximum countdown time is 9 hours.CHILD PROOF1  2ONAMPMOFFON: To activate press   and   buttons si-multaneously. Children icon displayed and the handset is rendered inoper-able, except for the OFF function.OFF: To deactivate press   and   buttons simultaneously. Children icon disap-pears.

Navigation menu