Lee Technology Korea LT2009B ALPHA COASTER PAGER User Manual
Lee Technology Korea Co., Ltd. ALPHA COASTER PAGER Users Manual
UserManual.wiki
>
Lee Technology Korea
>
LT2009B User Manual
Users Manual
Navigation menu
Upload a User Manual
Namespaces
Wiki Guide
HTML
PDF
Info
Views
User Manual
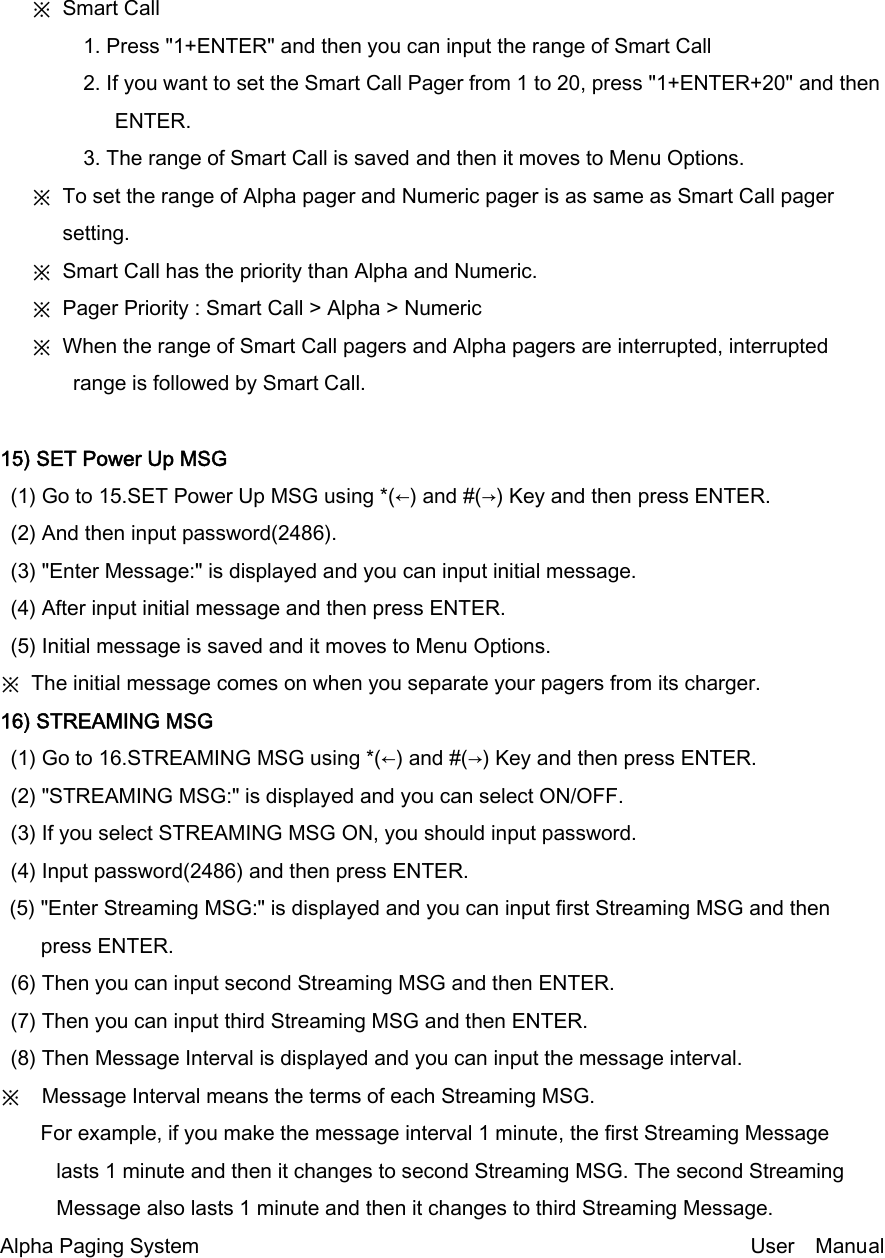
Discussion / Help
Navigation
![fax +82-32-324-9840 fax +1-678-218-0991 Alpha Paging System User Manual [ Alpha & Serial Transmitter Version ] Ⅰ. PREFACE Pager transmitter is the desktop paging system capable of addressing more than 1000 pagers with Alpha message or Numeric message. Ⅱ. TURNING THE TX ON/OFF & PAGER NUMBER SETUP 1. TX POWER ON/OFF * Plug the Pager Transmitter A/C Adaptor into the Pager Transmitter and then into a standard 110 outlet. * And the initial LCD screen is as below. 2. PAGER NUMBER SETUP * Press SETUP and then input operational password(2580) and then ENTER * Go to 14. PAGER TYPE SET-UP using *(←) and #(→) Key and then ENTER * Now, 3 kinds of Pager type is displayed as below. PAGER TYPE(1-3):1 1. Smart Call 2. Alpha 3. Numeric 1) Smart Call Pager Setup * If you want to setup the number of Smart Call pagers, press "1+ENTER" * And then, you should specify the range of Smart Call Pagers. * For example, if you want to set 30 Smart Call Pagers at the range of 1-30, input "1+ENTER+30+ENTER" 2) Alpha Pager Setup * If you want to setup the number of Alpha pagers, press "2+ENTER" * And then you should specify the range of Alpha Pagers.](https://usermanual.wiki/Lee-Technology-Korea/LT2009B/User-Guide-1081110-Page-2.png)