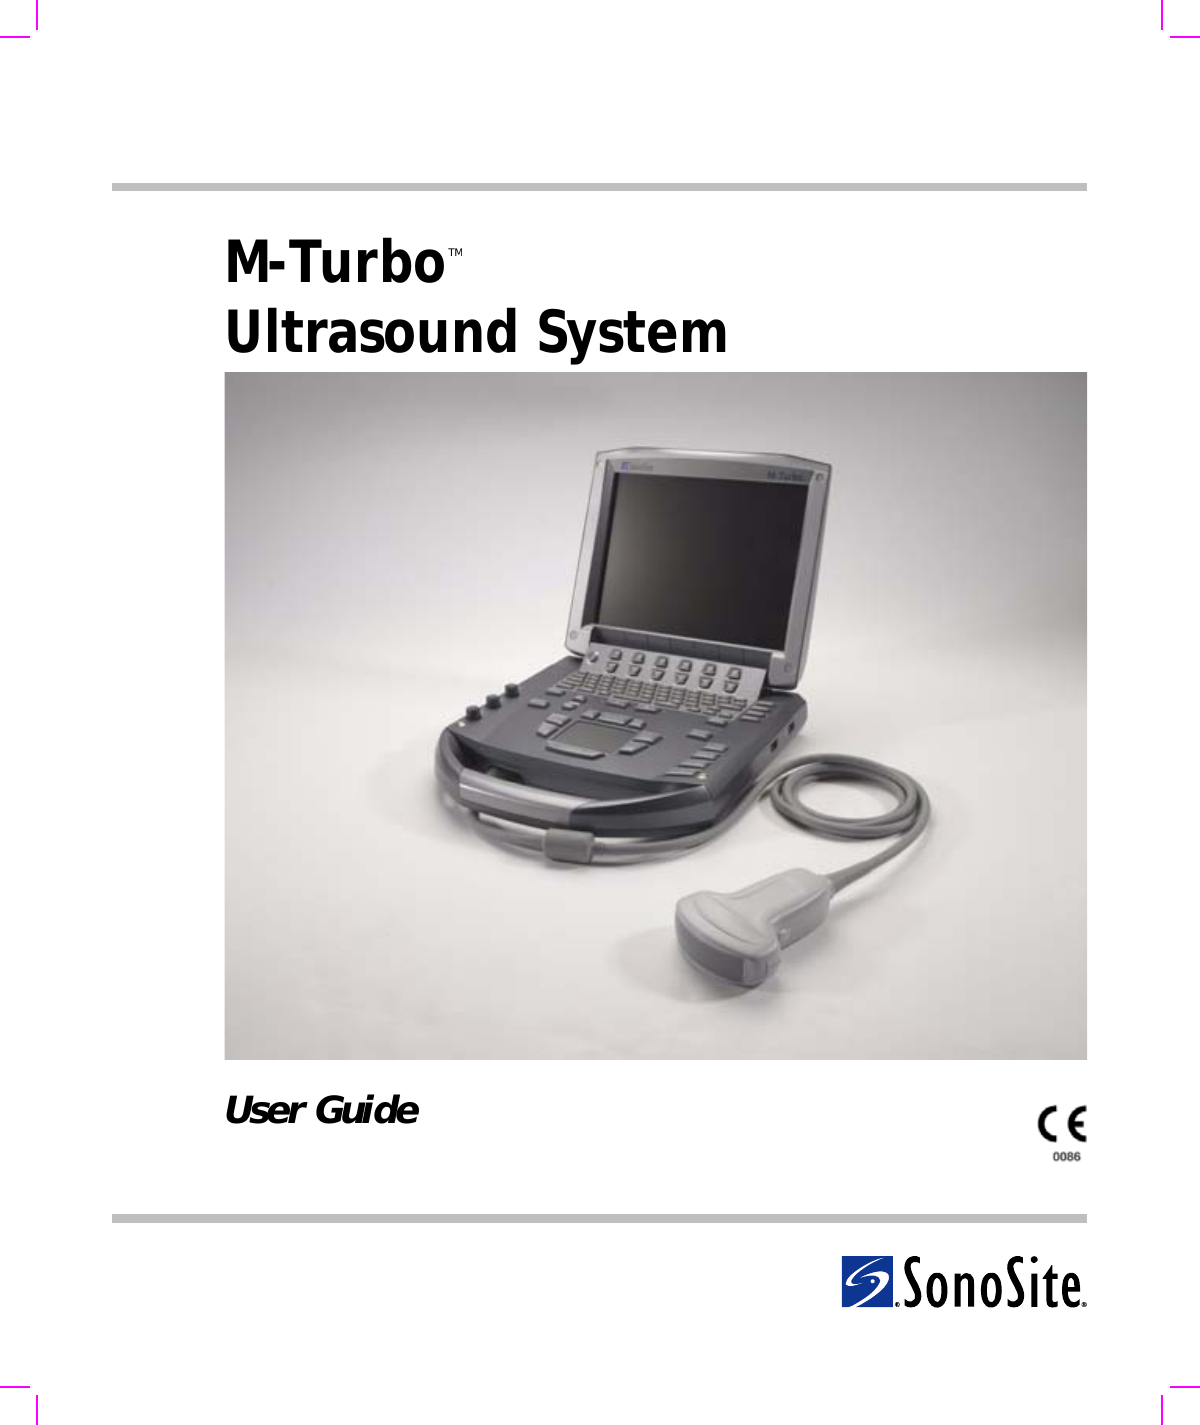
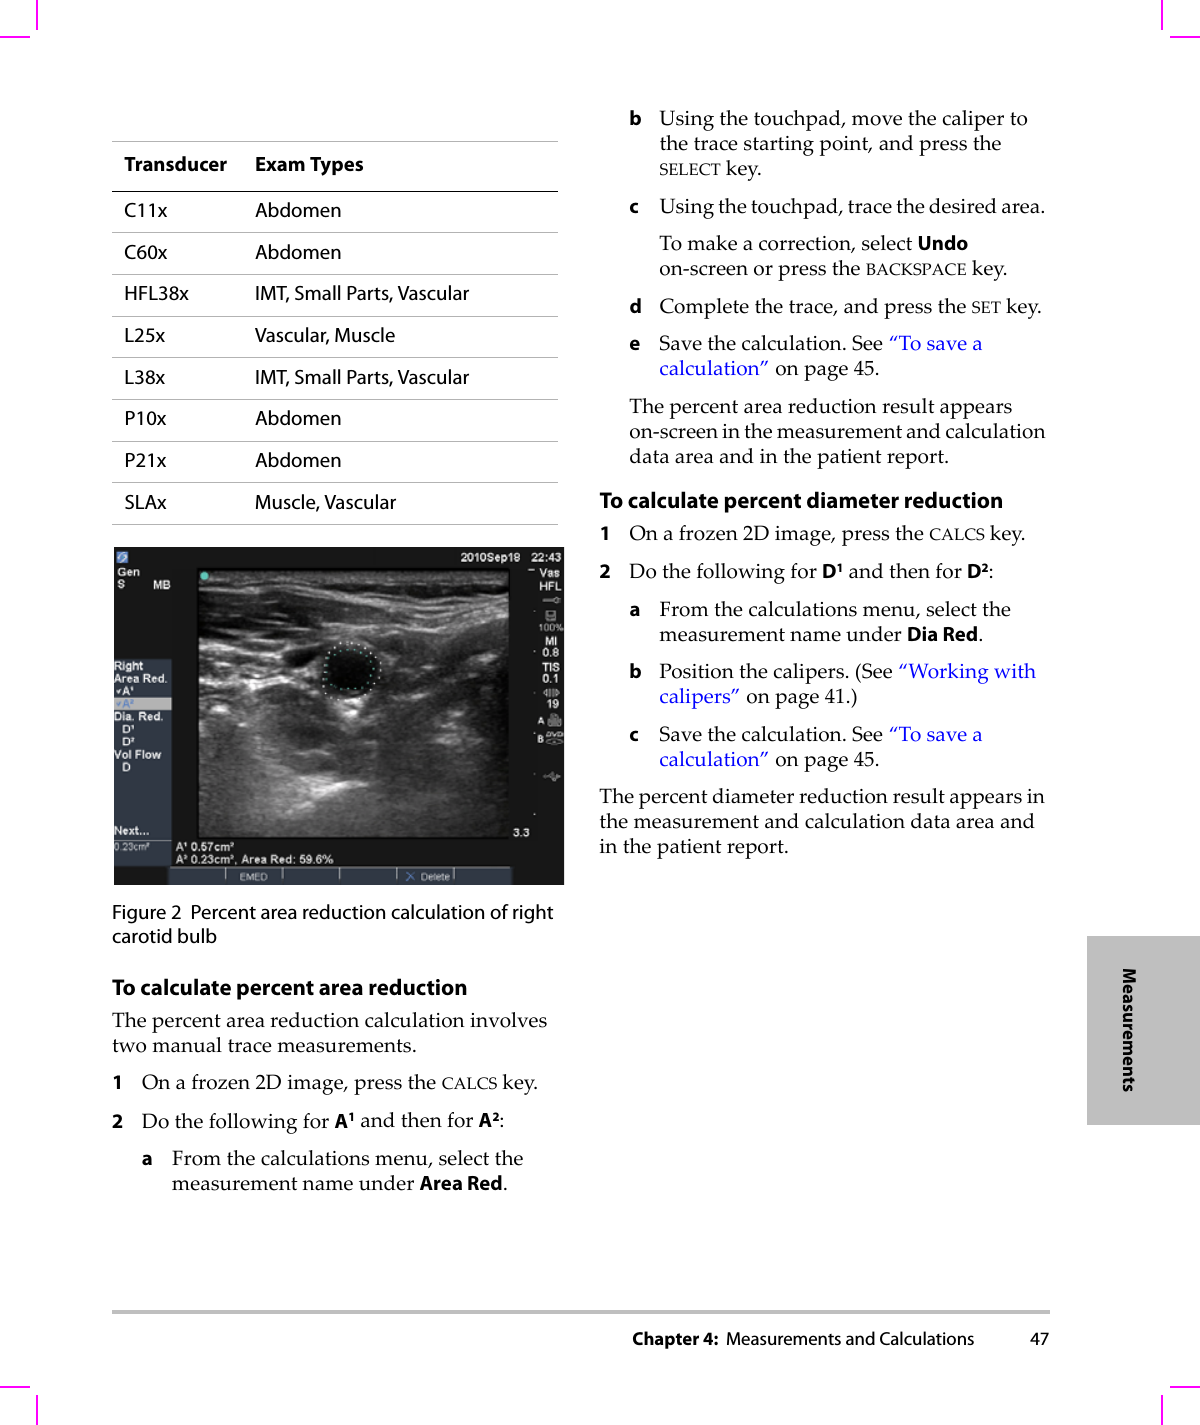
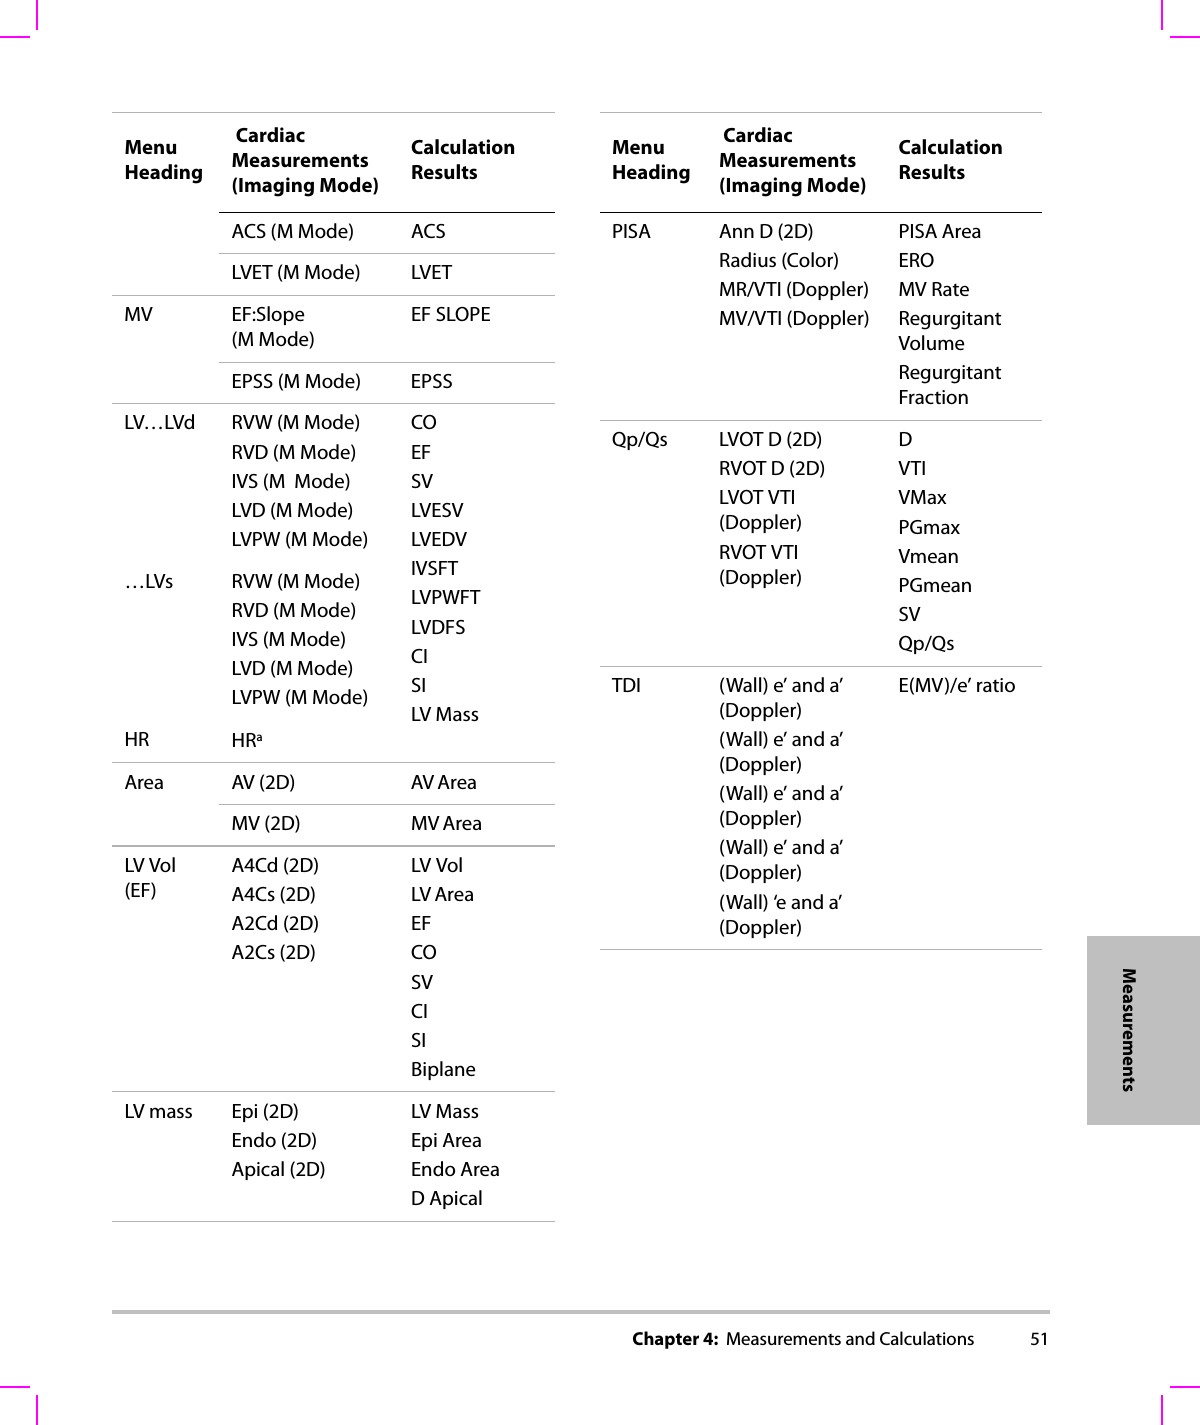
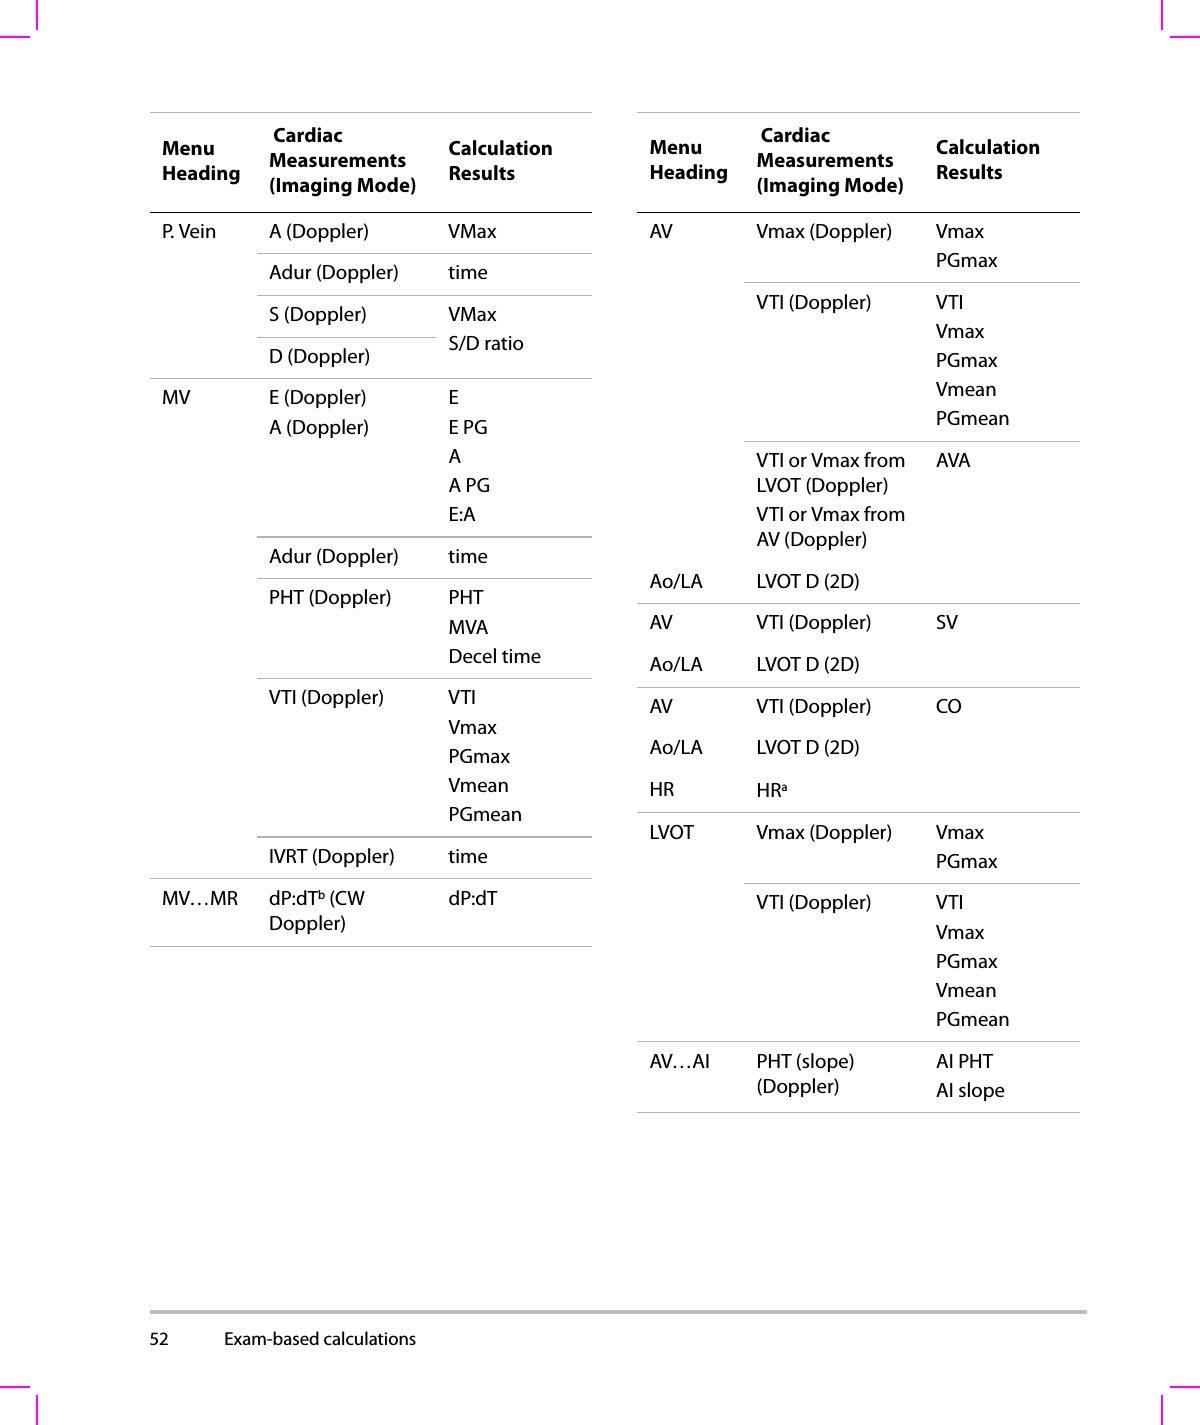
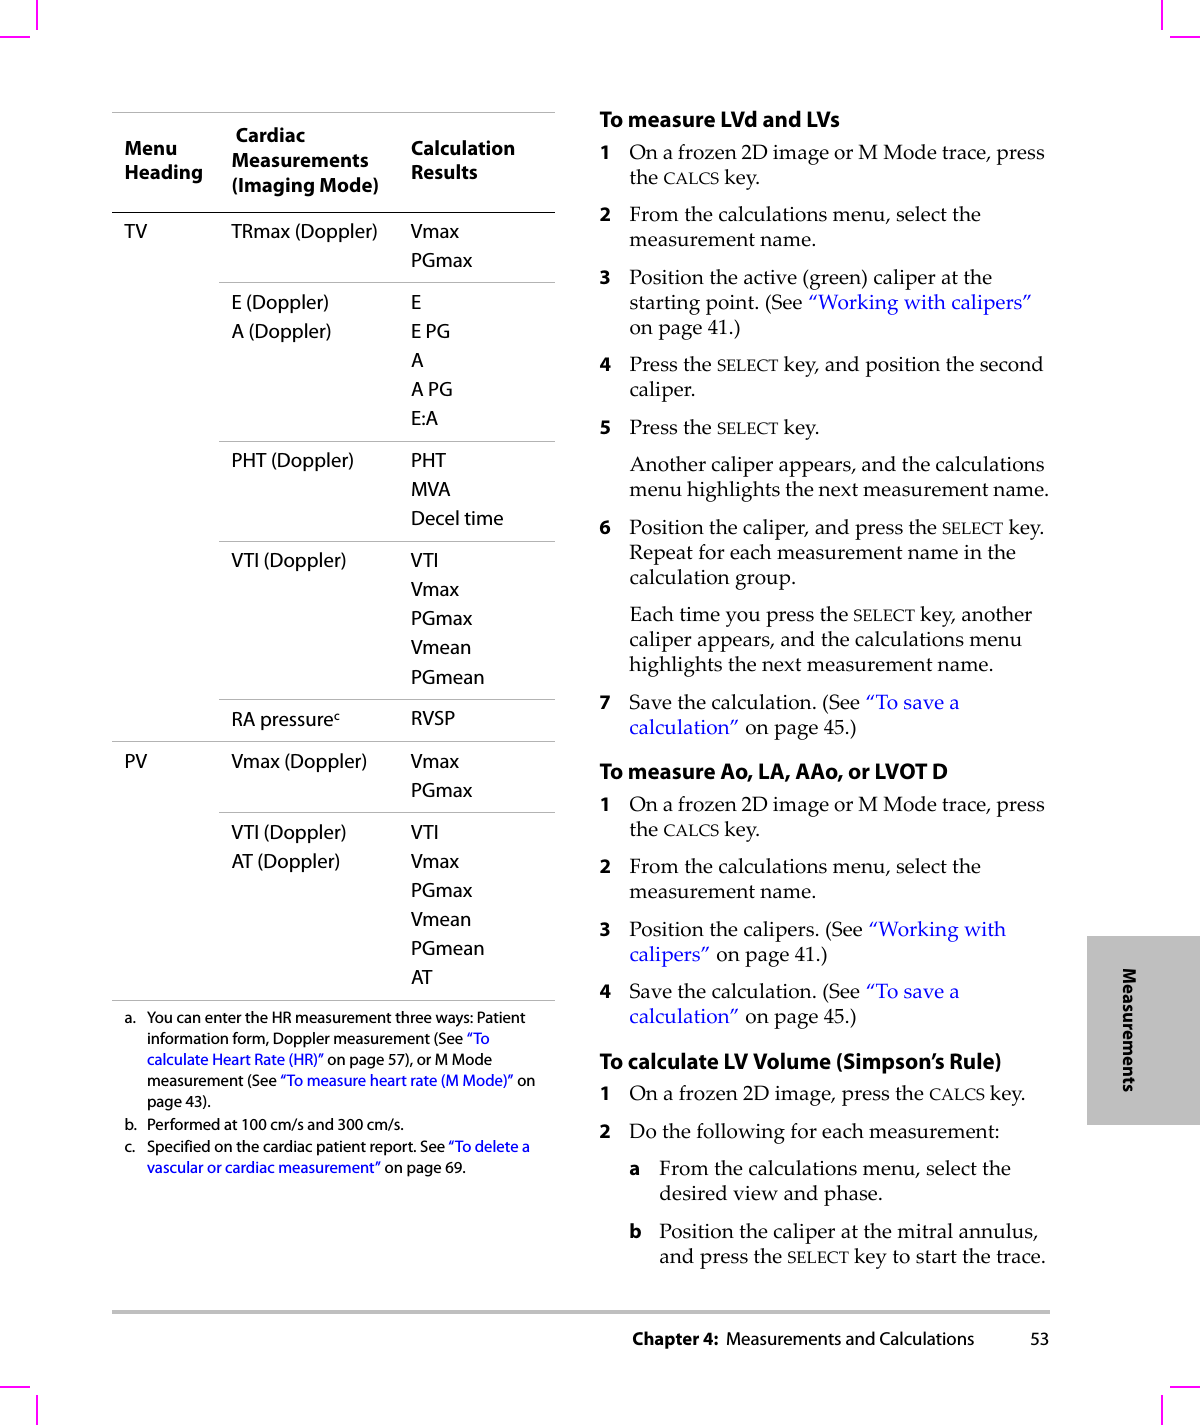
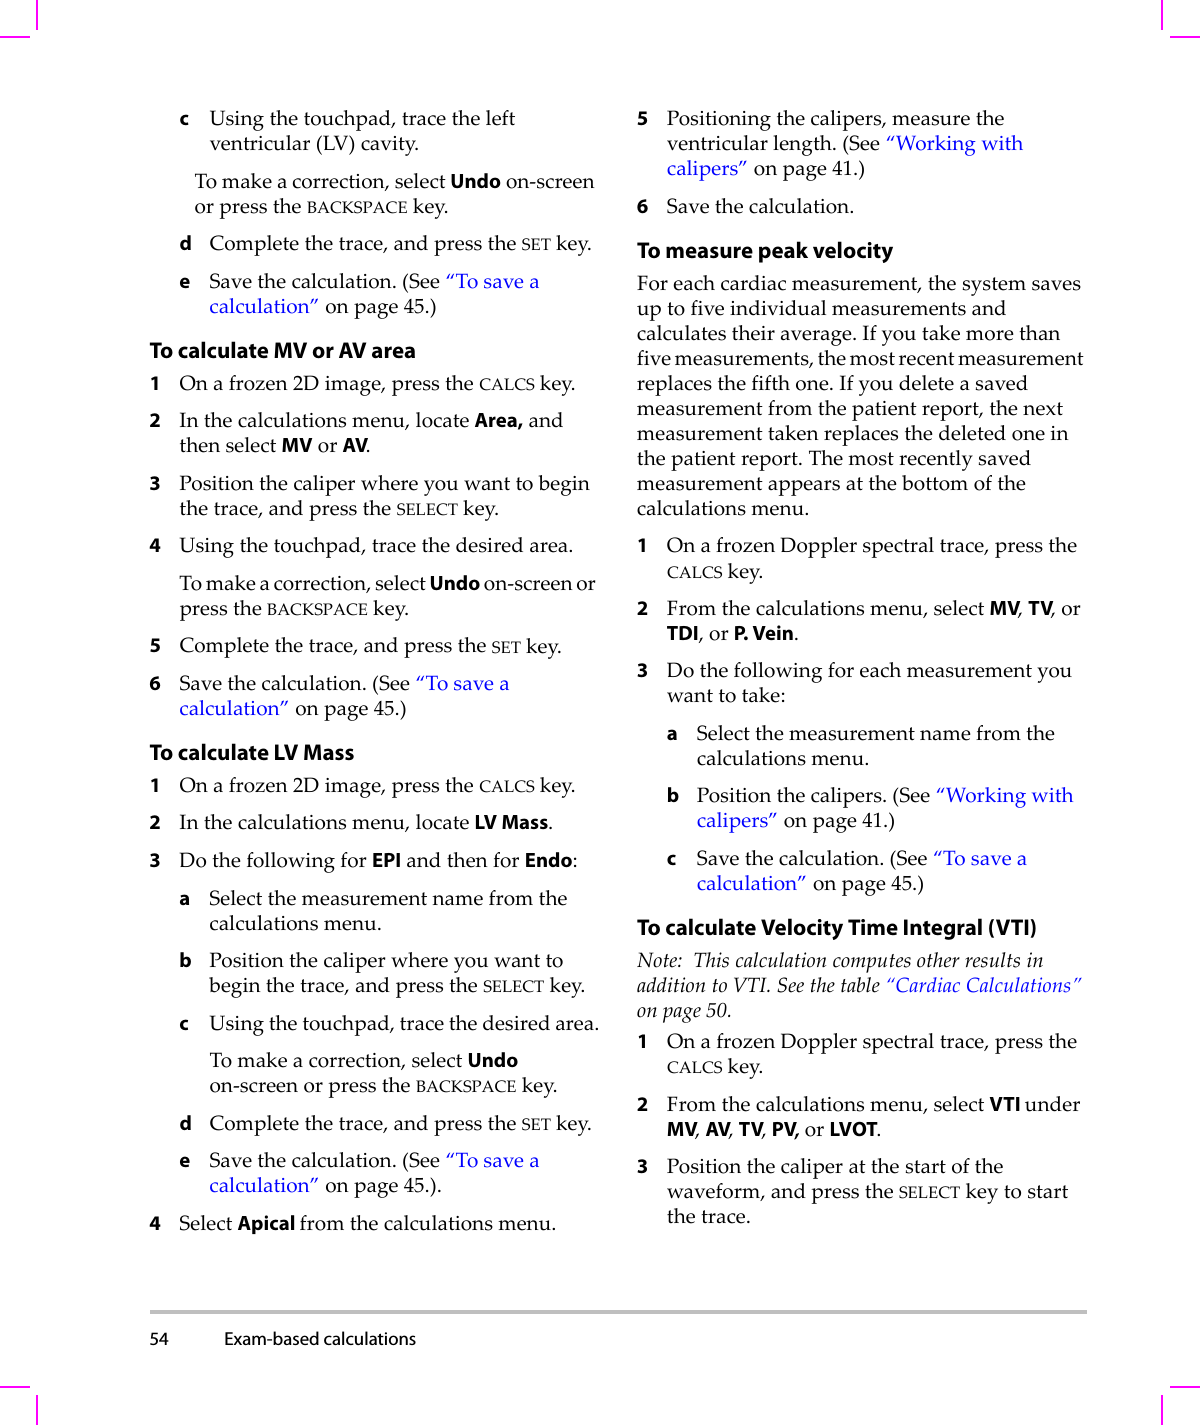
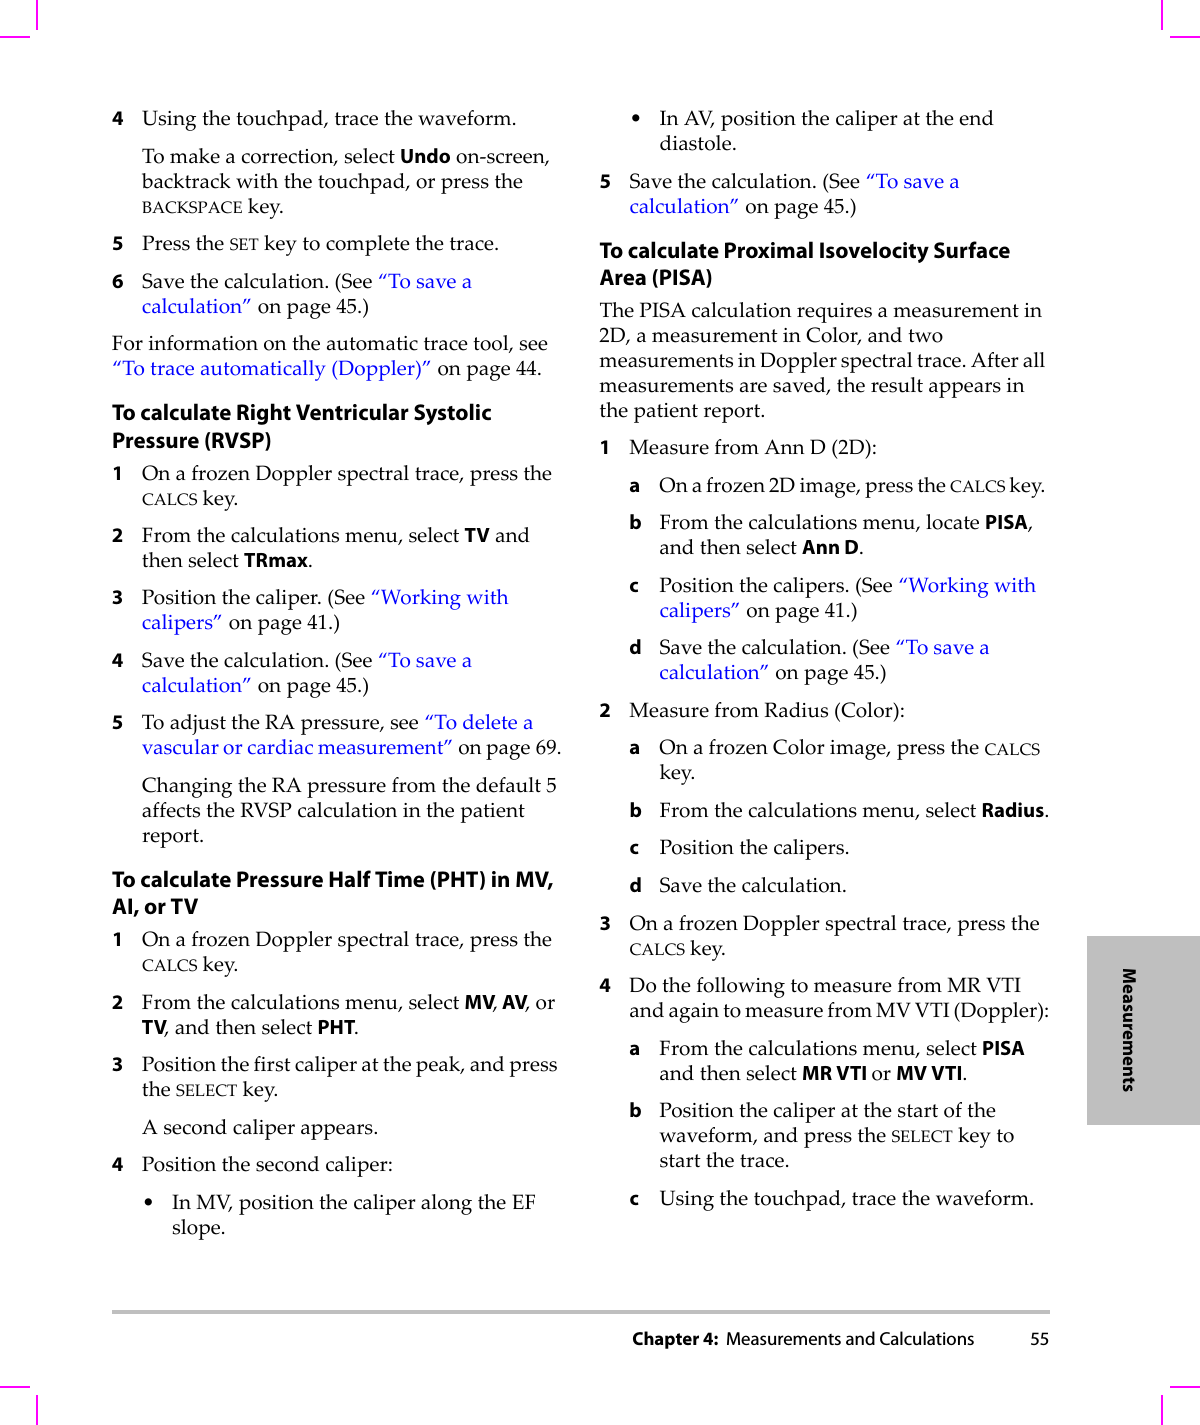
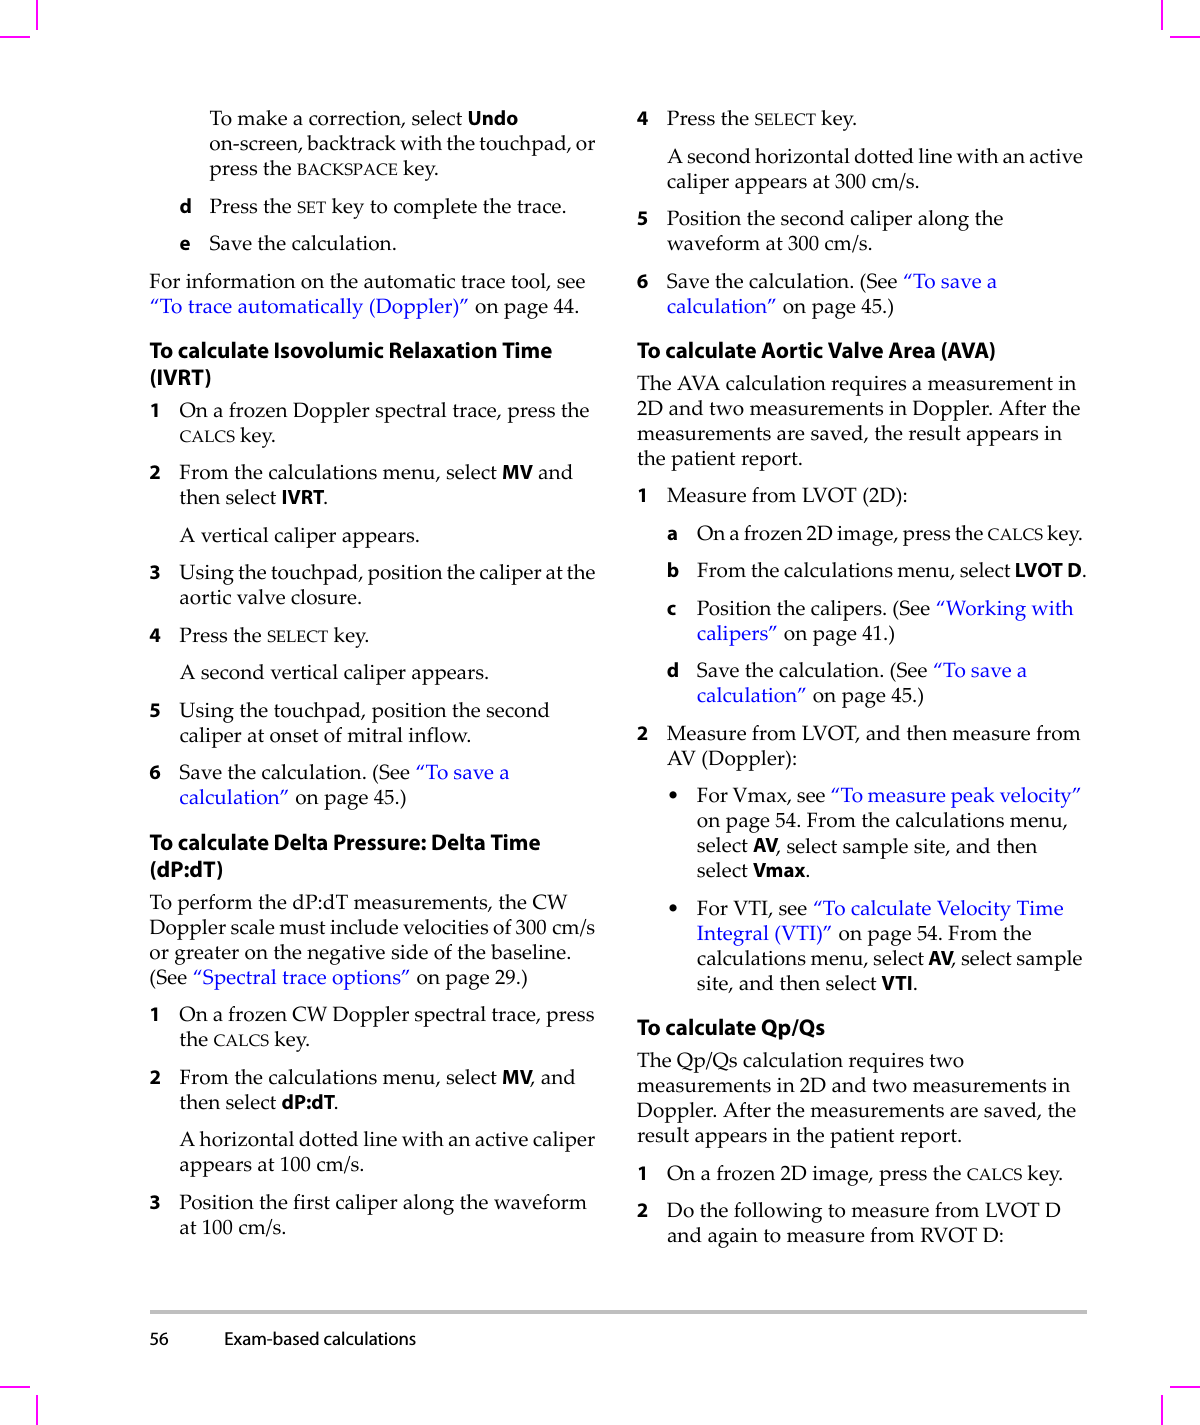
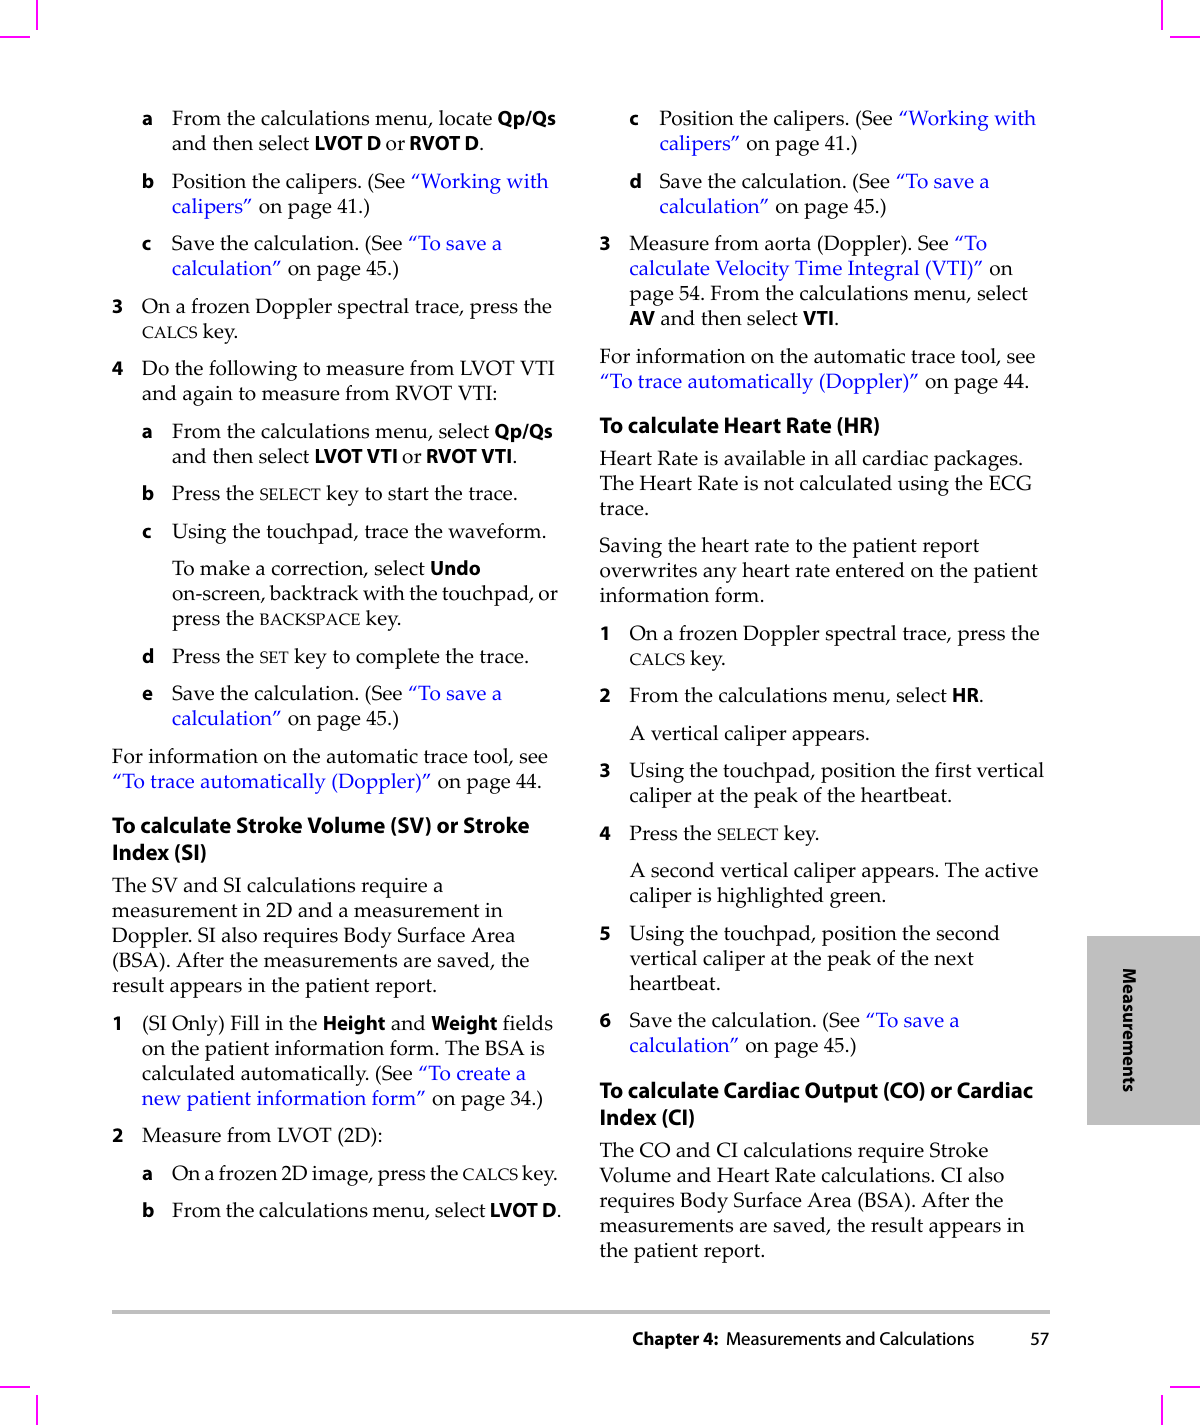
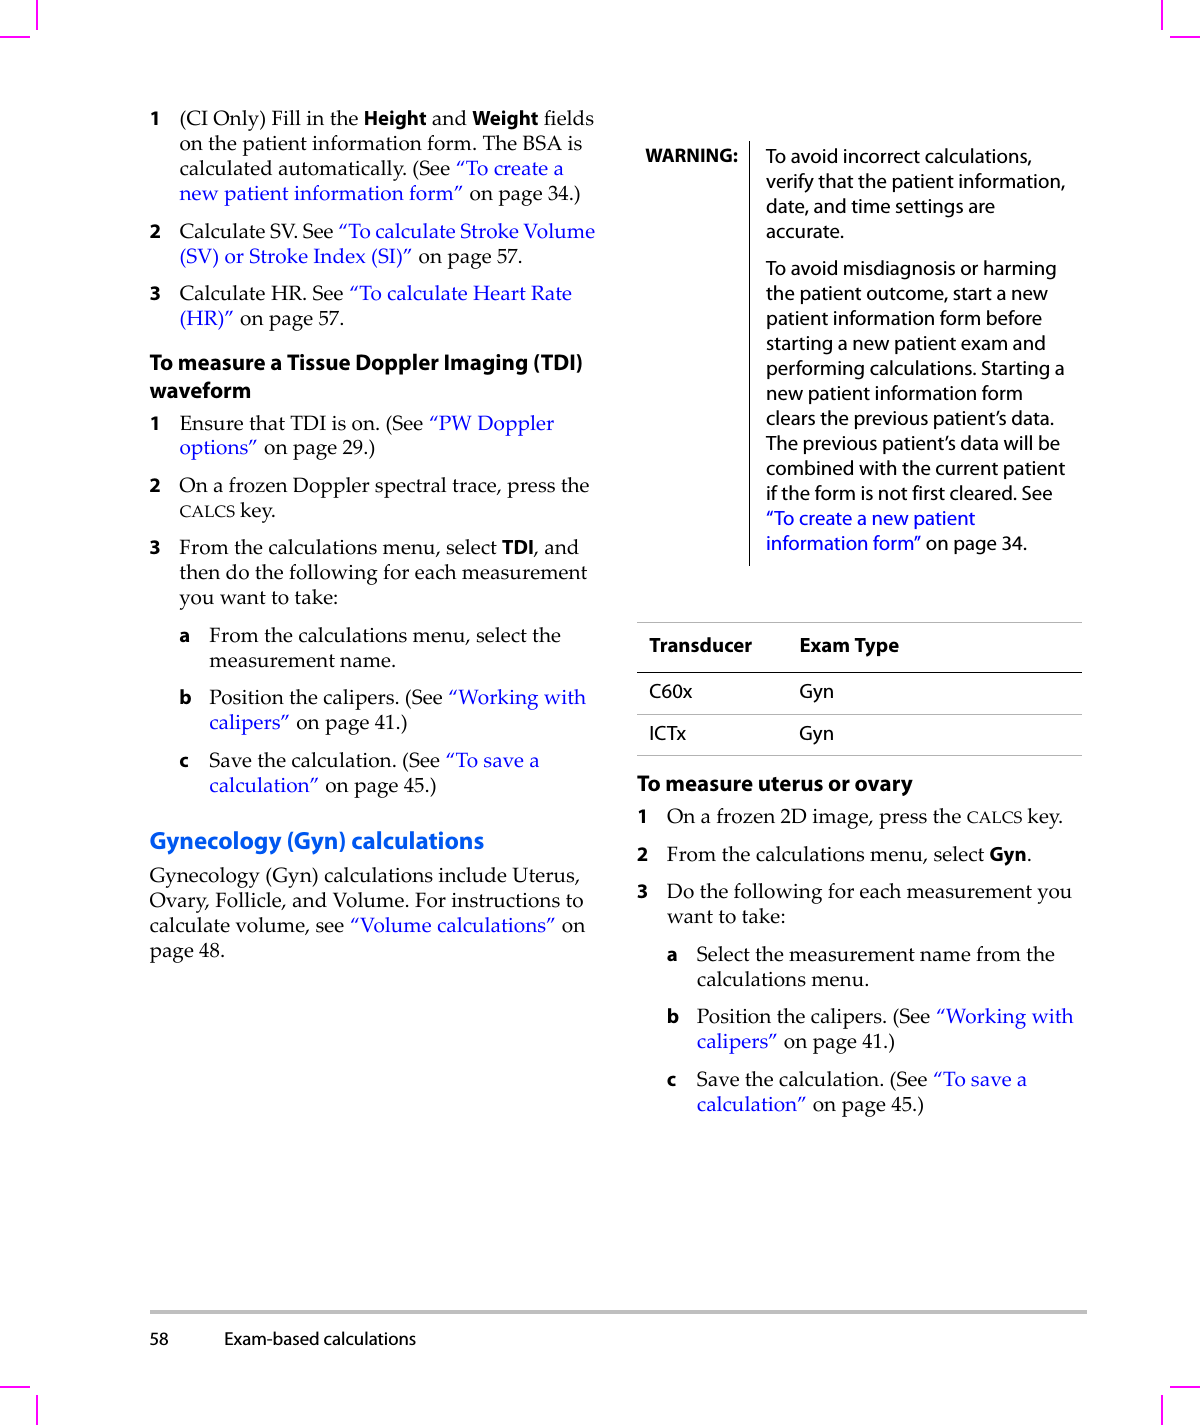
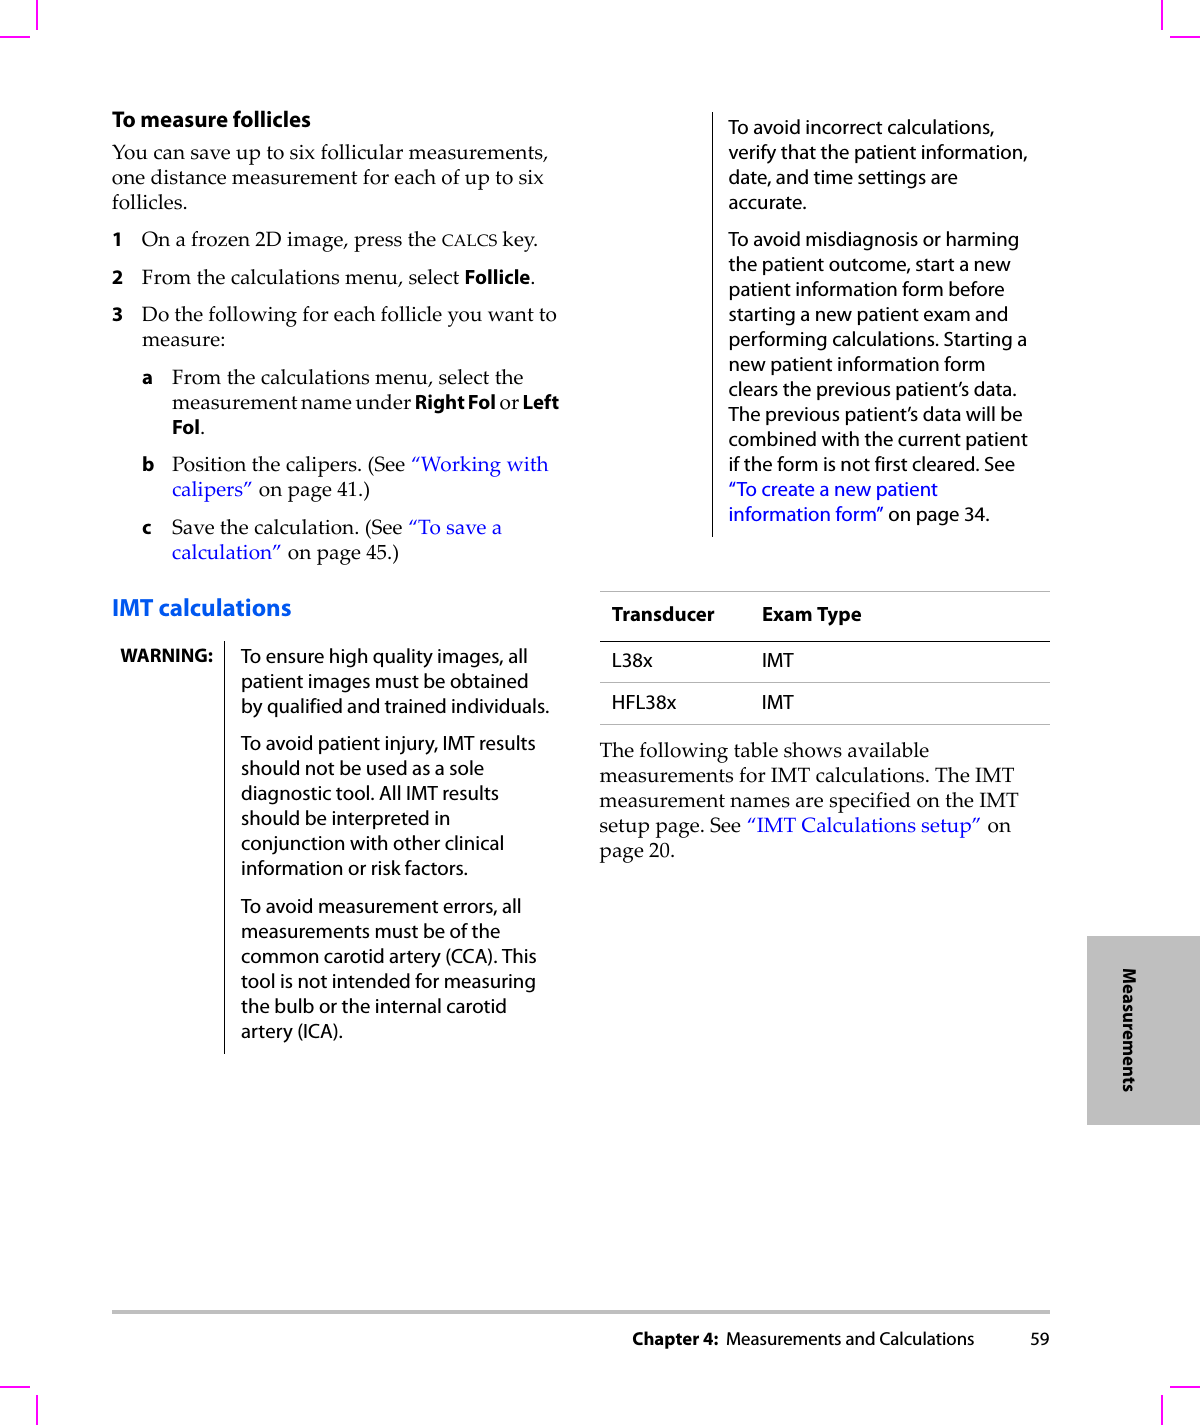
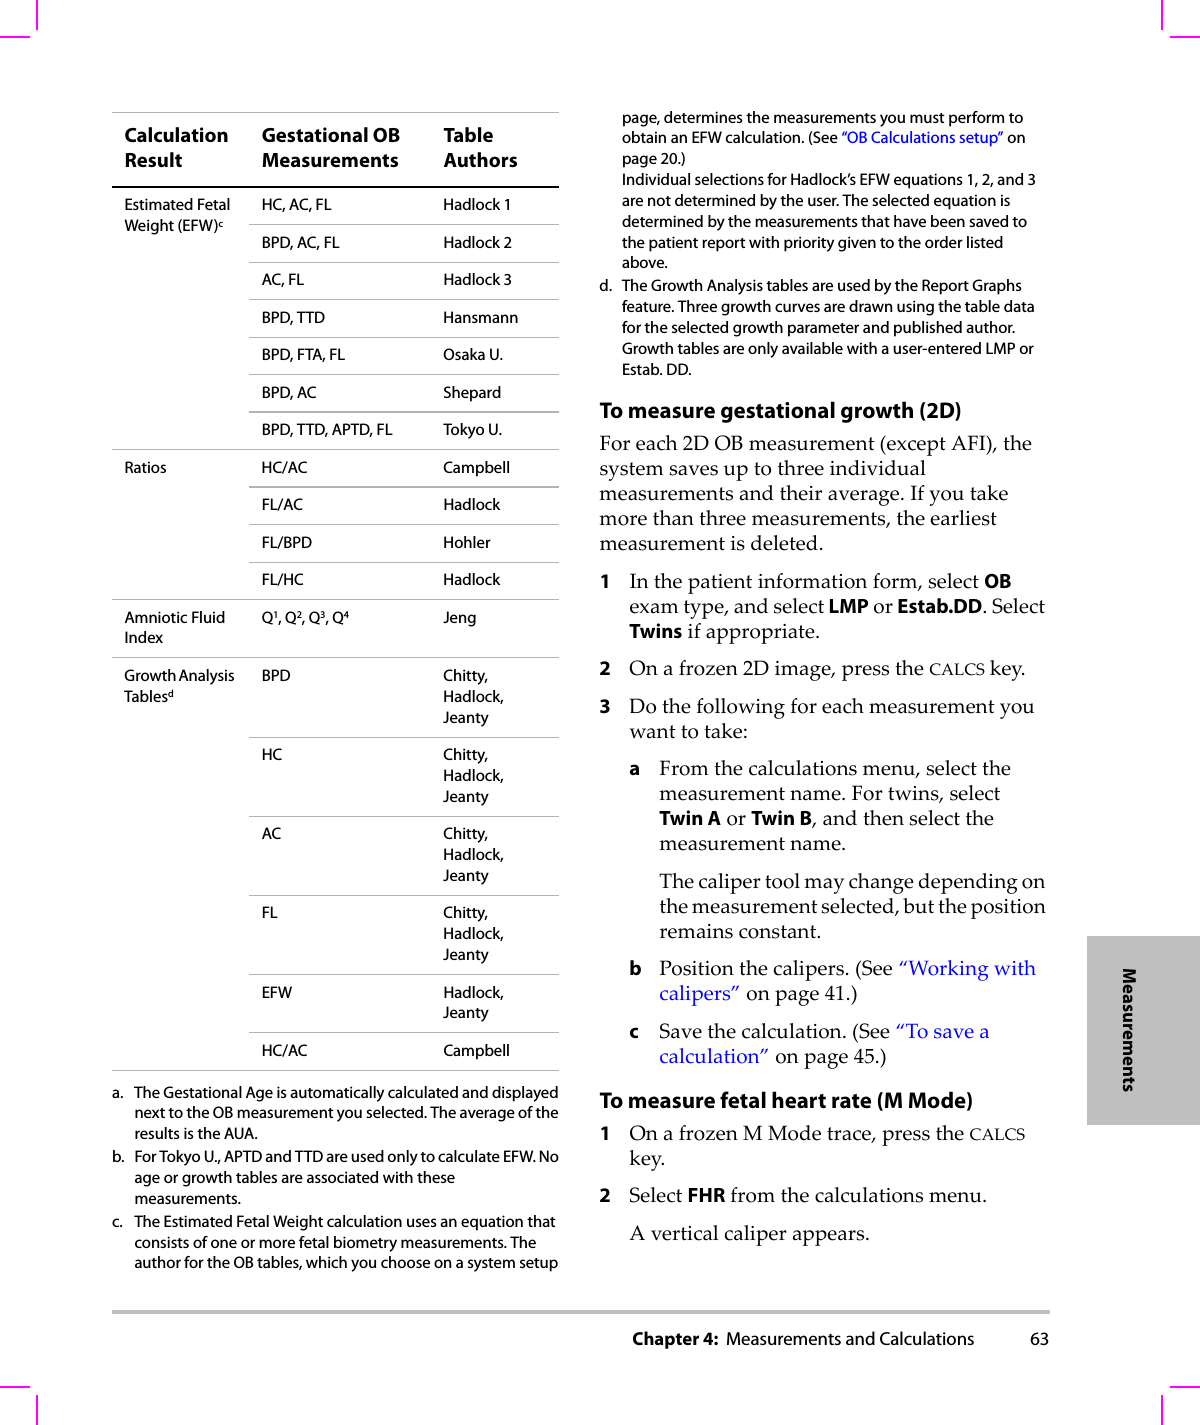
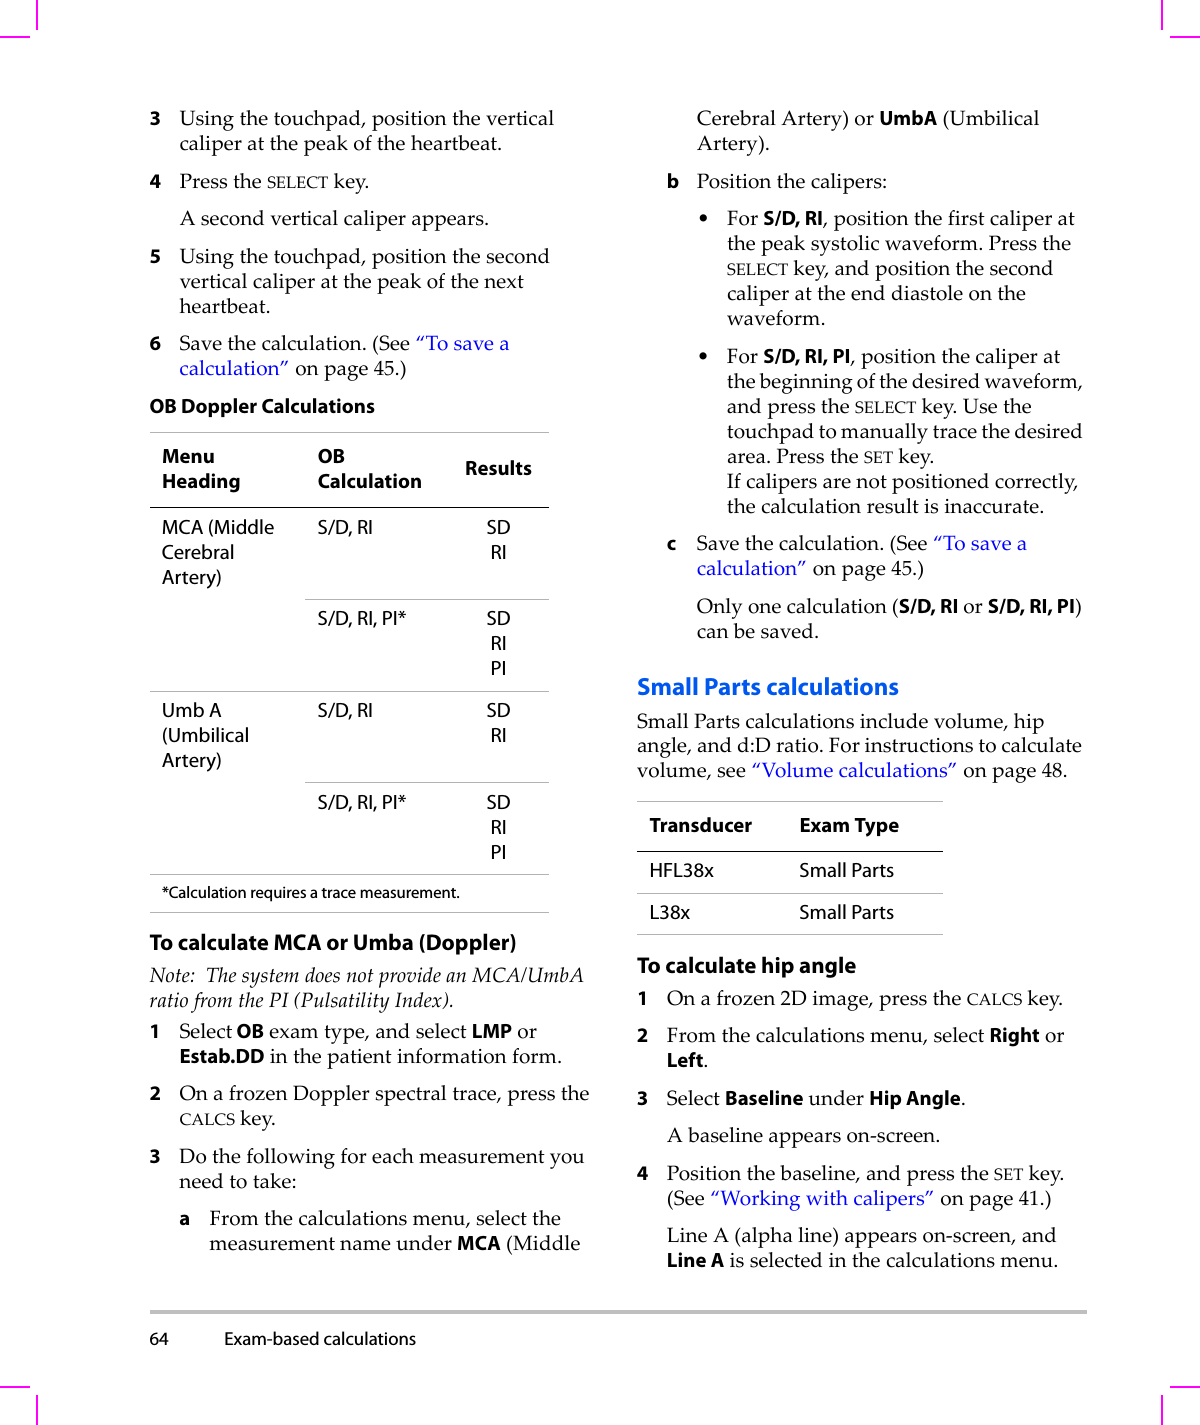
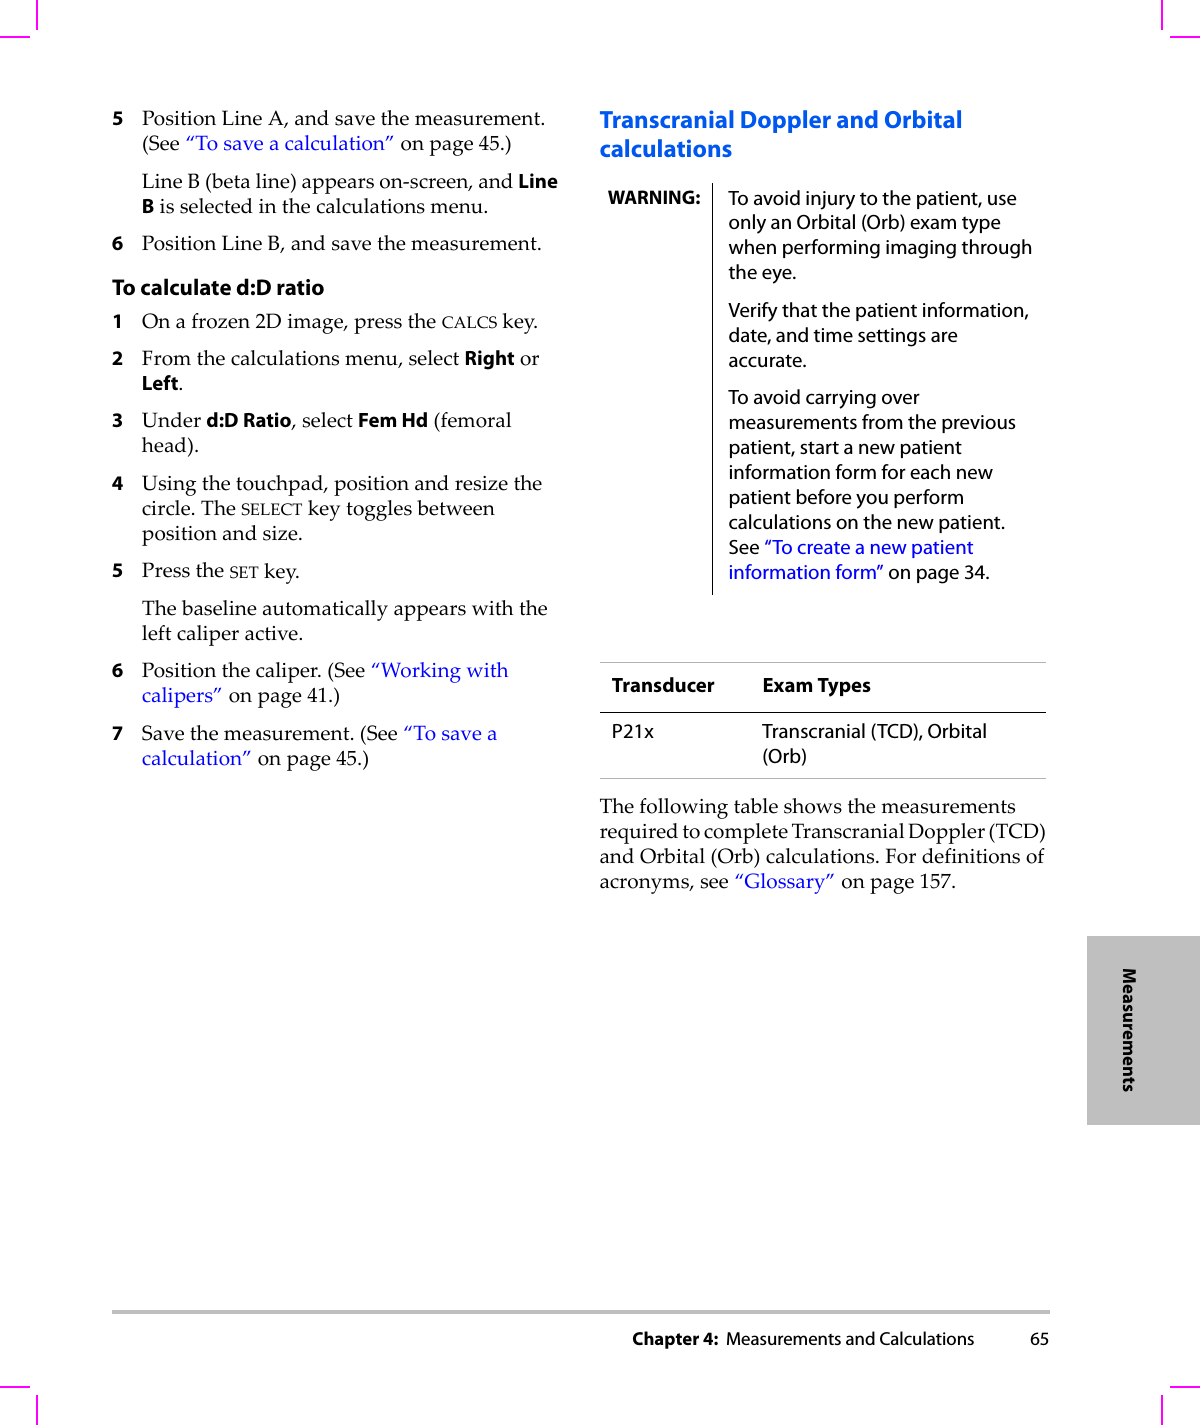
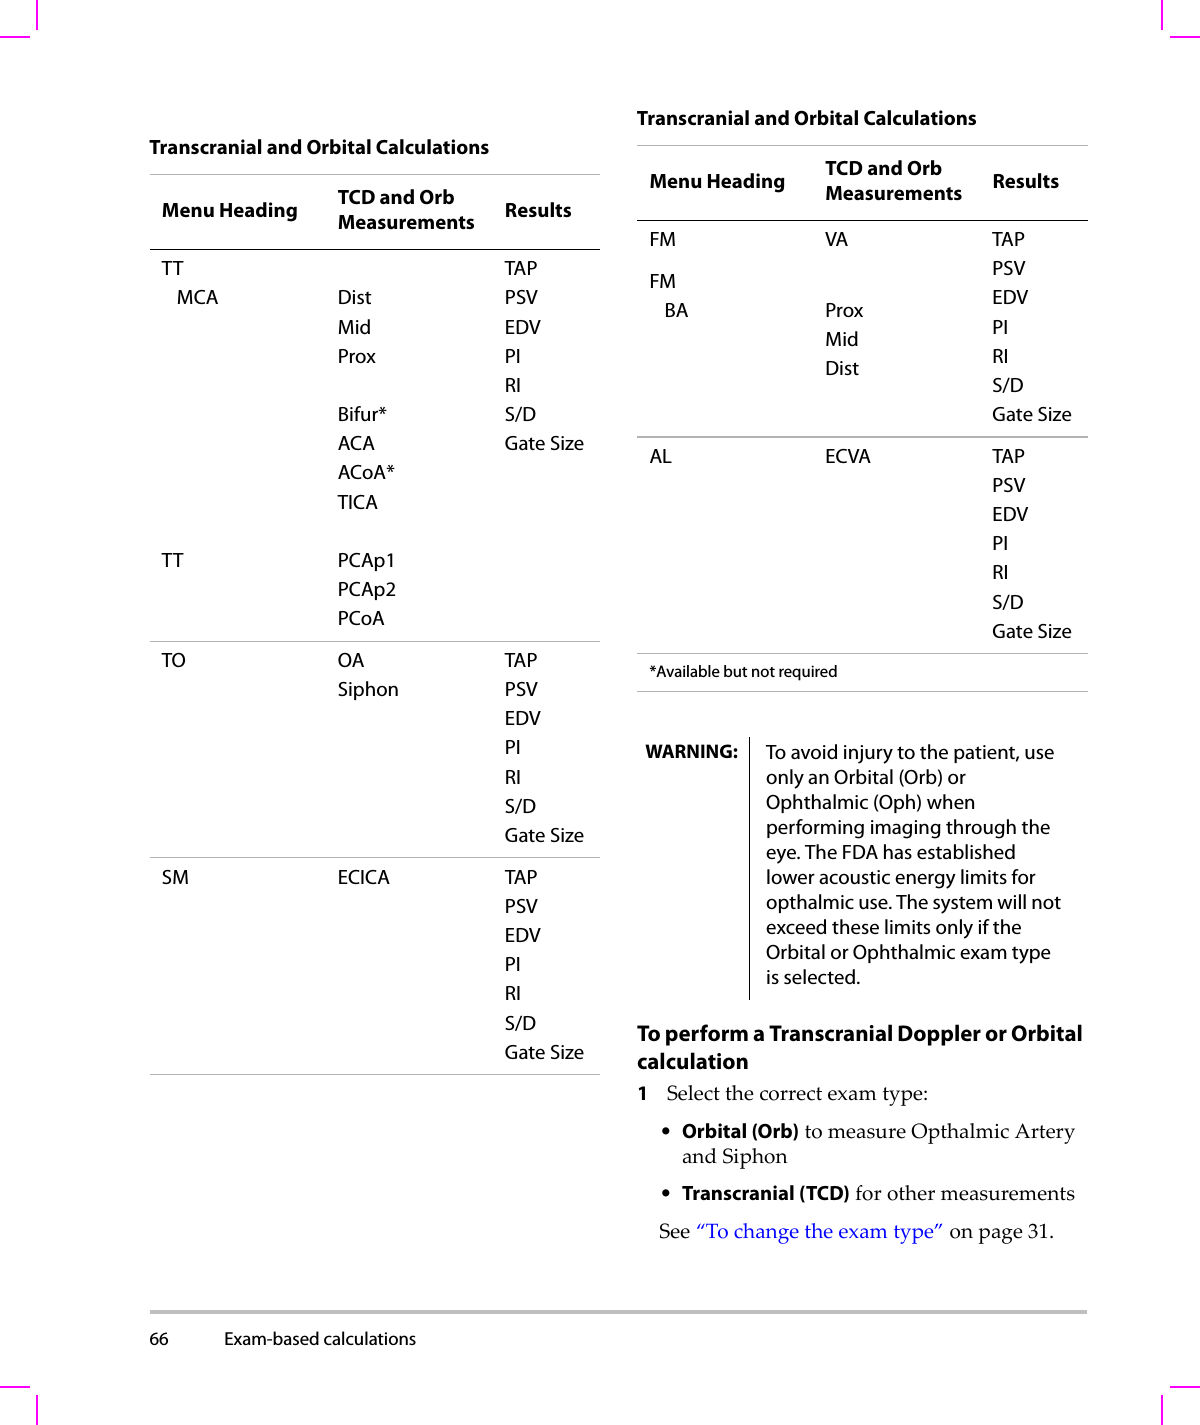
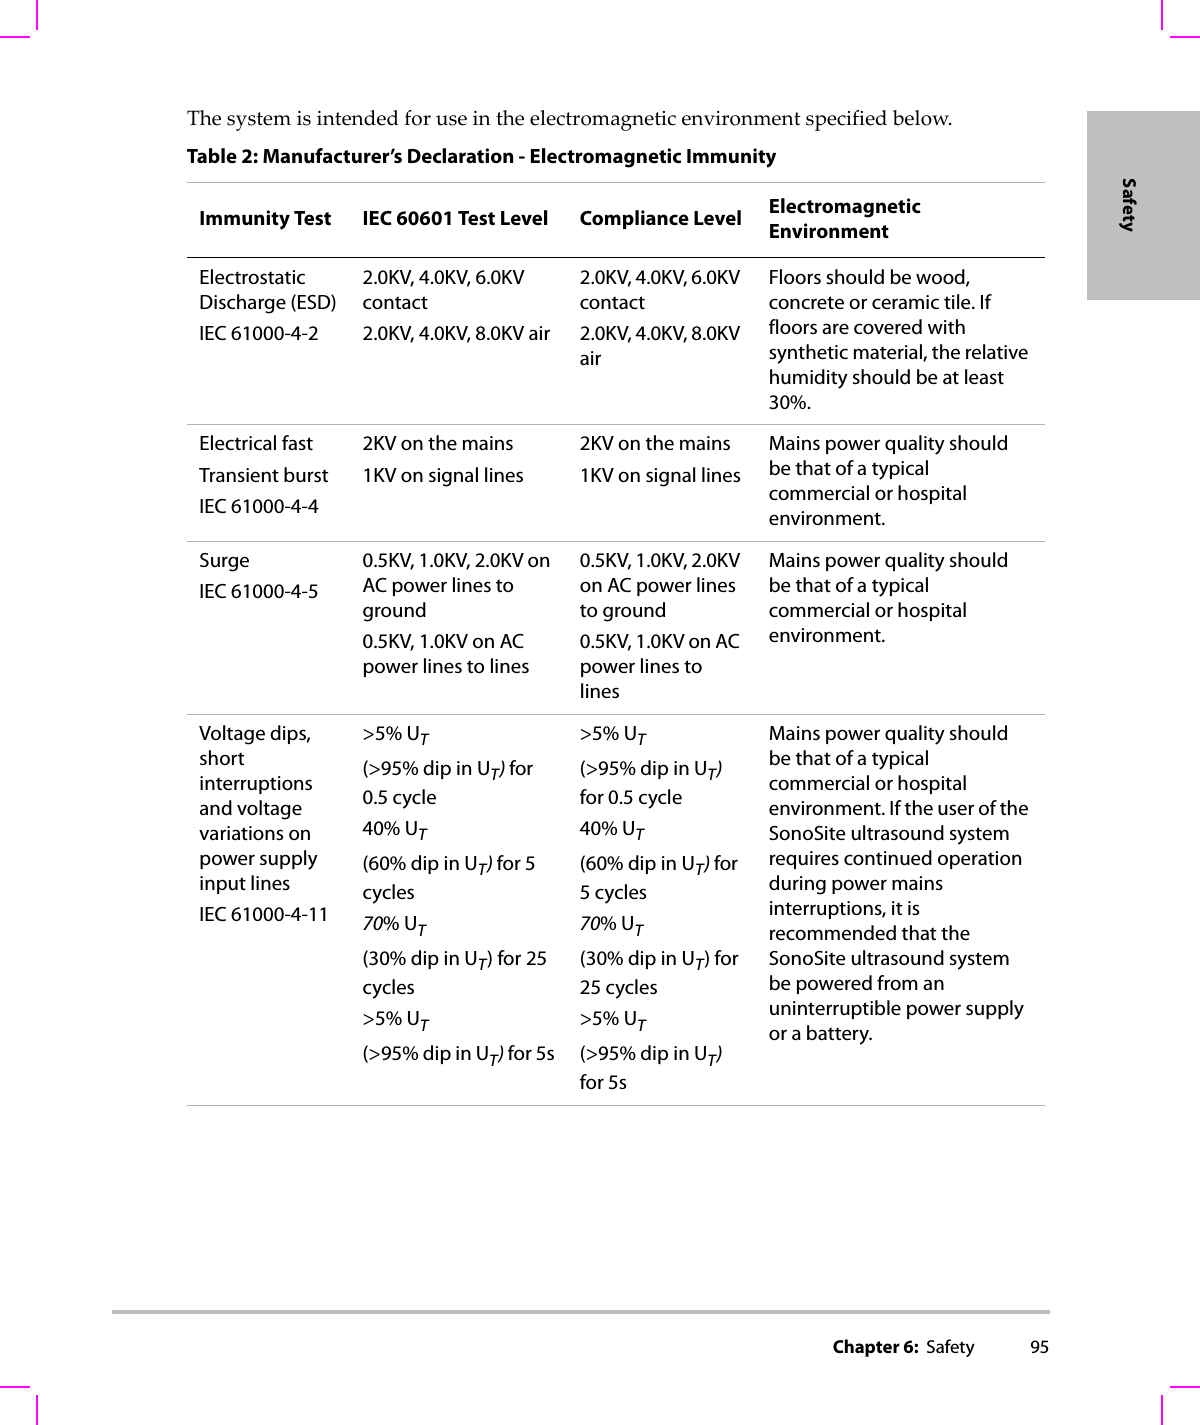
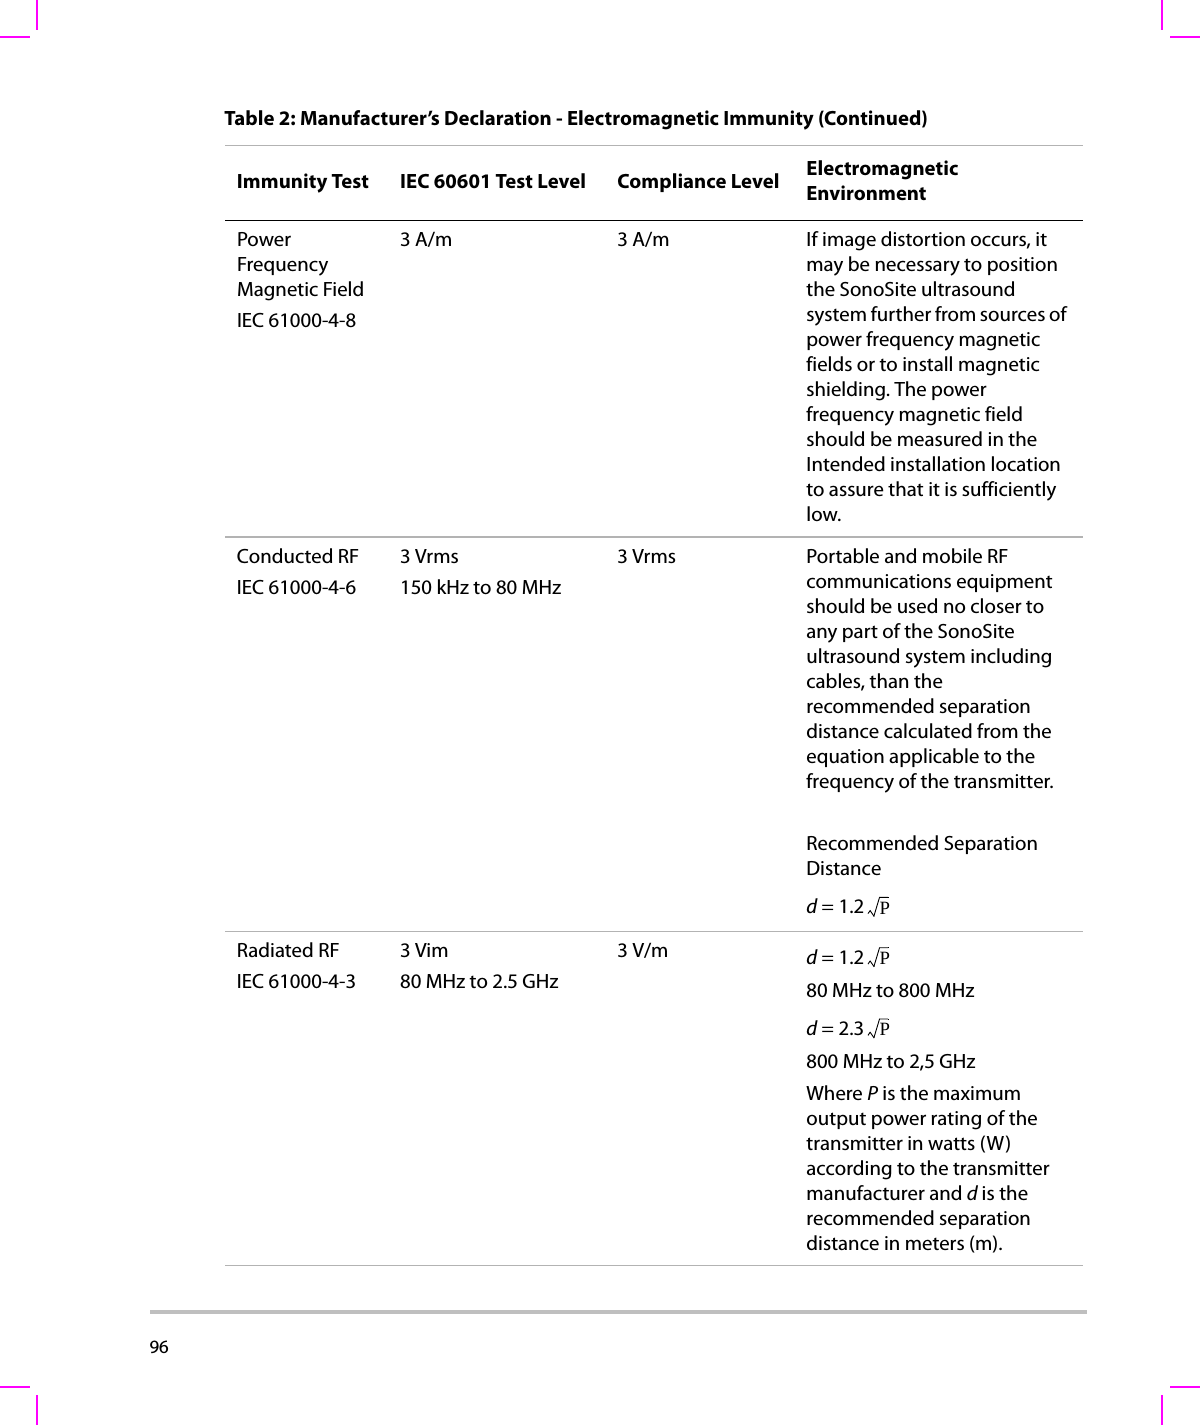
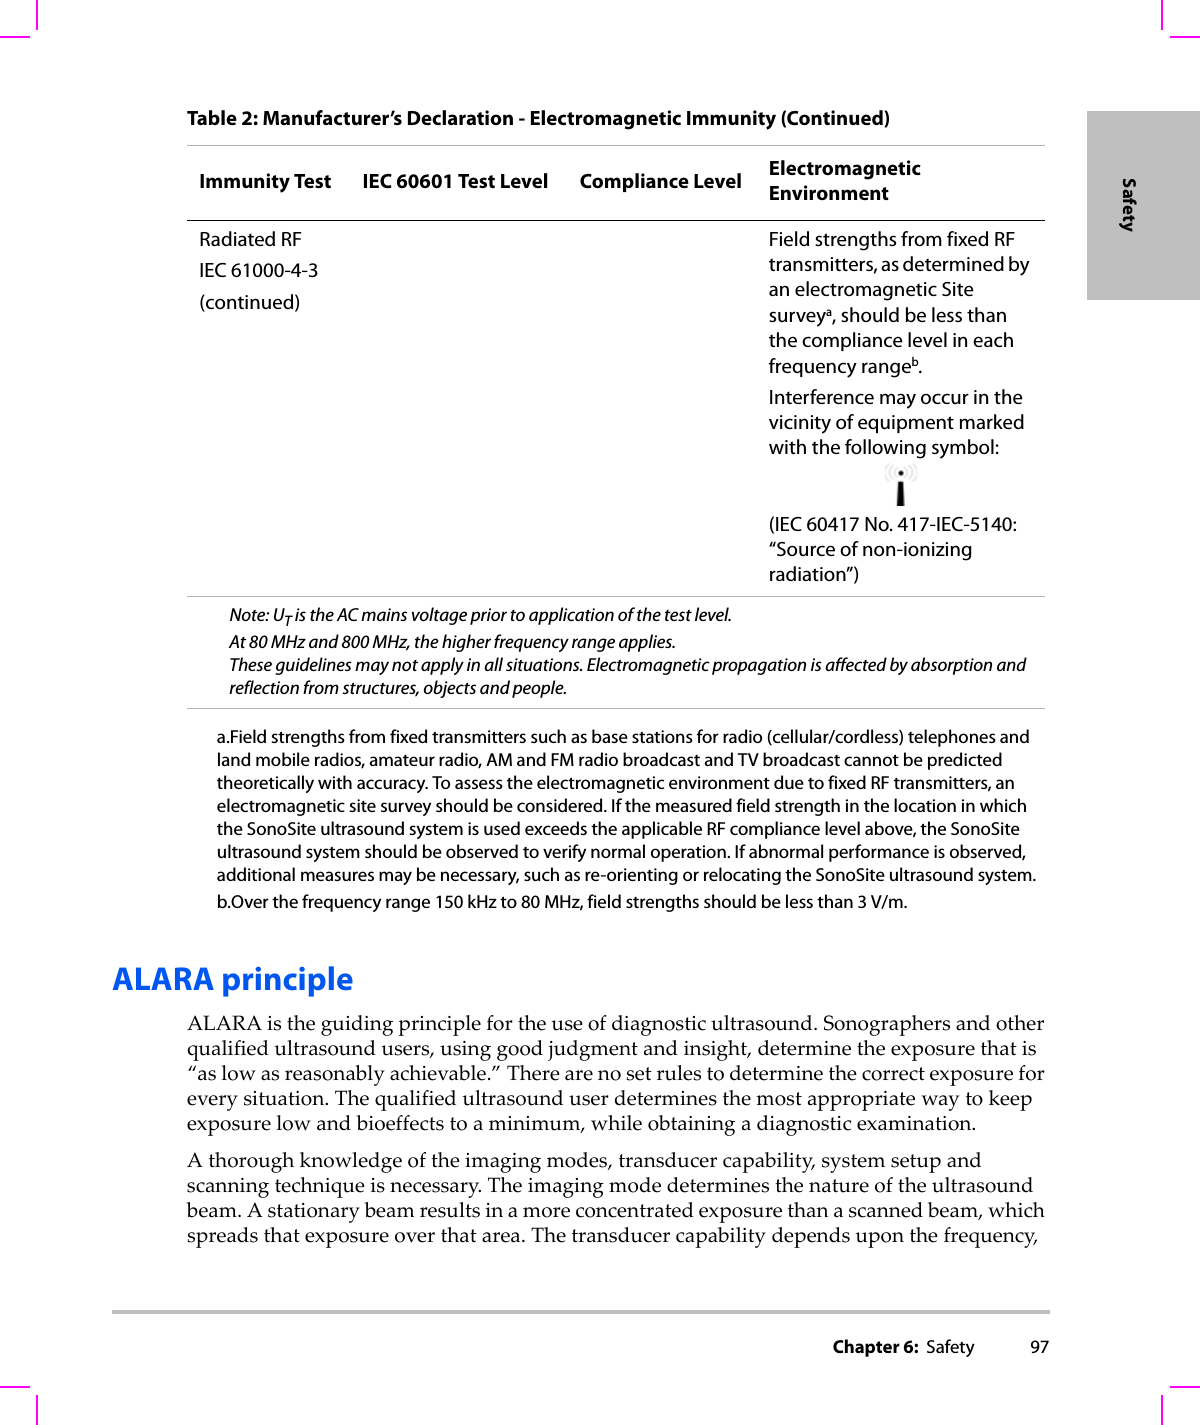
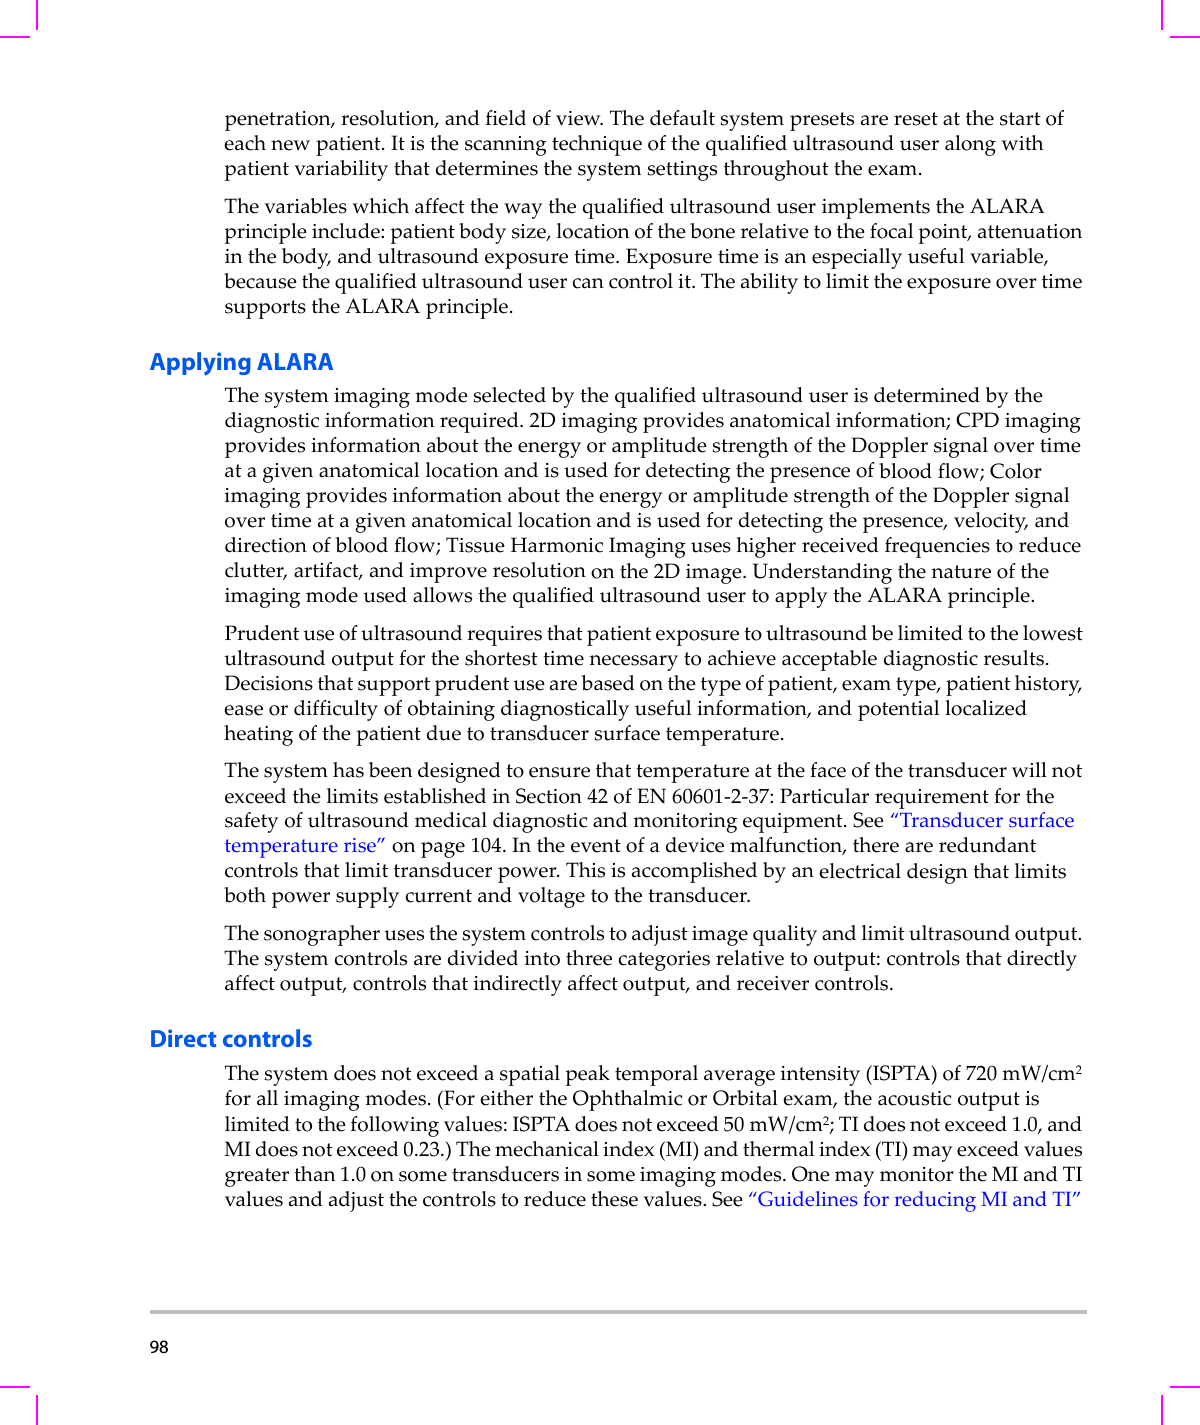
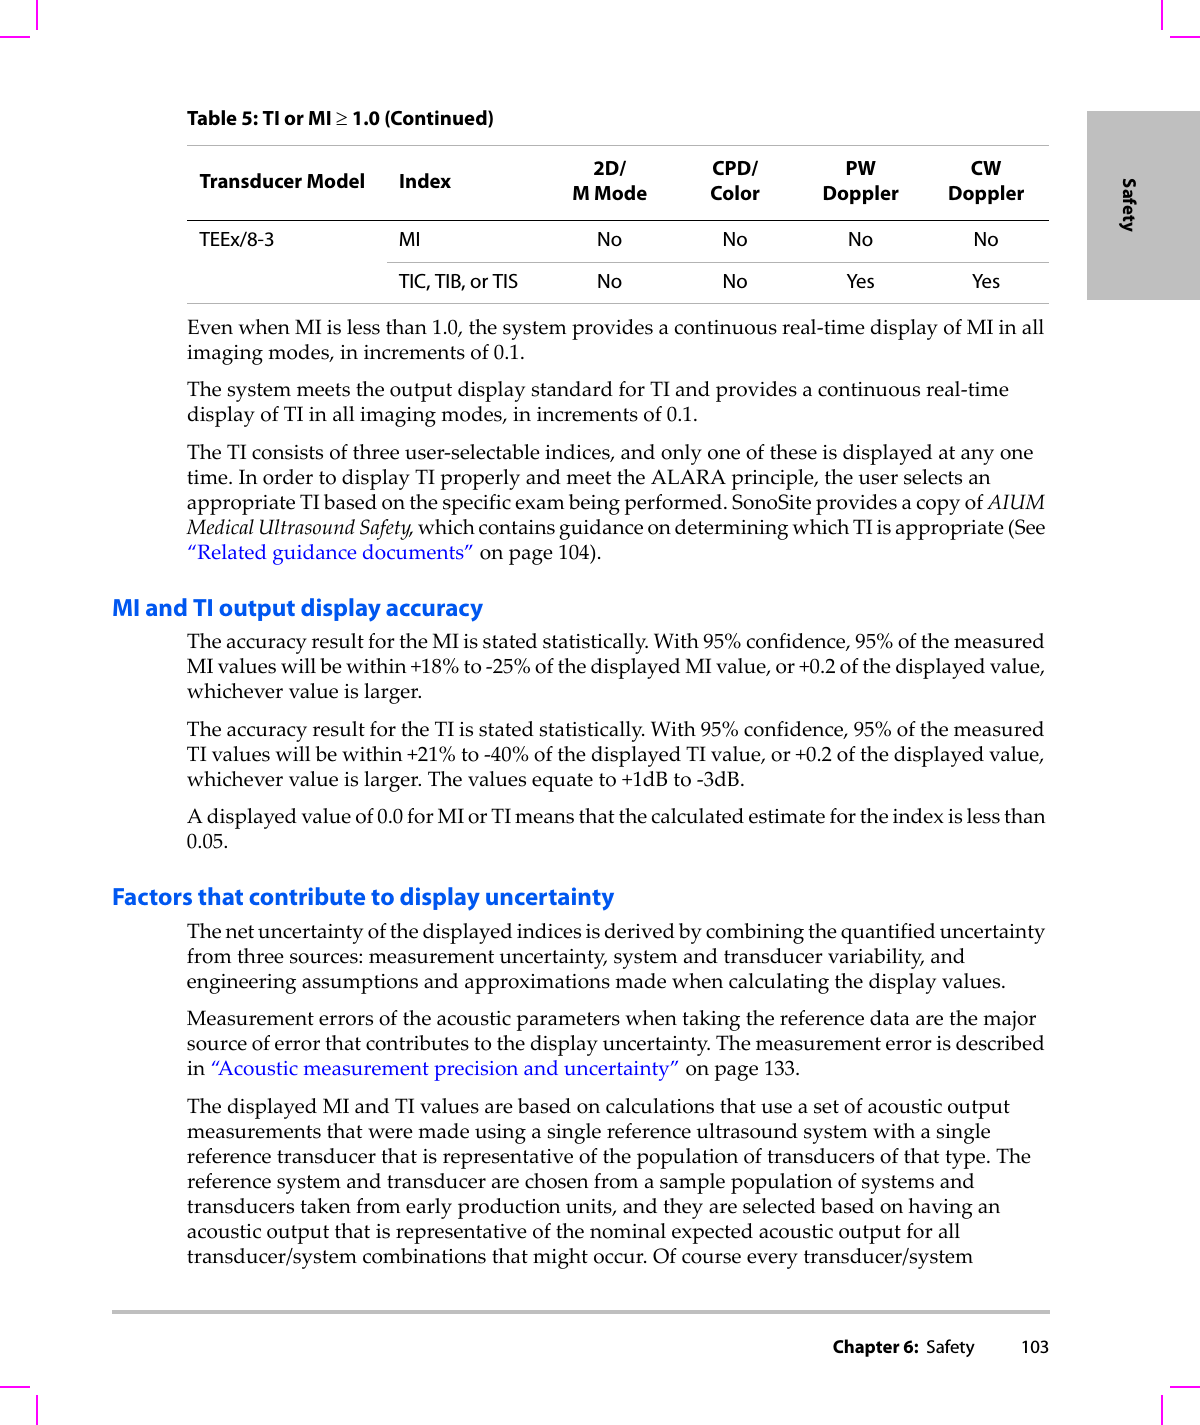
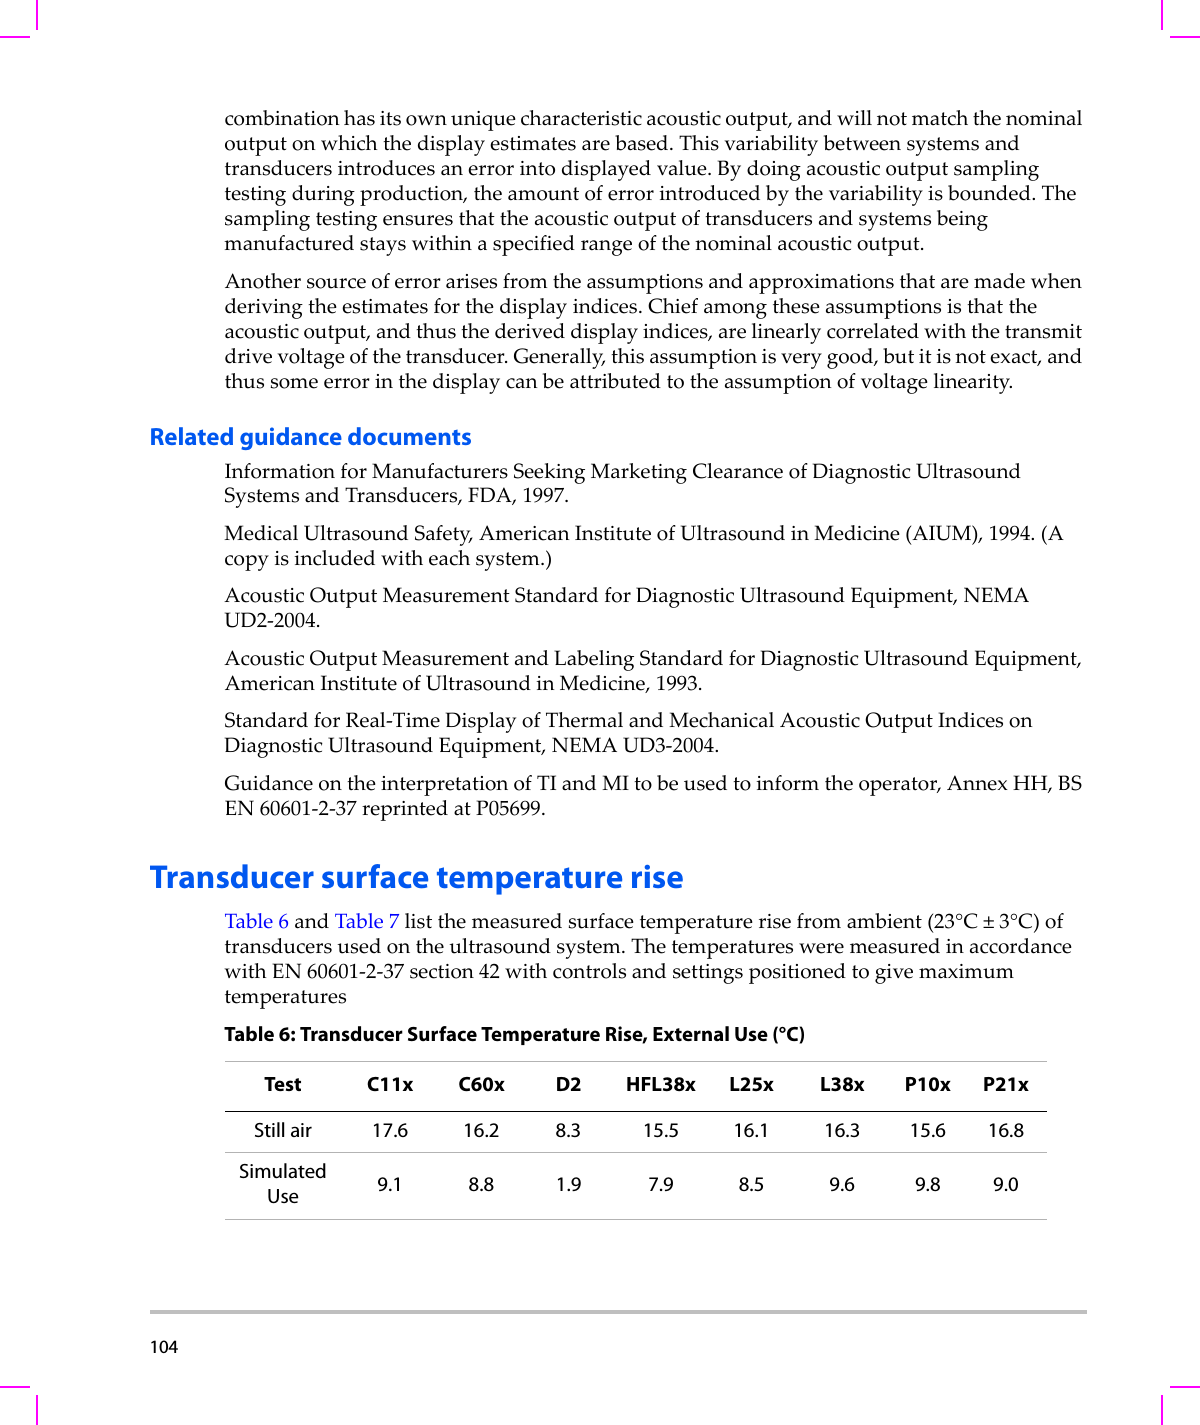
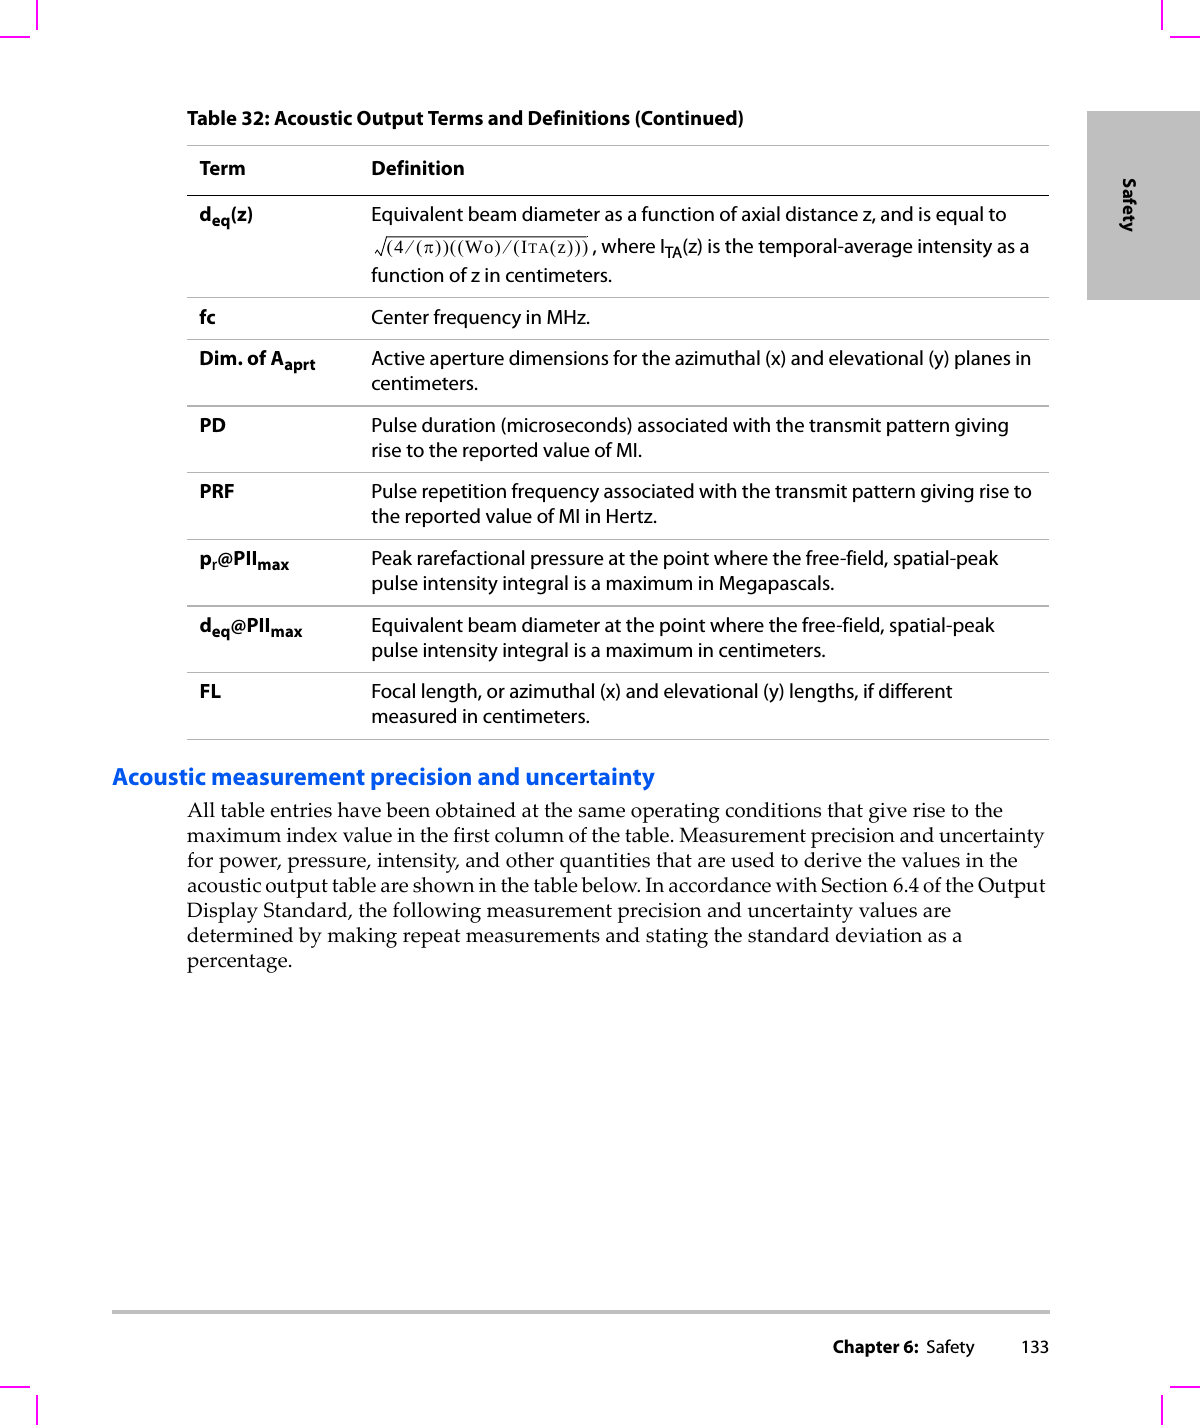
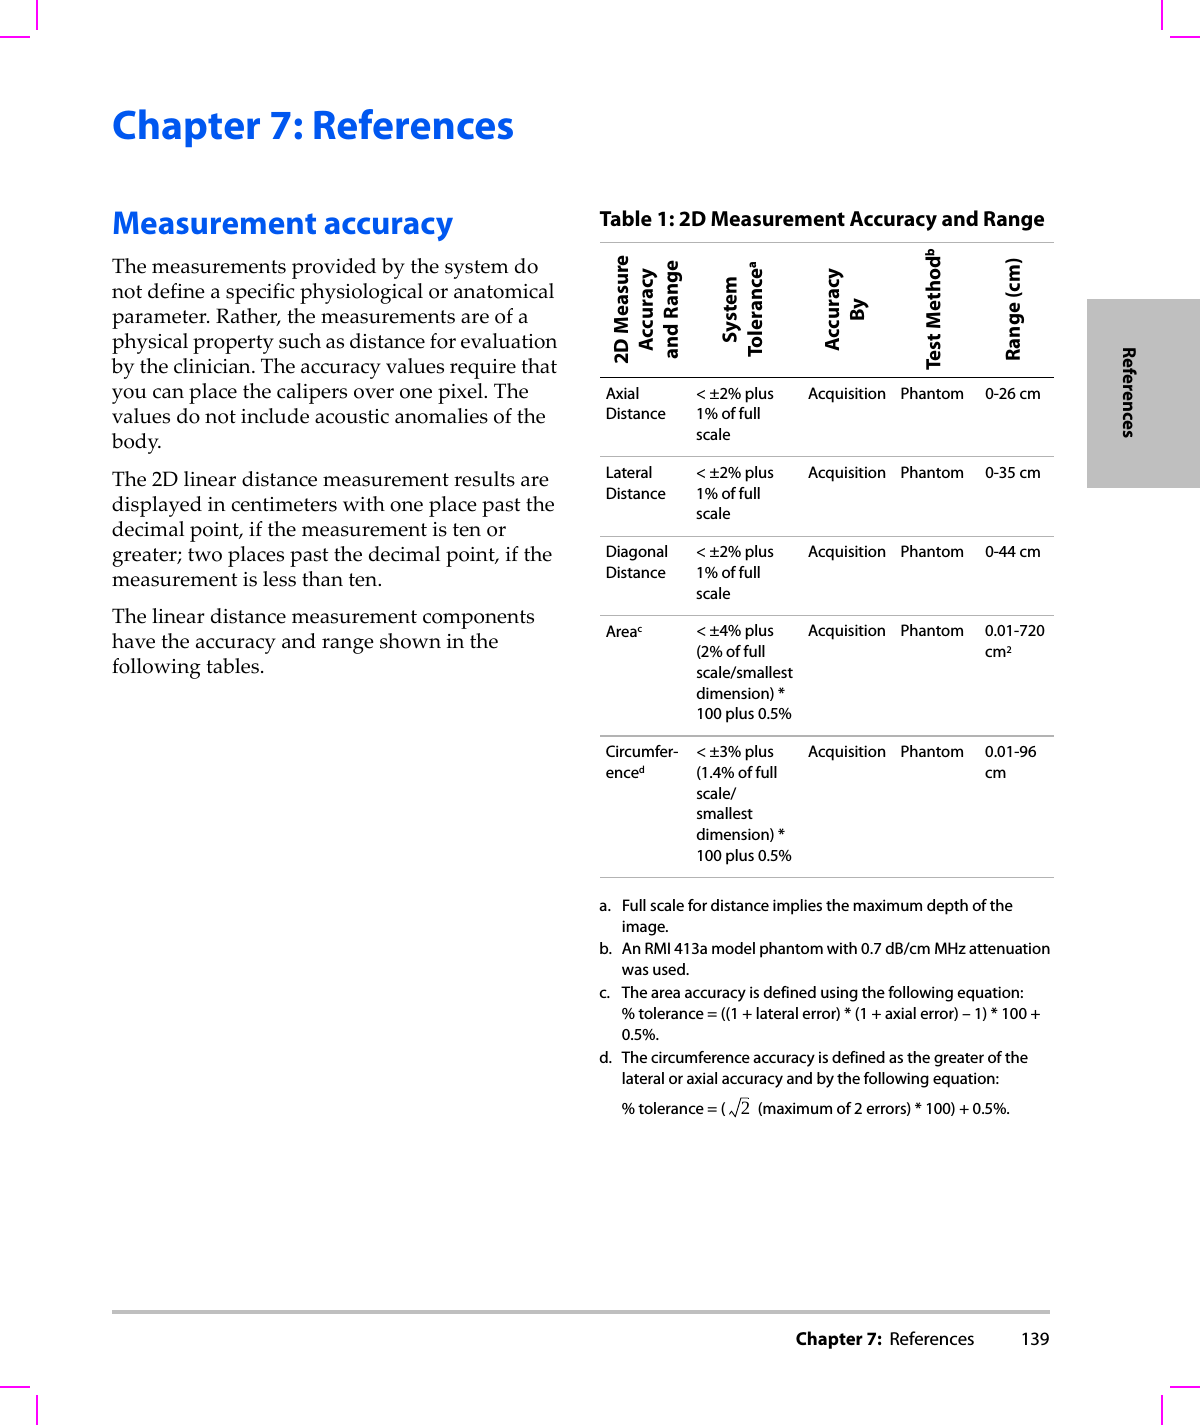
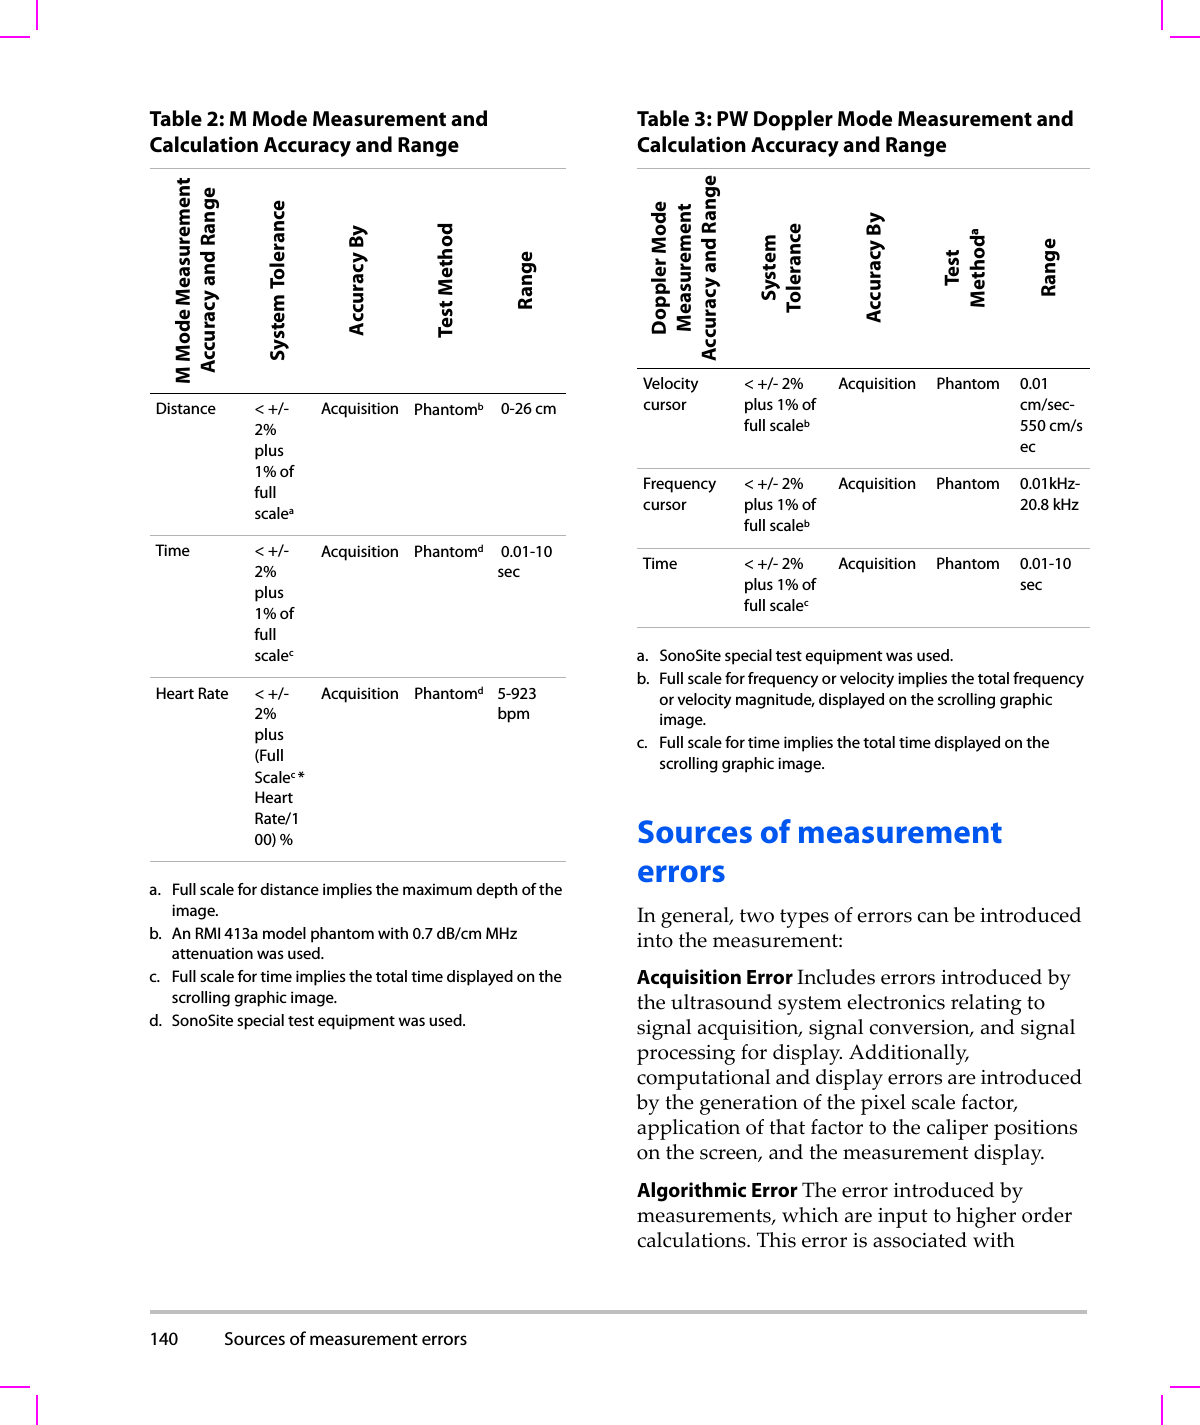
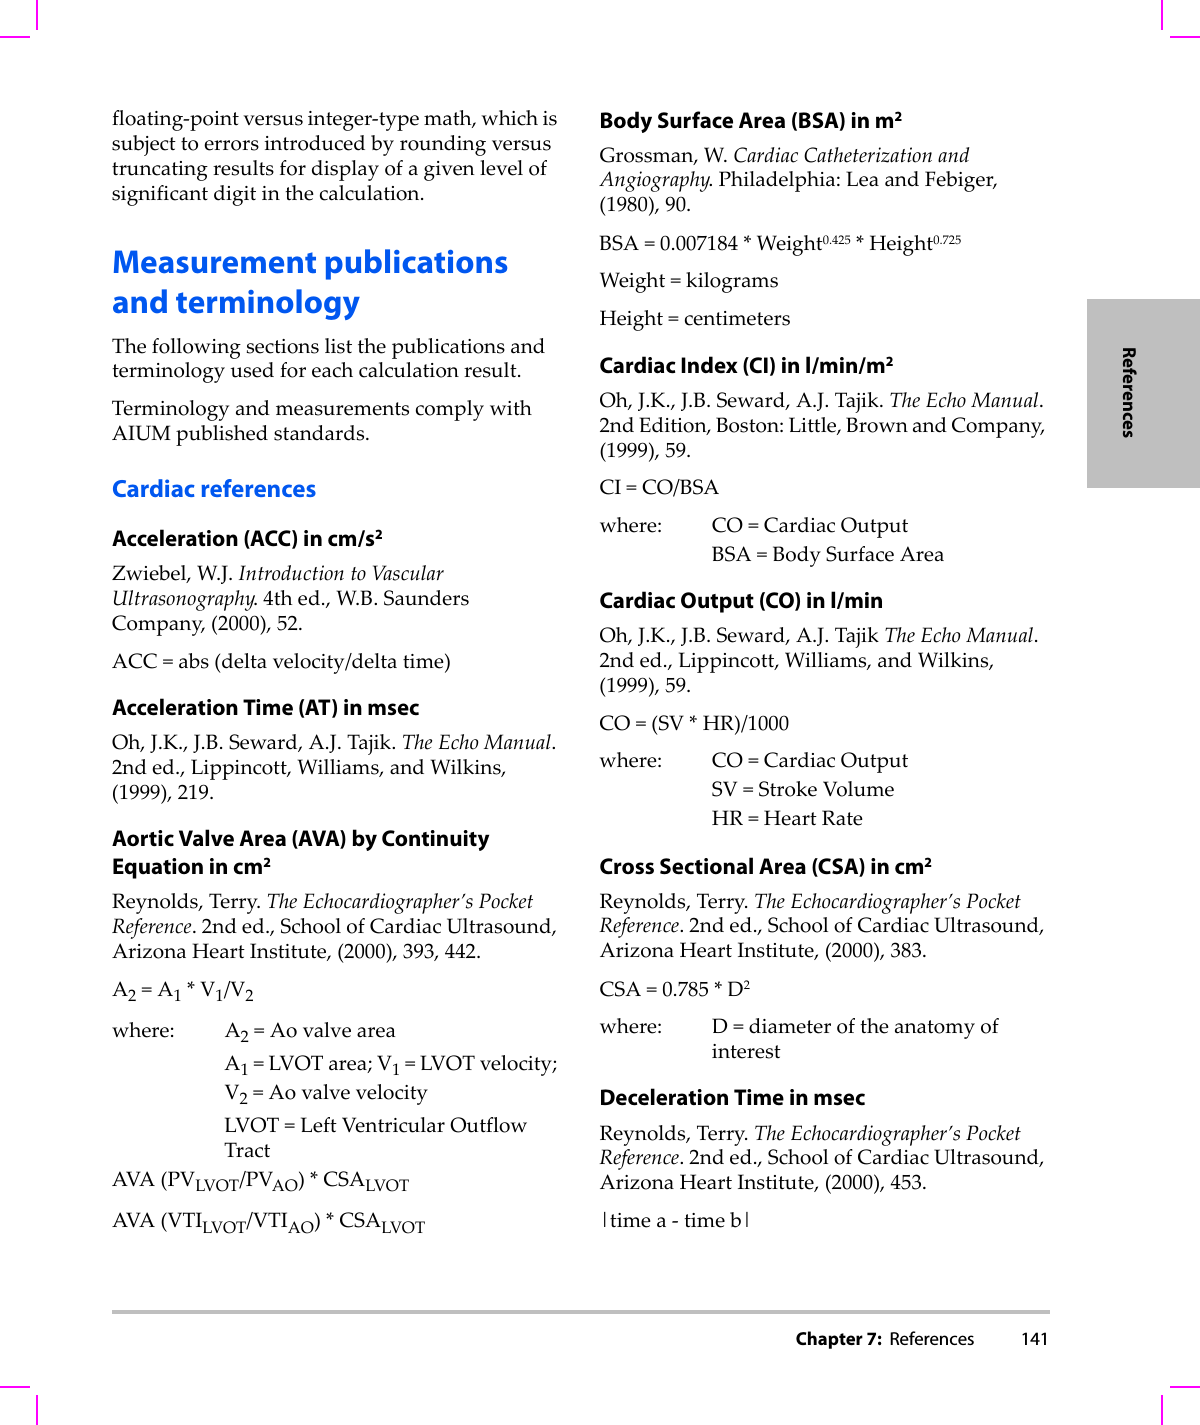
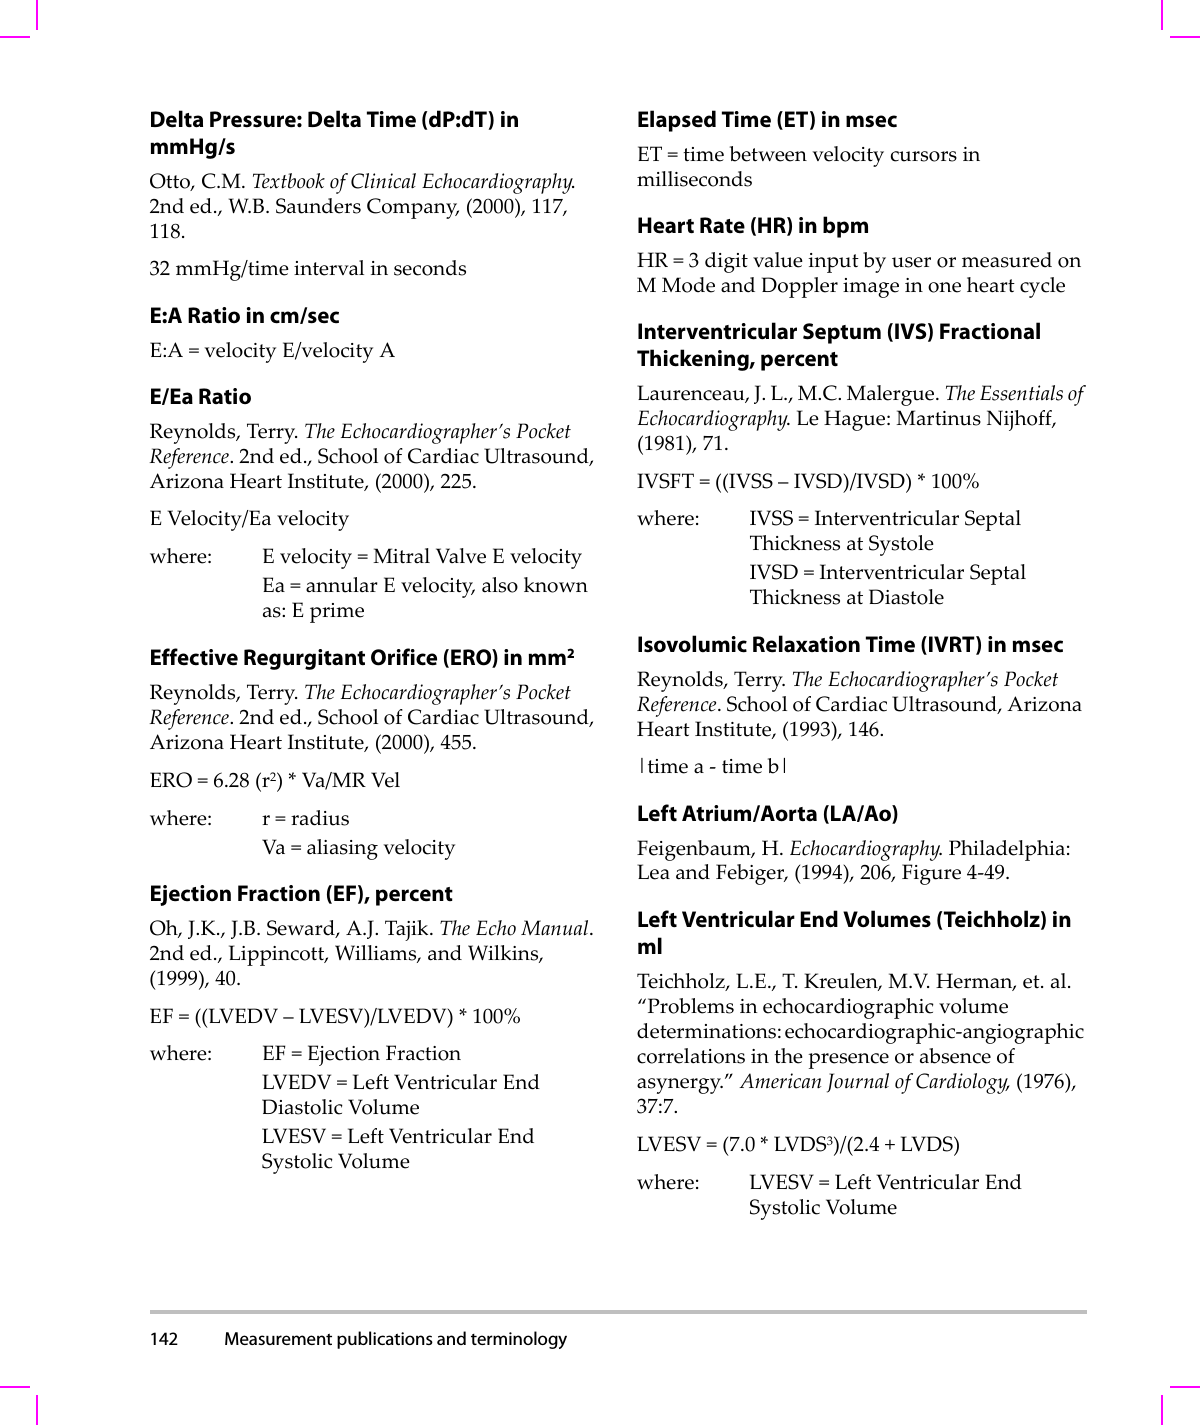
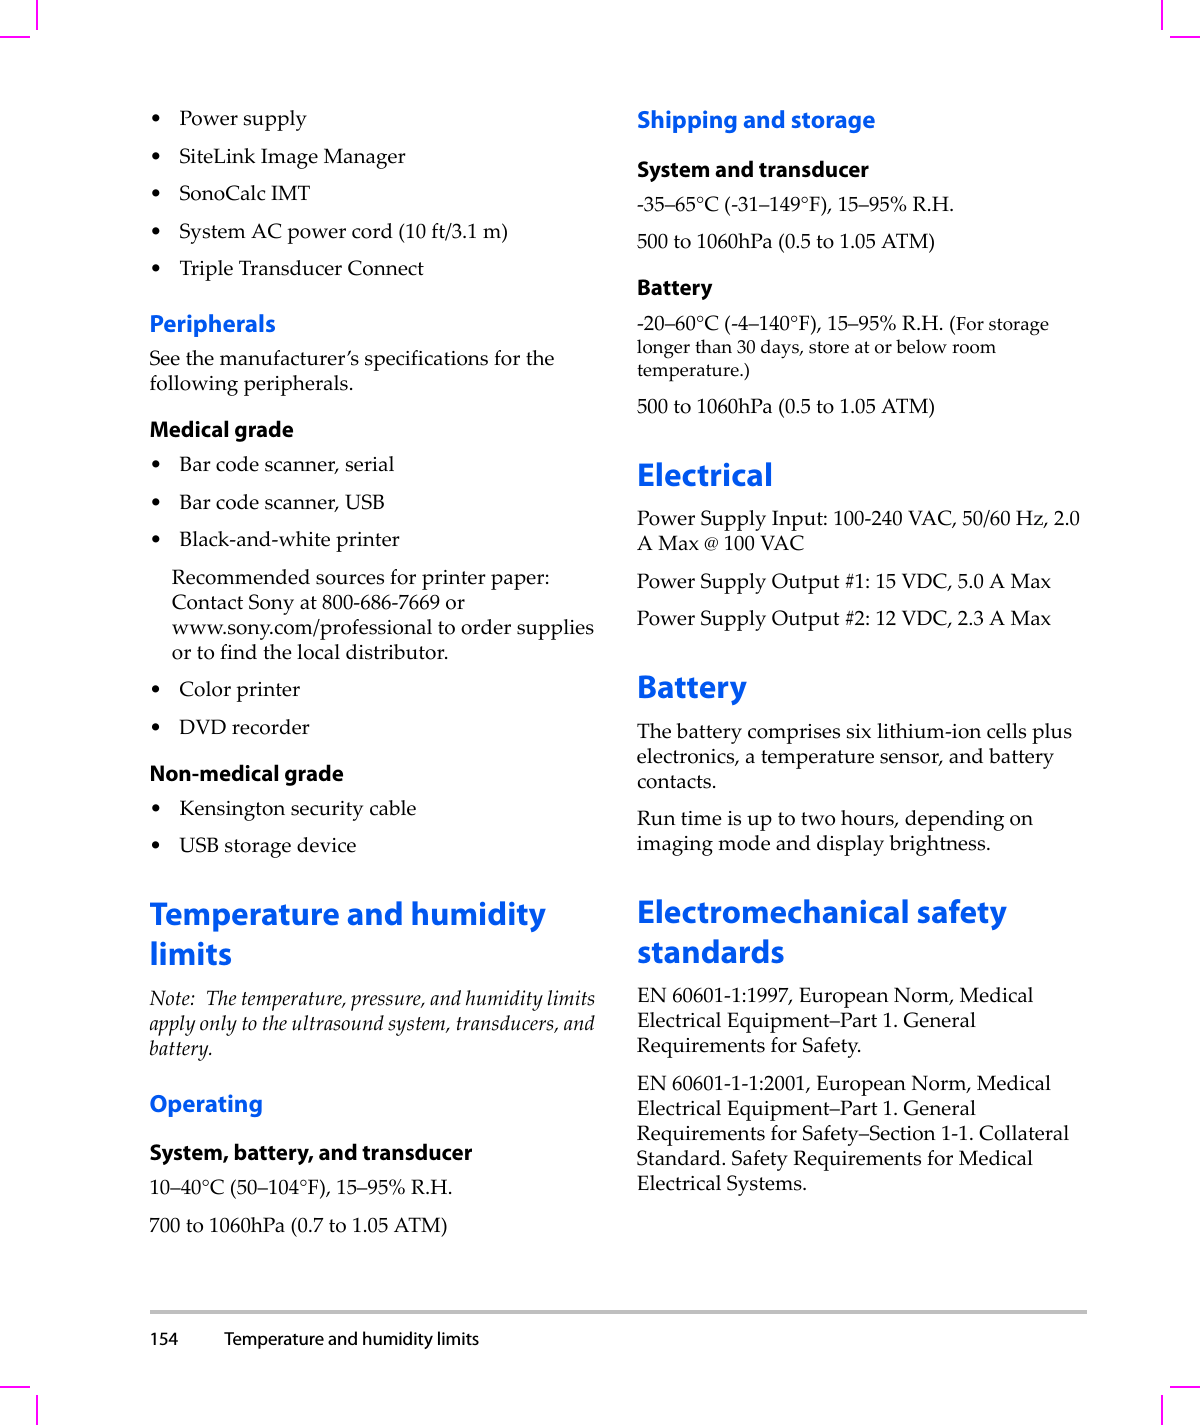
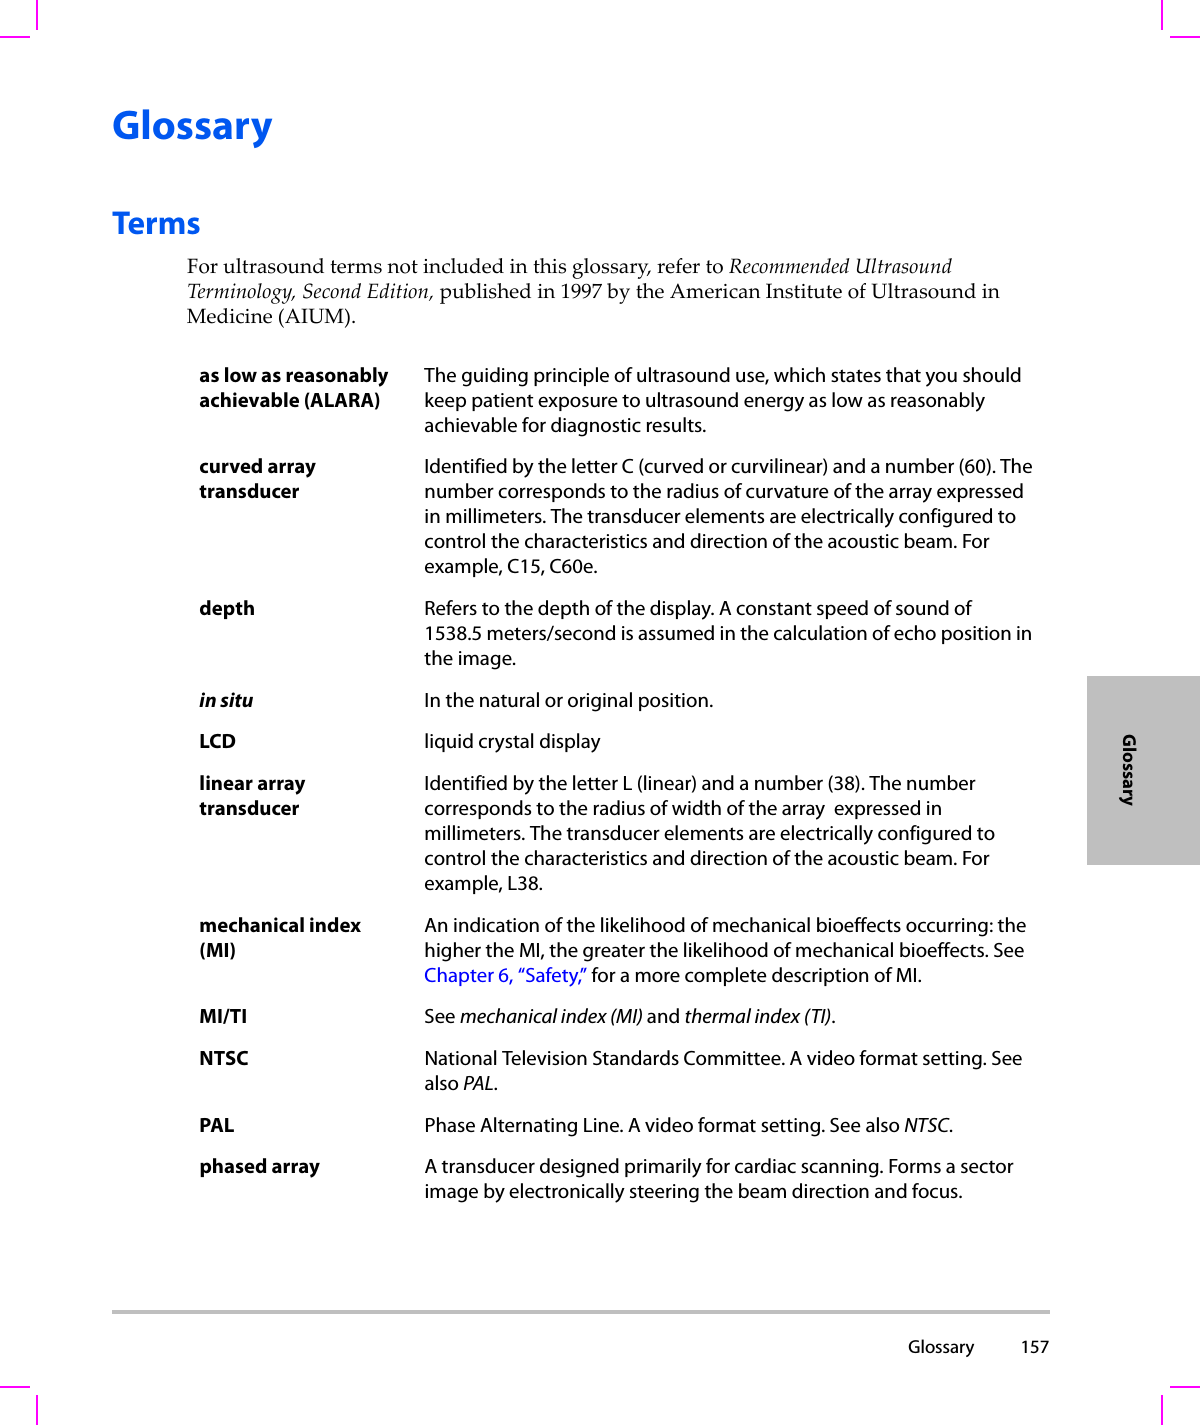
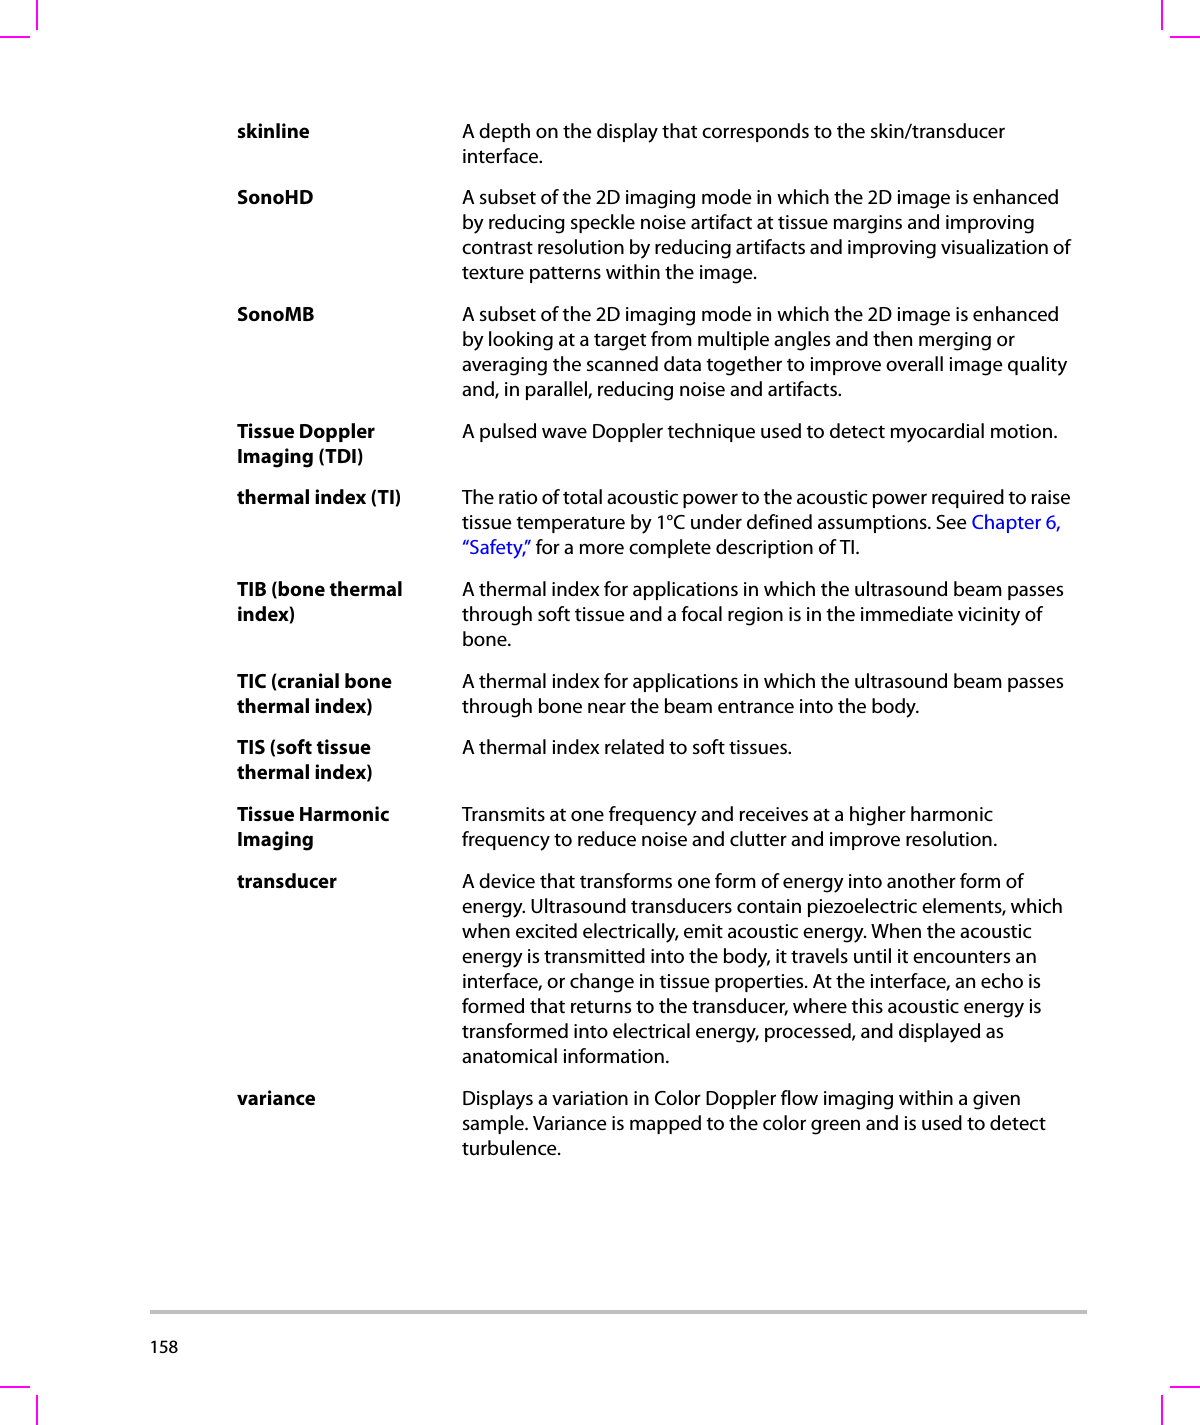
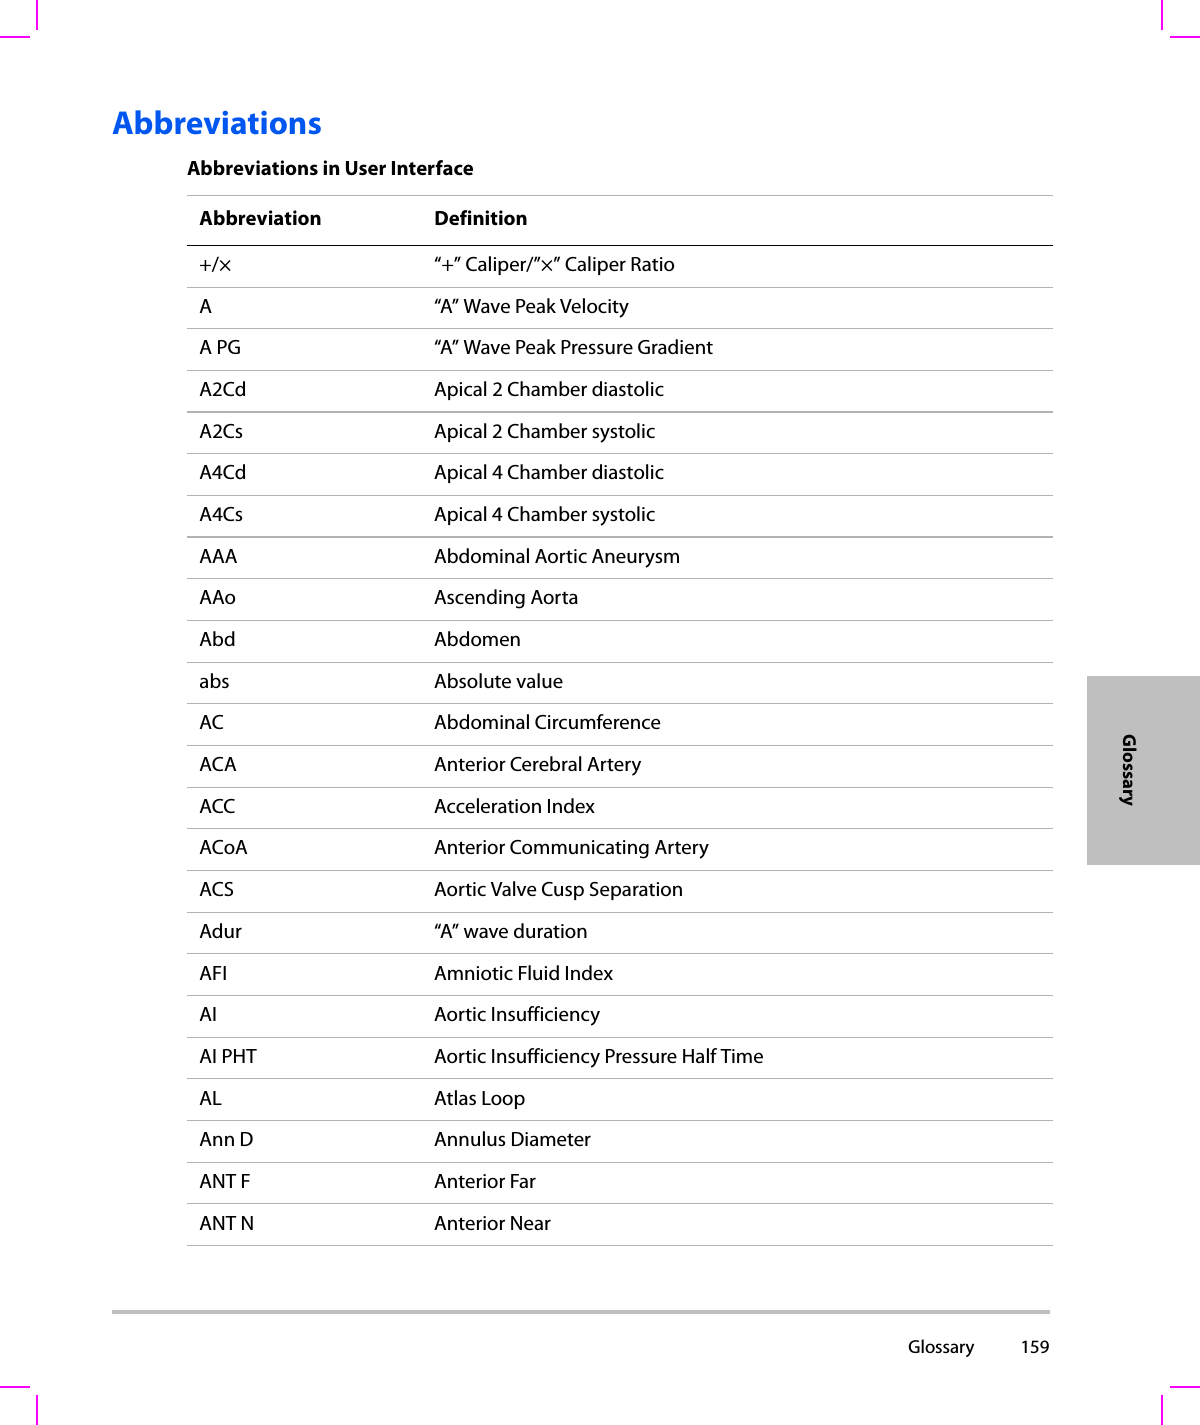
J Three Holding BU2073J Bluetooth Adaptor User Manual M Turbo Ultrasound System User Guide
J-Three International Holding Co., Ltd Bluetooth Adaptor M Turbo Ultrasound System User Guide

User Manual M Turbo
M-TurboUltrasound SystemUser GuideTM
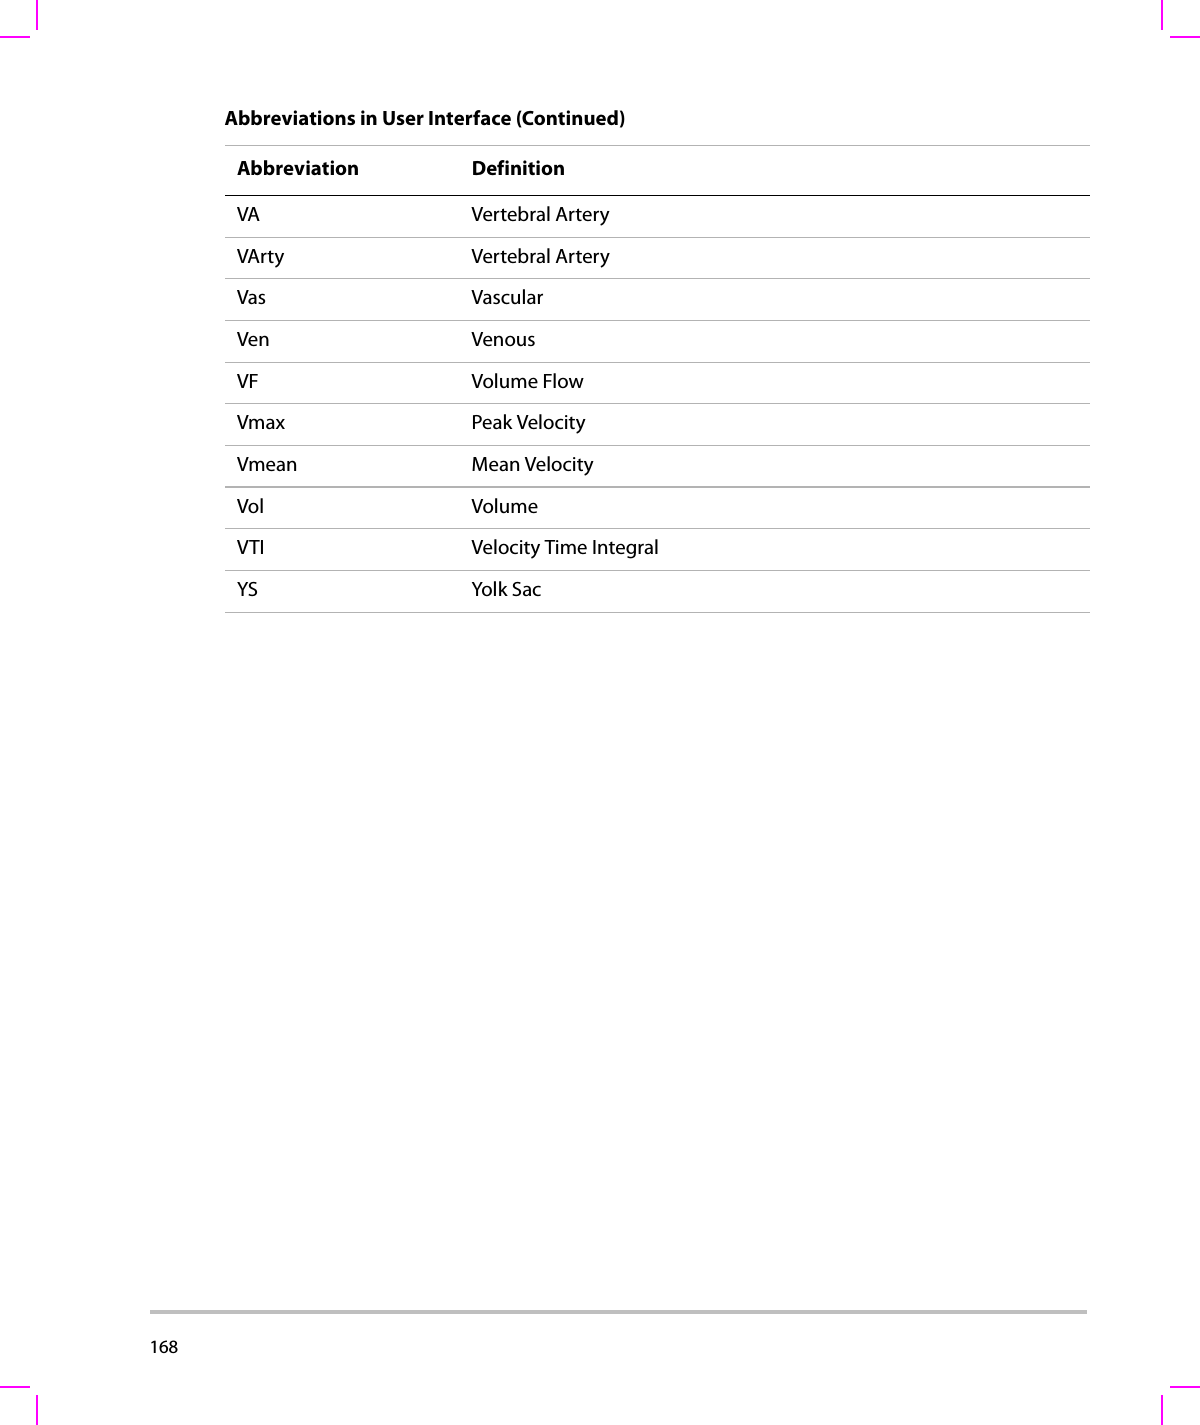
ii    SonoSite,Inc.2191930thDriveSEBothell,WA98021USAT:1‐888‐482‐9449or1‐425‐951‐1200F:1‐425‐951‐1201SonoSiteLtdAlexanderHouse40AWilburyWayHitchinHertsSG40APUKT:+44‐1462‐444800F:+44‐1462‐444801M-Turbo, SiteLink, SonoCalc, SonoHD, SonoSite, and the SonoSite logo are registered trademarks or trademarks of SonoSite, Inc.DICOM is the registered trademark of the National Electrical Manufacturers Association for its standards publications relating to digital communications of medical information.Non-SonoSite product names may be trademarks or registered trademarks of their respective owners. The SonoSite product(s) referenced in this document may be covered by one or more of the following US patents: 5722412, 5817024, 5893363, 6135961, 6203498, 6364839, 6371918, 6383139, 6416475, 6447451, 6471651, 6569101, 6648826, 6575908, 6604630, 6817982, 6835177, 6962566, 7169108, D456509, D461895, D509900, D538432, D544962, D558351, D559390, and by the following counterpart foreign patents: AU727381, AU730822, CA2373065, CN98106133.8, CN98108973.9, DE60021552.0, DE60029777.2, DE60034670.6, DE69730563.5, DE6980539.6, DE69831698.3, FR0875203, FR0881492, FR0815793, FR1180970, FR1175713, GB0875203, GB0881492, GB0815793, GB1180970, GB1180971, GB1175713, IT0881492, IT0815793, IT1175713, KR532359, KR528102, NZ542968, RCD000897368-0001, SP0881492, SP0815793. Patents pending. Caution: Federal (United States) law restricts this device to sale by or on the order of a physician.P07662‐02 10/2008Copyright2008bySonoSite,Inc.Allrightsreserved
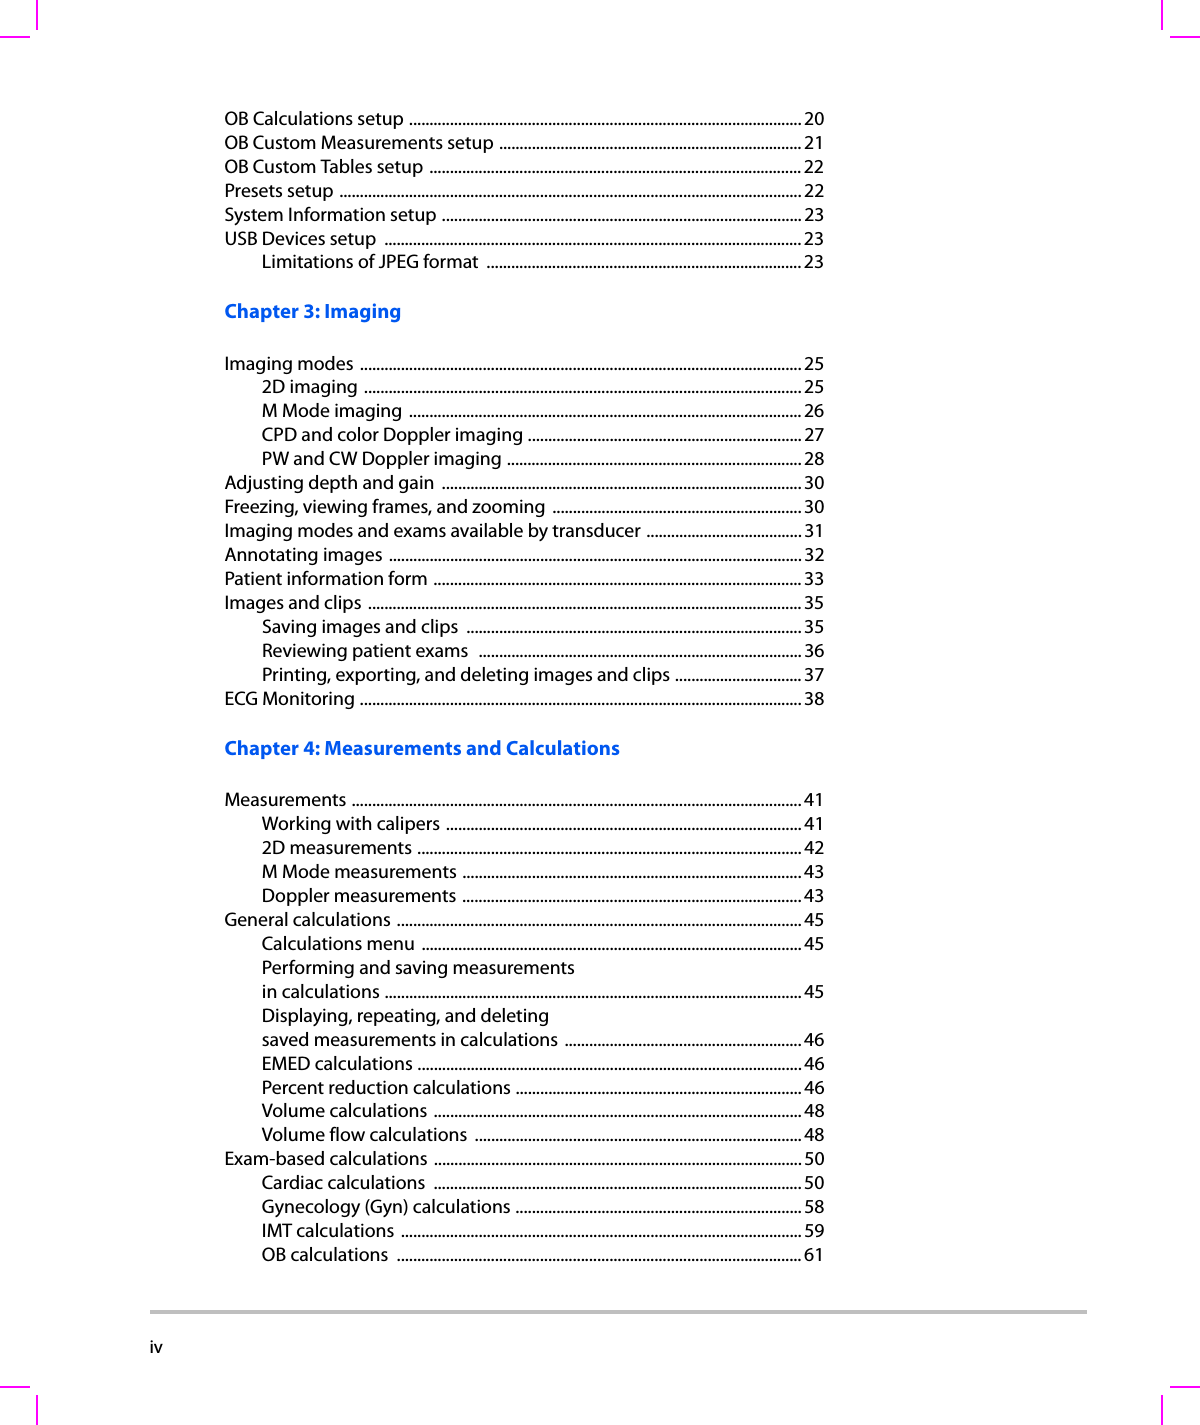
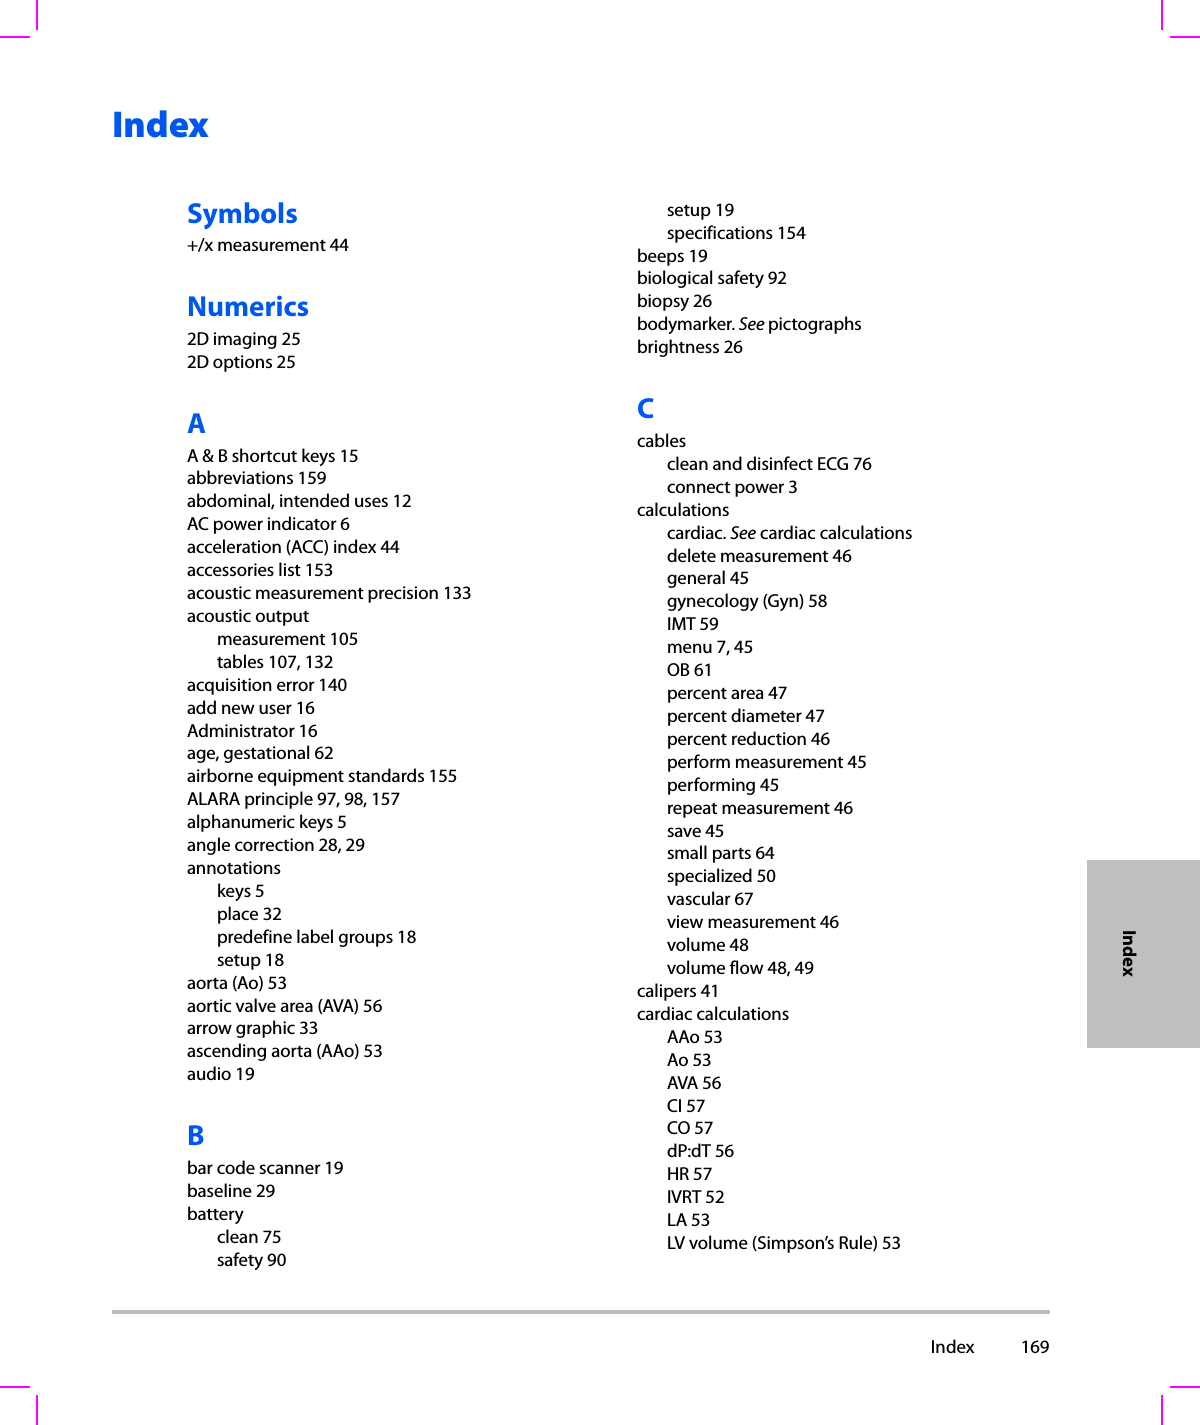
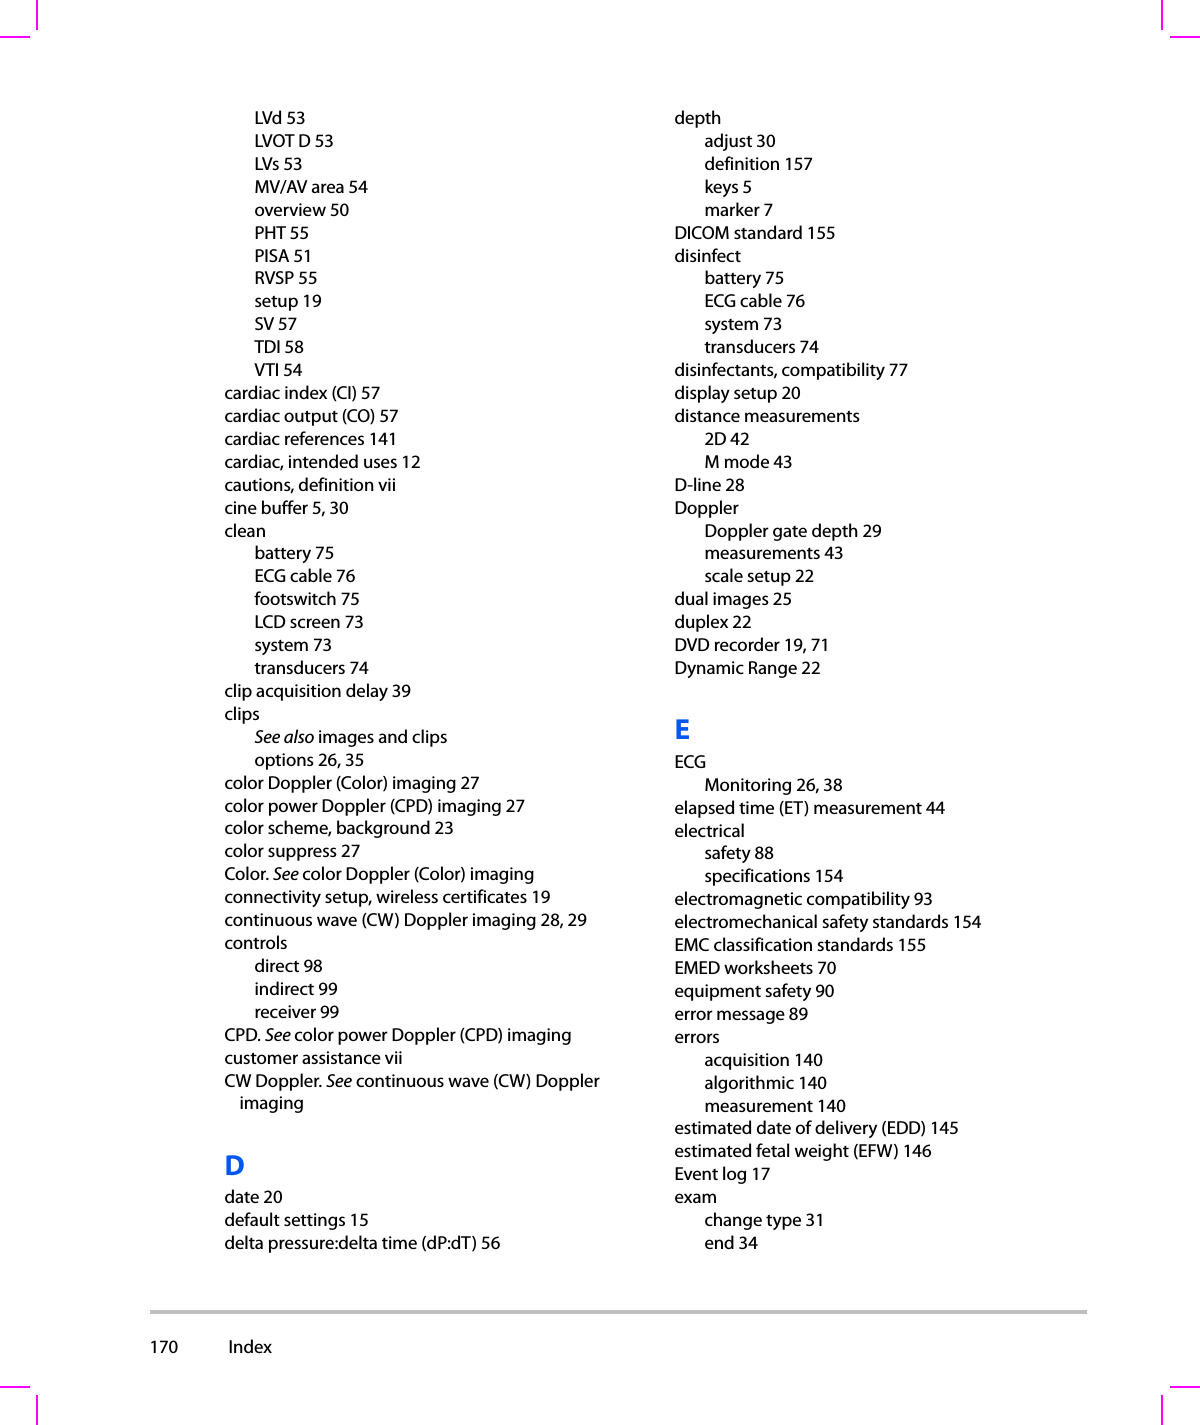
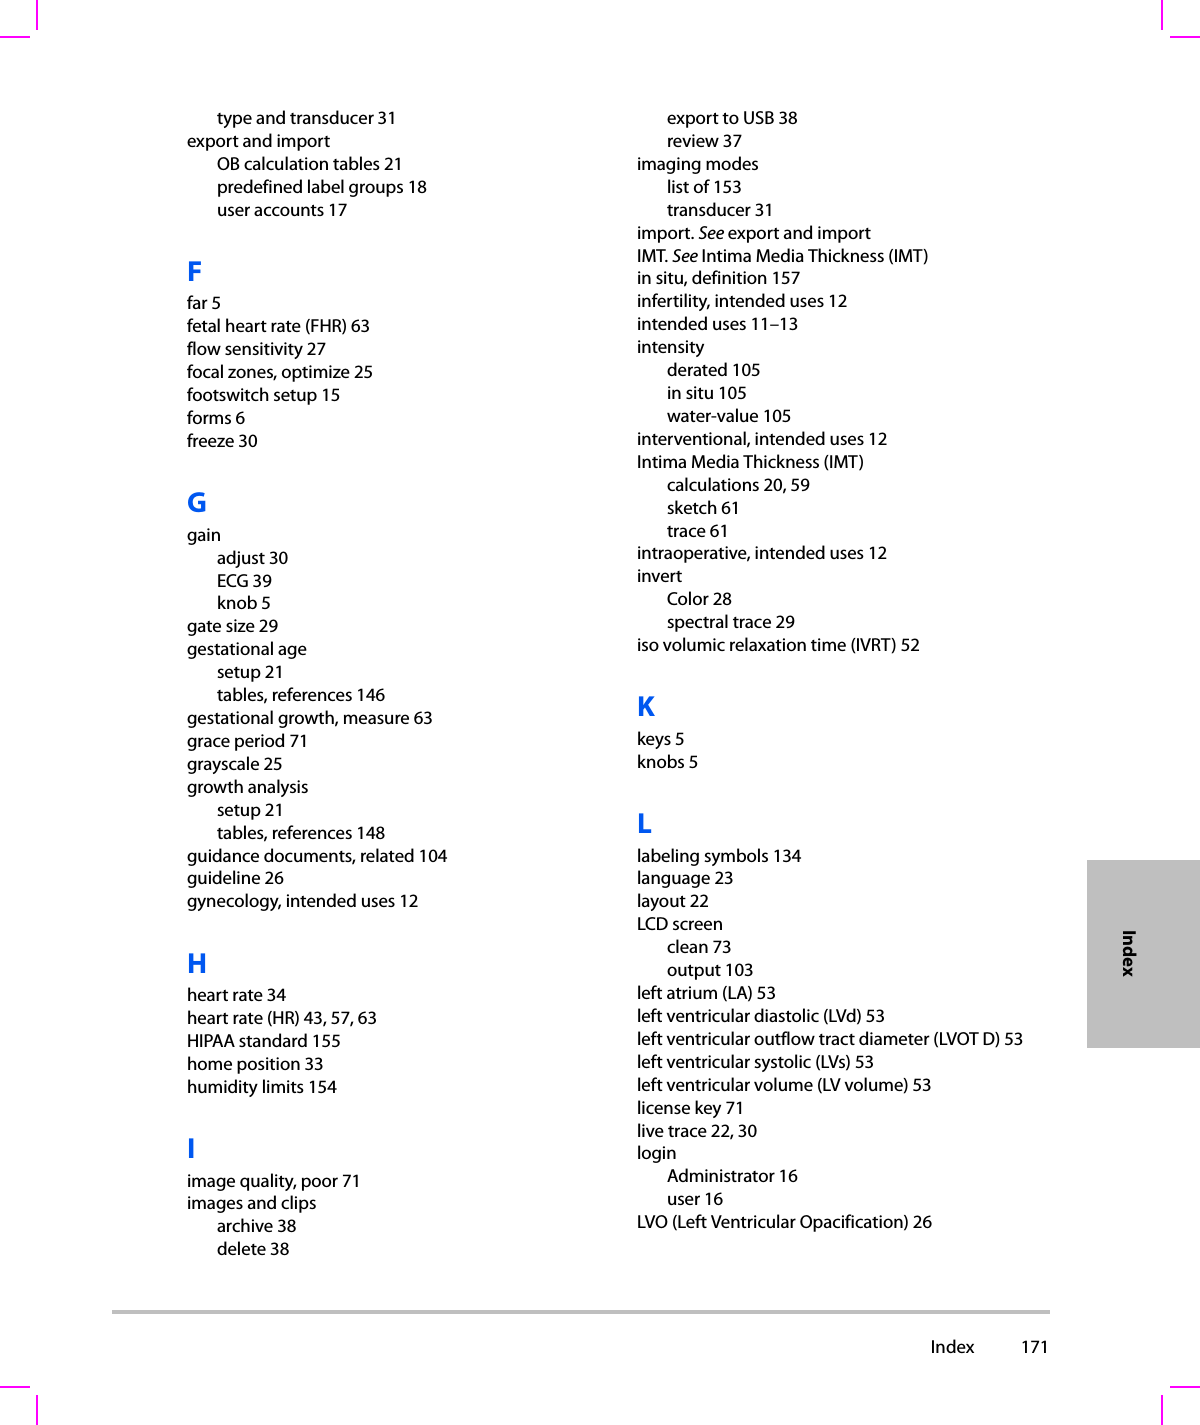
 iiiContentsIntroductionConventions, symbols, and terms  ......................................................................... viiCustomer comments .................................................................................................. viiChapter 1: Getting StartedAbout the system  .......................................................................................................... 1Preparing the system  ................................................................................................... 1Installing or removing the battery ................................................................. 1Using AC power and charging the battery  ................................................. 2Turning the system on or off ............................................................................ 3Connecting transducers  .................................................................................... 3Inserting and removing USB storage devices ............................................ 4System controls .............................................................................................................. 5Screen layout  ..................................................................................................................7General interaction ....................................................................................................... 8Touchpad and cursor  .......................................................................................... 8On-screen options  ............................................................................................... 8Annotation and text ............................................................................................ 9Preparing transducers  ...............................................................................................10Training videos  .............................................................................................................11Intended uses  ...............................................................................................................11Chapter 2: System SetupDisplaying the setup pages  .....................................................................................15Restoring default settings ........................................................................................15A & B Key, Footswitch setup  ....................................................................................15Administration setup  .................................................................................................15Security settings  .................................................................................................16User setup  .............................................................................................................16Exporting or importing user accounts  .......................................................17Exporting and clearing the Event log  .........................................................17Logging in as user ..............................................................................................18Choosing a secure password  .........................................................................18Annotations setup  ......................................................................................................18Audio, Battery setup ...................................................................................................19Cardiac Calculations setup  ......................................................................................19Connectivity setup ......................................................................................................19Date and Time setup ..................................................................................................20Display Information setup ........................................................................................20IMT Calculations setup  ..............................................................................................20Network Status setup .................................................................................................20
iv    OB Calculations setup ................................................................................................20OB Custom Measurements setup .......................................................................... 21OB Custom Tables setup ...........................................................................................22Presets setup ................................................................................................................. 22System Information setup ........................................................................................23USB Devices setup  ...................................................................................................... 23Limitations of JPEG format  ............................................................................. 23Chapter 3: ImagingImaging modes ............................................................................................................ 252D imaging ...........................................................................................................25M Mode imaging ................................................................................................ 26CPD and color Doppler imaging ...................................................................27PW and CW Doppler imaging ........................................................................ 28Adjusting depth and gain  ........................................................................................30Freezing, viewing frames, and zooming ............................................................. 30Imaging modes and exams available by transducer ...................................... 31Annotating images ..................................................................................................... 32Patient information form .......................................................................................... 33Images and clips  .......................................................................................................... 35Saving images and clips  .................................................................................. 35Reviewing patient exams  ...............................................................................36Printing, exporting, and deleting images and clips ...............................37ECG Monitoring ............................................................................................................ 38Chapter 4: Measurements and CalculationsMeasurements .............................................................................................................. 41Working with calipers .......................................................................................412D measurements ..............................................................................................42M Mode measurements ................................................................................... 43Doppler measurements ................................................................................... 43General calculations ...................................................................................................45Calculations menu ............................................................................................. 45Performing and saving measurementsin calculations ......................................................................................................45Displaying, repeating, and deletingsaved measurements in calculations .......................................................... 46EMED calculations ..............................................................................................46Percent reduction calculations ......................................................................46Volume calculations ..........................................................................................48Volume flow calculations  ................................................................................ 48Exam-based calculations ..........................................................................................50Cardiac calculations  .......................................................................................... 50Gynecology (Gyn) calculations ...................................................................... 58IMT calculations .................................................................................................. 59OB calculations  ...................................................................................................61
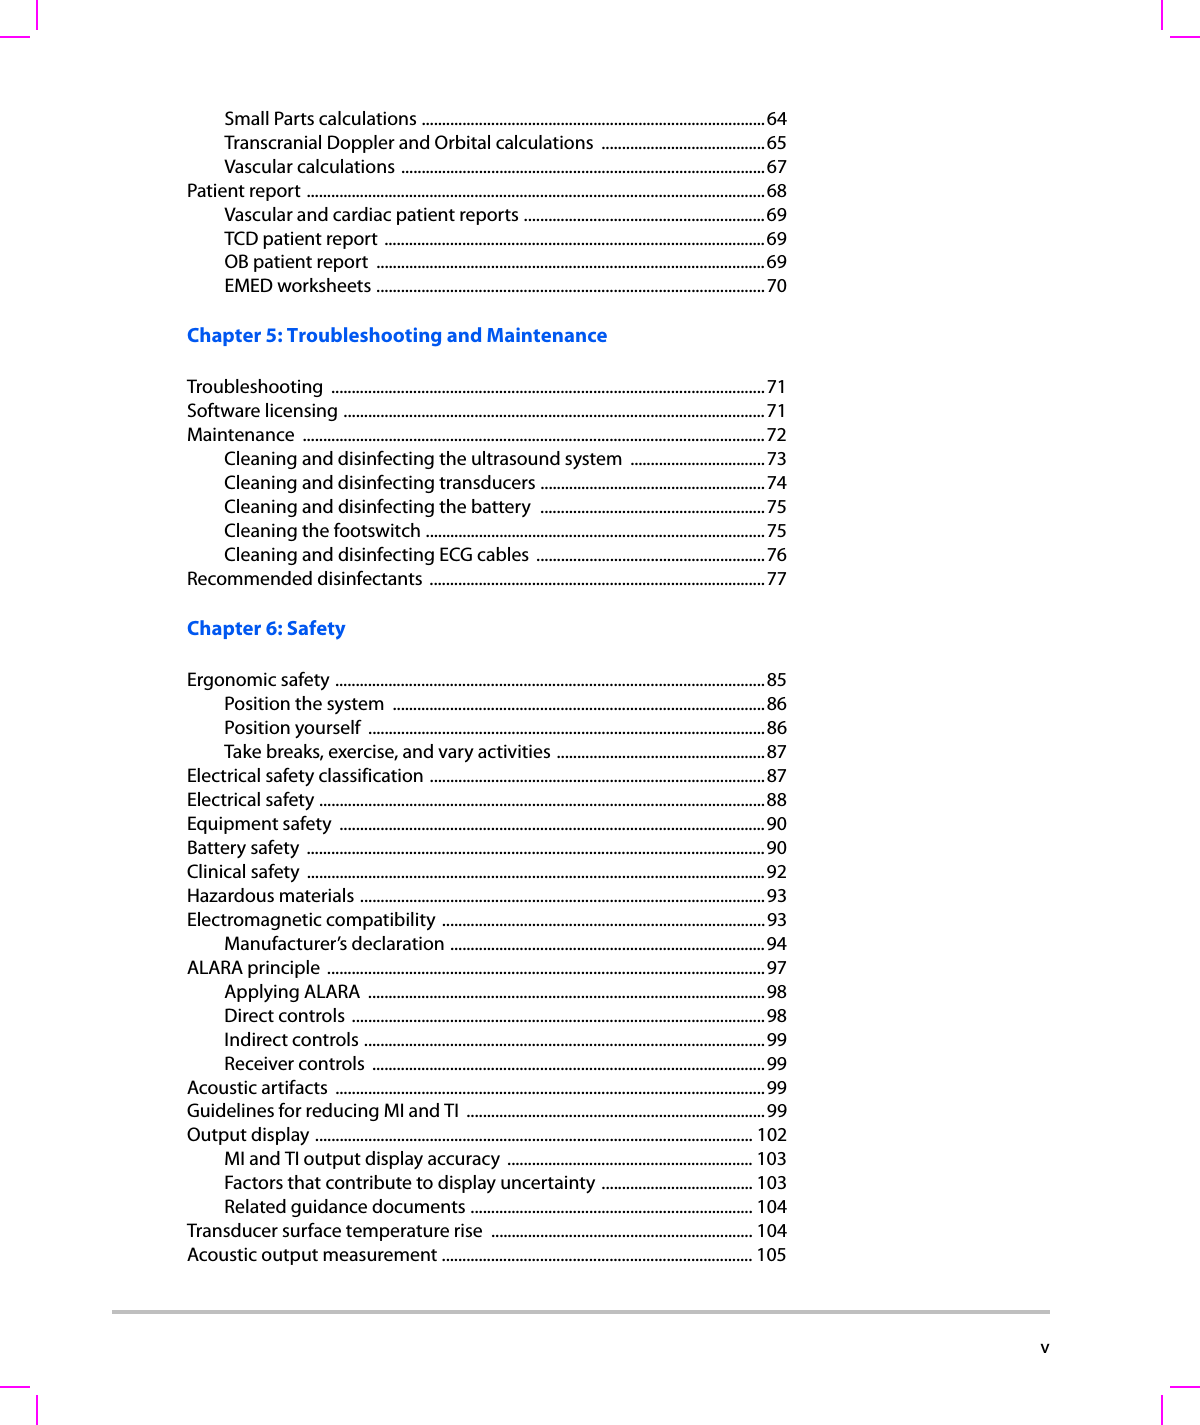
 vSmall Parts calculations ....................................................................................64Transcranial Doppler and Orbital calculations ........................................65Vascular calculations .........................................................................................67Patient report ................................................................................................................68Vascular and cardiac patient reports ...........................................................69TCD patient report .............................................................................................69OB patient report  ...............................................................................................69EMED worksheets ...............................................................................................70Chapter 5: Troubleshooting and MaintenanceTroubleshooting ..........................................................................................................71Software licensing .......................................................................................................71Maintenance .................................................................................................................72Cleaning and disinfecting the ultrasound system  .................................73Cleaning and disinfecting transducers .......................................................74Cleaning and disinfecting the battery  .......................................................75Cleaning the footswitch ...................................................................................75Cleaning and disinfecting ECG cables  ........................................................76Recommended disinfectants  ..................................................................................77Chapter 6: SafetyErgonomic safety .........................................................................................................85Position the system  ...........................................................................................86Position yourself  .................................................................................................86Take breaks, exercise, and vary activities ...................................................87Electrical safety classification ..................................................................................87Electrical safety .............................................................................................................88Equipment safety  ........................................................................................................90Battery safety  ................................................................................................................90Clinical safety  ................................................................................................................92Hazardous materials ...................................................................................................93Electromagnetic compatibility ...............................................................................93Manufacturer’s declaration .............................................................................94ALARA principle  ...........................................................................................................97Applying ALARA  .................................................................................................98Direct controls .....................................................................................................98Indirect controls ..................................................................................................99Receiver controls  ................................................................................................99Acoustic artifacts  .........................................................................................................99Guidelines for reducing MI and TI  .........................................................................99Output display ........................................................................................................... 102MI and TI output display accuracy  ............................................................ 103Factors that contribute to display uncertainty ..................................... 103Related guidance documents ..................................................................... 104Transducer surface temperature rise  ................................................................ 104Acoustic output measurement ............................................................................ 105
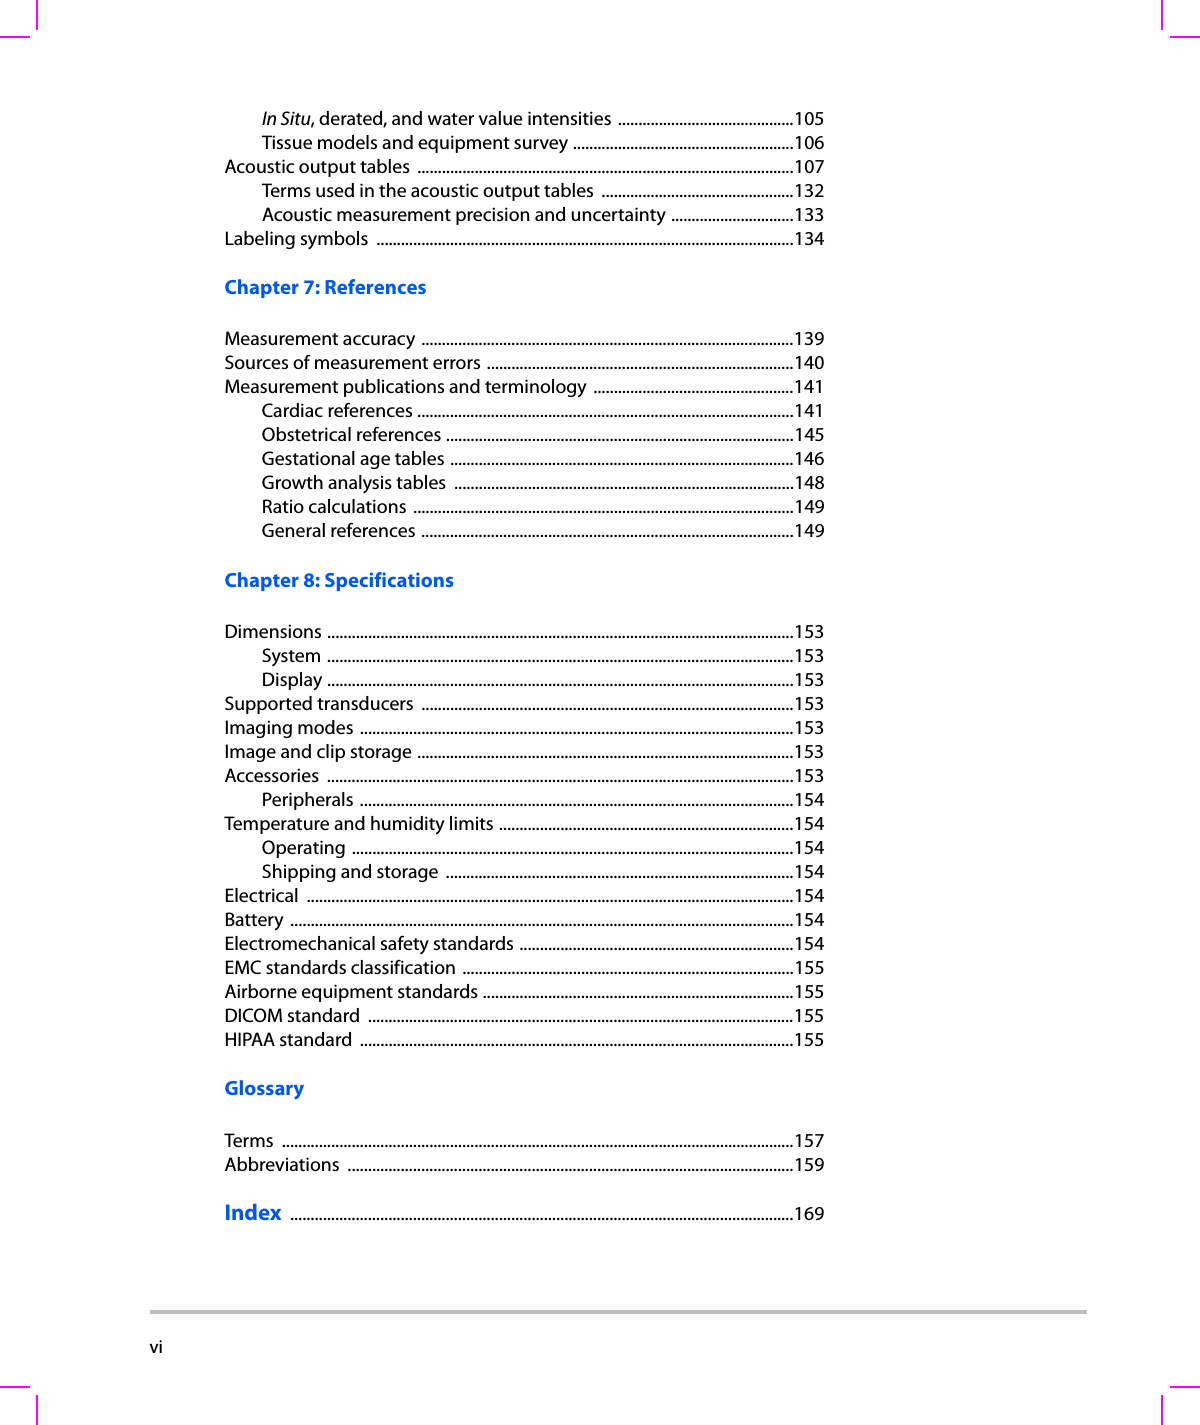
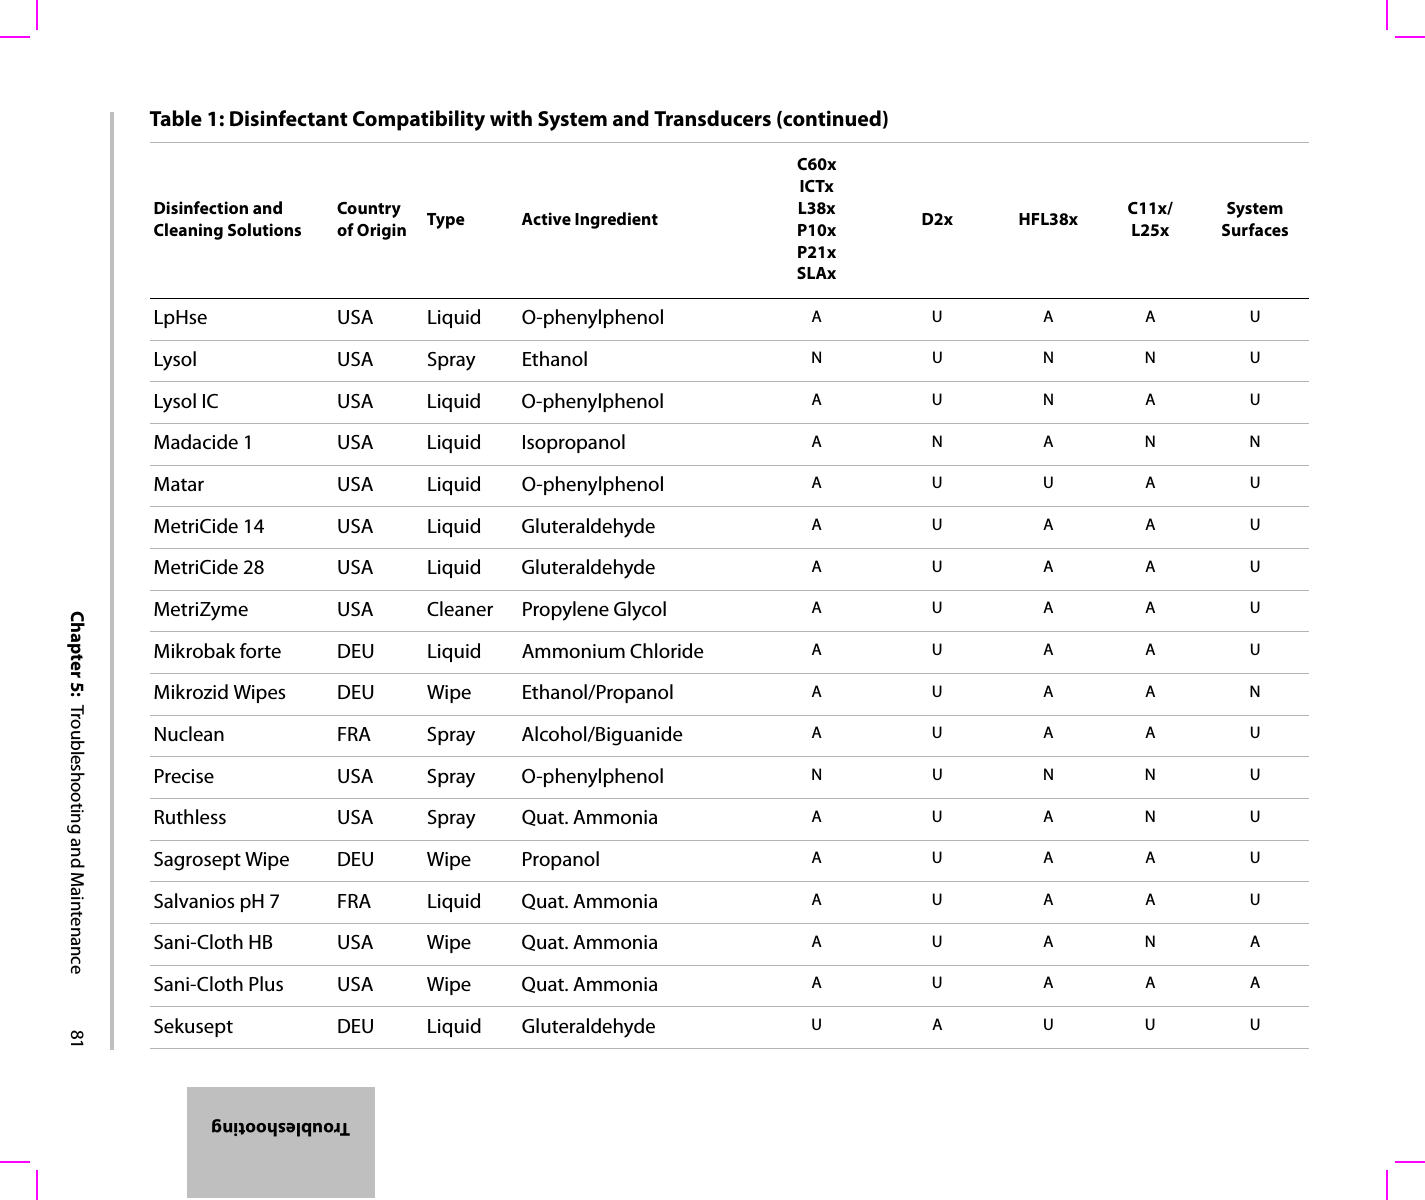
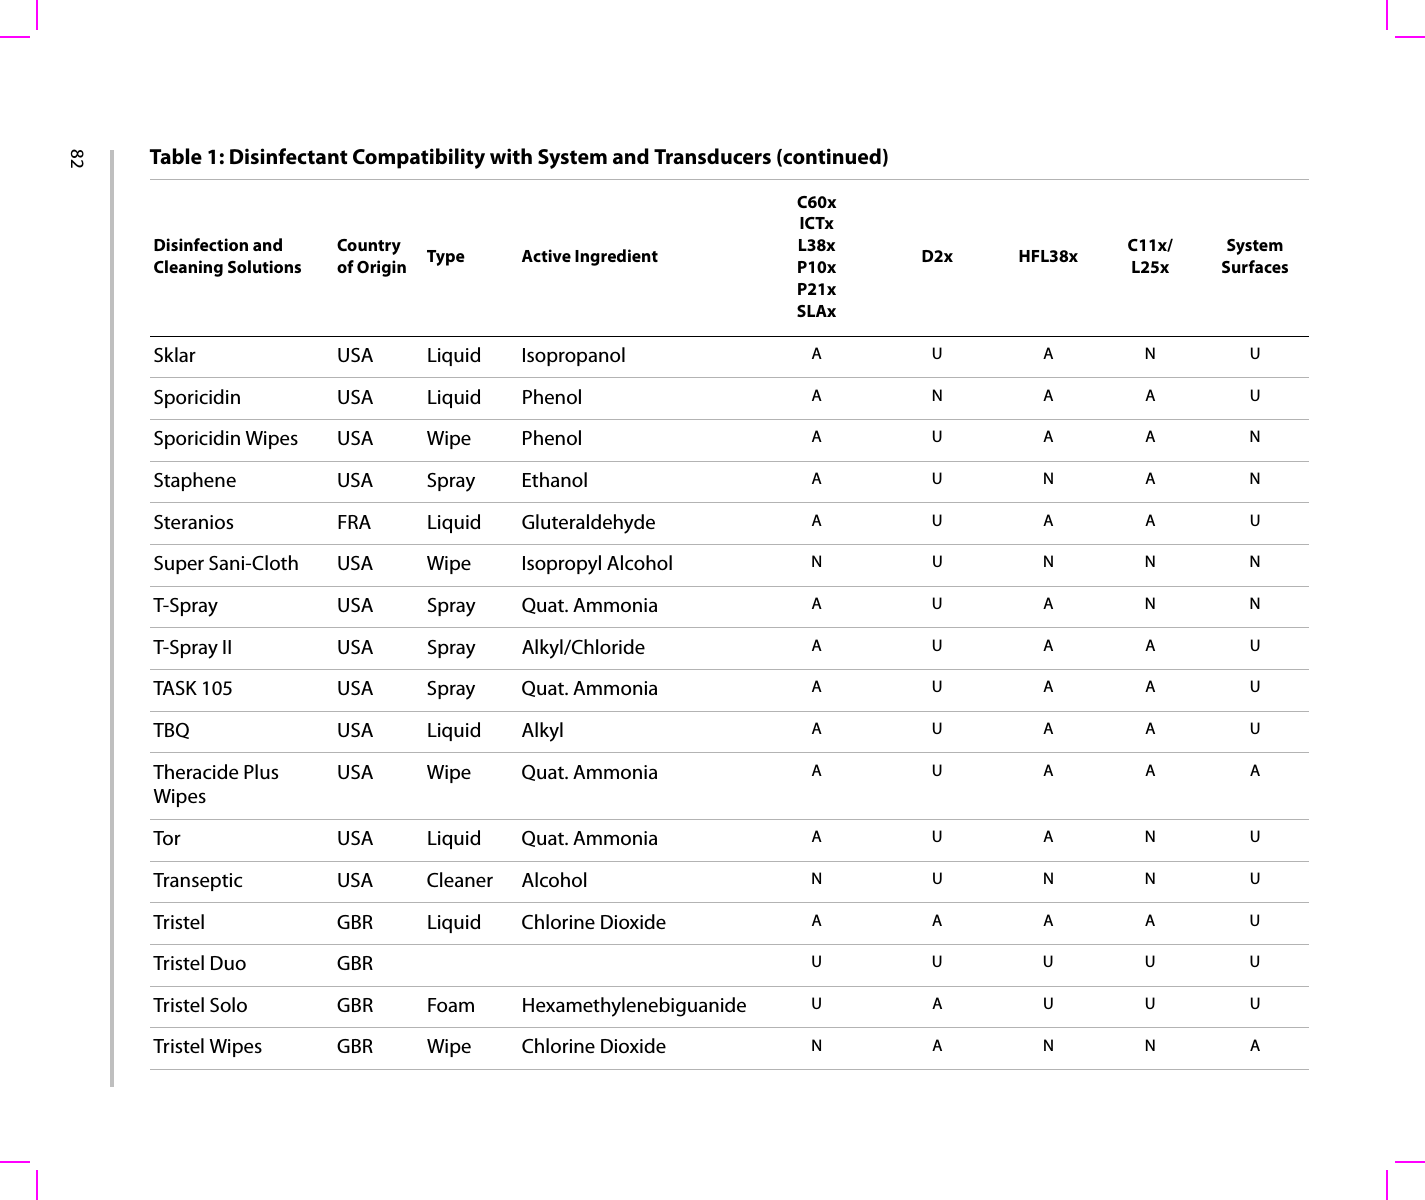
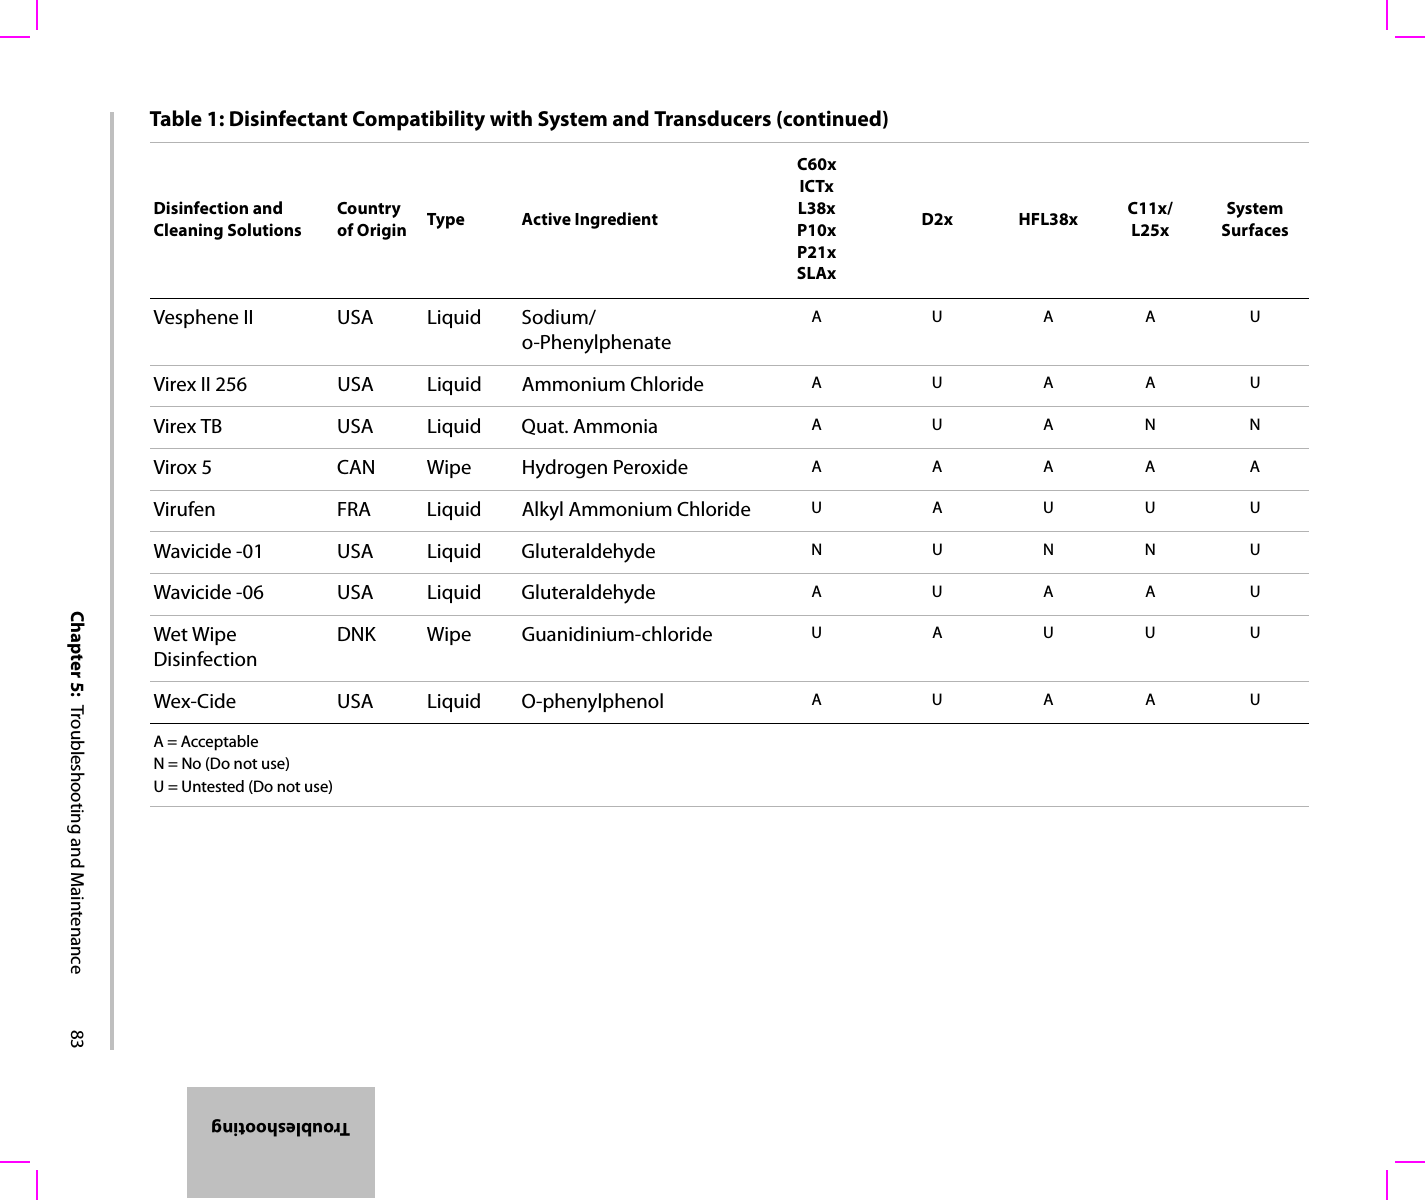
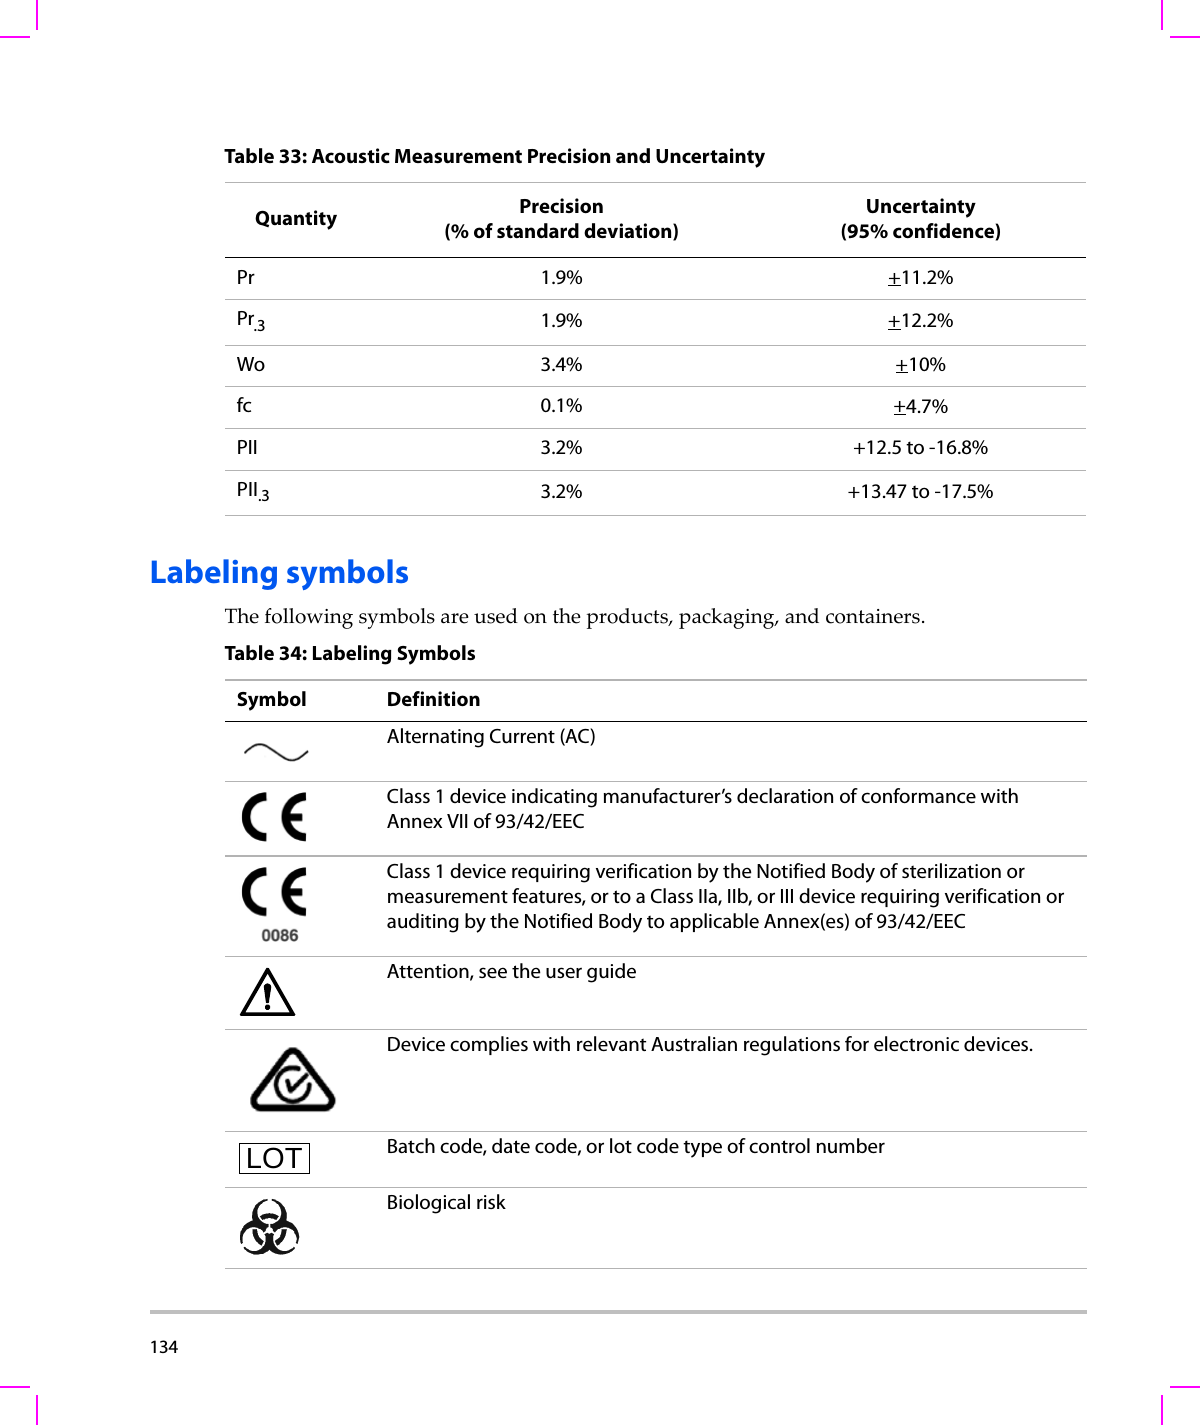
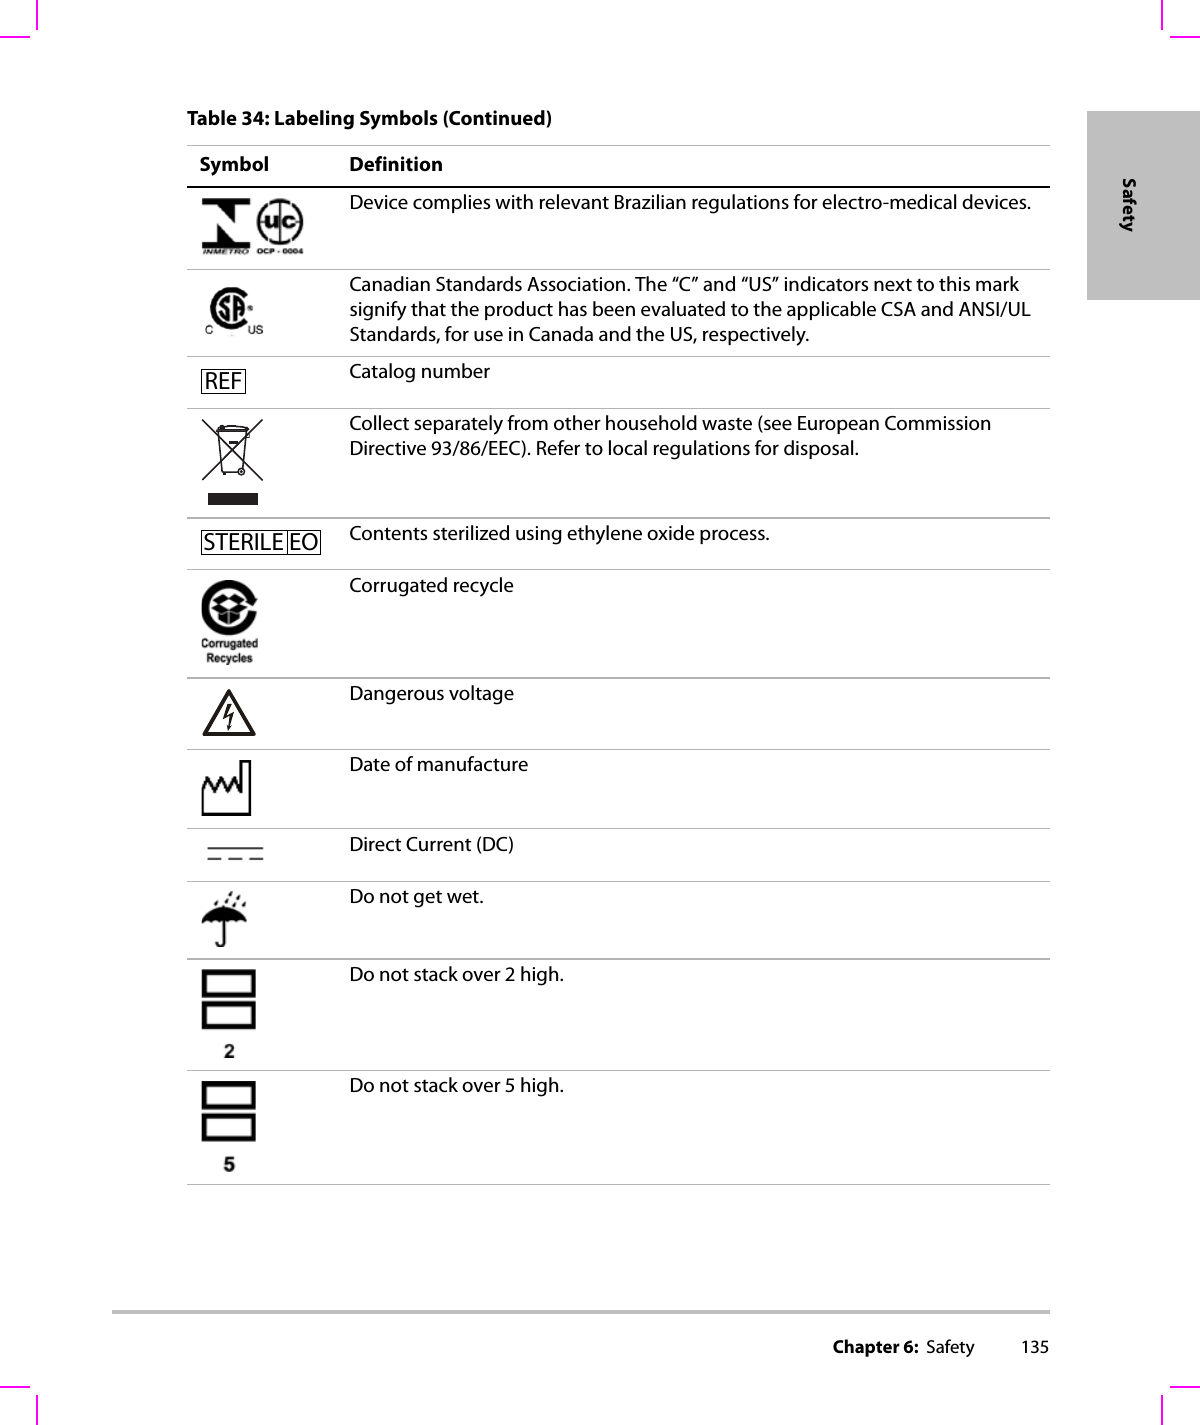
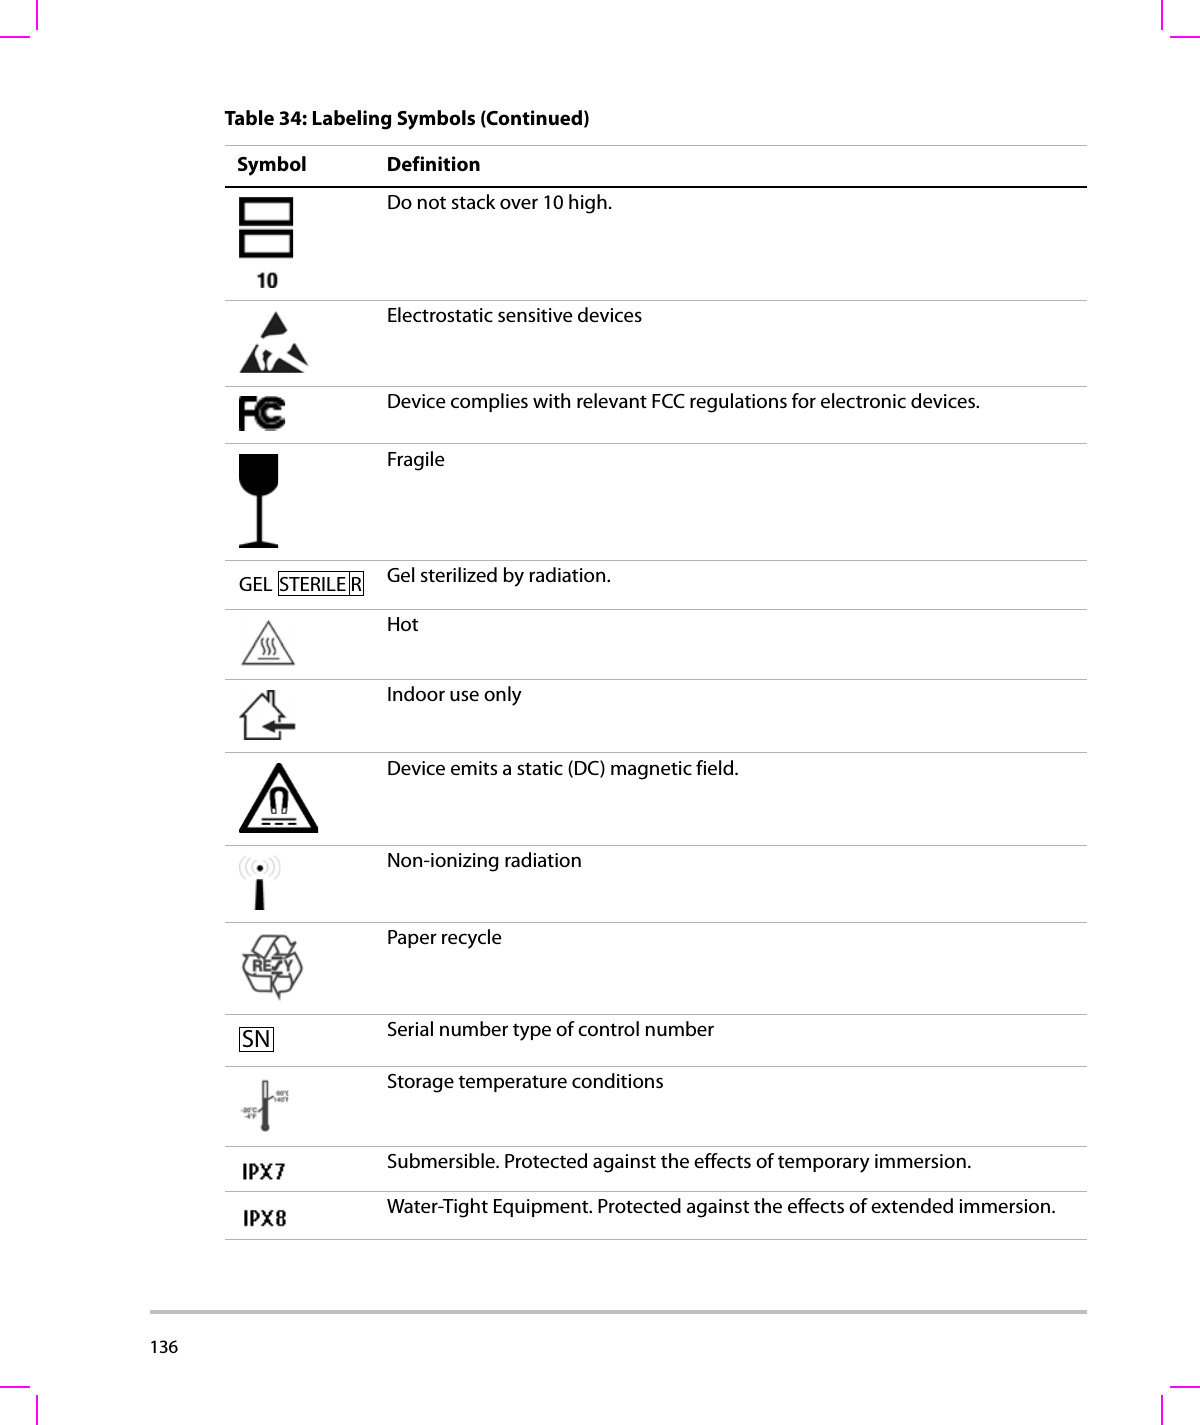
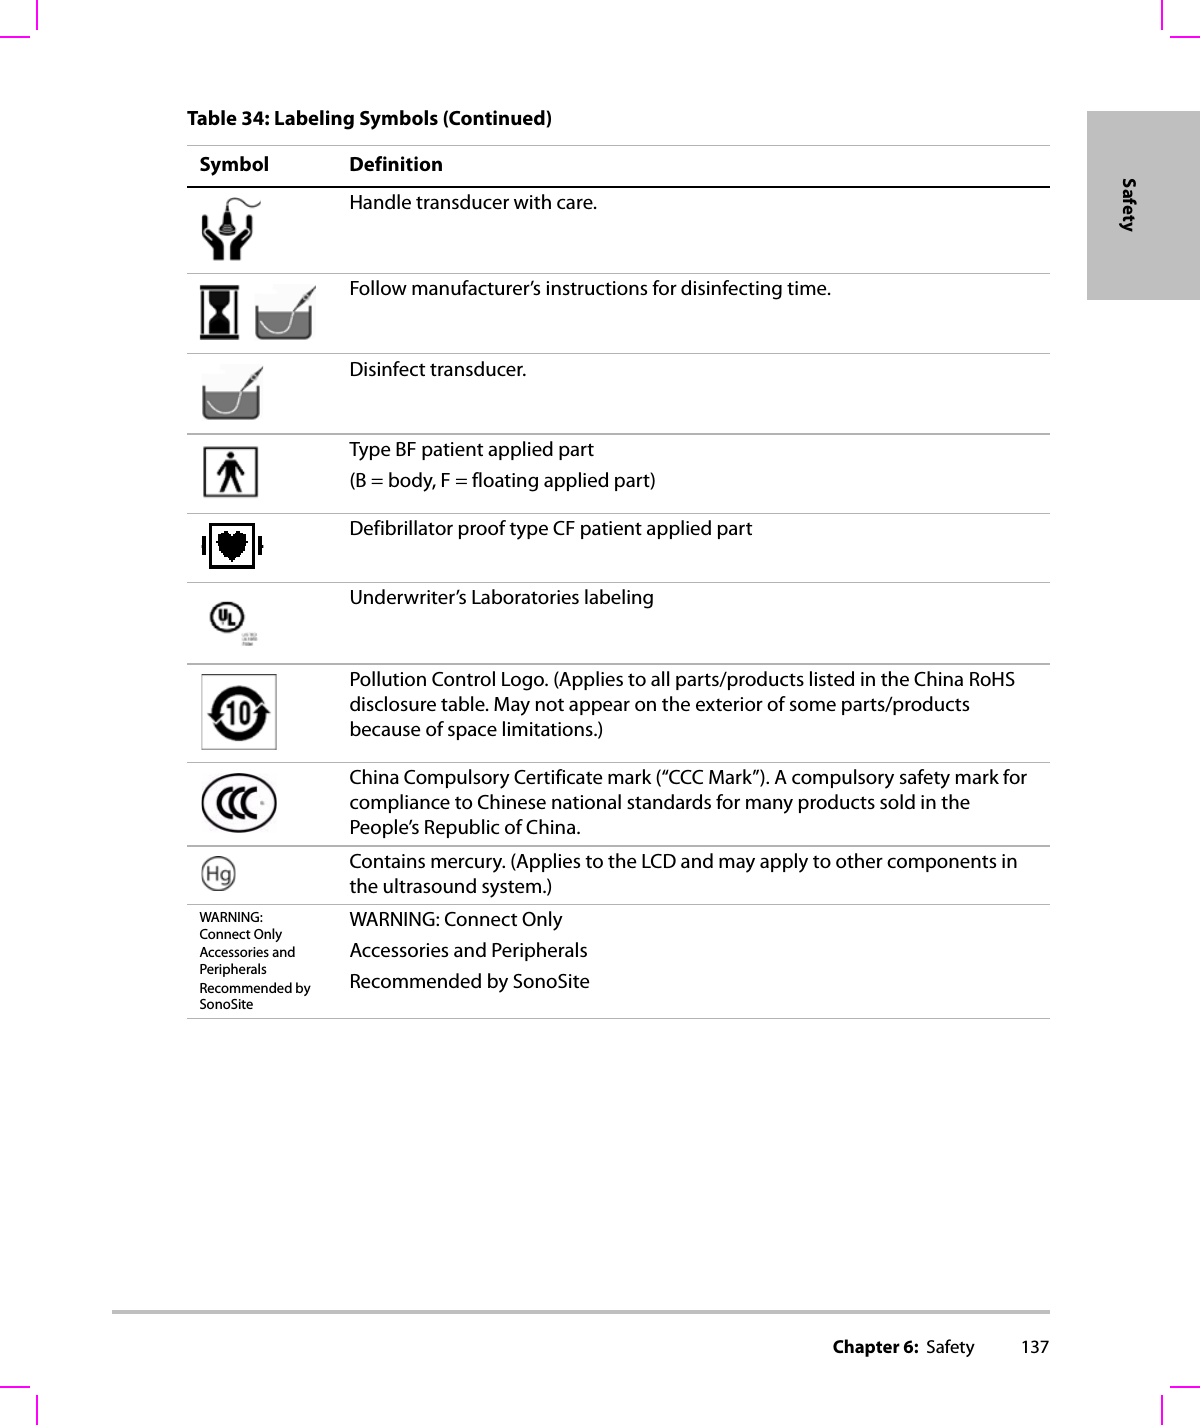
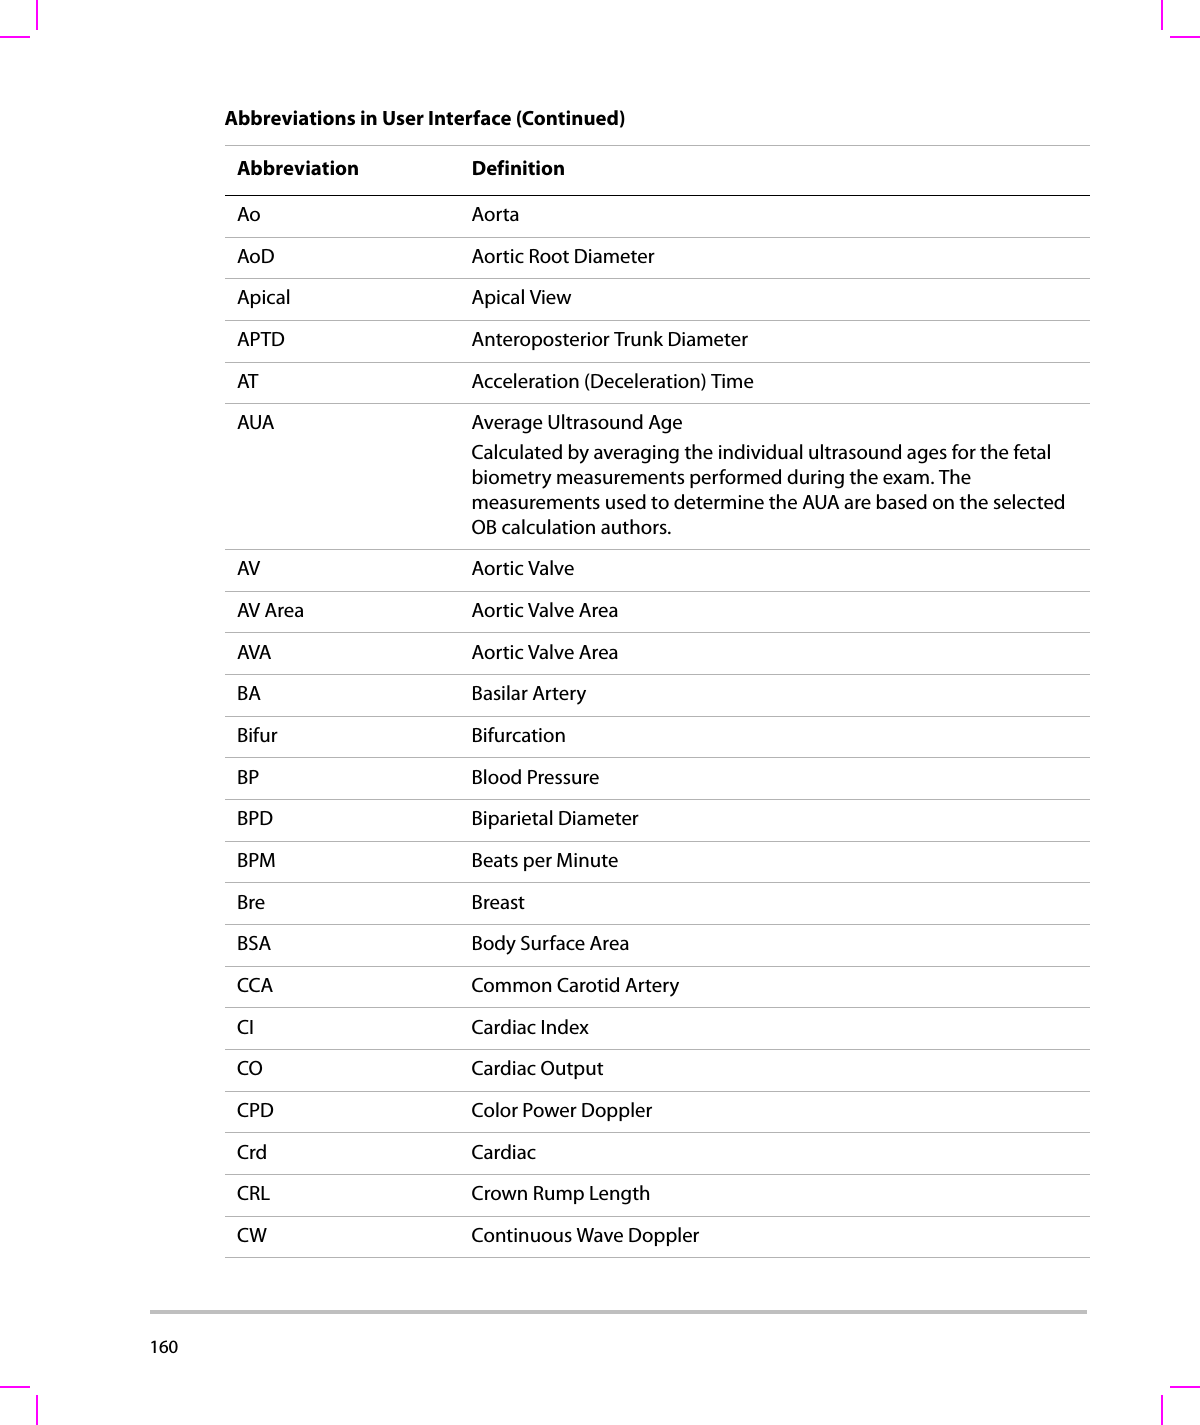
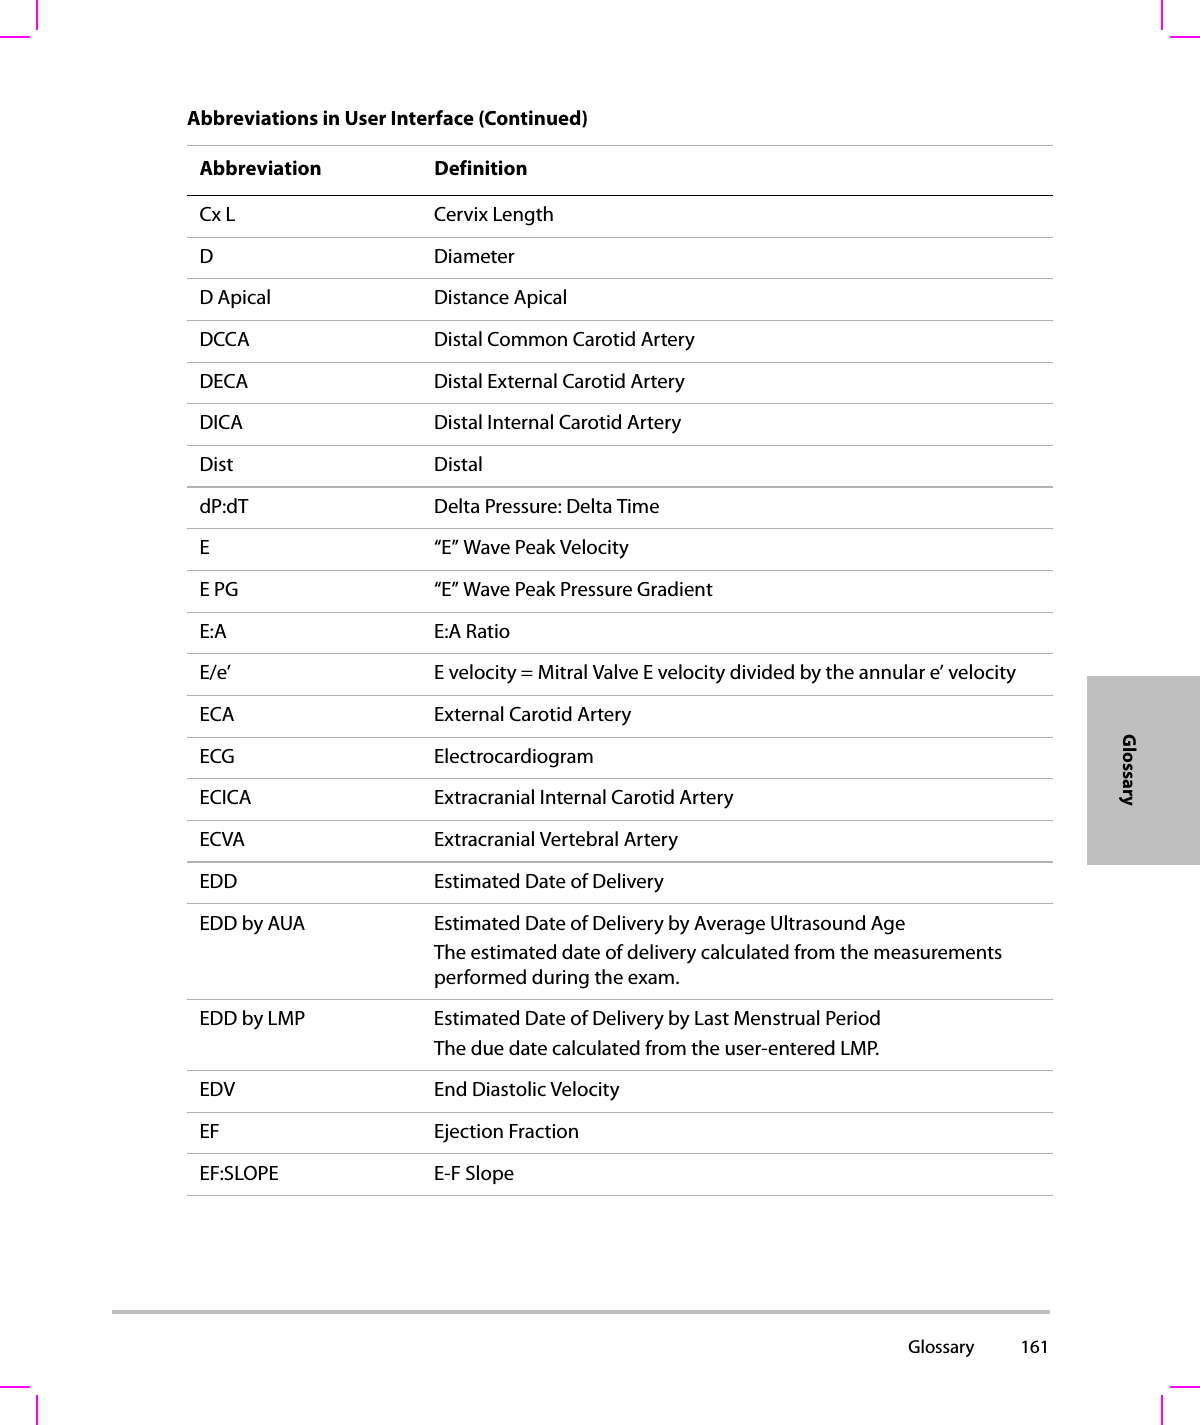
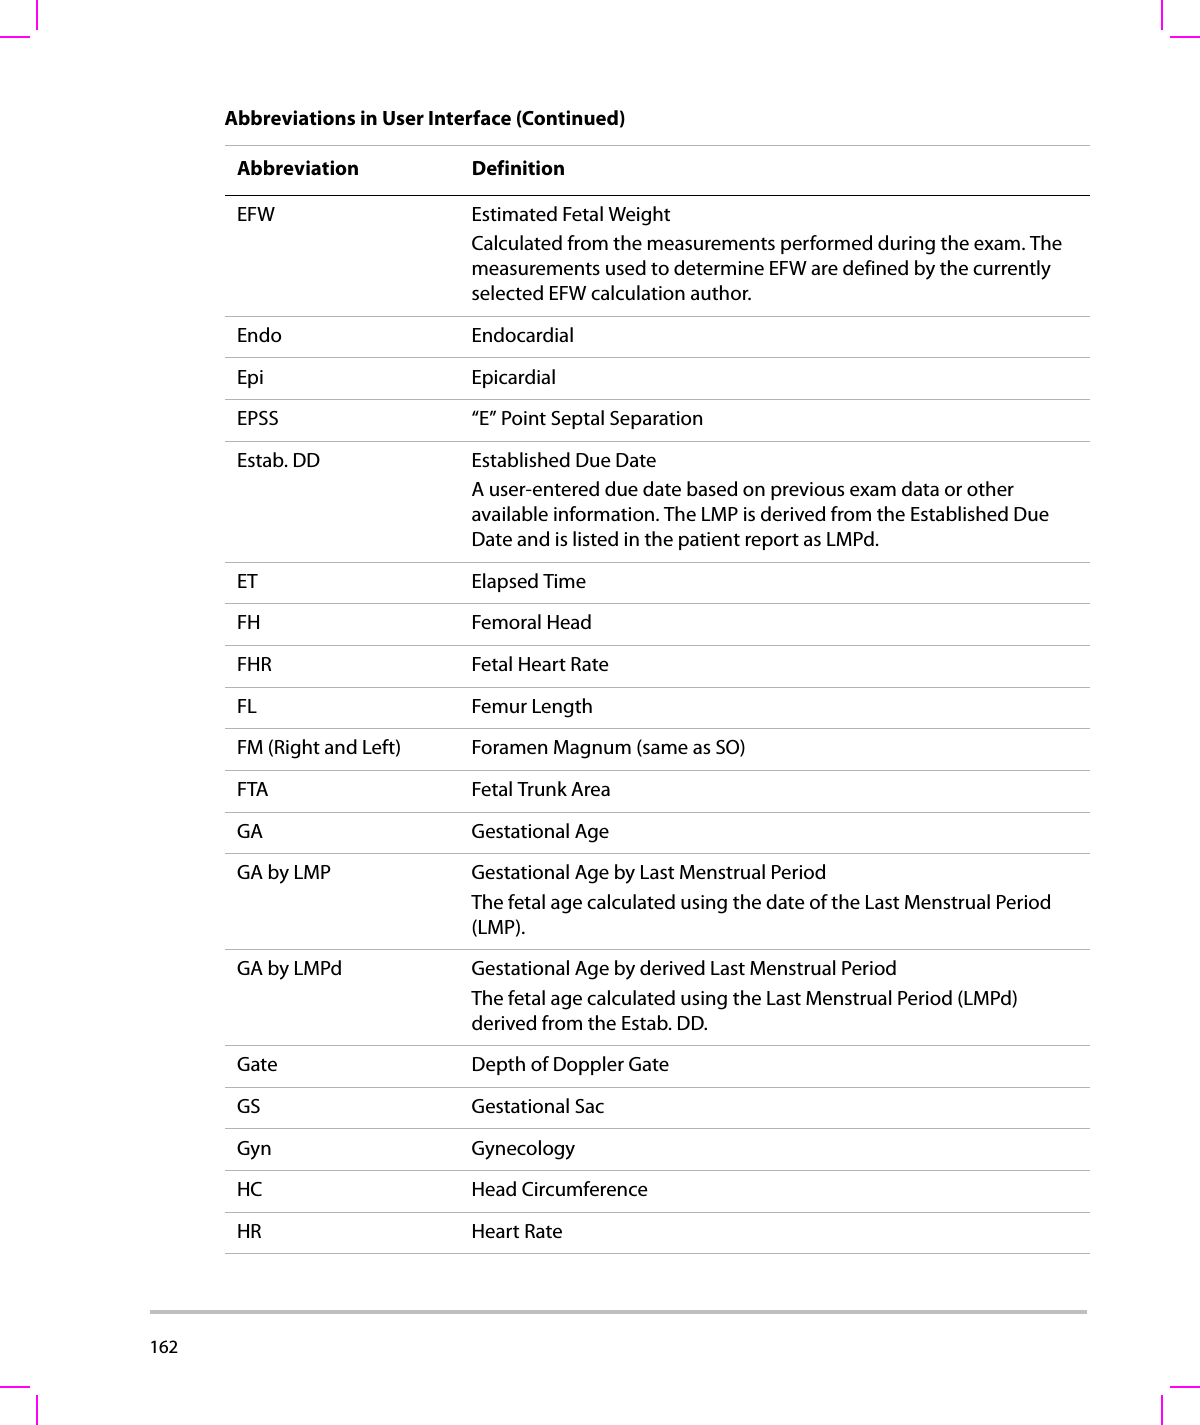
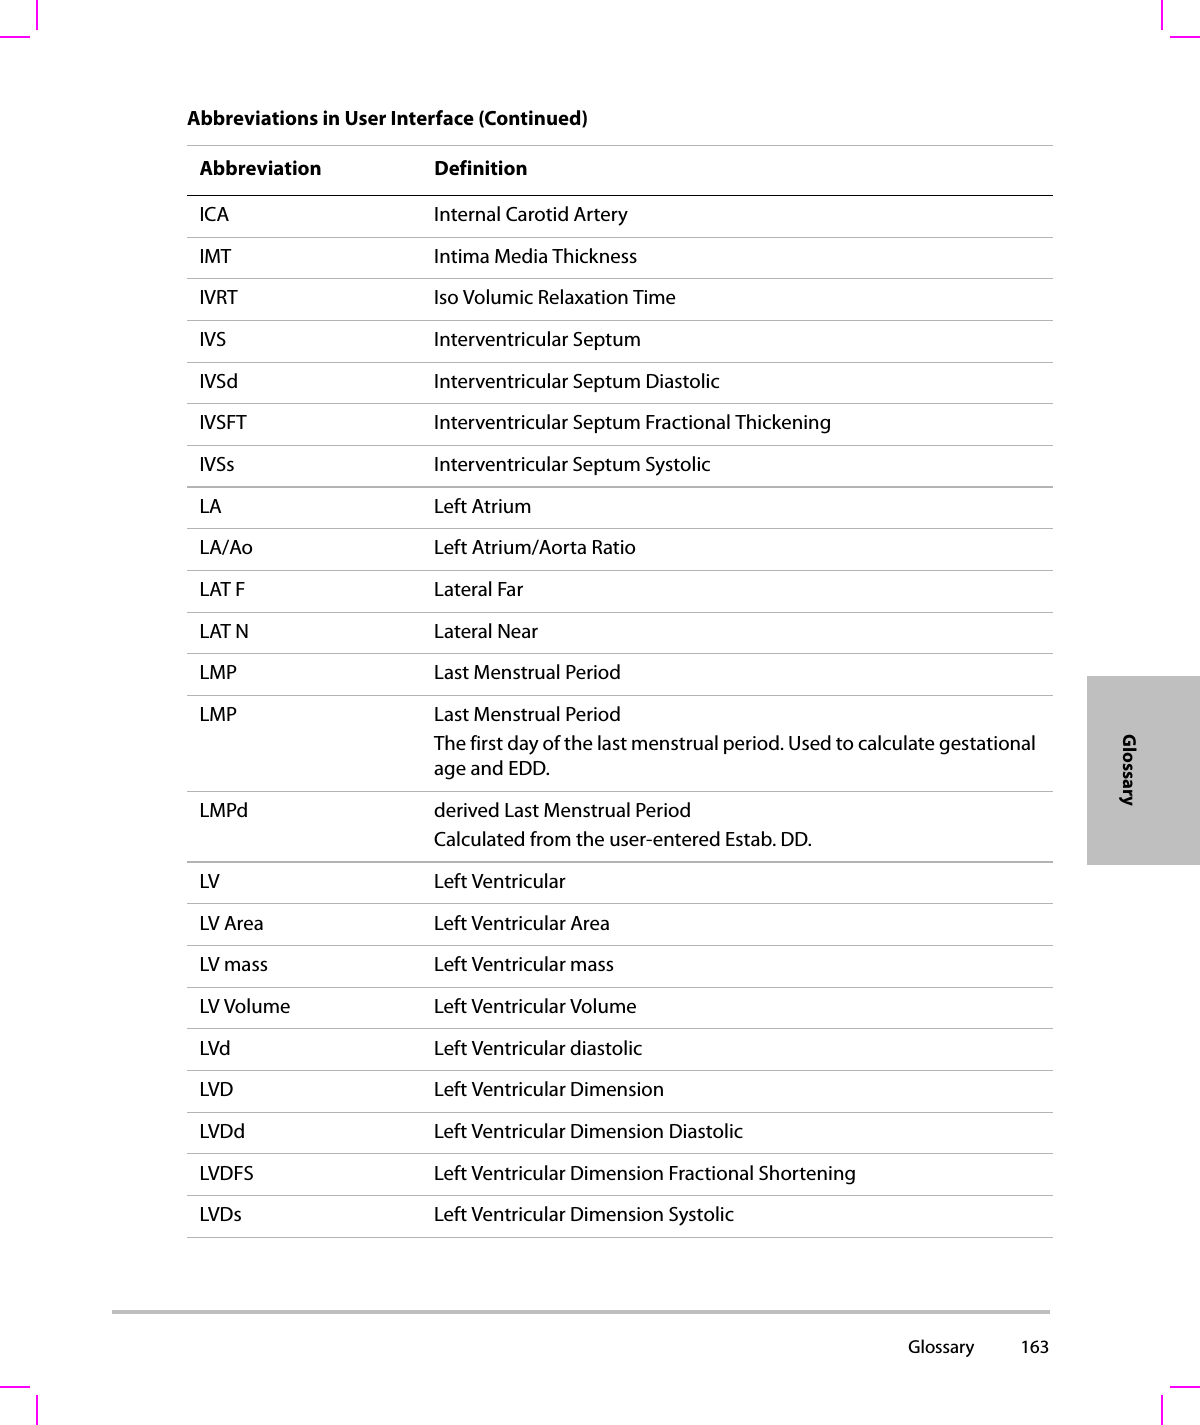
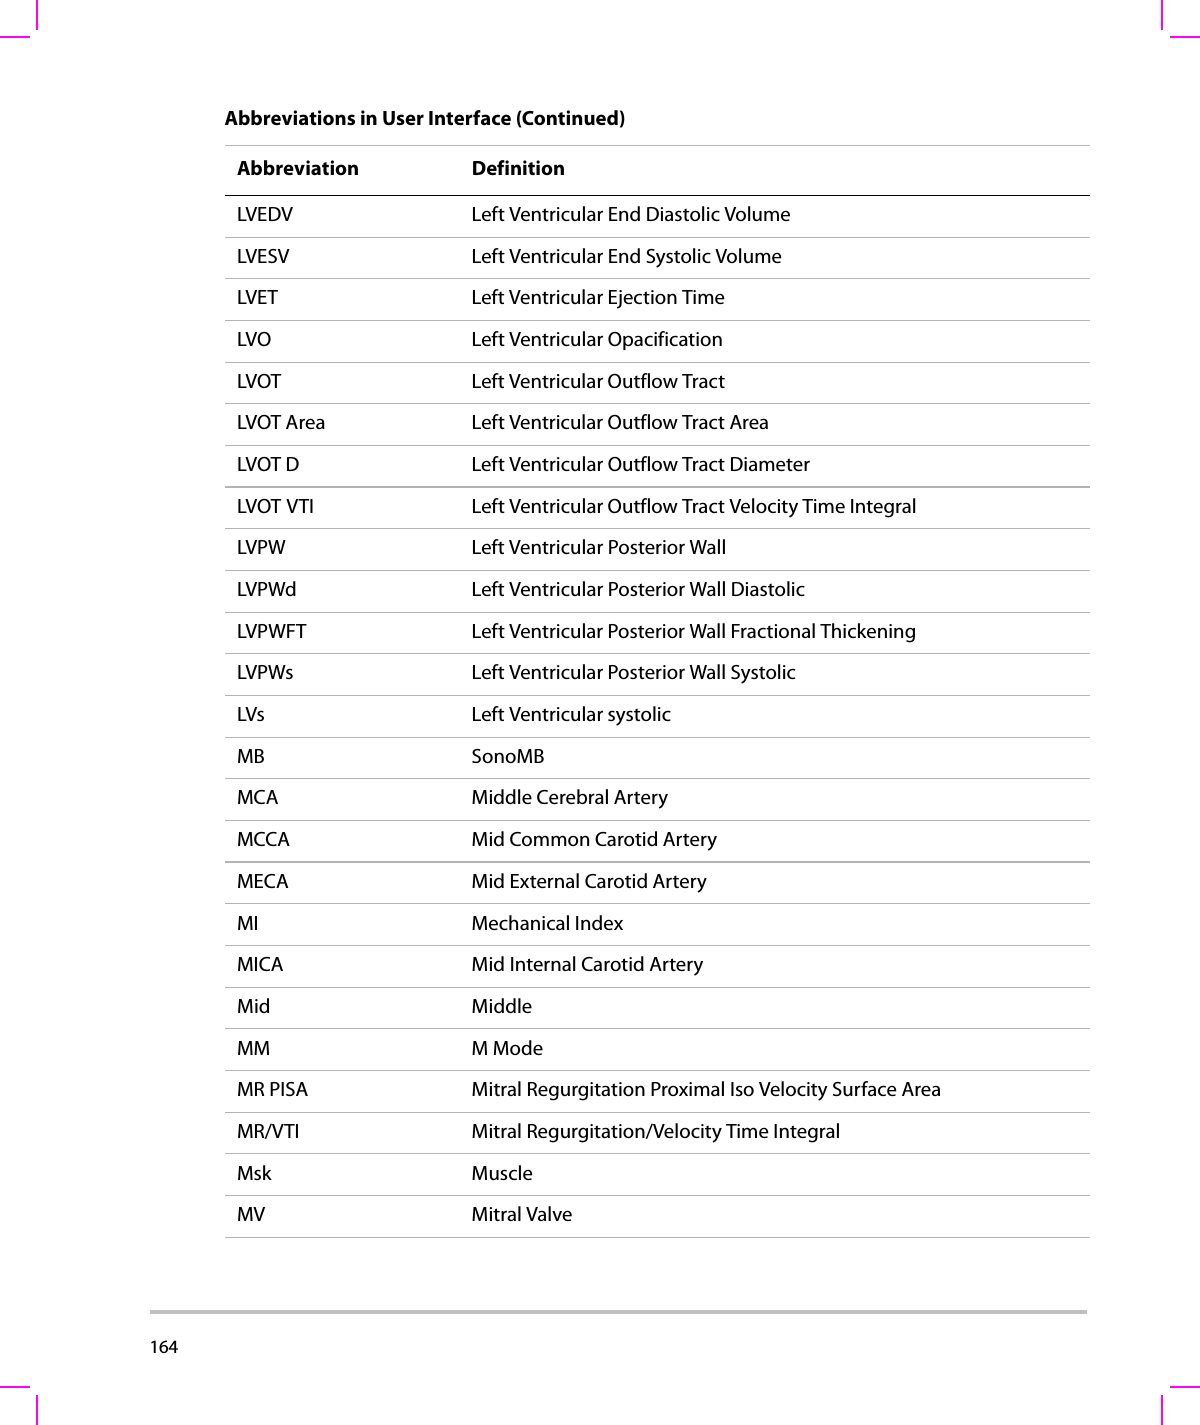
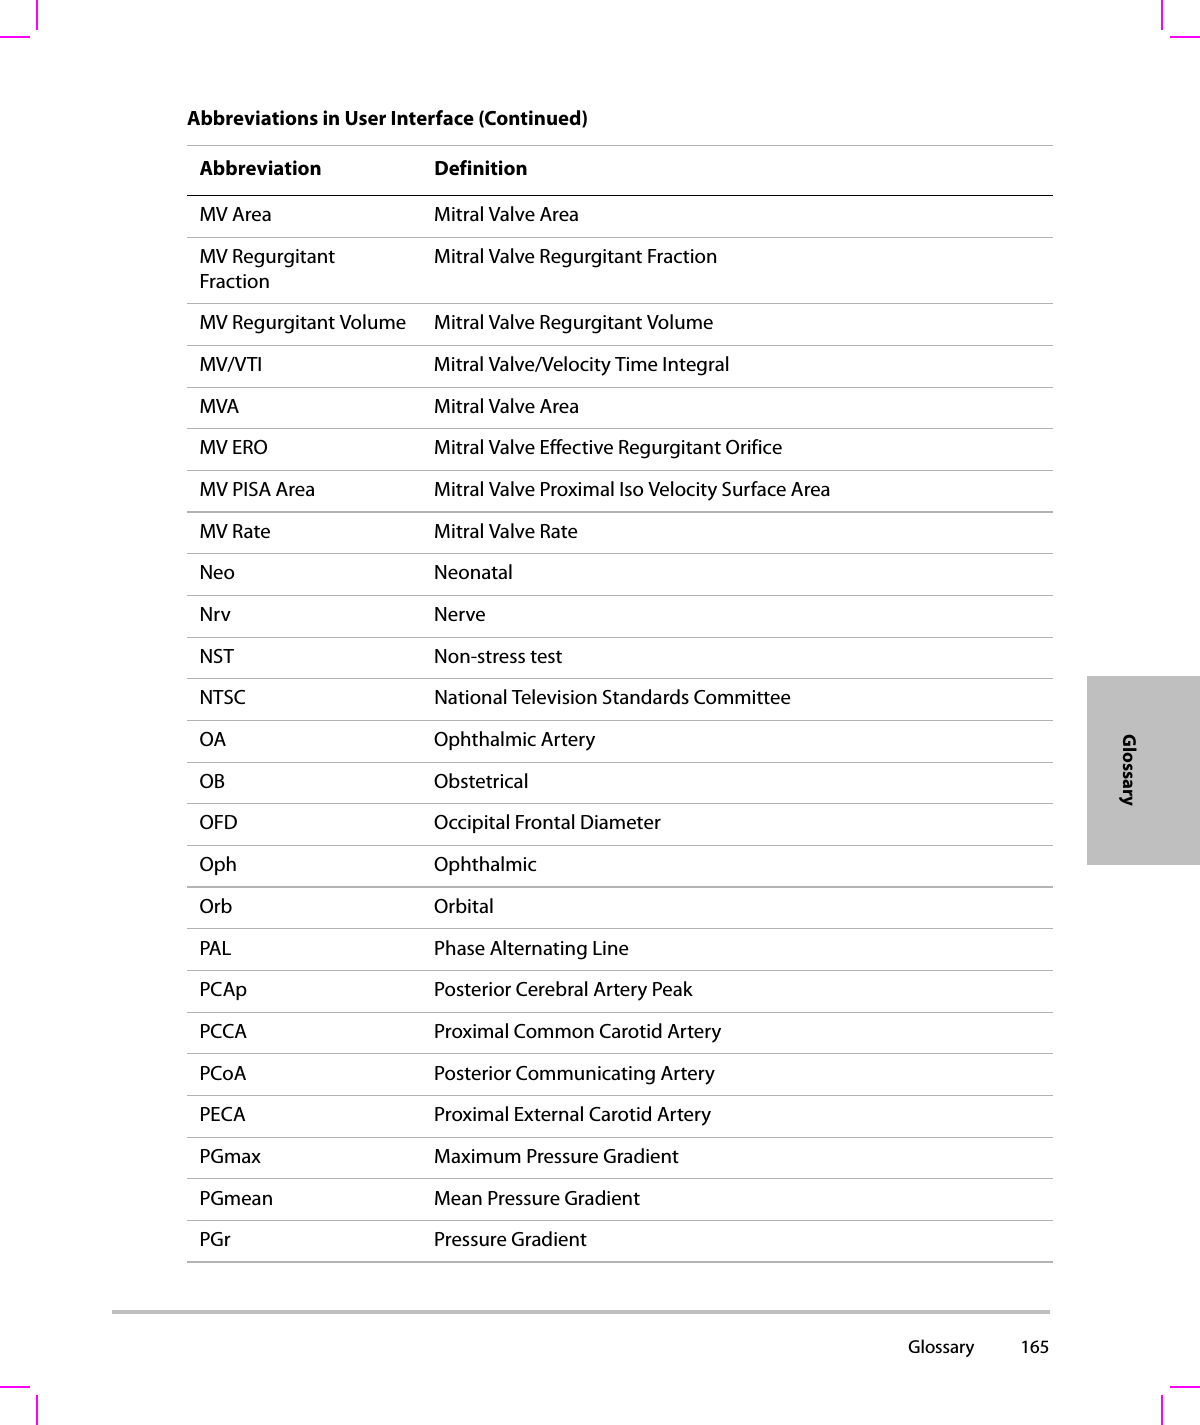
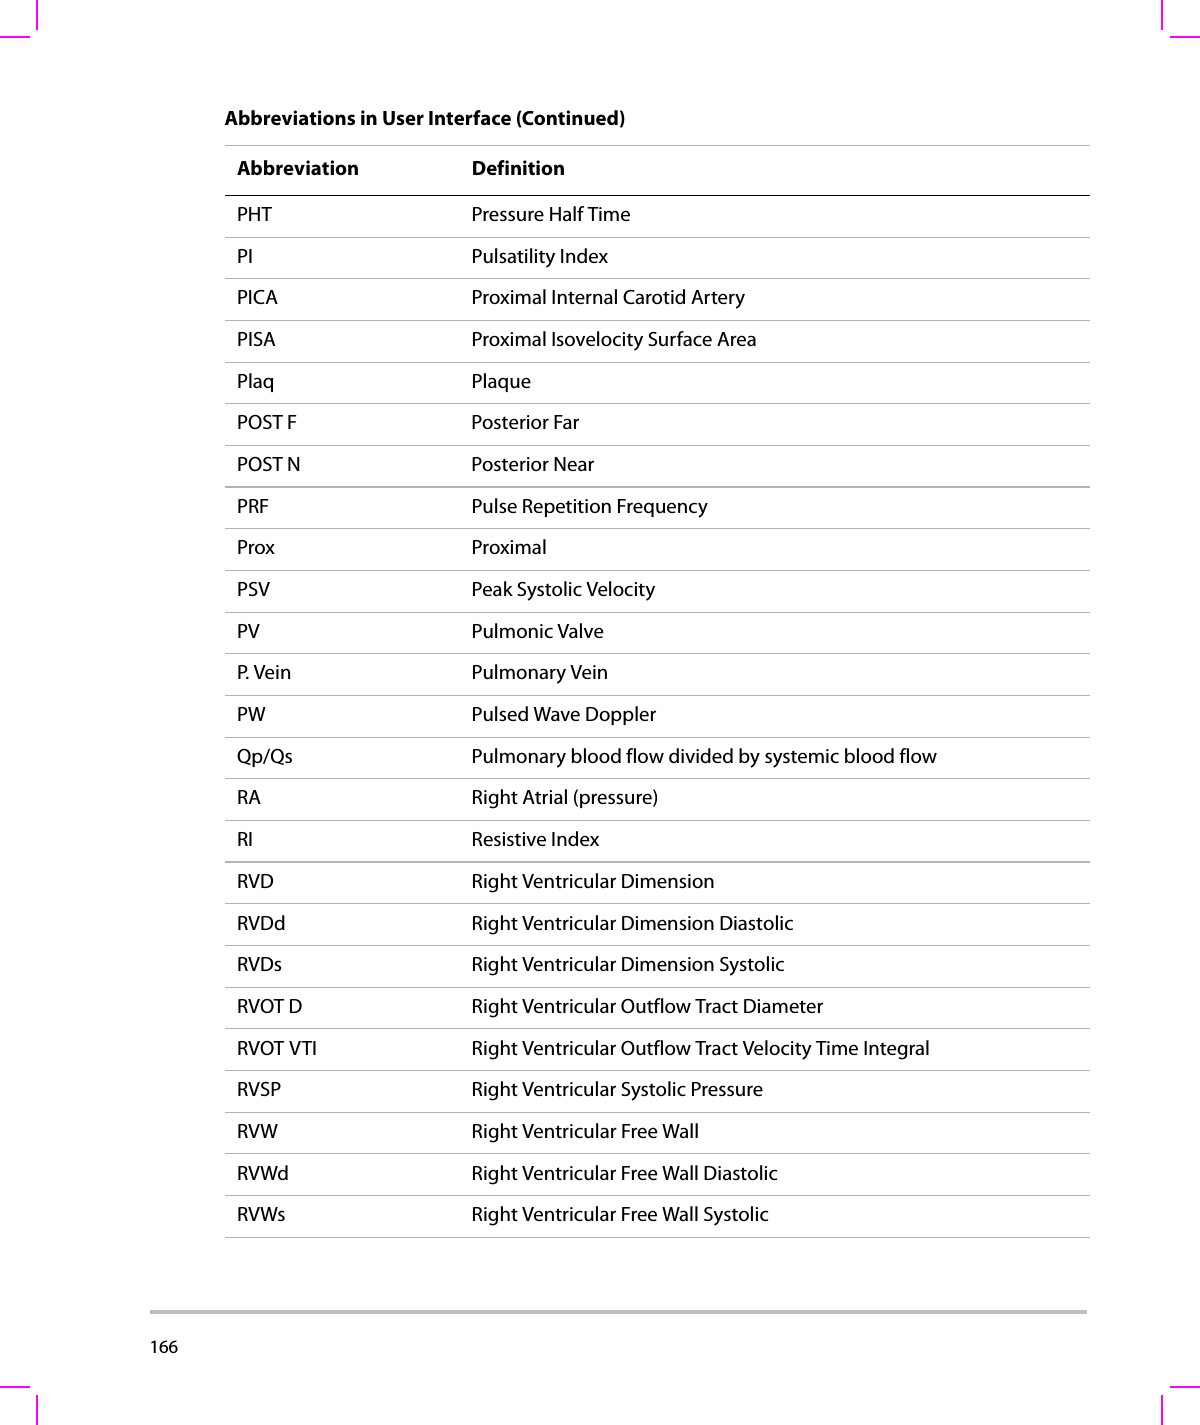
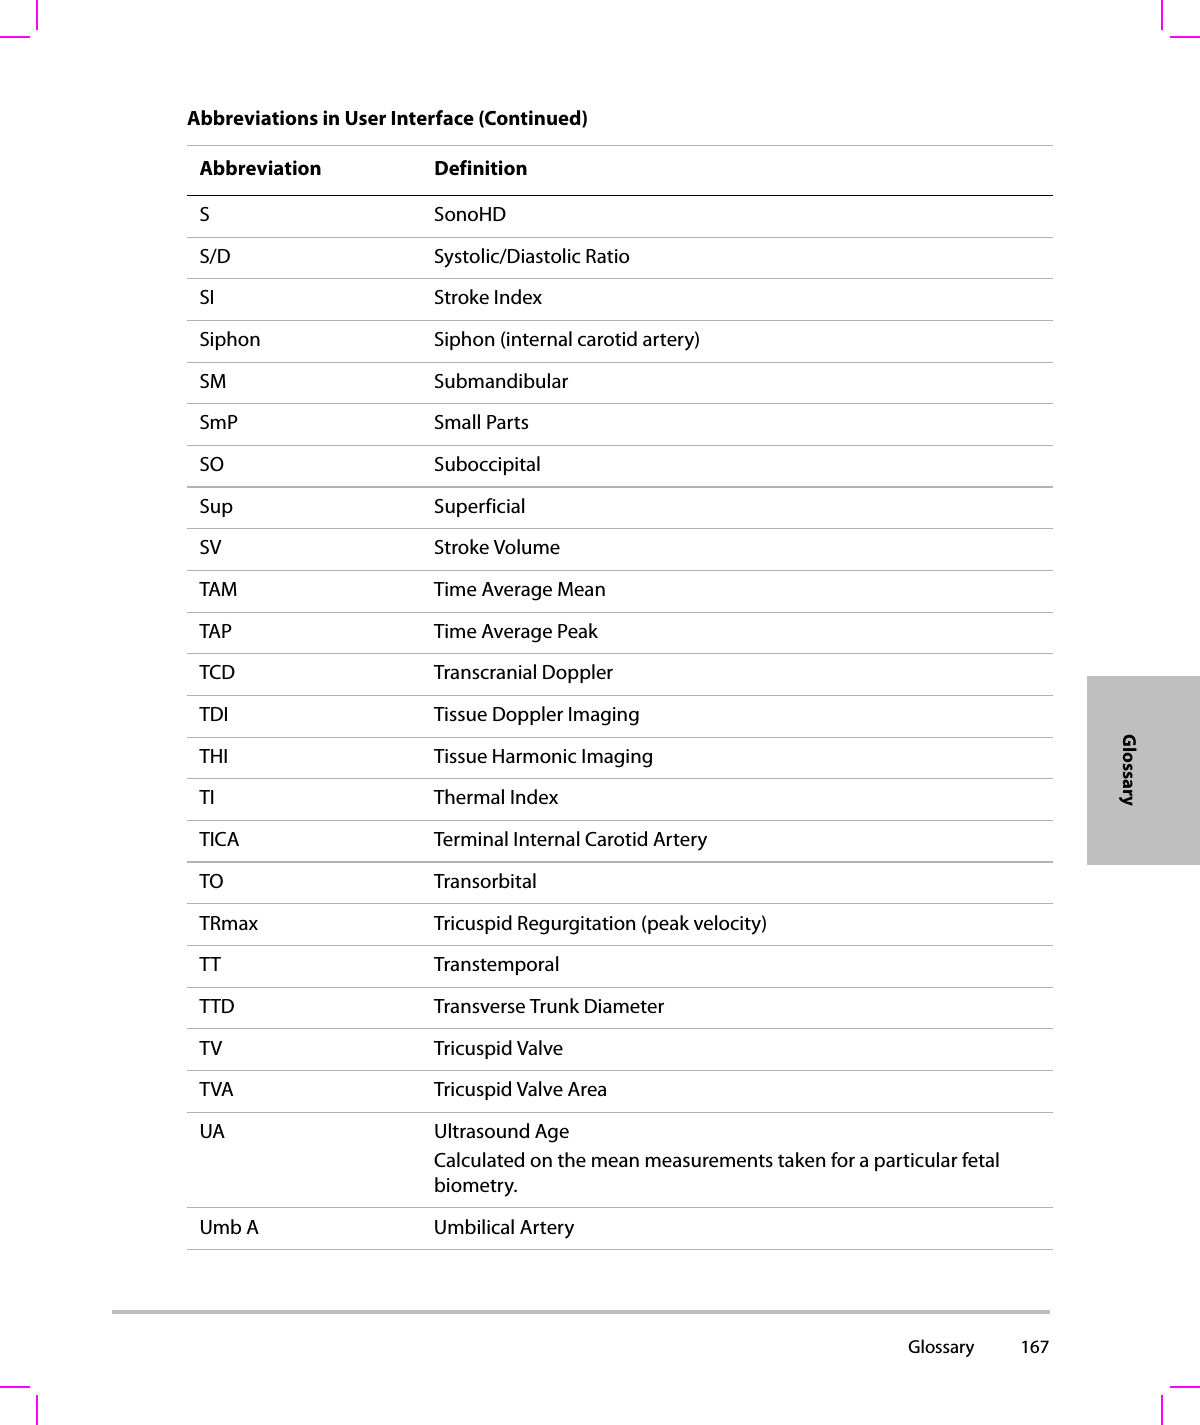
vi    In Situ, derated, and water value intensities ...........................................105Tissue models and equipment survey ......................................................106Acoustic output tables  ............................................................................................107Terms used in the acoustic output tables  ...............................................132Acoustic measurement precision and uncertainty ..............................133Labeling symbols  ......................................................................................................134Chapter 7: ReferencesMeasurement accuracy ...........................................................................................139Sources of measurement errors ...........................................................................140Measurement publications and terminology  .................................................141Cardiac references ............................................................................................141Obstetrical references .....................................................................................145Gestational age tables ....................................................................................146Growth analysis tables  ...................................................................................148Ratio calculations  .............................................................................................149General references ...........................................................................................149Chapter 8: SpecificationsDimensions ..................................................................................................................153System ..................................................................................................................153Display ..................................................................................................................153Supported transducers  ...........................................................................................153Imaging modes ..........................................................................................................153Image and clip storage ............................................................................................153Accessories ..................................................................................................................153Peripherals ..........................................................................................................154Temperature and humidity limits ........................................................................154Operating ............................................................................................................154Shipping and storage  .....................................................................................154Electrical .......................................................................................................................154Battery ...........................................................................................................................154Electromechanical safety standards ...................................................................154EMC standards classification .................................................................................155Airborne equipment standards ............................................................................155DICOM standard  ........................................................................................................155HIPAA standard  ..........................................................................................................155GlossaryTerms .............................................................................................................................157Abbreviations .............................................................................................................159Index  ...........................................................................................................................169
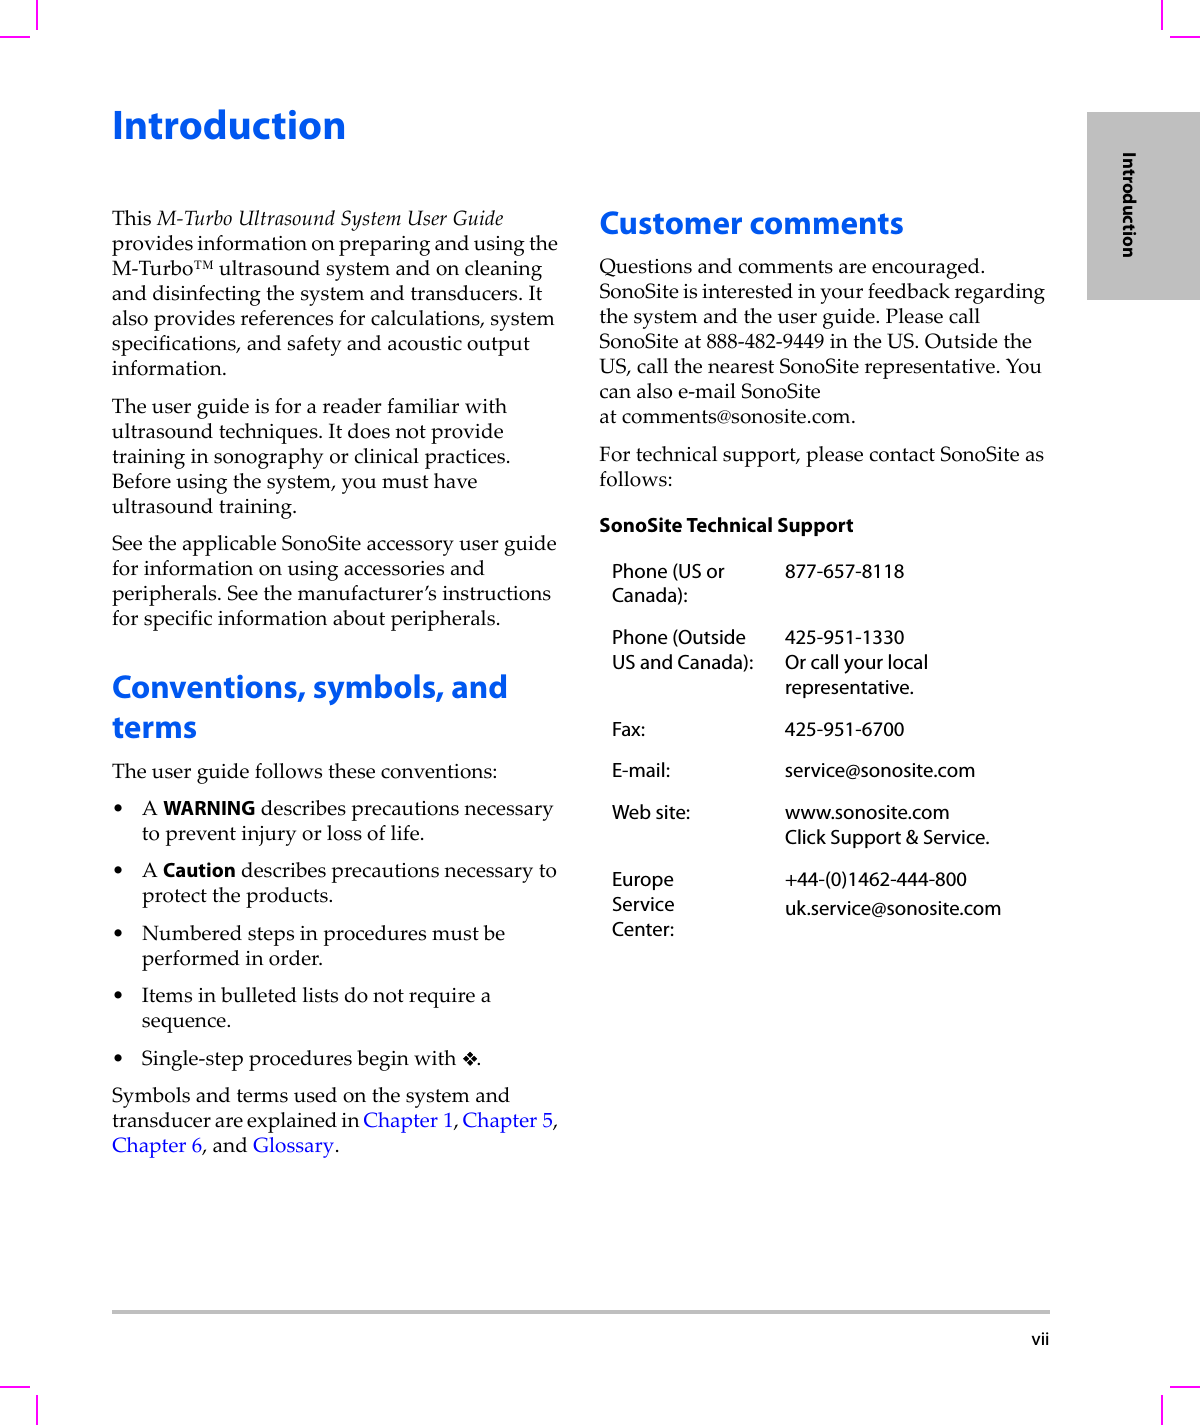
 viiIntroductionIntroductionThisM‐TurboUltrasoundSystemUserGuideprovidesinformationonpreparingandusingtheM‐Turbo™ultrasoundsystemandoncleaninganddisinfectingthesystemandtransducers.Italsoprovidesreferencesforcalculations,systemspecifications,andsafetyandacousticoutputinformation.Theuserguideisforareaderfamiliarwithultrasoundtechniques.Itdoesnotprovidetraininginsonographyorclinicalpractices.Beforeusingthesystem,youmusthaveultrasoundtraining.SeetheapplicableSonoSiteaccessoryuserguideforinformationonusingaccessoriesandperipherals.Seethemanufacturer’sinstructionsforspecificinformationaboutperipherals.Conventions, symbols, and termsTheuserguidefollowstheseconventions:•AWARNINGdescribesprecautionsnecessarytopreventinjuryorlossoflife.•ACautiondescribesprecautionsnecessarytoprotecttheproducts.•Numberedstepsinproceduresmustbeperformedinorder.•Itemsinbulletedlistsdonotrequireasequence.•Single‐stepproceduresbeginwith.SymbolsandtermsusedonthesystemandtransducerareexplainedinChapter 1,Chapter 5,Chapter 6,andGlossary.Customer commentsQuestionsandcommentsareencouraged.SonoSiteisinterestedinyourfeedbackregardingthesystemandtheuserguide.PleasecallSonoSiteat888‐482‐9449intheUS.OutsidetheUS,callthenearestSonoSiterepresentative.Youcanalsoe‐mailSonoSiteat comments@sonosite.com.Fortechnicalsupport,pleasecontactSonoSiteasfollows:SonoSite Technical SupportPhone (US or Canada):877-657-8118Phone (Outside US and Canada):425-951-1330 Or call your local representative.Fax: 425-951-6700E-mail: service@sonosite.comWeb site: www.sonosite.comClick Support & Service.EuropeServiceCenter:+44-(0)1462-444-800uk.service@sonosite.com
viii Customer comments
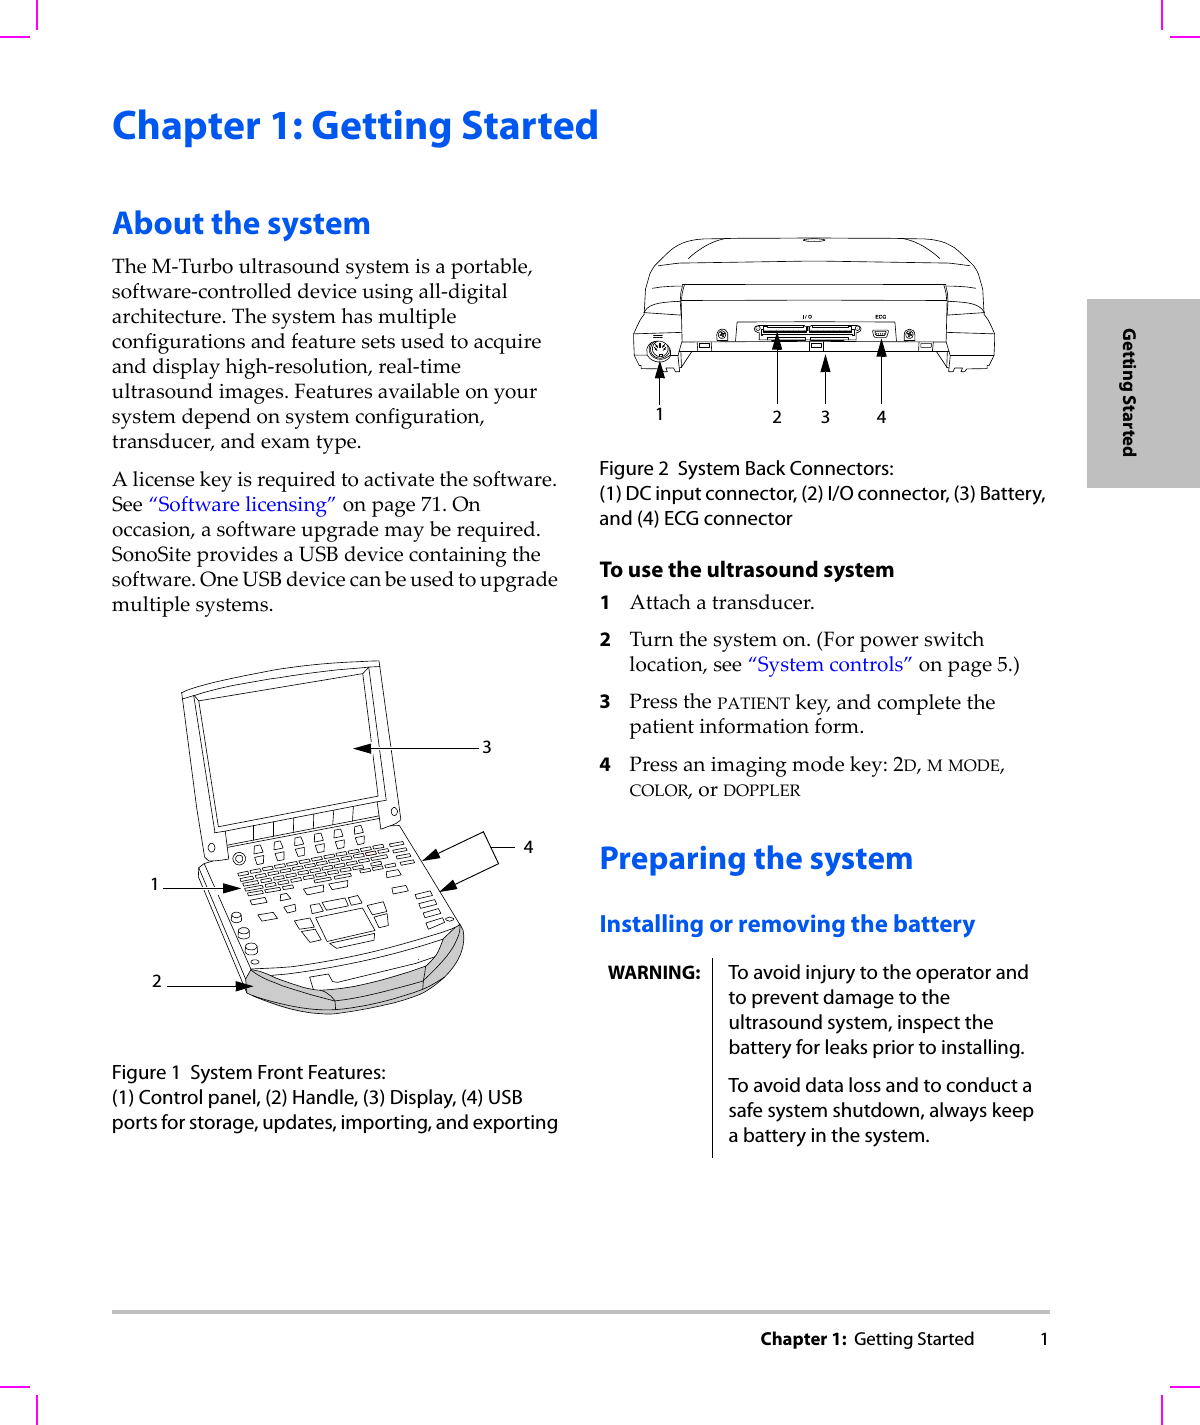
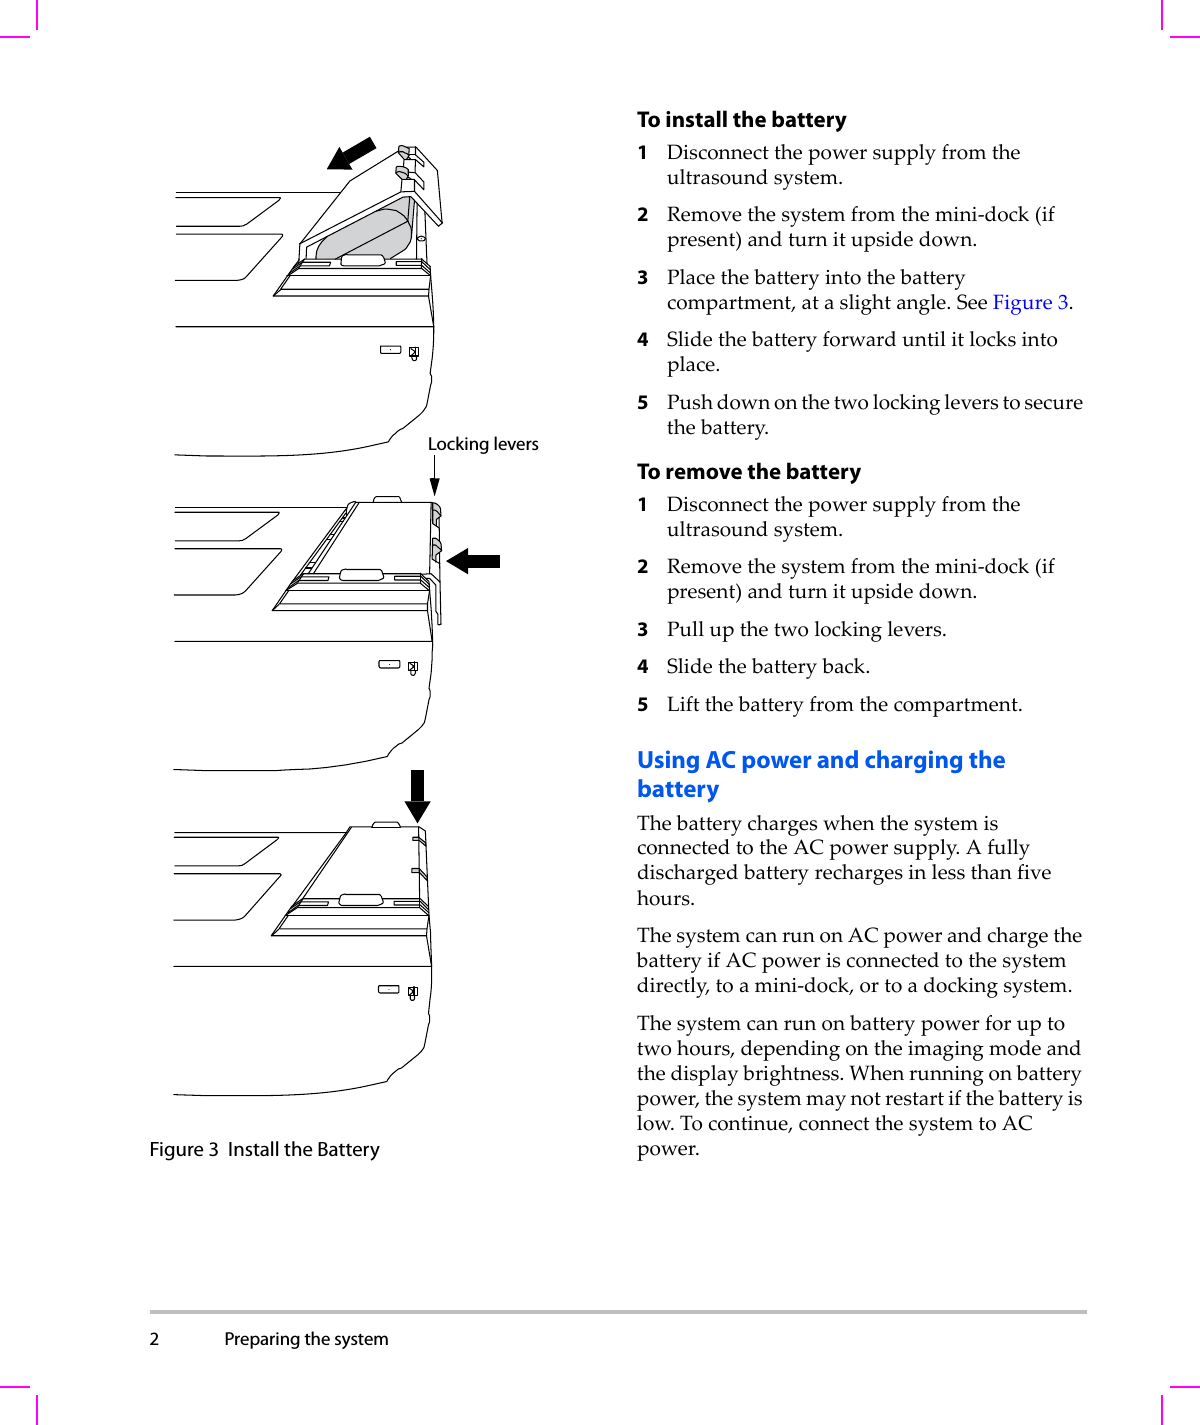
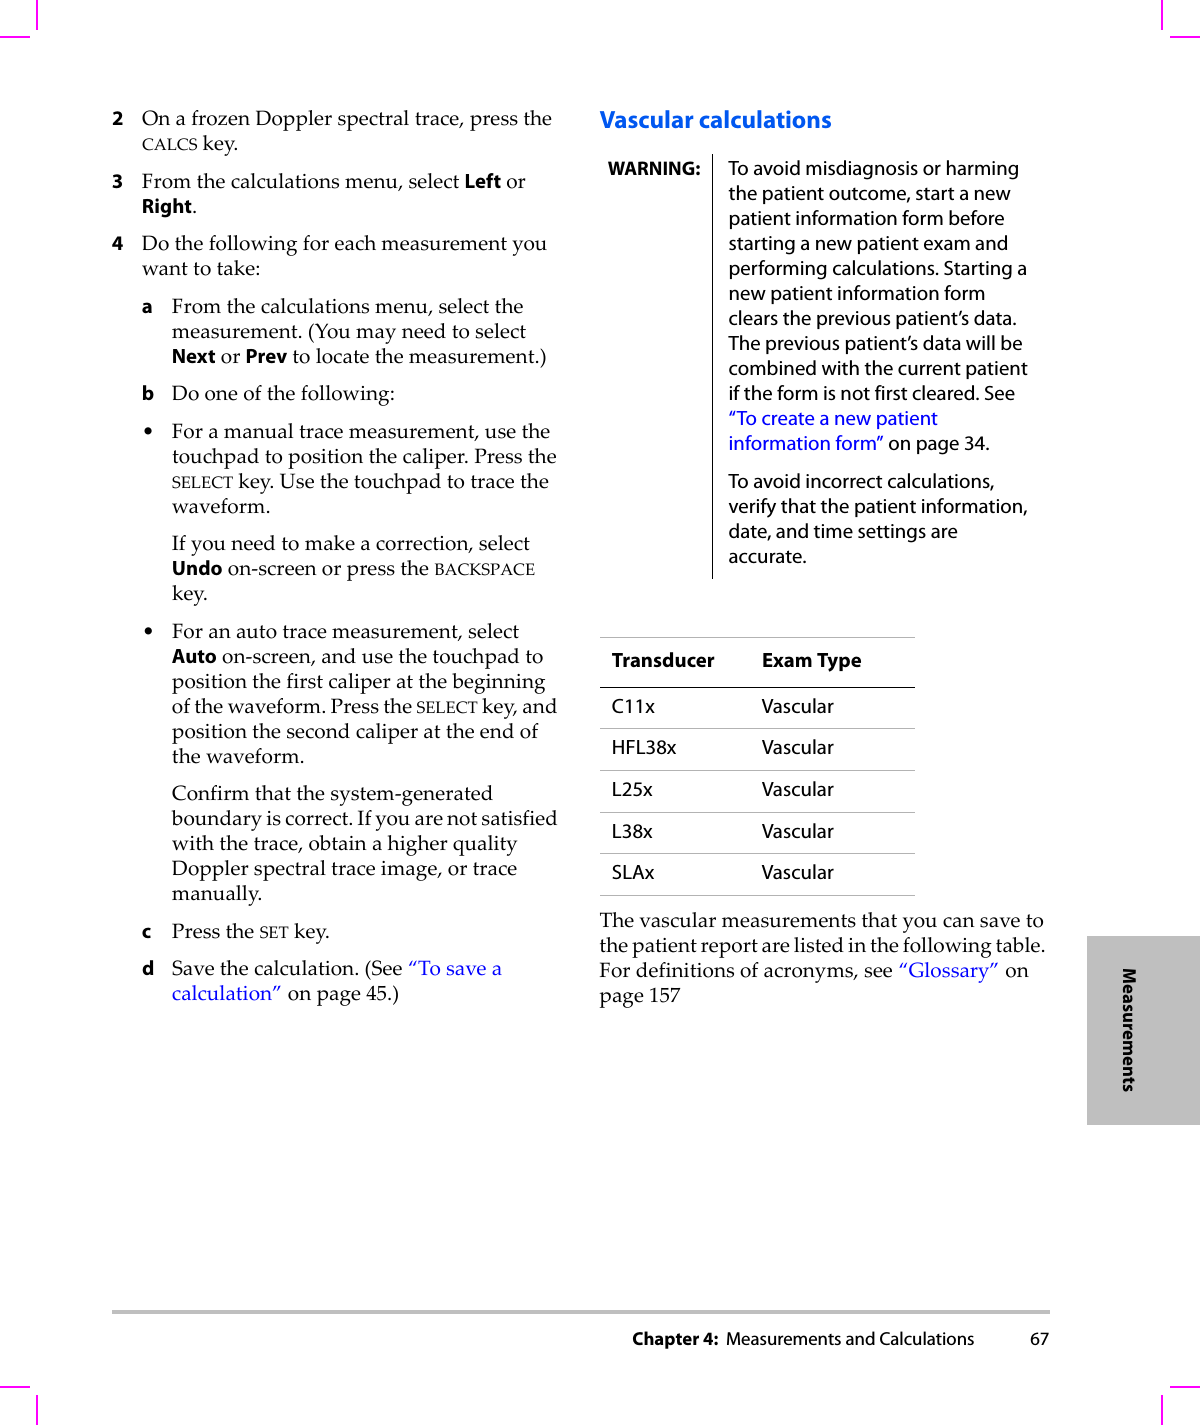
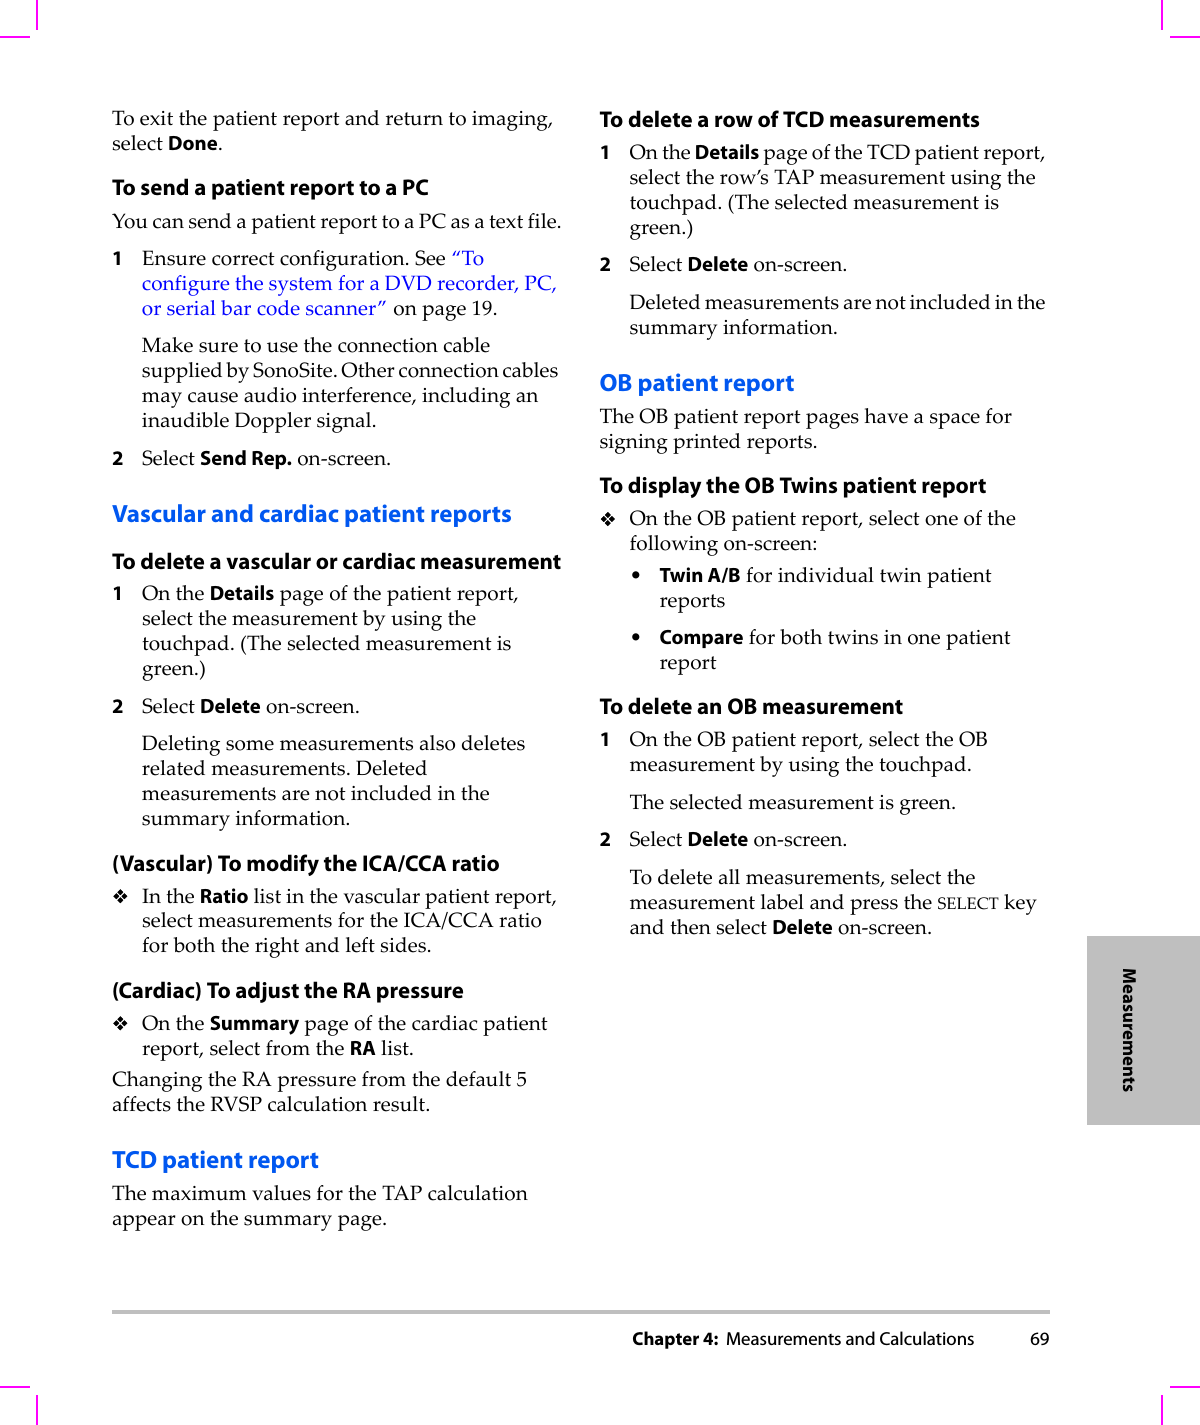
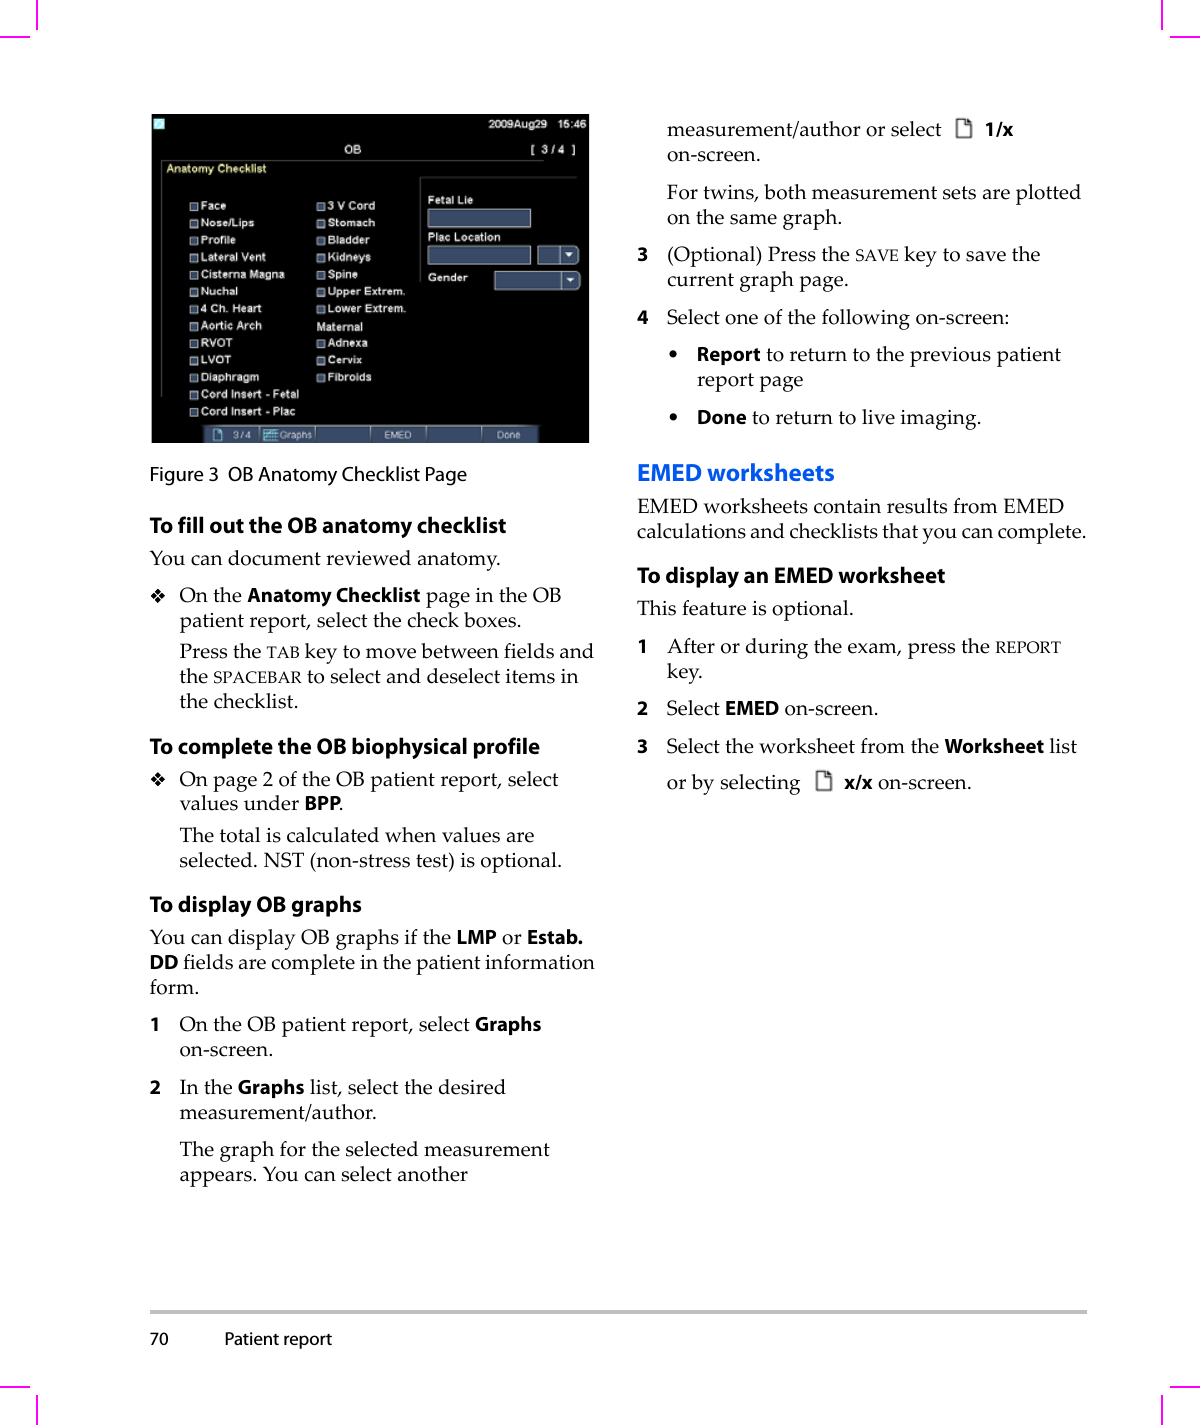
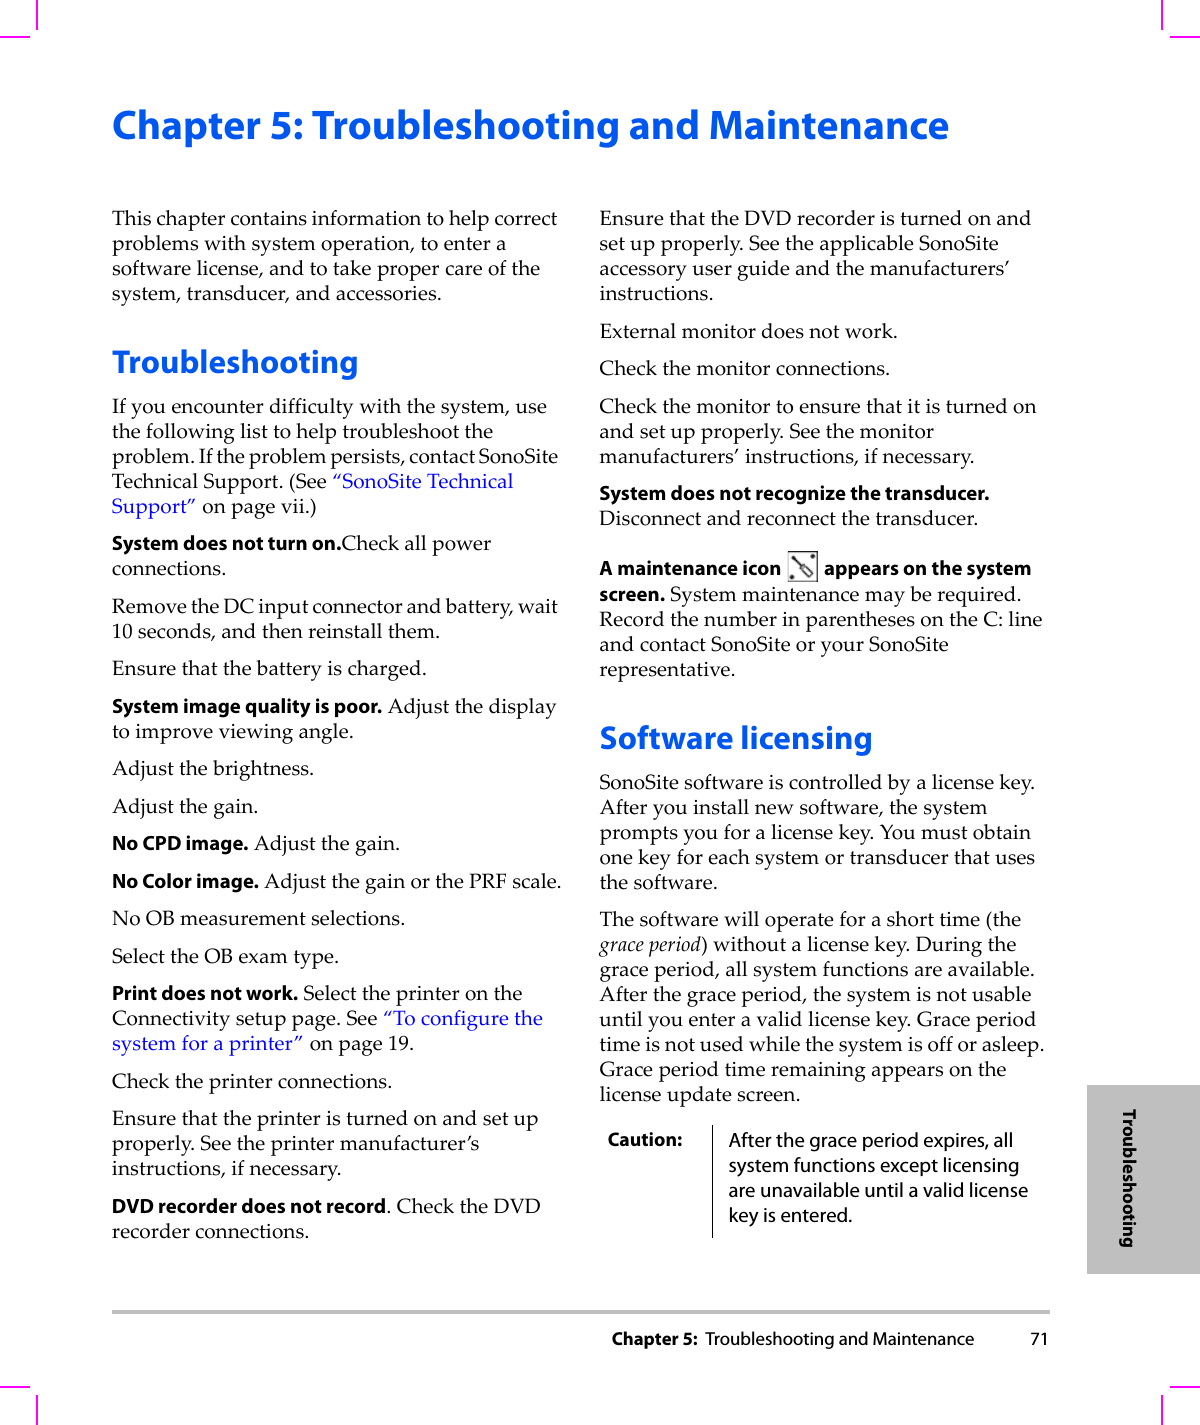
Chapter 1:  Getting Started 1Getting StartedChapter 1: Getting StartedAbout the systemTheM‐Turboultrasoundsystemisaportable,software‐controlleddeviceusingall‐digitalarchitecture.Thesystemhasmultipleconfigurationsandfeaturesetsusedtoacquireanddisplayhigh‐resolution,real‐timeultrasoundimages.Featuresavailableonyoursystemdependonsystemconfiguration,transducer,andexamtype.Alicensekeyisrequiredtoactivatethesoftware.See“Softwarelicensing”onpage 71.Onoccasion,asoftwareupgrademayberequired.SonoSiteprovidesaUSBdevicecontainingthesoftware.OneUSBdevicecanbeusedtoupgrademultiplesystems.Figure 1 System Front Features: (1) Control panel, (2) Handle, (3) Display, (4) USB ports for storage, updates, importing, and exporting Figure 2 System Back Connectors:(1) DC input connector, (2) I/O connector, (3) Battery, and (4) ECG connectorTo use the ultrasound system1Attachatransducer.2Turnthesystemon.(Forpowerswitchlocation,see“Systemcontrols”onpage 5.)3PressthePATIENTkey,andcompletethepatientinformationform.4Pressanimagingmodekey:2D,MMODE,COLOR,orDOPPLERPreparing the systemInstalling or removing the battery4321WARNING: To avoid injury to the operator and to prevent damage to the ultrasound system, inspect the battery for leaks prior to installing.To avoid data loss and to conduct a safe system shutdown, always keep a battery in the system.23 41
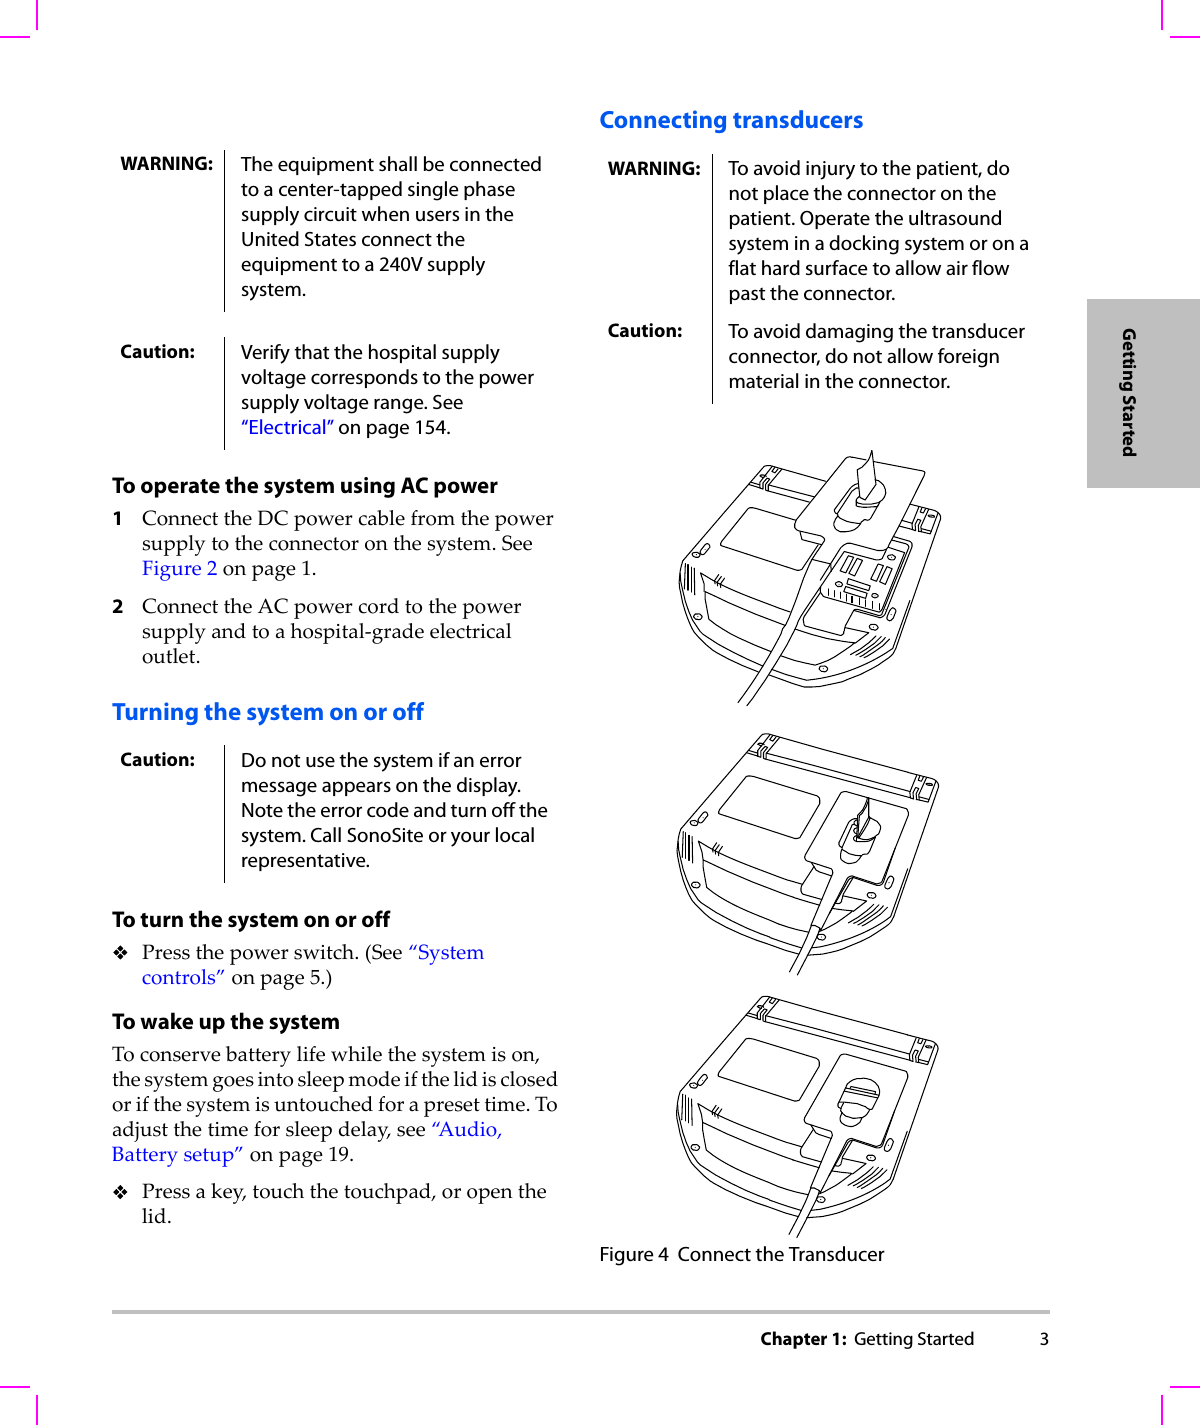
2 Preparing the system  Figure 3 Install the BatteryTo install the battery1Disconnectthepowersupplyfromtheultrasoundsystem.2Removethesystemfromthemini‐dock(ifpresent)andturnitupsidedown.3Placethebatteryintothebatterycompartment,ataslightangle.SeeFigure 3.4Slidethebatteryforwarduntilitlocksintoplace.5Pushdownonthetwolockingleverstosecurethebattery.To remove the battery1Disconnectthepowersupplyfromtheultrasoundsystem.2Removethesystemfromthemini‐dock(ifpresent)andturnitupsidedown.3Pullupthetwolockinglevers.4Slidethebatteryback.5Liftthebatteryfromthecompartment.Using AC power and charging the batteryThebatterychargeswhenthesystemisconnectedtotheACpowersupply.Afullydischargedbatteryrechargesinlessthanfivehours.ThesystemcanrunonACpowerandchargethebatteryifACpowerisconnectedtothesystemdirectly,toamini‐dock,ortoadockingsystem.Thesystemcanrunonbatterypowerforuptotwohours,dependingontheimagingmodeandthedisplaybrightness.Whenrunningonbatterypower,thesystemmaynotrestartifthebatteryislow.Tocontinue,connectthesystemtoACpower.Locking levers
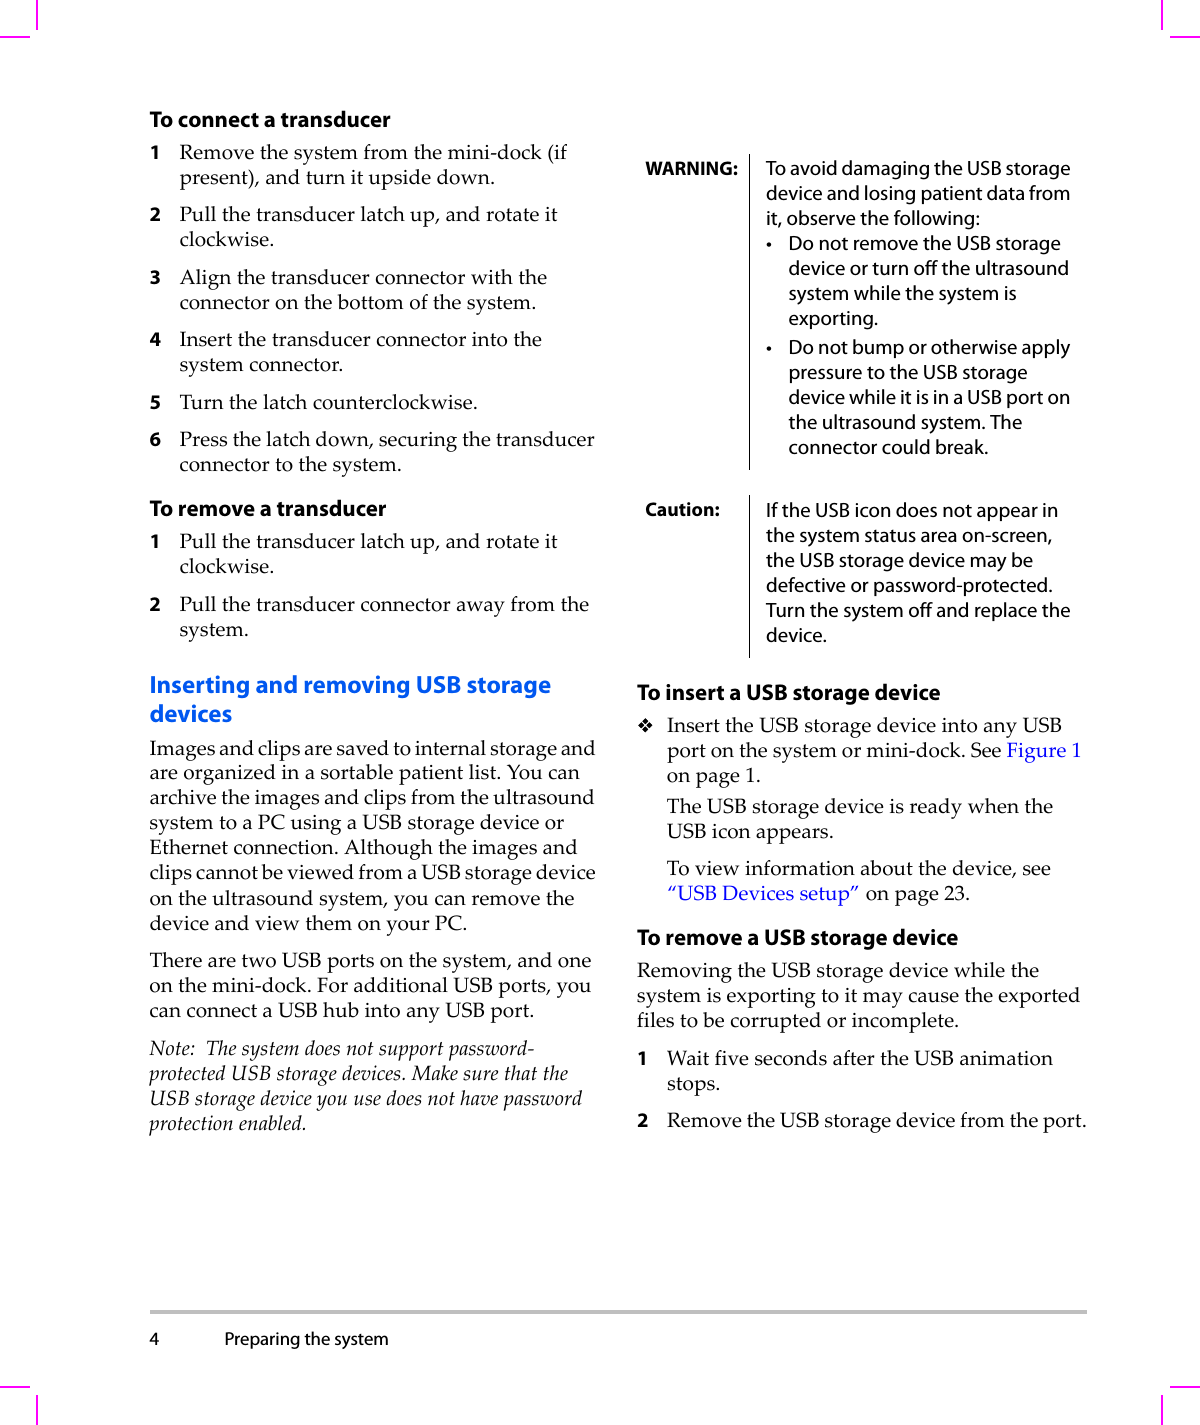
Chapter 1:  Getting Started 3Getting StartedTo operate the system using AC power1ConnecttheDCpowercablefromthepowersupplytotheconnectoronthesystem.SeeFigure 2onpage 1.2ConnecttheACpowercordtothepowersupplyandtoahospital‐gradeelectricaloutlet.Turning the system on or offTo turn the system on or offPressthepowerswitch.(See“Systemcontrols”onpage 5.)To wake up the systemToconservebatterylifewhilethesystemison,thesystemgoesintosleepmodeifthelidisclosedorifthesystemisuntouchedforapresettime.Toadjustthetimeforsleepdelay,see“A u d i o , Batterysetup”onpage 19.Pressakey,touchthetouchpad,oropenthelid.Connecting transducersFigure 4 Connect the TransducerWARNING: The equipment shall be connected to a center-tapped single phase supply circuit when users in the United States connect the equipment to a 240V supply system.Caution: Verify that the hospital supply voltage corresponds to the power supply voltage range. See “Electrical” on page 154.Caution: Do not use the system if an error message appears on the display. Note the error code and turn off the system. Call SonoSite or your local representative.WARNING: To avoid injury to the patient, do not place the connector on the patient. Operate the ultrasound system in a docking system or on a flat hard surface to allow air flow past the connector.Caution: To avoid damaging the transducer connector, do not allow foreign material in the connector.
4 Preparing the system  To connect a transducer 1Removethesystemfromthemini‐dock(ifpresent),andturnitupsidedown.2Pullthetransducerlatchup,androtateitclockwise.3Alignthetransducerconnectorwiththeconnectoronthebottomofthesystem.4Insertthetransducerconnectorintothesystemconnector.5Turnthelatchcounterclockwise.6Pressthelatchdown,securingthetransducerconnectortothesystem.To remove a transducer1Pullthetransducerlatchup,androtateitclockwise.2Pullthetransducerconnectorawayfromthesystem.Inserting and removing USB storage devicesImagesandclipsaresavedtointernalstorageandareorganizedinasortablepatientlist.YoucanarchivetheimagesandclipsfromtheultrasoundsystemtoaPCusingaUSBstoragedeviceorEthernetconnection.AlthoughtheimagesandclipscannotbeviewedfromaUSBstoragedeviceontheultrasoundsystem,youcanremovethedeviceandviewthemonyourPC.TherearetwoUSBportsonthesystem,andoneonthemini‐dock.ForadditionalUSBports,youcanconnectaUSBhubintoanyUSBport.Note: Thesystemdoesnotsupportpassword‐protectedUSBstoragedevices.MakesurethattheUSBstoragedeviceyouusedoesnothavepasswordprotectionenabled.To insert a USB storage deviceInserttheUSBstoragedeviceintoanyUSBportonthesystemormini‐dock.SeeFigure 1onpage 1.TheUSBstoragedeviceisreadywhentheUSBiconappears.Toviewinformationaboutthedevice,see“USBDevicessetup”onpage 23.To remove a USB storage deviceRemovingtheUSBstoragedevicewhilethesystemisexportingtoitmaycausetheexportedfilestobecorruptedorincomplete.1WaitfivesecondsaftertheUSBanimationstops.2RemovetheUSBstoragedevicefromtheport.WARNING: To avoid damaging the USB storage device and losing patient data from it, observe the following:• Do not remove the USB storage device or turn off the ultrasound system while the system is exporting.• Do not bump or otherwise apply pressure to the USB storage device while it is in a USB port on the ultrasound system. The connector could break. Caution: If the USB icon does not appear in the system status area on-screen, the USB storage device may be defective or password-protected. Turn the system off and replace the device.
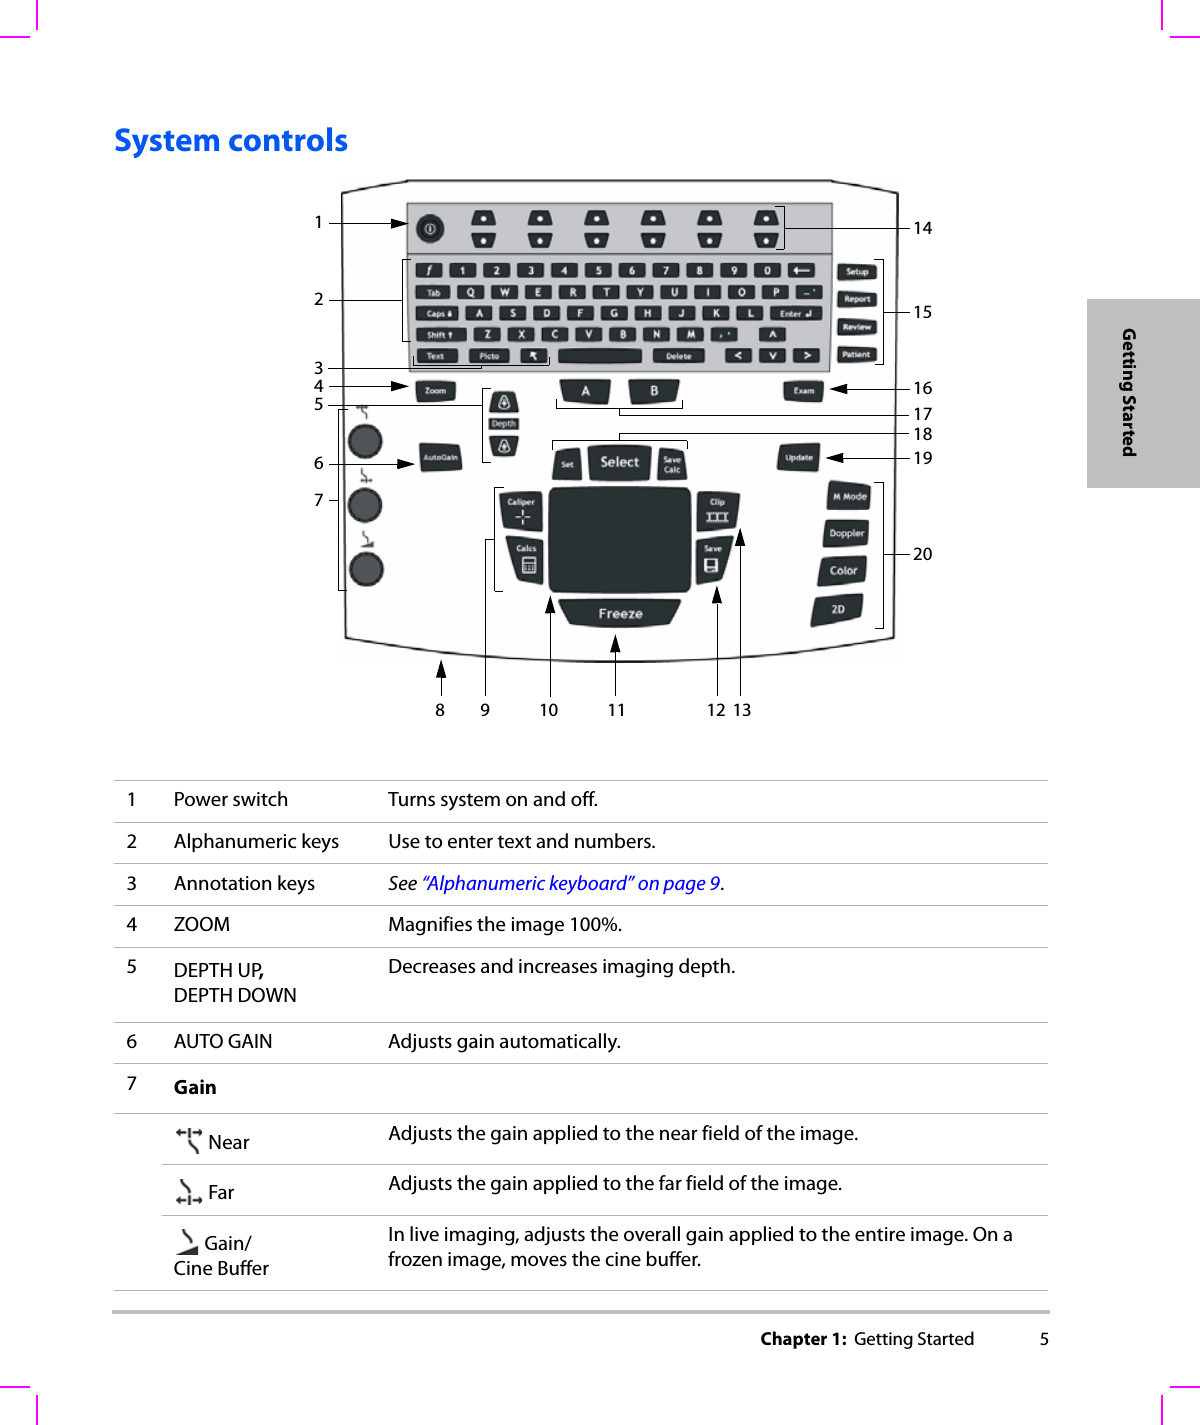
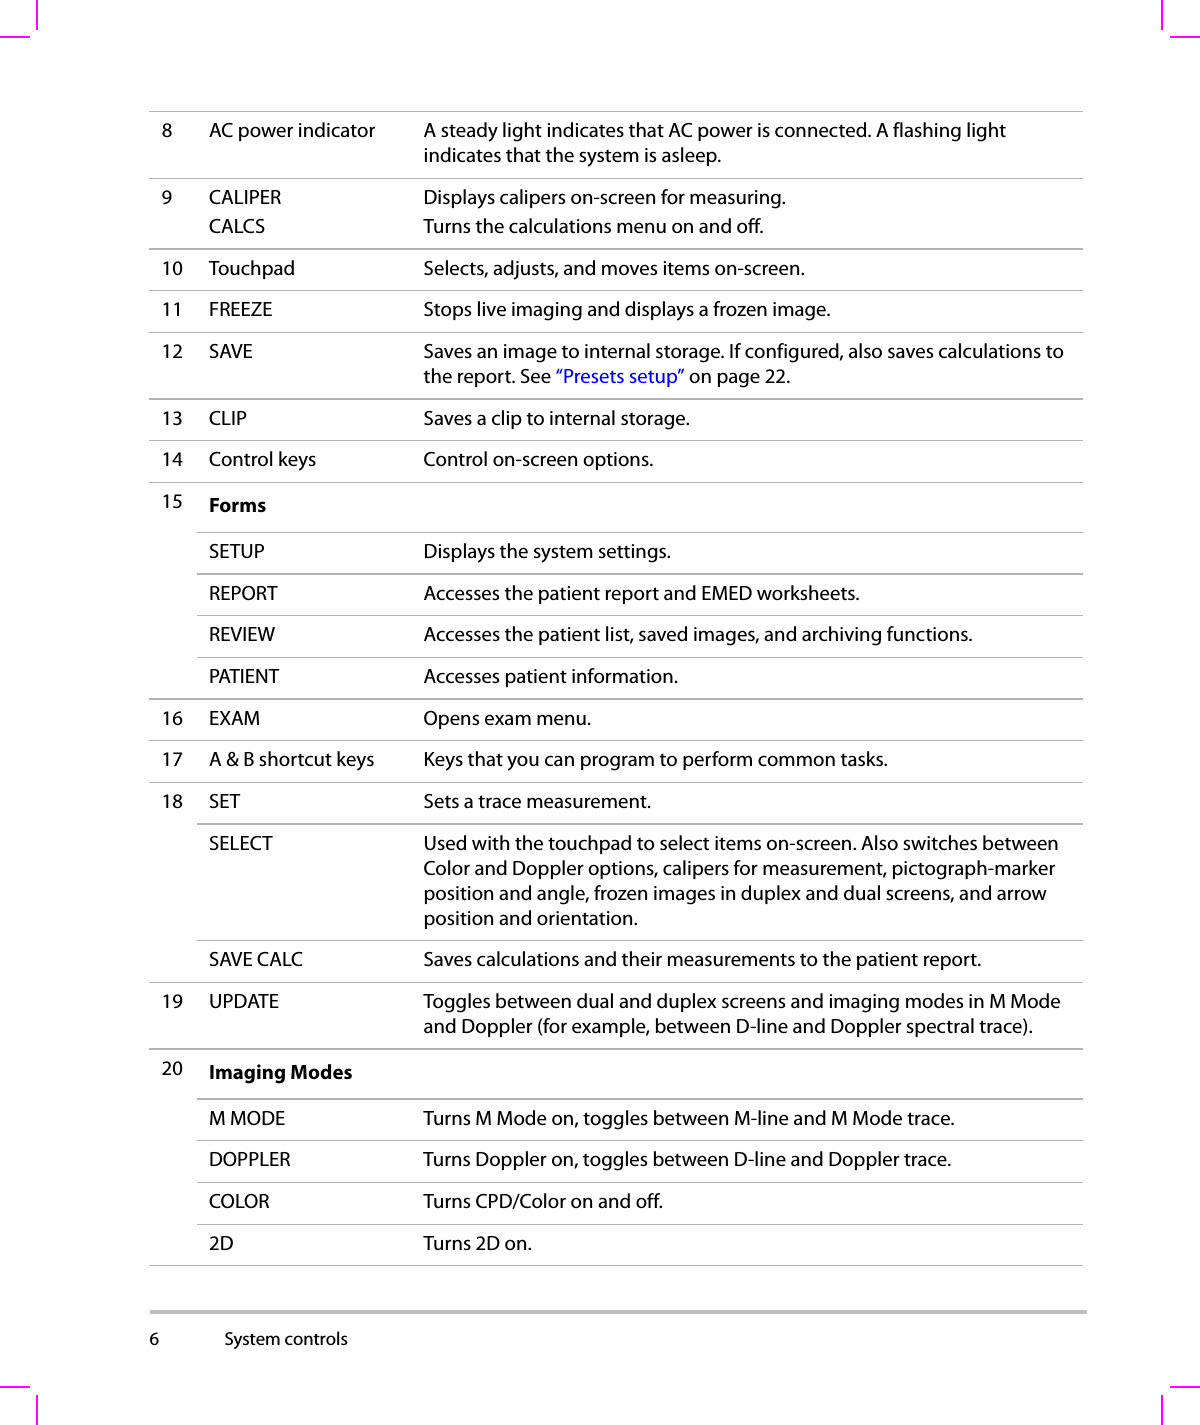
Chapter 1:  Getting Started 5Getting StartedSystem controls1 Power switch Turns system on and off.2 Alphanumeric keys Use to enter text and numbers.3 Annotation keys See “Alphanumeric keyboard” on page 9.4 ZOOM Magnifies the image 100%.5DEPTH UP, DEPTH DOWNDecreases and increases imaging depth.6 AUTO GAIN Adjusts gain automatically.7Gain Near Adjusts the gain applied to the near field of the image. Far Adjusts the gain applied to the far field of the image. Gain/ Cine BufferIn live imaging, adjusts the overall gain applied to the entire image. On a frozen image, moves the cine buffer.1234678 9 11 12 1314151716181920510
6 System controls  8 AC power indicator A steady light indicates that AC power is connected. A flashing light indicates that the system is asleep.9 CALIPERCALCSDisplays calipers on-screen for measuring.Turns the calculations menu on and off.10 Touchpad Selects, adjusts, and moves items on-screen.11 FREEZE Stops live imaging and displays a frozen image.12 SAVE Saves an image to internal storage. If configured, also saves calculations to the report. See “Presets setup” on page 22.13 CLIP Saves a clip to internal storage.14 Control keys Control on-screen options.15 FormsSETUP Displays the system settings.REPORT Accesses the patient report and EMED worksheets.REVIEW Accesses the patient list, saved images, and archiving functions.PATIENT Accesses patient information.16 EXAM Opens exam menu.17 A & B shortcut keys Keys that you can program to perform common tasks.18 SET Sets a trace measurement.SELECT Used with the touchpad to select items on-screen. Also switches between Color and Doppler options, calipers for measurement, pictograph-marker position and angle, frozen images in duplex and dual screens, and arrow position and orientation.SAVE CALC Saves calculations and their measurements to the patient report.19 UPDATE Toggles between dual and duplex screens and imaging modes in M Mode and Doppler (for example, between D-line and Doppler spectral trace).20 Imaging ModesM MODE Turns M Mode on, toggles between M-line and M Mode trace.DOPPLER Turns Doppler on, toggles between D-line and Doppler trace.COLOR Turns CPD/Color on and off.2D Turns 2D on.
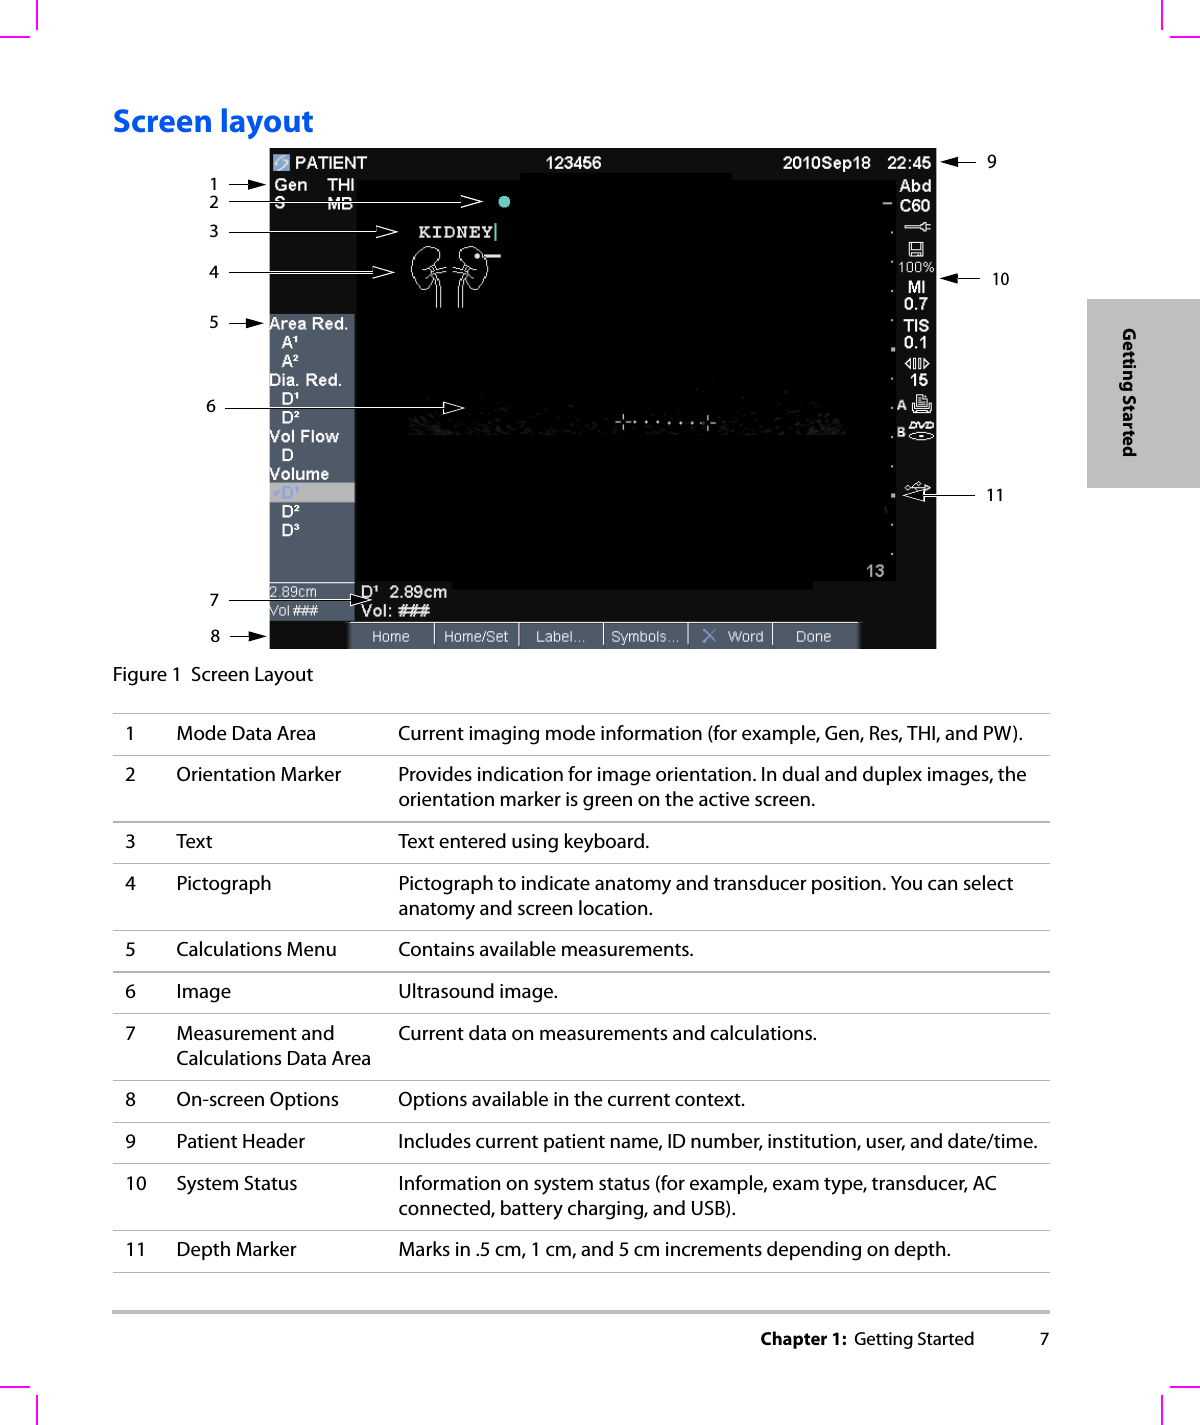
Chapter 1:  Getting Started 7Getting StartedScreen layoutFigure 1 Screen Layout1 Mode Data Area Current imaging mode information (for example, Gen, Res, THI, and PW).2 Orientation Marker Provides indication for image orientation. In dual and duplex images, the orientation marker is green on the active screen.3 Text Text entered using keyboard.4 Pictograph Pictograph to indicate anatomy and transducer position. You can select anatomy and screen location.5 Calculations Menu Contains available measurements.6 Image Ultrasound image.7Measurement and Calculations Data AreaCurrent data on measurements and calculations.8 On-screen Options Options available in the current context.9 Patient Header Includes current patient name, ID number, institution, user, and date/time.10 System Status Information on system status (for example, exam type, transducer, AC connected, battery charging, and USB).11 Depth Marker Marks in .5 cm, 1 cm, and 5 cm increments depending on depth.1546111097382
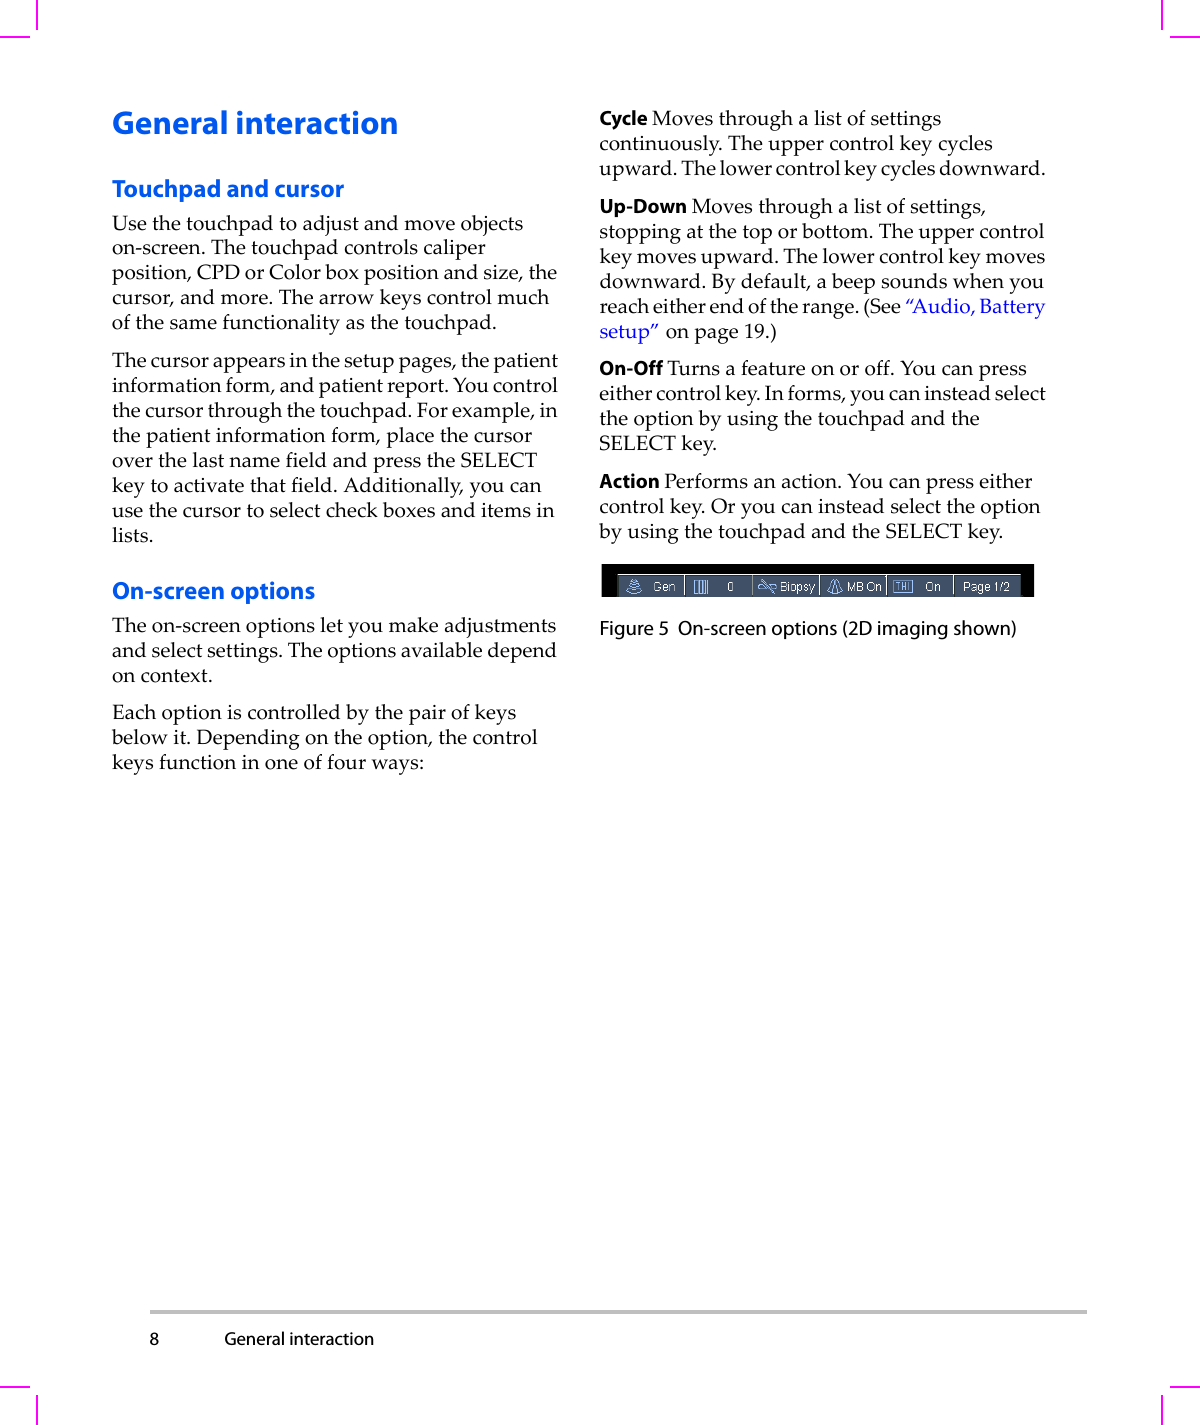
8 General interaction  General interactionTouchpad and cursorUsethetouchpadtoadjustandmoveobjectson‐screen.Thetouchpadcontrolscaliperposition,CPDorColorboxpositionandsize,thecursor,andmore.Thearrowkeyscontrolmuchofthesamefunctionalityasthetouchpad.Thecursorappearsinthesetuppages,thepatientinformationform,andpatientreport.Youcontrolthecursorthroughthetouchpad.Forexample,inthepatientinformationform,placethecursoroverthelastnamefieldandpresstheSELECTkeytoactivatethatfield.Additionally,youcanusethecursortoselectcheckboxesanditemsinlists.On-screen optionsTheon‐screenoptionsletyoumakeadjustmentsandselectsettings.Theoptionsavailabledependoncontext.Eachoptioniscontrolledbythepairofkeysbelowit.Dependingontheoption,thecontrolkeysfunctioninoneoffourways:Cycle Movesthroughalistofsettingscontinuously.Theuppercontrolkeycyclesupward.Thelowercontrolkeycyclesdownward.Up-Down Movesthroughalistofsettings,stoppingatthetoporbottom.Theuppercontrolkeymovesupward.Thelowercontrolkeymovesdownward.Bydefault,abeepsoundswhenyoureacheitherendoftherange.(See“A u d i o , Batterysetup”onpage 19.)On-Off Turnsafeatureonoroff.Youcanpresseithercontrolkey.Informs,youcaninsteadselecttheoptionbyusingthetouchpadandtheSELECTkey.Action Performsanaction.Youcanpresseithercontrolkey.OryoucaninsteadselecttheoptionbyusingthetouchpadandtheSELECTkey.Figure 5 On-screen options (2D imaging shown)
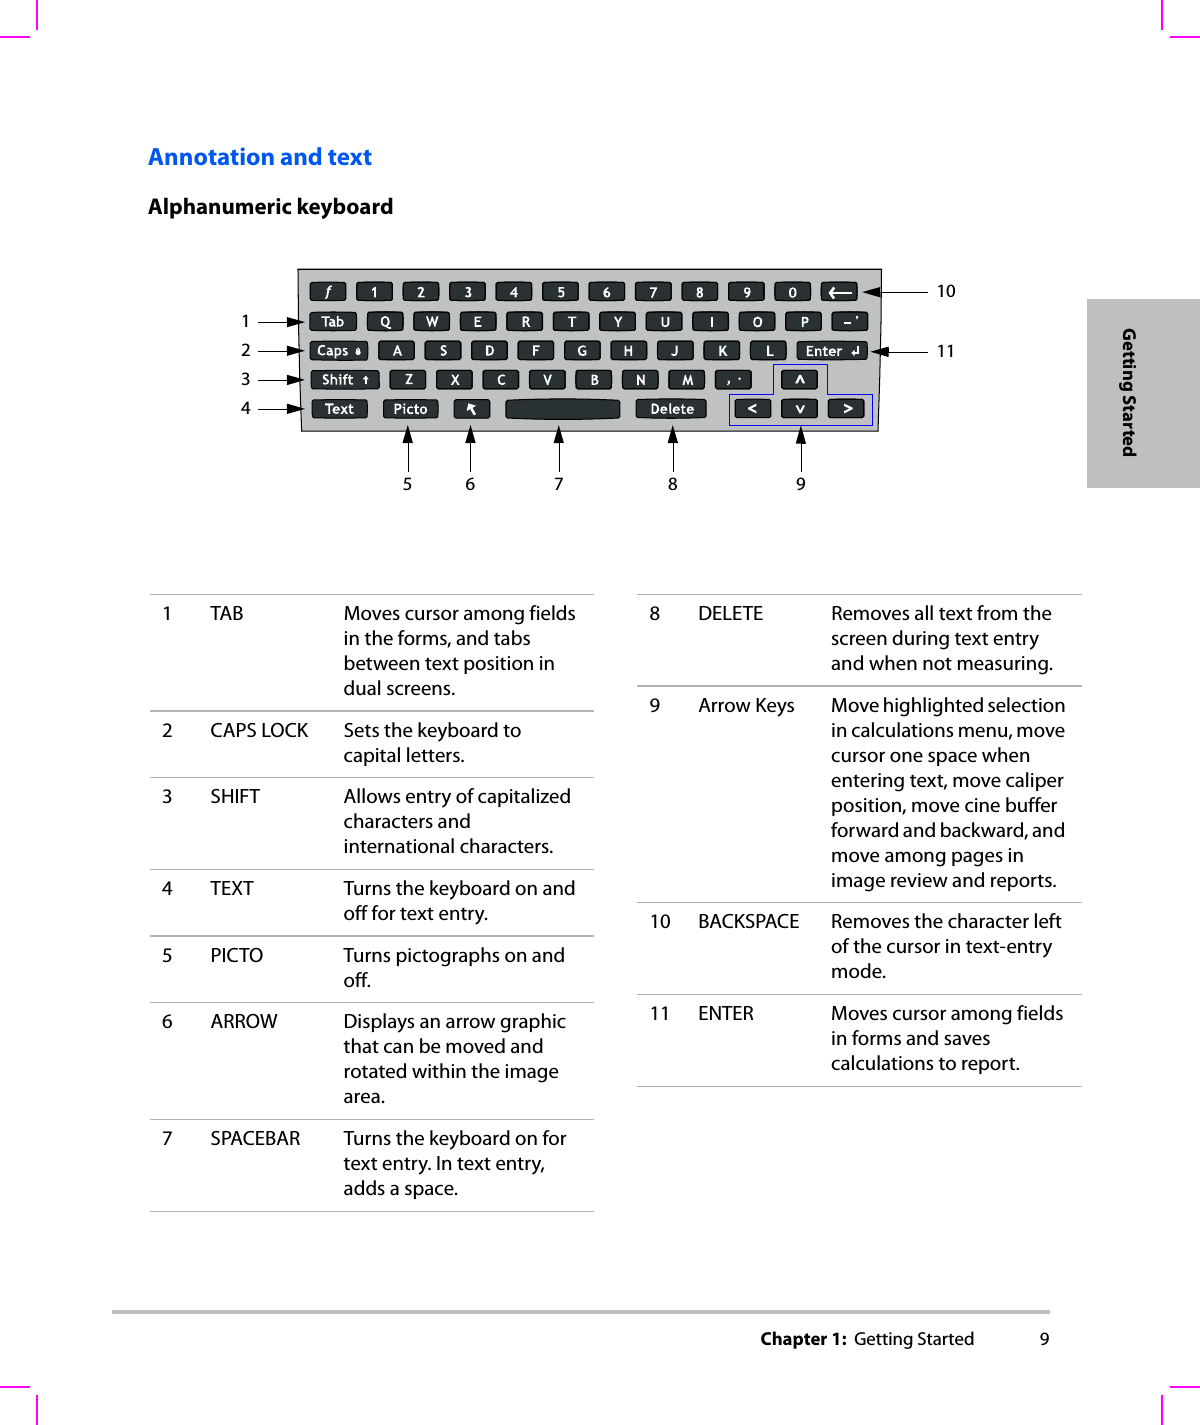
Chapter 1:  Getting Started 9Getting Started1TAB Moves cursor among fields in the forms, and tabs between text position in dual screens.2 CAPS LOCK Sets the keyboard to capital letters.3 SHIFT Allows entry of capitalized characters and international characters.4 TEXT Turns the keyboard on and off for text entry.5 PICTO Turns pictographs on and off.6 ARROW Displays an arrow graphic that can be moved and rotated within the image area. 7 SPACEBAR Turns the keyboard on for text entry. In text entry, adds a space.8 DELETE Removes all text from the screen during text entry and when not measuring.9 Arrow Keys Move highlighted selection in calculations menu, move cursor one space when entering text, move caliper position, move cine buffer forward and backward, and move among pages in image review and reports.10 BACKSPACE Removes the character left of the cursor in text-entry mode.11 ENTER Moves cursor among fields in forms and saves calculations to report.Annotation and textAlphanumeric keyboard2341110156 8 97
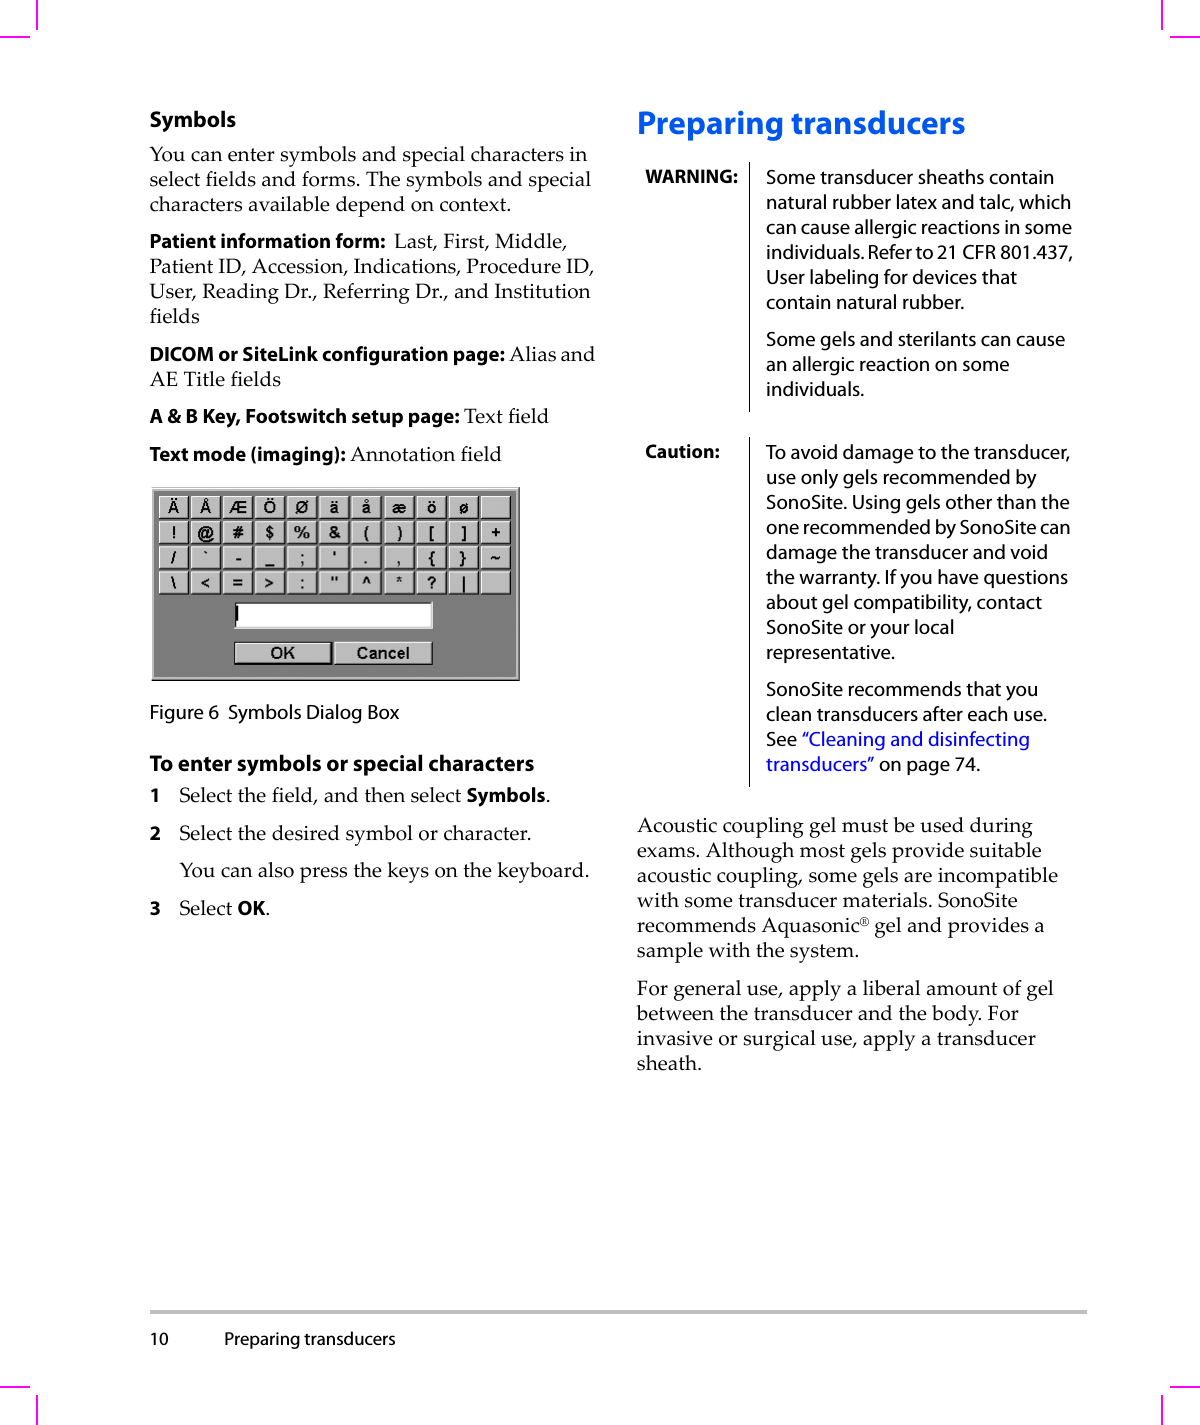
10 Preparing transducers  SymbolsYoucanentersymbolsandspecialcharactersinselectfieldsandforms.Thesymbolsandspecialcharactersavailabledependoncontext.Patient information form:  Last,First,Middle,PatientID,Accession,Indications,ProcedureID,User,ReadingDr.,ReferringDr.,andInstitutionfieldsDICOM or SiteLink configuration page: AliasandAETitlefieldsA & B Key, Footswitch setup page: TextfieldText mode (imaging): AnnotationfieldFigure 6 Symbols Dialog BoxTo enter symbols or special characters1Selectthefield,andthenselectSymbols.2Selectthedesiredsymbolorcharacter.Youcanalsopressthekeysonthekeyboard.3SelectOK.Preparing transducersAcousticcouplinggelmustbeusedduringexams.Althoughmostgelsprovidesuitableacousticcoupling,somegelsareincompatiblewithsometransducermaterials.SonoSiterecommendsAquasonic®gelandprovidesasamplewiththesystem.Forgeneraluse,applyaliberalamountofgelbetweenthetransducerandthebody.Forinvasiveorsurgicaluse,applyatransducersheath.WARNING: Some transducer sheaths contain natural rubber latex and talc, which can cause allergic reactions in some individuals. Refer to 21 CFR 801.437, User labeling for devices that contain natural rubber.Some gels and sterilants can cause an allergic reaction on some individuals.Caution: To avoid damage to the transducer, use only gels recommended by SonoSite. Using gels other than the one recommended by SonoSite can damage the transducer and void the warranty. If you have questions about gel compatibility, contact SonoSite or your local representative.SonoSite recommends that you clean transducers after each use. See “Cleaning and disinfecting transducers” on page 74.
Chapter 1:  Getting Started 11Getting StartedTo apply a transducer sheathSonoSiterecommendstheuseofmarket‐cleared,transducersheathsforintracavitaryorsurgicalapplications.Tolessentheriskofcontamination,applythesheathonlywhenyouarereadytoperformtheprocedure.1Placegelinsidethesheath.2Insertthetransducerintothesheath.3Pullthesheathoverthetransducerandcableuntilthesheathisfullyextended.4Securethesheathusingthebandssuppliedwiththesheath.5Checkforandeliminatebubblesbetweenthefaceofthetransducerandthesheath.Bubblesbetweenthefaceofthetransducerandthesheathmayaffecttheultrasoundimage.6Inspectthesheathtoensurethattherearenoholesortears.Training videosTheSonoSite®EducationKey™trainingvideosareanoptionalfeature.To display the list of videos1InserttheEducationKeyUSBdeviceintoaUSBportonthesystem.2PresstheREVIEWkey.3Ifthereisanactiveexam,selectListon‐screen.4SelecttheVideostab.5Ifthelistdoesnotappear,selectthecorrectUSBdevice:aSelectSelect USB.bIntheSelect USB device for media playback dialog box,selecttheEducationKeyUSBdevice(“Training”appearsunderType),andthenselectSelect.Note: ImageGalleryisanunsupportedfeature.To view a video1Displaythelistofvideos.2Selectthevideo.3SelectViewon‐screen.Thevideobeginsplaying.4Selectanyofthefollowing,asneeded:•Adjuststhevolume.Thehigherthenumber,thelouderthesound.Zeroismute.•BackRewindsthevideo10seconds.•Pause Pausesthevideo.•PlayResumesplayingofapausedvideo.•ForwardAdvancesthevideo10seconds.To exit a videoSelectoneofthefollowing:•Listtoreturntothevideolist.•Donetoreturnto2Dimaging.Intended usesThissystemtransmitsultrasoundenergyintovariouspartsofthepatient’sbodytoobtainultrasoundimages,asfollows.Fortheintendedtransducerandimagingmodesforeachexamtype,see“Imagingmodesandexamsavailablebytransducer”onpage 31.WARNING: To prevent contamination, the use of sterile transducer sheaths and sterile coupling gel is recommended for clinical applications of an invasive or surgical nature. Do not apply the transducer sheath and gel until you are ready to perform the procedure.
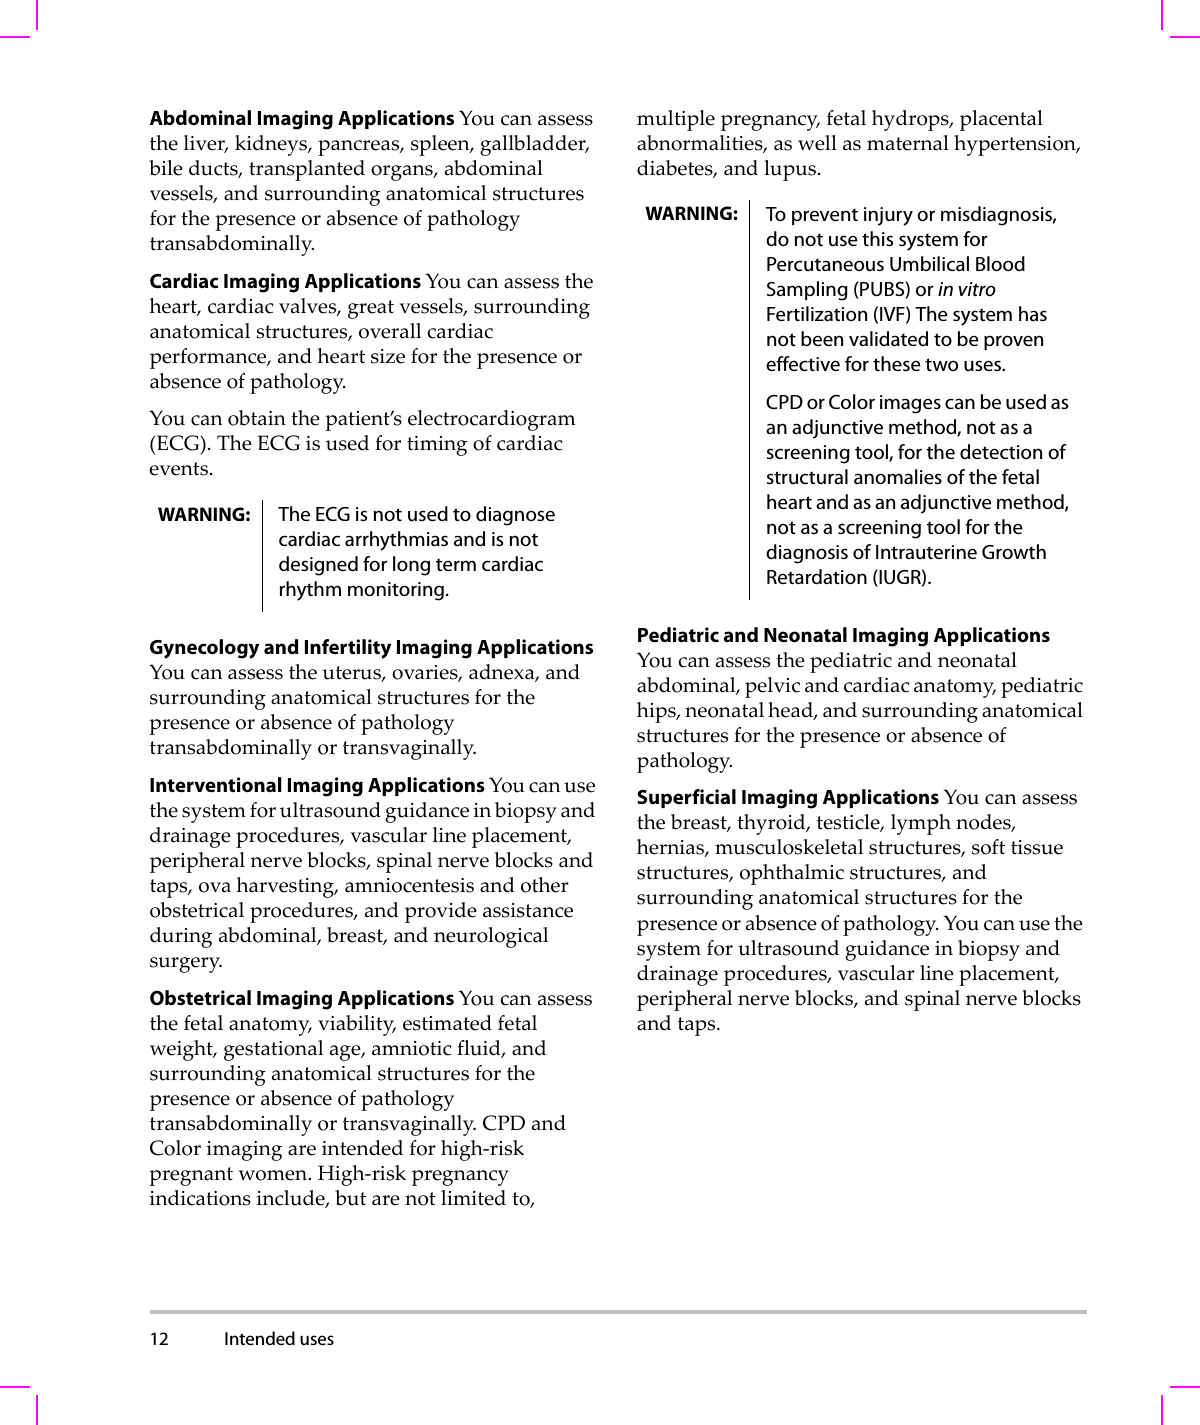
12 Intended uses  Abdominal Imaging Applications Youcanassesstheliver,kidneys,pancreas,spleen,gallbladder,bileducts,transplantedorgans,abdominalvessels,andsurroundinganatomicalstructuresforthepresenceorabsenceofpathologytransabdominally.Cardiac Imaging Applications Youcanassesstheheart,cardiacvalves,greatvessels,surroundinganatomicalstructures,overallcardiacperformance,andheartsizeforthepresenceorabsenceofpathology.Youcanobtainthepatient’selectrocardiogram(ECG).TheECGisusedfortimingofcardiacevents.Gynecology and Infertility Imaging Applications Youcanassesstheuterus,ovaries,adnexa,andsurroundinganatomicalstructuresforthepresenceorabsenceofpathologytransabdominallyortransvaginally.Interventional Imaging Applications Youcanusethesystemforultrasoundguidanceinbiopsyanddrainageprocedures,vascularlineplacement,peripheralnerveblocks,spinalnerveblocksandtaps,ovaharvesting,amniocentesisandotherobstetricalprocedures,andprovideassistanceduringabdominal,breast,andneurologicalsurgery.Obstetrical Imaging Applications Youcanassessthefetalanatomy,viability,estimatedfetalweight,gestationalage,amnioticfluid,andsurroundinganatomicalstructuresforthepresenceorabsenceofpathologytransabdominallyortransvaginally.CPDandColorimagingareintendedforhigh‐riskpregnantwomen.High‐riskpregnancyindicationsinclude,butarenotlimitedto,multiplepregnancy,fetalhydrops,placentalabnormalities,aswellasmaternalhypertension,diabetes,andlupus.Pediatric and Neonatal Imaging Applications Youcanassessthepediatricandneonatalabdominal,pelvicandcardiacanatomy,pediatrichips,neonatalhead,andsurroundinganatomicalstructuresforthepresenceorabsenceofpathology.Superficial Imaging Applications Youcanassessthebreast,thyroid,testicle,lymphnodes,hernias,musculoskeletalstructures,softtissuestructures,ophthalmicstructures,andsurroundinganatomicalstructuresforthepresenceorabsenceofpathology.Youcanusethesystemforultrasoundguidanceinbiopsyanddrainageprocedures,vascularlineplacement,peripheralnerveblocks,andspinalnerveblocksandtaps.WARNING: The ECG is not used to diagnose cardiac arrhythmias and is not designed for long term cardiac rhythm monitoring.WARNING: To prevent injury or misdiagnosis, do not use this system for Percutaneous Umbilical Blood Sampling (PUBS) or in vitro Fertilization (IVF) The system has not been validated to be proven effective for these two uses.CPD or Color images can be used as an adjunctive method, not as a screening tool, for the detection of structural anomalies of the fetal heart and as an adjunctive method, not as a screening tool for the diagnosis of Intrauterine Growth Retardation (IUGR).
Chapter 1:  Getting Started 13Getting StartedTranscranial Imaging Applications  Youcanassesstheanatomicalstructuresandvascularanatomyofthebrainforpresenceorabsenceofpathology.Youcanuseimagingtemporally,trans‐occipitally,ortrans‐orbitally.Vascular Imaging Applications Youcanassessthecarotidarteries,deepveins,andarteriesinthearmsandlegs,superficialveinsinthearmsandlegs,greatvesselsintheabdomen,andvarioussmallvesselsfeedingorgansforthepresenceorabsenceofpathology.WARNING: To avoid injury to the patient, use only an Orbital (Orb) or Ophthalmic (Oph) exam type when performing imaging through the eye. The FDA has established lower acoustic energy limits for ophthalmic use. The system will not exceed these limits only if the Orb or Oph exam type is selected.WARNING: To avoid injury to the patient, use only an Orbital (Orb) or Ophthalmic (Oph) exam type when performing imaging through the eye. The FDA has established lower acoustic energy limits for opthalmic use. The system will not exceed these limits only if the Orb or Oph exam type is selected.
14 Intended uses
Chapter 2:  System Setup 15SetupChapter 2: System SetupThesystemsetuppagesletyoucustomizethesystemandsetpreferences.Displaying the setup pagesTo display a setup page1PresstheSETUPkey.2SelectthesetuppageunderSetup Pages.Toreturntoimagingfromasetuppage,selectDoneon‐screen.Restoring default settingsTo restore default settings for a setup pageOnthesetuppage,select Reseton‐screen.To restore all default settings1Turnthesystemoff.2ConnectthesystemtoACpower.(See“TooperatethesystemusingACpower”onpage 3.)3Simultaneouslypress1andthepowerkey.Thesystembeepsseveraltimes.A & B Key, Footswitch setupOntheA&BKey,Footswitchsetuppage,youcanprogramtheshortcutkeysandfootswitchtoperformcommontasks.Selectfromthefollowinglists:A Key, B Key Thefunctionoftheshortcutkeys.Bydefault,theAshortcutkeyissettoPrintandtheBshortcutkeyissettoRecord.Theshortcutkeysarebelowthealphanumerickeypad.Footswitch (L),Footswitch (R) Thefunctionoftheleftandrightfootswitches:Save Clip,Record,Freeze,Save Image,orPrint.Seealso“Toconnectthefootswitch.”To connect the footswitchTheSonoSitefootswitchallowshands‐freeoperationwithacustomizabletwo‐pedalfootswitch.Thefootswitchisanoptionalfeature.1Connectthecables:•YadaptercabletotheECGconnectoronthemini‐dockordockingsystem•FootswitchcabletoYadaptercable2OntheA&BKey,Footswitchsetuppage,selectafunctionfortheleftandrightfootswitches.Administration setupOntheAdministrationsetuppage,youcanconfigurethesystemtorequireuserstologinandenterpasswords.Requiredloginhelpsprotectpatientdata.Youcanalsoaddanddeleteusers,changepasswords,importandexportuseraccounts,andviewtheeventlog.WARNING: To avoid contamination, do not use the footswitch in a sterile environment. The footswitch is not sterilized.
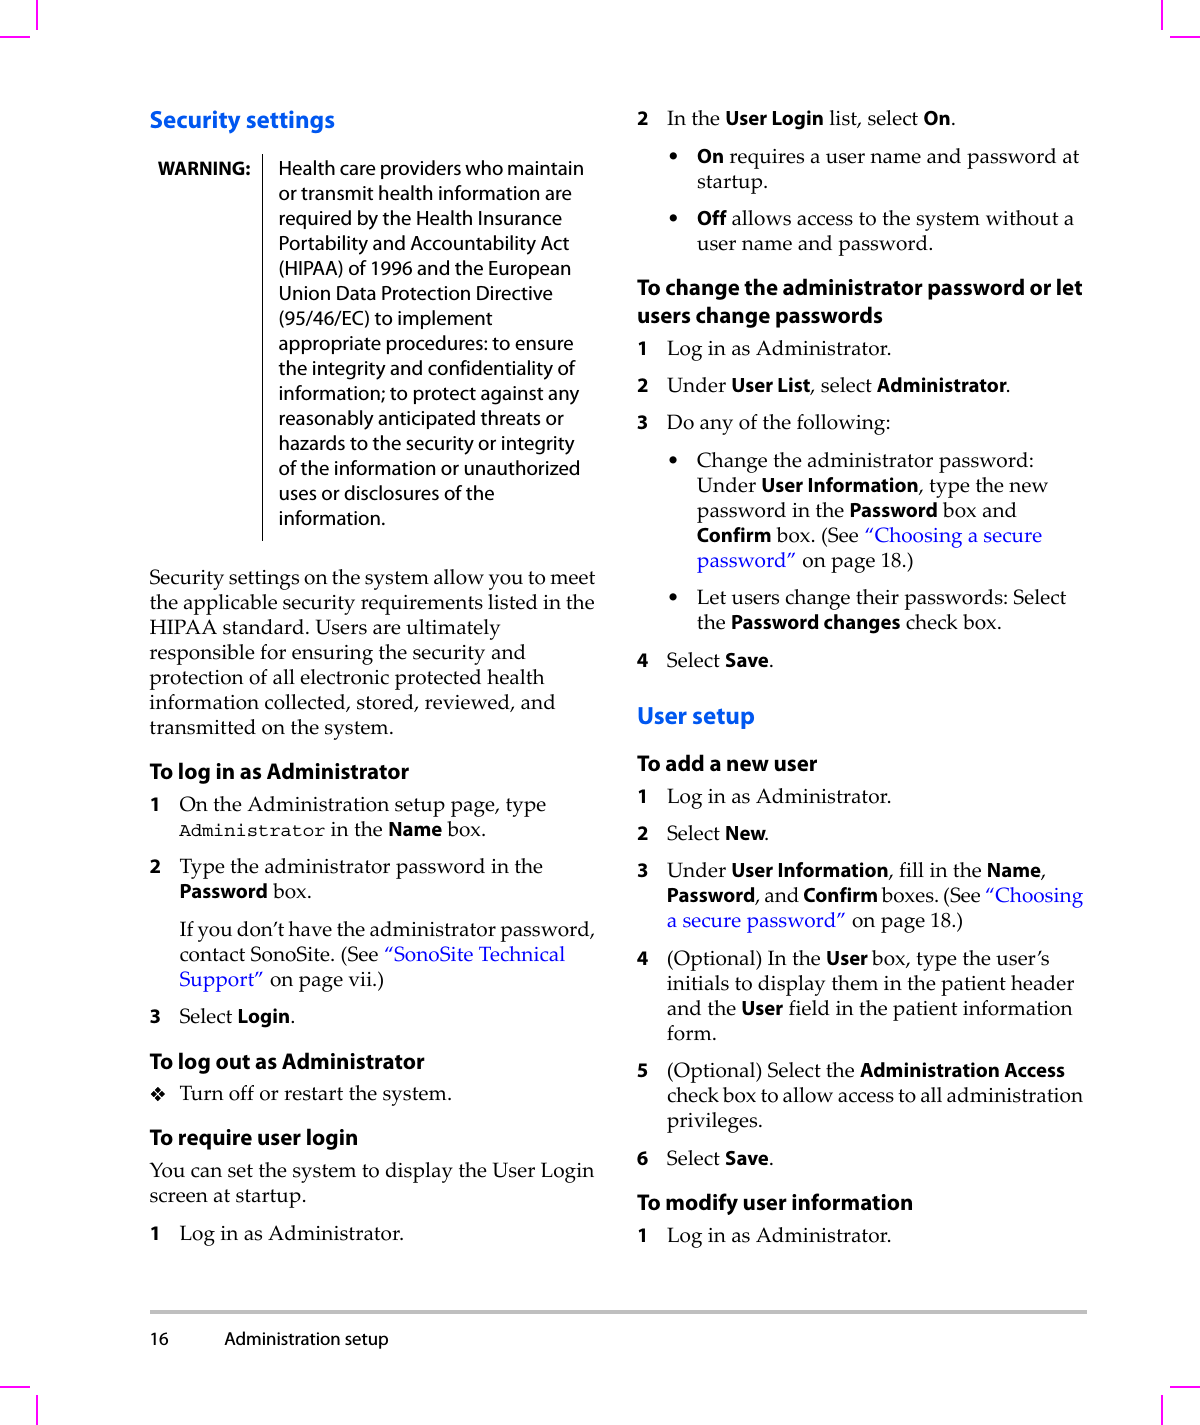
16 Administration setup  Security settingsSecuritysettingsonthesystemallowyoutomeettheapplicablesecurityrequirementslistedintheHIPAAstandard.Usersareultimatelyresponsibleforensuringthesecurityandprotectionofallelectronicprotectedhealthinformationcollected,stored,reviewed,andtransmittedonthesystem.To log in as Administrator1OntheAdministrationsetuppage,typeAdministratorintheNamebox.2TypetheadministratorpasswordinthePasswordbox.Ifyoudon’thavetheadministratorpassword,contactSonoSite.(See“SonoSiteTechnicalSupport”onpage vii.)3SelectLogin.To log out as AdministratorTurnofforrestartthesystem.To require user loginYoucansetthesystemtodisplaytheUserLoginscreenatstartup.1LoginasAdministrator.2IntheUser Loginlist,selectOn.•Onrequiresausernameandpasswordatstartup.•Offallowsaccesstothesystemwithoutausernameandpassword.To change the administrator password or let users change passwords1LoginasAdministrator.2UnderUser List,selectAdministrator.3Doanyofthefollowing:• Changetheadministratorpassword:UnderUser Information,typethenewpasswordinthePasswordboxandConfirmbox.(See“Choosingasecurepassword”onpage 18.)•Letuserschangetheirpasswords:SelectthePassword changescheckbox.4SelectSave.User setupTo add a new user1LoginasAdministrator.2SelectNew.3UnderUser Information,fillintheName,Password,andConfirmboxes.(See“Choosingasecurepassword”onpage 18.)4(Optional)IntheUser box,typetheuser’sinitialstodisplaytheminthepatientheaderandtheUserfieldinthepatientinformationform.5(Optional)SelecttheAdministration Accesscheckboxtoallowaccesstoalladministrationprivileges.6SelectSave.To modify user information1LoginasAdministrator.WARNING: Health care providers who maintain or transmit health information are required by the Health Insurance Portability and Accountability Act (HIPAA) of 1996 and the European Union Data Protection Directive (95/46/EC) to implement appropriate procedures: to ensure the integrity and confidentiality of information; to protect against any reasonably anticipated threats or hazards to the security or integrity of the information or unauthorized uses or disclosures of the information.
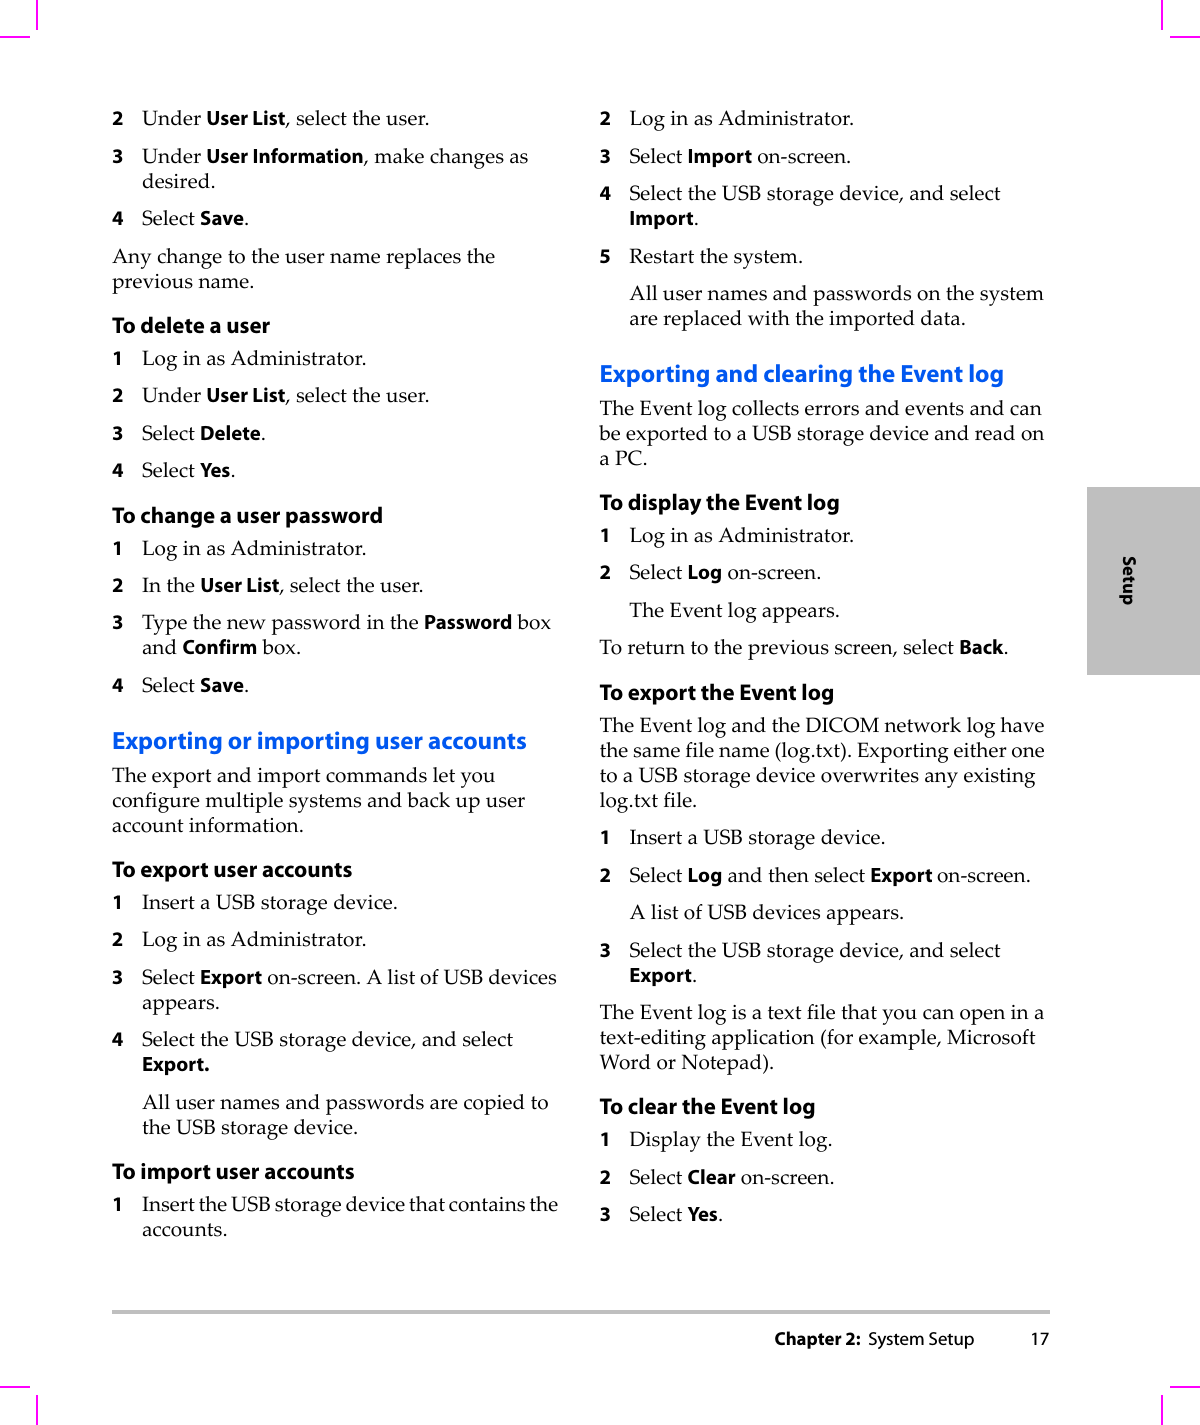
Chapter 2:  System Setup 17Setup2UnderUser List,selecttheuser.3UnderUser Information,makechangesasdesired.4SelectSave.Anychangetotheusernamereplacesthepreviousname.To delete a user1LoginasAdministrator.2UnderUser List,selecttheuser.3SelectDelete.4SelectYes .To change a user password1LoginasAdministrator.2IntheUser List,selecttheuser.3TypethenewpasswordinthePasswordboxandConfirmbox.4SelectSave.Exporting or importing user accountsTheexportandimportcommandsletyouconfiguremultiplesystemsandbackupuseraccountinformation.To export user accounts1InsertaUSBstoragedevice.2LoginasAdministrator.3SelectExporton‐screen.AlistofUSBdevicesappears.4SelecttheUSBstoragedevice,andselectExport.AllusernamesandpasswordsarecopiedtotheUSBstoragedevice.To import user accounts1InserttheUSBstoragedevicethatcontainstheaccounts.2LoginasAdministrator.3SelectImporton‐screen.4SelecttheUSBstoragedevice,andselectImport.5Restartthesystem.Allusernamesandpasswordsonthesystemarereplacedwiththeimporteddata.Exporting and clearing the Event logTheEventlogcollectserrorsandeventsandcanbeexportedtoaUSBstoragedeviceandreadonaPC.To display the Event log1LoginasAdministrator.2SelectLogon‐screen.TheEventlogappears.Toreturntothepreviousscreen,selectBack.To export the Event logTheEventlogandtheDICOMnetworkloghavethesamefilename(log.txt).ExportingeitheronetoaUSBstoragedeviceoverwritesanyexistinglog.txtfile.1InsertaUSBstoragedevice.2SelectLogandthenselectExport on‐screen.AlistofUSBdevicesappears.3SelecttheUSBstoragedevice,andselectExport.TheEventlogisatextfilethatyoucanopeninatext‐editingapplication(forexample,MicrosoftWordorNotepad).To clear the Event log1DisplaytheEventlog.2SelectClearon‐screen.3SelectYes .
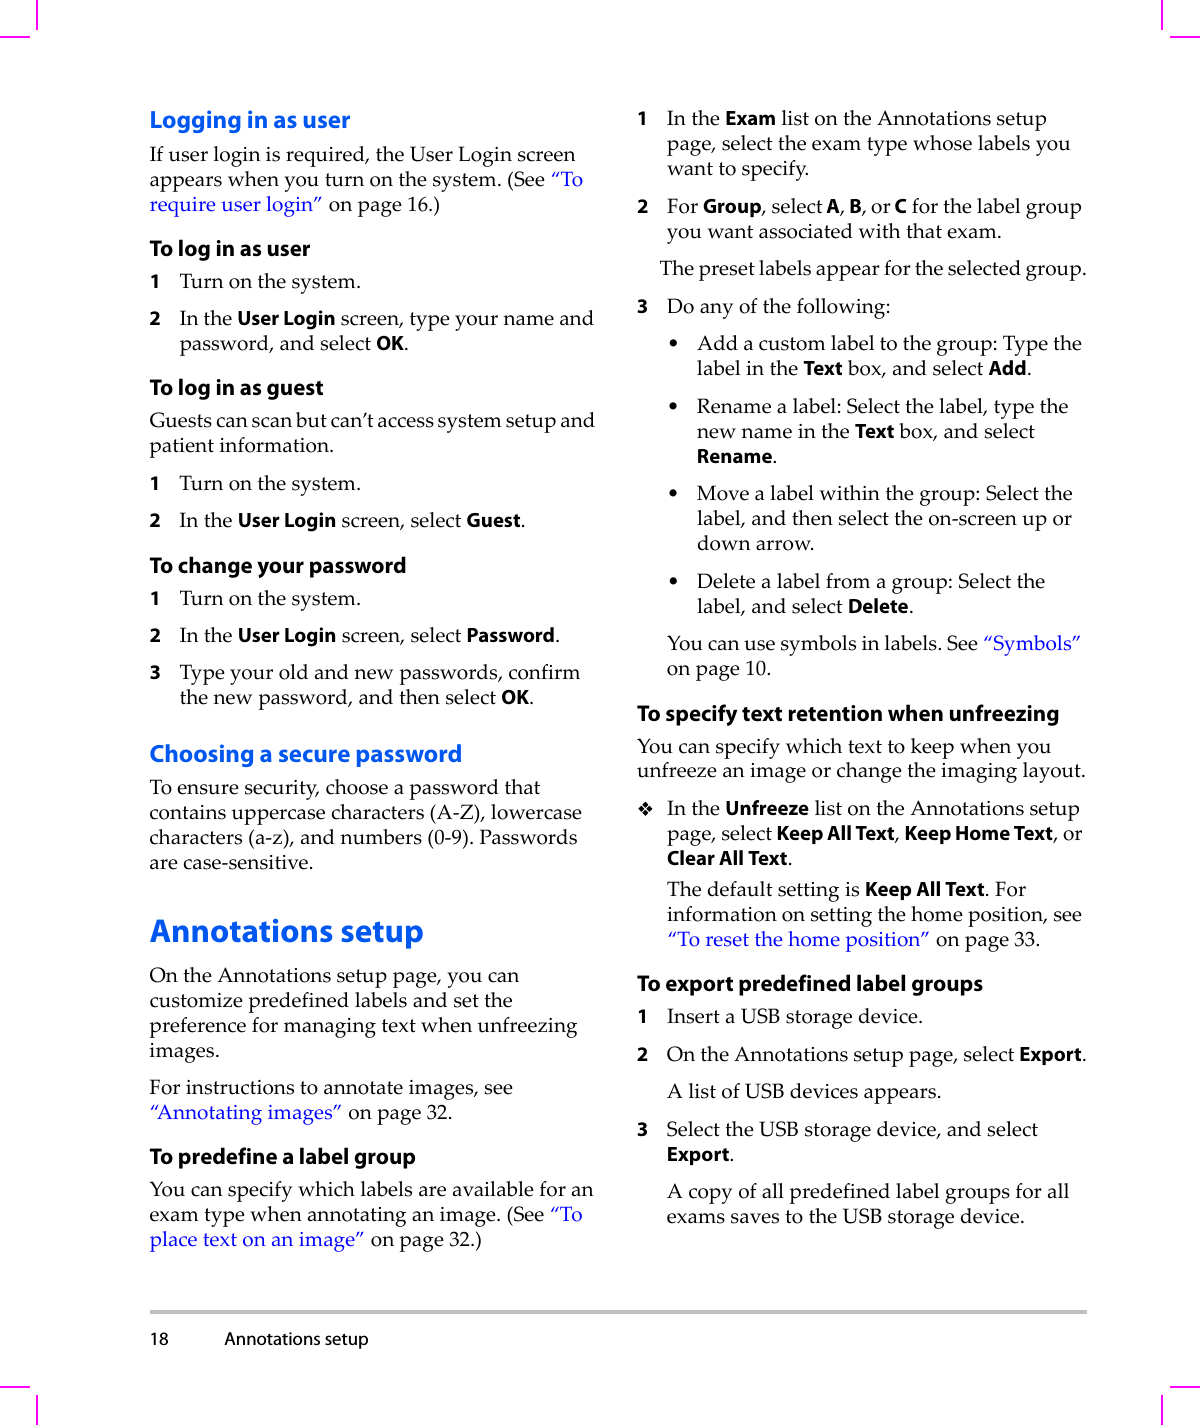
18 Annotations setup  Logging in as userIfuserloginisrequired,theUserLoginscreenappearswhenyouturnonthesystem.(See“Torequireuserlogin”onpage 16.)To log in as user1Turnonthesystem.2IntheUser Loginscreen,typeyournameandpassword,andselectOK.To log in as guestGuestscanscanbutcan’taccesssystemsetupandpatientinformation.1Turnonthesystem.2IntheUser Loginscreen,selectGuest.To change your password1Turnonthesystem.2IntheUser Loginscreen,selectPassword.3Typeyouroldandnewpasswords,confirmthenewpassword,andthenselectOK.Choosing a secure passwordToensuresecurity,chooseapasswordthatcontainsuppercasecharacters(A‐Z),lowercasecharacters(a‐z),andnumbers(0‐9).Passwordsarecase‐sensitive.Annotations setupOntheAnnotationssetuppage,youcancustomizepredefinedlabelsandsetthepreferenceformanagingtextwhenunfreezingimages.Forinstructionstoannotateimages,see“Annotatingimages”onpage 32.To predefine a label groupYoucanspecifywhichlabelsareavailableforanexamtypewhenannotatinganimage.(See“Toplacetextonanimage”onpage 32.)1IntheExamlistontheAnnotationssetuppage,selecttheexamtypewhoselabelsyouwanttospecify.2ForGroup,select A, B, or Cforthelabelgroupyouwantassociatedwiththatexam.Thepresetlabelsappearfortheselectedgroup.3Doanyofthefollowing:•Addacustomlabeltothegroup:TypethelabelintheTextbox,andselectAdd.• Renamealabel:Selectthelabel,typethenewnameintheTextbox,andselectRename.•Movealabelwithinthegroup:Selectthelabel,andthenselecttheon‐screenupordownarrow.• Deletealabelfromagroup:Selectthelabel,andselectDelete.Youcanusesymbolsinlabels.See“Symbols”onpage 10.To specify text retention when unfreezingYoucanspecifywhichtexttokeepwhenyouunfreezeanimageorchangetheimaginglayout.IntheUnfreezelistontheAnnotationssetuppage,selectKeep All Text,Keep Home Text,orClear All Text.ThedefaultsettingisKeep All Text.Forinformationonsettingthehomeposition,see“Toresetthehomeposition”onpage 33.To export predefined label groups1InsertaUSBstoragedevice.2OntheAnnotationssetuppage,selectExport.AlistofUSBdevicesappears.3SelecttheUSBstoragedevice,andselectExport.AcopyofallpredefinedlabelgroupsforallexamssavestotheUSBstoragedevice.
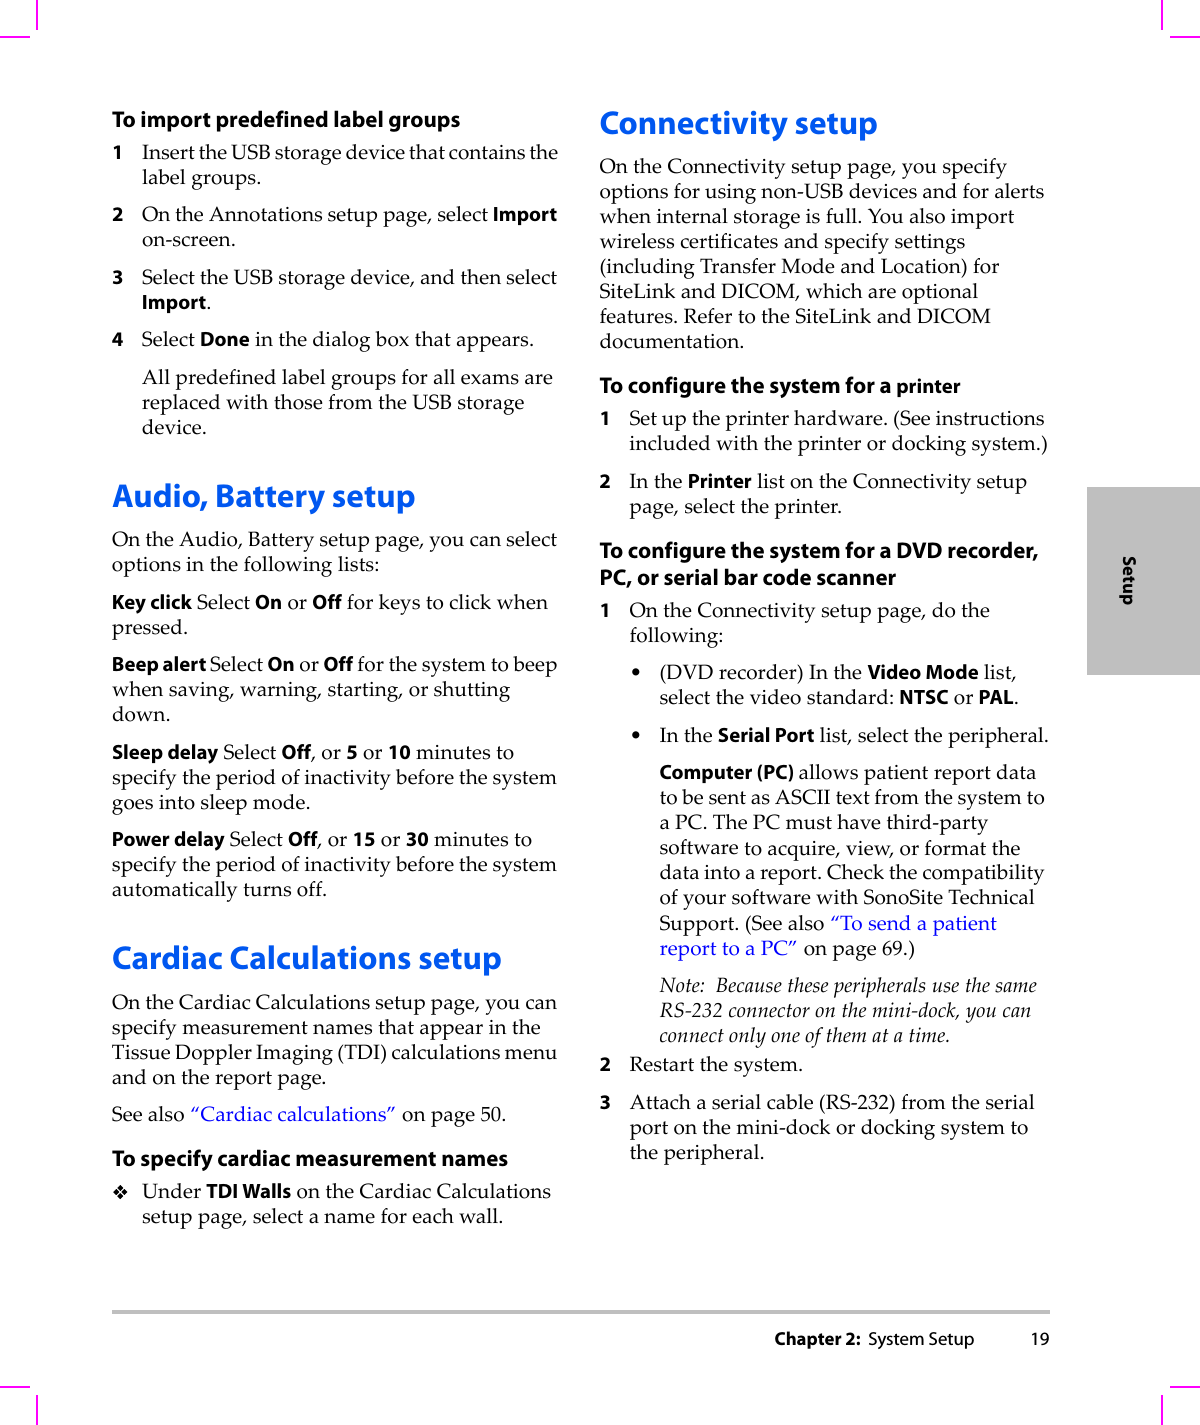
Chapter 2:  System Setup 19SetupTo import predefined label groups1InserttheUSBstoragedevicethatcontainsthelabelgroups.2OntheAnnotationssetuppage,selectImporton‐screen.3SelecttheUSBstoragedevice,andthenselectImport.4SelectDoneinthedialogboxthatappears.AllpredefinedlabelgroupsforallexamsarereplacedwiththosefromtheUSBstoragedevice.Audio, Battery setupOntheAudio,Batterysetuppage,youcanselectoptionsinthefollowinglists:Key clickSelectOnorOffforkeystoclickwhenpressed.Beep alert SelectOnorOffforthesystemtobeepwhensaving,warning,starting,orshuttingdown.Sleep delaySelectOff,or5or10minutestospecifytheperiodofinactivitybeforethesystemgoesintosleepmode.Power delaySelectOff,or15or30minutestospecifytheperiodofinactivitybeforethesystemautomaticallyturnsoff.Cardiac Calculations setup OntheCardiacCalculationssetuppage,youcanspecifymeasurementnamesthatappearintheTissueDopplerImaging(TDI)calculationsmenuandonthereportpage.Seealso“Cardiaccalculations”onpage 50.To specify cardiac measurement namesUnderTDI WallsontheCardiacCalculationssetuppage,selectanameforeachwall.Connectivity setupOntheConnectivitysetuppage,youspecifyoptionsforusingnon‐USBdevicesandforalertswheninternalstorageisfull.Youalsoimportwirelesscertificatesandspecifysettings(includingTransferModeandLocation)forSiteLinkandDICOM,whichareoptionalfeatures.RefertotheSiteLinkandDICOMdocumentation.To configure the system for a printer1Setuptheprinterhardware.(Seeinstructionsincludedwiththeprinterordockingsystem.)2InthePrinterlistontheConnectivitysetuppage,selecttheprinter.To configure the system for a DVD recorder, PC, or serial bar code scanner1OntheConnectivitysetuppage,dothefollowing:•(DVDrecorder)IntheVideo Modelist,selectthevideostandard:NTSCorPAL.•IntheSerial Portlist,selecttheperipheral.Computer (PC) allowspatientreportdatatobesentasASCIItextfromthesystemtoaPC.ThePCmusthavethird‐partysoftwaretoacquire,view,orformatthedataintoareport.CheckthecompatibilityofyoursoftwarewithSonoSiteTechnicalSupport.(Seealso“TosendapatientreporttoaPC”onpage 69.)Note: BecausetheseperipheralsusethesameRS‐232connectoronthemini‐dock,youcanconnectonlyoneofthematatime.2Restartthesystem.3Attachaserialcable(RS‐232)fromtheserialportonthemini‐dockordockingsystemtotheperipheral.
20 Date and Time setup  To receive storage alertsOntheConnectivitysetuppage,selectInternal Storage Capacity Alert.Thesystemdisplaysamessageifinternalstorageisnearcapacitywhenyouendanexam.ThesystemthendeletesarchivedpatientexamsifspecifiedinDICOM.Date and Time setupTo set the date and timeOntheDateandTimesetuppage,dothefollowing:•IntheDate box,typethecurrentdate.•IntheTime box,typethecurrenttimein24 hourformat(hoursandminutes).Display Information setupOntheDisplayInformationsetuppage,youcanspecifywhichdetailsappearon‐screenduringimaging.Youcanselectsettingsinthefollowingsections:Patient HeaderInformationthatappearsinthepatientheader.Mode DataImaginginformation.System StatusSystemstatusinformation.IMT Calculations setupOntheIMTCalculationssetuppage,youcancustomizetheIMTcalculationsmenu.Youcanspecifyuptoeightmeasurementnamesforbothrightsideandleftsidecalculations.Themeasurementnamesalsoappearinthepatientreport.Seealso“IMTcalculations”onpage 59.To customize the IMT calculations menuOntheIMTCalculationssetuppage,dothefollowing:•UnderIMT Calculations,selectmeasurementnamesfromthelists,orselectNone.Theselectednamesappearinthecalculationsmenuandinthepatientreport.•TypethedesiredwidthintheRegion width (mm)box.Network Status setupTheNetworkStatussetuppagedisplaysinformationonsystemIPaddress,Location,EthernetMACaddress,andthewirelessconnectionifany.OB Calculations setupOntheOBCalculationssetuppage,youselectauthorsforOBcalculationtables.YoucanalsoimportorexportadditionalOBcalculationtables.Seealso“OBcalculations”onpage 61.WARNING: To obtain accurate obstetrics calculations, an accurate date and time are critical. Verify that the date and time are accurate before each use of the system. The system does not automatically adjust for daylight saving time changes.
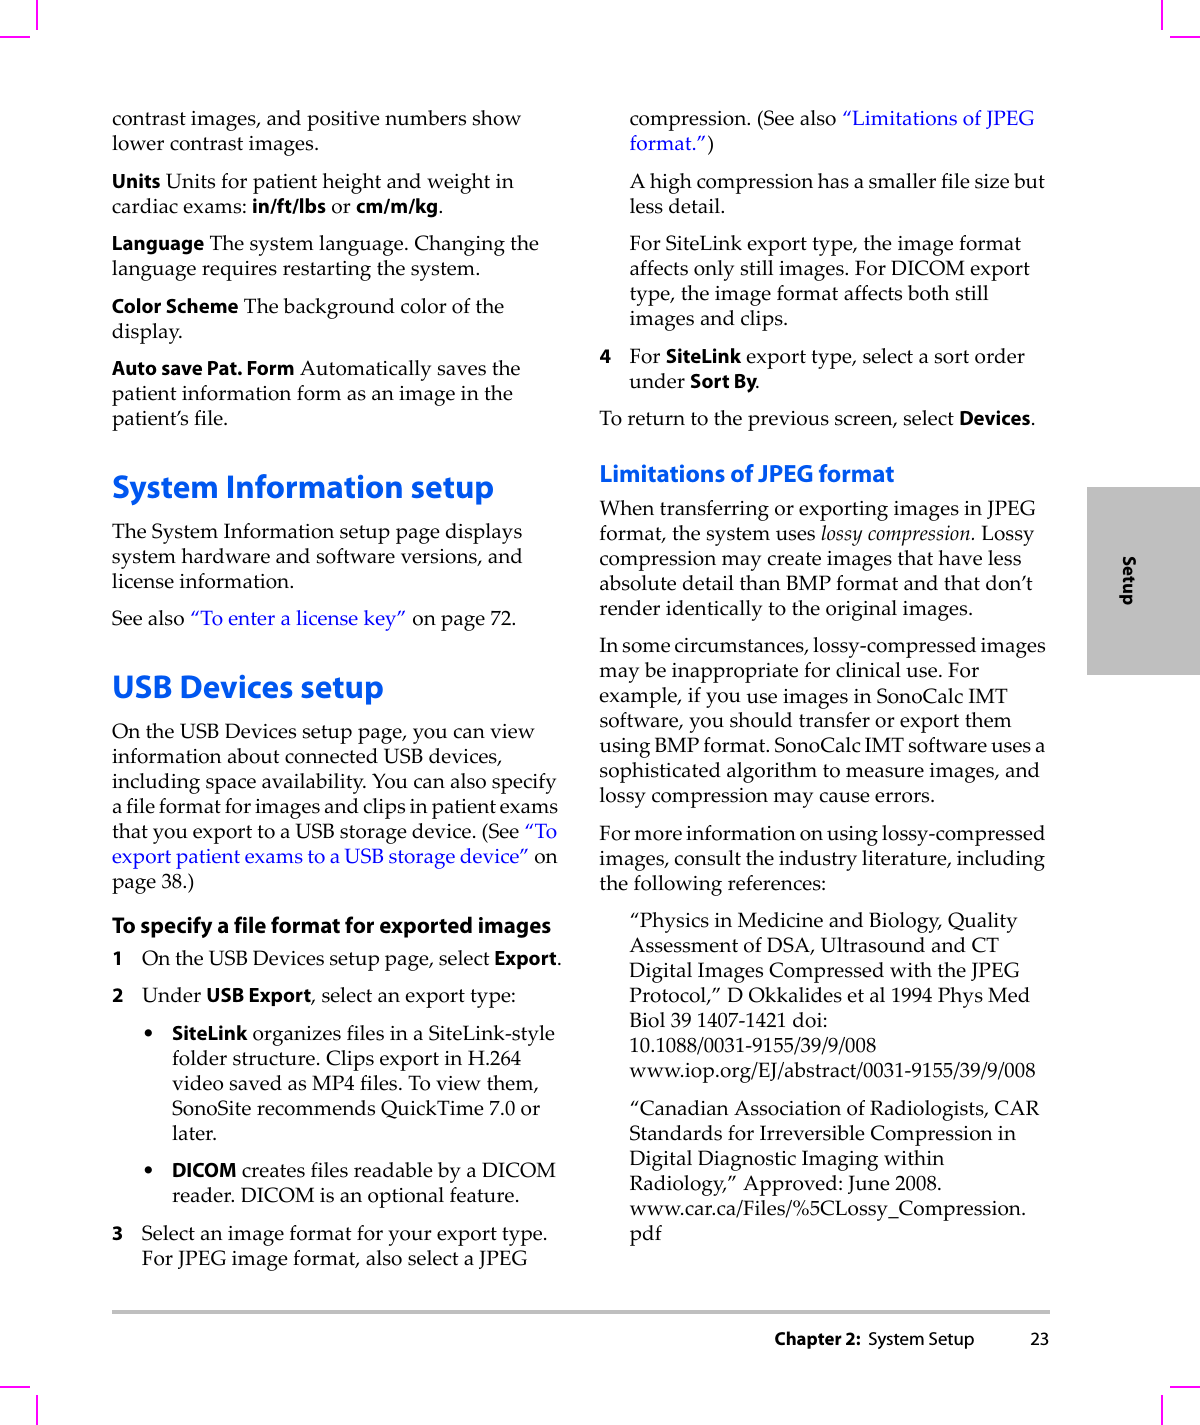
Chapter 2:  System Setup 21SetupFigure 1 OB Calculations Setup PageTo specify gestational age and growth analysis1OntheOBCalculationssetuppage,selectthedesiredOBauthors(orselectNone)inthemeasurementlistsunderGestational AgeandGrowth Analysis.Selectinganauthorplacestheassociatedmeasurementonthecalculationsmenu.2(Optional)SelectMoretodisplaythelistofuser‐definedcustommeasurementsandtoassociateacustomtableforthecustommeasurement.Thisoptionisavailableonlywhenauser‐definedcustomtablehasbeencreatedforthecustommeasurement.To export OB calculation tables1InsertaUSBstoragedevice.2OntheOBCalculationssetuppage,selectExport.AlistofUSBdevicesappears.3SelecttheUSBstoragedevice,andselectExport.Alluser‐definedtablesandmeasurementsarecopiedtotheUSBstoragedevice.To import OB calculationtablesTablesthatyouimportareaddedtothosealreadyonthesystem.1InserttheUSBstoragedevicethatcontainsthetables.2OntheOBCalculationssetuppage,selectImporton‐screen.3SelecttheUSBstoragedevice,andthenselectImport.4SelectOKinthedialogboxthatappears.Thesystemrestarts.OB Custom Measurements setupOntheOBCustomMeasurementssetuppage,youcandefinemeasurementsthatappearintheOBcalculationsmenuandOBreport.OBCustomMeasurementsisanoptionalfeature.Seealso“OBcalculations”onpage 61.To set up OB custom measurementsYoucansaveuptofivecustommeasurementsthatappearintheOBcalculationsmenuandOBreport.1OntheOBCustomMeasurementssetuppage,selectNew.2IntheNamebox,typeauniquename.3IntheTypelist,selectthedesiredmeasurementtype.4SelectSave.To delete an OB custom measurementIfyoudeleteanOBcustommeasurementduringanexam,theexamends.1OntheOBCustomMeasurementssetuppage,highlightthemeasurementintheCustom Measurementslist.2SelectDelete Last.
22 OB Custom Tables setup  3SelectYes .Theexamends,andanytablesandreportdataassociatedwiththemeasurementareremovedfromthesystem.OB Custom Tables setupOntheOBCustomTablessetuppages,youcancustomizegrowthtablesthatappearinthecalculationsmenuandpatientreport.Gestational Age Table Measurements ThesystemprovidesgestationalagemeasurementsbyselectedauthorsforCRL,GS,BPD,OFD,HC,AC,FL,APTD,TTD,FTA,and5 additionalcustommeasurementlabels.Growth Analysis Table MeasurementsThesystemprovidesgrowthgraphsorcurvesforBPD,HC,AC,FL,EFW,andHC/AC.To view OB tables1OntheOBCalculationsorOBCustomMeasurementssetuppage,selectTableson‐screen.2Selectthedesiredtableandmeasurement/author.To create a new OB custom tableYoucancreatetwocustomtablesforeachOBmeasurement.1OntheOBCalculationsorOBCustomMeasurementssetuppage,selectTableson‐screen.2Selectthedesiredtable(GestationalAgeorGrowth Analysis).3IntheMeasurementlist,selectthemeasurementforthecustomtable.4SelectNewon‐screen.5IntheAuthorbox,typeauniquename.6Enterthedata.7SelectSaveon‐screen.Todisplaythemeasurementforthecustomtableinthecalculationsmenu,see“Tospecifygestationalageandgrowthanalysis”onpage 21.To edit or delete an OB custom table1OntheOBCalculationsorOBCustomMeasurementssetuppage,selectTableson‐screen.2SelecttheOBcustomtable.3Selectoneofthefollowingon‐screen:•EditEnterdata,andthenselectSaveon‐screen.•Deletetoremovethecustomtable.SelectYes.Presets setupThePresetssetuppagehassettingsforgeneralpreferences.Youcanselectfromthefollowinglists:Doppler ScaleSelectcm/sorkHz.Duplex ThelayoutfordisplayingMModetraceandDopplerspectraltrace:1/3 2D, 2/3 Trace;1/2 2D, 1/2 Trace;orFull 2D, Full Trace.Live TraceSelectPeakorMean.Thermal Index YoucanselectTIS,TIB,orTIC.Thedefaultsettingisbasedonexamtype:OBisTIB,TCDisTIC,andallothersareTIS.Save KeyBehavioroftheSAVEkey.Image Onlysavestheimagetointernalstorage.Image/Calcssavestheimagetointernalstorageandsavesthecurrentcalculationtothepatientreport.Dynamic RangeSettingsinclude-3,-2,-1,0,+1,+2,or+3.NegativenumbersshowhigherWARNING: Prior to use, verify that custom table data entries are correct. The system does not confirm the accuracy of the custom table data entered by the user.
Chapter 2:  System Setup 23Setupcontrastimages,andpositivenumbersshowlowercontrastimages.UnitsUnitsforpatientheightandweightincardiacexams:in/ft/lbsorcm/m/kg.LanguageThesystemlanguage.Changingthelanguagerequiresrestartingthesystem.Color SchemeThebackgroundcolorofthedisplay.Auto save Pat. FormAutomaticallysavesthepatientinformationformasanimageinthepatient’sfile.System Information setupTheSystemInformationsetuppagedisplayssystemhardwareandsoftwareversions,andlicenseinformation.Seealso“Toenteralicensekey”onpage 72.USB Devices setupOntheUSBDevicessetuppage,youcanviewinformationaboutconnectedUSBdevices,includingspaceavailability.YoucanalsospecifyafileformatforimagesandclipsinpatientexamsthatyouexporttoaUSBstoragedevice.(See“ToexportpatientexamstoaUSBstoragedevice”onpage 38.)To specify a file format for exported images1OntheUSBDevicessetuppage,selectExport.2UnderUSB Export,selectanexporttype:•SiteLinkorganizesfilesinaSiteLink‐stylefolderstructure.ClipsexportinH.264videosavedasMP4files.Toviewthem,SonoSiterecommendsQuickTime7.0orlater.•DICOMcreatesfilesreadablebyaDICOMreader.DICOMisanoptionalfeature.3Selectanimageformatforyourexporttype.ForJPEGimageformat,alsoselectaJPEGcompression.(Seealso“LimitationsofJPEGformat.”)Ahighcompressionhasasmallerfilesizebutlessdetail.ForSiteLinkexporttype,theimageformataffectsonlystillimages.ForDICOMexporttype,theimageformataffectsbothstillimagesandclips.4ForSiteLinkexporttype,selectasortorderunderSort By.Toreturntothepreviousscreen,selectDevices.Limitations of JPEG formatWhentransferringorexportingimagesinJPEGformat,thesystemuseslossycompression.LossycompressionmaycreateimagesthathavelessabsolutedetailthanBMPformatandthatdon’trenderidenticallytotheoriginalimages.Insomecircumstances,lossy‐compressedimagesmaybeinappropriateforclinicaluse.Forexample,ifyouuseimagesinSonoCalcIMTsoftware,youshouldtransferorexportthemusingBMPformat.SonoCalcIMTsoftwareusesasophisticatedalgorithmtomeasureimages,andlossycompressionmaycauseerrors.Formoreinformationonusinglossy‐compressedimages,consulttheindustryliterature,includingthefollowingreferences:“PhysicsinMedicineandBiology,QualityAssessmentofDSA,UltrasoundandCTDigitalImagesCompressedwiththeJPEGProtocol,”DOkkalidesetal1994PhysMedBiol391407‐1421doi:10.1088/0031‐9155/39/9/008www.iop.org/EJ/abstract/0031‐9155/39/9/008“CanadianAssociationofRadiologists,CARStandardsforIrreversibleCompressioninDigitalDiagnosticImagingwithinRadiology,”Approved:June2008.www.car.ca/Files/%5CLossy_Compression.pdf
24 USB Devices setup
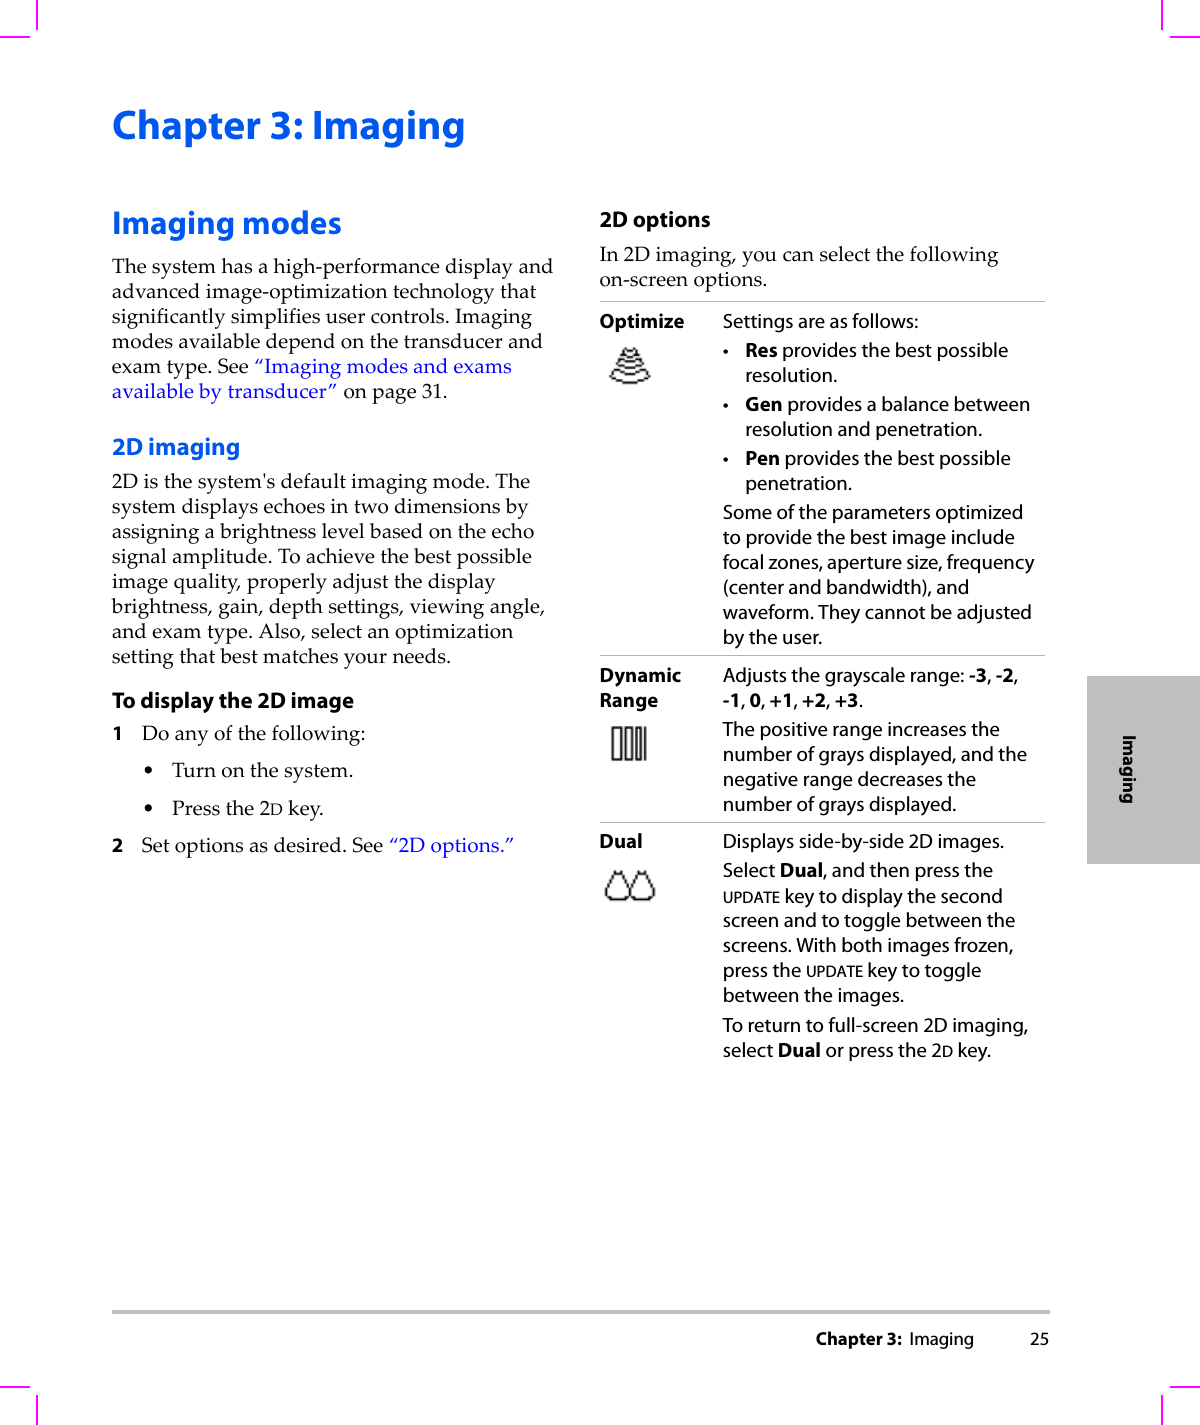
Chapter 3:  Imaging 25ImagingChapter 3: ImagingImaging modesThesystemhasahigh‐performancedisplayandadvancedimage‐optimizationtechnologythatsignificantlysimplifiesusercontrols.Imagingmodesavailabledependonthetransducerandexamtype.See“Imagingmodesandexamsavailablebytransducer”onpage 31.2D imaging2Disthesystemʹsdefaultimagingmode.Thesystemdisplaysechoesintwodimensionsbyassigningabrightnesslevelbasedontheechosignalamplitude.Toachievethebestpossibleimagequality,properlyadjustthedisplaybrightness,gain,depthsettings,viewingangle,andexamtype.Also,selectanoptimizationsettingthatbestmatchesyourneeds.To display the 2D image1Doanyofthefollowing:•Turnonthesystem.•Pressthe2Dkey.2Setoptionsasdesired.See“2Doptions.”2D optionsIn2Dimaging,youcanselectthefollowingon‐screenoptions.Optimize Settings are as follows:•Res provides the best possible resolution.•Gen provides a balance between resolution and penetration.•Pen provides the best possible penetration.Some of the parameters optimized to provide the best image include focal zones, aperture size, frequency (center and bandwidth), and waveform. They cannot be adjusted by the user.DynamicRangeAdjusts the grayscale range: -3, -2, -1, 0, +1, +2, +3. The positive range increases the number of grays displayed, and the negative range decreases the number of grays displayed.Dual Displays side-by-side 2D images.Select Dual, and then press the UPDATE key to display the second screen and to toggle between the screens. With both images frozen, press the UPDATE key to toggle between the images.To return to full-screen 2D imaging, select Dual or press the 2D key.
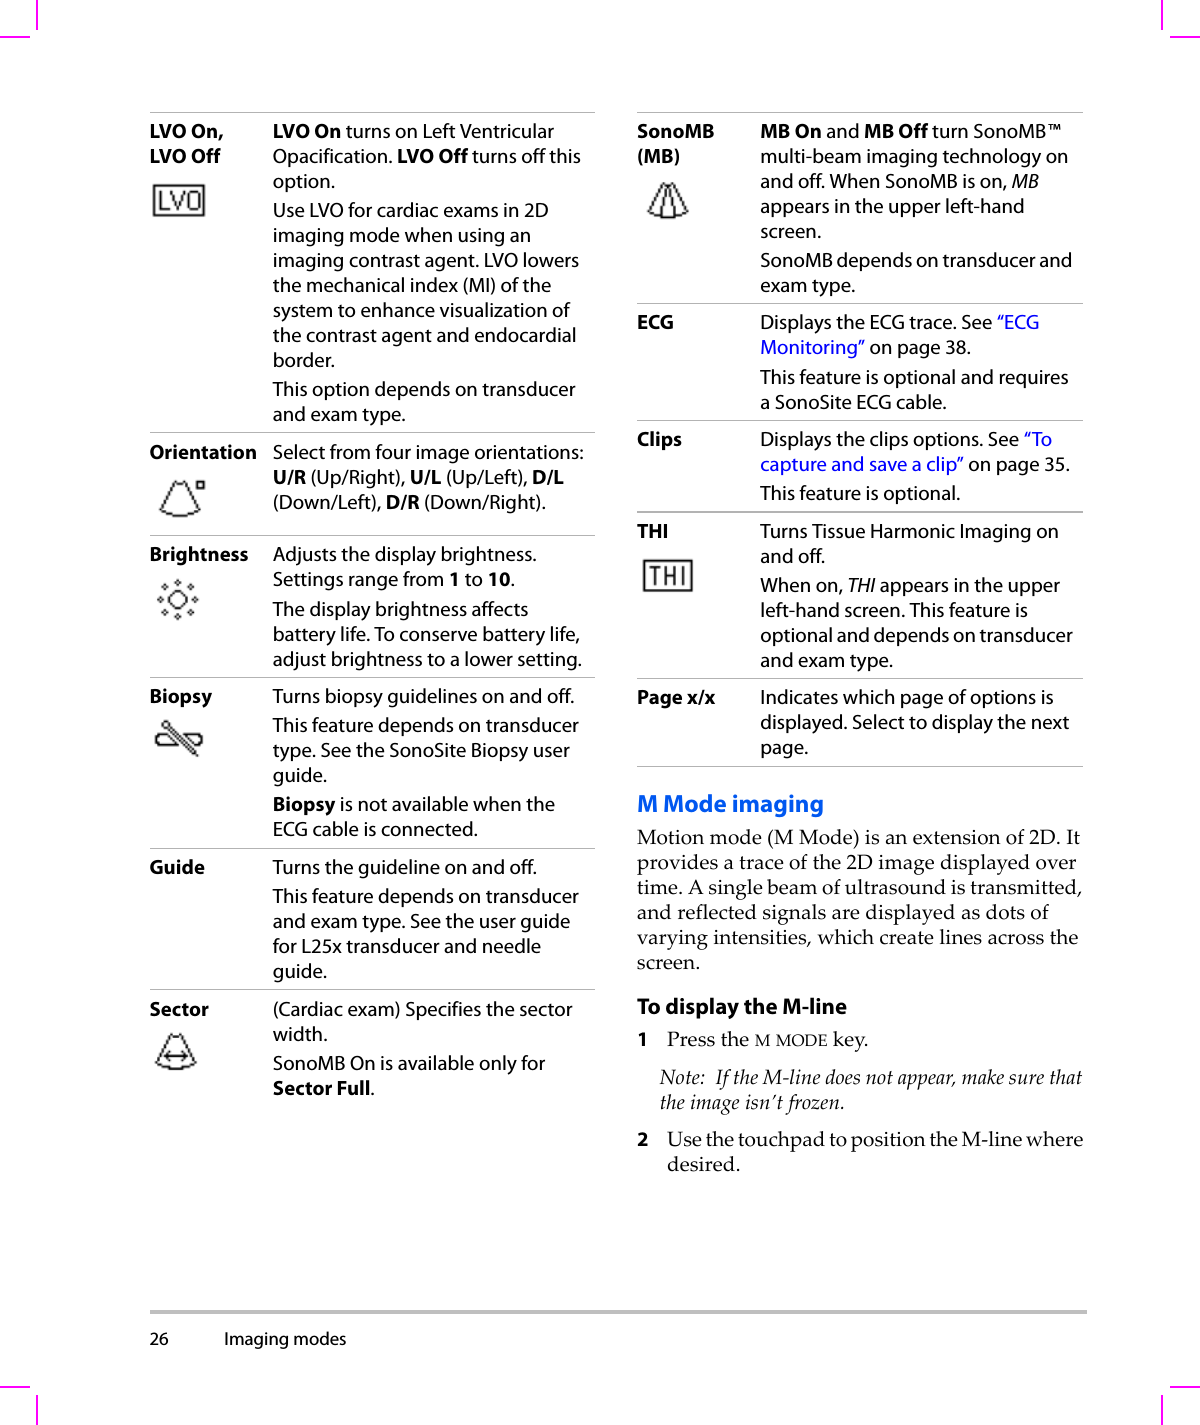
26 Imaging modes  M Mode imagingMotionmode(M Mode)isanextensionof2D.Itprovidesatraceofthe2Dimagedisplayedovertime.Asinglebeamofultrasoundistransmitted,andreflectedsignalsaredisplayedasdotsofvaryingintensities,whichcreatelinesacrossthescreen.To display the M-line 1PresstheMMODEkey.Note: IftheM‐linedoesnotappear,makesurethattheimageisn’tfrozen.2UsethetouchpadtopositiontheM‐linewheredesired.LVO On,LVO OffLVO On turns on Left Ventricular Opacification. LVO Off turns off this option.Use LVO for cardiac exams in 2D imaging mode when using an imaging contrast agent. LVO lowers the mechanical index (MI) of the system to enhance visualization of the contrast agent and endocardial border.This option depends on transducer and exam type.Orientation Select from four image orientations: U/R (Up/Right), U/L (Up/Left), D/L (Down/Left), D/R (Down/Right).Brightness Adjusts the display brightness. Settings range from 1 to 10.The display brightness affects battery life. To conserve battery life, adjust brightness to a lower setting.Biopsy Turns biopsy guidelines on and off. This feature depends on transducer type. See the SonoSite Biopsy user guide.Biopsy is not available when the ECG cable is connected.Guide Turns the guideline on and off.This feature depends on transducer and exam type. See the user guide for L25x transducer and needle guide.Sector (Cardiac exam) Specifies the sector width. SonoMB On is available only for Sector Full.SonoMB(MB)MB On and MB Off turn SonoMB™ multi-beam imaging technology on and off. When SonoMB is on, MB appears in the upper left-hand screen.SonoMB depends on transducer and exam type. ECG Displays the ECG trace. See “ECG Monitoring” on page 38.This feature is optional and requires a SonoSite ECG cable.Clips Displays the clips options. See “To capture and save a clip” on page 35.This feature is optional.THI  Turns Tissue Harmonic Imaging on and off.When on, THI appears in the upper left-hand screen. This feature is optional and depends on transducer and exam type.Page x/x Indicates which page of options is displayed. Select to display the next page.
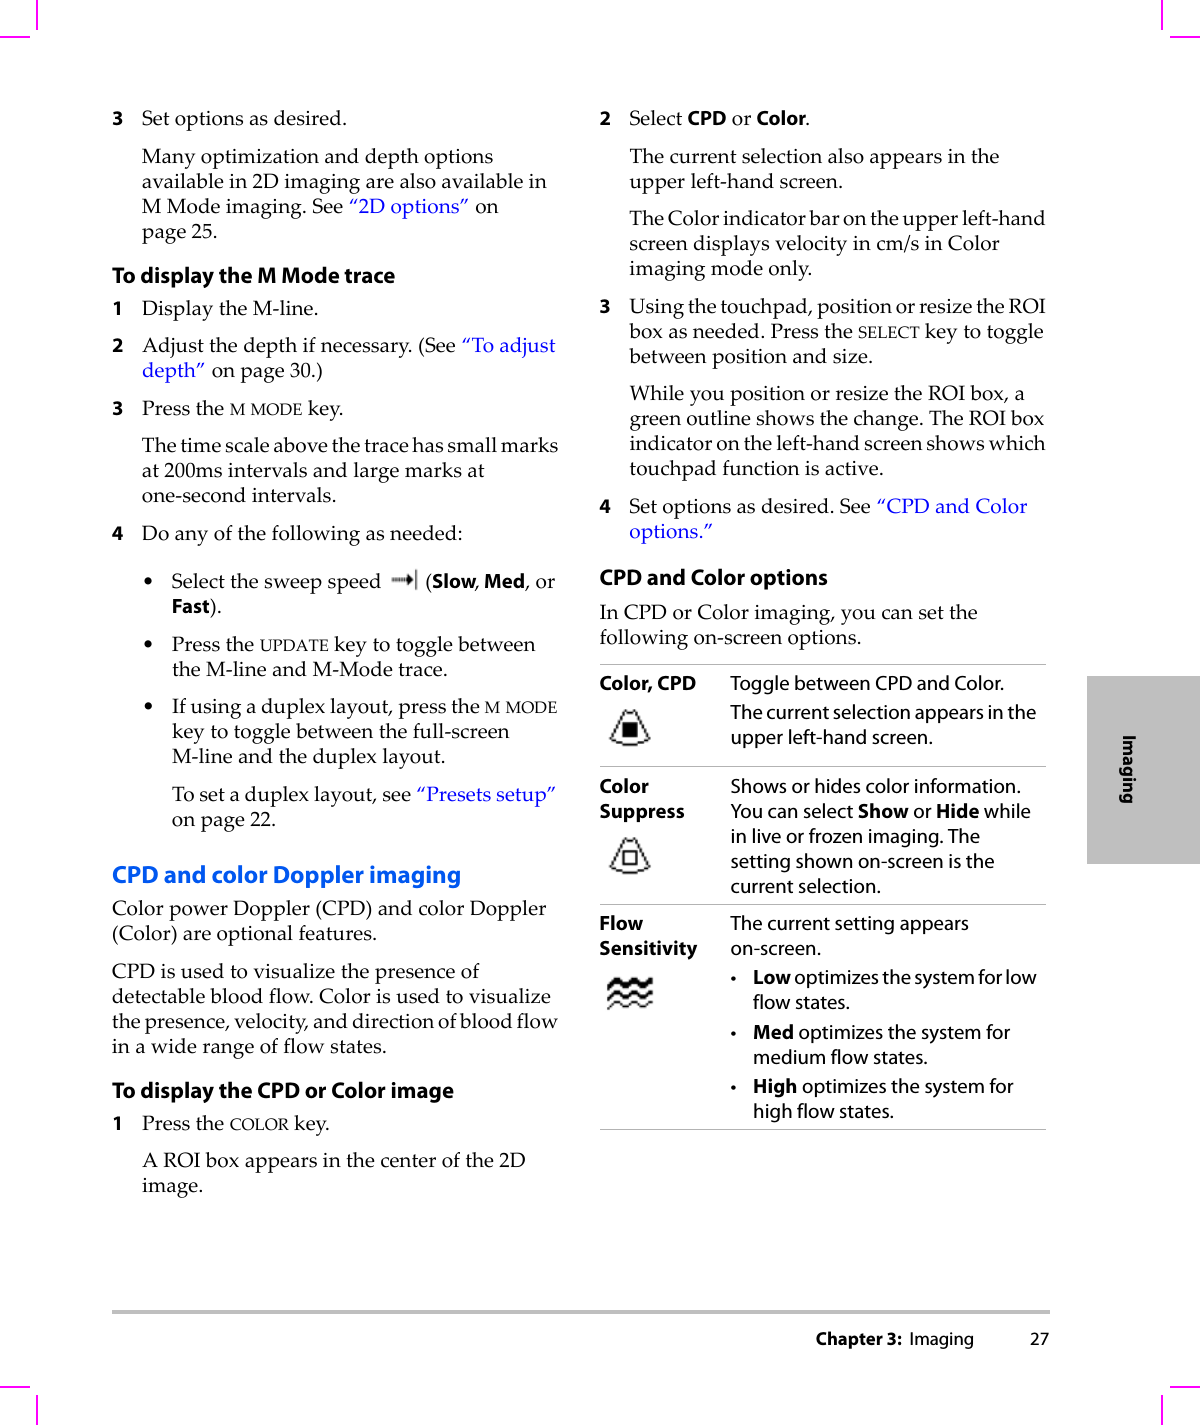
Chapter 3:  Imaging 27Imaging3Setoptionsasdesired.Manyoptimizationanddepthoptionsavailablein2DimagingarealsoavailableinMModeimaging.See“2Doptions”onpage 25.To display the M Mode trace 1DisplaytheM‐line.2Adjustthedepthifnecessary.(See“Toadjustdepth”onpage 30.)3PresstheMMODEkey.Thetimescaleabovethetracehassmallmarksat200msintervalsandlargemarksatone‐secondintervals.4Doanyofthefollowingasneeded:•Selectthesweepspeed(Slow, Med,orFast).•PresstheUPDATEkeytotogglebetweentheM‐lineandM‐Modetrace.•Ifusingaduplexlayout,presstheMMODEkeytotogglebetweenthefull‐screenM‐lineandtheduplexlayout.Tosetaduplexlayout,see“Presetssetup”onpage 22.CPD and color Doppler imagingColorpowerDoppler(CPD)andcolorDoppler(Color)areoptionalfeatures.CPDisusedtovisualizethepresenceofdetectablebloodflow.Colorisusedtovisualizethepresence,velocity,anddirectionofbloodflowinawiderangeofflowstates.To display the CPD or Color image1PresstheCOLORkey.AROIboxappearsinthecenterofthe2Dimage.2SelectCPDorColor.Thecurrentselectionalsoappearsintheupperleft‐handscreen.TheColorindicatorbarontheupperleft‐handscreendisplaysvelocityincm/sinColorimagingmodeonly.3Usingthetouchpad,positionorresizetheROIboxasneeded.PresstheSELECTkeytotogglebetweenpositionandsize.WhileyoupositionorresizetheROIbox,agreenoutlineshowsthechange.TheROIboxindicatorontheleft‐handscreenshowswhichtouchpadfunctionisactive.4Setoptionsasdesired.See“CPDandColoroptions.”CPD and Color optionsInCPDorColorimaging,youcansetthefollowingon‐screenoptions.Color, CPD Toggle between CPD and Color. The current selection appears in the upper left-hand screen.Color SuppressShows or hides color information. You can select Show or Hide while in live or frozen imaging. The setting shown on-screen is the current selection.Flow SensitivityThe current setting appears on-screen.•Low optimizes the system for low flow states.•Med optimizes the system for medium flow states.•High optimizes the system for high flow states.
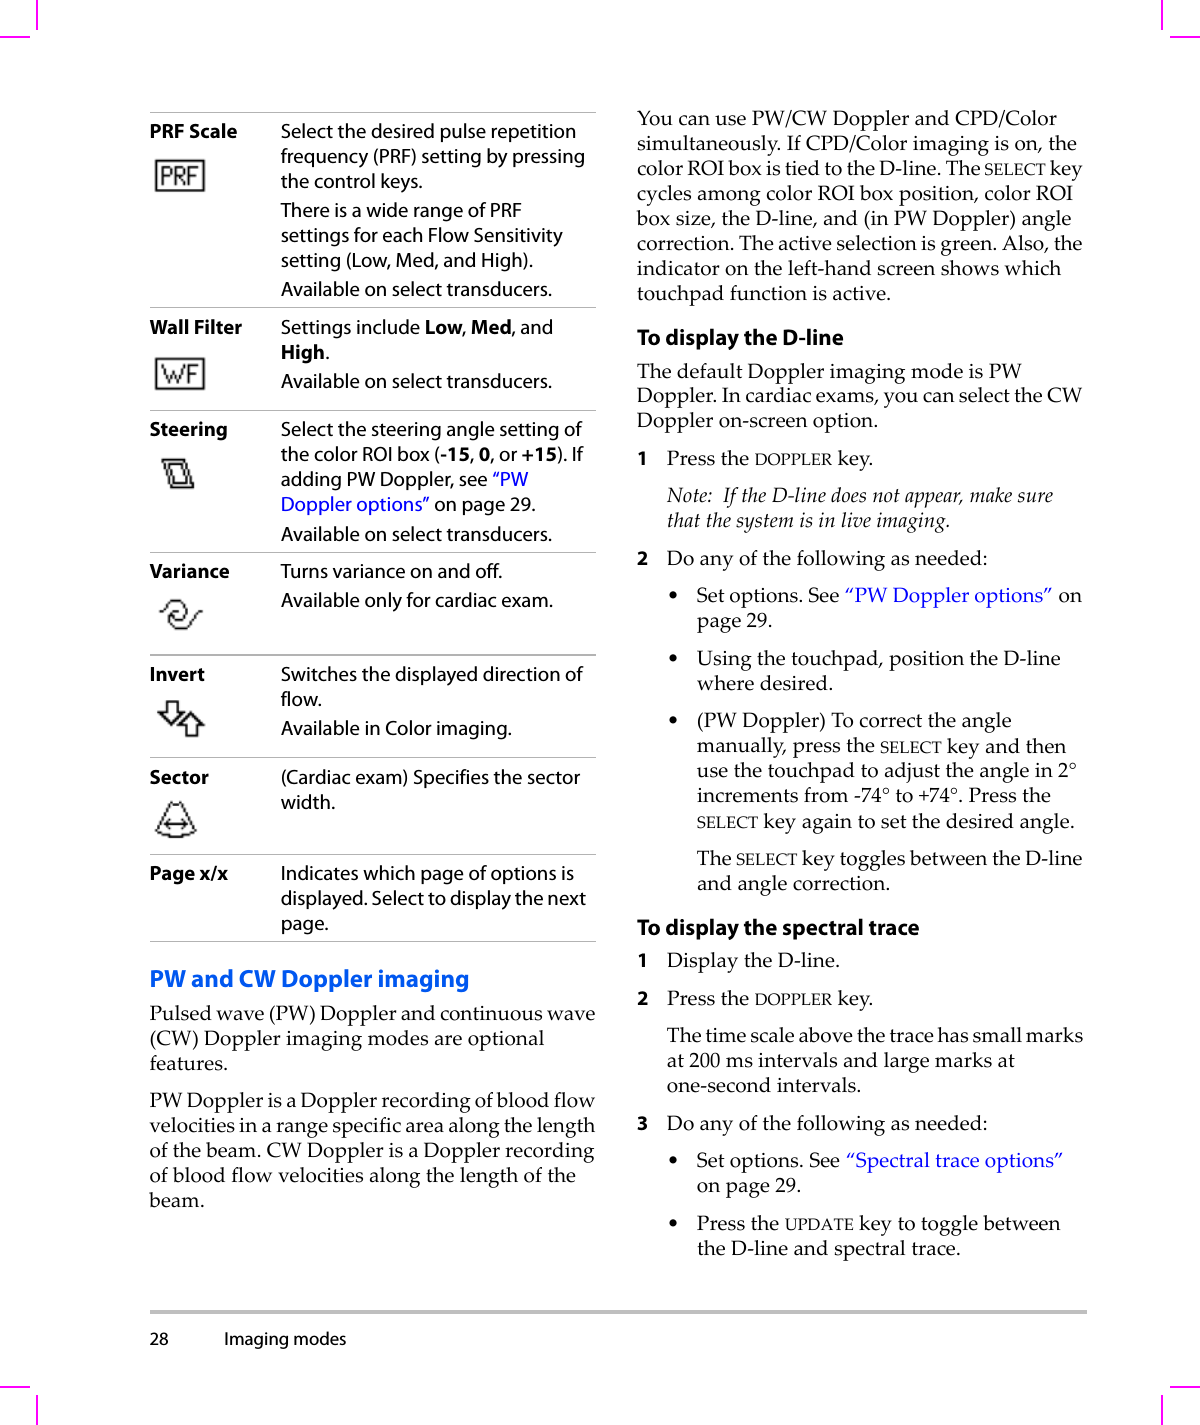
28 Imaging modes  PW and CW Doppler imagingPulsedwave(PW)Dopplerandcontinuouswave(CW)Dopplerimagingmodesareoptionalfeatures.PWDopplerisaDopplerrecordingofbloodflowvelocitiesinarangespecificareaalongthelengthofthebeam.CWDopplerisaDopplerrecordingofbloodflowvelocitiesalongthelengthofthebeam.YoucanusePW/CWDopplerandCPD/Colorsimultaneously.IfCPD/Colorimagingison,thecolorROIboxistiedtotheD‐line.TheSELECTkeycyclesamongcolorROIboxposition,colorROIboxsize,theD‐line,and(inPWDoppler)anglecorrection.Theactiveselectionisgreen.Also,theindicatorontheleft‐handscreenshowswhichtouchpadfunctionisactive.To display the D-lineThedefaultDopplerimagingmodeisPWDoppler.Incardiacexams,youcanselecttheCWDoppleron‐screenoption.1PresstheDOPPLERkey.Note: IftheD‐linedoesnotappear,makesurethatthesystemisinliveimaging.2Doanyofthefollowingasneeded:•Setoptions.See“PWDoppleroptions”onpage 29.•Usingthetouchpad,positiontheD‐linewheredesired.•(PWDoppler)Tocorrecttheanglemanually,presstheSELECTkeyandthenusethetouchpadtoadjusttheanglein2°incrementsfrom‐74°to+74°.PresstheSELECTkeyagaintosetthedesiredangle.TheSELECTkeytogglesbetweentheD‐lineandanglecorrection.To display the spectral trace1DisplaytheD‐line.2PresstheDOPPLERkey.Thetimescaleabovethetracehassmallmarksat200msintervalsandlargemarksatone‐secondintervals.3Doanyofthefollowingasneeded:•Setoptions.See“Spectraltraceoptions”onpage 29.•PresstheUPDATEkeytotogglebetweentheD‐lineandspectraltrace.PRF Scale Select the desired pulse repetition frequency (PRF) setting by pressing the control keys.There is a wide range of PRF settings for each Flow Sensitivity setting (Low, Med, and High).Available on select transducers.Wall Filter Settings include Low, Med, and High.Available on select transducers.Steering Select the steering angle setting of the color ROI box (-15, 0, or +15). If adding PW Doppler, see “PW Doppler options” on page 29.Available on select transducers.Variance Turns variance on and off.Available only for cardiac exam. Invert Switches the displayed direction of flow. Available in Color imaging.Sector (Cardiac exam) Specifies the sector width. Page x/x Indicates which page of options is displayed. Select to display the next page.
Chapter 3:  Imaging 29Imaging•Ifusingaduplexlayout,presstheDOPPLERkeytotogglebetweenthefull‐screenD‐lineandtheduplexlayout.Tosetaduplexlayout,see“Presetssetup”onpage 22.PW Doppler optionsInPWDopplerimaging,youcansetthefollowingon‐screenoptions.Spectral trace optionsInspectraltraceimaging,youcansetthefollowingon‐screenoptions.PW, CW (Cardiac exam only) Toggle between PW Doppler and CW Doppler. The current selection appears in the upper left-hand screen.Angle CorrectionCorrects the angle to 0°, +60°, or -60°.Gate Size Settings depend on transducer and exam type.In TCD or Orb exams, use the touchpad to specify the Doppler gate depth (the depth of the center of the gate in the Doppler image). The Doppler gate depth indicator is on the lower right-hand screen. TDI On, TDI OffSelect TDI On to turn on tissue Doppler imaging. When on, TDI appears in the upper left-hand screen. The default is TDI off.Available only in cardiac exams.Steering Select the desired steering angle setting. The PW Doppler angle correction automatically changes to the optimum setting.•-15 has an angle correction of -60°.•0 has an angle correction of 0°.•+15 has an angle correction of +60°.You can manually correct the angle after selecting a steering angle setting. (See “To display the D-line” on page 28.)Available on select transducers.Page x/x Indicates which page of options is displayed. Select to display the next page.Scale Select the desired scale (pulse repetition frequency [PRF]) setting.(To change the Doppler scale to cm/s or kHz, see “Presets setup” on page 22.)Line Sets the baseline position.(On a frozen trace, the baseline can be adjusted if Live Trace is off.)Invert Vertically flips the spectral trace.(On a frozen trace, Invert is available if Live Trace is off.)Volume Increases or decreases Doppler speaker volume (0-10).Wall Filter Settings include Low, Med, High.Sweep Speed Settings include Slow, Med, Fast.
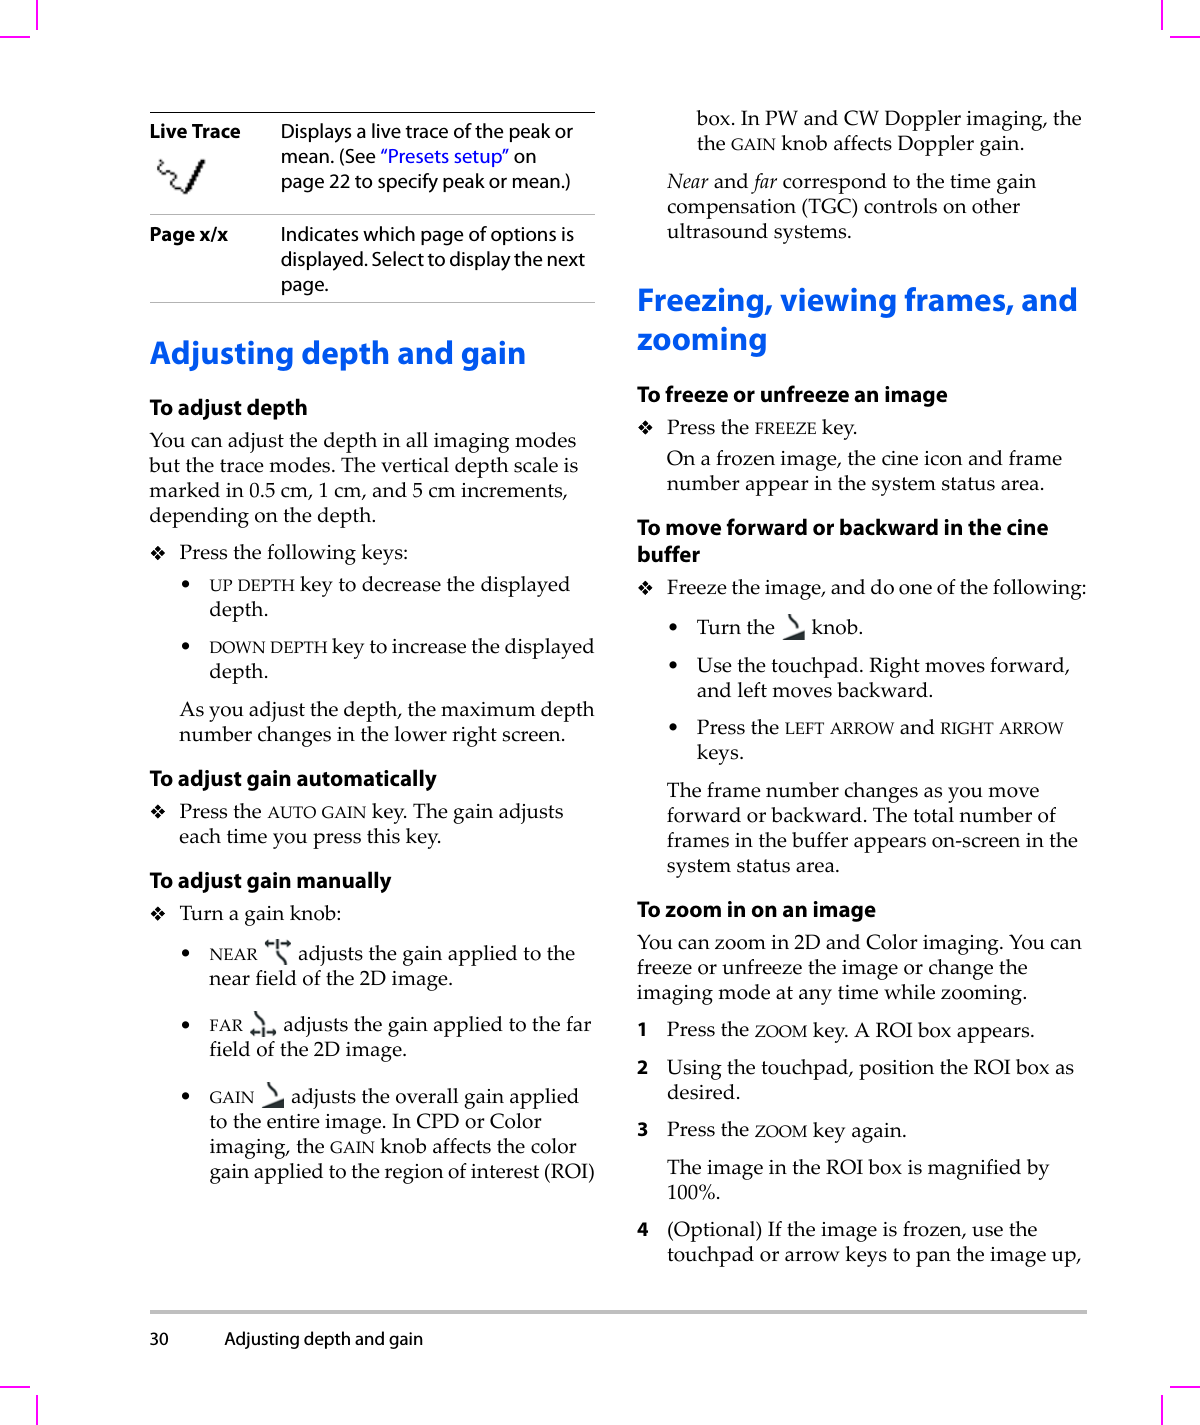
30 Adjusting depth and gain  Adjusting depth and gainTo adjust depthYoucanadjustthedepthinallimagingmodesbutthetracemodes.Theverticaldepthscaleismarkedin0.5 cm,1cm,and5cmincrements,dependingonthedepth.Pressthefollowingkeys:•UPDEPTHkeytodecreasethedisplayeddepth.•DOWNDEPTHkeytoincreasethedisplayeddepth.Asyouadjustthedepth,themaximumdepthnumberchangesinthelowerrightscreen.To adjust gain automaticallyPresstheAUTO GAINkey.Thegainadjustseachtimeyoupressthiskey.To adjust gain manuallyTurnagainknob:•NEAR adjuststhegainappliedtothenearfieldofthe2Dimage.•FAR adjuststhegainappliedtothefarfieldofthe2Dimage.•GAIN adjuststheoverallgainappliedtotheentireimage.InCPDorColorimaging,theGAINknobaffectsthecolorgainappliedtotheregionofinterest(ROI)box.InPWandCWDopplerimaging,thetheGAINknobaffectsDopplergain.Nearandfarcorrespondtothetimegaincompensation(TGC)controlsonotherultrasoundsystems.Freezing, viewing frames, and zoomingTo freeze or unfreeze an imagePresstheFREEZEkey.Onafrozenimage,thecineiconandframenumberappearinthesystemstatusarea.To move forward or backward in the cine bufferFreezetheimage,anddooneofthefollowing:•Turntheknob.•Usethetouchpad.Rightmovesforward,andleftmovesbackward.•PresstheLEFTARROWandRIGHTARROWkeys.Theframenumberchangesasyoumoveforwardorbackward.Thetotalnumberofframesinthebufferappearson‐screeninthesystemstatusarea.To zoom in on an imageYoucanzoomin2DandColorimaging.Youcanfreezeorunfreezetheimageorchangetheimagingmodeatanytimewhilezooming.1PresstheZOOMkey.AROIboxappears.2Usingthetouchpad,positiontheROIboxasdesired.3PresstheZOOMkeyagain.TheimageintheROIboxismagnifiedby100%.4(Optional)Iftheimageisfrozen,usethetouchpadorarrowkeystopantheimageup,Live Trace Displays a live trace of the peak or mean. (See “Presets setup” on page 22 to specify peak or mean.)Page x/x Indicates which page of options is displayed. Select to display the next page.
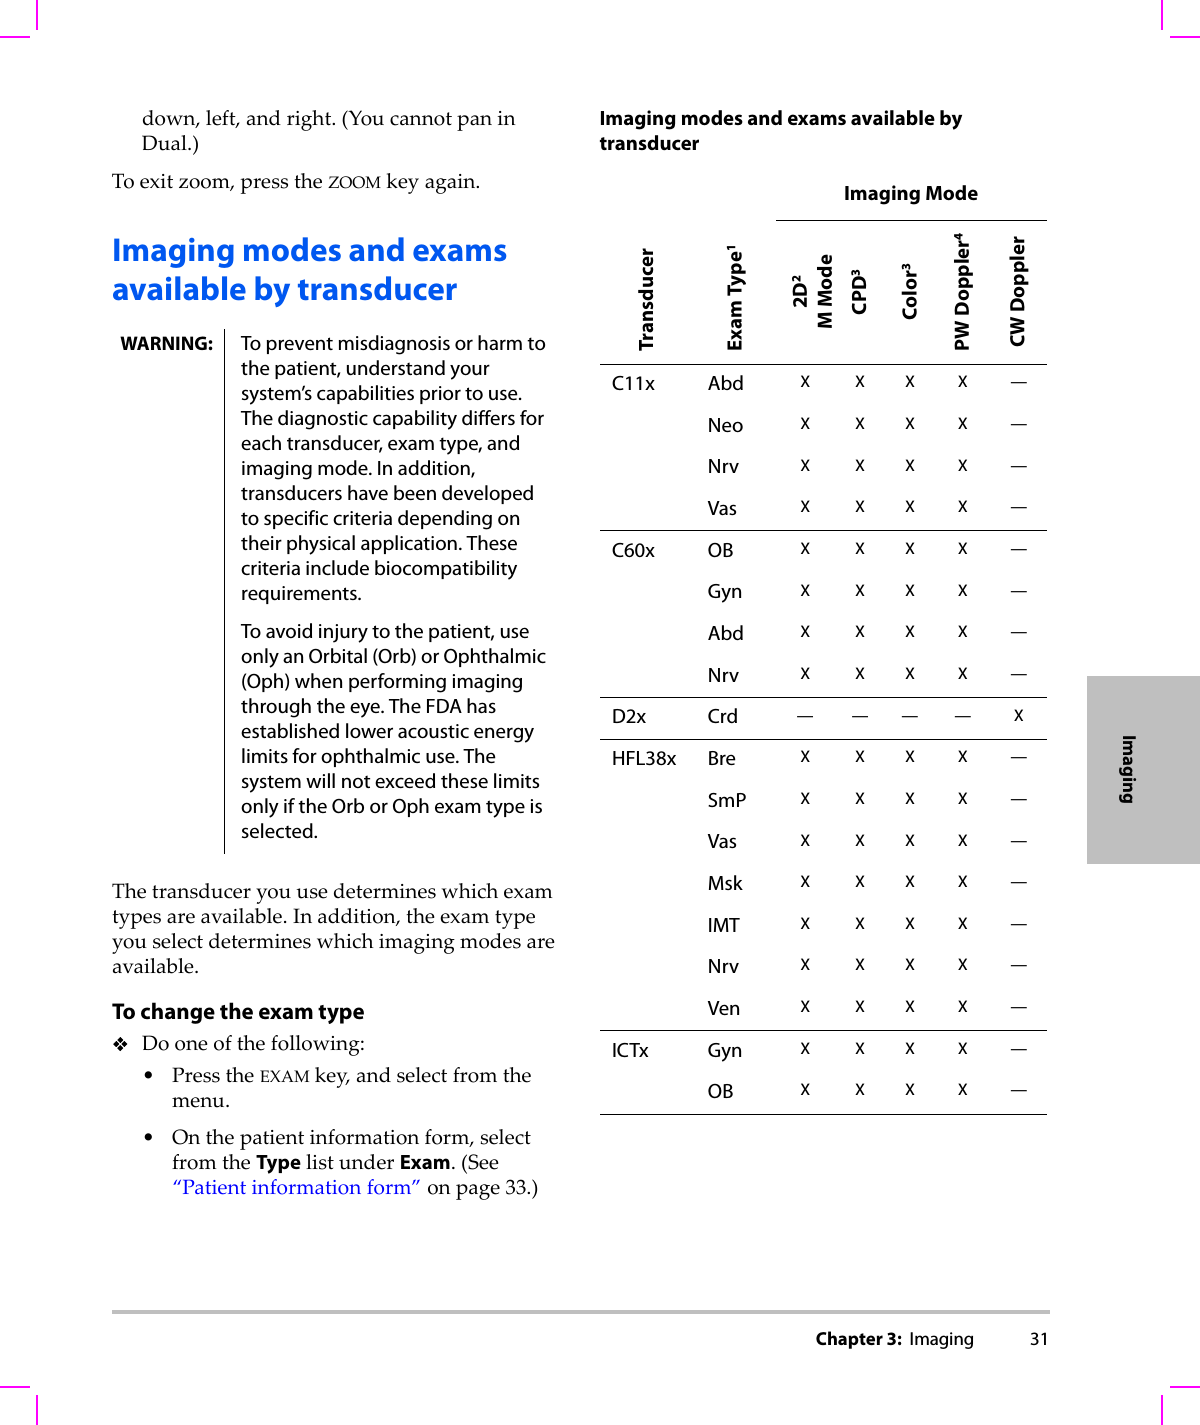
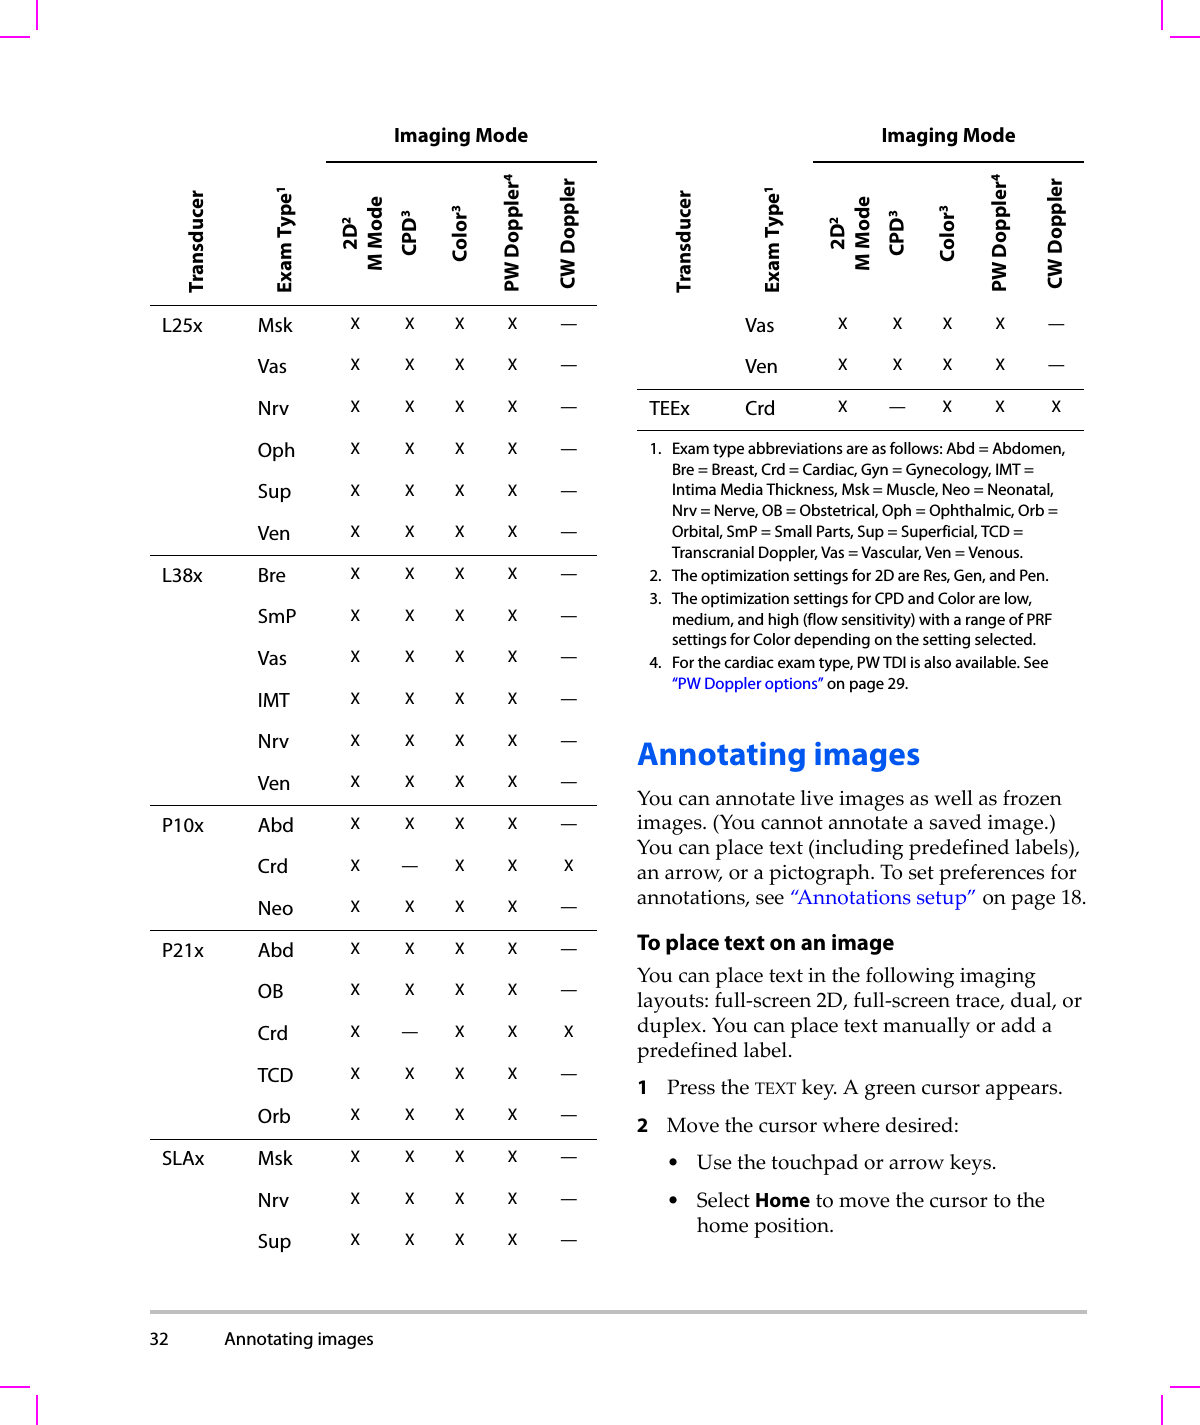
Chapter 3:  Imaging 31Imagingdown,left,andright.(YoucannotpaninDual.)Toexitzoom,presstheZOOMkeyagain.Imaging modes and exams available by transducerThetransduceryouusedetermineswhichexamtypesareavailable.Inaddition,theexamtypeyouselectdetermineswhichimagingmodesareavailable.To change the exam typeDooneofthefollowing:•PresstheEXAMkey,andselectfromthemenu.•Onthepatientinformationform,selectfromtheTypelistunderExam.(See“Patientinformationform”onpage 33.)Imaging modes and exams available by transducerWARNING: To prevent misdiagnosis or harm to the patient, understand your system’s capabilities prior to use. The diagnostic capability differs for each transducer, exam type, and imaging mode. In addition, transducers have been developed to specific criteria depending on their physical application. These criteria include biocompatibility requirements.To avoid injury to the patient, use only an Orbital (Orb) or Ophthalmic (Oph) when performing imaging through the eye. The FDA has established lower acoustic energy limits for ophthalmic use. The system will not exceed these limits only if the Orb or Oph exam type is selected. Imaging ModeTransducerExam Type12D2M ModeCPD3Color3PW Doppler4CW DopplerC11x Abd XXXX—Neo XXXX—Nrv XXXX—Vas XXXX—C60x OB XXXX—Gyn XXXX—Abd XXXX—Nrv XXXX—D2x Crd ———— XHFL38x Bre XXXX—SmP XXXX—Vas XXXX—Msk XXXX—IMT XXXX—Nrv XXXX—Ven XXXX—ICTx Gyn XXXX—OB XXXX—
32 Annotating images  Annotating imagesYoucanannotateliveimagesaswellasfrozenimages.(Youcannotannotateasavedimage.)Youcanplacetext(includingpredefinedlabels),anarrow,orapictograph.Tosetpreferencesforannotations,see“Annotationssetup”onpage 18.To place text on an imageYoucanplacetextinthefollowingimaginglayouts:full‐screen2D,full‐screentrace,dual,orduplex.Youcanplacetextmanuallyoraddapredefinedlabel.1PresstheTEXTkey.Agreencursorappears.2Movethecursorwheredesired:•Usethetouchpadorarrowkeys.•SelectHometomovethecursortothehomeposition.L25x Msk XXXX—Vas XXXX—Nrv XXXX—Oph XXXX—Sup XXXX—Ven XXXX—L38x Bre XXXX—SmP XXXX—Vas XXXX—IMT XXXX—Nrv XXXX—Ven XXXX—P10x Abd XXXX—Crd X—XX XNeo XXXX—P21x Abd XXXX—OB XXXX—Crd X—XX XTCD XXXX—Orb XXXX—SLAx Msk XXXX—Nrv XXXX—Sup XXXX—Imaging ModeTransducerExam Type12D2M ModeCPD3Color3PW Doppler4CW DopplerVas XXXX—Ven XXXX—TEEx Crd X—XX X1. Exam type abbreviations are as follows: Abd = Abdomen, Bre = Breast, Crd = Cardiac, Gyn = Gynecology, IMT = Intima Media Thickness, Msk = Muscle, Neo = Neonatal, Nrv = Nerve, OB = Obstetrical, Oph = Ophthalmic, Orb = Orbital, SmP = Small Parts, Sup = Superficial, TCD = Transcranial Doppler, Vas = Vascular, Ven = Venous.2. The optimization settings for 2D are Res, Gen, and Pen.3. The optimization settings for CPD and Color are low, medium, and high (flow sensitivity) with a range of PRF settings for Color depending on the setting selected.4. For the cardiac exam type, PW TDI is also available. See “PW Doppler options” on page 29.Imaging ModeTransducerExam Type12D2M ModeCPD3Color3PW Doppler4CW Doppler
Chapter 3:  Imaging 33ImagingThedefaulthomepositiondependsontheimagingscreenlayout.Youcanresetthehomeposition.See“Toresetthehomeposition”onpage 33.3Usingthekeyboard,typetext.•Thearrowkeysmovethecursorleft,right,up,anddown.•TheDELETEkeydeletesalltext.•The Wordoptionremovesaword.•SelectSymbolstoenterspecialcharacters.See“Symbols”onpage 10.4(Optional)Toaddapredefinedlabel,selectLabel,andthenselectthedesiredlabelgroup:, , or .Selectthegroupagainforthedesiredlabel.Thefirstnumbershowswhichlabelinthegroupisselected.Thesecondnumberisthenumberoflabelsavailable.See“Annotationssetup”onpage 18.Toturnofftextentry,presstheTEXTkey.To reset the home position1PresstheTEXTkey.2Usingthetouchpadorarrowkeys,positionthecursorwheredesired.3SelectHome/Set.To place an arrow on an imageYoucanaddanarrowgraphictopointoutaspecificpartoftheimage.1PresstheARROWkey.2Ifyouneedtoadjustthearrowʹsorientation,presstheSELECTkeyandthenusethetouchpad.Whentheorientationiscorrect,presstheSELECTkeyagain.3Usingthetouchpad,positionthearrowwheredesired.4PresstheARROWkeytosetthearrow.Thearrowchangesfromgreentowhite.Toremovethearrow,presstheARROWkeyandthenselectHide.To place a pictograph on an imageThepictographsetavailabledependsontransducerandexamtype.1PressthePICTOkey.2Select x/xtodisplaythedesiredpictograph,andthenpresstheSELECTkey.Thefirstnumbershowswhichpictographinthesetisselected.Thesecondnumberisthenumberofpictographsavailable.3Usingthetouchpad,positionthepictographmarker.4(Optional)Torotatethepictographmarker,presstheSELECTkeyandthenusethetouchpad.5Selectascreenlocationforthepictograph:U/L(Up/Left),D/L(Down/Left),D/R(Down/Right),U/R(Up/Right).Inaduplexlayout,thepictographisrestrictedtoupperleft.InDual,allfourpositionsareavailable.Toremovethepictograph,selectHide.Patient information formThepatientinformationformletsyouenterpatientidentification,exam,andclinicalinformationforthepatientexam.Thisinformationautomaticallyappearsinthepatientreport.Whenyoucreateanewpatientinformationform,allimages,clips,andotherdatayousaveduringtheexamarelinkedtothatpatient.(See“Patientreport”onpage 68.)
34 Patient information form  To create a new patient information form1PressthePATIENTkey.2SelectNew/End.3Fillintheformfields.See“Patientinformationformfields”onpage 34.4SelectDone.Seealso“Toappendimagesandclipstoapatientexam”onpage 37.To edit a patient information formYoucaneditpatientinformationiftheexamhasnotbeenarchivedorexportedandiftheinformationisnotfromaworklist.Seealso“Toeditpatientinformationfromthepatientlist”onpage 36.1PressthePATIENTkey.2Makechangesasdesired.3Selectoneofthefollowing:•Canceltoundochangesandreturntoimaging.•Donetosavechangesandreturntoimaging.To end the exam1Makesurethatyouhavesavedimagesandotherdatayouwanttokeep.(See“Savingimagesandclips”onpage 35.)2PressthePATIENTkey.3Select New/End.Anewpatientinformationformappears.Patient information form fieldsThepatientinformationformfieldsavailabledependonexamtype.InsomefieldsyoucanselectSymbolstoentersymbolsandspecialcharacters.See“Symbols”onpage 10.Patient•Last, First, Middle Patientname•IDPatientidentificationnumber•Accession Enternumber,ifapplicable.•Date of birth•Gender•Indications Enterdesiredtext•UserUserinitials•Procedure (button)AvailableiftheDICOMWorklistfeatureislicensedandconfigured.SeetheDICOMuserguide.SelectBacktosaveentriesandreturntothepreviousscreen.Exam•Type Examtypesavailabledependontransducer.See“Imagingmodesandexamsavailablebytransducer”onpage 31.•LMP Estab. DD(OBorGynexam)InanOBexam,selectLMPorEstab. DDandthenentereitherthedateofthelastmenstrualperiodortheestablishedduedate.InaGynexam,enterthedateofthelastmenstrualperiod.TheLMPdatemustprecedethecurrentsystemdate.•Twins (OBexam)SelecttheTwinscheckboxtodisplayTwin AandTwin BmeasurementsonthecalculationsmenuandforaccesstoTwinAandTwinBscreensforpreviousexamdata.•Previous Exams (button)(OBexam)Displaysfieldsforfivepreviousexams.Thedateforapreviousexammustprecedethecurrentsystemdate.Fortwins,selectTwin A/BtotogglebetweenTwinAandTwinBscreens.(IftheTwin A/Boptiondoesnotappear,selectBack,andmakesurethattheTwinscheckboxisselected.)SelectBacktosavechangesandreturntothepreviousscreen.•BP(Cardiac,IMT,Orbital,Transcranial,orVascularexam)BloodPressure•HR (Cardiac,Orbital,Transcranial,orVascularexam)HeartRate.Enterthebeatsperminute.
Chapter 3:  Imaging 35ImagingSavingtheheartrateusingameasurementoverwritesthisentry.•Height (Cardiacexam)Thepatientheightinfeetandinchesormetersandcentimeters.(Tochangetheunits,see“Presetssetup”onpage 22.)•Weight (Cardiacexam)Thepatientweightinpoundsorkilos.(Tochangetheunits,see“Presetssetup”onpage 22.)•BSA(Cardiacexam)BodySurfaceArea.Automaticallycalculatedafteryouenterheightandweight.•Ethnicity (IMTexam)Ethnicorigin•Reading Dr.• Referring Dr.•InstitutionImages and clipsSaving images and clipsWhenyousaveanimageorclip,itsavestointernalstorage.ThesystembeepsafterwardifBeepAlertison,andthepercentageiconflashes.(See“A u d i o , Batterysetup”onpage 19.)Toaccesssavedimagesandclips,openthepatientlist.(See“Reviewingpatientexams”onpage 36.)Thepercentageiconinthesystemstatusareashowsthepercentageofspaceusedininternalstorage.Toreceivealertswhenstorageisnearcapacity,see“Toreceivestoragealerts”onpage 20.Toaccesssavedimagesandclips,openthepatientlist.See“Reviewingpatientexams”onpage 36.To save an imagePresstheSAVEkey.Theimagesavestointernalstorage.Bydefault,theSAVEkeysavesonlytheimage.Asashortcutduringcalculations,theSAVEkeycansaveboththeimagetointernalstorageandthecalculationtothepatientreport.See“Presetssetup”onpage 22.To capture and save a clipClips,anoptionalfeature,letsyoucapture,preview,andsaveclips.1SetClipsoptions.(See“TosetClipsoptions”onpage 35.)2PresstheCLIPkey.Oneofthefollowingoccurs:•IfPrev/Offisselected,theclipsavesdirectlytointernalstorage.•IfPrev/Onisselected,theclipplaysbackinpreviewmode.Youcanselectanyofthefollowingon‐screen:•Aplaybackspeed(1x,1/2x,1/4x)•Pausetointerruptplayback•Left: xorRight: xtoremoveframesfromtheleftorrightsidesoftheclip(wherexisthebeginningorendingframenumber)•Savetosavethecliptointernalstorage•DeletetodeletetheclipTo set Clips optionsSettingClipsoptionsensuresthatclipsarecapturedtoyourspecifications.1In2Dimagingmode,selectClipson‐screen.2Setoptionsasdesired.
36 Images and clips  Clips optionsReviewing patient examsThepatientlistorganizessavedimagesandclipsinpatientexams.Youcandelete,view,print,orarchiveexams.YoucanalsocopythemtoaUSBstoragedevice.Figure 1 Patient ListTo display the patient list1PresstheREVIEWkey.2Ifthereisanactiveexam,selectListon‐screen.To sort the patient listAfterthesystemstarts,thepatientlistisarrangedbydateandtime,withthemostrecentpatientfilefirst.Youcanre‐sortthepatientlistasneeded.Selectthecolumnheadingthatyouwanttosortby.Selectitagainifsortinginreverseorder.Note: Thecolumnheadingisselectable.To select patients in the patient listUsingthetouchpad,selectthecheckboxforoneormorepatients.Select Allselectsallpatients.Todeselectpatients,selectcheckedboxesorClear All.To edit patient information from the patient list YoucaneditthepatientnameandIDfromthepatientlistinsteadoffromthepatientinformationformiftheexamhasnotbeenexportedorarchived.1Inthepatientlist,selectthepatient.Time, ECG Time and ECG share the same location on-screen.•With Time, capturing is based on number of seconds. Select the time duration.•With ECG, capturing is based on the number of heart beats. Select the number of beats.Preview On, Preview OffPrevOn and PrevOff turn the preview feature on and off.•With Prev/On, the captured clip automatically plays on-screen. The clip can be trimmed, saved, or deleted.•With Prev/Off, the clip saves to internal storage, and the trim and delete options are not available.Prospective,RetrospectivePro and Retro determine how clips are captured:•With Pro, a clip is captured prospectively, after you press the CLIP key.•With Retro, a clip is captured retrospectively, from pre-saved data before you press the CLIP key.Caution: If the internal storage icon does not appear in the system status area, internal storage may be defective. Contact SonoSite Technical Support. (See “SonoSite Technical Support” on page vii.)
Chapter 3:  Imaging 37Imaging2SelectEdit.3Fillintheformfields,andselectOK.To append images and clips to a patient examAlthoughyoucannotaddimagesandclipstoapatientexamthatisended,exported,orarchived,youcanautomaticallystartanewpatientexamthathasthesamepatientinformation.Dependingonyourarchiver,thetwoexamsappearasonestudywhenexportedorarchived.1Selecttheexaminthepatientlist.2SelectAppendon‐screen.Anewpatientinformationformappears.Theformhasthesameinformationastheexamyouselected.To review images and clipsYoucanreviewimagesandclipsinonlyonepatientexamatatime.1Inthepatientlist,highlightthepatientexamwhoseimagesandclipsyouwanttoreview.2SelectReviewon‐screen.3Select x/xtocycletotheimageorclipyouwanttoreview.4(ClipOnly)SelectPlay.Theclipplaysautomaticallyafterloading.Theloadtimedependsoncliplength.YoucanselectPausetofreezetheclipandcanselectaplaybackspeed 1x,1/2x,1/4x.5Selectx/xtocycletothenextimageorclipyouwanttoview.Toreturntothepatientlist,selectList.Toreturntoimaging,selectDone.Printing, exporting, and deleting images and clipsTo print an image1Verifythataprinterisselected.See“Toconfigurethesystemforaprinter”onpage 19.2Dooneofthefollowing:•Inthepatientlist,reviewthepatient’simages.SelectPrintwhentheimageappears.•Withtheimagedisplayed,presstheAshortcutkey.Bydefault,theAshortcutkeyprints.ToreprogramtheAandBshortcutkeys,see“Presetssetup”onpage 22.To print multiple images1Verifythataprinterisselected.See“Toconfigurethesystemforaprinter”onpage 19.2Dooneofthefollowing:•Printallimagesformultiplepatients:Selectoneormorepatientsinthepatientlist.Thenselect Print.•Printallimagesforonepatient:Highlightthepatientinthepatientlist,andthenselectPrint.WARNING: To avoid damaging the USB storage device and losing patient data from it, observe the following:• Do not remove the USB storage device or turn off the ultrasound system while the system is exporting.• Do not bump or otherwise apply pressure to the USB storage device while it is in a USB port on the ultrasound system. The connector could break.
38 ECG Monitoring  Eachimageappearsbrieflyon‐screenwhileprinting.To export patient exams to a USB storage deviceAUSBstoragedeviceisfortemporarystorageofimagesandclips.Patientexamsshouldbearchivedregularly.Tospecifyfileformat,see“USBDevicessetup”onpage 23.1InserttheUSBstoragedevice.2Inthepatientlist,selectthepatientexamsyouwanttoexport.3SelectExp. USB on‐screen.AlistofUSBdevicesappears.4SelecttheUSBstoragedevice.Ifyouwanttohidepatientinformation,deselectInclude patient information on images and clips.OnlyavailableUSBdevicesareselectable.5SelectExport.ThefilesarefinishedexportingapproximatelyfivesecondsaftertheUSBanimationstops.RemovingtheUSBstoragedeviceorturningoffthesystemwhileexportingmaycauseexportedfilestobecorruptedorincomplete.Tostopin‐progressexporting,selectCancel Export.To delete images and clips1Selectoneormorepatientsinthepatientlist.2SelectDeletetodeletetheselectedpatients.Aconfirmationscreenappears.To manually archive images and clipsYoucansendpatientexamstoaDICOMprinterorarchiver,ortoaPCusingSiteLink.DICOMandSiteLinkareoptionalfeatures.Formoreinformationaboutarchiving,seetheSiteLinkandDICOMdocumentation.1Selectoneormorepatientsinthepatientlist.2SelectArchive.To display information about a patient exam1Onthepatientlist,selecttheexam.2Select Info.ECG MonitoringECGMonitoringisanoptionalfeatureandrequiresaSonoSiteECGcable.To monitor ECG1ConnecttheECGcabletotheECGconnectorontheultrasoundsystem,mini‐dock,ordockingsystem.ECGMonitoringturnsonautomatically.Note: AnexternalECGmonitormaycausealaginthetimingoftheECGtrace,correspondingwiththe2Dimage.BiopsyguidelinesarenotavailablewhenECGisconnected.2SelectECGon‐screen.(ECGmaybeonanotherpage.ItappearsonlyiftheECGcableisconnected.)3Selectoptionsasdesired.WARNING: To prevent misdiagnosis, do not use the ECG trace to diagnose cardiac rhythms. The SonoSite ECG option is a non-diagnostic feature.To avoid electrical interference with aircraft systems, do not use the ECG cable on aircraft. Such interference may have safety consequences.Caution: Use only accessories recommended by SonoSite with the system. Your system can be damaged by connecting an accessory not recommended by SonoSite.
Chapter 3:  Imaging 39ImagingECG Monitoring optionsShow/Hide Turns on and off ECG trace.Gain Increases or decreases ECG gain. Settings are 0-20.Position Sets the position of the ECG trace.Sweep Speed Settings are Slow, Med, and Fast.Delay Displays Line and Save for clip acquisition delay. (For instructions to capture clips, see “To capture and save a clip” on page 35.)Line The position of the delay line on the ECG trace. The delay line indicates where the clip acquisition is triggered.Save Saves the current position of the delay line on the ECG trace. (You can change the position of the delay line temporarily. Starting a new patient information form or cycling system power reverts the delay line to the most recently saved position.)Select Delay to display these options.
40 ECG Monitoring
Chapter 4:  Measurements and Calculations 41MeasurementsChapter 4: Measurements and CalculationsYoucanmeasureforquickreference,oryoucanmeasurewithinacalculation.Youcanperformgeneralcalculationsaswellascalculationsspecifictoanexamtype.Measurementsareperformedonfrozenimages.Forreferencesused,seeChapter 7,“References.”MeasurementsYoucanperformbasicmeasurementsinanyimagingmodeandcansavetheimagewiththemeasurementsdisplayed.(See“Tosaveanimage”onpage 35.)ExceptfortheMModeHRmeasurement,theresultsdonotautomaticallysavetoacalculationandthepatientreport.Ifyouprefer,youcanfirstbeginacalculationandthenmeasure.See“Performingandsavingmeasurementsincalculations”onpage 45.Someoptionsmaynotapplytoyoursystem.Optionsavailabledependonyourconfiguration,transducer,andexamtype.To save a measurement to a calculation and patient report1Withthemeasurementactive(green),presstheCALCSkey.2Fromthecalculationsmenu,selectameasurementname.Onlymeasurementnamesavailablefortheimagingmodeandexamtypeareselectable.3Savethecalculation.(See“Tosaveacalculation”onpage 45.)Tostartacalculationbeforemeasuring,see“Performingandsavingmeasurementsincalculations”onpage 45.Working with calipersWhenmeasuring,youworkwithcalipers,ofteninpairs.Resultsbasedonthecalipers’positionappearatthebottomofthescreen.Theresultsupdateasyourepositionthecalipersbyusingthetouchpad.Intracemeasurements,theresultsappearafteryoucompletethetrace.Outsideacalculation,youcanaddcalipersbypressingtheCALIPERkey.Youcanhavemultiplesetsofcalipersandcanswitchfromonesettoanother,repositioningthemasneeded.Eachsetshowsthemeasurementresult.Theactivecalipersandmeasurementresultarehighlightedgreen.Ameasurementiscompletewhenyoufinishmovingitscalipers.Withinacalculation,calipersappearwhenyouselectfromthecalculationsmenu.(See“Toselectfromthecalculationsmenu”onpage 45.)Foranaccuratemeasurement,accurateplacementofcalipersisessential.To switch the active calipersDooneofthefollowing:•Toswitchtheactivecaliperwithinaset,presstheSELECTkey.•Toswitchtheactivesetwhenmeasuringoutsideacalculation,selectSwitchon‐screen.To delete or edit a measurementWiththemeasurementactive(highlighted),dooneofthefollowing:•Todelete,selectDeleteon‐screen.•Toedit,usethetouchpadtomovethecalipers.Note: Tracemeasurementscannotbeeditedonceset.
42 Measurements  To improve precision of caliper placement Doanyofthefollowing:•Adjustthedisplayformaximumsharpness.•Useleadingedges(closesttothetransducer)orbordersforstartingandstoppingpoints.• Maintainaconsistenttransducerorientationforeachtypeofmeasurement.•Makesurethattheareaofinterestfillsasmuchofthescreenaspossible.•(2D)Minimizethedepth,orzoom.2D measurementsThebasicmeasurementsthatyoucanperformin2Dimagingareasfollows:•Distanceincm•Areaincm2• CircumferenceincmYoucanalsomeasureareaorcircumferencebytracingmanually.Figure 1 2D image with two distance and one circumference measurementYoucanperformacombinationofdistance,area,circumference,andmanualtracemeasurementsatonetime.Thetotalnumberpossibledependsontheirorderandtype.To measure distance (2D)Youcanperformuptoeightdistancemeasurementsona2Dimage.1Onafrozen2Dimage,presstheCALIPERkey.Apairofcalipersappears,connectedbyadottedline.2Usingthetouchpad,positionthefirstcaliper,andthenpresstheSELECTkey.Theothercaliperbecomesactive.3Usingthetouchpad,positiontheothercaliper.Ifyoumovethecalipersclosetogether,theyshrinkandthedottedlinedisappears.See“Tosaveameasurementtoacalculationandpatientreport”onpage 41.To measure area or circumference (2D)1Onafrozen2Dimage,presstheCALIPERkey.2SelectEllipseon‐screen.Note: Ifyouexceedtheallowednumberofmeasurements,Ellipseisnotavailable.3Usethetouchpadtoadjustthesizeandpositionoftheellipse.TheSELECTkeytogglesbetweenpositionandsize.See“Tosaveameasurementtoacalculationandpatientreport”onpage 41.To trace manually (2D) 1Onafrozen2Dimage,presstheCALIPERkey.2SelectManualon‐screen.Note: Ifyouexceedtheallowednumberofmeasurements,Manualisnotavailable.3Usingthetouchpad,positionthecaliperwhereyouwanttobegin.
Chapter 4:  Measurements and Calculations 43Measurements4PresstheSELECTkey.5Usingthetouchpad,completethetrace,andpresstheSETkey.See“Tosaveameasurementtoacalculationandpatientreport”onpage 41.M Mode measurementsThebasicmeasurementsthatyoucanperforminMModeimagingareasfollows:•Distanceincm/Timeinseconds•HeartRate(HR)inbeatsperminute(bpm)Thetimescaleabovethetracehassmallmarksat200 msintervalsandlargemarksatone‐secondintervals.To measure distance (M Mode)Youcanperformuptofourdistancemeasurementsonanimage.1OnafrozenMModetrace,presstheCALIPERkey.Asinglecaliperappears.2Usingthetouchpad,positionthecaliper.3PresstheSELECTkeytodisplaythesecondcaliper.4Usingthetouchpad,positionthesecondcaliper.See“Tosaveameasurementtoacalculationandpatientreport”onpage 41.To measure heart rate (M Mode)1OnafrozenMModetrace,presstheCALIPERkey.2SelectHRon‐screen.Averticalcaliperappears.3Usingthetouchpad,positiontheverticalcaliperatthepeakoftheheartbeat.4PresstheSELECTkey.Asecondverticalcaliperappears.5Usingthetouchpad,positionthesecondverticalcaliperatthepeakofthenextheartbeat.See“Tosaveameasurementtoacalculationandpatientreport”onpage 41.Savingtheheartratemeasurementtothepatientreportoverwritesanyheartrateenteredonthepatientinformationform.Seealso“Tomeasurefetalheartrate(MMode)”onpage 63.Doppler measurementsThebasicmeasurementsthatyoucanperforminDopplerimagingareVelocity(cm/s),PressureGradient,ElapsedTime,+/xRatio,ResistiveIndex (RI),andAcceleration.Youcanalsotracemanuallyorautomatically.ForDopplermeasurements,theDopplerscalemustbesettocm/s.See“Presetssetup”onpage 22.To measure Velocity (cm/s) and Pressure Gradient (Doppler)1OnafrozenDopplerspectraltrace,presstheCALIPERkey.Asinglecaliperappears.2Usingthetouchpad,positionthecalipertoapeakvelocitywaveform.Thismeasurementinvolvesasinglecaliperfromthebaseline.See“Tosaveameasurementtoacalculationandpatientreport”onpage 41.
44 Measurements  To measure Velocities, Elapsed Time, +/x Ratio, Resistive Index (RI), and Acceleration (Doppler)1OnafrozenDopplerspectraltrace,presstheCALIPERkey.Asinglecaliperappears.2Usingthetouchpad,positionthecalipertoapeaksystolicwaveform.3PresstheSELECTkey.Asecondcaliperappears.4Usingthetouchpad,positionthesecondcaliperattheenddiastoleonthewaveform.See“Tosaveameasurementtoacalculationandpatientreport”onpage 41.To measure time duration (Doppler)1OnaDopplerspectraltrace,presstheCALIPERkey.2PressTimeon‐screen.3Averticalcaliperappears.4Usingthetouchpad,positionthecaliperwheredesired,andpresstheSELECTkey.5Asecondcaliperappears.6Usingthetouchpad,positionthesecondcaliperwheredesired,andpresstheSELECTkey.To trace manually (Doppler) 1OnafrozenDopplerspectraltrace,presstheCALIPERkey.2SelectManualon‐screen.Asinglecaliperappears.3Usingthetouchpad,positionthecaliperatthebeginningofthedesiredwaveform,andpresstheSELECTkey.Ifcalipersarenotpositionedcorrectly,theresultisinaccurate.4Usingthetouchpad,tracethewaveform.Tomakeacorrection,selectUndoon‐screen,backtrackwiththetouchpad,orpresstheBACKSPACEkey.5PresstheSETkey.Themeasurementresultsappear.See“Tosaveameasurementtoacalculationandpatientreport”onpage 41.To trace automatically (Doppler)Aftertracingautomatically,confirmthatthesystem‐generatedboundaryiscorrect.Ifyouarenotsatisfiedwiththetrace,obtainahigh‐qualityDopplerspectraltraceimage,ortracemanually.(See“Totracemanually(Doppler)”onpage 44.)1OnafrozenDopplerspectraltrace,presstheCALIPERkey.2SelectAutoon‐screen.Averticalcaliperappears.3Usingthetouchpad,positionthecaliperatthebeginningofthewaveform.Ifcalipersarenotpositionedcorrectly,thecalculationresultisinaccurate.4PresstheSELECTkey.Asecondverticalcaliperappears.5Usingthetouchpad,positionthesecondcaliperattheendofthewaveform.6PresstheSETkey.Themeasurementresultsappear.See“Tosaveameasurementtoacalculationandpatientreport”onpage 41.Automatic trace resultsDependingontheexamtype,theresultsfromautomatictracingincludethefollowing:•VelocityTimeIntegral(VTI)•PeakVelocity(Vmax)
Chapter 4:  Measurements and Calculations 45Measurements•MeanPressureGradient(PGmean)•MeanVelocityonPeakTrace(Vmean)•PressureGradient(PGmax)•CardiacOutput(CO)•PeakSystolicVelocity(PSV)•TimeAverageMean(TAM)*•+/×orSystolic/Diastolic(S/D)•PulsatilityIndex(PI)•EndDiastolicVelocity(EDV)• AccelerationTime(AT)•ResistiveIndex(RI)•TimeAveragePeak(TAP)• GateDepthGeneral calculationsWithincalculations,youcansavemeasurementresultstothepatientreport.Youcandisplay,repeat,anddeletemeasurementsfromacalculation.Somemeasurementscanbedeleteddirectlyfromthepatientreportpages.See“Patientreport”onpage 68.Calculationpackagesdependonexamtypeandtransducer.Calculations menuThecalculationsmenucontainsmeasurementsavailablefortheimagingmodeandexamtype.Afteryouperformandsaveameasurement,theresultsavestothepatientreport.(See“Patientreport”onpage 68.)Also,acheckmarkappearsnexttothemeasurementnameinthecalculationsmenu.Ifyouhighlightthecheckedmeasurementname,theresultsappearbelowthemenu.Ifyourepeatthemeasurement,theresultsbelowthemenureflecteitherthelastmeasurementortheaverage,dependingonthemeasurement.Menuitemsfollowedbyellipses(...)havesubentries.To select from the calculations menu1Onafrozenimage,presstheCALCSkey.Thecalculationsmenuappears.2Usingthetouchpadorarrowkeys,highlightthedesiredmeasurementname.Todisplayadditionalmeasurementnames,highlightNext,Prev,orameasurementnamethathasellipses(...).ThenpresstheSELECTkey.Onlymeasurementnamesavailablefortheimagingmodeareselectable.3PresstheSELECTkey.Toclosethecalculationsmenu,presstheCALCSkeyonce(ifthemenuisactive)ortwice(ifthemenuisinactive).Performing and saving measurementsin calculationsInperformingameasurementwithinacalculation,youselectfromthecalculationsmenu,positionthecalipersthatappear,andthensavethecalculation.Unlikemeasurementsperformedoutsideacalculation,thecalipersappearbyselectingfromthecalculationsmenu,notbypressingtheCALIPERkey.Thetypeofcalipersthatappeardependsonthemeasurement.To save a calculationDooneofthefollowing:•Savethecalculationonly:PresstheSAVE CALCkey,orselectSaveon‐screen.Thecalculationsavestothepatientreport.Tosavetheimagewiththemeasurementsdisplayed,see“Tosaveanimage”onpage 35.•Saveboththeimageandcalculation:PresstheSAVE keyiftheSAVEkeyfunctionality
46 General calculations  issettoImage/Calcs.(See“Presetssetup”onpage 22.)Thecalculationsavestothepatientreport,andtheimagesavestointernalstoragewiththemeasurementsdisplayed.Displaying, repeating, and deletingsaved measurements in calculationsTo display a saved measurementDooneofthefollowing:•Highlightthemeasurementnameinthecalculationsmenu.Theresultappearsbelowthemenu.Openthepatientreport.See“Patientreport”onpage 68.To repeat a saved measurement1Highlightthemeasurementnameinthecalculationsmenu.2PresstheSELECTkeyortheCALIPERkey.3Performthemeasurementagain.Thenewresultsappearon‐screeninthemeasurementandcalculationsdataarea.(See“Screenlayout”onpage 7.)Youcancomparethemtothesavedresultsbelowthemenu.4Tosavethenewmeasurement,presstheSAVE CALCkey.Thenewmeasurementsavestothepatientreportandoverwritesthepreviouslysavedmeasurement.To delete a saved measurement1Selectthemeasurementnamefromthecalculationsmenu.2SelectDeleteon‐screen.Themeasurementlastsavedisdeletedfromthepatientreport.Ifitistheonlymeasurement,thecheckmarkisdeletedfromthecalculationsmenu.Somemeasurementscanbedeleteddirectlyfromthepatientreportpages.See“Patientreport”onpage 68.EMED calculationsTheresultsfromEMEDcalculationsautomaticallyappearintheEMEDworksheets.AllEMEDcalculationsareavailableforeachexamtype.To perform an EMED calculation:1PresstheCALCSkey.2SelectEMEDon‐screen.ThecalculationsmenubecomestheEMEDcalculationsmenu.3Selectthecalculationname.4Performadistancemeasurement.5Savethemeasurement.Toreturntothecalculationsmenu,selectCalcson‐screen.Percent reduction calculationsWARNING: To avoid incorrect calculations, verify that the patient information, date, and time settings are accurate.To avoid misdiagnosis or harming the patient outcome, start a new patient information form before starting a new patient exam and performing calculations. Starting a new patient information form clears the previous patient’s data. The previous patient’s data will be combined with the current patient if the form is not first cleared. See “To create a new patient information form” on page 34.
Chapter 4:  Measurements and Calculations 47MeasurementsFigure 2 Percent area reduction calculation of right carotid bulb To calculate percent area reductionThepercentareareductioncalculationinvolvestwomanualtracemeasurements.1Onafrozen2Dimage,presstheCALCSkey.2DothefollowingforA1andthenforA2:aFromthecalculationsmenu,selectthemeasurementnameunderArea Red.bUsingthetouchpad,movethecalipertothetracestartingpoint,andpresstheSELECTkey.cUsingthetouchpad,tracethedesiredarea.Tomakeacorrection,selectUndoon‐screenorpresstheBACKSPACEkey.dCompletethetrace,andpresstheSETkey.eSavethecalculation.See“Tosaveacalculation”onpage 45.Thepercentareareductionresultappearson‐screeninthemeasurementandcalculationdataareaandinthepatientreport.To calculate percent diameter reduction1Onafrozen2Dimage,presstheCALCSkey.2DothefollowingforD1andthenforD2:aFromthecalculationsmenu,selectthemeasurementnameunderDia Red.bPositionthecalipers.(See“Workingwithcalipers”onpage 41.)cSavethecalculation.See“Tosaveacalculation”onpage 45.Thepercentdiameterreductionresultappearsinthemeasurementandcalculationdataareaandinthepatientreport.Transducer Exam TypesC11x AbdomenC60x AbdomenHFL38x IMT, Small Parts, VascularL25x Vascular, MuscleL38x IMT, Small Parts, VascularP10x AbdomenP21x AbdomenSLAx Muscle, Vascular
48 General calculations  Volume calculations To calculate volumeThevolumecalculationinvolvesthree2Ddistancemeasurements:D1,D2,andD3.Afterallmeasurementsaresaved,theresultappearson‐screenandinthepatientreport.Dothefollowingforeachimageyouneedtomeasure:aOnthefrozen2Dimage,presstheCALCSkey.bDothefollowingforeachmeasurementyouneedtotake:iFromthecalculationsmenu,selectthemeasurementnameunderVolume.(IfVolumeisnotavailableinaGynexam,selectGynandthenselectVolume.)ii Positionthecalipers.(See“Workingwithcalipers”onpage 41.)iii Savethemeasurement.See“Tosaveacalculation”onpage 45.Volume flow calculationsWARNING: To avoid incorrect calculations, verify that the patient information, date, and time settings are accurate.To avoid misdiagnosis or harming the patient outcome, start a new patient information form before starting a new patient exam and performing calculations. Starting a new patient information form clears the previous patient’s data. The previous patient’s data will be combined with the current patient if the form is not first cleared. See “To create a new patient information form” on page 34.Transducer Exam TypesC11x Abdomen, NerveC60x Abdomen, Gyn, NerveHFL38x Breast, Nerve, Small Parts, VascularICTx GynL25x Muscle, Nerve, Vascular, Superficial, L38x Breast, Nerve, Small Parts, VascularP10x Abdomen, NeonatalP21x AbdomenSLAx Muscle, Nerve, Superficial, VascularWARNING: To avoid incorrect calculations, verify that the patient information, date, and time settings are accurate.To avoid misdiagnosis or harming the patient outcome, start a new patient information form before starting a new patient exam and performing calculations. Starting a new patient information form clears the previous patient’s data. The previous patient’s data will be combined with the current patient if the form is not first cleared. See “To create a new patient information form” on page 34.
Chapter 4:  Measurements and Calculations 49MeasurementsThefollowingtableshowsthemeasurementsrequiredtocompletethevolumeflowcalculation.Fordefinitionsofacronyms,see“Glossary”onpage 157.Botha2DandaDopplermeasurementarerequiredforthevolumeflowcalculation.TheDopplersamplevolumeshouldcompletelyinsonatethevessel.Considerthefollowingfactorswhenperformingvolumeflowmeasurements:•Usersshouldfollowcurrentmedicalpracticeforvolumeflowcalculationapplications.•Theaccuracyofthevolumeflowcalculationlargelydependsontheuser.•Thefactorsidentifiedintheliteraturethataffecttheaccuracyareasfollows:•Usingthediametermethodfor2Darea•Difficultyensuringuniforminsonationofthevessel.Thesystemislimitedtothefollowingsamplevolumesizes:• C11xtransducer:1,2,3GateSize(mm)• C60xandP10xtransducers:2,3,5,7,10,12GateSize(mm)•HFL38x,L25x,L38x,andSLAxtransducers:1,3,5,7,10,12GateSize(mm)• P21xtransducer:2,3,5,7,11.5,14GateSize(mm)•Precisioninplacingthecaliper• AccuracyinanglecorrectionTheconsiderationsanddegreeofaccuracyforvolumeflowmeasurementsandcalculationsarediscussedinthefollowingreference:Allan,PaulL.etal.ClinicalDopplerUltrasound,4thEd.,HarcourtPublishersLimited,(2000)36‐38.To calculate volume flow 1Performthe2Dmeasurement:aOnafrozenfull‐screen2Dimageordupleximage,presstheCALCSkey.bFromthecalculationsmenu,selectD(distance)underVol Flow.cPositionthecalipers.(See“Workingwithcalipers”onpage 41.)dSavethecalculation.See“Tosaveacalculation”onpage 45.2PerformtheDopplermeasurement:aOnafrozenDopplerspectraltrace,presstheCALCSkey.bFromthecalculationsmenu,selectTAM underVol Flow.Averticalcaliperappears.Transducer Exam TypesC11x AbdomenC60x AbdomenHFL38x VascularL25x VascularL38x VascularP10x AbdomenP21x AbdomenSLAx VascularVolume Flow CalculationsMenuHeadingMeasurement (Imaging Mode)Calculation ResultVol Flow D (2D)TAM (Doppler)VF (Volume Flow l/min)
50 Exam-based calculations  cUsingthetouchpad,positiontheverticalcaliperatthebeginningofthewaveform.Ifcalipersarenotpositionedcorrectly,thecalculationresultisinaccurate.dPresstheSELECTkeytodisplayasecondverticalcaliper.eUsingthetouchpad,positionthesecondverticalcaliperattheendofthewaveform.fPresstheSETkeytocompletethetraceandtodisplaytheresults.gSavethecalculation.See“Tosaveacalculation”onpage 45.Todisplaythevolumeflowcalculation,see“Patientreport”onpage 68.Exam-based calculationsInadditiontothegeneralcalculations,therearecalculationsspecifictotheCardiac,Gynecology(Gyn),IMT,OB,Orbital,SmallParts,TranscranialDoppler(TCD),andVascularexamtypes.Cardiac calculationsThefollowingtableshowsthemeasurementsrequiredtocompletedifferentcardiaccalculations.Fordefinitionsofacronyms,see“Glossary”onpage 157.Cardiac CalculationsWARNING: To avoid incorrect calculations, verify that the patient information, date, and time settings are accurate.To avoid misdiagnosis or harming the patient outcome, start a new patient information form before starting a new patient exam and performing calculations. Starting a new patient information form clears the previous patient’s data. The previous patient’s data will be combined with the current patient if the form is not first cleared. See “To create a new patient information form” on page 34.Transducer Exam TypeD2x CardiacP10x CardiacP21x CardiacTEEx CardiacMenu Heading Cardiac Measurements (Imaging Mode)Calculation ResultsLV…LVd RVW (2D)RVD (2D)IVS (2D)LVD (2D)LVPW (2D)COEF SVLVESVLVEDVIVSFTLVPWFTLVDFSCISI…LVs RVW (2D)RVD (2D)IVS (2D)LVD (2D)LVPW (2D)HRa needed for CO & CIAo/LA Ao (2D or MMode)AoLA/AoAAo (2D) AAoLA (2D orMMode)LALA/AoLVOT D (2D) LVOT DLVOT area
Chapter 4:  Measurements and Calculations 51MeasurementsACS (M Mode) ACSLVET (M Mode) LVETMV EF:Slope(M Mode)EF SLOPEEPSS (M Mode) EPSSLV…LVd RVW (M Mode)RVD (M Mode)IVS (M  Mode)LVD (M Mode)LVPW (M Mode)COEF SVLVESVLVEDVIVSFTLVPWFTLVDFSCISILV Mass…LVs RVW (M Mode)RVD (M Mode)IVS (M Mode)LVD (M Mode)LVPW (M Mode)HR HRaArea AV (2D) AV AreaMV (2D) MV AreaLV Vol (EF)A4Cd (2D)A4Cs (2D)A2Cd (2D)A2Cs (2D)LV VolLV AreaEFCOSVCISIBiplaneLV mass Epi (2D)Endo (2D)Apical (2D)LV MassEpi AreaEndo AreaD ApicalMenu Heading Cardiac Measurements (Imaging Mode)Calculation ResultsPISA Ann D (2D)Radius (Color)MR/VTI (Doppler) MV/VTI (Doppler)PISA AreaEROMV RateRegurgitant VolumeRegurgitant FractionQp/Qs LVOT D (2D)RVOT D (2D)LVOT VTI(Doppler)RVOT VTI(Doppler)DVTIVMaxPGmax Vmean PGmeanSVQp/QsTDI (Wall) e’ and a’(Doppler)(Wall) e’ and a’(Doppler)(Wall) e’ and a’(Doppler)(Wall) e’ and a’(Doppler)(Wall) ‘e and a’(Doppler)E(MV)/e’ ratioMenu Heading Cardiac Measurements (Imaging Mode)Calculation Results
52 Exam-based calculations  P. Vein A (Doppler) VMaxAdur (Doppler) timeS (Doppler) VMaxS/D ratioD (Doppler)MV E (Doppler)A (Doppler)EE PGAA PGE:AAdur (Doppler) timePHT (Doppler) PHT MVADecel timeVTI (Doppler) VTIVmaxPGmaxVmeanPGmeanIVRT (Doppler) timeMV…MR dP:dTb (CWDoppler)dP:dTMenu Heading Cardiac Measurements (Imaging Mode)Calculation ResultsAV Vmax (Doppler) VmaxPGmaxVTI (Doppler) VTIVmaxPGmaxVmeanPGmeanVTI or Vmax fromLVOT (Doppler)VTI or Vmax fromAV (Doppler)AVAAo/LA LVOT D (2D)AV VTI (Doppler) SVAo/LA LVOT D (2D) AV VTI (Doppler) COAo/LA LVOT D (2D)HR HRaLVOT Vmax (Doppler) VmaxPGmaxVTI (Doppler) VTIVmaxPGmaxVmeanPGmeanAV…AI PHT (slope)(Doppler)AI PHTAI slopeMenu Heading Cardiac Measurements (Imaging Mode)Calculation Results
Chapter 4:  Measurements and Calculations 53MeasurementsTo measure LVd and LVs 1Onafrozen2DimageorMModetrace,presstheCALCSkey.2Fromthecalculationsmenu,selectthemeasurementname.3Positiontheactive(green)caliperatthestartingpoint.(See“Workingwithcalipers”onpage 41.)4PresstheSELECTkey,andpositionthesecondcaliper.5PresstheSELECTkey.Anothercaliperappears,andthecalculationsmenuhighlightsthenextmeasurementname.6Positionthecaliper,andpresstheSELECTkey.Repeatforeachmeasurementnameinthecalculationgroup.EachtimeyoupresstheSELECTkey,anothercaliperappears,andthecalculationsmenuhighlightsthenextmeasurementname.7Savethecalculation.(See“Tosaveacalculation”onpage 45.)To measure Ao, LA, AAo, or LVOT D1Onafrozen2DimageorMModetrace,presstheCALCSkey.2Fromthecalculationsmenu,selectthemeasurementname.3Positionthecalipers.(See“Workingwithcalipers”onpage 41.)4Savethecalculation.(See“Tosaveacalculation”onpage 45.)To calculate LV Volume (Simpson’s Rule)1Onafrozen2Dimage,presstheCALCSkey.2Dothefollowingforeachmeasurement:aFromthecalculationsmenu,selectthedesiredviewandphase.bPositionthecaliperatthemitralannulus,andpresstheSELECTkeytostartthetrace.TV TRmax (Doppler) VmaxPGmaxE (Doppler)A (Doppler)EE PGAA PGE:APHT (Doppler) PHT MVADecel timeVTI (Doppler) VTIVmaxPGmaxVmeanPGmeanRA pressurecRVSPPV Vmax (Doppler) VmaxPGmaxVTI (Doppler)AT (Doppler)VTIVmaxPGmaxVmeanPGmeanATa. You can enter the HR measurement three ways: Patient information form, Doppler measurement (See “To calculate Heart Rate (HR)” on page 57), or M Mode measurement (See “To measure heart rate (M Mode)” on page 43).b. Performed at 100 cm/s and 300 cm/s.c. Specified on the cardiac patient report. See “To delete a vascular or cardiac measurement” on page 69.Menu Heading Cardiac Measurements (Imaging Mode)Calculation Results
54 Exam-based calculations  cUsingthetouchpad,tracetheleftventricular(LV)cavity.Tomakeacorrection,selectUndoon‐screenorpresstheBACKSPACEkey.dCompletethetrace,andpresstheSETkey.eSavethecalculation.(See“Tosaveacalculation”onpage 45.)To calculate MV or AV area1Onafrozen2Dimage,presstheCALCSkey.2Inthecalculationsmenu,locateArea,andthenselectMVorAV.3Positionthecaliperwhereyouwanttobeginthetrace,andpresstheSELECTkey.4Usingthetouchpad,tracethedesiredarea.Tomakeacorrection,selectUndoon‐screenorpresstheBACKSPACEkey.5Completethetrace,andpresstheSETkey.6Savethecalculation.(See“Tosaveacalculation”onpage 45.)To calculate LV Mass1Onafrozen2Dimage,presstheCALCSkey.2Inthecalculationsmenu,locateLV Mass.3DothefollowingforEPIandthenforEndo:aSelectthemeasurementnamefromthecalculationsmenu.bPositionthecaliperwhereyouwanttobeginthetrace,andpresstheSELECTkey.cUsingthetouchpad,tracethedesiredarea.Tomakeacorrection,selectUndoon‐screenorpresstheBACKSPACEkey.dCompletethetrace,andpresstheSETkey.eSavethecalculation.(See“Tosaveacalculation”onpage 45.).4SelectApical fromthecalculationsmenu.5Positioningthecalipers,measuretheventricularlength.(See“Workingwithcalipers”onpage 41.)6Savethecalculation.To measure peak velocityForeachcardiacmeasurement,thesystemsavesuptofiveindividualmeasurementsandcalculatestheiraverage.Ifyoutakemorethanfivemeasurements,themostrecentmeasurementreplacesthefifthone.Ifyoudeleteasavedmeasurementfromthepatientreport,thenextmeasurementtakenreplacesthedeletedoneinthepatientreport.Themostrecentlysavedmeasurementappearsatthebottomofthecalculationsmenu.1OnafrozenDopplerspectraltrace,presstheCALCSkey.2Fromthecalculationsmenu,selectMV,TV,orTDI,orP.  V e i n .3Dothefollowingforeachmeasurementyouwanttotake:aSelectthemeasurementnamefromthecalculationsmenu.bPositionthecalipers.(See“Workingwithcalipers”onpage 41.)cSavethecalculation.(See“Tosaveacalculation”onpage 45.)To calculate Velocity Time Integral (VTI) Note: ThiscalculationcomputesotherresultsinadditiontoVTI.Seethetable“CardiacCalculations”onpage 50.1OnafrozenDopplerspectraltrace,presstheCALCSkey.2Fromthecalculationsmenu,selectVTI underMV,AV,TV,PV,orLVOT.3Positionthecaliperatthestartofthewaveform,andpresstheSELECTkeytostartthetrace.
Chapter 4:  Measurements and Calculations 55Measurements4Usingthetouchpad,tracethewaveform.Tomakeacorrection,selectUndoon‐screen,backtrackwiththetouchpad,orpresstheBACKSPACEkey.5PresstheSETkeytocompletethetrace.6Savethecalculation.(See“Tosaveacalculation”onpage 45.)Forinformationontheautomatictracetool,see“Totraceautomatically(Doppler)”onpage 44.To calculate Right Ventricular Systolic Pressure (RVSP)1OnafrozenDopplerspectraltrace,presstheCALCSkey.2Fromthecalculationsmenu,selectTVandthenselectTRmax.3Positionthecaliper.(See“Workingwithcalipers”onpage 41.)4Savethecalculation.(See“Tosaveacalculation”onpage 45.)5ToadjusttheRApressure,see“Todeleteavascularorcardiacmeasurement”onpage 69.ChangingtheRApressurefromthedefault5affectstheRVSPcalculationinthepatientreport.To calculate Pressure Half Time (PHT) in MV, AI, or TV1OnafrozenDopplerspectraltrace,presstheCALCSkey.2Fromthecalculationsmenu,selectMV, AV,orTV,andthenselectPHT.3Positionthefirstcaliperatthepeak,andpresstheSELECTkey.Asecondcaliperappears.4Positionthesecondcaliper:•InMV,positionthecaliperalongtheEFslope.•InAV,positionthecaliperattheenddiastole.5Savethecalculation.(See“Tosaveacalculation”onpage 45.)To calculate Proximal Isovelocity Surface Area (PISA)ThePISAcalculationrequiresameasurementin2D,ameasurementinColor,andtwomeasurementsinDopplerspectraltrace.Afterallmeasurementsaresaved,theresultappearsinthepatientreport.1MeasurefromAnnD(2D):aOnafrozen2Dimage,presstheCALCSkey.bFromthecalculationsmenu,locatePISA,andthenselectAnn D.cPositionthecalipers.(See“Workingwithcalipers”onpage 41.)dSavethecalculation.(See“Tosaveacalculation”onpage 45.)2MeasurefromRadius(Color):aOnafrozenColorimage,presstheCALCSkey.bFromthecalculationsmenu,selectRadius.cPositionthecalipers.dSavethecalculation.3OnafrozenDopplerspectraltrace,presstheCALCSkey.4DothefollowingtomeasurefromMRVTIandagaintomeasurefromMVVTI(Doppler):aFromthecalculationsmenu,selectPISAandthenselectMR VTI orMV VTI.bPositionthecaliperatthestartofthewaveform,andpresstheSELECTkeytostartthetrace.cUsingthetouchpad,tracethewaveform.
56 Exam-based calculations  Tomakeacorrection,selectUndoon‐screen,backtrackwiththetouchpad,orpresstheBACKSPACEkey.dPresstheSETkeytocompletethetrace.eSavethecalculation.Forinformationontheautomatictracetool,see“Totraceautomatically(Doppler)”onpage 44.To calculate Isovolumic Relaxation Time (IVRT)1OnafrozenDopplerspectraltrace,presstheCALCSkey.2Fromthecalculationsmenu,selectMVandthenselectIVRT.Averticalcaliperappears.3Usingthetouchpad,positionthecaliperattheaorticvalveclosure.4PresstheSELECTkey.Asecondverticalcaliperappears.5Usingthetouchpad,positionthesecondcaliperatonsetofmitralinflow.6Savethecalculation.(See“Tosaveacalculation”onpage 45.)To calculate Delta Pressure: Delta Time (dP:dT)ToperformthedP:dTmeasurements,theCWDopplerscalemustincludevelocitiesof300 cm/sorgreateronthenegativesideofthebaseline.(See“Spectraltraceoptions”onpage 29.)1OnafrozenCWDopplerspectraltrace,presstheCALCSkey.2Fromthecalculationsmenu,selectMV,andthenselectdP:dT.Ahorizontaldottedlinewithanactivecaliperappearsat100cm/s.3Positionthefirstcaliperalongthewaveformat100cm/s.4PresstheSELECTkey.Asecondhorizontaldottedlinewithanactivecaliperappearsat300cm/s.5Positionthesecondcaliperalongthewaveformat300cm/s.6Savethecalculation.(See“Tosaveacalculation”onpage 45.)To calculate Aortic Valve Area (AVA)TheAVAcalculationrequiresameasurementin2DandtwomeasurementsinDoppler.Afterthemeasurementsaresaved,theresultappearsinthepatientreport.1MeasurefromLVOT(2D):aOnafrozen2Dimage,presstheCALCSkey.bFromthecalculationsmenu,selectLVOT D.cPositionthecalipers.(See“Workingwithcalipers”onpage 41.)dSavethecalculation.(See“Tosaveacalculation”onpage 45.)2MeasurefromLVOT,andthenmeasurefromAV(Doppler):•ForVmax,see“Tomeasurepeakvelocity”onpage 54.Fromthecalculationsmenu,selectAV,selectsamplesite,andthenselectVmax.•ForVTI,see“TocalculateVelocityTimeIntegral(VTI)”onpage 54.Fromthecalculationsmenu,selectAV,selectsamplesite,andthenselectVTI.To calculate Qp/QsTheQp/Qscalculationrequirestwomeasurementsin2DandtwomeasurementsinDoppler.Afterthemeasurementsaresaved,theresultappearsinthepatientreport.1Onafrozen2Dimage,presstheCALCSkey.2DothefollowingtomeasurefromLVOTDandagaintomeasurefromRVOT D:
Chapter 4:  Measurements and Calculations 57MeasurementsaFromthecalculationsmenu,locateQp/QsandthenselectLVOT D or RVOT D.bPositionthecalipers.(See“Workingwithcalipers”onpage 41.)cSavethecalculation.(See“Tosaveacalculation”onpage 45.)3OnafrozenDopplerspectraltrace,presstheCALCSkey.4DothefollowingtomeasurefromLVOTVTIandagaintomeasurefromRVOTVTI:aFromthecalculationsmenu,selectQp/QsandthenselectLVOT VTI or RVOT VTI.bPresstheSELECTkeytostartthetrace.cUsingthetouchpad,tracethewaveform.Tomakeacorrection,selectUndoon‐screen,backtrackwiththetouchpad,orpresstheBACKSPACEkey.dPresstheSETkeytocompletethetrace.eSavethecalculation.(See“Tosaveacalculation”onpage 45.)Forinformationontheautomatictracetool,see“Totraceautomatically(Doppler)”onpage 44.To calculate Stroke Volume (SV) or Stroke Index (SI)TheSVandSIcalculationsrequireameasurementin2DandameasurementinDoppler.SIalsorequiresBodySurfaceArea(BSA).Afterthemeasurementsaresaved,theresultappearsinthepatientreport.1(SIOnly)FillintheHeightandWeightfieldsonthepatientinformationform.TheBSAiscalculatedautomatically.(See“Tocreateanewpatientinformationform”onpage 34.)2MeasurefromLVOT(2D):aOnafrozen2Dimage,presstheCALCSkey.bFromthecalculationsmenu,selectLVOT D.cPositionthecalipers.(See“Workingwithcalipers”onpage 41.)dSavethecalculation.(See“Tosaveacalculation”onpage 45.)3Measurefromaorta(Doppler).See“TocalculateVelocityTimeIntegral(VTI)”onpage 54.Fromthecalculationsmenu,selectAVandthenselectVTI.Forinformationontheautomatictracetool,see“Totraceautomatically(Doppler)”onpage 44.To calculate Heart Rate (HR)HeartRateisavailableinallcardiacpackages.TheHeartRateisnotcalculatedusingtheECGtrace.Savingtheheartratetothepatientreportoverwritesanyheartrateenteredonthepatientinformationform.1OnafrozenDopplerspectraltrace,presstheCALCSkey.2Fromthecalculationsmenu,selectHR.Averticalcaliperappears.3Usingthetouchpad,positionthefirstverticalcaliperatthepeakoftheheartbeat.4PresstheSELECTkey.Asecondverticalcaliperappears.Theactivecaliperishighlightedgreen.5Usingthetouchpad,positionthesecondverticalcaliperatthepeakofthenextheartbeat.6Savethecalculation.(See“Tosaveacalculation”onpage 45.)To calculate Cardiac Output (CO) or Cardiac Index (CI)TheCOandCIcalculationsrequireStrokeVolumeandHeartRatecalculations.CIalsorequiresBodySurfaceArea(BSA).Afterthemeasurementsaresaved,theresultappearsinthepatientreport.
58 Exam-based calculations  1(CIOnly)FillintheHeightandWeightfieldsonthepatientinformationform.TheBSAiscalculatedautomatically.(See“Tocreateanewpatientinformationform”onpage 34.)2CalculateSV.See“TocalculateStrokeVolume(SV)orStrokeIndex(SI)”onpage 57.3CalculateHR.See“TocalculateHeartRate(HR)”onpage 57.To measure a Tissue Doppler Imaging (TDI) waveform1EnsurethatTDIison.(See“PWDoppleroptions”onpage 29.)2OnafrozenDopplerspectraltrace,presstheCALCSkey.3Fromthecalculationsmenu,selectTDI,andthendothefollowingforeachmeasurementyouwanttotake:aFromthecalculationsmenu,selectthemeasurementname.bPositionthecalipers.(See“Workingwithcalipers”onpage 41.)cSavethecalculation.(See“Tosaveacalculation”onpage 45.)Gynecology (Gyn) calculationsGynecology(Gyn)calculationsincludeUterus,Ovary,Follicle,andVolume.Forinstructionstocalculatevolume,see“Volumecalculations”onpage 48.To measure uterus or ovary1Onafrozen2Dimage,presstheCALCSkey.2Fromthecalculationsmenu,selectGyn.3Dothefollowingforeachmeasurementyouwanttotake:aSelectthemeasurementnamefromthecalculationsmenu.bPositionthecalipers.(See“Workingwithcalipers”onpage 41.)cSavethecalculation.(See“Tosaveacalculation”onpage 45.)WARNING: To avoid incorrect calculations, verify that the patient information, date, and time settings are accurate.To avoid misdiagnosis or harming the patient outcome, start a new patient information form before starting a new patient exam and performing calculations. Starting a new patient information form clears the previous patient’s data. The previous patient’s data will be combined with the current patient if the form is not first cleared. See “To create a new patient information form” on page 34.Transducer Exam TypeC60x GynICTx Gyn
Chapter 4:  Measurements and Calculations 59MeasurementsTo measure follicles Youcansaveuptosixfollicularmeasurements,onedistancemeasurementforeachofuptosixfollicles.1Onafrozen2Dimage,presstheCALCSkey.2Fromthecalculationsmenu,selectFollicle.3Dothefollowingforeachfollicleyouwanttomeasure:aFromthecalculationsmenu,selectthemeasurementnameunderRight FolorLeft Fol.bPositionthecalipers.(See“Workingwithcalipers”onpage 41.)cSavethecalculation.(See“Tosaveacalculation”onpage 45.)IMT calculationsThefollowingtableshowsavailablemeasurementsforIMTcalculations.TheIMTmeasurementnamesarespecifiedontheIMTsetuppage.See“IMTCalculationssetup”onpage 20.WARNING: To ensure high quality images, all patient images must be obtained by qualified and trained individuals.To avoid patient injury, IMT results should not be used as a sole diagnostic tool. All IMT results should be interpreted in conjunction with other clinical information or risk factors.To avoid measurement errors, all measurements must be of the common carotid artery (CCA). This tool is not intended for measuring the bulb or the internal carotid artery (ICA).To avoid incorrect calculations, verify that the patient information, date, and time settings are accurate.To avoid misdiagnosis or harming the patient outcome, start a new patient information form before starting a new patient exam and performing calculations. Starting a new patient information form clears the previous patient’s data. The previous patient’s data will be combined with the current patient if the form is not first cleared. See “To create a new patient information form” on page 34.Transducer Exam TypeL38x IMTHFL38x IMT
60 Exam-based calculations  To calculate IMT automatically1Onafrozen2Dimage,presstheCALCSkey.2Fromthecalculationsmenu,selectthemeasurement.3Usingthetouchpadorarrowkeys,positiontheIMTtoolovertheareaofinterestuntilthemeasurementresultsappear.4Adjustthetool,andeditasneeded.See“IMTtooloptions”onpage 60.5Savethecalculation.(See“Tosaveacalculation”onpage 45.)IMT tool optionsWhenusingtheIMTtool,youcanselectthefollowingoptionson‐screen.IMT Calculations (2D)Menu Heading Available MeasurementsRight-IMTLeft-IMTAnt N (Anterior Near Wall)Ant F (Anterior Far Wall)Lat N (Lateral Near Wall)Lat F (Lateral Far Wall)Post N (Posterior Near Wall)Post F (Posterior Far Wall)IMT 1IMT 2IMT 3IMT 4IMT 5IMT 6IMT 7IMT 8Plaque Plaq 1Plaq 2Option DescriptionHide Use to check results. Hides the measurement results and trace line. Select Show to redisplay them.Move Repositions the tool horizontally by several pixels. The upper key moves the tool right, and the lower key moves the tool left.Width Adjusts the tool width by 1 mm. The upper key increases the width, and the lower key decreases the width.Edit Displays Smooth, Adven, and Lumen.Smooth Adjusts the IMT line smoothing. Select Edit to display this option.Adven Adjusts the adventitia-media line. The upper key moves the line upward. The lower key moves the line downward.Select Edit to display this option.Lumen Adjusts the lumen-intima line. The upper key moves the line upward. The lower key moves the line downward.Each of the two IMT lines can be adjusted independently.Select Edit to display this option.
Chapter 4:  Measurements and Calculations 61MeasurementsTo trace IMT manuallyInmanuallytracingIMT,theuserdefinesthelocation.1Onafrozen2Dimage,presstheCALCSkey2Fromthecalculationsmenu,selectameasurementname.3SelectEditon‐screen,andthenselectManual,andthenselectSketch.Asinglecaliperappears,andTraceappearsnexttothemeasurement.4Dothefollowingforthedesiredadventitia‐mediaboundaryandthenforthelumen‐intimaboundary:aPositionthecaliperatthebeginningoftheboundary,andpresstheSELECTkey.bUsingthetouchpad,markpointsbymovingthecalipertothenextdesiredpointandpressingtheSELECTkey.Tomakeacorrection,selectUndoon‐screenorpresstheBACKSPACEkeytodeletethelastsegment.cPresstheSETkeytocompletethetraceline.5Savethecalculation.(See“Tosaveacalculation”onpage 45.)To sketch IMTTheIMTsketchmeasurementinvolvestwouser‐definedsketchlinesthatyoucanadjustmanually.1Onafrozen2Dimage,presstheCALCSkey2Fromthecalculationsmenu,selectameasurementname.3SelectEditon‐screen,andthenselectManual.Asinglecaliperappearson‐screen,andSketchappearsnexttothemeasurement.4Dothefollowingforthedesiredadventitia‐mediaboundaryandthenforthelumen‐intimaboundary:aPositionthecaliperatthebeginningoftheboundaryandpresstheSELECTkey.bUsingthetouchpad,markpointsbymovingthecalipertothenextdesiredpointandpressingtheSELECTkey.Tomakeacorrection,selectUndoon‐screenorpresstheBACKSPACEkeytodeletethelastsegment.cPresstheSETkeytocompletethetraceline.dIfnecessary,adjustoreditthemeasurement.See“IMTtooloptions”onpage 60.eSavethecalculation.(See“Tosaveacalculation”onpage 45.)OB calculationsEFWiscalculatedonlyafterappropriatemeasurementsarecompleted.IfanyoneoftheseparametersresultsinanEDDgreaterthanwhattheOBcalculationtablesprovide,theEFWisnotdisplayed.WARNING: Make sure that you have selected the OB exam type and the OB author for the OB calculation table you intend to use. See “Results from System-Defined OB Measurements and Table Authors” on page 62.To avoid incorrect obstetrics calculations, verify with a local clock and calendar that the system’s date and time settings are correct before each use of the system. The system does not automatically adjust for daylight savings time changes.
62 Exam-based calculations  Ifyouchangethecalculationauthorduringtheexam,thecommonmeasurementsareretained.Thefollowingtableshowsthesystem‐definedmeasurementsavailableforOBcalculationsbyauthor.Fordefinitionoftheacronyms,see“Glossary”onpage 157.Toselectauthors,see“OBCalculationssetup”onpage 20.Seealso“OBCustomMeasurementssetup”onpage 21and“OBCustomTablessetup”onpage 22.Results from System-Defined OB Measurements and Table AuthorsTo avoid misdiagnosis or harming the patient outcome, start a new patient information form before starting a new patient exam and performing calculations. Starting a new patient information form clears the previous patient’s data. The previous patient’s data will be combined with the current patient if the form is not first cleared. See “To create a new patient information form” on page 34.Prior to use, verify that OB custom table data entries are correct. The system does not confirm the accuracy of the custom table data entered by the user.Transducer Exam TypeC60x OBICTx OBP21x OBCalculation ResultGestational OB MeasurementsTable AuthorsGestational AgeaYS —GS Hansmann, Nyberg, Tokyo U.CRL Hadlock, Hansmann, Osaka, Tokyo U.BPD Chitty, Hadlock, Hansmann, Osaka, Tokyo U.OFD HansmannHC Chitty, Hadlock, HansmannTTD Hansmann, Tokyo U.bAPTD Tokyo U.bAC Hadlock, Hansmann, Tokyo U.FTA OsakaFL Chitty, Hadlock, Hansmann, Osaka, Tokyo U.CX L —
Chapter 4:  Measurements and Calculations 63Measurementsa.  The Gestational Age is automatically calculated and displayed next to the OB measurement you selected. The average of the results is the AUA.b.  For Tokyo U., APTD and TTD are used only to calculate EFW. No age or growth tables are associated with these measurements.c.  The Estimated Fetal Weight calculation uses an equation that consists of one or more fetal biometry measurements. The author for the OB tables, which you choose on a system setup page, determines the measurements you must perform to obtain an EFW calculation. (See “OB Calculations setup” on page 20.)Individual selections for Hadlock’s EFW equations 1, 2, and 3 are not determined by the user. The selected equation is determined by the measurements that have been saved to the patient report with priority given to the order listed above.d.  The Growth Analysis tables are used by the Report Graphs feature. Three growth curves are drawn using the table data for the selected growth parameter and published author. Growth tables are only available with a user-entered LMP or Estab. DD.To measure gestational growth (2D) Foreach2DOBmeasurement(exceptAFI),thesystemsavesuptothreeindividualmeasurementsandtheiraverage.Ifyoutakemorethanthreemeasurements,theearliestmeasurementisdeleted.1Inthepatientinformationform,selectOBexamtype,andselectLMPorEstab.DD.SelectTwinsifappropriate.2Onafrozen2Dimage,presstheCALCSkey.3Dothefollowingforeachmeasurementyouwanttotake:aFromthecalculationsmenu,selectthemeasurementname.Fortwins,selectTwin AorTwin B,andthenselectthemeasurementname.Thecalipertoolmaychangedependingonthemeasurementselected,butthepositionremainsconstant.bPositionthecalipers.(See“Workingwithcalipers”onpage 41.)cSavethecalculation.(See“Tosaveacalculation”onpage 45.)To measure fetal heart rate (M Mode)1OnafrozenMModetrace,presstheCALCSkey.2SelectFHRfromthecalculationsmenu.Averticalcaliperappears.Estimated Fetal Weight (EFW)cHC, AC, FL Hadlock 1BPD, AC, FL Hadlock 2AC, FL Hadlock 3BPD, TTD HansmannBPD, FTA, FL Osaka U.BPD, AC ShepardBPD, TTD, APTD, FL Tokyo U.Ratios HC/AC CampbellFL/AC HadlockFL/BPD HohlerFL/HC HadlockAmniotic Fluid IndexQ1, Q2, Q3, Q4JengGrowth Analysis TablesdBPD Chitty, Hadlock, JeantyHC Chitty, Hadlock, JeantyAC Chitty, Hadlock, JeantyFL Chitty, Hadlock, JeantyEFW Hadlock, JeantyHC/AC CampbellCalculation ResultGestational OB MeasurementsTable Authors
64 Exam-based calculations  3Usingthetouchpad,positiontheverticalcaliperatthepeakoftheheartbeat.4PresstheSELECTkey.Asecondverticalcaliperappears.5Usingthetouchpad,positionthesecondverticalcaliperatthepeakofthenextheartbeat.6Savethecalculation.(See“Tosaveacalculation”onpage 45.)To calculate MCA or Umba (Doppler)Note: ThesystemdoesnotprovideanMCA/UmbAratiofromthePI(PulsatilityIndex).1Select OBexamtype,andselectLMPorEstab.DDinthepatientinformationform.2OnafrozenDopplerspectraltrace,presstheCALCSkey.3Dothefollowingforeachmeasurementyouneedtotake:aFromthecalculationsmenu,selectthemeasurementnameunderMCA(MiddleCerebralArtery)orUmbA(UmbilicalArtery).bPositionthecalipers:•ForS/D, RI,positionthefirstcaliperatthepeaksystolicwaveform.PresstheSELECTkey,andpositionthesecondcaliperattheenddiastoleonthewaveform.•ForS/D, RI, PI,positionthecaliperatthebeginningofthedesiredwaveform,andpresstheSELECTkey.Usethetouchpadtomanuallytracethedesiredarea.PresstheSETkey.Ifcalipersarenotpositionedcorrectly,thecalculationresultisinaccurate.cSavethecalculation.(See“Tosaveacalculation”onpage 45.)Onlyonecalculation(S/D, RIorS/D, RI, PI)canbesaved.Small Parts calculationsSmallPartscalculationsincludevolume,hipangle,andd:Dratio.Forinstructionstocalculatevolume,see“Volumecalculations”onpage 48.To calculate hip angle1Onafrozen2Dimage,presstheCALCSkey.2Fromthecalculationsmenu,selectRightorLeft.3SelectBaselineunderHip Angle.Abaselineappearson‐screen.4Positionthebaseline,andpresstheSETkey.(See“Workingwithcalipers”onpage 41.)LineA(alphaline)appearson‐screen,andLine Aisselectedinthecalculationsmenu.OB Doppler CalculationsMenu HeadingOB Calculation ResultsMCA (Middle Cerebral Artery)S/D, RI SDRIS/D, RI, PI* SDRIPIUmb A (Umbilical Artery)S/D, RI SDRIS/D, RI, PI* SDRIPI*Calculation requires a trace measurement. Transducer Exam TypeHFL38x Small PartsL38x Small Parts
Chapter 4:  Measurements and Calculations 65Measurements5PositionLineA,andsavethemeasurement.(See“Tosaveacalculation”onpage 45.)LineB(betaline)appearson‐screen,andLine Bisselectedinthecalculationsmenu.6PositionLineB,andsavethemeasurement.To calculate d:D ratio1Onafrozen2Dimage,presstheCALCSkey.2Fromthecalculationsmenu,selectRightorLeft.3Underd:D Ratio,selectFem Hd(femoralhead).4Usingthetouchpad,positionandresizethecircle.TheSELECTkeytogglesbetweenpositionandsize.5PresstheSETkey.Thebaselineautomaticallyappearswiththeleftcaliperactive.6Positionthecaliper.(See“Workingwithcalipers”onpage 41.)7Savethemeasurement.(See“Tosaveacalculation”onpage 45.)Transcranial Doppler and Orbital calculationsThefollowingtableshowsthemeasurementsrequiredtocompleteTranscranialDoppler(TCD)andOrbital(Orb)calculations.Fordefinitionsofacronyms,see“Glossary”onpage 157.WARNING: To avoid injury to the patient, use only an Orbital (Orb) exam type when performing imaging through the eye. Verify that the patient information, date, and time settings are accurate.To avoid carrying over measurements from the previous patient, start a new patient information form for each new patient before you perform calculations on the new patient. See “To create a new patient information form” on page 34.Transducer Exam TypesP21x Transcranial (TCD), Orbital (Orb)
66 Exam-based calculations  To perform a Transcranial Doppler or Orbital calculation1Selectthecorrectexamtype:•Orbital (Orb)tomeasureOpthalmicArteryandSiphon•Transcranial (TCD)forothermeasurementsSee“Tochangetheexamtype”onpage 31.Transcranial and Orbital CalculationsMenu Heading TCD and Orb Measurements ResultsTTMCATTDistMidProxBifur*ACAACoA*TICAPCAp1PCAp2PCoATAPPSVEDVPIRIS/DGate SizeTO OASiphonTAPPSVEDVPIRIS/DGate SizeSM ECICA TAPPSVEDVPIRIS/DGate SizeFM VA TAPPSVEDVPIRIS/DGate SizeFMBA ProxMidDistAL ECVA TAPPSVEDVPIRIS/DGate Size*Available but not requiredWARNING: To avoid injury to the patient, use only an Orbital (Orb) or Ophthalmic (Oph) when performing imaging through the eye. The FDA has established lower acoustic energy limits for opthalmic use. The system will not exceed these limits only if the Orbital or Ophthalmic exam type is selected.Transcranial and Orbital CalculationsMenu Heading TCD and Orb Measurements Results
Chapter 4:  Measurements and Calculations 67Measurements2OnafrozenDopplerspectraltrace,presstheCALCSkey.3Fromthecalculationsmenu,selectLeftorRight.4Dothefollowingforeachmeasurementyouwanttotake:aFromthecalculationsmenu,selectthemeasurement.(YoumayneedtoselectNextorPrevtolocatethemeasurement.)bDooneofthefollowing:•Foramanualtracemeasurement,usethetouchpadtopositionthecaliper.PresstheSELECTkey.Usethetouchpadtotracethewaveform.Ifyouneedtomakeacorrection,selectUndoon‐screenorpresstheBACKSPACEkey.•Foranautotracemeasurement,selectAutoon‐screen,andusethetouchpadtopositionthefirstcaliperatthebeginningofthewaveform.PresstheSELECTkey,andpositionthesecondcaliperattheendofthewaveform.Confirmthatthesystem‐generatedboundaryiscorrect.Ifyouarenotsatisfiedwiththetrace,obtainahigherqualityDopplerspectraltraceimage,ortracemanually.cPresstheSETkey.dSavethecalculation.(See“Tosaveacalculation”onpage 45.)Vascular calculationsThevascularmeasurementsthatyoucansavetothepatientreportarelistedinthefollowingtable.Fordefinitionsofacronyms,see“Glossary”onpage 157WARNING: To avoid misdiagnosis or harming the patient outcome, start a new patient information form before starting a new patient exam and performing calculations. Starting a new patient information form clears the previous patient’s data. The previous patient’s data will be combined with the current patient if the form is not first cleared. See “To create a new patient information form” on page 34.To avoid incorrect calculations, verify that the patient information, date, and time settings are accurate.Transducer Exam TypeC11x VascularHFL38x VascularL25x VascularL38x VascularSLAx Vascular
68 Patient report  .To perform a Vascular calculationAfteryouperformvascularmeasurements,valuesintheICA/CCAratiosareselectableonthevascularpageofthepatientreport.1OnafrozenDopplerspectraltrace,presstheCALCSkey.2Fromthecalculationsmenu,selectLeftorRight.3Dothefollowingforeachmeasurementyouwanttotake:aFromthecalculationsmenu,selectthemeasurementname.bUsingthetouchpad,positionthecaliperatthepeaksystolicwaveform.cPresstheSELECTkey.Asecondcaliperappears.dUsingthetouchpad,positionthesecondcaliperattheenddiastoleonthewaveform.eSavethecalculation.(See“Tosaveacalculation”onpage 45.)Patient reportThepatientreportcontainscalculationresultsandpatientinformation.ForCardiac,OB,Transcranial,andVascularexams,thepatientreporthasadditionaldetailsandfeatures.Youcandisplaythepatientreportatanytimeduringtheexam.Thevalueforacalculationappearsonlyifthecalculationisperformed.Thepoundsymbol(###)indicatesavaluethatisoutofrange(forexample,toolargeorsmall).Calculationvaluesthatareoutofrangearenotincludedinderivedcalculations(forexample,mean).To display a patient report1PresstheREPORTkey.2Doanyofthefollowing:•Todisplayadditionalpages,select1/xon‐screen.•(Cardiac,Vascular,orTCD)SelectDetailsorSummaryon‐screen.Themeanofthedetailentriesisusedinthesummary.3(Optional)PresstheSAVEkeytosavethecurrentpageofthepatientreport.Vascular CalculationsMenuHeadingVascular Measurement Calculation ResultsCCA Prox s (systolic), d (diastolic)Mid s (systolic), d (diastolic)Dist s (systolic), d (diastolic)Bulb s (systolic), d (diastolic)ICA Prox s (systolic), d (diastolic)Mid s (systolic), d (diastolic)Dist s (systolic), d (diastolic)ECA Prox s (systolic), d (diastolic)Mid s (systolic), d (diastolic)Dist s (systolic), d (diastolic)VArty s (systolic), d (diastolic)
Chapter 4:  Measurements and Calculations 69MeasurementsToexitthepatientreportandreturntoimaging,selectDone.To send a patient report to a PCYoucansendapatientreporttoaPCasatextfile.1Ensurecorrectconfiguration.See“ToconfigurethesystemforaDVDrecorder,PC,orserialbarcodescanner”onpage 19.MakesuretousetheconnectioncablesuppliedbySonoSite.Otherconnectioncablesmaycauseaudiointerference,includinganinaudibleDopplersignal.2SelectSend Rep.on‐screen.Vascular and cardiac patient reportsTo delete a vascular or cardiac measurement1OntheDetailspageofthepatientreport,selectthemeasurementbyusingthetouchpad.(Theselectedmeasurementisgreen.)2SelectDeleteon‐screen.Deletingsomemeasurementsalsodeletesrelatedmeasurements.Deletedmeasurementsarenotincludedinthesummaryinformation.(Vascular) To modify the ICA/CCA ratioIntheRatiolistinthevascularpatientreport,selectmeasurementsfortheICA/CCAratioforboththerightandleftsides.(Cardiac) To adjust the RA pressureOntheSummarypageofthecardiacpatientreport,selectfromtheRAlist.ChangingtheRApressurefromthedefault5affectstheRVSPcalculationresult.TCD patient reportThemaximumvaluesfortheTAPcalculationappearonthesummarypage.To delete a row of TCD measurements1OntheDetailspageoftheTCDpatientreport,selecttherow’sTAPmeasurementusingthetouchpad.(Theselectedmeasurementisgreen.)2SelectDeleteon‐screen.Deletedmeasurementsarenotincludedinthesummaryinformation.OB patient reportTheOBpatientreportpageshaveaspaceforsigningprintedreports.To display the OB Twins patient reportOntheOBpatientreport,selectoneofthefollowingon‐screen:•Twin A/Bforindividualtwinpatientreports•CompareforbothtwinsinonepatientreportTo delete an OB measurement1OntheOBpatientreport,selecttheOBmeasurementbyusingthetouchpad.Theselectedmeasurementisgreen.2SelectDeleteon‐screen.Todeleteallmeasurements,selectthemeasurementlabelandpresstheSELECTkeyandthenselectDeleteon‐screen.
70 Patient report  Figure 3 OB Anatomy Checklist PageTo fill out the OB anatomy checklistYoucandocumentreviewedanatomy.OntheAnatomy ChecklistpageintheOBpatientreport,selectthecheckboxes.PresstheTABkeytomovebetweenfieldsandtheSPACEBARtoselectanddeselectitemsinthechecklist.To complete the OB biophysical profileOnpage2oftheOBpatientreport,selectvaluesunderBPP.Thetotaliscalculatedwhenvaluesareselected.NST(non‐stresstest)isoptional.To display OB graphsYoucandisplayOBgraphsiftheLMPorEstab. DDfieldsarecompleteinthepatientinformationform.1OntheOBpatientreport,selectGraphson‐screen.2IntheGraphslist,selectthedesiredmeasurement/author.Thegraphfortheselectedmeasurementappears.Youcanselectanothermeasurement/authororselect 1/xon‐screen.Fortwins,bothmeasurementsetsareplottedonthesamegraph.3(Optional)PresstheSAVEkeytosavethecurrentgraphpage.4Selectoneofthefollowingon‐screen:•Reporttoreturntothepreviouspatientreportpage•Donetoreturntoliveimaging.EMED worksheetsEMEDworksheetscontainresultsfromEMEDcalculationsandcheckliststhatyoucancomplete.To display an EMED worksheetThisfeatureisoptional.1Afterorduringtheexam,presstheREPORTkey.2SelectEMEDon‐screen.3SelecttheworksheetfromtheWorksheetlistorbyselectingx/xon‐screen.
Chapter 5:  Troubleshooting and Maintenance 71TroubleshootingChapter 5: Troubleshooting and MaintenanceThischaptercontainsinformationtohelpcorrectproblemswithsystemoperation,toenterasoftwarelicense,andtotakepropercareofthesystem,transducer,andaccessories.TroubleshootingIfyouencounterdifficultywiththesystem,usethefollowinglisttohelptroubleshoottheproblem.Iftheproblempersists,contactSonoSiteTechnicalSupport.(See“SonoSiteTechnicalSupport”onpage vii.)System does not turn on.Checkallpowerconnections.RemovetheDCinputconnectorandbattery,wait10seconds,andthenreinstallthem.Ensurethatthebatteryischarged.System image quality is poor.Adjustthedisplaytoimproveviewingangle.Adjustthebrightness.Adjustthegain.No CPD image.Adjustthegain.No Color image.AdjustthegainorthePRFscale.NoOBmeasurementselections.SelecttheOBexamtype.Print does not work.SelecttheprinterontheConnectivitysetuppage.See“Toconfigurethesystemforaprinter”onpage 19.Checktheprinterconnections.Ensurethattheprinteristurnedonandsetupproperly.Seetheprintermanufacturer’sinstructions,ifnecessary.DVD recorder does not record.ChecktheDVDrecorderconnections.EnsurethattheDVDrecorderisturnedonandsetupproperly.SeetheapplicableSonoSiteaccessoryuserguideandthemanufacturers’instructions.Externalmonitordoesnotwork.Checkthemonitorconnections.Checkthemonitortoensurethatitisturnedonandsetupproperly.Seethemonitormanufacturers’instructions,ifnecessary.System does not recognize the transducer.Disconnectandreconnectthetransducer.A maintenance icon   appears on the system screen.Systemmaintenancemayberequired.RecordthenumberinparenthesesontheC:lineandcontactSonoSiteoryourSonoSiterepresentative.Software licensingSonoSitesoftwareiscontrolledbyalicensekey.Afteryouinstallnewsoftware,thesystempromptsyouforalicensekey.Youmustobtainonekeyforeachsystemortransducerthatusesthesoftware.Thesoftwarewilloperateforashorttime(thegraceperiod)withoutalicensekey.Duringthegraceperiod,allsystemfunctionsareavailable.Afterthegraceperiod,thesystemisnotusableuntilyouenteravalidlicensekey.Graceperiodtimeisnotusedwhilethesystemisofforasleep.Graceperiodtimeremainingappearsonthelicenseupdatescreen.Caution: After the grace period expires, all system functions except licensing are unavailable until a valid license key is entered.
72 Maintenance  Toobtainalicensekeyforyoursoftware,contactSonoSiteTechnicalSupport.(See“SonoSiteTechnicalSupport”onpage vii.)Youneedtoprovidethefollowinginformation.(See“SystemInformationsetup”onpage 23.)Afteryouobtainalicensekey,youmustenteritintothesystem.To enter a license key1Turnonthesystem.Thelicenseupdatescreenappears.2EnterthelicensekeyintheEnter license numberfield.3SelectDoneon‐screen.Ifyouenteredavalidlicensekeybutthelicenseupdatescreenappears,verifythatyouenteredthelicensekeycorrectly.Ifthelicenseupdatescreenstillappears,contactSonoSiteTechnicalSupport.(See“SonoSiteTechnicalSupport”onpage vii.)MaintenanceUsetherecommendationsinthissectionwhencleaningordisinfectingyourultrasoundsystem,transducer,andaccessories.Usethecleaningrecommendationsintheperipheralmanufacturer’sinstructionswhencleaningordisinfectingyourperipherals.Noperiodicorpreventivemaintenanceisrequiredforthesystem,transducer,oraccessoriesotherthancleaninganddisinfectingthetransduceraftereveryuse.(See“Cleaninganddisinfectingtransducers”onpage 74.)Therearenointernalcomponentsthatrequireperiodictestingorcalibration.Allmaintenancerequirementsaredescribedinthischapterandintheultrasoundsystemservicemanual.Performingmaintenanceproceduresnotdescribedintheuserguideorservicemanualmayvoidtheproductwarranty.ContactSonoSiteTechnicalSupportforanymaintenancequestions.(See“SonoSiteTechnicalSupport”onpage vii.)System Software Transducer Software Name of person installing the upgradeName of person installing the upgradeSerial number (on bottom of system)Transducer serial numberARM version Transducer part number (REF)or model number (for example, C60x)PCBA serial numberTransducer bundle versionWARNING: Disinfectants and cleaning methods listed are recommended by SonoSite for compatibility with product materials, not for biological effectiveness. Refer to the disinfectant label instructions for guidance on disinfection efficacy and appropriate clinical uses. The level of disinfection required for a device is dictated by the type of tissue it contacts during use. To avoid infection, ensure that the disinfectant type and the solution strength and duration are appropriate for the equipment. For information, see the disinfectant label instructions and the recommendations of the Association for Professionals in Infection Control and Epidemiology (APIC) and the FDA.
Chapter 5:  Troubleshooting and Maintenance 73TroubleshootingCleaning and disinfecting the ultrasound systemTheexteriorsurfaceoftheultrasoundsystemandtheaccessoriescanbecleanedanddisinfectedusingarecommendedcleanerordisinfectant.See“Recommendeddisinfectants”onpage 77. To clean the LCD screenDampenaclean,non‐abrasive,cottonclothwithanethanolic‐basedcleaner,andwipethescreenclean.Applythecleanertotheclothratherthanthesurfaceofthescreen.To clean and disinfect system surfaces1Turnoffthesystem.2Disconnectthesystemfromthepowersupply,orremoveitfromthemini‐dockordockingsystem.3Cleantheexteriorsurfacesusingasoftclothlightlydampenedinamildsoapordetergentcleaningsolutiontoremoveanyparticulatematterorbodyfluids.Applythesolutiontotheclothratherthanthesurface.4Mixthedisinfectantsolutioncompatiblewiththesystem,followingdisinfectantlabelWARNING: To prevent contamination, the use of sterile transducer sheaths and sterile coupling gel is recommended for clinical applications of an invasive or surgical nature. Do not apply the transducer sheath and gel until you are ready to perform the procedure.Caution: Some transducer sheaths contain natural rubber latex and talc, which can cause allergic reactions in some individuals. Refer to 21 CFR 801.437, User labeling for devices that contain natural rubber.WARNING: To avoid electrical shock, before cleaning, disconnect the system from the power supply or remove from the mini-dock or docking system.To avoid infection always use protective eyewear and gloves when performing cleaning and disinfecting procedures.To avoid infection, ensure that the solution expiration date has not passed.Caution: Do not spray cleaners or disinfectant directly on the system surfaces. Doing so may cause solution to leak into the system, damaging the system and voiding the warranty.Do not use strong solvents such as thinner or benzene, or abrasive cleansers, since these will damage the exterior surfaces.Use only recommended cleaners or disinfectants on system surfaces. Immersion-type disinfectants are not approved for use on system surfaces.When you clean the system, ensure that the solution does not get inside the system controls or the battery compartment. Do not scratch the LCD screen.
74 Maintenance  instructionsforsolutionstrengthsanddisinfectantcontactduration.5Wipesurfaceswiththedisinfectantsolution.6Airdryortoweldrywithacleancloth.Cleaning and disinfecting transducersTodisinfectthetransduceranditscable,usetheimmersionmethodorthewipemethod.Immersibletransducerscanbedisinfectedonlyiftheproductlabelingindicatestheycanbeusedwithanimmersionmethod.SeeTable 1,“DisinfectantCompatibilitywithSystemandTransducers”onpage 77.To clean and disinfect a transducer (wipe method)1Disconnectthetransducerfromthesystem.2Removeanytransducersheath.3Cleanthesurfaceusingasoftclothlightlydampenedinamildsoapordetergentcleaningsolutiontoremoveanyparticulatematterorbodyfluids.Applythesolutiontotheclothratherthanthesurface.4Rinsewithwaterorwipewithwater‐dampenedcloth;thenwipewithadrycloth.5Mixthedisinfectantsolutioncompatiblewiththetransducer,followingdisinfectantlabelinstructionsforsolutionstrengthsanddisinfectantcontactduration.6Wipesurfaceswiththedisinfectantsolution.WARNING: To avoid electrical shock, before cleaning, disconnect the transducer from the system.To avoid injury, always use protective eyewear and gloves when performing cleaning and disinfecting procedures.To avoid infection, ensure that the solution expiration date has not passed.Caution: Transducers must be cleaned after every use. Cleaning transducers is necessary prior to effective disinfection. Ensure that you follow the manufacturer's instructions when using disinfectants.Do not use a surgeon's brush when cleaning transducers. Even the use of soft brushes can damage a transducer. Use a soft cloth.Using a non-recommended cleaning or disinfection solution, incorrect solution strength, or immersing a transducer deeper or for a longer period of time than recommended can damage or discolor the transducer and void the transducer warranty.Do not allow cleaning solution or disinfectant into the transducer connector.Do not allow disinfectant to contact metal surfaces. Use a soft cloth lightly dampened in a mild soap or compatible cleaning solution to remove any disinfectant that remains on metal surfaces.Attempting to disinfect a transducer or transducer cable using a method other than the one included here can damage the transducer and void the warranty.
Chapter 5:  Troubleshooting and Maintenance 75Troubleshooting7Airdry.8Examinethetransducerandcablefordamagesuchascracks,splitting,orfluidleaks.Ifdamageisevident,discontinueuseofthetransducer,andcontactSonoSiteoryourlocalrepresentative.To clean and disinfect a transducer (immersion method)1Disconnectthetransducerfromthesystem.2Removeanytransducersheath.3Cleanthesurfaceusingasoftclothlightlydampenedinamildsoaporcompatiblecleaningsolutiontoremoveanyparticulatematterorbodyfluids.Applythesolutiontotheclothratherthanthesurface.4Rinsewithwaterorwipewithwater‐dampenedcloth,andthenwipewithadrycloth.5Mixthedisinfectantsolutioncompatiblewiththetransducer,followingdisinfectantlabelinstructionsforsolutionstrengthsanddisinfectantcontactduration.6Immersethetransducerintothedisinfectionsolutionnotmorethan12‐18 inches(31‐46 cm)fromthepointwherethecableenterstheconnector.Followtheinstructionsonthedisinfectantlabelforthedurationofthetransducerimmersion.7Usingtheinstructionsonthedisinfectantlabel,rinsetothepointofthepreviousimmersion,andthenairdryortoweldrywithacleancloth.8Examinethetransducerandcablefordamagesuchascracks,splitting,orfluidleaks.Ifdamageisevident,discontinueuseofthetransducer,andcontactSonoSiteoryourlocalrepresentative.Cleaning and disinfecting the battery To clean and disinfect a battery (wipe method)1Removethebatteryfromthesystem.2Cleanthesurfaceusingasoftclothlightlydampenedinamildsoapordetergentcleaningsolution.Applythesolutiontotheclothratherthanthesurface.3Wipethesurfaceswiththedisinfectionsolution.Sani‐ClothHB,Sani‐ClothWipes,or70%isopropylalcoholisrecommended.4Airdr.Cleaning the footswitchTo clean the footswitch1Dampenanon‐abrasiveclothwithoneofthefollowingproducts:•Isopropylalcohol•Soapandwater•Cidex•SodiumHypochlorite5.25%(Bleach)diluted10:12Wringoutclothuntilslightlywetandthengentlyrubsoiledareauntilclean.Caution: To avoid damaging the battery, do not allow cleaning solution or disinfectant to come in contact with the battery terminals.Caution: To avoid damaging the footswitch, do not sterilize. It is not intended for use in a sterile environment.
76 Maintenance  Cleaning and disinfecting ECG cablesTo clean and disinfect the ECG cable (wipe method)1Removethecablefromthesystem.2Cleanthesurfaceusingasoftclothlightlydampenedinamildsoapordetergentcleaningsolution.Applythesolutiontotheclothratherthanthesurface.3Wipethesurfaceswithanyofthefollowingproducts:• Bleach(sodiumhypochlorite)•Cidexdisinfectants•Greensoap4Airdryortoweldrywithacleancloth.Caution: To avoid damaging the ECG cable, do not sterilize.
Chapter 5:  Troubleshooting and Maintenance 77TroubleshootingRecommended disinfectantsSeewww.sonosite.comforupdatedcleaninganddisinfectantinformation.Table 1 does not have the following regulatory information for disinfectants:•EPA Registration• FDA 510(k) clearance (liquid sterilant, high level disinfectant)• CE approvalBefore using a disinfectant, confirm that its regulatory status is appropriate for your jurisdiction and use. Verify expiration dates on chemicals.When disposing of chemicals, follow manufacturer recommendations and EPA regulations.Table 1: Disinfectant Compatibility with System and TransducersDisinfection and Cleaning SolutionsCountry of Origin Type Active IngredientC60xICTxL38xP10xP21xSLAxD2x HFL38x C11x/L25xSystem SurfacesAbcoCide 14 USA Liquid Gluteraldehyde AAAUAccel Plus CAN Wipe Hydrogen Peroxide NNNUAccel TB CAN Wipe Hydrogen Peroxide NNNUAccel Wipes CAN Wipe Hydrogen Peroxide AAAUAidal Plus AUS Liquid Gluteraldehyde AAAUAlkacide FRA Liquid Gluteraldehyde AAAUAlkazyme FRA Liquid Quat. Ammonia AAAUAnioxyde 1000 FRA Liquid Peracetic Acid NNNUAquatabs (1000) IRL Tablet Sodium DichloroisocyanurateANAU
78Aquatabs (2000) IRL Tablet Sodium DichloroisocyanurateAUNAUAquatabs (5000) IRL Tablet Sodium DichloroisocyanurateNUNNUAscend USA Liquid Quat Ammonia AUAAUAsepti-HB USA Liquid Quat Ammonia AUAAUAsepti-Steryl USA Spray Ethanol AUAAUAsepti-Wipes USA Wipe Propanol (Isopropyl AlcoholAUAAABacillocid rasant DEU Liquid Glut./Quat. Ammonia AUAAUBacoban DEU Liquid Ethanol Isopropanol AAUUUBacoban WB DEU Liquid Benzalkoniumchloride DiethylenglycolAAUUUBanicide USA Liquid Gluteraldehyde AUUAUBetadine USA Liquid Providone-Iodine NUNAUBleach USA Liquid NaCl Hypochlorite AUAAUCavicide USA Liquid Isopropyl AUAAUCaviwipes USA Wipes Isopropanol AUANAChlor-Clean GBR Liquid Sodium DichloroisocyanurateAUNAUTable 1: Disinfectant Compatibility with System and Transducers (continued)Disinfection and Cleaning SolutionsCountry of Origin Type Active IngredientC60xICTxL38xP10xP21xSLAxD2x HFL38x C11x/L25xSystem Surfaces
Chapter 5:  Troubleshooting and Maintenance 79TroubleshootingCidalkan FRA Liquid Alkylamine, isopropanol UNUUUCidalkan Lingettes  FRA Wipes Ethyl Alcohol UNUUUCidex USA Liquid Gluteraldehyde AUAAACidex OPA USA Liquid Ortho-phthaldehyde AAAAUCidex Plus USA Liquid Gluteraldehyde AUAAACleanisept DEU Wipes Quat. Ammonia AAAAAClorox Wipes USA Wipes Isopropanol AUAAUControl III USA Liquid Quat. Ammonia AUANUCoverage Spray USA Spray Quat. Ammonia AUANNDenatured Alcohol USA Liquid Ethanol NUNNUDentaSept FRA Liquid Quat. Ammonia NUNNUDisCide Ultra Disinfecting TowelettesUSA Wipes Isopropyl Alcohol UUUUNDisCide Wipes USA Wipes Isopropyl Alcohol AUAANDisOPA JPN Liquid Ortho-phthaldehyde AAAAADispatch USA Spray NaCl Hypochlorite AAAAUDynacide PA FRA Liquid Peracetic Acid UAUUUTable 1: Disinfectant Compatibility with System and Transducers (continued)Disinfection and Cleaning SolutionsCountry of Origin Type Active IngredientC60xICTxL38xP10xP21xSLAxD2x HFL38x C11x/L25xSystem Surfaces
80End-Bac II USA Liquid Quat. Ammonia AUAAAEndozime AW Plus FRA Liquid Propanol AUAAUEnvirocide USA Liquid Isopropyl AUUNUEnzol USA Cleaner Ethylene Glycol AUAAUExpose USA Liquid Isopropyl AUAAUGigasept AF DEU Liquid Quat. Ammonia AUAAUGigasept FF DEU Liquid Bersteinsaure NUNNUGluteraldehyde SDS USA Liquid Gluteraldehyde AUUAUHexanios FRA Liquid Polyhexanide/Quat. AmmoniaAUAAUHi Tor Plus USA Liquid Chloride AUANUHibiclens USA Cleaner Chlorhexidine AUAAUHydrogen Peroxide USA Liquid Hydrogen Peroxide AAAAAIsopropanol Alcohol ALL Liquid Alcohol NUNNUKodan Tücher DEU Liquid Propanol AUAANKohrsolin ff DEU Liquid Gluteraldehyde AUUAUKorsolex basic DEU Liquid Gluteraldehyde NUNNULem-O-Quat USA Liquid Alkyl/Chloride UAUUUTable 1: Disinfectant Compatibility with System and Transducers (continued)Disinfection and Cleaning SolutionsCountry of Origin Type Active IngredientC60xICTxL38xP10xP21xSLAxD2x HFL38x C11x/L25xSystem Surfaces
Chapter 5:  Troubleshooting and Maintenance 81TroubleshootingLpHse USA Liquid O-phenylphenol AUAAULysol USA Spray Ethanol NUNNULysol IC USA Liquid O-phenylphenol AUNAUMadacide 1 USA Liquid Isopropanol ANANNMatar USA Liquid O-phenylphenol AUUAUMetriCide 14 USA Liquid Gluteraldehyde AUAAUMetriCide 28 USA Liquid Gluteraldehyde AUAAUMetriZyme USA Cleaner Propylene Glycol AUAAUMikrobak forte DEU Liquid Ammonium Chloride AUAAUMikrozid Wipes DEU Wipe Ethanol/Propanol AUAANNuclean FRA Spray Alcohol/Biguanide AUAAUPrecise USA Spray O-phenylphenol NUNNURuthless USA Spray Quat. Ammonia AUANUSagrosept Wipe DEU Wipe Propanol AUAAUSalvanios pH 7 FRA Liquid Quat. Ammonia AUAAUSani-Cloth HB USA Wipe Quat. Ammonia AUANASani-Cloth Plus USA Wipe Quat. Ammonia AUAAASekusept DEU Liquid Gluteraldehyde UAUUUTable 1: Disinfectant Compatibility with System and Transducers (continued)Disinfection and Cleaning SolutionsCountry of Origin Type Active IngredientC60xICTxL38xP10xP21xSLAxD2x HFL38x C11x/L25xSystem Surfaces
82Sklar USA Liquid Isopropanol AUANUSporicidin USA Liquid Phenol ANAAUSporicidin Wipes USA Wipe Phenol AUAANStaphene USA Spray Ethanol AUNANSteranios FRA Liquid Gluteraldehyde AUAAUSuper Sani-Cloth USA Wipe Isopropyl Alcohol NUNNNT-Spray USA Spray Quat. Ammonia AUANNT-Spray II USA Spray Alkyl/Chloride AUAAUTASK 105 USA Spray Quat. Ammonia AUAAUTBQ USA Liquid Alkyl AUAAUTheracide Plus WipesUSA Wipe Quat. Ammonia AUAAATor USA Liquid Quat. Ammonia AUANUTranseptic USA Cleaner Alcohol NUNNUTristel GBR Liquid Chlorine Dioxide AAAAUTristel Duo GBR UUUUUTristel Solo GBR Foam Hexamethylenebiguanide UAUUUTristel Wipes GBR Wipe Chlorine Dioxide NANNATable 1: Disinfectant Compatibility with System and Transducers (continued)Disinfection and Cleaning SolutionsCountry of Origin Type Active IngredientC60xICTxL38xP10xP21xSLAxD2x HFL38x C11x/L25xSystem Surfaces
Chapter 5:  Troubleshooting and Maintenance 83TroubleshootingVesphene II USA Liquid Sodium/o-Phenylphenate AUAAUVirex II 256 USA Liquid Ammonium Chloride AUAAUVirex TB USA Liquid Quat. Ammonia AUANNVirox 5 CAN Wipe Hydrogen Peroxide AAAAAVirufen FRA Liquid Alkyl Ammonium Chloride UAUUUWavicide -01 USA Liquid Gluteraldehyde NUNNUWavicide -06 USA Liquid Gluteraldehyde AUAAUWet Wipe DisinfectionDNK Wipe Guanidinium-chloride UAUUUWex-Cide USA Liquid O-phenylphenol AUAAUA = AcceptableN = No (Do not use)U = Untested (Do not use)Table 1: Disinfectant Compatibility with System and Transducers (continued)Disinfection and Cleaning SolutionsCountry of Origin Type Active IngredientC60xICTxL38xP10xP21xSLAxD2x HFL38x C11x/L25xSystem Surfaces
84
Chapter 6:  Safety 85SafetyChapter 6: SafetyThischaptercontainsinformationrequiredbyregulatoryagencies,includinginformationabouttheALARA(aslowasreasonablyachievable)principle,theoutputdisplaystandard,acousticpowerandintensitytables,andothersafetyinformation.Theinformationappliestotheultrasoundsystem,transducer,accessories,andperipherals.Ergonomic safetyThesehealthyscanningguidelinesareintendedtoassistyouinthecomfortandeffectiveuseofyourultrasoundsystem.WARNING: To prevent musculoskeletal disorders, follow the guidelines in this section.Use of an ultrasound system may be linked to musculoskeletal disorders (MSDs)a,b,c.Use of an ultrasound system is defined as the physical interaction between the operator, the ultrasound system, and the transducer.When using an ultrasound system, as with many similar physical activities, you may experience occasional discomfort in your hands, fingers, arms, shoulders, eyes, back, or other parts of your body. However, if you experience symptoms such as constant or recurring discomfort, pain, throbbing, aching, tingling, numbness, burning sensation, or stiffness, do not ignore these warning signs. Promptly see a qualified health professional. Symptoms such as these can be linked with MSDs. MSDs can be painful and may result in potentially disabling injuries to the nerves, muscles, tendons, or other parts of the body. Examples of MSDs include carpal tunnel syndrome and tendonitis.While researchers are not able to definitively answer many questions about MSDs, there is a general agreement that certain factors are associated with their occurrence including preexisting medical and physical conditions, overall health, equipment and body position while doing work, frequency of work, duration of work, and other physical activities that may facilitate the onset of MSDsd. This chapter provides guidelines that may help you work more comfortably and may reduce your risk of MSDse,f.a.Magnavita, N., L. Bevilacqua, P. Mirk, A. Fileni, and N. Castellino. “Work-related Musculoskeletal Complaints in Sonologists.” Occupational Environmental Medicine. 41:11 (1999), 981-988.b.Craig, M. “Sonography: An Occupational Hazard?” Journal of Diagnostic Medical Sonography. 3 (1985), 121-125.c.Smith, C.S., G.W. Wolf, G. Y. Xie, and M. D. Smith. “Musculoskeletal Pain in Cardiac Ultrasonographers: Results of a Random Survey.” Journal of American Society of Echocardiography. (May1997), 357-362.d.Wihlidal, L.M. and S. Kumar. “An Injury Profile of Practicing Diagnostic Medical Sonographers in Alberta.” International Journal of Industrial Ergonomics. 19 (1997), 205-216.
86  Position the systemPromote comfortable shoulder, arm, and hand postures•Useastandtosupporttheweightoftheultrasoundsystem.Minimize eye and neck strain•Ifpossible,positionthesystemwithinreach.•Adjusttheangleofthesystemanddisplaytominimizeglare.•Ifusingastand,adjustitsheightsothatthedisplayisatorslightlybeloweyelevel.Position yourselfSupport your back during an exam•Useachairthatsupportsyourlowerback,thatadjuststoyourworksurfaceheight,thatpromotesanaturalbodyposture,andthatallowsquickheightadjustments.•Alwayssitorstandupright.Avoidbendingorstooping.Minimize reaching and twisting•Useabedthatisheightadjustable.•Positionthepatientasclosetoyouaspossible.•Faceforward.Avoidtwistingyourheadorbody.•Moveyourentirebodyfronttoback,andpositionyourscanningarmnexttoorslightlyinfrontofyou.•Standfordifficultexamstominimizereaching.•Positiontheultrasoundsystemordisplaydirectlyinfrontofyou.•Provideanauxiliarymonitorforpatientviewing.Promote comfortable shoulder and arm postures•Keepyourelbowclosetoyourside.•Relaxyourshouldersinalevelposition.• Supportyourarmusingasupportcushionorpillow,orrestitonthebed.e.Habes, D.J. and S. Baron. “Health Hazard Report 99-0093-2749.” University of Medicine and Dentistry of New Jersey. (1999).f.Vanderpool, H.E., E.A. Friis, B.S. Smith, and K.L. Harms. “Prevalence of Carpal Tunnel Syndrome and Other Work-related Musculoskeletal Problems in Cardiac Sonographers.” Journal of Medicine. 35:6 (1993), 605-610.
Chapter 6:  Safety 87SafetyPromote comfortable hand, wrist, and finger postures•Holdthetransducerlightlyinyourfingers.• Minimizethepressureappliedonthepatient.•Keepyourwristinastraightposition.Take breaks, exercise, and vary activities• MinimizingscanningtimeandtakingbreakscaneffectivelyallowyourbodytorecoverfromphysicalactivityandhelpyouavoidMSDs.Someultrasoundtasksmayrequirelongerormorefrequentbreaks.However,simplychangingtaskscanhelpsomemusclegroupsrelaxwhileothersremainorbecomeactive.•Workefficientlybyusingthesoftwareandhardwarefeaturescorrectly.•Keepmoving.Avoidsustainingthesameposturebyvaryingyourhead,neck,body,arm,andlegpositions.•Dotargetedexercises.Targetedexercisescanstrengthenmusclegroups,whichmayhelpyouavoidMSDs.Contactaqualifiedhealthprofessionaltodeterminestretchesandexercisesthatarerightforyou.Electrical safety classificationClass I equipment Ultrasound system powered from power supply or part of the Mobile Docking SystemInternally powered equipment Ultrasound system not connected to the power supply (battery only)Type BF applied parts Ultrasound transducersType CF applied parts ECG module/ECG leadsIPX-7 (watertight equipment) Ultrasound transducersIPX-8 (watertight equipment) FootswitchNon AP/APG Ultrasound system power supply, docking system, and peripherals. Equipment is not suitable for use in the presence of flammable anaesthetics.
88  Electrical safetyThissystemmeetsEN60601‐1,ClassI/internally‐poweredequipmentrequirementsandTypeBFisolatedpatient‐appliedpartssafetyrequirements.ThissystemcomplieswiththeapplicablemedicalequipmentrequirementspublishedintheCanadianStandardsAssociation(CSA),EuropeanNormHarmonizedStandards,andUnderwritersLaboratories(UL)safetystandards.SeeChapter 8,“Specifications.”Formaximumsafetyobservethefollowingwarningsandcautions.WARNING: To avoid discomfort or minor risk of patient injury, keep hot surfaces away from the patient.Under certain circumstances, the transducer connector and back of the display enclosure can reach temperatures that exceed EN60601-1 limits for patient contact, therefore only the operator shall handle the system. This does not include the transducer face. To avoid discomfort or minor risk of operator injury when handling the transducer connector, the system should not be operated for more than 60 minutes continuously in a live-scan mode (as opposed to freeze or sleep modes).To avoid the risk of electrical shock or injury, do not open the system enclosures. All internal adjustments and replacements, except battery replacement, must be made by a qualified technician.To avoid the risk of injury, do not operate the system in the presence of flammable gasses or anesthetics. Explosion can result.To avoid the risk of electrical shock, use only properly grounded equipment. Shock hazards exist if the power supply is not properly grounded. Grounding reliability can only be achieved when equipment is connected to a receptacle marked “Hospital Only” or “Hospital Grade” or the equivalent. The grounding wire must not be removed or defeated.To avoid the risk of electrical shock, when using the system in an environment where the integrity of the protective earth conductor arrangement is in doubt, operate the system on battery power only without using the power supply.To avoid the risk of electrical shock, do not connect the system’s power supply or a docking system to an MPSO or extension cord.To avoid the risk of electrical shock, before using the transducer, inspect the transducer face, housing, and cable. Do not use the transducer if the transducer or cable is damaged.To avoid the risk of electrical shock, always disconnect the power supply from the system before cleaning the system.
Chapter 6:  Safety 89SafetyWARNING: To avoid the risk of electrical shock, do not use any transducer that has been immersed beyond the specified cleaning or disinfection level. See Chapter 5, “Troubleshooting and Maintenance.”To avoid the risk of electrical shock to the patient, do not simultaneously touch the patient and the ungrounded signal input/output connectors on the back of the ultrasound system.To avoid the risk of electrical shock and fire hazard, inspect the power supply, AC power cords, cables, and plugs on a regular basis. Ensure that they are not damaged. To avoid the risk of electrical shock and fire hazard, the power cord set that connects the power supply of the ultrasound system or MDS to mains power must only be used with the power supply or docking system, and cannot be used to connect other devices to mains power.To avoid the risk of electrical shock, use only accessories and peripherals recommended by SonoSite, including the power supply. Connection of accessories and peripherals not recommended by SonoSite could result in electrical shock. Contact SonoSite or your local representative for a list of accessories and peripherals available from or recommend by SonoSite.To avoid the risk of electrical shock, use commercial grade peripherals recommended by SonoSite on battery power only. Do not connect these products to AC mains power when using the system to scan or diagnose a patient/subject. Contact SonoSite or your local representative for a list of the commercial grade peripherals available from or recommended by SonoSite.To avoid the risk of electrical shock to the patient/subject, do not touch the system battery contacts while simultaneously touching a patient/subject.To prevent injury to the operator/bystander, the transducer must be removed from patient contact before the application of a high-voltage defibrillation pulse.To avoid possible electrical shock or electromagnetic interference, verify proper operation and compliance with relevant safety standards for all equipment before clinical use. Connecting additional equipment to the ultrasound system constitutes configuring a medical system. SonoSite recommends verifying that the system, all combinations of equipment, and accessories connected to the ultrasound system comply with JACHO installation requirements and/or safety standards such as AAMI-ES1, NFPA 99 OR IEC Standard 60601-1-1 and electromagnetic compatibility standard IEC 60601-1-2 (Electromagnetic compatibility), and are certified according to IEC Standard 60950 (Information Technology Equipment (ITE)).Caution: Do not use the system if an error message appears on the image display: note the error code; call SonoSite or your local representative; turn off the system by pressing and holding the power key until the system powers down.To avoid increasing the system and transducer connector temperature, do not block the airflow to the ventilation holes on the side of the system.
90  Equipment safetyToprotectyourultrasoundsystem,transducer,andaccessories,followtheseprecautions.Battery safetyTopreventthebatteryfrombursting,igniting,oremittingfumesandcausingpersonalinjuryorequipmentdamage,observethefollowingprecautions.Caution: Excessive bending or twisting of cables can cause a failure or intermittent operation.Improper cleaning or disinfecting of any part of the system can cause permanent damage. For cleaning and disinfecting instructions, see Chapter 5, “Troubleshooting and Maintenance.”Do not submerge the transducer connector in solution. The cable is not liquid-tight beyond the transducer connector/cable interface.Do not use solvents such as thinner or benzene, or abrasive cleaners on any part of the system.Remove the battery from the system if the system is not likely to be used for some time.Do not spill liquid on the system.WARNING: The battery has a safety device. Do not disassemble or alter the battery.Charge the batteries only when the ambient temperature is between 0° and 40°C (32° and 104°F). Do not short-circuit the battery by directly connecting the positive and negative terminals with metal objects.Do not touch battery contacts.Do not heat the battery or discard it in a fire.Do not expose the battery to temperatures over 60°C (140°F). Keep it away from fire and other heat sources.Do not charge the battery near a heat source, such as a fire or heater.Do not leave the battery in direct sunlight.Do not pierce the battery with a sharp object, hit it, or step on it.Do not use a damaged battery.Do not solder a battery.The polarity of the battery terminals are fixed and cannot be switched or reversed. Do not force the battery into the system.
Chapter 6:  Safety 91SafetyDo not connect the battery to an electrical power outlet.WARNING: Do not continue recharging the battery if it does not recharge after two successive six hour charging cycles.If the battery leaks or emits an odor, remove it from all possible flammable sources.Caution: To avoid the battery bursting, igniting, or emitting fumes from the battery and causing equipment damage, observe the following precautions:Do not immerse the battery in water or allow it to get wet.Do not put the battery into a microwave oven or pressurized container.If the battery emits an odor or heat, is deformed or discolored, or in any way appears abnormal during use, recharging or storage, immediately remove it and stop using it. If you have any questions about the battery, consult SonoSite or your local representative.Store the battery between -20°C (-4°F) and 60°C (140°F).Use only SonoSite batteries.Do not use or charge the battery with non-SonoSite equipment. Only charge the battery with the system.
92  Clinical safetyWARNING: Non-medical (commercial) grade peripheral monitors have not been verified or validated by SonoSite as being suitable for diagnosis.To avoid the risk of a burn hazard, do not use the transducer with high frequency surgical equipment. Such a hazard may occur in the event of a defect in the high frequency surgical neutral electrode connection. Do not use the system if it exhibits erratic or inconsistent behavior. Discontinuities in the scanning sequence are indicative of a hardware failure that must be corrected before use.Some transducer sheaths contain natural rubber latex and talc, which can cause allergic reactions in some individuals. Refer to 21 CFR 801.437, User labeling for devices that contain natural rubber.Perform ultrasound procedures prudently. Use the ALARA (as low as reasonably achievable) principle and follow the prudent use information concerning MI and TI.SonoSite does not currently recommend a specific brand of acoustic standoff. If an acoustic standoff is used, it must have a minimum attentuation of .3dB/cm/MHz.Some SonoSite transducers are approved for intraoperative applications if a market-cleared sheath is used.To avoid injury or reduce the risk of infection to the patient, observe the following:• • Follow Universal Precautions when inserting and maintaining a medical device for interventional and intraoperative procedures.• Appropriate training in interventional and intraoperative procedures as dictated by current relevant medical practices as well as in proper operation of the ultrasound system and transducer is required. During vascular access, the potential exists for serious complications including without limitation the following: pneumothorax, arterial puncture, guidewire misplacement, and risks normally associated with local or general anesthesia, surgery, and post-operative recovery.To avoid device damage or patient injury, do not use the P10x, P17x, or P21x needle guide bracket on patients with pacemakers or medical electronic implants. The needle guide bracket for the P10x, P17x, and P21x transducers contains a magnet that is used to ensure the bracket is correctly oriented on the transducer. The magnetic field in direct proximity to the pacemaker or medical electronic implant may have an adverse effect.
Chapter 6:  Safety 93SafetyHazardous materialsElectromagnetic compatibilityTheultrasoundsystemhasbeentestedandfoundtocomplywiththeelectromagneticcompatibility(EMC)limitsformedicaldevicestoIEC60601‐1‐2:2001.Theselimitsaredesignedtoprovidereasonableprotectionagainstharmfulinterferenceinatypicalmedicalinstallation.WARNING: The liquid crystal display (LCD) contains mercury. Dispose of the LCD properly in accordance with local regulations. Caution: Medical electrical equipment requires special precautions regarding EMC and must be installed and operated according to these instructions. It is possible that high levels of radiated or conducted radio-frequency electromagnetic interference (EMI) from portable and mobile RF communications equipment or other strong or nearby radio-frequency sources, could result in performance disruption of the ultrasound system. Evidence of disruption may include image degradation or distortion, erratic readings, equipment ceasing to operate, or other incorrect functioning. If this occurs, survey the site to determine the source of disruption, and take the following actions to eliminate the source(s).•Turn equipment in the vicinity off and on to isolate disruptive equipment.•Relocate or re-orient interfering equipment.•Increase distance between interfering equipment and your ultrasound system.•Manage use of frequencies close to ultrasound system frequencies.•Remove devices that are highly susceptible to EMI.•Lower power from internal sources within facility control (such as paging systems).•Label devices susceptible to EMI.•Educate clinical staff to recognize potential EMI-related problems.•Eliminate or reduce EMI with technical solutions (such as shielding).•Restrict use of personal communicators (cell phones, computers) in areas with devices susceptible to EMI.•Share relevant EMI information with others, particularly when evaluating new equipment purchases which may generate EMI.•Purchase medical devices that comply with IEC 60601-1-2 EMC Standards.
94  Manufacturer’s declarationTable 1andTable 2documenttheintendeduseenvironmentandEMCcompliancelevelsofthesystem.Formaximumperformance,ensurethatthesystemisusedintheenvironmentsdescribedinthistable.Thesystemisintendedforuseintheelectromagneticenvironmentspecifiedbelow.Caution: To avoid the risk of increased electromagnetic emissions or decreased immunity, use only accessories and peripherals recommended by SonoSite. Connection of accessories and peripherals not recommended by SonoSite could result in malfunctioning of your ultrasound system or other medical electrical devices in the area. Contact SonoSite or your local representative for a list of accessories and peripherals available from or recommended by SonoSite. See the SonoSite accessories user guide.Electrostatic discharge (ESD), or static shock, is a naturally occurring phenomenon. ESD is common in conditions of low humidity, which can be caused by heating or air conditioning. Static shock is a discharge of the electrical energy from a charged body to a lesser or non-charged body. The degree of discharge can be significant enough to cause damage to a transducer or an ultrasound system. The following precautions can help reduce ESD: anti-static spray on carpets, anti-static spray on linoleum, and anti-static mats.Table 1: Manufacturer’s Declaration - Electromagnetic EmissionsEmissions Test Compliance Electromagnetic EnvironmentRF emissionsClSPR 11Group 1 The SonoSite ultrasound system uses RF energy only for its internal function. Therefore, its RF emissions are very low and are not likely to cause any interference in nearby electronic equipment.RF emissionsClSPR 11Class A The SonoSite ultrasound system is suitable for use in all establishments other than domestic and those directly connected to the public low-voltage power supply network which supplies buildings used for domestic purposes.Harmonic emissionsIEC 61000-3-2Class AVoltage fluctuations/flicker emissionsIEC 61000-3-3Complies
Chapter 6:  Safety 95SafetyThesystemisintendedforuseintheelectromagneticenvironmentspecifiedbelow.Table 2: Manufacturer’s Declaration - Electromagnetic ImmunityImmunity Test IEC 60601 Test Level Compliance Level Electromagnetic EnvironmentElectrostatic Discharge (ESD)IEC 61000-4-22.0KV, 4.0KV, 6.0KV contact2.0KV, 4.0KV, 8.0KV air 2.0KV, 4.0KV, 6.0KV contact2.0KV, 4.0KV, 8.0KV airFloors should be wood, concrete or ceramic tile. If floors are covered with synthetic material, the relative humidity should be at least 30%.Electrical fastTransient burstIEC 61000-4-42KV on the mains1KV on signal lines2KV on the mains1KV on signal linesMains power quality should be that of a typical commercial or hospital environment.SurgeIEC 61000-4-50.5KV, 1.0KV, 2.0KV on AC power lines to ground0.5KV, 1.0KV on AC power lines to lines0.5KV, 1.0KV, 2.0KV on AC power lines to ground0.5KV, 1.0KV on AC power lines to linesMains power quality should be that of a typical commercial or hospital environment.Voltage dips, short interruptions and voltage variations on power supply input lines IEC 61000-4-11>5% UT(>95% dip in UT) for 0.5 cycle40% UT(60% dip in UT) for 5 cycles70% UT(30% dip in UT) for 25 cycles>5% UT(>95% dip in UT) for 5s>5% UT(>95% dip in UT) for 0.5 cycle40% UT(60% dip in UT) for 5cycles70% UT(30% dip in UT) for 25 cycles>5% UT(>95% dip in UT) for 5sMains power quality should be that of a typical commercial or hospital environment. If the user of the SonoSite ultrasound system requires continued operation during power mains interruptions, it is recommended that the SonoSite ultrasound system be powered from an uninterruptible power supply or a battery.
96  Power Frequency Magnetic FieldIEC 61000-4-83 A/m 3 A/m If image distortion occurs, it may be necessary to position the SonoSite ultrasound system further from sources of power frequency magnetic fields or to install magnetic shielding. The power frequency magnetic field should be measured in the Intended installation location to assure that it is sufficiently low.Conducted RFIEC 61000-4-63Vrms150 kHz to 80 MHz3 Vrms Portable and mobile RF communications equipment should be used no closer to any part of the SonoSite ultrasound system including cables, than the recommended separation distance calculated from the equation applicable to the frequency of the transmitter. Recommended Separation Distanced = 1.2Radiated RFIEC 61000-4-33Vim80 MHz to 2.5 GHz3 V/m d = 1.280 MHz to 800 MHzd = 2.3800MHz to 2,5GHzWhere P is the maximum output power rating of the transmitter in watts (W) according to the transmitter manufacturer and d is the recommended separation distance in meters (m).Table 2: Manufacturer’s Declaration - Electromagnetic Immunity (Continued)Immunity Test IEC 60601 Test Level Compliance Level Electromagnetic EnvironmentPPP
Chapter 6:  Safety 97SafetyALARA principleALARAistheguidingprinciplefortheuseofdiagnosticultrasound.Sonographersandotherqualifiedultrasoundusers,usinggoodjudgmentandinsight,determinetheexposurethatis“aslowasreasonablyachievable.”Therearenosetrulestodeterminethecorrectexposureforeverysituation.Thequalifiedultrasounduserdeterminesthemostappropriatewaytokeepexposurelowandbioeffectstoaminimum,whileobtainingadiagnosticexamination.Athoroughknowledgeoftheimagingmodes,transducercapability,systemsetupandscanningtechniqueisnecessary.Theimagingmodedeterminesthenatureoftheultrasoundbeam.Astationarybeamresultsinamoreconcentratedexposurethanascannedbeam,whichspreadsthatexposureoverthatarea.Thetransducercapabilitydependsuponthefrequency,Radiated RFIEC 61000-4-3(continued)Field strengths from fixed RF transmitters, as determined by an electromagnetic Site surveya, should be less than the compliance level in each frequency rangeb.Interference may occur in the vicinity of equipment marked with the following symbol:(IEC 60417 No. 417-IEC-5140: “Source of non-ionizing radiation”)Note: UT is the AC mains voltage prior to application of the test level.At 80 MHz and 800 MHz, the higher frequency range applies.These guidelines may not apply in all situations. Electromagnetic propagation is affected by absorption and reflection from structures, objects and people.a.Field strengths from fixed transmitters such as base stations for radio (cellular/cordless) telephones and land mobile radios, amateur radio, AM and FM radio broadcast and TV broadcast cannot be predicted theoretically with accuracy. To assess the electromagnetic environment due to fixed RF transmitters, an electromagnetic site survey should be considered. If the measured field strength in the location in which the SonoSite ultrasound system is used exceeds the applicable RF compliance level above, the SonoSite ultrasound system should be observed to verify normal operation. If abnormal performance is observed, additional measures may be necessary, such as re-orienting or relocating the SonoSite ultrasound system.b.Over the frequency range 150 kHz to 80 MHz, field strengths should be less than 3 V/m.Table 2: Manufacturer’s Declaration - Electromagnetic Immunity (Continued)Immunity Test IEC 60601 Test Level Compliance Level Electromagnetic Environment
98  penetration,resolution,andfieldofview.Thedefaultsystempresetsareresetatthestartofeachnewpatient.Itisthescanningtechniqueofthequalifiedultrasounduseralongwithpatientvariabilitythatdeterminesthesystemsettingsthroughouttheexam.ThevariableswhichaffectthewaythequalifiedultrasounduserimplementstheALARAprincipleinclude:patientbodysize,locationofthebonerelativetothefocalpoint,attenuationinthebody,andultrasoundexposuretime.Exposuretimeisanespeciallyusefulvariable,becausethequalifiedultrasoundusercancontrolit.TheabilitytolimittheexposureovertimesupportstheALARAprinciple.Applying ALARAThesystemimagingmodeselectedbythequalifiedultrasounduserisdeterminedbythediagnosticinformationrequired.2Dimagingprovidesanatomicalinformation;CPDimagingprovidesinformationabouttheenergyoramplitudestrengthoftheDopplersignalovertimeatagivenanatomicallocationandisusedfordetectingthepresenceofbloodflow;ColorimagingprovidesinformationabouttheenergyoramplitudestrengthoftheDopplersignalovertimeatagivenanatomicallocationandisusedfordetectingthepresence,velocity,anddirectionofbloodflow;TissueHarmonicImaginguseshigherreceivedfrequenciestoreduceclutter,artifact,andimproveresolutiononthe2Dimage.UnderstandingthenatureoftheimagingmodeusedallowsthequalifiedultrasoundusertoapplytheALARAprinciple.Prudentuseofultrasoundrequiresthatpatientexposuretoultrasoundbelimitedtothelowestultrasoundoutputfortheshortesttimenecessarytoachieveacceptablediagnosticresults.Decisionsthatsupportprudentusearebasedonthetypeofpatient,examtype,patienthistory,easeordifficultyofobtainingdiagnosticallyusefulinformation,andpotentiallocalizedheatingofthepatientduetotransducersurfacetemperature.ThesystemhasbeendesignedtoensurethattemperatureatthefaceofthetransducerwillnotexceedthelimitsestablishedinSection42ofEN60601‐2‐37:Particularrequirementforthesafetyofultrasoundmedicaldiagnosticandmonitoringequipment.See“Transducersurfacetemperaturerise”onpage 104.Intheeventofadevicemalfunction,thereareredundantcontrolsthatlimittransducerpower.Thisisaccomplishedbyanelectricaldesignthatlimitsbothpowersupplycurrentandvoltagetothetransducer.Thesonographerusesthesystemcontrolstoadjustimagequalityandlimitultrasoundoutput.Thesystemcontrolsaredividedintothreecategoriesrelativetooutput:controlsthatdirectlyaffectoutput,controlsthatindirectlyaffectoutput,andreceivercontrols.Direct controlsThesystemdoesnotexceedaspatialpeaktemporalaverageintensity(ISPTA)of720 mW/cm2forallimagingmodes.(ForeithertheOphthalmicorOrbitalexam,theacousticoutputislimitedtothefollowingvalues:ISPTAdoesnotexceed50 mW/cm2;TIdoesnotexceed1.0,andMIdoesnotexceed0.23.)Themechanicalindex(MI)andthermalindex(TI)mayexceedvaluesgreaterthan1.0onsometransducersinsomeimagingmodes.OnemaymonitortheMIandTIvaluesandadjustthecontrolstoreducethesevalues.See“GuidelinesforreducingMIandTI”
Chapter 6:  Safety 99Safetyonpage 99.Additionally,onemeansformeetingtheALARAprincipleistosettheMIorTIvaluestoalowindexvalueandthenmodifyingthisleveluntilasatisfactoryimageorDopplermodeisobtained.FormoreinformationonMIandTI,seeBSEN60601‐2‐37:2001:AnnexHH.Indirect controlsThecontrolsthatindirectlyaffectoutputarecontrolsaffectingimagingmode,freeze,anddepth.Theimagingmodedeterminesthenatureoftheultrasoundbeam.Tissueattenuationisdirectlyrelatedtotransducerfrequency.ThehigherthePRF(pulserepetitionfrequency),themoreoutputpulsesoccuroveraperiodoftime.Receiver controlsThereceivercontrolsarethegaincontrols.Receivercontrolsdonotaffectoutput.Theyshouldbeused,ifpossible,toimproveimagequalitybeforeusingcontrolsthatdirectlyorindirectlyaffectoutput.Acoustic artifactsAnacousticartifactisinformation,presentorabsentinanimage,thatdoesnotproperlyindicatethestructureorflowbeingimaged.Therearehelpfulartifactsthataidindiagnosisandthosethathinderproperinterpretation.Examplesofartifactsinclude:• Shadowing• Throughtransmission• Aliasing• Reverberations•ComettailsFormoreinformationondetectingandinterpretingacousticartifacts,seethefollowingreference:Kremkau,FrederickW.DiagnosticUltrasound:PrinciplesandInstruments.7thed.,W.B.SaundersCompany,(Oct.17,2005).Guidelines for reducing MI and TIThefollowingaregeneralguidelinesforreducingMIorTI.Ifmultipleparametersaregiven,thebestresultsmaybeachievedbyminimizingtheseparameterssimultaneously.InsomemodeschangingtheseparametersdoesnotaffectMIorTI.ChangestootherparametersmayalsoresultinMIandTIreductions.PleasenotetheMIandTIvaluesontherightsideofthescreen.
100  Table 3: MI Transducer DepthC11x ↑C60x ↑HFL38x ↑ICTx ↑L25x ↑L38x ↑P10x ↑P21x ↑SLAx ↑TEEx ↑↓Decrease or lower setting of parameter to reduce MI.↑Increase or raise setting of parameter to reduce MI.Table 4: TI (TIS, TIC, TIB) TransducerColor Power Doppler SettingsPW SettingsBox WidthBox HeightBox Depth PRF Depth OptimizeC11x ↑↓↑ ↓ (Depth)C60x ↓ ↑↓↑ ↓ (PRF)HFL38x ↑↑↑ ↓ (Depth)ICTx ↑↑↓ Exam Gyn ↓ (PRF)L25x ↓↑↓ (PRF)L38x ↓↓ (Depth)P10x —— ↑↓—— ↓ (PRF)P21x ↓↓↑ ↓ (PRF)
Chapter 6:  Safety 101SafetySLAx —— ↑↓↑ —↓ (PRF)TEEx ——— ↓↓ —↓ (PRF)↓Decrease or lower setting of parameter to reduce MI.↑Increase or raise setting of parameter to reduce MI.Table 4: TI (TIS, TIC, TIB) TransducerColor Power Doppler SettingsPW SettingsBox WidthBox HeightBox Depth PRF Depth Optimize
102  Output displayThesystemmeetstheAIUMoutputdisplaystandardforMIandTI(seelastreferencein“Relatedguidancedocuments”below).Table 5indicatesforeachtransducerandoperatingmodewheneithertheTIorMIisgreaterthanorequaltoavalueof1.0,thusrequiringdisplay.Note: TheD2xtransducerhasastaticcontinuouswave(CW)output.Thisoutputisfixed.Therefore,TIandMIvaluescannotbechangedbyanysystemcontrolsavailabletotheuser.Table 5: TI or MI ≥ 1.0Transducer Model Index 2D/MModeCPD/ColorPW DopplerCW DopplerC11x/8-5 MI No No No —TIC,TIB, or TIS No Yes Yes —C60x/5-2 MI Yes No No —TIC, TIB, or TIS No No Yes —D2x/2 MI ———NoTIC,TIB, or TIS — — — YesHFL38x/13-6 MI No Yes Yes —TIC, TIB, or TIS No Yes Yes —ICTx/8-5 MI No No No —TIC, TIB, or TIS No No Yes —L25x/13-6 MI No Yes No —TIC,TIB, or TIS No No Yes —L38x/10-5 MI No Yes Yes —TIC, TIB, or TIS No Yes Yes —P10x/8-4 MI No Yes Yes NoTIC, TIB, or TIS Yes Yes Yes YesP21x/5-1 MI Yes Yes Yes NoTIC, TIB, or TIS Yes Yes Yes YesSLAx/13-6 MI No No No —TIC, TIB, or TIS No No Yes —
Chapter 6:  Safety 103SafetyEvenwhenMIislessthan1.0,thesystemprovidesacontinuousreal‐timedisplayofMIinallimagingmodes,inincrementsof0.1.ThesystemmeetstheoutputdisplaystandardforTIandprovidesacontinuousreal‐timedisplayofTIinallimagingmodes,inincrementsof0.1.TheTIconsistsofthreeuser‐selectableindices,andonlyoneoftheseisdisplayedatanyonetime.InordertodisplayTIproperlyandmeettheALARAprinciple,theuserselectsanappropriateTIbasedonthespecificexambeingperformed.SonoSiteprovidesacopyofAIUMMedicalUltrasoundSafety,whichcontainsguidanceondeterminingwhichTIisappropriate(See“Relatedguidancedocuments”onpage 104).MI and TI output display accuracyTheaccuracyresultfortheMIisstatedstatistically.With95%confidence,95%ofthemeasuredMIvalueswillbewithin+18%to‐25%ofthedisplayedMIvalue,or+0.2ofthedisplayedvalue,whichevervalueislarger.TheaccuracyresultfortheTIisstatedstatistically.With95%confidence,95%ofthemeasuredTIvalueswillbewithin+21%to‐40%ofthedisplayedTIvalue,or+0.2ofthedisplayedvalue,whichevervalueislarger.Thevaluesequateto+1dBto‐3dB.Adisplayedvalueof0.0forMIorTImeansthatthecalculatedestimatefortheindexislessthan0.05.Factors that contribute to display uncertaintyThenetuncertaintyofthedisplayedindicesisderivedbycombiningthequantifieduncertaintyfromthreesources:measurementuncertainty,systemandtransducervariability,andengineeringassumptionsandapproximationsmadewhencalculatingthedisplayvalues.Measurementerrorsoftheacousticparameterswhentakingthereferencedataarethemajorsourceoferrorthatcontributestothedisplayuncertainty.Themeasurementerrorisdescribedin“A c o u s t i c measurementprecisionanduncertainty”onpage 133.ThedisplayedMIandTIvaluesarebasedoncalculationsthatuseasetofacousticoutputmeasurementsthatweremadeusingasinglereferenceultrasoundsystemwithasinglereferencetransducerthatisrepresentativeofthepopulationoftransducersofthattype.Thereferencesystemandtransducerarechosenfromasamplepopulationofsystemsandtransducerstakenfromearlyproductionunits,andtheyareselectedbasedonhavinganacousticoutputthatisrepresentativeofthenominalexpectedacousticoutputforalltransducer/systemcombinationsthatmightoccur.Ofcourseeverytransducer/systemTEEx/8-3 MI No No No NoTIC, TIB, or TIS No No Yes YesTable 5: TI or MI ≥ 1.0 (Continued)Transducer Model Index 2D/MModeCPD/ColorPW DopplerCW Doppler
104  combinationhasitsownuniquecharacteristicacousticoutput,andwillnotmatchthenominaloutputonwhichthedisplayestimatesarebased.Thisvariabilitybetweensystemsandtransducersintroducesanerrorintodisplayedvalue.Bydoingacousticoutputsamplingtestingduringproduction,theamountoferrorintroducedbythevariabilityisbounded.Thesamplingtestingensuresthattheacousticoutputoftransducersandsystemsbeingmanufacturedstayswithinaspecifiedrangeofthenominalacousticoutput.Anothersourceoferrorarisesfromtheassumptionsandapproximationsthataremadewhenderivingtheestimatesforthedisplayindices.Chiefamongtheseassumptionsisthattheacousticoutput,andthusthederiveddisplayindices,arelinearlycorrelatedwiththetransmitdrivevoltageofthetransducer.Generally,thisassumptionisverygood,butitisnotexact,andthussomeerrorinthedisplaycanbeattributedtotheassumptionofvoltagelinearity.Related guidance documentsInformationforManufacturersSeekingMarketingClearanceofDiagnosticUltrasoundSystemsandTransducers,FDA,1997.MedicalUltrasoundSafety,AmericanInstituteofUltrasoundinMedicine(AIUM),1994.(Acopyisincludedwitheachsystem.)AcousticOutputMeasurementStandardforDiagnosticUltrasoundEquipment,NEMAUD2‐2004.AcousticOutputMeasurementandLabelingStandardforDiagnosticUltrasoundEquipment,AmericanInstituteofUltrasoundinMedicine,1993.StandardforReal‐TimeDisplayofThermalandMechanicalAcousticOutputIndicesonDiagnosticUltrasoundEquipment,NEMAUD3‐2004.GuidanceontheinterpretationofTIandMItobeusedtoinformtheoperator,AnnexHH,BSEN60601‐2‐37reprintedatP05699.Transducer surface temperature riseTable 6andTable 7listthemeasuredsurfacetemperaturerisefromambient(23°C±3°C)oftransducersusedontheultrasoundsystem.ThetemperaturesweremeasuredinaccordancewithEN60601‐2‐37section42withcontrolsandsettingspositionedtogivemaximumtemperaturesTable 6: Transducer Surface Temperature Rise, External Use (°C)Test C11x C60x D2 HFL38x L25x L38x P10x P21xStill air 17.6 16.2 8.3 15.5 16.1 16.3 15.6 16.8SimulatedUse 9.1 8.8 1.9 7.9 8.5 9.6 9.8 9.0
Chapter 6:  Safety 105SafetyAcoustic output measurementSincetheinitialuseofdiagnosticultrasound,thepossiblehumanbiologicaleffects(bioeffects)fromultrasoundexposurehavebeenstudiedbyvariousscientificandmedicalinstitutions.InOctober1987,theAmericanInstituteofUltrasoundinMedicine(AIUM)ratifiedareportfromitsBioeffectsCommittee(BioeffectsConsiderationsfortheSafetyofDiagnosticUltrasound,JUltrasoundMed.,Sept.1988:Vol.7,No.9Supplement).Thereport,sometimesreferredtoastheStoweReport,reviewedavailabledataonpossibleeffectsofultrasoundexposure.Anotherreport,“BioeffectsandSafetyofDiagnosticUltrasound,”datedJanuary28,1993,providesmorecurrentinformation.Theacousticoutputforthisultrasoundsystemhasbeenmeasuredandcalculatedinaccordancewith“A c o u s t i c OutputMeasurementStandardforDiagnosticUltrasoundEquipment”(NEMAUD2‐2004),and“StandardforReal‐TimeDisplayofThermalandMechanicalAcousticOutputIndicesonDiagnosticUltrasoundEquipment”(NEMAUDe3‐2004).In Situ, derated, and water value intensitiesAllintensityparametersaremeasuredinwater.Sincewaterdoesnotabsorbacousticenergy,thesewatermeasurementsrepresentaworstcasevalue.Biologicaltissuedoesabsorbacousticenergy.Thetruevalueoftheintensityatanypointdependsontheamount,typeoftissue,andthefrequencyoftheultrasoundpassingthroughthetissue.Theintensityvalueinthetissue,In Situ,hasbeenestimatedbyusingthefollowingformula:In Situ=Water[e‐(0.23alf)]where:In Situ=In SituintensityvalueWater=Waterintensityvaluee=2.7183a=attenuationfactor(dB/cm MHz)Table 7: Transducer Surface Temperature Rise, Internal Use (°C )Test ICTx SLAx TEExStill air 9.2 9.5 9.3SimulatedUse 5.2 4.8 5.8
106  Attenuationfactor(a)forvarioustissuetypesaregivenbelow:brain=0.53heart=0.66kidney=0.79liver=0.43muscle=0.55l=skinlinetomeasurementdepthincmf=centerfrequencyofthetransducer/system/modecombinationinMHzSincetheultrasonicpathduringtheexamislikelytopassthroughvaryinglengthsandtypesoftissue,itisdifficulttoestimatethetrueIn Situintensity.Anattenuationfactorof0.3isusedforgeneralreportingpurposes;therefore,theIn Situvaluecommonlyreportedusestheformula:In Situ(derated)=Water[e‐(0.069lf)]SincethisvalueisnotthetrueIn Situintensity,theterm“derated”isusedtoqualify it.Themaximumderatedandthemaximumwatervaluesdonotalwaysoccuratthesameoperatingconditions;therefore,thereportedmaximumwaterandderatedvaluesmaynotberelatedbytheIn Situ(derated)formula.Forexample:amulti‐zonearraytransducerthathasmaximumwatervalueintensitiesinitsdeepestzone,butalsohasthesmallestderatingfactorinthatzone.Thesametransducermayhaveitslargestderatedintensityinoneofitsshallowestfocalzones.Tissue models and equipment surveyTissuemodelsarenecessarytoestimateattenuationandacousticexposurelevelsIn Situfrommeasurementsofacousticoutputmadeinwater.Currently,availablemodelsmaybelimitedintheiraccuracybecauseofvaryingtissuepathsduringdiagnosticultrasoundexposuresanduncertaintiesintheacousticpropertiesofsofttissues.Nosingletissuemodelisadequateforpredictingexposuresinallsituationsfrommeasurementsmadeinwater,andcontinuedimprovementandverificationofthesemodelsisnecessaryformakingexposureassessmentsforspecificexamtypes.Ahomogeneoustissuemodelwithattenuationcoefficientof0.3 dB/cm MHzthroughoutthebeampathiscommonlyusedwhenestimatingexposurelevels.ThemodelisconservativeinthatitoverestimatestheIn Situacousticexposurewhenthepathbetweenthetransducerandsiteofinterestiscomposedentirelyofsofttissue.Whenthepathcontainssignificantamountsoffluid,asinmanyfirstandsecond‐trimesterpregnanciesscannedtransabdominally,thismodelmayunderestimatetheIn Situacousticexposure.Theamountofunderestimationdependsuponeachspecificsituation.
Chapter 6:  Safety 107SafetyFixed‐pathtissuemodels,inwhichsofttissuethicknessisheldconstant,sometimesareusedtoestimateIn Situacousticexposureswhenthebeampathislongerthan3cmandconsistslargelyoffluid.Whenthismodelisusedtoestimatemaximumexposuretothefetusduringtransabdominalscans,avalueof1dB/cmMHzmaybeusedduringalltrimesters.Existingtissuemodelsthatarebasedonlinearpropagationmayunderestimateacousticexposureswhensignificantsaturationduetonon‐lineardistortionofbeamsinwaterispresentduringtheoutputmeasurement.Themaximumacousticoutputlevelsofdiagnosticultrasounddevicesextendoverabroadrangeofvalues:•Asurveyof1990‐equipmentmodelsyieldedMIvaluesbetween0.1 and1.0attheirhighestoutputsettings.MaximumMIvaluesofapproximately2.0areknowntooccurforcurrentlyavailableequipment.MaximumMIvaluesaresimilarforreal‐time2DandMModeimaging.•Computedestimatesofupperlimitstotemperatureelevationsduringtransabdominalscanswereobtainedinasurveyof1988and1990pulsedDopplerequipment.Thevastmajorityofmodelsyieldedupperlimitslessthan1°and4°C(1.8°and7.2°F)forexposuresoffirst‐trimesterfetaltissueandsecond‐trimesterfetalbone,respectively.Thelargestvaluesobtainedwereapproximately1.5°C(2.7°F)forfirst‐trimesterfetaltissueand7°C(12.6°F)forsecond‐trimesterfetalbone.Estimatedmaximumtemperatureelevationsgivenherearefora“fixedpath”tissuemodelandarefordeviceshavingISPTAvaluesgreaterthan500 mW/cm2.ThetemperatureelevationsforfetalboneandtissuewerecomputedbasedoncalculationproceduresgiveninSections4.3.2.1‐4.3.2.6in“BioeffectsandSafetyofDiagnosticUltrasound”(AIUM,1993).Acoustic output tablesTable 8throughTable 31indicatetheacousticoutputforthesystemandtransducercombinationswithaTIorMIequaltoorgreaterthanone.Thesetablesareorganizedbytransducermodelandimagingmode.Foradefinitionoftermsusedinthetables,see“Termsusedintheacousticoutputtables”onpage 132.
108  (a) This index is not required for this operating mode; value is <1.(b) This transducer is not intended for transcranial or neonatal cephalic uses.#No data are reported for this operating condition since the global maximum index value is not reported for the reason listed. (Reference Global Maximum Index Value line.)— Data are not applicable for this transducer/mode.Table 8: Transducer Model: C11x/8-5  Operating Mode: CPD/ColorIndex Label M.I.TIS TIBTICScanNon-scanNon-scanAaprt≤1Aaprt>1Global Maximum Index Value (a) (a) — — — 1.2Associated AcousticParameterpr.3 (MPa) #W0(mW) #— —40.50min of [W.3(z1),ITA.3(z1)] (mW) —z1(cm) —zbp (cm) —zsp (cm) #—deq(zsp)(cm) —fc(MHz) ## — — — 4.38Dim of Aaprt X(cm) # — — — 0.36Y(cm) #—— —0.5Other InformationPD (μsec) #PRF (Hz) #pr@PIImax (MPa) #deq@Pllmax (cm) —Focal Length FLx (cm) #—— 1.56FLy (cm) #—— 2.5IPA.3@MImax (W/cm2)#OperatingControl ConditionsControl 1: Mode CPDControl 2: Exam Type VasControl 3: PRF 2841Control 4: Optimization/Depth Med/2.0Control 5: Color Box Position/ SizeTop/Short
Chapter 6:  Safety 109Safety(a) This index is not required for this operating mode; value is <1.(b) This transducer is not intended for transcranial or neonatal cephalic uses.#No data are reported for this operating condition since the global maximum index value is not reported for the reason listed. (Reference Global Maximum Index Value line.)— Data are not applicable for this transducer/mode.Table 9: Transducer Model: C11x/8-5  Operating Mode: PW DopplerIndex Label M.I.TIS TIBTICScanNon-scanNon-scanAaprt≤1Aaprt>1Global Maximum Index Value (a) — (a) — 1.8 1.7Associated AcousticParameterpr.3 (MPa) #W0(mW) —# 26.29 24.65min of [W.3(z1),ITA.3(z1)] (mW) —z1(cm) —zbp (cm) —zsp (cm) #1.1deq(zsp)(cm) 0.236fc(MHz) # — # — 4.36 4.36Dim of Aaprt X(cm) — # — 0.28 0.2Y(cm) —# — 0.50.5Other InformationPD (μsec) #PRF (Hz) #pr@PIImax (MPa) #deq@Pllmax (cm) 0.226Focal Length FLx (cm) —# — 0.77FLy (cm) —# — 2.5IPA.3@MImax (W/cm2)#OperatingControl ConditionsControl 1: Exam Type Any AnyControl 2: Sample Volume 2 mm 3 mmControl 3: PRF 3906 ≥3906Control 4: Sample Volume Position Zone 1 Zone 0
110  (a) This index is not required for this operating mode; value is <1.(b) This transducer is not intended for transcranial or neonatal cephalic uses.#No data are reported for this operating condition since the global maximum index value is not reported for the reason listed. (Reference Global Maximum Index Value line.)— Data are not applicable for this transducer/mode.Table 10: Transducer Model: C60x/5-2 Operating Mode: 2DIndex Label M.I.TIS TIBTICScanNon-scanNon-scanAaprt≤1Aaprt>1Global Maximum Index Value 1.0 (a) — — — (b)Associated AcousticParameterpr.3 (MPa) 1.69W0(mW) #— —#min of [W.3(z1),ITA.3(z1)] (mW) —z1(cm) —zbp (cm) —zsp (cm) 4.7 —deq(zsp)(cm) —fc(MHz) 2.84 # — — — #Dim of Aaprt X(cm) #—— — #Y(cm) #—— — #Other InformationPD (μsec) 0.579PRF (Hz) 5440pr@PIImax (MPa) 2.679deq@Pllmax (cm) —Focal Length FLx (cm) #—— #FLy (cm) #—— #IPA.3@MImax (W/cm2)197.7OperatingControl ConditionsControl 1: Exam Type Abd/OBControl 2: Optimization AnyControl 3: Depth 11/13 cmControl 4: THI OnControl 5: MB (Multi Beam) On
Chapter 6:  Safety 111Safety(a) This index is not required for this operating mode; value is <1.(b) This transducer is not intended for transcranial or neonatal cephalic uses.#No data are reported for this operating condition since the global maximum index value is not reported for the reason listed. (Reference Global Maximum Index Value line.)— Data are not applicable for this transducer/mode.Table 11: Transducer Model: C60x/5-2 Operating Mode: MModeIndex Label M.I.TIS TIBTICScanNon-scanNon-scanAaprt≤1Aaprt>1Global Maximum Index Value 1.0 — (a) — (a) (b)Associated AcousticParameterpr.3 (MPa) 1.62W0(mW) —# ##min of [W.3(z1),ITA.3(z1)] (mW) —z1(cm) —zbp (cm) —zsp (cm) 4.7 #deq(zsp)(cm) #fc(MHz) 2.85 — # — # #Dim of Aaprt X(cm) —# — # #Y(cm) —# — # #Other InformationPD (μsec) 0.577PRF (Hz) 800pr@PIImax (MPa) 2.576deq@Pllmax (cm) #Focal Length FLx (cm) —# — #FLy (cm) —# — #IPA.3@MImax (W/cm2)184.3OperatingControl ConditionsControl 1: Exam Type AnyControl 2: Optimization PenControl 3: Depth 7.8 cmControl 4: MB (Multi Beam) Off or On
112  (a) This index is not required for this operating mode; value is <1.(b) This transducer is not intended for transcranial or neonatal cephalic uses.#No data are reported for this operating condition since the global maximum index value is not reported for the reason listed. (Reference Global Maximum Index Value line.)— Data are not applicable for this transducer/mode.Table 12: Transducer Model: C60x/5-2 Operating Mode: PW DopplerIndex Label M.I.TIS TIBTICScanNon-scanNon-scanAaprt≤1Aaprt>1Global Maximum Index Value (a) — (a) — 3.1 (b)Associated AcousticParameterpr.3 (MPa) #W0(mW) —# 85.64 #min of [W.3(z1),ITA.3(z1)] (mW) —z1(cm) —zbp (cm) —zsp (cm) #1.255deq(zsp)(cm) 0.51fc(MHz) #— # — 2.233#Dim of Aaprt X(cm) —# —0.6552#Y(cm) —# — 1.3 #Other InformationPD (μsec) #PRF (Hz) #pr@PIImax (MPa) #deq@Pllmax (cm) 0.415Focal Length FLx (cm) —# — #FLy (cm) —# — #IPA.3@MImax (W/cm2)#OperatingControl ConditionsControl 1: Exam Type AbdControl 2: PRF AnyControl 3: Sample Volume 12 mmControl 4: Sample Volume Position Zone 1
Chapter 6:  Safety 113Safety(a) This index is not required for this operating mode; value is <1.(b) This transducer is not intended for transcranial or neonatal cephalic uses.#No data are reported for this operating condition since the global maximum index value is not reported for the reason listed. (Reference Global Maximum Index Value line.)— Data are not applicable for this transducer/mode.Table 13: Transducer Model: D2x/2 Operating Mode: CW DopplerIndex Label M.I.TIS TIBTICScanNon-scanNon-scanAaprt≤1Aaprt>1Global Maximum Index Value (a) — (a) — 2.6 (b)Associated AcousticParameterpr.3 (MPa) #W0(mW) —# 90.52 #min of [W.3(z1),ITA.3(z1)] (mW) —z1(cm) —zbp (cm) —zsp (cm) #1.1deq(zsp)(cm) 0.66fc(MHz) #— # — 2.00 #Dim of Aaprt X(cm) —# — 0.8 #Y(cm) —# — 0.4 #Other InformationPD (μsec) #PRF (Hz) #pr@PIImax (MPa) #deq@Pllmax (cm) 0.54Focal Length FLx (cm) —# — #FLy (cm) —# — #IPA.3@MImax (W/cm2)#OperatingControl ConditionsControl 1: Exam Type CrdControl 2: Depth FixedControl 3: Zone Fixed
114  (a) This index is not required for this operating mode; value is <1.(b) This transducer is not intended for transcranial or neonatal cephalic uses.#No data are reported for this operating condition since the global maximum index value is not reported for the reason listed. (Reference Global Maximum Index Value line.)— Data are not applicable for this transducer/mode.Table 14: Transducer Model: HFL38x/13-6  Operating Mode: CPD/Color Index Label M.I.TIS TIBTICScanNon-scan Non-scanAaprt≤1Aaprt>1Global Maximum Index Value 1.1 1.0 — — — (b)Associated AcousticParameterpr.3 (MPa) 2.556W0(mW) 53.49 — —#min of [W.3(z1),ITA.3(z1)] (mW) —z1(cm) —zbp (cm) —zsp (cm) 1.2 —deq(zsp)(cm) —fc(MHz) 5.328 5.324 — — — #Dim of Aaprt X(cm) 0.44 — — — #Y(cm) 0.4 — — — #Other InformationPD (μsec) 0.525PRF (Hz) 2597pr@PIImax (MPa) 3.187deq@Pllmax (cm) —Focal Length FLx (cm) 1.32 — — #FLy (cm) 2.5 — — #IPA.3@MImax (W/cm2)325.5OperatingControl ConditionsControl 1: Mode Color ColorControl 2: Exam Type Any AnyControl 3: Optimization/Depth/PRF Low/3.3 cm/393Med/2.7 cm/1938Control 4: Color Box Position/Size Any Top/Short
Chapter 6:  Safety 115Safety(a) This index is not required for this operating mode; value is <1.(b) This transducer is not intended for transcranial or neonatal cephalic uses.#No data are reported for this operating condition since the global maximum index value is not reported for the reason listed. (Reference Global Maximum Index Value line.)— Data are not applicable for this transducer/mode.Table 15: Transducer Model: HFL38x/13-6 Operating Mode: PW DopplerIndex Label M.I.TIS TIBTICScanNon-scanNon-scanAaprt≤1Aaprt>1Global Maximum Index Value 1.0 — 1.2 — 2.2 (b)Associated AcousticParameterpr.3 (MPa) 2.37W0(mW) — 46.55 46.55 #min of [W.3(z1),ITA.3(z1)] (mW) —z1(cm) —zbp (cm) —zsp (cm) 0.9 1.1deq(zsp)(cm) 0.33fc(MHz) 5.32 — 5.33 — 5.33 #Dim of Aaprt X(cm) —1.04 — 1.04 #Y(cm) — 0.4 — 0.4 #Other InformationPD (μsec) 1.29PRF (Hz) 1008pr@PIImax (MPa) 2.404deq@Pllmax (cm) 0.46Focal Length FLx (cm) —3.72 — #FLy (cm) —2.5 — #IPA.3@MImax (W/cm2)323.35OperatingControl ConditionsControl 1: Exam Type Bre/VasSmP/IMTVas/Ven/IMTVas/Ven/IMTControl 2: Sample Volume 1 mm 12 mm 12 mmControl 3: PRF 1008 10417 10417Control 4: Sample Volume Position Zone 2 Zone 7 Zone 7
116  (a) This index is not required for this operating mode; value is <1.(b) This transducer is not intended for transcranial or neonatal cephalic uses.#No data are reported for this operating condition since the global maximum index value is not reported for the reason listed. (Reference Global Maximum Index Value line.)— Data are not applicable for this transducer/mode.Table 16: Transducer Model: ICTx/8-5 Operating Mode: PW DopplerIndex Label M.I.TIS TIBTICScanNon-scanNon-scanAaprt≤1Aaprt>1Global Maximum Index Value (a) — (a) — 1.2 (a)Associated AcousticParameterpr.3 (MPa) #W0(mW) —# 16.348 #min of [W.3(z1),ITA.3(z1)] (mW) —z1(cm) —zbp (cm) —zsp (cm) #1.6deq(zsp)(cm) 0.192fc(MHz) # — # — 4.36 #Dim of Aaprt X(cm) —# — 0.6 #Y(cm) —# — 0.5 #Other InformationPD (μsec) #PRF (Hz) #pr@PIImax (MPa) #deq@Pllmax (cm) 0.187Focal Length FLx (cm) —# — #FLy (cm) —# — #IPA.3@MImax (W/cm2)#OperatingControl ConditionsControl 1: Exam Type AnyControl 2: Sample Volume 3 mmControl 3: PRF AnyControl 4: Sample Volume Position Zone 1
Chapter 6:  Safety 117Safety(a) This index is not required for this operating mode; value is <1.(b) This transducer is not intended for transcranial or neonatal cephalic uses.#No data are reported for this operating condition since the global maximum index value is not reported for the reason listed. (Reference Global Maximum Index Value line.)— Data are not applicable for this transducer/mode.Table 17: Transducer Model L25x/13-6 Operating Mode: PW DopplerIndex Label M.I.TIS TIBTICScanNon-scanNon-scanAaprt≤1Aaprt>1Global Maximum Index Value (a) — (a) — 1.6 (b)Associated AcousticParameterpr.3 (MPa) #W0(mW) —# 14.02 #min of [W.3(z1),ITA.3(z1)] (mW) —z1(cm) —zbp (cm) —zsp (cm) #0.6deq(zsp)(cm) 0.155fc(MHz) #— # — 6.00 #Dim of Aaprt X(cm) —# — 0.16#Y(cm) —# — 0.3 #Other InformationPD (μsec) #PRF (Hz) #pr@PIImax (MPa) #deq@Pllmax (cm) 0.1549Focal Length FLx (cm) —# — #FLy (cm) —# — #IPA.3@MImax (W/cm2)#OperatingControl ConditionsControl 1: Exam Type Vas/Nrv/VenControl 2: Sample Volume 12 mmControl 3: PRF 20833Control 4: Sample Volume Position Zone 0
118  (a) This index is not required for this operating mode; value is <1.(b) This transducer is not intended for transcranial or neonatal cephalic uses.#No data are reported for this operating condition since the global maximum index value is not reported for the reason listed. (Reference Global Maximum Index Value line.)— Data are not applicable for this transducer/mode.Table 18: Transducer Model: L38x/10-5 Operating Mode: CPD/Color Index Label M.I.TIS TIBTICScanNon-scanNon-scanAaprt≤1Aaprt>1Global Maximum Index Value 1.3 1.0 — — — (b)Associated AcousticParameterpr.3 (MPa) 2.89W0(mW) 64.88 — —#min of [W.3(z1),ITA.3(z1)] (mW) —z1(cm) —zbp (cm) —zsp (cm) 1.1 —deq(zsp)(cm) —fc(MHz) 4.91 4.91 — — — #Dim of Aaprt X(cm) 0.54 — — — #Y(cm) 0.4 — — — #Other InformationPD (μsec) 0.529PRF (Hz) 9547pr@PIImax (MPa) 3.48deq@Pllmax (cm) —Focal Length FLx (cm) 1.5 — — #FLy (cm) 2.5 — — #IPA.3@MImax (W/cm2)439.3OperatingControl ConditionsControl 1: Mode Color CPDControl 2: Exam Type Any BreControl 3: PRF 331 2137Control 4: Optimization/Depth Any/3.1 Med/3.1Control 5: Color Box Position/Size Any Def/Def/Def
Chapter 6:  Safety 119Safety(a) This index is not required for this operating mode; value is <1.(b) This transducer is not intended for transcranial or neonatal cephalic uses.#No data are reported for this operating condition since the global maximum index value is not reported for the reason listed. (Reference Global Maximum Index Value line.)— Data are not applicable for this transducer/mode.Table 19: Transducer Model: L38x/10-5 Operating Mode: PW DopplerIndex Label M.I.TIS TIBTICScanNon-scanNon-scanAaprt≤1Aaprt>1Global Maximum Index Value 1.04 — 2.0 — 2.6 (b)Associated AcousticParameterpr.3 (MPa) 2.345W0(mW) —84.94 84.94 #min of [W.3(z1),ITA.3(z1)] (mW) —z1(cm) —zbp (cm) —zsp (cm) 0.8 1.3deq(zsp)(cm) 0.4685fc(MHz) 5.01 — 5.05 — 5.05 #Dim of Aaprt X(cm) — 1.80 — 1.80 #Y(cm) — 0.4 — 0.4 #Other InformationPD (μsec) 1.29PRF (Hz) 1008pr@PIImax (MPa) 2.693deq@Pllmax (cm) 0.2533Focal Length FLx (cm) —5.54 — #FLy (cm) —2.5 — #IPA.3@MImax (W/cm2)284.5OperatingControl ConditionsControl 1: Exam Type Any Vas VasControl 2: Sample Volume 1 mm 12 mm 12 mmControl 3: PRF 1008 Any AnyControl 4: Sample Volume Position Zone 0 (top) Zone 7 Zone 7
120  (a) This index is not required for this operating mode; value is <1.(b) This transducer is not intended for transcranial or neonatal cephalic uses.#No data are reported for this operating condition since the global maximum index value is not reported for the reason listed. (Reference Global Maximum Index Value line.)— Data are not applicable for this transducer/mode.Table 20: Transducer Model: P10x/8-4 Operating Mode: 2D ModeIndex Label M.I.TIS TIBTICScanNon-scanNon-scanAaprt≤1Aaprt>1Global Maximum Index Value (a) (a) — — — 1.0Associated AcousticParameterpr.3 (MPa) #W0(mW) #— —35.24min of [W.3(z1),ITA.3(z1)] (mW) —z1(cm) —zbp (cm) —zsp (cm) #—deq(zsp)(cm) —fc(MHz) ## — — — 4.84Dim of Aaprt X(cm) # — — — 0.416Y(cm) #—— —0.7Other InformationPD (μsec) #PRF (Hz) #pr@PIImax (MPa) #deq@Pllmax (cm) —Focal Length FLx (cm) #—— 1.67FLy (cm) #—— 5.0IPA.3@MImax (W/cm2)#OperatingControl ConditionsControl 1: Exam Type NeoControl 2: Optimization GenControl 3: Depth 2.0Control 4: MB/SonoHD Off/Off
Chapter 6:  Safety 121Safety(a) This index is not required for this operating mode; value is <1.(b) This transducer is not intended for transcranial or neonatal cephalic uses.#No data are reported for this operating condition since the global maximum index value is not reported for the reason listed. (Reference Global Maximum Index Value line.)— Data are not applicable for this transducer/mode.Table 21: Transducer Model: P10x/8-4 Operating Mode: ColorIndex Label M.I.TIS TIBTICScanNon-scanNon-scanAaprt≤1Aaprt>1Global Maximum Index Value 1.0 (a) — — — 1.3Associated AcousticParameterpr.3 (MPa) 2.02W0(mW) #— — 41.38min of [W.3(z1),ITA.3(z1)] (mW) —z1(cm) —zbp (cm) —zsp (cm) 2.4 —deq(zsp)(cm) —fc(MHz) 3.90 # — — — 3.91Dim of Aaprt X(cm) #— — —0.608Y(cm) #— — —0.7Other InformationPD (μsec) 0.70PRF (Hz) 2772pr@PIImax (MPa) 2.80deq@Pllmax (cm) —Focal Length FLx (cm) #— — 2.48FLy (cm) #— — 5.0IPA.3@MImax (W/cm2)252OperatingControl ConditionsControl 1: Mode Color ColorControl 2: Exam Type Neo AbdControl 3: Optimization/Depth/PRF Low/3.7/772Med/2.0/2315Control 4: Color Box Pos/Size Any/TallShort/Narrow
122  (a) This index is not required for this operating mode; value is <1.(b) This transducer is not intended for transcranial or neonatal cephalic uses.#No data are reported for this operating condition since the global maximum index value is not reported for the reason listed. (Reference Global Maximum Index Value line.)— Data are not applicable for this transducer/mode.Table 22: Transducer Model: P10x/8-4 Operating Mode: PW DopplerIndex Label M.I.TIS TIBTICScanNon-scanNon-scanAaprt≤1Aaprt>1Global Maximum Index Value 1.0 — 1.2 — 2.0 1.8Associated AcousticParameterpr.3 (MPa) 2.03W0(mW) — 36.25 34.4 31.5min of [W.3(z1),ITA.3(z1)] (mW) —z1(cm) —zbp (cm) —zsp (cm) 2.1 0.8deq(zsp)(cm) 0.32fc(MHz) 3.87 — 6.86 — 3.84 3.86Dim of Aaprt X(cm) — 0.992 — 0.416 .224Y(cm) — 0.7 — 0.7 0.7Other InformationPD (μsec) 1.28PRF (Hz) 1563pr@PIImax (MPa) 2.70deq@Pllmax (cm) 0.25Focal Length FLx (cm) —6.74 — 0.92FLy (cm) —5.0 — 5.0IPA.3@MImax (W/cm2)233OperatingControl ConditionsControl 1: Exam Type Crd Crd Neo CrdControl 2: Sample Volume 1 mm 7 mm 12 mm 1 mmControl 3: PRF/TDI 1563/OffAny/On15625/Off5208/OffControl 4: Sample Volume Position Zone 3 Zone 6 Zone 2 Zone 1
Chapter 6:  Safety 123Safety(a) This index is not required for this operating mode; value is <1.(b) This transducer is not intended for transcranial or neonatal cephalic uses.#No data are reported for this operating condition since the global maximum index value is not reported for the reason listed. (Reference Global Maximum Index Value line.)— Data are not applicable for this transducer/mode.Table 23: Transducer Model: P10x/8-4 Operating Mode: CW DopplerIndex Label M.I.TIS TIBTICScanNon-scanNon-scanAaprt≤1Aaprt>1Global Maximum Index Value (a) — (a) — 2.1 2.0Associated AcousticParameterpr.3 (MPa) #W0(mW) —# 40.72 30.00min of [W.3(z1),ITA.3(z1)] (mW) —z1(cm) —zbp (cm) —zsp (cm) #0.7deq(zsp)(cm) 0.36fc(MHz) # — # — 4.00 4.00Dim of Aaprt X(cm) — # — 0.320 0.16Y(cm) —# — 0.70.7Other InformationPD (μsec) #PRF (Hz) #pr@PIImax (MPa) #deq@Pllmax (cm) 0.27Focal Length FLx (cm) —# — 0.92FLy (cm) —# — 5.0IPA.3@MImax (W/cm2)#OperatingControl ConditionsControl 1: Exam Type Card CardControl 2: Depth Any AnyControl 3: Zone Zone 3 Zone 0
124  (a) This index is not required for this operating mode; value is <1.(b) This transducer is not intended for transcranial or neonatal cephalic uses.#No data are reported for this operating condition since the global maximum index value is not reported for the reason listed. (Reference Global Maximum Index Value line.)— Data are not applicable for this transducer/mode.Table 24: Transducer Model: P21x/5-1 Operating Mode: 2DIndex Label M.I.TIS TIBTICScanNon-scanNon-scanAaprt≤1Aaprt>1Global Maximum Index Value 1.4 (a) — — — 2.3Associated AcousticParameterpr.3 (MPa) 1.92W0(mW) #— —171.53min of [W.3(z1),ITA.3(z1)] (mW) —z1(cm) —zbp (cm) —zsp (cm) 5.1 —deq(zsp)(cm) —fc(MHz) 1.93 # — — — 1.94Dim of Aaprt X(cm) #—— —1.9Y(cm) #—— —1.3Other InformationPD (μsec) 0.842PRF (Hz) 4000pr@PIImax (MPa) 2.53deq@Pllmax (cm) —Focal Length FLx (cm) #—— 18.46FLy (cm) #—— 5.5IPA.3@MImax (W/cm2)355.1OperatingControl ConditionsControl 1: Exam Type Card CardControl 2: Optimization Res PenControl 3: Depth 4.7/7.5 cm 27 cmControl 4: THI On OffControl 5: Sector Width Narrow Narrow
Chapter 6:  Safety 125Safety(a) This index is not required for this operating mode; value is <1.(b) This transducer is not intended for transcranial or neonatal cephalic uses.#No data are reported for this operating condition since the global maximum index value is not reported for the reason listed. (Reference Global Maximum Index Value line.)— Data are not applicable for this transducer/mode.Table 25: Transducer Model: P21x/5-1 Operating Mode: MModeIndex Label M.I.TIS TIBTICScanNon-scanNon-scanAaprt≤1Aaprt>1Global Maximum Index Value 1.5 — (a) — 1.4 1.1Associated AcousticParameterpr.3 (MPa) 2.10W0(mW) —# 40.08 29.71min of [W.3(z1),ITA.3(z1)] (mW) —z1(cm) —zbp (cm) —zsp (cm) 3.645 4.9deq(zsp)(cm) 0.343fc(MHz) 1.93 — # — 1.93 1.94Dim of Aaprt X(cm) — # — 1.835 1.9Y(cm) —# — 1.31.3Other InformationPD (μsec) 0.904PRF (Hz) 800pr@PIImax (MPa) 2.679deq@Pllmax (cm) 0.341Focal Length FLx (cm) —# — 18.46FLy (cm) —# — 5.5IPA.3@MImax (W/cm2)237.4OperatingControl ConditionsControl 1: Exam Type Abd/OB Abd/OB Abd/OB/CardControl 2: Optimization Any Gen/Res PenControl 3: Depth 7.5 cm 10/13 cm 27 cmControl 4: THI On On OffControl 5: MB (Multibeam) On On or Off On or Off
126  (a) This index is not required for this operating mode; value is <1.(b) This transducer is not intended for transcranial or neonatal cephalic uses.#No data are reported for this operating condition since the global maximum index value is not reported for the reason listed. (Reference Global Maximum Index Value line.)— Data are not applicable for this transducer/mode.Table 26: Transducer Model: P21x/5-1 Operating Mode: CPD/ColorIndex Label M.I.TIS TIBTICScanNon-scanNon-scanAaprt≤1Aaprt>1Global Maximum Index Value 1.5 1.3 — — — 2.4Associated AcousticParameterpr.3 (MPa) 2.19W0(mW) 136.91 — — 137.5min of [W.3(z1),ITA.3(z1)] (mW) —z1(cm) —zbp (cm) —zsp (cm) 4.5 —deq(zsp)(cm) —fc(MHz) 2.15 2.16 — — — 2.16Dim of Aaprt X(cm) 0.918 — — — 0.918Y(cm) 1.3 — — — 1.3Other InformationPD (μsec) 1.20PRF (Hz) 1063pr@PIImax (MPa) 2.574deq@Pllmax (cm) —Focal Length FLx (cm) 3.68 — — 3.68FLy (cm) 5.5 — — 5.5IPA.3@MImax (W/cm2)330.4OperatingControl ConditionsControl 1: Mode Color CPD ColorControl 2: Exam Type Abd/OB OB AbdControl 3: PRF/Depth 300/10 850/7.5 751/7.5Control 4: Color Optimization Any Med MedControl 5: THI On Off OffControl 6: Color Box Size Any Short and NarrowShort and Narrow
Chapter 6:  Safety 127Safety(a) This index is not required for this operating mode; value is <1.(b) This transducer is not intended for transcranial or neonatal cephalic uses.#No data are reported for this operating condition since the global maximum index value is not reported for the reason listed. (Reference Global Maximum Index Value line.)— Data are not applicable for this transducer/mode.Table 27: Transducer Model: P21x/5-1 Operating Mode: PW DopplerIndex Label M.I.TIS TIBTICScanNon-scanNon-scanAaprt≤1Aaprt>1Global Maximum Index Value 1.2 — — 1.3 4.0 2.7Associated AcousticParameterpr.3 (MPa) 1.844W0(mW) —— 95.55 95.55min of [W.3(z1),ITA.3(z1)] (mW) 120.13z1(cm) 3.1zbp (cm) 2.66zsp (cm) 3.718 0.6deq(zsp)(cm) 0.49fc(MHz) 2.16 — — 2.22 2.23 2.23Dim of Aaprt X(cm) — — 1.9 0.459 0.459Y(cm) — — 1.3 1.3 1.3Other InformationPD (μsec) 1.21PRF (Hz) 1562.5pr@PIImax (MPa) 2.432deq@Pllmax (cm) 0.49Focal Length FLx (cm) ——13.84 1.55FLy (cm) —— 5.5 5.5IPA.3@MImax (W/cm2)187.5OperatingControl ConditionsControl 1: Exam Type Card Card TCD TCDControl 2: Sample Volume 1mm 3mm 14mm 14mmControl 3: PRF 1563 3906 12500 12500Control 4: Sample Volume Position Zone 1 Zone 4 Zone 0 Zone 0
128  (a) This index is not required for this operating mode; value is <1.(b) This transducer is not intended for transcranial or neonatal cephalic uses.#No data are reported for this operating condition since the global maximum index value is not reported for the reason listed. (Reference Global Maximum Index Value line.)— Data are not applicable for this transducer/mode.Table 28: Transducer Model: P21x/5-1 Operating Mode: CW DopplerIndex Label M.I.TIS TIBTICScanNon-scanNon-scanAaprt≤1Aaprt>1Global Maximum Index Value (a) — — 1.0 3.4 2.9Associated AcousticParameterpr.3 (MPa) #W0(mW) —— 88.30 101.73min of [W.3(z1),ITA.3(z1)] (mW) 102.54z1(cm) 1.386zbp (cm) 1.71zsp (cm) #1.255deq(zsp)(cm) 0.49fc(MHz) # — — 2.00 2.00 2.00Dim of Aaprt X(cm) — — 0.786 0.655 0.459Y(cm) —— 1.3 1.3 1.3Other InformationPD (μsec) #PRF (Hz) #pr@PIImax (MPa) #deq@Pllmax (cm) 0.45Focal Length FLx (cm) ——13.84 1.55FLy (cm) —— 5.5 5.5IPA.3@MImax (W/cm2)#OperatingControl ConditionsControl 1: Exam Type Card Card CardControl 2: ZoneZone 4 Zone 1 Zone 0
Chapter 6:  Safety 129Safety(a) This index is not required for this operating mode; value is <1.(b) This transducer is not intended for transcranial or neonatal cephalic uses.#No data are reported for this operating condition since the global maximum index value is not reported for the reason listed. (Reference Global Maximum Index Value line.)— Data are not applicable for this transducer/mode.Table 29: Transducer Model: SLAx/13-6 Operating Mode: PW DopplerIndex Label M.I.TIS TIBTICScanNon-scanNon-scanAaprt≤1Aaprt>1Global Maximum Index Value (a) — (a) — 1.2 (b)Associated AcousticParameterpr.3 (MPa) #W0(mW) —# 8.75 #min of [W.3(z1),ITA.3(z1)] (mW) —z1(cm) —zbp (cm) —zsp (cm) #0.65deq(zsp)(cm) 0.13fc(MHz) #— # — 6.00 #Dim of Aaprt X(cm) —# — 0.24#Y(cm) —# — 0.3 #Other InformationPD (μsec) #PRF (Hz) #pr@PIImax (MPa) #deq@Pllmax (cm) 0.13Focal Length FLx (cm) —# — #FLy (cm) —# — #IPA.3@MImax (W/cm2)#OperatingControl ConditionsControl 1: Exam Type Vas, Nrv, VenControl 2: Sample Volume 5 mmControl 3: PRF 20833Control 4: Sample Vol. Position Zone 2
130  (a) This index is not required for this operating mode; value is <1.(b) This transducer is not intended for transcranial or neonatal cephalic uses.#No data are reported for this operating condition since the global maximum index value is not reported for the reason listed. (Reference Global Maximum Index Value line.)— Data are not applicable for this transducer/mode.Table 30: Transducer Model: TEEx/8-3 Operating Mode: PW DopplerIndex Label M.I.TIS TIBTICScanNon-scanNon-scanAaprt≤1Aaprt>1Global Maximum Index Value (a) — (a) — 1.7 (b)Associated AcousticParameterpr.3 (MPa) #W0(mW) —# 29.29 #min of [W.3(z1),ITA.3(z1)] (mW) —z1(cm) —zbp (cm) —zsp (cm) #0.6deq(zsp)(cm) 0.34fc(MHz) #— # — 3.84 #Dim of Aaprt X(cm) —# —0.261#Y(cm) —# — 0.9 #Other InformationPD (μsec) #PRF (Hz) #pr@PIImax (MPa) #deq@Pllmax (cm) 0.34Focal Length FLx (cm) —# — #FLy (cm) —# — #IPA.3@MImax (W/cm2)#OperatingControl ConditionsControl 1: Exam Type CrdControl 2: Sample Volume 1 mmControl 3: PRF ≥ 2604Control 4: Sample Volume Position Zone 1
Chapter 6:  Safety 131Safety(a) This index is not required for this operating mode; value is <1.(b) This transducer is not intended for transcranial or neonatal cephalic uses.#No data are reported for this operating condition since the global maximum index value is not reported for the reason listed. (Reference Global Maximum Index Value line.)— Data are not applicable for this transducer/mode.Table 31: Transducer Model: TEEx/8-3 Operating Mode: CW DopplerIndex Label M.I.TIS TIBTICScanNon-scanNon-scanAaprt≤1Aaprt>1Global Maximum Index Value (a) — (a) — 1.2 (b)Associated AcousticParameterpr.3 (MPa) #W0(mW) —# 27.23 #min of [W.3(z1),ITA.3(z1)] (mW) —z1(cm) —zbp (cm) —zsp (cm) #1.1deq(zsp)(cm) 0.39fc(MHz) #— # — 4.00 #Dim of Aaprt X(cm) —# —0.435#Y(cm) —# — 0.9 #Other InformationPD (μsec) #PRF (Hz) #pr@PIImax (MPa) #deq@Pllmax (cm) 0.34Focal Length FLx (cm) —# — #FLy (cm) —# — #IPA.3@MImax (W/cm2)#OperatingControl ConditionsControl 1: Exam Type CrdControl 2: Depth AnyControl 3: Zone Zone 3
132  Terms used in the acoustic output tablesTable 32: Acoustic Output Terms and DefinitionsTerm DefinitionISPTA.3 Derated spatial peak, temporal average intensity in units of milliwatts/cm2.TI type Applicable thermal index for the transducer, imaging mode, and exam type.TI value Thermal index value for the transducer, imaging mode, and exam type.MI Mechanical index.Ipa.3@MImax Derated pulse average intensity at the maximum MI in units of W/cm2.TIS (Soft tissue thermal index) is a thermal index related to soft tissues. TIS scan is the soft tissue thermal index in an auto-scanning mode. TIS non-scan is the soft tissue thermal index in the non-autoscanning mode.TIB (Bone thermal index) is a thermal index for applications in which the ultrasound beam passes through soft tissue and a focal region is in the immediate vicinity of bone. TIB non-scan is the bone thermal index in the non-autoscanning mode.TIC (Cranial bone thermal index) is the thermal index for applications in which the ultrasound beam passes through bone near the beam entrance into the body.Aaprt Area of the active aperture measured in cm2.Pr.3 Derated peak rarefactional pressure associated with the transmit pattern giving rise to the value reported under MI (Megapascals).Wo Ultrasonic power, except for TISscan, in which case it is the ultrasonic power passing through a one centimeter window in units of milliwatts.W.3(z1)Derated ultrasonic power at axial distance z1 in units of milliwatts.ISPTA.3(z1)Derated spatial-peak temporal-average intensity at axial distance z1 (milliwatts per square centimeter).z1Axial distance corresponding to the location of maximum [min(W.3(z), ITA.3(z) x 1 cm2)], where z > zbp in centimeters.zbp 1.69   in centimeters.zsp For MI, the axial distance at which pr.3 is measured. For TIB, the axial distance at which TIB is a global maximum (for example, zsp = zb.3) in centimeters.Aaprt()
Chapter 6:  Safety 133SafetyAcoustic measurement precision and uncertaintyAlltableentrieshavebeenobtainedatthesameoperatingconditionsthatgiverisetothemaximumindexvalueinthefirstcolumnofthetable.Measurementprecisionanduncertaintyforpower,pressure,intensity,andotherquantitiesthatareusedtoderivethevaluesintheacousticoutputtableareshowninthetablebelow.InaccordancewithSection 6.4oftheOutputDisplayStandard,thefollowingmeasurementprecisionanduncertaintyvaluesaredeterminedbymakingrepeatmeasurementsandstatingthestandarddeviationasapercentage.deq(z) Equivalent beam diameter as a function of axial distance z, and is equal to , where ITA(z) is the temporal-average intensity as a function of z in centimeters.fc Center frequency in MHz.Dim. of Aaprt Active aperture dimensions for the azimuthal (x) and elevational (y) planes in centimeters.PD Pulse duration (microseconds) associated with the transmit pattern giving rise to the reported value of MI.PRF Pulse repetition frequency associated with the transmit pattern giving rise to the reported value of MI in Hertz.pr@PIImax Peak rarefactional pressure at the point where the free-field, spatial-peak pulse intensity integral is a maximum in Megapascals.deq@PIImax Equivalent beam diameter at the point where the free-field, spatial-peak pulse intensity integral is a maximum in centimeters.FL Focal length, or azimuthal (x) and elevational (y) lengths, if different measured in centimeters.Table 32: Acoustic Output Terms and Definitions (Continued)Term Definition4π()⁄()Wo()ITA z()()⁄()
134  Labeling symbolsThefollowingsymbolsareusedontheproducts,packaging,andcontainers.Table 33: Acoustic Measurement Precision and UncertaintyQuantity Precision (% of standard deviation)Uncertainty(95% confidence)Pr 1.9% +11.2%Pr.3 1.9% +12.2%Wo 3.4% +10%fc 0.1% +4.7%PII 3.2% +12.5 to -16.8%PII.3 3.2% +13.47 to -17.5%Table 34: Labeling SymbolsSymbol DefinitionAlternating Current (AC)Class 1 device indicating manufacturer’s declaration of conformance with Annex VII of 93/42/EECClass 1 device requiring verification by the Notified Body of sterilization or measurement features, or to a Class IIa, IIb, or III device requiring verification or auditing by the Notified Body to applicable Annex(es) of 93/42/EECAttention, see the user guideDevice complies with relevant Australian regulations for electronic devices.Batch code, date code, or lot code type of control numberBiological riskLOT
Chapter 6:  Safety 135SafetyDevice complies with relevant Brazilian regulations for electro-medical devices.Canadian Standards Association. The “C” and “US” indicators next to this mark signify that the product has been evaluated to the applicable CSA and ANSI/UL Standards, for use in Canada and the US, respectively.Catalog numberCollect separately from other household waste (see European Commission Directive 93/86/EEC). Refer to local regulations for disposal.Contents sterilized using ethylene oxide process.Corrugated recycleDangerous voltageDate of manufactureDirect Current (DC)Do not get wet.Do not stack over 2 high.Do not stack over 5 high.Table 34: Labeling Symbols (Continued)Symbol DefinitionREFSTERILE EO
136  Do not stack over 10 high.Electrostatic sensitive devicesDevice complies with relevant FCC regulations for electronic devices.FragileGel sterilized by radiation.HotIndoor use onlyDevice emits a static (DC) magnetic field.Non-ionizing radiationPaper recycleSerial number type of control numberStorage temperature conditionsSubmersible. Protected against the effects of temporary immersion.Water-Tight Equipment. Protected against the effects of extended immersion.Table 34: Labeling Symbols (Continued)Symbol DefinitionSTERILE RGELSN
Chapter 6:  Safety 137SafetyHandle transducer with care.Follow manufacturer’s instructions for disinfecting time.Disinfect transducer.Type BF patient applied part (B = body, F = floating applied part)Defibrillator proof type CF patient applied partUnderwriter’s Laboratories labelingPollution Control Logo. (Applies to all parts/products listed in the China RoHS disclosure table. May not appear on the exterior of some parts/products because of space limitations.)China Compulsory Certificate mark (“CCC Mark”). A compulsory safety mark for compliance to Chinese national standards for many products sold in the People’s Republic of China. Contains mercury. (Applies to the LCD and may apply to other components in the ultrasound system.) WARNING: Connect OnlyAccessories and PeripheralsRecommended by SonoSiteWARNING: Connect OnlyAccessories and PeripheralsRecommended by SonoSiteTable 34: Labeling Symbols (Continued)Symbol Definition
138
Chapter 7:  References 139ReferencesChapter 7: ReferencesMeasurement accuracyThemeasurementsprovidedbythesystemdonotdefineaspecificphysiologicaloranatomicalparameter.Rather,themeasurementsareofaphysicalpropertysuchasdistanceforevaluationbytheclinician.Theaccuracyvaluesrequirethatyoucanplacethecalipersoveronepixel.Thevaluesdonotincludeacousticanomaliesofthebody.The2Dlineardistancemeasurementresultsaredisplayedincentimeterswithoneplacepastthedecimalpoint,ifthemeasurementistenorgreater;twoplacespastthedecimalpoint,ifthemeasurementislessthanten.Thelineardistancemeasurementcomponentshavetheaccuracyandrangeshowninthefollowingtables.Table 1: 2D Measurement Accuracy and Range2D MeasureAccuracyand RangeSystemToleranceaAccuracy ByTest MethodbRange (cm)Axial Distance< ±2% plus 1% of full scaleAcquisition Phantom 0-26 cmLateral Distance< ±2% plus 1% of full scaleAcquisition Phantom 0-35 cmDiagonal Distance< ±2% plus 1% of full scaleAcquisition Phantom 0-44 cmAreac< ±4% plus (2% of full scale/smallest dimension) * 100 plus 0.5%Acquisition Phantom 0.01-720 cm2Circumfer-enced< ±3% plus (1.4% of full scale/ smallest dimension) * 100 plus 0.5%Acquisition Phantom 0.01-96 cma. Full scale for distance implies the maximum depth of the image.b. An RMI 413a model phantom with 0.7 dB/cm MHz attenuation was used.c. The area accuracy is defined using the following equation:% tolerance = ((1 + lateral error) * (1 + axial error) – 1) * 100 + 0.5%.d. The circumference accuracy is defined as the greater of the lateral or axial accuracy and by the following equation: % tolerance = (  (maximum of 2 errors) * 100) + 0.5%.2
140 Sources of measurement errors  Sources of measurement errorsIngeneral,twotypesoferrorscanbeintroducedintothemeasurement:Acquisition Error Includeserrorsintroducedbytheultrasoundsystemelectronicsrelatingtosignalacquisition,signalconversion,andsignalprocessingfordisplay.Additionally,computationalanddisplayerrorsareintroducedbythegenerationofthepixelscalefactor,applicationofthatfactortothecaliperpositionsonthescreen,andthemeasurementdisplay.Algorithmic Error Theerrorintroducedbymeasurements,whichareinputtohigherordercalculations.ThiserrorisassociatedwithTable 2: M Mode Measurement and Calculation Accuracy and RangeM Mode Measurement Accuracy and RangeSystem ToleranceAccuracy ByTest MethodRangeDistance < +/- 2% plus 1% of full scaleaAcquisition Phantomb 0-26 cmTime < +/- 2% plus 1% of full scalecAcquisition Phantomd 0.01-10 secHeart Rate < +/- 2% plus (Full Scalec * Heart Rate/100) %Acquisition Phantomd5-923 bpma. Full scale for distance implies the maximum depth of the image.b. An RMI 413a model phantom with 0.7 dB/cm MHz attenuation was used.c. Full scale for time implies the total time displayed on the scrolling graphic image.d. SonoSite special test equipment was used.Table 3: PW Doppler Mode Measurement and Calculation Accuracy and RangeDoppler ModeMeasurementAccuracy and RangeSystemToleranceAccuracy ByTest  MethodaRangeVelocity cursor< +/- 2% plus 1% of full scalebAcquisition Phantom 0.01 cm/sec- 550 cm/secFrequency cursor< +/- 2% plus 1% of full scalebAcquisition Phantom 0.01kHz-20.8 kHzTime < +/- 2% plus 1% of full scalecAcquisition Phantom 0.01-10 seca. SonoSite special test equipment was used.b. Full scale for frequency or velocity implies the total frequency or velocity magnitude, displayed on the scrolling graphic image.c. Full scale for time implies the total time displayed on the scrolling graphic image.
Chapter 7:  References 141Referencesfloating‐pointversusinteger‐typemath,whichissubjecttoerrorsintroducedbyroundingversustruncatingresultsfordisplayofagivenlevelofsignificantdigitinthecalculation.Measurement publications and terminologyThefollowingsectionslistthepublicationsandterminologyusedforeachcalculationresult.TerminologyandmeasurementscomplywithAIUMpublishedstandards.Cardiac referencesAcceleration (ACC) in cm/s2Zwiebel,W.J.IntroductiontoVascularUltrasonography.4thed.,W.B.SaundersCompany,(2000),52.ACC=abs(deltavelocity/deltatime)Acceleration Time (AT) in msecOh,J.K.,J.B.Seward,A.J.Tajik.TheEchoManual.2nded.,Lippincott,Williams,andWilkins,(1999),219.Aortic Valve Area (AVA) by Continuity Equation in cm2Reynolds,Terry.TheEchocardiographer’sPocketReference.2nded.,SchoolofCardiacUltrasound,ArizonaHeartInstitute,(2000),393,442.A2=A1*V1/V2where: A2=AovalveareaA1=LVOTarea;V1=LVOTvelocity;V2=AovalvevelocityLVOT=LeftVentricularOutflowTractAVA(PVLVOT/PVAO)*CSALVOTAVA(VTILVOT/VTIAO)*CSALVOTBody Surface Area (BSA) in m2 Grossman,W.CardiacCatheterizationandAngiography.Philadelphia:LeaandFebiger,(1980),90.BSA=0.007184*Weight0.425*Height0.725Weight=kilogramsHeight=centimetersCardiac Index (CI) in l/min/m2Oh,J.K.,J.B.Seward,A.J.Tajik.TheEchoManual.2ndEdition,Boston:Little,BrownandCompany,(1999),59.CI=CO/BSAwhere: CO=CardiacOutputBSA=BodySurfaceAreaCardiac Output (CO) in l/minOh,J.K.,J.B.Seward,A.J.TajikTheEchoManual.2nded.,Lippincott,Williams,andWilkins,(1999),59.CO=(SV*HR)/1000where: CO=CardiacOutputSV=StrokeVolumeHR=HeartRateCross Sectional Area (CSA) in cm2Reynolds,Terry.TheEchocardiographer’sPocketReference.2nded.,SchoolofCardiacUltrasound,ArizonaHeartInstitute,(2000),383.CSA=0.785*D2where: D=diameteroftheanatomyofinterestDeceleration Time in msecReynolds,Terry.TheEchocardiographer’sPocketReference.2nded.,SchoolofCardiacUltrasound,ArizonaHeartInstitute,(2000),453.|timea‐timeb|
142 Measurement publications and terminology  Delta Pressure: Delta Time (dP:dT) in mmHg/sOtto,C.M.TextbookofClinicalEchocardiography.2nded.,W.B.SaundersCompany,(2000),117,118.32 mmHg/timeintervalinsecondsE:A Ratio in cm/secE:A=velocityE/velocityAE/Ea RatioReynolds,Terry.TheEchocardiographer’sPocketReference.2nded.,SchoolofCardiacUltrasound,ArizonaHeartInstitute,(2000),225.EVelocity/Eavelocitywhere: Evelocity=MitralValveEvelocityEa=annularEvelocity,alsoknownas:EprimeEffective Regurgitant Orifice (ERO) in mm2Reynolds,Terry.TheEchocardiographer’sPocketReference.2nded.,SchoolofCardiacUltrasound,ArizonaHeartInstitute,(2000),455.ERO=6.28(r2)*Va/MRVelwhere: r=radiusVa=aliasingvelocityEjection Fraction (EF), percentOh,J.K.,J.B.Seward,A.J.Tajik.TheEchoManual.2nded.,Lippincott,Williams,andWilkins,(1999),40.EF=((LVEDV–LVESV)/LVEDV)*100%where: EF=EjectionFractionLVEDV=LeftVentricularEndDiastolicVolumeLVESV=LeftVentricularEndSystolicVolumeElapsed Time (ET) in msecET=timebetweenvelocitycursorsinmillisecondsHeart Rate (HR) in bpmHR=3digitvalueinputbyuserormeasuredonMModeandDopplerimageinoneheartcycleInterventricular Septum (IVS) Fractional Thickening, percentLaurenceau,J.L.,M.C.Malergue.TheEssentialsofEchocardiography.LeHague:MartinusNijhoff,(1981),71.IVSFT=((IVSS–IVSD)/IVSD)*100%where:IVSS=InterventricularSeptalThicknessatSystoleIVSD=InterventricularSeptalThicknessatDiastoleIsovolumic Relaxation Time (IVRT) in msecReynolds,Terry.TheEchocardiographer’sPocketReference.SchoolofCardiacUltrasound,ArizonaHeartInstitute,(1993),146.|timea‐timeb|Left Atrium/Aorta (LA/Ao)Feigenbaum,H.Echocardiography.Philadelphia:LeaandFebiger,(1994),206,Figure4‐49.Left Ventricular End Volumes (Teichholz) in mlTeichholz,L.E.,T.Kreulen,M.V.Herman,et.al.“Problemsinechocardiographicvolumedeterminations:echocardiographic‐angiographiccorrelationsinthepresenceorabsenceofasynergy.”AmericanJournalofCardiology,(1976),37:7.LVESV=(7.0*LVDS3)/(2.4+LVDS)where: LVESV=LeftVentricularEndSystolicVolume
Chapter 7:  References 143ReferencesLVDS=LeftVentricularDimensionatSystoleLVEDV=(7.0*LVDD3)/(2.4+LVDD)where: LVEDV=LeftVentricularEndDiastolicVolumeLVDD=LeftVentricularDimensionatDiastoleLeft Ventricular Mass in gmOh,J.K.,J.B.Seward,A.J.Tajik.TheEchoManual.2ndEdition,Boston:Little,BrownandCompany,(1999),39.LVMass=1.04[(LVID+PWT+IVST)3–LVID3]*0.8+0.6where: LVID=InternalDimensionPWT=PosteriorWallThicknessIVST=InterventricularSeptalThickness1.04=Specificgravityofthemyocardium0.8=CorrectionfactorLeft Ventricular Volume: Biplane Method in mlSchiller,N.B.,P. M . Shah,M.Crawford,et.al.“RecommendationsforQuantitationoftheLeftVentriclebyTwo‐DimensionalEchocardiography.”JournalofAmericanSocietyofEchocardiography.September‐October1989,2:362.where: V=Volumeinmla=Diameterb=Diametern=Numberofsegments(n=20)L=Lengthi=SegmentLeft Ventricular Volume: Single Plane Method in mlSchiller,N.B.,P. M . Shah,M.Crawford,et.al.“RecommendationsforQuantitationoftheLeftVentriclebyTwo‐DimensionalEchocardiography.”JournalofAmericanSocietyofEchocardiography.September‐October1989,2:362.where: V=Volumea=Diametern=Numberofsegments(n=20)L=Lengthi=SegmentLeft Ventricular Dimension (LVD) Fractional Shortening, percentOh,J.K.,J.B.Seward,A.J.Tajik.TheEchoManual.Boston:Little,BrownandCompany,(1994),43‐44.LVDFS=((LVDD–LVDS)/LVDD)*100%where: LVDD=LeftVentricleDimensionatDiastoleLVDS=LeftVentricleDimensionatSystoleLeft Ventricular Posterior Wall Fractional Thickening (LVPWFT), percentLaurenceau,J.L.,M.C.Malergue.TheEssentialsofEchocardiography.LeHague:MartinusNijhoff,(1981),71.LVPWFT=((LVPWS–LVPWD)/LVPWD)*100%where: LVPWS=LeftVentricularPosteriorWallThicknessatSystoleLVPWD=LeftVentricularPosteriorWallThicknessatDiastoleMean Velocity (Vmean) in cm/sVmean=meanvelocityVπ4---⎝⎠⎛⎞ aibiLn---⎝⎠⎛⎞i1=n∑=Vπ4---⎝⎠⎛⎞ ai2Ln---⎝⎠⎛⎞i1=n∑=
144 Measurement publications and terminology  Mitral Valve Area (MVA) in cm2Reynolds,Terry.TheEchocardiographer’sPocketReference.2nded.,SchoolofCardiacUltrasound,ArizonaHeartInstitute,(2000),391,452.MVA=220/PHTwhere: PHT=pressurehalftimeNote: 220isanempiricalderivedconstantandmaynotaccuratelypredictmitralvalveareainmitralprostheticheartvalves.Themitralvalveareacontinuityequationmaybeutilizedinmitralprostheticheartvalvestopredicteffectiveorificearea.MV Flow Rate in cc/secReynolds,Terry.TheEchocardiographer’sPocketReference.2nded.,SchoolofCardiacUltrasound,ArizonaHeartInstitute,(2000),396.Flow=6.28(r2)*Vawhere: r=radiusVa=aliasingVelocityPressure Gradient (PGr) in mmHGOh,J.K.,J.B.Seward,A.J.Tajik.TheEchoManual.2nded.,Lippincott,Williams,andWilkins,(1999),64.PGr=4*(Velocity)2PeakEPressureGradient(E PG)EPG=4*PE2PeakAPressureGradient(A PG)APG=4*PA2PeakPressureGradient(PGmax)PGmax=4*PV2MeanPressureGradient(PGmean)PGmean=Averageofpressuregradients/DurationofflowPressure Half Time (PHT) in msecReynolds,Terry.TheEchocardiographer’sPocketReference.2nded.,SchoolofCardiacUltrasound,ArizonaHeartInstitute,(2000),391.PHT=DT*0.29where: DT=decelerationtimeProximal Isovelocity Surface Area (PISA) in cm2Oh,J.K.,J.B.Seward,A.J.Tajik.TheEchoManual.2nded.,Boston:Little,BrownandCompany,(1999),125.PISA=2r2where: 2 =6.28r=aliasingradiusQp/QsReynolds,Terry.TheEchocardiographer’sPocketReference.2nded.,SchoolofCardiacUltrasound,ArizonaHeartInstitute,(2000),400.Qp/Qs=SVQpsite/SVQssiteSVsiteswillvarydependinguponthelocationoftheshunt.Regurgitant Fraction (RF) in percentOh,J.K.,J.B.Seward,A.J.Tajik.TheEchoManual.Boston:Little,BrownandCompany,(1999),125.RF=RV/MVSVwhere: RV=RegurgitantVolumeMVSV=MitralStrokeVolumeRegurgitant Volume (RV) in ccReynolds,Terry.TheEchocardiographer’sPocketReference.SchoolofCardiacUltrasound,ArizonaHeartInstitute,(2000),396,455.RV=ERO*MRVTIππ
Chapter 7:  References 145ReferencesRight Ventricular Systolic Pressure (RVSP) in mmHgReynolds,Terry.TheEchocardiographer’sPocketReference.SchoolofCardiacUltrasound,ArizonaHeartInstitute,(1993),152.RVSP=4*(VmaxTR)2+RAPwhere: RAP=RightAtrialPressureS/DReynolds,Terry.TheEchocardiographer’sPocketReference.2nded.,SchoolofCardiacUltrasound,ArizonaHeartInstitute,(2000),217.Svelocity/Dvelocitywhere: Svelocity=PulmonaryveinSwaveDvelocity=PulmonaryveinDwaveStroke Index (SI) in cc/m2Mosby’sMedical,Nursing,&AlliedHealthDictionary,4thed.,(1994),1492.SI=SV/BSAwhere: SV=StrokeVolumeBSA=BodySurfaceAreaStroke Volume (SV) Doppler in mlOh,J.K.,J.B.Seward,A.J.Tajik.TheEchoManual.2nded.,Lippincott,Williams,andWilkins,(1999),40,59,62.SV=(CSA*VTI)where CSA=CrossSectionalAreaoftheorifice(LVOTarea)VTI=VelocityTimeIntegraloftheaorticvalveTricuspid Valve Area (TVA)Reynolds,Terry.TheEchocardiographer’sPocketReference.2nded.,SchoolofCardiacUltrasound,ArizonaHeartInstitute,(2000),55,391,452.TVA=220/PHTStroke Volume (SV) 2D and M Mode in mlOh,J.K.,J.B.Seward,A.J.Tajik.TheEchoManual.2nded.,Boston:Little,BrownandCompany,(1994),44.SV=(LVEDV–LVESV)where: SV=StrokeVolumeLVEDV=EndDiastolicVolumeLVEDSV=EndSystolicVolumeVelocity Time Integral (VTI) in cmReynolds,Terry.TheEchocardiographer’sPocketReference.2nded.,SchoolofCardiacUltrasound,ArizonaHeartInstitute,(2000),383.VTI=sumofabs(velocities[n])where:AutoTrace–distance(cm)bloodtravelswitheachejectionperiod.Velocitiesareabsolutevalues.Obstetrical referencesAmniotic Fluid Index (AFI)Jeng,C.J.,etal.“A m n i o t i c FluidIndexMeasurementwiththeFourQuadrantTechniqueDuringPregnancy.”TheJournalofReproductiveMedicine,35:7(July1990),674‐677.Average Ultrasound Age (AUA)ThesystemprovidesanAUAderivedfromthecomponentmeasurementsfromthemeasurementtables.Estimated Date of Delivery (EDD) by Average Ultrasound Age (AUA)Resultsaredisplayedasmonth/day/year.EDD=systemdate+(280days–AUAindays)Estimated Date of Delivery (EDD) by Last Menstrual Period (LMP)ThedateenteredintothepatientinformationforLMPmustprecedethecurrentdate.Resultsaredisplayedasmonth/day/year.
146 Measurement publications and terminology  EDD=LMPdate+280daysEstimated Fetal Weight (EFW)Hadlock,F.,etal.“EstimationofFetalWeightwiththeUseofHead,Body,andFemurMeasurements,AProspectiveStudy.”AmericanJournalofObstetricsandGynecology,151:3(February1,1985),333‐337.Hansmann,M.,etal.UltrasoundDiagnosisinObstetricsandGynecology.NewYork:Springer‐Verlag,(1986),154.OsakaUniversity.UltrasoundinObstetricsandGynecology.(July 20,1990),103‐105.ShepardM.J.,V. A.Richards,R.L.Berkowitz,etal.“A n EvaluationofTwoEquationsforPredictingFetalWeightbyUltrasound.”AmericanJournalofObstetricsandGynecology,142:1(January1,1982),47‐54.UniversityofTokyo,Shinozuka,N.FJSUM,etal.“StandardValuesofUltrasonographicFetalBiometry.”JapaneseJournalofMedicalUltrasonics,23:12(1996),880,Equation1.Gestational Age (GA) by Last Menstrual Period (LMP)ThegestationalagederivedfromtheLMPdateenteredonthepatientinformationform.Resultsaredisplayedinweeksanddays,andiscalculatedasfollows:GA(LMP)=Systemdate–LMPdateGestational Age (GA) by Last Menstrual Period (LMPd) Derived from Established Due Date (Estab. DD)SameasGAbyEstab. DD.ThegestationalagederivedfromthesystemderivedLMPusingtheEstablishedDueDateenteredonthepatientinformationform.Resultsaredisplayedinweeksanddays,andiscalculatedasfollows:GA(LMPd)=SystemDate–LMPdLast Menstrual Period Derived (LMPd) by Established Due Date (Estab. DD)Resultsaredisplayedasmonth/day/year.LMPd(Estab. DD)=Estab. DD–280daysGestational age tablesAbdominal Circumference (AC)Hadlock,F.,etal.“EstimatingFetalAge:Computer‐AssistedAnalysisofMultipleFetalGrowthParameters.”Radiology,152:(1984),497‐501.Hansmann,M.,etal.UltrasoundDiagnosisinObstetricsandGynecology.NewYork:Springer‐Verlag,(1986),431.UniversityofTokyo,Shinozuka,N.FJSUM,etal.“StandardValuesofUltrasonographicFetalBiometry.”JapaneseJournalofMedicalUltrasonics,23:12(1996),885.Anteroposterior Trunk Diameter (APTD)UniversityofTokyo,Shinozuka,N.FJSUM,etal.“StandardValuesofUltrasonographicFetalBiometry.”JapaneseJournalofMedicalUltrasonics,23:12(1996),885.WARNING: The gestational age calculated by your SonoSite system does not match the age in the aforementioned reference at the 20.0 cm and 30.0 cm abdominal circumference (AC) measurements. The implemented algorithm extrapolates the gestational age from the slope of the curve of all table measurements, rather than decreasing the gestational age for a larger AC measurement indicated in the referenced table. This results in the gestational age always increasing with an increase in AC.
Chapter 7:  References 147ReferencesBiparietal Diameter (BPD)Chitty,L.S.andD.G.Altman.“Newchartsforultrasounddatingofpregnancy.”UltrasoundinObstetricsandGynecology10:(1997),174‐179,Table3.Hadlock,F.,etal.“EstimatingFetalAge:Computer‐AssistedAnalysisofMultipleFetalGrowthParameters.”Radiology,152:(1984),497‐501.Hansmann,M.,etal.UltrasoundDiagnosisinObstetricsandGynecology.NewYork:Springer‐Verlag,(1986),440.OsakaUniversity.UltrasoundinObstetricsandGynecology.(July 20,1990),98.UniversityofTokyo,Shinozuka,N.FJSUM,etal.“StandardValuesofUltrasonographicFetalBiometry.”JapaneseJournalofMedicalUltrasonics,23:12(1996),885.Crown Rump Length (CRL)Hadlock,F.,etal.“FetalCrown‐RumpLength:Re‐evaluationofRelationtoMenstrualAge(5‐18weeks)withHigh‐Resolution,Real‐TimeUltrasound.”Radiology,182:(February1992),501‐505.Hansmann,M.,etal.UltrasoundDiagnosisinObstetricsandGynecology.NewYork:Springer‐Verlag,(1986),439.OsakaUniversity.UltrasoundinObstetricsandGynecology.(July20,1990),20and96.TokyoUniversity.“GestationalWeeksandComputationMethods.”UltrasoundImagingDiagnostics,12:1(1982‐1),24‐25,Table3.Femur Length (FL)Chitty,L.S.andD.G.Altman.“Newchartsforultrasounddatingofpregnancy.”UltrasoundinObstetricsandGynecology10:(1997),174‐179,Table8,186.Hadlock,F.,etal.“EstimatingFetalAge:Computer‐AssistedAnalysisofMultipleFetalGrowthParameters.”Radiology,152:(1984),497‐501.Hansmann,M.,etal.UltrasoundDiagnosisinObstetricsandGynecology.NewYork:Springer‐Verlag,(1986),431.OsakaUniversity.UltrasoundinObstetricsandGynecology.(July 20,1990),101‐102.UniversityofTokyo,Shinozuka,N.FJSUM,etal.“StandardValuesofUltrasonographicFetalBiometry.”JapaneseJournalofMedicalUltrasonics,23:12(1996),886.Fetal Trunk Cross-Sectional Area (FTA)OsakaUniversity.UltrasoundinObstetricsandGynecology.(July 20,1990),99‐100.Gestational Sac (GS)Hansmann,M.,etal.UltrasoundDiagnosisinObstetricsandGynecology.NewYork:Springer‐Verlag,(1986).Nyberg,D.A.,etal.“TransvaginalUltrasound.”MosbyYearbook,(1992),76.Gestationalsacmeasurementsprovideafetalagebasedonthemeanofone,two,orthreedistancemeasurements;however,Nyberg’sgestationalageequationrequiresallthreedistancemeasurementsforanaccurateestimate.TokyoUniversity.“GestationalWeeksandComputationMethods.”UltrasoundImagingDiagnostics,12:1(1982‐1).Head Circumference (HC)Chitty,L.S.andD.G.Altman.“Newchartsforultrasounddatingofpregnancy.”UltrasoundinObstetricsandGynecology10:(1997),174‐191,Table5,182.
148 Measurement publications and terminology  Hadlock,F.,etal.“EstimatingFetalAge:Computer‐AssistedAnalysisofMultipleFetalGrowthParameters.”Radiology,152:(1984),497‐501.Hansmann,M.,etal.UltrasoundDiagnosisinObstetricsandGynecology.NewYork:Springer‐Verlag,(1986),431.Occipito-Frontal Diameter (OFD)Hansmann,M.,etal.UltrasoundDiagnosisinObstetricsandGynecology.NewYork:Springer‐Verlag,(1986),431.Transverse Trunk Diameter (TTD)Hansmann,M.,etal.UltrasoundDiagnosisinObstetricsandGynecology.NewYork:Springer‐Verlag,(1986),431.UniversityofTokyo,Shinozuka,N.FJSUM,etal.“StandardValuesofUltrasonographicFetalBiometry.”JapaneseJournalofMedicalUltrasonics,23:12(1996),885.Growth analysis tablesAbdominal Circumference (AC)Chitty,LynS.etal.“ChartsofFetalSize:3.AbdominalMeasurements.”BritishJournalofObstetricsandGynaecology101:(February1994),131,Appendix:AC‐Derived.Hadlock,F.,etal.“EstimatingFetalAge:Computer‐AssistedAnalysisofMultipleFetalGrowthParameters.”Radiology,152:(1984),497‐501.JeantyP. , E.Cousaert,andF.Cantraine.“NormalGrowthoftheAbdominalPerimeter.”AmericanJournalofPerinatology,1:(January1984),129‐135.(AlsopublishedinHansmann,Hackeloer,Staudach,Wittman.UltrasoundDiagnosisinObstetricsandGynecology.Springer‐Verlag,NewYork,(1986),179,Table7.13.)Biparietal Diameter (BPD)Chitty,LynS.etal.“ChartsofFetalSize:2.HeadMeasurements.”BritishJournalofObstetricsandGynaecology101:(January1994),43,Appendix:BPD‐Outer‐Inner.Hadlock,F.,etal.“EstimatingFetalAge:Computer‐AssistedAnalysisofMultipleFetalGrowthParameters.”Radiology,152:(1984),497‐501.JeantyP.,E.Cousaert,andF.Cantraine.“A LongitudinalStudyofFetalLimbGrowth.”AmericanJournalofPerinatology,1:(January1984),136‐144,Table5.(AlsopublishedinHansmann,Hackeloer,Staudach,Wittman.UltrasoundDiagnosisinObstetricsandGynecology.Springer‐Verlag,NewYork,(1986),176,Table7.8.)Estimated Fetal Weight (EFW)HadlockF.,etal.“InUteroAnalysisofFetalGrowth:ASonographicWeightStandard.”Radiology,181:(1991),129‐133.Jeanty,Philippe,F.Cantraine,R.Romero,E.Cousaert,andJ.Hobbins.“A LongitudinalStudyofFetalWeightGrowth.”JournalofUltrasoundinMedicine,3:(July1984),321‐328,Table1.(AlsopublishedinHansmann,Hackeloer,Staudach,andWittman.UltrasoundDiagnosisinObstetricsandGynecology.Springer‐Verlag,NewYork,(1986),186,Table7.20.)Femur Length (FL)Chitty,LynS.etal.“ChartsofFetalSize:4.FemurLength.”BritishJournalofObstetricsandGynaecology101:(February1994),135.Hadlock,F.,etal.“EstimatingFetalAge:Computer‐AssistedAnalysisofMultipleFetalGrowthParameters.”Radiology,152:(1984),497‐501.
Chapter 7:  References 149ReferencesJeantyP, E.Cousaert,andF.Cantraine.“A LongitudinalStudyofFetalLimbGrowth.”AmericanJournalofPerinatology,1:(January1984),136‐144,Table5.(AlsopublishedinHansmann,Hackeloer,Staudach,Wittman.UltrasoundDiagnosisinObstetricsandGynecology.Springer‐Verlag,NewYork,(1986),182,Table7.17.)Head Circumference (HC)Chitty,LynS.,etal.“ChartsofFetalSize:2.HeadMeasurements.”BritishJournalofObstetricsandGynaecology101:(January1994),43,Appendix:HC‐Derived.Hadlock,F.,etal.“EstimatingFetalAge:Computer‐AssistedAnalysisofMultipleFetalGrowthParameters.”Radiology,152:(1984),497‐501.JeantyP, E.Cousaert,andF.Cantraine.“A longitudinalstudyofFetalHeadBiometry.”AmericanJofPerinatology,1:(January1984),118‐128,Table3.(AlsopublishedinHansmann,Hackeloer,Staudach,Wittman.UltrasoundDiagnosisinObstetricsandGynecology.Springer‐Verlag,NewYork,(1986),176,Table7.8.)Head Circumference (HC)/Abdominal Circumference (AC)CampbellS.,ThomsAlison.“UltrasoundMeasurementsoftheFetalHeadtoAbdomenCircumferenceRatiointheAssessmentofGrowthRetardation,”BritishJournalofObstetricsandGynaecology,84:(March1977),165‐174.Ratio calculationsFL/AC RatioHadlockF.P.,R.L.Deter,R.B.Harrist,E.Roecker,andS.K.Park.“A DateIndependentPredictorofIntrauterineGrowthRetardation:FemurLength/AbdominalCircumferenceRatio,”AmericanJournalofRoentgenology,141:(November1983),979‐984.FL/BPD RatioHohler,C.W.,andT.A.Quetel.“ComparisonofUltrasoundFemurLengthandBiparietalDiameterinLatePregnancy,”AmericanJournalofObstetricsandGynecology,141:7(Dec.11981),759‐762.FL/HC RatioHadlockF.P.,R.B.Harrist,Y.Shah,andS.K.Park.“TheFemurLength/HeadCircumferenceRelationinObstetricSonography.”JournalofUltrasoundinMedicine,3:(October1984),439‐442.HC/AC RatioCampbellS.,ThomsAlison.“UltrasoundMeasurementsoftheFetalHeadtoAbdomenCircumferenceRatiointheAssessmentofGrowthRetardation,”BritishJournalofObstetricsandGynaecology,84:(March1977),165‐174.General references+/x or S/D Ratio+/x=abs(VelocityA/VelocityB)where A=velocitycursor+B=velocitycursorxAcceleration Index (ACC)Zwiebel,W.J.IntroductiontoVascularUltrasonography,4thed.,W.B.SaundersCompany,(2000),52.ACC=abs(deltavelocity/deltatime)Elapsed Time (ET)ET=timebetweenvelocitycursorsinmilliseconds
150 Measurement publications and terminology  Hip Angle/d:D RatioGraf,R.“FundamentalsofSonographicDiagnosisofInfantHipDysplasia.”JournalofPediatricOrthopedics,Vol.4,No.6:735‐740,1984.Morin,C.,Harcke,H.,MacEwen,G.“TheInfantHip:Real‐TimeUSAssessmentofAcetabularDevelopment.”Radiology177:673‐677,December1985.Intima Media Thickness (IMT)HowardG,SharrettAR,HeissG,EvansGW,ChamblessLE,RileyWA,etal.“CarotidArteryIntima‐MedialThicknessDistributioninGeneralPopulationsAsEvaluatedbyB‐ModeUltrasound.”ARICInvestigators.AtherosclerosisRiskinCommunities.Stroke.(1993),24:1297‐1304.O’Leary,DanielH.,MDandPolak,Joseph,F.,MD,etal.“UseofSonographytoEvaluateCarotidAtherosclerosisintheElderly.TheCardiovascularHealthStudy.”Stroke.(September1991),22,1155‐1163.Redberg,RitaF.,MDandVogel,RobertA.,MD,etal.“Taskforce#3—WhatistheSpectrumofCurrentandEmergingTechniquesfortheNoninvasiveMeasurementofAtherosclerosis?”JournaloftheAmericanCollegeofCardiology.(June4,2003),41:11,1886‐1898.Percent Area ReductionTaylorK.J.W.,P. N . Burns,P. Breslau.ClinicalApplicationsofDopplerUltrasound,RavenPress,N.Y.,(1988),130‐136.ZwiebelW.J.,J.A.Zagzebski,A.B.Crummy,etal.“CorrelationofpeakDopplerfrequencywithlumennarrowingincarotidstenosis.”Stroke,3:(1982),386‐391.%AreaReduction=(1‐A2(cm2)/A1(cm2))*100where: A1=originalareaofthevesselinsquarecmA2=reducedareaofthevesselinsquarecmPercent Diameter ReductionHanda,Nobuoetal.,“Echo‐DopplerVelocimeterintheDiagnosisofHypertensivePatients:TheRenalArteryDopplerTechnique,”UltrasoundinMedicineandBiology,12:12(1986),945‐952.%DiameterReduction=(1‐D2(cm)/D1(cm))*100where: D1=originaldiameterofthevesselincmD2=reduceddiameterofthevesselincmPressure Gradient (PGr) in mmHGOh,J.K.,J.B.Seward,A.J.Tajik.TheEchoManual.2nded.,Lippincott,Williams,andWilkins,(1999),64.4*(Velocity)2PeakEPressureGradient(E PG)EPG=4*PE2PeakAPressureGradient(A PG)APG=4*PA2PeakPressureGradient(PGmax)PGmax=4*PV2MeanPressureGradient(PGmean)PGmean=4*Vmax2Pulsatility Index (PI)Kurtz,A.B.,W.D.Middleton.Ultrasound‐theRequisites.MosbyYearBook,Inc.,(1996),469.PI=(PSV–EDV)/Vwhere PSV=peaksystolicvelocityEDV=enddiastolicvelocityV=meanflowvelocitythroughouttheentirecardiaccycleResistive Index (RI)Kurtz,A.B.,W.D.Middleton.Ultrasound‐theRequisites.MosbyYearBook,Inc.,(1996),467.
Chapter 7:  References 151ReferencesRI=abs((VelocityA–VelocityB)/VelocityA)inmeasurementswhere A=velocitycursor+B=velocitycursorxTime Averaged Mean (TAM) in cm/sTAM=mean(meanTrace)Volume (Vol)Beyer,W.H.StandardMathematicalTables,28thed.,CRCPress,BocaRaton,FL,(1987),131.Volume Flow (VF) in l/mAllan,PaulL.etal.ClinicalDopplerUltrasound,4thed.,HarcourtPublishersLimited.(2000),36‐38.VF=CSA*TAM*.06
152 Measurement publications and terminology
Chapter 8:  Specifications 153SpecificationsChapter 8: SpecificationsThischaptercontainssystemandaccessoryspecificationsandstandards.Thespecificationsforrecommendedperipheralsareinthemanufacturers’instructions.DimensionsSystemLength:11.8in.(29.97cm)Width:10.8in.(27.43cm)Height:3.1in.(7.87cm)Weight:8.5lbs.(3.9kg)withtheC60xtransducerandbatteryinstalledDisplayLength:8.4in.(21.34cm)Height:6.3in.(16cm)Diagonal:10.4in.(26.4cm)Supported transducers• C11x/8‐5MHz(6ft/1.8m)• C60x/5‐2MHz(5.5ft/1.7m)•D2x/2MHz(5.5ft/1.7m)• HFL38x/13‐6MHz(5.6ft/1.7m)•ICTx/8‐5MHz(5.5ft/1.7m)• L25x/13‐6MHz(7.5ft/2.3m)• L38x/10‐5MHz(5.5ft/1.7m)•P10x/8‐4MHz(6ft/1.8m)•P21x/5‐1MHz(6ft/1.8m)•SLAx/13‐6MHz(7.5ft/2.3m)•TEEx/8‐3MHz(7.2ft./2.2m)Imaging modes•2D(256grayshades)• ColorpowerDoppler(CPD)(256colors)• ColorDoppler(Color)(256colors)•MMode•Pulsedwave(PW)Doppler• Continuouswave(CW)Doppler•TissueDopplerImaging(TDI)•TissueHarmonicImaging(THI)Image and clip storageInternalstorage:Thenumberofimagesandclipsyoucansavedependsonimagingmodeandfileformat.AccessoriesThefollowingitemsareeitherincludedwithoravailableforuseontheultrasoundsystem:•Battery•BiopsyGuide• Carrycase•ECGcable(6ft/1.8m)• Educationkeys•Externaldisplay•Footswitch•Mini‐Dock•MobileDockingSystemMSeries(MDSm)•MobileDockingSystemLiteII(MDSLiteII)• NeedleGuide
154 Temperature and humidity limits  •Powersupply•SiteLinkImageManager• SonoCalcIMT•SystemACpowercord(10ft/3.1m)•TripleTransducerConnectPeripheralsSeethemanufacturer’sspecificationsforthefollowingperipherals.Medical grade•Barcodescanner,serial•Barcodescanner,USB•Black‐and‐whiteprinterRecommendedsourcesforprinterpaper:ContactSonyat800‐686‐7669orwww.sony.com/professionaltoordersuppliesortofindthelocaldistributor.• Colorprinter•DVDrecorderNon-medical grade•Kensingtonsecuritycable•USBstoragedeviceTemperature and humidity limitsNote: Thetemperature,pressure,andhumiditylimitsapplyonlytotheultrasoundsystem,transducers,andbattery.OperatingSystem, battery, and transducer10–40°C(50–104°F),15–95%R.H.700to1060hPa(0.7to1.05ATM)Shipping and storageSystem and transducer‐35–65°C(‐31–149°F),15–95%R.H.500to1060hPa(0.5to1.05ATM)Battery‐20–60°C(‐4–140°F),15–95%R.H.(Forstoragelongerthan30days,storeatorbelowroomtemperature.)500to1060hPa(0.5to1.05ATM)ElectricalPowerSupplyInput:100‐240VAC,50/60Hz,2.0AMax@100VACPowerSupplyOutput#1:15VDC,5.0AMaxPowerSupplyOutput#2:12VDC,2.3AMaxBatteryThebatterycomprisessixlithium‐ioncellspluselectronics,atemperaturesensor,andbatterycontacts.Runtimeisuptotwo hours,dependingonimagingmodeanddisplaybrightness.Electromechanical safety standardsEN60601‐1:1997,EuropeanNorm,MedicalElectricalEquipment–Part 1.GeneralRequirementsforSafety.EN60601‐1‐1:2001,EuropeanNorm,MedicalElectricalEquipment–Part1.GeneralRequirementsforSafety–Section1‐1.CollateralStandard.SafetyRequirementsforMedicalElectricalSystems.
Chapter 8:  Specifications 155SpecificationsEN60601‐2‐37:2001+AmendmentA1:2005,EuropeanNorm,Particularrequirementsforthesafetyofultrasonicmedicaldiagnosticandmonitoringequipment.CAN/CSAC22.2,No.601.1‐M90,CanadianStandardsAssociation,MedicalElectricalEquipment–Part1.GeneralRequirementsforSafety(includingCSA601.1Supplement1:1994andCSA601.1Amendment2:1998).CEI/IEC61157:1992,InternationalElectrotechnicalCommission,RequirementsfortheDeclarationoftheAcousticOutputofMedicalDiagnosticUltrasonicEquipment.UL60601‐1(1stEdition),UnderwritersLaboratories,MedicalElectricalEquipment‐Part 1:GeneralRequirementsforSafety.EMC standards classificationEN60601‐1‐2:2007,EuropeanNorm,MedicalElectricalEquipment.GeneralRequirementsforSafety‐CollateralStandard.ElectromagneticCompatibility.RequirementsandTests.CISPR11:2004,InternationalElectrotechnicalCommission,InternationalSpecialCommitteeonRadioInterference.Industrial,Scientific,andMedical(ISM)Radio‐FrequencyEquipmentElectromagneticDisturbanceCharacteristics‐LimitsandMethodsofMeasurement.TheClassificationfortheultrasoundsystem,dockingsystem,accessories,andperipheralswhenconfiguredtogetheris:Group1,ClassA.Airborne equipment standardsRTCA/DO‐160E:2004,RadioTechnicalCommissionforAeronautics,EnvironmentalConditionsandTestProceduresforAirborneEquipment,Section 21.0EmissionofRadioFrequencyEnergy,Category B.DICOM standardNEMAPS 3.15:2000,DigitalImagingandCommunicationsinMedicine(DICOM)‐Part15:SecurityProfiles.HIPAA standardTheHealthInsuranceandPortabilityandAccountabilityAct,Pub.L.No.104‐191(1996).45CFR160,GeneralAdministrativeRequirements.45CFR164,SecurityandPrivacy.
156 HIPAA standard
 Glossary 157GlossaryGlossaryTermsForultrasoundtermsnotincludedinthisglossary,refertoRecommendedUltrasoundTerminology,SecondEdition,publishedin1997bytheAmericanInstituteofUltrasoundinMedicine(AIUM).as low as reasonably achievable (ALARA)The guiding principle of ultrasound use, which states that you should keep patient exposure to ultrasound energy as low as reasonably achievable for diagnostic results.curved array transducerIdentified by the letter C (curved or curvilinear) and a number (60). The number corresponds to the radius of curvature of the array expressed in millimeters. The transducer elements are electrically configured to control the characteristics and direction of the acoustic beam. For example, C15, C60e.depth Refers to the depth of the display. A constant speed of sound of 1538.5 meters/second is assumed in the calculation of echo position in the image.in situ In the natural or original position.LCD liquid crystal displaylinear array transducerIdentified by the letter L (linear) and a number (38). The number corresponds to the radius of width of the array  expressed in millimeters. The transducer elements are electrically configured to control the characteristics and direction of the acoustic beam. For example, L38.mechanical index (MI)An indication of the likelihood of mechanical bioeffects occurring: the higher the MI, the greater the likelihood of mechanical bioeffects. See Chapter 6, “Safety,” for a more complete description of MI.MI/TI See mechanical index (MI) and thermal index (TI).NTSC National Television Standards Committee. A video format setting. See also PAL.PAL Phase Alternating Line. A video format setting. See also NTSC.phased array A transducer designed primarily for cardiac scanning. Forms a sector image by electronically steering the beam direction and focus.
158  skinline A depth on the display that corresponds to the skin/transducer interface.SonoHD A subset of the 2D imaging mode in which the 2D image is enhanced by reducing speckle noise artifact at tissue margins and improving contrast resolution by reducing artifacts and improving visualization of texture patterns within the image. SonoMB A subset of the 2D imaging mode in which the 2D image is enhanced by looking at a target from multiple angles and then merging or averaging the scanned data together to improve overall image quality and, in parallel, reducing noise and artifacts. Tissue Doppler Imaging (TDI)A pulsed wave Doppler technique used to detect myocardial motion.thermal index (TI) The ratio of total acoustic power to the acoustic power required to raise tissue temperature by 1°C under defined assumptions. See Chapter 6, “Safety,” for a more complete description of TI.TIB (bone thermal index)A thermal index for applications in which the ultrasound beam passes through soft tissue and a focal region is in the immediate vicinity of bone.TIC (cranial bone thermal index)A thermal index for applications in which the ultrasound beam passes through bone near the beam entrance into the body.TIS (soft tissue thermal index)A thermal index related to soft tissues.Tissue Harmonic ImagingTransmits at one frequency and receives at a higher harmonic frequency to reduce noise and clutter and improve resolution.transducer A device that transforms one form of energy into another form of energy. Ultrasound transducers contain piezoelectric elements, which when excited electrically, emit acoustic energy. When the acoustic energy is transmitted into the body, it travels until it encounters an interface, or change in tissue properties. At the interface, an echo is formed that returns to the transducer, where this acoustic energy is transformed into electrical energy, processed, and displayed as anatomical information.variance Displays a variation in Color Doppler flow imaging within a given sample. Variance is mapped to the color green and is used to detect turbulence.
 Glossary 159GlossaryAbbreviationsAbbreviations in User InterfaceAbbreviation Definition+/× “+” Caliper/”×” Caliper RatioA“A” Wave Peak VelocityA PG “A” Wave Peak Pressure GradientA2Cd Apical 2 Chamber diastolicA2Cs Apical 2 Chamber systolicA4Cd Apical 4 Chamber diastolicA4Cs Apical 4 Chamber systolicAAA Abdominal Aortic AneurysmAAo Ascending AortaAbd Abdomenabs Absolute valueAC Abdominal CircumferenceACA Anterior Cerebral ArteryACC Acceleration IndexACoA Anterior Communicating ArteryACS Aortic Valve Cusp SeparationAdur “A” wave durationAFI Amniotic Fluid IndexAI Aortic InsufficiencyAI PHT Aortic Insufficiency Pressure Half TimeAL Atlas LoopAnn D Annulus DiameterANT F Anterior FarANT N Anterior Near
160  Ao AortaAoD Aortic Root DiameterApical Apical ViewAPTD Anteroposterior Trunk DiameterAT Acceleration (Deceleration) TimeAUA Average Ultrasound AgeCalculated by averaging the individual ultrasound ages for the fetal biometry measurements performed during the exam. The measurements used to determine the AUA are based on the selected OB calculation authors.AV Aortic ValveAV Area Aortic Valve AreaAVA Aortic Valve AreaBA Basilar ArteryBifur BifurcationBP Blood PressureBPD Biparietal DiameterBPM Beats per MinuteBre BreastBSA Body Surface AreaCCA Common Carotid ArteryCI Cardiac IndexCO Cardiac OutputCPD Color Power DopplerCrd CardiacCRL Crown Rump LengthCW Continuous Wave DopplerAbbreviations in User Interface (Continued)Abbreviation Definition
 Glossary 161GlossaryCx L Cervix LengthDDiameterD Apical Distance ApicalDCCA Distal Common Carotid ArteryDECA Distal External Carotid ArteryDICA Distal Internal Carotid ArteryDist DistaldP:dT Delta Pressure: Delta TimeE“E” Wave Peak VelocityE PG “E” Wave Peak Pressure GradientE:A E:A RatioE/e’ E velocity = Mitral Valve E velocity divided by the annular e’ velocityECA External Carotid ArteryECG ElectrocardiogramECICA Extracranial Internal Carotid ArteryECVA Extracranial Vertebral ArteryEDD Estimated Date of DeliveryEDD by AUA Estimated Date of Delivery by Average Ultrasound AgeThe estimated date of delivery calculated from the measurements performed during the exam.EDD by LMP Estimated Date of Delivery by Last Menstrual PeriodThe due date calculated from the user-entered LMP.EDV End Diastolic VelocityEF Ejection FractionEF:SLOPE E-F SlopeAbbreviations in User Interface (Continued)Abbreviation Definition
162  EFW Estimated Fetal WeightCalculated from the measurements performed during the exam. The measurements used to determine EFW are defined by the currently selected EFW calculation author. Endo EndocardialEpi EpicardialEPSS “E” Point Septal SeparationEstab. DD Established Due DateA user-entered due date based on previous exam data or other available information. The LMP is derived from the Established Due Date and is listed in the patient report as LMPd.ET Elapsed TimeFH Femoral HeadFHR Fetal Heart RateFL Femur LengthFM (Right and Left) Foramen Magnum (same as SO)FTA Fetal Trunk AreaGA Gestational AgeGA by LMP  Gestational Age by Last Menstrual PeriodThe fetal age calculated using the date of the Last Menstrual Period (LMP).GA by LMPd Gestational Age by derived Last Menstrual PeriodThe fetal age calculated using the Last Menstrual Period (LMPd) derived from the Estab. DD.Gate Depth of Doppler GateGS Gestational SacGyn GynecologyHC Head CircumferenceHR Heart RateAbbreviations in User Interface (Continued)Abbreviation Definition
 Glossary 163GlossaryICA Internal Carotid ArteryIMT Intima Media ThicknessIVRT Iso Volumic Relaxation TimeIVS Interventricular SeptumIVSd Interventricular Septum DiastolicIVSFT Interventricular Septum Fractional ThickeningIVSs Interventricular Septum SystolicLA Left AtriumLA/Ao Left Atrium/Aorta RatioLAT F Lateral FarLAT N Lateral NearLMP Last Menstrual PeriodLMP Last Menstrual PeriodThe first day of the last menstrual period. Used to calculate gestational age and EDD.LMPd derived Last Menstrual PeriodCalculated from the user-entered Estab. DD.LV Left VentricularLV Area Left Ventricular AreaLV mass Left Ventricular massLV Volume Left Ventricular VolumeLVd Left Ventricular diastolicLVD Left Ventricular DimensionLVDd Left Ventricular Dimension DiastolicLVDFS Left Ventricular Dimension Fractional ShorteningLVDs Left Ventricular Dimension SystolicAbbreviations in User Interface (Continued)Abbreviation Definition
164  LVEDV Left Ventricular End Diastolic VolumeLVESV Left Ventricular End Systolic VolumeLVET Left Ventricular Ejection TimeLVO Left Ventricular OpacificationLVOT Left Ventricular Outflow TractLVOT Area Left Ventricular Outflow Tract AreaLVOT D Left Ventricular Outflow Tract DiameterLVOT VTI Left Ventricular Outflow Tract Velocity Time IntegralLVPW Left Ventricular Posterior WallLVPWd Left Ventricular Posterior Wall DiastolicLVPWFT Left Ventricular Posterior Wall Fractional ThickeningLVPWs Left Ventricular Posterior Wall SystolicLVs Left Ventricular systolicMB SonoMBMCA Middle Cerebral ArteryMCCA Mid Common Carotid ArteryMECA Mid External Carotid ArteryMI Mechanical IndexMICA Mid Internal Carotid ArteryMid MiddleMM M ModeMR PISA Mitral Regurgitation Proximal Iso Velocity Surface AreaMR/VTI Mitral Regurgitation/Velocity Time IntegralMsk MuscleMV Mitral ValveAbbreviations in User Interface (Continued)Abbreviation Definition
 Glossary 165GlossaryMV Area Mitral Valve AreaMV Regurgitant FractionMitral Valve Regurgitant FractionMV Regurgitant Volume Mitral Valve Regurgitant VolumeMV/VTI Mitral Valve/Velocity Time IntegralMVA Mitral Valve AreaMV ERO Mitral Valve Effective Regurgitant OrificeMV PISA Area Mitral Valve Proximal Iso Velocity Surface AreaMV Rate Mitral Valve RateNeo NeonatalNrv NerveNST Non-stress testNTSC National Television Standards CommitteeOA Ophthalmic ArteryOB ObstetricalOFD Occipital Frontal DiameterOph OphthalmicOrb OrbitalPAL Phase Alternating LinePCAp Posterior Cerebral Artery PeakPCCA Proximal Common Carotid ArteryPCoA Posterior Communicating ArteryPECA Proximal External Carotid ArteryPGmax Maximum Pressure GradientPGmean Mean Pressure GradientPGr Pressure GradientAbbreviations in User Interface (Continued)Abbreviation Definition
166  PHT Pressure Half TimePI Pulsatility IndexPICA Proximal Internal Carotid ArteryPISA Proximal Isovelocity Surface AreaPlaq PlaquePOST F Posterior FarPOST N Posterior NearPRF Pulse Repetition FrequencyProx ProximalPSV Peak Systolic VelocityPV Pulmonic ValveP. Vein Pulmonary VeinPW Pulsed Wave DopplerQp/Qs Pulmonary blood flow divided by systemic blood flowRA Right Atrial (pressure)RI Resistive IndexRVD Right Ventricular DimensionRVDd Right Ventricular Dimension DiastolicRVDs Right Ventricular Dimension SystolicRVOT D Right Ventricular Outflow Tract DiameterRVOT VTI Right Ventricular Outflow Tract Velocity Time IntegralRVSP Right Ventricular Systolic PressureRVW Right Ventricular Free WallRVWd Right Ventricular Free Wall DiastolicRVWs Right Ventricular Free Wall SystolicAbbreviations in User Interface (Continued)Abbreviation Definition
 Glossary 167GlossaryS SonoHDS/D Systolic/Diastolic RatioSI Stroke IndexSiphon Siphon (internal carotid artery)SM SubmandibularSmP Small PartsSO SuboccipitalSup SuperficialSV Stroke VolumeTAM Time Average MeanTAP Time Average PeakTCD Transcranial DopplerTDI Tissue Doppler ImagingTHI Tissue Harmonic ImagingTI Thermal IndexTICA Terminal Internal Carotid ArteryTO TransorbitalTRmax Tricuspid Regurgitation (peak velocity)TT TranstemporalTTD Transverse Trunk DiameterTV Tricuspid ValveTVA Tricuspid Valve AreaUA Ultrasound AgeCalculated on the mean measurements taken for a particular fetal biometry.Umb A Umbilical ArteryAbbreviations in User Interface (Continued)Abbreviation Definition
168  VA Vertebral ArteryVArty Vertebral ArteryVas VascularVen VenousVF Volume FlowVmax Peak VelocityVmean Mean VelocityVol VolumeVTI Velocity Time IntegralYS Yolk SacAbbreviations in User Interface (Continued)Abbreviation Definition
 Index 169IndexIndexSymbols+/x measurement 44Numerics2D imaging 252D options 25AA & B shortcut keys 15abbreviations 159abdominal, intended uses 12AC power indicator 6acceleration (ACC) index 44accessories list 153acoustic measurement precision 133acoustic outputmeasurement 105tables 107, 132acquisition error 140add new user 16Administrator 16age, gestational 62airborne equipment standards 155ALARA principle 97, 98, 157alphanumeric keys 5angle correction 28, 29annotationskeys 5place 32predefine label groups 18setup 18aorta (Ao) 53aortic valve area (AVA) 56arrow graphic 33ascending aorta (AAo) 53audio 19Bbar code scanner 19baseline 29batteryclean 75safety 90setup 19specifications 154beeps 19biological safety 92biopsy 26bodymarker. See pictographsbrightness 26Ccablesclean and disinfect ECG 76connect power 3calculationscardiac. See cardiac calculationsdelete measurement 46general 45gynecology (Gyn) 58IMT 59menu 7, 45OB 61percent area 47percent diameter 47percent reduction 46perform measurement 45performing 45repeat measurement 46save 45small parts 64specialized 50vascular 67view measurement 46volume 48volume flow 48, 49calipers 41cardiac calculationsAAo 53Ao 53AVA 56CI 57CO 57dP:dT 56HR 57IVRT 52LA 53LV volume (Simpson’s Rule) 53
170  Index  LVd 53LVOT D 53LVs 53MV/AV area 54overview 50PHT 55PISA 51RVSP 55setup 19SV 57TDI 58VTI 54cardiac index (CI) 57cardiac output (CO) 57cardiac references 141cardiac, intended uses 12cautions, definition viicine buffer 5, 30cleanbattery 75ECG cable 76footswitch 75LCD screen 73system 73transducers 74clip acquisition delay 39clipsSee also images and clipsoptions 26, 35color Doppler (Color) imaging 27color power Doppler (CPD) imaging 27color scheme, background 23color suppress 27Color. See color Doppler (Color) imagingconnectivity setup, wireless certificates 19continuous wave (CW) Doppler imaging 28, 29controlsdirect 98indirect 99receiver 99CPD. See color power Doppler (CPD) imagingcustomer assistance viiCW Doppler. See continuous wave (CW) Doppler imagingDdate 20default settings 15delta pressure:delta time (dP:dT) 56depthadjust 30definition 157keys 5marker 7DICOM standard 155disinfectbattery 75ECG cable 76system 73transducers 74disinfectants, compatibility 77display setup 20distance measurements2D 42Mmode43D-line 28DopplerDoppler gate depth 29measurements 43scale setup 22dual images 25duplex 22DVD recorder 19, 71Dynamic Range 22EECGMonitoring 26, 38elapsed time (ET) measurement 44electricalsafety 88specifications 154electromagnetic compatibility 93electromechanical safety standards 154EMC classification standards 155EMED worksheets 70equipment safety 90error message 89errorsacquisition 140algorithmic 140measurement 140estimated date of delivery (EDD) 145estimated fetal weight (EFW) 146Event log 17examchange type 31end 34
 Index 171Indextype and transducer 31export and importOB calculation tables 21predefined label groups 18user accounts 17Ffar 5fetal heart rate (FHR) 63flow sensitivity 27focal zones, optimize 25footswitch setup 15forms 6freeze 30Ggainadjust 30ECG 39knob 5gate size 29gestational agesetup 21tables, references 146gestational growth, measure 63grace period 71grayscale 25growth analysissetup 21tables, references 148guidance documents, related 104guideline 26gynecology, intended uses 12Hheart rate 34heart rate (HR) 43, 57, 63HIPAA standard 155home position 33humidity limits 154Iimage quality, poor 71images and clipsarchive 38delete 38export to USB 38review 37imaging modeslist of 153transducer 31import. See export and importIMT. See Intima Media Thickness (IMT)in situ, definition 157infertility, intended uses 12intended uses 11–13intensityderated 105in situ 105water-value 105interventional, intended uses 12Intima Media Thickness (IMT)calculations 20, 59sketch 61trace 61intraoperative, intended uses 12invertColor 28spectral trace 29iso volumic relaxation time (IVRT) 52Kkeys 5knobs 5Llabeling symbols 134language 23layout 22LCD screenclean 73output 103left atrium (LA) 53left ventricular diastolic (LVd) 53left ventricular outflow tract diameter (LVOT D) 53left ventricular systolic (LVs) 53left ventricular volume (LV volume) 53license key 71live trace 22, 30loginAdministrator 16user 16LVO (Left Ventricular Opacification) 26
172  Index  MM Mode imaging 26maintenance 72measurements+/x Ratio, Doppler 44See also calculations2D 42about 41Acceleration, Doppler 44accuracy 41, 139area, 2D 42automatic trace, Doppler 44circumference, 2D 42delete 41distance, 2D 42distance, M Mode 43Doppler 43edit 41Elapsed Time, Doppler 44errors 140fetal heart rate 63heart rate 43, 63M Mode 43manual trace 42, 44Pressure Gradient, Doppler 43publications 141Resistive Index, Doppler 44save to calculation and report 41terminology 141vascular 67Velocities, Doppler 44mechanical index (MI) 103, 157mitral valve/aortic valve (MV/AV) 54M-line 26mode data 7, 20modes, keys 6Nnear 5network 20NTSCdefinition 157option 19OOBcalculations 20, 61custom measurements setup 21custom tables setup 22graphs 70intended uses 12references 145tables setup 22on-screen controls 6optimize 25orientationmarker 7option 26output display 103PPALdefinition 157option 19password 16, 17, 18patient header 7, 20patient information form 33, 36, 37patient list 36patient reportabout 68cardiac 69general 68OB 69save measurement to 41vascular 69PC 19pediatric, intended uses 12percent reduction calculation 46peripherals 154pictographsPICTO key 7placing 33power delay 19power key 5precision, acoustic measurement 133preferences 22presets 22pressure half time (PHT) 55pressure limits 154PRF 28, 29print 37printerproblem 71setup 19probe. See transducerproximal isovelocity surface area (PISA) 51pulsed wave (PW) Doppler imaging 28
 Index 173IndexPW Doppler. See pulsed wave (PW) Doppler imagingRrecording problem 71referencescardiac 141general 149gestational age tables 146growth analysis tables 148obstetrical 145ratio calculations 149report, patient 68resistive index (RI) measurement 44right ventricular systolic pressure (RVSP) 55Ssafetybattery 90biological 92electrical 88electromagnetic compatibility 93equipment 90savecalculations 45image 6measurements 41SAVE key 22scale 29scanhead. See transducerscreen layout 7security 15, 16serial port 19setup pages 15shipping specifications 154shortcut keys 15Simpson’s Rule 53skin line, definition 158sleep delay 19small parts calculations 64software license 71SonoHD 158SonoMB 26, 158specifications 153spectral trace 28standardsairborne equipment 155DICOM 155electromechanical 154EMC classification 155HIPAA 155steeringCPD 28Doppler 29storage specificationsequipment 154images 153stroke volume (SV) 57superficial, intended uses 12sweep speedDoppler 29ECG 39M Mode 27symbols, labeling 134systemclean and disinfect 73controls 5software 1status 7, 20wake up 3TTechnical Support viitemperature limits 154text 32text description 7thermal index (TI) 22, 103, 158THI 26time setup 20tissue Doppler imaging (TDI) 29, 58tissue models 106touchpad 6, 8transcranial, intended uses 13transducerclean and disinfect 74curved array 157definition 158disinfect 74exam type 31general use 10imaging modes 31invasive or surgical use 10linear array 157preparation 10problems 71specifications 153troubleshoot 71
174  Index  Uultrasound terminology 157unfreeze text 18USB storage device, export to 38user account 17user guide, conventions used viiuser setup 16uses, intended 11–13Vvariance 28vascularcalculations 67intended uses 13velocity measurement 44velocity time integral (VTI) 54volumecalculation 48Doppler, adjust 29volume flow 48Wwall filter 28, 29warnings, definition viiworksheets, EMED 70Zzoom 30
P07662-02*P07662-02*

Navigation menu