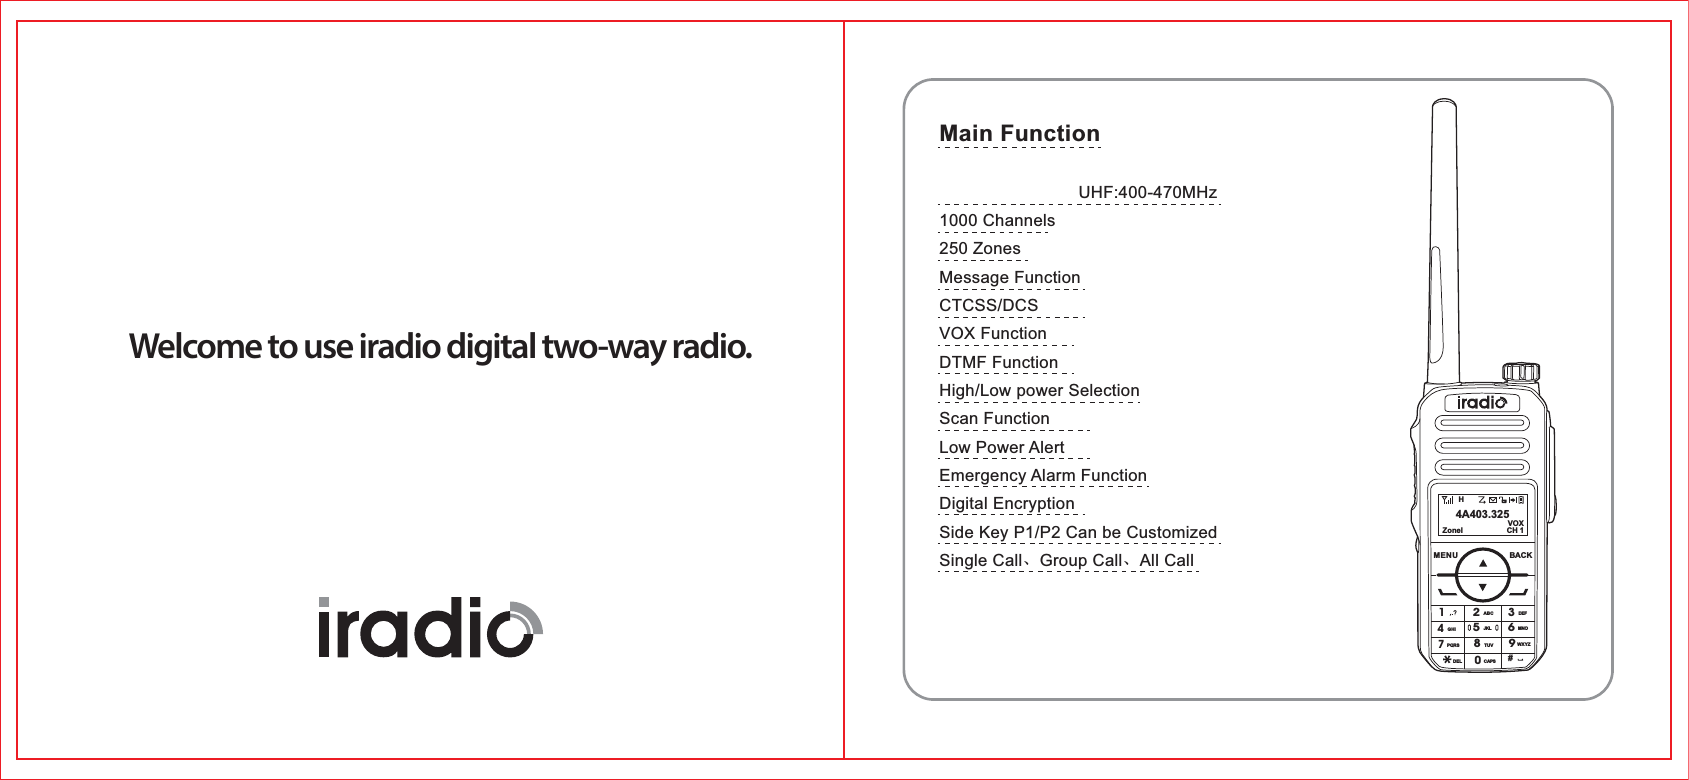
Iradio Electronics DM-568 Digital Two-way Radio User Manual
Iradio Electronics Co., Ltd. Digital Two-way Radio
UserManual.wiki
>
Iradio Electronics
>
DM 568 User Manual
User Manual
Navigation menu
Upload a User Manual
Namespaces
Wiki Guide
HTML
PDF
Info
Views
User Manual
Discussion / Help
Navigation


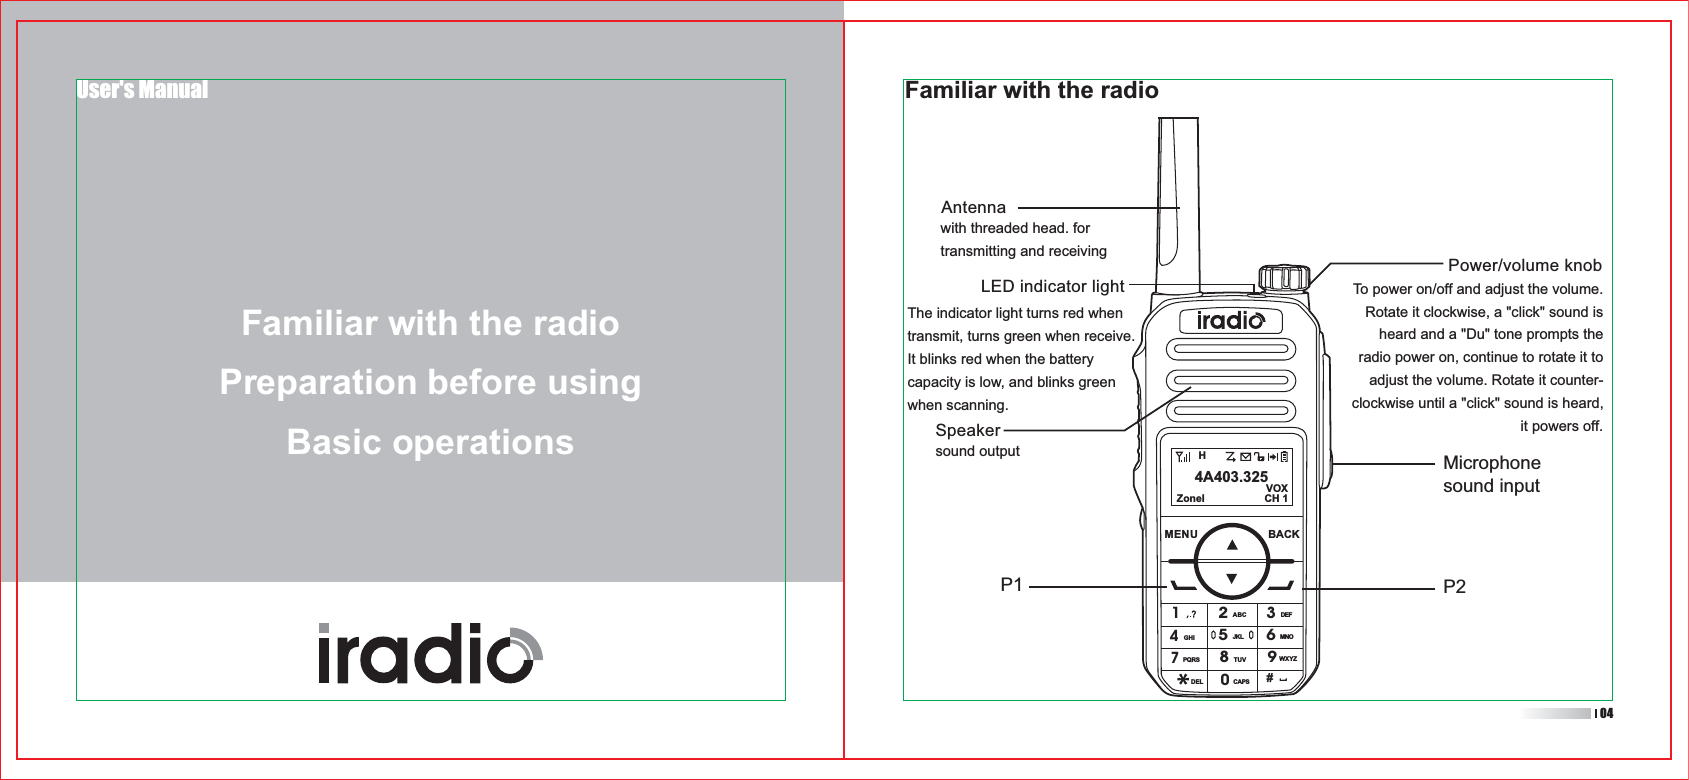
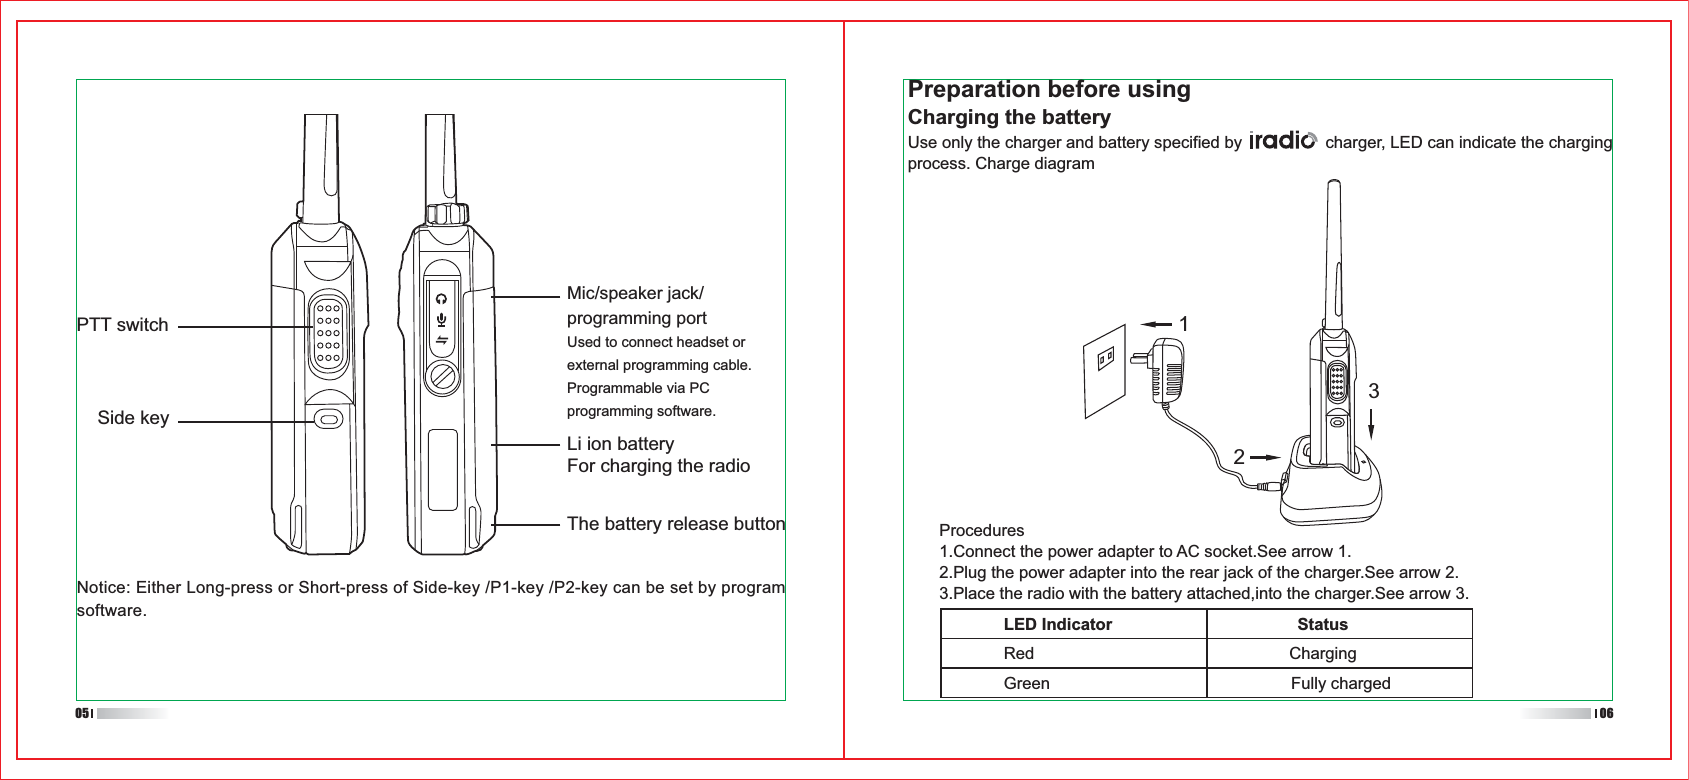
![Selecting a zoneA zone is a group of channels exhibiting the same property,and is programmed by your dealer.The radio supports up to 64 zones.each with a maximum of 16 channels.You may select a zone through any of the following methods:1.Press key to enter menu,go to the menu”Zone”, and use the [ or ] key to select your desired zone.2.You may quickly toggle to your desired zone by pressing the key to confirm.Channels、users ID、talk group ID selectionSelect Channels、users ID、talk group ID by pressing [ or ] key.MENUMENUUser's ManualBasic operationsPrivate Call、Group Call、All CallBasic operationsTurning the radio on/offRotate the radio on-off/volume control knob,clockwise/counter-clockwise until a click is heard to turn the radio on/off.Adjusting the volumeAfter turning the radio on,rotate the radio on-off/volume control knob clockwise to increase the call volume,or counter-clockwise to decrease it.CallTo ensure an optimal volume of the receiving radio,hold the radio approximately 2.5 to 5 centimeters away from your mouth.12](https://usermanual.wiki/Iradio-Electronics/DM-568/User-Guide-3541563-Page-12.png)
![Group CallTransmitting a group callYou may transmit a group call through any of the following methods.1.Transmitting a call to the preset contactIn the home screen,hold down the [ PTT ] key to transmit a group call to the group call contact preset for the current channel.2.Transmitting a call through contact list or call logsAnswered/Outgoing list.2)Use the [ or ] key to select the group call contact you want to call.3)Hold down the [ PTT ]key to transmit the group call.1)Transmitting a call through contact list or call logsAnswered/Outgoing list.3)Use the [ or ] key to select the private call contact you want to call.MENUMENUPrivate callTransmitting a private callTransmitting a private call through any of the following methods:In the home screen,hold down the [PTT] key to transmit a private call to the private call contact preset for the current channel. Note: Your dealer may preset a contact for each digital channel. The preset contact could be a private call contact,a group call contact or an all call contact.Receiving and responding to a group call1)When a group call is received,the LED indicator light for green light.2)In the home screen,top line will display RSSI etc status icon,In the display area below, the first line shows group call + User`s name/ID,next line shows a group call icon. 4)You may hold down the [ PTT ] key within the preset time period to call back. If you do not respond to a received group call,your radio`s Missed Call Log will display the missed calling number.13 14Receiving and responding to a private call1)When a private call is received,the LED indicator light for green light.2)In the home screen,top line will display RSSI etc status icon,In the display area below, the first line shows private call + User`s name/ID,next line shows a private call icon. 3)You may hold down the [ PTT ] key within the preset time period to call back.If you do not respond to a received private call, your radio`s Missed Call Log will display the missed calling number.](https://usermanual.wiki/Iradio-Electronics/DM-568/User-Guide-3541563-Page-13.png)
![User's ManualAll CallTransmitting an all callMethod are the same as those in transmitting a group call. Note: You can transmit an all call only when it is enabled by your dealer. And you cannot respond to an all call.Calls on analog channelsTo transmit on an analog channel, hold down the [ PTT ] key and speak into the microphone.To receive, release the [ PTT ] key.15Emergency Alarm Function and OperationsMenu Functions and Operations](https://usermanual.wiki/Iradio-Electronics/DM-568/User-Guide-3541563-Page-14.png)
![Emergency Alarm FunctionIn case of an emergency, you can use the feature to ask for help from your companion or control center.The emergency process has the highest priority.You can make emergency operation even when your radio is transmitting or receiving.To enable the feature on a channel.an emergency system must be assigned to the channel via the programming software.In addition,the system name,emergency type and emergency mode are settable via the programming software.Emergency typeFor each emergency mode,there are four emergency types available.You can select one of them via the programming software.Emergency Type DescriptionDisabledRegularSilentSilent with VoiceTurn off the function of emergency alarmIn emergency mode,the radio will give audible and visible indication.In emergency mode,the radio won`t give any audible or visible indication.In emergency mode,the radio won`t give any audible or visible indication,but will receive voice from the companion or control center automatically.Emergency ModeEmergency Mode DescriptionEmergency AlarmEmergency Alarm with CallIn this mode,you can send alarm information to your companion or control center by pressing the programmed emergency key, but you cannot talk with them.In this mode,you can send alarm information by pressing the programmed emergency key,then press [PTT ] and speak into the microphone,allowing your voice and background noise to be transmitted,release the [ PTT ] key to receiving.In this mode,press the programmed emergency key to go to the revert channel, then you can speak into the microphone, allowing your voice and background noise to be transmitted automatically(You do not need to hold down the [PTT] key).Emergency Alarm with Voice to Follow17 18](https://usermanual.wiki/Iradio-Electronics/DM-568/User-Guide-3541563-Page-15.png)
![1.Press any key to stop all sounds of receiving an emergency alarm.2.Hold the radio approximately 2.5 to 5 centimeters away from your mouth. If you turn on the function of Channel free indication tone, when you release [ PTT ] key, you will heard a short prompt tone,indicates that this channel can use now.3.Press [PTT] to start a call,LED indicator light flashing red color.The radio are on the emergency alarm mode.4.Release the [PTT] to receiving the call,when the sender part reply,LED indicator light flashing green color. You will see the group call icon、Talk Group ID and sender part ID.5.After finish the call, short press[ ]key, then press preset key to turn off the alarm.6.Radio back to home screen.Operation of sending emergency alarm1.Press preset key to turn on the emergency alarm function.2.Home screen will display 3.While receiving confirmation of emergency alarm, it will prompt Emergency call tone and the LED indicator light will flashing green color. Emergency Alarm 1)The screen display emergency alarm success. or if the radio didn`t received any confirmation of emergency alarm and used all the number of replication,will send a prompt tone, then display emergency alarm failure on screen.2)The radio exit emergency alarm mode,and back to the home screen. Emergency Alarm with CallRefer to the description of Emergency Alarm with Call. Emergency Alarm with Voice to FollowRefer to the description of Emergency Alarm with Voice to Follow.Operation of receiving emergency alarm1.While you receiving emergency alarm,the alarm and number of receiving will interchanging display with sender`s name and ID.2.Sending one prompt tone and LED indicator light flashing red color.3.If activated,radio will confirm the emergency alarm automatically. While you receiving the emergency alarm,the screen will display the prompt of emergency alarm,meanwhile you can not receive other prompt or other calling,until you exit the emergency alarm mode.Caution: Short press[ ]key, then press preset key to turn off the alarm.MENUMENU19 20Operation of replying emergency alarm](https://usermanual.wiki/Iradio-Electronics/DM-568/User-Guide-3541563-Page-16.png)
![1.Press [ ] to enter menu mode.2.Go to Call Log, press [ ] to confirm.3.Go to the user`s name or ID that you required.,then press[ ]to confirm.Or go to Manual dial,press [ ] to confirm,edit ID number then press [ ] key.4.Go to radio detection,,then press [ ] to confirm.5.The screen display radio detection: <user`s name or ID>, Indicates that the intercom is being detected.LED indicator light flashing red color.6.Waiting confirmation.7.If the target radio is active in the system, you will hear a prompt voice, the screen display target radio have responded.Or if the target radio is not active in the system, you will hear a prompt voice, the screen display target radio didn`t responded.8.Radio will back to user`s name or ID screen. If you press [ ] while waiting confirmation, you will hear a prompt voice and the radio will terminate all retry and exit the walkie talkie detection mode.Send a Radio DetectionButton11 2 345678abc2 A B Cdef 3 D E Fghi 4 GHIjkl5JKLmn o 6 M N Opqrs 7 P Q RSYZtuv8TUVwxLong press “0” to switch the case of character.Backspace,can delete one character or one number.Space key,long press”#”can switch input method.yz 9 WX9101112131.,?!@&'%- : * #234567890*#MENUMENUMENUMENUMENUMENUMENUMenu Functions and OperationsCharacter inputYou can use 3×4 alphanumeric keyboard to To access the radio`s function. While using keyboard to input user`s name or message,have three mode to select:1.English character mode.2.Chinese input method mode.3.Digital input modeWhile input ID by keyboard,only can using digital input mode.English character modeSome characters need to press a key several times,The following table shows the number of times you need to press a key to get the desired character.Radio DetectionActivation function allows you to determine whether there are other walkie talkies in the system is active,and won`t disturb the walkie talkie users.This feature only suitable for user`s name or ID. 21 22](https://usermanual.wiki/Iradio-Electronics/DM-568/User-Guide-3541563-Page-17.png)
![Receiving & Confirm call promptThe screen will display calling party`s alias/ID when you received a call prompt.1.You will heard a reduplicated sound,LED indicator light flashing red color.2.Press and release [PTT] key to confirm call prompt,or press [ ] key then select “Ignore”to exit call prompt mode.1.Press [ ] to enter menu mode.2.Press [ or ] key to Call Log, press [ ] to confirm.3.Go to the list that you want, press [ ] to choose current name/ID4.You can select store or delete.5.If you store the ID, press[ ] ,input it`s name that you want,then press [ ] to confirm.MENUMENUMENUMENU MENUMENUMENUCall prompt operationThis function allow you to send a prompt in order to remind receiver call back while free.Note:This function only suitable for user alias/ID,it can sending by Call Log or manual dialing.Message function23 24Setting contacts personCall log provides “Address Book” for radio.Each entry corresponds to an user`s name or ID for initiating the call. In addition,Each entry is different according to the settings,consist of group call、private call and all call.This radio support digital call log.Entries in the “Contacts” show the following information:Contacts ListNew ContactManual DialCall recording functionThis radio can record recent Missed, Answered, Outgoing information.You can press [Call Log] to check and manage the recent call. While check the list, press [PTT] to initiate a call.Missed call screenWhenever you missed the call,it will display a missed calling message in home screen, you can check or check later.Note:If press [PTT] key while check missed call,it will initiate a call with current number.Store/Delete Missed,Answered,Outgoing list name/IDTo access this item,press the [ ] key and then select [Message].New messageYou can create new text message(144 characters at most)and send it to an individual user or to a talk group.Quick textUnder this option there are some text message(50 entries at most).You can choose to edit and send any entry.InBoxThe InBox can save up to 50 received messages.When the InBox is full,the earliest message will be overwritten by the latest one automatically.For each message,you can choose to perform any of these operations:Reply,Forward,View ](https://usermanual.wiki/Iradio-Electronics/DM-568/User-Guide-3541563-Page-18.png)
![1. Press [ ] key to enter the menu2. Press [ or ] key and choose Contact list, then press [ ] key to confirm, the contacts are grouped by letter.3. Press [ or ] key to choose the name or ID, and press [ ] key to confirm.Or press [ or ] key to choose Manual Dial, press [ ] twice and input the user’s name and ID, then press [ ] to confirm.4. Press [ or ] key to choose Radio disable, and press [ ] key to confirm.5.The screen displays: radio disable:<user’s name or ID>, Indicator light turns red. MENUMENUMENUMENUMENUMENUEncryptionIf this function is enabled,which is beneficial to preventing other users on the channel by using a number of encryption and decryption technologies for unauthorized eavesdropping.The launch of signaling and user identification is unencrypted. The encryption must be enabled so that the radio can transmit the signal encrypted, even if you don’t have to encrypt it when receive it.DTMFMake a DTMF callAnti-TheftTwo way radio can only be assigned to one of the above encryption types. In order to decrypt the encrypted call or data transmission, the receiver must have the same encryption key with the transmitter.(Apply to Basic encryption) if your radio received the call of different encryption keys or key values and keyID, then you will receive some confused noisy.(Basic encryption)Press the pre-programmed encryption key to turn on or turn off this function. Dual Tone Multi-Frequency (DTMF) function allows you to operate the radio when there is interference in the radio system1. Press and hold [ PTT ] key.2. Input the number you need.You can disable DTMF tone by turning off all radio prompt sound.You can revival or kill any radio in the system. For example, you might want to disable a stolen radio, to prevent thief using it, and enable it when you get it back.Note: Only the radio with kill or revival function can be enable and disable.Basic encryptionKill FunctionChoose Menu,25 26OutBoxThe OutBox can save up to 50 sent messages.When the OutBox is full,the earliest message will be overwritten by the latest one automatically.For each of message, you can choose to perform any of these operations: Resend,Forward,Delete All”.DraftsThe Drafts can save up to 50 sent messages.When the Drafts is full, the earliest message will be overwritten by the latest one automatically.For each of message, you can choose to perform any of these operations:Send, Save and ](https://usermanual.wiki/Iradio-Electronics/DM-568/User-Guide-3541563-Page-19.png)
![When scanning, The radio will scan the current channels in a circular manner throughout the pre-programmed scanning list to find out which channel has received the signal. LED turns red and flashes, the scanning icon will appear on the screen.When scanning in dual modes,If the radio is in a digital channel while lock in an analogue channel, will switch from digital mode to analogue mode automatically during the call duration.Vice versa.1.Press the [ ] key to enter the menu.2.Press [ or ] key and choose Scan, then press the [ ] key to confirm.3.Press [ or ] key to view/edit the scanning list. then press the [ ] key to confirm.4.Use [ or ] key to check members in scanning list.5.If the priority channel has been set,the priority icon will appear in the left of user name, it means the user is priority channel or priority channel . If the priority channel is none , then the radio won’t display the special icon. In a scanning list, the radio can’t have more than one priority channel 1 or priority channel 2.6. Wait for confirmation.7. The radio will issue a prompt sound when disable the radio successfully, and the screen displays:radio disable successfully.The radio will issue a prompt sound as well when it fail to disable the radio. And the screen displays: Radio disable failed.During the process of disabling the radio, please do not press the [ ] key, otherwise, you won’t get the confirmation.Use menu function:1.Press [ ] key to enter the menu.2.Press [ or ] key and choose Contact list, then press [ ] key to confirm, the contacts are grouped by letter.3. Press [ or ] key to choose the name or ID, and press [ ] key to confirm.Or Press [ or ] key to choose Manual Dial, press[ ] twice and input the user’s name and ID, then press [ ] key to confirm.4. Press [ or ] key to choose Radio enable, and press [ ] key to confirm.5.The screen displays: radio enable:<user’s name or ID>, Indicator light turns red.6. Wait for confirmation.7.The radio will issue a prompt sound when enable the radio successfully, and the screen displays:radio enable successfully.The radio will issue a prompt sound as well when it fail to enable the radio. And the screen displays: Radio enable failed.During the process of disabling the radio, please do not press the [ ] key,otherwise, you won’t get the confirmation.MENUMENUMENUMENUMENUMENUMENUMENUMENUMENUMENURevival FunctionScanning listCreate the scan list and assign them to each channel or each group. There are up to 250 scanning lists available, each list is up to 16 members.Each scanning list supports mixed analogue and digital channels. You can edit the scanning list to add/delete the channel or set up a priority channel.Check the Members of Scanning List1 2NScanning indicator and method:27 28](https://usermanual.wiki/Iradio-Electronics/DM-568/User-Guide-3541563-Page-20.png)
![Press the scanning key which has been programmed by software or enter the menu list.1.Press the [ ] key to enter the menu2.Press [ or ] key and choose Scan, then press the [ ] key to confirm.3.If the scanning function is disable, the scanning interface displays TURN ON, or if this function is enable, the scanning interface displays TRUN OFF.4.Press the [ ] key to confirm.5. When this function is enable, indicator light turns red and flashes, the scanning icon appears on the screen; when this function is disable, LED indicator light and scanning icon disappear.MENUMENUMENUThere are two scanning methodsAccording to pre-programmed the scanning key to turn on/off scanning or enter the Menu and choose Scan. When you start to scan, radio will detect all channels/contact groupsin the pre-programmed scan list.When you select an already activated auto scan channels/contact groups,radiowill start to scan from the activated auto scan channel. Start/stop Scanning:Radio detect active channel/contact group when scanning, at this time radio will stay in thischannel/contact group, which called “scanning hold time”.Procedure:1. Hold the radio in a vertical position and keep one to two inches (2.5 to 5.0 cm) distancefrom the mouth. If the “channel idle tone” is enable, then you will hear a short prompt sound when release the PTT button after transmitting the signal, which indicates that the channel is idle, and waiting for your response.2.Press PTT button during the hold time, the LED indicator light turns red.3.Release PTT button to receive the signal.4.If you didn’t respond the signal during the hold time, the radio will carry on scanning.3029Reply](https://usermanual.wiki/Iradio-Electronics/DM-568/User-Guide-3541563-Page-21.png)
![UtilitiesThe utilities shall consist of the following options:Radio SettingsTalk aroundThis function allows the radio that continues to communicate where the repeater does not work, or the radio is out of the range of repeater while is within the call range of other radios. That called “talk around”.Press the 1750hz replay echo/talk around key which has been programmed via software, then you can switch these two kinds of modes.Use the menu function1. Press Key to enter the menu2.Press [or ] key and choose Utilities, then press key to confirm.3.Press [or ] key and choose Radio Setting, then press key toconfirm.4.then press key to confirm. and choose Talk around, then press key to to confirm.5.If radio is in 1750hz reply mode, you will see selected Turn off, when the radio is in talk around mode, you will see selected Turn on.6.press key to confirm.7.The screen displays talk around icon( ), or it will disappear when this function has shut down.8.The interface will return to the previous options list.Even after shutdown,talk around will be remained.31 32](https://usermanual.wiki/Iradio-Electronics/DM-568/User-Guide-3541563-Page-22.png)
![All TonesIf needed, all tones could be enable or disable.(Except emergency alerts tone).Press All tones key which pre-programmed by software to turn on/off this function.Keypad TonesIf needed, Keypad tones could be enable or disable.Use the menu function:1.Press [ ] key to enter the menu2.Press [ or ] key and choose utilities,then press key to confirm.3.Press [ or ] key and choose radio settings, then press key to confirm.4.Press [ or ] key and choose tones/alerts,then press key to confirm.5.Press [ or ] key and choose keypad tones,then press key to confirm.6.Press [ ] key to turn on, the screen displays”keypad tones on”Or press [ ] key to turn off all tones, the screen displays “keypad tones off”.MENUMENUMENUPower Level SettingThere is High/Low power available for each channel.Setting:High power allow you to communicate with other radio with long distance. Low power allows you to communicate with other radio with short distance. Press High/Low power key which has been programmed by software, you can switch high/low power.Use the menu function:1.Press key to enter the menu2.Press [or ] key and choose utilities,then press key to confirm.3.Press [or ] key and choose radio settings, then press key to confirm.4.Press [or ] key and choose Power,then press key to confirm.Tones/AlertsIncluding the following options:1.Press [ ] key to enter the menu2.Press [ or ] key and choose utilities,then press key to confirm.3.Press [ or ] key and choose radio settings, then press key to confirm.4.Press [ or ] key and choose tones/alerts,then press key to confirm.5.Press [ or ] key and choose all tone,then press key to confirm.6.Press [ ] key to turn on all tones,the screen displays”all tones on”Or 6.Press [ ] key to turn off all tones, the screen displays “all tones off”.MENUMENUMENUUse the menu function:33 34](https://usermanual.wiki/Iradio-Electronics/DM-568/User-Guide-3541563-Page-23.png)
![1.Press [ ] key to enter the menu2.Press [ or ] key and choose utilities,then press key to confirm.3.Press [ or ] key and choose radio settings, then press key to confirm.4.Press [ or ] key and choose Back light, then press key to confirm.5.Select Press [ ] Normal or Tight, then press key to Confirm.6.The interface will return to the option list of radio settings option list.Use the menu function:1.Press [ ] key to enter the menu2.Press [ or ] key and choose utilities,then press key to confirm.3.Press [ or ] key and choose radio settings, then press key to confirm.4.Press [ or ] key and choose Back light, then press key to confirm.5.Press [ ] key to turn on this function when the interface displays Auto On.Or Press [ ] key to turn off this function when the interface displays Turn off.Once you turn off this function, the back light of keypad and screen will be shut down.5.Under the instruction to switch the power.6.Press key to confirm high/low power7.The interface will return to the radio setting options.Press <back> to return the main interface. The power level icon will be displayed on the screen.MENUMENUMENUMENUMENUBack lightYou can turn on or off the screen back light according to your requirement.Press the Back light key which has been programmed by software, to turn on/off this function.SquelchAdjust the squelch level to filter useless call with low signal or when there’s too much background noise.Setting:The normal value is default value, to filter (useless) call or background strictly. However, a call from a remote location may also be filtered out. Press the squelch level key which has been pre-programmed by software, to switch between Normal and Tight.Use the menu function:35 36](https://usermanual.wiki/Iradio-Electronics/DM-568/User-Guide-3541563-Page-24.png)
![1.Press [ ] key to enter the menu2.Press [ or ] key and choose utilities,then press key to confirm.3.Press [ or ] key and choose radio settings, then press [ ] key to confirm.4.Press [ or ] key and choose LED indicator, then press [ ] key to confirm.5.Press [ ] key to turn on,the screen displays”All LED’s on” Or Press [ ] key to turn off, the screen displays “All LED’s off”.1.Press [ ] key to enter the menu2.Press [ or ] key and choose utilities,then press [ ] key to confirm.3.Press [ or ] key and choose radio settings, then press [ ] key to confirm.4.Press [ or ] key and choose Language, then press [ ] key to confirm.5.Press [ or ] key and choose the language option, then press [ ] key to confirm.6.The interface displays the selected language and return to the main interface.1.Press [ ] key to enter the menu2.Press [ or ] key and choose utilities,then press [ ] key to confirm.3.Press [ or ] key and choose Intro Screen, then press [ ] key to confirm.4.Press [ or ] key and choose Keypad Lock, then press [ ] key to confirm.5.The interface displays “keypad locked”. Press [ ] , then press [ ] Key to unlock the keypad.6.The screen displays Keypad unlock and return the main interface.If needed, Intro Screen could be enable or disable.1.Press [ ] key to enter the menu2.Press [ or ] key and choose utilities,then press [ ] key to confirm.3.Press [ or ] key and choose Intro Screen, then press [ ] key to confirm.4.Press [ or ] key and choose Back light, then press [ ] key to confirm.5.Press [ ] key to turn on,the screen displays”Intro screen on”6.Press [ ] key to turn off, the screen displays “Intro screen off”.MENUMENUMENUMENUMENUMENUMENUMENUMENUMENUMENUMENUMENUMENUMENUMENUMENUMENUMENUMENUMENUIntro ScreenKeypad LockYou can lock the keypad to prevent the unexpected input. Radio supports the following languages:EnglishChineseLanguageLED indicator lightIf needed, LED Indicator could be enable or disable.37 38](https://usermanual.wiki/Iradio-Electronics/DM-568/User-Guide-3541563-Page-25.png)
![1.Press [ ] key to enter the menu2.Press [ or ] key and choose utilities,then press [ ] key to confirm.3.Press [ or ] key and choose radio settings, then press [ ] key to confirm.4.Press [ or ] key and choose Password Lock, then press [ ] key to confirm.5.Input the correct eight-digit number password which has been programmed by software, then press [ ] key to confirm.6.If the password is incorrect, the interface displays “wrong password”, if the pass word is correct, the interface will change to the Password lock options list.7.If the first line displays “turn on”,press [ ] key to confirm, then you should input the correct password to turn on the radio.If the first line displays “turn off”, press If the first line displays to confirm, then you can turn on the radio directly while don’t have to input the password.8.Press [ or ] key and choose Change Pwd, then press [ ] key to confirm.9.Enter 8 digits new password. then press [ ] key to confirm.10.Confirm the new 8 digits password,hen press [ ] key to confirm.11.Screen displays that Password changed.Note:The password should be 8 digits number.VOXThis function allows you to initiate voice-activated hands-free calls on pre-programmed channels. Whenever a microphone with VOX function detect voice, radio will transmit signals automatically with the pre-programmed period of time.Press [PTT] button during the operation will disable VOX function, to re-enale the VOX function, You must do one of the following options:Note:Only the radio with these functions can be enable or disable VOX.Press VOX key which has been pre-programmed by software to turn on/off this function.Use the menu function:1.Press [ ] key to enter the menu2.Press [ or ] key and choose utilities, then press [ ] key to confirm.3.Press [ or ] key and choose radio settings, then press [ ] key to confirm.4.Press [ or ] key and choose VOX, then press [ ] key to confirm.MENUMENUMENUMENUMENUMENUMENUMENUMENUMENUMENUMENUMENUPassword Lock39 40](https://usermanual.wiki/Iradio-Electronics/DM-568/User-Guide-3541563-Page-26.png)
![My Number1.Press [ ] key to enter the menu2.Press [ or ] key and choose utilities,then press [ ] key to confirm.3.Press [ or ] key and choose radio information, then press [ ] key to confirm.4.Press [ or ] key and choose My Number, then press [ ] key to confirm.5.The radio’s ID and name will be displayed on the interface.1.Press [ ] key to enter the menu2.Press [ or ] key and choose utilities,then press [ ] key to confirm.3.Press [ or ] key and choose radio settings, then press [ ] key to confirm.4.Press [ or ] key and choose Clock, then press [ ] key to confirm.5.Press [ or ] key and choose time, then press [ ] key to confirm.6.Press [ ] key to enter time setting interface7.Press [ or ] key to move right and left and choose the number you want to change, the number turns to reverse video text, input the right number via keypad.8.The screen display “time saved” after pressing key to confirm.MENUMENUMENUMENUMENUMENUMENUMENUMENUMENUClockClock settings are divided into:Time4.Press [or ] key and choose Clock, then press key to confirm.5.Press [or ] key and choose date, then press key to confirm.6.Press key to enter date setting interface7.Press [or ] key to move right and left and choose the number you want to change, the number turns to reverse video text, input the right number via keypad.8.The screen display “date saved” after pressing key to confirm.iRadio InfoThe Radio Info contains the following parts:Note: Press Back key to return the previous interface.Date1.Press key to enter the menu2.Press [or ] key and choose utilities,then press key to confirm.3.Press [or ] key and choose radio settings, then press key to confirm.41 42](https://usermanual.wiki/Iradio-Electronics/DM-568/User-Guide-3541563-Page-27.png)
![TX Frequency 1.Press [ ] key to enter the menu2.Press [ or ] key and choose utilities,then press [ ] key to confirm.3.Press [ or ]key and choose Program Radio,then press [ ]key to confirm.1.Press [ ] key to enter the menu2.Press [ or ] key and choose utilities,then press [ ] key to confirm.3.Press [ or ] key and choose Program Radio, then press [ ] key to confirm.4.Input the correct password which has been programmed already by software.then press [ ] key to confirm.5.Press [ or ] key and choose RX Frequency, then press [ ] key to confirm.6.The screen displays the current RX frequency,then press [ ] key to confirm.7.Press [ or ] key to move right and left and choose the number you want to change, the number turns to reverse video text, input the right number via keypad.8.Press key to save the new frequency, the screen display “RX frequency saved”.Note: Editing frequency will be limited within the frequency range setted by programming software, If the frequency is less than the minimum of the frequency range, the radio will take the minimal value, conversely, when it greater than the maximum, take the maximal value of the frequency range.VersionsDisplay radio firmware version.1.Press [ ] key to enter the menu2.Press [ or ] key and choose utilities,then press [ ] key to confirm.3.Press [ or ] key and choose radio information, then press [ ] key to confirm.4.Press [ or ] key and choose Firmware Ver./CP Ver., then press [ ] key to confirm.5.The radio’s version will be displayed on the interface.MENUMENUMENUMENUMENUMENUMENUMENUMENUMENUMENUMENUMENUProgram RadioThis Option allows you to edit the channel content.The editable channel content contains the following options:43 44RX Frequency](https://usermanual.wiki/Iradio-Electronics/DM-568/User-Guide-3541563-Page-28.png)
![Encode1.Press [ ] key to enter the menu2.Press [ or ] key and choose utilities,then press [ ] key to confirm.3.Press [ or ] key and choose Program Radio, then press[ ]key to confirm.4.Input the correct password which has been programmed already by software.then press [ ] key to confirm.5.Press [ or ] key and choose QT/DQT Code, then press [ ] key to confirm.TOT1.Press [ ] key to enter the menu2.Press [ or ] key and choose utilities,then press [ ] key to confirm.3.Press [ or ] key and choose Program Radio, then press [ ] key to confirm.4.Input the correct password which has been programmed already by software.then press [ ] key to confirm.5.Press [ or ] key and choose TOT, then press [ ] key to confirm.6.The screen displays infinite, 15S,30S.....555S(Increasing 15S each time),Press [ ] key to choose the option you want.then The interface displays “TOT saved” after pressing [ ] key.Channel Name1.Press [ ] key to enter the menu2.Press [ or ] key and choose utilities,then press [ ] key to confirm.3.Press [ or ] key and choose Program Radio, then press [ ] key to confirm.4.Input the correct password which has been programmed already by software.then press [ ] key to confirm.5.Press [ or ] key and choose Channel Name, then press [ ] key to confirm.6.The screen displays the current channel name, then press [ ] key to change the letter, number, Chinese input method, the same as text editing.7.The screen displays “Channel name saved” after pressing [ ] key.4.Input the correct password which has been programmed already by software.then press [ ] key to confirm.5.Press [ or ] key and choose TX Frequency, then press [ ] key to confirm.6.The screen displays the current TX frequency,then press [ ] key to confirm.7.Press [ or ] key to move right and left and choose the number you want to change, the number turns to reverse video text, input the right number via keypad.8.Press [ ] key to save the new frequency, the screen display “TX frequency saved”.Note:Editing frequency will be limited within the frequency range setted by programming software, If the frequency is less than the minimum of the frequency range, the radio will take the minimal value, conversely, when it greater than the maximum, take the maximal value of the frequency range.MENU MENUMENUMENUMENUMENUMENUMENUMENUMENUMENUMENUMENUMENUMENUMENUMENUMENUMENUMENUMENUMENUCTC/DCSCTCSS/DCS is available only in analogue channel, it contains:CTCSS/DCS encodingCTCSS/DCS decoding#145 46](https://usermanual.wiki/Iradio-Electronics/DM-568/User-Guide-3541563-Page-29.png)
![4.Input the correct password which has been programmed already by software.then press [ ] key to confirm.5.Press [ or ] key and choose Color Code, then press [ ] key to confirm.6.Input the number and press [ ] key to confirm.Repeater SlotRepeater Slot is available only in digital channels.1.Press [ ] key to enter the menu2.Press [ or ] key and choose utilities,then press key to confirm.3.Press [ or ] key and choose Program Radio, then press [ ] key to confirm.4.Input the correct password which has been programmed already by software. then press [ ] key to confirm.5.Press [ or ] key and choose Repeater Slot, then press [ ] key to confirm.6.Press [ or ] key and choose repeater slot, then press [ ] key to confirm.The interface displays “Repeater slot saved”.MENUMENUMENUMENUMENUMENUMENUMENUColor CodeColor Code is available only in digital mode.1.Press [ ] key to enter the menu2.Press [ or ] key and choose utilities,then press [ ] key to confirm.3.Press [ or ] key and choose Program Radio, then press [ ] key to confirm. 6.There’s empty option and all kinds encoding value,press [ or ] key and choose Empty, press [ ] key confirm. Then the CTCSS/DCS has been shut down. press [ or ] key and choose the codes, press [ ] key to confirm. The interface displays “QT/DQT encode saved”.MENUMENUMENUMENUDecode1.Press [ ] key to enter the menu2.Press[ or ] key and choose utilities,then press [ ] key to confirm.3.Press[ or ] key and choose Program Radio, then press [ ] key to confirm.4.Input the correct password which has been programmed already by software.then press [ ] key to confirm.5.Press [ or ] key and choose QT/DQT Code, then press [ ] key to confirm.6.There’s empty option and all kinds decoding value,press[ or ] key and choose Empty, press [ ] key confirm. Then the CTCSS/DCS has been shut down. press [ or ] key and choose the codes, press [ ] key to confirm. The interface displays “QT/DQT decode saved”.MENUMENUMENUMENUMENUMENUMENUMENU47 48](https://usermanual.wiki/Iradio-Electronics/DM-568/User-Guide-3541563-Page-30.png)