Inseego NVWE760D PCI Express Mini Card User Manual 2
Novatel Wireless Inc PCI Express Mini Card 2
UserManual.wiki
>
Inseego
>
NVWE760D User Manual
>
User Manual 2
Contents
1.
User Manual 1
2.
User Manual 2
3.
User Manual
4.
User Manual 3
5.
User Manual Inspiron 1010
6.
Tiger User Manual Inspiron 1010
7.
Qiao User Guide Inspiron 910
8.
Qiao User Manual Inspiron 910
User Manual 2
Navigation menu
Upload a User Manual
Namespaces
Wiki Guide
HTML
PDF
Info
Views
User Manual
Discussion / Help
Navigation

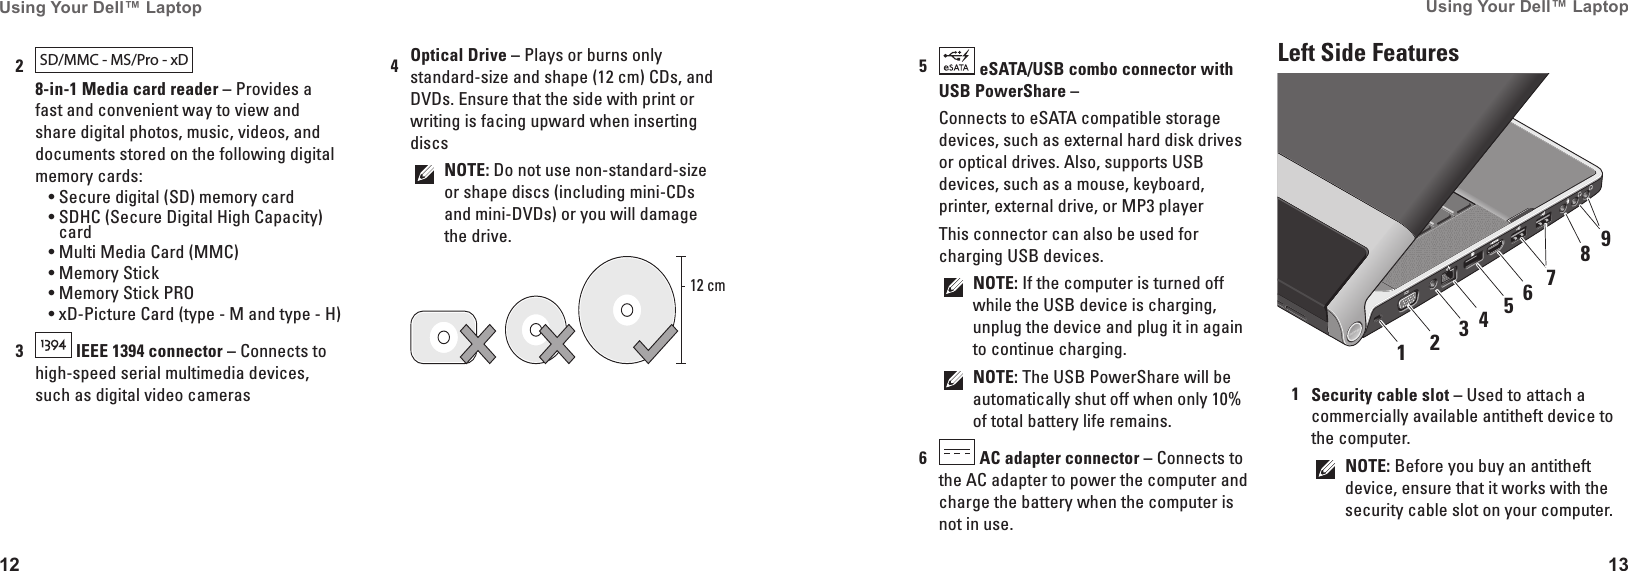

![27Using Support Tools The Dell Support Center helps you find the service, support, and system-specific information you need. For more information about Dell Support Center and available support tools, click the Services tab at support�dell�com.Dell Support CenterThe Dell Support Center helps you find the service, support, and system-specific information you need. For more information about Dell Support Center and available support tools, click the Services tab at support�dell�com.Click the icon in the taskbar to run the application. The home page provides links to access:Self Help (Troubleshooting, Security, System •Performance, Network/Internet, Backup/ Recovery, and Windows Vista)Alerts (technical support alerts relevant to •your computer)Assistance from Dell (Technical Support with •DellConnect™, Customer Service, Training and Tutorials, How-To Help with Dell on Call, •and Online Scan with PCCheckUp)About Your System (System Documentation, •Warranty Information, System Information, Upgrades & Accessories)The top of the Dell Support Center home page displays your system’s model number along with its service tag and express service code.For more information about the Dell Support Center, see the Dell Technology Guide on your hard drive or on the Dell Support website at support�dell�com.Using Support Tools System MessagesIf your computer has an issue or error, it may display a System Message that will help you identify the cause and action needed to resolve the issue. NOTE: If the message you received is not listed in the following examples, see the documentation for either the operating system or the program that was running when the message appeared. Alternatively you could see the Service Manual on the Dell Support website at support�dell�com or see “Contacting Dell” on page 40 for assistance.Alert! Previous attempts at booting this system have failed at checkpoint [nnnn]� For help in resolving this problem, please note this checkpoint and contact Dell Technical Support — The computer failed to complete the boot routine three consecutive times for the same error see “Contacting Dell” on page 40 for assistance.CMOS checksum error — Possible motherboard failure or RTC battery low. Replace the battery. See the Service Manual on the Dell Support website at support�dell�com or see “Contacting Dell” on page 40 for assistance.CPU fan failure — CPU fan has failed. Replace the CPU fan. See the Service Manual on the Dell Support website at support�dell�com.Hard-disk drive failure — Possible hard disk drive failure during POST see “Contacting Dell” on page 40 for assistance.Hard-disk drive read failure — Possible hard disk drive failure during HDD boot test see “Contacting Dell” on page 40 for assistance.Keyboard failure — Keyboard failure or loose cable.No boot device available — No bootable partition on hard disk drive, the hard disk drive cable is loose, or no bootable device exists.If the hard drive is your boot device, ensure •that the cables are connected and that the](https://usermanual.wiki/Inseego/NVWE760D.User-Manual-2/User-Guide-1074101-Page-15.png)