Huawei Technologies U9200 Ascend P1; HSPA+/HSUPA/HSDPA/UMTS/GSM/GPRS/EDGE Mobile Phone with BT User Manual User Guide
Huawei Technologies Co.,Ltd Ascend P1; HSPA+/HSUPA/HSDPA/UMTS/GSM/GPRS/EDGE Mobile Phone with BT User Guide
Contents
User Guide

Quick Start Guide
Welcome to HUAWEI

Copyright © Huawei Technologies Co., Ltd. 2012. All
rights reserved.
Trademarks and Permissions
, and are trademarks or registered trademarks
of Huawei Technologies Co., Ltd.
Manufactured under license from Dolby Laboratories.
Dolby and the double-D symbol are trademarks of Dolby
Laboratories.
Android is a trademark of Google Inc.
DISCLAIMER OF WARRANTIES
THE CONTENTS OF THIS MANUAL ARE PROVIDED “AS
IS”. EXCEPT AS REQUIRED BY APPLICABLE LAWS, NO
WARRANTIES OF ANY KIND, EITHER EXPRESS OR
IMPLIED, INCLUDING BUT NOT LIMITED TO, THE IMPLIED
WARRANTIES OF MERCHANTABILITY AND FITNESS FOR
A PARTICULAR PURPOSE, ARE MADE IN RELATION TO
THE ACCURACY, RELIABILITY OR CONTENTS OF THIS
MANUAL.
LIMITATIONS OF LIABILITY
TO THE MAXIMUM EXTENT PERMITTED BY APPLICABLE
LAW, IN NO EVENT SHALL HUAWEI TECHNOLOGIES
CO., LTD. BE LIABLE FOR ANY SPECIAL, INCIDENTAL,
INDIRECT, OR CONSEQUENTIAL DAMAGES, OR LOST
PROFITS, BUSINESS, REVENUE, DATA, GOODWILL OR
ANTICIPATED SAVINGS.
English
1
Getting to Know Your Phone
1
Figures in this guide are provided for your reference
only. Depending on the software version, your
phone's user interface may be different from the user
interface shown in the figures.
4
5
2
16
7
8
3
9
10
11
12
13
14
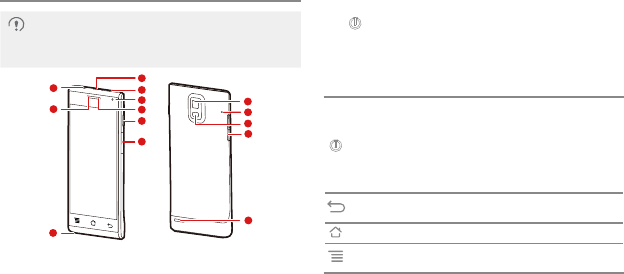
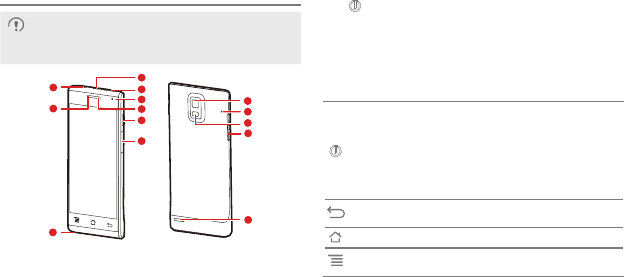
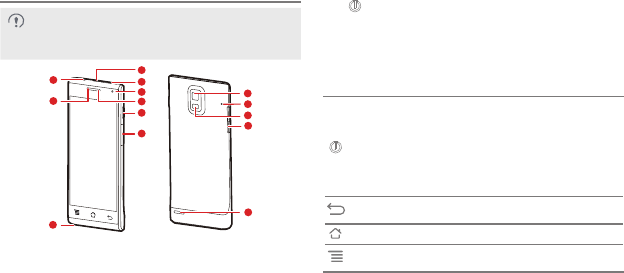
1 Earpiece 2 Headset jack
3 Charger jack/USB port 4 USIM card slot
5 Secondary camera 6 Status indicator
7 Power key 8 microSD card slot
9 Microphone 10 Camera
11 Noise reduction microphone 12 Flash unit
13 Volume keys 14 Speaker
• Press and hold to power on your phone.
• Press and hold to display the options menu from
where you can power off your phone and perform
some shortcut operations.
• Press to lock the screen when your phone is active.
• Press and hold for 10 or more seconds to forcibly
power off your phone.
• Touch to return to the previous screen.
• Touch to exit the current application.
• Touch to return to the Home screen.
• Touch to display the current screen's options menu
(some screens have no menu).
2
Installing SIM and microSD Cards
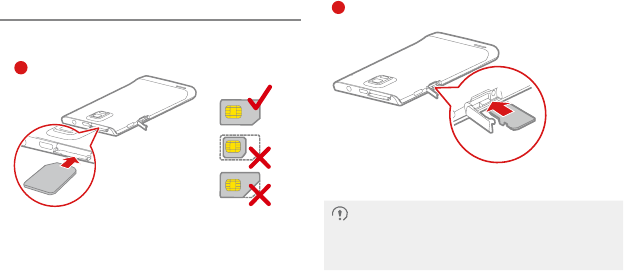
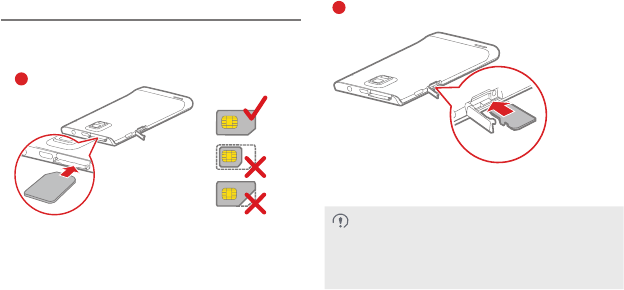
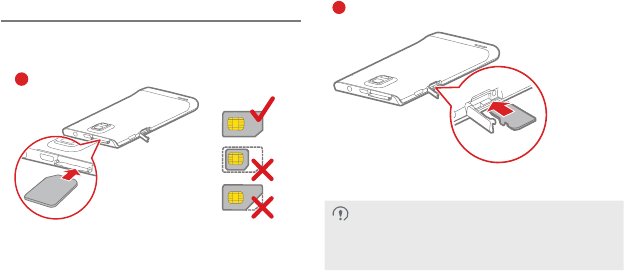
Install the USIM card or microSD card as shown in the
following diagram. Power off your phone before installation.
Install a USIM card
Standard USIM card dimensionsᷛ
25mmx15mmx0.76mm(DxWxH)
1
*The micro SD card is
an optional accessory
Install a *microSD card
2
• Your phone supports only standard USIM cards.
Using a non-standard USIM card may cause
damage to your phone.
• Do not install or remove a USIM card when your
phone is powered on.
3
Charging Your Phone
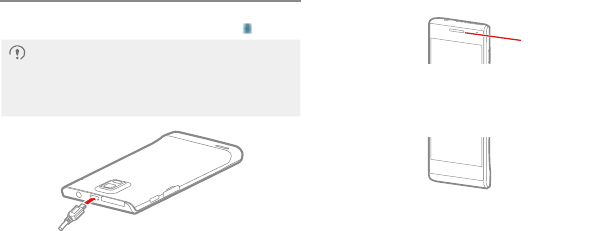
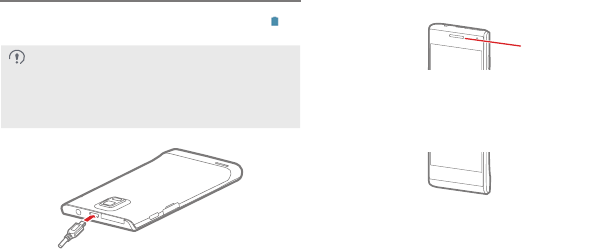
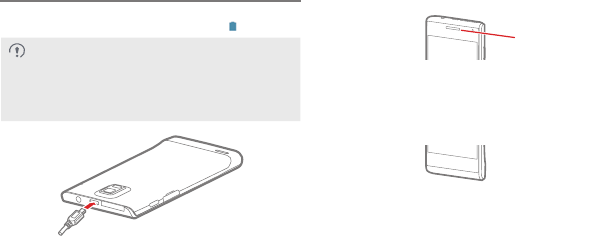
When charging your phone while it is powered on, the battery
is fully charged when the battery icon changes to .
Use the charger provided with your phone. If the
phone has not been used for a long time or if the
battery charge is fully depleted, the phone may not
power on immediately after the charger is plugged
in. Please charge the battery for a while before
attempting to power on the phone.
USIM
micro SD
Battery status indicator
Status indicator
Green continuous light: Battery power level is high,
or, if the power adapter is connected, fully charged.
Orange: The power adapter is connected and the
phone is charging.
Red: The battery power level is low.
4
Powering Your Phone On or Off
Powering Your Phone On
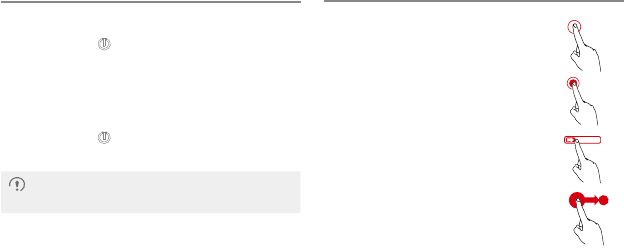
Press and hold the key to power on your phone. If this is
the first time you have powered on the phone, configure its
initial settings. If your SIM card is PIN-protected, enter the
personal identification number (PIN) to use the phone.
Powering Your Phone Off
Press and hold the key to display the options menu, and
touch Power off to power your phone off.
If your phone malfunctions or cannot be properly
powered off, press and hold the Power key for at
least 10 seconds to forcibly power off your phone.
Using the Touchscreen
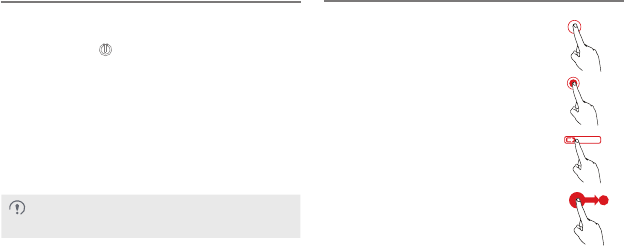
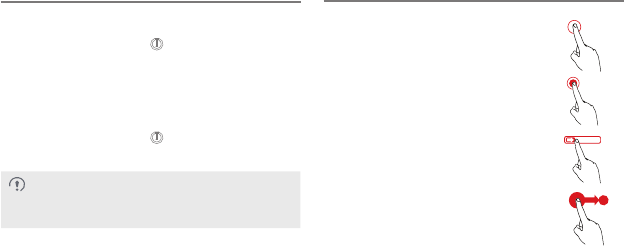
Touch: Touch the screen to select an option
or start an application.
Touch and hold: Touch and hold the screen
or text being edited to display the available
options menu.
Slide: Quickly drag your finger across the
screen vertically or horizontally.
Drag: Touch and hold an item, and then
drag it to the desired location on the screen.
For example, on the Home screen, you can
move an icon by dragging it to another
location or remove an icon by dragging it to
the trash can.

5
Certification Information (SAR)
This device meets guidelines for exposure to radio waves.
Your device is a low-power radio transmitter and receiver.
As recommended by international guidelines, the device
is designed not to exceed the limits for exposure to radio
waves. These guidelines were developed by the independent
scientific organization International Commission on Non-
Ionizing Radiation Protection (ICNIRP) and include safety
measures designed to ensure safety for all users, regardless
of age and health. The Specific Absorption Rate (SAR) is the
unit of measurement for the amount of radio frequency energy
absorbed by the body when using a device. The SAR value
is determined at the highest certified power level in laboratory
conditions, but the actual SAR level of the device when being
operated can be well below the value. This is because the
device is designed to use the minimum power required to
reach the network.
The SAR limit adopted by USA and Canada is 1.6 watts/
kilogram (W/kg) averaged over one gram of tissue. The
Highest SAR value reported to the FCC and IC for this device
type when tested for use at the ear is 1.070 W/kg, when
properly worn on body is 1.160 W/kg, and when using Wi-Fi
hotspot function is 1.150 W/Kg. The SAR limit also adopted
by Europe is 2.0 W/kg averaged over 10 grams of tissue.
The highest SAR value for this device type when tested at
the ear is 0.606 W/kg, and when properly worn on the body is
0.435 W/kg.
6
Finding the User Guide
For more information about how to use your phone, please
read the user guide. You can find the user guide by visiting
the Web site: http://www.huaweidevice.com/ worldwide.
Industry Canada Compliance
This device complies with Industry Canada. This device with the
Class B limits for radio noise emissions as set out in the interference
causing standard entitled "Digital Apparatus" (ICES-003) of Industry
Canada. Cet appareil numérique de la classe B est conforme à la
norme NMB-003 du Canada.
In the United States and Canada, the standard incorporates a
substantial margin of safety to give additional protection for the
public and to account for any variations in measurements.
This device complies with Industry Canada licence-exempt RSS
standard(s). Operation is subject to the following two conditions:
(1) this device may not cause interference, and (2) this device must
accept any interference, including interference that may cause
undesired operation of the device.
Le présent appareil est conforme aux CNR d'Industrie Canada
applicables aux appareils radio exempts de licence. L'exploitation
est autorisée aux deux conditions suivantes : (1) l'appareil ne
doit pas produire de brouillage, et (2) l'utilisateur de l'appareil doit
accepter tout brouillage radioélectrique subi, même si le brouillage
est susceptible d'en compromettre le fonctionnement.
IC: 6369A-U9200, the IC certificate number also built in the
User Interface, to access the IC certificate number, select
Settings->About phone->Legal information->IC.
V100R001C00_01 31010HYN
Please visit www.huaweidevice.com/worldwide/support/hotline
for recent updated hotline and email address in your country.
Please visit www.huaweidevice.com for recent updated
software for your device.
Model:HUAWEI U9200

6
Droit d'auteur © Huawei Technologies Co., Ltd. 2012.
Tous droits réservés.
Marques de commerce et autorisations
, et sont des marques de commerce ou des
marques déposées de Huawei Technologies Co., Ltd.
Fabriqué sous licence de Dolby Laboratories. Dolby et le
symbole double-D sont des marques déposées de Dolby
Laboratories.
Android est une marque commerciale de Google Inc.
EXCLUSION DES GARANTIES
LE CONTENU DE CE MANUEL EST FOURNI « TEL
QUEL ». SOUS RÉSERVE DES LOIS APPLICABLES,
AUCUNE GARANTIE DE QUELQUE NATURE QUE CE
SOIT, EXPLICITE OU IMPLICITE, Y COMPRISES, MAIS
SANS S'Y LIMITER, LES GARANTIES IMPLICITES
DE QUALITÉ MARCHANDE ET D'ADAPTATION À UN
USAGE PARTICULIER, N'EST FAITE PAR RAPPORT À
LA PRÉCISION, À LA FIABILITÉ OU AU CONTENU DE CE
MANUEL.
LIMITATIONS DE RESPONSABILITÉ
DANS LA LIMITE MAXIMUM PRÉVUE PAR LA LOI
APPLICABLE, HUAWEI TECHNOLOGIES CO., LTD., NE
SAURAIT, EN AUCUN CAS, ÊTRE TENU RESPONSABLE
DE DOMMAGES SPÉCIAUX, ACCESSOIRES, OU
INDIRECTS, OU DE PERTES DE BÉNÉFICES, DE
CHIFFRE D'AFFAIRES, DE REVENUS, DE DONNÉES, DE
CLIENTÈLE OU D'ÉCONOMIES ESCOMPTÉES.
Français
7
Prise en main de votre téléphone
Les illustrations de ce guide sont délivrées à titre de
référence uniquement. Selon la version du logiciel,
l'interface de votre téléphone peut s'avérer différente
de l'interface utilisateur présentée par les illustrations.
4
5
2
16
7
8
3
9
10
11
12
13
14
1Écouteur 2Prise micro-casque
3Prise chargeur / port USB 4Emplacement carte USIM
5Caméra secondaire 6Témoin d'état
7 Touche d'alimentation 8Emplacement carte
microSD
9Microphone 10 Appareil photo
11 Microphone avec
atténuation de bruit 12
13 Touches volume 14 Haut-parleur
Maintenir cette touche pour allumer votre appareil.
des opérations avec les raccourcis.
Appuyer pour verrouiller l'écran lorsque le
téléphone est allumé.
Maintenir pendant 10 secondes ou plus pour forcer
Toucher pour retourner à l'écran précédent.
Toucher pour quitter l'application en cours.
Appuyer pour retourner à l'écran d'accueil.
disposent pas).
8
Installation des cartes SIM et microSD
Installer la carte USIM ou microSD comme indiqué dans la
Installer une carte USIM
Dimensions d'une carte USIM classique :
25 mm x 15 mm x 0,76 mm(PxLxH)
1
*La carte microSD est un
accessoire facultatif
Installer une carte *microSD
2
Votre téléphone prend uniquement en charge
les cartes USIM classiques. L'utilisation de
téléphone.
Ne pas installer ou supprimer la carte USIM
lorsque le téléphone est allumé.
9
Chargement du téléphone
Quand le téléphone est actif pendant la charge, l'icône
Utilise le chargeur fourni avec votre téléphone. Si le
téléphone n'a pas été utilisé pendant longtemps ou si
le téléphone ne s'allume pas immédiatement lorsqu'il
est branché au chargeur. Veuillez laisser la batterie se
recharger avant de rallumer le téléphone.
USIM
micro SD
Témoin de statut de la batterie
Témoin d'état
Lumière verte continue : le niveau de la batterie est
élevé ou la batterie est complètement chargée si
l'alimentation est branchée
Orange : l'alimentation est branchée et le téléphone
est en charge
Rouge : le niveau de la batterie est faible
10
Allumer ou éteindre votre téléphone
Activation de votre téléphone
Maintenir la touche pour allumer votre téléphone.
activation. Si votre carte SIM est protégée par un code PIN
utiliser le téléphone.
Désactivation de votre téléphone
Pour éteindre le téléphone, maintenir la touche d'alimentation
Si votre téléphone fonctionne mal ou s'il ne s'allume
pas correctement, maintenir la touche d'alimentation
pendant au moins 10 secondes pour forcer l'arrêt.
Utilisation de l'écran tactile
Toucher : Toucher l'écran pour sélectionner
une option ou démarrer une application.
Toucher et maintenir : Toucher et maintenir
Glisser : Balayez l'écran rapidement vers
le haut ou vers le bas.
Déplacer : Toucher et maintenir un élément,
puis le déplacer vers l'endroit désiré.
possible de déplacer les icônes ou de les
supprimer en les glissant vers la corbeille.

11
radio.
Votre appareil est un émetteur radio de faible puissance
et un récepteur. Comme recommandé par les directives
internationales, l'appareil ne dépasse pas les limites
international indépendant et incluent des mesures de sécurité
destinées à protéger tous les utilisateurs, quels que soient
leur âge et état médical.
de la quantité d'énergie par radiofréquence absorbée par le
corps pendant l'utilisation d'un appareil. La valeur SAR est
des conditions de laboratoire, mais le niveau réel du SAR de
l'appareil lorsque celui-ci est en fonctionnement peut être bien
en dessous de cette valeur. L'appareil est conçu pour utiliser
le minimum de puissance requise pour atteindre le réseau.
valeur SAR la plus élevée mentionnée par la FCC et l'IC pour
ce type d'appareil lorsque celui-ci est testé en utilisation au
niveau de l'oreille est de 1,070 W/kg, de 1,160 W/kg lorsqu'il
est porté correctement et de 1,150 W/Kg lorsqu'il utilise la
fonction Wi-Fi.
2,0 W/kg en moyenne pour 10 grammes de tissu.
La valeur SAR la plus mentionnée pour ce type d'appareil
lorsqu'il est testé au niveau de l'oreille est de 0,606 W/kg et
de 0,435 W/kg, lorsqu'il est correctement utilisé en contact
avec le corps à une distance de 15mm du corps.
12
Trouver le guide de l'utilisateur
Pour plus d'informations sur l'utilisation de votre téléphone,
reportez-vous au guide de l'utilisateur. Visitez le site Web
pour consulter le guide de l'utilisateur :
http://www.huaweidevice.com/worldwide.
Conformité à Industrie Canada
émissions de radiobruit telles qu'elles sont énoncées dans
la norme sur les causes d'interférence intitulée “Appareils
digital apparatus complies with Canadian ICES-003.
marge de sécurité importante pour fournir une protection
supplémentaire pour le public et pour tenir compte des
variations des mesures.
interference that may cause undesired operation of the
device.
de l'appareil doit accepter tout brouillage radioélectrique subi,
même si le brouillage est susceptible d'en compromettre le
fonctionnement.
Settings->About phone->Legal information->IC.
13
V100R001C00_01 31010JVL
Veuillez visiter le site www.huaweidevice.com/worldwide/
support/hotline pour les numéros d'urgence et les
adresses électroniques de votre pays récemment mis à
Consultez www.huaweidevice.com pour connaître les

14
Copyright © Huawei Technologies Co., Ltd. 2012. Todos
os direitos reservados.
Marcas Registradas e Licenças
, , e são marcas comerciais ou registradas
da Huawei Technologies Co., Ltd.
Fabricados de acordo com licença da Dolby Laboratories.
Dolby e o símbolo D duplo são marcas registradas da Dolby
Laboratories.
Android é marca registrada da Google Inc.
ISENÇÃO DE GARANTIAS
OS CONTEÚDOS DESTE MANUAL SÃO FORNECIDOS
"NO ESTADO EM QUE SE ENCONTRAM". EXCETO
QUANDO REQUERIDO PELA LEGISLAÇÃO APLICÁVEL,
NENHUMA GARANTIA DE QUALQUER TIPO, EXPRESSA
OU IMPLÍCITA, INCLUINDO MAS NÃO SE LIMITANDO
ÀS GARANTIAS IMPLÍCITAS DE COMERCIALIZAÇÃO
E ADEQUAÇÃO PARA FINS ESPECÍFICOS, É DADA
COM RELAÇÃO À EXATIDÃO, CONFIABILIDADE OU
CONTEÚDOS DESTE MANUAL.
LIMITAÇÕES DE RESPONSABILIDADE
NO MAIS ALTO GRAU PERMITIDO PELA LEGISLAÇÃO
APLICÁVEL, SOB NENHUMA CIRCUNSTÂNCIA A HUAWEI
TECHNOLOGIES CO., LTD SERÁ RESPONSABILIZADA
POR QUAISQUER DANOS ESPECIAIS, FORTUITOS,
INDIRETOS OU CONSEQUENCIAIS, NEM POR LUCRO
CESSANTE, PERDA DE NEGÓCIOS, RECEITA, DADOS,
FUNDO DE COMÉRCIO OU EXPECTATIVA DE LUCROS.
A MÁXIMA RESPONSABILIDADE (ESTA LIMITAÇÃO
NÃO SE APLICA À RESPONSABILIDADE POR DANOS
PESSOAIS À MEDIDA QUE A LEI VIGENTE A VETA) DA
HUAWEI TECHNOLOGIES CO., LTD. RESULTANTE DO
USO DESTE PRODUTO DESCRITO NESTE DOCUMENTO
SERÁ LIMITADA AO VALOR PAGO PELOS CLIENTES POR
ESTE PRODUTO.
Português
15
Conhecendo o seu telefone
Todas as imagens deste manual são meramente
ilustrativas. Dependendo da versão do software, a
interface de seu telefone pode variar da indicada nas
imagens.
4
5
2
16
7
8
3
9
10
11
12
13
14
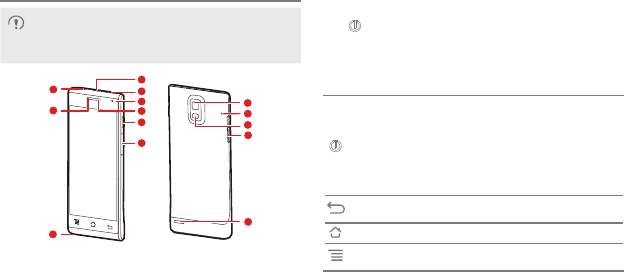
1 Fone 2 Entrada do fone de ouvido
3 Interface USB /
carregamento de bateria 4 Entrada do cartão USIM
5 Câmera secundária 6 Indicador de estado
7 Botão liga/desliga 8 Entrada do cartão microSD
9 Microfone 10 Câmera
11 Microfone com redução
de ruído 12 Flash
13 Teclas de volume 14 Alto-falante
Pressione e mantenha pressionado para ligar o telefone.
Pressione e mantenha pressionado para exibir as
opções do menu, onde você pode desligar seu telefone
e realizar algumas operações.
Pressione para bloquear a tela quando o telefone
estiver em uso.
Pressione e mantenha pressionado por 10 segundos
para desligar o telefone à força.
Toque para retornar à tela anterior.
Toque para sair do aplicativo ativo.
Toque para retornar à tela inicial.
Toque para exibir o menu de opções da tela ativa
(algumas telas não têm menu).
16
Instalando os cartões SIM e microSD
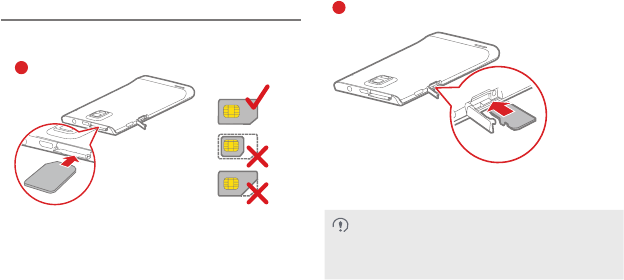
Instale o cartão USIM e microSD conforme mostrado no
diagrama a seguir. Desligue o seu telefone antes da instalação.
Instalando o cartão USIM
Dimensões do cartão USIm padrão:
25 mm x 15 mm x 0,76 mm (CxLxA)
1
* Item opcional
Instalando o cartão *microSD
2
Seu telefone somente suporta cartões USIM em
formato padrão. O uso de cartões USIM fora das
especicações pode danicar seu telefone.
Nunca instale nem remova o cartão USIM com o
telefone ligado.
17
Carregando seu telefone
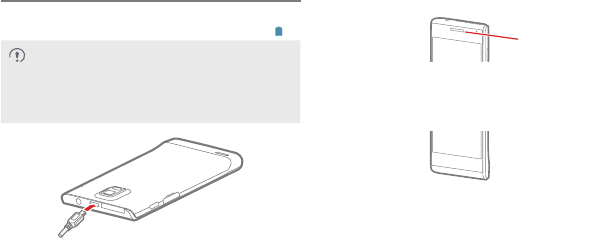
Durante o carregamento do telefone ligado, a carga da bateria
estará completa quando o ícone da bateria mudar para .
Use somente o carregador fornecido com seu
aparelho. Se o telefone não for usado por muito
tempo ou a bateria descarregar completamente, o
telefone pode não ligar de imediato logo depois de
conectar o carregador. Nesse caso, carregue a
bateria um tempo antes de ligar seu telefone.
USIM
micro SD
Indicador de estado da bateria
Idicador de estado
Luz verde contínua: nível da bateria alto; ou, se o
adaptador de energia estiver conectado, carga completa.
Laranja: o adaptador de energia está conectado e o
telefone está sendo carregado.
Vermelha: o nível da bateria está baixo.
18
Ligando e desligando seu telefone
Ligando seu telefone
Pressione e mantenha pressionado o botão para ligar o
telefone. Ao ligar seu aparelho pela primeira vez, faça os
ajustes iniciais. Se o seu cartão SIM for protegido por senha
(PIN), digite-a para usar o telefone.
Desligando seu telefone
Pressione e mantenha pressionado o botão para exibir o
menu com as opções e toque em Power off para desligar
seu telefone.
No caso de mau funcionamento ou impossibilidade
de desligar seu telefone, pressione e mantenha
pressionado o botão de ligar/desligar durante 10
segundos oara forçar o desligamento.
Usando a tela sensível ao toque
(touchscreen)
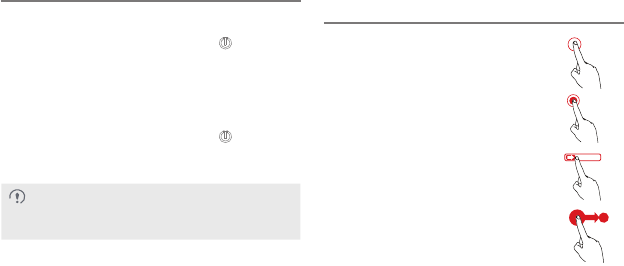
Toque: Toque a tela para selecionar a opção
desejada ou abrir um aplicativo.
Toque e mantenha pressionado: Toque e
mantenha pressionada a tela ou texto que
deseja editar para exibir o menu com as
opções.
Deslize: Mova seu dedo rapidamente sobre
a tela vertical ou horizontalmente.
Arraste: Toque e mantenha pressionado
um item, e então arraste-o para o local
desejado na tela. Por exemplo, na tela
inicial, você pode mover um ícone
arrastando-o de um lado para outro ou
removê-lo arrastando até a lixeira.

19
Informações sobre Certicação (SAR)
Este equipamento cumpre com a regulamentação sobre
exposição segura a ondas de rádio.
Seu aparelho é um transmissor e um receptor de
radiofrequência de baixa potência. Conforme recomendação
de diretrizes internacionais, o equipamento foi projetado
para não exceder os limites de exposição a radiofrequência.
Essas diretrizes foram desenvolvidas pela organização
cientíca independente International Commission on Non-
Ionizing Radiation Protection (ICNIRP) e incluem medidas de
segurança para garantir a segurança de todos os usuários,
independentemente de idade e condição física. A Taxa
de Absorção Especíca (SAR) é a unidade de medida de
quantidade de energia de radiofrequência absorvida pelo
corpo humano durante o uso do aparelho. O valor da SAR
é xado nos níveis mais altos de potência certicados sob
condições controladas em laboratório; contudo, o nível
da SAR real de um aparelho em operação pode estar
bem abaixo do valor de referência. Isso acontece porque
o aparelho é desenvolvido para usar a menor potência
necessária para seu funcionamento em rede.
O limite da SAR, adotado nos Estados Unidos e no Canadá, é
de 1,6 watts/kg, média calculada sobre 1g de tecido. O valor
mais alto de SAR registrado para este tipo de equipamento
e relatado à FCC e à IC foi de 1,070 W/kg para testes de
uso junto ao ouvido, e de 1,160 W/kg quando o aparelho é
mantido próximo ao corpo, e de 1,150 W/Kg quando usado
na função hotspot Wi-Fi. O limite da SAR adotado na Europa
é de 2,0 W/kg sobre 10 g de tecido. O mais alto valor da
SAR para este tipo de dispositivo quando testado junto do
ouvido é de 0,606 W/kg, e quando usado próximo ao corpo
adequadamente é de 0,435 W/Kg.
Mais informações
Para mais informações sobre como usar seu telefone, leia
o manual do usuário. O manual do usuário também está
disponível em nosso site: http://www.huaweidevice.com/
worldwide.
20
V100R001C00_01 31010JVL
Acesse www.huaweidevice.com/worldwide/support/
hotline para o número e e-mail atualizados de
atendimento ao cliente em seu país ou região.
Acesse www.huaweidevice.com para a versão mais
recente de software para seu aparelho.
Modelo: HUAWEI U9200

21
Copyright © Huawei Technologies Co., Ltd. 2012. Todos
los derechos reservados.
Marcas comerciales y permisos
, y son marcas comerciales o registradas de
Huawei Technologies Co., Ltd.
Fabricado con la autorización de Dolby Laboratories. Dolby
y el símbolo de doble D son marcas comerciales de Dolby
Laboratories.
Android es una marca comercial de Google Inc.
EXCLUSIÓN DE GARANTÍA
LOS CONTENIDOS DE ESTE MANUAL NO ESTÁN
SUJETOS A GARANTÍA ALGUNA. A EXCEPCIÓN DE LOS
CASOS EN QUE ASÍ LO REQUIERA LA LEY APLICABLE,
NO SE CONSTITUYEN GARANTÍAS DE NINGUNA CLASE,
NI EXPRESAS NI IMPLÍCITAS. ENTRE OTRAS, A TÍTULO
MERAMENTE ENUNCIATIVO, NO SE OFRECE NINGUNA
GARANTÍA DE COMERCIABILIDAD NI DE APTITUD PARA
UN FIN ESPECÍFICO RESPECTO DE LA PRECISIÓN, LA
CONFIABILIDAD, NI DE LOS CONTENIDOS DE ESTE
MANUAL.
LIMITACIÓN DE LA RESPONSABILIDAD
EN LA MEDIDA EN QUE LO PERMITAN LAS LEYES
APLICABLES, HUAWEI TECHNOLOGIES CO., LTD. BAJO
NINGUNA CIRCUNSTANCIA SERÁ RESPONSABLE POR
DAÑOS ESPECIALES, INCIDENTALES, INDIRECTOS O
EMERGENTES, NI POR EL LUCRO CESANTE, LA PÉRDIDA
DE OPORTUNIDADES COMERCIALES, LA PÉRDIDA DE
INGRESOS, DE DATOS O DE BUEN NOMBRE, NI POR LA
PÉRDIDA DE AHORROS PREVISTOS.
Español
22
Información sobre el teléfono
de usuario del teléfono puede ser distinta de la que se
4
5
2
16
7
8
3
9
10
11
12
13
14
1 Auricular 2 Entrada para auriculares
3 Entrada para cargador/
puerto USB
4 Ranura para tarjeta USIM
5 Cámara secundaria 6 Indicador de estado
7 Tecla de Encendido/
Apagado
8 Ranura para tarjeta microSD
9 Micrófono 10 Cámara
11 Micrófono con reducción
de ruido
12 Flash
13 14
Mantenga presionada esta tecla para encender el teléfono.
de opciones donde podrá apagar el teléfono y realizar
algunas operaciones de acceso directo.
Presione esta tecla para bloquear la pantalla del
Mantenga presionada esta tecla alrededor de 10
segundos para apagar el teléfono forzosamente.
Presione esta tecla para salir de la aplicación actual.
Presione esta tecla para mostrar el menú de opciones
en la pantalla actual (algunas pantallas no tienen menú).
23
Instalación de las tarjetas SIM y microSD
Instale la tarjeta USIM o microSD como se muestra en el
siguiente diagrama. Apague el teléfono antes de la instalación.
Instalación de la tarjeta USIM
Dimensiones de la tarjeta USIM estándar:
25 mm x 15 mm x 0,76 mm (profundidad x ancho x altura)
1
*La tarjeta microSD es un
accesorio opcional.
Instalación de una *tarjeta microSD
2
El teléfono solo soporta tarjetas USIM estándar.
El uso de una tarjeta USIM no estándar puede
dañar el teléfono.
No instale ni extraiga la tarjeta USIM con el
teléfono encendido.
24
Carga del teléfono
Cuando el teléfono se carga encendido, la batería está
totalmente cargada cuando el ícono cambia a .
el teléfono no se usa por un período prolongado o si
se agota totalmente la batería, es posible que el
teléfono no se encienda inmediatamente después de
conectar el cargador. Cargue la batería por un
tiempo antes de intentar encender el teléfono.
USIM
micro SD
Indicador de estado de la batería
Indicador de estado
Luz verde sin parpadear: El nivel de carga de la
batería es alto o el adaptador de corriente está
conectado y el teléfono está totalmente cargado.
Naranja: El adaptador de corriente está conectado
y el teléfono se está cargando.
Rojo: El nivel de carga de la batería es bajo.
25
Encendido y apagado del teléfono
Encendido del teléfono
Mantenga presionada la tecla para encender el teléfono.
un PIN, ingréselo para usar el teléfono.
Apagado del teléfono
Mantenga presionada la tecla
opciones y presione Power off para apagar el teléfono.
Si el teléfono no funciona correctamente o no se
puede apagar en forma adecuada, mantenga
presionada la tecla de Encendido/Apagado alrededor
de 10 segundos para apagar el equipo forzosamente.
Uso de la pantalla táctil
Presionar: Presione la pantalla para
seleccionar una opción o iniciar una
aplicación.
Mantener presionado: mantenga presionada
la pantalla o el texto que se está editando
Deslizar: Deslice rápidamente el dedo sobre
Arrastrar: Mantenga presionado un elemento
y arrástrelo a la ubicación deseada de la
pantalla. Por ejemplo, en la pantalla principal,
otra ubicación o eliminarlo arrastrándolo a la
papelera.

26
la exposición a ondas de radio.
a la exposición a ondas de radio de acuerdo con las
recomendaciones establecidas por directrices internacionales.
Estas directrices fueron establecidas por la Comisión
Internacional de Protección contra la Radiación No Ionizante
incluyen medidas de seguridad diseñadas para garantizar la
protección de las personas, independientemente de su edad
es la unidad que se utiliza para medir la cantidad de energía
de radiofrecuencia absorbida por el cuerpo cuando se utiliza
más alto de potencia en condiciones de laboratorio. Sin
requerida para conectarse a la red.
El límite SAR adoptado por los EE. UU. y Canadá es un
lo utiliza de manera adecuada sobre el cuerpo. Cuando se
utiliza la función de área de acceso inalámbrico Wi-Fi, dicho
se lo ha puesto a prueba para su uso en el oído es 0,606 W/
sobre el cuerpo.
Cómo obtener la guía de usuario
Para obtener más información sobre cómo utilizar el teléfono,
lea la guía del usuario. La guía del usuario se puede encontrar
27
V100R001C00_01 31010JVL
para conocer la línea de acceso directo y la dirección de
e-mail actualizadas correspondientes a su país.
Modelo: HUAWEI U9200