Hisense Electric LCDC0008 Part15 Subpart B-LCD TV User Manual
Hisense Electric Co., Ltd. Part15 Subpart B-LCD TV
Contents
- 1. W9HLCDC0008_User Manual 1
- 2. W9HLCDC0008_User Manual 2
- 3. W9HLCDC0008_User Manual 3_Rev.1
- 4. W9HLCDC0008_User Manual 4
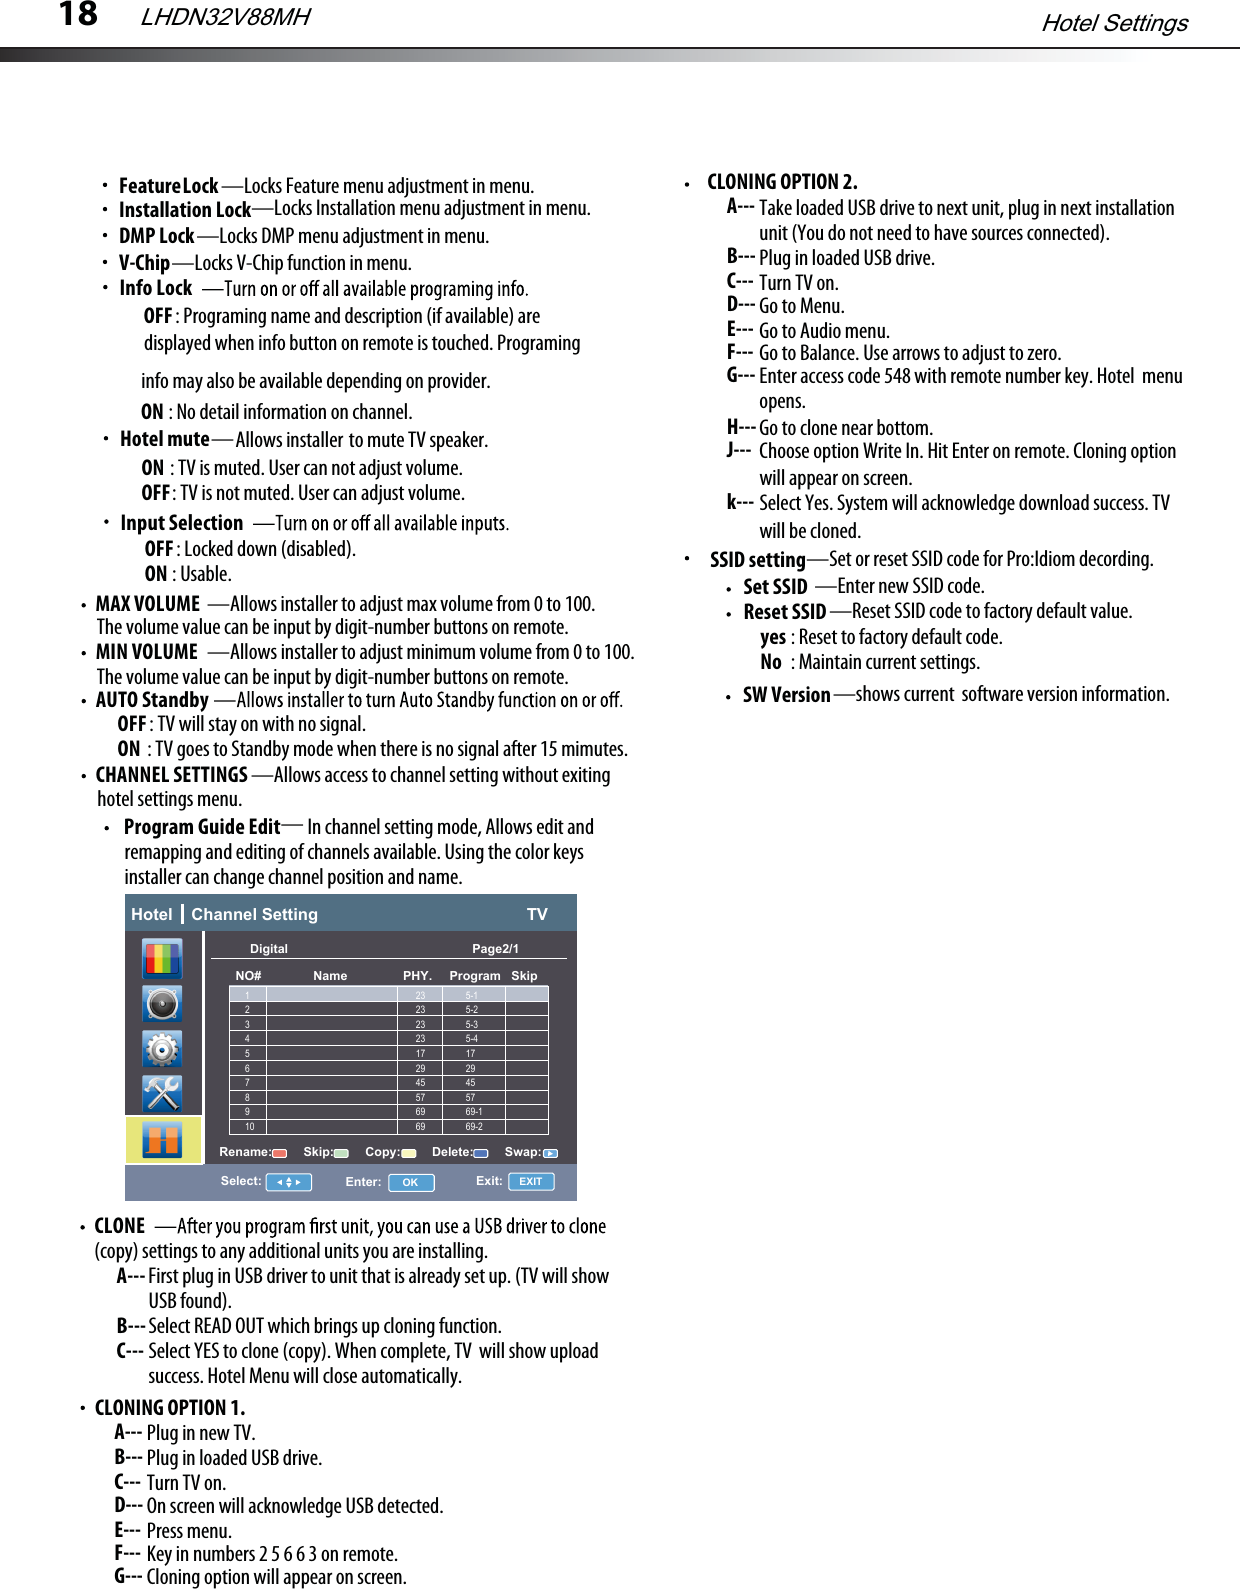
W9HLCDC0008_User Manual 4
![13Adjusting the FeaturesTo change the channel settings:1Press MENU. The Main menu opens.2Press or to highlight Features, then press ENTER or . The TV menu opens.3Press or to highlight an option, then press or to accessthe option, and press or to adjust the option. You can select:ENTERCaption settings– Adjust Captioning settings.Changing channel settings LHD32V77MHFeatures TVCaption settings >>>Sleeptimer 0Power on >>>Power off >>>V-Chip >>>Change PIN >>>Transpaerncy 0OSD Timeout >>>Move: Enter: OK Exit: EXITSleeptimer –Press [ / ] to set the sleep timer between 0-120minutes.Power on –When “On”, you can set the time when the TV turns on automatically. And Set the current time when the TV turns on.Power off –When “On”, you can set the time when the TV turns off automatically. And set the current time when the TV turns off.V-Chip –Lock channels in Channel Manager, to prevent unauthorized users, such aschildren, from watching unsuitable programme. Available only when the Input source is set to TV. Change PIN–Change the password of the V-Chip function.Transpaerncy–Adjust the transparency of menu.OSD Timeout –The time it takes the OSD to disappear whenno operations are performed. You can change it from Off, 5seconds, 10seconds, and 30seconds.In TV mode, you can adjust:Hotel Function Lock TVMove: Enter: OK Exit: EXIT OffSearch Lock OffUser Save Lock OffPicture Lock OffAudio Lock OffFeatures Lock OffInstallation Lock OffDMP Lock Off.......Function V-Chip TVMove: Enter: OK Exit: EXITUS TV Parental Guid... >>>US MPAA Rating SelectCanadian English Rating SelectCanadian French Rating Select.......Press the number buttons to enter the four-digit password. The default password is 0532. The V-Chip menu opens.Access to V-Chip MenuProgram Block– A–Rating Enable is on.B–U.S. TV Ratings: You can choose TV ratings according to the illustration on the screen.C–The settings for U.S. Movie Ratings, Canada (English) Ratings, and Canada (French) Ratings follow Step B. If you want to block an unrated program, turn on this function. You can select all the ratings listed in the charts below.Press or to highlight an option, then press or to accessthe option. Press or to highlight a rating and press to ENTERENTERlock the rating and all other higher ratings or unlock the rating and U.S. TV ratings (age-based)These ratings are determined by the Federal Communications Commission (FCC).TV-Y All children.TV-Y7 Suitable for children 7 and older.TV-G General audiences.TV-PG Parental guidance suggested.TV-14 Parental guidance strongly suggested.TV-MA Mature audiences only.U. S. TV ratings (content-based)FV Fantasy violence.V Violence.S Sexual situations.L Strong language.D Suggestive dialog.U.S. movie (MPAA) ratingsThese ratings are determined by the Motion Picture Association of America (MPAA).G General audiences.PG Parental guidance suggested.PG-13 Suitable for children 13 and older.R Parental guidance suggested for children under 17.NC-17 Not suitable for children under 17.X Adults only.Canadian French ratingsdetermined by La Régle du cinéma du Québec.G General audiences.8 ans+ Suitable for children 8 and older.13 ans+ Suitable for children 13 and older.16 ans+ Suitable for children 16 and older.18 ans+ Adults only.Canadian English ratingsThese ratings are based on the Canadian Home Video Rating System, determined by the Canadian Motion Picture Distributors Association (CMPDA).C Suitable for all children.C8+ Suitable for children 8 and older.G General audiences.PG Parental guidance suggested.14+ Suitable for children 14 and older.18+ Adults only.](https://usermanual.wiki/Hisense-Electric/LCDC0008.W9HLCDC0008-User-Manual-4/User-Guide-1515031-Page-1.png)