Hanwha Techwin PRO815 Digital Camera User Manual H1 en 002 v03
Samsung Techwin Co Ltd Digital Camera H1 en 002 v03
UserManual.wiki
>
Hanwha Techwin
>
PRO815 User Manual
>
Users Manual 6 of 7
Contents
1.
Users Manual 1 of 7
2.
Users Manual 2 of 7
3.
Users Manual 3 of 7
4.
Users Manual 4 of 7
5.
Users Manual 5 of 7
6.
Users Manual 6 of 7
7.
Users Manual 7 of 7
Users Manual 6 of 7
Navigation menu
Upload a User Manual
Namespaces
Wiki Guide
HTML
PDF
Info
Views
User Manual
Discussion / Help
Navigation
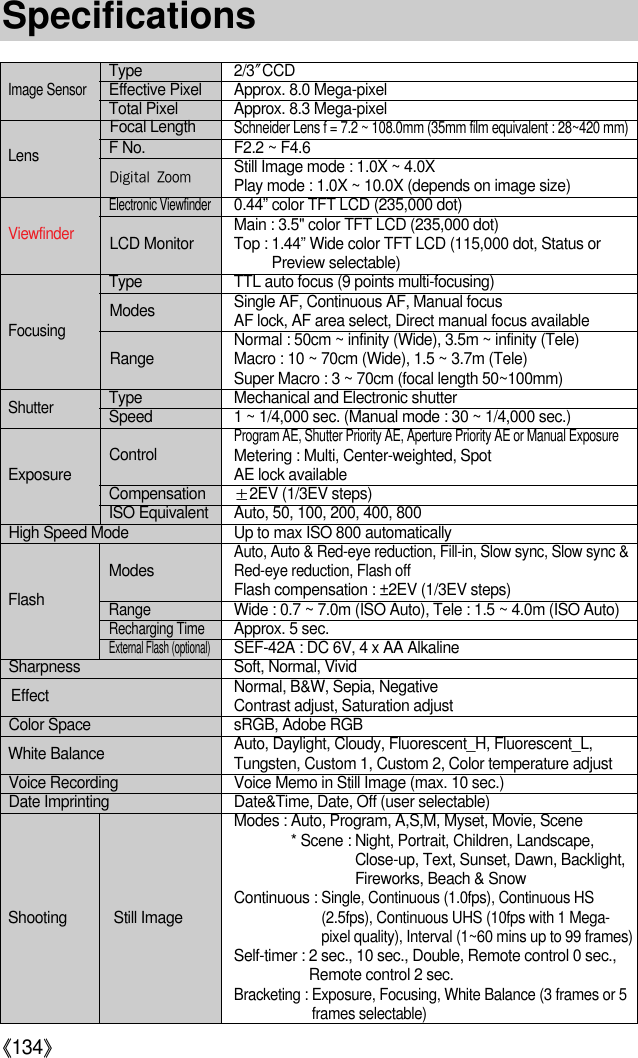
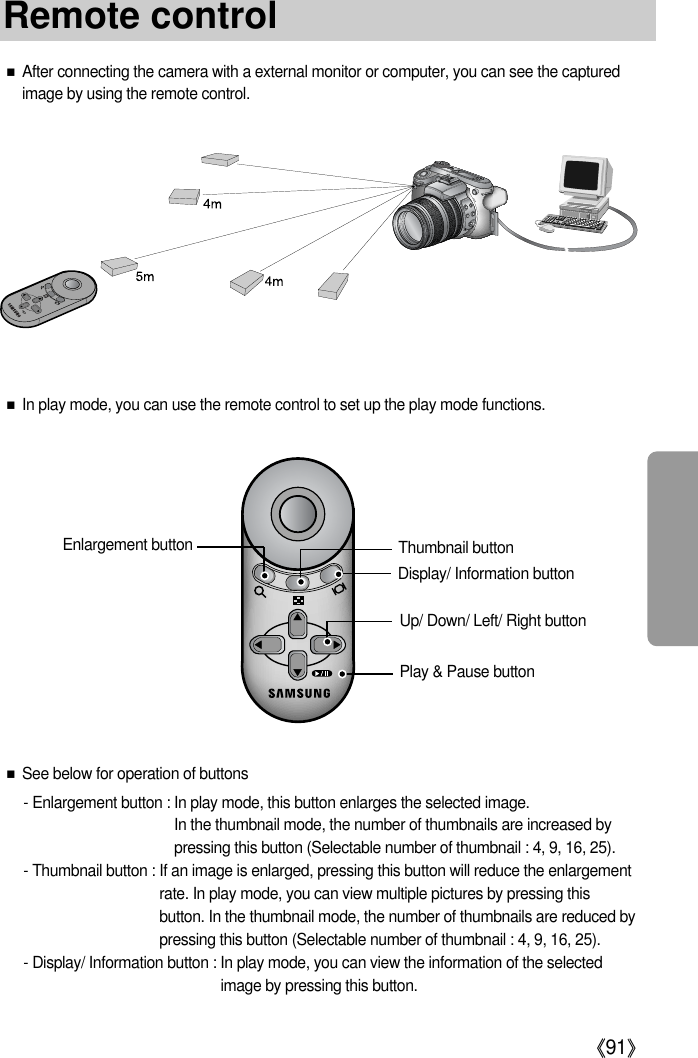
![《82》28100-00092005.07.0113:00 PM1/30F2.2100④⑤⑥⑦⑧⑪⑮⑭⑫⑬⑯⑰③ ② ① ⑱No. Description Icon Page1Image size p.162Metering3Battery status p.11~124Date 2005.07.01 p.525Time 13:00PM p.346Contrast7Saturation8Quality9Sharpness p.3710 F No. 28mmx4.0 p.3211 Exposure compensation p.33■The LCD displays shooting information about the displayed image.■Refer to page 00 for more information about selecting an LCD.Rear LCD/ Finder LCD[ Image & Full information ]⑨⑩LCD monitor indicator](https://usermanual.wiki/Hanwha-Techwin/PRO815.Users-Manual-6-of-7/User-Guide-572125-Page-1.png)
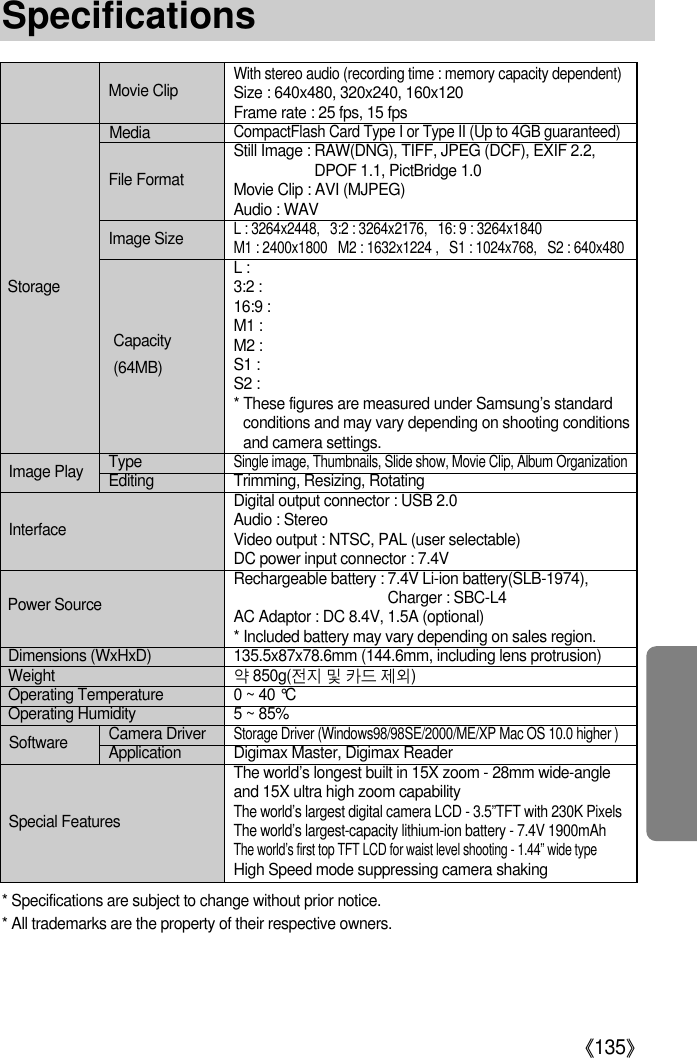
![《84》■In Play mode, you can use the buttons and the jog dial onthe camera to conveniently set up the Play mode functions.■You can view multiple pictures, enlarge a selected picture,and crop and save a selected area of an image.●Thumbnail display1. While an image is displayed full screen, press the Thumbnail button( ).2. The thumbnail display will highlight the image that hadbeen showing at the time the thumbnail mode was selected.3. Change the number of thumbnail by rotating the Front jog dial (JOG1). You can select 4, 9,16, 25 thumbnail.- Rotating the Front jog dial to left will reduce the number of thumbnail.- Rotating the Front jog dial to right will increase the number of thumbnail.4. Rotate the Rear jog dial (JOG2) or press the Up/ Down/ Left/ Right button to move to adesired image.●Image enlargement1. Select an image that you want to enlarge and press the Enlargement button( ). Enlarge the image by rotating the Rear jog dial (JOG2).2. You can change the enlargement rate by rotating theRear jog dial (JOG2).- Rotating the Rear jog dial to right will increase theenlargement rate.- Rotating the Rear jog dial to left will reduce theenlargement rate.3. Different parts of the image can be viewed by pressing the Up/ Down/ Left/ Right button.JOG2X1.4328100-00092005.07.0113:00 PM1/30F2.2100Pressing the Thumbnailbutton ( )Pressing the Enlargementbutton ( )Highlighted image[ Normal display mode ] [ Thumbnail display mode ]Exit:AELMove:JOG2/Change:JOGThumbnail button/ Enlarge button](https://usermanual.wiki/Hanwha-Techwin/PRO815.Users-Manual-6-of-7/User-Guide-572125-Page-3.png)
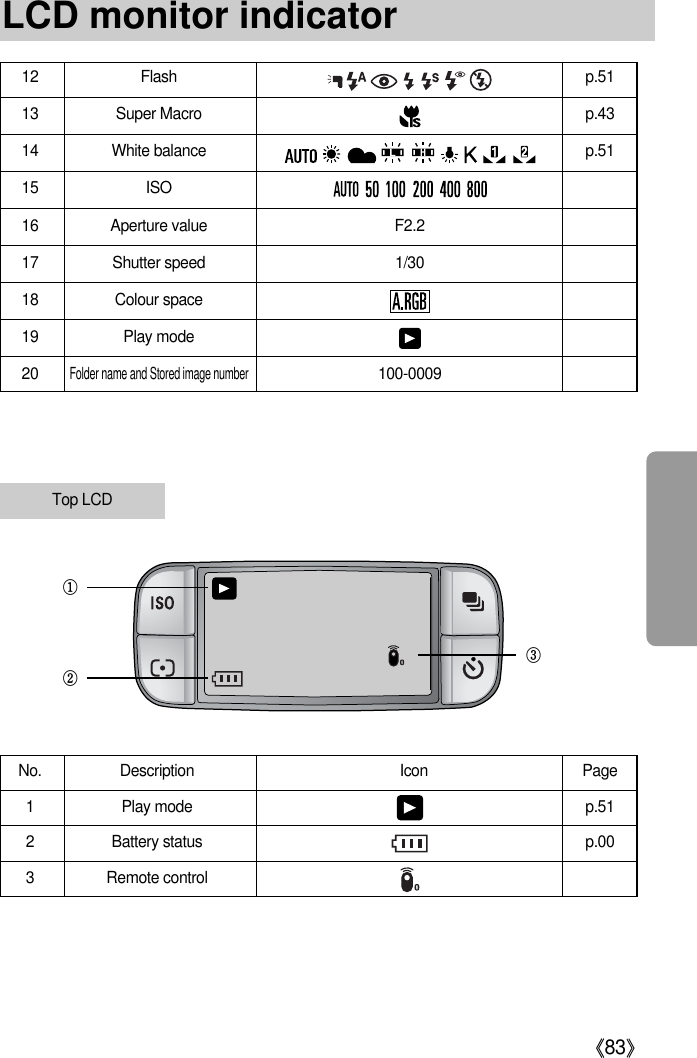
![《85》●You can tell whether the image displayed is an enlarged view by checking the imageenlargement indicator shown at the bottom left of the LCD. (If the image is not an enlargedview, the indicator will not be displayed.) You can also check the area of enlargement.●RAW, TIFF and Movie clip files can’t be enlarged.●If an image is enlarged, a loss of quality may occur.●During the image enlargement, you can delete the image by pressing the delete button. INFORMATION●Trimming : You can extract part of the image that youwant and save it separately.1. Enlarge an image by rotating the Rear jog dial(JOG2) and press the Menu button.2. Press the Menu button and a message will displayto crop the image.3. Select a desired sub menu by pressing the Up/Down button and press the OK button.- [Yes] : The trimmed image will save as a new filename, and display on the LCD.- [No] : The trimming menu will disappear.※If there is little memory space to save the trimmed image, the image can’t be trimmed.●The maximum enlargement rate in proportion to the image size.Trimming?YesNoTrimming:OKImage sizeMaximum enlargement rate×10.20 ×10.20 ×10.20 ×6.82 ×4.64 ×4.00 ×3.33Thumbnail button/ Enlarge button](https://usermanual.wiki/Hanwha-Techwin/PRO815.Users-Manual-6-of-7/User-Guide-572125-Page-4.png)
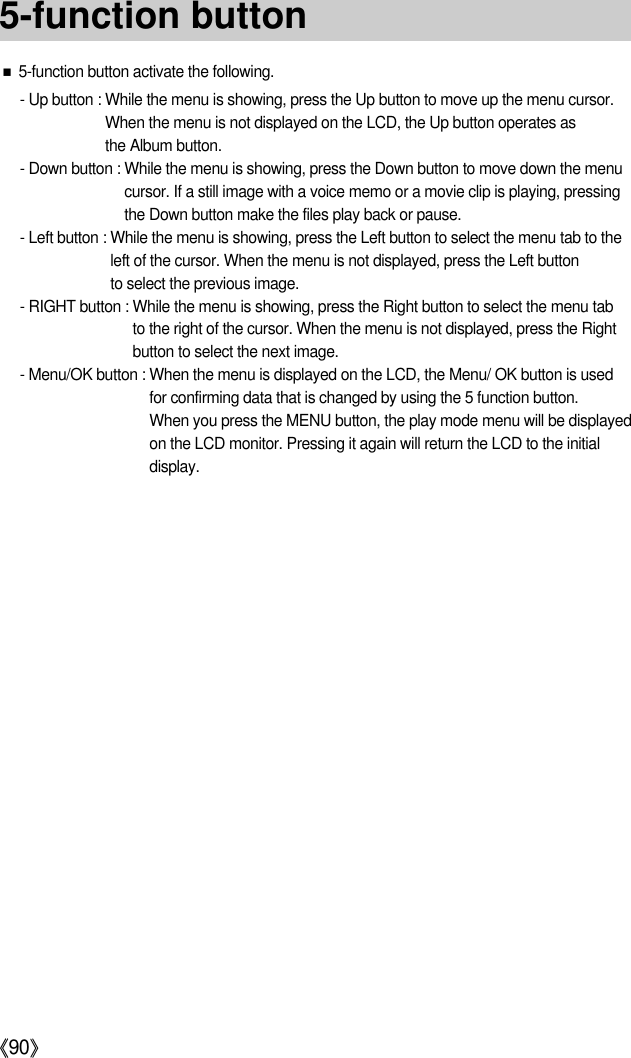
![《86》■The shooting and playing back information will bedisplayed on the LCD. The last image stored in thememory is displayed on the LCD by pressing the playmode button.■Pressing the Display/ Information button( ) in thePLAY mode will change the display as shown below.■Refer to page 00 for more information about the shooting information.■The followings are playing back information.28100-00092005.07.0113:00 PM1/30F2.2100[ Shooting information ] [ Playing back information ] [ Image only ]- [ ] : Voice memo- [ ] : DPOF indicator- [ ] : Protect indicatorDisplay/ Information button ( )](https://usermanual.wiki/Hanwha-Techwin/PRO815.Users-Manual-6-of-7/User-Guide-572125-Page-5.png)
![《87》Album mode■You can organise the captured still images into albums.■This camera has 8 albums and each album can take up to 100 images.■The album menu loading time depends on the memorycard type.■How to use the album●Selecting the album1. In the play mode, press the Album (Up) button.2. Select the [ ] menu by pressing the Up/ Down buttonand press the Right button.3. Select a desired album by pressing the Up/ Down/ Left/Right buttons and press the OK button.●Inserting still images into the album1. Select an album.2. Select the [ ] menu by pressing the Up/ Downbutton and press the Right button.Exit:OK Move: Exit:OK Move:Set:OK Select:JOG1 Set:OK](https://usermanual.wiki/Hanwha-Techwin/PRO815.Users-Manual-6-of-7/User-Guide-572125-Page-6.png)
![《88》3. Select the still images you wish to add by pressing theUp/Down/Left/Right buttons and rotate the Front jog dial(JOG1).V marks are displayed on the selected images.* To cancel the selection, rotate the Front jog dial (JOG1)again.4. Press the OK button and a confirmation window willdisplay. Select a desired sub menu by pressing the Up/Down button and press the OK button.[Yes] : Inserts the selected images into the album.[No] : Cancels the inserting images.●Removing still images from the album1. Select an album.2. Select the [ ] menu by pressing the Up/ Down buttonand press the Right button.3. Select a desired sub menu and press the OK button.- [Select] : Specific still images in the album can beremoved.- [All] : All of the still images in the album will be removed.※If [Select] is selected :- Select images that you want to remove by pressingthe Left/ Right buttons and rotate the Front jog dial(JOG1). V marks are displayed on the selectedimages.4. Press the OK button and a confirmation window will display.Select a desired sub menu by pressing the Up/ Downbutton and press the OK button.[Yes] : Removes the selected images from the album.[No] : Cancels the removing images.* The removed images are not deleted from the memory,but just removed from the album.Select:JOG1 Set:OK Confirm:OKAdd?YesNoSet:OKSelectAllSet:JOG1 Set:OKConfirm:OKRemove?YesNoAlbum mode](https://usermanual.wiki/Hanwha-Techwin/PRO815.Users-Manual-6-of-7/User-Guide-572125-Page-7.png)
![《89》●If an image is deleted from the memory, the image doesn’t display on an album.●An image can’t be added twice into the same album.●An image can be added into the different albums.INFORMATION●Playing back the albums◎Playing back all of the albums1. Select [ ] menu and press the OK button.All of the albums will be selected.2. Select the [ ] menu by pressing the Up/ Down buttonand press the Right button.※You can select [Start], [Interval], [Repeat] and [Effect]menus.- [Start] : Start the slide show- [Interval] : Set the slide show play interval- [Repeat] : Choose to repeat the slide show after finishingthe first cycle.- [Effect] : Unique screen effects can be used for theslide show.3. Select the [Start] menu by pressing the Up/ Down buttonand press the OK button to start the slide show.4. To stop the slide show, Press the Play & Pause buttonand MENU/OK button.◎Playing a desired album1. Select a desired album and press the OK button.2. Select the [ ] menu by pressing the Up/ Downbutton and press the Right button.※You can Select the [Start], [Interval], [Repeat] and[Effect] menu.3. Select the [Start] menu and press the OK button tostart the slide show.4. To stop the slide show, press the Play & Pause buttonand MENU/ OK button.Exit:OK Move: Exit:OK Move: Back:◀Set:OKStartIntervalRepeatEffectBack:◀Set:OKStartIntervalRepeatEffect1 SecOffOff1 SecOffOffAlbum mode](https://usermanual.wiki/Hanwha-Techwin/PRO815.Users-Manual-6-of-7/User-Guide-572125-Page-8.png)
![《92》■This deletes images stored on the memory.●Before deleting images from the camera, you should protect (p.77) or download images(p.121) to your computer that you wish to keep.INFORMATION●Deleting Images in Play Mode1. Select an image that you want to delete by pressing theLeft/ Right button and press the Delete ( ) button.2. A message will display as shown alongside on the LCD.3. Select the [Delete] menu and press the OK button todelete the selected image. Delete?YesNoDelete:OKRemote control- Up/ Down/ Left/ Right button : In play mode, different parts of the enlarged image can beviewed by pressing these buttons. In the thumbnail mode,you can move to a desired image by pressing these buttons.- Play & Pause button : If a still image with a voice memo or a movie clip is playing, pressingthis button make the files play back or pause.Delete button ( )](https://usermanual.wiki/Hanwha-Techwin/PRO815.Users-Manual-6-of-7/User-Guide-572125-Page-11.png)
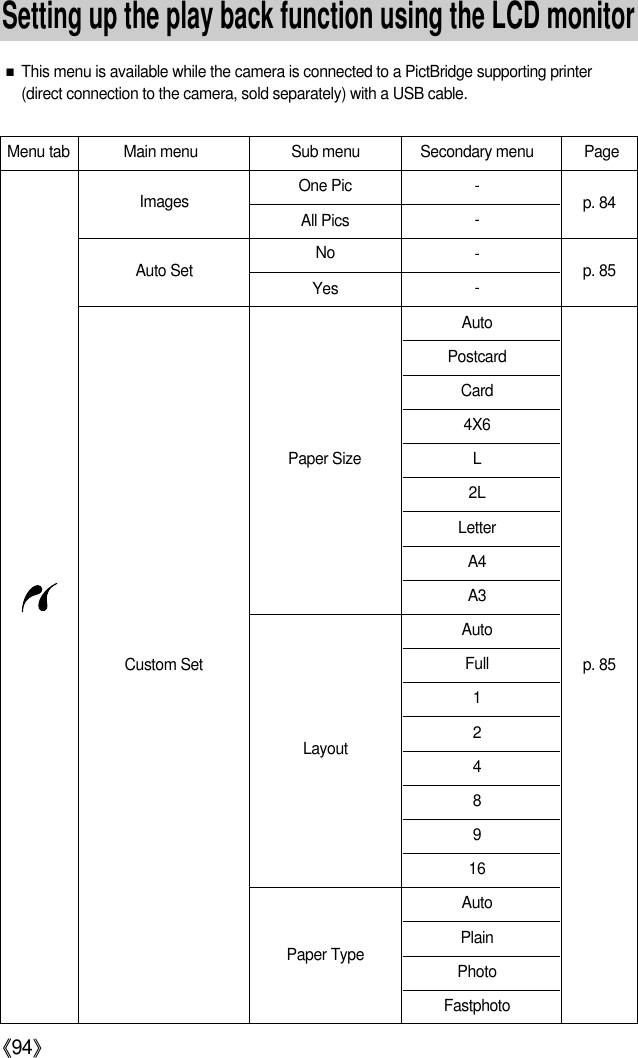
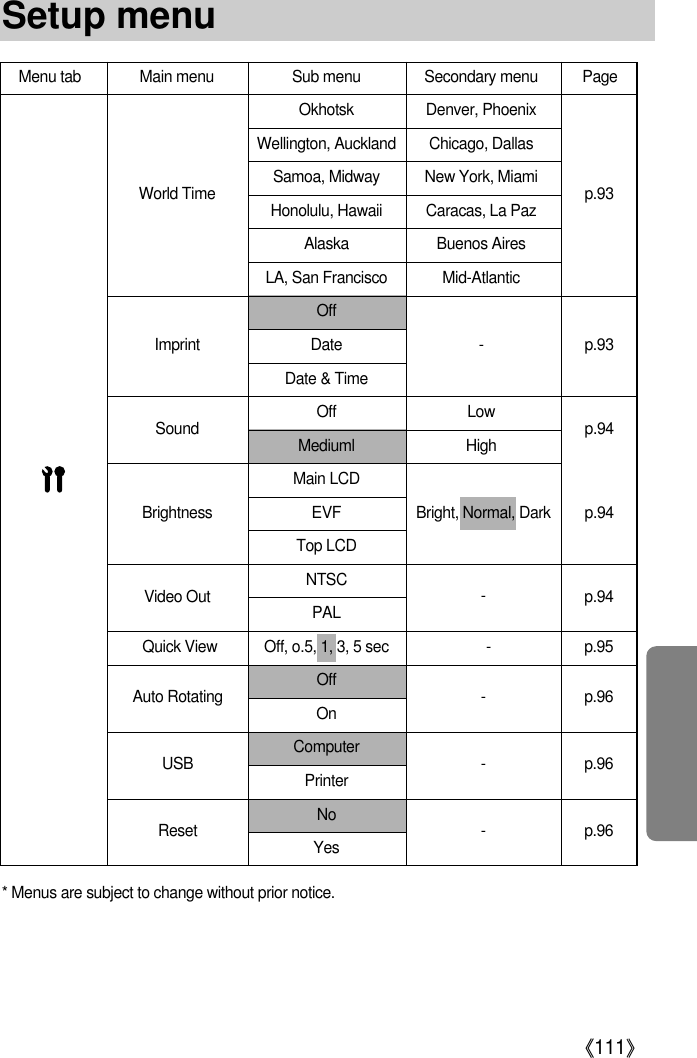
![《93》■PLAY mode functions can be changed by using the LCD monitor.Press the Menu button and select the [▶] menu tab. The play back menu will display.The menus you can set up in Play mode are as follows. To capture an image after setting upthe play menu, press the Play mode button or shutter button.Menu tab Main menu Sub menu Secondary menu Page--OffOn---------Slide Showp. 77p. 78p. 761, 3, 5, 10 secOff,OnCancelEffect1,2,3-Right 90°Left 90°180°IntervalRepeatStartDPOF/ StandardDPOF/ IndexDPOF/ SizeSelect/ All Pics/ CancelNo/ YesSelect/ All Pics/ CancelProtectDeleteVoice MemoEffectSelectAll PicsSelectAll PicsUnlock/LockResizeRotatep. 79p. 80p. 817M6M5M4M3M2M 1M640X480User Image▶Setting up the play back function using the LCD monitor](https://usermanual.wiki/Hanwha-Techwin/PRO815.Users-Manual-6-of-7/User-Guide-572125-Page-12.png)
![《96》■Images can be displayed continuously at pre-set intervals. You can view the slide show byconnecting the camera to an external monitor.1. In play mode, press the Menu button and select the [▶]menu tab.2. Press the Right button and select the [Slide Show] menuby pressing the Up/ Down button.3. Press the Right button and select a desired sub menu bypressing the Up/ Down button.●Setting play interval : Set the slide show play interval.1. Select the [Interval] menu by pressing the Up/ Downbutton and press the Right button.2. Press the Up/ Down button to select the desired interval.3. Press the OK button to set the setting.●Repeat setting : setting the slide show to repeat after thefirst cycle.1. Select the [Repeat] menu by pressing the Up/ Downbutton and press the Right button.2. Select a desired sub menu by pressing the Up/ Downbutton.[On] selected : The slide show is repeated until cancelled.[Off] Selected : The slide show is closed after one cycle.3. Press the OK button to set the setting.●The loading time depends on the image size and quality.●While the slide show is playing, only the first frame of a movie clip file is displayed.INFORMATIONStartIntervalRepeatEffect10 sec1 sec3 sec5 secIntervalRepeatEffectStartOffOnDPOF/StandardDPOF/IndexDPOF/SizeSlide ShowProtectDeleteVoice MemoStarting the slide show](https://usermanual.wiki/Hanwha-Techwin/PRO815.Users-Manual-6-of-7/User-Guide-572125-Page-15.png)
![《97》●Configure slide show effects : Unique screen effects can be used for the slide show.1. Select the [Effect] sub menu by pressing the Up/ Down button and press the Right button.2. Use the Up/ Down button to select the type of effect.[Off] : Normal display.[Effect 1] : Image moves from the top left.[Effect 2] : The image slides diagonally from top left to bottom right.[Effect 3] : Image is displayed slowly from the centreoutwards.3. Press the OK button to set the setting.●Start the slide show : The slide show can start only in the [Start] menu.1. Select the [Start] menu by pressing the Up/ Downbutton.2. Press the OK button to start the slide show.- Press the Play & Pause button to pause the slide show.- Press the Play & Pause button ( ) again toresume the slide show.- To stop the slide show, press the Play & Pause button,and then press the Left or Right button.RepeatEffectStartIntervaloffEffect 1Effect 2Effect 3EffectStartIntervalRepeatStarting the slide show](https://usermanual.wiki/Hanwha-Techwin/PRO815.Users-Manual-6-of-7/User-Guide-572125-Page-16.png)
![《98》■This is used to protect specific shots from being accidentally erased (Lock). It also unprotectsimages that have been previously protected (Unlock).●How to protect images1. In play mode, press the Menu button.2. Select the [▶] menu tab and press the Right button.3. Select the [Protect] menu by pressing the Up/ Downbutton and press the Right button.4. Select a desired sub menu by pressing the Up/ Downbutton and press the Right button.[Select] : Selection window for an image to be protected/released is displayed.- Rear jog dial (JOG2) : Select an image- Front jog dial (JOG1) : Protect/ release the image- OK Button : Your changes will be saved and the menuwill disappear.[All Pics] : Protect/ release all saved images- [Lock] : Protect all saved images- [Unlock] : Unprotect all save images- [Cancel] : The confirmation window will disappear.- OK button : The changed settinga are saved and menuwill disappear. Set:OKSelect:JOG1MovePic:JOG2- If you protect an image, the protect icon will be displayedby pressing the Display/ Information button on the LCD.(An unprotected image has no indicator)- An image in LOCK mode will be protected from thedelete function, but will NOT be protected from theFormat function.DPOF/IndexDPOF/SizeSlide ShowProtectDeleteVoice MemoResizeSelectAll PicsSet:OKProtect?LockUnlockCancelProtecting images](https://usermanual.wiki/Hanwha-Techwin/PRO815.Users-Manual-6-of-7/User-Guide-572125-Page-17.png)
![《99》■Of all the files stored in the memory card, the unprotected files in the DCIM subfolder will bedeleted. Remember that this will permanently delete unprotected images. Important shotsshould be stored on a computer before deletion takes place.The startup image is stored in the camera's internal memory (i.e., not on the memory card)and it will not be deleted even if you delete all files on the memory card.●How to delete images1. In play mode, press the Menu button.2. Select the [▶] menu tab and press the Right button.3. Select the [Delete] menu and press the Right button.4. Select a desired sub menu by pressing the Up/ Downbutton and press the Right button.[Select] : Selection window for an image to delete isdisplayed.- Rear jog dial (JOG2) : Select an image.- Front jog dial (JOG1) : Select the image for deletion.- OK button : Press the OK Button to display theconfirmation message. Select the [Yes]menu and press the OK Button again todelete [ ] marked images.[All Pics] : Displays confirmation window. Select the [Yes]menu and press the OK button to delete allunprotected images. If there are no protectedimages, a [No Image!] message will display.5. After deletion, the screen will be changed to the playmode screen.DPOF/SizeSlide ShowProtectDeleteResizeDPOF/StandardDPOF/IndexSelectAll PicsSet:OKSelect:JOG1MovePic:JOG2Delete?YesNoDelete:OKDeleting images](https://usermanual.wiki/Hanwha-Techwin/PRO815.Users-Manual-6-of-7/User-Guide-572125-Page-18.png)
![《100》●How to add a voice to a still image1. Select an image that you wish to add sound to bypressing the Left/ Right button.2. Select the [▶] menu by pressing the Menu button andpress the Right button.3. Select the [Voice Memo] menu by pressing the Up/Down button and press the Right button.4. Select the [On] menu by pressing the Up/ Down buttonand press the OK button.5. The camera is now ready to record a voice memo.6. Press the shutter button to start recording and voice willbe recorded to the still image for 10 seconds. While thevoice is recording, the recording status window will bedisplayed as shown alongside.7. The recording can be stopped by pressing the shutterbutton again.8. The ( ) icon will be displayed on the LCD bypressing the Display/ Information button after voicememo recording has finished.- Voice memos can’t be recorded onto movie clip files.- A distance of 40cm between you and the camera(microphone) is the best distance to record sound.- The voice memo will be saved in *.wav format, but hasthe same file name as the still image to which itcorresponds.- If you add a new voice memo to the still image that already has a voice memo, the existingvoice memo will be erased.Slide ShowProtectDeleteVoice MemoResizeRotateDPOF/StandardOnOffSet:OKStart:SHUTTERStop:SHUTTER■You can add your voice to a stored still image.Voice memo](https://usermanual.wiki/Hanwha-Techwin/PRO815.Users-Manual-6-of-7/User-Guide-572125-Page-19.png)
![《101》■Change the resolution (size) of pictures taken. Select the [User Image] to save an image tobe the start-up image. The resized image will have a new file name.1. In play mode, press the Menu button and select the [▶] menu tab.2. Press the Right button and select the [Resize] menu bypressing the Up/ Down button.3. Press the Right button and select a desired sub menu bypressing the Up/ Down button.4. Press the OK button and a confirmation window willdisplay.5. Select the [Yes] menu and press OK button to save theresized image.●A large sized image can be resized to a smaller sized image, but not vice versa.●3264X2176(3:2) and 3264X1840(16:9) image size files, TIFF, Movie clip (AVI) files can’tbe resized.●You can change the resolution of only those files compressed in the JPEG 4:2:2 format.●The resized image will have a new file name. The [User Image] image is stored not on thememory card but on the internal memory.●If the memory capacity is insufficient to store the resized image, a [Card Full!] messagewill display on the LCD and the resized image will not be stored.INFORMATION●Image Resize Types3264X2448 O O O O O O O O O3264X2176 X X X X X X X X X3264X1840 X X X X X X X X X2400X1800 X X X O O O O O O1632X1224 X X X X X O O O O1024X768 X X X X X X X O O640X480 X X X X X X X X OSize4M7M 6M 5M 3M 2M 1M 640X480사용자이미지ProtectDeleteVoice MemoResizeRotateDPOF/StandardDPOF/Index640×480User Image7M6M5MSet:OKResize](https://usermanual.wiki/Hanwha-Techwin/PRO815.Users-Manual-6-of-7/User-Guide-572125-Page-20.png)
![《102》■You can rotate the stored images by various degrees.1. In play mode, press the Menu button and select the [▶]menu.2. Press the Right button and select the [Rotate] menu bypressing the Up/ Down button.3. Press the Right button and select a desired sub menu bypressing the Up/ Down button.[Right 90°] : Rotate picture in a clockwise direction[Left 90°] : Rotate picture in a counter clock-wise direction[180°] : Rotate picture 180 degrees[ Right 90° ] [ 180° ][ Left 90° ]4. Press the OK button and a confirmation window will display.5. Select the [Yes] menu and press the OK button. A rotated image will display on the LCDand the menu will disappear. There will be empty space to the left and right of the rotatedimage.DeleteVoice MemoResizeRotateDPOF/StandardDPOF/IndexDPOF/Size180。Right 90。Left 90。●The rotated image can’t be enlarged or trimmed.●RAW, TIFF and movie clip can’t be rotated.INFORMATIONRotating an image](https://usermanual.wiki/Hanwha-Techwin/PRO815.Users-Manual-6-of-7/User-Guide-572125-Page-21.png)
![《103》■DPOF(Digital Print Order Format) allows you to embed printing information on your memorycard’s MISC folder. Select the pictures to be printed and how many prints to make.■The DPOF indicator will display on the LCD when an image that has DPOF information playsback. Images can then be printed on DPOF printers, or at an increasing number of photo labs.■This function is not available for Movie clips and Voice recording files.DPOF : STANDARD■This function allows you to embed print quantity information on a stored image.1. In play mode, press the Menu button. 2. Select [▶] menu tab and press the Right button.3. Select the [DPOF/Standard] menu by pressing theUp/Down button and press the Right button.4. Select a desired sub menu by pressing the Up/Downbutton and press the Right button. [Select] : Selection window for an image to print isdisplayed.- Rear jog dial (JOG2) : Select an image to print.- Front jog dial (JOG1) : Select the number of prints.[All Pics] : Configure number of prints for all pictures exceptmovie and voice files.- Front jog dial (JOG1) : Select the number of prints.[Cancel] : Cancel the print setup.5. Press the OK button to confirm the setting. If an imagecarries DPOF instructions, the DPOF indicator ( )will show.Voice MemoResizeRotateDPOF/StandardDPOF/IndexDPOF/SizeSlide ShowCancelSelectAll PicsSelect:JOG1 Set:OKMovePic:JOG20PrintsDPOF?OPrintsSet:OKDPOF](https://usermanual.wiki/Hanwha-Techwin/PRO815.Users-Manual-6-of-7/User-Guide-572125-Page-22.png)
![《104》■Images (except for movie clips and voice file) are printed as index type.1. In play mode, press the Menu button and select the [▶] menu tab.2. Press the Right button and select the [DPOF/Index] menuby pressing the Up/ Down button.3. Press the Right button and select a desired sub menu bypressing the Up/Down button.If [No] is selected : Cancel the index print setting.If [Yes] is selected : The image will be printed in indexformat.4. Press the OK button to set the setting.DPOF : PRINT SIZE■You can specify the print size when printing images stored on the memory card.The [DPOF/Size] menu is available only for DPOF 1.1 compatible printers.●Setting the Print Size1. In play mode, press the Menu button.2. Select [▶] menu tab and press the Right button. 3. Select the [DPOF/Size] menu by pressing the Up/ Downbutton and press the Right button.4. Select a desired sub menu by pressing the Up/ Downbutton and press the Right button. [Select] : Selection window for an image to be changedprinted size is displayed.- Rear jog dial (JOG2) : Select an image.- Front jog dial (JOG1) : Change the print size.- OK button : Your changes will be saved and the menu will disappear.[All Pics] : Change print size of all saved images- Select a desired print size by pressing the Up/ Downbutton.* DPOF Size secondary menu : Cancel, 3X5, 4X6, 5X7, 8X10ResizeRotateDPOF/StandardDPOF/IndexDPOF/SizeSlide ShowProtectNoYesSet:OKRotateDPOF/StandardDPOF/IndexDPOF/SizeSlide ShowProtectDeleteCancelSelectAll PicsSelect:JOG1 Set:OKMove Pic:JOG23 X 5Set:OKDPOF?Cancel3 X 54 X 65 X 78 X 10DPOF : INDEX](https://usermanual.wiki/Hanwha-Techwin/PRO815.Users-Manual-6-of-7/User-Guide-572125-Page-23.png)
![《105》※If you selected [Computer] in Step 4, when you connect the camera to your printer, the[Connecting…] message will display and the connection will not be established. In this case,disconnect the USB cable, and then follow the procedure from Step 2 and onward.Video OutQuick ViewAuto RotatingUSBReset AllFilePower OffPrinterComputer■You can use the USB cable to connect this camera to a printer that supports PictBridge (soldseparately) and print the stored images directly. RAW, TIFF and Movie clip files cannot beprinted. You can set up the following settings from the PictBridge menu.Images : Select the pictures to be printed.Auto Set/Custom Set : Setting up printingPrint : Printing picturesDPOF Print : Printing the DPOF filesReset : Initialising the PictBridge functions Connecting the Camera to a Printer●Connecting the Camera to a Printer1. Press the POWER button to turn on the camera.2. Press the Menu button and select the set up menu tab ( ).3. Press the Right button and select the [USB] menu bypressing the Up/ Down button.4. Press the Right button and select the [Printer] menu bypressing the Up/ Down button.5. Press the OK button to set the setting.6. Use the supplied USB cable to connect the camera to the printer as shown below.7. Turn on the printer and the camera will be connected to the printer. PictBridge](https://usermanual.wiki/Hanwha-Techwin/PRO815.Users-Manual-6-of-7/User-Guide-572125-Page-24.png)
![《106》■Select pictures to print1. Connect the camera to your printer. The USB menu mustbe set to [Printer] before you connect the camera to theprinter. (See p.83)2. Press the Menu button and select the [ ] menu tabby pressing the Up/ Down button.3. Press the Right button and select the [Images] menu bypressing the Up/ Down button.4. Press the Right button and select a desired sub menu bypressing the Up/ Down button.When [One Pic] is selected : The PictBridge function will be applied only to the picturecurrently displayed.When [All Pics] is selected : The PictBridge function will be applied to all pictures, excludingRAW, TIFF and movie clips files.[ When [One Pic] is selected ] [ When [All Pics] is selected ]- Press the Up/ Down button to select the number of prints.- When you select [One Pic] menu, use the Left/ Right button to select another picture andselect the number of prints for another picture.- After setting the number of prints, press the OK button to save.사진 이동:◀▶ 설정:OK●Setting the Number of Copies to Print- Select [One Pic] or [All Pics]. A screen where you can set the number of copies to print willappear as shown below.■Easy printingWhen you connect the camera to printer in the Play backmode, you can print a picture easily.- Pressing the shutter button : Currently displayed imagewill be printed with theprinter’s default setting.- Pressing the Left/ Right button: Selects a previous/ nextimage.100-0009출력초기화이미지자동 설정사용자 설정한장전부사진 이동:◀▶ SHUTER:출력출력?0 Prints출력?0 PrintsSet:OKPictBridge : Picture Selection](https://usermanual.wiki/Hanwha-Techwin/PRO815.Users-Manual-6-of-7/User-Guide-572125-Page-25.png)
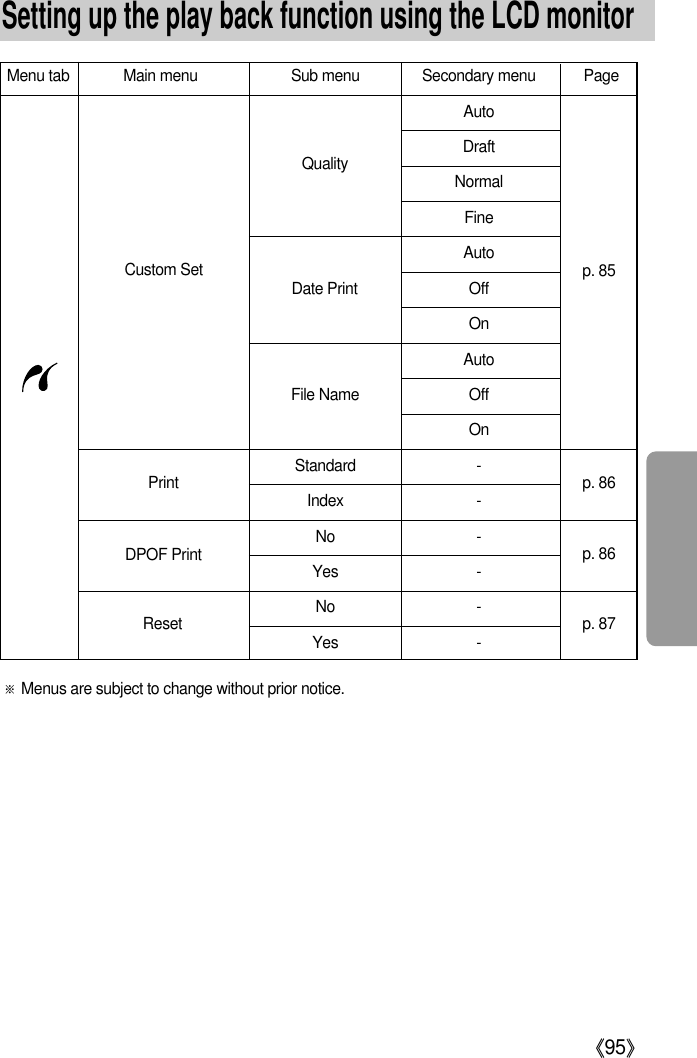
![《107》MenuPaper SizeSetting the size of the printing paperAuto, Postcard, Card, 4X6, L, 2L, Letter, A4, A3Setting the number of pictures to be printed on a sheet of paperPaper TypeSetting the quality of the printing paperAuto, Plain, Photo, FastphotoSetting the quality of the picture Auto, Draft, Normal, Fineto be printedDate Print Setting whether to print the date Auto, Off, OnFile Name Setting whether to print the file name Auto, Off, On■AUTO SET1. Connect the camera to your printer. The USB menumust be set to [Printer] before you connect the camerato the printer. (See p.83)2. Select the [Auto Set] menu by pressing the Left/ Rightbutton.3. Press the Right button and select a desired sub menuby pressing the Up/ Down button.[No] : [Custom Set] values are kept.[Yes] : Press the OK button and a confirmation window will display. Press the OK buttonagain and all values in the [Custom Set] are automatically changed.※Some menu options are not supported in all manufacturer and printer models.※If the setting values are not changed in the automatic/manual setting, the setting values areautomatically kept.1. Connect the camera to your printer. The USB menumust be set to [Printer] before you connect the camera tothe printer. (See p.83)2. Select the [Auto Set] menu by pressing the Left/ Rightbutton.3. Press the Right button and select a desired sub menu bypressing the Up/ Down button.4. Select a desired sub menu and press the OK button. The menus you can set up are as follows :■Custom Set : You can select the Paper Size, Print Format, Paper Type, Print Quality, Date,Print, and File Name Print menus for printed pictures.Function Sub menu초기화이미지자동 설정사용자 설정출력아니오예이미지자동 설정사용자 설정출력초기화Layout Auto, Full, 1, 2, 4, 8, 9, 16출력 화질PictBridge : Print Setting](https://usermanual.wiki/Hanwha-Techwin/PRO815.Users-Manual-6-of-7/User-Guide-572125-Page-26.png)
![《108》■Printing Pictures1. Connect the camera to your printer. The USB menumust be set to [Printer] before you connect the camerato the printer. (See p.83)2. Select the [Print] menu by pressing the Left/ Rightbutton.3. Press the Right button and select a desired sub menuby pressing the Up/ Down button.[Standard] : Print the pictures stored in the memory cardin set numbers. One picture is printed on one piece of paper.[Index] : Print multiple images on one sheet of paper.1. Connect the camera to your printer. The USB menumust be set to [Printer] before you connect the camera tothe printer. (See p.83)2. Select the [DPOF Print] menu by pressing the Left/ Rightbutton.3. Select a desired sub menu by pressing the Up/Downbutton and press the OK button.[No] : Cancel the printing[Yes] : Directly print the file with the DPOF information※With a printer without supporting the DPOF, the menu is still displayed but not available.4. The screen shown on the right will appear and thepicture will be printed. If no picture is selected,the [No image!] message will be displayed. Press theMenu/ OK button while printing to cancel the printingand the [Print] menu is displayed.※Depending on the manufacturer and printer model,some menus may not be available.■DPOF Print : This allows you to directly print the files with DPOF information.자동 설정사용자 설정출력초기화이미지표준사용자 설정출력DPOF출력초기화이미지자동 설정출력?예아니오출력:OK아니오예PictBridge : Printing](https://usermanual.wiki/Hanwha-Techwin/PRO815.Users-Manual-6-of-7/User-Guide-572125-Page-27.png)
![《109》■Initialises user-changed configurations.1. Connect the camera to your printer. The USB menumust be set to [Printer] before you connect the camerato the printer. (See p.83)2. Select the [Reset] menu by pressing the Left/ Rightbutton.3. Press the Right button and select a desired sub menuby pressing the Up/ Down button.If [No] is selected : Settings will not be reset.If [Yes] is selected : Press the OK button and a confirmation window will display.Press the OK button again and all print and image settings will be reset.※Default print setting varies depending on the printer manufacturer.For your printer’s default setting, refer to the user’s guide that came with your printer.사용자 설정출력초기화이미지자동 설정아니오예PictBridge : RESET](https://usermanual.wiki/Hanwha-Techwin/PRO815.Users-Manual-6-of-7/User-Guide-572125-Page-28.png)
![《112》■This function allows the user to select the file naming format.●How to set the file names1. Press the Menu button and select the [ ] menu tab bypressing the Up/ Down button. 2. Press the Right button and select the [File] menu bypressing the Up/ Down button. 3. Press the Right button and select a desired sub menu bypressing the Up/ Down button. [Series] : New files are named using numbers that followthe previous sequence, even when a new memory card is used, or after formatting,or after deleting all pictures.[Reset] : After using the reset function, the next file name will be set from 0001 even afterformatting, deleting all or inserting a new memory card.4. Press the OK button to set the setting.●The first stored folder name is 100SSCAM, and the first file name is SH100001.●File names are assigned sequentially from SH100001→→SH100002 →~ →SH100099.But, files that was saved as the Adobe RGB type are assigned as _H1xxxxx. ●The folder number is assigned sequentially from 100 to 999 as follows :100SSCAM →101SSCAM →~ →999SSCAM.●The files used with the memory card conform to the DCF(Design rule for Camera Filesystems) format.INFORMATIONAuto RotatingUSBReset AllFilePower OffLCD OffLanguageSeriesResetFile name](https://usermanual.wiki/Hanwha-Techwin/PRO815.Users-Manual-6-of-7/User-Guide-572125-Page-31.png)
![《113》●Even if the battery or AC adapter are removed and inserted again, the power off settingwill be preserved.●Note that the automatic power off function will not operate if the camera is in PC mode,slide show, playing back a movie clip.INFORMATION●How to set the Auto power Off1. Press the Menu button and select the [ ] menu tab bypressing the Up/ Down button.2. Press the Right button and select the [Power Off] menu bypressing the Up/ Down button.3. Press the Right button and select a desired sub menu bypressing the Up/ Down button.[Off] : The power off function will not operate.[1, 3, 5, 10 min] : The power will turn off automatically if not used for the period of timespecified.4. Press the OK button to set the setting.■This function switches the camera off after a set amount of time in order to prevent unnecessary batterydrainage.USBReset AllFilePower OffLCD OffLanguageFormat5 min10 minOff1 min3 minAuto power off](https://usermanual.wiki/Hanwha-Techwin/PRO815.Users-Manual-6-of-7/User-Guide-572125-Page-32.png)
![《114》●Even if the battery or AC adapter are removed and inserted again, the auto LCD turningoff setting will be preserved.●Note that the automatic power off function will not operate if the camera is in PC mode,slide show, playing back a movie clip.INFORMATION●How to set the auto turning off time1. Press the Menu button and select the [ ] menu tab bypressing the Up/ Down button. 2. Press the Right button and select the [LCD Off] menu bypressing the Up/ Down button. 3. Press the Right button and select a desired sub menu bypressing the Up/ button.[Off] : The LCD will not turn off.[10, 20, 30, 60 sec] : The LCD will turn off automaticallyif not used for the period of time specified.4. Press the OK button to set the setting.■This function switches the LCD off after a set amount of time in order to prevent unnecessarybattery drainage.Reset AllFilePower OffLCD OffLanguageFormatDate & Time30 sec60 secOff10 sec20 secAuto turning off the LCD](https://usermanual.wiki/Hanwha-Techwin/PRO815.Users-Manual-6-of-7/User-Guide-572125-Page-33.png)
![《115》●How to set the language1. Press the Menu button and select the [ ] menu tab bypressing the Up/ Down button.2. Press the Right button and select the [Language] menu bypressing the Up/ Down button.3. Press the Right button and select a desired sub menu bypressing the Up/ Down button.LANGUAGE sub menu : English, Korean, French, German,Spanish, Italian, S. Chinese, T. Chinese, Japanese, Russian,Portuguese, Dutch, Danish, Swedish, Finnish.※The following languages are inserted depending on sales region.- Type A : Thai, BAHASA(MALAY/ INDONESIAN), Arabic.- Type B : Czech, Polish, Hungarian.4. Press the OK button to set the setting.■There is a choice of languages that can be displayed on the LCD. Even if the battery or ACadapter are removed and inserted again, the language setting will be preserved.FilePower OffLCD OffLanguageFormatDate & TimeDate TypeBAHASAENGLISH한국어FRANÇAISLanguage●ype A or B language can be inserted depending on sales region- Type A : Thai, Bahasa, Arabic- Type B : Hungarian, Polish, CzechINFORMATION](https://usermanual.wiki/Hanwha-Techwin/PRO815.Users-Manual-6-of-7/User-Guide-572125-Page-34.png)
![《116》●How to format the memory card1. Press the Menu button and select the [ ] menu tab bypressing the Up/ Down button.2. Press the Right button and select the [Format] menu bypressing the Up/ Down button.3. Press the Right button and select a desired sub menu bypressing the Up/ Down button.If [No] is selected : The memory card will not be formatted. If [Yes] is selected : A [Processing!] message appears andthe memory card will be formatted. If you ran FORMAT in Play mode,a [No Image!] message will appear.■This is used for formatting the memory card. If you run [Format] on the memory card, allimages, including the protected images, will be deleted. Be sure to download importantimages to your PC before formatting the memory card.●Be sure to run [Format] on the following types of memory card.- A new memory card, or an unformatted memory card.- A memory card that has a file this camera can't recognise or one that has been takenfrom another camera.●Always format the memory card using this camera. If you insert a memory card that hasbeen formatted using other cameras, memory card readers, or PCs, you will get a [CardError!] message.INFORMATIONPower OilLCD OffLanguageFormatDate & TimeDate TypeWorld TimeNoYesSet:OKFormatting a memory card](https://usermanual.wiki/Hanwha-Techwin/PRO815.Users-Manual-6-of-7/User-Guide-572125-Page-35.png)
![《117》■You can change the date and time that will be displayed onthe captured images. ●How to set the Date & Time1. Press the Menu button and select the [ ] menu tab bypressing the Up/ Down button. 2. Press the Right button and select the [Date & Time]menu by pressing the Up/ Down button.3. Press the Right button and select a desired sub menu bypressing the Up/ Down button. - Left/ Right button : Selects the year/ month/ day/ hour/minute item.- Up/ Down button : Changes the setting value4. Press the OK button to set the setting.Setting up the date type■You can change the date type that will be displayed on thecaptured images.●How to set the date type1. Press the Menu button and select the [ ] menu tab bypressing the Up/ Down button.2. Press the Right button and select the [Date Type] menuby pressing the Up/ Down button.3. Press the Right button and select a desired sub menu bypressing the Up/ Down button.- Up/ Down : Changes the date type4. Press the OK button to set the setting.LCD OffLanguageFormatDate & TimeDate TypeWorld TimeImprint2005 / 07 / 0113 : 00LanguageFormatDate & TimeDate TypeWorld TimeImprintSounddd/mm/yyyy/mm/ddmm/dd/yySet:OKDate & Time2005 / 07 / 01 13 : 00Setting up the Date & Time](https://usermanual.wiki/Hanwha-Techwin/PRO815.Users-Manual-6-of-7/User-Guide-572125-Page-36.png)
![《118》■You can check the time of cities of various nations.●How to check the time1. Press the Menu button and select the [ ] menu tab bypressing the Up/ Down button.2. Press the Right button and select the [World Time] menuby pressing the Up/ Down button.3. Press the Right button and a world map will display asshown alongside.- Left/ Right or Rear jog dial (JOG2) : moves the red line to check the time of various cities.4. Press the OK button to set the setting.FormatDate & TimeDate TypeWorld TimeImprintSoundBrightnessSeoulTokyoSet:OKSeoul, Tokyo2005/07/01 13:00 PMWorld time](https://usermanual.wiki/Hanwha-Techwin/PRO815.Users-Manual-6-of-7/User-Guide-572125-Page-37.png)
![《119》■There is an option to include Date/Time on still images.●How to imprint the date & time1. Press the Menu button and select the [ ] menu tab bypressing the Up/ Down button.2. Press the Right button and select the [Imprint] menu bypressing the Up/ Down button.3. Press the Right button and select a desired sub menu.[Off] : The DATE & TIME will not be imprinted onthe image file.[Date] : Only the DATE will be imprinted on the image file.[Date&Time] : The DATE & TIME will be imprinted on the image file.4. Press the OK button to set the setting.●The Date & Time are imprinted at the bottom right side of the still image.●The date will be imprinted as a DATE TYPE setting.●TIME is imprinted in the following way : [Hour : Minute] and hours are shown using the 24hour clock.●The imprint function is applied only to still images except for the images taken in the [Text]scene mode.INFORMATIONDate & TimeDate TypeWorld TimeImprintSoundBrightnessVideo OutDate & TimeOffDateImprinting the recording date](https://usermanual.wiki/Hanwha-Techwin/PRO815.Users-Manual-6-of-7/User-Guide-572125-Page-38.png)
![《120》■If you set the operation sound to ON, various sounds will be activated for camera startup,when button are pressed, and if there is a card error, so that you can be aware of the cameraoperation status.●How to set the sound1. Press the Menu button and select the [ ] menu tab bypressing the Up/ Down button.2. Press the Right button and select the [Sound] menu bypressing the Up/ Down button.3. Press the Right button and select a desired sub menu.[Sound] sub menu : Off/ Low/ Medium/ High4. Press the OK button to set the setting.LCD brightness■You can adjust the Rear, Finder and Top LCD brightness.●How to set the brightness1. Press the Menu button and select the [ ] menu tab bypressing the Up/ Down button.2. Press the Right button and select the [Brightness] menuby pressing the Up/ Down button.3. Press the Right button and select a desired LCD bypressing the Up/ Down button.4. Press the Right button and select a desired sub menu.- [Brightness] sub menu : Dark, Normal, Bright5. Press the OK button to set the setting.Date TypeWorld TimeImprintSoundBrightnessVideo OutQuick ViewWorld TimeImprintSoundBrightnessVideo OutQuick ViewAuto RotatingTop LCDMain LCDEVFDarkNormalBrightLowMediumHighOffSound](https://usermanual.wiki/Hanwha-Techwin/PRO815.Users-Manual-6-of-7/User-Guide-572125-Page-39.png)
![《121》■The Movie output signal from the camera can be NTSC or PAL.Your choice of output will be governed by the type of device (monitor or TV, etc.) to which thecamera is connected. PAL mode can support only BDGHI.●How to set the video out type1. Press the Menu button and select the [ ] menu tab by pressing the Up/ Down button.2. Press the Right button and select the [Video Out] menu by pressing the Up/ Down button.3. Press the Right button and select a desired LCD by pressing the Up/ Down button.- [Video Out] sub menu : NTSC, PAL4. Press the OK button to set the setting.●NTSC : U.S.A, Canada, Japan, South Korea, Taiwan, Mexico.●PAL : Australia, Austria, Belgium, China, Denmark, Finland, Germany, U.K., Holland,Italy, Kuwait, Malaysia, New Zealand, Singapore, Spain, Sweden, Switzerland,Thailand, Norway.●When using a TV as an external monitor, you will need to select the external or AVchannel of the TV.●There will be a digital noise on the external monitor, but it is not a malfunction.●If the image is not in the centre of the screen, use the TV controls to centre it.●When the camera is connected to an external monitor, the menu will be visible on theexternal monitor and the menu functions are the same as those indicated on the LCDINFORMATION●Connecting to an external monitorIn RECORDING/ PLAY mode, you canview the stored still images or movie clipsby connecting the camera to an externalmonitor via the AV cable. When thecamera is connected to an externalmonitor, the LCD monitor will be turnedoff automatically.Yellow Colour-VideoWhite Colour-Voice (Stereo)ImprintSoundBrightnessVideo OutQuick ViewAuto RotatingUSBNTSCPALSelecting Video out type](https://usermanual.wiki/Hanwha-Techwin/PRO815.Users-Manual-6-of-7/User-Guide-572125-Page-40.png)
![《122》■If you enable Quick View before capturing an image, you can view the image you justcaptured on the LCD for the duration set in the [Quick View] setup. Quick view is possibleonly with still images.●How to set the quick view1. Press the Menu button and select the [ ] menu tab bypressing the Up/ Down button.2. Press the Right button and select the [Quick View] menuby pressing the Up/ Down button.3. Press the Right button and select a desired sub menu bypressing the Up/ Down button.[Off] : The quick view function can’t be activated.[0.5, 1, 3 sec] : The captured image is briefly displayed during the selected time.4. Press the OK button to set the setting.SoundBrightnessVideo OutQuick ViewRotatingUSBReset AllOff0.5 sec1 sec3 sec5 secQuick view](https://usermanual.wiki/Hanwha-Techwin/PRO815.Users-Manual-6-of-7/User-Guide-572125-Page-41.png)
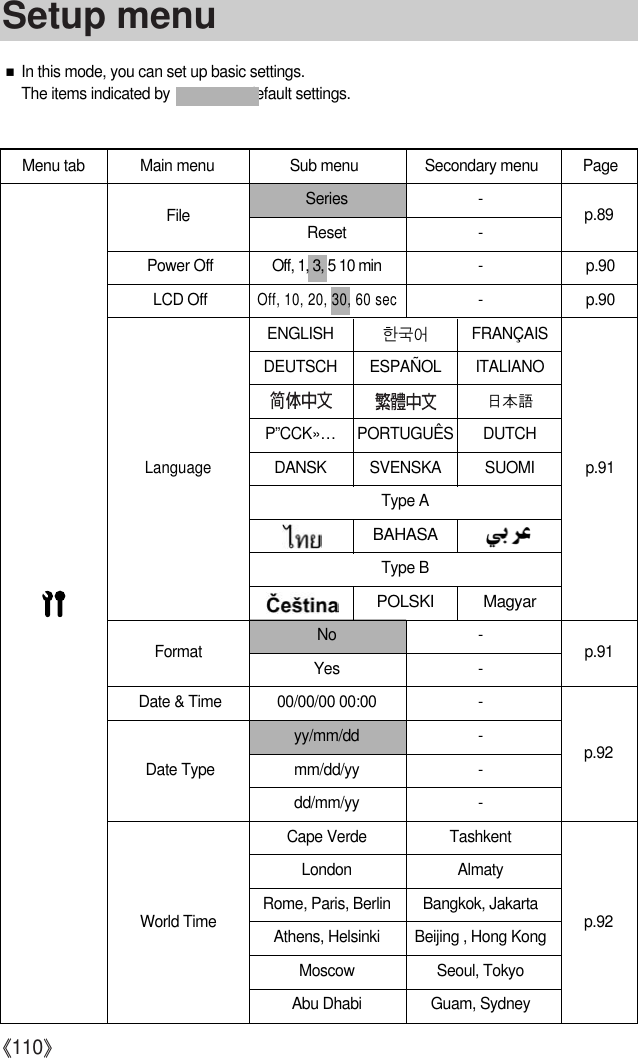
![《123》■When an image taking vertically plays back, the auto rotating sensor will rotate the image correctly.■You can view the reversed image correctly without rotating the image.●How to set the auto rotating sensor1. Press the Menu button and select the [ ] menu tabby pressing the Up/ Down button.2. Press the Right button and select the [Auto Rotating]menu by pressing the Up/ Down button.3. Press the Right button and select a desired sub menuby pressing the Up/ Down button.- [Off] : The image will not be rotated automatically.- [On] : The image will be rotated automatically.4. Press the OK button to set the setting.BrightnessVideo OutQuick ViewAuto RotatingUSBReset AllFileOnOff※Selecting the [On] sub menu28100-00092005.07.0113:00 PM1/30F2.2100281/30F2.2100100-00092005.07.0113:00 PM[ Taking an image ] [ Playing back the image ]Auto rotating sensor](https://usermanual.wiki/Hanwha-Techwin/PRO815.Users-Manual-6-of-7/User-Guide-572125-Page-42.png)
![《124》■You can select an external device to which you want to connect the camera using the USB cable.●How to set the external device1. Press the Menu button and select the [ ] menu tab by pressing the Up/ Down button.2. Press the Right button and select the [USB] menu bypressing the Up/ Down button.3. Press the Right button and select a desired sub menu by pressing the Up/ Down button.- [Computer] : Select this if you want to connect the camerato your PC.Refer to page 120 for instructions on how to connect the camera to your PC.- [Printer] : Select this if you want to connect the camera to your printer.Refer to page 83 for instructions on how to connect the camera to your printer.4. Press the OK button to set the setting.Initialisation■All camera menu and function settings will be restored to their default values. However, values for DATE/ TIME, LANGUAGE, and VIDEO OUT will not be changed.●How to set the initialisation1. Press the Menu button and select the [ ] menu tab by pressing the Up/ Down button.2. Press the Right button and select the [Reset All] menu by pressing the Up/ Down button.3. Press the Right button and select a desired sub menu by pressing the Up/ Down button.If [No] is selected : Settings will not be restored to theirdefaults.If [Yes] is selected : A confirmation window will display. Select the [Yes] menu by pressingthe Up/ Down button. All settings will be restored to their defaults.Quick ViewAuto RotatingUSBReset AllFilePower OffLCD OffNoYesSet:OKVideo OutQuick ViewAuto RotatingUSBReset AllFilePower OffComputerPrinterConnecting an External Device (USB)](https://usermanual.wiki/Hanwha-Techwin/PRO815.Users-Manual-6-of-7/User-Guide-572125-Page-43.png)
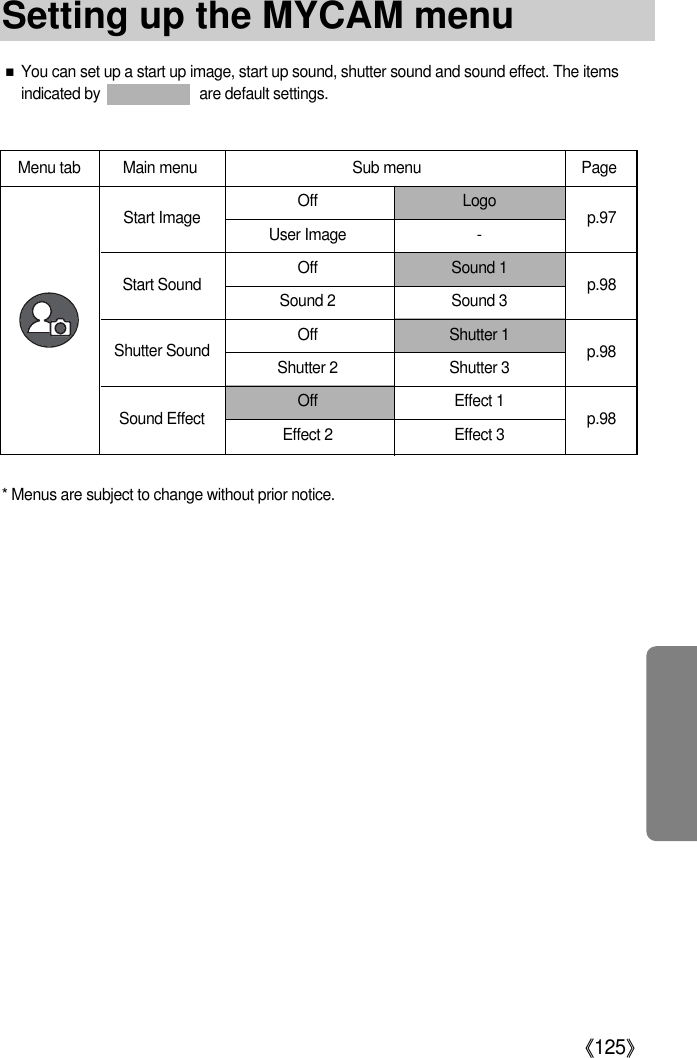
![《126》●How to set the start up image1. Press the Menu button and select the [ ] menu tab by pressing the Up/ Down button.2. Press the Right button and select the [Start Image] menuby pressing the Up/ Down button.3. Press the Right button and select a desired sub menu by pressing the Up/ Down button.4. Press the OK button to set the setting.■You can select the image that is first displayed on the LCD whenever the camera is turned on.●Use a saved image for the start-up image with the [User Image] in the [Resize] menu inthe play mode.●The start-up image will not be deleted by deleting all images or Format function.●The User images will be deleted by [Reset] menu.INFORMATIONSound EffectStart ImageStart SoundShutter SoundSet:OK■You can select the sound that is activated whenever thecamera is turned on.●How to set the start up sound1. Press the Menu button and select the [ ] menu tab by pressing the Up/ Down button.2. Press the Right button and select the [Start Sound] menuby pressing the Up/ Down button.3. Press the Right button and select a desired sub menu by pressing the Up/ Down button.4. Press the OK button to set the setting.Start ImageStart SoundShutter SoundSound EffectOffSound 1Sound 2Sound 3Start up soundStart up image](https://usermanual.wiki/Hanwha-Techwin/PRO815.Users-Manual-6-of-7/User-Guide-572125-Page-45.png)
![《127》■You can select the shutter sound.●How to select the shutter sound1. Press the Menu button and select the [ ] menu tab by pressing the Up/ Down button.2. Press the Right button and select the [Shutter Sound]menu by pressing the Up/ Down button.3. Press the Right button and select a desired sub menu by pressing the Up/ Down button.4. Press the OK button to set the setting.Start SoundShutter SoundSound EffectStart ImageOffSound 1Sound 2Sound 3Shutter SoundSound EffectStart ImageStart SoundEffect 3OffEffect 1Effect 2■You can select a type of sound when the sound is activated.●How to set the type of sound1. Press the Menu button and select the [ ] menu tabby pressing the Up/ Down button.2. Press the Right button and select the [Shutter Sound]menu by pressing the Up/ Down button.3. Press the Right button and select a desired sub menuby pressing the Up/ Down button.4. Press the OK button to set the setting.Sound typeShutter sound](https://usermanual.wiki/Hanwha-Techwin/PRO815.Users-Manual-6-of-7/User-Guide-572125-Page-46.png)
![《131》Set USBㆍ[USB] sub menu and connected device are not matched.→Reconfigure [USB] in the [Setup] menu.Out Of NumberㆍWhen selecting too many printing pages in the PictBridge menu.→Select printing page within the limitation.■Please check the followingThe camera doesn’t switch onㆍThere is low battery capacity.→Insert charged battery. ㆍBatteries are inserted incorrectly with the reverse polarities.→Insert the batteries according to the polarity marks (+, -).The camera power ceases while in use.ㆍThe batteries are exhausted.→Insert charged battery.ㆍThe Camera is turned off automatically.→Turn off the camera power and turn it on again.Batteries drain quicklyㆍThe Camera is being used in low temperatures.→Keep the camera in warm conditions (i.e. inside a coat or jacket) and only remove it inorder to take images.Before contacting a service centreWarning indicator](https://usermanual.wiki/Hanwha-Techwin/PRO815.Users-Manual-6-of-7/User-Guide-572125-Page-50.png)
![《132》Camera does not take images when pressing the Shutter buttonㆍThere is insufficient memory capacity.→Delete unnecessary image filesㆍThe memory card has not been formatted→Format the memory card (p.91)ㆍThe memory card is exhausted→Insert a new memory cardㆍThe memory card is locked→Refer to [Card Locked !] error message (p.101)ㆍThe camera’s power is off→Turn the camera power onㆍThe batteries are exhausted→Insert charged battery.ㆍBatteries are inserted incorrectly with the reverse polarities.→Insert the batteries according to the polarity marks (+, -).The camera suddenly stops working while in useㆍThe camera was stopped due to a malfunction→Remove/ re-insert batteries and switch the camera onThe images are unclearㆍA picture was taken within 0.8 m from the subject without setting an appropriate macro mode→If the subject is closer than 0.8m, select macro shot modeㆍTaking a picture beyond the flash range→Take a picture within the flash rangeㆍThe lens is smudged or dirty→Clean the lensThe flash does not fireㆍFlash off mode has been selected→Dis-engage flash off modeㆍThe camera mode can’t use the flash→Refer to the FLASH instruction (p.34)Incorrect date and time is displayedㆍThe date and time have been set incorrectly or the camera has adopted the default settings→Reset the date and time correctlyBefore contacting a service centre](https://usermanual.wiki/Hanwha-Techwin/PRO815.Users-Manual-6-of-7/User-Guide-572125-Page-51.png)
![《133》The images don't play backㆍIncorrect file name (Violation of DCF format)→Do not change the image file nameColour of image is different to the original scene ㆍWhite balance setting is incorrect→Select appropriate White balanceImages are too brightㆍExposure is excessive→Reset exposure compensationNo image on external monitorㆍThe external monitor has not been connected properly with the camera→Check the connection cablesㆍThere are incorrect files in the memory card→Insert a memory card that has correct filesWhen using the PC’s explorer, the [Removable Disk] file does not showㆍCable connection is incorrect→Check the connectionㆍThe camera is off→Turn the camera onㆍThe operating system is not Windows 98, 98SE, 2000, ME, XP/ Mac OS 9.2 ~ 10.3.Alternatively the PC does not support USB→Install Windows 98, 98SE, 2000, ME, XP/ Mac OS 9.2 ~ 10.3 to PC that supports USBㆍThe camera driver is not installed→Install a [USB Storage Driver]Before contacting a service centre](https://usermanual.wiki/Hanwha-Techwin/PRO815.Users-Manual-6-of-7/User-Guide-572125-Page-52.png)