Hanwha Techwin DIGIMAXV6 Digital Camera User Manual
Samsung Techwin Co Ltd Digital Camera Users Manual
UserManual.wiki
>
Hanwha Techwin
>
DIGIMAXV6 User Manual
>
User Manual 2
Contents
1.
User Manual 1
2.
User Manual 2
User Manual 2
Navigation menu
Upload a User Manual
Namespaces
Wiki Guide
HTML
PDF
Info
Views
User Manual
Discussion / Help
Navigation
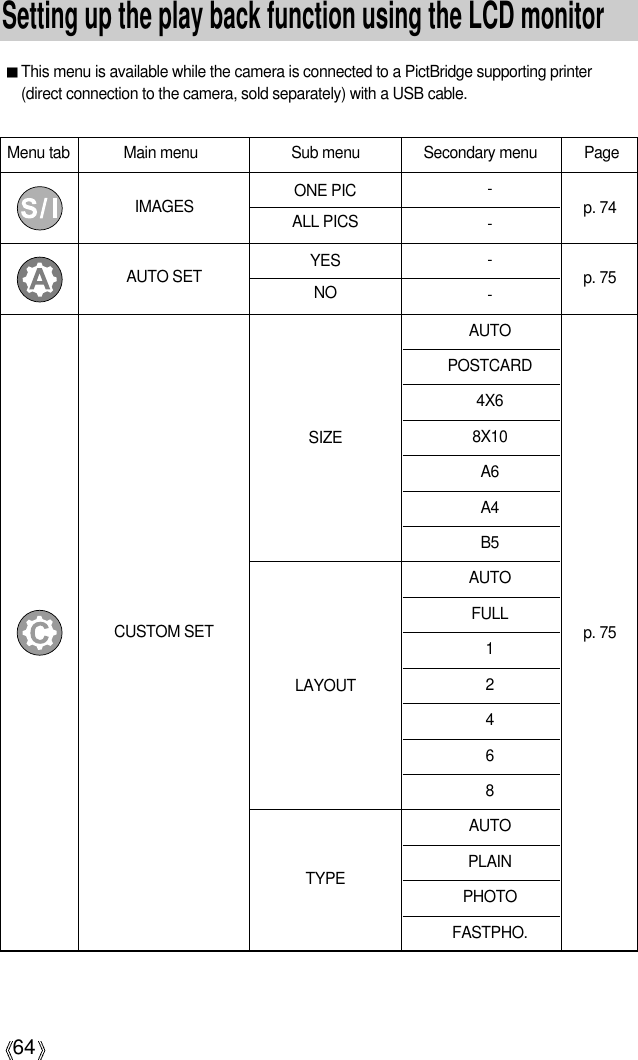
![61DOWN/ LEFT/ RIGHT/ MENU/ OK buttonDOWN/ LEFT/ RIGHT/ MENU/ OK buttons activate the following.- DOWN button : While the menu is showing, press the DOWN button to move from themain menu to a sub menu, or to move down the sub menu cursor.- LEFT button : While the menu is showing, press the LEFT button to select the menutab to the left of the cursor.- RIGHT button : While the menu is showing, press the RIGHT button to select the menutab to the right of the cursor, or to move an secondary menu.- MENU button : When you press the MENU button, the play mode menu will bedisplayed on the LCD monitor. Pressing it again will return the LCD tothe initial display.- OK button : When the menu is displayed on the LCD monitor, the OK button is usedfor confirming data that is changed by using the 5 function button.The shooting information will be displayed on the LCD monitor.The last image stored in the memory is displayed on theLCD monitor by pressing the play mode button.Pressing the LCD( ) button in the PLAY mode willchange the display as shown below. [Image & Icons] [Image & Information] [Image only][ Image & Icons ] [ Image & Information ] [ Image only ]Pressing the LCD buttonPressing theLCD buttonPressing theLCD buttonLCD( ) button SIZE : 2816X2112AV : F2.7 TV : 1/30ISO : 50 FLASH : OFFDATE : 2004/07/01* The LCD button is not available for voice recording in play mode.](https://usermanual.wiki/Hanwha-Techwin/DIGIMAXV6.User-Manual-2/User-Guide-452399-Page-1.png)
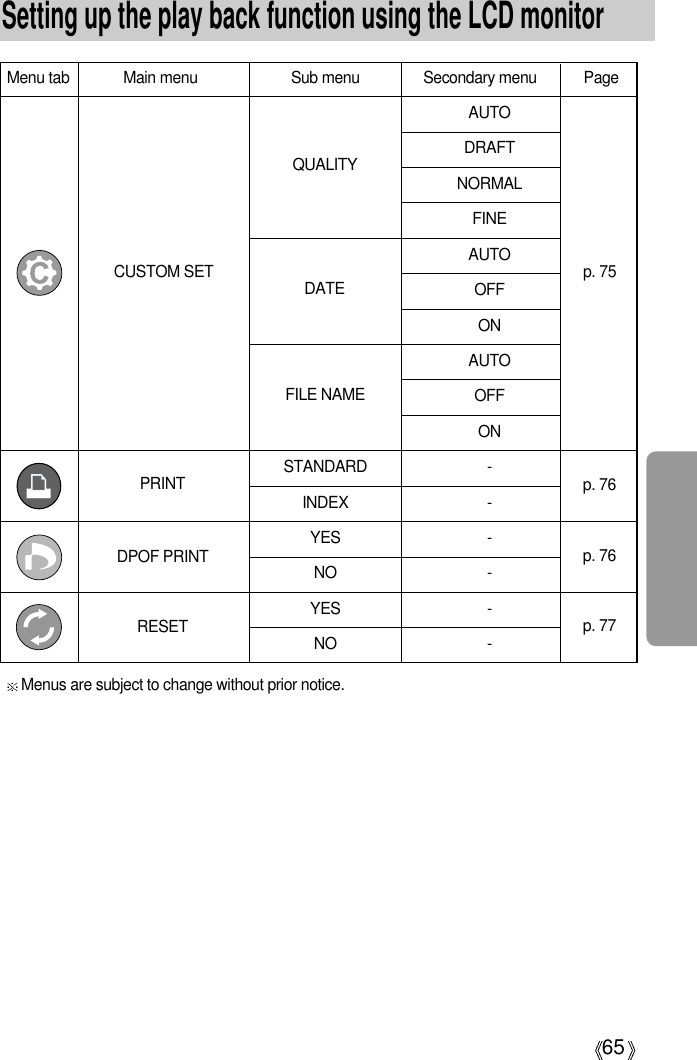
![66Starting the slide showImages can be displayed continuously at pre-set intervals.You can view the slide show by connecting the camera to an external monitor.Configure the interval for the slide show: Configure the length of time to display each picture in the slide show.1. Press the play mode button and press the menu button.2. Press the LEFT/ RIGHT button and select the [SLIDE]menu tab.3. Select the [INTERVAL] sub menu by pressing the UP/DOWN button and press the RIGHT button.4. Use the Up/Down Button to establish the display interval.- Slide Show Display Interval : OFF, 1 ~10 seconds5. Use the Right Button to start the slide show. Use the Pause ( ) Button to pause and resume the slide show. To cancel the slide show in the middle of the show, press the Pause button and the LEFTor RIGHT button.The loading time depends on the image size and quality.The slide show will start from an image that was displayed on the LCD monitor.The [PWR OFF] function can t be activated. While the slide show is playing, only the first frame of an MOVIE file is displayed.INFORMATION Configure slide show repeat mode: Automatically restart the slide show after displaying all pictures.Steps 1 and 2 are the same as for the [INTERVAL] section.3. Select the [REPEAT] sub menu by pressing the UP/DOWN button and press the RIGHT button.4. Use the Up/Down Button to select the repeat mode.[ON] : The slide show will repeat until turned off.[OFF]: The slide show will not repeat after the firstshowing.5. Press the OK button to confirm the setting.6. Press the OK button again and the slide show will start. SLIDEINTERVALREPEATEFFECTMOVE: SET:OKOFFSLIDEINTERVALREPEATEFFECTBACK: SET:OKONOFF](https://usermanual.wiki/Hanwha-Techwin/DIGIMAXV6.User-Manual-2/User-Guide-452399-Page-6.png)
![67Starting the slide showProtecting imagesConfigure slide show effects: Unique screen effects can be used for the slide show.Steps 1 and 2 are the same as for the [INTERVAL] section.3. Select the [EFFECT] sub menu by pressing the UP/DOWN button and press the RIGHT button.4. Use the Up/Down Button to select the type of effect.[CANCEL] : Normal display.[EFFECT 1] : Image is displayed slowly.[EFFECT 2] : Image is displayed slowly from thecenter outwards.[EFFECT 3] : Image moves from the top left.[EFFECT 4] : The image slides diagonally from top left to bottom right. 5. Press the OK button to confirm the setting.6. Press the OK button again and the slide show will start. This is used to protect specific shots from being accidentally erased (LOCK).It also unprotects images that have been previously protected (UNLOCK).Protecting Images1. Press the play mode button and press the menu button.2. Press the LEFT/ RIGHT button and select the[PROTECT] menu tab.3. Select a desired sub menu by pressing the UP/ DOWNbutton and press the OK button.[SELECT] : Selection window for an image to beprotected/released is displayed.- Up/Down/Left/Right : Select an image- Zoom W/T Button : Protect/release the image- Menu Button : Your changes will be saved and themenu will disappear.[ALL PICS] : Protect/release all saved images- Zoom W/T Button : Protect/release the images- Menu Button : Your changes will be saved and themenu will disappear.SLIDEINTERVALREPEATEFFECTBACK: SET:OKCANCELEFFECT1EFFECT2PROTECTSELECT ALL PICSEXIT:MENU MOVE: SET:OKWUNLOCK TSET:OKWUNLOCK T](https://usermanual.wiki/Hanwha-Techwin/DIGIMAXV6.User-Manual-2/User-Guide-452399-Page-7.png)
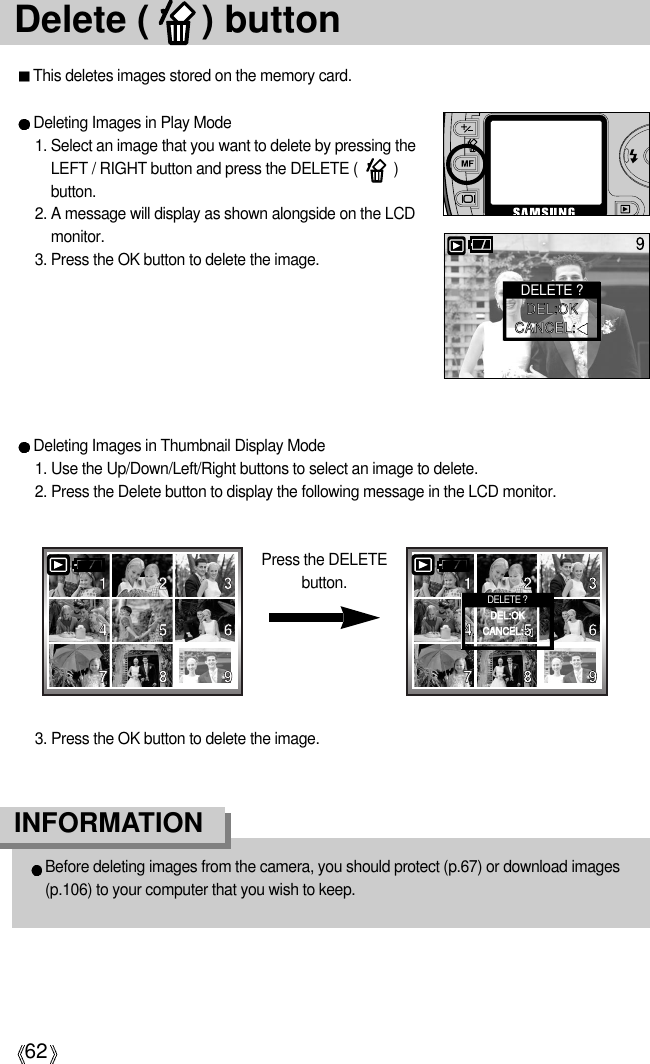
![68Protecting images- If you protect an image, the protect icon will be displayedon the LCD monitor. (An unprotected image has noindicator)- An image in LOCK mode will be protected from thedelete function or [DELETE] functions, but will NOT beprotected from the [FORMAT] function.Deleting imagesOf all the files stored in the memory card, the unprotected files in the DCIM subfolder will bedeleted. Remember that this will permanently delete unprotected images. Important shots should be stored on a computer before deletion takes place. The startupimage is stored in the camera's internal memory (i.e., not on the memory card) and it will notbe deleted even if you delete all files on the memory card.Deleting images1. Press the play mode button and press the menu button.2. Press the LEFT/ RIGHT button and select the [DELETE]menu tab.3. Select a desired sub menu by pressing the UP/ DOWNbutton and press the OK button.[SELECT]: Selection window for an image to delete isdisplayed.- Up/Down/Left/Right: Select an image- Zoom T Button: Select the image for deletion.(V mark)- OK Button: Press the OK Button to display confirmationmessagePress the OK Button again to delete V marked images.[ALL PICS]: Displays confirmation windowPress the OK Button again to delete allunprotected images. If there aren t protectedimages, all the images are deleted and a [NOIMAGE!] message will display.4. After deletion, the screen will be changed to the playmode screen.DELETESELECTALL PICSEXIT:MENU MOVE: DEL:OKSELECT :TDELETE ?DEL:OKCANCEL:](https://usermanual.wiki/Hanwha-Techwin/DIGIMAXV6.User-Manual-2/User-Guide-452399-Page-8.png)
![69ResizeChange the resolution (size) of pictures taken. Select [LOGO] to save an image to be thestart-up image. The resized image will have a new file name.1. Press the play mode button and press the menu button.2. Press the LEFT/ RIGHT button and select the [RESIZE]menu tab.3. Select a desired sub menu by pressing the UP/ DOWNbutton and press the OK button.[RESIZE] sub menu : 1600X1200, 1280X960, 800X600,LOGOA large sized image can be resized to a smaller sized image, but not vice versa.Only still image(JPEG) images can be resized. TIFF, Movie clip(AVI) and Voicerecording(WAV) files can’t be resized.You can change the resolution of only those files compressed in the JPEG 4:2:2 format.The resized image will have a new file name. The [LOGO] image is stored not on thememory card but on the internal memory.Only one [LOGO] image can be saved. If you save a new [LOGO] image, the existingstartup image will be deleted.If the memory capacity is insufficient to store the resized image, a [CARD FULL!]message will display on the LCD monitor and the resized image will not be stored.INFORMATION Image Resize TypesRESIZE1600X12001280X960800X600EXIT:MENU MOVE: Size 1600X1200 1280X960 800X600 LOGO2816 O O O O2560 O O O O2272 O O O O2048 O O O O1600 O O O O1024 X X O O640 X X X O](https://usermanual.wiki/Hanwha-Techwin/DIGIMAXV6.User-Manual-2/User-Guide-452399-Page-9.png)
![70Rotating an imageDPOF DPOF(Digital Print Order Format) allows you to embed printing information on your memorycard’s MISC folder. Select the pictures to be printed and how many prints to make.The DPOF indicator will display on the LCD monitor when an image that has DPOFinformation plays back. Images can then be printed on DPOF printers, or at an increasingnumber of photo labs.This function is not available for Movie clips and Voice recording files.You can rotate the stored images by 90, 180, or 270 degrees.You can view a picture in its proper orientation if the picture has been taken with the cameraoriented vertically or up-side-down. Once the playback of the rotated picture is finished, it willswitch back to the original state.1. Press the play mode button and press the menu button.2. Press the LEFT/ RIGHT button and select the [ROTATE]menu tab.3. Select a desired sub menu by pressing the UP/ DOWNbutton.[RIGHT] : Rotate picture in a clock-wise direction[LEFT] : Rotate picture in a counter-clock-wisedirection[UPDOWN] : Rotate picture 180 degrees[ Picture after 90 degrees ] CCW rotation[ Picture after 180 degrees ]rotation[ Picture after 90 degrees ]CW rotation4. Press the OK button. The rotated image will be displayed and the menu will disappear. If you display the rotated image on the LCD monitor, empty spaces may appear to the leftand right of the image.ROTATERIGHTLEFTUPDOWNEXIT:MENU MOVE:](https://usermanual.wiki/Hanwha-Techwin/DIGIMAXV6.User-Manual-2/User-Guide-452399-Page-10.png)
![71DPOF : STANDARDImages (except for movie clips and voice file) are printed as index type.1. Press the play mode button and press the menu button.2. Press the LEFT/ RIGHT button and select the [DPOF]menu tab.3. Select the [INDEX] menu by pressing the UP/ DOWNbutton and press the RIGHT button.4. Select a desired sub menu by pressing the UP/ DOWNbutton.If [NO] is selected : Cancel the index print setting.If [YES] is selected : The image will be printed in indexformat.5. Press the OK button to confirm the setting.DPOF : INDEXThis function allows you to embed print quantity information on a stored image.1. Press the play mode button and press the menu button.2. Press the LEFT/ RIGHT button and select the [DPOF]menu tab.3. Select the [STANDARD] menu by pressing the UP/DOWN button and press the RIGHT button.4. Select a desired sub menu by pressing the UP/ DOWNbutton and press the OK button.[SELECT]: Selection window for an image to print isdisplayed.- Up/Down/Left/Right: Select an image to print.- Zoom W/T Button: Select the number of prints.[ALL PICS] : Configure number of prints for all picturesexcept movie and voice files.[CANCEL] : Cancel the print setup.5. Press the OK button to confirm the setting.If an image carries DPOF instructions, the DPOFindicator ( ) will show.DPOFBACK: SET:OKSET:OKW 0 PRINTS TDPOFSTANDARDINDEXSIZEBACK: SET:OKNOYESSTANDARDINDEXSIZESELECT ALL PICSCANCELDPOFBACK: SET:OKSTANDARDINDEXSIZE0 PRINTS](https://usermanual.wiki/Hanwha-Techwin/DIGIMAXV6.User-Manual-2/User-Guide-452399-Page-11.png)
![72DPOF : PRINT SIZEYou can specify the print size when printing images stored on the memory card.The [SIZE] menu is available only for DPOF 1.1 compatible printers.Setting the Print Size1. Press the play mode button and press the menu button.2. Press the LEFT/ RIGHT button and select the [DPOF]menu tab.3. Select the [SIZE] menu by pressing the UP/ DOWNbutton and press the RIGHT button.4. Select a desired sub menu by pressing the UP/ DOWNbutton and press the OK button.[SELECT] : Selection window for an image to be changedprinted size is displayed.- Up/Down/Left/Right : Select an image.- Zoom W/T Button : Change the print size.- OK button : Your changes will be saved and the menuwill disappear.[ALL PICS] : Change print size of all saved images.- Up/Down/Left/Right : Select an image.- OK button : Confirm the changed setting.[CANCEL] : Cancel all of the print size settings.* DPOF [SIZE] secondary menu : CANCEL, 3X5, 4X6, 5X7,8X10DPOFSTANDARDINDEXSIZEBACK: SET:OKSELECTALL PICSCANCELSET:OKWCANCEL TDPOFSTANDARDINDEXSIZEBACK: SET:OKCANCEL](https://usermanual.wiki/Hanwha-Techwin/DIGIMAXV6.User-Manual-2/User-Guide-452399-Page-12.png)
![73PictBridgeIf you selected [COMPUTER] in Step 5, when you connect the camera to your printer, theMode dial lamp(Green) will illuminate and the connection will not be established. In this case,disconnect the USB cable, and then follow the procedure from Step 2 and onward.SETUPQ. VIEWRESETUSBBACK: SET:OKCOMPUTERPRINTERNOR 2816Connecting the Camera to a Printer1. Slide the power switch to turn the camera power on.2. In a mode other than Voice Recording mode, press theMENU button.3. Press the LEFT/ RIGHT button and select [SETUP]menu tab.4. Select [USB] menu by pressing the UP/ DOWN buttonand press the RIGHT button.5. Select [PRINTER] menu by pressing the UP/ DOWNbutton and press the OK button.6. Press the menu button twice and the menu will disappear.7. Use the supplied USB cable to connect the camera to the printer as shown below.8. Turn on the printer to connect the camera to the printer.You can use the USB cable to connect this camera to a printer that supports PictBridge (soldseparately) and print the stored images directly. TIFF, Movie clips and voice files cannot beprinted. You can set up the following settings from the PictBridge menu.IMAGES : Select the pictures to be printed.PRINTER SETUP : Setting up printing(AUTO SET/CUSTOM SET)PRINT : Printing picturesDPOF AUTO PRINT : Printing the DPOF filesRESET : Initializing the PictBridge functions](https://usermanual.wiki/Hanwha-Techwin/DIGIMAXV6.User-Manual-2/User-Guide-452399-Page-13.png)
![74PictBridge: Picture SelectionSelect pictures to print1. Connect the camera to your printer. The USB menu mustbe set to [PRINTER] before you connect the camera tothe printer.(See p.86)2. The [IMAGES] menu will appear.3. Use the UP and DOWN buttons to select the desiredsubmenu value, and then press the OK button.When [ONE PIC] is selected : The PictBridge function willbe applied only to the picture currently displayed.When [ALL PICS] is selected : The PictBridge function will be applied to all pictures,excluding TIFF, movie clips and voice files.[ When [ONE PIC] is selected ] [ When [ALL PICS] is selected ]- Press the Up/Down button to select the number of prints. Maximum 30 prints.- Use the Left/Right button to select another picture and select the number of prints foranother picture.- After setting the number of prints, press the OK button to save.- Press the Shutter button to return to the menu without setting the number of prints.0EXIT:SHUTTER SET:OKIMAGESONE PICALL PICSMOVE: SET:OKSetting the Number of Copies to Print- Select [ONE PIC] or [ALL PICS]. A screen where you can set the number of copies to printwill appear as shown below.PREV NEXT0EXIT:SHUTTER SET:OK](https://usermanual.wiki/Hanwha-Techwin/DIGIMAXV6.User-Manual-2/User-Guide-452399-Page-14.png)
![75PictBridge: Print SettingMenuSIZE Setting the size of the printing paperAUTO, POSTCARD, 4x6, 8x10, A6, A4, B5LAYOUTSetting the number of pictures to be printed on a sheet of paperAUTO, FULL, 1, 2, 4, 6, 8TYPE Setting the quality of the printing paper AUTO, PLAIN, PHOTO, FASTPHO.QUALITYSetting the quality of the picture to be printedAUTO, DRAFT, NORMAL, FINEDATE Setting whether to print the date AUTO, OFF, ONFILE NAME Setting whether to print the file name AUTO, OFF, ONAUTO SET1. Connect the camera to your printer. The USB menumust be set to [PRINTER] before you connect thecamera to the printer.(See p.86)2. Use the LEFT and RIGHT buttons to select the [AUTOSET] menu tab.3. Use the UP and DOWN buttons to select the desiredsubmenu value, and then press the OK button.[YES]: All values in the [CUSTOM SET] areautomatically changed.[NO] : [CUSTOM SET] values are kept.Some menu options are not supported in all manufacturer and printer models. If notsupported, the menus are still displayed in the LCD, but are not selectable.If the setting values are not changed in the automatic/manual setting, the setting values areautomatically kept.AUTO SET YESNOMOVE: SET:OKCUSTOM SETSIZELAYOUTTYPEAUTOPOST DARD4X6BACK: SET:OK1. Connect the camera to your printer. The [USB] menumust be set to [PRINTER] before you connect thecamera to the printer.(See p.86)2. Use the LEFT and RIGHT buttons to select the[CUSTOM SET] menu tab.3. Use the UP and DOWN buttons to select the desiredsubmenu value, and then press the RIGHT button.4. Use the UP and DOWN buttons to select the desiredsubmenu value, and then press the OK button.CUSTOM SET : You can select the Paper Size, Print Format, Paper Type, Print Quality, DatePrint, and File Name Print menus for printed pictures.Function Sub menuThe menus you can set up are as follows:](https://usermanual.wiki/Hanwha-Techwin/DIGIMAXV6.User-Manual-2/User-Guide-452399-Page-15.png)
![76PictBridge: PrintingPrinting Pictures1. Connect the camera to your printer. The USB menumust be set to [PRINTER] before you connect thecamera to the printer.(See p.86)2. Use the LEFT and RIGHT buttons to select the [PRINT]menu tab.3. Use the UP and DOWN buttons to select the desiredsubmenu value, and then press the OK button.[STANDARD] : Print the pictures stored in the memorycard in set numbers. One picture is printed on one piece of paper.[INDEX] : Print multiple images on one sheet of paper.PRINTSTANDARDINDEXMOVE: SET:OKDPOF PRINTYESNOMOVE:1. Connect the camera to your printer. The [USB] menumust be set to [PRINTER] before you connect thecamera to the printer.(See p.86)2. Use the LEFT and RIGHT buttons to select the [ DPOFPRINT] menu tab.3. Use the UP and DOWN buttons to select the desiredsubmenu value, and then press the OK button.[YES]: Directly print the file with the DPOF information[NO] : Cancel the printingDepending on the manufacturer and printer model, some menus may not be available.With a printer without supporting the DPOF, the menu is still displayed but not available.NOW PRINTINGCANCEL:OK1/14. The screen shown on the right will appear and thepicture will be printed. If no picture is selected, the [NOIMAGE!] message will be displayed. Press theMenu/OK button while printing to cancel the printing andthe [IMAGES] menu is displayed.Number of pictures in a index print varies depends onthe printer used.DPOF PRINT : This allows you to directly print the files with DPOF information.](https://usermanual.wiki/Hanwha-Techwin/DIGIMAXV6.User-Manual-2/User-Guide-452399-Page-16.png)
![77PictBridge : RESETInitializes user-changed configurations.1. Connect the camera to your printer. The [USB] menumust be set to [PRINTER] before you connect thecamera to the printer.(See p.86)2. Use the LEFT and RIGHT buttons to select the [RESET]menu tab.3. Use the UP and DOWN buttons to select the desiredsubmenu value, and then press the OK button.- If [YES] is selected : All print and image settings will bereset.- If [NO] is selected : Settings will not be reset.Default print setting varies depending on the printer manufacturer.For your printer’s default setting, refer to the user’s guide that came with your printer.RESETYESNOMOVE: SET:OK](https://usermanual.wiki/Hanwha-Techwin/DIGIMAXV6.User-Manual-2/User-Guide-452399-Page-17.png)
![79Setup menuMenu tab Main menu Sub menu Secondary menu PageDARKNORMAL BRIGHTNTSCPALNOYESCOMPUTERPRINTERLCDVIDEOQ. VIEWUSBRESETThis function allows the user to select the file naming format.Assigning File Names1. In any mode with the exception of Voice Recording mode,press the MENU button.2. Press the LEFT/ RIGHT button and select the [SETUP]menu tab.3. Select the [FILE] menu by pressing the UP/ DOWN buttonand press the RIGHT button.4. Select a desired sub menu by pressing the UP/ DOWNbutton and press the OK button.[RESET] : After using the reset function, the next file namewill be set from 0001 even after formatting, deleting all or inserting a newmemory card.[SERIES]: New files are named using numbers that follow the previous sequence, evenwhen a new memory card is used, or after formatting, or after deleting allpictures5. Press the menu button twice and the menu will disappear.File nameOFF, 1, 2, 3SECp.83p.84p.85p.85p.86* Menus are subject to change without prior notice.SETUPFILEPWR OFFLANGUAGEBACK: SET:OKRESETSERIESNOR 2816](https://usermanual.wiki/Hanwha-Techwin/DIGIMAXV6.User-Manual-2/User-Guide-452399-Page-19.png)
![80File nameThe first stored folder name is 100SSCAM, and the first file name is SV600001.File names are assigned sequentially from SV600001 SV600002 ~ SV609999.The folder number is assigned sequentially from 100 to 999 as follows: 100SSCAM 101SSCAM ~ 999SSCAM.The files used with the memory card conform to the DCF(Design rule for Camera Filesystems) format.INFORMATIONEven if the batteries or AC adapter are removed and inserted again, the power off settingwill be preserved.Note that the automatic power off function will not operate if the camera is in PC mode,slide show, playing back a voice recording or movie clip.INFORMATIONAuto power offSetting Power Off1. In any mode with the exception of Voice Recording mode,press the MENU button.2. Press the LEFT/ RIGHT button and select the [SETUP]menu tab.3. Select the [PWR OFF] menu by pressing the UP/ DOWNbutton and press the RIGHT button.4. Select a desired sub menu by pressing the UP/ DOWNbutton and press the OK button.Selecting [OFF] : The power off function will not operate.[1~10 MIN] : The power will turn off automatically if not used for the period of timespecified.5. Press the menu button twice and the menu will disappear.This function switches the camera off after a set amount of time in order to preventunnecessary battery drainage.SETUPFILEPWR OFFLANGUAGEBACK: SET:OKOFFNOR 2816](https://usermanual.wiki/Hanwha-Techwin/DIGIMAXV6.User-Manual-2/User-Guide-452399-Page-20.png)
![81Language Setting Language1. In any mode with the exception of Voice Recording mode,press the MENU button.2. Press the LEFT/ RIGHT button and select the [SETUP]menu tab.3. Select the [LANGUAGE] menu by pressing the UP/DOWN button and press the RIGHT button.4. Select a desired sub menu by pressing the UP/ DOWNbutton and press the OK button. LANGUAGE sub menu : Korean, English, French, German, Spanish, Italian, T.Chinese,S.Chinese, Japanese, Russian, Portuguese, Dutch, Danish, Swedish, Finnish, Thai.5. Press the menu button twice and the menu will disappear.Formatting a Memory Card1. In any mode other than Voice Recording mode, press theMENU button.2. Press the LEFT/ RIGHT button and select the [SETUP]menu tab.3. Select the [FORMAT] menu by pressing the UP/ DOWNbutton and press the RIGHT button.4. Select a desired sub menu by pressing the UP/ DOWNbutton and press the OK button.If [NO] is selected : The memory card will not be formatted. Press the menu button twice and the menu display will disappear. If [YES] is selected : A [PLEASE WAIT!] message appears and the memory card will beformatted. If you ran FORMAT in Play mode, a [NO IMAGE!]message will appear.There is a choice of languages that can be displayed on the LCD monitor. Even if the batteries orAC adapter are removed and inserted again, the language setting will be preserved.Formatting a memory cardThis is used for formatting the memory card. If you run [FORMAT] on the memory card, allimages, including the protected images, will be deleted. Be sure to download importantimages to your PC before formatting the memory card.Be sure to run [FORMAT] on the following types of memory card.- A new memory card, or an unformatted memory card.- A memory card that has a file this camera can t recognize or one that has been takenfrom another camera.Always format the memory card using this camera. If you insert a memory card that hasbeen formatted using other cameras, memory card readers, or PCs, you will get a [CARDERROR!] message.INFORMATIONSETUPFILEPWR OFFLANGUAGEBACK: SET:OKENGLISHFRANÇAISSETUPPWR OFFLANGUAGEFORMATBACK: SET:OKNOYESNOR 2816NOR 2816](https://usermanual.wiki/Hanwha-Techwin/DIGIMAXV6.User-Manual-2/User-Guide-452399-Page-21.png)
![82Setting up the Date/ Time/ Date typeYou can change the date and time that will be displayed on the captured images and set upthe date type.Setting Date/Time & Selecting Date Format1. In any mode with the exception of Voice Recording mode,press the MENU button.2. Press the LEFT/ RIGHT button and select the [SETUP]menu tab.3. Select the [D&TIME] menu by pressing the UP/ DOWNbutton and press the RIGHT button.4. Use the UP, DOWN, LEFT, and RIGHT buttons to selectthe desired submenu value, and then press the OK button.RIGHT button : Selects the year/month / day/hour / minute date type.LEFT button : Moves the cursor to the [D&TIME] main menu if the cursor is at the firstitem of the date and time setup. In all other cases, the cursor will beshifted to the left of its current position.UP and DOWN buttons : Changes the setting value.- Date type : [YY/MM/DD] /[DD/MM/YY] /[MM/DD/YY]5. Press the menu button twice and the menu will disappear.There is an option to include DATE/TIME on still images.Date Imprinting1. In any mode with the exception of Voice Recording mode,press the MENU button.2. Press the LEFT/ RIGHT button and select the [SETUP]menu tab.3. Select the [IMPRINT] menu by pressing the UP/ DOWNbutton and press the RIGHT button.4. Use the UP and DOWN buttons to select the desired dateimprint type, and then press the OK button.[OFF]: The DATE & TIME will not be imprinted on the image file.[DATE] : Only the DATE will be imprinted on the image file.[D&TIME] : The DATE & TIME will be imprinted on the image file.5. Press the menu button twice and the menu will disappear.Imprinting the recording dateThe Date & Time are imprinted at the bottom right side of the still image.The date will be imprinted as a DATE TYPE setting.TIME is imprinted in the following way : [Hour : Minute] and hours are shown using the 24hour clock.The imprint function is applied only to still images.INFORMATIONSETUPLANGUAGEFORMATD & TIMEBACK: SET:OKYY/MM/DDSETUPFORMATD & TIMEIMPRINTBACK: SET:OKOFFDATED & TIMENOR 2816NOR 2816](https://usermanual.wiki/Hanwha-Techwin/DIGIMAXV6.User-Manual-2/User-Guide-452399-Page-22.png)
![83Sound If you set the operation sound to ON, various sounds will be activated for camera startup,when button are pressed, and if there is a card error, so that you can be aware of the cameraoperation status.Setting Operation Sounds1. In any mode with the exception of Voice Recording mode,press the MENU button.2. Press the LEFT/ RIGHT button and select the [SETUP]menu tab.3. Select the [SOUND] menu by pressing the UP/ DOWNbutton and press the RIGHT button.4. Select a desired sub menu by pressing the UP/ DOWNbutton and press the OK button.[SOUND] sub menu : OFF/ LOW/ MEDIUM/ HIGH5. Press the menu button twice and the menu will disappear.You can adjust the LCD brightness.Adjusting LCD Brightness1. In any mode with the exception of Voice Recording mode,press the MENU button.2. Press the LEFT/ RIGHT button and select the [SETUP]menu tab.3. Select the [LCD] menu by pressing the UP/ DOWN buttonand press the RIGHT button.4. Select a desired sub menu by pressing the UP/ DOWNbutton and press the OK button.[LCD] sub menu : DARK, NORMAL, BRIGHT5. Press the menu button twice and the menu will disappear.LCD brightnessSETUPD & TIMEIMPRINTSOUNDBACK: SET:OKOFFLOWMEDIUMSETUPIMPRINTSOUNDLCDBACK: SET:OKDARKNORMALBRIGHTNOR 2816NOR 2816](https://usermanual.wiki/Hanwha-Techwin/DIGIMAXV6.User-Manual-2/User-Guide-452399-Page-23.png)
![84Selecting Video out typeThe Movie output signal from the camera can be NTSC or PAL. Your choice of output will be governed by the type of device (monitor or TV, etc.) to which thecamera is connected. PAL mode can support only BDGHI.Setting the Video Out Type1. In any mode with the exception of Voice Recording mode,press the MENU button.2. Press the LEFT/ RIGHT button and select the [SETUP]menu tab.3. Select the [VIDEO] menu by pressing the UP/ DOWNbutton and press the RIGHT button.4. Select a desired sub menu by pressing the UP/ DOWNbutton and press the OK button.[VIDEO] sub menu : NTSC, PAL5. Press the menu button twice and the menu will disappear.NTSC : U.S.A, Canada, Japan, South Korea, Taiwan, Mexico.PAL : Australia, Austria, Belgium, China, Denmark, Finland, Germany, U.K., Holland,Italy, Kuwait, Malaysia, New Zealand, Singapore, Spain, Sweden, Switzerland,Thailand, Norway.When using a TV as an external monitor, you will need to select the external or AVchannel of the TV.There will be a digital noise on the external monitor, but it is not a malfunction.If the image is not in the centre of the screen, use the TV controls to centre it.When the camera is connected to an external monitor, the menu will be visible on the externalmonitor and the menu functions are the same as those indicated on the LCD monitor.INFORMATIONConnecting to an external monitorIn RECORDING/ PLAY mode, you canview the stored still images or movie clipsby connecting the camera to an externalmonitor via the A/V cable. When thecamera is connected to an externalmonitor, the LCD monitor will be turnedoff automatically. Yellow color-VideoWhite color-VoiceSETUPSOUNDLCDVIDEOBACK: SET:OKNTSCPALNOR 2816](https://usermanual.wiki/Hanwha-Techwin/DIGIMAXV6.User-Manual-2/User-Guide-452399-Page-24.png)
![85Quick viewIf you enable Quick View before capturing an image, you can view the image you justcaptured on the LCD monitor for the duration set in the [Q.VIEW] setup. Quick view ispossible only with still images.Setting Quick View1. In any mode with the exception of Voice Recording mode,press the MENU button.2. Press the LEFT/ RIGHT button and select the [SETUP]menu tab.3. Select the [Q.VIEW] menu by pressing the UP/ DOWNbutton and press the RIGHT button.4. Select a desired sub menu by pressing the UP/ DOWNbutton and press the OK button.[OFF] : The quick view function can’t be activated.[1 ~ 3 SEC] : The captured image is briefly displayed during the selected time.5. Press the menu button twice and the menu will disappear.Initialization(RESET ALL)All camera menu and function settings will be restored to their default values. However, values for DATE/TIME, LANGUAGE, and VIDEO OUT will not be changed.Initializing the Camera1. In any mode with the exception of Voice Recording mode,press the MENU button.2. Press the LEFT/ RIGHT button and select the [SETUP]menu tab.3. Select the [RESET] menu by pressing the UP/ DOWNbutton and press the RIGHT button.4. Select a desired sub menu by pressing the UP/ DOWNbutton and press the OK button.If [NO] is selected : Settings will not be restored to their defaults.If [YES] is selected : All settings will be restored to their defaults.5. Press the menu button twice and the menu will disappear.SETUPLCDVIDEOQ. VIEWBACK: SET:OK1 SECSETUPVIDEOQ. VIEWRESETBACK: SET:OKNOYESNOR 2816NOR 2816](https://usermanual.wiki/Hanwha-Techwin/DIGIMAXV6.User-Manual-2/User-Guide-452399-Page-25.png)
![86Connecting an External Device (USB)You can select an external device to which you want to connect the camera using the USB cable.Selecting an External Device1. In any mode with the exception of Voice Recording mode,press the MENU button.2. Press the LEFT/ RIGHT button and select the [SETUP]menu tab.3. Select the [USB] menu by pressing the UP/ DOWN buttonand press the RIGHT button.4. Select a desired sub menu by pressing the UP/ DOWNbutton and press the OK button.[COMPUTER] : Select this if you want to connect the camera to your PC. Refer to page 105 for instructions on how to connect the camera to yourPC.[PRINTER] : Select this if you want to connect the camera to your printer. Refer to page 73 for instructions on how to connect the camera to yourprinter.5. Press the menu button twice and the menu will disappear.SETUPQ. VIEWRESETUSBBACK: SET:OKCOMPUTERPRINTERNOR 2816](https://usermanual.wiki/Hanwha-Techwin/DIGIMAXV6.User-Manual-2/User-Guide-452399-Page-26.png)
![87Setting up the MYCAM menuYou can set up a start up image, start up sound and shutter sound. Every camera workingmode (with the exception of Voice recording mode) has the MyCAM menu.The items indicated by are default settings.Menu tab Main menu Sub menu PageIMAGE 1IMAGE 2 IMAGE 3OFF SOUND 1SOUND 2 SOUND 3OFF SOUND 1SOUND 2 SOUND 3S.IMAGES.SOUNDSH.SOUNDp.87p.88p.88You can select the image that is first displayed on the LCD monitor whenever the camera isturned on.Setting a Startup Image1. In any mode with the exception of Voice Recording mode,press the MENU button.2. Press the LEFT/ RIGHT button and select the [MYCAM]menu tab.3. Select the [S.IMAGE] menu by pressing the UP/ DOWNbutton and press the RIGHT button.4. Select a desired sub menu by pressing the UP/ DOWNbutton and press the OK button.5. Press the menu button twice and the menu will disappear.Start up imageUse a saved image for the start-up image with the [LOGO] in the [RESIZE] menu in theplay mode.The start-up image will not be deleted by deleting all images or [FORMAT] menu.INFORMATIONOFFUSER IMAGE* Menus are subject to change without prior notice.MYCAMS.IMAGES.SOUNDSH.SOUNDBACK: SET:OK2816](https://usermanual.wiki/Hanwha-Techwin/DIGIMAXV6.User-Manual-2/User-Guide-452399-Page-27.png)
![88Start up soundYou can select the shutter sound.Selecting the Shutter Sound1. In any mode with the exception of Voice Recording mode,press the MENU button.2. Press the LEFT/ RIGHT button and select the [MYCAM]menu tab.3. Select the [SH.SOUND] menu by pressing the UP/DOWN button and press the RIGHT button.4. Select a desired sub menu by pressing the UP/ DOWNbutton and press the OK button.5. Press the menu button twice and the menu will disappear.Shutter soundSetting the Startup Sound1. In any mode with the exception of Voice Recording mode,press the MENU button.2. Press the LEFT/ RIGHT button and select the [MYCAM]menu tab.3. Select the [S.SOUND] menu by pressing the UP/ DOWNbutton and press the RIGHT button.4. Select a desired sub menu by pressing the UP/ DOWNbutton and press the OK button.5. Press the menu button twice and the menu will disappear.MYCAMS.IMAGES.SOUNDSH.SOUNDBACK: SET:OKOFFSOUND 1SOUND 2MYCAMS.IMAGES.SOUNDSH.SOUNDBACK: SET:OKOFFSOUND 1SOUND 2You can select the sound that is activated whenever the camera is turned on.28162816](https://usermanual.wiki/Hanwha-Techwin/DIGIMAXV6.User-Manual-2/User-Guide-452399-Page-28.png)

![91Warning indicatorWarning indicator Causes RemedyThere are several warnings that may appear on the LCD display- Turn off the camera power and turn it on again- Insert the memory card again- Format the memory card (p.81)- Memory card error- There is insufficient memorycapacity to take an image- There are no images storedon the memory card- A memory card is not inserted- The camera can’t recognizethe memory card- File error - Memory card error - There is low battery capacity- The memory card is lockedCARD ERROR !CARD FULL !NO IMAGE !NO CARD !FILE ERROR ! LOW BATTERY ! CARD LOCKED !- Insert a new memory card- Delete unnecessary image files to free upsome memory- Take images- Insert a memory card that is holding someimages- Insert a memory card- Insert the memory card again- Turn off the camera power and turn it on again - Format the memory card - Contact a camera service center - Insert fresh batteries- Slide the write protect switch to the top of thememory card- When taking pictures in darkplacesLOW LIGHT ! - Use a tripod and take pictures in FlashPhotography mode- [USB] sub menu andconnected device are notmatched.SET USB- Reconfigure [USB] in the [SETUP] menu.](https://usermanual.wiki/Hanwha-Techwin/DIGIMAXV6.User-Manual-2/User-Guide-452399-Page-31.png)
![92Before contacting a service centerPlease check the followingSymptom Causes Remedy- Insert fresh batteries- Connect an AC Power Adapter- Insert the batteries according to the polaritymarks (+, -)- There is low battery capacity- An AC Power Adapter is notconnected- Batteries are insertedincorrectly with the reversepolarities- The batteries are exhausted- The Camera is turned offautomatically- The Adapter plug is notconnected securely- The Camera is being used inlow temperatures- The memory card is notinserted- There is insufficient memorycapacity- The memory card has notbeen formatted- The memory card is exhausted- The camera’s power is off- The batteries are exhausted- The memory card is locked- Batteries are insertedincorrectly with the reversepolaritiesThe camera doesn tswitch onThe camera powerceases whilst in useBatteries drainquicklyCamera does nottake images whenpressing theShutter button- Insert fresh batteries- Press the power button to reactivate camera- Remove and re-insert the plug- Keep the camera in warm conditions (i.e. inside a coat or jacket) and only remove itin order to take images- After turning the camera off, insert a newmemory card- Delete unnecessary image files- Format the memory card (p.81)- Insert a new memory card- Turn the camera power on- Insert fresh batteries- Refer to [CARD LOCKED!] error message(p.91)- Insert the batteries according to the polaritymarks (+, -)- The camera was stopped dueto a malfunctionThe camerasuddenly stopsworking while in use- Remove /re-insert batteries and switch thecamera on](https://usermanual.wiki/Hanwha-Techwin/DIGIMAXV6.User-Manual-2/User-Guide-452399-Page-32.png)
![94Before contacting a service centerSymptom Causes Remedy- White balance setting isincorrect- Exposure is excessive- Cable connection is incorrect- The camera is off- There are no batteries, thebatteries are exhausted or theAC adapter is not connected.- The operating system is notWindows 98, 98SE, 2000, ME,XP/ Mac OS 9.0~10.2.Alternatively the PC does notsupport USB- The camera driver is notinstalledColour of image isdifferent to theoriginal sceneImages are toobrightWhen using thePC’s explorer, the[Removable Disk]file does not show- Select appropriate White balance- Reset exposure compensation- The external monitor has notbeen connected properly withthe camera- There are incorrect files in thememory cardNo image onexternal monitor- Check the connection cables- Insert a memory card that has correct files- Check the connection- Turn the camera on- Insert new batteries or check the adapterconnection- Install Windows 98, 98SE, 2000, ME, XP/Mac OS 9.0~10.2 to PC that supports USB- Install a [USB Storage Driver]](https://usermanual.wiki/Hanwha-Techwin/DIGIMAXV6.User-Manual-2/User-Guide-452399-Page-34.png)

![98About the softwareAfter inserting the CD-ROM provided with this camera into the CD-ROM drive, the followingwindow should automatically run.Before connecting the camera to thePC, you should first install the cameradriver.Figures (Images) used for the manualare based on model Digimax V5.Camera driver : This enables images to transfer between the camera and PC.This camera uses the USB Storage Driver as the camera driver. You can use the camera asa USB card reader. After installing the driver and connecting this camera to the PC, you canfind [Removable Disk] in [Windows Explorer] or [My computer]. A USB Storage Driver isprovided only for Windows. A USB Driver for MAC is not included with the Application CD.But you can use the camera with Mac OS 9.0 ~ 10.2.Digimax Viewer : This is a program for viewing stored images.You can see the stored images in the memory directly on a PC monitor. You can also copy,move or delete the images and enlarge/downscale the image sizes with Digimax Viewer.This software is only compatible with Windows.PhotoImpression : Image editing program.You can edit or store still images that you download from the camera. This software is onlycompatible with Windows.Be sure to check the system requirements (p.97) before installing the driver.You should allow 5~10 seconds for running the automatic setup program according to thecapability of the computer. If the frame does not show, run the [Windows Explorer] andselect [Samsung.exe] in the CD-ROM Drive root directory.INFORMATION](https://usermanual.wiki/Hanwha-Techwin/DIGIMAXV6.User-Manual-2/User-Guide-452399-Page-38.png)
![99Setting up the application softwareTo use this camera with a PC, install the application software first. After this has been done, thestored images in the camera can be moved to the PC and can be edited by an image editingprogram.You can visit the Samsung web-site through the internet.http://www.samsungcamera.com : Englishhttp://www.samsungcamera.co.kr : KoreanClose other programs before installing the application software.Before installing the application software, disconnect the USB connection.INFORMATION 1. Click the [Install] menu in the Autorunframe. The camera driver is installedautomatically.2. Camera driver installation is complete.Click the [Finish] button.[Click!][Click!]](https://usermanual.wiki/Hanwha-Techwin/DIGIMAXV6.User-Manual-2/User-Guide-452399-Page-39.png)
![100Setting up the application softwareIf you select [Exit] at the step 3, the application program installation will be cancelled.INFORMATION If you select [Cancel] at step 4, a window for installing PhotoImpression will be displayed.INFORMATION 3. A window for which you can selectapplication software will be displayed.Select the application program and clickthe [Install] button. Refer to page 98 for more informationabout the application program.4. Install Digimax Viewer. Click [Next >] button.5. The Software License Agreement windowwill be displayed. If you agree to this, click[Yes], the window will then move to thenext step. If you disagree, click [No] andthe installation program will be canceled.6. A destination selection window will open.Click [Next >]. To copy to the files toanother folder, click [Browse..] and choosea folder you want.[Click!][Click!][Click!][Click!]](https://usermanual.wiki/Hanwha-Techwin/DIGIMAXV6.User-Manual-2/User-Guide-452399-Page-40.png)
![101Setting up the application software7. A window will open, asking you to choosea folder to which program icons will beadded. Click [Next >] button. If you want to add the program icons to adifferent folder, choose another folder, andthen click [Next >] button.If you click [Cancel] in Step 9, the PhotoImpression installation will be canceled and theRestart Computer window will appear.INFORMATION[Click!]8. Digimax Viewer installation is successfullycompleted. Click the [Finish] button toinstall PhotoImpression.The system willnot reboot even the [Yes, I want to restartthe computer now] option is selected.*The frame 8 may not appear according tothe system requirements. [Click!]9. Digimax Viewer Installation is completed. The PhotoImpression installation windowwill be displayed as shown alongside. Click the [OK] button.[Click!]10. A Welcome window will be displayed.Click the [Next >] button.[Click!]11. The Software License Agreementwindow will be displayed. If you agree tothis, click [Yes], the window will thenmove to the next step. If you disagree,click [No] and the installation program willbe canceled. [Click!]](https://usermanual.wiki/Hanwha-Techwin/DIGIMAXV6.User-Manual-2/User-Guide-452399-Page-41.png)
![102Setting up the application software12. A destination selection window will open.Click [Next >]. To copy to the files toanother folder, click [Browse...] andchoose a folder you want.[Click!]13. The [Select Components] window willappear. Click [Next >] button.[Click!]14. A window will open, asking you to choosea folder to which program icons will beadded. Click [Next >] button. If you want to add the program icons to adifferent folder, choose another folder,and then click [Next >] button. [Click!]](https://usermanual.wiki/Hanwha-Techwin/DIGIMAXV6.User-Manual-2/User-Guide-452399-Page-42.png)
![103Setting up the application software15. Installation is complete. To applychanges, you must restart the computer.Select [Yes, I want to restart mycomputer now], and then click [Finish].16. After restarting the computer, connect the PC to the camera with the USB cable.18. If you can see [Removable Disk] under[My computer], the camera driverinstallation was successful. Now you can transfer image files from thecamera to PC via the USB cable.[Click!]17. Turn the camera power on. [Found NewHardware Wizard] will open and thecomputer will recognize the camera.If you have ever installed an image viewerprogram or your OS is Windows XP, animage viewer program will open. If the image viewer program opens, thecamera driver was setup successfully.](https://usermanual.wiki/Hanwha-Techwin/DIGIMAXV6.User-Manual-2/User-Guide-452399-Page-43.png)
![104Setting up the application softwareIf you have installed the camera driver, [Found New Hardware Wizard] may not open.On a Windows 98 or 98 SE system, the Found New Hardware Wizard dialog box opensand a window asking you to select a driver file may appear. In this case, specify "USBDriver" in the CD supplied. (for Windows 98 and 98 SE).When connecting the camera to your PC, it is recommended that you use an AC poweradapter.Before connecting the camera to the PC, You should first install the camera driver.After installing the camera driver, you have to restart your PC.If you connect the camera to the PC before installing the camera driver, the [Found NewHardware Wizard] will open.In this case, cancel the [Found New Hardware Wizard] and disconnect the camera. Installthe camera driver and connect the camera to the PC again.Should the computer not find the camera driver after installation, please try one or more ofthe following measures.1. Delete the camera driver (p.108), and re-install the driver.2. Refer to FAQ (p.114) to check for a possible solution to the problem.3. If your PC’s central processing unit is VIA chip (This is shown in the USB HostController), download the patch file from the Samsung Camera web page.(http://www.samsungcamera.com)INFORMATION](https://usermanual.wiki/Hanwha-Techwin/DIGIMAXV6.User-Manual-2/User-Guide-452399-Page-44.png)
![105Starting PC ModeThe camera driver must be installed before using PC mode.To save battery power, it is recommended that you use an AC adapter (Optional) whenconnecting the camera to a computer.INFORMATIONIf you connect the USB cable to a USB port on your PC and then turn on the power, thecamera will automatically switch to "computer connection mode".In this mode, you can download stored images to your PC through the USB cable.The LCD monitor is always turned off in PC mode.The auto focus lamp will illuminate when the files are transferring via the USB connection.Connecting the camera to a PC1. Turn the PC power on.2. Turn the camera power on.3. In any mode other than Voice Recording mode, pressthe MENU button.4. Press the LEFT/ RIGHT button and select the [SETUP]menu tab.5. Select the [USB] menu by pressing the UP/ DOWNbutton and press the RIGHT button.6. Use the UP and DOWN buttons to select[COMPUTER], and then press the OK button.7. Press the menu button twice and the menu will disappear.8. Connect the PC and the camera via the USB cable.- Insert the small plug of the USB cable into the camera USB connection terminal.- Insert the large connector of the USB cable into the USB port of the PC.- The plugs must be firmly inserted.Disconnecting the camera and PC : Refer to page 110 (Removing the removable disk).If you selected [PRINTER] in Step 6,when you connect the camera to yourcomputer, the [CONNECTING...]message will be displayed on the LCDmonitor and the connection will not beestablished. In this case, disconnect theUSB cable, and then follow the procedurefrom Step 3 and onward.SETUPQ. VIEWRESETUSBBACK: SET:OKCOMPUTERPRINTERNOR 2816](https://usermanual.wiki/Hanwha-Techwin/DIGIMAXV6.User-Manual-2/User-Guide-452399-Page-45.png)
![106Starting PC Mode3. Select an image and press the right mousebutton.4. A pop-up menu will open.Click [Cut] or [Copy] menu.- [Cut] : cuts a selected file.- [Copy] : copies files.Downloading stored imagesYou can download the still images stored on the camera to your PC's hard disk and printthem or use a photo editing software to edit them.1. Connect the camera to your PC with the USB cable.2. On your computer's desktop display, select[My computer] and double click [RemovableDisk DCIM 100SSCAM].The image files will then be displayed.5. Click a folder where you want to paste the file.](https://usermanual.wiki/Hanwha-Techwin/DIGIMAXV6.User-Manual-2/User-Guide-452399-Page-46.png)
![107Starting PC Mode6. Press the right mouse button and a pop-upmenu will open. Click [Paste].7. An image file is transferred from the camera toyour PC.- By using [Digimax Viewer], you can see the stored images in the memory directly on the PCmonitor and you can copy or move the image files.](https://usermanual.wiki/Hanwha-Techwin/DIGIMAXV6.User-Manual-2/User-Guide-452399-Page-47.png)
![108Removing the USB Driver for Windows 98SETo remove the USB driver, refer to the process shown below.1. Trace [Start Settings] and click [Control Panel].[Click !]4. Uninstallation is complete. Click the [Finish] button and the window willdisappear.[Click !]2. Double-click [Add/Remove programs].3. The [Add/Remove Programs Properties] windowwill open. Click [Digimax V6 V6000] and click the[Add/Remove] button.](https://usermanual.wiki/Hanwha-Techwin/DIGIMAXV6.User-Manual-2/User-Guide-452399-Page-48.png)
![109Removable DiskTo use this camera as a Removable Disk, install (p.99) the USB Driver.1. Before turning the camera power on, connect the camera to the PC with the USB cable.2. Click [Removable Disk] under [My computer] or [Windows Explorer].3. Image files stored in the Removable Disk (DCIM 100SSCAM) can be transferred to thePC.Important information whilst using the Removable DiskThe [Removable Disk] indicator will not show when the camera power is off or the USBcable is removed.We recommend that you should copy the images to the PC to view them. Openingimages directly from the removable disk may be subject to unexpected disconnection.When uploading images from the PC to the camera, ensure that the uploaded file namesare not the same as those already stored on the memory. When you upload a file that is not taken by this camera to Removable Disk, the [FILEERROR!] message will be displayed on the LCD monitor in the PLAY mode, and nothingis displayed in THUMBNAIL mode.The auto focus lamp will blink, when a file istransferred (copy or deletion) between the PC andthe camera. Do not remove the USB cable untilthe lamp stops blinking. To remove the USB cablein Windows 2000/ME/XP, use the [Unplug or EjectHardware] icon on the task bar.INFORMATION](https://usermanual.wiki/Hanwha-Techwin/DIGIMAXV6.User-Manual-2/User-Guide-452399-Page-49.png)
![110Removing the removable disk[Click!][Double-click!][Click!][Click!]Windows 98SE1. Check whether the camera and PC are transferring a file. If the auto focus lamp blinks, youhave to wait until the lamp illuminates.2. Unplug the USB cable.Windows 2000/ME/XP(The illustrations may be different from the real display in accordance with the Windows O/S.)1. Check whether the camera and PC are transferring a file. If the auto focus lamp blinks, youhave to wait until the lamp illuminates.2. Double-click the [Unplug or Eject Hardware]icon on the task bar.3. The [Unplug or Eject Hardware] window willopen. Select the [USB Mass Storage Device]and click the [Stop] button.4. The [Stop a Hardware device] window willopen. Select the [SAMSUNG Digimax V5USB Device] and click the [OK] button.5. A [Safe to Remove Hardware] window willopen. Click the [OK] button.](https://usermanual.wiki/Hanwha-Techwin/DIGIMAXV6.User-Manual-2/User-Guide-452399-Page-50.png)
![111Removing the removable disk1. A USB Driver for MAC is not included with the software CD as MAC OS supports thecamera driver.2. Check the MAC OS. You can check the MAC OS version during MAC OS start-up. Thiscamera is compatible with MAC OS 9.0 ~ 10.2.3. Connect the camera to the Macintosh and turn the camera power on.4. A new icon will be displayed on the desktop after connecting the camera to the MAC.Using the USB Driver for MACSetting up the USB Driver for MAC1. Double click a new icon on the desktop and the folder in the memory will be displayed.2. Select an image file and copy or move it to MAC.For Mac OS 10.0 or later: First complete uploading from computer to camera and thenremove the removable disk with the Extract commandINFORMATION6. A [Unplug or Eject Hardware] window willopen. Click the [Close] button and theremovable disk will be removed safely.7. Unplug the USB cable.[Click!]](https://usermanual.wiki/Hanwha-Techwin/DIGIMAXV6.User-Manual-2/User-Guide-452399-Page-51.png)
![112Using PhotoImpressionYou can use PhotoImpression to perform the following tasks.With PhotoImpression, you can edit or store still images that you downloaded from the camera.This software is only available in Windows version.To start the program, click [Start Programs ArcSoft PhotoImpression 4 PhotoImpression4]. The following screen will appear.[ Command Button ][ Tool Bar ]Command ButtonButton DescriptionImports a picture from an album, a source folder, or the camera/scanner, orcaptures screen shots of what is being viewed on the current monitor.Selects Cut, Resize, Edit Image, Insert Text, Enhance Picture, InsertEffects, or Layer.Performs Insert Frame, Insert Borders, Insert Calendar, Insert GreetingCards, Insert Template, or Connect with Other Software.Saves the edited picture, and sends an e-mail or uses it as the backgroundimage.Outputs the edited picture according to your preferences.[ Help Button ]](https://usermanual.wiki/Hanwha-Techwin/DIGIMAXV6.User-Manual-2/User-Guide-452399-Page-52.png)
![113Using PhotoImpressionTool BarButton Description Button DescriptionResize LayerFlip Layer HorizontallyUndoCopyDelete LayerRotate LayerRotate All LayersRedoPasteClose PictureFor detailed instruction on how to use PhotoImpression, please refer to the program's Help.INFORMATIONDigimax Viewer 2.1This software is only compatible with Windows.1. To open Digimax Viewer, click the [Start ProgramsSamsung Digimax Viewer 2.1 Digimax Viewer2.1 ] and Digimax Viewer 2.1 will then open. 2. If the [Auto Launch] option is selected, this program will be executed automatically withrecognizing the camera.](https://usermanual.wiki/Hanwha-Techwin/DIGIMAXV6.User-Manual-2/User-Guide-452399-Page-53.png)
![114Digimax Viewer functions are listed below.- Basic functions : Copy, Cut, Paste, Delete, Rotate, Rename, changing file type, Resize,Property.- Advanced functions : Print, Slide show, Export, Sending e-mail, On-line print, Web album etc.Digimax Viewer 2.1Please check the following if the USB connection malfunctions.[Case 1] The camera power is off.Turn the camera power on. We recommend using an AC power adapter in PCmode.[Case 2] USB Driver is not installed correctly.Install the USB Driver correctly. Refer to page 99.[Case 3] The USB cable is not connected or you are using a cable with an incorrectspecification.Use a USB cable with the correct specification.Before deleting images from the camera, you should protect or download images to yourcomputer that you wish to keep.Refer to the [Help] menu in Digimax viewer 2.1 for further information.INFORMATION FAQ3. You can easily use the Digimax viewer 2.1 program asit offers a FILE menu and TOOL bar. And, you can usethe pop up menu. Click an image and press the rightmouse button.](https://usermanual.wiki/Hanwha-Techwin/DIGIMAXV6.User-Manual-2/User-Guide-452399-Page-54.png)
![115FAQ[Case 4] The camera is not recognized by your PC. Sometimes, the camera may appear under [Unknown Devices] in DeviceManager.Install the camera driver correctly.Turn off the camera, remove the USB cable, plug in the USB cable again, andthen turn on the camera.[Case 5] There is an unexpected error during file transferTurn the camera power off and on again. Transfer the file again.[Case 6] How do I know my computer supports a USB Interface?Check the USB port in your computer or keyboard.Check the OS version. A USB Interface is available in Windows 98, 98SE, 2000, ME .XP.Check [Universal serial bus controller] in Device Manager. Do the following to check [Universal serial bus controller].Win 98/ME : Trace [Start Setting Controller System DeviceManager Universal serial bus controller]Win 2000 : Trace [Start Setting Controller System HardwareDevice Manager Universal serial bus controller].Win XP : Trace [Start Control Panel Performance andMaintenance System Hardware Device Manager Universal Serial Bus controller].There must be USB Host Controller and USB root hub under [Universal serialbus controller].In addition, double-click on the USB Universal Host Controller and the USBRoot Hub to check if the Device Status states "This device is working properly".If the Device Status says the device is "not working properly", click the "Driver"tab and then click [Update Driver] or [Reinstall Driver].When all the conditions mentioned above are met, the computer can supportthe USB interface.[Case 7] When using the USB hub.There may be a problem in connecting the camera to the PC through the USBhub if the PC and the hub are not compatible. Wherever possible, connect the camera to the PC directly.[Case 8] Are other USB cables connected to the PC?The camera may malfunction when it is connected to the PC at the same timeas another USB cable. In this case, disconnect the other USB cable, andconnect only one USB cable to the camera.](https://usermanual.wiki/Hanwha-Techwin/DIGIMAXV6.User-Manual-2/User-Guide-452399-Page-55.png)
![116FAQ[Case 9] When I open the Device Manager (by clicking Start (Settings) ControlPanel (Performance and Maintenance) System (Hardware) DeviceManager), there are Unknown Devices or Other Devices entries with ayellow question mark(?) beside them or devices with an exclamation mark(!)beside them.Right-click on the entry with the question(?) or exclamation (!) mark and select"Remove". Restart the PC and connect the camera the again. For Windows 98 PC, remove the camera driver also, restart the PC, and thenreinstall the camera driver.Double-click on the entry with the question (?) or exclamation (!) mark, click the"Driver" tab, and click [Update Driver] or [Reinstall Driver]. If a message appearsasking you to specify the location of the appropriate device driver, specify "USBDriver" in the CD supplied.If you installed an incorrect codec onto your PC, the movie clip may not play back on the PC. 1. Check whether the JPEG Decoder provided with the camera is installed.If you didn't install the camera driver, please install the JPEGCODE included in theapplication S/W CD-ROM. If not, the movie clip may not play back on the PC. [ Installing the JPEG Decoder ]1) Insert the CD provided with the camera. 2) Run the windows explorer and select the CD-ROM drive. 3) Select the JPEG_Decoder folder and double click the Setup.exe file. The codec will be installed. Please check the following if the movie clip doesn't play back.2. Compatible problems with the codecs installed onto the PC. If the movie clip doesn't play back after installing the JPEG Decoder, refer to thefollowing.](https://usermanual.wiki/Hanwha-Techwin/DIGIMAXV6.User-Manual-2/User-Guide-452399-Page-56.png)
![117FAQ1) When the movie clip plays back, only the sound plays back without the image. It isn't compatible with the Mogen MJPEG Decoder. Uninstall the Mogen MJPEGDecoder as following order. Click [Start Run] and a window will open. Type "regsvr32 /u m3jpgdec.ax" and press the Enter key. Most problems will be solved with those remedies. If the movie clip doesn't play backcontinuously, install the JPEGCODE provided with the camera again. For more information, visit the samsung website(www.samsungcamera.com) and see theFAQ page. 2) When the movie clip plays back, the blue and red colors are reversed or the movie clipdoesn't open. It isn't compatible with the ffdshow Codec or K-lite Codec Pack. Disable the ffdshow program.Trace [Start Programs ffdshowDisable ffdshow]. Uninstall the K-Lite Codec Pack or set thedefault program of the AVI file as theWindows Media Player. Trace [Start Cotroller Add/ RemovePrograms Select the K-Lite Codec PackClick the Change/ Remove button]. Run the windows explorer Select AVI fileClick the right mouse button Selectthe "Open with" menu Click theWindows Media Player Check the"Always use this program to open thesefiles" option Click the [OK] button.](https://usermanual.wiki/Hanwha-Techwin/DIGIMAXV6.User-Manual-2/User-Guide-452399-Page-57.png)