Hanwha Techwin DIGIMAXV50 Digital Camera User Manual v50en c
Samsung Techwin Co Ltd Digital Camera v50en c
UserManual.wiki
>
Hanwha Techwin
>
DIGIMAXV50 User Manual
>
User Manual 2
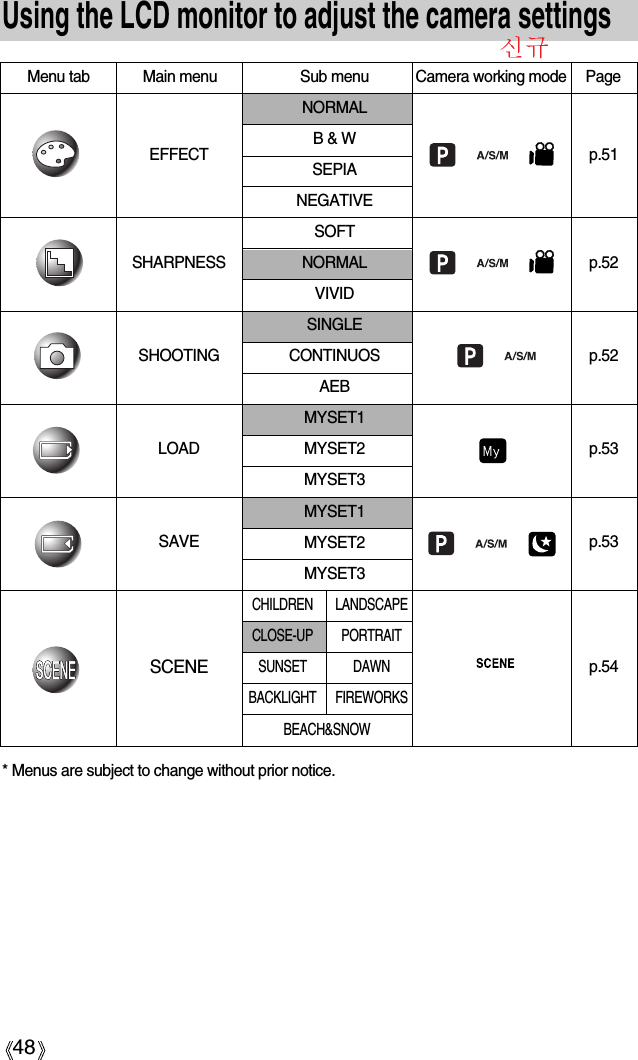
Contents
1.
User Manual 1
2.
User Manual 2
3.
User Manual 3
User Manual 2
Navigation menu
Upload a User Manual
Namespaces
Wiki Guide
HTML
PDF
Info
Views
User Manual
Discussion / Help
Navigation
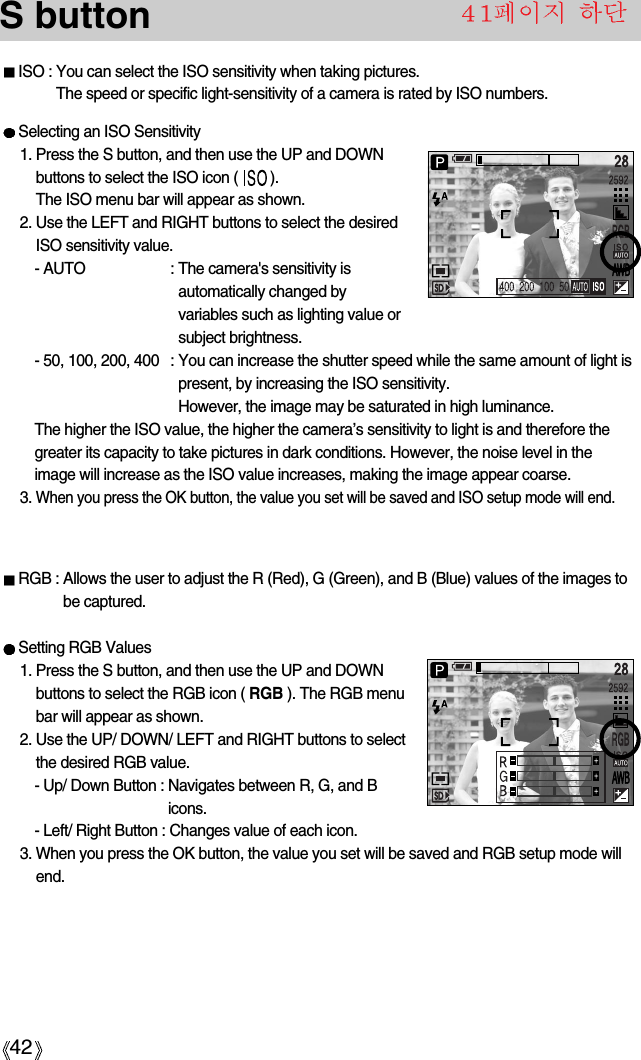
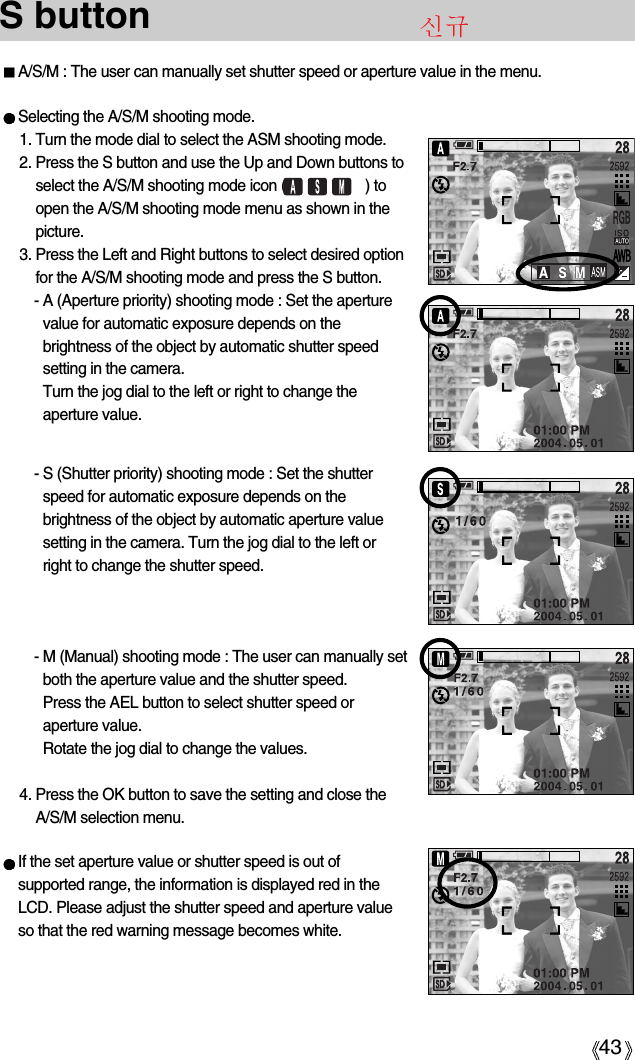
![41S button Selecting a White Balance1. Press the S button, and then use the UP and DOWNbuttons to select the white balance icon ( ). The white balance menu bar will appear as shown.2. Use the LEFT and RIGHT buttons to set the whitebalance to the desired value. The value you set will bedisplayed on the LCD monitor.AUTO : The camera automaticallyselects the appropriate whitebalance settings, depending on the prevailing lighting conditions.DAYLIGHT : For taking images outside.CLOUDY : For taking images under a cloudy and overcast sky.Fluorescent H : For shooting under daylight fluorescent types of three-wayfluorescent lighting.Fluorescent L : Shooting under white fluorescent lightingTUNGSTEN : For shooting under tungsten (standard light bulb) lighting.CUSTOM : Allows the user to set the white balance according to the shootingcondition.Different lighting conditions may cause a colour cast on your images.3. Press the OK button. The value you set will be saved and White Balance setup mode will end.White balance : The white balance control allows you to adjust the colours to appear morenatural looking.Using the Custom White BalanceWhite balance settings may vary slightly depending on the shooting environment. You can select the most appropriate white balance setting for a given shooting environmentby setting up the custom white balance.1. Select the CUSTOM( ) menu of the White Balance.2. Place a sheet of white paper in front of the camera sothat the LCD monitor shows only white, and then pressthe shutter button.3. Your custom white balance value is stored.- The custom white balance value will be applied,starting with the next picture you take.- The user configured white balance will remain effectiveuntil it is overwritten.[ White paper ]](https://usermanual.wiki/Hanwha-Techwin/DIGIMAXV50.User-Manual-2/User-Guide-442676-Page-1.png)
![45Use this button to select the focusing method. Repeatedly press the MF button to rotate [Manualfocusing] [Continuous automatic focusing] [Automatic focusing].Automatic focusing : Slightly press the shutter to let the camera measuredistance to the object and select the best focusing. If successfully focused with the slight press of the shutter,the automatic focusing mark is turned green.Manual focusing : Where the automatic focusing is not available such as verydark place, use the manual focusing. Continuous automatic focusing : The camera keeps focusing while the object is movingeven if the shutter button is not slightly pressed. Note that using the Continuous automatic focusing usesmore battery than the Automatic focusing does. MF button Focus distance of 0.04~0.3m are only supported in the Wide zoom. The flash is fixed as not available.The focus value displayed in the LCD while manually focusing is measured from theend of the lensINFORMATION Modes where the Continuous automatic focusing is available: Program, A/S/M mode, Children mode in the scene shooting modes, and MySET mode. If selected, the CAF icon is displayed in the bottom of the LCD.Manual focusing.1. Press the MF button to display the MF bar. The MF icon is displayed in the bottom of the LCD.2. Use the jog dial to set the focus distance.Turn to the left : Move the focus farther.Turn to the right : Move the focus closer.mcmLong distanceClose-up](https://usermanual.wiki/Hanwha-Techwin/DIGIMAXV50.User-Manual-2/User-Guide-442676-Page-5.png)
![46The camera measures brightness of the object and automatically set the best exposurevalue. If difference between the exposure values of the object and background is too great,use the AEL button to manually set the exposure value against sunlight or in strong light. This button is available in the PROGRAM, A/S/M, SCENE mode.Use the automatic exposure lock. 1. Ensure the subject in the center of the autofocus frame.2. Move the camera to point the automatic focus mark on the object of desired exposure.3. Press the AEL button to lock the exposure and display the AEL icon in the bottom of theLCD.4. Focus the camera again and press the shutter button again for shooting.- The automatic exposure lock function is automatically unset after taking one picture.LCD button[ Image & full information ] [ Image & basic information ] [ LCD off ]You can check the recording status in the LCD monitor.In any mode with the exception of VOICE RECORDINGmode, pressing the LCD button will change the display asshown below.If the LCD monitor is turned off, the auto focus lamp will light up.Pressing theLCD buttonPressing theLCD buttonPressing the LCD buttonAEL button (Automatic Exposure Lock)[ Screen for shooting ] [ Focus to the object and ]press the AEL button[ Refocus and fully press ]the shutter button](https://usermanual.wiki/Hanwha-Techwin/DIGIMAXV50.User-Manual-2/User-Guide-442676-Page-6.png)
![49How to use the menu3. Use the UP and DOWN buttons to select a sub menu.4. Select a sub menu, and then press the OK button. The value you set will be saved and themenu will disappear.1. Turn on the camera and press the MENU button. A menu for each camera mode appears.However, there is no menu for Voice Recording mode ( ).2. Use the LEFT and RIGHT buttons to navigate through the menus.Press the UPor DOWNbutton.Press the UPor DOWNbutton.Press theLEFT orRIGHT button.Press theLEFT orRIGHT button.You can select the image size appropriate for your application.Mode Icon 2592 2272 2048 1600 1024 640Size2592X1944 2272X1704 2048X1536 1600X1200 1024X768 640X480 640X480 320X240STILL IMAGE mode MOVIE CLIP mode640 320[PROGRAM mode]The higher the resolution, the lower the number of available shots will be because highresolution images require more memory than lower resolution images.INFORMATION Size[ MOVIE CLIP mode ]2592QUALITYTIFFSUPER FINEFINENORMAL2592METERINGMULTISPOT2592EFFECTNORMALB & WSEPIANEGATIVESHARPNESSSOFTNORMALVIVIDSHOOTINGSINGLECONTINUOUSAEB2592SAVEMYSET1MYSET2MYSET3MOVE: SET:OKSIZE2592X1944 25922272X1704 22722048X1536 20481600X1200 16001024X768 1024SIZE640X480 640320X240 32030fps](https://usermanual.wiki/Hanwha-Techwin/DIGIMAXV50.User-Manual-2/User-Guide-442676-Page-9.png)
![50Quality You can select the compression ratio appropriate for yourapplication of the captured images. The higher thecompression ratio, the lower the picture quality. Mode Icon TIFFSub menu TIFF S.FINE FINE NORMAL 30FPS 15FPSFile Format tif jpeg jpeg jpeg avi aviSTILL IMAGE mode MOVIE CLIP modeTIFF is the highest quality and NORMAL is the lowest setting. Choose the setting appropriate for your needs.The TIFF file format is for professionals and provides the best quality. However, large file size reduces number of available pictures to take and increasessaving time to the memory card.[PLEASE WAIT !] message is displayed while saving a TIFF file to the memory card.This file format complies with the DCF(Design rule for Camera File system).JPEG (Joint Photographic Experts Group): JPEG is the image compression standarddeveloped by the Joint Photographic Experts Group. This type of compression is mostcommonly used for compressing photos and graphics because it can compress the filesefficiently without damaging the data.INFORMATION[PROGRAM mode]2592QUALITYTIFFTIFFSUPER FINEFINENORMAL](https://usermanual.wiki/Hanwha-Techwin/DIGIMAXV50.User-Manual-2/User-Guide-442676-Page-10.png)
![51MeteringIf you cannot obtain suitable exposure conditions, you can change the metering method totake brighter pictures.MULTI ( ) : Exposure will be calculated based on anaverage of the available light in theimage area. However, the calculation will be biasedtowards the centre of the image area.This is suitable for general use.SPOT ( ) : Only the rectangular area in the center ofthe LCD monitor will be metered for light.This is suitable when the subject in the center is exposed correctly,regardless of the back lighting. Effect By using the camera's digital processor, it is possible to add special effects to your images. NORMAL : No effect is added to the image.B & W : Converts the image to black and white.SEPIA : Captured images will be stored in a sepia tone (a gradient of yellowish browncolours).NEGATIVE : Save the image in negative mode.[ PROGRAM mode ][ PROGRAM mode ] [ MOVIE CLIP mode ]2592METERINGMULTISPOTEFFECTNORMALB & WSEPIANEGATIVE2592EFFECTNORMALB & WSEPIANEGATIVE30fps640](https://usermanual.wiki/Hanwha-Techwin/DIGIMAXV50.User-Manual-2/User-Guide-442676-Page-11.png)
![52SharpnessYou can adjust the sharpness of the picture you want totake. You cannot check the sharpness effect on the LCDmonitor before you take a picture, because this function isapplied only when the captured image is stored on thememory.Sub menu Icon Description VIVIDNORMALSOFTIf you select CONTINUOUS or AEB, the flash will automatically be set to Flash Off.[SINGLE] : Take one picture only [CONTINUOS] : Take three pictures in a series by pressingthe shutter button only once.[AEB] : Take three pictures in a series in differentexposures: over exposure (+0.5EV),standard exposure (0.0EV), and shortexposure (-0.5EV). Use the mode if it ishard to decide exposure of the object.Continuous shot[ PROGRAM mode ]The edges of the image are softened. This effect is suitable for editing images on your PC.The edges of the image are sharp. This is suitable for printing.The edges of the image are emphasized. The edges willappear sharp, but noise may occur in the recorded image.SHARPNESSSOFTNORMALVIVIDSHOOTINGSINGLECONTINUOUSAEB[ PROGRAM mode ]](https://usermanual.wiki/Hanwha-Techwin/DIGIMAXV50.User-Manual-2/User-Guide-442676-Page-12.png)
![53Use the MySET mode to save frequently used camera settings (SAVE) and use it later (LOAD)Saving the camera configuration : Available in the PROGRAM, A/S/M and NIGHT SCENEshooting modes.1. Use the camera buttons and menu to set desiredcamera configuration.2. Press the menu button in any modes except AUTO,VOICE RECORDING, MySET, MOVIE CLIP or SCENEmode.3. Press the Left/Right buttons to select the [SAVE] menutap.4. Press the Up/Down buttons to select desired MySETslot number to save.5. Press the OK button to save the current configuration inthe selected MySET slot and close the menu.Save / Load the camera configuration (MySET)Loading the saved camera configuration: available in theMySET shooting mode.1. Turn the mode dial to select the MySET shooting modeand press the menu button.2. Press the Left/Right buttons to select the [LOAD] menutap.3. Press the Up/Down buttons to select a MySET slotnumber to load.4. Press the OK button to set the camera configuration assaved in the MySET slot.* The current MySET slot number is displayed in the top left of the LCD.Saving is available for the following camera functions.Functions using the camera buttons - Macro, self-timer, flash, white balance, ISO,Aperture value and Shutter speed. Functions using the menu screen - Size, quality, metering, effect, sharpness andcontinuous shot.INFORMATION[ PROGRAM mode ][ PROGRAM mode ]SAVEMYSET1MYSET2MYSET3LOADMYSET1MYSET2MYSET3MOVE: SET:OK](https://usermanual.wiki/Hanwha-Techwin/DIGIMAXV50.User-Manual-2/User-Guide-442676-Page-13.png)
![54Scene Sub menu Icon Description CHILDRENLANDSCAPECLOSE-UPSUNSETDAWNBACKLIGHTFIREWORKSBEACH&SNOW Select the [SCENE] submenu to automatically configureoptimal settings, depending on the selected scene.Only available in the Scene Mode.Take a still picture of capturing moving children.PORTRAIT To take picture of a person.Close-up shooting for small objects such as plants andinsects.Splendor of the setting sun.Scenery with green woods or blue sky. Daybreak scenes.Portrait without shadows caused by back light.Firework scenes.For oeean, lake, beach and snowscape scenes.[ SCENE mode ]When the close-up, sunset, dawn, fireworks are selected, it is possible that camerashake will occur. If this is the case, use a tripod to eliminate this.INFORMATIONSET UPFILEPWR SAVELANGUAGEFORMATDATE.TIMERESETOFFNTSC04/05/01EXIT:MENU MOVE:2592](https://usermanual.wiki/Hanwha-Techwin/DIGIMAXV50.User-Manual-2/User-Guide-442676-Page-14.png)
![58Using the camera buttons to adjust the cameraIn Play mode, you can use the buttons on the camera to conveniently set up the Play modefunctions.Image enlargement1. Select an image that you want to enlarge and press the enlargement button.2. Different parts of the image can be viewed by pressingthe 5 function button.3. Pressing the thumbnail button will zoom back to theoriginal full sized image.- You can tell whether the image displayed is anenlarged view by checking the image enlargementindicator shown at the bottom left of the LCD monitor.(If the image is not an enlarged view, the indicator willnot be displayed.) You can also check the area ofenlargement.- TIFF, Movie clips and WAV files can’t be enlarged.- If an image is enlarged, a loss of quality may occur.Thumbnail ( ) / Enlargement ( ) button You can view multiple pictures, enlarge a selected picture, and crop and save a selected areaof an image.Thumbnail display1. While an image is displayed full screen, press thethumbnail button.2. The thumbnail display will highlight the image that hadbeen showing at the time the thumbnail mode wasselected.3. Press the 5 function button to move to a desired image.4. To view an image separately, press the enlargement button ( ).[ Normal display mode ] [ Thumbnail display mode ]Pressing the thumbnail button ( )Pressing the enlargementbutton ( )Highlighted imageMOVE: EXIT:T](https://usermanual.wiki/Hanwha-Techwin/DIGIMAXV50.User-Manual-2/User-Guide-442676-Page-18.png)
![60Voice ( ) memo / Up button3. Press the shutter button to start recording and voice willbe recorded to the still image for 10 seconds. While the voice is recording, the recording statuswindow will be displayed as shown alongside.4. The recording can be stopped by pressing the shutterbutton again.5. The ( ) icon will be displayed on the LCD monitorafter voice memo recording has finished. - Voice memos can’t be recorded onto movie clip files.- A distance of 40cm between you and the camera(microphone) is the best distance to record sound.- The voice memo will be saved in *.wav format, but hasthe same file name as the still image to which itcorresponds.- If you add a new voice memo to the still image thatalready has a voice memo, the existing voice memo will be erased.Play & Pause ( )/ Down buttonIn Play mode, the play & pause/ down button works as follows:- If the menu is displayedPress the DOWN button to move from the main menu to a sub menu, or to move down thesub menu cursor.- If a still image with a voice memo, a voice file, or a movie clip is playingIn Stop mode : Plays a still image with a voice memo, a voice file, or a movie clip.During playback : Temporarily stops playback.In Pause mode : Resumes playback[ Voice recording is stopped ] [ Voice recording is paused ][ Voice recording is playing ]STOP.SHUTTERRECPLAYPAUSEPLAY](https://usermanual.wiki/Hanwha-Techwin/DIGIMAXV50.User-Manual-2/User-Guide-442676-Page-20.png)
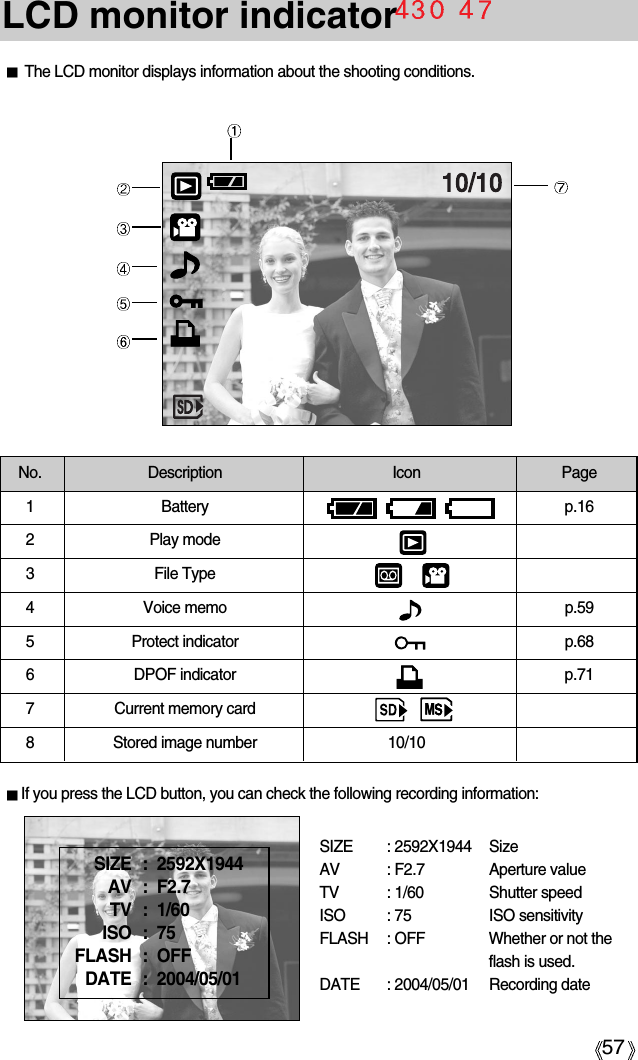
![61LEFT/ RIGHT/ MENU/ OK buttonLEFT / RIGHT/ MENU/ OK buttons activate the following.- LEFT button : While the menu is showing, press the LEFT button to select the menu tabto the left of the cursor.- RIGHT button : While the menu is showing, press the RIGHT button to select the menu tabto the right of the cursor, or to move an secondary menu.- MENU button : When you press the MENU button, the play mode menu will be displayedon the LCD monitor. Pressing it again will return the LCD to the initialdisplay.- OK button : When the menu is displayed on the LCD monitor, the OK button is used forconfirming data that is changed by using the 5 function button.The shooting information will be displayed on the LCD monitor.The last image stored in the memory is displayed on theLCD monitor by pressing the play mode button.Pressing the LCD button in the PLAY ( ) mode willchange the display as shown below. [Image & Icons] [Image & Information] [Image only][ Image & Icons ] [ Image & Information ] [ Image only ]Pressing the LCD buttonPressingthe LCDbuttonPressingthe LCDbuttonLCD button SIZE : 2592X1944AV : F2.7TV : 1/60ISO : 75 FLASH : OFFDATE : 2004/05/01](https://usermanual.wiki/Hanwha-Techwin/DIGIMAXV50.User-Manual-2/User-Guide-442676-Page-21.png)
![63This function is used to copy images in a memory card to another memory card.Copying an image1. Press the play mode button and use the Left/Rightbuttons to select an image to copy.2. Press the Copy button to display the following message.3. Press the OK button : The image is copied.Press the Left button : Cancel the copy operation.COPY button If there is not enough space in the memory card to save the image, [CARD FULL!]message is displayed.INFORMATIONCOPY?COPY : OKCANCEL :](https://usermanual.wiki/Hanwha-Techwin/DIGIMAXV50.User-Manual-2/User-Guide-442676-Page-23.png)
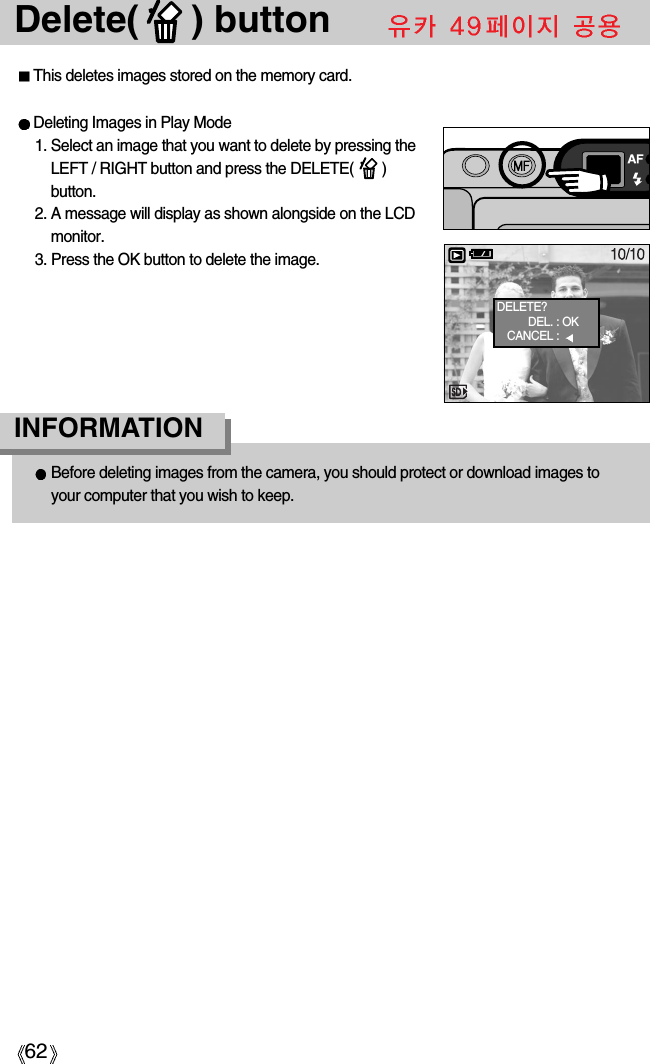
![66Deleting imagesOf all the files stored in the memory card, the unprotected files in the DCIM subfolder will bedeleted. Remember that this will permanently delete unprotected images. Important shotsshould be stored on a computer before deletion takes place. The startup image is stored inthe camera's internal memory (i.e., not on the memory card) and it will not be deleted even ifyou delete all files on the memory card.Deleting images1. Press the play mode button and press the menu button.2. Press the LEFT/ RIGHT button and select the [DELETE]menu tab.3. Select a desired sub menu by pressing the UP/ DOWNbutton.[SELECT] : Press the OK button and a window forselecting the image to be deleted is opened.1) Up/Down/Left/Right: Select an imageS button: Select an image to delete. If an image is selected, the image becomes dim. 2) Press the OK button and the selected images will bedeleted.[ALL PICS]: Press the right button and menu forselecting memory card to be deleted willdisplay. 1) Use the Up/Down buttons to select the desiredmemory card and press the OK button.2) The delete confirmation window is opened.Press the OK button again to delete all unprotectedimages. If there is no protected image, [NO IMAGES!] message is displayed.4. After deletion, the screen will be changed to the play mode screen.DELETESELECTALLMSEXIT:MENU MOVE:DELETE?DEL. : OKCANCEL : SELECT:SSET:OK](https://usermanual.wiki/Hanwha-Techwin/DIGIMAXV50.User-Manual-2/User-Guide-442676-Page-26.png)
![67If all memory card slots are full, use this function to copy images in one memory card toanother.Copy Pictures1. Press the play mode button and press the menu button.2. Press the LEFT/ RIGHT button and select the [COPY]menu tab.3. Select a desired sub menu by pressing the UP/ DOWNbutton and press the RIGHT button.[SELECT] : Menu to select source memory card isdisplayed.1) Use the Up/Down buttons to select a desired memorycard and press the OK button.2) Selection window for an image to copy is displayed.- Up/Down/Left/Right : Select an image. - S Button : Confirm the selection V mark isdisplayed if an image is selected.3) Press the OK button to copy the confirmed image to theother memory card.[ALL] : Menu to select source memory card is displayed. 1) Use the Up/Down buttons to select a desired memorycard and press the OK button.2) The copy confirmation window is displayed. Press the OK button again to copy all images to theother memory card.Copy PicturesAll memory slots need to be loaded for the function.If the destination is smaller than the source, the remaining files are not copied.Please delete unneeded files to free up enough memory space before copying.While copying a picture, the destination file is automatically renamed to the nextsequential filename after the last saved file to avoid filename duplication.INFORMATIONCOPYSELECTALLSD/MMC MSSD/MMC MSEXIT:MENU MOVE:COPY?COPY : OKCANCEL : SELECT:SSET:OK](https://usermanual.wiki/Hanwha-Techwin/DIGIMAXV50.User-Manual-2/User-Guide-442676-Page-27.png)
![68Protecting imagesThis is used to protect specific shots from being accidentally erased (LOCK).It also unprotects images that have been previously protected (UNLOCK).Protecting Images1. Press the play mode button and press the menu button.2. Press the LEFT/ RIGHT button and select the [PROTECT]menu tab.3. Select a desired sub menu by pressing the UP/ DOWNbutton and press the OK button.[ONE PIC] : Only an image that is displayed on the LCDmonitor is protected or unprotected.- UP/DOWN Button : Protect/release the image- Left/Right button : Select an previous or next image. - MENU button : Your changes will be saved and the menuwill disappear.[SELECT] : Selection window for an image to beprotected/released is displayed.- Up/Down/Left/Righ t: Select an image- S Button : Protect/release the image- MENU button : Your changes will be saved and the menu will disappear.[ALL PICS] : Protect/release all saved images1) Press the right button. 2) Select a memory card to be protected by pressing theUP/DOWN button. 3) UP/ DOWN Button : Protect/release the images- MENU button : Your changes will be saved and the menu will disappear.- If you protect an image, the protect icon will be displayed onthe LCD monitor. (An unprotected image has no indicator)- An image in LOCK mode will be protected from the deletefunction or [DELETE] functions, but will NOT be protectedfrom the [FORMAT] function.PROTECTONE PICSELECTALL PICSMSEXIT:MENU MOVE:UNLOCKCCAANNCCLLEE::SSEETT::OOKKUNLOCKCCAANNCCLLEE::SSEETT::OOKKSELECT:SSET:OK](https://usermanual.wiki/Hanwha-Techwin/DIGIMAXV50.User-Manual-2/User-Guide-442676-Page-28.png)
![01 SECON69Starting the slide showImages can be displayed continuously at pre-set intervals. You can view the slide show byconnecting the camera to an external monitor.1. Press the play mode button and press the menu button.2. Press the LEFT/ RIGHT button and select the [SLIDE]menu tab.Setting play interval: Set the slide show play interval.1. Use the Up/Down buttons to select the [Interval] menuand press the Right button2. Use the Up/Down buttons to select the desired interval.3. Press the OK button to save the configuration.Repeat setting : Repeat or not the slide show after finishing the first cycle. 1. Use the Up/Down buttons to select the [Repeat] menu and press the Right button2. Use the Up/Down buttons to select the desired sub menu.[ON] selected : The slide show is repeated until canceled.[OFF] Selected : The slide show is closed after one cycle.3. Press the OK button to save the configuration.Start the slide show: The slide show can start only in the [START] menu.1. Use the Up/Down buttons to select the [START] menu2. Press the OK button to start the slide show.- Press the Pause button to pause the slide show.- Press the Pause button ( ) again to resume the slide show.- Press the Menu button to stop the slide show.The loading time depends on the image size and quality.The slide show will start from an image that was displayed on the LCD monitor. The [PWR OFF] function can’t be activated.While the slide show is playing, only the first frame of an MOVIE file is displayed. INFORMATION SLIDEINTERVALREPEATSTARTEXIT:MENU MOVE:](https://usermanual.wiki/Hanwha-Techwin/DIGIMAXV50.User-Manual-2/User-Guide-442676-Page-29.png)
![70ResizeChange the resolution (size) of pictures taken. Select [LOGO] to save an image to be thestart-up image. The resized image will have a new file name.1. Press the play mode button and press the menu button.2. Press the LEFT/ RIGHT button and select the [RESIZE]menu tab.3. Select a desired sub menu by pressing the UP/ DOWNbutton and press the OK button.A large sized image can be resized to a smaller sized image, but not vice versa.Only still image(JPEG) images can be resized. TIFF, Movie clip(MOV) and Voicerecording(WAV) files can’t be resized.You can change the resolution of only those files compressed in the JPEG 4:2:2 format. The resized image will have a new file name. The [LOGO] image is stored not on thememory card but on the internal memory.Only one [LOGO] image can be saved. If you save a new [LOGO] image, the existingstartup image will be deleted.If the memory capacity is insufficient to store the resized image, a [CARD FULL!]message will display on the LCD monitor and the resized image will not be stored.INFORMATION 2592 O O O O O O2272 X O O O O O2048 X X O O O O1600 X X X O O O1024 X X X X O O640 X X X X X OImage Resize TypesResize2272X17042048X15361600X12001024X768640X480LOGORESIZE2272X1704 22722048X1536 20481600X1200 16001024X768 1024640X480 640EXIT:MENU MOVE:](https://usermanual.wiki/Hanwha-Techwin/DIGIMAXV50.User-Manual-2/User-Guide-442676-Page-30.png)
![71Rotating an imageDPOF DPOF(Digital Print Order Format) allows you to embed printing information on your memorycard’s MISC folder. Select the pictures to be printed and how many prints to make.The DPOF indicator will display on the LCD monitor when an image that has DPOFinformation plays back. Images can then be printed on DPOF printers, or at an increasingnumber of photo labs.This function is not available for Movie clips and Voice recording files.You can rotate the stored images by 90, 180, or 270 degrees. You can view a picture in itsproper orientation if the picture has been taken with the camera oriented vertically or up-side-down. The rotated image can’t be enlarged or trimmed.1. Press the play mode button and use the Left / Rightbuttons to select an image to rotate.2. Press the menu button and use the Left / Right buttons to select the [ROTATE] menu tap.3. Select a desired sub menu by pressing the UP/ DOWNbutton.[RIGHT] : Rotate picture in a clock-wise direction[LEFT] : Rotate picture in a counter-clock-wise direction[UPDOWN] : Rotate picture 180 degrees[ Picture after 90 degrees ]CCW rotation[ Picture after 180 degrees ]rotation[ Picture after 90 degrees ]CW rotation4. Press the OK button. The rotated image will be displayed and the menu will disappear. Ifyou display the rotated image on the LCD monitor, empty spaces may appear to the leftand right of the image.ROTATERIGHT(90 )LEFT(90 )UPDOWN(180 )EXIT:MENU MOVE:](https://usermanual.wiki/Hanwha-Techwin/DIGIMAXV50.User-Manual-2/User-Guide-442676-Page-31.png)
![72DPOF : STANDARDImages (except for movie clips and voice file) are printed as index type.1. Press the play mode button and press the menu button.2. Press the LEFT/ RIGHT button and select the [DPOF]menu tab.3. Select the [INDEX] menu by pressing the UP/ DOWNbutton and press the RIGHT button.4. Select a desired sub menu by pressing the UP/ DOWNbutton.If [NO] is selected : The image will not be printed in indexformat.If [YES] is selected : The image will be printed in index format.5. Press the OK button to confirm the setting.DPOF : INDEXThis function allows you to embed print quantity information on a stored image.1. Press the play mode button and press the menu button.2. Press the LEFT/ RIGHT button and select the [DPOF]menu tab.3. Select the [STANDARD] menu by pressing the UP/DOWN button and press the RIGHT button.4. Select a desired sub menu by pressing the UP/ DOWNbutton and press the OK button.[SELECT] : A window for selecting the image to beprinted is opened.Up/ Down/ Left/ Right : Select an imageW/T button : Select an image to delete.[ALL PICS] : Set the number of copies to print for eachpicture, excluding movie clips and voicerecordings.5. Press the OK button to confirm the setting.If an image carries DPOF instructions, the DPOFindicator ( ) will show.DPOFSTANDARDINDEXPRINT SIZECANCELALL PICSNOALL PICSINDEXEXIT:MENU MOVE:DPOFBACK: SET:OKSELECT:SSET:OKPRINTS:W/TSTANDARDINDEXPRINT SIZECANCELNOYES](https://usermanual.wiki/Hanwha-Techwin/DIGIMAXV50.User-Manual-2/User-Guide-442676-Page-32.png)
![73DPOF : CANCELDPOF : PRINT SIZEYou can specify the print size when printing images stored on the memory card.The [SIZE] menu is available only for DPOF 1.1 compatible printers.Setting the Print Size1. Press the play mode button and press the menu button.2. Press the LEFT/ RIGHT button and select the [DPOF]menu tab.3. Select the [SIZE] menu by pressing the UP/ DOWNbutton and press the RIGHT button.4. Select a desired sub menu by pressing the UP/ DOWNbutton and press the OK button.[SELECT] : A window for selecting the print size isopened.Up/ Down/ Left/ Right : Select an imageW/T button : Select a print size[ALL PICS] : print size of all images are changed. SIZE : DEFAULT, 3X5, 4X6, 5X7, 8X10* The [DEFAULT] print size varies depending on the printermanufacturer.For your printer's default value, please refer to the user'sguide that came with your printer.You can cancel the [STANDARD], [INDEX], or [SIZE] settings. Cancel the setting to reset thevalue to its default.1. Press the play mode button and press the menu button.2. Press the LEFT/ RIGHT button and select the [DPOF]menu tab.3. Select the [CANCEL] menu by pressing the UP/ DOWNbutton and press the RIGHT button.4. Select a desired sub menu by pressing the UP/ DOWNbutton.If [STANDARD] is selected: Cancels the standard print setting.If [INDEX] is selected : Cancels the index print setting.If [SIZE] is selected : Cancels the print size setting.5. Press the OK button to confirm the setting.SELECT:SSET:OKSIZE:W/TDPOFBACK: SET:OKSTANDARDINDEXPRINT SIZECANCELALL PICSSTANDARDDPOFBACK: SET:OKSTANDARDINDEXPRINT SIZECANCELALL PICSSTANDARDDPOFBACK: SET:OKSTANDARDINDEXPRINT SIZECANCELNDEXPRINT SIZEPRINTS](https://usermanual.wiki/Hanwha-Techwin/DIGIMAXV50.User-Manual-2/User-Guide-442676-Page-33.png)
![74PictBridgeYou can use the USB cable to connect this camera to a printer that supports PictBridge (soldseparately) and print the stored images directly. Movie clips and voice files cannot be printed.You can set up the following settings from the PictBridge menu.IMAGES : Setting up the scope of PictBridgePRINTER SETUP : Setting up printingPRINT : Printing picturesDPOF AUTO PRINT : Printing the DPOF filesRESET : Initializing the PictBridge functionsConnecting the Camera to a Printer1. Press the POWER button to turn on the camera.2. In a mode other than Voice Recording mode, press theMENU button.3. Press the LEFT/ RIGHT button and select [SETUP] menu tab.4. Select [USB] menu by pressing the UP/ DOWN buttonand press the RIGHT button.5. Select [PRINTER] menu by pressing the UP/ DOWNbutton and press the OK button.6. Press the menu button twice and the menu will disappear.7. Use the supplied USB cable to connect the camera to the printer as shown below.8. Turn on the printer to connect the camera to the printer.If you selected [Computer] in Step 5, when you connect the camera to your printer, thecamera status lamp (red) will illaminate and the connection will not be established. In thiscase, disconnect the USB cable, and then follow the procedure from Step 2 and onward.SET UPBACK: SET:OKSOUNDLCDVIDEOQ.VIEWUSBCOMPUTERPRINTER](https://usermanual.wiki/Hanwha-Techwin/DIGIMAXV50.User-Manual-2/User-Guide-442676-Page-34.png)
![75PictBridge: Picture SelectionYou can select the scope of the PictBridge function.1. Connect the camera to your printer. The USB menu must be set to [PRINTER] before youconnect the camera to the printer.(See p.74)2. The [PICTBRIDGE] menu will appear.3. Select the [SELECT] menu by pressing the UP/ DOWNbutton and press the RIGHT button. 4. Use the UP and DOWN buttons to select the desiredsubmenu value, and then press the OK button.When [ONE PIC] is selected : The PictBridge function will be applied only to the picturecurrently displayed.When [ALL PICS] is selected : The PictBridge function will be applied to all pictures,excluding movie clips and voice files.Setting the Number of Copies to Print- Select [ONE PIC] or [ALL PICS]. A screen where you can set the number of copies to print will appear as shown below. [ When [ONE PIC] is selected ] [ When [ALL PICS] is selected ]- Use the UP and DOWN buttons to select the number of copies to print and then press theOK button. The number of copies you wish to make : 30Unless you press the OK button, the changed number of prints will not be applied. - When selecting [ONE PIC] in Step 4, you can use the LEFT and RIGHT buttons to move tothe previous or next picture. - Press the SHUTTER button to return to the PictBridge menu. PICTBRIDGESELECTPRINTER SETUPPRINTDPOF PRINTRESETONE PICALL PICSMOVE: COPY:EXIT:SHMENU:OK01 PRINTSMOVE: COPY:EXIT:SHMENU:OK01 PRINTS](https://usermanual.wiki/Hanwha-Techwin/DIGIMAXV50.User-Manual-2/User-Guide-442676-Page-35.png)
![76PictBridge: Print SettingYou can select the Paper Size, Print Format, Paper Type, Print Quality, Date Print, and FileName Print menus for printed pictures.Menu Function Sub menu1. Connect the camera to your printer. The USB menu must be set to [PRINTER] before youconnect the camera to the printer.(See p.74)2. The [PICTBRIDGE] menu will appear.3. Select the [PRINTER SETUP] menu by pressing the UP/DOWN button and press the RIGHT button. 4. Use the UP and DOWN buttons to select the desiredsubmenu value, and then press the OK button.If [DEFAULT] is selected: The print format will be set to the printer's default values.If [CUSTOM] is selected: A window from which the user can set up the printformat with the desired values will appear.Use the UP and DOWN buttons to select asubmenu value, and then press the RIGHT button.Auxiliary menus will appear. Use the UP andDOWN buttons to select the desired auxiliarymenu, and then press the OK button. The menus you can set up are as follows:SIZESetting the size of the printing paperSetting the number of pictures to beprinted on a sheet of paperSetting the quality of the printing paperSetting the quality of the picture to be printedSetting whether to print the dateSetting whether to print the file namePOSTCARD, 4X6, 8X10, A6, A4, B5FULL, 1, 2, 4, 6, 8, INDEXPLAIN, PHOTO, FASTPHOTODRAFT, NORMAL, FINEON, OFFON, OFFLAYOUTPAPERQUALITYDATEFILENAMEDepending on the manufacturer and model of your printer, some menus are inaccessible. Even though these menus will still appear on the LCD monitor, but you will not be able toselect them. PICTBRIDGESELECTPRINTER SETUPPRINTDPOF PRINTRESETDEFAULTCUSTOMIZECUSTOMIZEPAPER SIZELAYOUTPAPER TYPEPRINT QUALITYDATE PRINTPOSTCARDFULLPLAINDRAFTOFF](https://usermanual.wiki/Hanwha-Techwin/DIGIMAXV50.User-Manual-2/User-Guide-442676-Page-36.png)
![77PictBridge: Picture PrintingPrinting Pictures1. Connect the camera to your printer. The USB menu must be set to [PRINTER] before youconnect the camera to the printer.(See p.74)2. The [PICTBRIDGE] menu will appear.3. Select the [PRINT] menu by pressing the UP/ DOWNbutton and press the RIGHT button.4. Select a desired sub menu by pressing the UP/ DOWNbutton and press the OK button.[STANDARD] : Print a selected image according to thenumber of copies required.[INDEX] : Print all images displayed in the Indexformat.5. The screen shown on the right will appear and thepicture will be printed. If no picture is selected, the [NO IMAGE!] message will be displayed. If you pressthe SHUTTER button during printing, printing will becancel and the menu from Step 2 will appear.6. If an error occurs during printing, the screen shown below will appear.When printing pictures by connecting the camera to the printer, use the AC adapter.If the printer is turned off during printing, the printing will stop and the paper will bedispelled.If there are continuous print error, please check the print condition. INFORMATION Press the OK button to cancel printing.Follow the Steps 1 to 4 again to print thepicture(s).Press the OK button to resume printing,or press the RIGHT button to cancelprinting.[ Fatal error ] [ Recoverable error ]PICTBRIDGESELECTPRINTER SETUPPRINTDPOF PRINTRESETSTANDARDINDEXWARNINGOK: RESUMEWARNINGOK: RESUMELEFT: CANCEL](https://usermanual.wiki/Hanwha-Techwin/DIGIMAXV50.User-Manual-2/User-Guide-442676-Page-37.png)
![78PictBridge : DPOF AUTO PRINTThis allows you to directly print the files with DPOF information. For instructions on how to set up DPOF, refer to pages 72 to 73.1. Connect the camera to your printer. The USB menu must be set to [PRINTER] before youconnect the camera to the printer.(See p.74)2. The [PICTBRIDGE] menu will appear.3. Select the [DPOF PRINT] menu using the UP/DOWNbutton and press the RIGHT button. Next, select [YES]using the Up/Down button, and then press the OKbutton.4. The screen shown on the right will appear and thepicture will be printed. If no picture is selected, the [NO IMAGE!] message will be displayed. If you pressthe SHUTTER button during printing, printing will becancel and the menu from Step 2 will appear.5. If an error occurs during printing, the error messagenumber 5 on page 77 will be displayed. For details, please refer to page 77.This allows you to restore the values of the PictBridge menu, which was changed inCUSTOMIZE, to their default values.1. Connect the camera to your printer. The USB menu must be set to [PRINTER] before youconnect the camera to the printer.(See p.74)2. The [PICTBRIDGE] menu will appear.3. Select the [RESET] menu by pressing the UP/ DOWNbutton and press the RIGHT button.4. Select a desired sub menu by pressing the UP/ DOWNbutton and press the OK button.- If [NO] is selected : Settings will not be reset.- If [YES] is selected : All print and image settings will be reset.Default print setting varies depending on the printer manufacturer. For your printer s default setting, refer to the user s guide that came with your printer.PictBridge : RESETSTOP.SHUTTERPICTBRIDGESELECTPRINTER SETUPPRINTDPOF PRINTRESETYESNOPICTBRIDGESELECTPRINTER SETUPPRINTDPOF PRINTRESETYESNO](https://usermanual.wiki/Hanwha-Techwin/DIGIMAXV50.User-Manual-2/User-Guide-442676-Page-38.png)
![80Setup menuThis function allows the user to select the file naming format.Assigning File Names1. In any mode other than Voice Recording mode, press theMENU button.2. Press the LEFT/ RIGHT button and select the [SETUP]menu tab.3. Select the [FILE] menu by pressing the UP/ DOWN buttonand press the RIGHT button.4. Select a desired sub menu by pressing the UP/ DOWNbutton and press the OK button.[RESET] : After using the reset function, the next file name will be set from 0001 evenafter formatting, deleting all or inserting a new memory card.[SERIES] : Under this system, the file name will directly follow the last stored file name,regardless of any actions such as file deletion or formatting.File nameMenu tab Main menu Sub menu Secondary menu PageDARKNORMA BRIGHTNTSCPALOFFCOMPUTERPRINTERNOYESSD/MMCMS 1 ~ 5 SECLCD VIDEOQ.VIEWUSBRESETCARD SELECTp.85p.86p.87p.87p.88p.88SET UPFILEPWR SAVELANGUAGEFORMATDATE.TIMEBACK: SET:OK2592RESETSERIES](https://usermanual.wiki/Hanwha-Techwin/DIGIMAXV50.User-Manual-2/User-Guide-442676-Page-40.png)