Haier Telecom 1104HW-A56W Mobile Phone User Manual W110 HET V1 0 110324 English
Haier Telecom (Qingdao) Co., Ltd. Mobile Phone W110 HET V1 0 110324 English
Contents
- 1. User manual
- 2. user manual
User manual
UserManualforA56W

1
IntroductiontoManual
ThismanualprovidesoperationguidelinesforuseofyourA56Wmobile
phone.PleaserefertotheQuickStartGuide,includedintheboxforabrief
overviewofthebasicfunctions.
IntroductiontoManualIcon
Thefollowingiconsareusedforindicationanimportantmessageinthe
UserManual:
Messageprompt.
Aserviceorfunctionrequiresthesupportofnetworkservice.For
moredetails,pleaseconsultthenetworkservicesupplier.

2
TABLEOFCONTENTS
GettingtoKnowYourPhone ............................................................................... 4
FrontView ................................................................................................ 4
SideView .................................................................................................. 4
BackView ................................................................................................. 5
Gettingstarted ..................................................................................................... 6
(U)SIMCardandBattery .......................................................................... 6
PoweringthePhoneOnandOff .............................................................. 7
DisplayScreen .......................................................................................... 8
Keys ........................................................................................................... 9
TextInputMethods ................................................................................10
SetupYourPhone .................................................................................. 11
GuidelineforQuickUse ..................................................................................... 14
CallFunction ...........................................................................................14
MainMenuFunctions ............................................................................19
SAT ..........................................................................................................21
Browser ..................................................................................................21
Entertainment ........................................................................................25
Camera ...................................................................................................27
Messages ................................................................................................31
Contacts ..................................................................................................43
Tools ........................................................................................................48

3
Multimedia .............................................................................................52
Mystuff ..................................................................................................54
Calendar .................................................................................................58
CallLog ...................................................................................................60
Settings ...................................................................................................61
FAQsandTroubleshootingSolution .................................................................. 6 9
Health&SafetyInformation ............................................................................. 72
DeclarationofConformity ................................................................................. 76
4
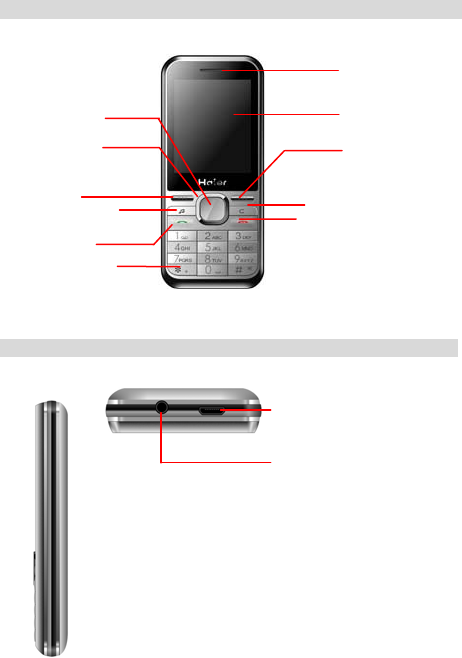
GettingtoKnowYourPhone
FrontView
SideView
USB socket
Headphones socket
Phone Receiver
CENTRAL Display Screen
Right Soft Key (RSK)
Navi
g
ation Ke
y
Music player
Left Soft Key (LSK)
Special Function Key
END/POWER Key
SEND key
Delete Key
5
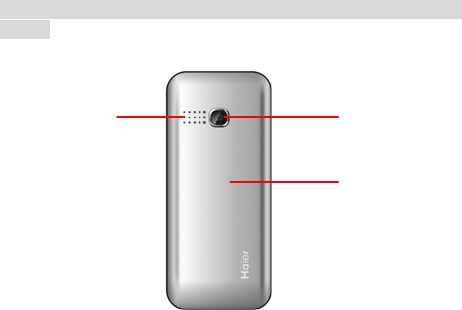
BackView
Camera
Battery Cover
Loudspeaker

6
Gettingstarted
(U)SIMCardandBattery
Whenyousubscribetowirelessservicesyouwillreceivea(U)SIMCard
(subscriberidentitymodule),whichcontainsinformationaboutyour
networkservicesandyourmobilenumber.
PleaseconsultwithyourSIMcardprovider,networkserviceprovideror
networkoperatortoobtainanduseSIM‐basedinformation.
Insert(U)SIMCardandBattery
Poweroffthephoneandensuretheadapterisdisconnectedfromthe
phonebeforeremovingthebattery.
1. Withthephonebackfacingupward,slightlypressandpushthe
rearcovertowardthephonebottomuntilthecoverisremoved.
2. Removethebattery.
3. InserttheSIMcardintomarkedSIMslotwiththegoldenchip
facingdown.
4. Installthebattery,ensuringcontactsarealigned.
5. Pushthebackcoverbacktotheoriginalplace.
RechargingtheBattery
Whenthebatterypowerislow,thephonewilldisplayalowpower
notificationwithaflickeringbatteryiconwithzerobars.Whenthebattery
islow,somefunctionsofthephonemightnotoperateuntilthebattery
receivesafullcharge.
Whenthepowerislowerthanthethresholdvalue,thephonewill
automaticallypoweroffuntilitisrecharged.Whenthephoneis
powered‐onandbeingcharged,thebatteryicononthetop‐rightcornerof
thedisplaywillflickertoshowitisbeingrecharged.Whenthebatteryis
fullycharged,thepromptof“chargecompleted”isdisplayedonthe
top‐rightcornerofthescreen.Whenthephoneispowered‐offandbeing
charged,thechargingstatusisdisplayedonthescreen;aftercharginghas
finished,thepromptof“chargecompleted”isdisplayedonthescreen.It
takesapproximately2.5hourstofullychargethebattery.Besuretofully

7
chargeyourbatterybeforeusingforthefirsttime.
Chargingyourbattery:
1. InserttheUSBconnectorofthechargerintothephone.
2. Whenchargingiscompleletd,removetheUSBchargerfromthe
phone
PoweringthePhoneOnandOff
Beforethephoneispoweredon,ensurethatthephonehasbeencharged
andthatthe(U)SIMcardisinsertedinthephone.Whenthephoneis
poweredonwithout(U)SIMcardinserted,amessagewillbedisplayed
advisingthatthe(U)SIMcardmustbeinsertedtocontinue.Withoutthe
(U)SIMcardinsertedthephonewillonlysupportemergencycalls.
Thephonecanbepoweredonwhileitisbeingcharged.Ifthephone
powersoffautomaticallyduetolowpower,thepower‐oninfowillnot
displayuntilithasbeenchargedforseveralminutes.
TurningthePhoneOn
1.PressandholdEND/POWERKey.
2.Ifthephonehasbeenlocked,insertthelockcodeandselectthe
CENTRALKEYtoconfirm.
3.Thehomescreenwilldisplaythedefaultwallpaperandscreensaver.
Theseimagescanbechangedtooneofyourchoice.Formoreinformation
seethesectiontitledSETUPYOURPHONE.
Afterthephoneispoweredon,itwillidentifythenetworksupplier
automaticallyandfinishsettingupthewirelessnetworkparameters.Ifthe
phonedoesnotconfigureallparametersautomatically,pleaseconsult
networkservicesupplierforthecorrectparameterstocompletethis
processmanually.
TurningthePhoneOff
1.PressandholdEND/POWERkeyforapproximately4seconds..
8
2.Thephonehasbeenpoweredoffoncethepowerdownanimationis
completed.
Note:whenthephoneispoweredoff,allphonefunctionsare
disabledexceptforthealarm.
DisplayScreen
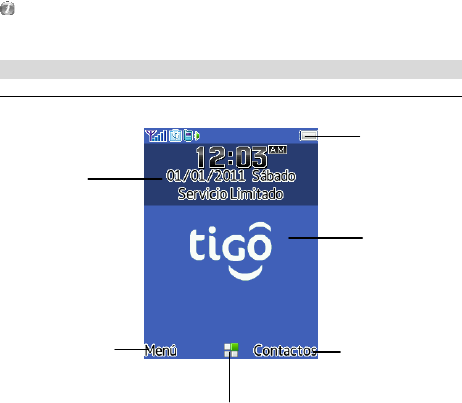
DisplayScreen
z StatusIndication:displaysthestatusofthesignalstrength,battery
power,messages,incomingcalls,usersprofile,functionoptionsand
connectiontoexternaldevices(e.g.USBorcharging)etc.
z Standby:displaysthenameofnetworkservicesupplier,date,time
andanymessages(e.g.missedcalls).
z Wallpaper:displaysthebackgroundimageonthedevice’shome
screen.
z SoftKeyindication:LeftSoftKey(LSK)‐>MainMenu,
Standby
Status Indication
Left Soft Key Indication
Wallpaper
CENTRAL KEY
Right Soft Key Indication
9
CENTRALKEY‐>MainMenu,
RightSoftKey(RSK)‐>Contacts.
Keys
Keys
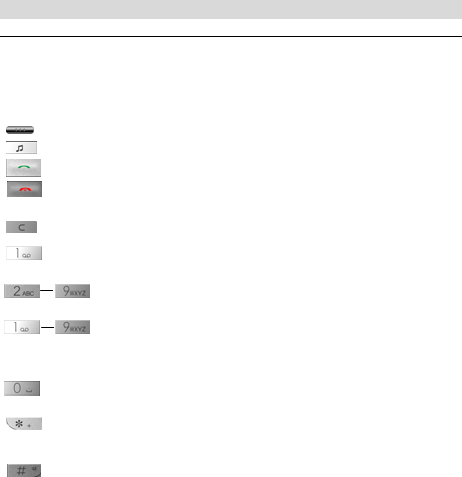
CENTRALKEYEnterintomainfunctionmenuorconfirmselected
entries.
NavigationKey 4waynavigationallowsyoutoscrollbetweenthe
menuoptions.
Toexecutethedisplayedfunction
GotoMusicplayer
Usedtoinitiateacall
Usedtoterminateacall,powerthephoneon/offand
returntothestandbymenu
CLEAR,usedtodeleteentriesorclearinput
Onetouchaccesstovoicemailbypressingandholding
1
Speeddialoptions;Pressandholdtocallthecontact
thathasbeenprogrammedintothespeeddialslot
Numerickeysfordialingphonenumbersand/or
navigatingthemenus(versusscrollingtothemenu
option,eachhasacorrespondingnumber)
Spacebar;Wheninputtingtext,press0forthespace
bar
Select*toinput*/+/p,inputsymbolsand
punctuation.
Pressingandholding#wheninhomescreenwill
enablemutemode.Pressing#whencomposinga
messagingwillallowyoutochangeyourtextinput
method.

10
TextInputMethods
ThephonesupportsEnglish,Spanishandspecialsymbolinputusingkeypad.
PhysicalKeyboardInput
Youcanchangeyourtextinputmethodwhenyouarecomposingby
Option>Inputmode.
Toquicklychangethetextinputmodewhencomposingamessageselect
thekeytoscrollthroughtheinputoptions
LetterInput
Theletterinputmethodsupportsmulti‐pressandsmartinputmodes.
TextInputusingMulti‐pressMode
1.Locateatcharacterinputstatus,forexample:Mainmenu>
Messages>SMS>New.
2.Begincomposingyourmessage.Thecursorwillstayinthesame
placefor0.5secondsbeforemovingtotheright.
3.Spelloutthewordyouwanttotyperepeatedlypressthenumbers
‐ utilltherequiredcharacterappears.
4.Toswitchbetweenlower‐caseandcapitalletters,selectOPTIONand
selectINPUTMODE;selecttheletterinputmode“Abc/A BC/abc”and
selectOK.
5.ToinputnumbersselectOPTIONandINPUTMODE;select123and
selectCENTRALKEYandselectOK.
6.Toinputsymbolswhencomposingamessage,selectthekey
andselectthesymbol.
TextInputusingSmartInputMode:
SmartInputModeisapredictivetextfeaturethatidentifiesthemost
commonlyusedwordswithabuiltindictionary.Forexample,ratherthan
havetotypeanumberthreetimestogetaCtodisplayinyourmessage,
youcouldpressthecorrespondingnumberonceandproceedtotypeout
therestofthewordusingthesameapproachanditwillpredictword
optionsthatyoucanselectfrom.
1. Locateatthecharacterinputstatus,forexampleMainmenu>
11
Messages>SMS>New.
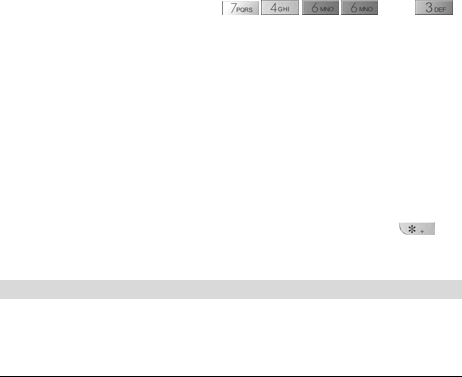
2. Totypeaword“Phone”,select , , , and.
3. Ifthescreendisplaysthedesiredword,selectCENTRALKEYfor
confirmation.
4. Ifthescreendoesnotdisplaythedesiredword,selecttheDOWN
NAVIGATIONKEYtoviewotherwordoptions.Oncethedesiredword
hasbeenfound,selecttheCENTRALforconfirmation.
5. Toswitchbetweenlower‐caseandcapitalletters,selectOPTION
menuandselectSWITCHINPUTMETHOD,selecttheletterinput
mode“PreAbc/PreABC/Preabc”andselect“OK”.
6. ToinputnumbersselectOPTIONandINPUTMODE;select123and
selectCENTRALKEYandselectOK.
7. Toinputsymbolswhencomposingamessage,selectthekey
andselectthesymbol.
SetupYourPhone
Personalizeyourphone,includingdisplaysettings,ringtonesettings,time
anddatesettings,shortcutsettingsandphonelocksettings.
DisplaySettings
ToaccessDisplaySettings:Mainmenu>Settings>DisplaySettings
SelectWallpaper
1. Mainmenu>Settings>DisplaySettings>Idlescreen.
2. SelectWALLPAPERandselecttheCENTRALKEYwhichwillallowyou
tochoosefrompreloadedimagesorfromMyStuff,whereyoucan
selectafiletobeloadedaswallpaper.
3. SelectSAVEtoconfirm.
DisplaytheTimeandDateontheScreen
1. Mainmenu>Settings>Displaysettings>Idlescreen.
2. SelecteitherTimeDisplayorDateDisplayandselectturn‐on/off
statusandthentoselect“Save”tosavethesettings

12
AdjustingBacklighttime
1. Mainmenu>Settings>DisplaySettings>Backlighttime.
2. SelectpreferredbacklighttimeandselectOKtosave.
Notethat“Al ways”willdrainbatterypowerfasterthanothersettings.
AdjustingtheBrightnessofScreenDisplay
1. Mainmenu>Settings>DisplaySettings>Brightness.
2. Selectthebrightnessofdisplayscreenbyscrollingleftorrightwith
thenavigationkeyandselectSAVEtosavethesettings.
RingtoneSettings
SelecttheProfile
1. Select:Mainmenu>Settings>Profile.
2. SelecteitheroneprofileforallcallsorselectNewProfiletoassign
differenttypesofnotificationsforincomingvoicecalls,messagealert,
emailalert,vibratingalert,keytoneandwarningtone
SelectaRingtone
1. Select:Mainmenu>Settings>Profile.
2. Tochangetheringtone,selecttheprofileyouwishtochange(e.g.
Standard),
3. SelectVoiceCallRingandselectaringtonefromPresetFilesorselect
FilestoaccessMyStuffandselectthedesiredringtonefiles.
4. Aftersettingtheprofile,selectSAVE.
TimeandDateSettings
SettingtheTimeanddate
1. Mainmenu>Settings>PhoneSettings>Timeanddate.
2. Selecttheoptionsyouwishtochangeandinputthecurrenttimeand
date.To changetothetimedisplayformat,toggleleftandrightwith
theNavigationKEY.
3. SelectSAVE

13
ShortcutKeySetting
SetupShortcutKey
1. Mainmenu>Settings>PhoneSettings>Shortcuts>Shortcut
settings.
2. UsingtheCENTRALKEY,selecttheshortcutkeyyouwishtocustomize
andthenselectCENTRALKEYtoseetheoptions.
3. SelectafeaturefortheshortcutoptionandthenselectOK.
4. AftersettingallofyourshortcutsselectSAVE
DisplayShortcutKey
1. Mainmenu>Settings>PhoneSettings>Shortcuts>Shortcutdisplay.
2. SelectDISPLAYorHIDEandselectOKtosavethesettings.
PhoneLockSetting
Youcanlockthephone,usingapassword,topreventothersfrombeing
abletouseyourphone.Thedefaultpasswordofthephonewhenleaving
thefactoryis0000.
ModifythePhonePassword
1. Mainmenu>Settings>SecuritySettings>Changephonecode.
2. Entertheoldpassword,thenewpasswordandthenre‐enterthenew
passwordtoconfirmit
3. SelectOKtosavethenewpasswordsetting.
UnlockthePhoneLock
1. Mainmenu>Settings>SecuritySettings>Phonelock
2. SelectONandthenselectOK.
3. Youwillbepromptedtoenterthepasswordtochangethesettings.
EnterthecurrentpasswordandselectOK.

14
GuidelineforQuickUse
CallFunction
WhenthephoneispoweredonitwillsearchfortheLocalnetworkand
automaticallyconnecttoit.Ifthephoneisoutsideofthecoveragearea,it
mayroamonothernetworks,dependingonavailability.Consultyour
networkserviceproviderfordetailsonroamingandassociatedfees.
Thesignalstrengthicon,(foundinthetopleftcornerofthedisplay),
displaysthecurrentsignalstrengththenetwork.Ifthesignalisweak,call
qualitymaybeaffected.
DialingCalls
NormalPhoneDialing
1. Fromthehomescreen,dialthenumberthatyouwanttocall.(The
numberwillbevisibleonthedisplay)
2. SelecttheSENDKEYtoinitiatethecall.
3. Toendthecallorcancel,selecttheEND/POWERKey.
Tomakeaninternationalcallselecttheicon twicetoinput+
allowingyoutoreplacetheinternationalconnectingnumber,andthen
inputnationalcode,regionalcodeandphonenumber.
Whenyoudialanextension,inputthenumberofphoneextensionand
selecttheiconuntilyouseeaPonthedisplay,andtheninputthe
extensionnumber.
PlaceacallfromtheLatestPhoneRecords
1. SelecttheSENDKeytoopenthecalllogfromthehomescreen.
Alternatelyselect:Mainmenu>Calllog>Missedcalls/Outgoingcalls/
Incomingcalls/Allcalls.
2. SelectthecontactnumberthatyouwishtocallandselectSENDKey
toinitiatethecall.
PlaceacallfromContacts
1. Mainmenu>Contacts,oralternatelyselecttheContactssoftkey

15
fromtheRightSoftKEY.
2. Selectthecontactnumberthatyouwishtocallorinputthename’s
letterofthecontacttosearchyourcontacts.
3. SelecttheSENDkeytoactivatethecall.
PlaceacallusingSpeedDialShortcuts
Priortoplacingacallusingthespeeddialshortcutsyouneedtosetupthe
shortcutkeyforeachcontacts.
1. Mainmenu>Contacts>Option>Settings>Speeddial..
2. SelectSHORTCUTKEYandSETtoinputthecorrespondingnumberof
shortcutkeysorselectSEARCHtoanumberfromContacts.
3. SelectOKtosavethesettings.
4. Tocallusingthespeeddialshortcuts,pressandholdthe
correspondingshortcutkeys‐ underthestandby
statustoinitiatethecall.
FixedDial
Fixeddialingrestrictsthephonenumberswhichcanbedialedfromthe
phone.Alloutboundcallsotherthanthosesetinthefixeddialmenuwill
berestrictedandprotectedbyaPIN2.Fixeddialallowsforrestrictingcalls
topartialnumbersandprefixes.
SettingupFixedDial
Tosetthenumbersallowableforthephonetooriginateacall:
1. Mainmenu>Contacts>Option>Setting>FixedDial.
2. SelectOPTIONmenuandNEWCONTACT.
3. InputPIN2andselectOKwhenprompted.
4. Inputcontact’snameandnumberinfixeddialingandselectSAVEto
savetheinputinformation.
5. Todeletethefixeddial,opentheOPTIONmenuandselectDELETE.
EnablingFixedDial
1. Mainmenu>Contacts>Option>Setting>FixedDial
2. OpentheOPTIONmenuandselectEnable.

16
Fixeddialingwillstillsupportemergency911calls.
EmergencyCalls
Thephonesupportsemergencycallsto911whereverthereisnetworkcoverage.
RegardlessifyousubscribetoserviceorhaveaSIMcardinstalled.Tomakean
emergencycall:
1. Dialtheemergencynumber(911)andselectSENDKEYtoinitiatethecall.
Somecountriesorregionsmaysetupotheremergencynumbers.
Therefore,thenetworkservicesuppliermaystoreemergencynumbersof
othercountriesorregionsinSIMcard.
AnsweringCalls
SettinguptheAnswerMode
1.Mainmenu>Settings>Callsettings>Answermode
2.SelecteitherANYKEYorSENDKEYasthepreferredsettingandpress
OKtosavethesettings.
NormalAnswer
Whenyourphonereceivesanincomingcall,theringtonewillsoundorthe
phonewillvibrate,andthedisplayscreenwilldisplaytheincomingcallicon.
Thereareanumberofoptionsforhowtorespondtoincoimingcalls.
1. SelectANSWERortheSENDKeytoreceivetheincomingcall;
2. Ifyouwishtoendthecallorignoretheincomingcall,youcandoso
bypressingtheEND/POWERKey;
3. IfyouareusingawiredheadsetorBluetoothheadsetyoucananswer
thecallbytheearphone;
4. SelectCENTRALKEYtoswitchphonetospeakerphonemodeduring
thecall.
5. YoucanadjustthevolumebyOption>Volumeduringthecall.
Whenyouusetheloudspeaker,donotholdorpressthephonecloseto
yourearasitmaybeharmfultoyourhearing.

17
Missedcalls
1. Whenanincomingcallisnotanswered,thephonewilldisplaythe
missedcallsonthestandbydisplay.
2. SelectVIEWtoseetherecordofmissedcalls.
3. Todialfromthemissedcallslist,selectthenumberandselectthe
SENDkey.
4. Toviewthecalllogofallmissedcallsselect:Mainmenu>Calllog>
Missedcalls.
TransfertoreceivetheIncomingCallwithCallDivert
1. Mainmenu>Settings>Callsettings>Calldivert
2. Selectthetransfercondition:Allcalls/Ifbusy/Ifnotanswered/Ifnot
available.
3. SelectOPTIONandthenselectON
4. Selectwhereyouwantthecallstransferredto;TOVOICEMAILorTO
ANOTHER.
5. IfyouselectTOANOTHER,youwillbepromptedtoenterthephone
numbertotransferto,oryoucanselectCENTRALKEYandselecta
numberfromyourcontactlist.
6. SelectOKtosavethesettings.
7. TocanceltransfersselectMainmenu>Settings>Callsettings>Call
divert>Cancelall.
Thisfeaturerequiresthesupportfromthenetworkserviceprovider.
Pleasecontactyournetworkserviceproviderfordetails.
ScreeningIncomingCalls
1. Mainmenu>Contacts>Option>Settings>Blacklist.
2. SelectNEWandinputnumberstobescreened/filteredorselect
SEARCHtogotocontactswhereyoucanselectthenumberstobe
filtered.
3. SelectSAVE.
CallWaiting

18
1. Mainmenu>Settings>Callsettings>Callwaiting>CheckStatus.
2. ConfirmifCallWaitingisenabledordisabled.Tochangethesetting
selectONorOFF
3. Afteractivatingthecallwaiting,iftherehasnewincomingcallduring
calling,thephonewilldisplaythecallwaitingwindowandthe
messageprompt.
4. ToswitchbetweenthetwocallsselectSWITCH
Thisfeaturerequiressupportofthenetwork.Pleasecontactyour
networksupplier.
Multi‐partycalls
Makingacallduringanexistingcall
1. Duringacall,selectOPTIONandselectNEWCALL
2. InputthenumberofnewcallandselecttheSENDkeytoinitiatethe
secondcall.
3. ToswitchbetweenthetwocallsselectSWITCH.
4. Toendthecall,selecttheEND/POWERkey.
Multi‐PartyCalls
Youcanacceptmultipartycallsbyconnectingyourexistingcalltoan
incomingcall.Inaddition,youcaninitiatemulti‐partycalls,addingupto
sixparticipants.
1. Whenonthephonewithinthefirstparticipant,selectOPTIONand
selectCALLMEETING
2. Toendtheconferencecall,youcanselectOPTIONandENDCALL
MEETING.
3. ToterminateonepartyfromthecallselectOPTIONandselect
HANGUPONE,thenselectthenumbertobedisconnectedfromthe
conference.
4. Tocanceltheconferencecalltomakeasinglecall,selectOPTIONand
selectSPLIT.
Thisfeaturerequiresthesupportofthenetwork.Pleasecontactyour
19
networkservicesupplierformoredetails.
MainMenuFunctions
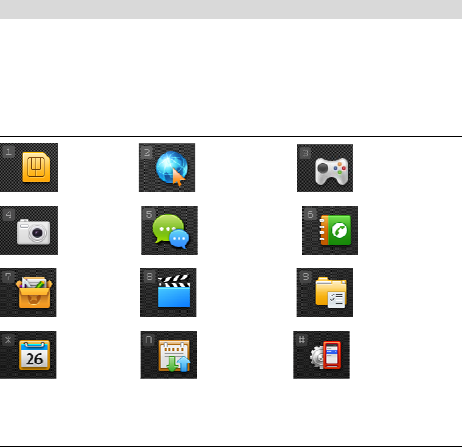
SelecttheCENTRALKEYtoentertheMainMenufromtheHomescreen.The
mainmenuhas12iconswhichareusedtoaccessthefeaturesofthephone.
Thefeaturesandfunctionalitystepsforeachofthemenuoptionsare
describedbelowthemenucatalogmatrix
MainFunctionMenu
SAT Browser Entertainment
Camera Messages Contacts
Tools Multimedia Mystuff
Calendar Calllog Settings
MenuCatalog
SAT
BrowserGotohomepage
EnterURL
Bookmark
History
Pushmessagebox
Savedpages
Browsersettings
Networksettings
Entertainment
20
Camera
MessagesSMS
MMS
Email
ContactsAll/Phone/USIM
Group
ToolsAlarm
Notes
Calculator
Recorder
Stopwatch
E‐book
Unitconvert
Worldtime
MultimediaMusicplayer
Videoplayer
Radio
MystuffImages
Sounds
Videos
Applications
Others
Calendar
CallLogMissedcalls
Outgoingcalls
Incomingcalls
AllCalls
DataTransmission
Callduration
SettingsProfile
DisplaySettings
PhoneSettings
CallSettings
NetworkSettings

21
SecuritySettings
ConnectionSettings
ResetSettings
Flightmode
SAT
Yournetworkserviceproviderwillprovideadditionalserviceson(U)SIM
card,forexample,entertainment,mobilechatandweatheretc.
ToaccesstheSATmenu,selectCENTRALKEYfromthehomescreenand
selecttheSATicon
Browser
Thewirelessapplicationprotocol(WAP)browserallowsyoutoconnectto
thewebusingthenetwork.Thiswillallowyoutobrowsenews,searchfor
informationandownloadcontent.
ToaccesstheBROWSERmenu,selectCENTRALKEYfromthehomescreen
andselecttheBROWSERicon.
Youcanusethebrowertodownloadfilesthatwillnotbedisplayedonthe
webpagesuchasringtones,imagesandvideo.Thesedownloadeditemswill
bestoredintheirrespectiveapplicationfilesonthephone.
BrowseWebpage
Gotohomepage
Thedefaulthomepageisthenetworkoperator’shomepage.Youcanlinkto
thehomepageURLwiththemainmenu.
1.Operationpath:Mainmenu>Browser>Gotohomepage.
2.SelectBACKtoquitandreturntothepreviouspage.
3.SelectOPTIONandEXITtoclosethebrowser.
EnterURL
AccesstoWebpage

22
ManuallyinputtheURLtoaccesstherelatedwebpage.
1. Mainmenu>Browser>EnterURL.
2. Typeinthethewebsiteaddress
3. SelectOPTIONandOK.
4. Afterthewebpageisloaded,anylinkswillbehighlighted.Usethe
CENTRALKEYtoopentheselectedlink.
ClearuptherelevantrecordsonInternet
1. Mainmenu>Browser>Browsersettings>Clear.
2. Selectclearedcontents:history,cache,cookies,orlogininfo.
SaveWebpageMessage
1. Wheninabrowsersession,select:OPTION>Tools>Savewebpage
2. Thephonewilldisplaywebpagemessageswhichcanbedownloaded.
DownloadthecontentandselectCENTRALKEYtosave.
Bookmark
Withthebookmarkfeature,youcanaccesssavedwebpageURLsquickly.
AddBookmark
Youcansetthecurrentwebpageasabookmarkorcreateabookmark
throughthefunctionalmenuwhenyouarebrowsingawebpage.
1. Underthewebpage‐browsingstatus,select:OPTION>Tools>Mark
page.
2. Tocreateabookmarkusingfunctionalmenu,select:Mainmenu>
Browser>Bookmark.
3. IfnobookmarkshavebeencreatedselectNEW.Ifthereareother
bookmarksalreadyselectionOPTIONthenNEW.
4. InputbookmarknameandURLandselectSAVE.
OpenBookmark
1. Mainmenu>Browser>Bookmark.
2. SelectthebookmarkyouwishtoopenandselectCENTRALKEYto
accessthelink.

23
OptionMenuofBookmark:
z New:createanewbookmark.
z Edit:re‐editthebookmarktitleandURL.
z Delete:deletethecurrentbookmarkordeleteallbookmarks.
z Details:viewthetitleofbookmarkandaddress.
z SendLink:sendthelinkbySMS,MMSorBluetooth
z Move:moveaselectedbookmarktoapreviousposition,orto
anextposition,ortothelisttoporbottom.
History
Withhistory,youcanviewahistoryofURLsvisitedandopenURLsdirectly
fromthehistorylog.
AccesstoLatestBrowsedWebpage
1. Mainmenu>Browser>History.
2. HighlightthelinkandselecttheCENTRALKEYtoaccessanyofthethe
webpages.
OptionMenuofBrowsingLog:
z Delete:deletetheselectedlog.
z DeleteAll:clearawayallthelogs.
z Showtitle:displaymessagetitle.
Pushmessagebox
ViewPushMessages.
1.Mainmenu>Browser>Pushmessagebox.
Savedpages
SaveWebpage
1. Whenbrowsingawebpage,SelectOPTIONandTOOLS
2. SelectSAVEPAGEandthecurrentwebpagewillbesavedintheSaved
Pagesfolder.
BrowseSavedpages

24
1. Mainmenu>Browser>Savedpages.
2. SelectwebpagelistandSelectCENTRALKEYtoviewthewebpage.
3. WhenviewingtheSavedPages,selectalinktothewebpageand
selecttheCENTRALKEY.Thebrowserwillautomaticallyopenthe
linkedwebpage.
SetupWebpageListDisplayMode
1.Mainmenu>Browser>Savedpages.
2.Selecttodisplaywebpagetitle,timeandURL.
OptionMenuofSavedPages:
z Delete:deletetheselectedSavedPagesitem.
z DeleteAll:clearupallSavedPagesitems.
z ShowTitle/Date/URL:displaywebpagetitle,dateorURL
BrowserSettings
ClearBrowseMessage
1. Mainmenu>Browser>Browsersettings>Clear.
2. Selecttheitemtoclearincludingclearhistory,cache,cookiesand
logininfo.
3. Selectcleartodeletethehistory.
SetupSecurityParameter
1. Mainmenu>Browser>BrowserSettings>Securitysetting.
2. SelectSettingtype,andselectOKtoaccessthesettingoptions.
3. Selectasecuritycharacteristicstatustoselectandsavethesettingby
selectingOK.
SetupBrowserDisplayCharacteristics
1. Mainmenu>Browser>BrowserSettings>Lookandfeel.
2. SelectSettingtype,andselectOKtoaccessthesettingoptions.
3. Selecttheconcretedisplaycharacterparametertoselectandsave
thesettingbyselectingOK

25
SetupNewPushMessagesNotifyCharacteristics
1. Mainmenu>Browser>BrowserSettings>Autodisplaysettings.
2. SelectONorOFFandsavethesettings.
NetworkSettings
Setupnetworkconnectionparameters.
1. Mainmenu>Browser>NetworkSettings.
CreateNetworkSettings
1. Mainmenu>Browser>Networksettings.
2. SelectOPTIONandNEWtoopenthesettingpageofnewnetwork
configuration.
3. Inputnetworkparameterincludingprofilename,homepage,
connectionmodeanddataaccount.
4. Afterfinishingtheinput,selectSAVEtoreservethenetwork
configuration.
SetupDefaultNetworkConfiguration
1. Mainmenu>Browser>Networksettings.
2. HighlightthenetworkconfigurationitemandselecttheCENTRALKEY,
Thephonewillsettheselecteditemasdefaultnetworkconfiguration.
OptionMenuofNetworkConfiguration:
z New:createanewnetworkconnection.
z View:viewparametersoftheselectednetworkconfiguration.
z Edit:editparametersoftheselectednetworkconfiguration.
z Delete:deleteanetworkconfigurationentry.
Entertainment
ThephonesupportsvariousfunctionsenabledbyJAVA™applications.
Youcandownloadthegamesfromthenetworktoinstallanduse.
ToaccesstheENTERTAINMENTmenu,selecttheCENTRALKEYfromthe
homescreenandselecttheENTERTAINMENTicon.

26
Pleaseinstallandusethosereliably‐originatedapplicationprogramsand
software.Thesoftwaredevelopermustbecapableofprovidingessential
securityprotectionagainstthepotentialofvirussoftware.
DownloadApplicationSoftware
1. Operationpath:Mainmenu>Entertainment.
2. SelectOPTIONandselectDOWNLOAD
3. TypeintheURLthatyouwishtodownloadfromandselectCENTRAL
KEY.ThedevicewilllinktothewebpageoftheURLtocompletethe
download.
4. Afterthedownloadhascompleted,thephonewilldisplayaprompt
askingyoutoconfirminstallation.SelectYES.
5. Thephonewillbegintoinstalltheapplicationsoftware.
6. Ifthedownloadfails,thephonewillprovideinformationaboutthe
reason,suchas:memoryshortage,userinterruption,interruptionfor
networkswitch.
InstallApplicationSoftware
1. Mainmenu>Entertainment.
2. SelectOPTIONandselectGOTOJAVA.
3. Selecttheapplicationsoftwareyouwishtoinstallandselectthe
CENTRALKEYtobegintoinstallation.
4. Thescreenwilldisplaytheinstallationprogress
5. Todeletetheapplicationsoftware,youcanselectOPTIONandselect
DELETE.
6. Toviewinformationregardingtheapplication,selectOPTION,then
selectDETAILS.
RunApplicationSoftware
1. Mainmenu>Entertainment.
2. Torunapplicationsoftware,selecttheCENTRALKEY
OptionMenuofJAVAApplicationList:
z Download:inputthedownloadURL.Thephonewilllinkto

27
theURL.
z GotoJava:opentheMyStufftoviewthedownloadsoftware
listsavedinthephone.
z Delete:deletetheapplicationsoftware.
z AccessPoint:setupthenetworkconfiguration.
z Details:viewtheapplicationsoftwaredata.
Camera
Youcantakepicturesandrecordvideosbyusingthecamerafunctioninthe
phone.
ThephotosandvideoscapturesonthephonewillbesavedinJPG,3GP,
MP4and3G2formats.
ToaccesstheCAMERAmenu,selecttheCENTRALKEYfromthehomescreen
andselecttheCAMERAicon.
CameraFunctions
TakingPhotos
1. Mainmenu>Camera.
2. TotakepicturesselecttheCENTRALKEY.Thedevicewill
automaticallysavethecapturedpicturesintheMyStufffolder.
3. Todeletethepicture,selectOPTIONandDELETEunderthepreview
status.
4. SelectCENTRALKEYtoreturnbacktheviewfinder
5. Toviewyourpictures,selectOPTIONandPHOTOALBUM
6. SelecttheCENTRALKEYtoopenthealbumwithpictures
7. Toquitoutthecamerafunction,selectBACKtoreturntothemain
menu.
Camerasettings
1. Tousetheautomatictimerselect:Mainmenu>Camera>Option>
Countdown>/3 sec./5sec./10sec.
2. Tosetspecialeffectsforthepictureselect:Mainmenu>Camera>
Option>Effect.ChoosefromBlack/White/Negative/Sepia/Aqua
28
3. Toadjustthesettingsonthecameraselect:Mainmenu>Camera>
Option>Settings.FromhereyoucanadjusttheShuttersound,Quality,
Imagesize,Whitebalance,Anti‐Banding,Nightmode,Photodefault
name.
OpenOptionMenubySelectingOPTIONunderView‐selectingStatusof
Camera:
z Tocamcorder:switchtothevideocamera.
z Photoalbum:switchtoMyAlbumorMystuff.MyAlbumisa
folderforstoringpictures.
z Countdown:thefunctionofself‐timerincludesClose/3Sec/5
Sec/10Sec,self‐timercloseissetindefault.
z Effect:Close/Blackandwhite/Negative/Sepia/Aqua,special
effectcloseissetindefault.
z Framemode:youcanselectdifferentframestoscreen.
z Settings:youcansetuptheShuttersound,Quality,Imagesize,
Whitebalance,Anti‐Banding,NightmodeandPhotodefault
name.
9 Shuttersound:Sound1/Sound2/Sound3,“Sound1”is
setindefault.
9 Quality:Middle,High,Low,Middleissetindefault.
9 Imagesize:manykindsofResolutiontochoose,
240X320issetindefault.
9 Whitebalance:Auto,Tungsten,Fluorescence,Daylight,
Cloudy,Autoissetindefault.
9 Anti‐Banding:50Hz/60Hz,50Hzissetindefault.
9 Nightmode:Open/Close,Closeissetindefault.
9 Photodefaultnameofpicture:Image.
z Savelocation:thestoragepositionforscreenedphotos.The
optionisphone/Memorycard.Thephoneissetindefault.
z Memorystatus:displaysthecurrentmemoryused.The
displaycontentsareusedspace/totalspaceandclassifiedas
phoneandexternalmemorydisplay.

29
VideoFunctions
Withthecamera/camcorderfeatureyoucanrecordthevideoswiththe
optiontostore,vieworsendthevideofiles.
Recordingavideo
1. Mainmenu>Camera.
2. SelectOPTIONandselect“Tocamcorder”whichwillopenthe
camcorderwindow.
3. SelecttheCENTRALKEYtostartthevideo.
4. SelecttheCENTRALKEYtopauseandresumethevideorecord.
5. SelecttheDOWNNAVIGATIONKEYtoendthevideorecording.The
phonewillautomaticallysavetherecordedvideototheMyStufffolder
andandreturnbacktothevideostandbystatus.
6. ToviewthevideoselectOPTIONinthecamecordermenuandselect
VIDEOALBUM
7. SelecttheCENTRALKEYtoopenthevideo.
8. Toquitthevideofunction,selectBACKtoreturntothemainmenu
Videosettings
1. Mainmenu>Camera>Option>Tocamcorder
2. Tosetthevideocolour,select:Option>Effect>Close/Blackand
white/Negative/Sepia/Aqua.
3. Toadjustthesettingsofthecamcorderselect:Option>Settings.
TheseincludeQuality,Imagesize,Whitebalance,Recordsound,
Videotype,Recordtimelimit,Anti‐Banding,Nightmode,Video
defaultname
OpenOptionMenubySelectingOPTIONunderView‐selectingand
ScreeningStatus:
z Tocamera:switchtothescreeningmodeofcamera.
z Videoalbum:switchtoVideoinMyStuff,thestoragefolder
forscreeningfilmwillbedefaultedas“video”.
z Effect:Close/Blackandwhite/Negative/Sepia/Aqura,Closeis

30
setindefault.
z Settings:Quality,Imagesize,Whitebalance,Recordsound,
Videotype,Recordtimelimit,Anti‐banding,Nightmodeand
Videodefaultname.
9 Quality:Middle,Low,High,Middleissetindefault.
9 Imagesize:176X144,128X96,176X144issetindefault.
9 Whitebalance:Auto,Tungsten,Fluorescence,Daylight,
Cloudy,Autoissetindefault.
9 Recordsound:Close/Open,Openissetindefault.
9 Videotype:3GP,MP4and3G2,MP4issetindefault.
9 Recordtimelimit:1minute/5minutes/15minutes/60
minutes,60minutesaresetindefault.
9 Anti‐banding:50Hz/60Hz,50Hzissetindefault.
9 Nightmode:Close/Open,Closeissetindefault.
9 Videodefaultname:Video.
z Savelocation:thestoragepositionforscreenedvideos.The
optionisphone/memorycard.Thephoneissetindefault.
z Memorystatus:displaythestatusmemoryused.
SendPicturesandVideos
SendPictureviaMMSorE‐mailorBluetooth
1. Mainmenu>Camera.
2. SelectOPTIONtoopenphotoalbum.
3. YoucanselecttherequiredpicturesinalbumthenselectOPTIONto
selectSEND>viaMMS/Email/Bluetooth.
4. Select“viaMMS/Email”thephonereturnstheeditingwindowofMMS
orE‐mail.YoucaninputthemessageofaddresseeandselectCENTRAL
KEYtoconfirmthesendingundertheeditingwindowofaddressee.
5. Select“viaBluetooth”thephonereturnsthepaireddevicelist.Youcan
selectthetargetdevicetosend.
SendVideoviaMMSorE‐mailorBluetooth
1. Mainmenu>Camera.
2. SelecttocamcorderandselectOPTIONtoopenVideoalbum.

31
3. YoucanselecttherequiredvideoinvideoalbumthenselectOPTIONto
selectSend>viaMMS/Email/bluetooth.
4. Select“viaMMS/Email”thephonereturnstheeditingwindowofMMS
orE‐mail.YoucaninputthemessageofaddresseeandselectCENTRAL
KEYtoconfirmthesendingundertheeditingwindowofaddressee.
5. Select“viaBluetooth”thephonereturnsthepaireddevicelist.youcan
selectthetargetdevicetosend.
StorageSettings
SetupStoragePositionofPictures
1. Mainmenu>Camera.
2. SelectOPTIONandSAVELOCATION
3. SelectifyouwanttostoretothePhoneorMemorycard.
SetupStoragePositionofVideos
1. Mainmenu>Camera.
4. SelectOPTIONandthenselectTOCAMCORDERandselectOK.
5. SelectOPTIONandthenSAVELOCATIONthenselectifyouwantto
storetothePhoneorMemorycard.
Messages
YoucanusetheMessagesmenutosendandreceiveSMS,MMSandE‐mail.
ToaccesstheMESSAGESmenuselecttheCENTRALKEYfromthehome
screenandselecttheMESSAGESicon.
SMS(Text)Messages
CreateandSendMessage
1. Mainmenu>Messages>SMS>New.
2. ComposethemessageandselectOPTIONandSEND
3. Typetherecipient’smobilenumberorselectCENTRALKEYtochoosea
numberfromyourcontacts.SelectOKwhenyouhaveaddedall
recipients
4. SelecttheCENTRALKEYtosendthemessage.
32
OptionMenuofEditingTextmessage:
z Send:sendthecompletedTextmessage
z Insert:insertapresetmessage,awebsiteoradditional
contactswheneditingthecurrentText message.
z Savetodraft:savethecurrentlyeditedTextmessageinto
draftbox.
z Inputmode:changethetextinputmode.
z Insertsymbol:Insertsymbol.
z Inputsettings:changetheinputmodeforallmessages.
ViewReceivedMessage
1. Mainmenu>Messages>SMS>Inbox.
2. Selectthemessageyouwishtoview
OptionMenuafterSelectingInbox:
z Reply:replythecurrentTextmessagebySMS/MMS.
z Forward:forwardthecurrentTextmessage.
z Delete:deletethecurrentTextmessageorselectedText
message.
z Deleteall:clearuptheTextmessageininbox.
z Batchtocopy:CopytheselectedmessagetoPhone/USIM
z Batchtomove:MovetheselectedmessagetoPhone/USIM
z Call:callthenumberofcurrentmessagesender.
z Viewmode:displaythemessageinthemessage‐receivinglist
bydateandsubject.
z Details:displaytheattributeinformationofthecurrent
message.
OptionMenuforViewingTextmessageContents:
9 Reply:replythecurrentTextmessagebySMS/MMS.
9 Forward:forwardthecurrentTextmessage.
9 Delete:deletethecurrentTextmessage.
9 Call:callthenumberofcurrentmessageaddresser.
9 Extract:abstractthephonenumber/URL/E‐mailinthe
33
messagecontents.
9 Movetomobile/USIMcard:movetheText messageto
thephone/USIMcard.
9 Copytomobile/USIMcard:copytheTextmessageto
thephone/USIMcard.
ViewMessageFailedinSending
1. Mainmenu>Messages>SMS>Outbox.
2. SelectthemessageyouwishtoviewandselectCENTRALKEYtoview
thedetails..
OptionMenuofOutboxMessage
z Resend:resendaselectedmessage.
z Delete:deleteordeleteabatchtheselectedSMS.
z Deleteall:clearupthecurrentoutbox.
z Viewmode:displaythemessageinthemessage‐sendinglist
bydateandsubject.
z Details:addressee,timeandtype.
OptionMenuforViewingUnsentMessage:
9 Resend:resendaselectedmessage.
9 Delete:deletetheselectedSMS.
9 Call:callthecurrentmessageaddressee.
9 Extract:phonenumber,websiteandE‐mail.
ViewSentMessage
1. Mainmenu>Messages>SMS>Sentbox.
2. SelectthemessageyouwishtoviewandselectCENTRALKEY.
OptionMenuforSentMessage:
z Forward:forwardthecurrentsuccessfully‐sentmessageto
otherperson.
z Delete:deletethecurrentselectedmessageorthewhole
messagelist.
34
z Deleteall:clearupthecurrentsentbox.
z Call:callthenumberofcurrentmessageaddressee.
z Viewmode:displaythemessageinthesentmessagelistby
dateandsubject.
z Details:addressee,timeandtype.
View/EditDraftMessage
1. Mainmenu>Messages>SMS>Draftbox.
2. Tocontinueeditingadraft,selectthemessagetoopenit.
3. WhenyouhavecompletedtheeditingselectOPTIONandSENDwhich
willpromptyoutoselectthenumberoftherecipient(s)
OptionMenuafterSelectingDraftBox:
z Send:sendthecontentofdraftboxtothecontacts,ifthereis
noaddressee,youcanjumptotheaddresseditingwindowof
addressee.
z Delete:deletethecurrentselectedmessageorthewhole
messagelist.
z Deleteall:clearupthecurrentdraftbox.
z Viewmode:displaythemessageinthedraftlistbydateand
subject.
z Messagedetails:addressee,timeandtype.
CellBroadcast
AfteryoulaunchCellBroadcastservice,themessagewillbesentaccording
thelocalarea’sconditions.Youwillfeelthatallmessagesaretogetherwith
youwhenyoureceivetheCellBroadcastservice.
MessageTempl ates
Editthecommonly‐usedtextmessagetemplatesinadvanceforyour
convenience.
Thephonecanstore10texttemplates.
1. Mainmenu>Messages>SMS>Templates.
2. Toeditexistingtemplates,selectCENTRALKEY.

35
3. TocreateanewtemplateselectOPTIONandthenNEW
4. TypeinthecontentofthemessagetemplateandselectCENTRALKEY
tosave.
OptionMenuwhenthePresetMessageTem plates Entryisnotfull:
z Send:sendthepresetcommonly‐usedSMStothecontacts.
z New:createthecommomly‐usedSMS.
z Delete:deleteordeleteabatchtheselectedcommonly‐used
SMS.
z Deleteall:clearuptheSMStemplates.
OptionMenuwhenthePresetMessageTem plates Entryisfull:
z Send:sendthepresetcommonly‐usedSMStothecontacts.
z Delete:deleteordeleteabatchtheselectedcommonly‐used
SMS.
z Deleteall:clearupallcommonly‐usedSMS.
TextmessageSettings
1. Mainmenu>Messages>SMS>Settings>Textmessage>Setting/Send
settings/Defaultstorage.
2. SelectsettingentryandinputtherelevantparametersofSMSaccount,
Sendingparametersanddefaultstorage.
Voicemailsettings
SelecttosaveaftertypingVoicemailnumber.
Multimediamessages(MMS)
CreateandSendMMS
TheMultimediamessagingfeaturerequiresthesupportofnetwork.
Multimediamessagesmayincludetext,pictures,photos,audioandvideo.
Defaultparametersareset,howeveradditionalsettingscanbe
user‐controlled.
TochangeMMSparameters:
1. Mainmenu>Message>MMS>Setting.
36
2. Settherelatedparametersaccordingtotheinformationofferedby
networkserviceproviderandpersonalpreference,including:MMS
centerlifetime,Priority,Reportallowed,Deliveryreport,Readreport,
Admitad,Admitanonymity,Deliverysizelimit,Receptionsizelimit
andNetworksettings
CreateandSendaMultimediaMessage(MMS)
1. Mainmenu>Messages>MMS>New.
2. Enterthesubjectofthemessage
3. Scrolldownandcomposethetextportionofthemessage
4. ScrolldownandselectCENTRALKEYtoattachpictures,videosand
sounds
5. SelectthemultimediafromthefolderandselectCENTRALKEYto
attach
6. SelectOPTIONandSEND
7. Typetherecipient’smobilenumberorselectCENTRALKEYtochoosea
numberfromyourcontacts.SelectOKwhenyouhaveaddedall
recipients
8. SelectCENTRALKEYtosendthemessage
EditaMultimediaMessage(MMS)
1. ToaddadditionalcontenttotheMMSmessage,select:OPTION>Add
page.
2. TopreviewtheMMSmessage,select:OPTION>Preview.
3. TosavetheeditedMMSasaMMStemplatesselect:Option>Saveas
MMStemplate.
4. TosavetheeditedMMStodraftbox,select:Option>Savetodraft.
5. Afterediting,select:Option>Send.
OptionMenuforEditingMMS:
z Send:sendthecomposedMMScontents
z Preview:previewtheeditedMMS.
z Slidetime:setuptheintervalofslideplayingtime.
z Addpage:addaneditedpageintheMMS.
37
z Savetodraft:savetheeditedMMStodrafts.
z SaveasMMStemplate:savetheeditedMMSintothephone
asMMStemplate.
ViewMultimedia
1. Mainmenu>Messages>MMS>Inbox.
2. SelectthemessageyouwishtoviewandselectCENTRALKEY.
OptionMenuforViewingMissedMMS:
9 Retrieve:downloadMMScontents.
9 Delete:deleteordeleteabatchoftheselectedMMS.
9 Deleteall:clearuptheMMSininbox.
9 Viewtype:arrangetheMMSsequenceby
date/subject.
9 Details:displaythecurrentattributeinformationofthe
currentMMS,includingsender,date,timeandtype.
OptionMenuforViewingReceivedMMS:
9 Reply:replythecurrentsenderoftheMMS.
9 Forward:forwardthecurrentMMStoothercontacts.
9 Call:callthecurrentMMSsender.
9 Extractobject:savethevideo,audio,imageand
applicationtothefolder.
9 Extract:abstractthephonenumber,URLandEmail.
9 Delete:deletetheselectedMMSintheinbox.
9 Details:displaythecurrentattributeinformationofthe
currentMMS,subject,sender,recipient,time,priority
andsize.
Viewthefailed‐sentMMS:
1. Mainmenu>Messages>MMS>Outbox.
2. SelectthemessageyouwishtoviewandselectCENTRALKEYtoview
theMMSdetails.
38
OptionMenuforOutboxMessage:
z Resend:resendtheselectedMMS.
z Delete:deleteordeleteabatchtheselectedMMS.
z Deleteall:clearupthecurrentoutbox.
z Viewmode:displaytheMMSinthemessage‐sendinglistby
dateandsubject.
z Details:subject,addressee,time,priorityandsize.
OptionMenuforviewingUnsentMMS:
9 Resend:resendtheselectedMMS.
9 Delete:deletetheselectedunsentMMS.
9 Details:viewaddressee,timeandtypeofMMS.
ViewSentMMS
1. Mainmenu>Messages>MMS>Sentbox.
2. SelectthemessageyouwishtoviewandselectCENTRALKEYtoview
theMMSdetails.
OptionMenuforSentMMS:
z Forward:forwardthecurrentsentMMStoothercontacts.
z Delete:deletethecurrentorthebulkdelete.
z Deleteall:clearupthecurrentsentbox.
z Call:callthecurrentMMSsendernumber.
z Viewmode:displaythesentlistofMMSbydateandsubject.
z Details:subject,addressee,time,priorityandsize.
View/EditDraft
1. Mainmenu>Messages>MMS>Draftbox.
2. SelectthemessageyouwishtoviewandselectCENTRALKEYtoview.
Tocontinuetoeditmessageindraftbox,selecttheCENTRALKEY.
3. Afterselectingtheeditingentryandfinishingtheediting,select
OPTIONandSENDwhichwillpromptyoutoenterthenewnumberof
therecipient.
4. SelectCENTRALKEYtosendthemessage.
39
OptionMenuafterSelectingDraftBox:
z Send:sendthedrafttothecontacts
z Delete:selecttodeletethecurrentselectedMMSorthe
wholeMMSlist.
z Deleteall:clearupthecurrentdraftbox.
z Viewmode:displaythemessageofdraftlistbydateand
subject.
z Details:subject,addressee,time,priorityandsize
MMSTem pla te
Editthecommonly‐usedtemplatesinadvanceforyourconvenience.
1. Mainmenu>Messages>MMS>Templates.
2. Toeditexistingtemplates,selectCENTRALKEY.
3. TypeinthecontentofthemessagetemplateandselectCENTRALKEY
tosave.
OptionMenuforMMSTemplates Entry:
z Send:sendtheMMStemplatestothecontacts.
z Delete:deleteordeleteabatchoftheselectedMMS
templates.
z Deleteall:clearupMMStemplates.
MMSSetting
1. Mainmenu>Messages>MMS>Settings.
2. Selectthesettingyouwishtomodify,including:MMScenterlifetime,
Priority,Reportallowed,Deliveryreport,Readreport,Admitad,Admit
Anonymity,Deliverysizelimit,ReceptionsizelimitandNetwork
settings.
Memorystatus
Displaythecurrentstatusofstorage.

40
Email
SettingupanEmailAccount
1. SelectCENTRALKEY>Messages>Email>Settings
2. SelectEMAILACCOUNTSandNEW
3. Enteryouremailsettings,including:Accountname,Myaddress,Save
copy,Username,Password,Receiveserver,Sendserver,Receiveport,
Sendport,Auth.type,SMTPauthentication,UseSSLandData
account.
4. SelectSAVE
ReceivingandViewingEmailMessages
Whenyourphonereceivesanewemailmessage,thepromptringtonewill
soundorvibrateandthemessageiconwilldisplayinthescreen.
1. Toviewthenewmessage,selectVIEWwhenthenewmessage
promptdisplaysinthescreen.
2. Toviewthemessageinyourinboxselect:CENTRALKEY>Messages>
Textmessage/Multimedia/E‐mail>Inbox.
3. ScrolltothemessageyouwishtoviewandselectCENTRALKEYto
viewthemessage.
4. Todeletethemessage,selectOPTIONandselectDELETEwhile
viewingthecurrentmessage.
CreateandSendEmail
1. Select:CENTRALKEY>Messages>Email>New.
2. Scrolltothesubjectlineandenterthesubject
3. Scrolltothetextsectionandcomposethemessage
4. ToaddanattachmenttoyourE‐mail,select:Option>Addattachment.
5. ToinsertacontactcardintotheE‐mail,select:Option>AddvCard.
6. TosaveadraftofanE‐mailinthedraftsfolder,select:Option>Saveto
draft.
7. Afteryouhavefinishedediting,select:Option>Send.
8. Youcaninputtheaddressofcontactsorselecttheaddressofcontacts
fromtheContacts.
41
9. TouseCCorBCC,select:Option>Changesendmode>To/CC/BCC.
10. SelectSendtheE‐mail..
OptionMenuforEditingEmail:
z Send:sendthecomposedE‐mailcontents
z Addattachment:selecttheAddFilefromtheMyStuff.
z AddvCard:selectandaddcontactinfofromtheContacts.
z Savetodraft:savethecomposedE‐mailinthedraft.
ViewReceivedEmail
1. Mainmenu>Messages>Email>Inbox.
2. SelecttheEmailyouwishtoview,andselectCENTRALKEYtoview.
OptionMenuforViewingEmailList:
9 Reply:replytosenderofthecurrentE‐mail.
9 ReplyAll:replytoallsendersandcopy‐topersonsof
thecurrentE‐mail.
9 Forward:forwardthecurrentE‐mailtoothercontact.
9 Retreivebody:downloadanintegralE‐mailcontent.
9 Markasunread/read:marktheE‐mailas
read/unread.(downloadedE‐mail)
9 Retreivenew:viewandreceivethenewE‐mail.
9 Delete:deleteordeleteabatchtheselectedE‐mail.
9 Deleteall:clearuptheE‐mails.
9 Viewmode:displaythemailofmaillistbydateand
subject.
9 Details:displaythemaildata.
Viewfailed‐sentEmail
1. Mainmenu>Email>Outbox.
2. SelectthemessageyouwishtoviewandselecttheCENTRALKEYto
view.
42
OptionMenuforOutboxMessage:
z Resend:resendtheselectedmail.
z Delete:deleteordeleteabatchtheselectedE‐mail.
z Deleteall:clearupthecurrentoutbox.
z Viewmode:displaythemailofmail‐sendinglistbydateand
subject.
z Details:from,subject,time,size,to,priority,attachment.
OptionMenuofViewingunsentE‐mail:
9 Resend:resendtheselectedmail.
9 Delete:deletethecurrentemail.
9 Extract:extractnumber,URL,mailaddressfromthe
content.
ViewSentE‐mail
1. Mainmenu>Messages>Email>Sentbox.
2. SelectthemessageyouwishtoviewandselectCENTRALKEYtoview
OptionMenuforSentE‐mail:
z Forward:forwardthesentE‐mailtoothercontact.
z Delete:deleteordeleteabatchtheselectedE‐mail.
z Deleteall:clearupthecurrentsentmail.
z Viewmode:displaythemailofmail‐sendinglistbydateand
subject.
z Details:from,subject,time,size,to,priority,attachment.
OptionMenuforViewingSentEmail:
9 Forward:forwardthesentE‐mailtoothercontact.
9 Delete:deleteordeleteabatchtheselectedE‐mail.
9 Attachmentlist:viewthedetailedlistinattachment.
9 Extract:extractnumber,URL,mailaddressfromthe
content.
9 Details:from,subject,time,size,to,priorityand
attachment.
View/EditDraft

43
1. Mainmenu>Messages>Email>Draftbox.
2. Tocontinuetoeditmessageindraftbox,selectthedraftentryand
selectCENTRALKEYtoedit
3. SelectOPTIONandSENDtosendtheemail
OptionMenuafterSelectingDraftBox:
z Send:ifthereisnoaddressee,youcanjumptotheaddress
editingwindowofaddressee.
z Delete:deletethecurrentorthebulkdelete.
z Deleteall:clearupthecurrentdraftbox.
z Viewmode:displaythedraftlistbydateandsubject.
z Details:from,subject,time,size,to,priority,attachment.
EmailSetting
1. Mainmenu>Messages>Email>Settings>Generalsettings/Email
accounts/About.
z Generalsettings:Youcanselectthesettingentryandinput
theEmailparametersincluding:persentmail,perreceived
mail,onlyreceiveheaders,AutoreceiveandReceiveauto
timer.
z Emailaccounts:Select“New”.Youcanselectthesettingentry
andinputtheEmailparametersincluding:Accountname,My
address,Savecopy,Username,Password,Receiveserver,
Sendserver,Receiveport,Sendport,Auth.type,SMTP
authentication,UseSSLandDataaccount.
z About:DisplaytheACCESSVersion.
Contacts
Withthecontactsfeature,youcanmanagetheinformation,suchascontact
phonenumberandaddressandyoucansetupthepersonalringtoneand
incomingcallimageorsendthev‐Cardtothecontacts.
ToaccesstheCONTACTSmenuselecttheCENTRALKEYfromthemain
menuandselecttheCONTACTSicon.

44
SetupContactsView
ViewingContacts
1.Mainmenu>Contacts.
2.ViewcontactsstoredonthePhone,the(U)SIMcardorALL
CreateandEditContacts
CreateaNewContact
1. Mainmenu>Contacts
2. SelectOPTIONStoselectNEW.
3. SelectPhoneorUSIMcardtodeterminewherethecontactshouldbe
storedbyscrollingleftandright.
4. ScrolldowntoNAMEandselecttheCENTRALKEYtocontinue
5. Enteratleastonephonenumberforthecontactandselectthe
CENTRALKEYtosave.
6. Ifstoringacontacttothephoneyoucansavethefollowingdata:Name,
Mobilenumber,Homenumber,Number,Numbertype,Group,E‐mail,
URL,Birthday,Ringtone,ImageandNotes
7. IfstoringacontacttotheUSIMcard,youcansavethenameand
number.
EditaContact
1. Mainmenu>Contacts.
2. SelectthecontactentryandselectOPTIONandselectEDITand
OK.
3. Ifthedataofthecontactissavedinthephone,thecontents
thatcanbeeditedinclude:name,mobilenumber,other
numbers,numbertype,group,E‐mail,URL,birthday,ringtone,
imageandnotes.IfthedataofcontactssaveinUSIMcard,the
contentswhichcanbeeditedarenameandnumber.
DeleteaContact
Deletethedataofcontactsindividuallyorinabatch.
1. Mainmenu>Contacts.
45
2. SelectthecontactentryandselectOPTIONandDELETE
3. SelectthedeletionmodeandselectOK.
4. Ifselectingthemode“batchtodelete”,youcanusethe
CENTRALKEYtoselectdeletionitems
5. SelectOPTIONandDELETE,thenselectOKtoconfirm.
AssignaRingtoneandImageforaContact
Onlycontactsstoredinthephone’smemorysupportthisfeature.
1. Mainmenu>Contacts.
2. SelectacontactandselectOPTIONandEDIT.
Selecttheringtoneorimage,andthenselecttheCENTRALKEYtoopenthe
folder,selecttherequiredfiles.
OptionMenuwhenatNewly‐addedStatus:
9 Save:savethecurrently‐setmessageofanewcontact.
9 Addnumber:addtheoptionforacoupleofnumbers
includingphonenumbereditingandphonenumber
typeselecting.
9 Addcompany:addthecompanynameitemwhichcan
beedited.
9 Addjobtitle:addthepostitemwhichcanbeedited.
SearchContact
ThephonesupportsalphabeticsearchinEnglish.Contactswillbeordered
alphabeticallystartingwiththefirstletterofthename.
1. Mainmenu>Contacts.
2. Searchacontactandphonenumberbythealphabetic
sequence.
3. Tosearchthemessageentriesbythegroup,selectRIGHT
NAVIGATIONKEYtoopenthegroupfolder.Selectgrouptype,
andselectCENTRALKEYtoopenthecontact’slistunderthe
group,andthensearchthesequence.
4. Todoaquicksearchincontactsinputseverallettesfromthe
46
contactsname.
OptionMenuunderContactsStatus:
z Call:calltheselectedcontactbyvoicecall.
z Sendmessage:editSMSorMMS.
z New:createthemessageofcontactincontacts.
z Edit:editthemessageofthecurrentcontactincontacts.
z Delete:deletethecurrentselectedcontactsordeleteabatch
theselectedcontacts.
z CopytoUSIM/mobile:supportthecopybetweenUSIMcard
andphonemutually,copythecurrentrecord/copyabatch
selectedrecords.
z Contactsdisplay:selectthecontactstodisplayphone/USIM
card/All.
z Send:sendthedataofcurrentcontactby
SMS/MMS/E‐mail/Bluetooth.
z Memorystatus:displaythecontactsvolumeofUSIMcardand
thephone.
z Settings:setupmybusinesscard/Speeddial/Blacklist/Fixed
dial.
9 Mybusinesscard:presettoedittheself‐message.
9 Speeddial:supporttosetupthenumerickeyof
keyboardtoQuickDialKeyofcontactnumberin
contacts.Underthestandbystatus,pressandholdthe
numerickey1isdialingthevoicemail.
9 Blacklist:savethecontact’snumberofphoneinto
incomingcallfilterlist,thephonewillrefusethe
incomingcallofthiscontact.
9 Fixeddial:setupthecontact’snumberasfixed
numberandafterthroughconfirmingofPIN2and
launching,thephonejustsupportstodialthenumbers
infixeddiallist.

47
ManageGroup
Organizeandclassifythecontactdataaccordingtothetypeofthecontact.
ManageGroup
1. Mainmenu>Contacts.
2. SwitchtothegroupbyselectingRIGHTNAVIGATIONKEY.
3. SelectgroupnameandselecttheCENTRALKEYtoenterintothecall
entrylistunderthecurrentgroup.
4. Thegroupcontactsentryarealphabeticallyordered.Youcanquickly
searchtherequiredcontact’snameandphonenumberbytypinginthe
contact’sname.
OptionMenuofPredefiningGroup:
z Edit:editrelevantdataforcurrentgroup,includinggroup
name,groupringtoneandgroupimage.
z New:createthegroup.
OptionMenuofCustomizingGroup:
z Edit:editrelevantdataforcurrentgroup,includinggroup
name,groupringtoneandgroupimage.
z New:createthegroup.
z Delete:deleteacurrently‐selectedgroup.
Businesscards
Createabusinesscard
1. Mainmenu>Contacts.
2. SelectOPTIONandselectSETTINGS.
3. SelectMYBUSINESSCARDandselecttheCENTRALKEYtoopenthe
businesscardsettingwindow.
4. Selecttheinputentriesandinputthepersonalinformationinorder,
includingname,mobilenumber,homenumber,number,numbertype,
E‐mail,URL,birthday,myphotoandnotes.

48
SendMybusinesscardthroughContacts
1. Mainmenu>Contacts.
2. SelectOPTIONandselectSETTINGS
3. SelectMYBUSINESSCARDandselecttheCENTRALKEYtoopenthe
businesscardmessagewindow.
4. SelectSENDtoselectthesendingmodeandselectOK.
5. Thephonewillopenthemessageeditingwindowandaddbusiness
cardinmessage.
6. Afterfinishingmessageediting,youcanselctOPTIONandSEND,
followedbyOK.
7. InputtheaddressoftherecipientandselecttheCENTRALKEYtosend.
MemoryStatus
ViewMemoryStatus
1. Mainmenu>Contacts.
2. SelectOPTIONandselectMEMORYSTATUS.
3. Memorystatusexistsintwoplaces;thephoneandUSIMcardwhich
displaystheusespace/totalspace.
Tools
ThetoolsmoduleincludesAlarm,Notes,Calculator,Recorder,Stopwatch,
E‐book,Unitconvert,Worldtime.
AccesstheTOOLSmenubyselectingtheCENTRALKEYfromthemainmenu
andselecttheTOOLSicon.
AlarmClock
Youcansetthealarmclockforaspecifictimeandcanactivatethealarm
clockwitharecurringdate.Thetonefunctionofalarmclockwillbeaudible
whenyousetthephoneatmuteorturnthephoneoff.
ActivateAlarmClock
1. Mainmenu>Tools>Alarm
2. Thephonesupportsthreealarmclocksettings;scrolltothedesired
settingandselecttheCENTRALKEYtoaccessthesettingspageofthe

49
alarmclock.
3. InputthetimeforthealarmandselectSAVE.
4. Tore‐activateanalarmwhichhasbeenturnedoff,scrolltothealarm
andselectON
Notes
YoucanrecordtherelevantissueswithNotes
NotesUsage
1. Mainmenu>Tools>Notes.
2. SelectNEWtoenterintotheeditboxtoedit
3. SelectCENTRALKEYtosavethenote.
Calculator
Thephonesupportsthesimplecalculatorfunction,includingaddition,
subtraction,multiplicationanddivisionoperations,radicalsignoperation,
storageoperationandoperationnumberreverse.
CalculatorUsage
1. Mainmenu>Tools>Calculator.
2. Thecalculatorwilloperateaccordingtotheinputorder.Andthe
resultwilldisplayintheinputarea.
Recorder
Thephonesupportsrecordandplayfunctions.
RecorderUsage
1. Mainmenu>Tools>Recorder.
2. Toactivatetherecorder,selecttheCENTRALKEY
3. TopauserecordingselecttheCENTRALKEY.
4. Toendtherecording,selecttheDOWNNAVIGATIONKEYandthe
phonewillstoretherecordedfileintoMyStuffautomatically.
5. Afterfinishingtherecording,youcanusetheUPNAVIGATIONKEYto
playtherecordedfile.

50
OptionMenuunderRecorderStatus:
z Recordfolder:turntothepageofrecordfoldertoplayor
viewthespecificmessageofrecordfolder.
z Settings:setupthestoragepositionofrecordfile,nameof
fileissetindefaultandtherecordtimeislimited.
z Delete:deletetherecordfile(s)
z Rename:renamethecurrentfile
z Send:sendthecurrentrecorderfileVia
MMS/Email/Bluetooth.
Stopwatch
YoucanusetheStopwatchfunctionfortiming.
Sequencetiming
1. Mainmenu>Tools>Stopwatch>Sequencetiming.
2. SelectCENTRALKEYtostarttiming,
3. DuringtimingselectCENTRALKEYagaintosavethistiming.
SelectLSKwillendandinitialthestopwatch.
SelectRSKtostoptiming.
4. Whenstoped:SelectLSKtodeletecurrentrecordandinitializethe
stopwatch.
SelectBACKtosavetherecordandexittiming
E‐book
ThePhonesupportsTXTfiles.
E‐bookUsage
1. SaveTXTfilesunderthefolderof“Others”fromMyStuff
2. Mainmenu>Tools>E‐book
3. SelecttheE‐bookfileyouwanttoviewandpressCENTRALKEYto
readit.
E‐bookmenuOptions:
z BookMarker:Gotobookmarklisttomanagebookmark(s).
z Find:Findthespecifictext

51
z Goto:Gotospecificpageofebook.
z Autoscroll:Settheautoscrollbyline/pageoroff.
z Encode:Settheencodemode.
Unitconvert
UsethisfeaturefortheconvertedunitsofArea,Energy,Length,Quality,
Power,Pressure,Temperature,Time,Speed,Volume,andCurrency.
WorldTime
Thephonesupportsthedisplayoftimefromcitiesindifferenttimezones
SearchCityInfoviaFocusingonMap
1. Mainmenu>Tools>WorldTime.
2. SearchcityinfoviatheNAVIGATIONKEYStofindthedesiredtime
zone.
3. Thecityname,mapposition,localcitytime,timezoneandday&
nightstatuswillbedisplayedonthewindow.
QuicklySearchCityviaCityName
1. Mainmenu>Tools>WorldTime.
2. SelectCENTRALKEYtoopenaquicksearchingwindoworuse:
OPTION>Quicksearch.
3. InputthefirstletteroftheCityandusetheUP/DOWNNAVIGATION
KEYStoscrollthelistandfindthecity.
4. SelectOKtoselectthecity.
5. Thephonewilldisplaythecitypositioninthemap,localdate,time,
timezoneandsummertimestatus.
SetLocateZone
1. Mainmenu>Tools>WorldTime.
2. Selectacitybyeitherthemaporviathequicksearch.
3. SelectOPTIONandselectSETLOCATEZONEandselectOK.
4. Thephonewillsetuptheselectedcitytimeaslocalcitytime.

52
SetSummerTime
1.Mainmenu>Tools>WorldTime.
2.Selectarequiredcityinmaporquicksearchway.
3.SelectOPTIONtoselectSUMMERTIME.
4.SelectaSUMMERTIMEstatusandthensave.
OptionMenuofTimeZoneDisplay:
z Quicksearch:youcanquicklysearchtherequiredcityby
inputtinginitialletterofthenameofcity.
z Summertime:launchorclosesummertime.
z Setlocatezone:setupthetimeofselectedcitytolocaltime.
Multimedia
Multimediaincludesmusicplayer,videoplayerandFMradio.
Musicplayer
ThemusicfileformatsupportedbyMusicPlayerincludesAMR,AAC,MP3,
WAV,IMY,MID,MIDIandMMF.
Editplaylist
1. Menu>Multimedia>Musicplayer>Playlist.
2. SelectOPTIONandNEWtocreatetheplaylist.
3. Intheplaylistswindow,selectOPTIONandselectADDtoopentheMy
Stuff.
4. Selectthemediafolder/fileswhichyouwishtoadd,andselect
CENTRALKEYtoaddintotheplaylist.
5. Savetheplaylist
Playmusicfile
1.Mainmenu>Multimedia>Musicplayer.
2.IntheMusicLibrarylist,selectSHUFFLEALL,orselectkeyin
PlayBackwindowtoplaymusic.
3.Ifwishtopausetheplaying,youcanselectkey.
4.Ifwishtoplaypreviousornextmusic,youcanselector
key.

53
5.Alsoyoucanselecttosetupplayingsettings,including:Shuffle,
Repeat,andEqualizer.
Videoplayer
ThevideofileformatsupportedbyVideoPlayerincludes3GP,3G2,3GPP
andMP4.
PlayVideoFiles
1.Menu>Multimedia>Videoplayer.
2.Ifdesiredtopalyvideo,youcanselectkeytoplay.
3.Ifdesiredtopausetheplaying,youcanselectkey.
4.Ifdesiredtoplaypreviousornextvideo,youcanselector
key.
Optionmenuwhenplaying:
z Fullscreen:swithtofull‐screenmode.
z Playlist:thevideoplayerwillplayvideoaccordingtotheplay
list,youcanaddorremovetheplayfileinfilemanager.
z Changevolume:adjustthevolume
z Quit:exitVideoPlayer.
FMRadio
Listeningtotheradio
Pleasenotethattheabilitytoreceivingbroadcastbyradiodependsonthe
proximityandcoverageofthebroadcastingstation.Theantennausedby
FMradioisnottheantennaofwirelessdevice.TheFMradiowillworkonly
whenusedwiththewired3.5mmearphone.
UsingtheFMRadio
1. Mainmenu>Multimedia>Radio.
2. Toactivatetheradiosearch,selectSEARCH
3. Thesearchwillstopwhenithascompoleteditssearchof
availablestations.

54
4. SelecttheUP/DOWNNAVIGATIONKEYStotunetheradio
5. SelecttheLEFT/RIGHTNAVIGATIONKEYStochangethe
channel.
BroadcastSetting
1. SelectOPTIONtoselectAUTOSEARCH,andsearchthesignalchannel
automaticallyandsave.
2. SelectSAVECHANNEL,youcansavethecurrentdisplayedchannelto
thechannellist.
3. Ifyousavethestoredbroadcastingstation,youcanenterCHANNEL
LISTtoselectyourrequiredstation.
4. Tochangethefrequencymanually,pleaseselectOPTIONtoselect
MANUALINPUT.
5. Tolistentothebroadcastbyloudspeaker,pleaseselectOPTIONto
selectSPEAKERthesoundpathwillbeswitchedtothespeaker.
6. SelectCHANGEVOLUME,youcanadjustthevolumeoftheradio.
7. Toturnofftheradioandexit,pleaseselectQUIT.
Mystuff
MyStuffsupportstheoperationofimages,sounds,videosandjavafiles.
ToaccesstheMYSTUFFmenuselecttheCENTRALKEYfromthe
homescreenandselecttheMYSTUFFicon.
Folder
CreateaFolder
1. Mainmenu>Mystuff>Images/Sounds/Videos/Applications/Others.
2. Selectasub‐folderincluding:images,sounds,videos,applicationsand
othersbypressingtheCENTRALKEY
3. SelectOPTIONandNEWFOLDER
4. InputthenameofnewfolderandselectCENTRALKEYtosave.

55
OptionMenuofFolderType:
z NewFolder:createthenewfolderinthecurrentfolder.
z Deletefolder:deletetheselectedfolder.
z Movefloder:movetheselectedfolderfromthecurrent
positiontootherposition.
z Copyfolder:Copythecurrentfoldertootherposition.
z Viewmode:listandabbreviatoryimage.
z Memorystatus:displaythephoneandstoragestatusof
externalmemorizer.
Files
ViewFiles
1. Mystuff>Images/Sounds/Videos/Applications/Others.
2. Selectafolderincluding:images,sounds,videos,applicationsand
others.YoucanselecttheCENTRALKEYtoopenthefolderlistunder
thisfolder.
3. Afterselectingandopeningthefolder,selectCENTRALKEYtoseethe
filelist.
4. ToviewthememorystatusofthefolderOPTIONandMEMORY
STATUS.
Move,CopyandDeletetheFiles
1. Mainmenu>Mystuff.
2. Selectafolderincluding:images,sounds,videos,applications
andothers.
3. SelecttherequiredfilesandselectOPTION
4. SelectMOVE/COPY/DELETEorMOVE/BATCHTOMOVEor
COPY/BATCHTOCOPYorDELETE/BATCHTODELETE
5. Forabatchoperation,selectCENTRALKEYtoselectthe
requiredfileandselectOPTIONtoselectaspecificoperation.
OptionMenuforImageList:
z Setas:setuptheselectedfileaswallpaper/contact
56
image/screensaver.
z Send:sendtheselectedfilesbyMMS/E‐mail/Bluetooth.
z Move:movetheselectedfilefromthecurrentpositionto
otherposition.
z Copy:copytheselectedthefiletootherposition.
z Delete:deletetheselectedfile.
z Rename:renamethecurrentfile.
z NewFolder:createthenewfolderinthecurrentfolder.
z Viewmode:setuptoarraythefilesbylist/abbreviatory
image.
z Details:displaythecurrentdetailedmessageofthefile,
includingName,Format,Type,Timecreation,Size,Resolution,
PositionandProtected.
z Memorystatus:viewthephoneandoccupiedstatusof
externalmemorizer.
OptionMenuWhenViewingImageStatus:
9 Setas:setuptheselectedfileaswallpaper/contact
image/screenprotection.
9 Rotation+flip:rotateoroverturntheimage.
9 Addeffect:originalimage,decoloration,oldpicture,
reversion,brightening,darkling,exposalandcartoon.
9 Slidesshow:displaythefilebyplayingslide.
9 Send:sendthecurrentfilesbyMMS/E‐mail/Bluetooth.
9 Delete:deletethecurrentfile.
9 Details:displaythecurrentspecificmessageofthefile,
includingName,Format,Type,CreationDate,Size,
Resolution,PositionandProtected.
OptionMenuforMusicRingList:
z Setas:setuptheselectedfileasvoicecallring/message
57
alert/emailalert.
z Send:sendtheselectedfilesbyMMS/E‐mail/Bluetooth.
z Move:movetheselectedfilefromthecurrentpositionto
otherposition.
z Copy:copytheselectedfiletootherposition.
z Delete:deletetheselectedfile.
z Rename:renamethecurrentfile.
z Newfolder:createthenewfolderinthecurrentfolder.
z Viewmode:setuptoarraythefilesbylist/abbreviatory
image.
z Details:displaythecurrentdetailedmessageofthefile,
includingname,mode,type,timecreation,size,positionand
fileprotection.
z Memorystatus:viewthephoneandoccupiedstatusof
externalmemorizer.
OptionMenuofVideoList:
z Send:sendtheselectedfilesbyMMS/E‐mail/Bluetooth.
z Move:movetheselectedfilefromthecurrentpositionto
otherposition.
z Copy:copytheselectedfiletootherposition.
z Delete:deletetheselectedfile.
z Rename:renamethecurrentfile.
z Newfolder:createthenewfolderinthecurrentfolder.
z Viewmode:setuptoarraythefilesbylist/abbreviatory
image.
z Details:displaythecurrentdetailedmessageofthefile,
includingName,Format,Type,CreationDate,Size,Position
andProtected.
z Memorystatus:viewthephoneandoccupiedstatusof
externalmemorizer.
OptionMenuunderApplicationList:
z Send:sendtheselectedfilesbyMMS/E‐mail/Bluetooth.

58
z Move:movetheselectedfilefromthecurrentpositionto
otherposition.
z Copy:copyselectedfiletootherposition.
z Delete:deletetheselectedfile.
z Rename:renamethecurrentfile.
z Newfolder:createthenewfolderinthecurrentfolder.
z Viewmode:setuptoarraythefilesbylist/Grid.
z Details:displaythecurrentdetailedmessageofthefile,
includingName,Format,Type,Creationdate,Size,Position
andProtected.
z Memorystatus:viewthephoneandoccupiedstatusof
externalmemorizer.
Calendar
YoucansavetheAppointment,MemoandAnniversary.
Thephonewilltimelyremindyouoftherelatedevents,assistingforyouto
manageyourroutines.
ToaccesstheCALENDARmenuselecttheCENTRALKEYfromthe
homescreenandselecttheCALENDARicon.
Afteryouenterintothecalendarwindow,thecurrentdatewillbedisplayed
inthecalendarmonthview.
ViewCalendar
ViewEventsinDesignatedDate
1. Select:CENTRALKEY>Calendar.
2. SelectOPTIONandTOCERTAINDAY,followedbyOK.
3. Afterinputtingthedate,selectOK.
WeekView
1. Select:CENTRALKEY>Calendar.
2. SelectOPTIONandWEEKVIEWandselecttheCENTRALKEY.
3. Ifthereisaneventloginatimeinterval,theweekviewwill
prominentlydisplaythetimeinterval.

59
ViewanOutdatedEvent
1.Select:CENTRALKEY>Calendar.
2.SelectOPTIONandselectEXPIREDEVENTandselectOK.
3.SelectOPTIONtoviewthedetailedeventinfo.
OptionMenuunderCalendarStatus:
z Newevent:createaneventinaselecteddate.
z Weekview:viewthespecificroutineintheweek.
z DeleteDeletetheeventinaselectdate
z Tocertainday:skiptoadesignateddate.
z Settings:setupalarmringtonesfordifferenttypesofevents,
andsetuptheparameterforWeekViewincludingthedate
andnameofWeekView.
z ExpiredEvent:displayalloutdatedeventlogs.
ManagingEvents
CreateEvent
1. Mainmenu>Calendar.
2. SelectneweventdateandselecttheCENTRALKEYtoaccessthe
currentday’scalendardetails.
3. SelectOPTIONandNEWEVENT.
4. Typetheeventdetails(e.g.title,type,summary,address,startdate,
starttime,enddate,endtime,alarm,(alarmringtone)repeatcycle
etc.incalendarsetting.
5. SelectSAVE
DeleteEvent
1. Mainmenu>Calendar.
2. SelectdateincalendarandselecttheCENTRALKEYtoaccessthe
currentday’scalendardetails.
3. SelectOPTIONandDELETEandthenselectthedeletionmodeand
selectOK.

60
OptionMenuunderPresentEventManagementList:
z Newevent:createaneventinapresentdate.
z Delete:deletethecurrentordeleteabatchfiles.
z Tocertainday:skiptotheeventmanagementlistwindowof
designateddate.
CallLog
ThecalllogallowsyoutoviewOutgoingcalls,incomingcalls,missedcalls
andrelevantmessages.
ToaccesstheCALLLOG,selecttheCENTRALKEYfromthehomescreenand
selecttheCALLLOGicon.
OptionMenuforCallLog
• Missedcalls:displaysthelistofrecentlymissedcalls.
• Outgoingcalls:displaysthelistofrecentlyoutgoingcalls.
• Incomingcalls:displaysthelistofrecentlyincomingcalls.
• AllCalls:displaysallcallrecordsincludingmissedcalls,outgoing
calls,incomingcallsandcalllog.
• Datatransmission:displaysthevolumeofsentandreceived
messages
• Callduration:displayrecentcallduration,alloutgoingcallstime,
allincomingcallstime.
ViewingtheCallLog
ViewCallLog
1. Mainmenu>Calllog
2. Selectthecalllogyouwishtoview:Missedcalls/Outgoingcalls/
Incomingcalls/Allcalls.
SaveaNumberfromCallLoginContacts
1. Select:CENTRALKEY>Calllog
2. Selectthecalllogyouwishtoview:Missedcalls/Outgoingcalls/

61
Incomingcalls/Allcalls.
3. Selectcalllogentry/phonenumberandselectOPTIONand
SAVENUMBER,thenselectOK.
4. Ifsavingasanewcontactentry,selectthetypeofnumber,
selectOKandinputtheotherinformationofcontact
5. SelectSAVE.
6. Ifaddingthenumberasanupdatetoanexistingcontact,select
number’stype,addanyotherinformationofcontactandselect
SAVE.
MakeacallfromtheCallLog
1. Select:CENTRALKEY>Calllog
2. Selectthecalllogyouwishtoview:Missedcalls/Outgoingcalls/
Incomingcalls/Allcalls.
3. Selectcalllogentry.
4. SelectSENDtocallthenumber.
OptionMenuinRecordList:
z Editanddial:youcaneditandcallthenumber.
z Sendmessage:sendtheSMS/MMS.
z Delete:deletethecurrent/deleteabatchrecords.
z Savenumber:addthemessageofrecoredcontacttothe
Contacts.
z Setspeeddial:setuptheselectedcontact’snumberasspeed
dialnumber.
z Setrejectcall:setuptheselectedcontact’snumberasfilter
number.
Settings
Thesettingsfunctionwillhelpyoucustomizethephone.Donotrevisethe
settingprovidedbythenetworksupplier.
ToaccesstheSETTINGSmenuselecttheCENTRALKEYfromthehome
screenandselecttheSETTINGSicon.Formoredetailsonsetting
persoinalizingthesettingsinyorudeviceseethesectiontitledSETUPYOUR

62
PHONE
Profile
Youcansetuppersonalringtoneandrelevantprompttoneofthephonein
differentscenes.
1. Mainmenu>Settings>Profile.
2. Selectfromoneofthefiveprofileoptions(Standard,Meeting,Silent,
carorOutdoor)toindicatethevolumeofyouralerts.
3. OnceyouselecttheProfileselectCENTRALKEYtochangethesettings
oftheprofile.
4. Scrollthrougheachfeaturenotificationandassigndifferent
notificationsforincomingvoicecalls,messagealerts,emailalerts,key
tonesandwarnings.
5. PressSELECTusingtheleftsoftkeytosaveyourchanges
OptionsunderStandardModeSettings:
z Voicecallring:settheringtoneforincomingvoicecalls.
z Volume:controlthevolumeoftheringtone.
z Messagealert:setupprompttoneofmessage.
z Emailalert:setupprompttoneofemail.
z Vibratingalert:setthephonetovibrate.
z Keytone:selectaudiblekeytonesorsilent.
z Warningtone:turnthewarningtoneon/off.
OptionsunderSilentModeSettings:
z Voicecallring:settheringtoneforincomingvoicecalls.
z Messagealert:setupprompttoneofmessage.
z Emailalert:setupprompttoneofE‐mail.
DisplaySettings
Setupscreendisplayparametersforthephone.

63
1. Mainmenu>Settings>Displaysettings.
2. SelectsettingtoeditandselecttheCENTRALKEYtoopen.
3. AftereditingthesettingsselectSAVE.
ItemsunderDisplaySettings:
z Idlescreen:setupstandbymenuforthephone.Itincludes
wallpaperandwhethertodisplaythetimeanddate.
z Backlighttime:setupthewaitingtimeofscreenlight,
including10seconds/20seconds/30seconds/Always.
z Brightness:setupthebrightnessofdisplayscreen.
z Screensaver:setuptheScreensaverstateandselectimages.
PhoneSettings
Setupthelanguage,time,dateandshortcutofthephone.
1. Mainmenu>Settings>Phonesettings.
2. SelectsettingtoeditandselecttheCENTRALKEYtoopen.
3. AftereditingthesettingsselectSAVE.
ItemsofPhoneSettings:
z Language:youcansetupthedisplayedlanguageofthe
phone.
z Timeanddate:setupreferencetime,date,displayedformat
oftime,displayedformatofdate.
z Shortcuts:setupthedisplayedstatusandfunctionofshortcut
key.
z Automatictimeupdate:Setautomatictimeupdatefunction
onandoff.
CallSettings
Setuptheattributeparameterofcallfunction.
1. Select:CENTRALKEY>Settings>Callsettings.
2. SelectsettingtoeditandselecttheCENTRALKEYtoopen
3. AftereditingthesettingsselectSAVE.

64
OptionforCallSettings:
z Phonenumber:setupwhetherdisplayingthelocalphone
numberinthecontactee’sphone,andthesendinglocal
phonenumberrequiresthenetworksupport.
z Callwaiting:setupwhetheransweringthesecondincoming
callunderthecallstatusofthephone.
z Answermode:setuptoreceivethecallbyrandom
key/recevingkey.
z Autoredial:setupwhethercontinuingtodialifcallingfailure,
thisfunctionsupportsatmost10timesautomaticre‐dial.
z Minuteprompt:setupwhetherreminding10secondsprior
tointegralminuteunderthecallstatusofthephone.
z Answerprompt:prompttherecevingfunctionofthephone.
z Calldivert:transferthevoiceincomingcalltoanothernumber
orvoicemessageboxwhichyoudesignated.
z Callbarring:setupthepreviewofcallingandreceving,
includingtoprohibitthephonefromdialingout,restrict
dialinginternationallong‐distancecall,restrictdialing
internationallong‐distanceouterdomestic,restrictall
incomingcalls,restricttheincomingcallduringthe
internationalroam,cancelallcallrestriction.Thisfeature
requiresnetworksupport.
NetworkSettings
Configuresettingsforthephonewhensearchingfornetworks.
1. Mainmenu>Settings>Networksettings.
2. SelectsettingtoeditandselecttheCENTRALKEYtoopen
3. AftereditingthesettingsselectSAVE.
OptionsforNetworkSettings:
z Networkmode:setuptheconnectednetworkmodeofthe
Phoneas3GPrefer.
z Searchmode:setupthemodeofnetworksearchingofthe
phone,includingAutoandManual.

65
SecuritySettings
Unauthorizeduseofthisphonecanbepreventedthroughmanagementof
thephoneand(U)SIMcardpasswords.Thephoneand(U)SIMcardhave
passwords,aswellasPIN2whichsupport4‐8characters.Thefactorylock
passwordforthephoneis0000.The(U)SIMcardpasswordandPIN2are
providedbynetworkserviceprovider.IfyouinputaninvalidPIN/PIN23
timesyour(U)SIMcardwillbelocked.
Ifyouwanttounlockthelocked(U)SIMcard,youneedtoinputpersonal
unlockkey(PUK/PUK2),whichisprovidedbyCincinnatiBell.Ifyouinputan
invalidPUK10consecutivetimes,your(U)SIMcardwillbepermanently
disabled.
1. Mainmenu>Settings>SecuritySettings
2. SelectsettingtoeditandselecttheCENTRALKEYtoopen
3. AftereditingthesettingsselectSAVE.
OptionsforSecuritySettings:
z Automatickeylock:Setuptolaunchorclosetheauto
keyboardlockfunction.Afterlaunchingtheautokeyboard
lock,itwilllockthekeyboardautomaticallyafteroperating
oneminutewithoutkeypressingunderthestandbystatusof
thephonetopreventdialingthenumberwrongly.
z Phonelock:setuptolaunchorclosethefunctionofphone
lock.Afterlaunchingthephonelock,youshouldinputthe
passwordofphonelockatatimewhenyouturnonthe
phone.
z PINlock:setuptolaunchorclosethefunctionofPINlock.
AfterlaunchingofPINlock,youshouldinputthepasswordof
PINlockatatimewhenyouturnonthephone.
z Changephonecode:alterthepasswordofphonelock.
z ChangePIN:alterpasswordofPIN.
z ChangePIN2:alterpasswordofPIN2..

66
ConnectionSettings
ParametersettingincludesBluetoothandDataaccount.
Select:Mainmenu>Settings>Connectionsettings.
OptionsforConnectionSettings:
z Bluetooth:activateordeactivatetheBluetoothfunction,
searchBluetoothdevicesorsetupBluetoothparameters.
z Dataaccount:Setuptheparameterofdataaccount.
BluetoothSettings
Select:Mainmenu>Settings>ConnectionSettings>Bluetooth>Settings.
OptionsforBluetoothSettings:
9 Visibility:AimingatotherBluetoothdevicetodisplay
orconcealthelocalphone.
9 Devicename:Inputthenameoflocalphone.
9 Savelocation:ThestoragepositionforBluetooth
device.Theoptionisphone/Memorycard.
PairingBluetoothDevices
Bluetoothdevicesarepairedpriortobeingabletocommunicateand
exchangeinformation.InordertocompletethepairingaPINnumbermust
beentered.Foraccessoriesthisisoften0000(orasotherwiseindicatedin
themanualoftheaccessory).Forotherdevicesamatchingpassword(1‐6
digits),mustbecreatedtoenablepairing.Oncepaired,thedeviceswill
automaticallyconnectinthefuture,whenBluetoothisenabled.
1. Mainmenu>Settings>ConnectionSettings>Bluetooth.
2. SelectTURNONtoactivatetheBluetoothfunction.
3. ScrolltoDEVICESandselect
4. SelectSEARCHtolookforBluetoothdevicesinrange
5. SelectyourheadsetorBluetoothaccessoryfromthelist
6. EnterthePIN0000tocompletethepairingprocessandselect
theMENUKEY

67
7. AfterthepasswordisacceptedtheBluetoothdevicewillbe
pairedtothephoneandstoredinthelistofdevices.
8. Note:pleaseconsulttheusermanualofyourBluetooth
accessororyforthePINifitisnot0000.
TransmittingDataviaBluetooth
1. Openthefoldercontainingthefileyouwishtosend,(for
example,openMyStuffifyouwanttosendapictureto
anotherdevice),selectthefileyouwishtosend.
2. SelectOPTIONandSENDandthenselectVIABLUETOOTH
3. Thephonewilldisplaythedevicelist,allowingyoutoselect
whichBluetoothdeviceyousenditto.Note:inordertosenda
fileviaBluetoothyourdevicemustbepairedwiththe
receivingdeviceinadvance.Seeinstructionsonpairing
above.
4. Iftheobjectdevicerequiresapassword,thephonewill
promptyoutoinput.
5. Afterthedevicesarepaired,thephonewilldisplayapromptof
SendingFile.
DataAccountSettings(DONOTMODIFY)
1. Mainmenu>Setting>ConnectionSettings>DataAccount.
2. SelectadataaccountandselecttheMENUKEYtoviewtheaccount
info,includingaccountname,accesspoint,authentificationtype,
user’snameandpassword.
3. Ifdesiredtocreateanewdataaccount,selectOPTIONandCREATE
4. Inputtheoption,inputaccountsettingparameters,andsettingsand
selectSAVE.
ResetSettings
Therearetwotypesorresetoptions;partialorfull.Apartialrecovery

68
(RestoreSpecific),restoresallsettingstothefactorydefaultbutdoesnot
eraseuser‐createdcontent,includingcontacts,messagesandfiles.Afull
recovery(RestoreAll),restoresthedevicetofactorysettingsanderasesall
user‐createdordownloadedcontent.
1. Mainmenu>Settings>DefaultSettings
2. Choosetherestoretype;Restorespecific/Restoreall.
3. Inputthephonepassword.(Theoriginalpasswordofthephone
is0000whenthephoneleavesthefactory).
4. SelectOK.
5. Afterthephoneisreset,itwillreturntothehomescreen
Flightmode
Radiofrequency(RF)willdisturbtheelectronicequipment,whenyouarein
followingcondition,pleaseturnon“Flightmode”,andturnoffallthe
functionwhichrelatedwithradio,forinstance:hospital,oilstationand
plane,andsoon.
Select:Mainmenu>Settings>Flightmode.
69
FAQsandTroubleshootingSolution
IfyouexperienceissueswithyourCincinnatiBellA56W,plesereverttothe
followingFAQpriortocallingcustomersupport.
Thephonecannotbestartedup:
z Checkwhetherthepowerkeyispressedandheldcontinuously.
z Checkwhetherthebatteryiscontactedwellornot.Pleasefirstly
removethebatteryandrefitit,thenre‐poweronthedevice.
z Checkwhetherthebatteryisrunoutornot.Pleaserechargeit.
Thereisalockscreendisplayeduponpoweringonthephone:
z Inputthephonelockpassword:selectafunctionofautomatically
lockingthephone.Thephonelockpasswordmustbeinputbefore
usingit.
z InputPIN:selectafunctionofinputtingPINuponpoweringonthe
deviceeachtime.ThePINmustbeinput;(thePINofUSIMcard
shouldbeinputwhenfirstlyusedthephone).
z InputPUK:inputPINwronglyincontinually3times.The
operator‐suppliedPUKmustbeinput.
(U)SIMCardisError:
z (U)SIMcardmetalsurfaceiscontaminated.Wipethe(U)SIMcard
metalcontactswithapieceofcleancloth.
z (U)SIMcardisnotinstalled.Installthe(U)SIMcardcorrectly
accordingtoUser’sManual.
z (U)SIMcardisdamaged.Peasecontactwithyournetworkservice
supplier.
Thenetworkcannotbeaccessed:
z Weaksignal.Pleasemovetoalocationofstrongsignalforatrial.
z Beyondthecoverageofthenetworkservicesupplier.
z (U)SIMcardisinvalid.Pleasecontactwithyournetworkservice
supplier.
70
CannotDialOut:
z Pleaseconfirmthedialkeyispressedafterthenumberisdialed.
z Pleaseconfirmthe(U)SIMcardisvalid.
z Pleaseconfirmwhetherthecallrestrictionfunctionissetup.
z Pleaseconfirmwhetherthefixeddialfunctionissetup.
Badcallquality:
z Checkwhetherthevolumeisadjustedappropriately.
z Usethephoneattheplacewherethereceivingqualityisnotgood,
suchasneartothebuildingorinthebasementwheretheradiowave
cannotreach.
z Usethephoneatthepeaktime,suchasatthetimeofgoingon/off
theduty,thechanneliscongested.
Contactcannotcallyou:
z Pleaseconfirmthatthephoneispoweredonandisuplinkedwith
network;
z Pleaseconfirmthatthecallisbarredbecauseofownedtoll;
z Pleaseconfirmwhetherthe(U)SIMcardisvalid;
z Pleaseconfirmwhetherthefixeddialfunctionissetup;
Contactcannothearyou:
z Pleaseconfirmthatthemicrophoneareaisfreeofdebris.
z Pleasekeepthemicrophoneatthebottomofthephoneclosetoyour
mouth.
Shortstandbytime
z Thestand‐bytimeisrelevanttothesystemsetup.Thephoneis
possiblyattheplacewherethesignalstateisbad.Whenthephone
cannotreceivethesignal,thephonewilltransmittosearchthebase
stationcontinuously;consumingagreatdealofbatterycapacityand
shorteningthestand‐bytimeofthebattery.Pleasemovetotheplace
wherethesignalisstrongtousethephoneortemporarilypowerthe
phoneoff.
z Thebatteryrequiresreplacmentwithanewbattery.
71
Cannotcharge:
z Badelectricalcontact!Pleasecheckthattheplugisconnectedwell.
z Wipetheinterfacesofthephoneandbatterywithsoftdrycloth.
z Thebatteryoradapterisdamagedandrequirestobereplaced.
Contactcustomercareifyoususpectdamagetothebatteryor
charger.
72
Health&SafetyInformation
RF/SARInformation
Yourphoneisalow‐energywirelessreceiver.Uponpoweringiton,the
phonewillemitalow‐levelradiofrequency(RF).
Allgovernmentsaroundtheworldusethenationalsafetydirectivesframed
byspecializedscientificorganizations,suchasICNIRPandIEEE.These
directiveshaveestablishedanapprovedlevelofradiowavesexposureto
commonpopulation.Theapprovedlevelincludesanymetrological
deviation,suchasageandhealthlevels,providingaguaranteewithinasafe
rangeforhumanbeing.
Thespecificabsorptionrate(SAR)isameasurementunitofbody‐absorbed
wirelesswavequantitywhenthephoneisused.TheSARvalueisinstituted
accordingtothehighestenergylevelvalidatedinthelabstatus.Thetrue
SARlevelwhenthephoneisoperatedwillbefarlowerthanthislevel.The
nearerthephoneisfromabasestation,theloweristheenergyemittedby
thephone.
TheSARlevelsofdifferentmodelsofphoneswillvarypossibly.Inorderto
ensurethesubscribersafeandhealthful,thephoneisdesignedand
manufacturedbyabidingbytheWirelessExposureDirective.
TheSARlimitfitforthepublicradiowaveis2.0watt/kg(W/kg)per10body
issues.Aftertest,thephoneconformstothislimit.
Battery
Donotuseadamagedadapterorbattery.
Pleaseusethebatterycorrectly,donotshortcircuitthebattery,shortwill
createfirehazard.
Donotburnthebatteryorinsertinfire.
Donotdiscardthebatteryinyourgarbage.ReturnittoCincinnatiBellor
otherbatteryrecyclingfacility.
73
Thebatterychargingtimedependsontheremainedcapacity,typeand
adapter.Thebatterymaybechargedthousandsoftimes,butwillwearout
gradually.Pleasepurchasesnewbatterywhenthestandbytimeisshorter
thanthenormaltimeobviously.
Pleaseusetheproperchargingequiptmentandcertifiedbattery
Pleasedisconnecttheadapterandthepowersupplywhentheadapteris
notused.
Pleasedonotoverchargethebattery;otherwisedamagetothebatterymay
shortentheservicelifeofthebattery.
TrafficSafety
Thephonehasastrongwirelessvoicecommunicationfunction.Withit,you
cancallatanytimeandanyplace,thusthesubscribershallundertakesome
importantresponsibilities.
Drivingisyourfirstprioritywhenyouaredriving.Beawareofanswering
callsandabidebythelocalregulationswhiledriving.
Usethehands‐freedevicetoenhancetheconvenienceandsafetyforthe
useofthewirelessphone.
Tel lthecallerthatyouaredriving.Ifnecessary,hangupduringtraffic
congestionandbadweather.
Pleasecloseyourmobilephonewhenfuellingoratanyplacewherethe
bidirectionalwirelessdevicesareprohibitedusing.Pleasedonotplacethe
phonetogetherwiththeflammableandexplosivearticlesbecausethe
internalsparklecanignite.
Pleaseclosethemobilephonebeforetheplanetakesoff.Besurenotuse
thephoneduringtheflightinordertopreventthephoneformdisturbing
theplanecommunicationsystem.
OperatingEnvironment
Pleasepowerdownthephonewherewirelessphoneuseisprohibited.
Usingthewirelessdevicemaycausetherisks.
ReadtheUser’sManual;understandthesecurityandsafetyinstructions.
Thephoneisprohibitedfromconnectingwithotherincompatibledevices.
Thesubscribershallusethephoneatthecorrectlocation(totheearwith

74
theantennapointingtotopofthearm)inordertooperatesatisfactorily
andprotectyourhealth.
Pleaseusethephoneatapplicabletemperaturerange-10℃to50℃.
ElectronicApparatus
Mostelectronicdevicesshieldtheradioinformation.Pleasecontactthe
manufacturerforrelatedinformation.
Pacemaker:keepthephone6inches(15cm)oraboveapartfromthe
pacemaker;donotcarrythephoneinthechestpocket;answerthe
incomingcallwiththeearattheothersideofthepacemakertolowerthe
possibledisturbance.Pleasepoweroffthephoneifyouconcernaboutthe
disturbanceofthepacemakers.
Othermedicalapparatus:pleaseconsultwithmanufacturerifyouuseother
personalmedicalapparatusinconfirmationofwirelessshieldwave.The
doctormayassistyouobtainingtheinformation.Pleaseclosethephoneif
thephoneisprohibitedusingnearthehealthcarefacilities.
Automobiledevice:pleaseconsultthemanufacturerinconfirmationofthe
informationbecausethewirelesssignalmayaffecttheelectronicdevices
installedintheautomobile.
EmergencyCall
Pleaseinputtheemergencycallunderthestandbymodeandthenpress
thekeytodialoutifyouwanttomakeanemergencycall.
OtherImportantSafetyInformation
z Pleaseusetheaccessoriesoftheoriginalmanufacturerorthe
accessoriesapprovedbythemanufacturer.Theusageofany
unapprovedaccessorywillaffectthephoneperformanceand
damagethephone,andmayresultinhumanbodyrisks.
z Pleasedonotplaceyourphoneneartothemagneticmemory
mediumsuchasPCdisk.ThephonemaydisturbtheTV,radio,PC,
thusaffectingthecallperformancewhenusingthephonenear
them.
z Donotconnectthephonewithotherdevicenotsupportingthe
75
phone.
Repair&Maintenance
z Thisproductisdesigneddelicatelyandmanufacturedwithhi‐tech.
Pleaseuseitcautiously.Thefollowingsuggestionswillhelpyouuse
thephonehappilyforalongtime.
z Keepthephonedry,andavoidalltypesofliquidsfromenteringthe
interiorofthephone.Waterdamagevoidswarranty.
z Donotoperatethephonewithwethands,ifyoudoelectricshock
mayresult.
z Pleasedonotstorethephoneunderelevatedtemperature,or
otherwisetheservicelifeoftheelectronicapparatuswillshorten,
damagethebatteryandpossiblymelttheaccessories.
z Pleasedonotstorethephoneunderthelowtemperature.Whenthe
phonerestoresanormaloperatingtemperature,vaporwillenterin
theinteriorofthephonetodamagethephonecircuitboard.
z Pleasedonotexposeyourphoneunderthestrongsunlightand
avoidyourphonebeingheated.
z Pleasedonotplaceyourphonenearflammableliquidsandgasor
explosiveobjects.
z Pleasedonotthrowandbeatyourphone.Crueltytothephonewill
damagetheinternalcircuitboard.
z Whencleaningthephone,pleaseusestatic‐proofcloth,butnotdry
orstatic‐pronecloth.Whencleaningthephonesurface,donotuse
chemicals,suchasdetergents.Pleasepoweroffthephonebefore
cleaningit.
z Pleasedonotpaintyourphonebecausethepigmentswillimpede
yourphonefrombeingusednormally.
z Ifyourphonehasflashlamp,pleasedonotgettooclosetotheeyes
topreventeyedamage.
z Ifyourphoneorbatterygetswet,theinternaltagsofthephonewill
bedamaged.
FCC Regulations:
This mobile phone complies with part 15 of the FCC Rules. Operation is subject to the
following two conditions: (1) This device may not cause harmful interference, and (2) this
device must accept any interference received, including interference that may cause undesired
operation.
This mobile phone has been tested and found to comply with the limits for a Class B digital
device, pursuant to Part 15 of the FCC Rules. These limits are designed to provide reasonable
protection against harmful interference in a residential installation. This equipment generates,
uses and can radiated radio frequency energy and, if not installed and used in accordance with
the instructions, may cause harmful interference to radio communications. However, there is
no guarantee that interference will not occur in a particular installation If this equipment does
cause harmful interference to radio or television reception, which can be determined by
turning the equipment off and on, the user is encouraged to try to correct the interference by
one or more of the following measures:
-Reorient or relocate the receiving antenna.
-Increase the separation between the equipment and receiver.
-Connect the equipment into an outlet on a circuit different from that to which the receiver is
connected.
-Consult the dealer or an experienced radio/TV technician for help.
Changes or modifications not expressly approved by the party responsible for compliance
could void the user‘s authority to operate the equipment.
The antenna(s) used for this transmitter must not be co-located or operating in conjunction
with any other antenna or transmitter.

RF Exposure Information (SAR)
This mobile phone meets the government’s requirements for exposure to radio waves.
This phone is designed and manufactured not to exceed the emission limits for exposure to
radio frequency (RF) energy set by the Federal Communications Commission of the U.S.
Government.
The exposure standard for wireless mobile phones employs a unit of measurement known as
the Specific Absorption Rate, or SAR. The SAR limit set by the FCC is 1.6W/kg. *Tests
for SAR are conducted using standard operating positions accepted by the FCC with the
phone transmitting at its highest certified power level in all tested frequency bands.
Although the SAR is determined at the highest certified power level, the actual SAR level of
the phone while operating can be well below the maximum value. This is because the
phone is designed to operate at multiple power levels so as to use only the poser required to
reach the network. In general, the closer you are to a wireless base station antenna, the
lower the power output.
The highest SAR value for the model phone as reported to the FCC when tested for use at the
ear is 1.44 W/kg and when worn on the body, as described in this user guide, is 0.538 W/kg
(Body-worn measurements differ among phone models, depending upon available
accessories and FCC requirements.)
While there may be differences between the SAR levels of various phones and at various
positions, they all meet the government requirement.
The FCC has granted an Equipment Authorization for this model phone with all reported
SAR levels evaluated as in compliance with the FCC RF exposure guidelines. SAR
information on this model phone is on file with the FCC and can be found under the Display
Grant section of www.fcc.gov/oet/ea/fccid after searching on FCC ID: SG71104HW-A56W.
For body worn operation, this phone has been tested and meets the FCC RF exposure
guidelines for use with an accessory that contains no metal and the positions the handset a
minimum of 1.5cm from the body. Use of other accessories may not ensure compliance
with FCC RF exposure guidelines. If you do no t use a body-worn accessory and are not
holding the phone at the ear, position the handset a minimum of 1.5 cm from your body when
the phone is switched on.