HYUNDAI MOBIS AVN-215TDL CAr AVN User Manual KMC TDaE 0528
HYUNDAI MOBIS CO., LTD. CAr AVN KMC TDaE 0528
UserManual.wiki
>
HYUNDAI MOBIS
>
AVN-215TDL User Manual
>
user manual 2 of 2
Contents
1.
user manual 1 of 2
2.
user manual 2 of 2
user manual 2 of 2
Navigation menu
Upload a User Manual
Namespaces
Wiki Guide
HTML
PDF
Info
Views
User Manual
Discussion / Help
Navigation
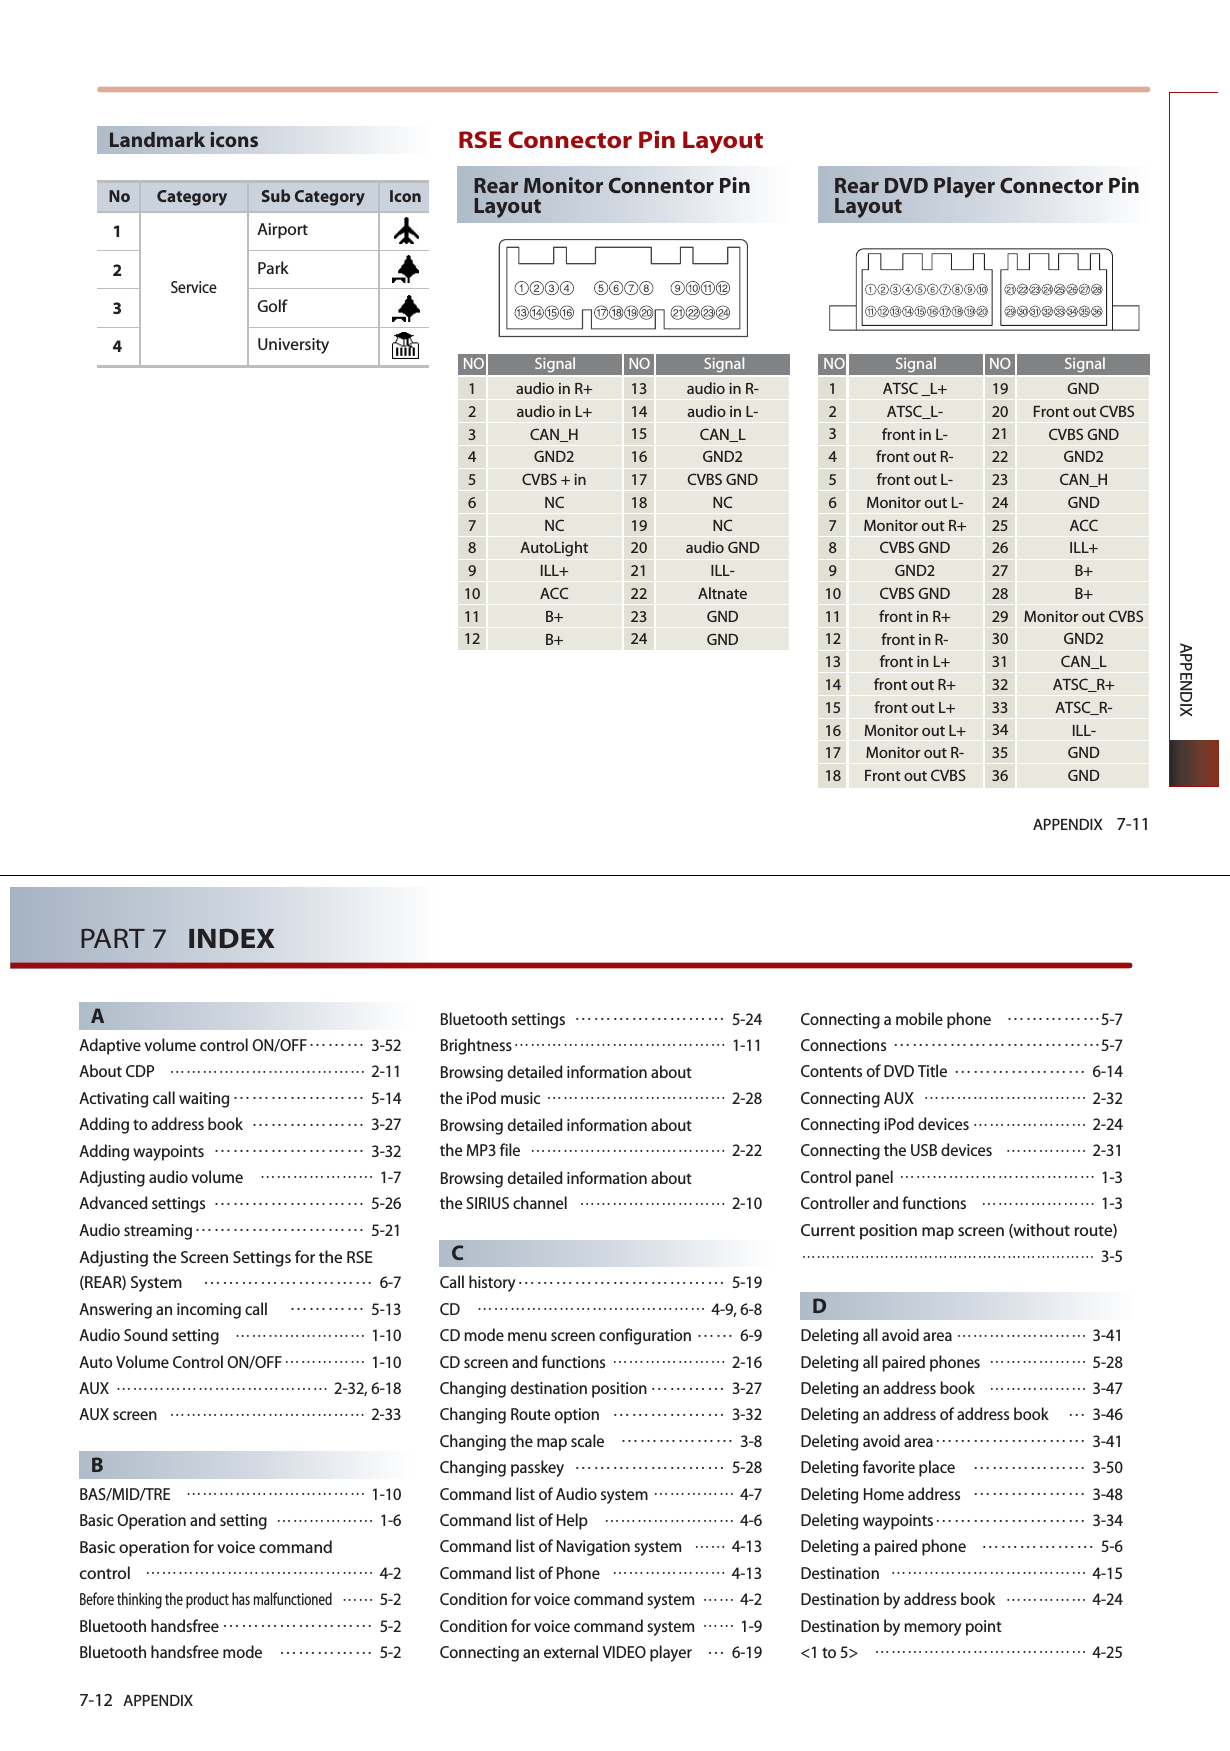
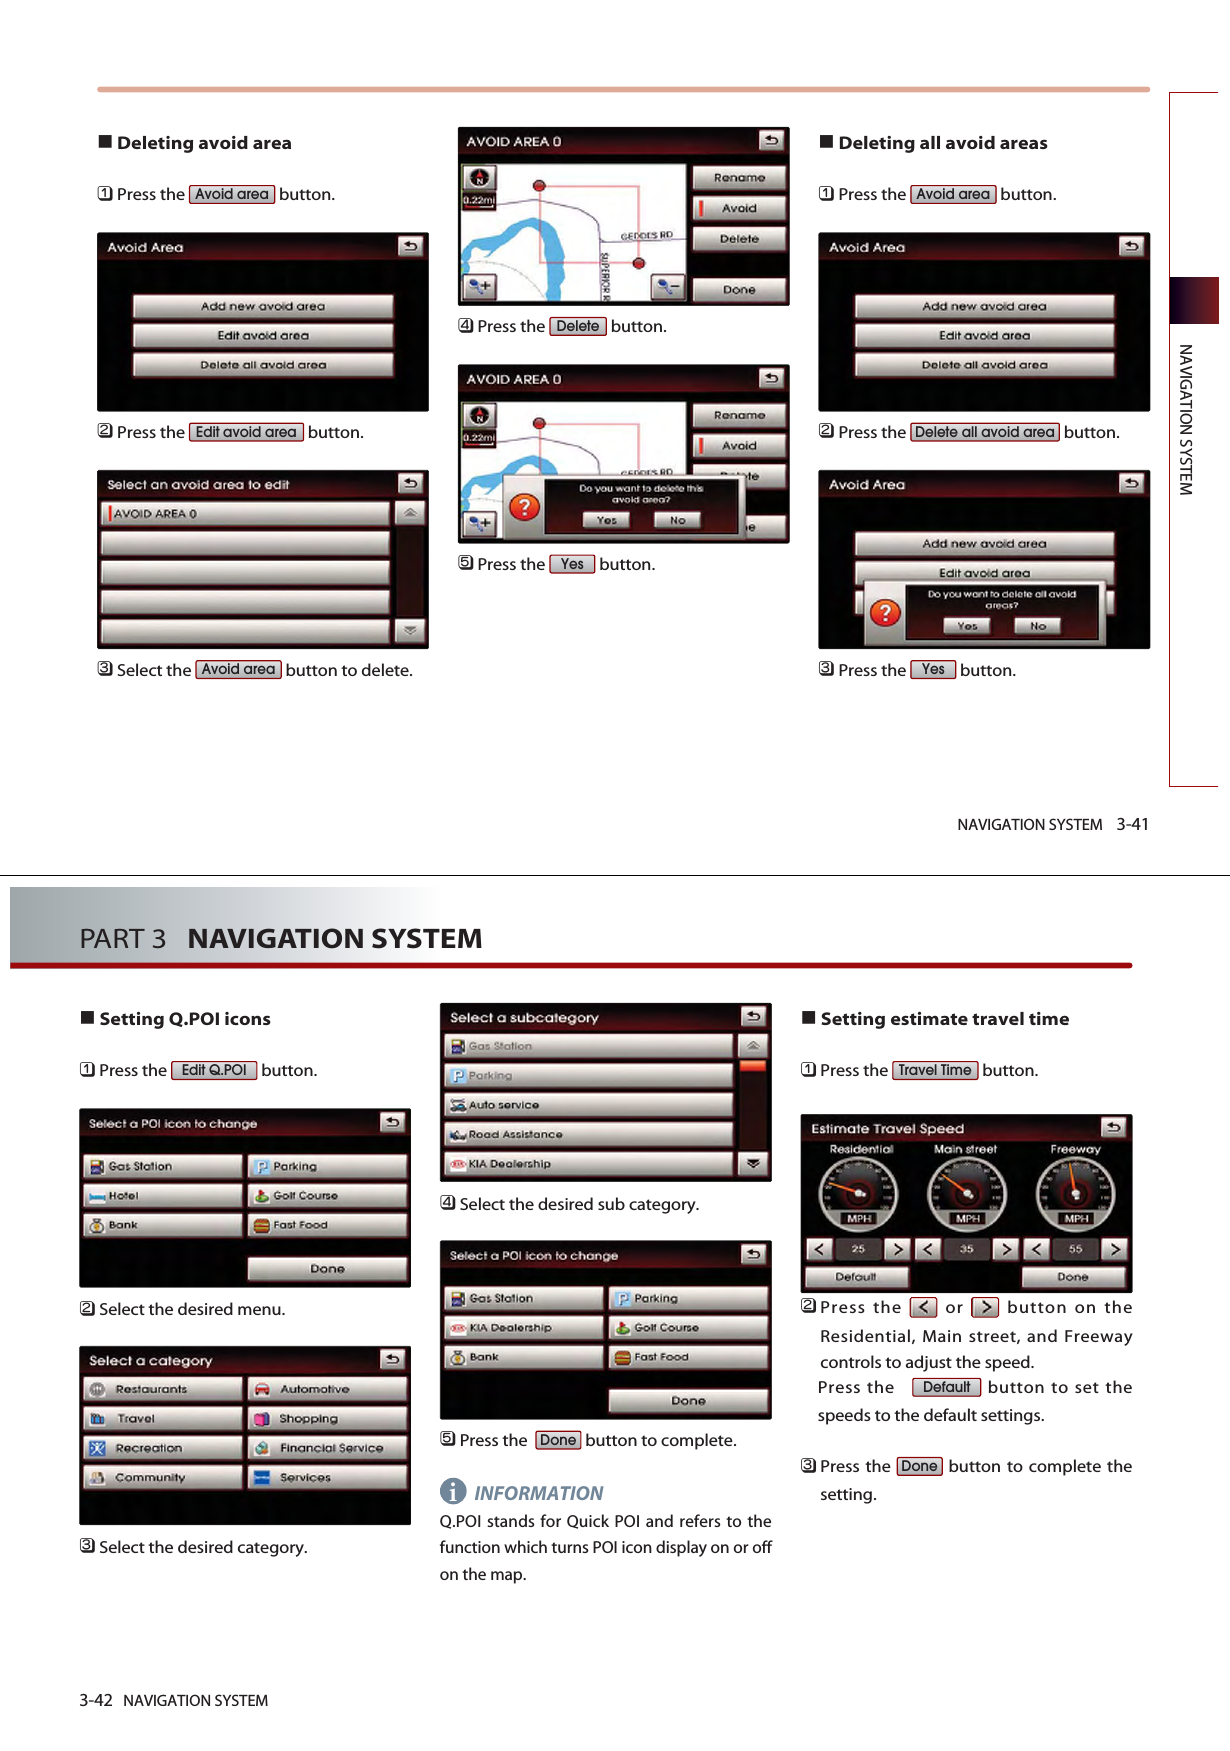
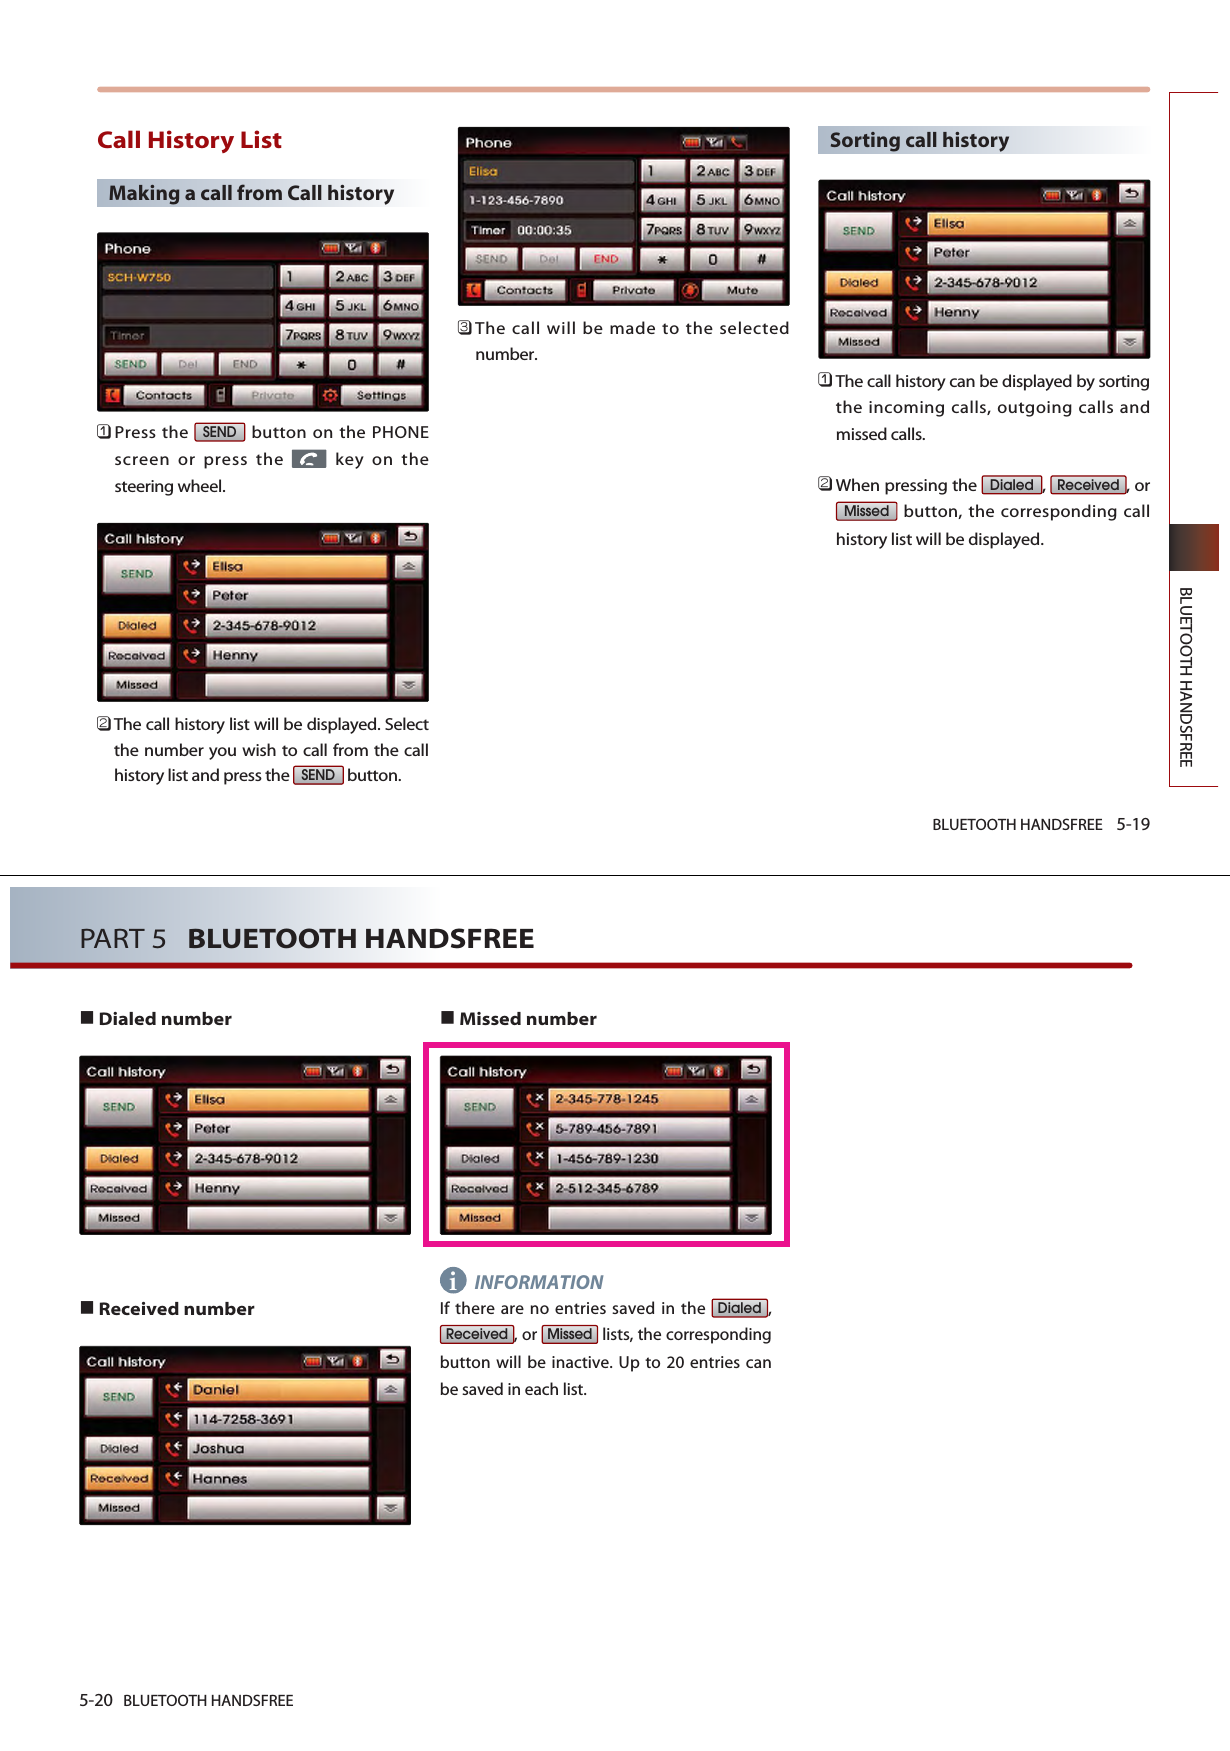
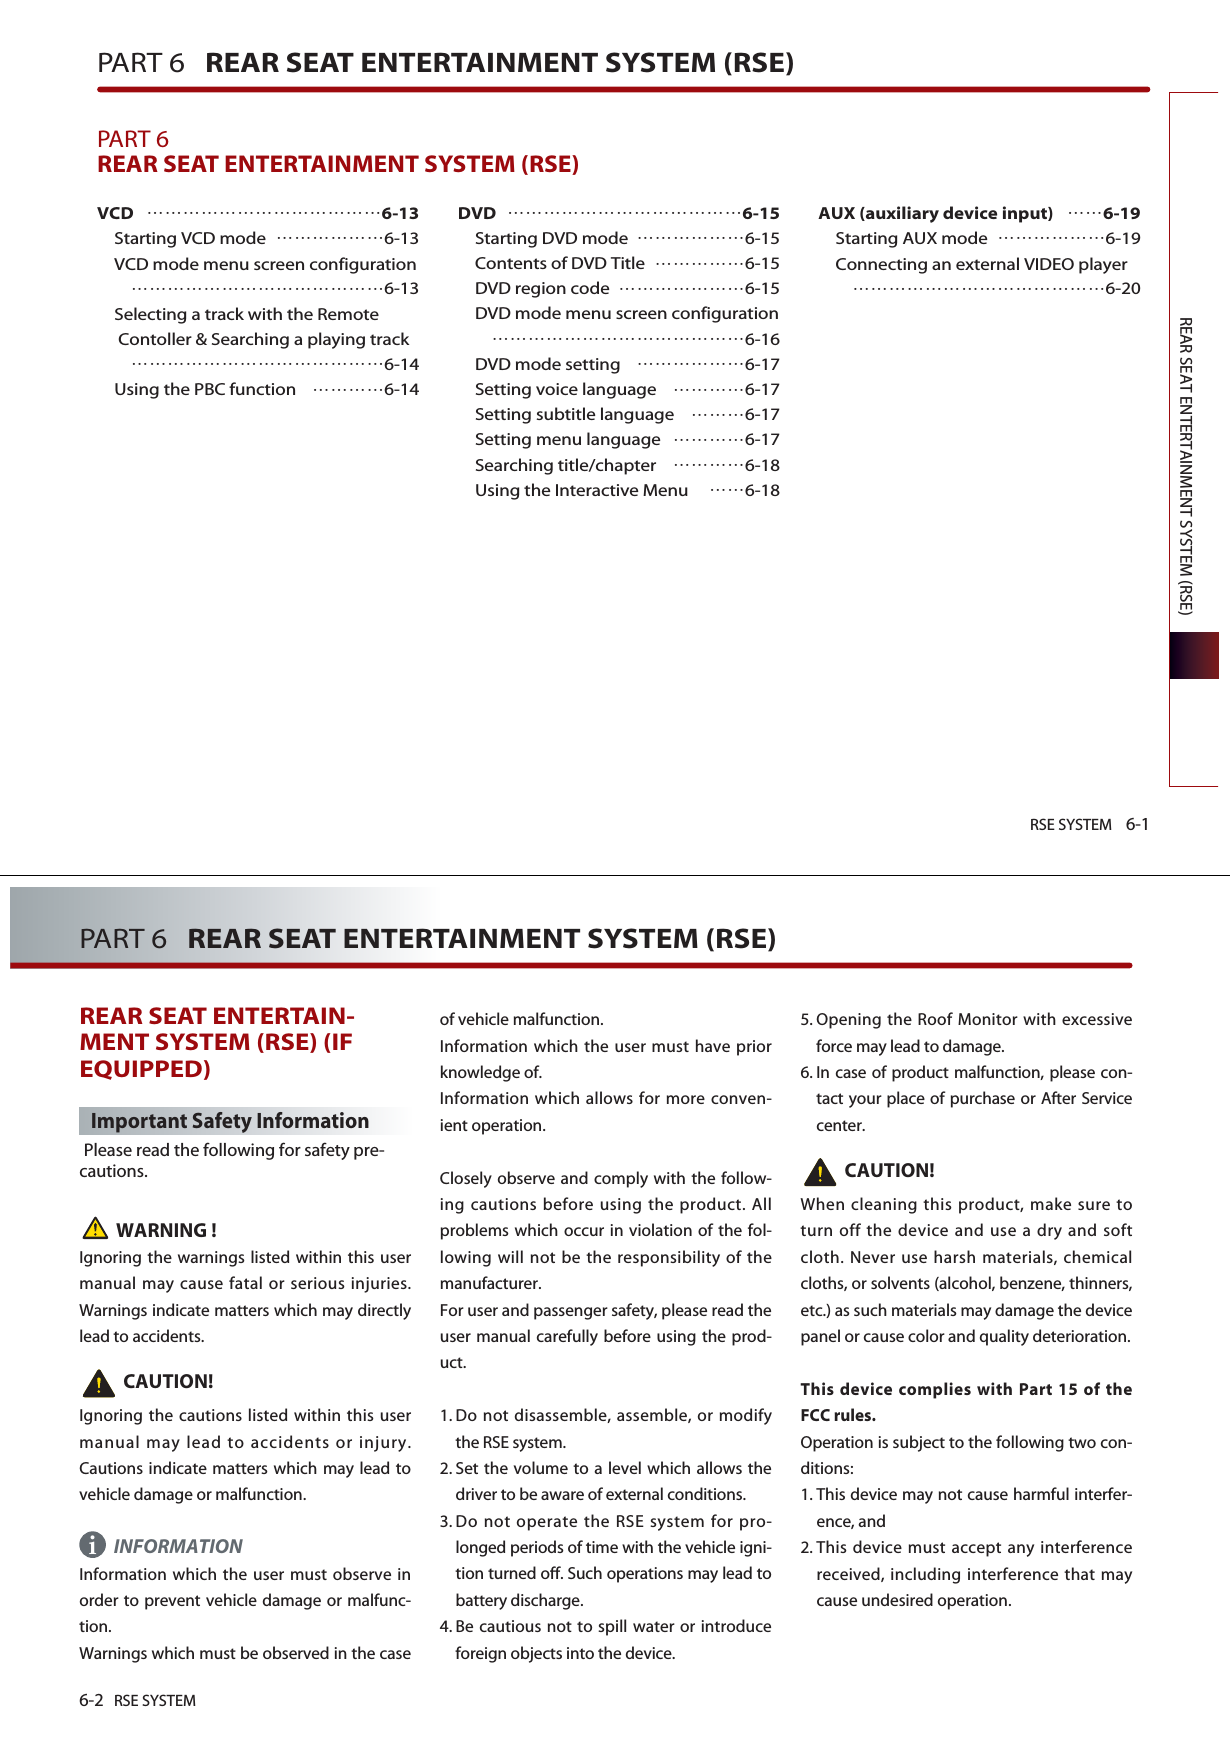
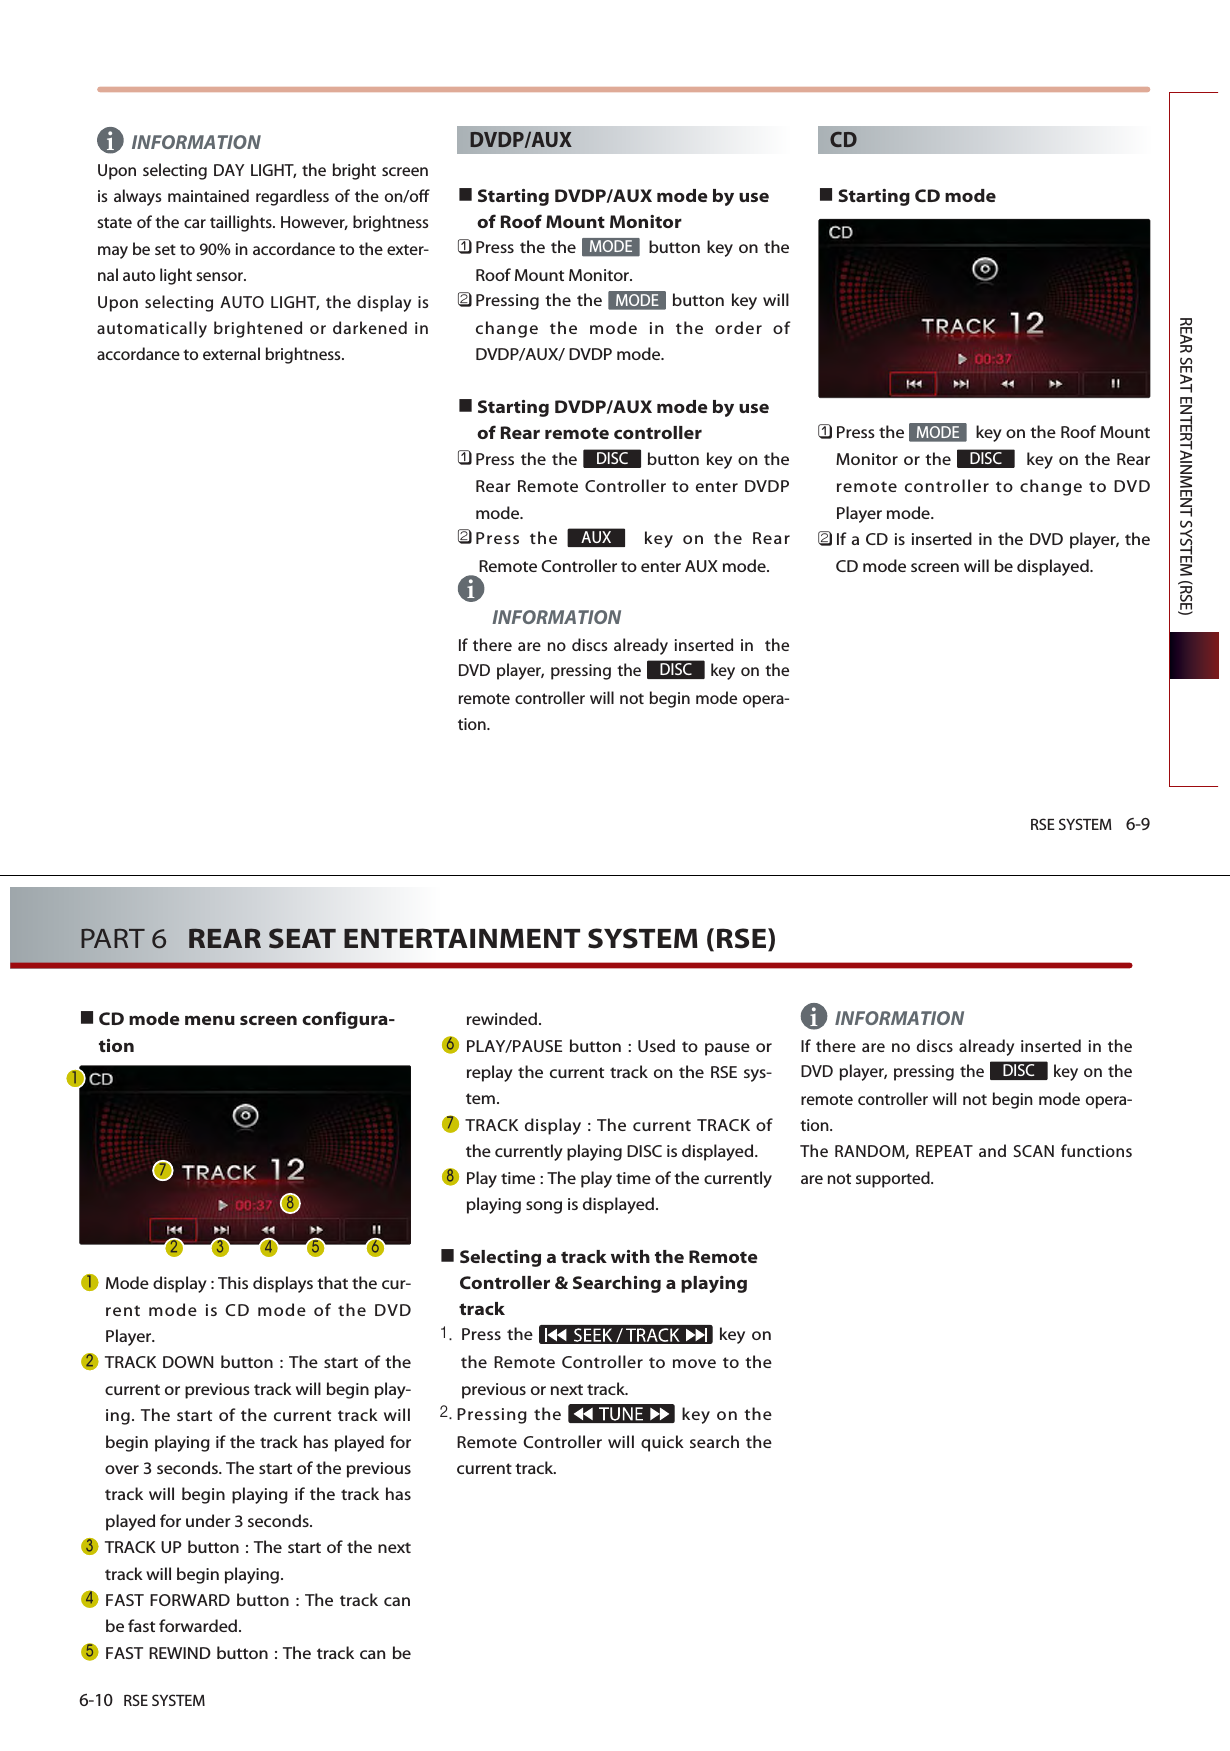
![NAVIGATION SYSTEM 3-25NAVIGATION SYSTEMSearching for Emergency facilitiesPress the key.Press the button.Select the desired facility category. Select the desired facility. The corresponding position will bedisplayed on the map. Voice Command1. Press the key on the steering wheelremote controller.2. After the beep sound, say a command."Find emergency <Category>"[Find emergency <Category>], page 4-23.Searching your HomePress the key.Press the button. The Home position will be displayed onthe map. INFORMATIONIf the Home address is not registered, then thebutton will be displayed. [Registering home address], page 3-48.Voice Command1. Press the key on the steering wheelremote controller.2. After the beep sound, say a command."Go home"[Go home], page 4-25.HOMEHOMEDESTEmergencyDESTi3-26 NAVIGATION SYSTEMPART 3 NAVIGATION SYSTEMSearching favorite placesPress the key.Select the desired button from ~ .The corresponding position will bedisplayed on the map. INFORMATIONIf the address of the Favorite place is notregistered, then the ~ buttonswithout registered addresses will be disabled.[Registering favorite place], page 3-49.Voice Command1. Press the key on the steering wheelremote controller.2. After the beep sound, say a command."Destination by memory point <1 to 5>"[Destination by memory point <1 to 5>],page 4-25.Searching from MAP Position the scroll mark at the destinationby scrolling the map on the map screen. Searching POI by local POI listPress the button on the mapscreen.Press the button.Press the button.Select the desired POI menu. The corresponding position will bedisplayed on the map. Voice Command1. Press the key on the steering wheelremote controller.2. After the beep sound, say a command."Find nearest <POI name>"[Find nearest <POI name>], page 4-21.Local POI listsOthersPOI5151DESTi](https://usermanual.wiki/HYUNDAI-MOBIS/AVN-215TDL.user-manual-2-of-2/User-Guide-1295156-Page-1.png)
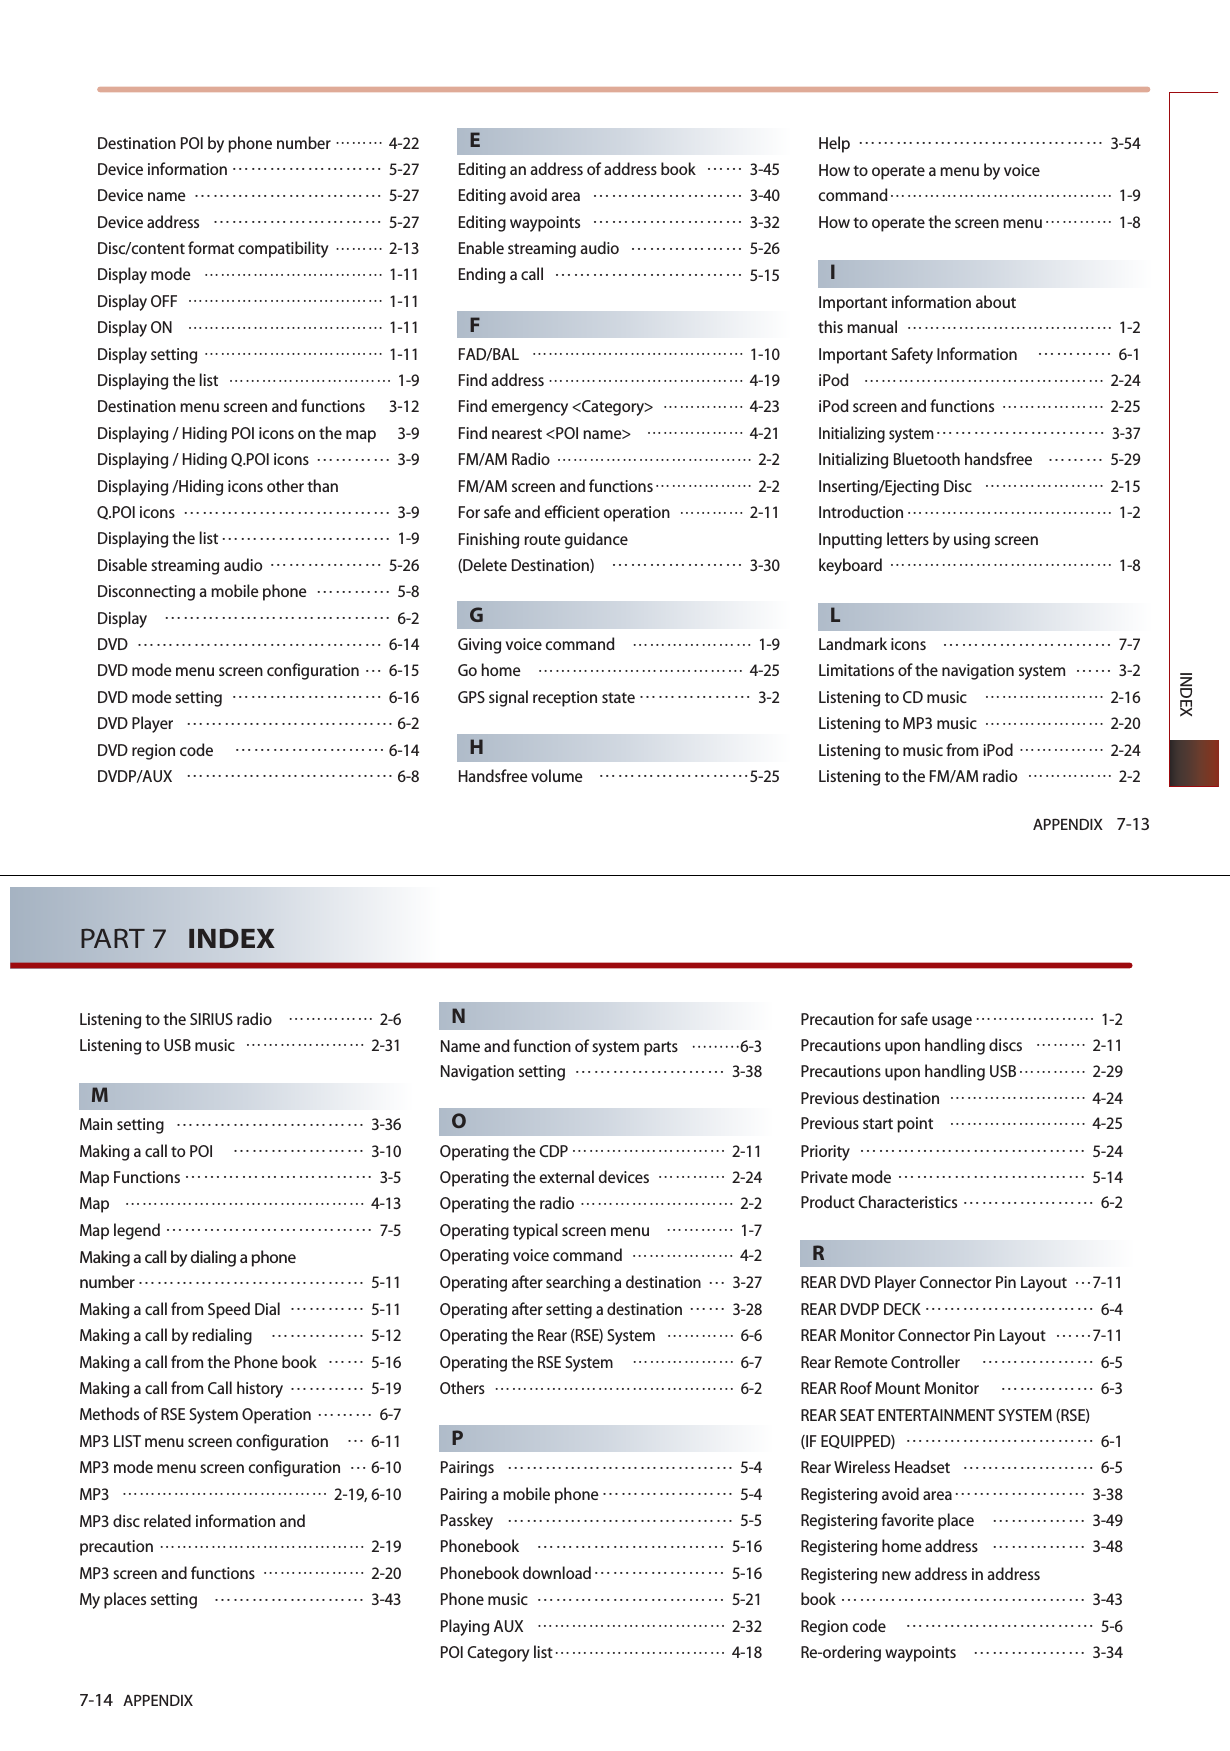
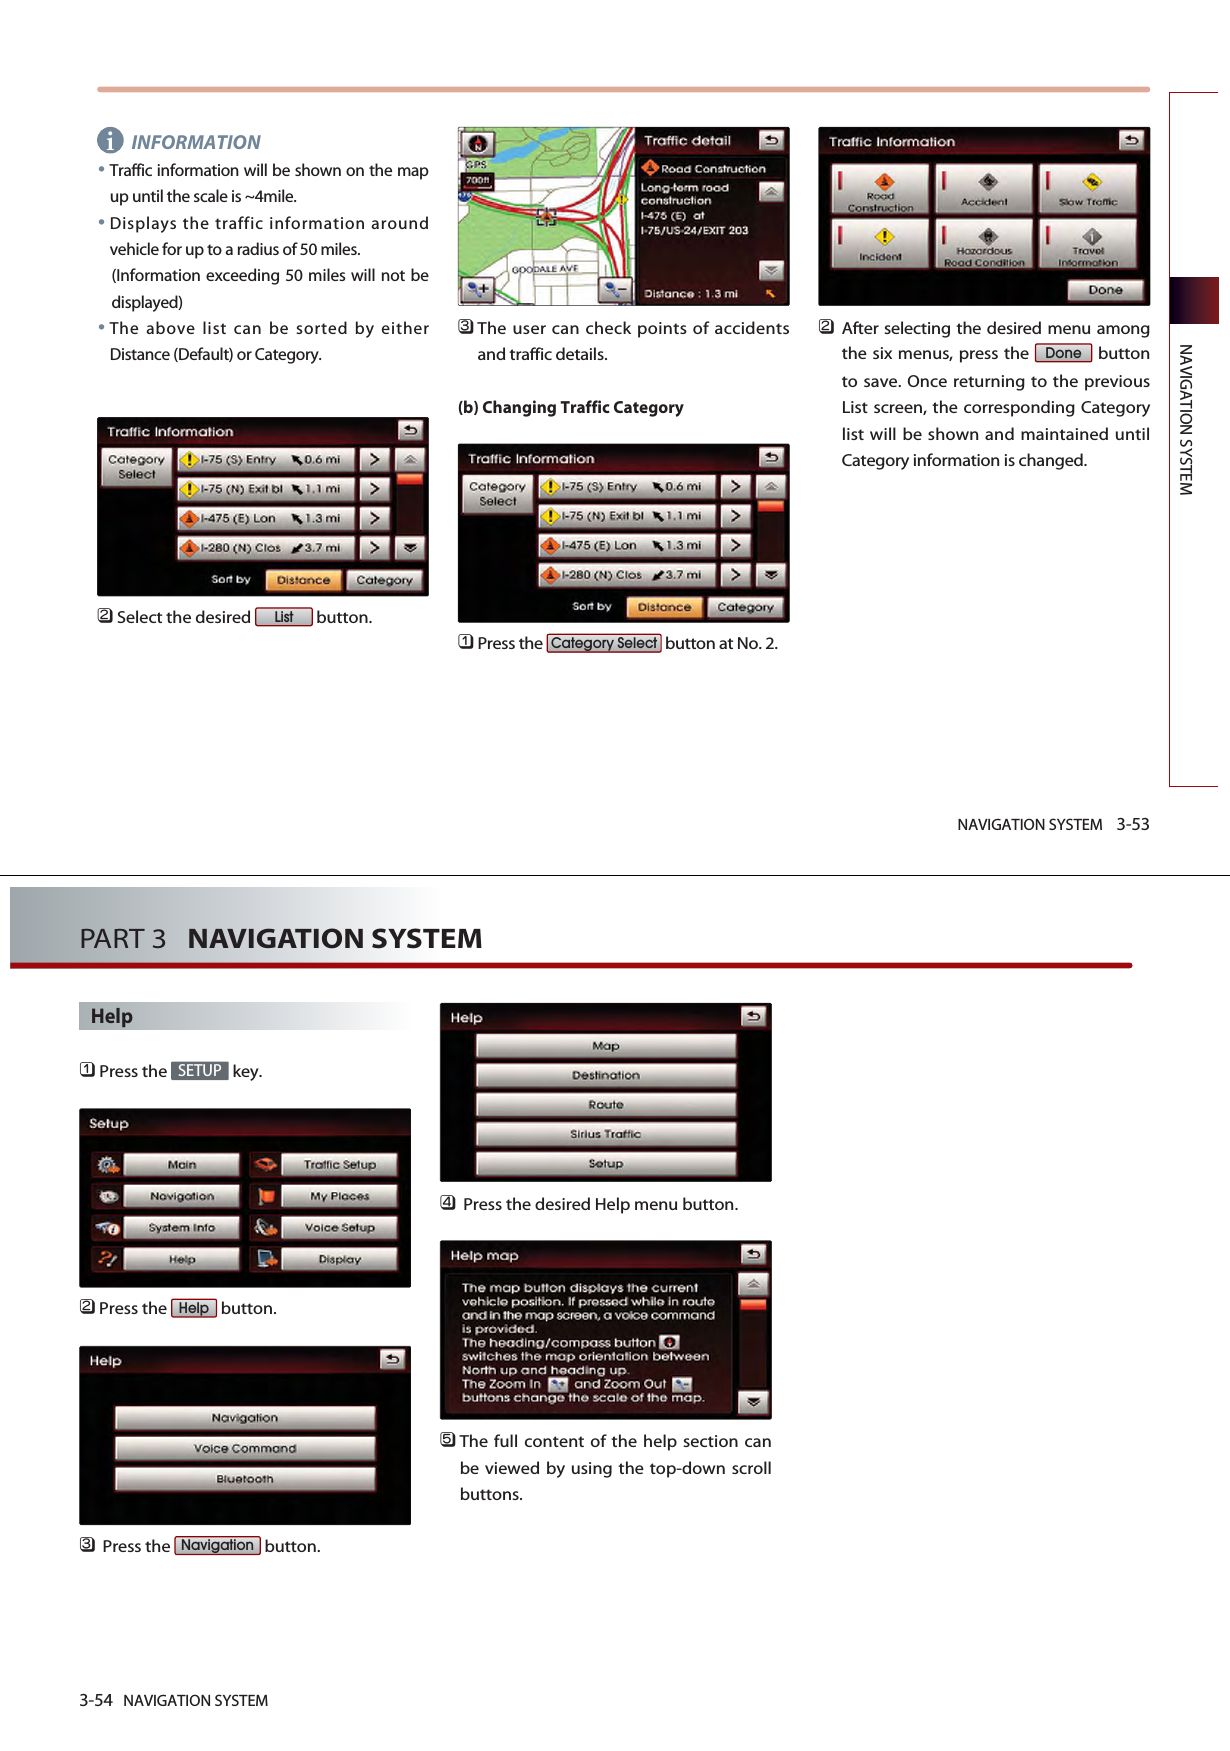
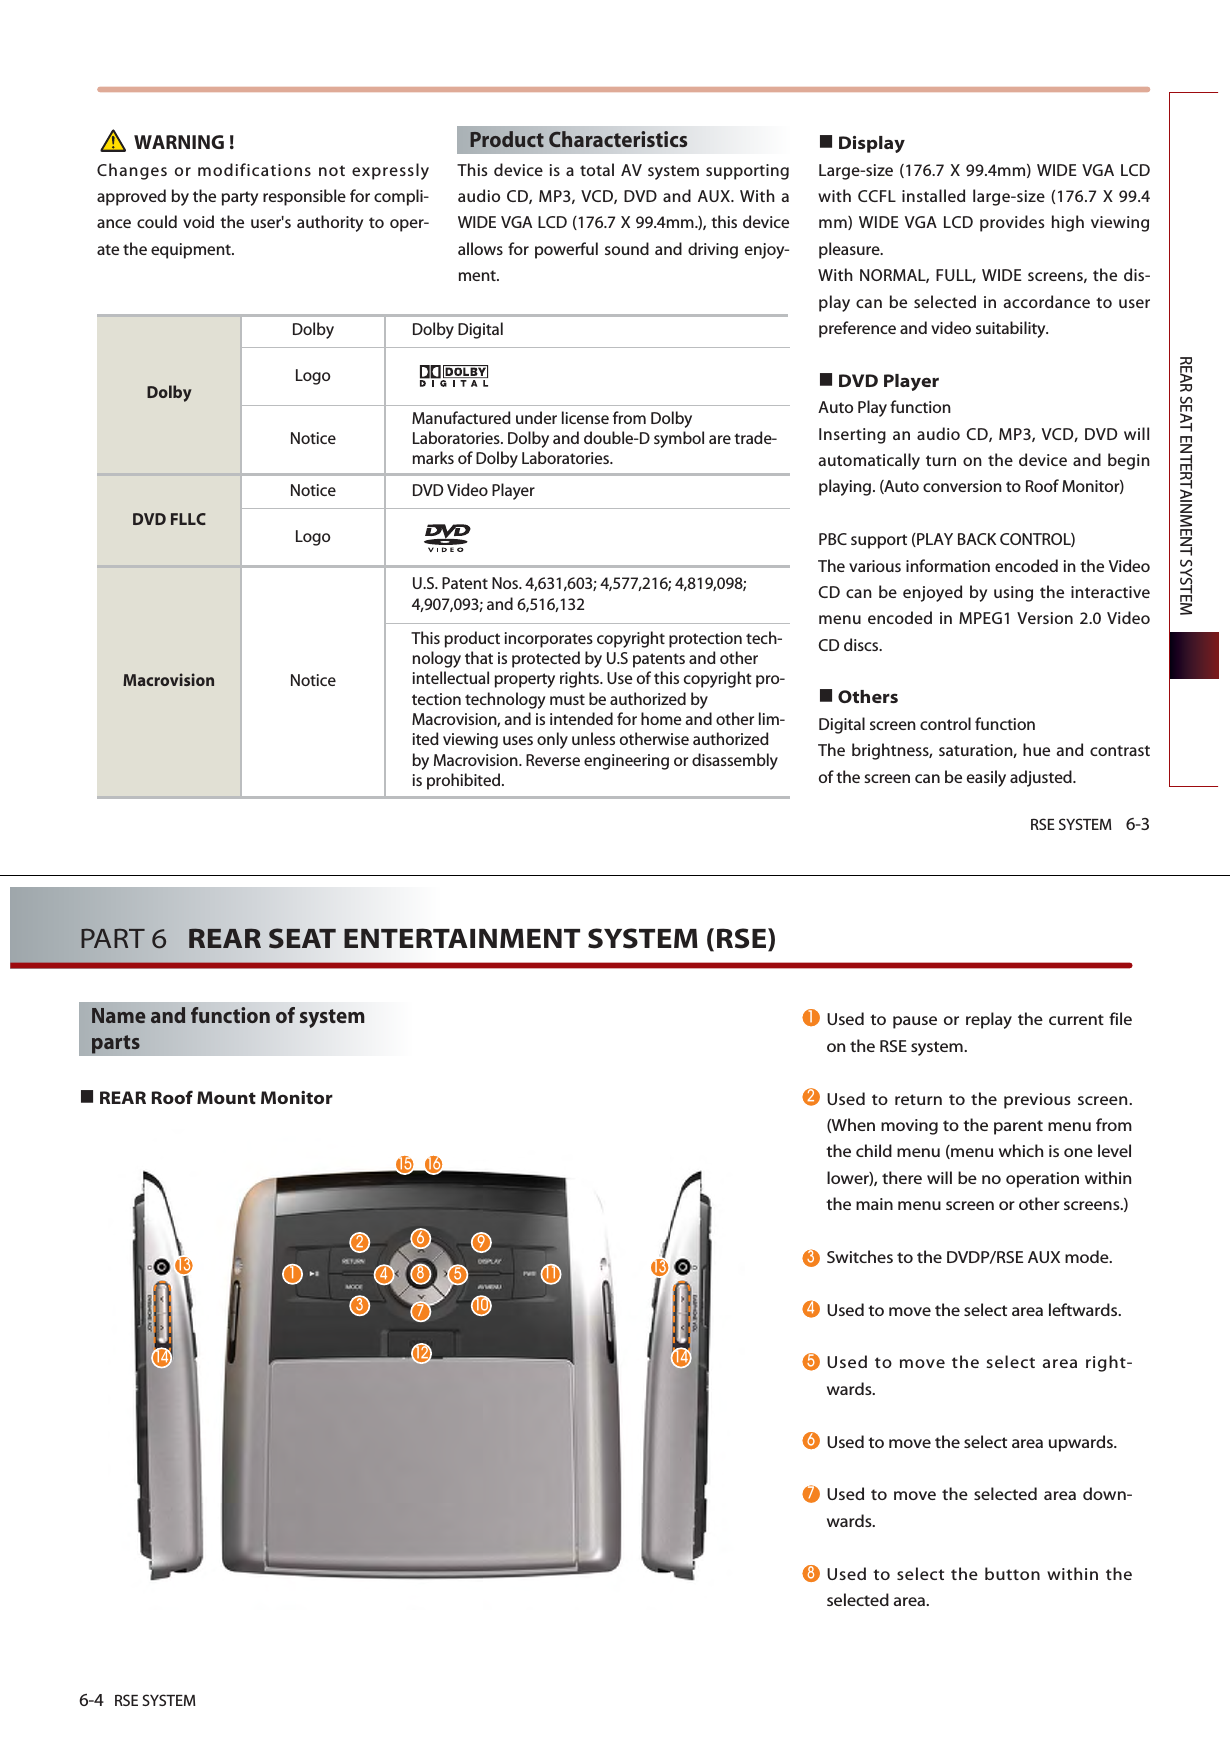
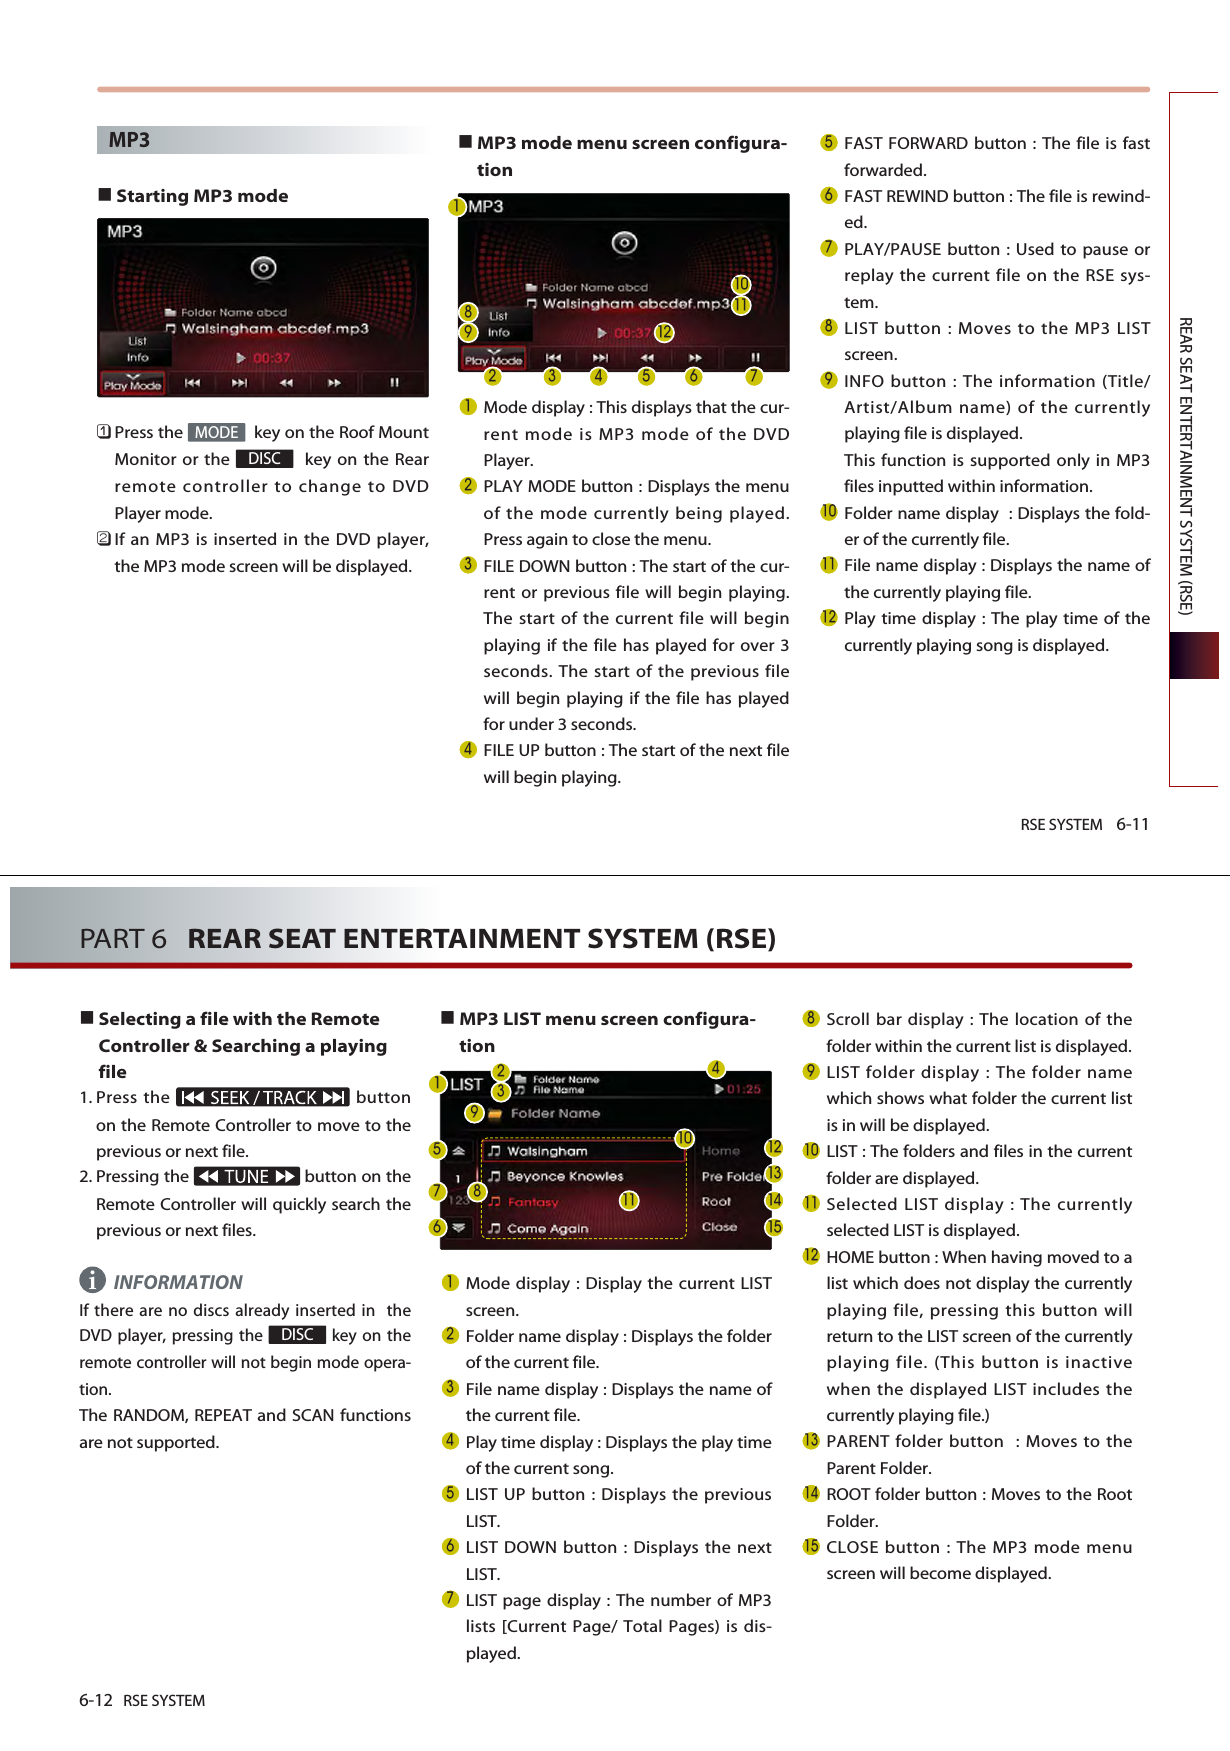
![NAVIGATION SYSTEM 3-27NAVIGATION SYSTEMOperating after searching adestination Changing destination position : Changes the position of the destination byscrolling the map. [Scrolling map], page 3-11.Setting as Destination / waypoint :Sets the position as the destination orwaypoint.Voice Command1. Press the key on the steering wheelremote controller.2. After the beep sound, say a command."Start guidance" (Sets the position of the scroll mark as thedestination and begins route guidance.)Adding to address book : Saves the position in the address book. [Registering new address in addressbook], page 3-43. Voice Command1. Press the key on the steering wheelremote controller.2. After the beep sound, say a command."Store Marked Location to <text tag>"3-28 NAVIGATION SYSTEMPART 3 NAVIGATION SYSTEMOperating after setting adestination Starting Route Guidance Press the button. RouteGuidance will start. Route simulationIf the button is pressedand held for over 0.8 second, then theroute simulation will start. If the key on the control panel ispressed during route simulation, thenroute simulation will be terminated.Voice Command1. Press the key on the steering wheelremote controller.2. After the beep sound, say a command."Time to destination" "Distance to destination"Route guidance screenSymbol guidance mode : If the button is pressed, then the followingroute guidance screen will be displayed. Turn-List mode : If the button ispressed, then the following routeguidance screen will be displayed. MAPStart GuidanceStart Guidance](https://usermanual.wiki/HYUNDAI-MOBIS/AVN-215TDL.user-manual-2-of-2/User-Guide-1295156-Page-2.png)
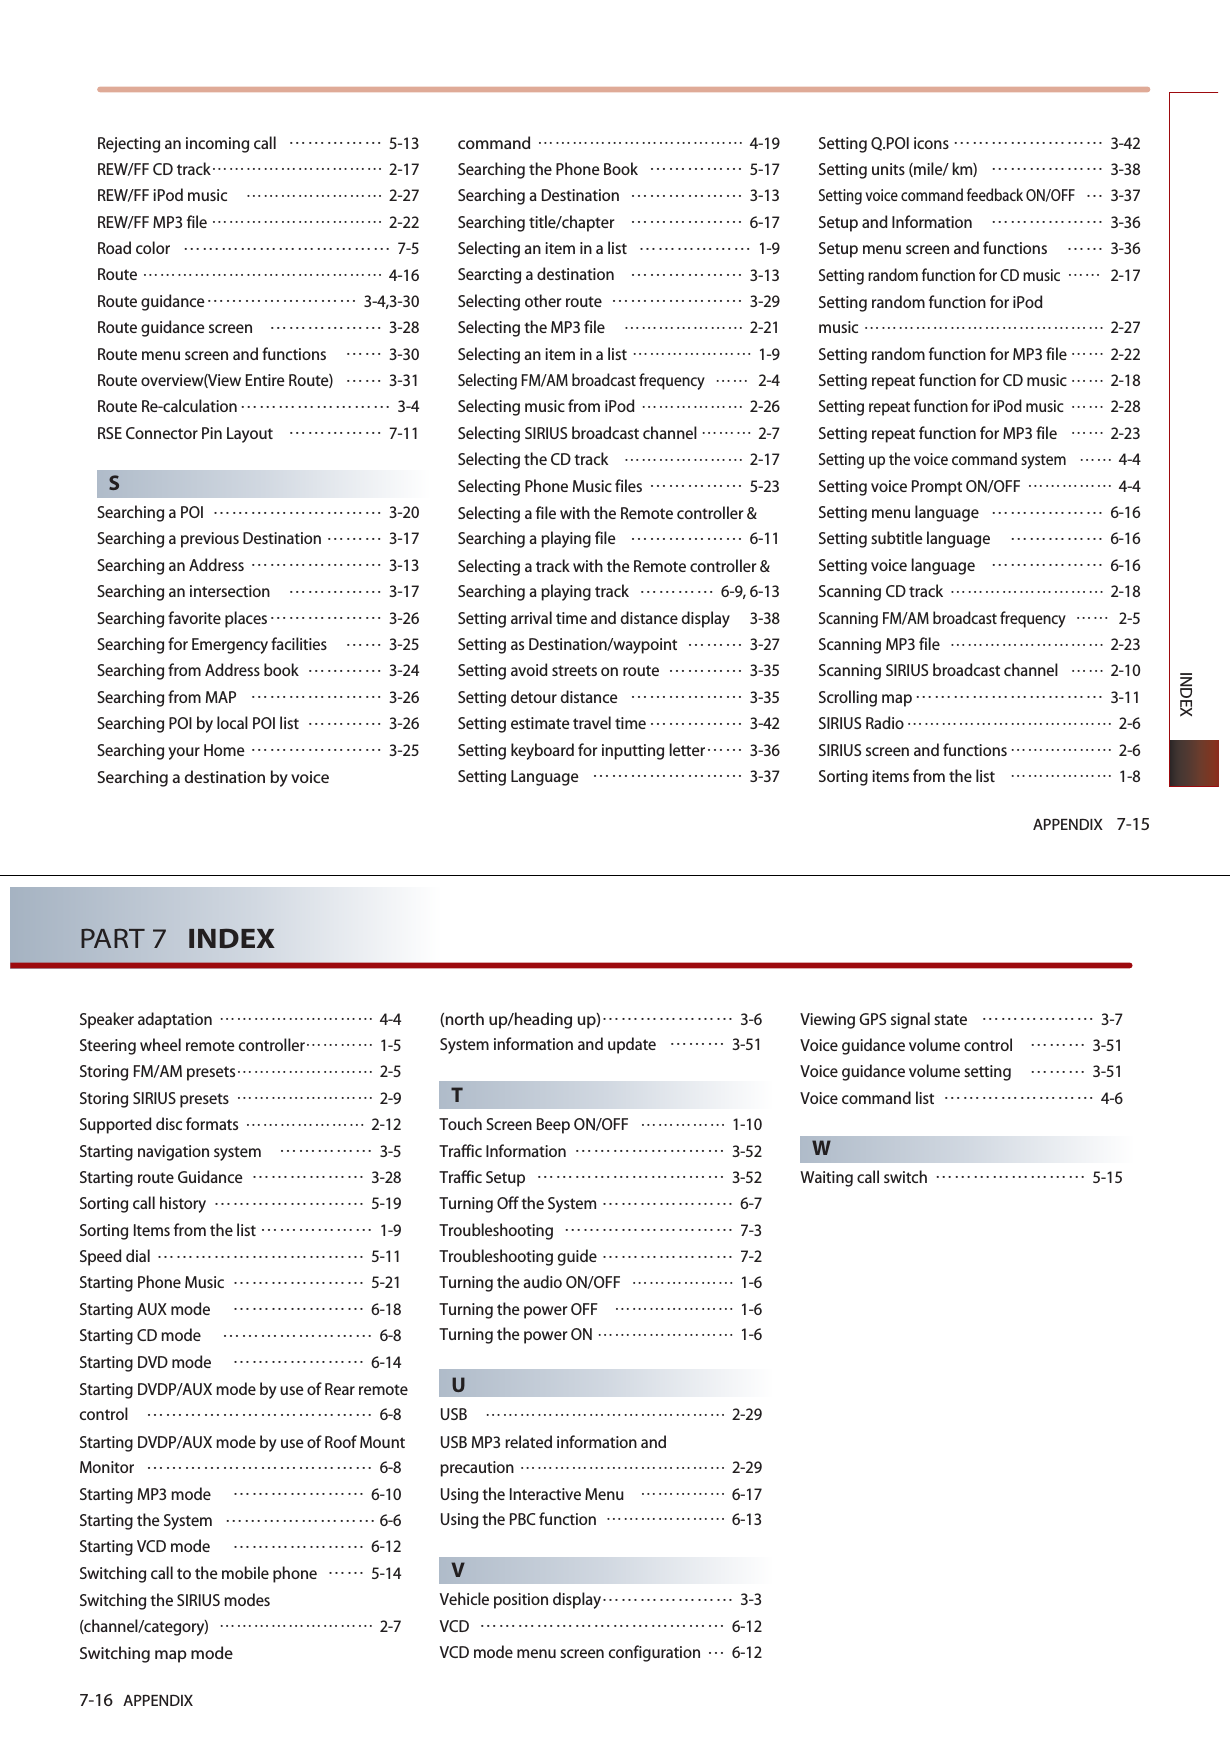
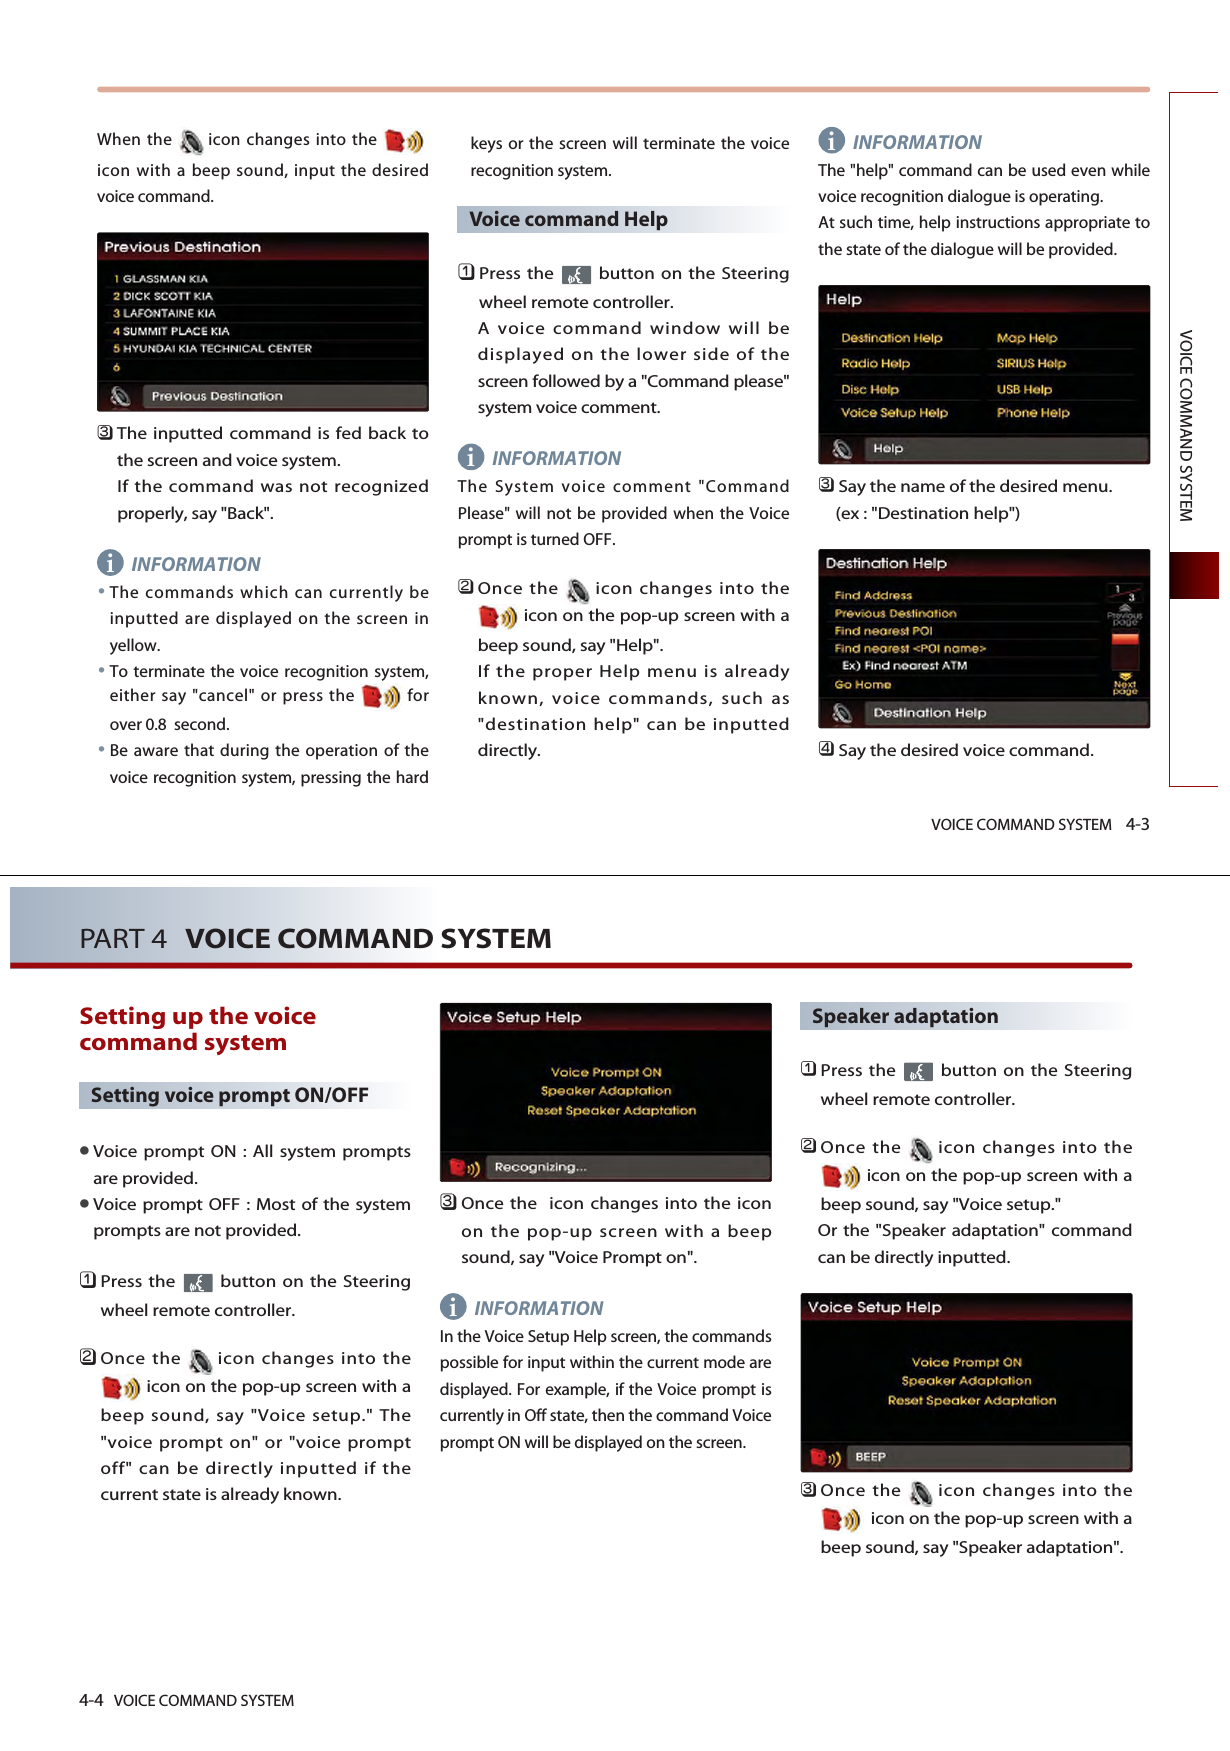
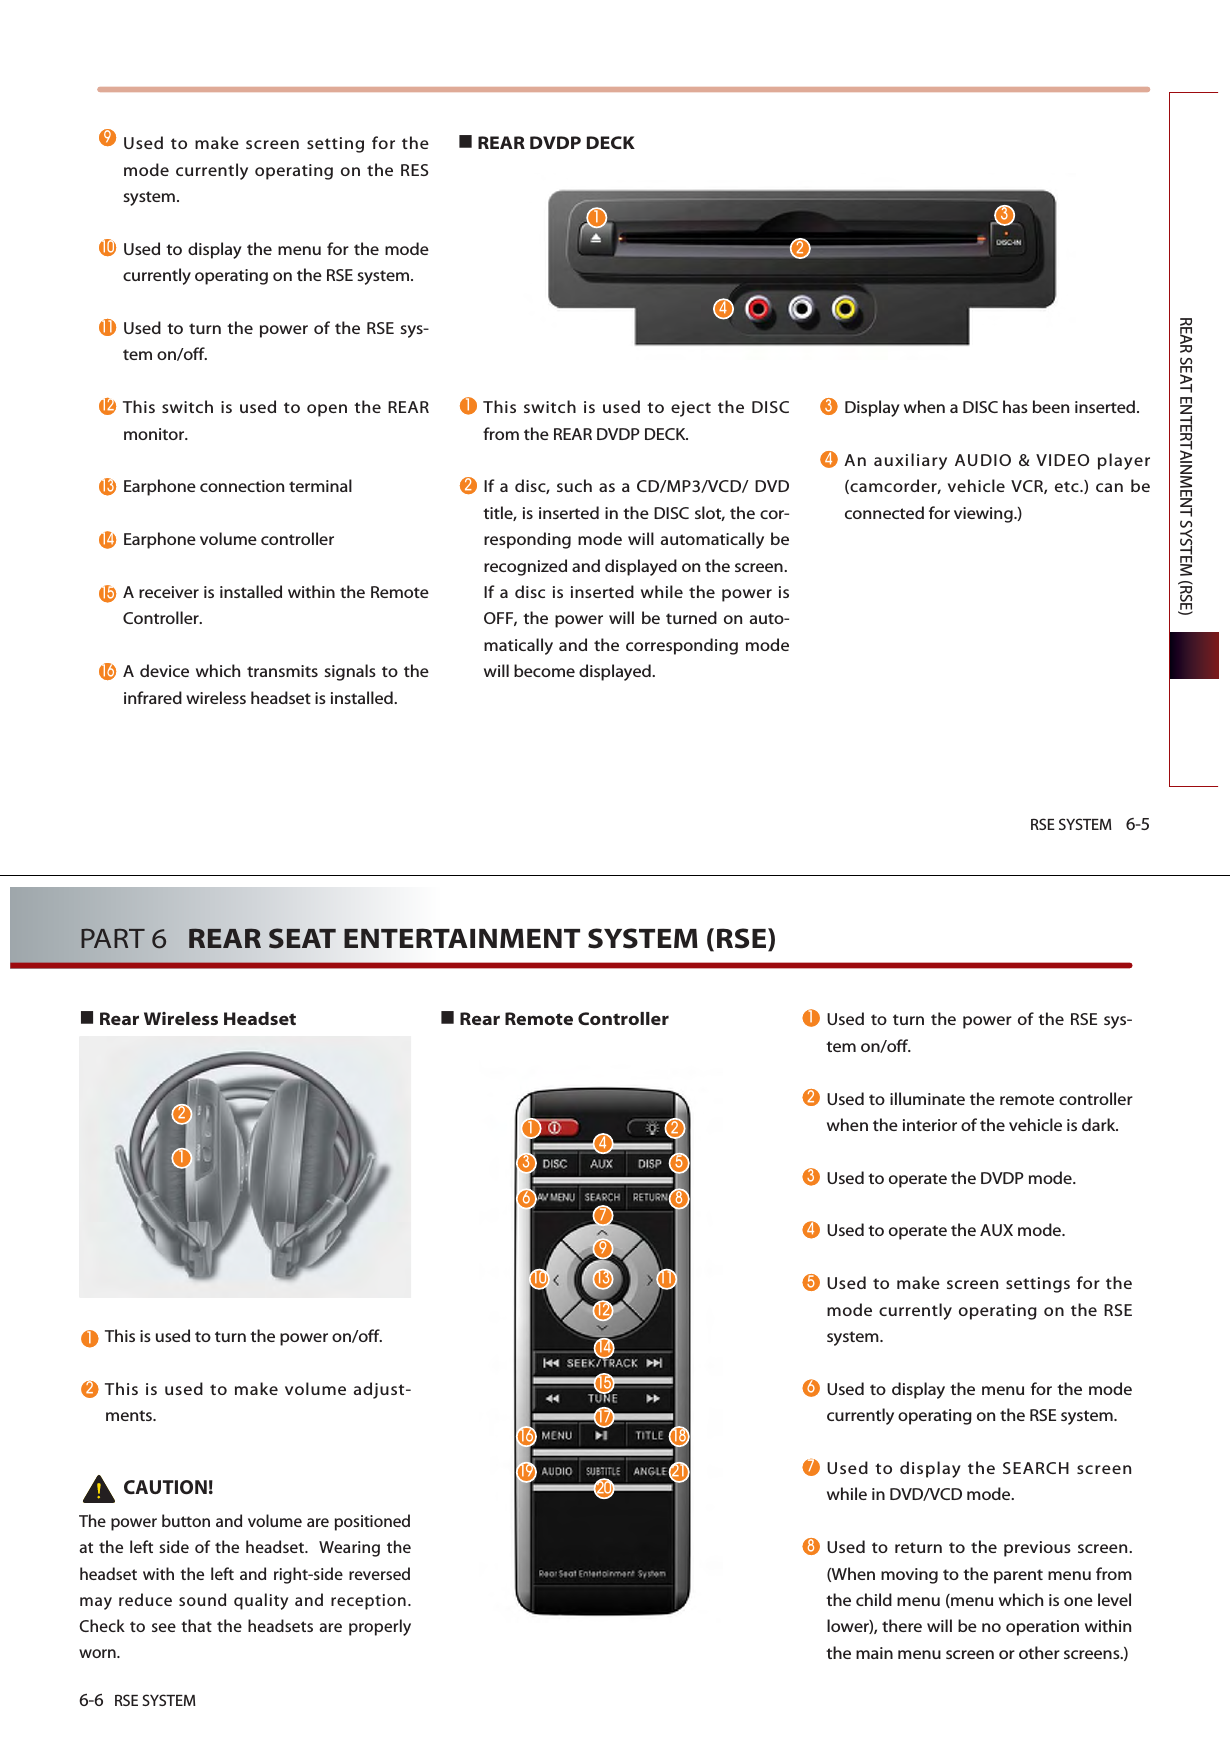
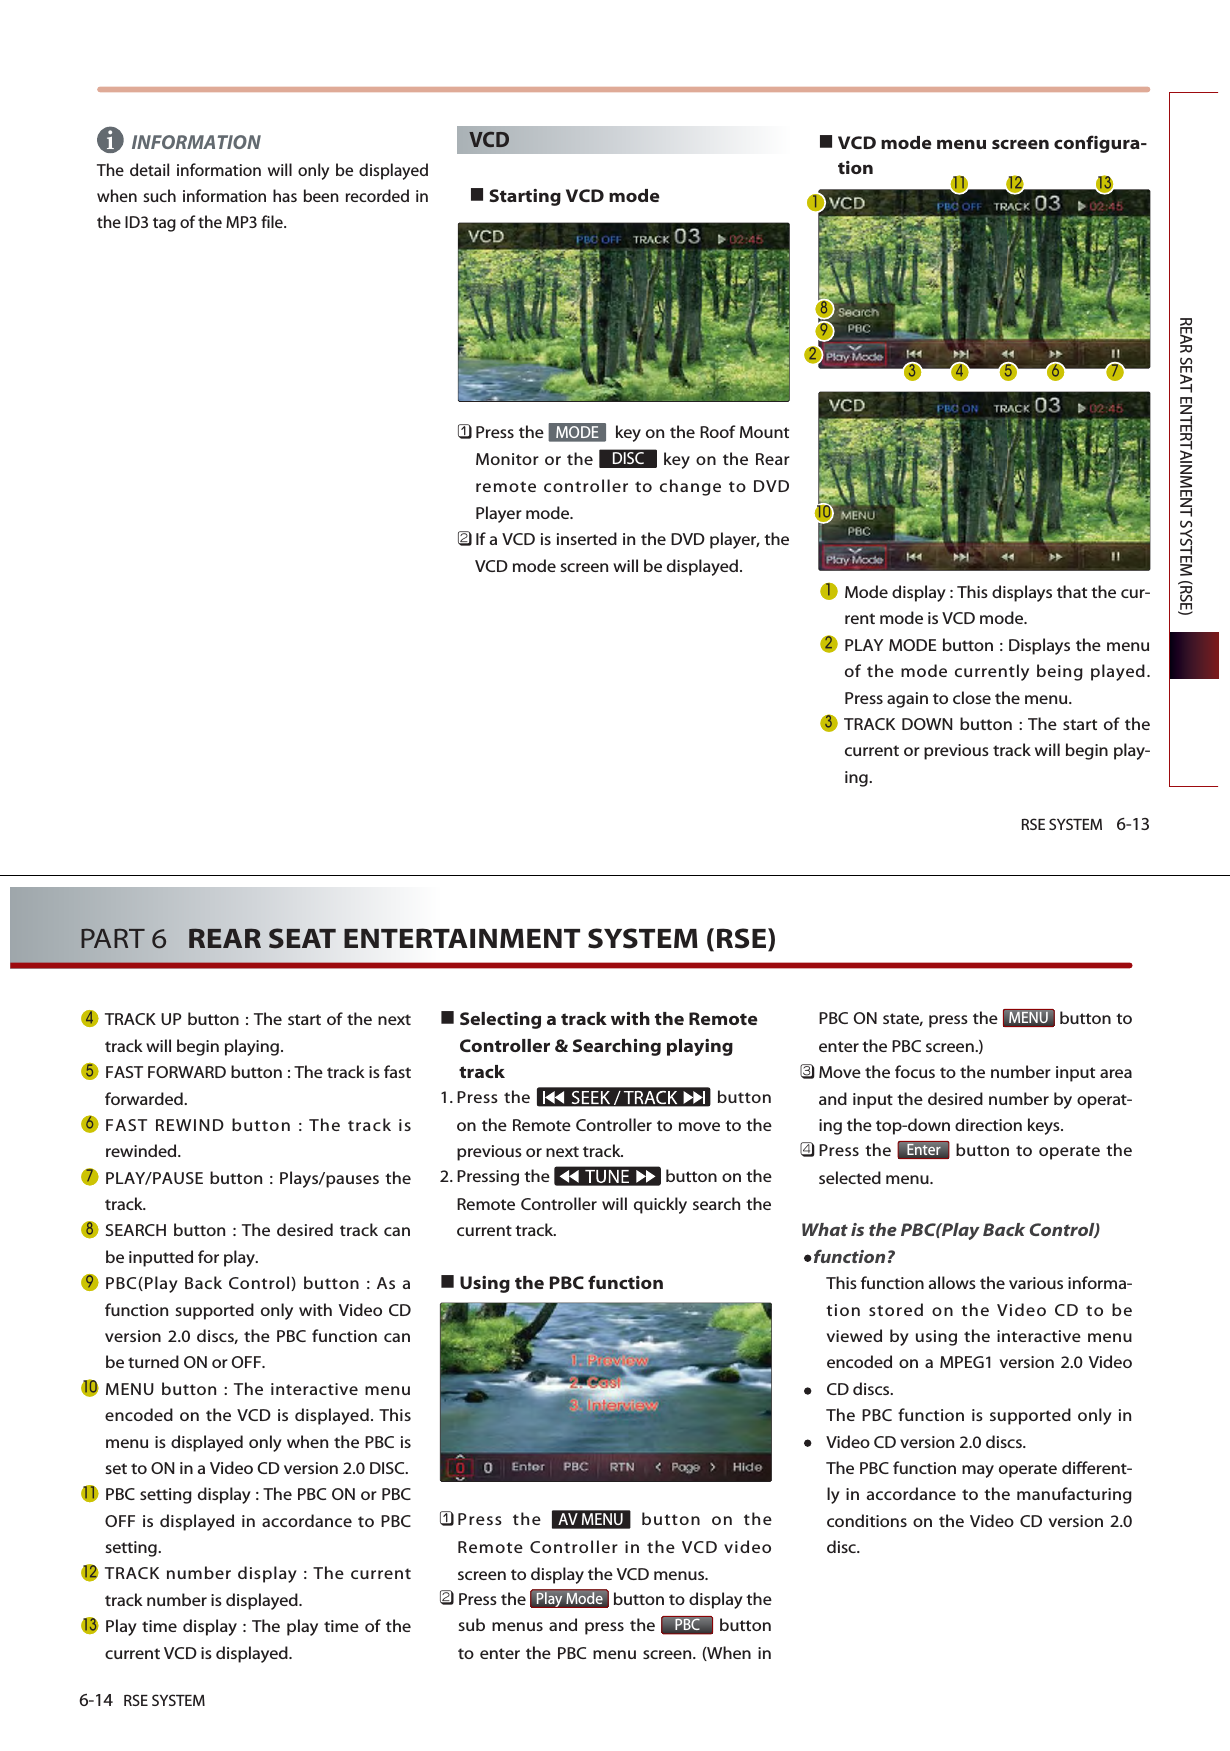
![NAVIGATION SYSTEM 3-29NAVIGATION SYSTEMHighway mode : If the button ispressed, then the following routeguidance screen will be displayed.Intersection zoom mode : This routeguidance screen is automatically displayedduring guidance at an intersection. Once guidance at the intersection iscomplete, the screen will automaticallydisappear and the previous guidancescreen will be restored. Highway junction mode : This routeguidance screen is automaticallydisplayed during guidance at highwayjunctions.Once guidance at a highway junction iscomplete, this screen will automaticallydisappear and the previous guidancescreen will be restored. Selecting other routePress the button. Other routes can be selected by pressingthe or buttons. Others3-30 NAVIGATION SYSTEMPART 3 NAVIGATION SYSTEMRoute guidance Route menu screen and functionsPress the key on the control panel. The ROUTE menu screen will be displayed. Cancel Route: Deletes destination,waypoints and terminates routeguidance.[Finishing route guidance], page 3-30 .Route Overview: Displays the entireroute and route detailed.[Route overview], page 3-31 .Route Option: The route option can bechanged.[Changing Route option], page 3-32 .Edit Waypoint: Waypoints can beadded/deleted and the order can bechanged.[Editing waypoints], page 3-32 .Detour: Searches detour routes. [Setting detour distance], page 3-35 .Avoid Streets: Searches routes whichavoid the selected streets. [Setting avoid streets on route], page3-35.Finishing route guidance (DeleteDestination)Press the key.Press the button. Press the button. The destination and waypoints aredeleted and the route guidance isterminated.[Finishing route guidance], page 3-30 .YesCancel RouteROUTEROUTE ](https://usermanual.wiki/HYUNDAI-MOBIS/AVN-215TDL.user-manual-2-of-2/User-Guide-1295156-Page-3.png)
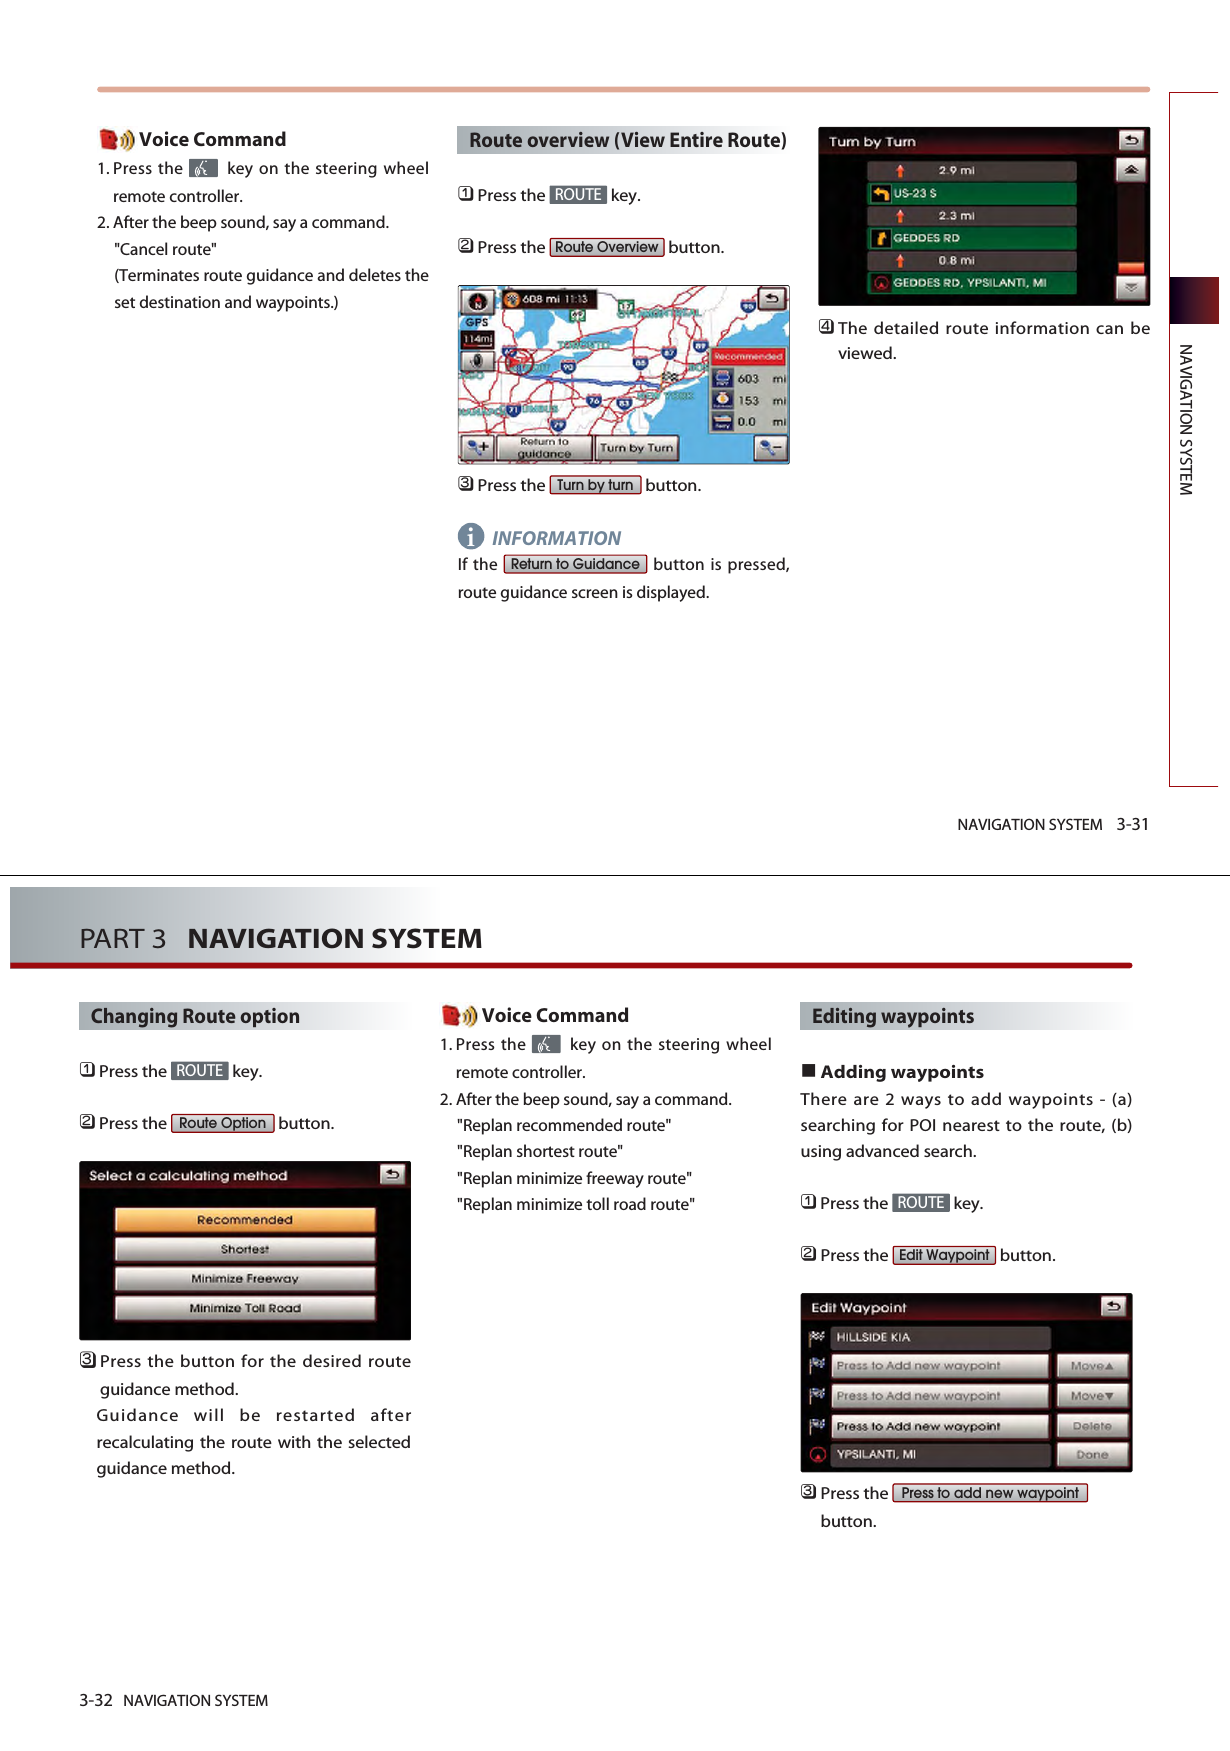
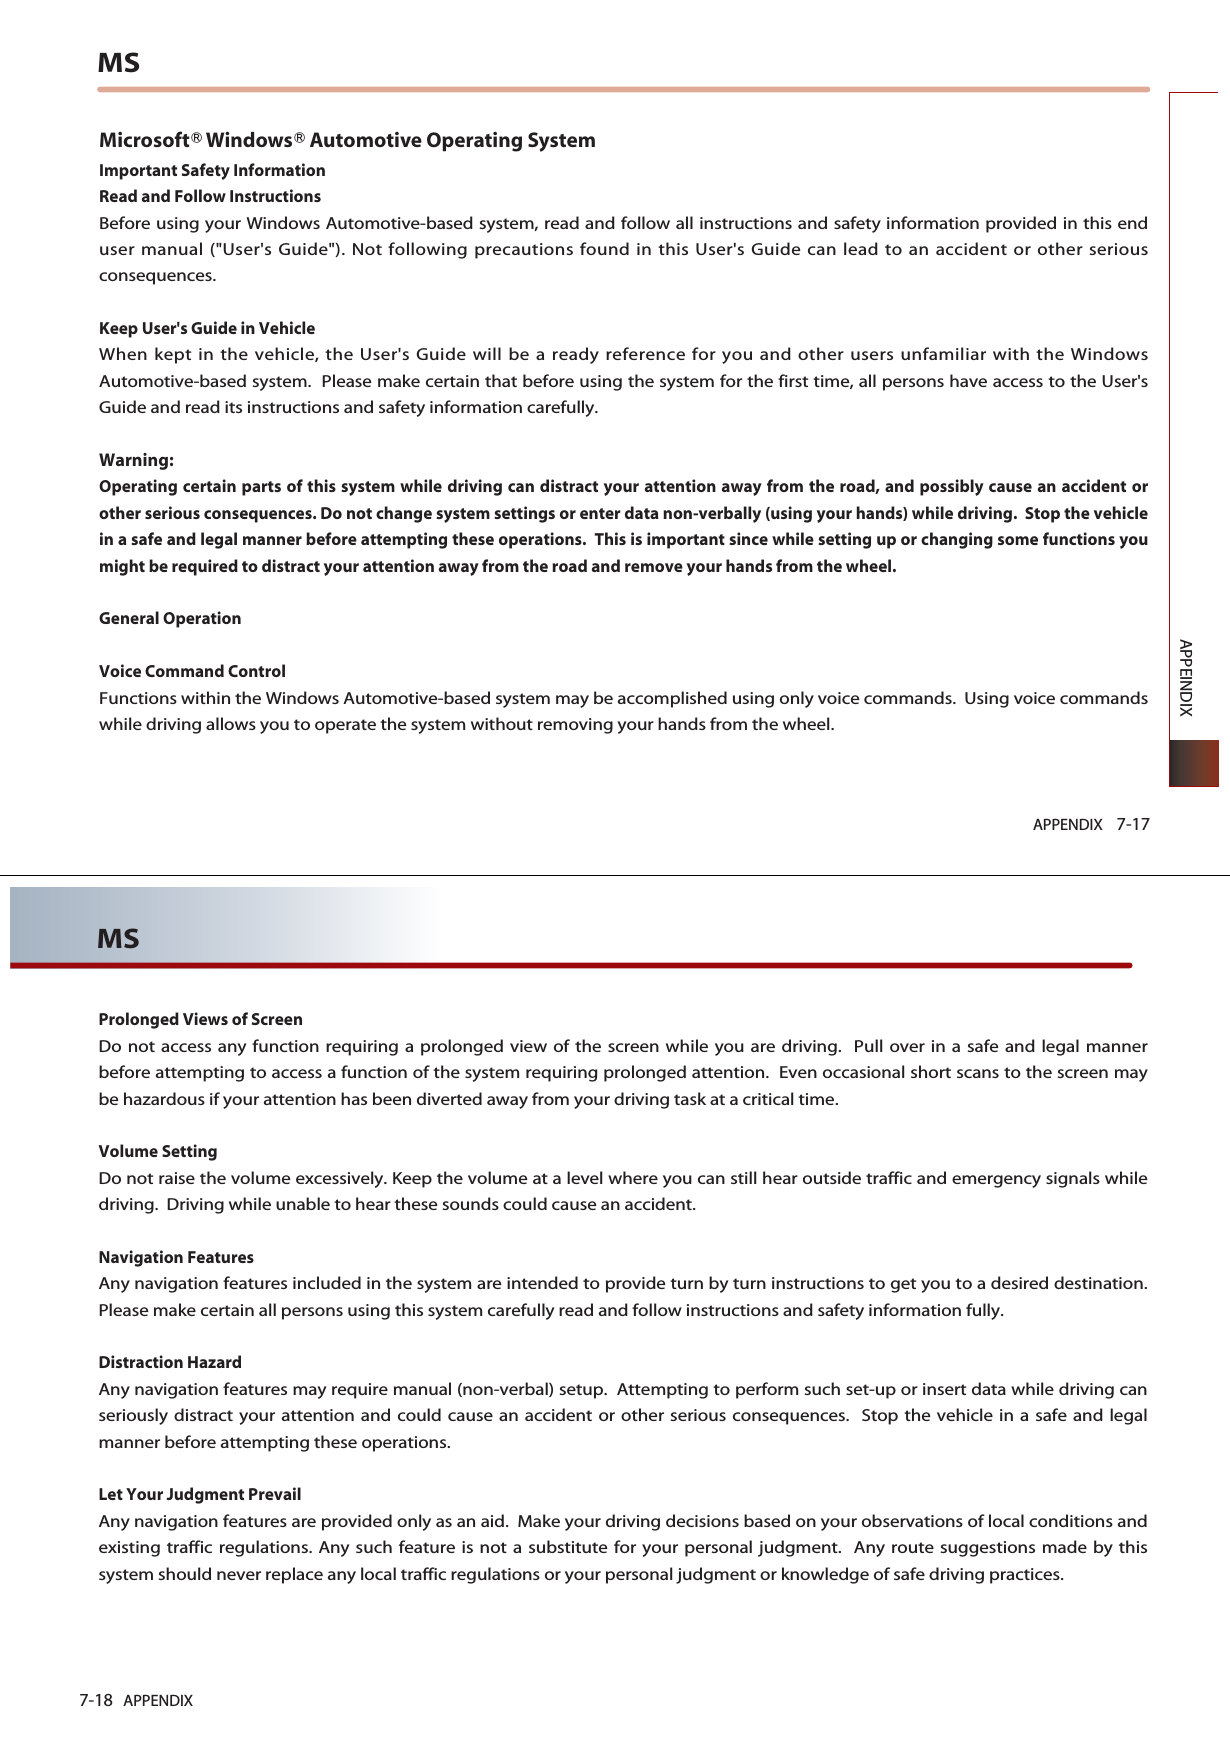
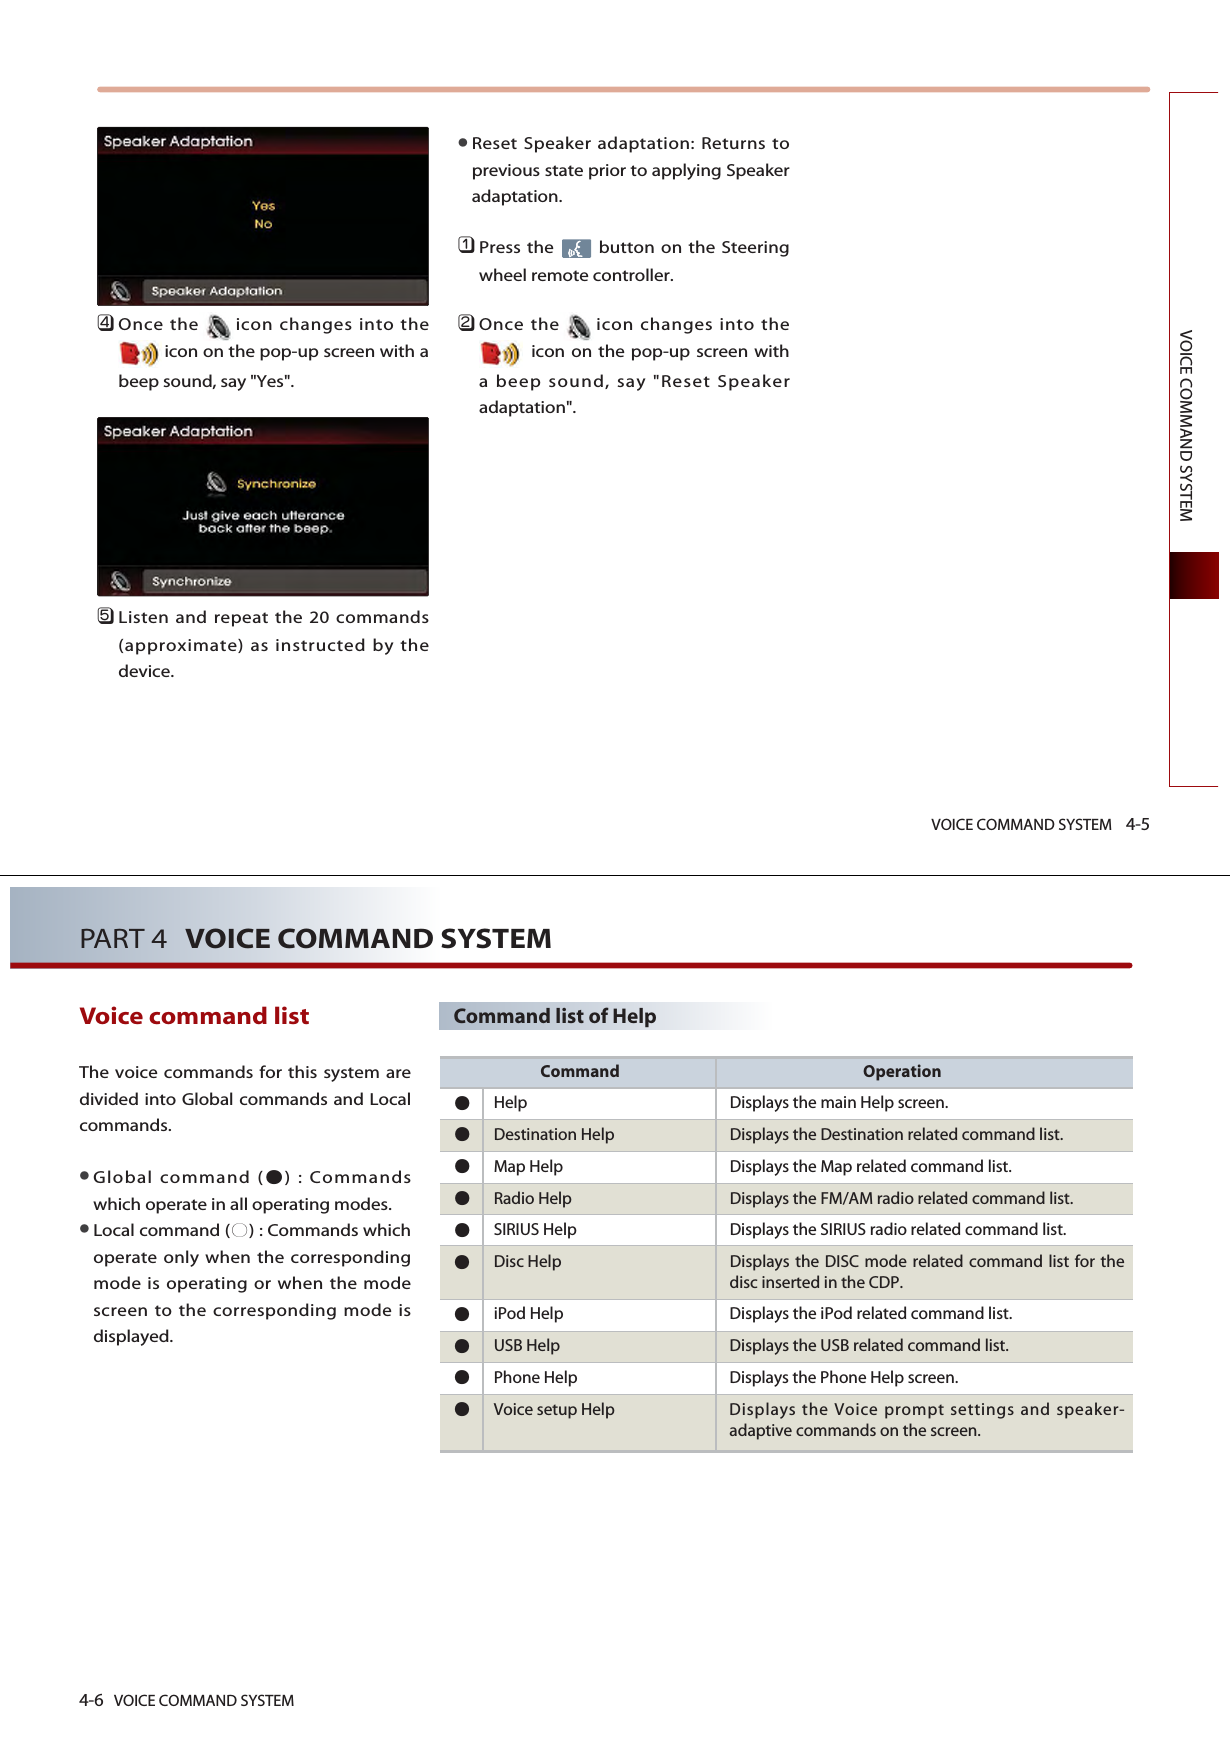
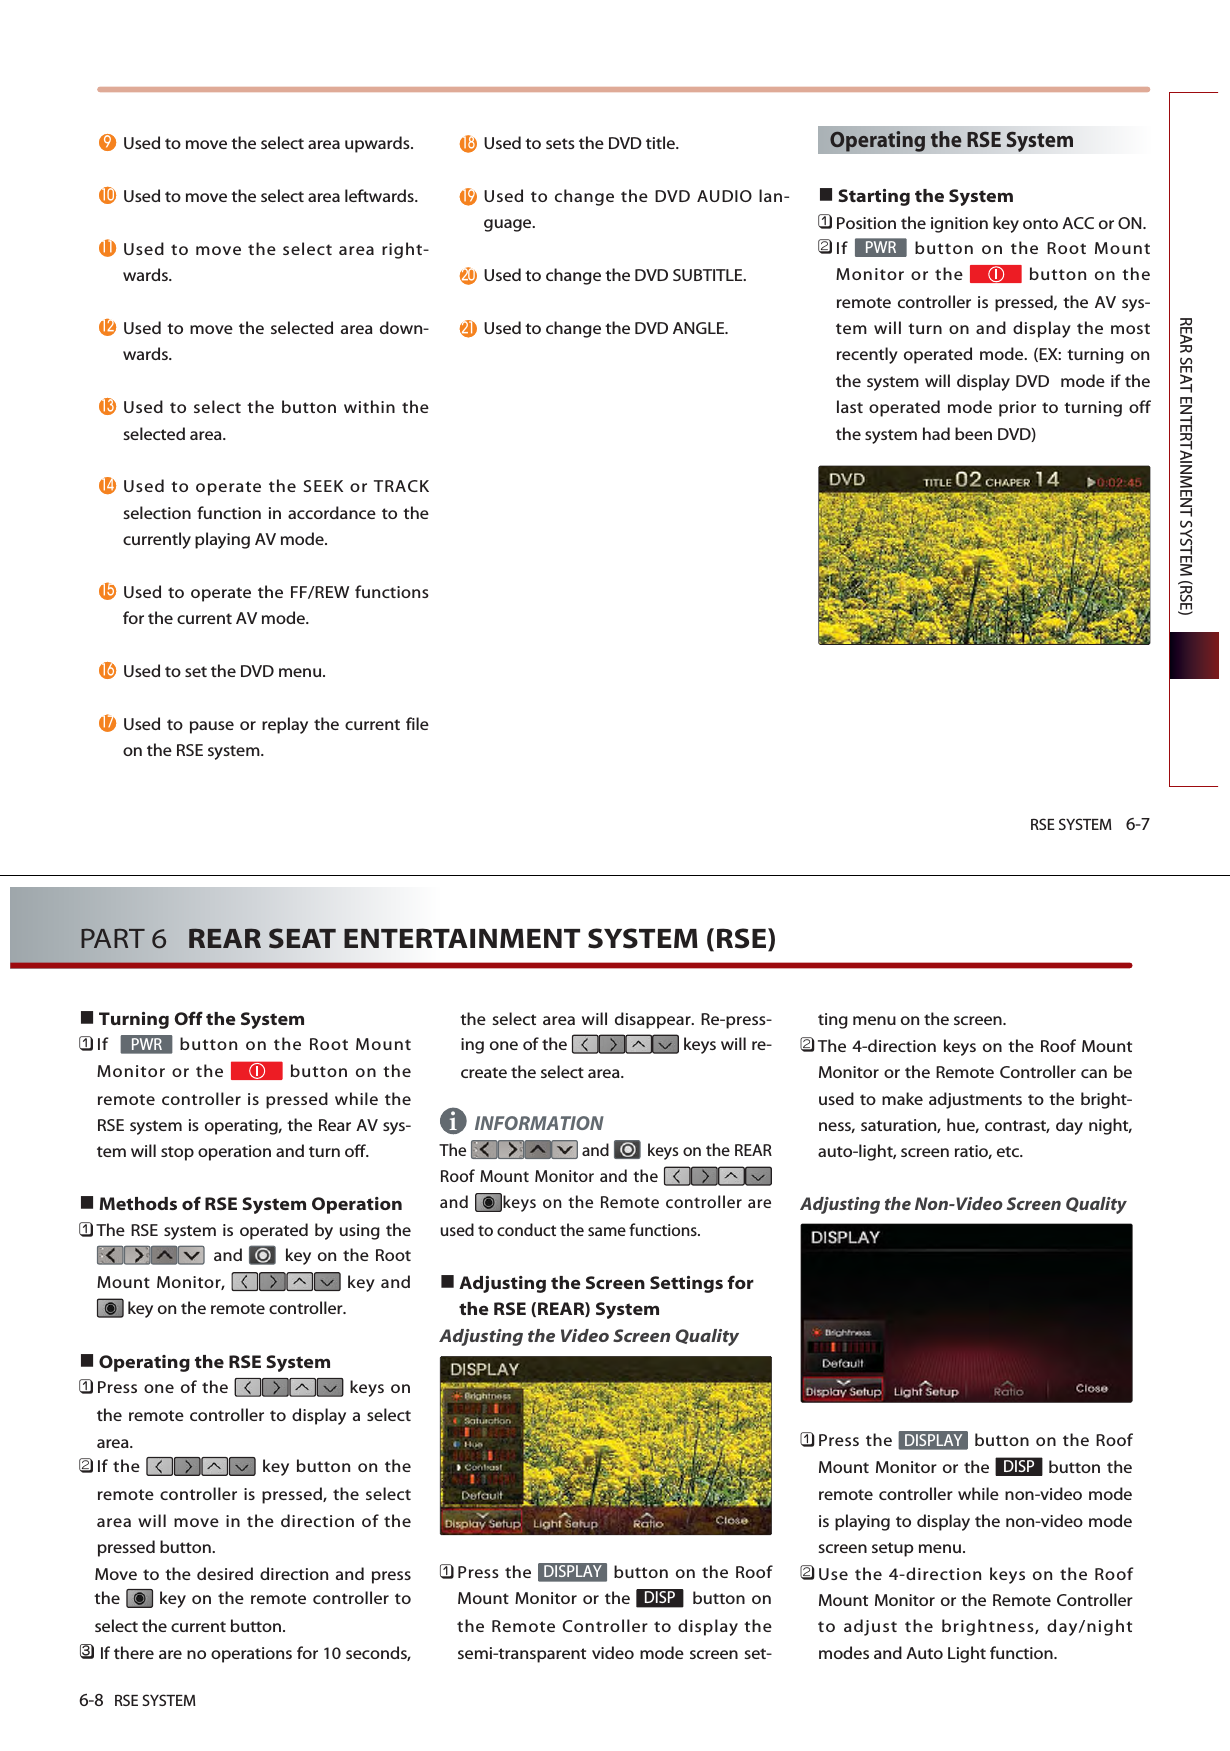
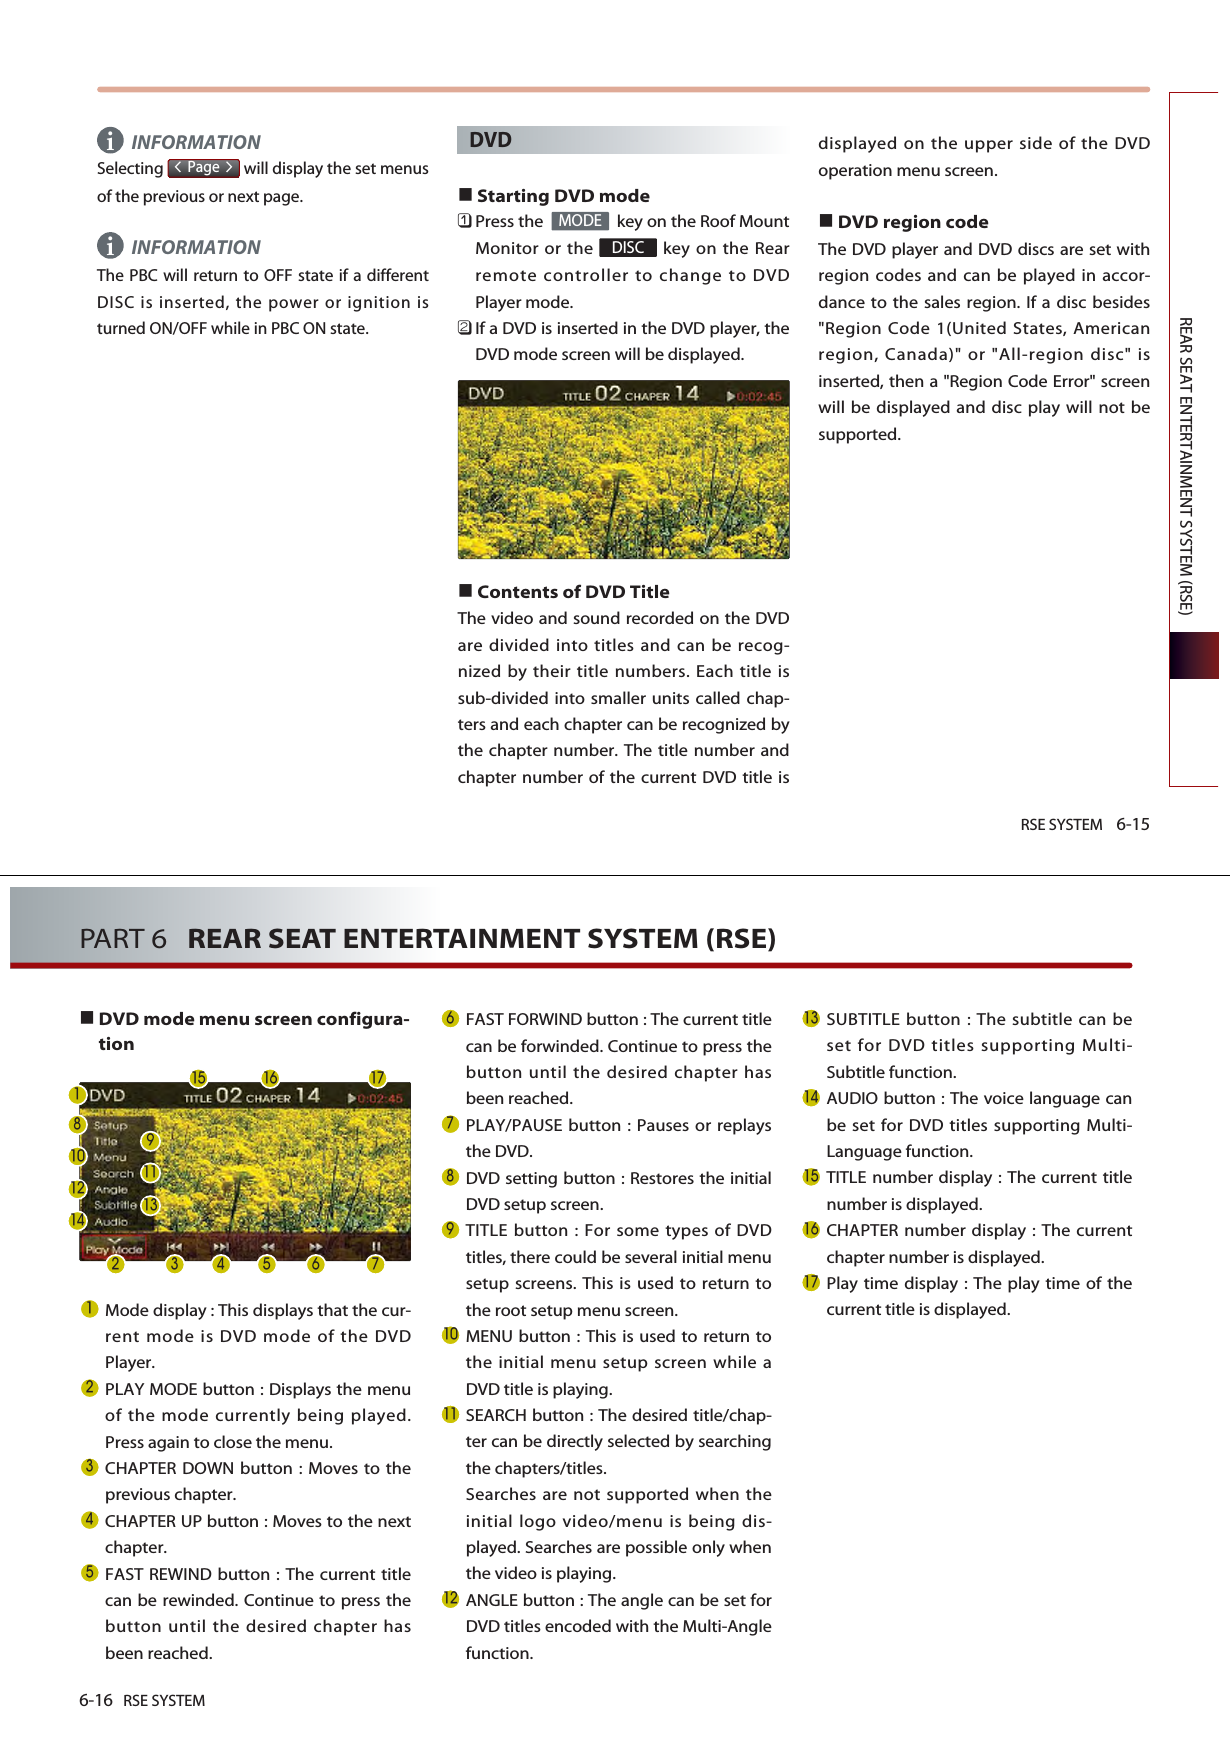
![NAVIGATION SYSTEM 3-33NAVIGATION SYSTEM(a) Searching POI lists near route Press the button. Select the desired category. Select the desired sub category from list. Select the desired POI from the list. The corresponding position will bedisplayed on the map. Press the button. Press the button to complete. Guidance will restart after recalculatingthe route. DoneAdd as WaypointNear POI lists on Route3-34 NAVIGATION SYSTEMPART 3 NAVIGATION SYSTEM(b) Using advanced Search The method for searching waypoints throughthe button is the samemethod as searching destination.[Searching a Destination], page 3-13.Deleting waypointsPress the key.Press the button.Select the waypoint and press thebutton.Press the button.After deleting, press the button tocomplete.Guidance will be restart after recalculating.Re-ordering waypointsPress the key.Press the button.Select the desired waypoint and use the, buttons to changethe order. Once re-ordering is complete, press thebutton to complete. Guidance will restart after recalculatingthe route. DoneMOVEMOVEEdit waypointROUTEDoneYesDeleteEdit waypointROUTEAdvanced(more)](https://usermanual.wiki/HYUNDAI-MOBIS/AVN-215TDL.user-manual-2-of-2/User-Guide-1295156-Page-5.png)
![NAVIGATION SYSTEM 3-35NAVIGATION SYSTEMSetting detour distancePress the key.Press the button.Select the desired detour range.Guidance will restart after recalculatingthe detour route. Voice Command1. Press the key on the steering wheelremote controller.2. After the beep sound, say a command."Detour <1 or 2 or 5 or 10> miles""Detour <1 or 2 or 5 or 10> kilometers"Setting avoid streets on routePress the key.Press the button.Select the desired streets to avoid( avoid, allow) and press the button to complete. Guidance will restarted after recalculating.DoneAvoid streetsROUTEDetourROUTE3-36 NAVIGATION SYSTEMPART 3 NAVIGATION SYSTEMSetup and Information Setup menu screen and functionsPress the key on the control panelto display the setup menu screen.Main button : Changes to the inputkeyboard type, voice command feedbackON/OFF settings and system initializationcan be made. [Main setting], page 3-36 .Traffic Setup button : Sets whether todisplay traffic information on map,whether to provide upcoming trafficinformation voice guidance, and whetherto display the detour route popupshowing upcoming traffic information. Navigation button : Navigation relatedsettings can be set. [Navigation setting], page 3-38 .My Places button : The Address book,Home address, Favorite places, Previousdestination can be edited.[My places setting], page 3-43 .System Info button : The system versioninformation can be viewed and systemupgrades can be conducted. [System information and update],page 3-51 .Voice Setup button : Adjusts theNavigation guidance volume. [Voice guidance volume setting],page 3-51 .Help button : The help contents can beviewed. [Help], page 3-54 .Display button : Adjusts the displaysetting. [Display setting], page 1-12 .Main settingPress the key.Press the button.Select the desired changes and press thebutton to complete. Setting keyboard for inputtingletterPress the desired keyboard type button.The selection will be highlighted. DoneMainSETUPSETUP ](https://usermanual.wiki/HYUNDAI-MOBIS/AVN-215TDL.user-manual-2-of-2/User-Guide-1295156-Page-6.png)
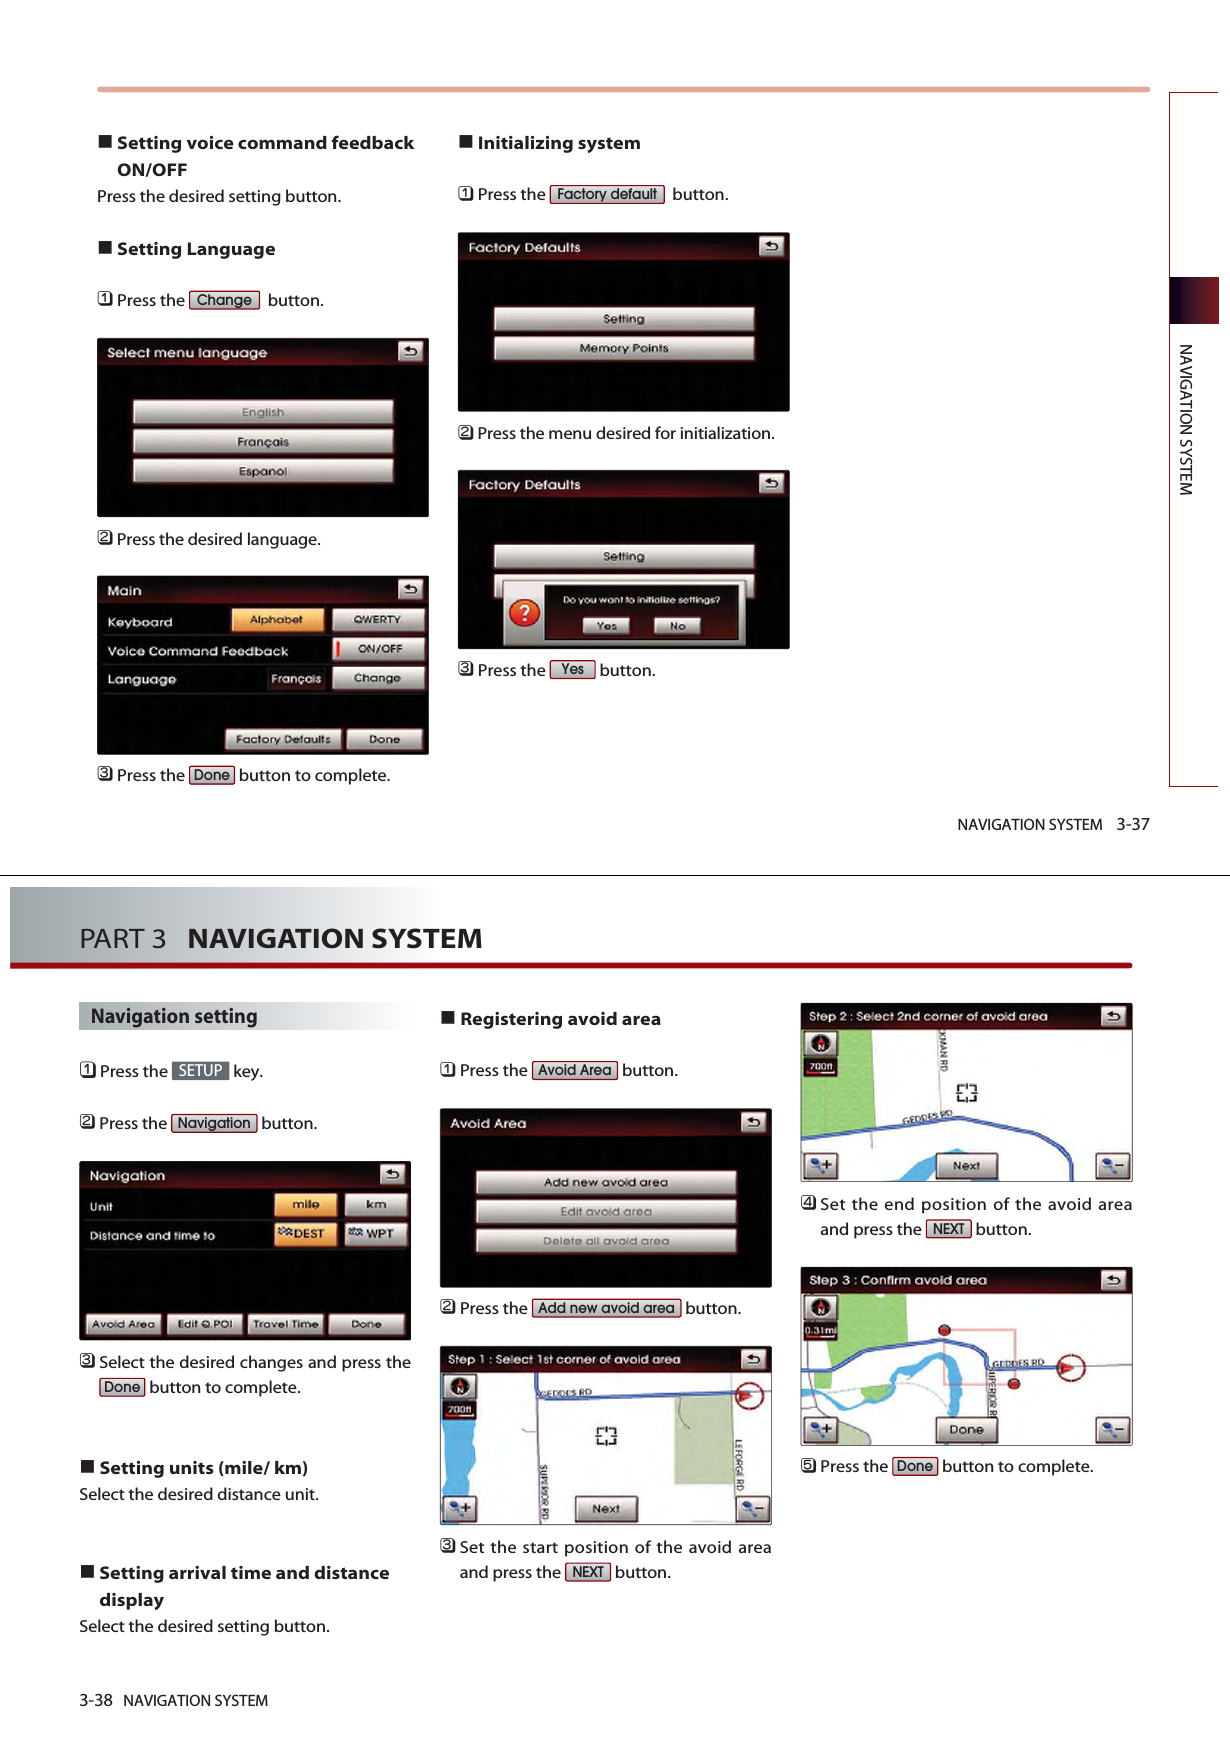
![NAVIGATION SYSTEM 3-43NAVIGATION SYSTEMMy places settingRegistering new address inaddress bookThere are 3 ways to register a new addressin the address book - (a) by DEST menu, (b)by registering address in address book, (c)from map scroll. (a) by DEST menuPress the key.Search through the desired method. The search process is the same as themethod for destination search.[Searching a destination], page 3-13.Press the button.Press the desired address book (user)button.Input the name and telephone informationand press the button to complete.[Editing an address of address book],page 3-45.(b) by registering in the address book Press the key.Press the button.Press the button.Press the desired address book (user)button.Address bookMy PlacesSETUPDoneAdd to Address BookDEST3-44 NAVIGATION SYSTEMPART 3 NAVIGATION SYSTEMPress the button.Press the button to search theaddress.[Searching an address], page 3-13.INFORMATIONPress the button to inputthe address of the current position. Input the name and telephone informationand press the button to complete.[Editing an address of address book],page 3-45.(c) from map scrollIn the map screen, scroll the map to thedesired position. Press the button.Press the desired address book (user)button.Input the name and telephone informationand press the button to complete.[Editing an address of address book],page 3-45.DoneAdd to Address BookDoneStore current positionAddressNew Addressi](https://usermanual.wiki/HYUNDAI-MOBIS/AVN-215TDL.user-manual-2-of-2/User-Guide-1295156-Page-10.png)
![NAVIGATION SYSTEM 3-45NAVIGATION SYSTEMEditing an address of addressbookPress the key.Press the button.Press the button.Select the desired address book (user)button .Select the desired address to edit. Press the button to input theaddress name.Input the address name and press thebutton to complete.Press the button to search theaddress. The process is the same as themethod for searching an address.[Searching an Address] , page 3-13.INFORMATIONPress the button to inputthe address of the current position.Store current positionAddressDoneNameAddress bookMy placesSETUPi3-46 NAVIGATION SYSTEMPART 3 NAVIGATION SYSTEMPress the button to input thephone number.Input the phone number and press thebutton to complete.Press the button to complete.Deleting an address of addressbookPress the key.Press the button.Press the button.Select the desired address book (user)button.Select the desired address button todelete.Press the button.DeleteAddress bookMy placesSETUPDoneDonePhone](https://usermanual.wiki/HYUNDAI-MOBIS/AVN-215TDL.user-manual-2-of-2/User-Guide-1295156-Page-11.png)
![NAVIGATION SYSTEM 3-47NAVIGATION SYSTEMPress the button.Deleting an address bookPress the key.Press the button.Press the button.Press the desired address book (user)button.Press the button. Press the button.YesDelete allAddress bookMy placesSETUPYes3-48 NAVIGATION SYSTEMPART 3 NAVIGATION SYSTEMRegistering home addressPress the key.Press the button.Press the button.Press the button. INFORMATIONPress the button toregister the current position as Home.Search the address. The process is the same method assearching an address.[Searching an Address], page 3-13.Press the button to complete.Deleting home addressPress the key.Press the button.Press the button.Press the button.DeleteHome AddressMy placesSETUPDoneStore current positionSearch AddressHome AddressMy placesSETUPi](https://usermanual.wiki/HYUNDAI-MOBIS/AVN-215TDL.user-manual-2-of-2/User-Guide-1295156-Page-12.png)
![NAVIGATION SYSTEM 3-49NAVIGATION SYSTEMPress the button.Registering favorite placePress the key.Press the button.Press the button.Press the number of the Favorite Place toregister.Press the button.INFORMATIONPress the button toregister the current position as a Favorite place. Search the address. The process is the same as the methodfor searching an address.[Searching an Address], page 3-13.Store current positionSearch addressFavorite PlacesMy placesSETUPYesi3-50 NAVIGATION SYSTEMPART 3 NAVIGATION SYSTEMPress the button to complete.Deleting favorite placePress the key.Press the button.Press the button.Select the desired favorite place buttonto delete. Press the button.Press the button.YesDeleteFavorite PlacesMy placesSETUPDone](https://usermanual.wiki/HYUNDAI-MOBIS/AVN-215TDL.user-manual-2-of-2/User-Guide-1295156-Page-13.png)


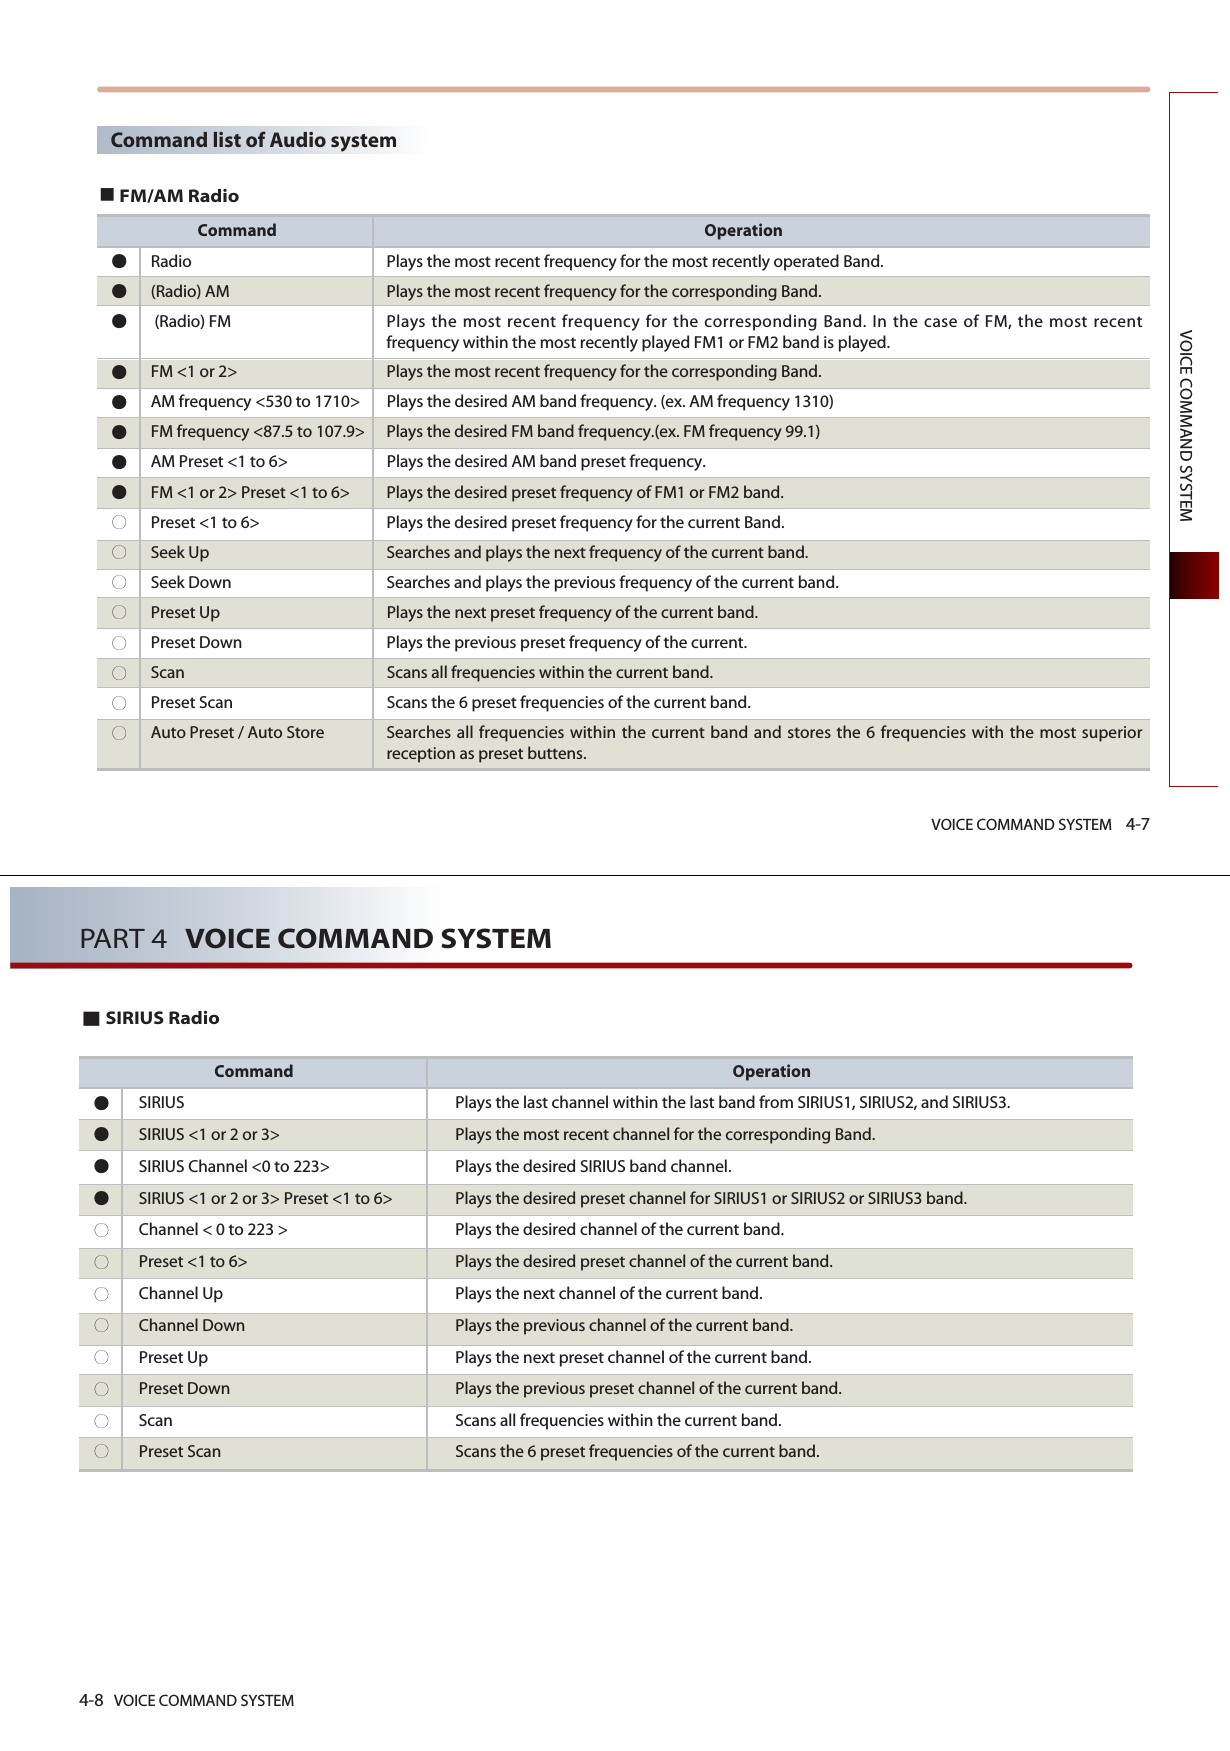
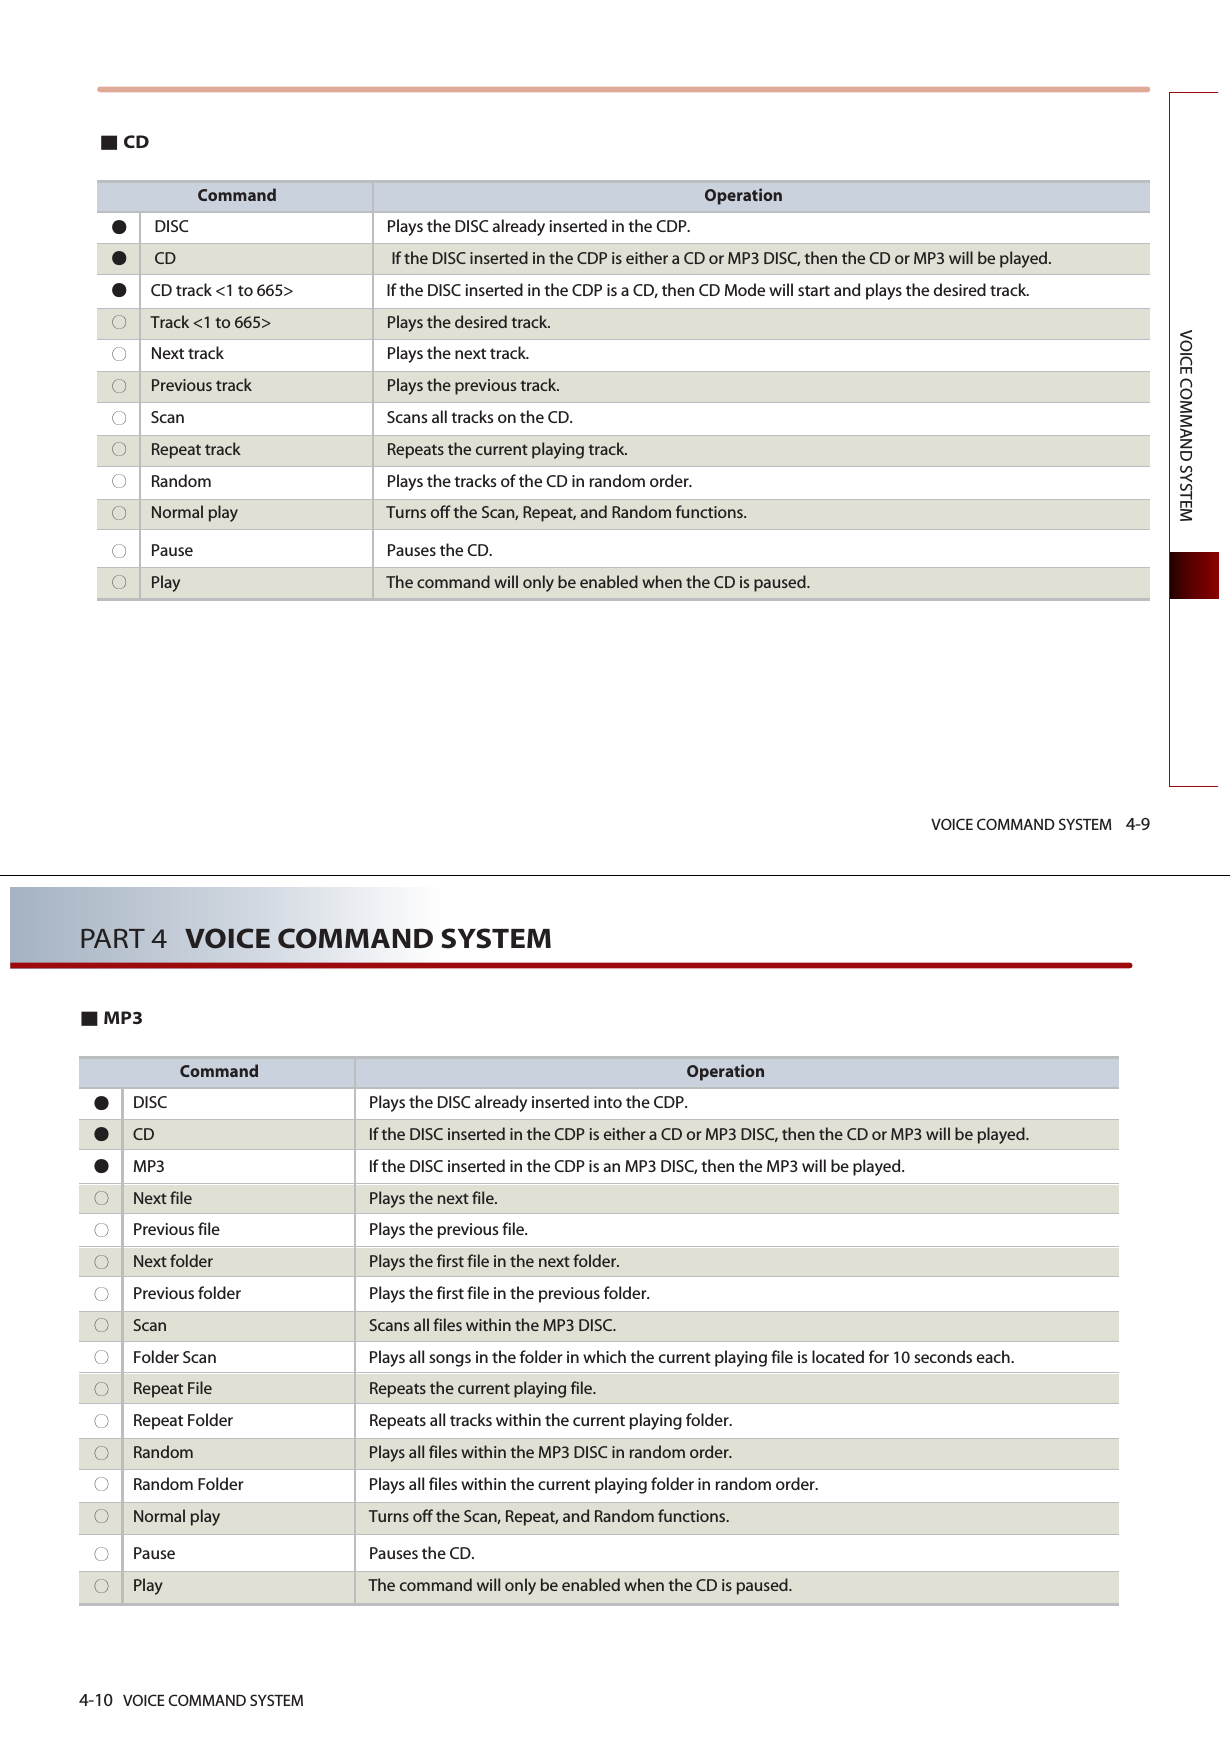
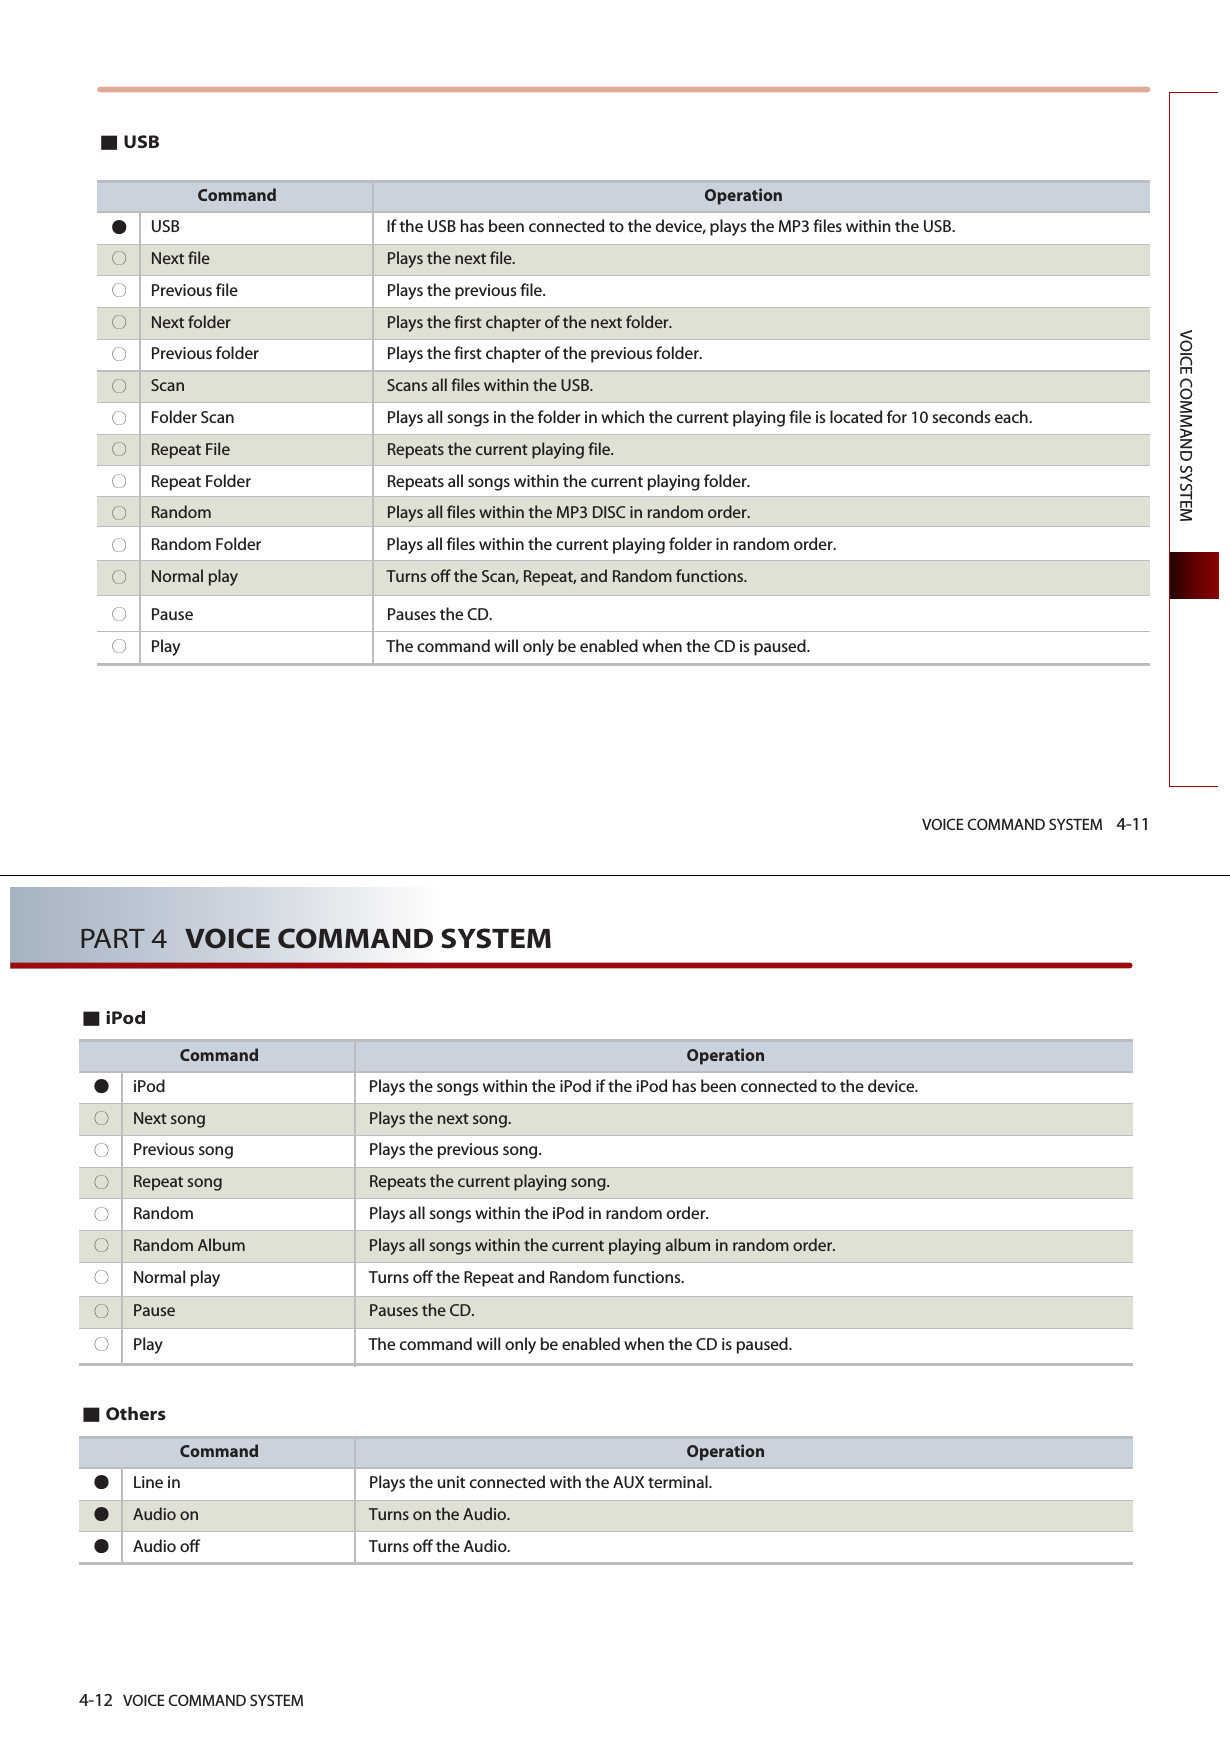
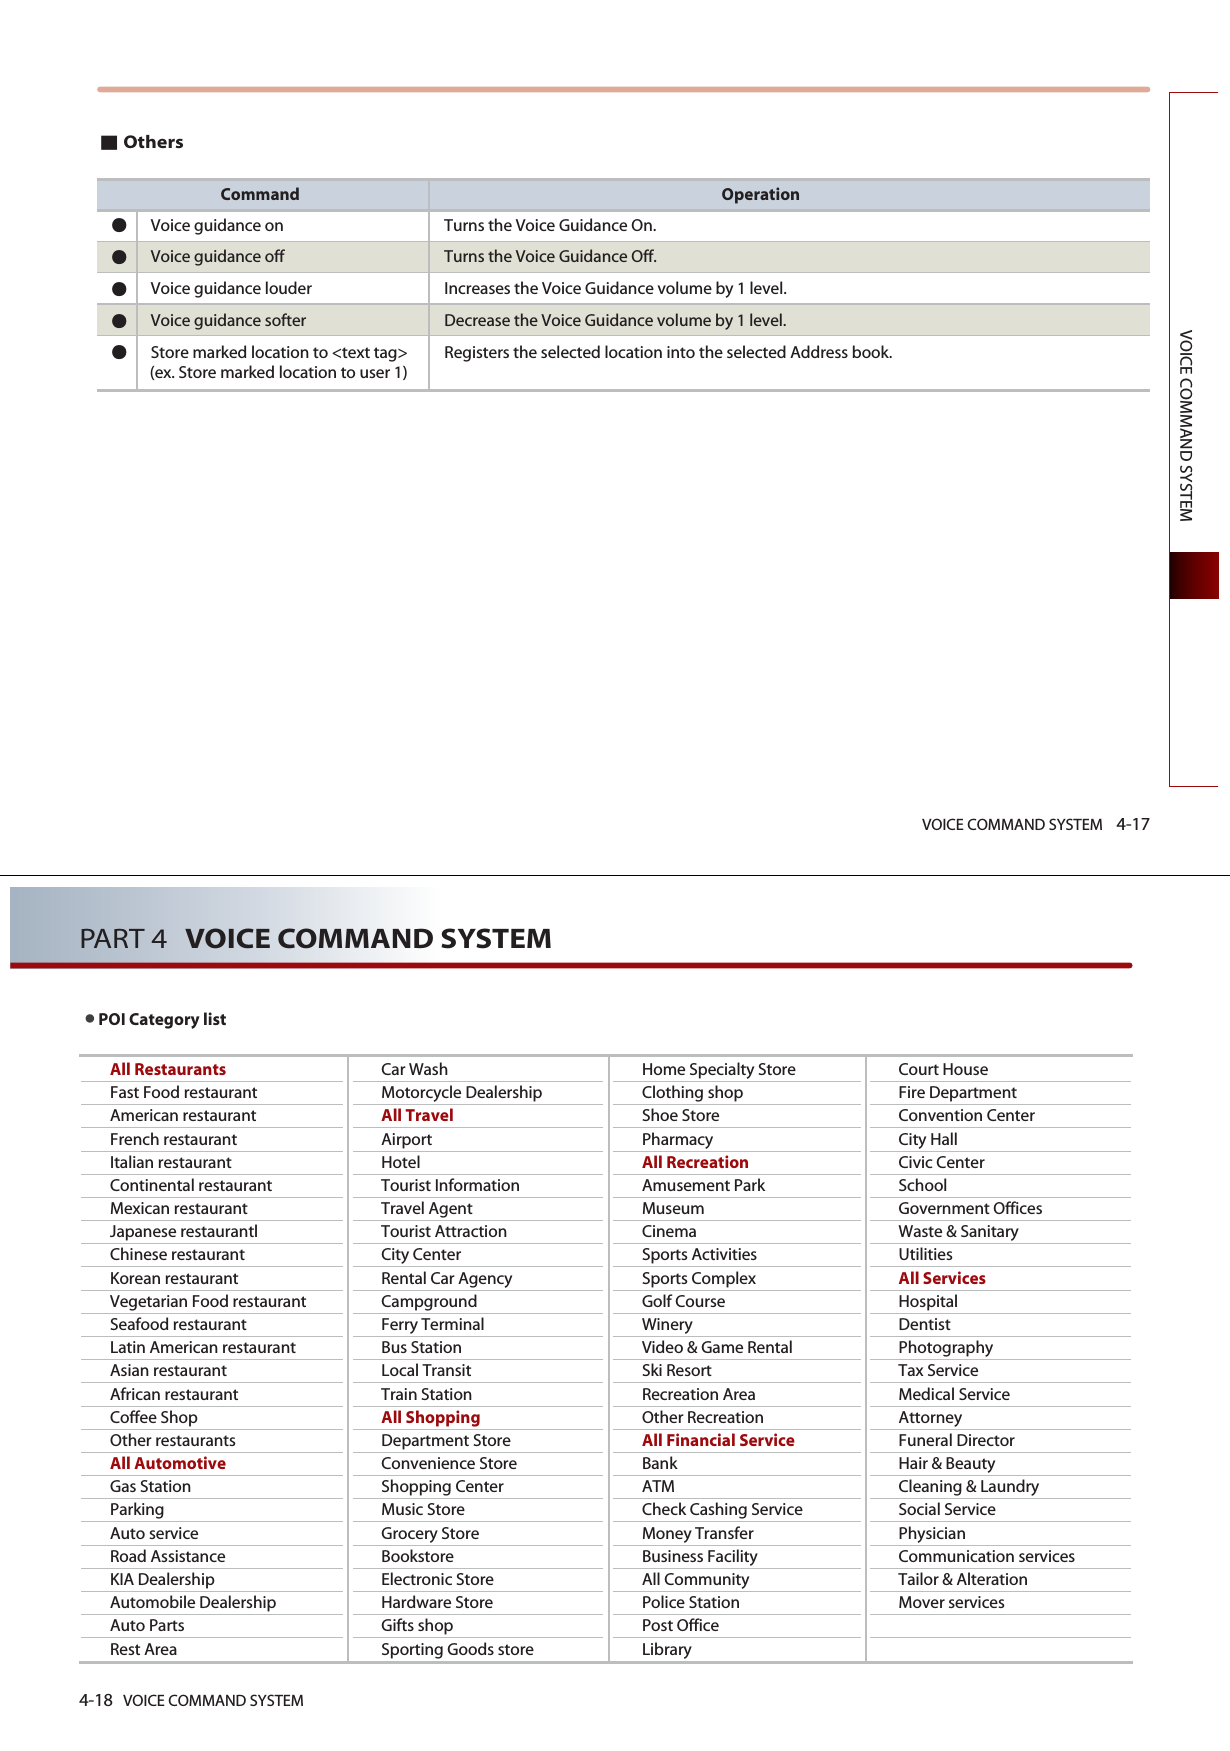
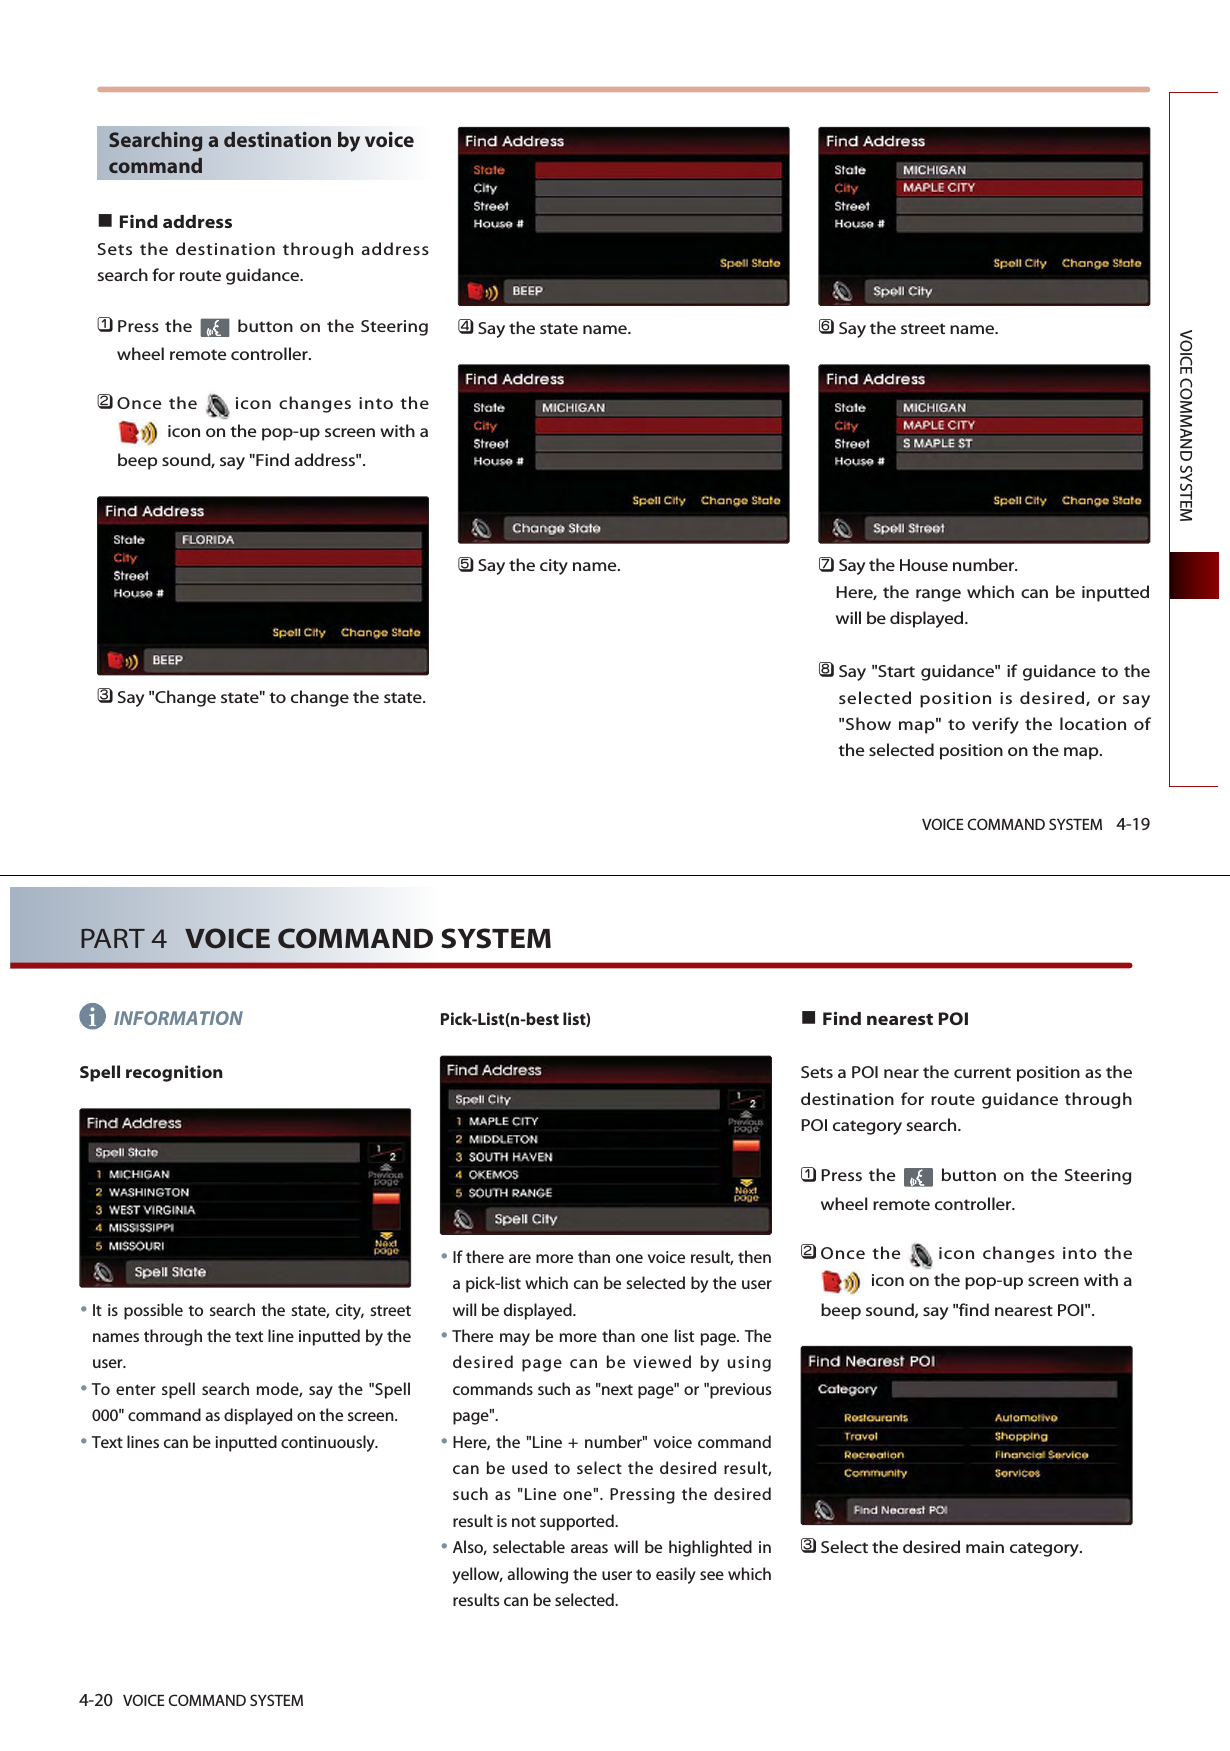
![VOICE COMMAND SYSTEM 4-1VOICE COMMAND SYSTEMPART 4VOICE COMMAND SYSTEM Operating voice command 4-2Condition for voice command system4-2Basic operation for voice command control 4-2Voice command help 4-3Setting up the voice commandsystem 4-4Setting voice Prompt ON/OFF 4-4Speaker adaptation 4-4Voice command list 4-6Command list of Help 4-6Command list of Audio system 4-7FM/AM Radio 4-7SIRIUS Radio 4-8CD 4-9MP3 4-10USB 4-11iPod 4-12Others 4-12Command list of Phone 4-13Command list of Navigation system4-13Map 4-13Destination 4-15Route 4-16Others 4-17POI Category list 4-19Searching a destination by voice command 4-19Find address 4-19Find nearest <POI name> 4-20Destination POI by phone number 4-22Find emergency <Category> 4-23Destination by address book 4-24Previous destination 4-24Previous start point 4-25Go home 4-25Destination by memory point <1 to 5> 4-254-2 VOICE COMMAND SYSTEMPART 4 VOICE COMMAND SYSTEMOperating voice command Condition for voice commandsystemMost of the functions within the AV andNavigation system can be operated byvoice. Please follow the followinginstructions for optimal voice recognitionperformance.Close all windows and the sunroof. Theperformance of the voice recognitioncan be improved if the environment ofthe car interior is quiet. Press the voice recognition button andsay the desired voice command afterthe sound of the beep.The microphone is positioned abovethe driver so that voice commands canbe said while maintaining a properposture.Pronounce the voice commandsnaturally and clearly as if in a normalconversation.Basic operation for voicecommand controlPress the button on the steeringwheel remote controller. A voice command window will bedisplayed on the lower side of thescreen followed by a "Command please"system voice comment. INFORMATIONThe System voice comment "CommandPlease" will not be provided when the Voiceprompt is turned OFF. Once the icon changes into theicon on the pop-up screen with abeep sound, say the desired voicecommand (ex : previous destination)[Voice command list], page 4-6.[Searching a destination by voicecommand], page 4-19.If the exact command is not known, use the"Help" command to view the commandslist in detail. INFORMATIONPress the shortly to input a voicecommand from among the system voicecomments.The system voice instruction comment willimmediately terminate. ii](https://usermanual.wiki/HYUNDAI-MOBIS/AVN-215TDL.user-manual-2-of-2/User-Guide-1295156-Page-17.png)
![VOICE COMMAND SYSTEM 4-13VOICE COMMAND SYSTEMMapCommand OperationMap Current location Displays the current position of the vehicle.Zoom In Decreases the map zoom by one level. Zoom Out Increases the map zoom by one level. Zoom minimum Displays the map screen in the maximum zoom level. Zoom maximum Displays the map screen in the minimum zoom level. Zoom level <1 to 14> Displays the map in the zoom level selected from the 14 levels. Zoom <scale factor> Displays the map in the corresponding zoom.Command list of navigation systemNavigation commands will operate only agreeing to the terms and conditions for the Navigation system. Command OperationCall Name Makes the call to the name.Dial Number Makes the call to the number. Redial The recently called number is redialed. Recent Calls The user can selest a number from the outgoing, incoming, and missed calls. Command list of Phone4-14 VOICE COMMAND SYSTEMPART 4 VOICE COMMAND SYSTEMCommand Operation150 feet / 50 meters300 feet /100 meters700 feet / 200 meters0.25 miles / 400 meters0.5 miles / 800 meters1 mile / 1.6 kilometers2 miles / 3.2 kilometers4 miles / 6.4 kilometers8 miles / 12 kilometers16 miles / 25 kilometers32 miles / 50 kilometers64 miles / 100 kilometers130 miles / 200 kilometers250 miles / 400 kilometers(ex.Zoom 0.25 miles, zoom 400 meters)North up Displays the map in North Up mode. Heading up Displays the map in Heading Up mode. Show <POI name> (ex. Show ATM) Displays the selected POI categories. [POI Category list], page 4-18.Hide <POI name> (ex. Hide ATM) Hides the selected POI categories. [POI Category list], page 4-18.Hide all Hides all POI categories. Daylight mode Converts the map display into daylight mode. Night mode Converts the map display into night mode. Auto mode Converts the map display is between daylight/night modes automatically.](https://usermanual.wiki/HYUNDAI-MOBIS/AVN-215TDL.user-manual-2-of-2/User-Guide-1295156-Page-23.png)
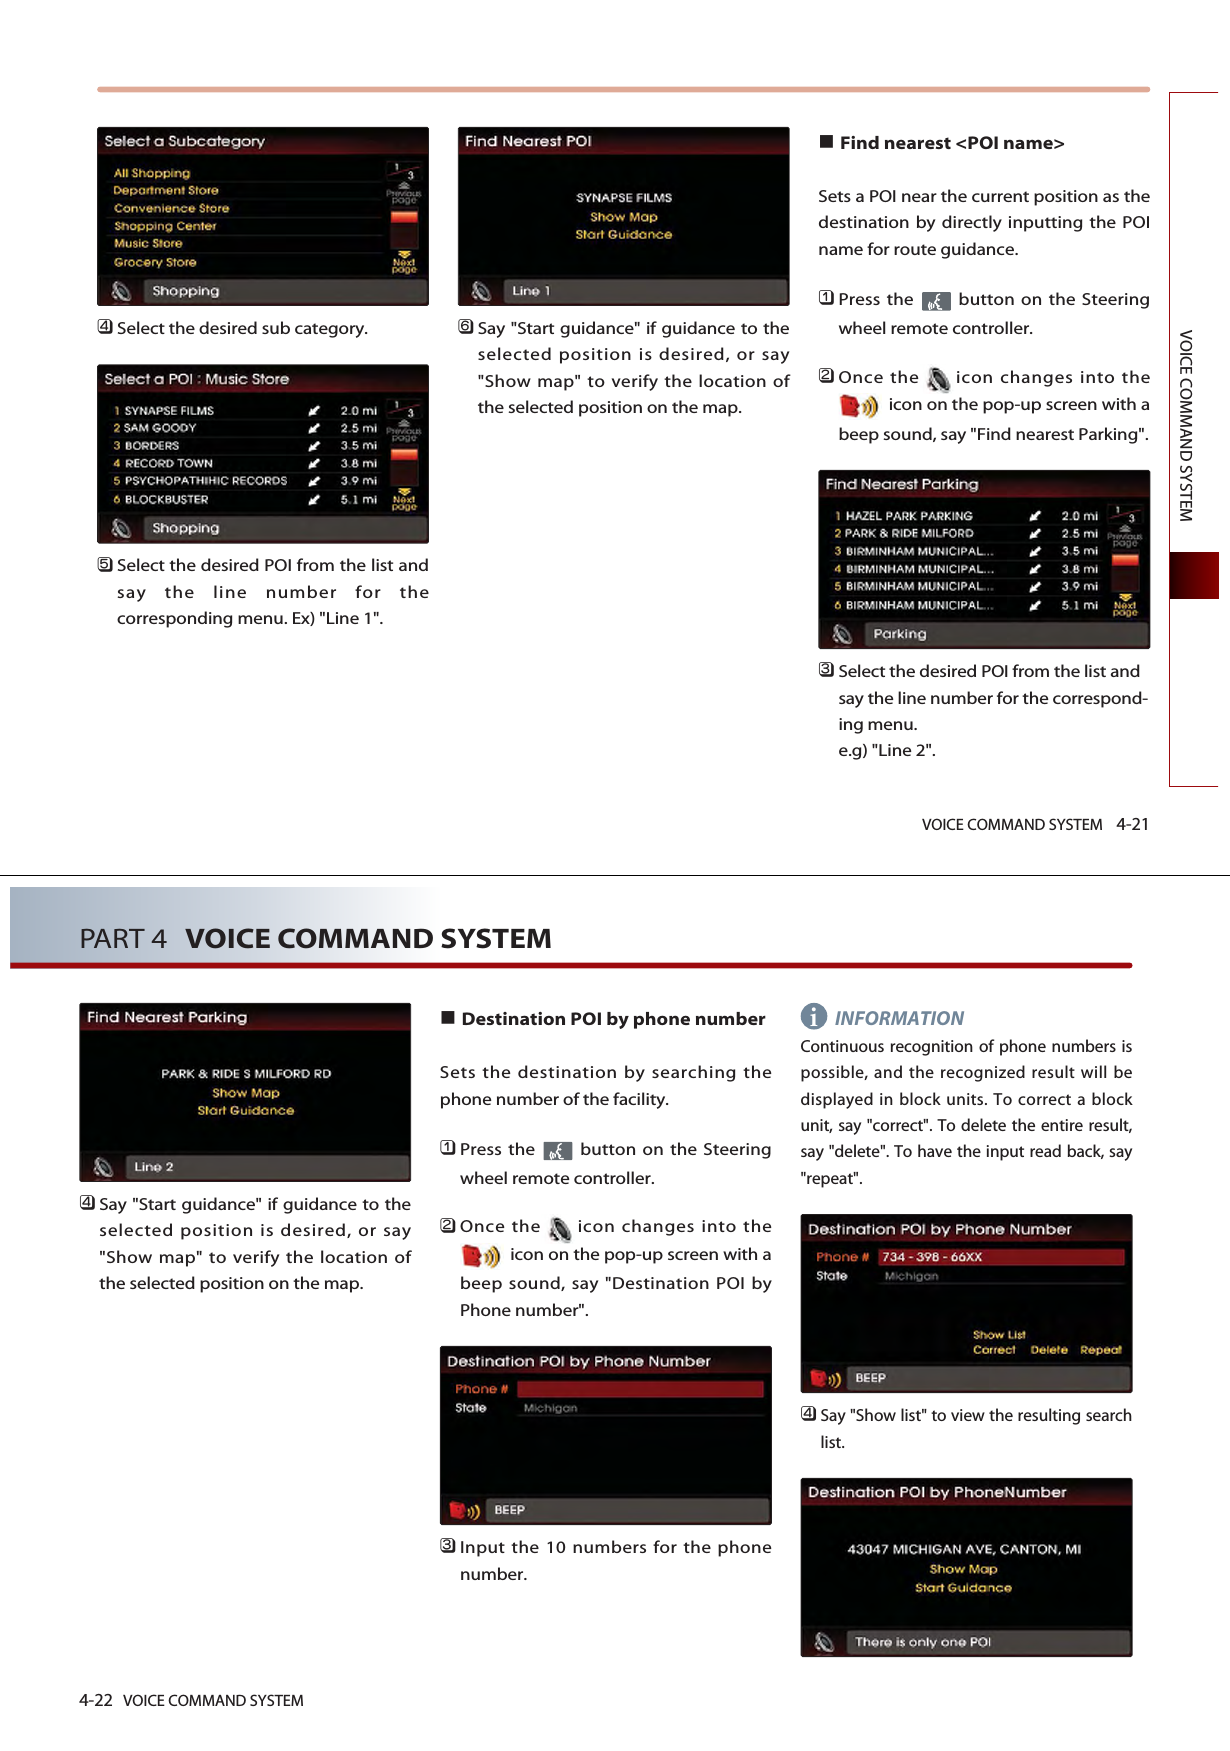
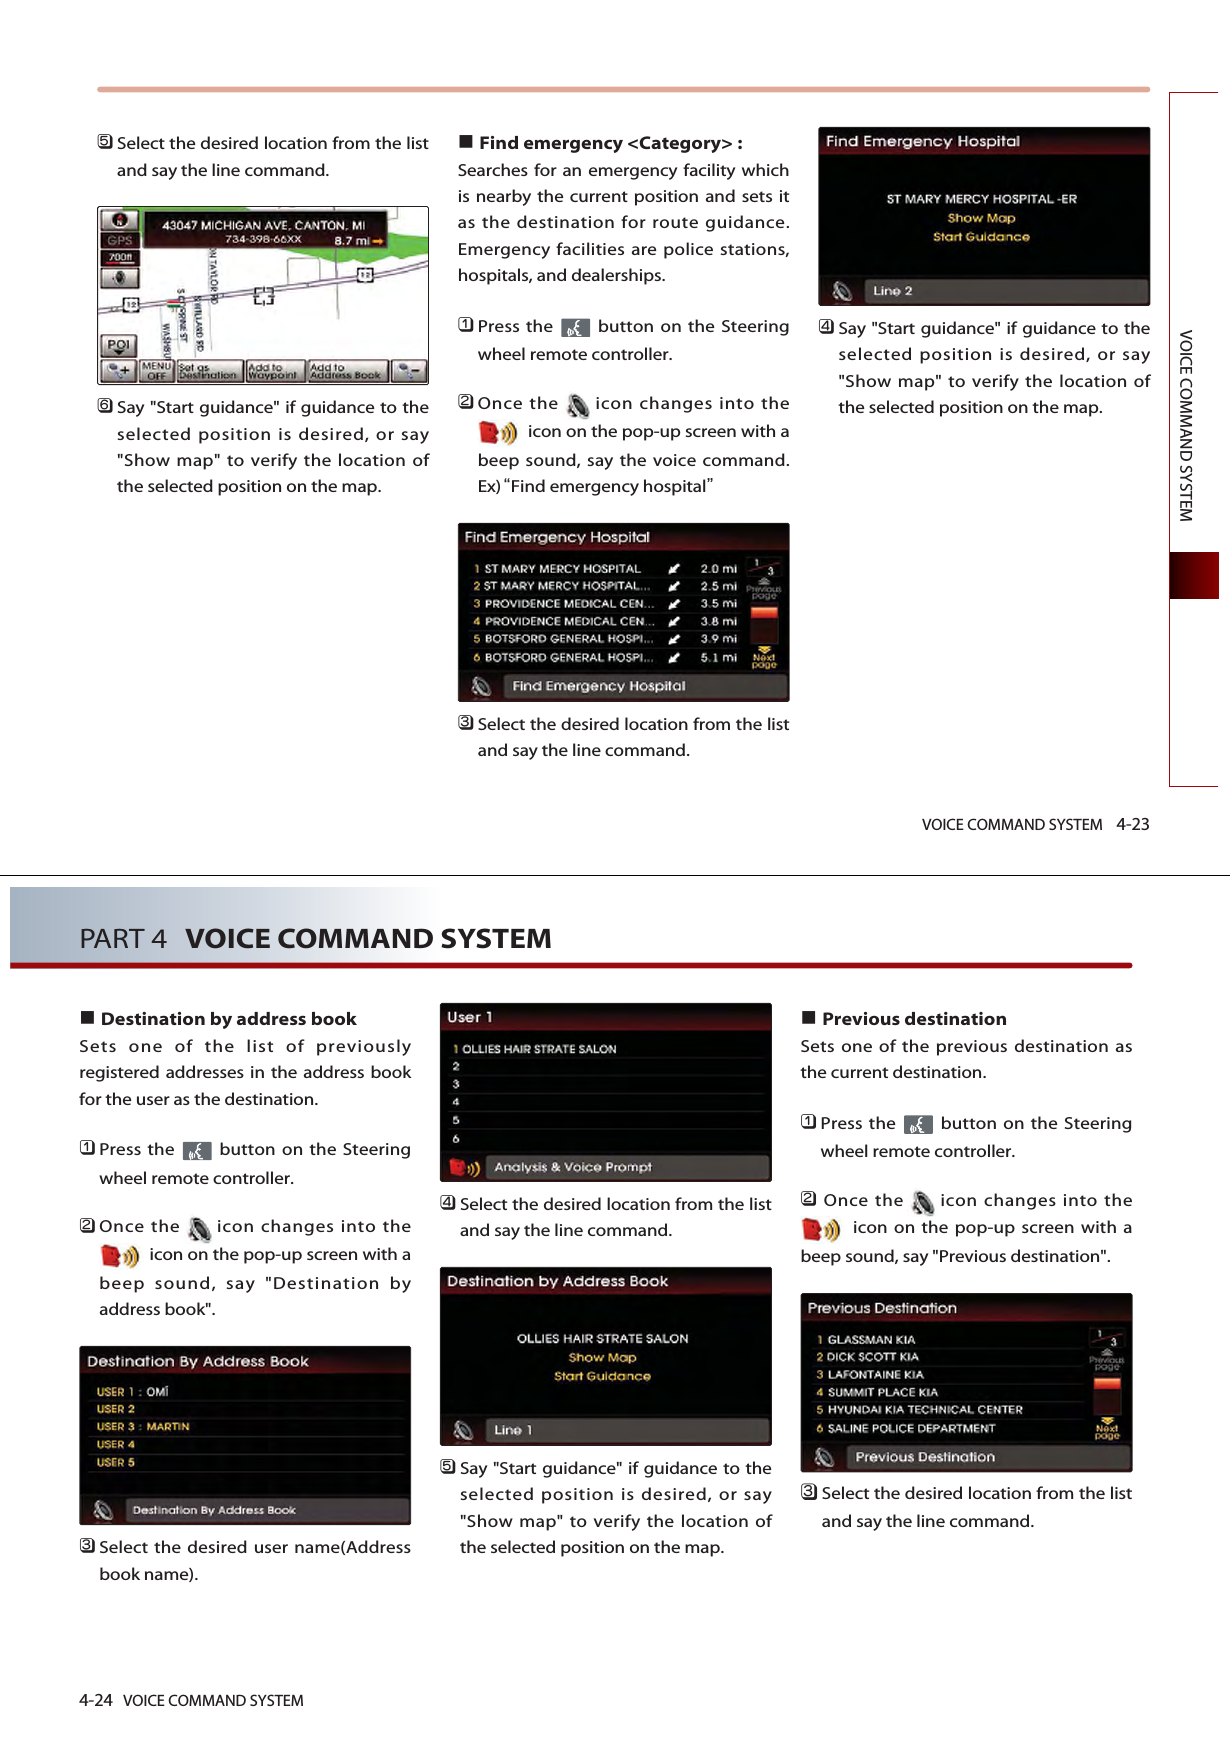
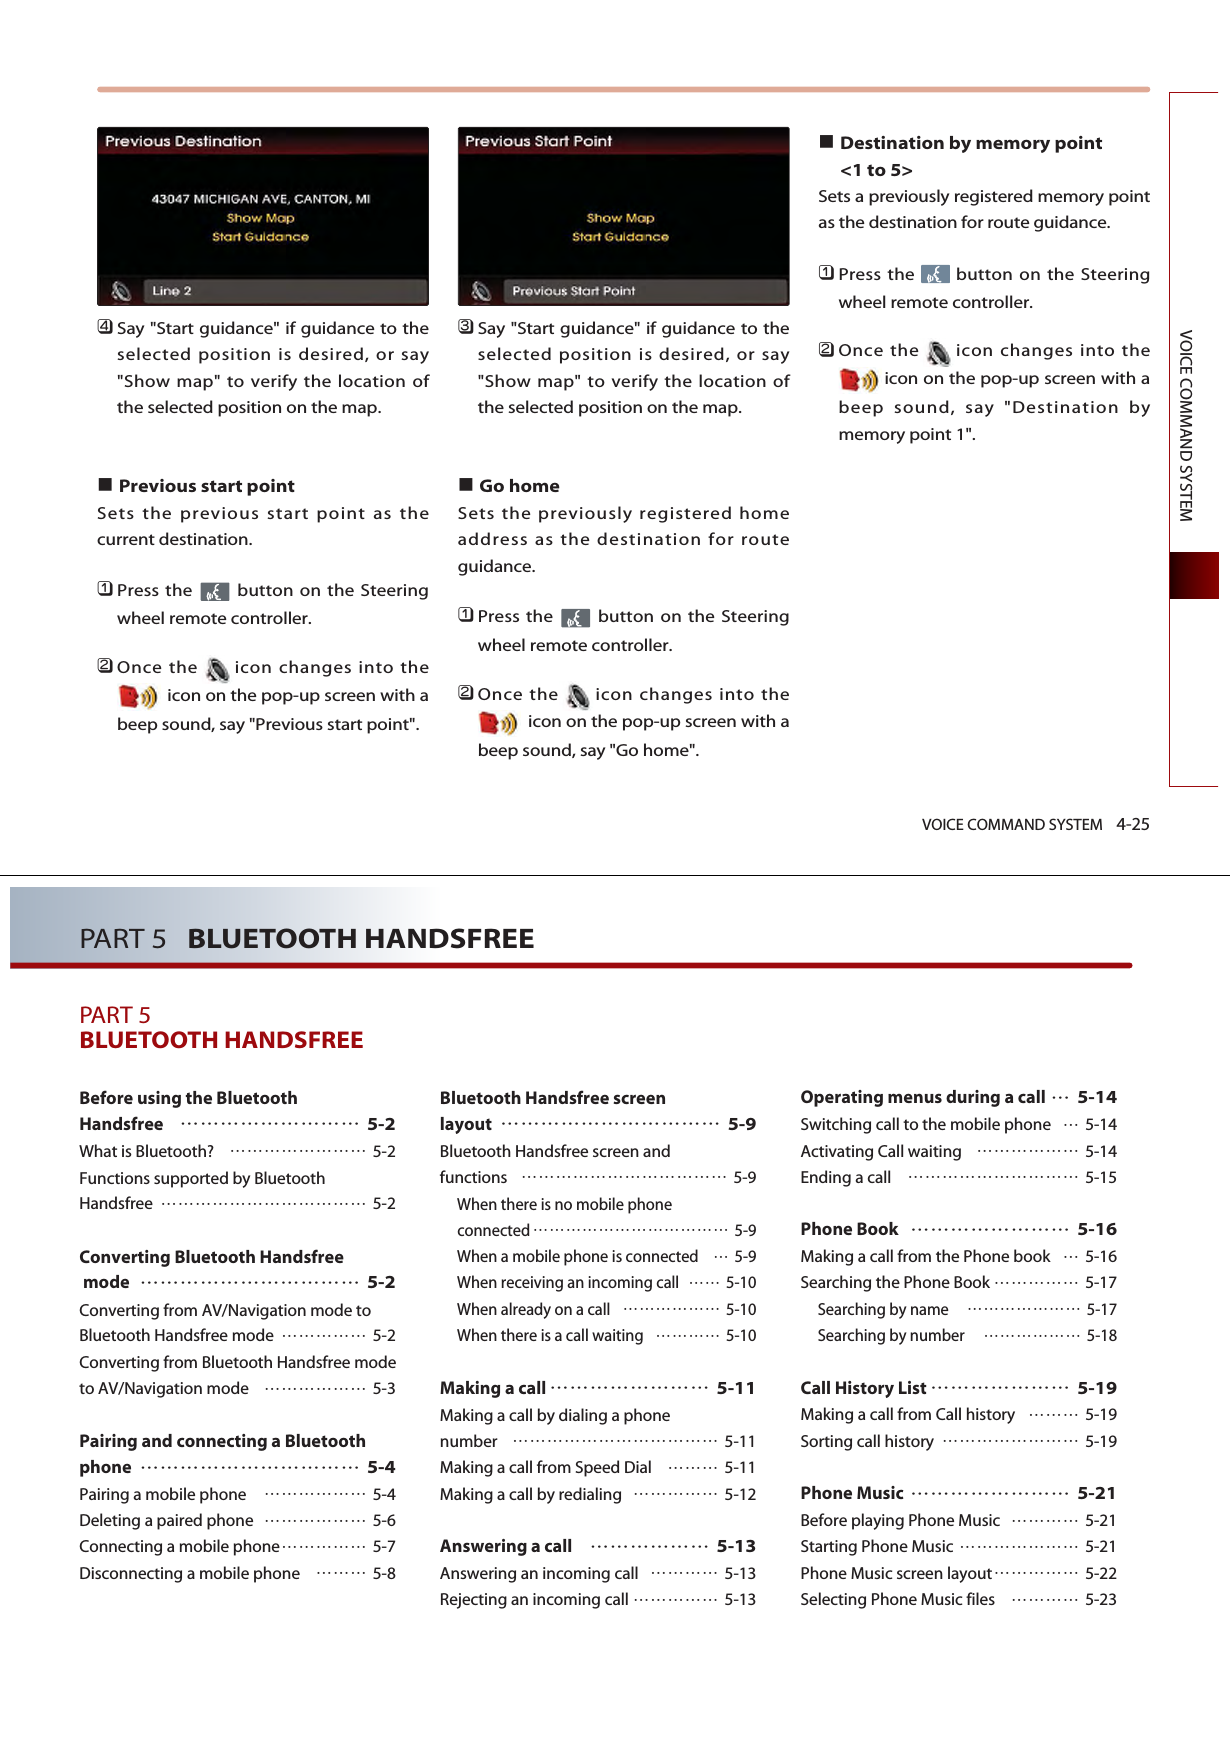
![VOICE COMMAND SYSTEM 4-15VOICE COMMAND SYSTEMDestinationCommand OperationFind address Sets the destination through address search for route guidance.Find nearest POISets a POI near the current position as the destination for route guidance through POI category search.Find nearest <POI name> Sets a POI near the current position as the destination by directly inputting the POI name forroute guidance. [POI Category list], page 4-18.Destination POI by phone number Sets the destination by searching the phone number of the facility.Find Emergency <Category> Searches for an emergency facility which is nearby the current position and sets it as thedestination for route guidance. Emergency facilities are police stations, hospitals, anddealerships.Destination by address book Sets one of the list of previously registered addresses in the address book for the user as thedestination.Previous destination Sets one of the previous destination as the current destination.Previous start point Sets the previous start point as the current destination.Go home Sets the previously registered home address as the destination for route guidance. Destination by memory point <1 to 5> Sets a previously registered memory point as the destination for route guidance.(ex. Find Emergency Hospital)4-16 VOICE COMMAND SYSTEMPART 4 VOICE COMMAND SYSTEMRouteCommand OperationCancel route Deletes the designated destination and terminates the route guidance.Repeat voice guidance Repeats the route guidance. Detour <1 or 2 or 5 or 10> miles Searches detour routes within a <1|2|5|10> mile radius. Detour <1 or 2 or 5 or 10> kilometers Searches detour routes within a <1|2|5|10> kilometer radius. Replan recommended route Recalculates the route with the recommended route. Replan shortest route Recalculates the route with the shortest route. Replan minimize freeway route Recalculates the route with the minimize freeway route. Replan minimize toll road route Recalculates the route with the minimize toll route. Distance to destination Reports the remaining distance until destination by voice. Time to destination Reports the remaining time until destination by voice.View route If the destination has been set, displays the whole route screen until the destination. Start guidance Sets the scroll mark displayed on the map as the destination and starts route guidance.](https://usermanual.wiki/HYUNDAI-MOBIS/AVN-215TDL.user-manual-2-of-2/User-Guide-1295156-Page-24.png)
![BLUETOOTH HANDSFREE 5-7BLUETOOTH HANDSFREEConnecting a mobile phonePress the button on the PHONEscreen.Press the button on theSettings screen. The list of currently paired phones will bedisplayed. Select the phone you wish toconnect from the list and press thebutton.INFORMATIONWhen there are no paired phones, pair themobile phone through [Settings>Pairings>Add to]. For more information on pairingmobile phones, refer to the user's manual[Pairing and Connecting a Bluetooth phone >Pairing a mobile phone]. The Bluetooth connection between the carsystem and mobile phone will start.Once Bluetooth connection is successful,the name of the connected mobile phonewill become displayed on the PHONEscreen and Bluetooth handsfree functionswill operate.ConnectConnectionsSettingsi5-8 BLUETOOTH HANDSFREEPART 5 BLUETOOTH HANDSFREEIf the connection between the mobilephone and Bluetooth fails, the followingpop-up will be displayed. If problems occurwhile connecting Bluetooth, check for thefollowing conditions.Whether the mobile phone you wish toconnect is in the vicinity of the car systemWhether the power of the mobile phoneBluetooth has been turned offWhether the mobile phone Bluetooth hasbeen set to hidden stateWhether there are Bluetooth compatibilityissues between the car system and anothermobile phoneDisconnecting a mobile phonePress the button on the PHONEscreen.Press the button on theSettings screen. The list of currently paired phones will bedisplayed. Select the phone you wish todisconnect from the list and press thebutton.A pop-up asking whether you wish todisconnect the mobile phone will bedisplayed.Press the button to disconnect themobile phone and the button tocancel.NoYesDisconnectConnectionsSettings](https://usermanual.wiki/HYUNDAI-MOBIS/AVN-215TDL.user-manual-2-of-2/User-Guide-1295156-Page-33.png)
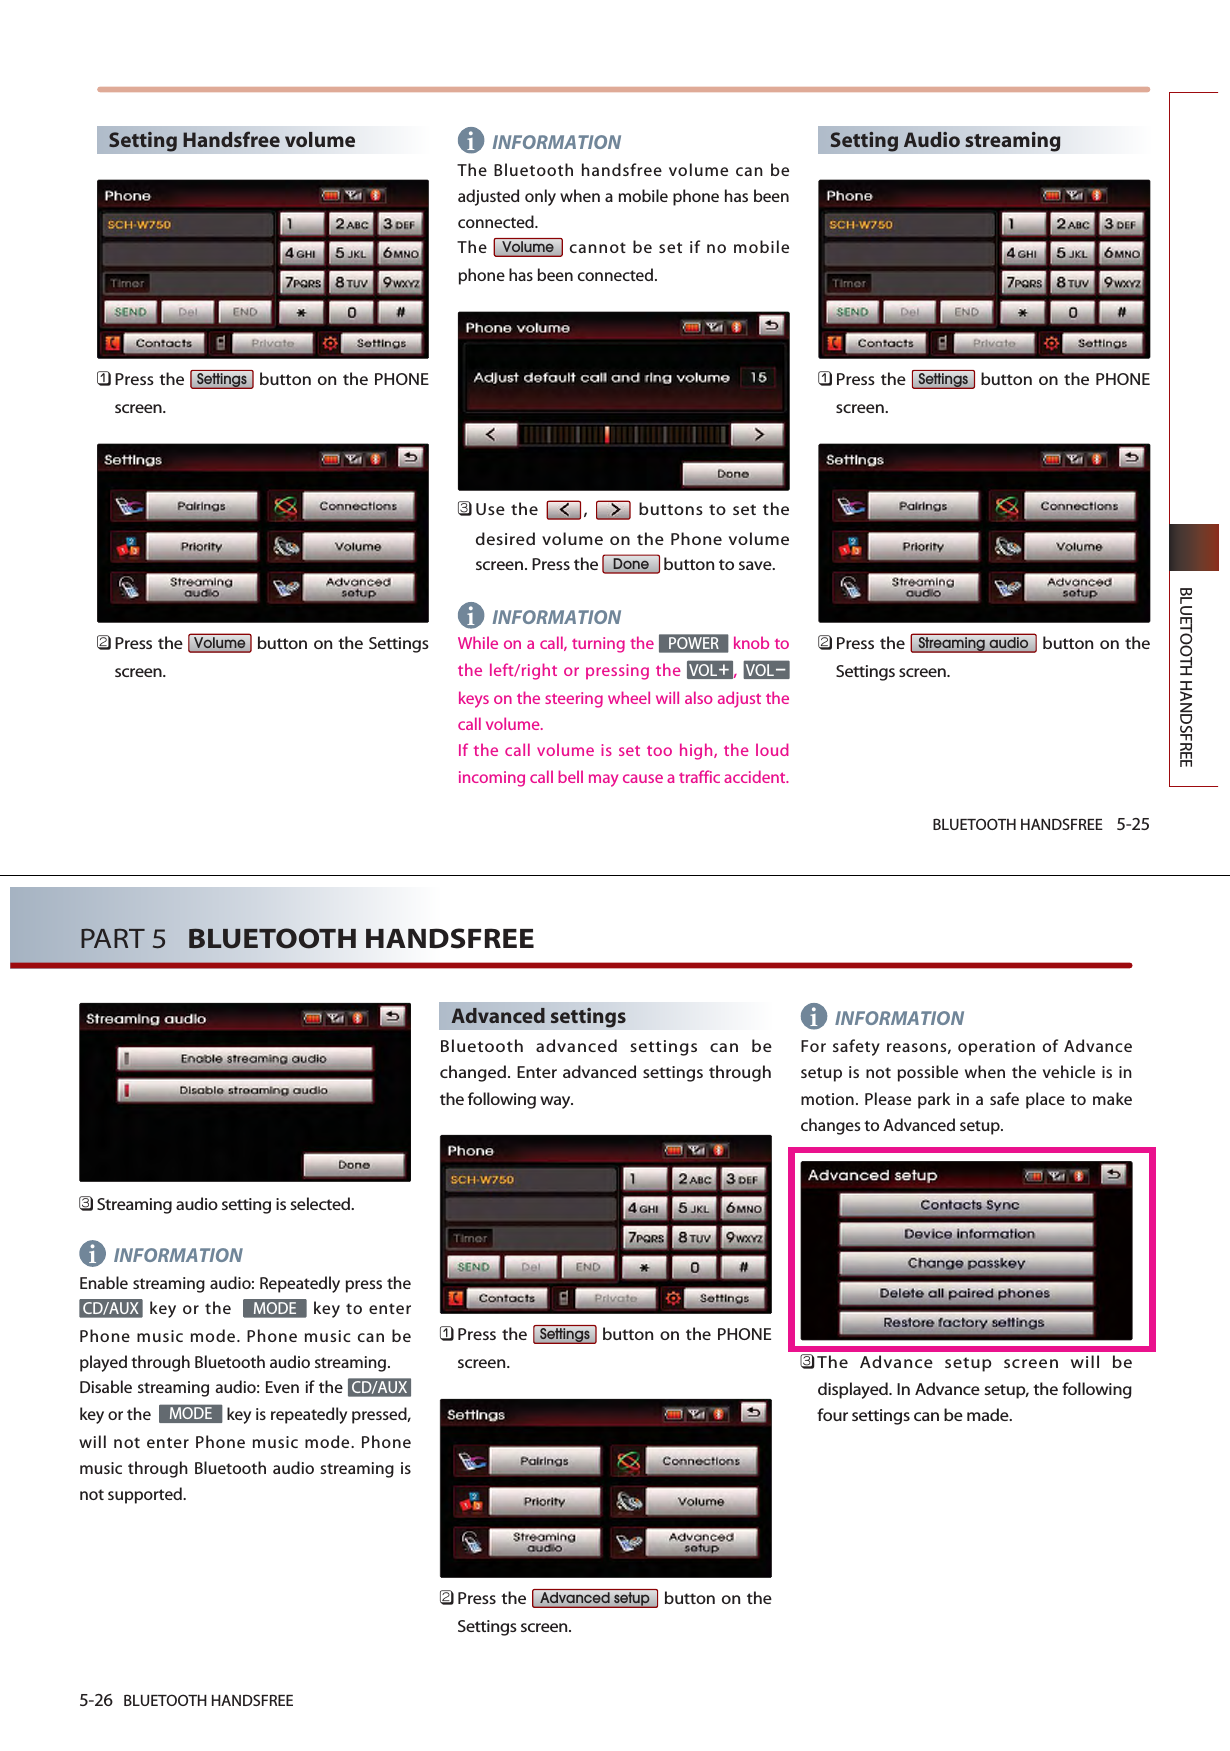
![BLUETOOTH HANDSFREE 5-21BLUETOOTH HANDSFREEPhone MusicBefore playing Phone musicMusic saved in the mobile phone can beplayed in the car through Bluetooth audiostreaming.Phone music can be played only when aBluetooth phone has been connected. Toplay phone music, connect the Bluetoothphone to the car system. For moreinformation on connecting Bluetooth, pleaserefer to the user's manual [Pairing andConnecting a Bluetooth phone]. If the Bluetooth is disconnected while playingphone music, the music will be discontinued. The audio streaming function may not besupported in some mobile phones. Only one function can be used at a timebetween the Bluetooth handsfree or Phonemusic function. For example, if you convert to the Bluetoothhandsfree while playing Phone music, themusic will be discontinued. Playing music from the car is not possiblewhen there are no music files stored in themobile phone. Starting Phone MusicRepeatedly press the key on thefront panel or the key on thesteering wheel to enter Phone musicmode.MDOECD/AUX5-22 BLUETOOTH HANDSFREEPART 5 BLUETOOTH HANDSFREEINFORMATIONEach press of the key on the frontpanel will change the function in the order ofDISC USB or iPod AUX Phone Music DISC .Each press of the key on the steeringwheel will change the audio mode in theorder of FM1 FM2 AM SIRIUS1 SIRIUS2 SIRIUS3 DISC USB or iPod AUX Phone Music FM1.It is not possible to enter Phone music mode ifthe mobile phone is not connected or if theaudio streaming setting within Bluetoothhandsfree settings has been set to [Disablestreaming audio]. For more information on audio streamingsetting, please refer to the users manual[Bluetooth settings > Setting Audio streaming].The Phone music screen is displayed. INFORMATIONWhile music saved in the mobile phone willautomatically begin playing after convertingto the Phone music screen, this music playerfunction may not be supported in somemobile phones. If music does not begin playing even afterconverting to the Phone music screen, trystarting the music directly from the mobilephone.Phone music screen layoutInformation Bar : displays information forthe currently playing song.File Down button : plays the previoussong.Play/Pause button : Plays/pauses thesong.File Up button : plays the next song. MODECD/AUXii ](https://usermanual.wiki/HYUNDAI-MOBIS/AVN-215TDL.user-manual-2-of-2/User-Guide-1295156-Page-40.png)
![BLUETOOTH HANDSFREE 5-23BLUETOOTH HANDSFREESelecting Phone music filesPress the , buttons on the Phonemusic screen or the , keys on the system. The previous or next song will be playedeach time the button or key is pressed.INFORMATIONThe file selection function may not besupported in some mobile phones. TRACKSEEKi5-24 BLUETOOTH HANDSFREEPART 5 BLUETOOTH HANDSFREEBluetooth settingsPairing and connecting a mobilephoneFor more information on pairing andconnecting a mobile phone, please refer to[Pairing and Connecting a Bluetooth phone]. Setting mobile phone autoconnect priorityINFORMATIONAfter turning on the car ignition and thesystem is booted up, the Bluetooth connectionbetween the car system and mobile phone isautomatically made. The Bluetooth connection will be conductedin the order of mobile phone priority. The auto connect priority will be supportedonly for previously paired mobile phones. Press the button on the PHONEscreen.Press the button on the Settingsscreen.The paired mobile phone list and themobile phone connection priority will bedisplayed.When wishing to change the priority order,select the mobile phone from the list anduse the , buttons to change itspriority.Press the button to save thechanged mobile phone priority.DonePrioritySettingsi](https://usermanual.wiki/HYUNDAI-MOBIS/AVN-215TDL.user-manual-2-of-2/User-Guide-1295156-Page-41.png)
![BLUETOOTH HANDSFREE 5-29BLUETOOTH HANDSFREEA pop-up asking whether you wish todelete all paired phone will be displayed.Press the button to delete all pairedphones and the button to cancel. If button is pressed, all currentlypaired phones will be deleted.Initializing Bluetooth handsfreePress the button onthe Advance setup screen.A pop-up asking whether you wish toinitialize the Bluetooth handsfree will bedisplayed.Press the button to initialize theBluetooth handsfree system and the button to cancel.INFORMATIONUpon initializing the Bluetooth handsfree, theentire paired phone list will be deleted and allBluetooth related settings will be restored tofactory state.If is pressed, the Bluetooth handsfreesettings will be initialized. YesNoYesRestore factory settingsYesNoYesi5-30 BLUETOOTH HANDSFREEPART 5 BLUETOOTH HANDSFREEImportant information About pairing mobile phonesI cannot search for mobile phonesthrough the car system. What is thecause?Check to see whether the mobile phoneyou wish to connect supports Bluetoothfunction. If your mobile phone supportsBluetooth, check to see that whether theBluetooth settings in the mobile phonehave been set to hidden state or if theBluetooth power has been turned off. Ifthe device has been set to hidden,release the hidden state and if theBluetooth power has been turned off,turn the power ON and try searchingagain.What is the difference between pairing amobile phone and connecting a mobilephone?Through a two-way passkey betweenthe car system and mobile phones, up to5 mobile phones can be paired with thecar system. The paired mobile phone willremain paired with the car system untilthe user deletes it manually. In addition, the call history lists andphone number books saved in eachmobile phone will also be maintaineduntil the paired phone is deleted. Formore information on pairing mobilephones, please refer to the manual[Pairing and Connecting a Bluetoothphone > Pairing a mobile phone]. Connect a mobile phone to Bluetoothby selecting the desired mobile phonefrom the paired phones. Within the carsystem, only one Bluetooth phone canbe connected at one time. For moreinformation, please refer to the manual[Pairing and Connecting a Bluetoothphone > Pairing a mobile phone]. What is a Passkey?A passkey is an authentication code usedfor two-way authentication of the carsystem and the mobile phone. Only 4-digit numbers can be used aspasskeys. Passkeys are registered onlyonce when pairing the phone numberfor the first time. The factory-set passkeyis 0000. Q.A.A.A.Q. Q.](https://usermanual.wiki/HYUNDAI-MOBIS/AVN-215TDL.user-manual-2-of-2/User-Guide-1295156-Page-44.png)

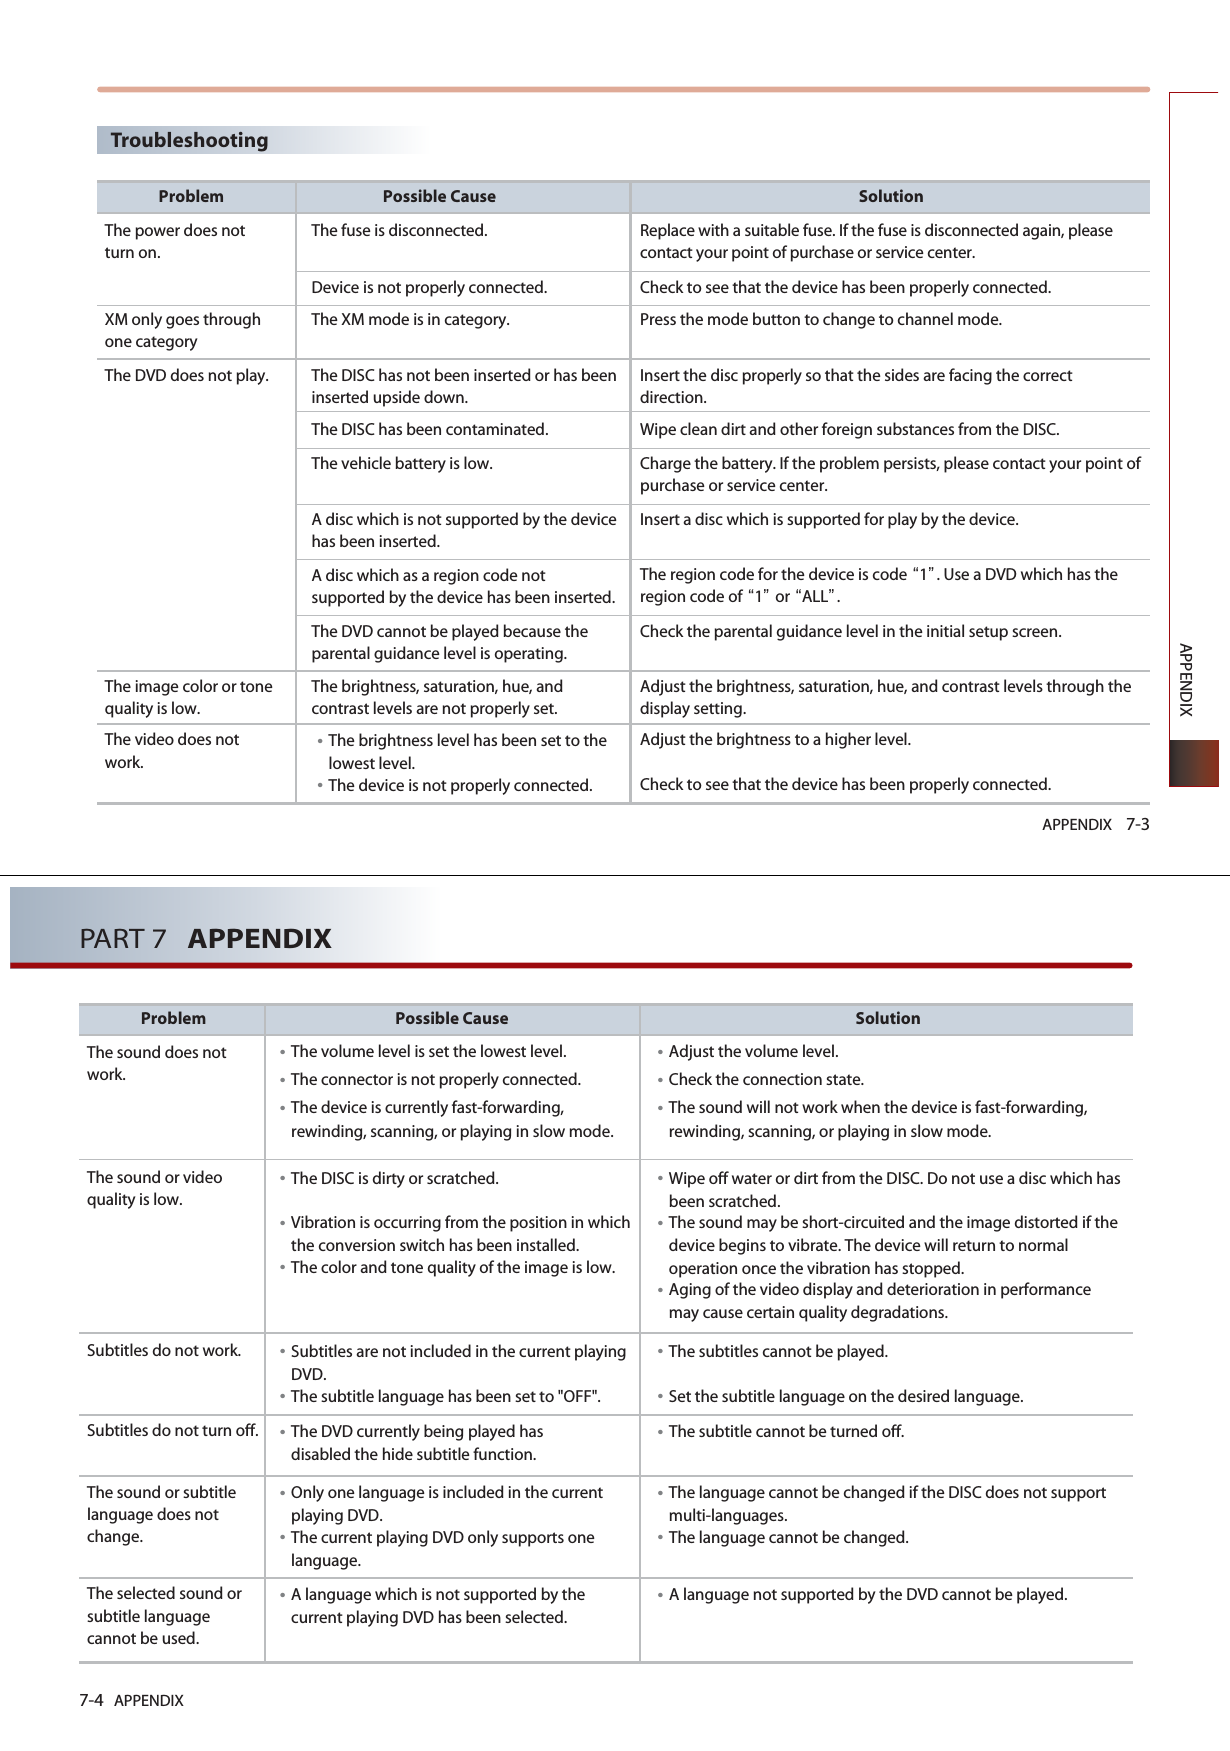
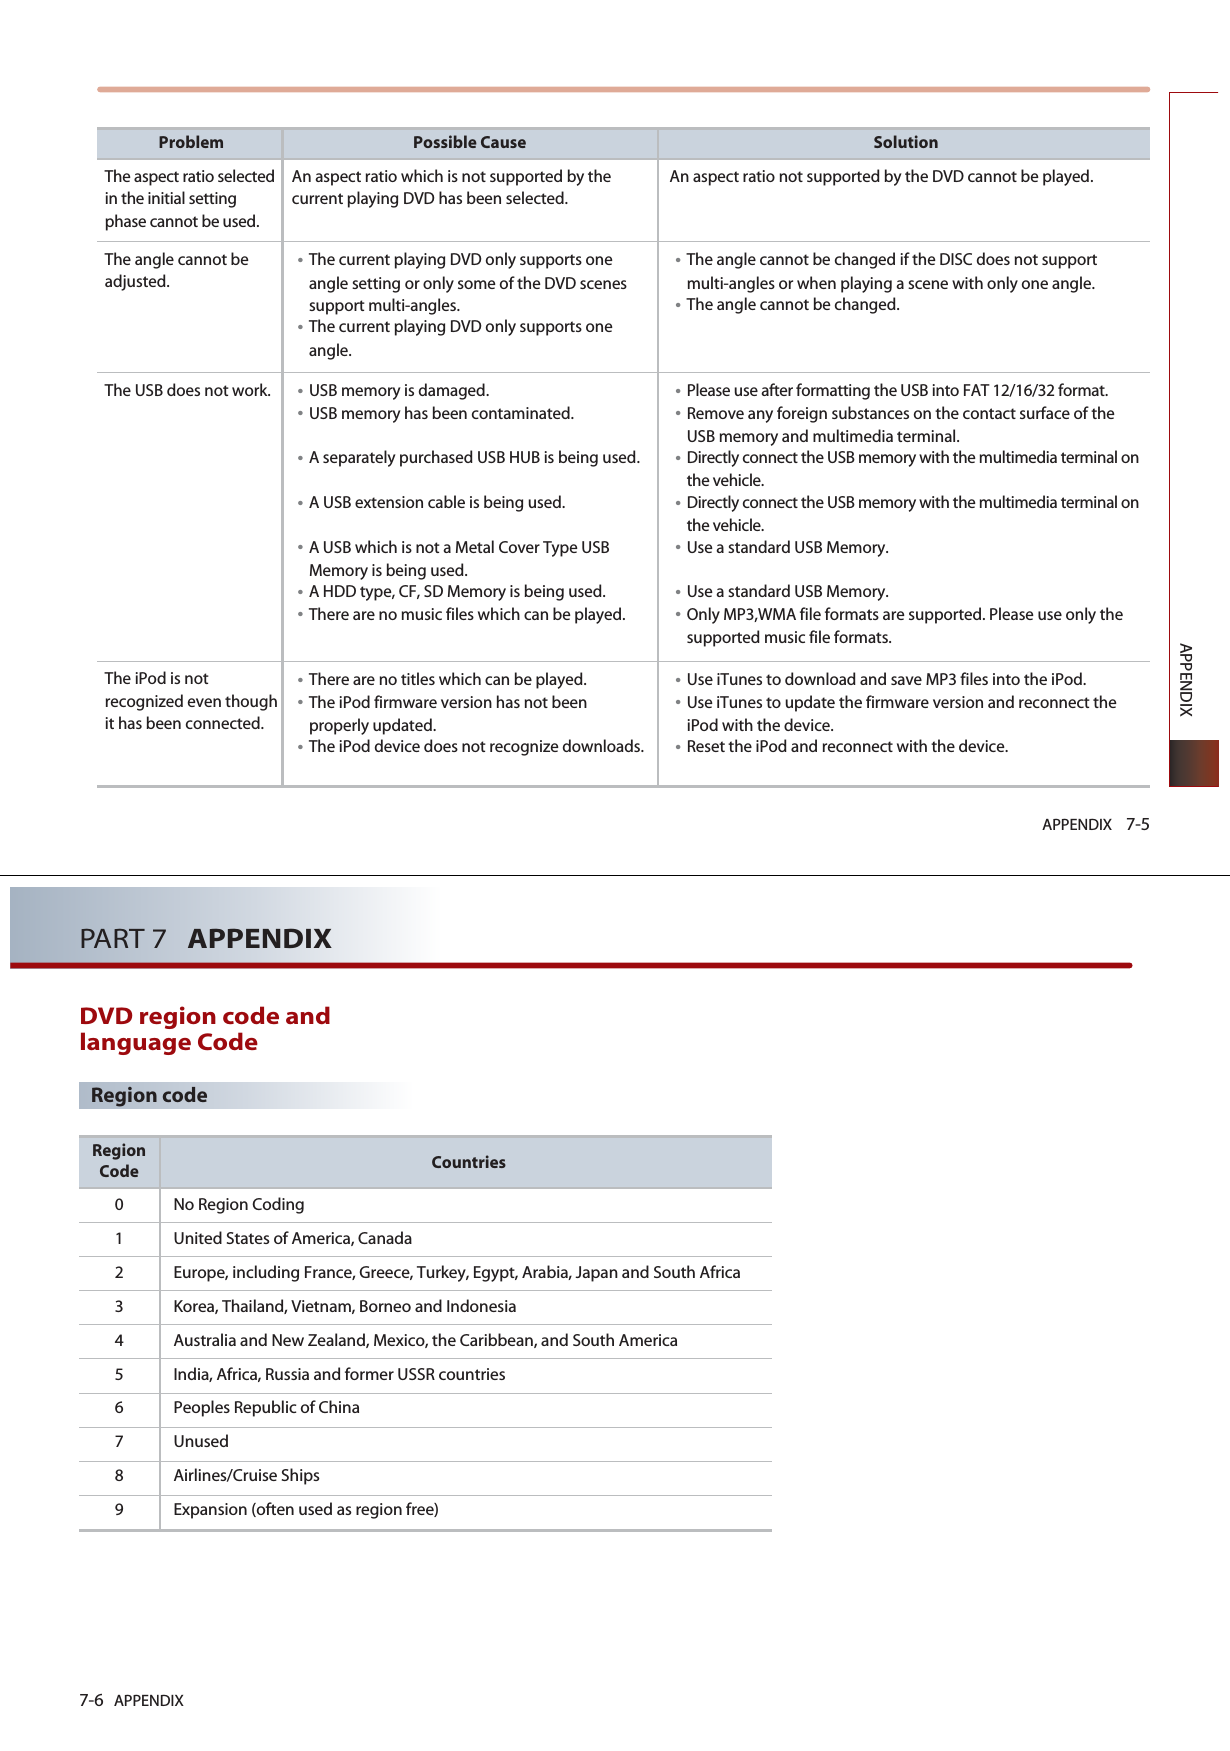
![APPENDIX 7-1APPENDIXPART 7APPENDIXTroubleshooting guide 7-2Before thinking the product has malfunctioned 7-2Troubleshooting 7-3DVD region code and language code 7-6Region code 7-6Language code 7-7Map legend 7-8Road color 7-8POI icons 7-9Landmark icons 7-11INDEX 7-12RSE Connector Pin Layoutout 7-177-2 APPENDIXPART 7 APPENDIXTroubleshooting guideBefore thinking the product has malfunctioned Errors which occur during the operation or installation of the device may be mistaken as a malfunction of the actual device. If you are having problems with the device, try the suggestions listed below. If the problems persist, contact your point of purchase or the nearest service center. FunctionBecause the LCD is manufactured with technology requiring high point density, a pixel deficiency orlighting may occur within 0.01% of total pixels.Has the Switch for the vehicle been turned to [ACC] or [ON]?Has the SYSTEM been turned OFF? Has the volume been set to a low level?Has the volume been set on mute?The display looking somewhat darker after prolonged periods of use is a normal phenomenon withLCD panels. It is not a malfunction.If the screen is very dark, contact your point of purchase or the nearest service center.Is the position of FAL/BAL sound controls or volume adjusted to only one side?Is the audio and video connector jacks fully inserted into the AUX terminal? Is the external device connected with a standard connector cable? Some map data may be missing or incorrect. The TTS(Text To Speech) engine speaks the street name based off of the phonetic spelling. This will continuously be update with the map database.ProblemThere are small red, blue, or green dotson the screenThe sound or image is not workingThe video is being displayed but sound is not workingWhen the power is turned on, thecorners of the screen are darkSound is working from only onespeakerSound and video does not work in AUXmodeThe external device is not working The road is missing The road name is spoken incorrectly](https://usermanual.wiki/HYUNDAI-MOBIS/AVN-215TDL.user-manual-2-of-2/User-Guide-1295156-Page-57.png)