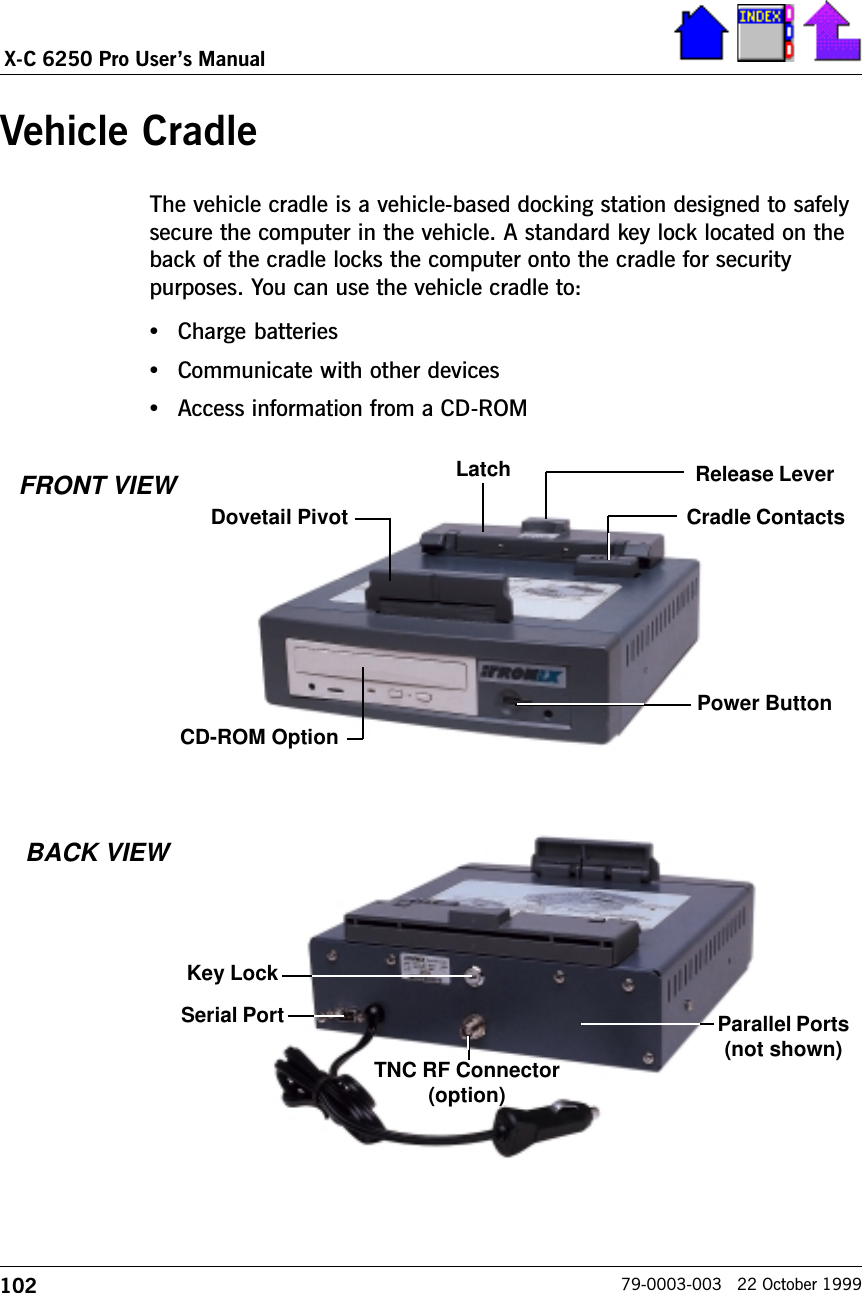
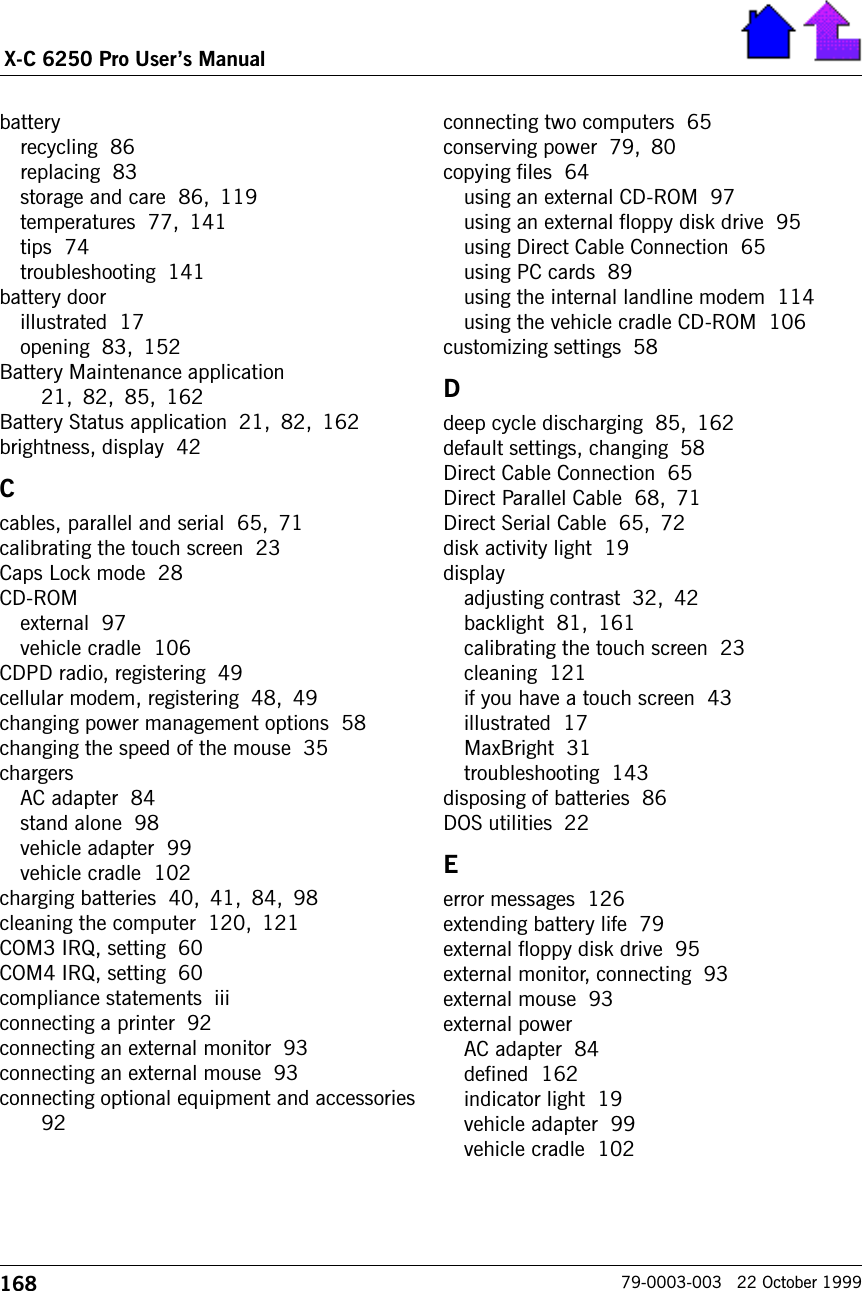
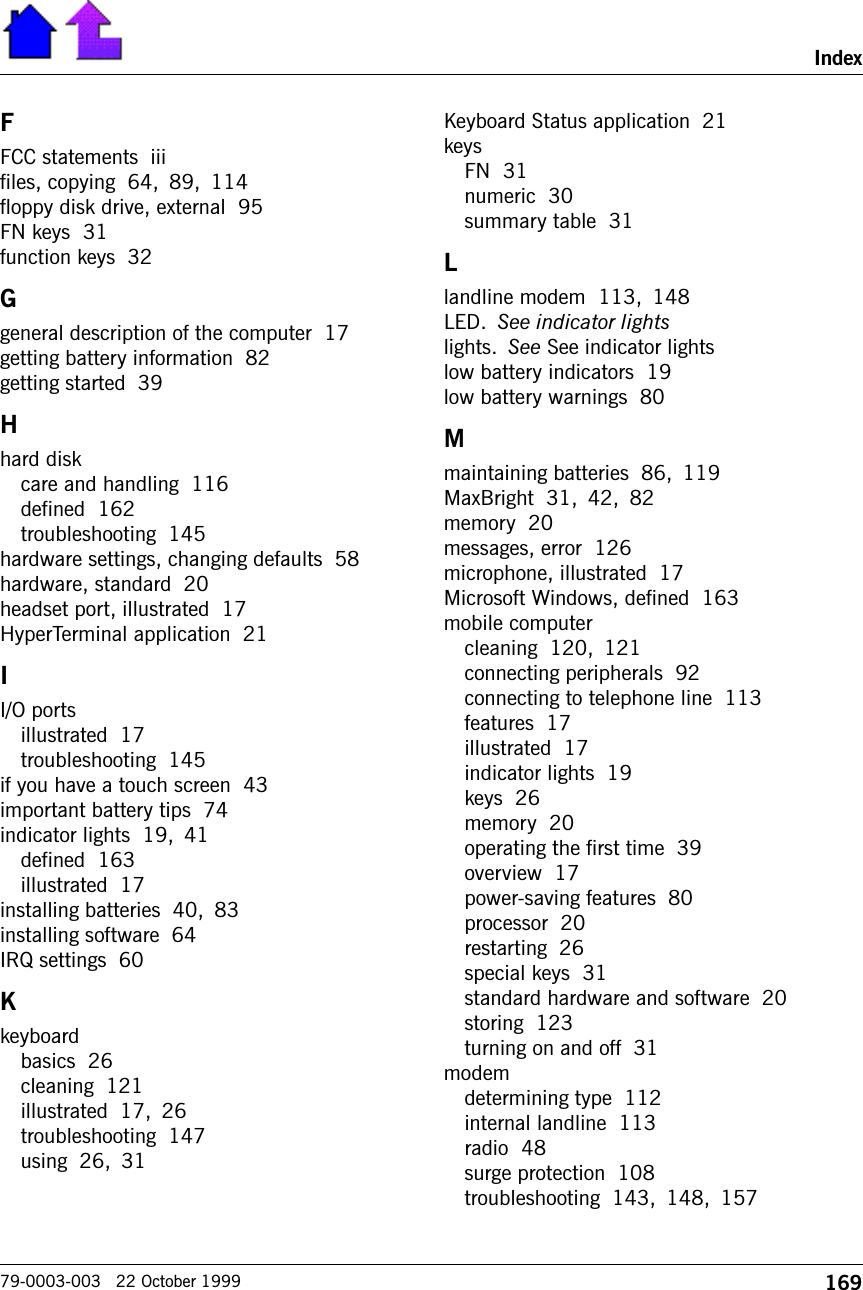
General Dynamics Itronix XC6250RIM801D Laptop PC with RIM 801D ARDIS Radio Module User Manual Contents

General Dynamics Itronix Corporation Laptop PC with RIM 801D ARDIS Radio Module Contents

Contents

Users Manual

X-C 6250 ProUser’s Manual
iiX-C 6250 Pro Users Manual79-0003-003   22 October 1999IdentificationX-C 6250 Pro Users ManualOctober 1999 · Revision 003Copyright Notice© Copyright 1999 Itronix Corporation. All rights reserved. No part of thisdocument may be reproduced, transmitted, transcribed, stored in a retrievalsystem, or translated into any other language or computer language in whole orin part, in any form or by any means, whether it be electronic, mechanical,magnetic, optical, manual, or otherwise, without the prior written consent ofItronix Corporation, South 801 Stevens Street, Spokane, Washington  99204.DisclaimerThis document is printed in the U.S.A. Itronix Corporation reserves the right torevise the manual and make periodic changes to the content without a direct orinferred obligation to Itronix to notify any person of such revision or changes.Itronix Corporation does not assume responsibility for the use of this manual,nor for any patent infringements or other rights or third parties who may use themanual.This document contains valuable trade secrets and proprietary information ofItronix Corporation.This product is available for purchase under the terms of the Itronix HardwarePurchase and Software License Agreement. Itronix hardware products may bereconditioned, or be manufactured from parts and components that may benew, used, rebuilt, or recycled and in some cases, the hardware product maynot be new and may have been previously installed. In any event, Itronixwarranty terms apply.Trademark  NoticeItronix is a registered trademark of Itronix Corporation.Microsoft, MS, Windows, and MS-DOS are registered trademarks of MicrosoftCorporation.IBM is a trademark of International Business Machines Corporation.
iii79-0003-003   22 October 1999Compliance StatementsThe X-C 6250 Pro computer has been tested and found to comply with thelimits for a Class B digital device, pursuant to Part 15 of the FCC Rules.  Theselimits are designed to provide reasonable protection against harmful interferencein a residential installation.  This equipment generates, uses, and can radiateradio frequency energy and, if not installed and used in accordance with theinstructions, may cause harmful interference to radio communications.However, there is no guarantee that interference will not occur in a particularinstallation.If this equipment does cause harmful interference to radio or televisionreception, which can be determined by turning the equipment off and on, theuser is encouraged to try to correct the interference by one or more of thefollowing measures:•Reorient or relocate the receiving antenna.•Increase the separation between the equipment and receiver.•Connect the equipment into an outlet on a circuit different from that towhich the receiver is connected.•Consult the dealer or an experienced radio/TV technician for help.The X-C 6250 Pro computer complies with Part 68 of the FCC Rules.  On thebottom of this equipment is a label that contains, among other information, theFCC registration number and ringer equivalence number (REN) for thisequipment. If requested, this information must be provided to the telephonecompany.The REN is used to determine the quantity of devices which may be connectedto the telephone line. Excessive RENs on the telephone line may result in thedevices not ringing in response to an incoming call. In most, but not all areas,the sum of the RENs should not exceed five (5.0). To be certain of the numberof devices that may be connected to the line, as determined by the total RENs,contact the telephone company to determine the maximum REN for the callingarea.The X-C 6250 Pro computer may be connected to the telephone network usingthe RJ-11 jack provided.If this equipment causes harm to the telephone network, the telephonecompany will notify you in advance that temporary discontinuance of servicemay be required. If advance notice isnt practical, the telephone company willnotify the customer as soon as possible. Also, you will be advised of your rightto file a complaint with the FCC if you believe it is necessary.The telephone company may make changes in its facilities, equipment,operations, or procedures that could affect the operation of the equipment. If
ivX-C 6250 Pro Users Manual79-0003-003   22 October 1999this happens, the telephone company will provide advance notice in order foryou to make the necessary modifications in order to maintain uninterruptedservice.If trouble is experienced with this equipment, please contact the equipmentmanufacturer for repair and/or warranty information. Do not attempt repairs ofthis equipment yourself without obtaining manufacturer authorized parts anddocumentation. If the trouble is causing harm to the telephone network, thetelephone company may request you remove the equipment from the networkuntil the problem is resolved.Compliance  Statement for CanadaNOTICE:  The Industry Canada label identifies certified equipment.  Thiscertification means that the equipment meets certain telecommunicationsnetwork protective, operational and safety requirements as prescribed in theappropriate Terminal Equipment Technical Requirements document(s).  TheDepartment does not guarantee the equipment will operate to the userssatisfaction.Before installing this equipment, users should ensure that it is permissible to beconnected to the facilities of the local telecommunications company.  Theequipment must also be installed using an acceptable method of connection.The customer should be aware that compliance with the above conditions maynot prevent degradation of service in some situations.Repairs to certified equipment should be made by a representative designatedby the supplier.  Any repairs or alterations made by the user to this equipment,or equipment malfunctions, may give the telecommunications company causeto request the user to disconnect the equipment.Users should ensure for their own protection that the electrical groundconnections of the power utility, telephone lines, and internal metallic waterpipe system, if present, are connected together.  This precaution may beparticularly important in rural areas.CAUTION!  Users should not attempt to make such connections themselves,but should contact the appropriate electric inspection authority, or electrician,as appropriate.The Ringer Equivalence Numbers (REN) are:X-C 6250 Pro non-radio: 0.5BX-C 6250 Pro ARDIS: 0.5BX-C 6250 Pro RAM: 0.5BX-C 6250 Pro CDPD: 1.3BNOTICE:  The Ringer Equivalence Number (REN) assigned to each terminal
v79-0003-003   22 October 1999device provides an indication of the maximum number of terminals allowed tobe connected to a telephone interface. The termination on an interface mayconsist of any combination of devices subject only to the requirement that thesum of the Ringer Equivalence Numbers of all the devices does not exceed 5.The X-C 6250 Pro computer may be connected to the telephone network usingthe RJ-11 jack provided.Fax  BrandingThe Telephone Consumer Protection Act of 1991 makes it unlawful for anyperson to use a computer or other electronic device to send any message via atelephone fax machine unless such message clearly contains in a margin at thetop or bottom of each transmitted page or on the first page of the transmission,the date and time it is sent and an identification of the business or other entity,or other individual sending the message and the telephone number of thesending machine or such business, other entity, or individual.In order to program this information into your fax machine, you shouldcomplete the following:This information is entered through the FAX application softwareyou have installed.  Consult your FAX software documentation forinstructions about entering this information.Warnings and CautionsWARNING   It is important that only authorized Itronix personnel attemptrepairs on Itronix equipment as this might void any maintenance contract withyour company.  Unauthorized service personnel might be subject to shockhazard on some Itronix equipment if removal of protective covers is attempted.The product you have purchased is powered by a rechargeable battery. Thebattery is recyclable and, under various state and local laws, it may be illegal todispose of this battery into the municipal waste stream. Do not crush thebattery or place it in a fire. Check with your local solid-waste officials for detailson recycling options or proper disposal.CAUTION   Internal components of the  X-C 6250 Pro computer will bedamaged if exposed to contaminants.  When dust covers, the PC card door, orthe battery door are open on the computer, shield the unit from allcontaminants such as liquids, rain, snow, and dust.Federal  Communication  Commission  (FCC)  Regulations  for  the  Stand  AloneChargerThis equipment has been tested and found to comply with the limits for a ClassB digital device, pursuant to part 15 of the FCC Rules. These limits aredesigned to provide reasonable protection against harmful interference in a
viX-C 6250 Pro Users Manual79-0003-003   22 October 1999residential installation. This equipment generates, uses and can radiate radiofrequency energy and, if not installed and used in accordance with theinstructions, may cause harmful interference to radio communications.However, there is no guarantee that interference will not occur in a particularinstallation. If this equipment does cause harmful interference to radio ortelevision reception, which can be determined by turning the equipment off andon, the user is encouraged to try to correct the interference by one or more ofthe following measures:•Reorient or relocate the receiving antenna.•Increase the separation between the equipment and receiver.•Connect the equipment into an outlet on a circuit different from that towhich the receiver is connected.•Consult the dealer or an experienced radio/TV technician for help.The equipment has been approved to [Commission Decision CTR21] forpan-European single terminal connection to the Public Switched TelephoneNetwork (PSTN).  However, due to differences between individual PSTNsprovided in different countries the approval does not, of itself, give an uncondi-tional assurance of successful operation on every PSTN network terminationpoint.In the event of problems, you should contact your equipment supplier in thefirst instance.Safety InformationThe following safety symbols are used in this manual to indicate potentiallydangerous situations.  Do not proceed beyond a WARNING or CAUTION symboluntil the indicated conditions are fully understood and met.CAUTION   This caution statement denotes a hazard.  It calls attention to aprocedure or practice that could result in damage to or destruction of partor all of the product if not performed correctly.WARNING   This warning  denotes a hazard.  It calls attention to a proce-dure or practice that could result in personal injury if not performedcorrectly.
vii79-0003-003   22 October 1999About This ManualThe X-C 6250 Pro Users Manual provides information about using theX-C 6250 Pro computer and some of its peripherals.If youve  never  used  this  computer  (or  any  computer)  before,  the  firstthree sections contain important information to get you started success-fully. To help you become a proficient user or just to make your dailytasks easier, try using the tools that reside on your system listed onpage viii.If  youre  an  experienced  computer  user  already  familiar  with  Win-dows, Section 3, Getting Started, provides important setup proce-dures for the computer. Section 5 shows you how to customize systemsettings.If you dont read anything else in this manual, turn  to  Section  7 andread about batteries and power. Following the tips outlined in thissection can significantly increase the life of your batteries.InsideTo  Do  This... Turn  to  This  SectionSee where we put the parts Features of the Computer, Page 17Use the keyboard Using the Keyboard and Mouse, Page 26Use the mouse Using the Keyboard and Mouse, Page 34Set up your computer correctly Getting Started, Page 38Register your radio modem If You Have a Radio Modem, Page 48Customize settings Customizing Settings, Page 58Copy files Transferring Files, Page 64Charge and maintain batteries Managing Batteries and Power, Page 74Use PC Cards Using PC Cards, Page 88Connect printers or external drives Optional Equipment and Accessories,Page 92Find out about your modem Modems, Page 112Maintain your computer Maintenance and Storage, Page 116Correct errors Error Messages, Page 126Solve problems Troubleshooting, Page 136
viiiX-C 6250 Pro Users Manual79-0003-003   22 October 1999For More HelpIf you need help, or if you want to learn more about your computer, usethe following resources already installed on your system.•If you need help using an application, refer to the applications onlineHelp. Start the application, select Help from the menu bar, and thenchoose the item you want.•To learn about using Windows 95, a ten-minute tutorial is accessiblefrom the Start Menu by selecting Help, Contents, Tour: Ten Minutesto Using Windows.•For help using Windows 95, refer to the online Help on your system.To access this information, select Help from the Start Menu.
ix79-0003-003   22 October 1999ContentsAbout This Manual.............................................................. viiInside.................................................................................. viiFor More Help ....................................................................viiiSection 1  Features of the Computer........................15Introduction .......................................................................16Individual Parts ..................................................................17Indicator Lights ................................................................... 19Standard Hardware .............................................................. 20Optional Hardware............................................................... 20Standard Software ............................................................... 21Optional Software ................................................................ 22MS-DOS Utilities ................................................................. 22If You Have a Touch Screen .................................................23Section 2  Using the Keyboard and Mouse ...............25Keyboard Basics .................................................................26Restarting the Computer ....................................................... 26Primary Keys....................................................................... 26Arrow Keys ......................................................................... 29Numeric Keypad .................................................................. 30FN Keys ............................................................................. 31Function Keys ..................................................................... 32Other Keys .......................................................................... 33Using the Mouse.................................................................34General Guidelines ............................................................... 35Changing the Speed of the Mouse .................................... 35Section 3  Getting Started ......................................37Introduction .......................................................................38PRECAUTIONS.................................................................... 38
xX-C 6250 Pro Users Manual79-0003-003   22 October 1999The First Time... .................................................................39Connecting the AC Adapter ................................................... 39Installing and Charging the Battery ........................................ 40Turning the Computer On and Off .......................................... 42Startup Problems? ............................................................... 43If You Have a Touch Screen................................................... 43Password Security ..............................................................44Setting or Changing Your Password ........................................ 45If You Cannot Remember Your Password ................................ 45Section 4  If You Have a Radio Modem ....................47Introduction .......................................................................48Before You Start: Register! ...................................................48ARDIS or RAM .................................................................... 48Cellular Data or Voice ........................................................... 48Cellular CDPD ..................................................................... 49What Can I Do with My Radio Modem?.................................49Using the Integrated Radio Modem.......................................50Antenna Positioning ............................................................. 50Serial Port Settings .............................................................. 51Radio Indicator Light............................................................ 51Enabling the Radio Modem ................................................... 51For MS-DOS Users ............................................................... 53Factory Installed Radio Software ..........................................53User Installable Cellular/CDPD Radio Software ......................54Additional Documentation....................................................55Section 5  Customizing Settings ..............................57Introduction .......................................................................58Using the System Configuration Utility ..................................58Accessing the SCU............................................................... 59Setting the COM3 and COM4 IRQs.......................................60
xi79-0003-003   22 October 1999Section 6  Transferring Files ...................................63Introduction .......................................................................64Using Direct Cable Connection .............................................65Direct Cable Connection Requirements................................... 65Computers Connected to a Network ....................................... 66Direct Cable Connection Tips ................................................ 66Wiring Specifications for Cables ...........................................71Parallel Cables..................................................................... 71Serial Cables ....................................................................... 72Section 7  Managing Batteries and Power ................73Introduction .......................................................................74Practical Battery Tips ..........................................................74Conserving Power and Extending Battery Life ........................79Low Battery Warnings .........................................................80Power-saving Features.........................................................80Suspend ............................................................................. 80Hard Disk Standby............................................................... 80Display ............................................................................... 81Backlight ....................................................................... 81MaxBright...................................................................... 82Getting Battery Information..................................................82Battery Status ..................................................................... 82Battery Maintenance ............................................................ 82Removing and Replacing Batteries........................................83Charging Batteries ..............................................................84Deep Cycle Discharging.......................................................85Battery Storage and Care.....................................................86Disposing of Batteries .........................................................86
xiiX-C 6250 Pro Users Manual79-0003-003   22 October 1999Section 8  Using PC Cards .....................................87Introduction .......................................................................88Inserting and Removing a PC Card .......................................88Transferring Files Using PC Cards .........................................89Using Bootable PC Cards.....................................................90Section 9  Optional Equipment and Accessories .......91Connecting a Printer ...........................................................92Connecting an External Monitor............................................93Connecting an External Mouse .............................................93PC Card External Floppy Disk Drive ......................................95PRECAUTIONS.................................................................... 95Booting from a PC Card External Floppy ................................. 96Using an External CD-ROM..................................................97Stand Alone Charger ...........................................................98Indicator Lights ................................................................... 99Vehicle Adapter ..................................................................99Vehicle Cradle ..................................................................102PRECAUTIONS.................................................................. 103Charging Batteries ............................................................. 103Communicating with Other Devices ..................................... 104External Antennas......................................................... 104RF Antenna Placement .................................................. 105Using the CD-ROM ............................................................ 106Cleaning or Replacing Cradle Contact Pins ............................ 107Surge Protection ...............................................................108Selecting the Right Surge Protection .................................... 108Surge Environment ....................................................... 108Type of Equipment to be Protected.................................. 108Quality of Electrical Wiring and Service ........................... 109Selecting the Right Equipment ............................................ 109
xiii79-0003-003   22 October 1999Section 10  Modems............................................111Introduction .....................................................................112Which Modem Do I Have? .................................................. 112Using the Internal Landline Modem ....................................113Transferring Files ..............................................................114Section 11  Maintenance and Storage ...................115Introduction .....................................................................116If You Have a Touch Screen ...............................................116Hard Drive Care and Handling............................................116Internal Hard Drives ........................................................... 117External PC Card Hard Drives.............................................. 118Battery Maintenance and Storage .......................................119Maintaining Batteries ......................................................... 119Storing Batteries ................................................................ 119Computer Maintenance and Storage ...................................120Maintaining Your Computer................................................. 120Care and Cleaning ........................................................ 120Storing Your Computer ....................................................... 123Appendix A  Error Messages .................................125Introduction .....................................................................126POST Messages................................................................126MS-DOS Messages ...........................................................132Windows Messages...........................................................133Application Messages ........................................................133
xivX-C 6250 Pro Users Manual79-0003-003   22 October 1999Appendix B  Troubleshooting ................................135What to Try First...............................................................136For More Help ................................................................... 136Common Solutions to Common Problems ............................137Applications ...................................................................... 138Batteries ........................................................................... 140Cellular Modem ................................................................. 143Display ............................................................................. 143Hard Disk ......................................................................... 145I/O Ports ........................................................................... 145Keyboard .......................................................................... 147Landline Modems .............................................................. 148Miscellaneous ................................................................... 151Mouse .............................................................................. 155PC Cards .......................................................................... 155Pen/Touch Screen .............................................................. 157Peripherals........................................................................ 157Radio Modems .................................................................. 157Appendix C  Glossary ...........................................161Index..................................................................167
WE KNOW THE ROADTMSECTION 1Features of theComputerIntroduction 16Individual Parts 17Indicator Lights  19Standard Hardware  20Optional Hardware  20Standard Software  21Optional Software 22MS-DOS Utilities 22If You Have a Touch Screen 23
16X-C 6250 Pro Users Manual79-0003-003   22 October 1999IntroductionThe X-C 6250 Pro mobile computer is a ruggedized, weather-sealedcomputer system built for the demanding environment of the mobileworker. Designed for use by large mobile workforces, this computer isone of the most practical work tools for collecting, managing, andcommunicating information in the field.The following pages describe the external and internal features of yourX-C 6250 Pro computer.
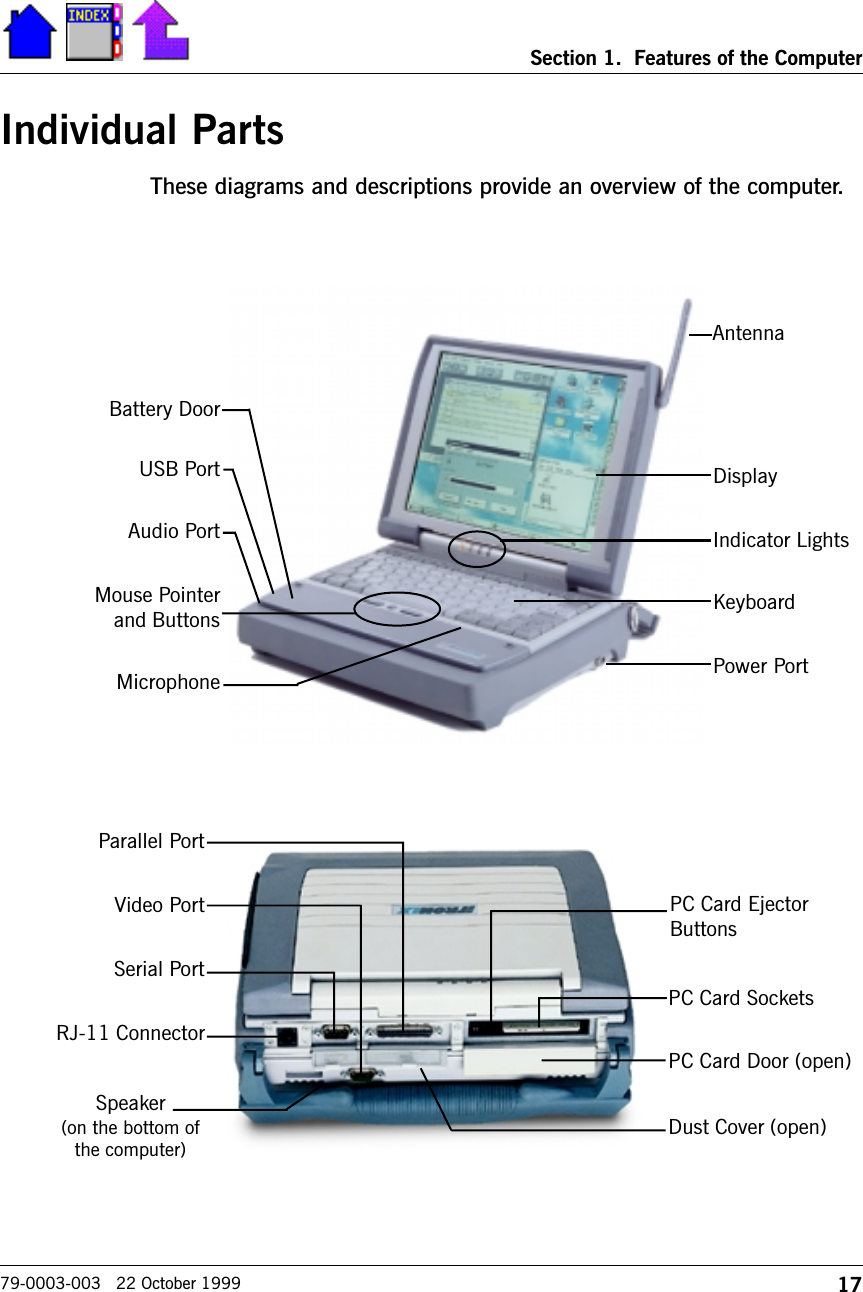
17Section 1.  Features of the Computer79-0003-003   22 October 1999AntennaDisplayIndicator LightsKeyboardPower PortBattery DoorUSB PortAudio PortMicrophoneMouse Pointerand ButtonsSerial PortRJ-11 ConnectorSpeaker(on the bottom ofthe computer)Video PortParallel PortPC Card EjectorButtonsPC Card SocketsDust Cover (open)PC Card Door (open)Individual PartsThese diagrams and descriptions provide an overview of the computer.
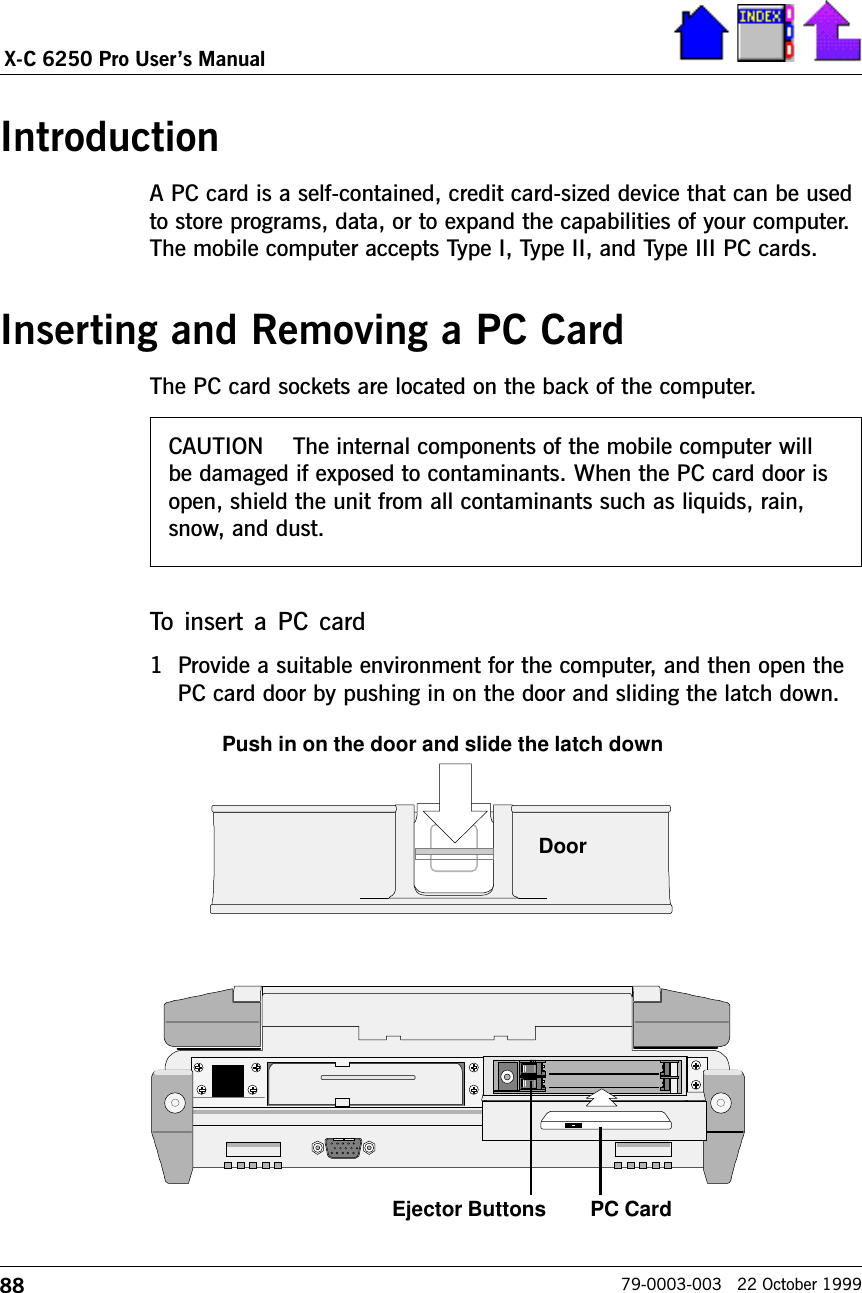
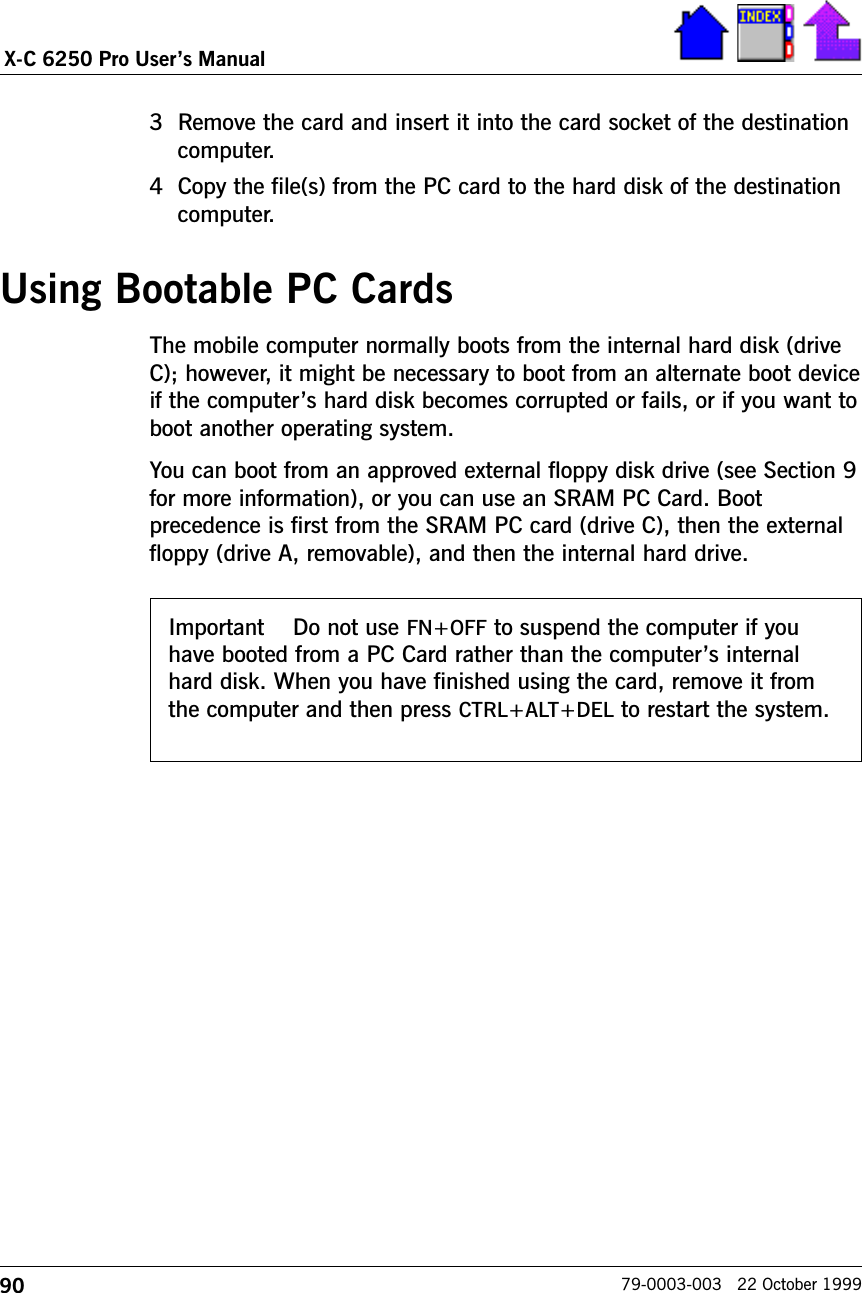
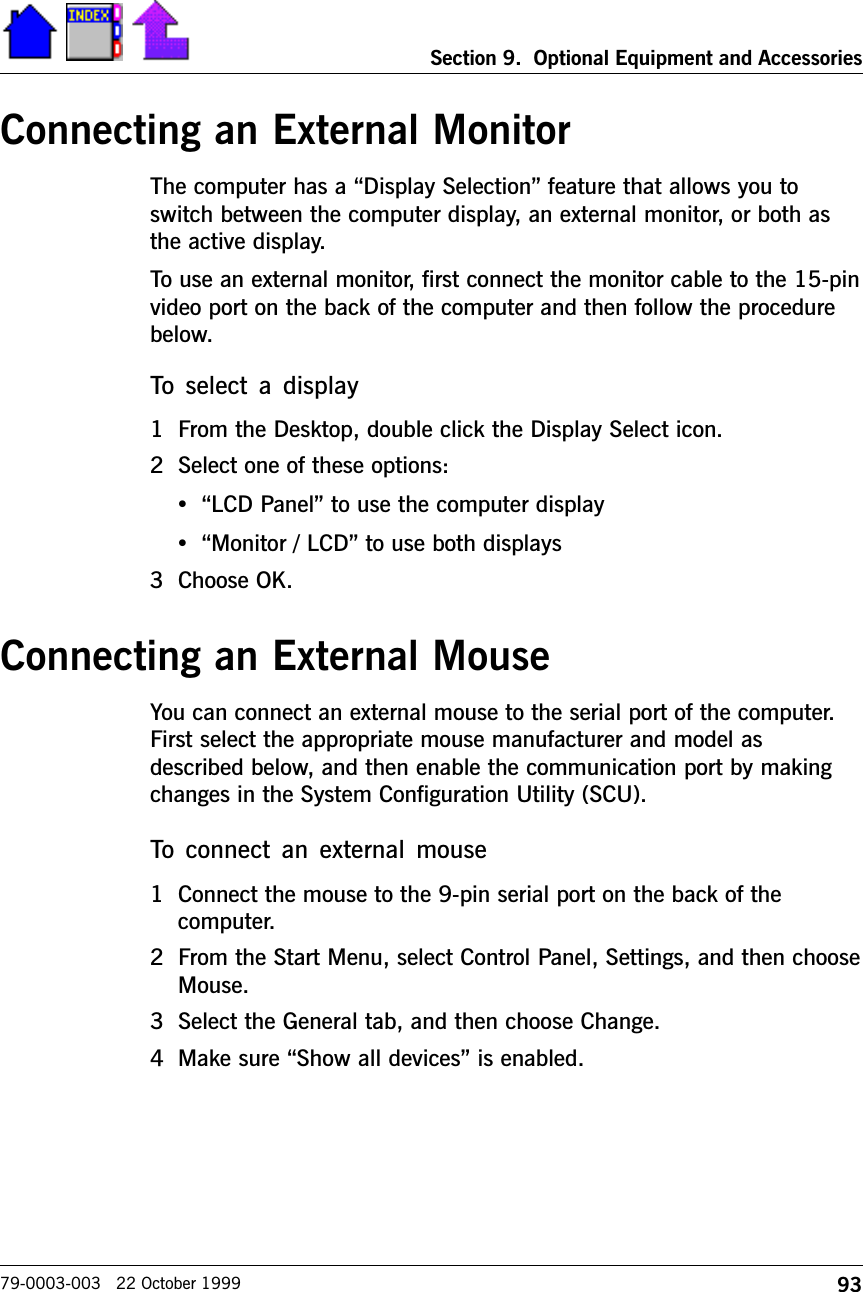
18X-C 6250 Pro Users Manual79-0003-003   22 October 1999The labeled components are described below.  •9-Pin Serial Port   This port can be used for serial communications,bar code input, connection to a printer, or other purposes.•15-Pin Video Port   This port can be used to connect an externalmonitor (see Section 9 of this manual for more information).•25-Pin Parallel Port   This port can be used to connect optionaldevices such as a printer.•Antenna   If you have a radio modem installed in your computer, theantenna sends and receives radio waves for this modem.•Audio Port  A custom port designed to connect to an adapter suchas a telco or multimedia adapter.•Battery Door and Latches   This door covers the Nickel Metal-Hydride (NiMH) battery. If you unlatch the battery door beforeturning off the computer first, the system automatically powers offthe unit to protect data on the hard disk.•Display   Display options include monochrome, color, or touchscreen. The screen can be illuminated in low-light conditions byturning on the backlight or MaxBright (FN+F1).•Dust Covers   These covers provide added protection for the serial,parallel, and video ports when they are not being used.•Keyboard   The keyboard is environmentally sealed and designedwith 93 percent standard key spacing.•Microphone   The microphone allows a user to talk to anotherperson using the internal modem and the Speaker Phone application.•Mouse Pointer and Buttons   The integrated mouse pointer islocated directly below the spacebar on the keyboard.  The left andright mouse buttons are located on either side of the mouse.•PC Card Door   This door covers the PC card sockets. When thisdoor is open, shield the unit from all contaminants such as liquids,rain, snow, and dust.•PC Card Sockets   PC cards are inserted into these sockets. Toremove a card, press the ejector button located to the left of theeach socket.
19Section 1.  Features of the Computer79-0003-003   22 October 1999•Power Port   This port is used to connect the external power supplyto the computer.•RJ-11 Connector   This port is used by the internal modem tocommunicate over standard voice grade telephone lines.•Speaker   Located on the bottom of the computer, the speakerprovides sound for the unit. Use the FN+F6 and FN+F7 keys toadjust speaker volume.•USB Port   The Universal Serial Bus port is a series Type A USBconnector.Indicator Lights Located below the display, these lights blink or remain on or off toindicate activity on the system.The On/Off light illuminates when you power on the computer; it blinksto indicate a low battery.  The External Power light illuminates when external power is connectedto the computer. It blinks while the external power supply is chargingthe battery and remains on when the battery is fully charged.The Disk Activity light comes on when the hard disk is spinning orprocessing data. The Radio On/Off light illuminates when the radio modem is poweredon (if your computer is equipped with a radio modem). If the computeris off and you receive a message, the light blinks to indicate a messageis waiting.POWER ON / LOW BATT RADIO ON / MESSAGEEXTERNAL POWER / CHRG HARD DRIVE ACTIVE
20X-C 6250 Pro Users Manual79-0003-003   22 October 1999Standard Hardware•National Instruments® 266 megahertz (MHz) GXm® processor   •32, 64, 96, or 128 Megabytes (MB) of Random Access Memory(RAM)•1 MB of internal video RAM•Monochrome, color, or touch screen display that opens to 180degrees•Internal hard disk•Weather sealed keyboard with 93 percent standard key spacing•Video port with a standard 15-pin D connector•USB port that is a series Type A USB connector•2 PC card sockets supporting two Type I or II cards, or one Type IIIcard•Nickel Metal Hydride (NiMH) battery•Display contrast and speaker volume adjustment keys•Backlight toggle key and adjustment keys (monochrome display)•Backlight adjustment keys (color display)•MaxBright toggle key (10.4-inch color display only)•Automatic temperature compensation of display contrast•Integrated mouse pointer•AC adapterOptional Hardware•Stand Alone Charger •Vehicle Adapter•Vehicle Cradle•RF modem•Bar code wand•Bar code laser scanner
21Section 1.  Features of the Computer79-0003-003   22 October 1999•Hand-held laser scanner•External 3.5-inch floppy drive•External CD-ROM drive•Internal modemStandard Software •Microsoft® Windows® 95, 98 and NT National Instrumentss Virtual System Architecture (VSA)Allows XpressGRAPHICS and XpressAUDIO as well as generic16-bit emulation capabilities (SoundBlaster®16).•Speaker PhoneAllows you to dial a number and talk with someone, just like atelephone.•Battery MaintenanceAllows you to deep cycle discharge batteries.•Battery StatusProvides current information about the battery including voltage,temperature, and remaining capacity.•Documentation in PDF formatA Users Manual resides on the computers desktop as a PDF file.•Practical Battery TipsLists important information about battery use and propermaintenance.•Keyboard Status Shows the status of the Num Lock and Caps Lock keys. Icons appearon the Windows 95 Taskbar when Num Lock or Caps Lock areactivated.•HyperTerminalEnables you to connect your computer to other computers andexchange information.
22X-C 6250 Pro Users Manual79-0003-003   22 October 1999Optional Software•Battery HistoryTracks all major power and battery events in the system andgenerates a timeline of power events and usage.•Password SecurityPrevents unauthorized users from gaining access to information onthe computer.MS-DOS Utilities•MODEMAllows you to turn on the internal modem before running an MS-DOS® application.•XCPRFInstalls the radio modem power management TSR.•RADIOReports the status of the radio modem; turns the radio modem onand off.•BATTMONLogs battery and power usage statistics for later viewing anddiagnostic purposes.
23Section 1.  Features of the Computer79-0003-003   22 October 1999If You Have a Touch ScreenIf you have a touch screen, follow the guidelines below.To use the stylus•Slide the stylus out of its holder.If you have a shoulder strap, you may have a slot on the strap tohold the stylus.•To replace it, slide it into the appropriate slot point first.If you cannot select objects accurately with the stylus, you may need torecalibrate the touch screen. To  calibrate  the  touch  screen1 From the Start Menu, select Programs, Touch, and then chooseTouchscreen Controls.2 Select the Calibration button.3 Follow the instructions on the screen to calibrate the touch screen.CAUTION•Always use an approved stylus.•Never use sharp, hard, or abrasive implements on the touchscreen such as ball point pens, pencils, or keys. They coulddamage the screen.•To clean the touch screen panel, apply a household glass cleanerto a soft, clean, dry cloth and wipe the screen.
24X-C 6250 Pro Users Manual79-0003-003   22 October 1999
WE KNOW THE ROADTMSECTION 2Using theKeyboard andMouseKeyboard Basics 26Restarting the Computer 26Primary Keys 26Arrow Keys 29Numeric Keypad 30FN Keys 31Function Keys 32Other Keys 33Using the Mouse 34General Guidelines 35Changing the Speed of the Mouse 35
26X-C 6250 Pro Users Manual79-0003-003   22 October 1999Keyboard BasicsThe keyboard on the mobile computer looks much like the keyboard of atypewriter and operates in almost the same way. While typewriter keysput characters on paper, the keys on the laptop enter characters in thecomputer and perform certain functions, depending on the applicationor program. Typing skills are helpful but are not essential becausetyping short commands or responses is easy.  The mobile computer features:•A typewriter-style keyboard•Twelve function keys, F1-F12•Embedded numeric keypad•Mouse keys Special Function Keys (85-Key Keyboard Only)Restarting the ComputerPress To do thisCTRL+ALT+DEL Reboot the computer.Press and hold both mouse Reset the computer.buttons for about ten secondsand then release the buttons.Primary KeysKey DescriptionALT The ALT (alternate) key is used with other keys toperform special tasks. Pressing CTRL+ALT+DEL resetsthe computer. Processing stops and the computerattempts to restart the operating system.CAUTION  You can restart the mobile computer using the followingkeys; however, restarting your computer while you are runningapplications or working in Windows may corrupt files or data.
27Section 2.  Using the Keyboard and Mouse79-0003-003   22 October 1999Esc F1 F2 F3 F4 F5 F6 F7 F8 F9 F10 F11 F12 Num LkPrt ScSysRqScr Lk PauseBreakDeleteIns ert=+-_0)*9(98*87&76^5%3#2@1!Backspace4$[{P_OIUYTREWQTabOFF}]¦\CapsLock '";:+L3K2J1HGFDSA Enterñ Shift ñShift/?/.>.,<MNBVCXZPg UpFn Ctrl Alt ON /~`Alt EndHome Pg Dn5460Function KeysOn/Off KeysEmbedded Numeric KeypadMouse Keys79-Key USA Keyboard 85-Key International(UK Layout) Keyboard (Optional)Esc F1 F2 F3 F4 F5 F6 F7 F8 F9 F10 F11 F12 Prt ScSys Rq InsertScr Lk PauseBreak Deleteù`¦!1“2£3$4%5^6&    77*     88(    99^     *0U     4I     5O     6P     -J     1K     2L     3:     +;M    0<,>    ..Tab çèQWERTYAS DFGHZXCVBNCaps LockShiftñFN Ctrl Alt |\ON   /Alt Gr Ctrl Home Pg Dn EndèêèShiftñPg Upé?    //@,~#Off}]{[Enter¿BackSpace+=_-Function KeysOn/Off KeysEmbedded Numeric KeypadMouse KeysSpecial Function KeysNum LkBackSpace
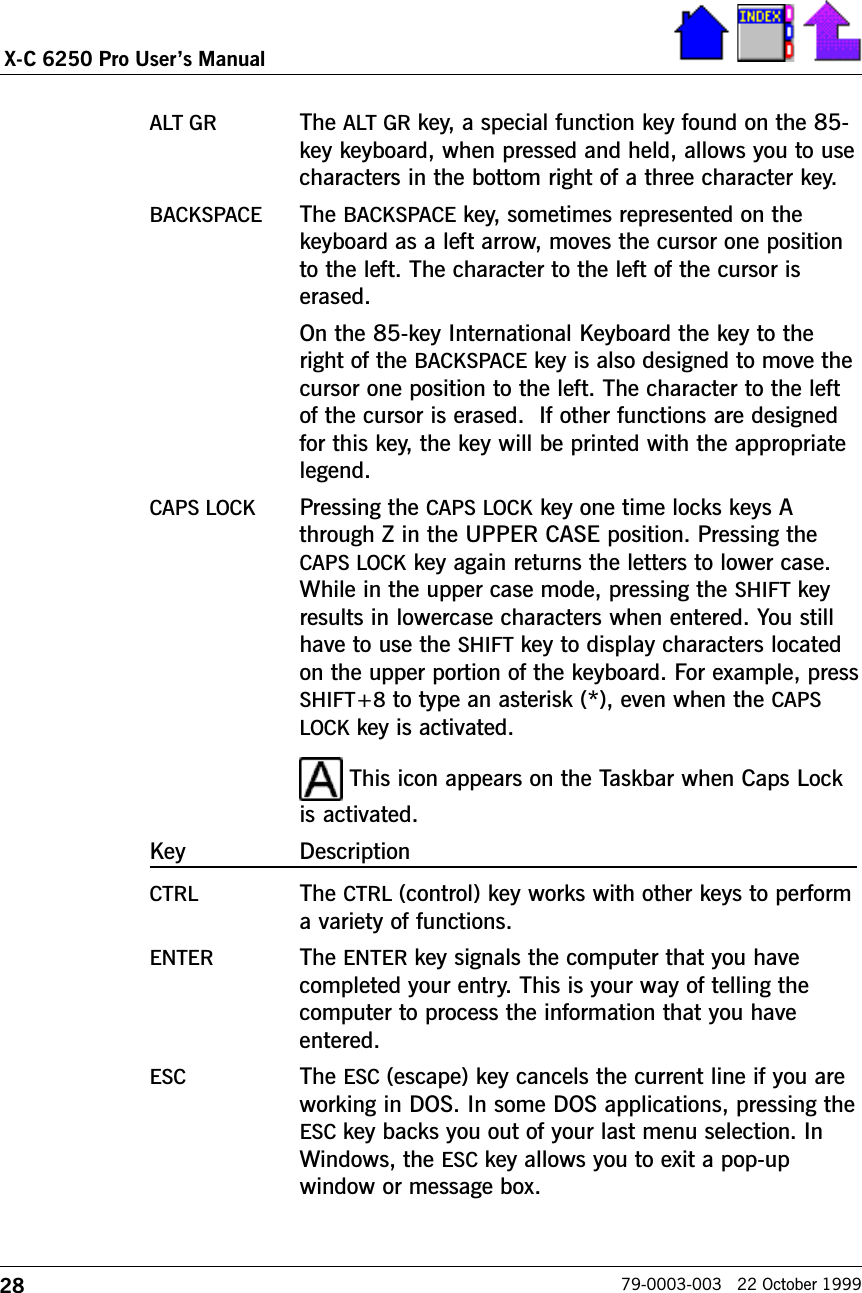
28X-C 6250 Pro Users Manual79-0003-003   22 October 1999ALT GR The ALT GR key, a special function key found on the 85-key keyboard, when pressed and held, allows you to usecharacters in the bottom right of a three character key.BACKSPACE The BACKSPACE key, sometimes represented on thekeyboard as a left arrow, moves the cursor one positionto the left. The character to the left of the cursor iserased.On the 85-key International Keyboard the key to theright of the BACKSPACE key is also designed to move thecursor one position to the left. The character to the leftof the cursor is erased.  If other functions are designedfor this key, the key will be printed with the appropriatelegend.CAPS LOCK Pressing the CAPS LOCK key one time locks keys Athrough Z in the UPPER CASE position. Pressing theCAPS LOCK key again returns the letters to lower case.While in the upper case mode, pressing the SHIFT keyresults in lowercase characters when entered. You stillhave to use the SHIFT key to display characters locatedon the upper portion of the keyboard. For example, pressSHIFT+8 to type an asterisk (*), even when the CAPSLOCK key is activated.  This icon appears on the Taskbar when Caps Lockis activated.Key DescriptionCTRL The CTRL (control) key works with other keys to performa variety of functions.ENTER The ENTER key signals the computer that you havecompleted your entry. This is your way of telling thecomputer to process the information that you haveentered.ESC The ESC (escape) key cancels the current line if you areworking in DOS. In some DOS applications, pressing theESC key backs you out of your last menu selection. InWindows, the ESC key allows you to exit a pop-upwindow or message box.
29Section 2.  Using the Keyboard and Mouse79-0003-003   22 October 1999PRT SC In Windows, pressing the PRT SC (print screen) keycopies the current screen or window to the clipboard soyou can paste it into documents. Pressing ALT+PRT SCkey copies the active window to the clipboard.SHIFT The SHIFT key changes the keys A through Z to theUPPER CASE position. When you press an alphabetickey, the character appears as a capital letter. When youpress SHIFT with other keys, the characters on the upperpart of the keys appear. For example, pressing SHIFT+7displays an ampersand (&).FN Function. Some special keys have been established toperform important tasks when pressed and held with theFN key. These keys are described later in this document.SPACEBAR Use the SPACEBAR to enter a space and move the cursorone character to the right. If you press FN and theSPACEBAR at the same time, your computer turns on.On the 85-key International Keyboard the two keys tothe right of the SPACEBAR are also designed to enter aspace and move the cursor one character to the right.  Ifother functions are designed for these keys, the keys willbe printed with the appropriate legends.TAB The TAB key moves the cursor to the next tab stop orfield. Tab stops are defined by your operating system orapplication program. Press the TAB key to move from onefield or text box to another.Arrow KeysThe arrow keys are defined by the software application.The UP ARROW key usually moves the cursor up one line. In somecases, you can use the up arrow to make selections from menus andscrollable list boxes.The DOWN ARROW key usually moves the cursor down one line. InWindows, you can use the down arrow to make selections from menusand scrollable list boxes.The RIGHT ARROW key usually moves the cursor one character positionto the right.
30X-C 6250 Pro Users Manual79-0003-003   22 October 1999The LEFT ARROW key usually moves the cursor one character position tothe left.In Windows, you can use the arrow keys instead of the mouse.Key DescriptionFN+END Pressing FN+END (FN+RIGHT ARROW) activates the Endkey. The function of the End key is defined by theapplication being used.FN+HOME Pressing FN+HOME (FN+LEFT ARROW) activates theHome key. The function of the Home key is defined bythe application with which you are working.FN+PGDN Pressing FN+PGDN (FN+DOWN ARROW) activates thepage down key. The Page Down key is defined by theapplication being used. It usually causes the next screenor window to appear.FN+PGUP Pressing FN+PGUP (FN+UP ARROW) activates the pageup key. The Page Up key is defined by the applicationyou use. It usually causes the previous screen or windowto appear.Numeric KeypadThe numeric keypad is embedded in the keyboard area. The embeddedkeypad emulates the numeric keypad typically found on a full-sizekeyboard. It is arranged like a calculator for applications that requireyou to key many numbers or for use with the Calculator in the standardWindows Accessories.  This icon appears on the Windows 95 Taskbar when Num Lock isenabled:  Num Lock icon
31Section 2.  Using the Keyboard and Mouse79-0003-003   22 October 1999Below are descriptions of the keys when NUM LK is pressed.Key DescriptionNUM LK (FN+F12) Numeric Lock. Pressing the FN+NUM LK keys placesthe embedded numeric keypad in the numeric state.Pressing 0 through 9 generates numbers. PressingFN+NUM LK again returns keys back to their originalstate. For example, when NUM LOCK is on, the ukey generates a 4 when pressed. When NUM LOCKis off, the keys return to their alphabetic setting.Minus (-) The Minus key is used to subtract numbers.Plus (+) The Plus key is used to add numbers.Asterisk (*) The Asterisk key is used to multiply numbers.Forward Slash (/) The Forward Slash key is used to divide numbers.Period (.) The period key inserts a decimal point.ENTER The ENTER key generates a total for calculations youhave entered.FN KeysOn the mobile computer, you must press the FN key in combinationwith other keys to perform various tasks. These keys are labeled with asmall box around the command.  For example:   FN+PGDNFn  PgDnPress To do thisFN+ON Turn on the computer(FN+SPACEBAR)FN+OFF Turn off the computerFN+F1 Toggle the backlight on and off (monochromedisplay)FN+F1 Toggle MaxBright on and off (10.4-inch colordisplay only)FN+F2 Dim the display backlightFN+F3 Brighten the display backlight
32X-C 6250 Pro Users Manual79-0003-003   22 October 1999FN+F4 Lighten the display contrast (not available on the10.4-inch color display)FN+F5 Darken the display contrast (not available on the10.4-inch color display)FN+F6 Decrease the volumeFN+F7 Increase the volumeFN+NUM LK (FN+F12) Toggle NUM LOCK on and off (In NUMLOCK mode, the blue keys on the keyboardemulate a numeric keypad.)FN+INSERT Toggle Insert mode on and offFN+END Activate the End key. The function of the End keyis defined by the application being used.FN+HOME Activate the Home key. The function of the homekey is defined by the application with which youare working.Press To do thisFN+PGDN Activate the Page Down key. This key is defined bythe application being used. It usually causes thenext screen or window to appear.FN+PGUP Activate the Page Up key. This key is defined bythe application you use. It usually causes theprevious screen or window to appear.Function KeysKey DescriptionF1 - F12 The Function keys are located at the top row of thekeyboard. How you use function keys F1 through F12depends upon the application that is running.
33Section 2.  Using the Keyboard and Mouse79-0003-003   22 October 1999Other KeysKey DescriptionDEL Delete. In DOS, the DEL key deletes one character to theleft of the cursors position. In Windows, the DEL keydeletes highlighted text, selected objects or graphics,and single characters of text located one position to theright of the cursor.FN+INSERT The Insert key is activated by pressing FN+INSERT(FN+SCR LK). The Insert key may vary with the softwarebeing used.PAUSE Momentarily pauses or stops the display.SCROLL LOCK The function of the SCROLL LOCK key depends on thesoftware being used. It is often used to keep the cursorin one position while the text moves.
34X-C 6250 Pro Users Manual79-0003-003   22 October 1999Using the MouseThe mouse (pointer device) and its buttons (controls) are located at thebottom of the keyboard just below the space bar. The mouse, whichlooks like a gray eraser head, is positioned between the left and rightmouse buttons at the bottom of the keyboard.Apply light pressure to the mouse in the direction you want to move thepointer around the screen. You can move the pointer to the icon ormenu you want, and click with the left, primary mouse button for mostoperations. Or, double-click the left, primary mouse button twice ratherquickly for certain operations. Use the left, primary mouse button toeither click or double-click, which is based on the task you areperforming.Esc F1 F2 F3 F4 F5 F6 F7 F8 F9 F10 F11 F12 Num LkPrt ScSysRqScr Lk PauseBreakDeleteIns ert=+-_0)*9(98*87&76^5%3#2@1!Backspace4$[{P_OIUYTREWQTabOFF}]¦\CapsLock '";:+L3K2J1HGFDSA Enterñ Shift ñShift/?/.>.,<MNBVCXZPg UpFn Ctrl Alt ON /~`Alt EndHome Pg Dn5460Mouse KeysThe following table describes the meaning of terms used with themouse.Term MeaningPoint To move the mouse until the mouse pointer on thescreen points to the item of choice.Click To quickly press and release the left, primary mousebutton. To select an icon, you must point and click onthat icon. Usually, you point and click on buttons, menubars, menu options, and drop-down list boxes.
35Section 2.  Using the Keyboard and Mouse79-0003-003   22 October 1999Term MeaningDouble-click To click the left, primary mouse button twice in rapidsuccession.Pointing and double-clicking on an application iconopens or launches the program associated with the icon.Drag To point, click, and press and hold down the left,primary mouse button while you move the mouse. Youuse drag to move icons from one window or directory toanother. To select text in a data entry field, you place thecursor at the beginning of the text, click on the left,primary mouse button, and drag the cursor over text.You can then delete or type over the text.General GuidelinesThe mobile computer uses a Liquid Crystal Display (LCD), which is thetype of screen used on many notebook and sub-notebook computers.One problem experienced on computers with an LCD display, especiallyin cold environments, is that the cursor seems to disappear wheneverthe mouse is moved quickly. To improve the visibility of the mousecursor, you should:•Enable the Pointer Trails feature to add trailing cursors.•Use a slow or medium speed/sensitivity level.You can combine a higher level of acceleration with a slow or mediumspeed/sensitivity level. This will allow you to move the mouse cursorquickly by increasing your finger pressure, while still providing a finerdegree of control when you apply minimum pressure.Changing the Speed of the MouseTo change the speed of the mouse, from the Start Menu select Settings,Control Panel, and then choose Mouse to make adjustments.
36X-C 6250 Pro Users Manual79-0003-003   22 October 1999
WE KNOW THE ROADTMSECTION 3Getting StartedIntroduction 38PRECAUTIONS 38The First Time... 39Connecting the AC Adapter 39Installing and Charging the Battery  40Turning the Computer On and Off 42Startup Problems? 43If You Have a Touch Screen 43Password Security 44Setting or Changing Your Password 45If You Cannot Remember Your Password 45
38X-C 6250 Pro Users Manual79-0003-003   22 October 1999IntroductionThis section includes procedures for setting up and using yourcomputer for the first time.PRECAUTIONSPlease be aware of the following important information before youbegin operating your computer. Data stored on floppy disks may be corrupted if the disks come inclose contact with the magnetic components of the computer. Donot lay a floppy disk on top of or under the computer.  The internal components of the computer will be damaged ifexposed to contaminants. When dust covers, the PC card door, orthe battery door on the computer are open, shield the unit from allcontaminants such as liquids, rain, snow, and dust. You can lose data if you remove the battery while the computer isoperating on battery power. Turn off the unit by pressing FN+OFFbefore you remove the battery. You can also lose data if the batteryis removed for more than 10 minutes.CAUTION  If you have a touch screen:-Always use an approved stylus.-Never use sharp, hard, or abrasive implements on the touch screensuch as ball point pens, pencils, or keys. They could damage thescreen.•WARNING  The computer is powered by a rechargeable NickelMetal Hydride (NiMH) battery. Disposing of this battery improperlycan cause serious personal injury. Do not crush the battery or placeit in a fire. The battery is recyclable and, under various state andlocal laws, it may be illegal to dispose of the battery into themunicipal waste stream. Check with your local solid-waste officialsfor details on recycling options or proper disposal.
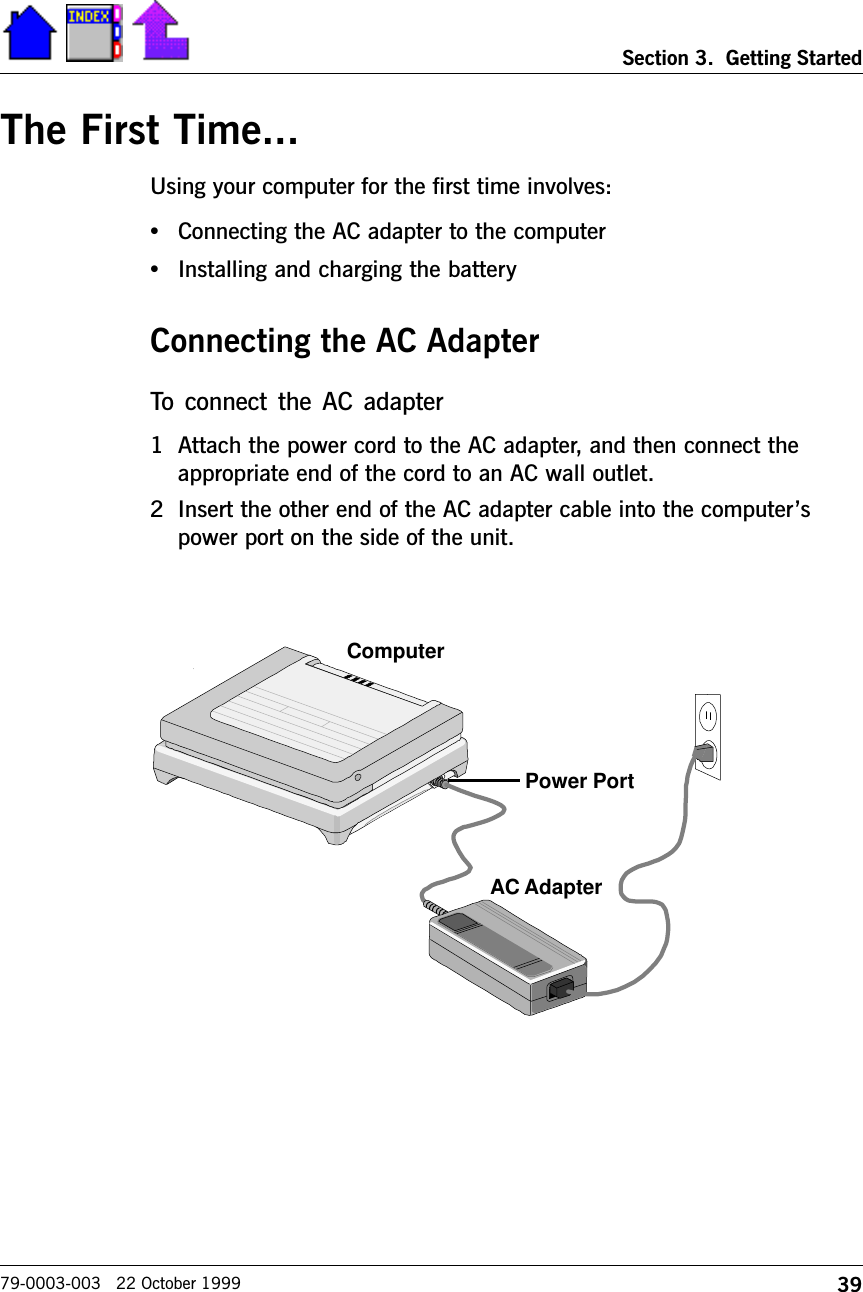
39Section 3.  Getting Started79-0003-003   22 October 1999The First Time...Using your computer for the first time involves:•Connecting the AC adapter to the computer•Installing and charging the batteryConnecting the AC AdapterTo  connect  the  AC  adapter 1 Attach the power cord to the AC adapter, and then connect theappropriate end of the cord to an AC wall outlet.2 Insert the other end of the AC adapter cable into the computerspower port on the side of the unit.AC AdapterComputerPower Port
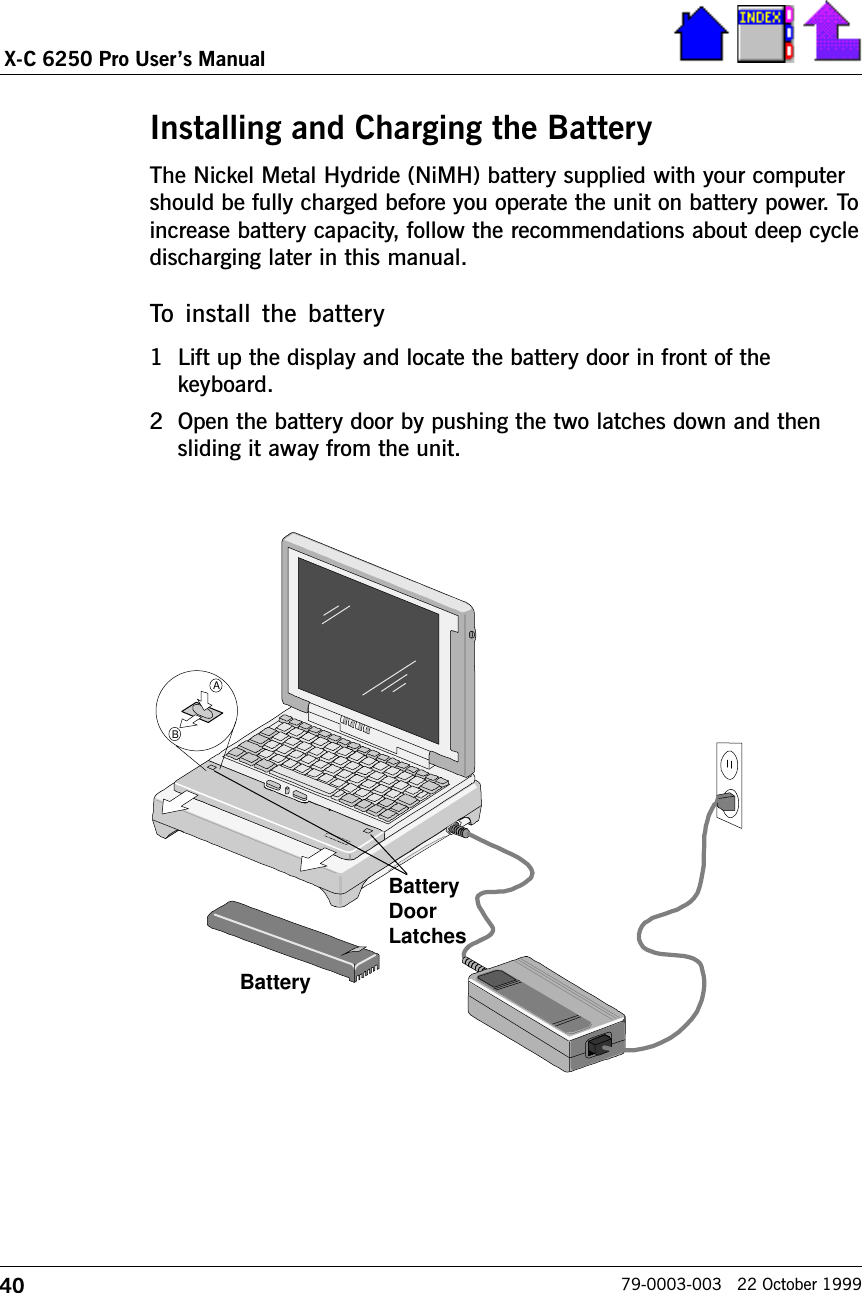
40X-C 6250 Pro Users Manual79-0003-003   22 October 1999Installing and Charging the Battery The Nickel Metal Hydride (NiMH) battery supplied with your computershould be fully charged before you operate the unit on battery power. Toincrease battery capacity, follow the recommendations about deep cycledischarging later in this manual.To  install  the  battery1 Lift up the display and locate the battery door in front of thekeyboard.2 Open the battery door by pushing the two latches down and thensliding it away from the unit.Ve lcr oPadABBatteryBatteryDoorLatches
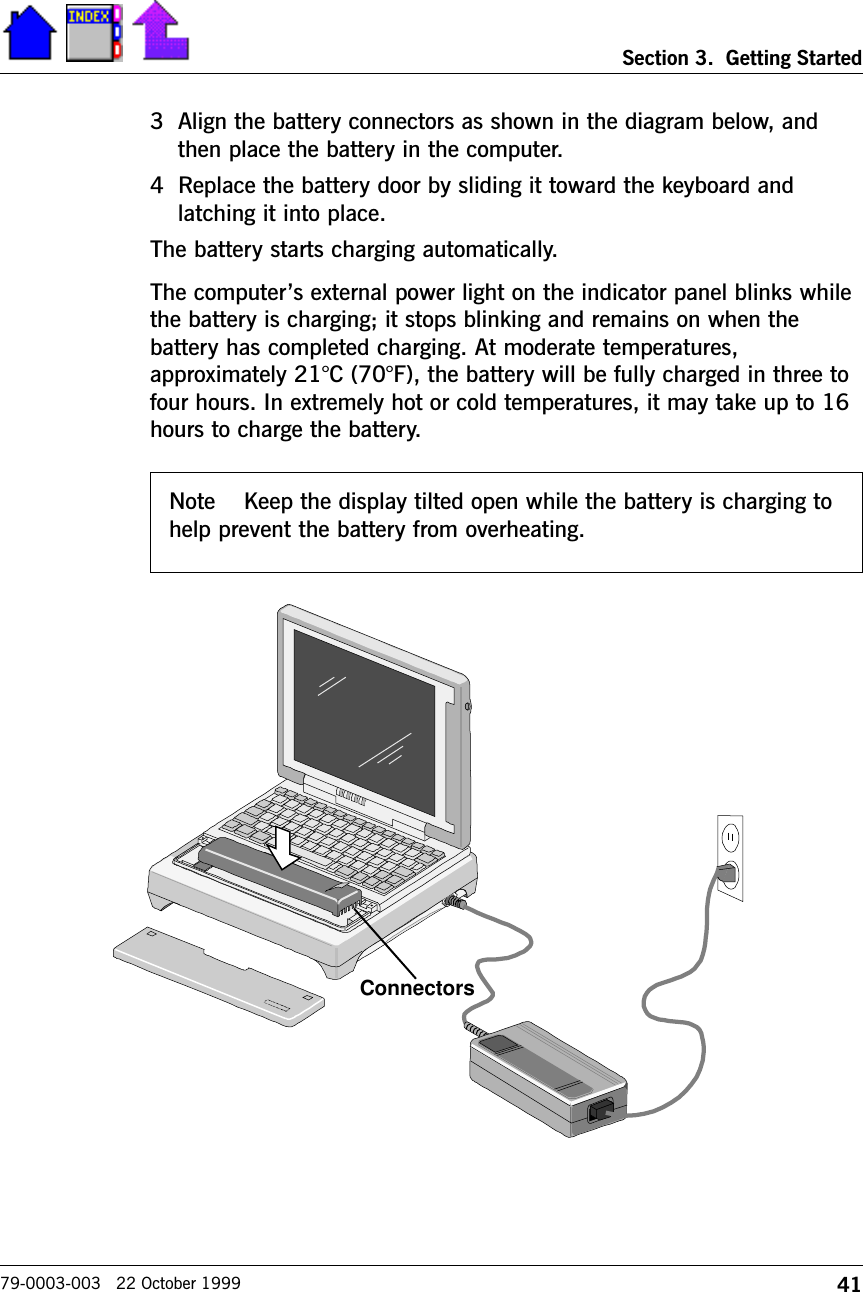
41Section 3.  Getting Started79-0003-003   22 October 19993 Align the battery connectors as shown in the diagram below, andthen place the battery in the computer.4 Replace the battery door by sliding it toward the keyboard andlatching it into place.The battery starts charging automatically.The computers external power light on the indicator panel blinks whilethe battery is charging; it stops blinking and remains on when thebattery has completed charging. At moderate temperatures,approximately 21°C (70°F), the battery will be fully charged in three tofour hours. In extremely hot or cold temperatures, it may take up to 16hours to charge the battery. Note Keep the display tilted open while the battery is charging tohelp prevent the battery from overheating.Connectors
42X-C 6250 Pro Users Manual79-0003-003   22 October 1999Turning the Computer On and OffYou can operate the computer while the battery is charging. To  turn  on  the  computer1 Press FN+ON (FN+SPACEBAR).Note:  If the computer does not power on, restart it by holding downboth mouse buttons for at least 10 seconds, and then releasing thebuttons.2 Adjust the display contrast control for a sharp, clear display.  •FN+F4 lightens the display•FN+F5 darkens the displayNote:  If you have a 10.4-inch color display, these keys are notactive.3 Adjust the backlight if necessary. •On a monochrome display, pressing FN+F1 toggles the backlighton and off.•On a color display, the backlight is on whenever the computer isrunning. Pressing FN+F1 toggles the MaxBright feature on and off.4 Make sure the date and time are correct by choosing the Date/Timeicon from Control Panel and making any needed changes.To  turn  off  the  computer•Press FN+OFF.When you power the computer back on, the system resumes fromwhere you left off. To conserve battery power, turn off the computerwhenever you are not using it.Note The system automatically turns off (suspends) the unit aftera period of continuous idle time. You can resume where you left offby pressing FN+ON.
43Section 3.  Getting Started79-0003-003   22 October 1999Startup Problems?If your computer does not operate, try these solutions. •Connect the AC adapter to charge the battery if it is not charged.•If the AC adapter is connected, make sure the electrical outlet youare using works.•Check to make sure the battery is installed and charged properly.•Check the battery door latches to make sure the door is closed andsecured.•If the computer does not turn on, restart the system by holding downboth mouse buttons for at least 10 seconds and then releasing thebuttons.•If the battery doesnt begin charging, remove the battery, connect theAC adapter, and turn on the computer by pressing FN+ON. Reinstallthe battery. The indicator light blinks while the battery is charging.Appendix B, Troubleshooting, lists additional solutions you can try.If You Have a Touch ScreenCAUTION•Always use an approved stylus.•Never use sharp, hard, or abrasive implements on the touchscreen such as ball point pens, pencils, screw drivers or keys.They could damage the screen.•To clean the touch screen panel, apply a household glass cleanerto a soft, clean, dry cloth and wipe the screen.  A soft, dry cottoncloth may be used to eliminate fingerprints on the screen ifhousehold cleaner is unavailable.
44X-C 6250 Pro Users Manual79-0003-003   22 October 1999To use the stylus•Slide the stylus out of its holder.If you have a shoulder strap, you may have a slot on the strap tohold the stylus.•To replace it, slide it into the appropriate slot point first.If you cannot select objects accurately with the stylus, you may need torecalibrate the touch screen.To  calibrate  the  touch  screen1 From the Start Menu, select Programs, Touch, and then chooseTouchscreen Controls.2 Select the Calibration button.3 Follow the instructions on the screen to calibrate the touch screen.Password SecurityIf your computer is equipped with security software configuredappropriately, you can activate or deactivate password security. To learnmore about the security software, refer to its online help.To  activate  or  deactivate security1 Select the Password Security icon in the Mobile Computer Toolsfolder.2 Enter your current password and check the box to be able to get intothe Change Password screen.If you are using the computer for the first time, enter the defaultpassword provided by your company.3 If the Activate Security field is available to change, toggle the field tothe desired setting (contact your supervisor or help desk if you donthave access to this field and need it).If you set the Activate Security field, this activates password securityand you are prompted for a password whenever keyboard or mouseinactivity exceeds the time specified in the Inactivity Delay field. Ifyou clear the Activate Security field, you are not prompted for apassword.
45Section 3.  Getting Started79-0003-003   22 October 1999Setting or Changing Your PasswordSetting or changing your password is a way to make sure unauthorizedusers do not gain access to the information stored on your computer. Ifyour computer is equipped with security software, follow theseinstructions to set or change your password.To  set  or  change  your password1 Select the Password Security icon in the Mobile Computer Toolsfolder.2 Enter your current password.If you are using the computer for the first time, enter the defaultpassword provided by your company.3 Enter your new password twiceonce in the Enter New Passwordfield and again in the Re-Enter New Password field.4 Choose OK to save your new password.If You Cannot Remember Your PasswordIf your computer is equipped with security software and you forget yourpassword, contact your supervisor or the help desk at your organizationfor instructions about regaining access to your system.
46X-C 6250 Pro Users Manual79-0003-003   22 October 1999
WE KNOW THE ROADTMSECTION 4If You Have aRadio ModemIntroduction 48Before You Start: Register! 48ARDIS or RAM 48Cellular Data or Voice 48Cellular CDPD 49What Can I Do with My Radio Modem? 49Using the Integrated Radio Modem 50Antenna Positioning 50Serial Port Settings 51Radio Indicator Light 51Enabling the Radio Modem 51For MS-DOS Users 53Factory Installed Radio Software 53User Installable Cellular/CDPD Radio Software 54Additional Documentation 55
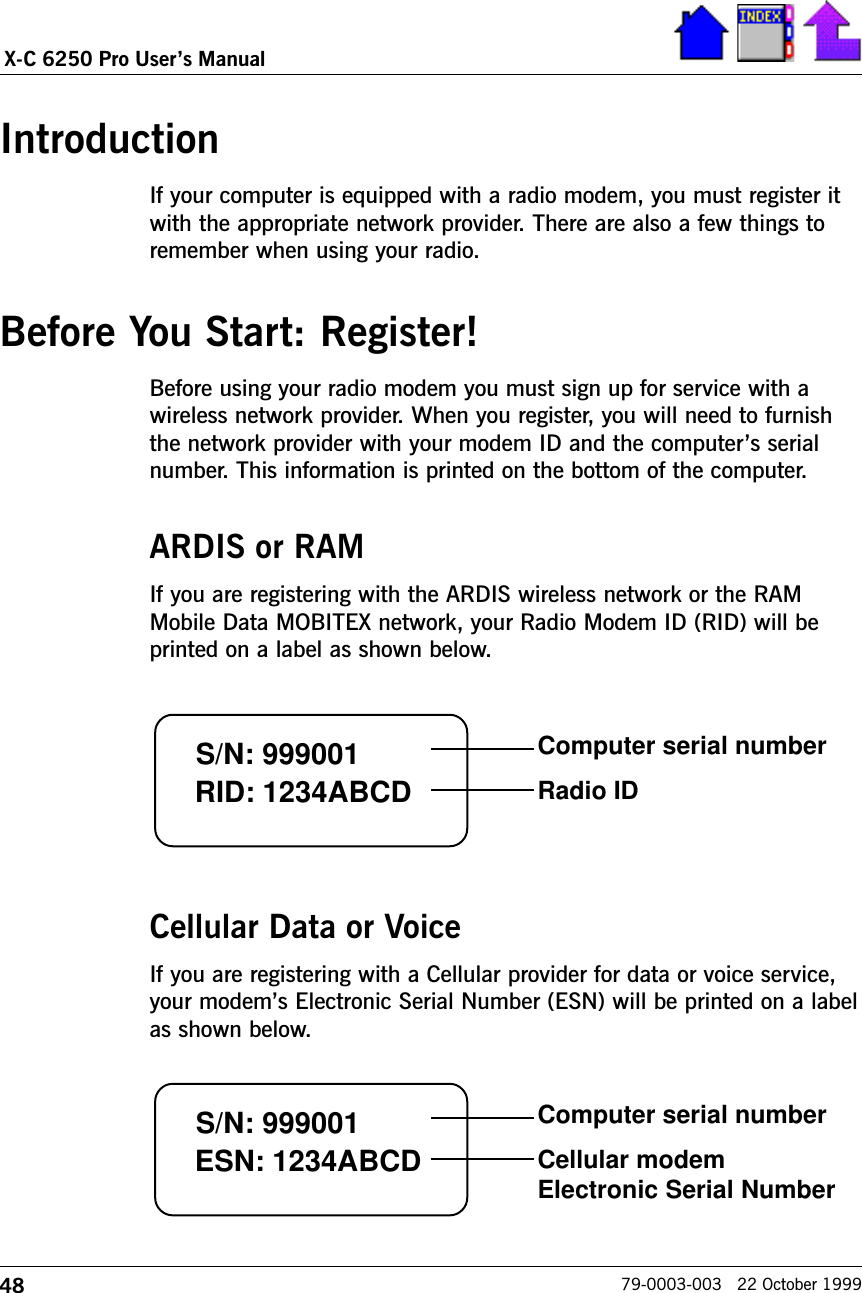
48X-C 6250 Pro Users Manual79-0003-003   22 October 1999IntroductionIf your computer is equipped with a radio modem, you must register itwith the appropriate network provider. There are also a few things toremember when using your radio. Before You Start: Register!Before using your radio modem you must sign up for service with awireless network provider. When you register, you will need to furnishthe network provider with your modem ID and the computers serialnumber. This information is printed on the bottom of the computer. ARDIS or RAMIf you are registering with the ARDIS wireless network or the RAMMobile Data MOBITEX network, your Radio Modem ID (RID) will beprinted on a label as shown below.Cellular Data or VoiceIf you are registering with a Cellular provider for data or voice service,your modems Electronic Serial Number (ESN) will be printed on a labelas shown below. S/N: 999001 RID: 1234ABCDComputer serial numberRadio IDS/N: 999001 ESN: 1234ABCDComputer serial numberCellular modemElectronic Serial Number
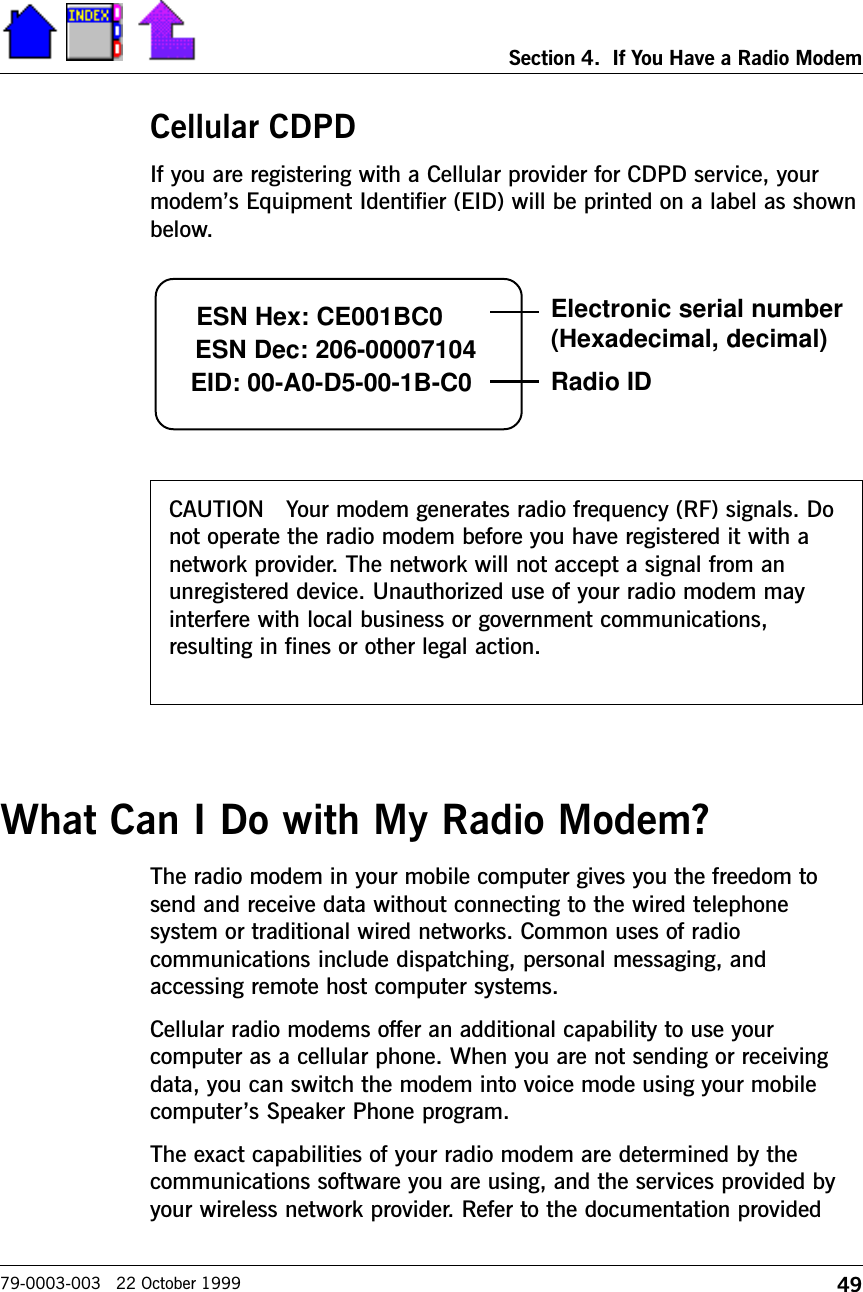
49Section 4.  If You Have a Radio Modem79-0003-003   22 October 1999Cellular CDPDIf you are registering with a Cellular provider for CDPD service, yourmodems Equipment Identifier (EID) will be printed on a label as shownbelow.What Can I Do with My Radio Modem?The radio modem in your mobile computer gives you the freedom tosend and receive data without connecting to the wired telephonesystem or traditional wired networks. Common uses of radiocommunications include dispatching, personal messaging, andaccessing remote host computer systems. Cellular radio modems offer an additional capability to use yourcomputer as a cellular phone. When you are not sending or receivingdata, you can switch the modem into voice mode using your mobilecomputers Speaker Phone program.The exact capabilities of your radio modem are determined by thecommunications software you are using, and the services provided byyour wireless network provider. Refer to the documentation providedCAUTION   Your modem generates radio frequency (RF) signals. Donot operate the radio modem before you have registered it with anetwork provider. The network will not accept a signal from anunregistered device. Unauthorized use of your radio modem mayinterfere with local business or government communications,resulting in fines or other legal action.ESN Hex: CE001BC0 ESN Dec: 206-00007104EID: 00-A0-D5-00-1B-C0Radio IDElectronic serial number(Hexadecimal, decimal)
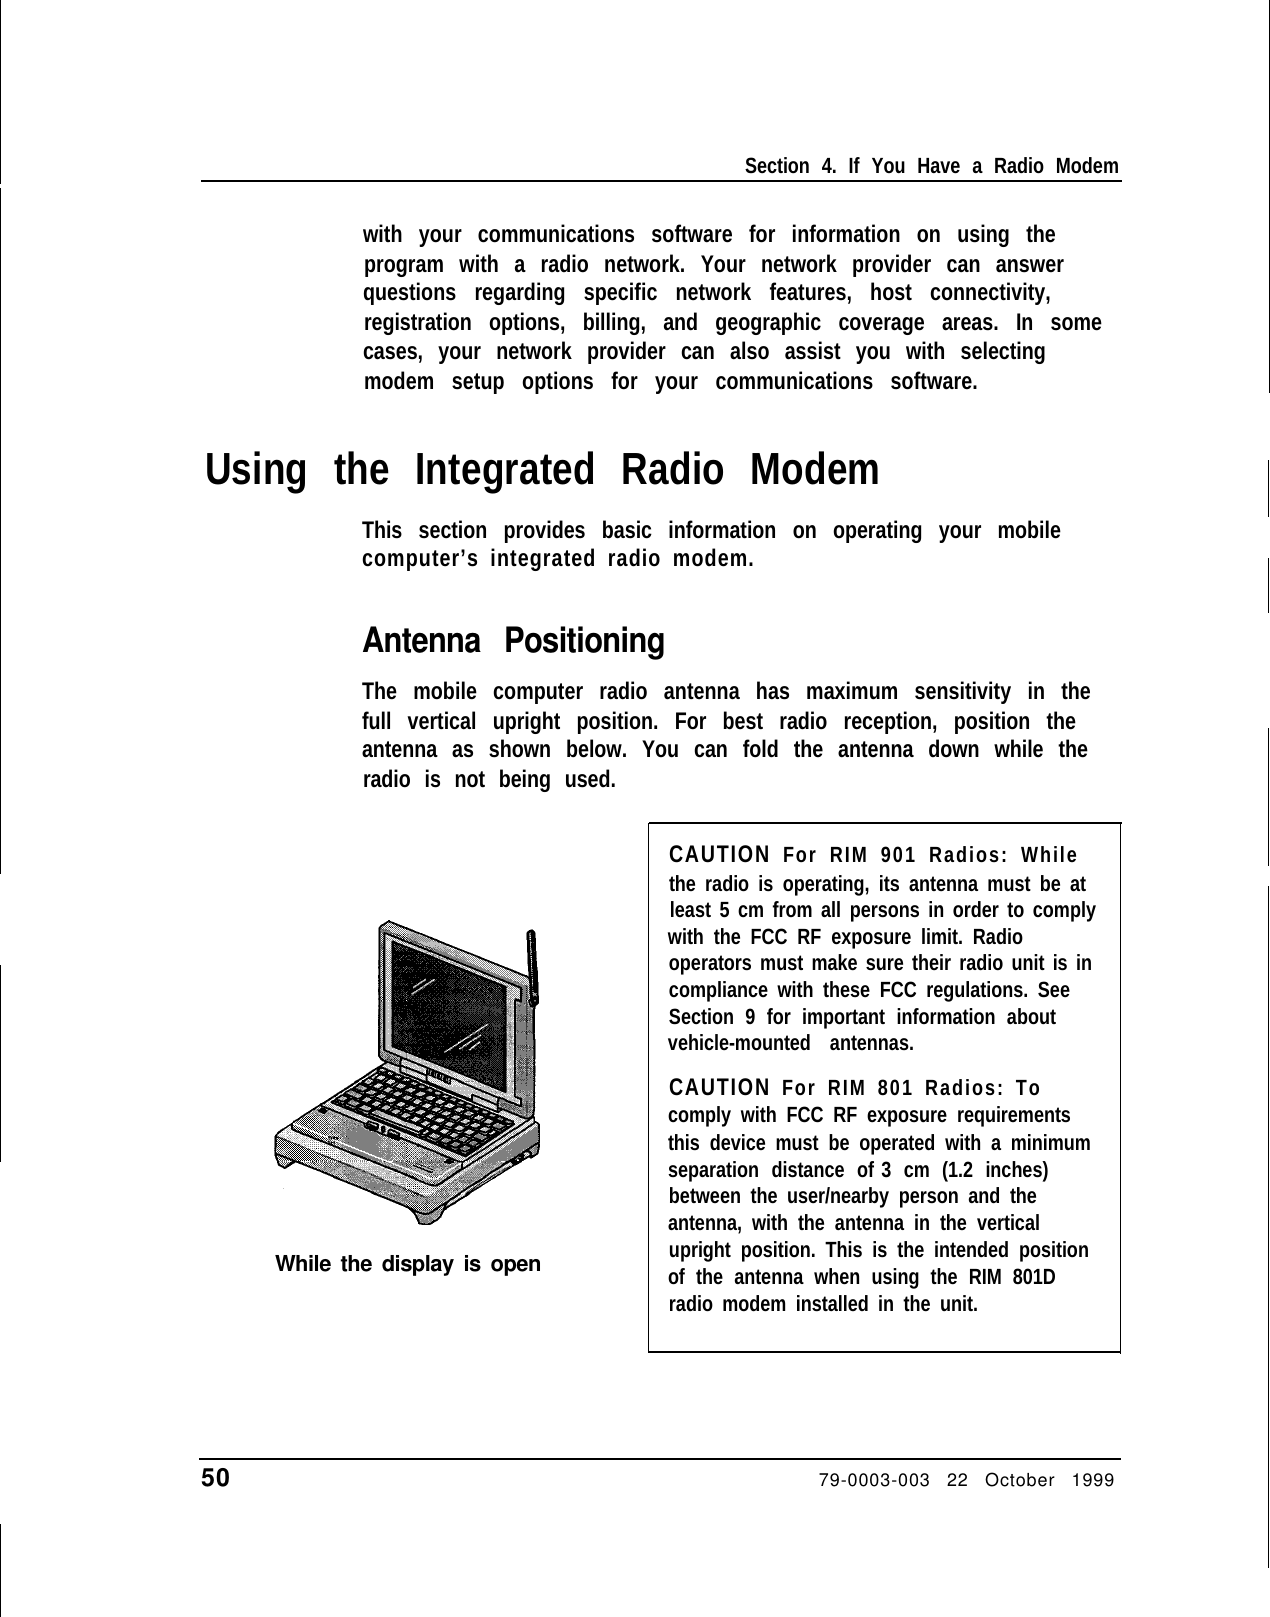
Section 4. If You Have a Radio Modemwith your communications software for information on using theprogram with a radio network. Your network provider can answerquestions regarding specific network features, host connectivity,registration options, billing, and geographic coverage areas. In somecases, your network provider can also assist you with selectingmodem setup options for your communications software.Using the Integrated Radio ModemThis section provides basic information on operating your mobilecomputer’s integrated radio modem.Antenna PositioningThe mobile computer radio antenna has maximum sensitivity in thefull vertical upright position. For best radio reception, position theantenna as shown below. You can fold the antenna down while theradio is not being used.While the display is openCAUTION For RIM 901 Radios: Whilethe radio is operating, its antenna must be atleast 5 cm from all persons in order to complywith the FCC RF exposure limit. Radiooperators must make sure their radio unit is incompliance with these FCC regulations. SeeSection 9 for important information aboutvehicle-mounted antennas.CAUTION For RIM 801 Radios: Tocomply with FCC RF exposure requirementsthis device must be operated with a minimumseparation distance of 3 cm (1.2 inches)between the user/nearby person and theantenna, with the antenna in the verticalupright position. This is the intended positionof the antenna when using the RIM 801Dradio modem installed in the unit.50                        79-0003-003 22 October 1999
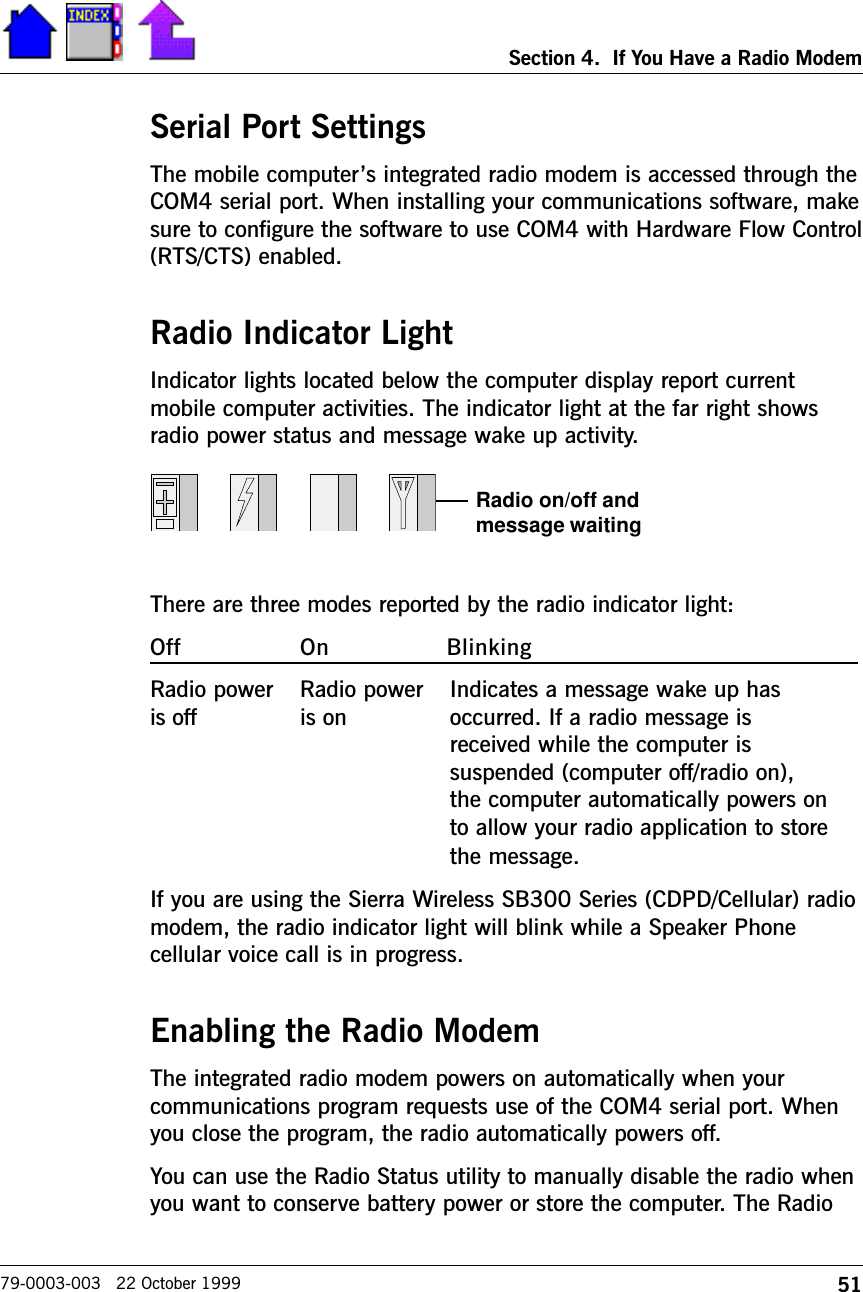
51Section 4.  If You Have a Radio Modem79-0003-003   22 October 1999Serial Port SettingsThe mobile computers integrated radio modem is accessed through theCOM4 serial port. When installing your communications software, makesure to configure the software to use COM4 with Hardware Flow Control(RTS/CTS) enabled. Radio Indicator LightIndicator lights located below the computer display report currentmobile computer activities. The indicator light at the far right showsradio power status and message wake up activity.There are three modes reported by the radio indicator light:Off On BlinkingRadio power Radio power Indicates a message wake up hasis off is on occurred. If a radio message isreceived while the computer issuspended (computer off/radio on),the computer automatically powers onto allow your radio application to storethe message.If you are using the Sierra Wireless SB300 Series (CDPD/Cellular) radiomodem, the radio indicator light will blink while a Speaker Phonecellular voice call is in progress.Enabling the Radio ModemThe integrated radio modem powers on automatically when yourcommunications program requests use of the COM4 serial port. Whenyou close the program, the radio automatically powers off. You can use the Radio Status utility to manually disable the radio whenyou want to conserve battery power or store the computer. The RadioRadio on/off andmessage waiting
52X-C 6250 Pro Users Manual79-0003-003   22 October 1999Status utility appears as a minimized icon on the Windows desktop. Youcan also run Radio Status by opening the Radio Tools folder. Double-click on the icon to activate Radio Status. Clicking on the Radio Status Power button toggles power to theintegrated radio modem.Modem TypeCDPD/CellularModem typeCDPD/CellularRadio enabledRadio disbled
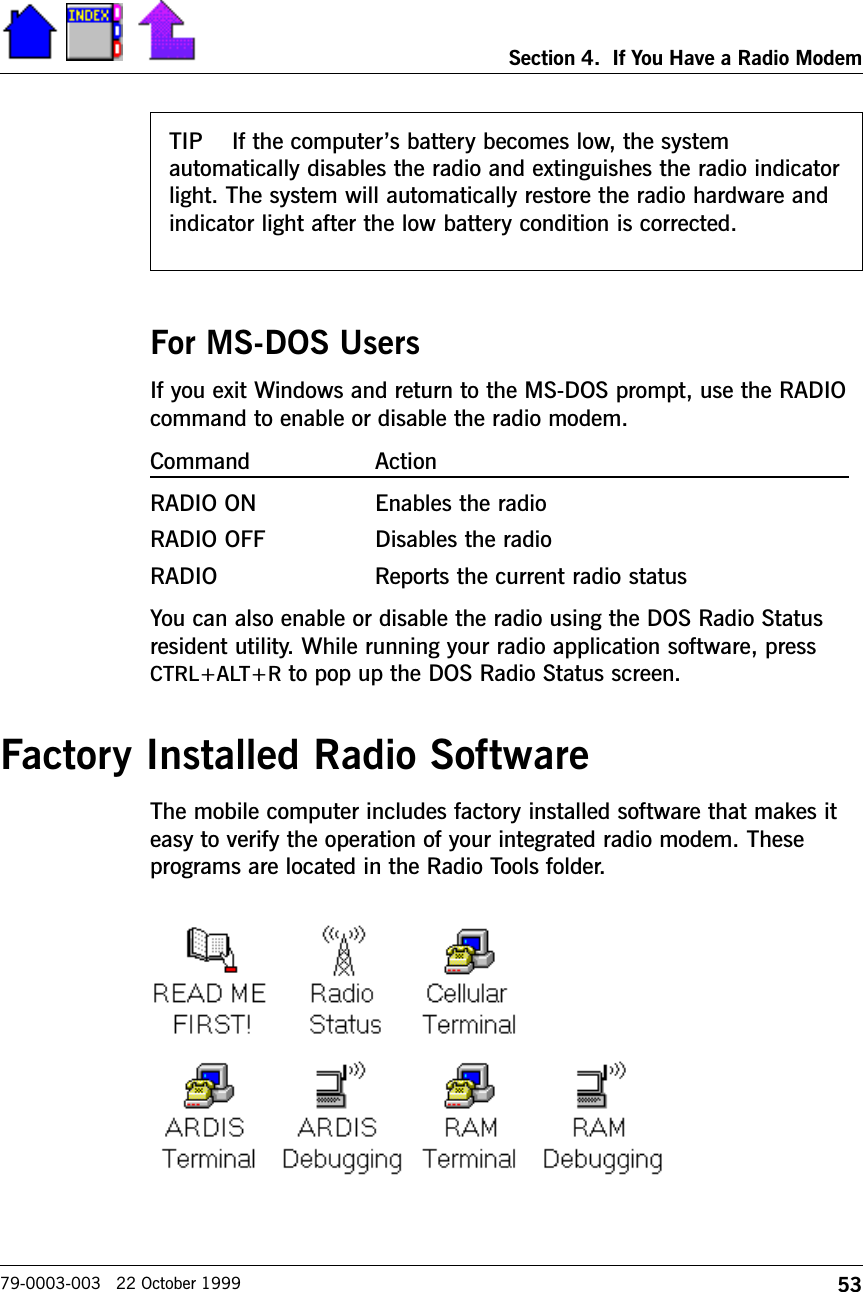
53Section 4.  If You Have a Radio Modem79-0003-003   22 October 1999For MS-DOS UsersIf you exit Windows and return to the MS-DOS prompt, use the RADIOcommand to enable or disable the radio modem. Command ActionRADIO ON Enables the radioRADIO OFF Disables the radioRADIO Reports the current radio statusYou can also enable or disable the radio using the DOS Radio Statusresident utility. While running your radio application software, pressCTRL+ALT+R to pop up the DOS Radio Status screen.Factory Installed Radio SoftwareThe mobile computer includes factory installed software that makes iteasy to verify the operation of your integrated radio modem. Theseprograms are located in the Radio Tools folder.  TIP    If the computers battery becomes low, the systemautomatically disables the radio and extinguishes the radio indicatorlight. The system will automatically restore the radio hardware andindicator light after the low battery condition is corrected.
54X-C 6250 Pro Users Manual79-0003-003   22 October 1999User Installable Cellular/CDPD Radio SoftwareIf you are using the Sierra Wireless SB300 (CDPD/Cellular) radiomodem, you will need to install the Sierra Wireless Watcher program.  To  install  Sierra  Wireless Watcher  software1 Ensure that Dialup Networking and TCP/IP are installed on yoursystem.Refer to Windows 95 online Help for information about installingthese components.2 Select Run from the Start menu and enter the following:c:\sierra\watcher\setup.exe3 When prompted to select a modem, choose the SB300 Series option.4 When prompted for a communications port select COM4.5 Select defaults for all other settings.
55Section 4.  If You Have a Radio Modem79-0003-003   22 October 1999Additional DocumentationIf you are developing a custom radio application for the mobilecomputer, you may need to order additional documentation describingthe programming interface to your radio modem. The following is a listof documents available for purchase from Technical Publications, ItronixCorporation, P.O. Box 179, Spokane, WA 99210. Motorola RPM Native Mode Interface R1.1Itronix Part No. 98-0008-001Native Control Language (NCL) interface specification for developingcommunication applications using the ARDIS networks.Motorola Mobile Asynchronous Communications (MASC) Interface R1.0Itronix Part No. 98-0009-001MASC serial interface specification for developing communicationapplications using the Bell South Wireless network).Sierra Wireless SB300 Series Modem User GuideItronix Part No. 98-0013-001 & 98-0012-001AT command set and SLIP interface specification for use with the SierraWireless SB300 Series modem (CDPD/Cellular/PSTN networks).Sierra Wireless PocketPlus Developers ToolkitItronix Part No. 98-0005-001Programming information for designing and developing TCP/IP, UDP, andWinsock applications on the CDPD network using the Sierra WirelessSB300 Series modem.
56X-C 6250 Pro Users Manual79-0003-003   22 October 1999
WE KNOW THE ROADTMSECTION 5CustomizingSettingsIntroduction 58Using the System Configuration Utility 58Accessing the SCU 59Setting the COM3 and COM4 IRQs 60
58X-C 6250 Pro Users Manual79-0003-003   22 October 1999IntroductionThis section shows you how to access the System Configuration Utility(SCU) in order to customize settings for your own personal preference.It also covers viewing and changing IRQ settings.Using the System Configuration UtilityThe System Configuration Utility (SCU) allows you to change defaultsettings for your hardware options and power management. The defaultsettings should not be changed unless you are installing new hardwareor adding memory. Otherwise, your existing hardware may not operateproperly.  You can change the power management options based on personalpreference. For example, the computer enters suspend mode after 2minutes if it does not detect any keyboard or mouse activity. If you wantto change this time-out setting, use SCU to make this change. Otherpower management options you may want to change include:•When the system turns off the backlight (or MaxBright)•When the hard disk is placed in standby mode•How power is managed for the COM ports•Whether the computer resumes when the radio modem detects aring signal•Whether or not power management is enabledCAUTION    Changing settings may cause the mobile computer tooperate incorrectly. Change default settings only if you areinstructed to do so.Important    Changing or disabling power management options candecrease battery life. Set these options at levels that will use theleast amount of battery power.
59Section 5.  Customizing Settings79-0003-003   22 October 1999Accessing the SCUTo  access  the  System Configuration  Utility1 From the Start Menu, select Shut Down and then choose Restartthe computer.2 Read the text on the screen while the computer is restarting andpress CTRL+ALT+S as soon as the following line appears:<CTRL+ALT+S> to enter System Configuration Utility.3 Follow the instructions at the bottom of the screen to move around inthis utility and change the items you want to customize.4 To exit the utility, press ALT+E (or select Exit from the menu), andthen choose the appropriate option.This utility provides additional options in the Exit menu:Default Settings loads default settings defined by the system.Factory Defaults loads the settings defined at the time ofmanufacture.Note   You may want to reset these parameters to their factorydefaults and then customize the settings. First write down theexisting settings in case you need to refer to them.
60X-C 6250 Pro Users Manual79-0003-003   22 October 1999Setting the COM3 and COM4 IRQsSome modem software will not work with standard communication(COM) port and Interrupt Request (IRQ) settings. Follow theseguidelines for the mobile computer:COM Port IRQ Setting Change toCOM3 IRQ 11 IRQ 4COM4 IRQ 10 IRQ 3The IRQ must be set the same in Windows 95 (Windows 98 and NT)and in the SCU. Follow the procedures below.   To view or change the IRQ settings in the SCU1 From the Start Menu, select Shut Down and then choose Restartthe computer.2 Read the text on the screen while the computer is restarting, andpress CTRL+ALT+S as soon as the following line appears:<CTRL+ALT+S> to enter System Configuration Utility.3 Select Components by pressing ALT+C.4 Select COM Ports.5 Press TAB to move to COM3 or COM4 settings.6Use the UP and DOWN ARROW keys to switch between IRQ values,and then press the SPACEBAR on the desired setting.7 Choose OK to save the settings.To  view  or  change  the  Windows  95 IRQ  settings1 From the Start Menu, select Settings, Control Panel, and then chooseSystem.2 Select the Device Manager tab, and then choose the plus sign nextto Ports.3 Choose COM3 or COM4.4 Select the Resources tab to view the current Interrupt Requestsetting.5 Make sure the Use Automatic Settings box is not checked.
61Section 5.  Customizing Settings79-0003-003   22 October 19996 Select Interrupt Request listed under Resource type.7 Choose the Change Setting button.If a message appears indicating that this resource cannot bechanged, select a different configuration type in the Setting basedon box and go back to Step 6.8 In the Value field, use the UP or DOWN ARROW to display validvalues.If the desired value does not appear, select a different configurationtype in the Setting based on box and go back to Step 6.
62X-C 6250 Pro Users Manual79-0003-003   22 October 1999
WE KNOW THE ROADTMSECTION 6Transferring FilesIntroduction 64Using Direct Cable Connection  65Direct Cable Connection Requirements 65Computers Connected to a Network 66Direct Cable Connection Tips 66Wiring Specifications for Cables 71Parallel Cables 71Serial Cables 72
64X-C 6250 Pro Users Manual79-0003-003   22 October 1999IntroductionYou may need to transfer files to the mobile computers hard drive suchas copying a new program file to the computer so you can use a newversion. There are several different ways you can transfer files to yourcomputer:    •Using Direct Cable Connection between computers loaded withWindows 95 (see the instructions in this section).•Using PC cards (see Section 8, Using PC Cards).•Using an external floppy or a CD-ROM (see Section 9, OptionalEquipment and Accessories).•Using the internal landline modem (see Section 10, Modems).CAUTION    In addition to the above methods, your company mayhave other ways of copying files to your computer. Contact yoursupervisor or your organizations help desk for information about thebest way to do this.
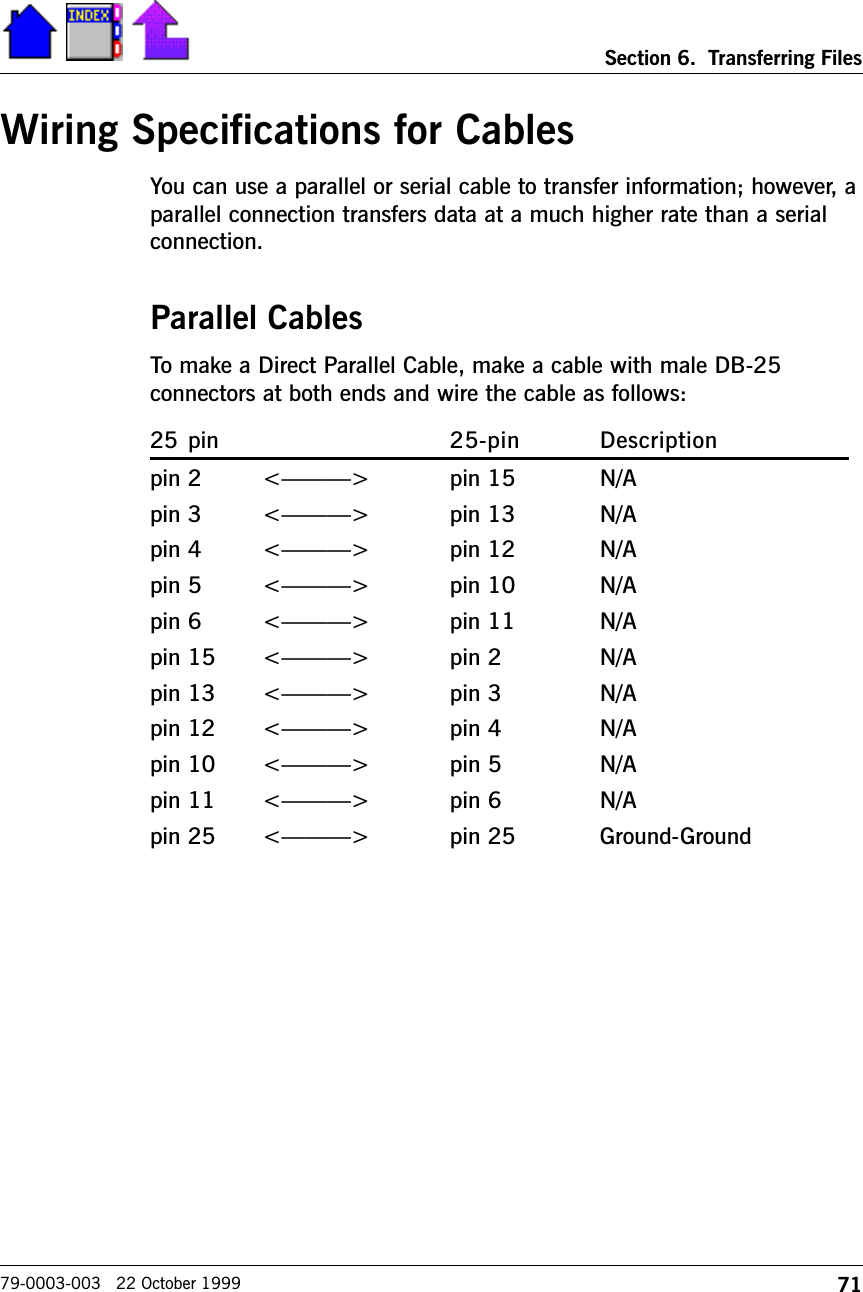
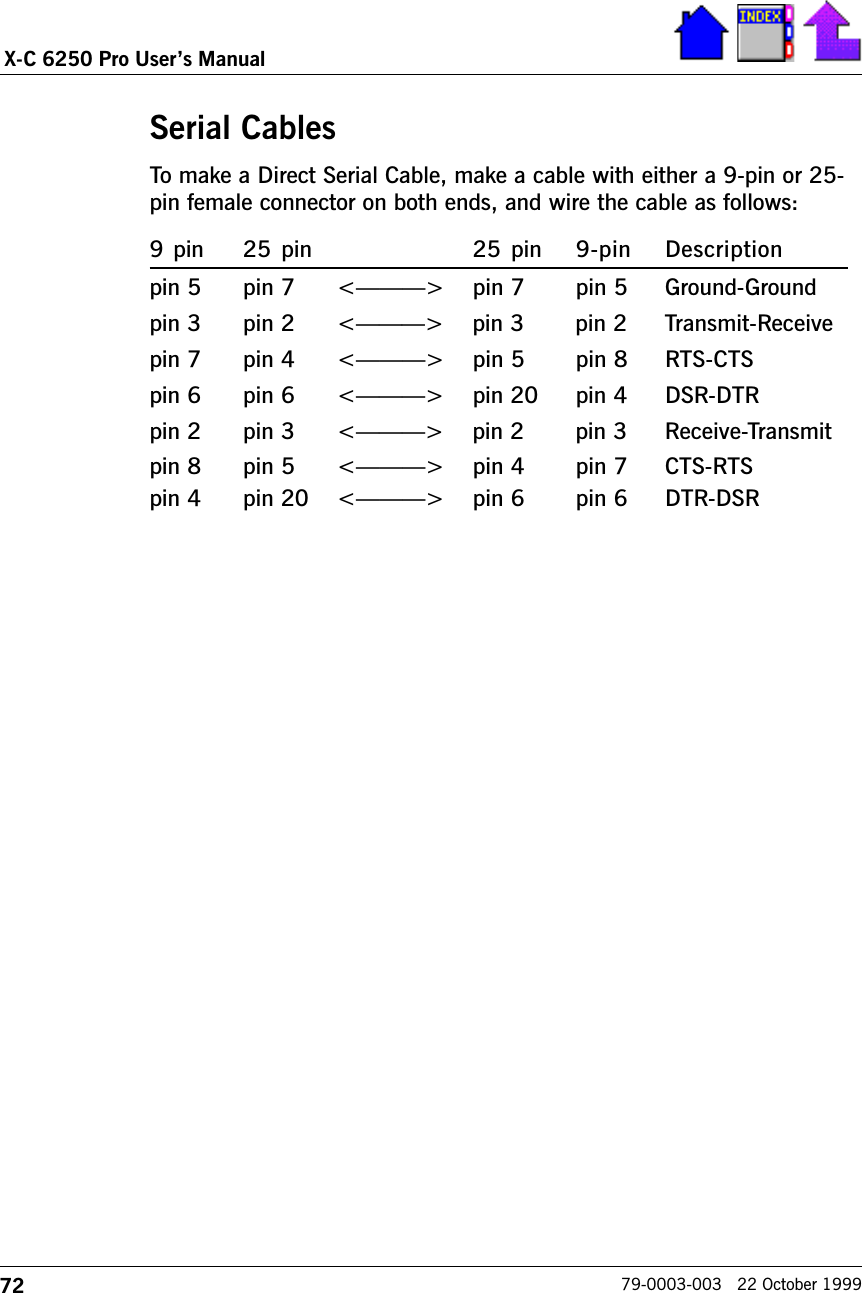
65Section 6.  Transferring Files79-0003-003   22 October 1999Using Direct Cable ConnectionDirect Cable Connection is a Microsoft product that comes withWindows 95. It allows you to establish a connection between twocomputers loaded with Windows 95 to gain access to the hostcomputers resources.Windows 95 online Help provides detailed instructions about installingand using this software, as well as troubleshooting information for thisprocess. Look up Direct Cable Connection and Direct CableConnection, Troubleshooting in the Help index. The information on thefollowing pages provides additional tips and guidelines to help makethis process successful.     For additional information, check your local bookstore for books onWindows 95. Also, a large amount of information about Direct CableConnection can be found on the Internet (search for Direct CableConnection).Direct Cable Connection RequirementsMake sure the following requirements are met before installing andusing Direct Cable Connection.•Windows 95 must be installed on the host and the guest computer.•A parallel or serial cable must be connected to both computers. SeeDirect Cable Connection Tips for information about obtaining acable. If you need to make a cable, see Wiring Specifications forCables later in this section.•File sharing must be enabled on the host computer. For informationabout how to enable sharing, look up enabling, file and printersharing in the Windows 95 online Help index.•To share files, you share the folder they are in. A folder must be setup as shared. For information about establishing shared folders,look up shared folders, setting up in the online Help index.
66X-C 6250 Pro Users Manual79-0003-003   22 October 1999Computers Connected to a NetworkIf you are using Direct Cable Connection to share resources with acomputer on a network, follow these guidelines.•Give your guest computer a unique name to avoid problemsconnecting to the host computer.1 From the Start Menu, select Settings, Control Panel, and thenchoose Network.2 Select the Identification tab, and then enter the appropriateinformation.3 Choose OK, and then restart your computer if you are prompted todo so.•If you are prompted to enter a network password, enter it correctly oryou may not be able to see the shared resources on the hostcomputer.Direct Cable Connection TipsWhere do  I  find  basic  information  about  Direct CableConnection?•Windows 95 online Help provides several help topics about DirectCable Connection. From the Start menu, select Help, and then usethe index to search for Direct Cable Connection.I dont know  how to  start Direct  Cable Connection•To start Direct Cable Connection, select the Start button, Programs,Accessories, and then choose Direct Cable Connection. If you dontsee Direct Cable Connection on the Accessories menu, see theprocedure below. Note that Direct Cable Connection will only work ifboth machines are running Windows 95.
67Section 6.  Transferring Files79-0003-003   22 October 1999Direct Cable Connection is not on the Accessories menu•If Direct Cable Connection is not on your Accessories menu, followthis procedure to add it:1 From the Start button, select Settings, and then choose ControlPanel.2 Choose Add/Remove Programs, and then select the Window Setuptab.3 Highlight Communications in the component list, and then chooseDetails.Make sure that Dial-Up Networking and Direct Cable Connectionare checked.4 Choose OK. Choose OK again.You may be prompted to insert the Windows 95 CD-ROM ordisk(s).When I  try to  start  Direct  Cable  Connection,  I  get  the  errorCannot find  file  C:\WINDOWS\DIRECTCC.EXE (or  one of  itscomponents)•This indicates that Direct Cable Connection was not initially installedcompletely. First, uninstall both Dial-Up Networking and Direct CableConnection as follows:1 From Control Panel, choose Add/Remove Programs.2 Select the Window Setup tab.3 Highlight Communications in the component list, and then chooseDetails.Make sure that Dial-Up Networking and Direct Cable Connectionare NOT checked.4 Choose OK; choose OK again.5 Follow the instructions previously under Direct Cable Connectionis not on the Accessories menu.
68X-C 6250 Pro Users Manual79-0003-003   22 October 1999Where do  I  get  a  Direct  Parallel  Cable?•Direct Parallel Cables are available at computer stores. They areoften referred to as one of the following:Parallel Laplink CablePC File Transfer CableDirect Cable Connection CableDirect Parallel CableInterlink CableInterlnk/Intersvr CableFor information about obtaining a Direct Parallel Cable, contact yourorganizations help desk.I am  having  trouble  making  a  connection•Use the Windows 95 Direct Cable Connection Troubleshooting as thefirst step in resolving a problem. From the Start menu, choose Help,and then use the index to search for Direct Cable Connection,Troubleshooting.•Make sure that Windows 95 is installed on the host and the guestcomputer.•Make sure that both computers are securely connected by a DirectParallel Cable. A Direct Parallel Cable is not the same as a standardparallel cable.•When starting Direct Cable Connection for the first time, you areprompted to select Host or Guest for the operating mode. Make surethat one PC is the Host (PC Workstation) and one is the Guest(mobile computer). If one of the computers is attached to a LocalArea Network (LAN) and you want both computers to have access toLAN resources, set the computer attached to the LAN as the Host,and the other computer as the Guest.•Make sure that the Host and Guest computers have unique computernames. On both computers, from the Start menu, select Settings,Control Panel, and then choose Network. Select the Identificationtab, and then verify that the computer name is different for eachcomputer. If necessary, change the computer name of the Guestcomputer to a name that is unique for the entire workgroup. Thename is case sensitive.
69Section 6.  Transferring Files79-0003-003   22 October 1999•Verify that the Host and Guest computers have the same workgroupname. On both computers, from the Start menu, select Settings,Control Panel, and then choose Network. Select the Identificationtab, and then verify that the workgroup name is the same for bothcomputers. If not, set the Guest computer to have the sameworkgroup name as the Host computer. The name is case sensitive.For example, the name WORKGROUP is not the same asWorkgroup.•Make sure that you start Direct Cable Connection on the Hostcomputer first, and then the Guest computer. After starting DirectCable Connection on the Host, make sure that you choose the Listenbutton. After starting Direct Cable Connection on the Guest, makesure that you choose the Connect button.•Check to make sure your printer/parallel port is configured for DirectCable Connection communication. Both computers must have thesame printer port configuration. In your BIOS setup, check thesection regarding ports setup, usually in the chipset setup for newermotherboards. There will be a section that configures the printer/parallel port. There are two printer sections: one is IRQ and the otheris type of communication. In the type, make sure it is in the ECPmode or EPP + ECP mode. Save and exit. The IRQs do not have tomatch.•Make sure that you are able to see the Verifying... message whenconnecting. If you see this message, the Host and Guest computersare able to communicate over the cable. This means that your portand cable configurations are working.•If you see this message but still cannot make a connection, makesure that both computers have the same protocols. On bothcomputers, from the Start menu, select Settings, Control Panel, andthen choose Network. Select the Configuration tab, and verify thatboth computers have the same network components installed.NetBEUI protocol needs to be installed for the Host gateway functionto operate. If the protocols are not the same, select Help from theStart menu, and then use the index to search for installing anetwork protocol and follow the instructions.•If you do not see the Verifying... message, this means the Host andGuest are not able to communicate over the cable. Something maybe wrong with your cable. Verify that the cable is securely connectedat each computer.
70X-C 6250 Pro Users Manual79-0003-003   22 October 1999•Make sure that both computers have the Dial-Up Adapter installed.From the Start menu, select Settings, Control Panel, and then chooseAdd/Remove Programs. Select the Window Setup tab. HighlightCommunications in the component list, and then choose Details.Make sure that Dial-Up Networking is checked. If not, check it, andthen choose OK. Choose OK again. You may be prompted to insertthe Windows 95 CD-ROM or disk(s).•Verify that another application is not using Dial-up Adapter. Youcannot use the Dial-up Adapter for a dial-up connection (such asInternet, FAX, modem) at the same time as a Direct CableConnection. Disconnect from any dial-up connections before startingDirect Cable Connection.I cannot  access  information  on  the  Host  computer or  LAN•Make sure Network Neighborhood is on the desktop of bothcomputers. If it isnt, you can re-install it from your Windows 95 CD-ROM or disk(s).•Make sure that resources on the Host computer are shared. ChooseNetwork Neighborhood on the Host computer. Right click on theresource you want to share, and then select Sharing... from the pop-up menu. Select Shared As, and then choose OK. If Sharing... is noton the pop-up menu, that resource cannot be shared. You wont beable to access LAN resources unless they are shared (talk to yourNetwork Administrator about this).The shared  folder  doesnt  have  a  drive  letter  assigned  to  it•To map a drive letter to a shared folder, choose NetworkNeighborhood on the Guest computer. Right click on the folder youwant to assign a drive letter to, and then select Map Network Drivefrom the pop-up menu. Enter the drive letter you want to assign.
71Section 6.  Transferring Files79-0003-003   22 October 1999Wiring Specifications for CablesYou can use a parallel or serial cable to transfer information; however, aparallel connection transfers data at a much higher rate than a serialconnection.Parallel CablesTo make a Direct Parallel Cable, make a cable with male DB-25connectors at both ends and wire the cable as follows:25 pin 25-pin Descriptionpin 2 <> pin 15 N/Apin 3 <> pin 13 N/Apin 4 <> pin 12 N/Apin 5 <> pin 10 N/Apin 6 <> pin 11 N/Apin 15 <> pin 2 N/Apin 13 <> pin 3 N/Apin 12 <> pin 4 N/Apin 10 <> pin 5 N/Apin 11 <> pin 6 N/Apin 25 <> pin 25 Ground-Ground
72X-C 6250 Pro Users Manual79-0003-003   22 October 1999Serial CablesTo make a Direct Serial Cable, make a cable with either a 9-pin or 25-pin female connector on both ends, and wire the cable as follows:9 pin 25 pin 25 pin 9-pin Descriptionpin 5 pin 7 <> pin 7 pin 5 Ground-Groundpin 3 pin 2 <> pin 3 pin 2 Transmit-Receivepin 7 pin 4 <> pin 5 pin 8 RTS-CTSpin 6 pin 6 <> pin 20 pin 4 DSR-DTRpin 2 pin 3 <> pin 2 pin 3 Receive-Transmitpin 8 pin 5 <> pin 4 pin 7 CTS-RTSpin 4 pin 20 <> pin 6 pin 6 DTR-DSR
WE KNOW THE ROADTMSECTION 7ManagingBatteries andPowerIntroduction 74Practical Battery Tips 74Conserving Power and Extending Battery Life  79Low Battery Warnings   80Power-saving Features 80Getting Battery Information 82Removing and Replacing Batteries 83Charging Batteries 84Deep Cycle Discharging 85Battery Storage and Care 86Disposing of Batteries 86
74X-C 6250 Pro Users Manual79-0003-003   22 October 1999IntroductionThe mobile computer uses a Nickel Metal Hydride (NiMH) battery. Thissection provides some important information about these types ofbatteries and ways to extend their life.Practical Battery TipsTip 1.    Getting the  most  from your  battery•Your battery will last longer during the day if it is used and chargedbetween 10°C and 30°C (50°F and 86°F).•Charge the battery nightly where the temperature will remain around20°C (68°F).•Set up your system to automatically suspend (turn off) while thebattery is charging.This can be done by enabling the Suspend on AC Power optionunder the Power, Suspend/Resume Control menu in the SystemConfiguration Utility (SCU). This allows the system to automaticallysuspend while it is connected to external power.•Use the Battery Maintenance application (located in the computertools folder) to deep cycle discharge your battery. Deep cycling yourbattery reconditions it and eliminates memory effect. Follow theseguidelines when deep cycling:- Deep cycle your battery when requested, which may be as oftenas 3 months, depending on usage.- For the best conditioning, deep cycle the battery where thetemperature will remain around 20°C (68°F). - Leave the display tilted open and allow unrestricted airflow soexcess heat can escape from the battery compartment andprevent the battery from overheating.- Consider running the deep cycle process over a weekend becauseit can take up to 40 hours to complete.
75Section 7.  Managing Batteries and Power79-0003-003   22 October 1999•The indicator light may read fully charged, but this does notnecessarily guarantee sufficient capacity. Use the Battery Statusapplication periodically to check your batterys capacity, and thenrecondition it as needed.•Even the best maintained batteries eventually need to be retired.They simply degrade from continuous use. Consider replacing yourbattery if you are not getting the usage you need from it afterperforming a deep cycle discharge.Tip 2.  Conserving power and extending battery life•Turn off your computer by pressing FN+OFF whenever you are notusing it.•Make sure your system suspends automatically. PC Cards, customapplications, or modified system settings can affect this.•Unplug peripherals and remove peripheral and network PC Cardswhen you are not using them.•If you have a monochrome display, turn off the backlight when youdo not need it.•If you have a 10.4-inch color display, turn off MaxBright when youdo not need it.•Use the SCU to set power management options at levels that willconsume the least amount of battery power (see Section 5,Customizing Settings, for more information).•Use the AC adapter or vehicle adapter whenever possible.•Avoid exposing batteries to extremely hot or cold temperatures forlong periods.•The mobile computer display does not require a screen saver. Usingscreen savers consumes valuable battery power and is discouragedunless the unit is connected to external power and an externalmonitor.•Deep cycle discharge your battery when requested, which may be asoften as 3 months, depending on usage by using the BatteryMaintenance application.•Store the battery within the recommended temperature range:  10°Cto 30°C (50°F to 86°F).
76X-C 6250 Pro Users Manual79-0003-003   22 October 1999Tip 3.  If your battery is new or has not been used forseveral weeksFollow these guidelines to deep cycle discharge the battery andcondition it.•Deep cycling the battery up to four times in succession may increaseits capacity. You may want to do this over consecutive weekendssince each deep cycle process can take up to 40 hours. After thisinitial conditioning, maintain battery capacity by deep cycling whenrequested, which may be as often as 3 months, depending on usage.•For the best conditioning, deep cycle the battery where thetemperature will remain around 20°C (68°F).Tip  4.   Determining  when  your  battery has finishedcharging•Under normal circumstances, your battery is finished charging whenthe external power indicator light stops blinking and remains solid.To prevent possible damage to the battery, the system will not allowa charge if the battery temperature is above 50°C (122°F) or below5°C (41°F), such as in a closed, unattended vehicle. In this case,your battery may not be fully charged.•If you charge your battery every night, it is finished charging whenthe Battery Status application shows a full gas gauge even thoughthe external power indicator light may still be blinking.If your battery is new, or if you have not used it for a week or more,the gas gauge may be inaccurate because the battery naturallydischarges over time. In this case, wait until the external powerindicator light stops blinking and remains solid.
77Section 7.  Managing Batteries and Power79-0003-003   22 October 1999Tip  5.    How  your  battery  behaves  in  warm  and coldconditionsIn  warm  conditions•When using a battery in warm conditions, the battery capacity willdrain faster. In general, as the temperature rises, it is possible for thebattery to drain 20 percent faster at 40°C (104°F) and 50 percentfaster at 45°C (113°F).  •To prevent possible damage to the battery, the system will not allowa charge if the battery temperature is above 45°C (113°F), such asin a closed, unattended vehicle during the summer.•If possible, charge the battery in a location with a moderatetemperature of around 20°C (68°F). The battery wont last as longduring the day if charged at higher temperatures because heat slowsdown the batterys chemical reactions. Also, if the battery becomestoo hot while charging, the charge mode automatically switches fromFast Charge to Slow Charge. Slow Charge takes much longer to finishcharging the battery.•When charging the battery, leave the display tilted open and allowunrestricted airflow so excess heat can escape from the batterycompartment and prevent the battery from overheating.In  cold  conditions•When using a battery in cold conditions, the battery capacity candrain 30 percent faster at 4°C (39°F) and 70 percent faster at -11°C(19°F).•To prevent possible damage to the battery, the system will not allowa charge if the battery temperature is below 5°C (41°F), such as in aclosed, unattended vehicle during the winter.•If possible, charge the battery in a location with a moderatetemperature of around 20°C (68°F). The battery wont last as longduring the day if charged at lower temperatures because cold slowsdown the batterys chemical reactions.
78X-C 6250 Pro Users Manual79-0003-003   22 October 1999Tip 6.  Preventing data lossHow to prevent data loss when removing the battery or storingyour computer•You can lose data if you remove the battery while the computer isoperating on battery power. To prevent this, turn off the unit bypressing FN+OFF before you remove the battery.•The computer is equipped with enough internal backup power tomaintain memory contents for about 5 minutes each time youexchange batteries. Be careful not to exceed this 5 minute limitwhen you replace the battery.•If you plan to store your computer for more than 30 days, exitWindows to save data to the hard disk, and then press FN+OFF toturn off the computer. Remove the battery before storing thecomputer.Tip 7.  Returning batteries for service•When shipping batteries, use non-static packing material to reducethe possibility of static discharge. Placing the battery in a non-staticbag is ideal; however, wrapping the battery in paper or newspaper isalso acceptable.•Contact your supervisor or your organizations help desk for correctshipping procedures and information.Tip  8.    For  more  information•The Battery Status and Battery Maintenance applications providebattery troubleshooting information. From the Help menu for eachapplication, choose Contents (or Help Topics), and then chooseTroubleshooting, followed by Common Solutions to CommonProblems.
79Section 7.  Managing Batteries and Power79-0003-003   22 October 1999Conserving Power and Extending Battery LifeFollow these guidelines to get the most use from your batteries andextend their life.  •Turn off your computer by pressing FN+OFF whenever you are notusing it.•Make sure your system suspends automatically. PC Cards, customapplications, or modified system settings can affect this.•Unplug peripherals and remove peripheral and network PC Cardswhen you are not using them.•If you have a monochrome display, turn off the backlight when youdo not need it.•If you have a 10.4-inch color display, turn off MaxBright when youdo not need it.•Use the SCU to set power management options at levels that willconsume the least amount of battery power (see Section 5,Customizing Settings, for more information).•Use the AC adapter or vehicle adapter whenever possible.•Avoid exposing batteries to extremely hot or cold temperatures forlong periods.•The mobile computer display does not require a screen saver. Usingscreen savers consumes valuable battery power and is discouragedunless the unit is connected to external power and an externalmonitor.•Deep cycle discharge your battery when requested, which may be asoften as 3 months, depending on usage by using the BatteryMaintenance application.•If you plan to store the computer for more than 30 days, remove thebattery.•Store the battery within the recommended temperature range:  10°Cto 30°C (50°F to 86°F).
80X-C 6250 Pro Users Manual79-0003-003   22 October 1999Low Battery WarningsWhen the battery becomes low, the mobile computer beeps and thebattery indicator light blinks. If you are running Windows, a warningmessage also appears on the screen periodically. Unless you connectexternal power or replace the battery within a reasonable time, thesystem turns off the computer automatically. If the battery voltagebecomes very low, the computer shuts off and you cannot turn it backon until you correct the low battery condition.  Power-saving FeaturesSuspendSuspend mode turns off the system if there is no activity for a period oftime. The computer also enters suspend mode if the battery capacitybecomes critically low and external power is not connected or thebattery is not replaced. By default, the computer enters suspend mode after two minutes ofinactivity. This time-out setting can be changed in the SystemConfiguration Utility (see Section 5, Customizing Settings). You canplace the computer in suspend mode manually by pressing FN+OFF.Files and data are retained and you can resume where you left off bypressing FN+ON.Hard Disk StandbyTo conserve power, the hard disk switches to standby mode after aperiod of inactivity and resumes when it detects activity.Note    Some systems do not automatically enter suspend modewhen they are connected to external power. Systems that cansuspend on external power have a user-defined option in the SystemConfiguration Utility (SCU) that enables or disables this feature. SeeSection 5 for information about accessing the SCU.
81Section 7.  Managing Batteries and Power79-0003-003   22 October 1999DisplayTo conserve power, the system turns off the display when the computerenters suspend mode. It automatically turns on when the computer isturned back on. BacklightThe display backlight can be turned on to make information on thescreen easier to read in low-light situations. To conserve power on themonochrome displays only the system automatically turns off thebacklight after a period of inactivity. You must manually turn thebacklight on by pressing FN+F1 when you resume. You can change thetime-out setting for the backlight in the System Configuration Utility(SCU). See Section 5, Customizing Settings, for more information.On a color display, the backlight is always on whenever the computer isrunning. See About the Display Backlight below.About the Display Backlight10.4-inch color•Backlight is always on when the computer is runnning•FN+F1 toggles MaxBright on/off•FN+F2 dims•FN+F3 brightens•FN+F2 and FN+F3 are active only when MaxBright is off10-inch monochrome•FN+F1 toggles the backlight on/off•FN+F2 dims•FN+F3 brightens
82X-C 6250 Pro Users Manual79-0003-003   22 October 1999MaxBrightMaxBright is a feature available on 10.4-inch color display thatintensifies the backlight to its maximum brightness. Pressing FN+F1toggles MaxBright on and off. The system automatically turns offMaxBright after a period of inactivity, and this time-out setting can bechanged in the System Configuration Utility (SCU). See Section 5,Customizing Settings, for information about accessing the SCU. Getting Battery InformationBattery StatusThe Battery Status application provided with your system monitors thecondition of the battery installed in the computer. This applicationallows you to check information such as the current capacity andtemperature of the battery. Battery Status runs automatically when yourun Windows. To learn more about this program, refer to its online help.To open this program, choose the Battery Status icon from the Taskbar.Battery MaintenanceThe Battery Maintenance application allows you to perform a deepcycle discharge of the battery and obtain information about the lasttime this activity was completed. For additional information, see DeepCycle Discharging later in this section.To learn more about this program, refer to its online help.
83Section 7.  Managing Batteries and Power79-0003-003   22 October 1999Removing and Replacing BatteriesReplace the battery in your computer with a new one if your existingbattery does not hold a charge. If your battery is drained, replace it witha charged one. When operating on battery power, the computer isequipped with enough internal backup power to maintain memorycontents for about 5 minutes each time you exchange batteries.   To remove and replace the battery1 Turn off the computer by pressing FN+OFF, and then locate thebattery door in front of the keyboard.2 Push the two battery door latches down to unlatch the door and slideit away from the unit (C).3 Grasp the ribbon and pull up on the battery to remove it.4 Align the battery connectors and place a new battery in thecomputer (D).5 Replace the battery door and make sure it is securely latched.Velcr oPadABCAUTION    You can lose data if you remove the battery while themobile computer is operating on battery power. Turn off thecomputer by pressing FN+OFF before you remove the battery. Youcan also lose data if the battery is removed from the unit for morethan 5 minutes.C DConnectors
84X-C 6250 Pro Users Manual79-0003-003   22 October 1999Charging BatteriesTo maintain power and prevent data loss from a low battery, charge thebattery daily. You can use several external power or charging devicesapproved for use with the mobile computer. The AC adapter comes withyour computer, but you also can use other optional devices such as thevehicle adapter, the stand alone charger, or the vehicle cradle.  SeeSection 9, Optional Equipment and Accessories, for more informationabout this equipment.    To  charge  the  battery  using  the AC  adapter1 Connect the appropriate end of the AC adapter to an AC wall outlet.2 Connect the other end to the computers power port on the side ofthe unit.3 Install the battery in your computer and make sure the battery dooris latched and secured.VelcroPad
85Section 7.  Managing Batteries and Power79-0003-003   22 October 1999Leave the display tilted open and allow unrestricted airflow while thebattery is charging.  This allows excess heat to escape from the batterycompartment and helps prevent the battery from overheating.The battery starts fast charging automatically, and the external powerindicator light blinks while the battery is charging. At moderatetemperatures, around 70 degrees Fahrenheit, the battery will completecharging in 3 to 4 hours. Under extremely cold or hot temperatures,however, the battery can take up to 16 hours to fully charge.Deep Cycle DischargingUse the mobile computers Battery Maintenance application to performa deep cycle discharge. To run this application, double-click the BatteryMaintenance icon in the Mobile Computer Tools folder. To learn moreabout this program, refer to its online help.Nickel Metal Hydride (NiMH) batteries can develop memory effectwhen they are partially discharged and recharged repetitively without afull discharge. Repeatedly charging the batteries this way will eventuallydecrease battery capacity and performance. To recondition the batteriesand eliminate battery charge memory effect, you should deep cycledischarge batteries when requested, which may be as often as 3months, depending on usage. If your battery is new or has not been used for several weeks, deepcycling it up to four times in succession may increase its capacity. Youmay want to do this over consecutive weekends since each deep cycleprocess can take up to 40 hours. After this initial conditioning, maintainbattery capacity by deep cycling at the recommended frequency.
86X-C 6250 Pro Users Manual79-0003-003   22 October 1999Battery Storage and CareFollow these guidelines to maintain performance of NiMH batteries.   •Avoid exposing batteries to extremely hot or cold temperatures forlong periods. To prevent possible damage to the battery, the mobilecomputer does not allow the battery to charge if the internaltemperature of the battery gets too low (<5°C or < 41°F) or toohigh (> 50°C or > 122°F).•Charge the batteries nightly where the temperature will remainaround 20°C (68°F).•Deep cycle discharge your battery when requested, which may be asoften as 3 months, depending on usage.•Store the batteries within the recommended temperature range:10°C to 30°C (50°F to 86°F).•After storage, or periods during which the battery has not been used,deep cycling it up to four times in succession may increase itscapacity. You may want to do this over consecutive weekends sinceeach deep cycle process can take up to 40 hours. After this initialconditioning, maintain battery capacity by deep cycling at therecommended frequency.Disposing of BatteriesWARNING The mobile computer is powered by a rechargeableNickel Metal Hydride (NiMH) battery. Disposing of the batteryimproperly can cause serious personal injury. Do not crush thebattery or place it in a fire. The battery is recyclable and, undervarious state and local laws, it may be illegal to dispose of it intothe municipal waste stream. Check with your local solid-wasteofficials for details on recycling options or proper disposal.
WE KNOW THE ROADTMSECTION 8Using PC CardsIntroduction 88Inserting and Removing a PC Card 88Transferring Files Using PC Cards 89Using Bootable PC Cards 90
88X-C 6250 Pro Users Manual79-0003-003   22 October 1999CAUTION    The internal components of the mobile computer willbe damaged if exposed to contaminants. When the PC card door isopen, shield the unit from all contaminants such as liquids, rain,snow, and dust.IntroductionA PC card is a self-contained, credit card-sized device that can be usedto store programs, data, or to expand the capabilities of your computer.The mobile computer accepts Type I, Type II, and Type III PC cards.  Inserting and Removing a PC CardThe PC card sockets are located on the back of the computer.To insert  a PC  card1 Provide a suitable environment for the computer, and then open thePC card door by pushing in on the door and sliding the latch down.Push in on the door and slide the latch downDoorEjector Buttons PC Card
89Section 8.  Using PC Cards79-0003-003   22 October 19992 Position the card and carefully slide it into the card socket until it isfirmly seated.3 Close the PC card door and push the latch up to secure it.To remove a  PC card1 Before you remove the card, select the PC card icon in the systemtray area of the screen (near the clock in the lower right corner),and choose Stop [card name] card.2 Provide a suitable environment for the computer, and then open thePC card door by pushing in on the door and sliding the latch down.3 Press the ejector button.4 Carefully slide the card out of the socket.Transferring Files Using PC CardsTo  transfer  files  using  PC  cardsThis method of transferring files requires that the computer you areexchanging files with is also equipped with a PC card socket.   1 Insert a PC memory or ATA card into the PC card socket of thesource computer.2 Copy the file(s) you want to transfer from the hard disk to the PCcard.The drive letter assigned to the card depends on the hardwareconfiguration of the computer.Important    Make sure the card is positioned correctly when youinsert it.  Attempting to insert the card upside down can damagethe ejector button, and this may cause the button to malfunctionwhen you remove the card.Tip   Use one finger to press down lightly on top of the card, andthen slide it out. If the ejector button malfunctions when you pressit, release the button and press it again.
90X-C 6250 Pro Users Manual79-0003-003   22 October 1999Important    Do not use FN+OFF to suspend the computer if youhave booted from a PC Card rather than the computers internalhard disk. When you have finished using the card, remove it fromthe computer and then press CTRL+ALT+DEL to restart the system.3 Remove the card and insert it into the card socket of the destinationcomputer.4 Copy the file(s) from the PC card to the hard disk of the destinationcomputer.Using Bootable PC CardsThe mobile computer normally boots from the internal hard disk (driveC); however, it might be necessary to boot from an alternate boot deviceif the computers hard disk becomes corrupted or fails, or if you want toboot another operating system.You can boot from an approved external floppy disk drive (see Section 9for more information), or you can use an SRAM PC Card. Bootprecedence is first from the SRAM PC card (drive C), then the externalfloppy (drive A, removable), and then the internal hard drive.
WE KNOW THE ROADTMSECTION 9OptionalEquipment andAccessoriesConnecting a Printer 92Connecting an External Monitor 93Connecting an External Mouse 93PC Card External Floppy Disk Drive 95Using an External CD-ROM 97Stand Alone Charger 98Vehicle Adapter 99Vehicle Cradle 102Surge Protection 108
92X-C 6250 Pro Users Manual79-0003-003   22 October 1999Connecting a PrinterYou can connect a printer to the mobile computer with the parallel orserial cable supplied with your printer. This allows you to printdocuments that are stored in the computer. See your printers usersmanual for more information.      To  connect  a  printer to the  parallel port1 Open the I/O dust cover on the back of the computer and connectthe male end of the parallel cable to the 25-pin connector (the largerof the two connectors).This connector is referred to as LPT1.2 Connect the other end of the cable to your printer.3 Follow the instructions for your application to use the printer.To  connect  a  printer  to  the serial  port1 Open the I/O dust cover on the back of the computer and connectthe male end of the parallel cable to the 9-pin connector (the smallerof the two connectors).This connector is referred to as COM1. 2 Connect the other end of the cable to your printer.3 Follow the instructions for your application to use the printer.BACK VIEW9-pinSerial Port Dust Cover(open)25-pinParallel Port
93Section 9.  Optional Equipment and Accessories79-0003-003   22 October 1999Connecting an External MonitorThe computer has a Display Selection feature that allows you toswitch between the computer display, an external monitor, or both asthe active display. To use an external monitor, first connect the monitor cable to the 15-pinvideo port on the back of the computer and then follow the procedurebelow.To  select  a  display1 From the Desktop, double click the Display Select icon.2 Select one of these options:•LCD Panel to use the computer display•Monitor / LCD to use both displays3 Choose OK.Connecting an External MouseYou can connect an external mouse to the serial port of the computer.First select the appropriate mouse manufacturer and model asdescribed below, and then enable the communication port by makingchanges in the System Configuration Utility (SCU).  To  connect  an  external  mouse1 Connect the mouse to the 9-pin serial port on the back of thecomputer.2 From the Start Menu, select Control Panel, Settings, and then chooseMouse.3 Select the General tab, and then choose Change.4 Make sure Show all devices is enabled.
94X-C 6250 Pro Users Manual79-0003-003   22 October 19995 Under Manufacturers, select the appropriate mouse you intend touse.6 Under Model, select the appropriate model.7 Choose OK.8 Close all windows and enable the communication port.
95Section 9.  Optional Equipment and Accessories79-0003-003   22 October 1999PC Card External Floppy Disk DriveAn external floppy drive can be connected to the computer using the PCCard socket. You can use the external floppy to transfer files to themobile computer; use the drive letters that correspond to your hardwareconfiguration. Follow the procedures in this section to connect the floppy drive to thecomputer.PRECAUTIONS•Using an unapproved bootable external floppy disk drive may causeerrors or may damage the computer. Use only external floppy diskdrives approved for use with the mobile computer. •Do not open the computers battery door when you are using anexternal floppy disk drive.
96X-C 6250 Pro Users Manual79-0003-003   22 October 1999To connect an external floppy disk drive1 Open the PC Card door on the back of the computer and insert thePC Card connector into the socket.2 Connect the other end of the cable to your external floppy drive.3 Turn on the floppy disk drive.Booting from a PC Card External FloppyThe mobile computer normally boots from the internal hard disk;however, it might be necessary to boot from an alternate boot device ifthe computers hard disk becomes corrupted or fails, or if you want toboot another operating system. One option is to use a bootable externalfloppy disk drive.To  boot  from  an external  floppy disk  drive1 If you are running Windows, Exit Windows (from the Start Menuselect Shut Down, and then choose Shut down the computer).2 Separate the PC Card connector from the cable by gently squeezingthe two small clips on each side of the connector.3 Insert the PC Card (disconnected from the cable) into the socket.4 Restart the computer by pressing FN+ON.5 Follow the instructions on the screen to reconnect the cable to thePC Card, insert a diskette, and boot the computer.PC CardConnector
97Section 9.  Optional Equipment and Accessories79-0003-003   22 October 1999Using an External CD-ROMYou can use an external CD-ROM drive to copy files to the mobilecomputer or access information from a CD. Before you connect anexternal CD-ROM to the computer, check these things: •Make sure you are using an external CD-ROM that is approved foruse with the mobile computer.•If necessary, follow the instructions provided with the CD-ROM toinstall the correct device drivers on the computer.After following the appropriate setup procedures, you can access theexternal CD-ROM by using Windows Explorer or My Computer. Use thedrive letter that corresponds to your hardware configuration.To  connect  an  external  CD-ROM1 Connect the CD-ROM cable to your CD-ROM drive.2 Open the PC Card door on the back of the computer and insert thePC Card connector into the socket.3 Turn on the CD-ROM drive.PC CardConnector
98X-C 6250 Pro Users Manual79-0003-003   22 October 1999Stand Alone ChargerThe stand alone charger is an optional charging device used to charge aNickel Metal Hydride (NiMH) battery. This charger allows you to chargean additional battery for the mobile computer.   The operating temperature for this device is +10ºC to +40ºC (+50ºFto +104ºF). Operating the stand alone charger outside of thistemperature range may damage the battery.To  charge  a  battery1 Insert the appropriate end of the power cord into the power port onthe stand alone charger; insert the other end of the power cord intoan electrical wall outlet.2 Align the connectors and place the battery onto the charger.The charger automatically begins fast charging the battery. Atmoderate temperatures, around 21°C (70ºF), the battery will be fullycharged in approximately three to four hours. Under extremely coldor hot temperatures, however, the battery can take up to 16 hours tocharge.CAUTION    There are no user-replaceable parts within the standalone charger, so do not open the charger case. The stand alonecharger is internally protected. It resets automatically if there is apower fault.Power PortRed “Fault” LightGreen IndicatorLight
99Section 9.  Optional Equipment and Accessories79-0003-003   22 October 1999Indicator LightsGreen Red DescriptionOn On Power up. No battery installed.Blinking Off Charging battery.On Off Charging complete.On Blinking Battery problem. Use Battery Statusto check the condition of the battery.Blinking Blinking Charger problem.Vehicle AdapterThe Vehicle Adapter is an optional device that supplies power from thevehicle battery to operate the computer and charge the battery installedin the unit. It typically connects to the vehicle battery using thecigarette lighter socket. To prevent possible damage to the battery, the system will not allow thebattery to charge at extreme temperatures. Be aware of the followingcharging characteristics, especially if the computer is left unattended ina closed vehicle.Temperature Charging  Activity<5°C (<41°F) Battery will not charge>45°C (>113°F) Slow charge mode>50°C (>122°F) Maintenance chargeCAUTIONThere are no user-replaceable parts within the vehicle adapter, sodo not open the adapter case. The adapter is internally protected. Itresets automatically if there is a power fault.The operating temperature for this device is -20°C to +60°C (-4°Fto +140°F). Operating the vehicle adapter outside of thistemperature range may damage the battery.
100X-C 6250 Pro Users Manual79-0003-003   22 October 1999To connect the vehicle adapter1 Insert the vehicle adapters power cord into the power port on theside of the computer.2 Insert the cigarette lighter adapter into the vehicles cigarette lightersocket, turning it slightly to make a good connection.The power light illuminates to indicate that current is reaching thevehicle adapter. When you connect the vehicle adapter, itautomatically begins fast charging the computers battery. Atmoderate temperatures, around 21°C (70ºF), the battery will be fullycharged in approximately three hours. Under extremely cold or hottemperatures, however, it will take longer to charge the battery (upto 16 hours).Power LightPower CordCigaretteLighter Adapter
101Section 9.  Optional Equipment and Accessories79-0003-003   22 October 1999Important If you charge your battery daily, rely on the gas gauge reading todetermine battery capacity. The gas gauge displayed by BatteryStatus may show that the battery is full, but the external powerindicator light may still be blinking. This typically occurs if thecharge mode switched from Fast to Slow because the batterybecame too hot. The charging process is trying to put a littlemore capacity into the battery; however, external power can beremoved since the battery is virtually full. If your battery is new or has not been used for several weeks,rely on the indicator light to determine when the battery is fullycharged. The gas gauge is unreliable in these cases; it may read100 percent, but the actual capacity is only 10 percent.
102X-C 6250 Pro Users Manual79-0003-003   22 October 1999Vehicle CradleThe vehicle cradle is a vehicle-based docking station designed to safelysecure the computer in the vehicle. A standard key lock located on theback of the cradle locks the computer onto the cradle for securitypurposes. You can use the vehicle cradle to:    •Charge batteries•Communicate with other devices•Access information from a CD-ROMParallel Ports(not shown)TNC RF Connector(option)Serial PortKey LockFRONT VIEWBACK VIEWDovetail PivotCD-ROM OptionRelease LeverCradle ContactsPower ButtonLatch
103Section 9.  Optional Equipment and Accessories79-0003-003   22 October 1999PRECAUTIONS•There are no user-replaceable parts within the vehicle cradle, so donot open the cradle case. The vehicle cradle is internally protected. Itresets automatically if there is a power fault.•Do not use the vehicle cradle to charge the computer batteryovernight. Turn off the vehicle cradle at the end of each work day toprevent draining the voltage in your vehicles battery below startinglevels.Charging BatteriesThe vehicle cradle is designed to charge the computers battery withvoltage from the vehicle battery while you are traveling betweencustomer jobs. Follow the procedure below to charge a Nickel MetalHydride (NiMH) battery.To  charge  a  battery  installed in  the computer1 Make sure the computer is powered off.2 Place the computer onto the vehicle cradle, making sure it issecurely latched.CD-ROM vehicle cradles automatically power on.3 If you have a model with no CD-ROM, turn on the vehicle cradleby pressing the power button.The vehicle cradle automatically begins fast charging the battery.Important    The power button works differently on the standardVehicle Cradle and the CD-ROM Vehicle Cradle:•On the standard cradle, pressing the power button turns on theunit, and the power light means current is reaching the cradle.•The CD-ROM model powers on as soon as external power isconnected. The power button on the CD-ROM model only turnsthe CD-ROM on and off, and the power light means current isreaching the CD-ROM.
104X-C 6250 Pro Users Manual79-0003-003   22 October 1999Communicating with Other DevicesThe vehicle cradle is designed with a standard serial port so you canconnect external devices such as a printer or modem. Specify COM2when you select the communications port in your application. Connectthe external device to the serial port on the back of the cradle, and thenplace the mobile computer onto the vehicle cradle. You can install orremove the computer from the vehicle cradle without connecting ordisconnecting a printer or modem cable from the computer.External AntennasAn external RF antenna also can be connected to the cradle using theTNC RF connector on the back. FCC regulations require that users ofvehicle-mounted antennas must use only antennas authorized for usewith the mobile computer in order to meet FCC RF exposure limits.Please contact your organizationss help desk for a list of approvedvehicle-mounted antennas. For mounting installation and/or mountingImportant•A temperature of -20ºC to +60ºC (-4ºF to +140ºF) isrecommended when charging batteries with the vehicle cradle.Batteries may not charge successfully outside this temperaturerange.•If you charge your battery daily, rely on the gas gauge reading todetermine battery capacity. The gas gauge displayed by BatteryStatus may show that the battery is full, but the external powerindicator light may still be blinking. This typically occurs if thecharge mode switched from Fast to Slow because the batterybecame too hot. The charging process is trying to put a littlemore capacity into the battery; however, external power can beremoved since the battery is virtually full.•If your battery is new or has not been used for several weeks,rely on the indicator light to determine when the battery is fullycharged. The gas gauge is unreliable in these cases; it may read100 percent, but the actual capacity is only 10 percent.
105Section 9.  Optional Equipment and Accessories79-0003-003   22 October 1999instructions for these types of antennas, see the instructions thataccompany each antenna.RF Antenna PlacementPlacement of a vehicle-mounted antenna1 Measure and identify an area 20 cm (8 inches) in from the edges ofthe vehicle roof.2 Place the antenna within that area.To maximize RF performance, position the antenna in the center of thevehicle roof.WARNING    Improper installation and/or operating configurations ofpermanent and magnetic vehicle-mounted antennas may cause FCCRF exposure limits to be exceeded. Vehicle-mounted antennas mustbe placed at least 20 cm from operators and bystanders.Side View Front View
106X-C 6250 Pro Users Manual79-0003-003   22 October 1999Using the CD-ROMThe Vehicle Cradle has an optional CD-ROM feature. You can use theCD-ROM to copy files to the mobile computer or access informationfrom a CD. Follow the procedure below if your cradle is equipped with aCD-ROM. To use the CD-ROM with the mobile computer1 Place the computer on to the vehicle cradle, making sure it issecurely latched.2 Connect the appropriate end of the CD-ROM cable to the parallelport on the back of the computer and the other end to the CD-ROMport on the back of the vehicle cradle.The cable connectors are keyed to be inserted only one way.3 Turn on the CD-ROM by pressing the power button.4 Restart the mobile computer by pressing CTRL+ALT+DEL.5 Insert a CD into the CD slot on the cradle.6 You can access the CD-ROM by using an application or using youroperating systems file manager. Choose the CD icon or theappropriate drive assigned to the CD-ROM, depending on thehardware configuration for your computer.Important    The power button works differently on the standardVehicle Cradle and the CD-ROM Vehicle Cradle:•On the standard cradle, pressing the power button turns on theunit, and the power light means current is reaching the cradle.•The CD-ROM model powers on as soon as external power isconnected. The power button on the CD-ROM model only turnsthe CD-ROM on and off, and the power light means current isreaching the CD-ROM.Important    If your CD-ROM does not operate after following theseinstructions, additional drivers may need to be installed on yoursystem. Contact your organizations help desk for assistance.
107Section 9.  Optional Equipment and Accessories79-0003-003   22 October 1999Cleaning or Replacing Cradle Contact PinsThe contact pins on the vehicle cradle are exposed to contaminationand stress when the computer is installed and removed from the cradleduring normal daily operation. The pins were designed to be cleaned orreplaced as required.If the pins become dirty, they can be removed and cleaned with anelectrical contact cleaner or replaced. The power and ground pins arepins 3 and 8 respectively. When charging problems are encounteredand replacement pins are not available, other pins in the contactassembly can be used to field fix the unit until replacement parts areavailable.To clean or replace the cradle contact pins1 Hold down the protective plastic cover.2 Grasp a pin and pull straight up, being careful not to bend it.3 Clean the pin with electrical contact cleaner and reinstall it into thecradle contact assembly.If a pin is bent or cannot be cleaned, contact your support desk toobtain a replacement pin.4158CAUTION    Turn off the vehicle cradle at the end of each work dayto prevent draining the voltage in your vehicles battery belowstarting levels.Note    Pin 8 on RF units is an RF connector and is not userreplaceable. Contact your support desk for information aboutreplacing this RF connector.
108X-C 6250 Pro Users Manual79-0003-003   22 October 1999Surge ProtectionA large number of computer and high technology equipment damage isdirectly related to AC power and telephone line problems. Theseproblems can include surges, spikes, noise, interference, and weather-related problems, which in turn can cause glitches, hang-ups, crashes,performance slow downs, and down time with computer equipment.The market is flooded with hundreds of AC power line surge suppressorsadvertising high performance surge protection; only a few of themactually provide adequate protection. This section provides guidelines for selecting a quality surge suppressorto be used with your mobile computer, and it helps identify a fewsources for products with acceptable performance.Selecting the Right Surge ProtectionConsider the level of quality you need when selecting a surgesuppressor. This depends on factors such as surge environment, thetype of equipment to be protected, and the quality of the electricalwiring and service. Surge EnvironmentSurge environment refers to the damage potential from electrical surgesin a particular geographical area. A high quality suppressor should beused if there is frequent lightening activity in the area and the locationservice is fed by overhead utility poles. An example of a high surgeenvironment would be Florida; a low surge environment might be NewYork.Type of Equipment to be ProtectedIf the computer is equipped with a modem, the modem should also besurge protected. Protecting the power line without protecting themodem line provides only partial protection.
109Section 9.  Optional Equipment and Accessories79-0003-003   22 October 1999Quality of Electrical Wiring and ServiceWiring should be up to current NEC standards and have verified goodAC grounds. It is important that your computer system be plugged intoa grounded AC outlet when charging and that all peripherals connectedto your system reference the same AC ground.Selecting the Right EquipmentThere are a number of companies that sell quality surge suppressorssuch as Sutton Designs, APC, and Panamax. When you are looking for asurge suppressor, consider these things.•Expect to pay at least $50 for a good quality surge suppressor.•The surge suppressor should be a UL 1449, 497, and 1283 listedfor surge suppression, modem surge protection, and RFI/EMI noisefiltering respectively.•The surge suppressor should have diagnostic LEDs that verify goodAC ground, proper wiring, and proper surge operation. Lighted on/offswitches are not recommended since they can produce electricalnoise.•The Joule ratings should be a minimum of 480 Joules for the ACsurge circuit.•The Joule ratings should be a minimum of 240 Joules for themodem.•The modem surge circuit should present low capacitance to themodem line or it will slow the transmission rate. Capacitance shouldbe specified at less than 50 picofarads.•Quality surge suppressor manufacturers generally offer a lifetimewarranty.•Consider obtaining a protected equipment coverage policy whichinsures the equipment in the event of surge damage.•The devices that will be attached to the computer also need to besurge protected.
110X-C 6250 Pro Users Manual79-0003-003   22 October 1999
WE KNOW THE ROADTMSECTION 10ModemsIntroduction 112Which Modem Do I Have? 112Using the Internal Landline Modem 113Transferring Files 114
112X-C 6250 Pro Users Manual79-0003-003   22 October 1999IntroductionThe mobile computer may be equipped with one of several modems. Amodem allows the computer to exchange data over a phone line withanother computer that is also equipped with a modem.See Section 5, Customizing Settings, for correct IRQ andcommunication port settings.Which Modem Do I Have?To verify which modem is installed in your unit, locate the Configstring label on the bottom of the computer, check the seventh digit inthis string, and then refer to the following table. For more detailed information, see the AT Command Reference Manual.If the  7th  Configstring digit is . . . This  modem  is  installedA Rockwell 56K baud modemZ No modem installed
113Section 10.  Modems79-0003-003   22 October 1999Using the Internal Landline ModemTo use the internal landline modem1 Plug one end of an RJ-11 cable into the RJ-11 connector on theback of the computer.  2 Plug the other end of the RJ-11 cable into a telephone jack.  Make sure the COM3 IRQ is set correctly. Failure to do so may causesome communication programs to lock up. See Section 5,Customizing Settings.3 Set up the HyperTerminal application, or another application, to usethe communications port COM3.4 If necessary, set up other communication parameters in yourapplication to match the parameters set for the modem you aretalking to.5 Use the HyperTerminal application, or another application, toestablish a connection to another computer.RJ-11 Connector
114X-C 6250 Pro Users Manual79-0003-003   22 October 1999Transferring FilesTo  transfer  files  using  the  internal  landline modem1 Insert one end of an RJ-11 cable into the RJ-11 connector on theback of the computer. 2 Insert the other end of the RJ-11 cable into a telephone jack.3 Set up the HyperTerminal application, or another application, to usethe communications port COM3.4 If necessary, set up other communication parameters in theapplication to match the parameters set for the external modem.5 Use the HyperTerminal application, or another application, toestablish a connection to another computer.RJ-11 Connector
WE KNOW THE ROADTMSECTION 11Maintenance andStorageIntroduction 116If You Have a Touch Screen 116Hard Drive Care and Handling 116Internal Hard Drives 117External PC Card Hard Drives 118Battery Maintenance and Storage 119Maintaining Batteries 119Storing Batteries 119Computer Maintenance and Storage 120Maintaining Your Computer 120Care and Cleaning 120Storing Your Computer 123
116X-C 6250 Pro Users Manual79-0003-003   22 October 1999CAUTION•Always use an approved stylus.•Never use sharp, hard, or abrasive implements on the touchscreen such as ball point pens, pencils, or keys. They coulddamage the screen.•To clean the touch screen panel, apply a household glass cleanerto a soft, clean, dry cloth and wipe the screen.IntroductionThe mobile computer is ruggedized and weather resistant. Handle itwith the normal care required by any sophisticated electronicequipment, and the computer will provide reliable service even underharsh field conditions.Follow the guidelines below to care for your unit.If You Have a Touch ScreenHard Drive Care and HandlingThere are two hard drive options for the mobile computer: a shock-mounted 2.5-inch hard drive and a PC Card Type III hard drive. All harddrives contain media for data storage in the form of a rotating disk,read/write head(s), a motor, and electronics for interfacing and control.Each hard drive type can be susceptible to damage from severe shockand other stressful environmental impacts. The degree of susceptibilityto damage is directly related to the individual hard drive and mountingsystem employed. When reading or writing to the hard disk, the head is flying on a thinlayer of air, micro-inches above the disk. A shock can cause the read/write head to contact the spinning disk, resulting in immediate loss ofstored data and possible physical damage to the disk. It could also
117Section 11.  Maintenance and Storage79-0003-003   22 October 1999create loose debris in the drive enclosure that may cause progressivedamage over time.To reduce exposure to high operating shocks, the mobile computer usespower modes for the hard drive that prevent the read/write heads frombeing positioned over the disk when it is not being used: idle mode andstandby mode.You can reduce the risk of damage to the hard drive and increase thereliability of the hard drive and data integrity by following therecommendations below.Internal Hard Drives•Do not intentionally drop the computer. The unit is designed towithstand the day to day rigors of the mobile environment andprovide years of reliable service. The useful life of the product can beenhanced by not intentionally abusing it.•Use the power management feature control in the SystemConfiguration Utility (SCU). Power management conserves power butalso ensures that the read/write heads are unloaded and the harddrive is spun down within the time specified.•Whenever possible suspend the unit by pressing FN+OFF beforemoving it from one location to another. This will unload the read/write heads and spin down the disk.•Maintain the environmental seal of the computer by keeping the PCCard door closed and latched. Also avoid exposing the unit toextreme temperatures or moisture when the PC Card door is open.•Periodically backup or archive important files and data.
118X-C 6250 Pro Users Manual79-0003-003   22 October 1999External PC Card Hard DrivesEach PC Card hard drive manufacturer provides specific guidelines forthe care and handling of the product. In addition, follow theserecommendations:•When the PC Card hard drive is not inserted in a PC Card socket,store the hard drive in a protective carrying case. This will helpprotect it from inadvertent shocks.•Always use care when handling the hard drive. Do not drop, bend,flex, or crush it.•Avoid exposing the PC Card hard drive to extreme moisture, heat, orsunlight.•Keep all debris out of the connector to ensure good electricalconnections.•There are no user repairable parts in the PC Card hard drive. Do notattempt to disassemble any part of the hard drive. The warranty willbe voided if drive seals are broken or screws have been removed.•Periodically backup or archive important files and data.If you encounter or suspect hard drive problems, you can runSCANDISK from the MS-DOS prompt.  If you are not familiar withSCANDISK, enter SCANDISK/? at the DOS prompt for a description ofusage and syntax.  SCANDISK will identify any failures on the harddrive and prompt you for corrective action based on selected options. Ifproblems are found, it may be necessary to run SCANDISK severaltimes to determine the extent and severity of the problem. SCANDISKmay discover multiple bad clusters. Up to ten bad clusters can beallowed before returning the computer for service. After you have runSCANDISK and the problem persists or becomes more severe, or ifSCANDISK finds more than ten bad clusters, return the unit for service.
119Section 11.  Maintenance and Storage79-0003-003   22 October 1999Battery Maintenance and StorageMaintaining BatteriesFollow these guidelines to maintain performance of Nickel MetalHydride (NiMH) batteries.   •Avoid exposing batteries to extremely hot or cold temperatures forlong periods. To prevent possible damage to the battery, the mobilecomputer does not allow the battery to charge if the internaltemperature of the battery gets too low (< 5°C or < 41°F) or toohigh (> 50°C or > 122°F).•Charge the battery nightly where the temperature will remain around20°C (68°F).•Deep cycle discharge your battery when requested, which may be asoften as 3 months, depending on usage.Storing Batteries•Store the battery within the recommended temperature range:  10°Cto 30°C (50°F to 86°F).•Unused or stored batteries can lose power over time. When youinstall a battery that has not been used for awhile, connect externalpower to the computer and charge the battery.•After storage, deep cycling the battery up to four times in successionmay increase its capacity. You may want to do this over consecutiveweekends since each deep cycle process can take up to 40 hours.After this initial conditioning, maintain battery capacity by deepcycling at the recommended frequency.
120X-C 6250 Pro Users Manual79-0003-003   22 October 1999Computer Maintenance and StorageMaintaining Your ComputerFollow these guidelines to help maintain the condition and performanceof your computer.•Turn off the computer when you are not using it.•Charge the batteries daily or whenever their capacity is low.•Operate the computer within the recommended temperature rangesof -20°C to +60°C (-4°F to +140°F). Care and CleaningPhysical Inspection   Periodically inspect the computer and accessoriesfor wear, damage, or loose or missing parts. Identifying and correctingpotential problems early can help reduce the need to return the unit forservice.Outside Case   Like all tools, the outside of the computer will get dirtywith use. The case is made of painted Magnesium with Santoprenebumpers and polycarbonate blend (plastic) doors and covers. Theseareas can be cleaned with a solution of one part Formula 409® and onepart water. Follow the procedure below. To  clean  the  outside  case1 Disconnect external power and turn off the computer.2 Remove the battery.3 Using a soft, dry cloth (do not use paper products because they canscratch the surface), add a small amount of cleaning solution to thecloth and clean the computer case and bumpers.4 Wipe off any excess liquid with a soft cloth.5 Reinstall the battery.
121Section 11.  Maintenance and Storage79-0003-003   22 October 1999Display   Periodically inspect the display to make sure the contrast andbrightness functions are operating properly and that all pixels areoperational.Note   If you have a 10.4-inch color display, the FN+F2 and FN+F3keys to adjust backlight brightness are only active when MaxBright isoff. Additionally, the contrast keys, FN+F4 and FN+F5 are not active forthis display.If you have a touch screen•Always use an approved stylus.•Never use sharp, hard, or abrasive implements on the touch screensuch as ball point pens, pencils, or keys. They could damage thescreen.To clean the display assembly, use the same cleaning solution andprocedure described earlier for the outside case. In some cases, you canuse a small amount of isopropyl alcohol to remove streaks or smears.Use a soft, clean cloth to clean the display. Do not use paper productsbecause they can scratch the screen. External Power Connector   The external power connector maysometimes be exposed to moisture and/or contamination causing anunreliable connection to the external power source.Clean the connector using a cotton swab dipped in isopropyl alcohol. RJ-11 Connector   Make sure this connector is operating properly.During normal use, the connector pins can get dirty or become broken,bent, or pushed out of place. Clean the connector with a cotton swabdipped in isopropyl alcohol. If the connector needs to be replaced, this can be done withoutreturning the unit for service. Contact your local support person formore information.Keyboard   Check all keys to make sure they are working properly. Toclean the keyboard, use the same cleaning solution and proceduredescribed above for the outside case. If keyboard problems persist, the keyboard might need to be replaced.This can be done without returning the unit for service. Contact yourlocal support person for more information.
122X-C 6250 Pro Users Manual79-0003-003   22 October 1999I/O Ports   Make sure the video, serial, and parallel ports are operatingproperly. Periodically inspect the ports for damage or contamination,and make sure the cover is attached to the computer. The I/O cover canbe replaced without returning the unit for service. Contact your localsupport person for more information.PC Card Door and Connector   Whenever possible, make sure this dooris closed and latched properly. When the PC Card door is closed, itprovides a watertight seal for the PC Card socket. Shield the area fromall contaminants such as liquids, rain, snow, and dust when the door isopen.If the door needs to be replaced, this can be done without returning theunit for service. Contact your local support person for more information.Make sure the PC Card connector is operating properly by reading fromor writing to a PC Card.Battery and Battery Well   The battery well is not sealed, so it ispossible for moisture to enter this area. If this happens, remove thebattery and use a clean, dry cloth to wipe away any moisture from thebattery well. Also remove any moisture from the battery and batteryconnectors. The connectors may corrode if they are exposed to moisturefor extended periods. Corrosion can be removed with a cotton swabdipped in isopropyl alcohol.Cradle Contacts   The cradle contacts on the bottom of the computermay get dirty with daily use. Pins can be cleaned with a cotton swabdipped in isopropyl alcohol.
123Section 11.  Maintenance and Storage79-0003-003   22 October 1999Storing Your ComputerYou can store the mobile computer for approximately 30 days withoutlosing data as long as the battery is fully charged to begin with.If you plan to store the computer for more than 30 days, follow thesestorage guidelines. To  store  the  computer1 Files and data should be saved before storing the computer.Contact your organizations help desk about the procedure forbacking up files or data.2 Exit all applications and use the appropriate procedure to exit fromyour operating system.3 Turn off the computer.4 Remove the battery from the unit and store it in a dry place.5 Store the computer within the recommended temperature ranges of-40°C to +75°C (-40°F to +167°F). If you use PC cards, refer to the manufacturers instructions youreceived with the card for storage and care information.Note    When you turn on the mobile computer after it has beenstored for a long period, you may need to reset the system byholding down both mouse buttons for at least 10 seconds and thenreleasing the buttons.
124X-C 6250 Pro Users Manual79-0003-003   22 October 1999
WE KNOW THE ROADTMAPPENDIX AError MessagesIntroduction 126POST Messages 126MS-DOS Messages 132Windows Messages 133Application Messages 133
126X-C 6250 Pro Users Manual79-0003-003   22 October 1999IntroductionThe following are possible error and warning messages you mayencounter while operating the computer.  The messages in this sectionare listed alphabetically. Error and warning messages are generated by several different sourcesincluding:•Power On Self Test (POST)•MS-DOS•Windows•ApplicationsPOST MessagesWhen the mobile computer restarts, it tests its hardware components.This test is called the Power On Self Test (POST). If the system finds anerror during this test, it displays an error message.Some POST errors can occur before anything can be displayed on thescreen. In this case, the computer issues a series of beeps, then stopsworking. This type of error indicates a serious hardware problem, andyou should contact your supervisor or your organizations help desk.The most common POST error messages are listed next along withsolutions you can try.BIOS  ROM  bad  checksumAn expansion card has a bad ROM checksum. The expansion card mayneed to be replaced. Contact your supervisor or your organizations helpdesk.
127Appendix A.  Error Messages79-0003-003   22 October 1999-Disk not found-FATAL: CMOS RAM test failed-FATAL: DMA controller faulty-FATAL: Faulty DMA page registers-FATAL: Faulty refresh circuit-FATAL: Interrupt controller failed-FATAL: No RAM found-FATAL: No video display found-FATAL: RAM error at location xxxxxx: Wrote: xx Read: xx-FATAL: ROM checksum incorrectRestart the computer by pressing both mouse buttons for at least tenseconds and then releasing the buttons. If the problem persists, contactyour supervisor or your organizations help desk.Fixed  disk  controller  failureDisk controller is not responding. Report this error to your supervisor oryour organizations help desk.Fixed  disk  failureReport this error to your supervisor or your organizations help desk.Floppy  disk  fault  -  insert valid  boot  disk  and  press any  keyIf no floppy drive is present, run the System Configuration Utility (SCU)and disable the floppy disk controller. (See Section 5, CustomizingSettings, for more information about the SCU.)Gate A20 failureHardware failure. Report this error to your supervisor or yourorganizations help desk.
128X-C 6250 Pro Users Manual79-0003-003   22 October 1999-Hard disk boot sector invalid-Hard disk failedRestart the computer by pressing both mouse buttons for at least tenseconds and then releasing the buttons. If the problem persists, contactyour organizations help desk.-Insert  boot-disk  and  press  any  key-Internal  cache  test  failedRestart the computer by pressing both mouse buttons for at least tenseconds and then releasing the buttons. If the problem persists, contactyour organizations help desk.-Keyboard clock  line  failure-Keyboard controller  failure-Keyboard data  line  failureReboot the computer by pressing CTRL+ALT+DEL. If the messagepersists, and the keyboard is not usable, report this error to yoursupervisor or your organizations help desk.-Keyboard failure-Keyboard stuck  key  failure-Memory  failure  at  AAAAAAAA, read  XX  expected  YYRestart the computer by pressing both mouse buttons for at least tenseconds and then releasing the buttons. If the problem persists, contactyour organizations help desk.No  boot  device  available    press  F1  to  retry  bootReboot the computer by pressing CTRL+ALT+DEL. If the problempersists, the hard disk may need to be replaced. Report this error toyour supervisor or your organizations help desk.No boot sector on hard diskData corrupted on hard disk. Restore hard disk data by rebooting from abootable PC card.
129Appendix A.  Error Messages79-0003-003   22 October 1999No timer tick interruptRestart the computer by pressing both mouse buttons for at least tenseconds and then releasing the buttons. If the problem persists, contactyour organizations help desk.Non-system  disk  or  disk  error   Replace  and  press  any  key tocontinueRemove the non-bootable PC memory card from the card socket andpress any key to reboot.Non-system  disk  -  insert  boot  disk and  press  any  keyRestart the computer by pressing both mouse buttons for at least tenseconds and then releasing the buttons. If the problem persists, contactyour organizations help desk.Press  the  F1  key to  continueThis message indicates that an error was found during POST. Pressingthe F1 key allows the system to attempt to boot.Shutdown  failureReboot the computer by pressing CTRL+ALT+DEL. If the messagepersists, contact your supervisor or your organizations help desk.Unexpected  interrupt  in  protected  modeReboot the computer by pressing CTRL+ALT+DEL. If the messagepersists, contact your supervisor or your organizations help desk.WARNING!  PC87570 initialization  incomplete.  Code=XXXPress ENTER to continue and then restart the computer by pressingCTRL+ALT+DEL. You can continue to use the computer since basiccomputer functions may still be operable; however, some functions maynot work properly.If the problem persists, contact your supervisor or your organizationshelp desk.
130X-C 6250 Pro Users Manual79-0003-003   22 October 1999WARNING!  Boot  sector 0  has  changedThe boot sector of the hard drive has been modified. This message alsomay be displayed when booting from drive C after booting from anotherdevice. Pressing F1 will allow the system to continue to boot. If thisproblem persists, contact your organizations help desk.-WARNING: CMOS checksum  invalid  -  run SCU-WARNING: CMOS failure  -  run  SCURun the System Configuration Utility (SCU) to set the systemconfiguration. If the problem persists, contact your organizations helpdesk. (See Section 5, Customizing Settings, for more informationabout the SCU.)-WARNING: Floppy  controller  failed-WARNING: Floppy  disk track  0  failedRestart the computer by pressing both mouse buttons for at least tenseconds and then releasing the buttons. If the problem persists, contactyour organizations help desk.WARNING: Floppy information  invalid  - run SCURun the System Configuration Utility (SCU) to set the systemconfiguration. If the problem persists, contact your organizations helpdesk. (See Section 5, Customizing Settings, for more informationabout the SCU.)-WARNING: Keyboard controller  failure-WARNING:  Keyboard failureReboot the computer by pressing CTRL+ALT+DEL. If the problempersists, the keyboard is not usable; contact your organizations helpdesk.-WARNING: No bootable floppy drive 0 installed-WARNING: No  interrupts from  timer  0Restart the computer by pressing both mouse buttons for at least tenseconds and then releasing the buttons. If the problem persists, contactyour organizations help desk.
131Appendix A.  Error Messages79-0003-003   22 October 1999WARNING:  Time/date  corrupt  -  run SCURun the System Configuration Utility (SCU) to set the time of day anddate. (See Section 5, Customizing Settings, for more informationabout the SCU.)WARNING:  Unexpected  amount of  memory  -  run  SCURun the System Configuration Utility (SCU) to reinitialize the systemconfiguration. If the problem persists, contact your organizations helpdesk. (See Section 5, Customizing Settings, for more informationabout the SCU.)xxxxxh  Option  ROM  checksum  failure  where  xxxxxh is  thestarting  address  of  the  option ROMAn expansion board contains a defective ROM. Try restarting thecomputer by pressing CTRL+ALT+DEL. If the problem persists, theexpansion board may need to be replaced. Report this error to yoursupervisor or your organizations help desk.-PC87570  CPU  test failed!  Press ENTER  to  continue-PC87570  initialization  failed!  Press ENTER  to  continue-PC87570  RAM  test  failed!  Press  ENTER  to  continue-PC87570  ROM  test failed!  Press  ENTER  to  continueRestart the computer by pressing both mouse buttons for at least tenseconds and then releasing the buttons. You can press ENTER tocontinue to use the computer since basic computer functions may stillbe operable; however, the battery will not be charged properly. If theproblem persists, contact your organizations help desk.
132X-C 6250 Pro Users Manual79-0003-003   22 October 1999MS-DOS MessagesThe MS-DOS operating system may display a warning or error messageif it encounters a problem with a command in the CONFIG.SYS orAUTOEXEC.BAT file, or a command that you entered at the DOSprompt. Following are a few of the most common MS-DOS messages. Bad  command  or  file  nameA command was entered that is spelled incorrectly or does not exist onthe computer.Invalid  media  type  reading  drive  DAbort,  Retry,  Fail?The PC memory card may not be formatted. Press A to abort, thenformat the card using the MS-DOS Format command, or from Windowsusing the Format Disk command.Invalid  drive  specificationYou tried to access a drive that does not exist. This can happen if youtry to access drive D, but the PC card drivers are not loaded. Reportthis error to your supervisor or help desk.Non-System  disk  or  disk  errorReplace and  press  any key when  readyThis can occur if a PC memory card is in the card socket and yourestart the computer. Remove the card, and then press any key.Not  ready  reading  drive  DAbort,  Retry,  Fail?Make sure that the PC card is inserted fully into the card socket, thenpress R to retry. See Section 8, Using PC cards for more information.
133Appendix A.  Error Messages79-0003-003   22 October 1999Windows MessagesWindows messages are typically self-explanatory. See Appendix B,Troubleshooting, for more information.Application MessagesBoth MS-DOS and Windows applications may display messages if awarning or error condition occurs. Refer to the online Help or otherdocumentation for the application that generated the message.
134X-C 6250 Pro Users Manual79-0003-003   22 October 1999
WE KNOW THE ROADTMAPPENDIX BTroubleshootingWhat to Try First 136For More Help  136Common Solutions to Common Problems 137Applications  138Batteries   140Cellular Modem 143Display   143Hard Disk   145I/O Ports   145Keyboard  147Landline Modems   148Miscellaneous  151Mouse  155PC Cards   155Pen/Touch Screen 157Peripherals 157Radio Modems   157
136X-C 6250 Pro Users Manual79-0003-003   22 October 1999What to Try FirstThis section is designed to help you determine and fix problems youmight encounter while operating the mobile computer. Try the followingthings in order: •First look through the categories in this section for a solution. •If you dont find a solution for your situation here, try one of theresources listed below.•If you are having a problem with a computer application, use theonline Help that comes with the application to find a solution.•If you still cannot resolve your problem, contact the help desk at yourorganization.For More Help•Windows 95 online Help is already installed on your system. Toaccess this information, select Help from the Start Menu.•A ten-minute Windows 95 tutorial is accessible from the Start Menuby selecting Help, Contents, Tour: Ten Minutes to Using Windows.•Third-party Windows manuals are available from your localbookstore.
137Appendix B.  Troubleshooting79-0003-003   22 October 1999Common Solutions to Common ProblemsSolutions to some common problems are listed on the following pagesunder these categories:  •Applications•Batteries•Cellular Modem•Display•Hard Disk•I/O Ports•Keyboard•Landline Modem•Miscellaneous•Mouse•PC Cards•Pen/Touch screen•Peripherals•Radio Modem
138X-C 6250 Pro Users Manual79-0003-003   22 October 1999ApplicationsMy application locks up, acts strangely, or produces a GeneralProtection Fault (GPF) error•If youve tried to resolve the problem other ways and your applicationstill doesnt respond, you may need to restart your computer asdescribed below. To reboot your computer, press CTRL+ALT+DEL.If the computer does not restart when you press CTRL+ALT+DEL, thekeyboard may be locked up. Reset the computer by holding downboth mouse buttons for at least ten seconds and then releasing thebuttons.•The data on the hard disk could be corrupted.  Run SCANDISK.•Windows is out of memory/resources. Exit Windows and restartWindows.•If you are using a communications application, make sure that theInterrupt Request lines (IRQ) for COM3 and COM4 specified forWindows match the IRQ lines specified in the SCU.  See Section 5,Customizing Settings, to view and change IRQ settings.The Speaker Phone application does not work and it locks up oris very slow after dialing•Make sure the IRQ is set to the same value in both Windows and inthe SCU. See Section 5, Customizing Settings.When trying to install some third-party software applications, themessage Insert disk into drive B appears•Before running Windows to install the program, enter the followingcommand at the DOS prompt:SUBST A:  C:\CAUTION    Restarting your computer may corrupt files or data.
139Appendix B.  Troubleshooting79-0003-003   22 October 1999ApplicationsIn Windows, Windows and the mouse lock up when aborting thedeep cycle process in Battery Maintenance•Restarting the computer by pressing CTRL+ALT+DEL corrects theproblem.Communications programs such as HyperTerminal, ProcommPlus, or Speaker Phone dont seem to work or they lock Windows•If you are using the internal modem, be sure to specify COM3 as thecommunications port.•When you first try to use HyperTerminal or similar application, thesystem responds with a message asking if you want to install themodem. Answer Yes to this question and follow the instructions onthe screen to install it.•Verify with your company that your computer has an internal modeminstalled.•Make sure the IRQ lines for COM3 and COM4 are specified forWindows. See Section 5, Customizing Settings, for moreinformation.Third-party applications dont work with COM3•Make sure a modem is installed. Locate the Config string label onthe bottom of the computer; a modem is not installed if the seventhdigit is Z.•Make sure your application is set to use COM3.•Make sure your application is using the correct communicationsettings (baud, parity, etc.).•Make sure that the Interrupt Request lines (IRQs) for COM3 orCOM4 specified for Windows match the IRQ lines specified in theSCU. See Section 5, Customizing Settings, for more information.•You may also need to try a different IRQ setting. See Section 5,Customizing Settings, for more information.
140X-C 6250 Pro Users Manual79-0003-003   22 October 1999BatteriesThe battery does not charge•To prevent possible damage to the battery, the system will not allowa charge if the battery temperature is extremely hot or cold (such asin a closed, unattended vehicle). If possible, charge the battery in alocation with a moderate temperature of around 20°C (68°F).•Keep the display tilted open and allow unrestricted airflow while thebattery is charging so excess heat can escape and prevent thebattery from overheating.•If possible, turn off the computer while the battery is charging.•Try enabling the Suspend on AC Power option under the Power,Suspend/Resume Control menu in the System Configuration Utility(SCU). This allows the system to automatically suspend while it isconnected to external power.•If the battery is new or has been stored for a week or more, followthis procedure:1 Make sure the computer is turned off (press FN+OFF).2 Open the battery door and remove the battery.3 Connect the AC adapter to the computer and an AC wall outlet,and then turn on the computer by pressing FN+ON(FN+SPACEBAR).4 Reinstall the battery and replace the battery door.5 Allow the system to remain idle for one hour with the AC adapterconnected to the computer.The external power light blinks when the battery starts charging.6 If the battery still fails to charge after an hour, remove the battery,wait several seconds, and then install it again.If the battery does not begin charging within several minutes,return the unit for service.
141Appendix B.  Troubleshooting79-0003-003   22 October 1999BatteriesThe batteries take much longer than three hours to charge•Under moderate temperatures, about 21°C (70ºF), the computersbattery takes 3 to 4 hours to completely charge.  Under extremelycold or hot temperatures, however, the battery can take up to 16hours to fully charge.The batteries dont last very long•Deep cycle discharge the battery using the Battery Maintenanceapplication. If your battery is new or has not been used for severalweeks, deep cycle discharging the battery over two or threeconsecutive weekends may substantially increase its capacity.•As your battery ages, the maximum capacity that it can holdnaturally decreases, and even the best maintained batterieseventually need to be retired. Consider replacing the battery if youare not getting the usage you need from it.•You may have a defective battery. Check the battery condition withthe Battery Status application. Generally, a battery should bereplaced when it charges to less than 80 percent of capacity.The charging light doesnt flash•Verify that a battery is installed in the unit.•This may indicate that the charging process terminated. Use theBattery Status application to determine whether a normal orabnormal condition caused the charging process to terminate. SelectLast Charge Termination in the More Info dialog box.The gas gauge isnt full after charging the battery•This may indicate that the charging process terminated prematurely.Use the Battery Status application to determine if some conditioncaused the charging process to terminate. Select Last ChargeTermination in the More Info dialog box.
142X-C 6250 Pro Users Manual79-0003-003   22 October 1999BatteriesThe ambient temperature rises rapidly when charging the batteryat room temperature•This is normal. The internal ambient temperature is always 0º to 16ºhigher than the external ambient temperature. Ambient temperatureis not used for charge termination criteria.The gas gauge reads full, but the indicator light is still blinking•If you charge your battery daily, rely on the gas gauge reading todetermine battery capacity. The charge mode may have switchedfrom Fast to Slow because the battery became too hot. The chargingprocess is trying to put a little more capacity into the battery;however, external power can be removed because the battery isvirtually full.•If your battery is new or has not been used for several weeks, rely onthe indicator light to determine when the battery is fully charged.The gas gauge is unreliable in these cases; it may read 100 percent,but the actual capacity is only 10 percent.My battery seems to have less and less capacity•To keep your battery at optimum performance, perform a deep cycledischarge every 2-1/2 to 3 months using the Battery Maintenanceapplication.•Over time, your battery may develop memory effect. This occurswhen the battery is partially discharged and recharged repetitivelywithout a full discharge. A partial or shallow discharge means thatyou use less than 50 percent of its capacity before charging. Deepcycle discharge the battery using the Battery Maintenanceapplication to help prevent memory effect.•If your battery is new or has not been used for several weeks, deepcycling it up to four times in succession may increase its capacity.You may want to do this over consecutive weekends since each deepcycle process can take up to 40 hours. After this initial conditioning,maintain battery capacity by deep cycling at the recommendedfrequency.
143Appendix B.  Troubleshooting79-0003-003   22 October 1999Batteries•Over time as your battery ages, the maximum capacity that it canhold naturally decreases, and even the best maintained batterieseventually need to be retired. Consider replacing your battery if youare not getting the usage you need from it.Cellular ModemThe Sierra Watcher utility has a run time error when starting orwhen trying to setup the cellular modem•Make sure the Speaker Phone application is not running. DisplayThe display performance is slow•The temperature may be too cold.  Move the computer to a warmeroperating environment. I cant read the display•Adjust the backlight.-On a monochrome display, pressing FN+F1 toggles the backlight onand off.-On a color display, the backlight is on whenever the computer isrunning. Pressing FN+F1 toggles the MaxBright feature on and off.•The automatic power-saving mode may have shut off (suspended)the computer. Press FN+ON to resume.•Adjust the contrast by pressing FN+F4 and FN+F5 (these keys arenot active on a 10.4-inch color display).The underlined, inverse, and hypertext characters are difficult toread on the screen•Adjust the contrast by pressing FN+F4 and FN+F5 (these keys arenot active on a 10.4-inch color display).
144X-C 6250 Pro Users Manual79-0003-003   22 October 1999Display•Change the color scheme. From the Start Menu select Settings,Control Panel, choose Display, and then click the Appearance tab tomake changes to the color scheme.•Make the online hypertext jumps black by adding the lineJumpColor=0,0,0 to the [Windows Help] section of WIN.INI.The display goes squiggley wiggley after removing/inserting thebattery•This can occur if you attempt to turn on the unit with a low ordepleted battery. Restart the unit by pressing and holding down bothmouse buttons for at least 10 seconds and then releasing thebuttons. Connect external power and recharge the battery.I cant see the cursor while using the DOS editor•Press FN+INSERT to change from insert mode to overwrite mode toenable a block cursor. When it defaults to insert mode, the DOSeditor uses an underline cursor which is less visible than the blockcursor for overwrite mode.The display appears to have random pixels darkened afterscrolling•Contact your supervisor or your organizations help desk forinformation about correcting this problem.I changed my display resolution, but I see no difference on thescreen•Try restarting your computer by pressing CTRL+ALT+DEL for thechanges to take effect.CAUTION    Restarting your computer while you are running appli-cations or while you are working Windows may corrupt files or data.
145Appendix B.  Troubleshooting79-0003-003   22 October 1999DisplayThe NeoMagic tab under Display Properties disappears if thenumber of colors is set to 16•If the NeoMagic tab disappears when the number of colors is set to16, set the number of colors to 256 or more.Hard DiskThe hard disk will not spin up so the computer cant boot up•This occurs if the unit is exposed to extreme temperature andhumidity. This is a hardware failure associated with the hard diskpower circuit. Return the unit for service.I cant save files because the disk is full•Report this situation to your supervisor or your organizations helpdesk.Diskette Read Error•Any card in the PC card socket except for a properly formattedmemory card will cause this error since it is trying to read the PCcard.I/O PortsI cant access a serial port•Make sure another application is not using the same port. •Make sure the correct COM port is selected in your application. Referto the online Help for your application.
146X-C 6250 Pro Users Manual79-0003-003   22 October 1999I/O PortsFloppy disk attached to the parallel port does not work aftersuspend/resume•Not all external floppy disk drives will work with the mobilecomputer. Make sure all add-on device drivers are Advanced PowerManagement (APM) aware.PC SRAM cards are not readable on the mobile computer•If the SRAM card is reformatted on the mobile computer, read/writeoperations will be successful. Verify the following lines are in your CONFIG.SYS:DEVICE=C:\WINDOWS\SYSTEM\CSMAPPER.SYSDEVICE=C:\WINDOWS\SYSTEM\CARDDRV.EXE\SLOT=2Serial ports do not work consistently with Procomm Plus Version2.00 or earlier•Procomm Plus Versions 2.01 and later do support 16550 bufferedUART operation. Upgrade software.The system does not automatically detect COM3•This error can occur if COM3 is removed using Device Manager inSystem Properties and then Add New Hardware is run. To preventthis problem, open a DOS box and enter MODEM ON before runningAdd New Hardware.
147Appendix B.  Troubleshooting79-0003-003   22 October 1999KeyboardSomething unexpected happens when I press a key•You may have pressed a key combination that performs a Windowsfunction. Make sure you are pressing the correct keys for theapplication you are running. I cant tell if Im in NUM LOCK mode•This icon appears on the Windows 95 Taskbar when NUM LOCK isenabled:Pressing FN+NUM LK toggles NUM LOCK mode on and off.PGUP, PGDN, HOME, and END keys dont work•You need to press the FN key in combination with other keys forcertain functions. For example:To page up, press FN+UP ARROW.To page down, press FN+DOWN ARROW.To move to the home position, press FN+HOME.To move to the end position, press FN+END.Incorrect characters appear on the screen when I press certainkeys•You may be in NUM LOCK mode. Press FN+NUM LK (FN+F12) totoggle NUM LOCK mode off.Keyboard stuck failure appears when the computer boots up•This error occurs if more than four keys are pressed during the PowerOn Self Test (POST).
148X-C 6250 Pro Users Manual79-0003-003   22 October 1999Landline ModemsThe modem doesnt work•Make sure a modem is installed. Locate the Config string label onthe bottom of the mobile computer; a modem is not installed if theseventh digit is Z.  •When you first try to use HyperTerminal or similar application, thesystem responds with a message asking if you want to install themodem. Answer Yes to this question and follow the instructions onthe screen to install it.•If you are operating in DOS, verify that the modem has beenpowered on using MODEM ON. MODEM OFF will power off themodem to conserve power when the modem is not in use.•Make sure the communication settings are correct in yourapplication. Refer to the online Help for your application.•Make sure you have the correct COM port selected in yourapplication. Refer to the online Help for your application. Thefollowing table describes the correct settings for each modem type.Modem  type COM portExternal COM1 or COM2Internal landline COM3Internal CDPD COM4•Make sure that the Interrupt Request lines (IRQs) for COM3 orCOM4 specified for Windows match the IRQ lines specified in theSCU.You may also need to try a different IRQ setting. See Section 5,Customizing Settings.The modem doesnt dial a numberCheck these things:•If you are running a program in MS-DOS, make sure the modem isturned on using MODEM ON before you run the application. MODEMOFF will power off the modem to conserve power when the modemis not in use.
149Appendix B.  Troubleshooting79-0003-003   22 October 1999Landline Modems•If you are using an external modem, make sure the cables areattached correctly.•If you are using an internal modem, make sure the modem isinstalled. Check with your organization to determine if your computerhas an optional internal modem installed.•Make sure your communications parameters are correct in yourapplication. Refer to the online Help for your application.•Make sure you have the correct COM port selected in yourapplication. Refer to the online Help for your application. Thefollowing table describes the correct settings for each modem type.Modem  type COM  portExternal COM1 or COM2Internal landline COM3Internal CDPD COM4•Make sure that the Interrupt Request lines (IRQs) for COM3 orCOM4 specified for Windows match the IRQ lines specified in theSCU.You may also need to try a different IRQ setting. See Section 5,Customizing Settings.The modem dials and receives an answer but does not establisha connection•You may have incorrect parameters selected for your application totalk with the remote modem. Refer to the online Help for yourapplication.•You may need to adjust your modems baud rate or protocolselection.•Make sure that the Interrupt Request lines (IRQs) for COM3 orCOM4 specified for Windows match the IRQ lines specified in theSCU.You may also need to try a different IRQ setting. See Section 5,Customizing Settings.
150X-C 6250 Pro Users Manual79-0003-003   22 October 1999Landline ModemsCommunications programs such as HyperTerminal, ProcommPlus, or Speaker Phone dont seem to work or they lock Windows•If you are using the internal modem, be sure to specify COM3 as thecommunications port.•Verify with your company that your computer has an internal modeminstalled.•When you first try to use HyperTerminal or similar application, thesystem responds with a message asking if you want to install themodem. Answer Yes to this question and follow the instructions onthe screen to install it.•Make sure the IRQ lines for COM3 and COM4 are specified forWindows.  See Section 5, Customizing Settings, to view andchange IRQ settings.Third-party applications dont work with COM3•Make sure a modem is installed. Locate the Config string label onthe bottom of the mobile computer; a modem is not installed if theseventh digit is Z.•Make sure your application is set to use COM3.•Make sure your application is using the correct communicationsettings (baud, parity, etc.).•The modem may not be powered on. If you are using a DOSapplication, before running the application, make sure that MODEMON is called from the DOS command line or from a batch file.•Make sure that the Interrupt Request lines (IRQs) for COM3 orCOM4 specified for Windows match the IRQ lines specified in theSCU.You may also need to try a different IRQ setting. See Section 5,Customizing Settings.
151Appendix B.  Troubleshooting79-0003-003   22 October 1999Landline ModemsAttempting to use the speaker phone without a modem installedcauses Windows to lock up•This can also happen if the IRQ settings in Windows under ControlPanel, Ports dont match those in the SCU. Verify IRQ settings andthat the modem option is installed. Locate the Config string labelon the bottom of the mobile computer; a modem is not installed ifthe seventh digit is Z.The modem dials and the answering modem generates tone, butour modem does not begin the training sequence to establish aconnectionAlthough the problem may appear to originate from the computer, thesource of the problem is the answering modem.•Try setting up the answering modem to generate the correct V.22tone which can usually be done by sending an AT command to themodem. See the AT Command summary in the AT CommandReference manual more information.•Add %!1300AO to the initialization string. If used, this commandmust be sent immediately before the command to dial the desiredphone number and sent again before re-dialing the number since themodem will default to the original setting at the end of the session.MiscellaneousThe computer shuts off unexpectedly•The computer has entered suspend mode. Press FN+ON to turn itback on.•The battery capacity may be low. Connect external power to chargethe battery, or replace the battery with a fully charged one.•The battery door may be loose. Make sure the battery door issecurely latched.
152X-C 6250 Pro Users Manual79-0003-003   22 October 1999Miscellaneous•The computer turns off automatically if you remove the battery door.To turn on the computer, replace the door, make sure the door issecured, and press FN+ON.•The battery contacts may be dirty. Turn off the computer by pressingFN+OFF, remove the battery, and clean the contacts.The speaker volume is too high or too low•Increase the volume by pressing FN+F7; decrease the volume bypressing FN+F6.The computer wont turn on•The battery may not be installed properly, or it may not be fullycharged. Make sure a fully charged battery is properly installed.•Connect external power to charge the battery if it is not charged.•If you are using the AC adapter, check the electrical outlet you areusing to make sure it is working properly.•If the mobile computer does not turn on, restart the computer byholding down both mouse buttons for at least 10 seconds and thenreleasing the buttons.The computer wont turn off•Press FN+OFF.If pressing FN+OFF does not turn off your computer, the system maybe locked up. Reboot your computer by pressing CTRL+ALT+DEL. Ifyour system still does not respond, restart your computer by holdingdown both mouse buttons for at least 10 seconds and then releasingthe buttons.•The unit may have been idle for an extended period. Hold down bothmouse buttons for at least 10 seconds and then release the buttons.CAUTION    Restarting your computer while you are running appli-cations or while you are working Windows may corrupt files or data.
153Appendix B.  Troubleshooting79-0003-003   22 October 1999MiscellaneousThe computer enters suspend mode too quickly•When there is no activity for a period of time, the computer turns offor enters suspend mode. To extend this time, use the SCU and entera new time. See Section 5, Customizing Settings, for informationabout accessing this utility.The computer doesnt automatically suspend•Check to make sure the COM ports are off. For example, exit anyapplication that uses COM ports such as Speaker Phone.•Make sure external power is not connected. Some systems will notsuspend automatically when they are connected to external power.The computer is locked up•If youve tried to resolve the problem other ways and your system stilldoesnt respond, you may need to restart your system as describedbelow.To reboot your computer, press CTRL+ALT+DEL.If the computer does not restart when you press CTRL+ALT+DEL, thekeyboard may be locked up. Reset the computer by holding downboth mouse buttons for at least 10 seconds and then releasing thebuttons.The system date and time are incorrect•Reset the correct date and time by choosing the Date/Time icon fromControl Panel and making the appropriate changes.CAUTION    Restarting your computer while you are running appli-cations or while you are working Windows may corrupt files or data.
154X-C 6250 Pro Users Manual79-0003-003   22 October 1999MiscellaneousAll of the indicator lights are flashing•This can occur during a Power On Self Test (POST) and means thetest has failed. Reset the mobile computer by pressingCTRL+ALT+DEL or holding down both mouse buttons for at least 10seconds and then releasing the buttons.I receive an out of memory error message•Too many applications may be running at the same time. Closeapplications you dont need.•Run MS-DOS applications in full screen rather than a window. PressALT+ENTER to toggle between full screen and window mode.•If youre using desktop wallpaper, set wallpaper to None. To do this,choose Display from Control Panel and make the appropriate change.•Make sure you have enough space on your hard disk. Contact yoursupervisor or your organizations help desk for assistance.•Set up a permanent swap file. Contact your supervisor or yourorganizations help desk for assistance.Holding down both mouse buttons to reset the computer doesntalways work•Try resetting the computer again. If this doesnt work, remove allpower, and allow the unit to remain idle for ten minutes. After tenminutes, connect external power and retry.This warning message appears when I restart the computer:Warning Include specifies memory already excluded at D100"•This problem is generally caused when the PC card controller is outto lunch. Reset the computer once again by holding down bothmouse buttons for at least 10 seconds and then releasing thebuttons.CAUTION    Restarting your computer may corrupt files or data.
155Appendix B.  Troubleshooting79-0003-003   22 October 1999MiscellaneousI cant turn off the computer after booting from a PC Card•Do not use FN+OFF to suspend the computer if you have bootedfrom a PC Card rather than the internal hard disk. Instead, removethe card and then press CTRL+ALT+DEL to restart the system.MouseI have difficulty double-clicking the mouse fast enough•From the Start Menu, select Settings, Control Panel, and then chooseMouse.  The Buttons tab contains the setting for the double-clickspeed.I cant see the mouse pointer•The mouse pointer may be off the screen. Move the mouse until itreappears on the screen.•From the Start Menu, select Settings, Control Panel, and then chooseMouse.  The Motion tab contains settings for the mouse speed andtrail.Its difficult to position the mouse on window borders•From the Start Menu, select Settings, Control Panel, and then chooseDisplay.  Click on the Appearance tab, select Active WindowBorder under Item, and then increase the numbers under Size.PC CardsI cant remove the PC card•Press the ejector button located inside the PC card door on the backof the computer. Use one finger to press down lightly on top of thecard, and then slide it out.•If the ejector button malfunctions when you press it, release thebutton and then press it again.
156X-C 6250 Pro Users Manual79-0003-003   22 October 1999PC CardsDiskette Read Error•Any card in the PC Card socket except for a properly formattedmemory card will cause this error since it is trying to read the PCCard.PC SRAM cards are not readable on the mobile computer•If the SRAM card is reformatted on the computer, read/writeoperations will be successful.•Try loading the SystemSoft CardWorks drivers by running thisprogram:C:\DRIVERS\CARDWORKS\SETUP.EXEThe system does not recognize the PC Card CD-ROM when it isinserted into the PC Card socket•There is a delay of 10 to 15 seconds before the CD-ROM drive isrecognized.•Drivers may not be installed. Contact your organizations help deskfor assistance.The computer locks up when I remove the PC card•Before you remove the card, select the PC card icon in the systemtray area of the screen (near the clock in the lower right corner),and choose Stop [card name] card.I cant turn off the computer after booting from a PC Card•Do not use FN+OFF to suspend the computer if you have bootedfrom a PC Card rather than the internal hard disk. Instead, removethe card and then press CTRL+ALT+DEL to restart the system.The Megahertz Ethernet PC card does not work•This card has two connectors, XJACK and Honda. Use the Hondaconnector.
157Appendix B.  Troubleshooting79-0003-003   22 October 1999Pen/Touch ScreenWhen I try to use the stylus on my touch screen, nothinghappens•If you cannot select objects accurately with the stylus, you may needto recalibrate the touch screen. To calibrate  the  touch  screen1 From the Start Menu, select Programs, Touch, and then chooseTouchscreen Controls.2 Select the Calibrate button.3 Follow the instructions on the screen to calibrate the touch screen.The touch screen display warps or pillows in high humidity•The computer remains functional; however, moving the computer toa more suitable environment will allow the display to recover.PeripheralsThe parallel floppy drive does not work•This floppy is not supported on the mobile computer. Use the PCCard floppy instead.Radio ModemsHow can I tell if my RAM radio is working?Try the following procedure. 1 Make sure the IRQ is set the same in the SCU and in Windows.See Section 5, Customizing Settings, for more information.2 Use Battery Status to make sure the battery is at 100 percentcapacity.3 Make sure RFGXM.EXE is loaded in AUTOEXEC.BAT.4 Exit Windows to a DOS prompt.
158X-C 6250 Pro Users Manual79-0003-003   22 October 1999Radio Modems5 From a DOS prompt, enter: C:\XCTOOLS\XCMASC.6 Check to make sure the radio indicator light is on.The following messages appear in order:Network Contact Lost (or something similar as it starts up)Network ContactedIf you receive the first message and not the second, your unit isprobably not registered. See Section 4, If You Have a RadioModem, for more information, or contact your companys help deskfor assistance.7 After the Network Contacted message appears, your radio ID isdisplayed. Make sure this matches the ID on the bottom of yourcomputer.If these numbers do not match, contact your companys help deskfor assistance.8 If your unit is registered, type some text and press ENTER.This sends the text to the RAM network which in turn sends it backto you (sending a message to yourself). After receiving a message,this text appears at the top of the screen: MPAK received. Thismeans the message was sent successfully. MPAK rejected meansthat the message just echoed back to itself internally within themodem (you may be out of range).9 Press ALT+R to display signal strength.If it is greater than 0 db, your radio is probably working correctly.Press F1 for help on other keys.
159Appendix B.  Troubleshooting79-0003-003   22 October 1999Radio ModemsHow can I tell if my ARDIS radio is working?•First connect the computer to external power, install a fully-chargedbattery, and then follow the procedure below for your particularoperating system.1 From the Start Menu, select Shut Down, and then choose Restartthe computer.2 Press F8 when this message appears: Starting Windows 95...3 Select Option 5.This allows you to single step through each startup command.4 Respond N to each prompt EXCEPT the following:Process your startup device drivers (CONFIG.SYS)DEVICE=C:\WINDOWS\HIMEM.SYSDEVICE=C:\WINDOWS\EMM386.EXE NOEMS5 From the DOS prompt, enter C:\CD XCTOOLS.6 Enter  RFGXM.Radio driver starts and the radio on/off light comes on; continue tothe next step. If the light does not come on, contact yourcompanys help desk for assistance.7 Enter  XCMG.If a message appears indicating that it was unable to initialize,contact your companys help desk for assistance.8 ARDIS can be contacted to verify that the computer has an ARDISradio installed and that it is registered with their company.Contact your companys help desk for assistance.
160X-C 6250 Pro Users Manual79-0003-003   22 October 1999Radio ModemsXCMASC program cant regain network contact after the radiodetects a low battery even when the battery is recharged•The radio power must be cycled before the radio will resume contactwith the network. Radio application cannot find radio modem•Make sure the IRQ setting for COM4 is set correctly in the SCU.Many DOS applications assume this to be IRQ 3 rather than thedefault of IRQ 10.See Section 5, Customizing Settings.•Make sure that XCPRF is being loaded in AUTOEXEC.BAT beforestarting the application.Activating the Radio TSR while in the DOS Editor causes thecomputer to lock up requiring a hardware reset•Do not use CTRL+ALT+R while inside the DOS Editor.The Transparent Mode application doesnt work•This application is only for the ARDIS radio network.
WE KNOW THE ROADTMAPPENDIX CGlossaryAC adapter   The standard charging device shipped with the mobilecomputer that supplies power from an AC wall outlet to operate thecomputer and charge the battery installed in the unit. antenna   If you have a radio modem installed in your computer, thisdevice sends and receives radio waves for this modem. For bestreception, place the antenna in a vertical position.application   A program designed for a specific purpose such as solvinga particular business or mathematical problem. backlight   A feature of the computer display that makes information onthe screen easier to read in low-light situations. On a monochromedisplay, the backlight automatically turns off after one minute ofinactivity. You must manually turn the backlight on by pressing FN+F1when you resume. On a color display, the backlight is on wheneverthe computer is running. See also MaxBright.battery indicator light   The left-most light on the indicator panel, thislight illuminates when the computer is operating on battery powerand blinks to let you know the battery capacity is getting low.
162X-C 6250 Pro Users Manual79-0003-003   22 October 1999Battery Maintenance application   A separate program that allows youto deep cycle discharge batteries.   Battery Status application   A separate program that displaysinformation about the current state of the battery. By default, thisprogram runs automatically when you run Windows.  bit   The smallest unit of computer data (binary digit).deep cycle discharge   A user-initiated charging method thatcompletely discharges Nickel Metal Hydride (NiMH) batteries beforecharging them again. This helps eliminate memory effect,reconditions the batteries, and helps increase their capacity.  desktop   The screen background for Windows on which windows,icons, and dialog boxes appear.dust cover   A cover that provides added protection for the serial,parallel, and video ports when they are not being used.external power   Any of the approved devices used to supply power tothe mobile computer including the AC adapter, the vehicle adapter,and the vehicle cradle. external power light   The second light from the left on the indicatorpanel, this light illuminates when the computer is operating onexternal power. If a battery is installed, the external power supplyautomatically begins charging the battery when power is connected.The light blinks to indicate the battery is being charged; it remains onwhen the battery is fully charged.fast charge   A method of quickly increasing the battery capacity whilethe mobile computer is attached to external power. This is the normaland preferred charging method. It takes approximately three hours tofully charge the battery using this method.hard disk   A rigid magnetic storage device that provides fast access tostored data. The standard hard disk for the mobile computer isruggedized to withstand more shock and vibration than hard disks intypical notebook computers. hardware   The electronic components, boards, peripherals, andequipment that make up your computer system.
163Appendix C.  Glossary79-0003-003   22 October 1999indicator lights   The small lights located between the display and thekeyboard that blink or remain on or off to indicate activity on thesystem. They include an On/Off light, an External Power light, a DiskActivity light, and a Radio On/Off light. keyboard   The keyboard is weather sealed and designed with 93percent standard key spacing.MaxBright   A feature available on the 10.4-inch color display thatintensifies the backlight to its maximum brightness. Pressing FN+F1toggles MaxBright on and off.megabytes (MB)   A unit of memory measurement equal toapproximately one million bytes (1,048,576 bytes).megahertz (MHz)   A measurement of electrical frequency equal to onemillion cycles per second.microphone    Using the Speaker Phone application, the microphoneallows a user to talk to another person.Microsoft Windows and Windows 95   An operating environment forMS-DOS used on IBM-compatible computers that provides users withgraphical windows in which to do their work. All Windowsapplications have consistent features such as command menus,windows, and dialog boxes. mouse pointer and buttons   On the mobile computer, the integratedmouse pointer is located directly below the spacebar on the keyboard.The left and right mouse buttons are located on either side of themouse pointer. MS-DOS   Microsoft Disk Operating System. The standard, single-useroperating system of IBM-compatible computers.Nickel Metal Hydride battery (NiMH)  The standard types ofrechargeable batteries used in the mobile computer.  on/off light   The left-most light on the indicator panel, this lightilluminates when you turn on the mobile computer; it also blinks to letyou know the battery is getting low.online help   A help utility available on-screen while you are using anapplication.
164X-C 6250 Pro Users Manual79-0003-003   22 October 1999operating system   A set of programs that manage the overall operationof the computer.parallel port   A port that can be used to connect a printer. PC card   A self-contained, credit card-sized device that can be used tostore programs, data, or to expand the capabilities of your computer.port   An interface between the computer and external devices.Power On Self Test (POST)   A diagnostic test run by the computersBIOS system when the computer restarts.power port   A port used to connect the external power supply to themobile computer.radio on/off light   The right-most light on the indicator panel. If yourcomputer is equipped with a radio modem, this light turns on whenthe radio modem is powered on. When the computer is off, the lightblinks to indicate a message is waiting.Random Access Memory (RAM)   The computers primary workingmemory in which program instructions and data are stored so theyare accessible directly to the central processing unit (CPU).RJ-11 connector   A port used by the internal modem to communicateover standard voice grade telephone lines. ruggedized   The unique design of mobile computers that are built towithstand rugged and rough environments.serial port   A port that can be used to connect a printer or modem. slow charge   A method of increasing the battery capacity while thecomputer is attached to external power. This method uses lower ACvoltage. It takes approximately 16 hours to fully charge the batteryusing this method.software    System, utility, or application programs expressed in acomputer-readable language. Software programs tell the hardwarecomponents what to do.speaker   Located on the bottom of the computer, the speaker providessound for the unit.
165Appendix C.  Glossary79-0003-003   22 October 1999Speaker Phone application   The Speaker Phone application is aseparate program that allows you to dial a number and talk withanother person over telephone lines. To run this application, double-click the Speaker Phone icon in the Mobile Computer Tools folder. stand alone charger   An optional charging device used to charge anadditional battery for the computer. suspend mode   Suspend mode turns off certain functions of thecomputer if there is no activity for a user-specified time. Thecomputer also enters suspend mode if the battery capacity becomescritically low and external power is not connected or the battery is notreplaced. Some systems do not automatically enter suspend modewhen they are connected to external power.System Configuration Utility (SCU)    A utility that allows you tochange default settings for your hardware options and powermanagement.Taskbar   In Windows 95, the area along the bottom of the screen thatcontains the Start button and buttons for windows, documents, orapplications that are open.utility   A program that helps you maintain and improve the efficiencyof the computer system.vehicle adapter   An optional device that supplies power from thevehicle battery to operate the computer and charge the batteryinstalled in the unit. It typically connects to the vehicle battery usingthe cigarette lighter socket. vehicle cradle   An optional, vehicle-based docking station designed tosafely secure the computer in a vehicle. You can also use the vehiclecradle to charge batteries, communicate with other devices, andaccess information from a CD-ROM. Video Graphics Array (VGA)   Video graphics technology that supportsup to 256 colors and a graphics resolution of 640 x 480 pixels.video port   This port can be used to connect an external monitor.
166X-C 6250 Pro Users Manual79-0003-003   22 October 1999
WE KNOW THE ROADTMIndexSymbols15-pin video port  1725-pin parallel port  179-pin serial port  17AAC adapter  39, 84defined  161accessoriesoptional  20, 92adjusting display contrast  32, 42adjusting mouse movement  35adjusting volume  32antennaillustrated  17position  50applicationsBattery Maintenance  21, 82, 85, 162Battery Status  21, 82, 162defined  161HyperTerminal  21Keyboard Status  21Radio Status  52applications (continued)Speaker Phone  21, 165troubleshooting  138ARDIS radio, registering  48ATA cards. See PC cardsaudio port, illustrated  17Bbacklight  42, 81adjusting  31changing time-out setting  58defined  161batterycharging  40, 41, 84, 98conserving power  79, 80deep cycle discharging  85, 162disposing of  86extending life  79installing  40, 83light  19low battery indicators  19low battery warnings  80maintenance  86, 119Nickel Metal Hydride (NiMH)  40, 163
168X-C 6250 Pro Users Manual79-0003-003   22 October 1999batteryrecycling  86replacing  83storage and care  86, 119temperatures  77, 141tips  74troubleshooting  141battery doorillustrated  17opening  83, 152Battery Maintenance application21, 82, 85, 162Battery Status application  21, 82, 162brightness, display  42Ccables, parallel and serial  65, 71calibrating the touch screen  23Caps Lock mode  28CD-ROMexternal  97vehicle cradle  106CDPD radio, registering  49cellular modem, registering  48, 49changing power management options  58changing the speed of the mouse  35chargersAC adapter  84stand alone  98vehicle adapter  99vehicle cradle  102charging batteries  40, 41, 84, 98cleaning the computer  120, 121COM3 IRQ, setting  60COM4 IRQ, setting  60compliance statements  iiiconnecting a printer  92connecting an external monitor  93connecting an external mouse  93connecting optional equipment and accessories92connecting two computers  65conserving power  79, 80copying files  64using an external CD-ROM  97using an external floppy disk drive  95using Direct Cable Connection  65using PC cards  89using the internal landline modem  114using the vehicle cradle CD-ROM  106customizing settings  58Ddeep cycle discharging  85, 162default settings, changing  58Direct Cable Connection  65Direct Parallel Cable  68, 71Direct Serial Cable  65, 72disk activity light  19displayadjusting contrast  32, 42backlight  81, 161calibrating the touch screen  23cleaning  121if you have a touch screen  43illustrated  17MaxBright  31troubleshooting  143disposing of batteries  86DOS utilities  22Eerror messages  126extending battery life  79external floppy disk drive  95external monitor, connecting  93external mouse  93external powerAC adapter  84defined  162indicator light  19vehicle adapter  99vehicle cradle  102
169Index79-0003-003   22 October 1999FFCC statements  iiifiles, copying  64, 89, 114floppy disk drive, external  95FN keys  31function keys  32Ggeneral description of the computer  17getting battery information  82getting started  39Hhard diskcare and handling  116defined  162troubleshooting  145hardware settings, changing defaults  58hardware, standard  20headset port, illustrated  17HyperTerminal application  21II/O portsillustrated  17troubleshooting  145if you have a touch screen  43important battery tips  74indicator lights  19, 41defined  163illustrated  17installing batteries  40, 83installing software  64IRQ settings  60Kkeyboardbasics  26cleaning  121illustrated  17, 26troubleshooting  147using  26, 31Keyboard Status application  21keysFN  31numeric  30summary table  31Llandline modem  113, 148LED. See indicator lightslights. See See indicator lightslow battery indicators  19low battery warnings  80Mmaintaining batteries  86, 119MaxBright  31, 42, 82memory  20messages, error  126microphone, illustrated  17Microsoft Windows, defined  163mobile computercleaning  120, 121connecting peripherals  92connecting to telephone line  113features  17illustrated  17indicator lights  19keys  26memory  20operating the first time  39overview  17power-saving features  80processor  20restarting  26special keys  31standard hardware and software  20storing  123turning on and off  31modemdetermining type  112internal landline  113radio  48surge protection  108troubleshooting  143, 148, 157
170X-C 6250 Pro Users Manual79-0003-003   22 October 1999monitor, external  93mouseadjusting movement  35connecting external  93defined  163how to use  34illustrated  17MS-DOS messages  132MS-DOS utilities  22NNickel Metal Hydride (NiMH) battery  40defined  163maintaining  86, 119tips  74Num Lock mode  30numeric keypad  26, 30Ooptional equipment and accessories  20, 92optional hardware and software  20Pparallel cable  68, 71parallel portconnecting a printer  92defined  164illustrated  17password security  44PC card door and slots, illustrated  17PC cardsbootable  90inserting  88troubleshooting  155using to transfer files  89pen/touch screen  43calibrating  23cleaning  116troubleshooting  157peripheralsconnecting  92surge protection  108power, conserving  79power management. See also battery: tipsAC adapter  39changing options in the SCU  58power portcleaning  121illustrated  17power surges, protecting equipment from  108precautions  38printer  92problems, solutions to  136, 137processor  20protecting equipment from power surges  108Rradio modemadditional documentation  55antenna position  50capabilities  49enabling  51, 53indicator light  19registering  48software  53, 54troubleshooting  160Radio Status application  52RAM radio, registering  48recycling batteries  86replacing the battery  83restarting the computer  26resuming  42RJ-11 connector  113cleaning  121defined  164illustrated  17
171Index79-0003-003   22 October 1999Ssafety information  viscreen. See See display. See displayselecting a surge suppresser  108serial cable  65, 72serial portconnecting a printer  92connecting an external mouse  93defined  164illustrated  17radio settings  51settings, changing defaults  58softwareinstalling  64radio  53, 54standard  21speaker, illustrated  17Speaker Phone application  21, 165stand alone charger  98, 165standard hardware  18standard software  21startup instructions  39startup problems, solutions to  43storing batteries  86, 119storing the computer  123stylus, using  43surge suppressors  108suspend mode  80, 165System Configuration Utility (SCU)  58accessing  59defined  165Ttelephone line, connecting  113temperaturesbattery  74, 77, 140operating  120storing the computer  123tips, battery  74touch screen  43calibrating  23cleaning  116troubleshooting  157transferring files  64using an external CD-ROM  97using an external floppy disk drive  95using Direct Cable Connection  65using PC cards  89using the internal landline modem  114using the vehicle cradle CD-ROM  106troubleshootingcommon solutions  137what to try first  136turning MaxBright on and off  31, 42turning the backlight on and off  31, 42turning the computer on and off  42UUSB port, illustrated  17Vvehicle adapter  99, 165vehicle cradle  102, 165video port  17, 93volume, adjusting  32Wwireless network providers  48
172X-C 6250 Pro Users Manual79-0003-003   22 October 1999
Itronix CorporationP.O. Box 179Spokane, WA   99210-0179www.itronix.com79-0003-003

Navigation menu