Furuno USA 9ZWDSC60 Maritime DSC controller With MF/HF Watchkeeping Receiver User Manual dsc60 Part 2 of 2
Furuno USA Inc Maritime DSC controller With MF/HF Watchkeeping Receiver dsc60 Part 2 of 2
Contents
- 1. DSC60
- 2. dsc60 - Part 1 of 2
- 3. dsc60 Part 2 of 2
dsc60 Part 2 of 2
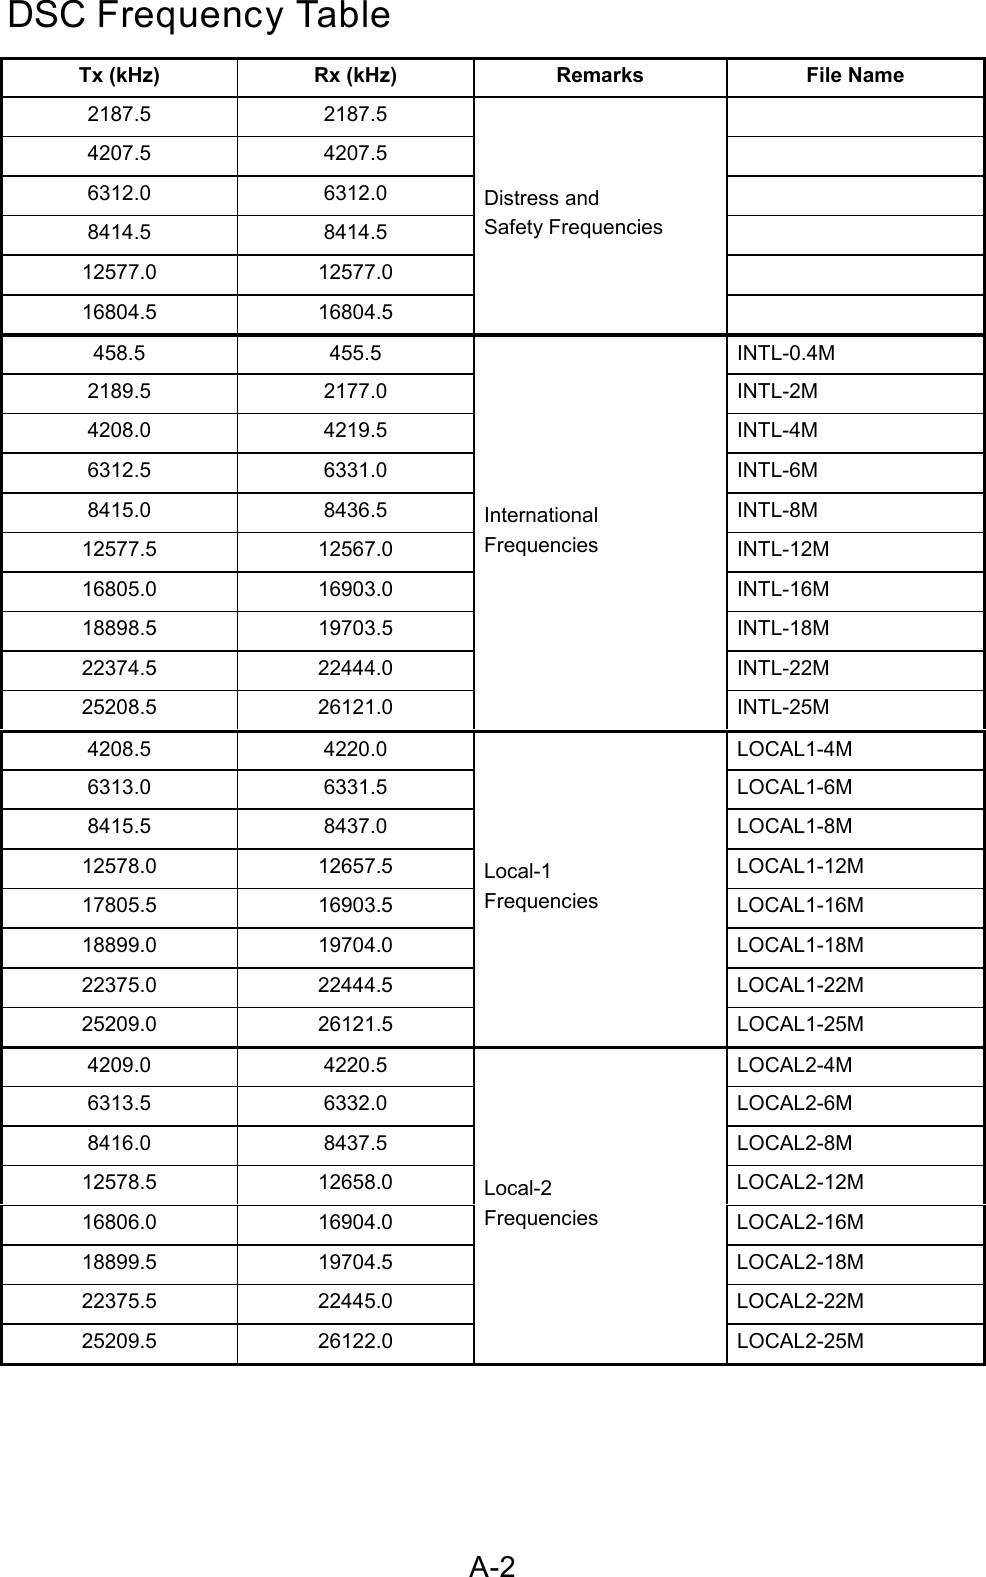
![5-1 5. LOG FILEThe log file stores routine received messages (messages other than Distress), received distressmessages and transmitted messages, each in its own separate log.5.1 Log File DescriptionThree memory banks are provided for storage of messages: received ordinary log, receiveddistress log and transmitted log. Each memory bank stores 50 messages, on a first-in, first-outbasis. This means that a latest message is saved as log no.1 and the log no. of all previousmessages in that memory bank increments by one. When the storage capacity is exceeded theoldest message is deleted to make room for the latest. Any unread messages are retained, andmarked with *.5.2 Opening a Log File5.2.1 Distress log1. Press the [0/LOG] key to open the log file menu.8436.535˚00.000N 135˚00.000E 23:59WATCH KEEPING21168DISTROUT2116903.0 12657.0VOLUMESelect log file RECEIVED ORDINARY RECEIVED DISTRESS TRANSMITTED222. Select RECEIVED DISTRESS and press the [ENT] key. Use or to scroll the log asdesired.Scroll with or .* Rcvd distress log *02.JUL-23-19:56 DISTRESS03.JUL-23-13:45*RELAY ALL04.JUL-23-11:52 RELAY AREA05.JUL-23-11:43 RELAY GRP06.JUL-22-21:18 RELAY INDV01.JUL-23-19:58 ACKNOWLEDG* Rcvd distress log *46.JUN-29-19:56*RELAY ALL47.JUN-29-19:48*DISTRESS48.JUN-29-19:44*DISTRESS49.JUN-26-12:36*ACKNOWLED45.JUL-01-23:45*RELAY ALL 50.JUN-26-12:34*DISTRESS OLD NEW DELETE OLD NEW DELETE3. To view a file, select it and press the [ENT] key. To return to the distress log, press the[CANCEL] key.](https://usermanual.wiki/Furuno-USA/9ZWDSC60.dsc60-Part-2-of-2/User-Guide-91742-Page-1.png)
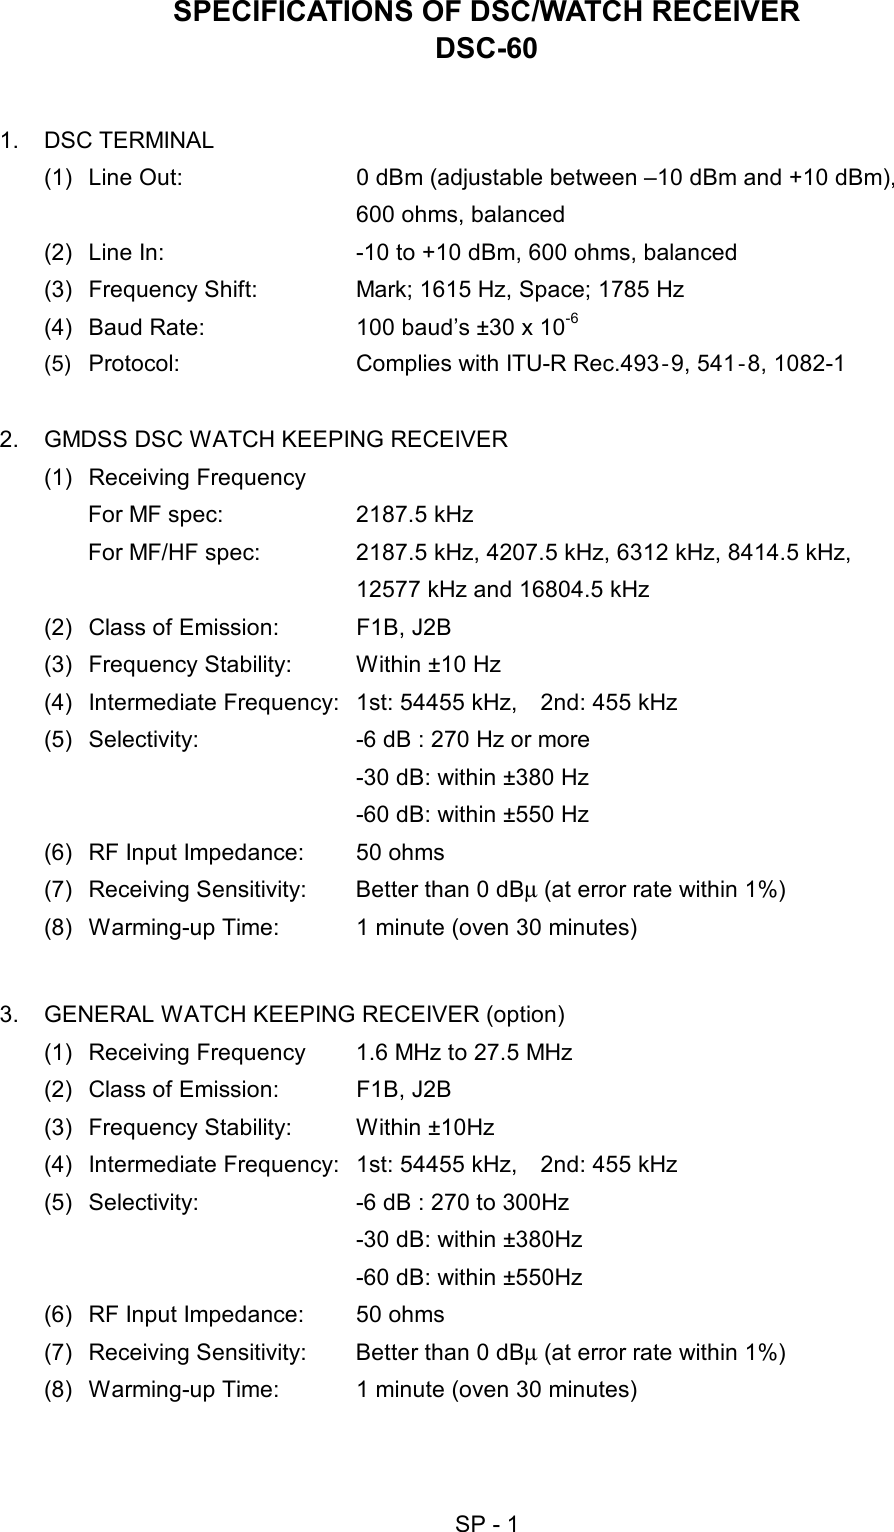
![5-2Select file,press [ENT]to view.* Rcvd distress log *46.JUN-29-19:56 *RELAY ALL47.JUN-29-19:48*DISTRESS48.JUN-29-19:44*DISTRESS49.JUN-26-12:36*ACKNOWLED45.JUL-01-23:45*RELAY ALL50.JUN-26-12:34*DISTRESS* Received message *JUN-26-1999-12:34:56 ECC: OKDISTRESS CALL ANSWERSHIP IN DIST : 987654321NATURE : UNDESIGNATEDPOS : 12˚34N 123˚45E AT 12:34 TELEPHONE 2182.0 KHZ ALL VIEW OLD NEW DELETE4. To delete a file, select it, press to select DELETE, and press the [ENT] key. The log filesare renumbered to reflect the deletion.Note: Unread files cannot be deleted.Select file to delete,press to selectDELETE, press[ENT] to delete.* Rcvd distress log * 46.JUN-29-19:56*RELAY ALL47.JUN-29-19:48*DISTRESS48.JUN-29-19:44*DISTRESS49.JUN-26-12:36*ACKNOWLED45.JUL-01-23:45*RELAY ALL 50.JUN-26-12:34*DISTRESS* Rcvd distress log * 46.JUN-29-19:56*RELAY ALL47.JUN-29-19:48*DISTRESS48.JUN-29-19:44*DISTRESS49.JUN-26-12:36*ACKNOWLED45.JUL-01-23:45 DELETE*RELAY ALL44.JUL-01-12:34*RELAY ALL OLD NEW OLD NEW DELETE](https://usermanual.wiki/Furuno-USA/9ZWDSC60.dsc60-Part-2-of-2/User-Guide-91742-Page-2.png)
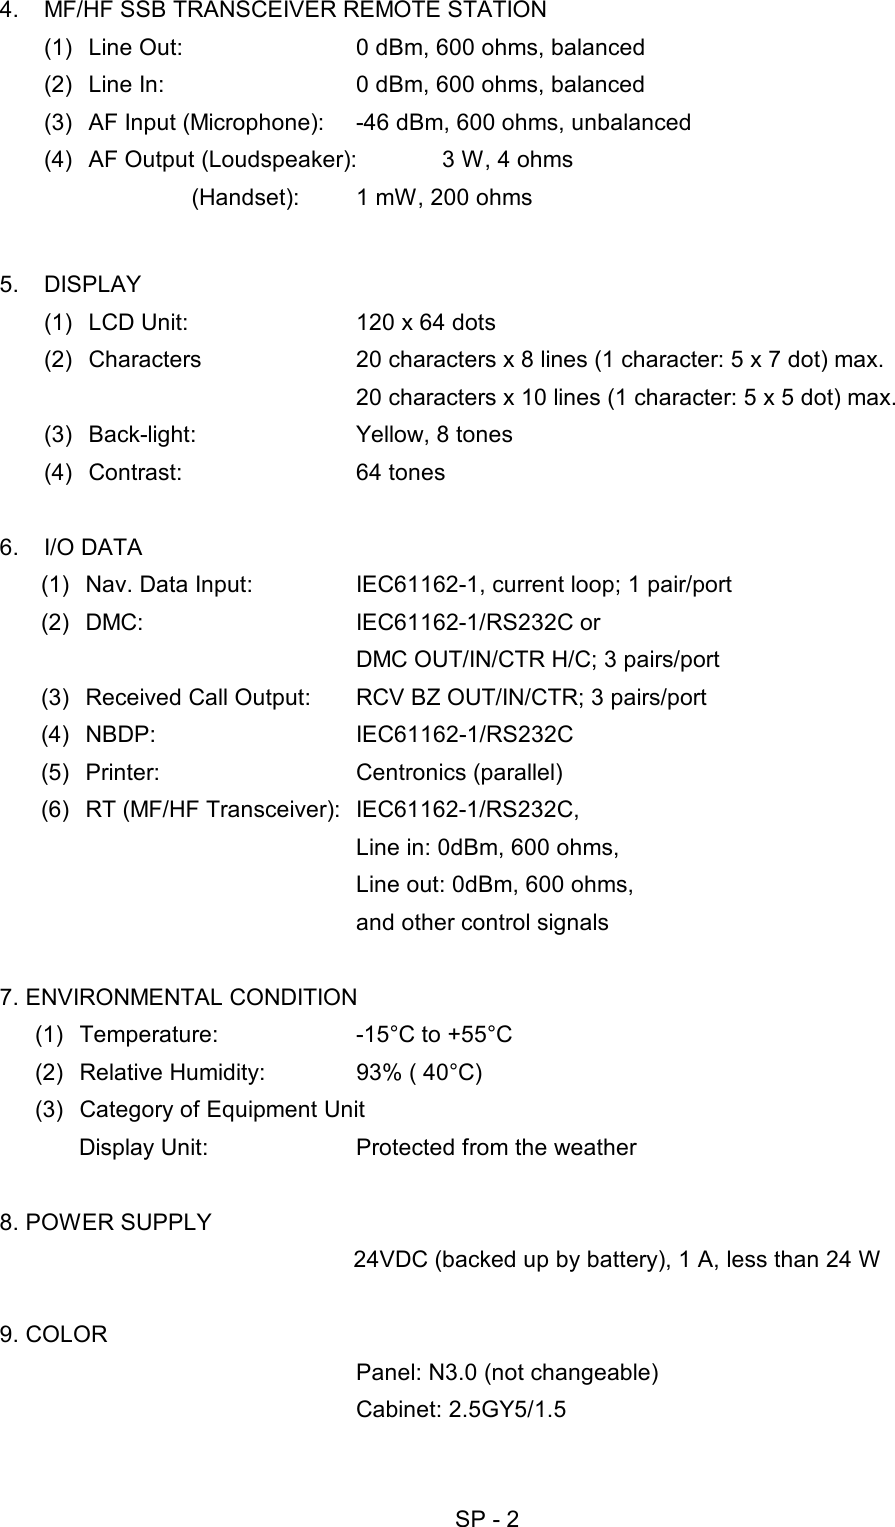
![5-35.2.2 Ordinary log1. Press the [LOG] key to open the log file menu.8436.535˚00.000N 135˚00.000E 23:59WATCH KEEPING21168DISTROUT2116903.0 12657.0VOLUMESelect log file RECEIVED ORDINARY RECEIVED DISTRESS TRANSMITTED222. Press the [ENT] key to open the received ordinary log.* Rcvd ordinary log 02.JUL-23-23:41 PSTN CALL03.JUL-23-21:34 TEST CALL04.JUL-22-12:34 ALL SHIPS05.JUL-13-18:21*GROUP CALL06.JUN-29-11:23 AREA CALL01.JUL-23-23:55*INDIVIDUAL OLD NEW DELETE3. Use or to scroll the log.4. To view the contents of a file, select it and press the [ENT] key. To return the ordinary log,press the [CANCEL] key.* Rcvd ordinary log 46.MAY-12-03:31 NEUTRAL47.APR-24-01:54 MEDICAL48.MAR-27-22:09*INDIVIDUAL49.FEB-13-18:17 INDIVIDUAL45.JUN-29-20:49*POLLING 50.JAN-11-11:23 *ALL SHIPSJAN-11-1999-11:23:45 ECC: OKALL SHIPS CALL FROM SHIP : 234567890 SAFETY TELEPHONE 2182.0 KHZ* Received message *GO TO ALL VIEW[ENT] toview file. OLD NEW DELETE5. To delete a file, select it, press to select DELETE, and press the [ENT] key. The log filesare renumbered to reflect the deletion.Note: Unread files cannot be deleted.* Rcvd ordinary log 46.MAY-12-03:31 NEUTRAL47.APR-24-01:54 MEDICAL48.MAR-27-22:09*INDIVIDUAL49.FEB-13-18:17 INDIVIDUAL45.JUN-29-20:49*POLLING 50.JAN-11-11:23 ALL SHIPSDELETE* Rcvd ordinary log 46.MAY-12-03:31 NEUTRAL47.APR-24-01:54 MEDICAL*INDIVIDUAL 44.JUL-01-23:45 INDIVIDUAL 45.JUN-29-20:49*POLLING 48.MAR-27-22:09 49.FEB-13-18:17 INDIVIDUAL Select file, press toselect [DELETE],and press [ENT[. OLD NEW OLD NEW DELETE](https://usermanual.wiki/Furuno-USA/9ZWDSC60.dsc60-Part-2-of-2/User-Guide-91742-Page-3.png)
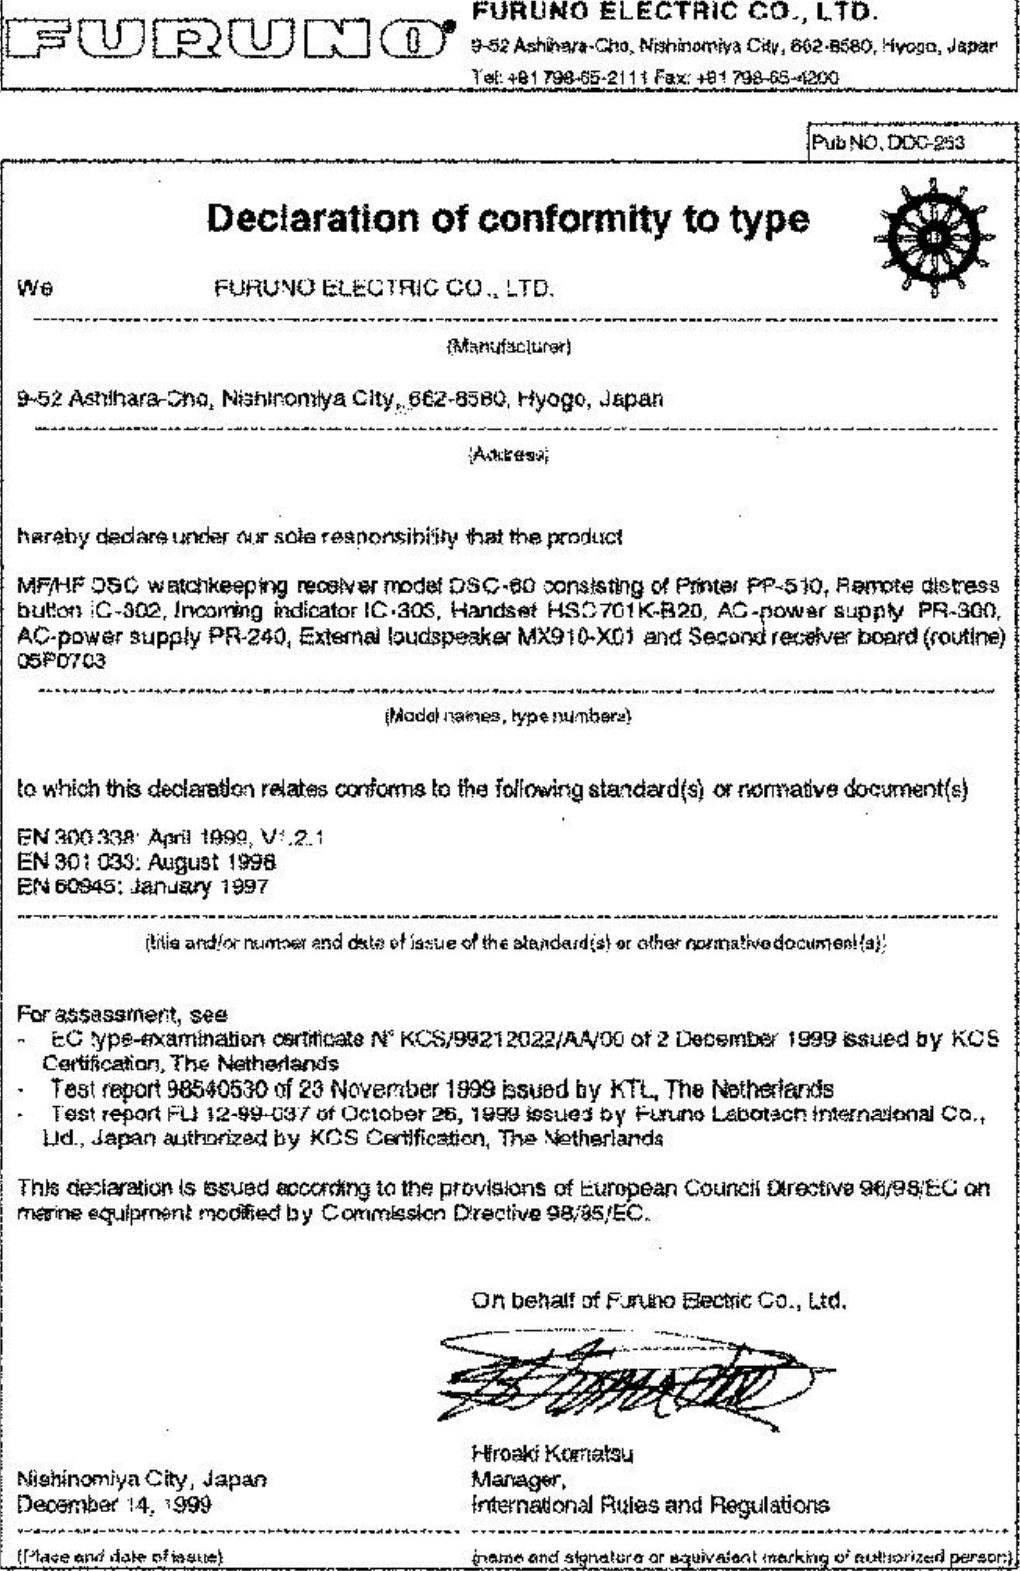
![5-45.2.3 Transmitted log1. Press the [LOG] key to open the log file menu.8436.535˚00.000N 135˚00.000E 23:59WATCH KEEPING21168DISTROUT2116903.0 12657.0VOLUMESelect log file RECEIVED ORDINARY RECEIVED DISTRESS TRANSMITTED222. Select TRANSMITTED and press the [ENT] key.** Transmitted log *02.JUL-23-23:41 PSTN CALL03.JUL-23-21:34 TEST CALL04.JUL-22-12:34 ALL SHIPS05.JUL-13-18:21*GROUP CALL06.JUN-29-11:23 AREA CALL01.JUL-23-23:55*INDIVIDUAL OLD NEW DELETE3. Use or to scroll the log.4. To view the contents of a file select it and press the [ENT] key.** Transmitted log *02.JUL-23-23:41 PSTN CALL03.JUL-23-21:34 TEST CALL04.JUL-22-12:34 ALL SHIPS05.JUL-13-18:21 *GROUP CALL06.JUN-29-11:23 AREA CALL01.JUL-23-23:55 *INDIVIDUAL Select file,press [ENT]to view.MAY-12-1999-03:31:45 UNABLE ACKNO REASON GIVEN TO SHIP : 234567890 ROUTINE * Xmitted message *RE-SEND ALL VIEW OLD NEW DELETE5. To delete a file, select it, press to select DELETE, and press the [ENT] key. The log filesare renumbered to reflect the deletion. Note: Unread files cannot be deleted.6. To re-send a file do the following:a) Do steps 1-4 above to select file to re-send.b) Press to select RE-SEND.c) Press the [ENT] key.d) Press the [CALL] key.](https://usermanual.wiki/Furuno-USA/9ZWDSC60.dsc60-Part-2-of-2/User-Guide-91742-Page-4.png)
![6-1 6. PREPARING SEND MESSAGESIn Chapter 3 you learned how to manually send individual, group and area calls. In this chapteryou will learn how to send prepare and send them automatically, using prepared messages (files).50 such files can be stored for future use.6.1 Preparing Individual Call Messages1. Press the [#/SETUP] key to open the Setup menu.2. Select MESSAGE and press the [ENT] key.3. Press the [ENT] key to open the CALL TYPE menu.* Message file entry CALL TYPE STATION ID COM. TYPE COM. FREQ DSC FREQ: INDIVIDUAL : --------- : TELEPHONE : NO INFO : 2M-INTLINDIVIDUALPSTN CALLGROUP CALLAREA CALL4. Use or to select INDIVIDUAL and press the [ENT] key.5. Press to select STATION ID and press the [ENT] key.* Message file entry CALL TYPE STATION ID COM. TYPE COM. FREQ DSC FREQ: INDIVIDUAL : --------- : TELEPHONE : NO INFO : 2M-INTL0000000006. Key in ID of station which is to receive the call and press the [ENT] key.7. Press to select COM. TYPE and press the [ENT] key.* Message file entry CALL TYPE:STATION ID COM. TYPE COM. FREQ DSC FREQ INDIVIDUAL : 001234567 : TELEPHONE : NO INFO : 2M-INTLTELEPHONENBDP-ARQNBDP-FEC](https://usermanual.wiki/Furuno-USA/9ZWDSC60.dsc60-Part-2-of-2/User-Guide-91742-Page-5.png)
![6-28. Press to select COM. FREQ and press the [ENT] key. Choose appropriate item and pressthe [ENT] key.* Message file entry CALL TYPE: STATION ID COM. TYPE COM. FREQ DSC FREQ INDIVIDUAL : 123456789 : TELEPHONE : NO INFO : 2M-INTLNO INFOFREQUENCYCHANNELPOSITION9. Press to select DSC FREQ and press the [ENT] key.* Message file entry CALL TYPE STATION ID COM. TYPE COM. FREQ DSC FREQ: INDIVIDUAL : 001234567 : TELEPHONE : NO INFO : 2M-INL6 MHZ8 MHZ12 MHZ4 MHZ2 MHZ 16 MHZ18 MHZ22 MHZ25 MHZOTHERMANUALUse to scrollmenu. 10. Select appropriate frequency and press the [ENT] key.11. Enter file name and file number as shown on the next page.](https://usermanual.wiki/Furuno-USA/9ZWDSC60.dsc60-Part-2-of-2/User-Guide-91742-Page-6.png)
![6-3GO TO NEXT FILE* Message file entry FURUNO NO001 file entered* Message file entry FILE NAME: ----------------FILE NUMBER : ---FILE ENTRYHow to Enter File Name and Number1. Press to scroll the display and then press the [ENT] key.2. Use the numeric keys and cursor pad to enter file name (max. 16 characters) and press the [ENT] key. For example, enter FURUNO as the file name. (If the file name exists the message "Duplicate name! Overwrite OK?" appears. Press [ENT] to write over the name, or press the [CANCEL] key to escape.)3. Press followed by the [ENT] key. Key in file number in three digits with the numeric keys, and press the [ENT] key. For example, press [0] [0] [1] to enter file number 001.4. Press the [ENT] key. The display shows the name and file number entered. 5. Press the [ENT] key to continue.How to enter "FURUNO" as file nameHow to assign file name[1_] key : 1→_→1[2ABC] : 2→A→B→C→2[3DEF] : 3→D→E→F→3[4GHI] : 4→G→H→I→4[5JKL] : 5→J→K→L→5[6MNO] : 6→M→N→O→6[7PQRS] : 7→P→Q→R→S→7[8TUV] : 8→T→U→V→8[9WXYZ]: 9→W→X→Y→Z→9[0_] : 0→_→01. Press or to select location.2. Press appropriate key.1. Press the [3] key to display F.2. Press.3. Press the [8] key to select U.4. Press.6. Press the [7] key to select R.7. Press.8. Press the [8] key to select U.7. Press .8. Press the [6] key to select N.9. Press.10. Press the [6] key to select O.FILE ENTRY: FURUNO* Message file entry FILE NAMEFILE NUMBER : ---000](https://usermanual.wiki/Furuno-USA/9ZWDSC60.dsc60-Part-2-of-2/User-Guide-91742-Page-7.png)
![6-46.2 Preparing Group Call Messages1. Press the [#/SETUP] key to open the Setup menu.2. Select MESSAGE and press the [ENT] key.3. Press the [ENT] key to open the CALL TYPE menu.* Message file entry CALL TYPE STATION ID COM. TYPE COM. FREQ DSC FREQ: INDIVIDUAL : --------- : TELEPHONE : NO INFO : 2M-INTLINDIVIDUALPSTN CALLGROUP CALLAREA CALL4. Use or to select GROUP CALL and press the [ENT] key.5. Press to select GROUP ID and press the [ENT] key.* Message file entry CALL TYPE: GROUP ID COM. TYPE COM. FREQ DSC FREQ GROUP CALL: 0 -------- : TELEPHONE : NO INFO : 2M-INTL 000000000 6. Key in ID of group which is to receive the call and press the [ENT] key.7. Press to select COM. TYPE and press the [ENT] key.* Message file entry CALL TYPE: GROUP ID COM. TYPE COM. FREQ DSC FREQ GROUP CALL: 001234567 : TELEPHONE : NO INFO : 2M-INTLTELEPHONENBDP-FEC8. Select appropriate communications type and press the [ENT] key.9. Press to select COM. FREQ and press the [ENT] key. Choose appropriate item and pressthe [ENT] key.* Message file entry CALL TYPE: GROUP ID COM. TYPE COM. FREQ DSC FREQ GROUP CALL : 123456789 : TELEPHONE : NO INFO : 2M-INTLNO INFOFREQUENCYCHANNELPOSITION10. Press to select DSC FREQ and press the [ENT] key.](https://usermanual.wiki/Furuno-USA/9ZWDSC60.dsc60-Part-2-of-2/User-Guide-91742-Page-8.png)
![6-5* Message file entry CALL TYPE GROUP ID COM. TYPE COM. FREQ DSC FREQ: INDIVIDUAL : 001234567 : TELEPHONE : NO INFO : 2M-INTL6 MHZ8 MHZ12 MHZ4 MHZ2 MHZ 16 MHZ18 MHZ22 MHZ25 MHZOTHERMANUALUse to scrollmenu. 11. Select appropriate frequency and press the [ENT] key.12. Follow “How to Enter File Name and Number” on page 6-3 to enter file name and number.Note: Your ship’s group ID will be as registered as entered in step 6 of this procedure.6.3 Preparing Geographic Area Call Messages1. Press the [#/SETUP] key to open the Setup menu.2. Select MESSAGE and press the [ENT] key.3. Press the [ENT] key to open the CALL TYPE menu.* Message file entry CALL TYPE STATION ID COM. TYPE COM. FREQ DSC FREQ: INDIVIDUAL : --------- : TELEPHONE : NO INFO : 2M-INTLINDIVIDUALPSTN CALLGROUP CALLAREA CALL4. Use or to select AREA CALL and press the [ENT] key.5. Press to select AREA and press the [ENT] key.* Message file entry CALL TYPE: AREA COM. TYPE COM. FREQ DSC FREQ AREA CALL: --˚N ---˚E ↓ --˚ → -- ˚: TELEPHONE : NO INFO : 2M-INTL00˚N 000˚E ↓ 00˚ → 00˚6. Select location where to enter data with or , set value with numeric keys and press the[ENT] key.](https://usermanual.wiki/Furuno-USA/9ZWDSC60.dsc60-Part-2-of-2/User-Guide-91742-Page-9.png)
![6-67. Press to select COM. TYPE and press the [ENT] key.* Message file entry CALL TYPE: AREA: 34˚N 135˚W ↓10˚ →10˚ COM. TYPE COM. FREQ DSC FREQ INDIVIDUAL : TELEPHONE: NO INFO : 2M-INTLTELEPHONENBDP-FEC8. Press to select COM. FREQ and press the [ENT] key.* Message file entry CALL TYPE: AREA COM. TYPE COM. FREQ DSC FREQ AREA CALL: 34˚N 135˚E ↓ 05˚ → 05 ˚: TELEPHONE : NO INFO : 2M-INTLNO INFOFREQUENCYCHANNELPOSITION9. Press to select DSC FREQ and press the [ENT] key.* Message file entry *CALL TYPE AREA COM. TYPE COM. FREQ DSC FREQ: AREA CALL: 34˚N 123˚E ↓12 ˚ → 05 ˚: TELEPHONE : NO INFO : 2M-INTL6 MHZ8 MHZ12 MHZ4 MHZ2 MHZ 16 MHZ18 MHZ22 MHZ25 MHZOTHERMANUALUse to scrollmenu. 10. Select appropriate frequency and press the [ENT] key.11. Follow “How to Enter File Name and Number” on page 6-3 to enter file name and number.6.4 Preparing PSTN Call Messages1. Press the [#/SETUP] key to open the Setup menu.2. Select MESSAGE and press the [ENT] key.3. Press the [ENT] key to open the CALL TYPE menu.* Message file entry CALL TYPE STATION ID COM. TYPE COM. FREQ DSC FREQ: INDIVIDUAL : --------- : TELEPHONE : NO INFO : 2M-INTLINDIVIDUALPSTN CALLGROUP CALLAREA CALL4. Select PSTN CALL and press the [ENT] key.5. Press to select COAST ID and press the [ENT] key.](https://usermanual.wiki/Furuno-USA/9ZWDSC60.dsc60-Part-2-of-2/User-Guide-91742-Page-10.png)
![6-7* Message file entry CALL TYPE COAST ID TEL NO. : DSC FREQ: PSTN CALL: 0------- ----------------: 2M-INTL0000000006. Key in ID of coast station (seven digits) to send the call to and press the [ENT] key.7. Press to select TEL NO. and press the [ENT] key.* Message file entry CALL TYPE: COAST ID TEL NO. : DSC FREQ PSTN CALL: 001234567 : ----------------: 2M-INTL-----------------8. Key in telephone no. (max. 16 digits) and press the [ENT] key.9. Press to select DSC FREQ and press the [ENT] key.* Message file entry CALL TYPE: COAST ID TEL NO. : PSTN CALL 001234567 1234567890---DSC FREQ : 2M-INTL TL6 MHZ8 MHZ12 MHZ4 MHZ2 MHZ 16 MHZ18 MHZ22 MHZ25 MHZOTHERMANUALUse to scrollmenu. 10. Select appropriate frequency and press the [ENT] key.11. Follow “How to Enter File Name and Number” on page 6-3 to enter file name and number.](https://usermanual.wiki/Furuno-USA/9ZWDSC60.dsc60-Part-2-of-2/User-Guide-91742-Page-11.png)
![6-86.5 Sending Prepared Messages1. Press the [*/FILE] key at the DSC standby screen to show the send message file list. Belowis an example of the send message file list.* Send message file * 001 - FURUNO JAPAN002 - FURUNO USA003 - FURUNO UK004 - FURUNO DENMARK005 - FURUNO NORWAY006 - FURUNO SPAIN007 - FURUNO FRANCE2. Select file with or . (You can also select a file by entering its number with the numerickeys and pressing the [ENT] key.)3. Press the [CALL] key to send the file.](https://usermanual.wiki/Furuno-USA/9ZWDSC60.dsc60-Part-2-of-2/User-Guide-91742-Page-12.png)
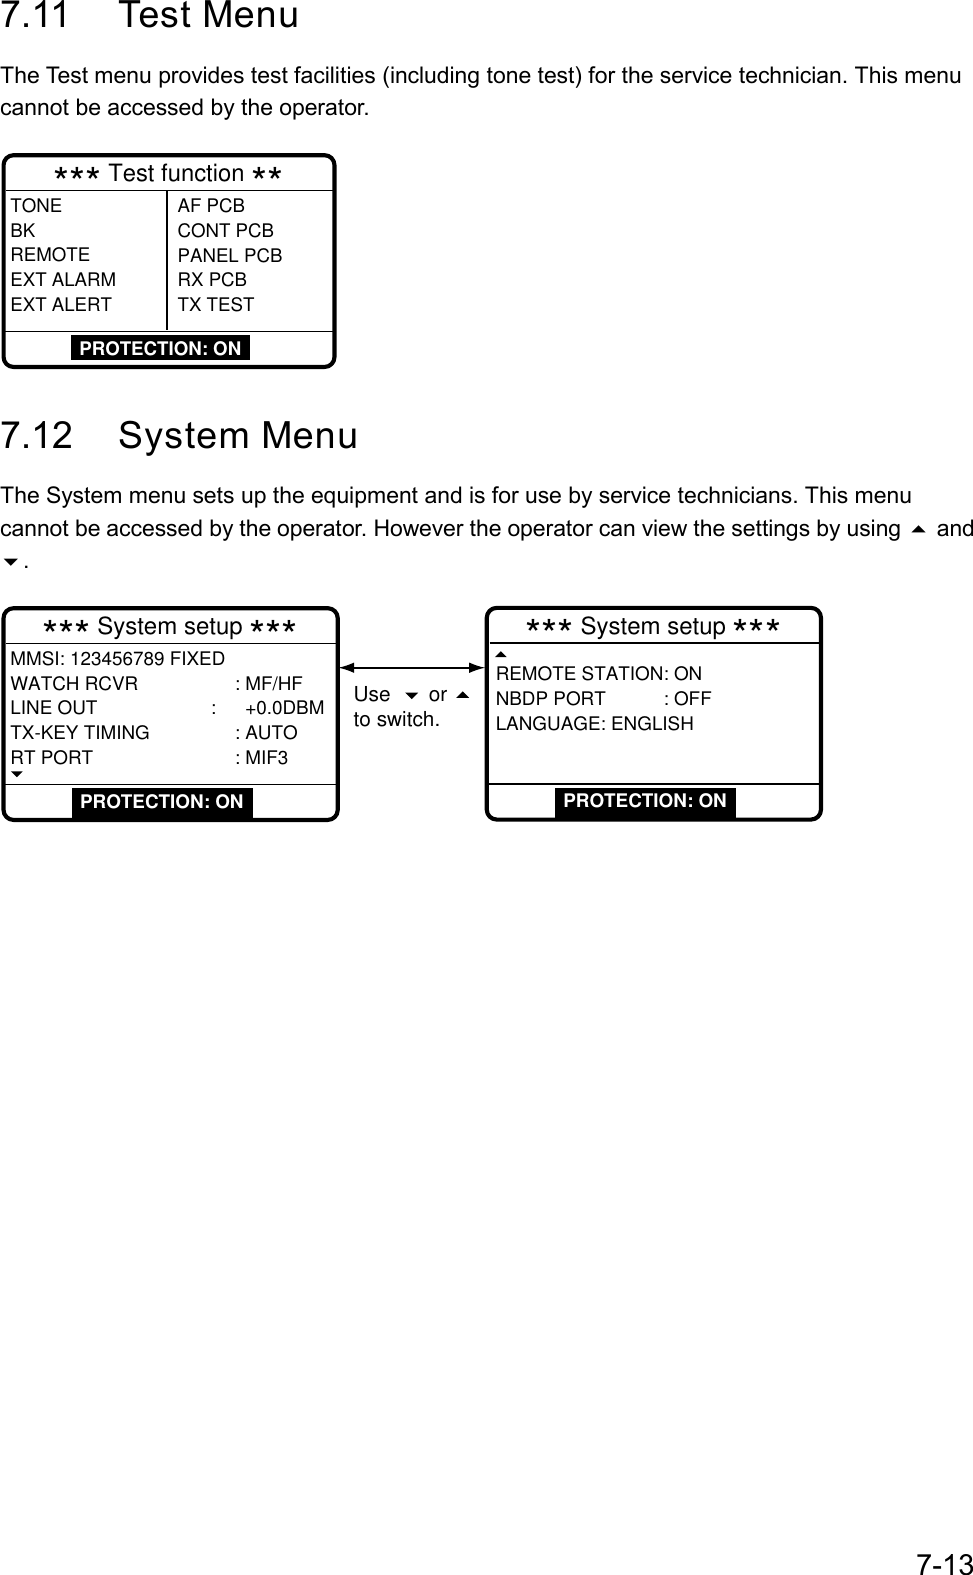
![7-1 7. SETUP MENU7.1 Setup Menu OverviewThe Setup menu, consisting of 11 menus, provides for set up of the equipment according toexpected usage and user's preferences.1. At the DSC standby screen, press the [#/SETUP] key to display the Setup menu.**** Setup menu ****SCAN FREQ USER CH VOLUME TEST SYSTEMALARM AUTO ACK ERASE FILE MESSAGE POSITION PRINT OUT2. Use the Cursor Pad to select a menu and press the [ENT] key. For example, select theVOLUME menu.KEY CLICK HANDSET ORDINARY ALARM DISTRESS ALARM: ON : 40 : 30 : 63*** Volume setup ***3. Use the Cursor Pad to choose item and press the [ENT] key. For example, select KEYCLICK. A pop-up window showing choices appears.KEY CLICK HANDSET ORDINARY ALARM DISTRESS ALARM: ON : 40 : 30 : 63*** Volume setup ***ONN OFF4. Use or to choose option desired and press the [ENT] key.5. Press the [CANCEL] key twice to close the menu and return to the DSC standby screen.](https://usermanual.wiki/Furuno-USA/9ZWDSC60.dsc60-Part-2-of-2/User-Guide-91742-Page-13.png)
![7-27.2 Alarm MenuThe Alarm menu enables/disables internal and external alarms. Note that the Distress/Urgencyalarm cannot be disabled. Press the [#/SETUP] key, select ALARM and press the [ENT] key todisplay the Alarm menu.35˚00.000N 135˚00.000E 23:59WATCH KEEPING2187.5 4207.5 6312.08414.516804.5 12577.0DISTRESSROUTINE2177.0 4219.5 6331.08436.516903.0 12657.0VOLUME**** Alarm setup ***INTERNAL AUDIO ALARM RCVD CALL OLD POSITION POSITION OLDER EXT ALARM : DSTRS/URG: ON : ON : 4.0 HOFFONOFFON3.02.01.00.54.0ROUTINEALLOFFDSTRS/URG35˚00.000N 135˚00.000E 23:59WATCH KEEPING2187.5 4207.5 6312.08414.516804.5 12577.0DISTRESSROUTINE2177.0 4219.5 6331.08436.516903.0 12657.0VOLUMEWarning forold position!Default: ONDefault: ONDefault: ONDefault: DSTRS/URGDisables/enables alarm for received Safety, Ship's Business and Routine messages.Disables/enables old position alarm, which alerts the operator when position data is older by the number of hours or minutes set in the Position Older field.Alarm is output when position is older by the number of hours set here.Sets type of message to be output to the IC-303 incoming Indicatior.DSTRS/URG: Distress or urgency message output upon receipt.ROUTINE: Routine message output upon receipt.ALL: All messages output.OFF: No output.Note: Alarm for Distress and Urgency messages cannot be disabled, and its decibel level is fixed at 75-85 dB.Note: Authorities require that position be updated at least every four hours.2222AUTO ACKAUTO ACK or to set. or to set. or to set.](https://usermanual.wiki/Furuno-USA/9ZWDSC60.dsc60-Part-2-of-2/User-Guide-91742-Page-14.png)
![7-37.3 Auto Ack MenuThe Auto Ack menu enables/disables automatic acknowledgement of individual, position andpolling messages. Press the [#/SETUP] key, select AUTO ACK and press the [ENT] key todisplay the Auto Ack setup menu. See the next page for the Auto Ack menu.Comply type, automaticacknowledgeABLE UNABLEAUTO ACK Can send acknowledgeautomaticallyCannot send automaticacknowledgeMANUAL ACK Can send acknowledge manually Cannot send manualacknowledge](https://usermanual.wiki/Furuno-USA/9ZWDSC60.dsc60-Part-2-of-2/User-Guide-91742-Page-15.png)
![7-4Default: ABLE** Auto ack setup **COMPLY TYPE : ABLEUNABLE REASON :NO REASON GIVENPOSITION CALL : OFFPOLLING CALL : ON ABLEUNABLEChoose ABLE or UNABLE as automatic acknowledgement reply to Individual, Position and Polling messages.Note: Automatic acknowledge is automatically disabled when Rx message contains error, as required by law. Further, automatic acknowledge is disabled in case of OFF HOOK.Automatic acknowledge of Position or Polling request is not available when UNABLE is selected.Default: NO REASONNO REASONBUSYEQUIP DISABLEDMODE NOT USABLECH NOT USABLESets reason for UNABLE.Note: This menu is the same as manual acknowledgement. EQUIPMENT DISABLED is shown in messages when EQUIP DISABLED is selected.Default: ONOverrides/follows AUTO ACK setting in case of position.OFF: Disables automatic acknowledgement of position request.ON: Enables automatic acknowledgement of position request.[ENT] key[ENT] key[ENT] key[ENT] keyONOFFDefault: ONOverrides/follows AUTO ACK setting in case of polling.OFF: Disables automatic acknowledgement of polling request.ON: Enables automatic acknowledgement of polling request.ONOFF or to set. or to set. or to set. or to set.](https://usermanual.wiki/Furuno-USA/9ZWDSC60.dsc60-Part-2-of-2/User-Guide-91742-Page-16.png)
![7-57.4 Erase File MenuThe Erase File menu separately erases the entire contents of the received ordinary log, receiveddistress log, transmitted log, send messages and user channels. Press the [#/SETUP] key,select ERASE FILE and press the [ENT] key to display the Erase File menu. Select the item toerase and press the [ENT] key.**** Erase file ****RCVD ORDINARY LOG?RCVD DISTRESS LOG?TRANSMITTED LOG?SEND MESSAGE?USER CHANNEL?To cancel, press [ENT] or [CANCEL].Item selected for erasureappears in 2nd row. To erase, select YES with and press [ENT].ERASEXXXXXXXXXXXXXXXXX.ARE YOU SURE?YES NO[ENT] key7.5 Message MenuThe Message menu prepares and stores messages for later transmission. Press the [#/SETUP]key, select MESSAGE and press the [ENT] key to display the Message menu. For further detailssee Chapter 6.](https://usermanual.wiki/Furuno-USA/9ZWDSC60.dsc60-Part-2-of-2/User-Guide-91742-Page-17.png)
![7-67.6 Position MenuPosition and time are entered (automatically or manually) on the Position menu. Manually enterposition and time when the DSC-60 is not interfaced with EPFS or the EPFS is not working.Press the [#/SETUP] key, select POSITION and press the [ENT] key to display the Positionmenu. For further details see Paragraph 2.10 “Manual Input of Position and Time” on page 2-10.7.7 Print Out MenuThe Print Out menu enables/disables automatic printing of transmitted and received messagesand the results of the daily test. Press the [#/SETUP] key, select PRINT OUT and press the[ENT] key to display the Print Out menu.Default: MANUAL* Print out setup *XMTD CALL : MANUALRCVD CALL : AUTODAILY TEST : MANUAL MANUALAUTOSelect AUTO to automatically print transmitted messages.Default: MANUALMANUALAUTOSelect AUTO to automatically print received messages.Default: MANUALMANUALAUTOSelect AUTO to automatically print results of Daily Test.[ENT] key[ENT] key[ENT] key or to set. or to set. or to set.](https://usermanual.wiki/Furuno-USA/9ZWDSC60.dsc60-Part-2-of-2/User-Guide-91742-Page-18.png)
![7-77.7.1 Sample printoutsPrinting can be done automatically or manually. For manual printing, press the [8/PRINT] key.Note that messages comprised of more than one page (for example, received messages) areprinted out in their entirety. * Received message at JAN-08-1999-16:10:12 *FORMAT : DISTRESS CALLSELF-IDENTITY : 987654321NATURE OF DISTRESS : UNDESIGNATED DISTRESSDISTRESS COORDINATES: NO INFORMATIONDISTRESS TELECOMMAND: J3E TELEPHONEEND OF SEQUENCE : EOSERROR-CHECK : OKDSC FREQUENCY TX: 2187.5 kHz RX: 2187.5 kHzSample Received MessagePrintout (Distress) * Received message at JAN-08-1999-16:10:12 *FORMAT : INDIVIDUAL CALLADDRESS : 111660000CATEGORY : ROUTINESELF-IDENTITY : 9876543211st TELECOMMAND : J3E TELEPHONE2nd TELECOMMAND : NO INFORMATIONWORKING FREQUENCY : NO INFORMATIONEND OF SEQUENCE : ACK. RQERROR-CHECK : OKDSC FREQUENCY TX: 2177.0 kHz RX: 2177.0 kHzSample Received Message Printout (Individual)*Transmitted message at JAN-08-1999-16:10:12 *FORMAT : INDIVIDUAL CALLADDRESS : 987654321CATEGORY : ROUTINESELF-IDENTITY : 1116600001st TELECOMMAND : J3E TELEPHONE2nd TELECOMMAND : NO INFORMATIONWORKING FREQUENCY : NO INFORMATIONEND OF SEQUENCE : ACK. RQERROR-CHECK : OKDSC FREQUENCY TX: 2177.0 kHz RX: 2177.0 kHzSample Transmitted Message Printout (Individual)Note: Messages are not framed in actual printouts. *************** Send message *************FORMAT : INDIVIDUAL CALLADDRESS : 111660000CATEGORY : ROUTINESELF-IDENTITY : 9876543211st TELECOMMAND : J3E TELEPHONE2nd TELECOMMAND : NO INFORMATIONWORKING FREQUENCY : NO INFORMATIONEND OF SEQUENCE : ACK. RQERROR-CHECK : OKDSC FREQUENCY TX: 2177.0 kHz RX: 2177.0 kHzSample Send Message Printout (Individual)](https://usermanual.wiki/Furuno-USA/9ZWDSC60.dsc60-Part-2-of-2/User-Guide-91742-Page-19.png)
![7-87.8 Scan Freq MenuThe Scan Freq menu determines which DSC routine and distress frequencies to scan. Follow theinstructions below to select/deselect DSC routine and distress frequencies to scan.7.8.1 Distress frequencies1. Press the [#/SETUP] key, select SCAN FREQ and press the [ENT] key to display the SCANFREQ menu.DISTRESS 2M : FIXED 4M : FIXED 6M : ON 8M : FIXED12M : ON16M : OFF** Scan freq setup *ROUTINEF1 : 2M-INTLF2 : 4M-INTLF3 : 6M-INTLF4 : 8M-INTLF5 : 16M-INTLF6 : 25M-INTL2. Press to shift the cursor to the DISTRESS column.3. Select the frequency to process and press the [ENT] key. For example, select 4 MHz.ROUTINEF1 : 2M-INTLF2 : 2M-USR3F3 : 4M-INTLF4 : 8M-INTLF5 : 16M-LCL1F6 : 25M-LCL2DISTRESS 2M : FIXED 4M : ON 6M : ON 8M : FIXED12M : ON16M : OFF** Scan freq setup *ONOFF4. Select ON or OFF as appropriate and press the [ENT] key.5. Press the [CANCEL] key twice to return to the DSC standby screen.Note: Regulations require that 2 MHz and 8 MHz be watched continuously. These frequenciescannot be turned off.](https://usermanual.wiki/Furuno-USA/9ZWDSC60.dsc60-Part-2-of-2/User-Guide-91742-Page-20.png)
![7-97.8.2 Routine frequencies1. Press the [#/SETUP] key, select SCAN FREQ and press the [ENT] key to display the SCANFREQ menu.DISTRESS 2M : FIXED 4M : FIXED 6M : ON 8M : FIXED12M : ON16M : OFF** Scan freq setup *ROUTINEF1 : 2M-INTLF2 : 4M-INTLF3 : 6M-INTLF4 : 8M-INTLF5 : 16M-INTLF6 : 25M-INTL2. Select the frequency to process and press the [ENT] key. For example, select 2 MHz.ROUTINEF1 : 2M-INTLF2 : 2M-USR3F3 : 4M-INTLF4 : 8M-INTLF5 : 16M-LCL1F6 : 25M-LCL2DISTRESS 2M : FIXED 4M : ON 6M : ON 8M : FIXED12M : ON16M : OFF** Scan freq setup *OFF2 MHZ4 MHZ6 MHZ8 MHZ12 MHZ16 MHZ22 MHZ25 MHZOTHERUse to scrollthe menu.3. Press the [ENT] key, and the display looks something like the one below.ROUTINEF1 : 2M-INTLF2 : 2M-USR3F3 : 4M-INTLF4 : 8M-INTLF5 : 16M-LCL1F6 : 25M-LCL2DISTRESS 2M : FIXED 4M : ON 6M : ON 8M : FIXED12M : ON16M : OFF** Scan freq setup *INTL :T12577.5/R12657.0LOCAL1 :T12578.0/R12657.5LOCAL2 :T12578.5/R12658.0USER CH1:T12345.0/R12345.04. Select frequency desired and press the [ENT] key.5. Press the [CANCEL] key twice to return to the DSC standby screen.](https://usermanual.wiki/Furuno-USA/9ZWDSC60.dsc60-Part-2-of-2/User-Guide-91742-Page-21.png)
![7-107.9 User CH MenuThe User CH menu allows registration of user Tx and Rx channels, where permitted by theAuthorities. Follow the instructions below to register user channels.CAUTIONFURUNO will assume no responsibilityfor the disturbance caused by theunlawful or improper setting of userchannels.1. Press the [#/SETUP] key, select USER CH and press the [ENT] key to display the User chentry menu.*** User ch entry ** MODE: TEL0201. TX: 2111.5 RX: 2111.50202. TX: 2222.0 RX: 2222.00203. TX: 2333.5 RX: 2333.50204. TX: 2444.0 RX: 2444.00205. TX: 2555.5 RX: 2555.5CH: 2-01256 channels may be registered, and each mode has its own channels.Band and channel no. appear to right of "CH."Band no. setting range is 0-29 and band channel no. range is 00-99. When the full 256 channels have been entered no more channels can the entered. However, only four DSC channels can be registered per band.2. Press to select MODE and press the [ENT] key.*** User ch entry ** MODE: TEL0201. TX: 2111.5 RX: 2111.50202. TX: 2222.0 RX: 2222.00203. TX: 2333.5 RX: 2333.50204. TX: 2444.0 RX: 2444.00205. TX: 2555.5 RX: 2555.5CH: 2-01TELNBDPDSC3. Select appropriate mode and press the [ENT] key.4. Press to select CH and press the [ENT] key.*** User ch entry **MODE: NBDP0201. TX: 2101.5 RX: 2101.50202. TX: 2202.0 RX: 2202.00203. TX: 2303.5 RX: 2303.50204. TX: 2404.0 RX: 2404.00205. TX: 2505.5 RX: 2505.5CH : 2-01CH:0−00](https://usermanual.wiki/Furuno-USA/9ZWDSC60.dsc60-Part-2-of-2/User-Guide-91742-Page-22.png)
![7-115. Key in channel no. and press the [ENT] key. For example, press [1], [2], [3], [4] and [ENT] toenter channel 1234. The channel selected is shown in black on white characters at the top ofthe screen.*** User ch entry ** MODE: NBDP01234. TX: 0.0 RX: 0.001240. TX: 12666.0 RX: 13666.001241. TX: 12777.5 RX: 13777.501242. TX: 12999.5 RX: 13999.501250. TX: 12100.0 RX: 13100.0CH: 12-406. Press the [ENT] key to enter Rx and Tx frequencies. For example, enter 12345.5 kHz as theTx frequency and 13456.0 kHz as the Rx frequency.*** User ch entry ** MODE: NBDP01234. TX: 12345.5 RX: 13456.001240. TX: 12666.0 RX: 13666.001241. TX: 12777.5 RX: 13777.501242. TX: 12999.5 RX: 13999.501250. TX: 12100.0 RX: 13100.0CH: 12-407. The display shows the information entered. Using the examples mentioned in this procedure,Tx frequency 12345.5, Rx frequency 13456.0 are registered to channel 1234.*** User ch entry ** MODE: NBDP01234. TX: 12345.5 RX: 13456.001240. TX: 12666.0 RX: 13666.001241. TX: 12777.5 RX: 13777.501242. TX: 12999.5 RX: 13999.501250. TX: 12100.0 RX: 13100.0CH: 12-34](https://usermanual.wiki/Furuno-USA/9ZWDSC60.dsc60-Part-2-of-2/User-Guide-91742-Page-23.png)
![7-127.10 Volume MenuThe Volume menu enables/disables key beep (acknowledges correct key input) and adjusts thevolume of the handset, ordinary alarm and distress/urgency alarm. Press the [#/SETUP] key,select VOLUME and press the [ENT] key to display the Volume menu.Default: ONDefault: 32*** Volume setup ***KEY CLICK : ONHANDSET : 40ORDINARY ALARM : 30DISTRESS ALARM : 63 ONOFFVOLUME (8~63) 40Turns on/off beep generated when keyboard is operated.Note : Do not confuse keyboard beep (single beep) with ACK beep (three beeps).Sets volume of handset.Default: 32VOLUME (8~63) 30Sets loudness of Safety/Ships Business/Routine alarm and old position alarm.Default: 63VOLUME (8~63) 63Sets loudness of Distress/Urgency alarm and Distress Alert alarm.[ENT] key[ENT] key[ENT] key[ENT] key or to set. or to set. or to set. or to set.](https://usermanual.wiki/Furuno-USA/9ZWDSC60.dsc60-Part-2-of-2/User-Guide-91742-Page-24.png)
![8-1 8. CHECKING, MAINTENANCEWARNINGDo not open the equipment.Hazardous voltage which cancause electrical shock existsinside the equipment. Only qualified personnel should work inside the equipment.8.1 Daily TestAuthorities require that the equipment be checked daily for proper operation to ensure that it willfunction properly in the event of distress. Set the frequency of the radiotelephone to otherthan 2182 kHz. Execute the daily test as below.1. At the DSC standby screen or radiotelephone setting screen, press the [3/TEST] key to startthe test.2. After several seconds the test results appear followed by the audio alarm. OK denotesnormal operation, and NG (No Good), error. For NG (No Good) contact your dealer foradvice. MAIN CPU MODEM RCVR1 RCVR2 REMOTE RT REMOTE DP: OK VER.XX* : OK VER.XX* : OK : OK : OK FS1562 : OK DP6**DSC-60 daily test **Alarm: Distress alarm sounds for two seconds after completionof test.MAIN CPU: ROM/RAM test executed and version no. displayed.MODEM: DSP ROM and DSC signal loopback tests executed andversion no. displayed.RCVR1: Distress/safety watch received tested.RCVR2: Routine watch receiver tested.REMOTE RT: CAID of MIF command sent and received. (Systemsetting RP PORT must be set for MIF otherwise nothing appears.)REMOTE DP: CAID of MIF command sent and received. (Systemsetting NBDP PORT must be set for MIF otherwise nothing appears.)* XX = Version number](https://usermanual.wiki/Furuno-USA/9ZWDSC60.dsc60-Part-2-of-2/User-Guide-91742-Page-26.png)
![8-23. If auto printing is active the test results are printed. To manually print results, press the[8/PRINT] key. Below is a sample test results printout. * DSC-60 daily test * AUG-14-1999-15:24 MMSI: 123456789 MAIN CPU: OK VER.01MODEM: OK VER.02RCVR1: OKRCVR2: OKREMOTE RT: OK FS1562REMOTE DP: OK DP6 4. Press the [CANCEL] key to quit the test and return to the previously used screen.8.2 MaintenanceRegular maintenance is necessary for continued performance. Following the procedures belowwill help keep the equipment in top operating condition.8.2.1 Preventive maintenance• Check the following points periodically to ensure proper performance.• Check that each connector is firmly connected and is clean.• Check the earth terminal for corrosion. If corroded, clean.8.2.2 CleaningDust on the display unit and display screen may be removed with a soft cloth. Do not usecommercial cleaners to clean the display unit - they can remove paint and markings.](https://usermanual.wiki/Furuno-USA/9ZWDSC60.dsc60-Part-2-of-2/User-Guide-91742-Page-27.png)
![8-38.3 Simple TroubleshootingThe table below provides common problems and the means with which to restore normaloperation. If normal operation cannot be restored do not attempt to check inside the equipment.Any servicing should be referred to a qualified technician.Problem Probable cause RemedyPower cannot beturned on. • Mains switchboard may be off.• DC overvoltage input.• Battery may have discharged, orpoor contact at terminals.• Turn on the mains switch• Check supply voltage.• Recharge battery and tighten batteryterminals.Display indicationsdo not appear butkey lamps are lit.• Contrast is too low. • Press the [9/ ] key followed by or toadjust the contrast.Power is on but nosound fromloudspeaker.• Loudspeaker is off. • Operate the [7/ ] key to turn on the loud-speaker.8.4 Error MessagesThe table below shows error messages and their meanings.Error messagesError message Meaning RemedyEPFS error No position data from navigatorfor one minute.Press the [CANCEL] key to silence alarm.Check the navigator. If it is malfunctioningmanually enter position.Warning: UpdatepositionPosition data is older by theamount of time preset on theAlarm setup menu.Press the [CANCEL] key to silence alarm.Reenter position on the Position menu.](https://usermanual.wiki/Furuno-USA/9ZWDSC60.dsc60-Part-2-of-2/User-Guide-91742-Page-28.png)
![8-48.5 Test CallThis function sends a test signal over one of six distress and safety frequencies to a coaststation. For that reason, it should not be executed unnecessarily.1. Press the [CALL] key at the DSC standby screen, and press the [ENT] key to open the CALLTYPE menu.*** Send message *** : Test : 00------- : Safety : 2187.5 kHzPSTN CALLTEST CALLALL SHIPSGROUP CALLAREA CALLPOSITION RELAY SELPOLLINGNEUTRALMEDICALRELAY ALLDISTRESSINDIVIDUALCALL TYPESTATION IDPRIORITYCOM TYPECOM TYPEDSC FREQ If this part of the menuappears, use to scroll.2. Use or to select TEST CALL and press the [ENT] key.3. Press the [ENT] key to open the COAST ID menu.GO TO ALL VIEW*** Send message ***CALL TYPE PRIORITYDSC FREQ : 2187.5 KHZ: TEST : SAFETYCOAST ID 0000000004. Key in the ID of the coast station ID (nine digits) to where to send the test call and press the[ENT] key.5. Press the [ENT] key to open the DSC FREQ menu. (Note that PRIORITY is automaticallyselected to SAFETY.)DSC FREQ KHZ*** Send message ***CALL TYPECOAST IDPRIORITY: Test : 001234567 : Safety : kHz VIEW 4207.5 6312.0 8414.5 12577.016804.5MANUAL2187.5](https://usermanual.wiki/Furuno-USA/9ZWDSC60.dsc60-Part-2-of-2/User-Guide-91742-Page-29.png)
![8-56. Select an appropriate frequency and press the [ENT] key, and the display changes as below.*** Send message ***CALL TYPE : TEST COAST ID : 001234567 PRIORITY : SAFETY DSC FREQ : 2187.5 KHZ GO TO ALL VIEW7. Press the [CALL] key to send the test call (transmission time: 6-8 sec.). The display shows"Test call in progress!" while the test call is being transmitted.Testcall in progress!DSC FREQ : 2187.5 KHZTIME TO GO : 8STO COAST : 001234567 SAFETY8. After the test call has been sent, the following message appears.Waiting for test acknowledgement.DSC FREQ : 2187.5 KHZTIME TO GO : 4M12SFROM COAST : 001234567 SAFETY9. One of the following displays appears. (“No response! Try calling again?” appears when thetimer counts down to zero, meaning no response from coast station.)No response! Try calling again?DSC FREQ : 2187.5 KHZFROM COAST: 001234567 SAFETYTest acknowledgecall received.FROM COAST: 001234567 SAFETY NO INFORMATIONSTOP ALARM CALL AGAINTest acknowledge received No response to test call10. Do one of the following depending on the message shown in step 9.](https://usermanual.wiki/Furuno-USA/9ZWDSC60.dsc60-Part-2-of-2/User-Guide-91742-Page-30.png)
![8-6Test acknowledge call receivedThe audio alarm sounds; press the [CANCEL] key to silence the alarm. The display changes asbelow.JUL-23-1999-23:59 ECC : OKTEST ACKNOWLEDGEMENT FROM COAST : 001234567 SAFETY NO INFORMATION * Received message * GO TO ALL VIEWNo response! Try calling again?Press the [ENT] key (the display shown in step 6 appears) followed by the [CALL] key to re-sendthe test call, or press the [CANCEL] key to return to the DSC standby screen.](https://usermanual.wiki/Furuno-USA/9ZWDSC60.dsc60-Part-2-of-2/User-Guide-91742-Page-31.png)
![A-1APPENDIXMenu TreeINTERNAL AUDIO ALARM RCVD CALL (ON, OFF) OLD POSITION (ON, OFF) POSITION OLDER (4.0, 3.0, 2.0, 1.0, 0.5 hr)EXT ALARM (DSTRS/URG, ROUTINE, ALL, OFF)[SETUP] key ALARM AUTO ACKERASE FILEMESSAGE POSITIONPRINTSCAN FREQ Selects DSC frequencies to scan.USER CH Registers user channels.VOLUMETEST (For technicians)SYSTEM (For technicians)COMPLY TYPE (ABLE, UNABLE)UNABLE REASON (NO REASON, BUSY, EQUIP DISABLED, MODE NOT USABLE, CH NOT USABLE)POSITION CALL (ON, OFF)POLLING CALL (ON, OFF) RCVD ORDINARY LOGRCVD DISTRESS LOGTRANSMITTED LOGSEND MESSAGEUSER CHANNELINPUT TYPE (AUTO, MANUAL)LATLONGTIMEXMTD CALL (AUTO, MANUAL)RCVD CALL (AUTO, MANUAL)DAILY TEST (AUTO, MANUAL)KEY CLICK (ON,OFF)HANDSET (0-63, 32)ORDINARY ALARM (0-63, 32)DISTRESS ALARM (0-63, 63)[LOG] key RECEIVED ORDINARYRECEIVED DISTRESSTRANSMITTEDDefault settingsin boldface italic.](https://usermanual.wiki/Furuno-USA/9ZWDSC60.dsc60-Part-2-of-2/User-Guide-91742-Page-32.png)