First Computer MB02W3BB Notebook Computer With 802.11b WLAN Module User Manual 11b

First International Computer Inc Notebook Computer With 802.11b WLAN Module 11b

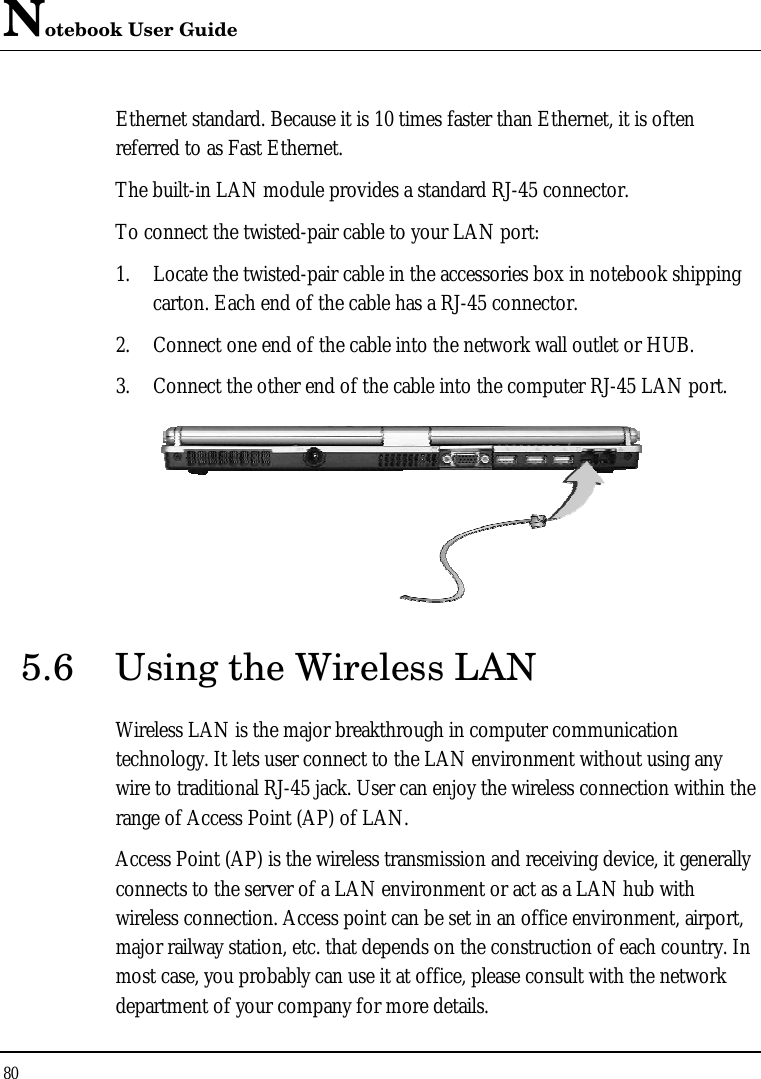
Pge 61 to 80 of user manual

Notebook User Guide 62  ++   PC cards draw power even when not in use. To save energy, press the button to disconnect the card when it is not in use.
Fun with Multimedia 4 63  4 Fun with Multimedia   This chapter lets you make full use of all the multimedia features of your computer in having fun and excitement during work or leisure. You will learn how to mix and match the built-in sound system, use Combo drive in creating an exciting full multimedia presentation.
Notebook User Guide 64  4.1 Notebook Multimedia Features Your notebook computer is rich in multimedia features that make your computing fun, comfortable, exciting and easy. Your computer is well able to perform all multimedia tasks through the following: • Intel® Pentium® M microprocessor powered by Intel® Centrino™ Mobile Technology • Up to 2GB DDR SDRAM • CD-RW/DVD combo for DVD/CD watching/playing and CD making • Integrated Intel graphics engine. • 16-bit Audio Sound System with built-in speaker and microphone. 4.2 Audio Sound System Features Your computer has a built-in 16-bit stereo sound controller that allows you to record, store, and playback voice, music and other sound effects with built-in mixer controls. An integrated full-duplex microphone and twin mini-speakers are also built-in into your computer to allow you to record and playback sound anytime and anywhere.  On the left side of your computer, you will find the audio ports that include the following: • External 1/8-inch microphone jack that connects external microphone for recording purpose.  • Earphone or headphone jack for personal listening.
Fun with Multimedia 4 65  4.3  Setting Up the Audio Driver Properties Before you can start using the audio capabilities of your computer, you need first to setup properly the audio driver after installing Windows. If you bought your computer with Windows pre-installed, it is most likely that your dealer have configured the sound driver for you. If not, you must refer to Chapter 2 on how to setup the sound drivers for Windows. 4.4 Windows Multimedia Programs Windows provides several multimedia programs that you can run with the built-in features of your computer. Pointing the Start button, Programs, Accessories, then Entertainment, you will find the Multimedia programs group. (The section below use Window XP as examples)
Notebook User Guide 66   Figure 4-1 Entertainment Programs Group The standard multimedia components are as follows: • Windows Media Player - for playing sound, video and animation files • Sound Recorder - for recording sounds and playback • Volume Control - for adjusting the volume of mixer ++   For more information on how to operate these multimedia components, run the program and click on the Help menu. 4.5 Recording Sounds  Your computer allows you to record voice and other sounds in several ways and stores them as files on your hard disk. These voice or sound files can then
Fun with Multimedia 4 67  be played back through the internal speaker or earphone jack using an external speaker, headphone, or earphone set. You can also use the files as voice annotations on many applications for more real presentation. This section will describe briefly how you can record sounds under Windows operating system.  To record sounds, you need to run the Sound Recorder program from the Multimedia program groups. The control buttons of the Sound Recorder are simple to understand which comprise of the Fast Rewind, Fast Forward, Play, Stop, and Record buttons. Click the Help menu on how to operate the Sound Recorder.   Figure 4-2 Sound Recorder The Sound Recorder also allows you to record sound from different input audio source like the following:  • From the external microphone • From the Combo drive Since you could record sound from different input sources, you must first set the proper audio input recording device under the Recording Control panel. To do this: 1. Double-click on the Volume Control on the taskbar or click Start button, then point to Programs, Accessories, Entertainment and then click on Volume Control.
Notebook User Guide 68  2. Click Properties in the Options main menu. 3. Click the round button for Recording and tick off each component that list in the "Shows the following Volume Controls" box.   Figure 4-3 Audio Properties 4. Click OK and the Recording Control dialog box will appear. Here, you will select the input device for the recording source. If you want to record from the Combo drive with audio music, you must click on CD Player.
Fun with Multimedia 4 69   Figure 4-4 Recording Volume Control USING AN EXTERNAL MICROPHONE Your computer allows you to connect an external microphone for high quality recording. The external microphone jack is found on the left side of your computer. Use only microphone with 1/8-inch mini-jack connector. Follow the same procedure for recording voice.  USING THE BUILT-IN COMBO DRIVE You would normally use the Combo drive for recording audio music from the Audio CD. Follow these steps: 1. Activate CD Player volume on the Recording Control as discussed earlier. 2. Run the Sound Recorder program.  3. Insert the audio CD into the Combo drive. Unless you have disabled the CD auto-insertion notification for supporting Suspend mode, the CD Player should automatically run after you have inserted an audio compact disc and will start playing the audio CD.
Notebook User Guide 70   Figure 4-5 Play Audio CD by Windows Media Player 5. Select the starting point where you want to start recording. 6. Switch to the Sound Recorder and press the Record button.  7. Switch immediately to the Windows Media Player and press the Play button. You can adjust the volume control so you can also hear the music while in recording. 4.6 Playing Audio and Sound  Your computer has built-in twin speakers to playback audio and sound. You can also adjust the volume manually by adjusting the volume control hotkeys found on the right bottom side of the keyboard.
Fun with Multimedia 4 71  For more quality sound output, you can choose to connect an external amplified speaker or earphone from headphone jack. Always minimize the volume first before placing the phone set to your ear. USING THE WINDOWS MEDIA PLAYER The easiest way to playback multimedia media files is to run the Windows Media Player. Follow these steps: 1. Click on Start, point to Programs, Accessories, and then Entertainment. 2. Click on Windows Media Player to start program.  3. Click on the File menu and select the file you want to play. 4. When the file is recognized and open, click on the Play button to start playback. 4.7 Playing Video and MPEG Files Your computer is capable of running video motion files as well as MPEG (Motion Picture Expert Group) files on CD, DVD, or CD-RW. By using software MPEG program, you can watch real full-motion picture on your computer. You can also run the Windows Media Player under the Entertainment programs group as well to show all media device programs.
Notebook User Guide 72   Figure 4-6  Windows Media Player 4.8 Using DVD DVD is the breakthrough in superb full-motion picture playback. One disc can contain at least 4.7GB of information, capable of holding one full-length movie with soundtracks, subtitles, and different languages. Much more, the DVD-ROM drive of your computer is backward compatible with CD-ROM drive so it allows you to use any CD as well. It also works the same as the CD-ROM. To playback DVD titles, you would need a software MPEG-2 program and the Combo drive.
Fun with Multimedia 4 73  ++   For best DVD playback, please enable the DMA function of this notebook, for how to enable the DMA channel on both DVD/CD-ROM drive and Hard Disk, please refer to driver installation on section 5 of chapter 2. Moreover, you can enable Hardware Accelerator if the software MPEG-2 player you are using has supported this function. 4.9 Using CD-RW/DVD combo CD-RW/DVD combo drive is a device that can write digital data to CD-RW and CD-R compact disk (CD). With this device, you can backup your own data to CD-R or CD-RW disc for mass data storage and safely retaining. The CD-R disc can be written several times until the CD-R is full; the CD-RW disc, furthermore, can write and erase data repeatedly. Please refer to the related user manual about the CD-RW software. ++   Please pay attention to the copyright of the software or data you want to backup. Backup or distribute the software or data might be illegal according the restriction of the law.
Notebook User Guide 74
Connecting to Peripherals 5 75  5 Connecting to Peripherals   This chapter describes how you attach peripheral devices to your notebook. You can attach a printer or mouse; connect an external monitor and keyboard, or any other peripheral device. You will learn how to use these peripheral devices with the step-by-step instructions depicted in this chapter.
Notebook User Guide 76   5.1 Using the USB Port USB or Universal Serial Port is a peripheral bus standard developed by Compaq, DEC, IBM, Intel, Microsoft, NEC and Northern Telecom. Personal computers equipped with USB will allow computer peripherals to automatically configure as soon as they are physically attached - without the need to reboot or run setup. USB will also allow multiple devices to run simultaneously on a computer, with peripherals such as floppy drive, mouse, digital cameras, scanners, printers, CD-RW drives, modems, keyboards, games devices and acting as additional plug-in sites, or hubs.  ++   Depending on your operational requirements, you may need to disable other ports in order to release system resource for the USB port. 5.2 Using an External Monitor Port Your computer has a 15-pin Monitor port for supporting any external CRT or LCD color monitor. You need a display signal cable (usually provided with the monitor). One end of the cable must have a 15-pin connector for the system. To connect an external monitor:
Connecting to Peripherals 5 77  1. Turn off your computer and make sure the monitor power switch is turned off. ++   The notebook computer must be powered off or suspended while the monitor is being connected. Although you can connect the external Monitor without power off the computer and the external monitor, however, it is harmful to both devices and it shortens the life of these devices. 2. Connect the connector cable of the monitor to the VGA port at the back of your computer. Secure the cable connection with the screws provided. 3. Connect the monitor power cable and plug it into a properly grounded wall outlet. 4. Turn on the power of the monitor. 5. Turn on your computer. Both the LCD panel and the monitor screen will show the display. Your computer is set at default to run at simultaneous display mode. 6. If you only want to show the display on the external monitor or projector and shut off the LCD display, you can use the <Fn> + <F3> hot-key to switch display type between LCD and external monitor. Keep pressing the hot-key until you get the display to external monitor only.  ++   Refer to Chapter 3 regarding the possible External CRT resolutions and how to change the display properties.
Notebook User Guide 78  5.3 Using the IEEE 1394 Port IEEE 1394 is a new I/O standard that is supported by Win98 (second edition) or later Windows version. With supporting high-speed transmission and delivering data at a guaranteed rate, you can record digital video clips and download them directly via a super-speed IEEE 1394 port at the left of the notebook. IEEE 1394 becomes an ideal for devices that need to transfer high levels of data in real-time. With built-in IEEE 1394 port, this computer enables the peripheral devices in transmitting digital video data or data backup. To install the IEEE 1394 port driver, please refer to Win98 (second edition) or later Windows version. The Windows system will automatically recognize it in installing a suitable driver for it. For other version of Windows, please visit Microsoft's web site for more information about it. Moreover, you should install the driver of peripheral device to connect with the IEEE 1394 port, for details please refer to the manual that comes with your peripheral device.
Connecting to Peripherals 5 79  ++   Please make sure that the external IEEE 1394 HDD box you purchase on local electronic store should provide external power adapter. There are different types of IEEE1394 HDD box and hard disk from different manufactures, the power consumption has varied range. If the power of the external IEEE 1394 HDD is supplied from the USB of this notebook, it may not run properly. 5.4 Using the External Audio System At the left side of your computer, you will find the built-in audio ports. You can connect Microphone jacks, earphone or powered speaker. To connect to a audio jack: 1. Locate the audio port (Microphone, Headphone) that you want to use to the target device. 2. Plug the jack into the port on the left side of the system. ++   If you use external speakers and experience the sound distortion or feedback, please lower the volume. Some factors is caused by too close locating the microphone and speakers from each other, moving away the external audio option from the unit may also help. 5.5 Using the LAN Port This notebook comes with an internal 10Base-T/100Base-TX LAN module that connects your computer to other computers/networks through a local area network (LAN) and supports data transfer rates at 10Mbps and can be up to 100Mbps. The 10Base-T standard also called Twisted Pair Ethernet is connected with RJ-45 connectors. The 100Base-TX is based on the older
Notebook User Guide 80  Ethernet standard. Because it is 10 times faster than Ethernet, it is often referred to as Fast Ethernet. The built-in LAN module provides a standard RJ-45 connector.  To connect the twisted-pair cable to your LAN port: 1. Locate the twisted-pair cable in the accessories box in notebook shipping carton. Each end of the cable has a RJ-45 connector. 2. Connect one end of the cable into the network wall outlet or HUB. 3. Connect the other end of the cable into the computer RJ-45 LAN port.  5.6 Using the Wireless LAN Wireless LAN is the major breakthrough in computer communication technology. It lets user connect to the LAN environment without using any wire to traditional RJ-45 jack. User can enjoy the wireless connection within the range of Access Point (AP) of LAN.  Access Point (AP) is the wireless transmission and receiving device, it generally connects to the server of a LAN environment or act as a LAN hub with wireless connection. Access point can be set in an office environment, airport, major railway station, etc. that depends on the construction of each country. In most case, you probably can use it at office, please consult with the network department of your company for more details.

Navigation menu