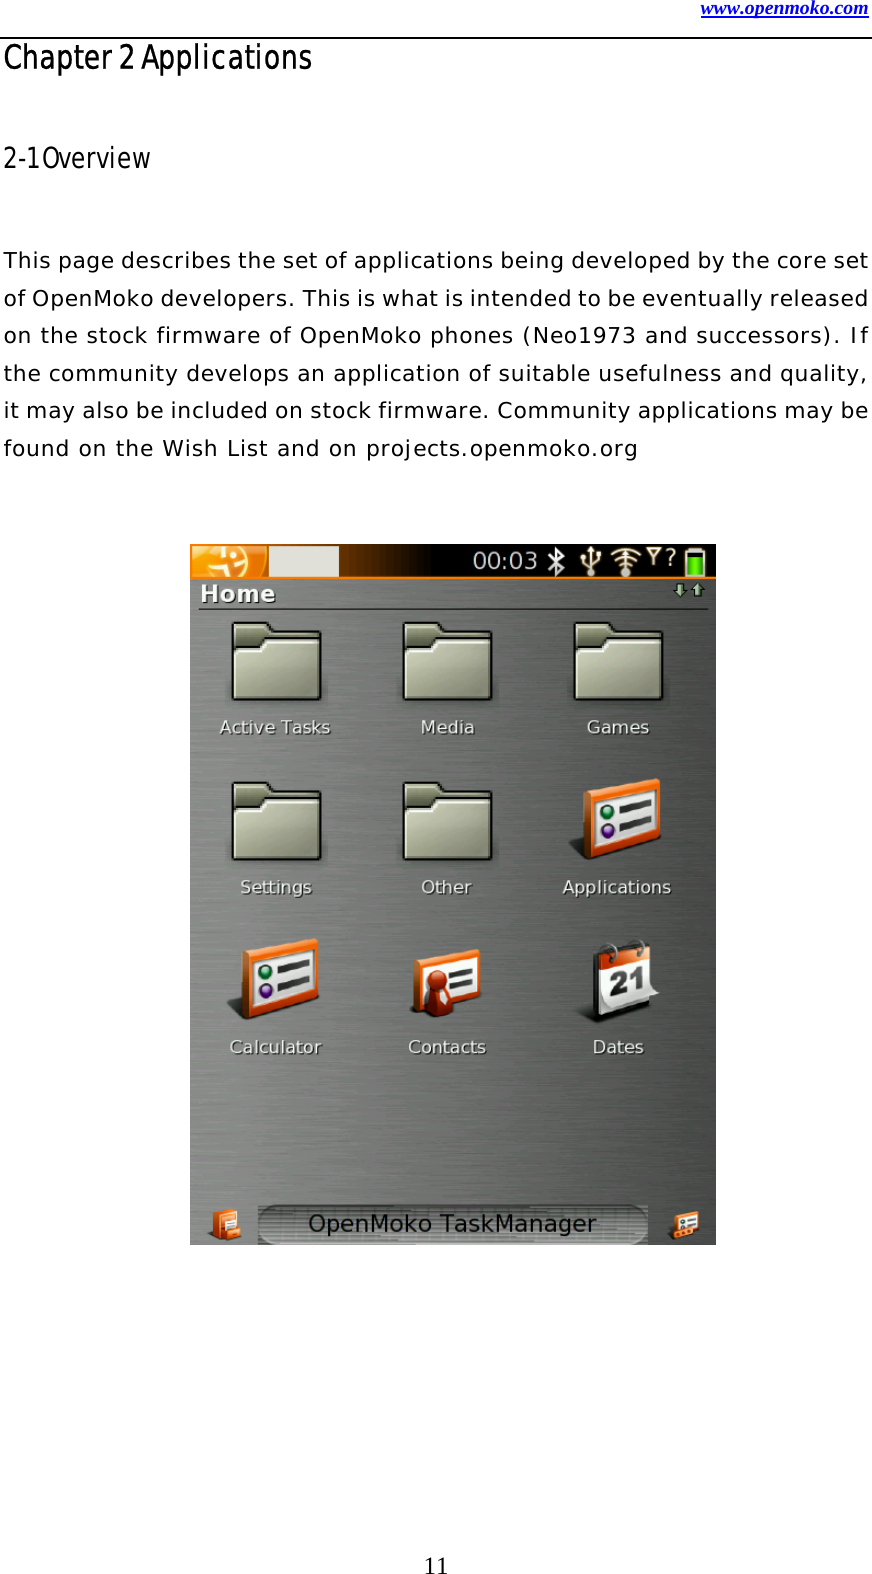
First Computer GTA01BV4 NEO 1973 WITH GSM AND BLUETOOTH GPRS User Manual openmoko menu 1
First International Computer Inc NEO 1973 WITH GSM AND BLUETOOTH GPRS openmoko menu 1
UserManual.wiki
>
First Computer
>
GTA01BV4 User Manual
USERS MANUAL
Navigation menu
Upload a User Manual
Namespaces
Wiki Guide
HTML
PDF
Info
Views
User Manual
Discussion / Help
Navigation
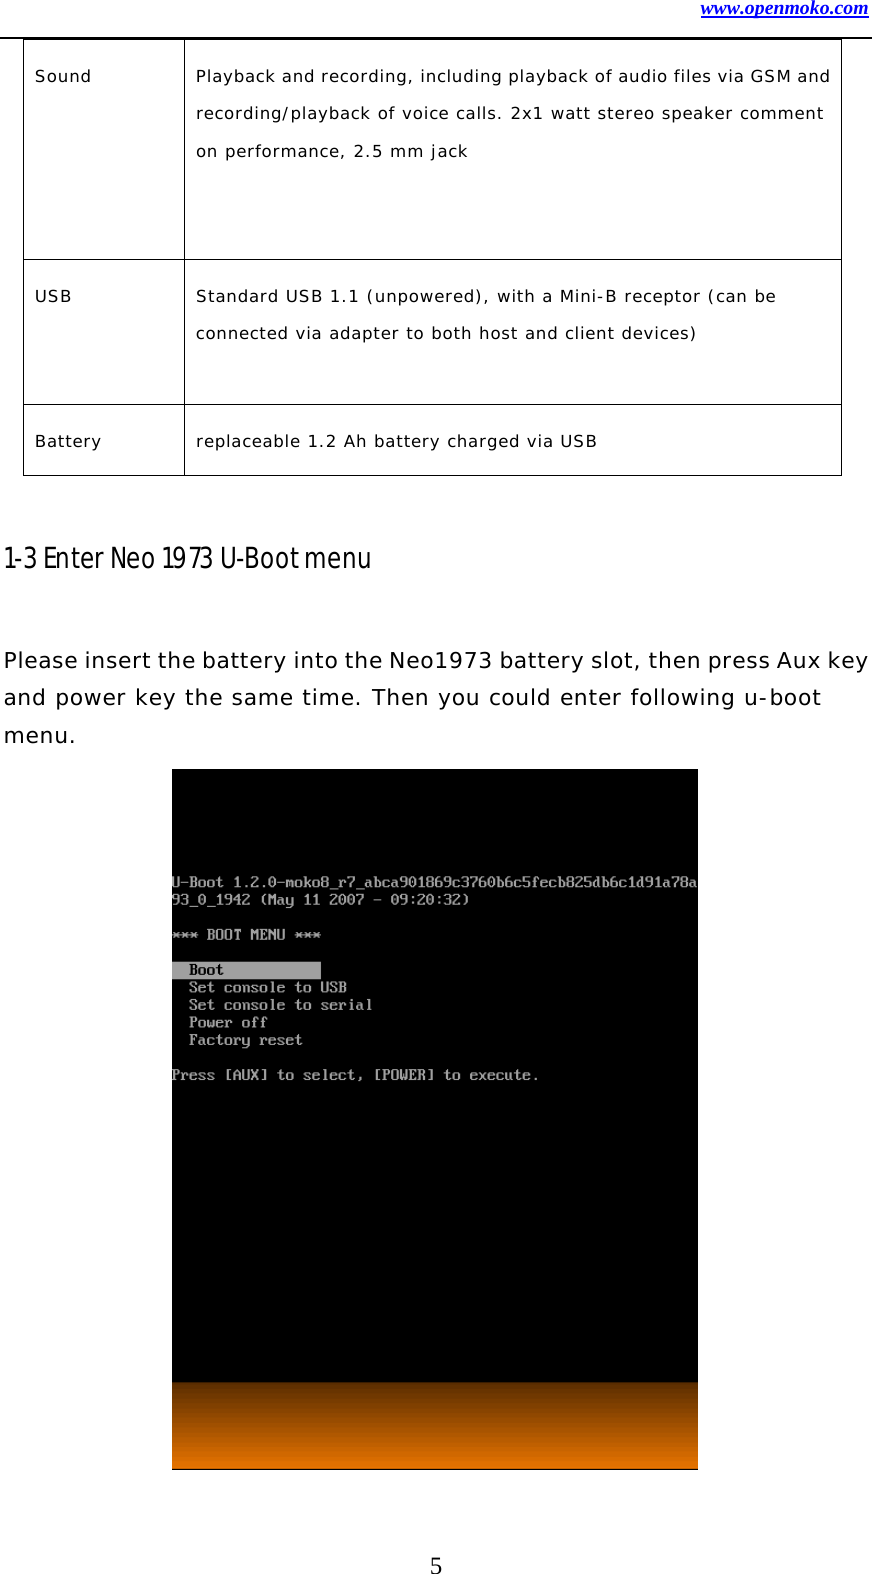
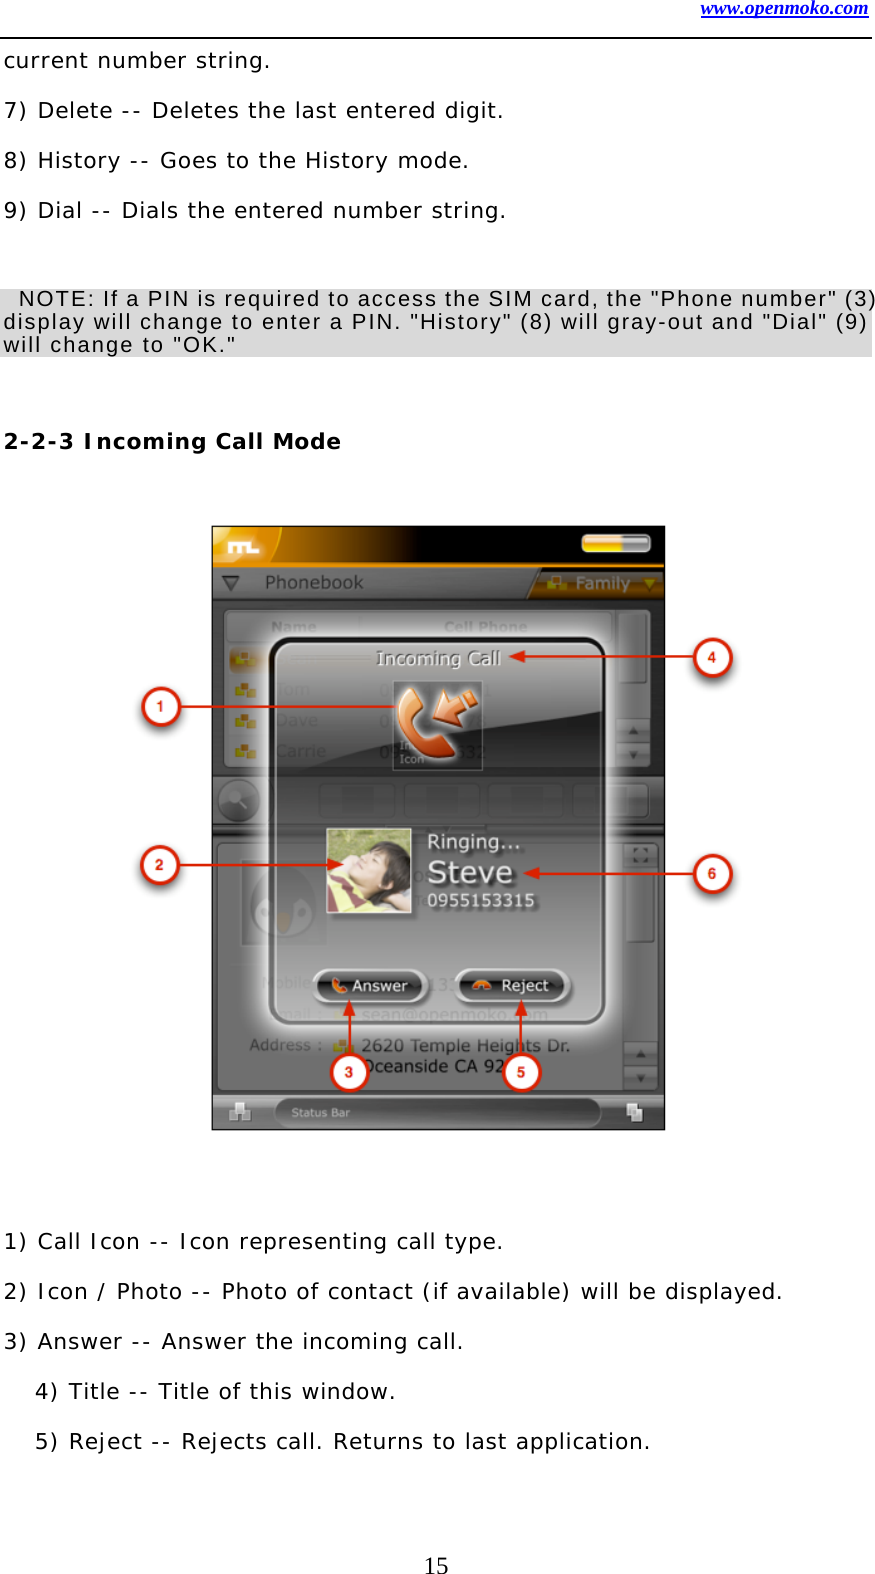
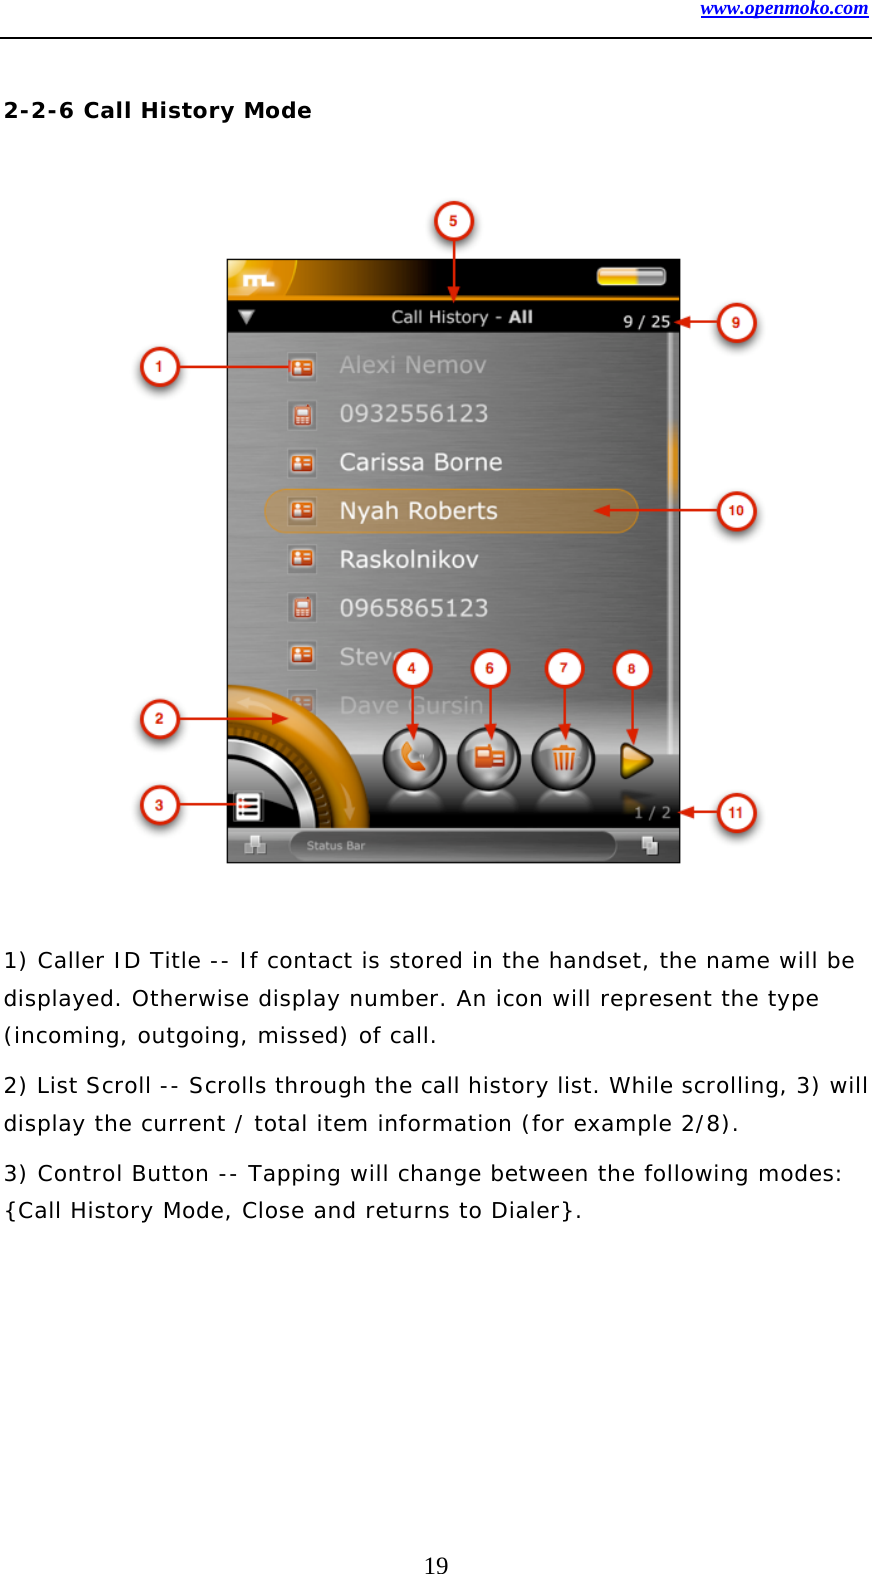
![www.openmoko.com 6 After enter u-boot menu, you could use [Aux] key to select the item, and [Power] key for confirm. There should be 5 items by default: 1. Boot: Direct boot 2. Set console to USB: Could use Linux terminal software (like minicom to connect Neo1973) 3. Set console to Serial: Re-Direct terminal output to Neo1973 debug port serial interface. 4. Power off: Power of Neo1973 5. Factory reset: Reset parameter into factory default value. If your Neo1973 already had kernel image or rootfs installed, once you select the boot, system will boot. If your Neo1973 doesn’t contain any kernel image, you will need to use devirginator or DFU-Util to install system and root file system. If you using the minicon or other terminal software like hyperterminal, please using following settings to connect terminal: Speed: 115200, N ,8, 1 Hardware flow control: Off 1-4 Install OpenMoko Kernel image by using DFU 1-4-1 Purpose dfu-util is a program that implements the Host (PC) side of the USB DFU (Universal Serial Bus Device Firmware Upgrade) protocol.](https://usermanual.wiki/First-Computer/GTA01BV4/User-Guide-814074-Page-6.png)
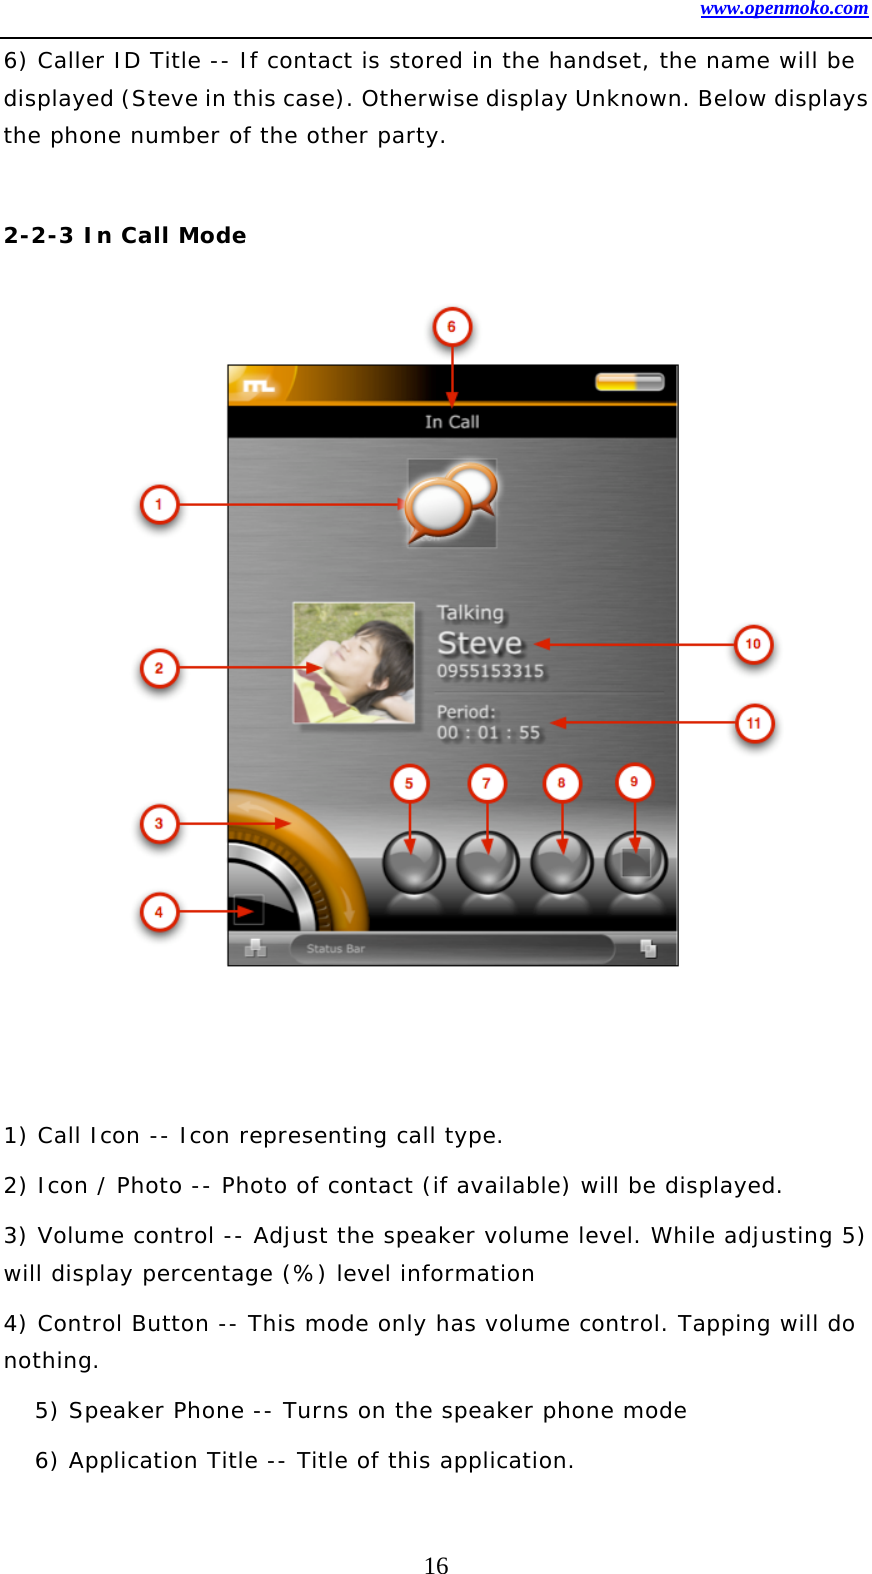
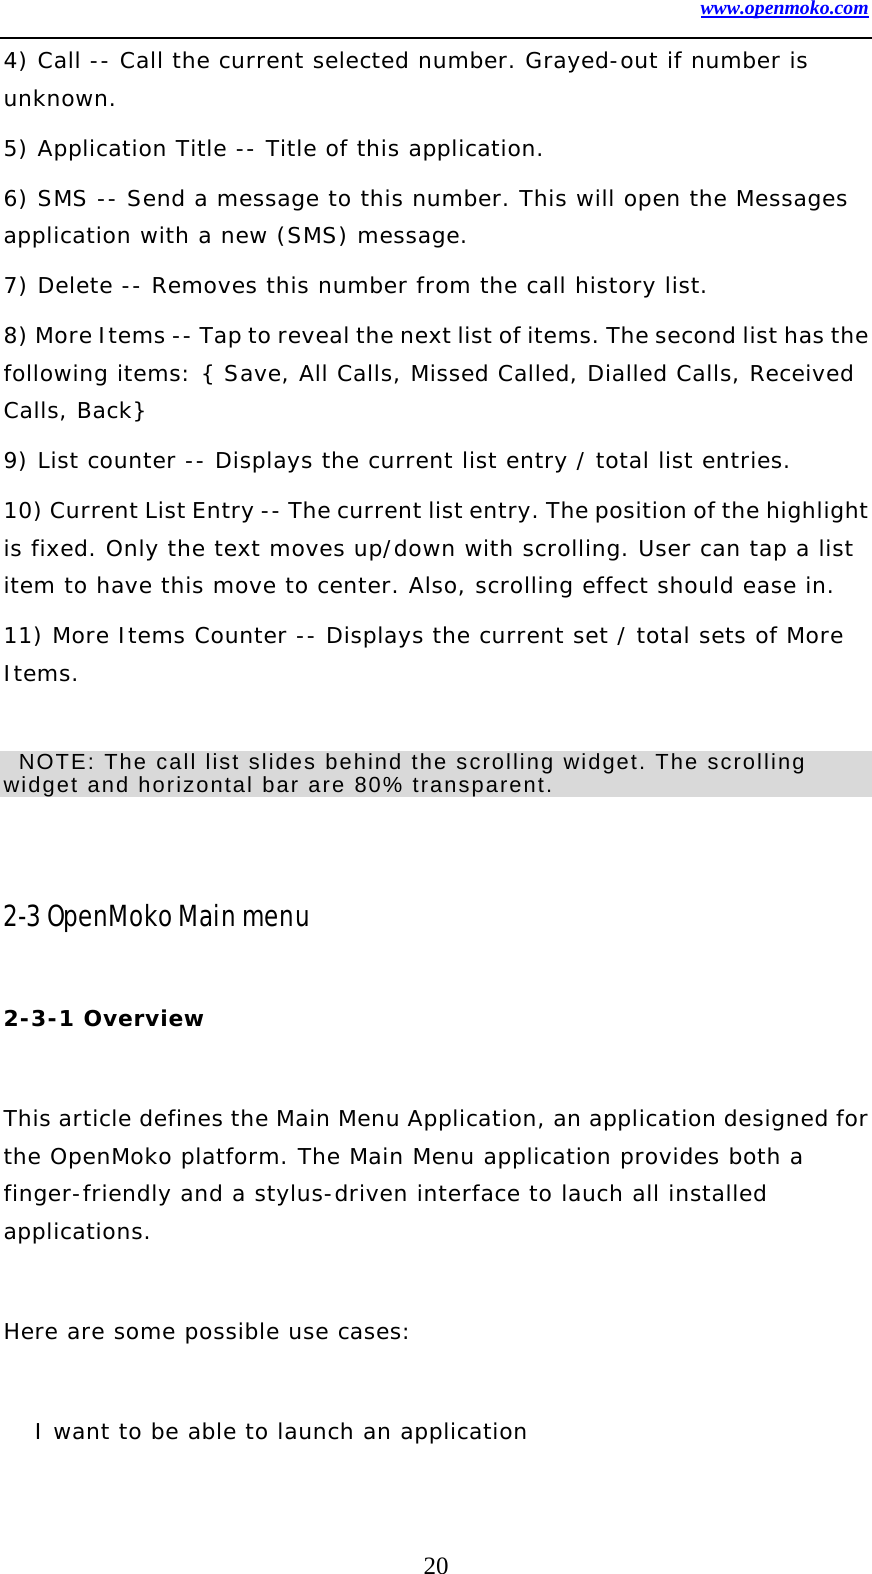
![www.openmoko.com 8 This program is Free Software and has ABSOLUTELY NO WARRANTY Usage: dfu-util [options] ... -h --help Print this help message -V --version Print the version number -l --list List the currently attached DFU capable USB devices -d --device vendor:product Specify Vendor/Product ID of DFU device -c --cfg config_nr Specify the Configuration of DFU device -i --intf intf_nr Specify the DFU Interface number -a --alt alt_nr Specify the Altseting of the DFU Interface -t --transfer-size Specify the number of bytes per USB Transfer -U --upload file Read firmware from device into <file> -D --download file Write firmware from <file> into device -R --reset Issue USB Reset signalling once we're finished 1-4-4 List function Using the --list option, you can list the available DFU capable devices, their configuration, interface and altsettings. Below is an example for a current Neo1973 phone in u-boot Runtime Mode # ./dfu-util --list dfu-util - (C) 2007 by OpenMoko Inc. This program is Free Software and has ABSOLUTELY NO WARRANTY Found DFU Runtime: [0x1457:0x5119] devnum=0, cfg=0, intf=2, alt=0, name="USB Device Firmware Upgrade" Below is an example for a current Neo1973 phone in u-boot DFU Mode # ./dfu-util --list dfu-util - (C) 2007 by OpenMoko Inc. This program is Free Software and has ABSOLUTELY NO WARRANTY Found DFU: [0x1457:0x5119] devnum=16, cfg=0, intf=0, alt=0, name="RAM 0x32000000" Found DFU: [0x1457:0x5119] devnum=16, cfg=0, intf=0, alt=1, name="u-boot"](https://usermanual.wiki/First-Computer/GTA01BV4/User-Guide-814074-Page-8.png)
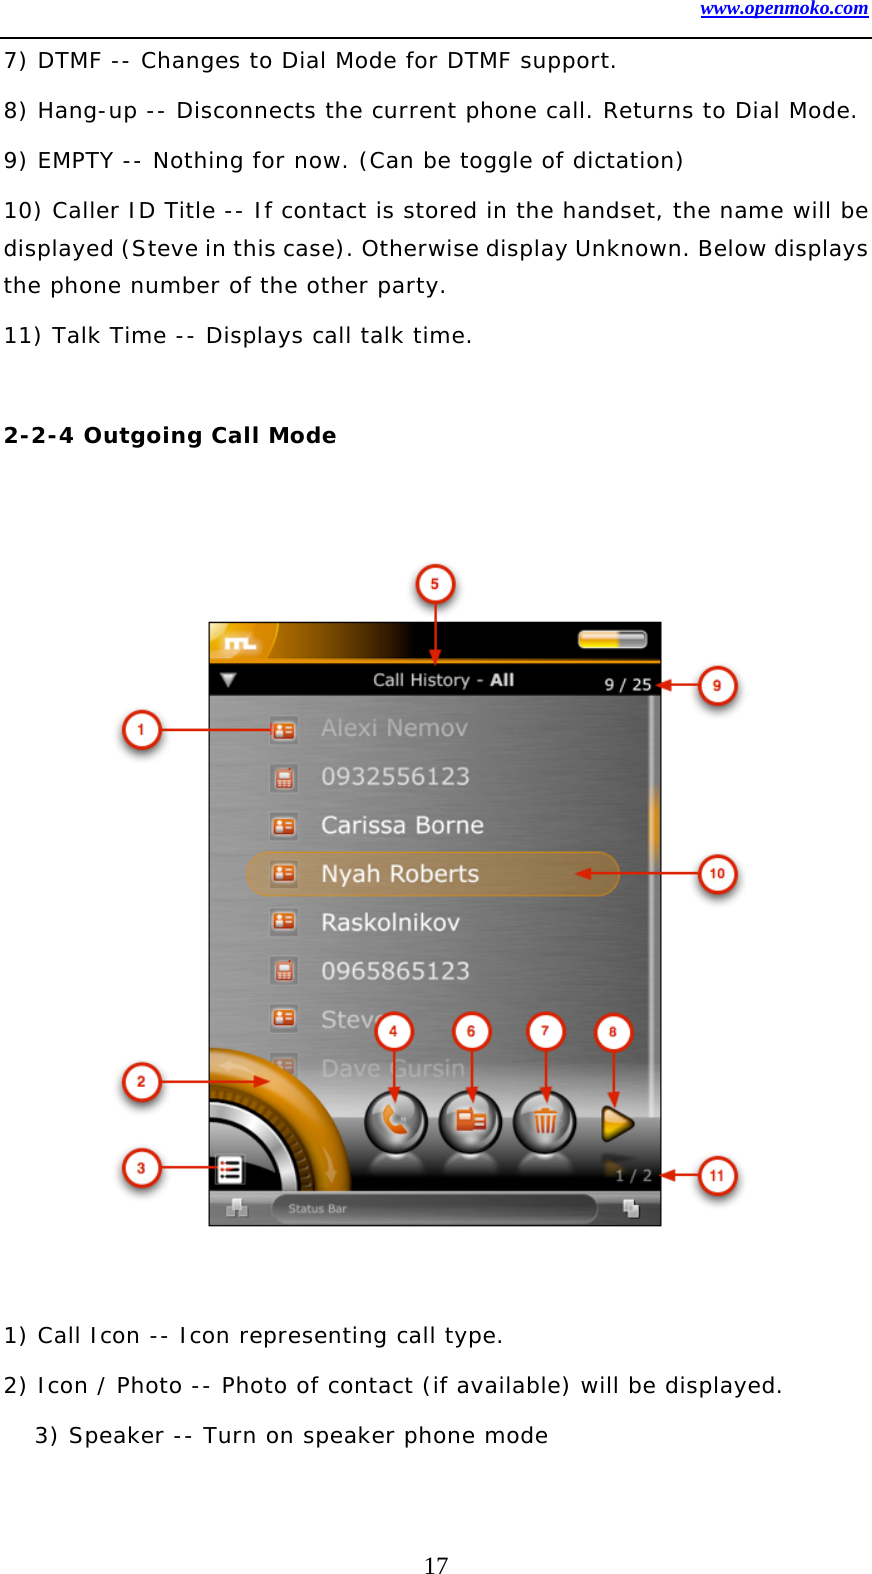
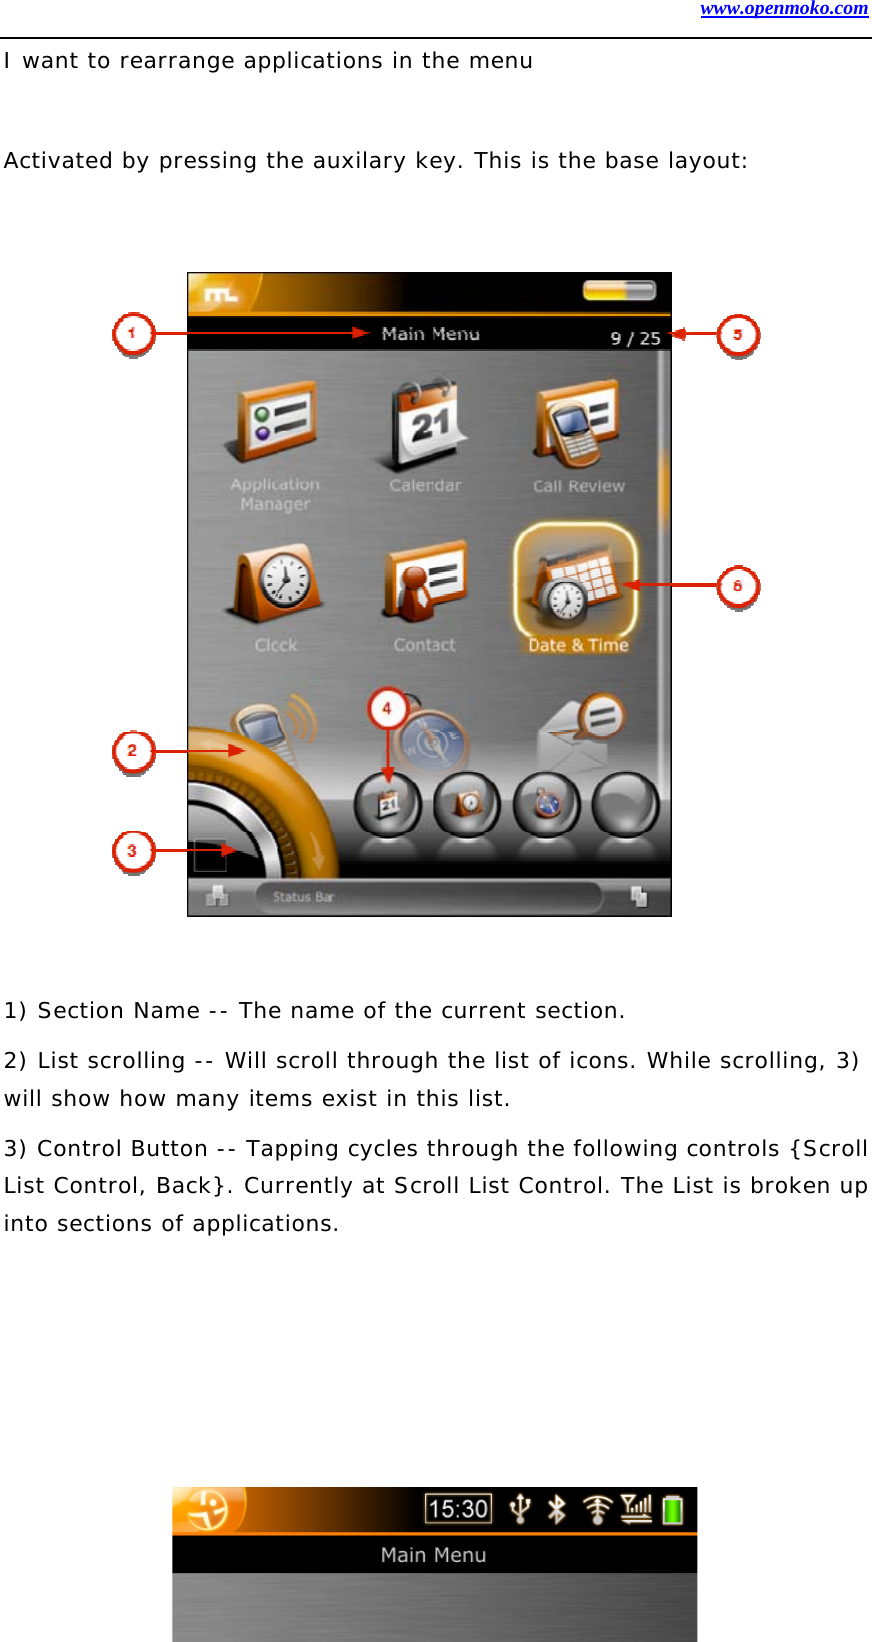
![www.openmoko.com 9 Found DFU: [0x1457:0x5119] devnum=16, cfg=0, intf=0, alt=2, name="u-boot_env" Found DFU: [0x1457:0x5119] devnum=16, cfg=0, intf=0, alt=3, name="kernel" Found DFU: [0x1457:0x5119] devnum=16, cfg=0, intf=0, alt=4, name="splash" Found DFU: [0x1457:0x5119] devnum=16, cfg=0, intf=0, alt=5, name="rootfs" This shows you six interfaces, all in configuration 0 and interface 0, with altsetting 0...4. The name is currently not yet defined, but will be added to one of the upcoming u-boot releases. The mapping on the Neo1973 is as follows: 0: RAM 1: 'u-boot' partition 2: 'u-boot_env' partition 3: 'kernel' partition 4: 'splash' partition 5: 'rootfs' partition 1-4-5 device function You can specify the USB Vendor and Product ID of the device you want to program: dfu-util --device 0x1457:0x5119 If you only have one standards-compliant DFU device attached to your PC, this is optional. However, as soon as you have multiple DFU devices, dfu-util will detect this and abort, asking you to specify which device it shall use. 1-4-6 transfer-size Specifies the size of each individual USB transfer. If you don't use it, the maximum possible size for your combination of host operating system and USB device is chosen (for optimal performance). 1-4-7 download](https://usermanual.wiki/First-Computer/GTA01BV4/User-Guide-814074-Page-9.png)
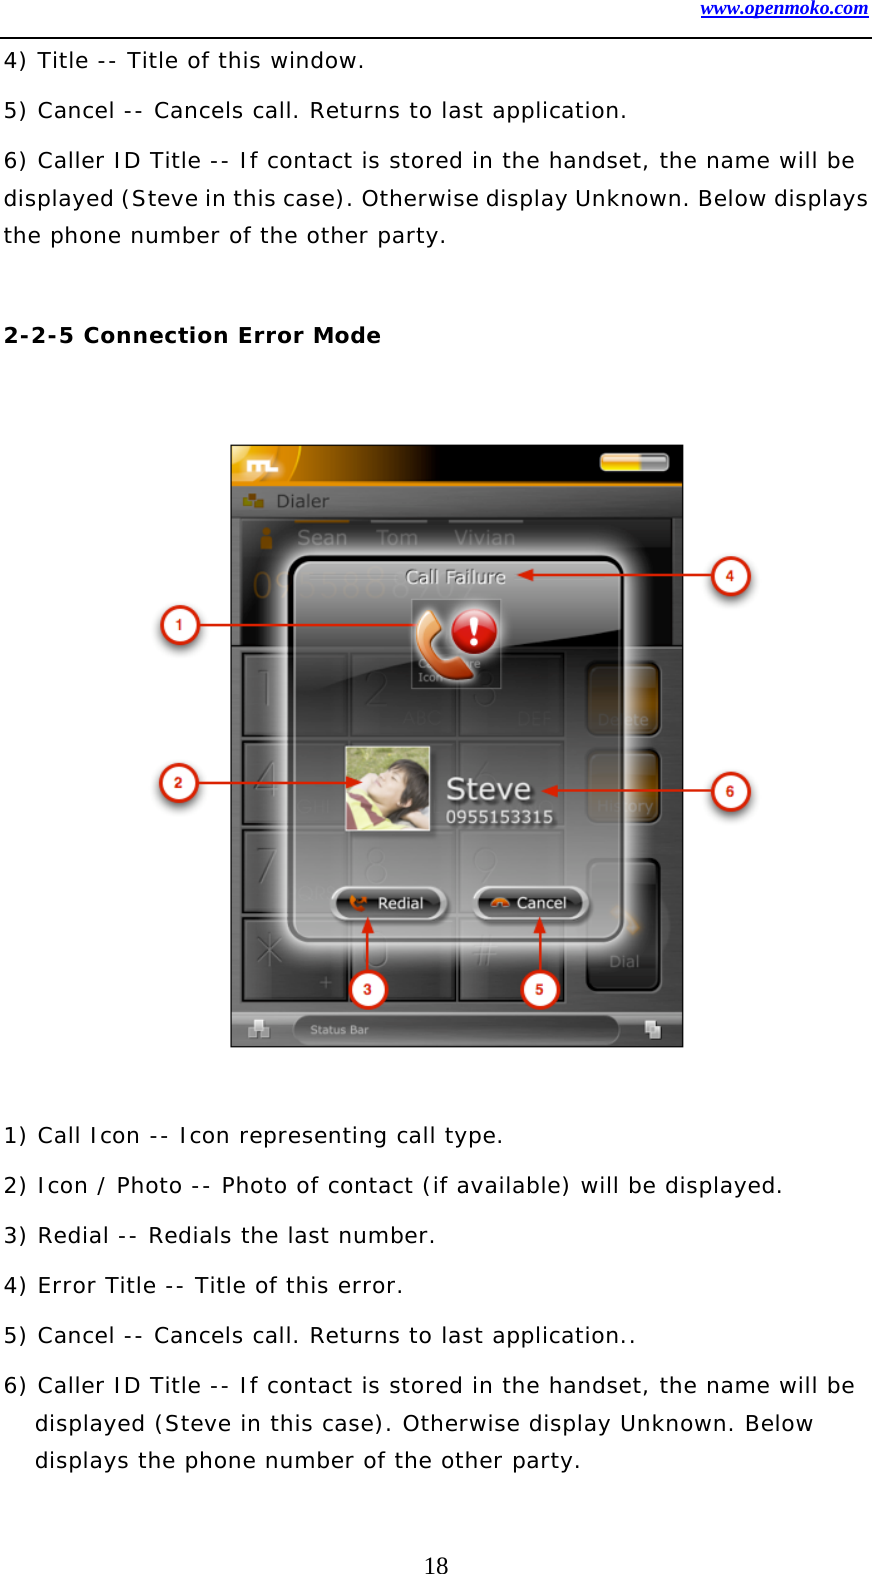
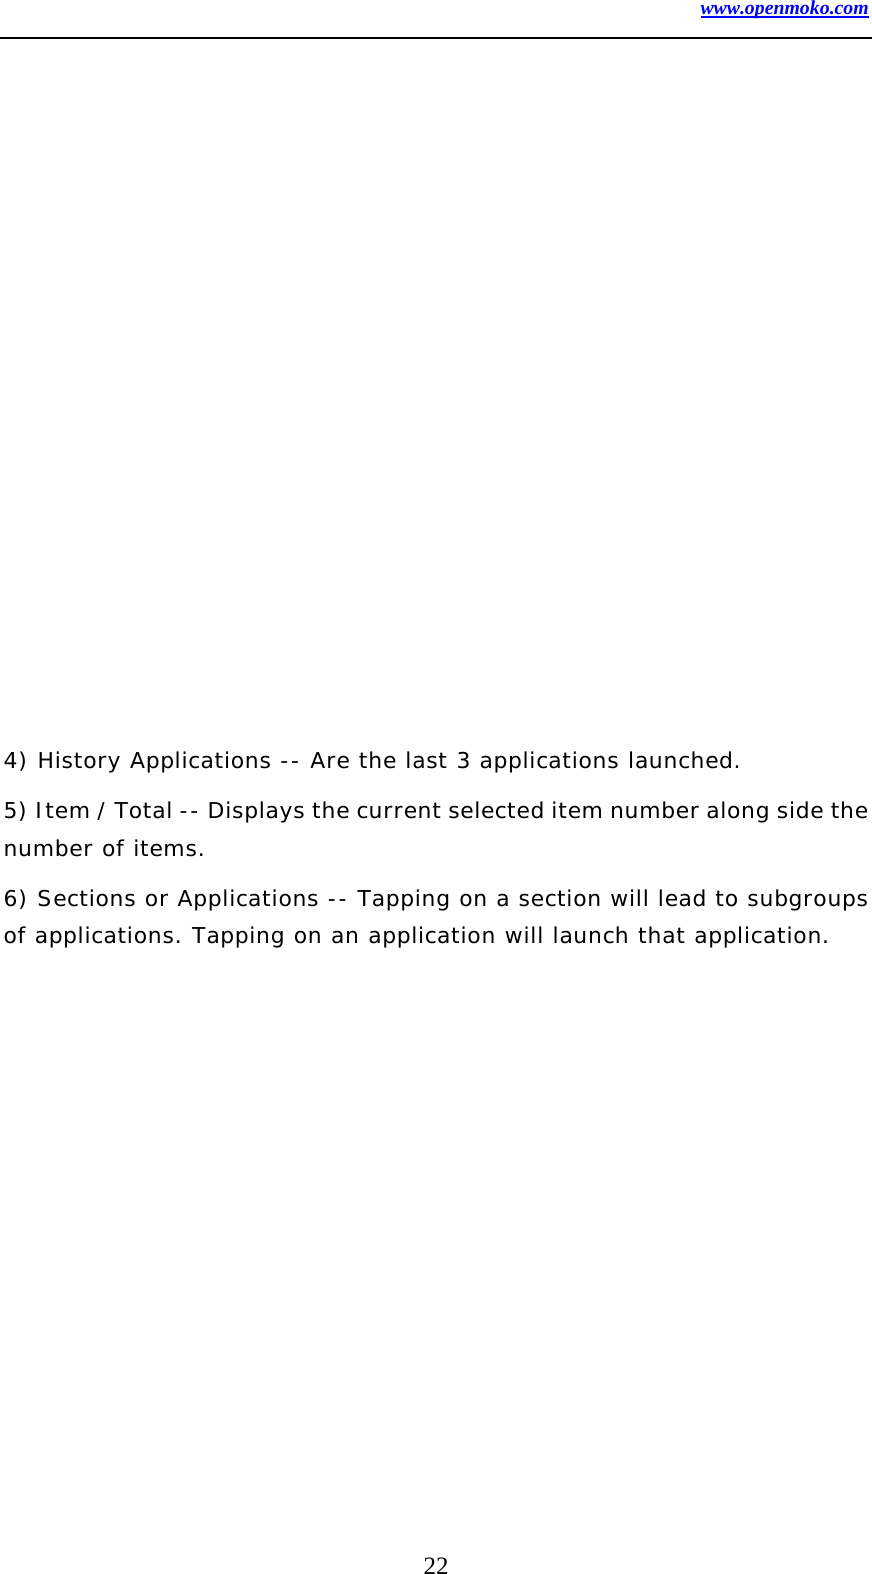
![www.openmoko.com 10 download the given file into the device. 1-4-8 upload upload from the DFU device into the given file[name]. NOTE: Upload support is currently broken Phrasebook There's no full-fledged manual yet. Instead, some examples: Flashing the kernel dfu-util -a 3 -R -D /path/to/uImage Flashing the bootloader dfu-util -a 1 -R -D /path/to/u-boot.bin Copying a kernel into RAM dfu-util -a 0 -R -D /path/to/uImage Once this has finished, the kernel will be available at the default load address of 0x32000000 in Neo1973 RAM.](https://usermanual.wiki/First-Computer/GTA01BV4/User-Guide-814074-Page-10.png)