First Computer A430 Notebook PC User Manual Chap6
First International Computer Inc Notebook PC Chap6
UserManual.wiki
>
First Computer
>
A430 User Manual
>
Chap 6
Contents
1.
Instruction
2.
Chap 1
3.
Chap 2
4.
Chap 3
5.
Chap 4
6.
Chap 5
7.
Chap 6
8.
Chap 7
9.
Chap 8
10.
Appendix
Chap 6
Navigation menu
Upload a User Manual
Namespaces
Wiki Guide
HTML
PDF
Info
Views
User Manual
Discussion / Help
Navigation
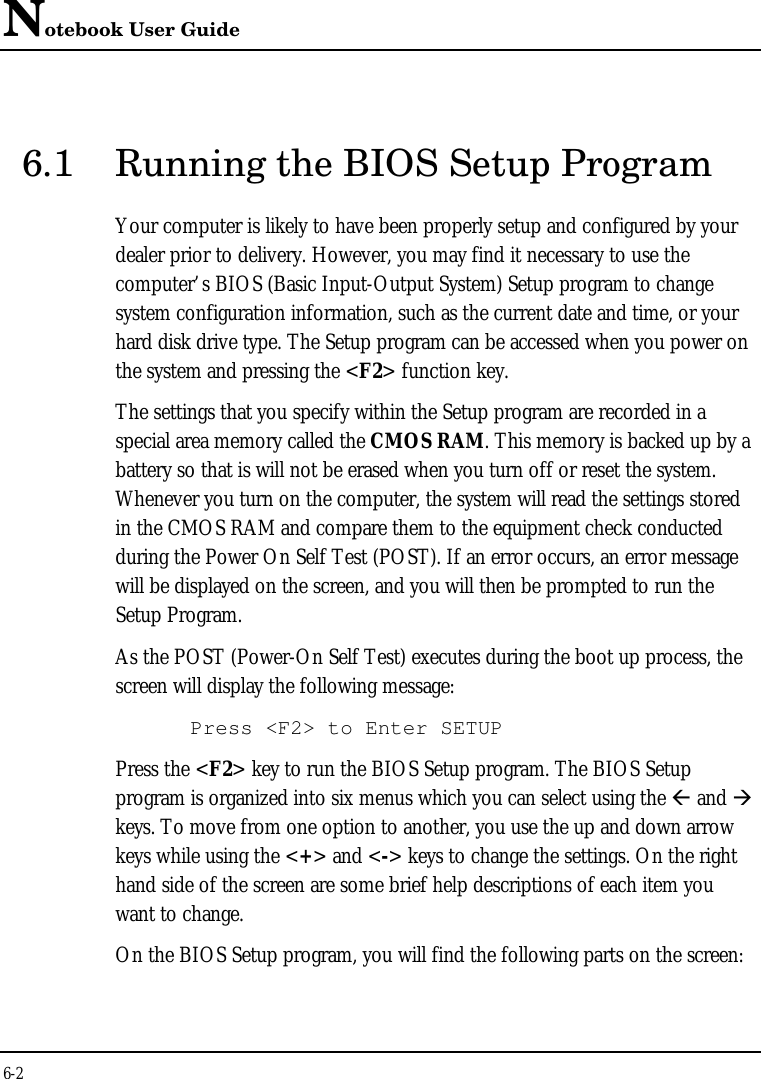
![Notebook User Guide6-46.2 Using the Main Menu SetupPhoenixBIOS Setup UtilityMain Advanced Security Power Boot ExitItem Specific HelpSystem Time:[12:00 :00]<Tab>, <Shift-Tab>,System Date: [07/01/1999] or <Enter> selectsLanguage: [English (US)] field.Diskette A: [1.44/1.25 MB, 3½”]4Internal HDD [12073MB]Internal CD-ROM InstalledBoot Display Device: [Both]System Memory: 640 KBExtended Memory: 130048 KBCPU Type: Pentium (R) IIICPU Speed: 500 MHzBIOS Version: B.1A-0215-6211F1 Helpá âSelect Item−/+Change Values F9 Setup DefaultsEsc ExitßàSelect Menu Enter Select 4Sub-Menu F10 Save and Exit](https://usermanual.wiki/First-Computer/A430.Chap-6/User-Guide-92185-Page-4.png)
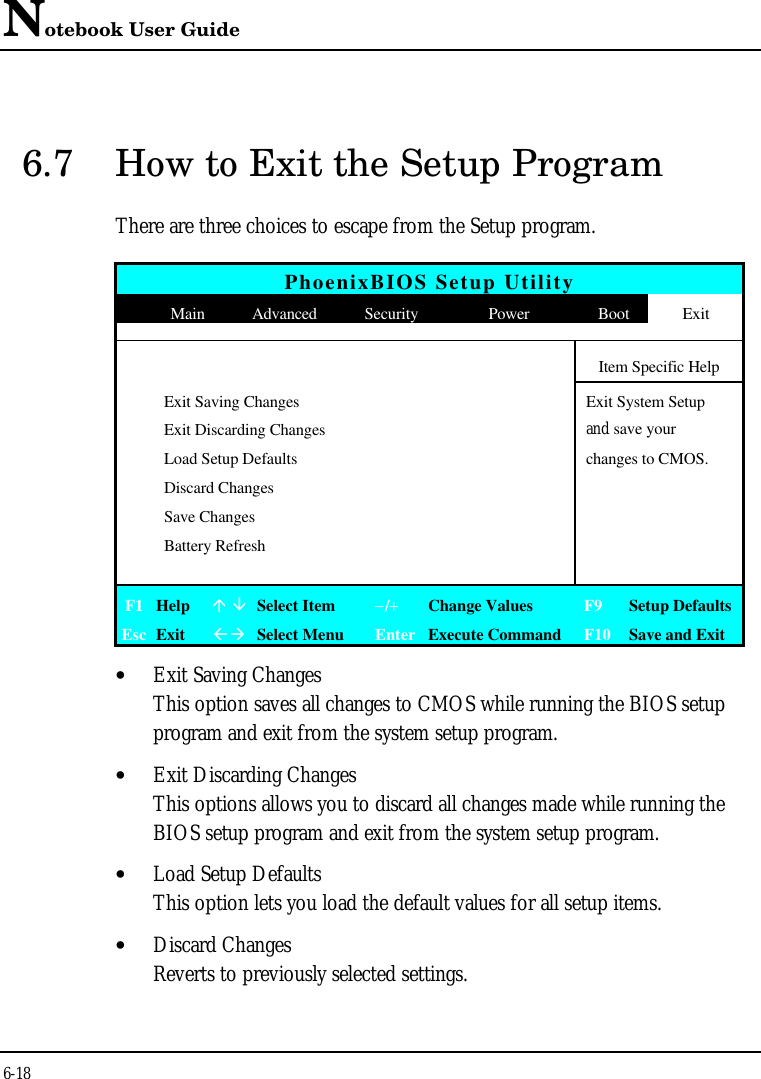
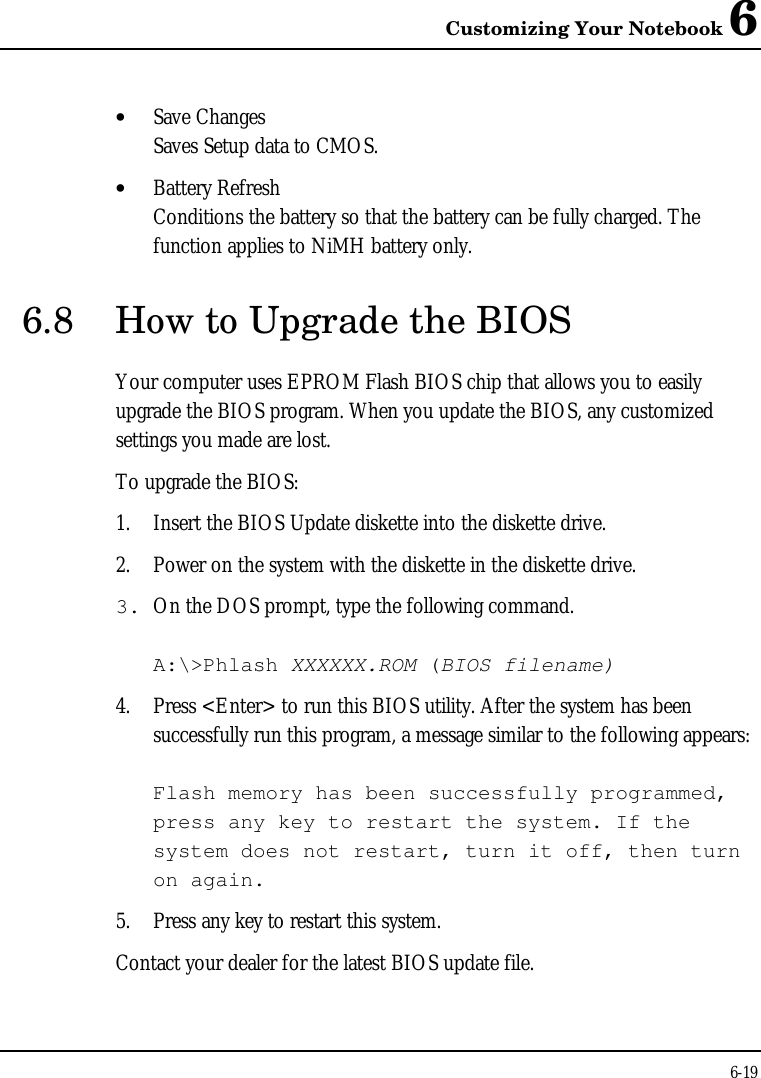
![Customizing Your Notebook 66-5• System TimeAllows you to change the system time using the hour:minute:secondformat of the computer.Enter the current time for reach field and use the <Tab>,<Shift>+<Tab>, or <Enter> key to move from one field or back toanother.You can also change the system time from your operating system.• System DateAllows you to set the system date using the month/date/year format.Your notebook is year 2000-compliant.Enter the current time for reach field and use the <Tab>,<Shift>+<Tab>, or <Enter> key to move from one field or back toanother.You can also change the system time from your operating system.• LanguageAllows you to set the display language in English or Japanese version forthe BIOS Setup program.• Diskette AThis item enables or disables the floppy disk drive by pressing the<Enter> key. When you select 1.44MB/1.25MB 3 ½”, you should knowthat the 1.25MB 3 ½” diskette requires a 3-mode floppy-disk drive andrefers to a 1024byte/sector Japanese media format.• Internal HDDThis field displays various parameters for the hard disk drive. If type[Auto] is selected, the system automatically sets these parameters. If type[User] is selected, Cylinders, Heads and Sectors can be edited.• Internal CD-ROMThis field is for information only as the BIOS automatically detects theCD-ROM.](https://usermanual.wiki/First-Computer/A430.Chap-6/User-Guide-92185-Page-5.png)
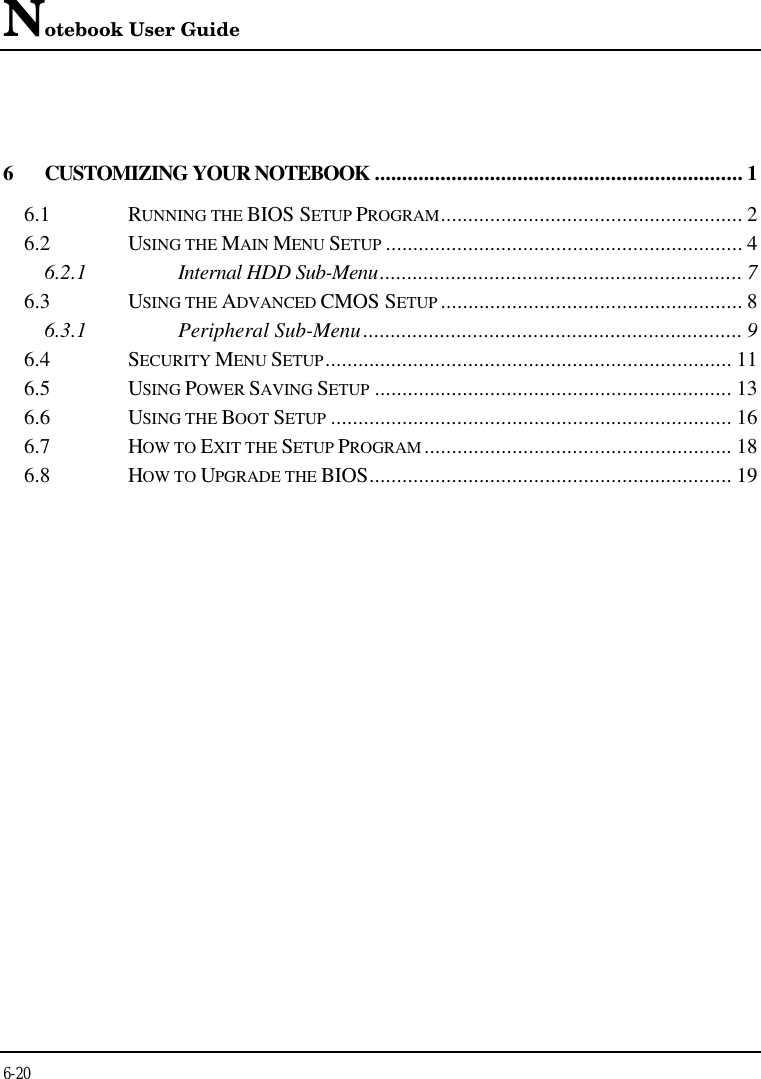
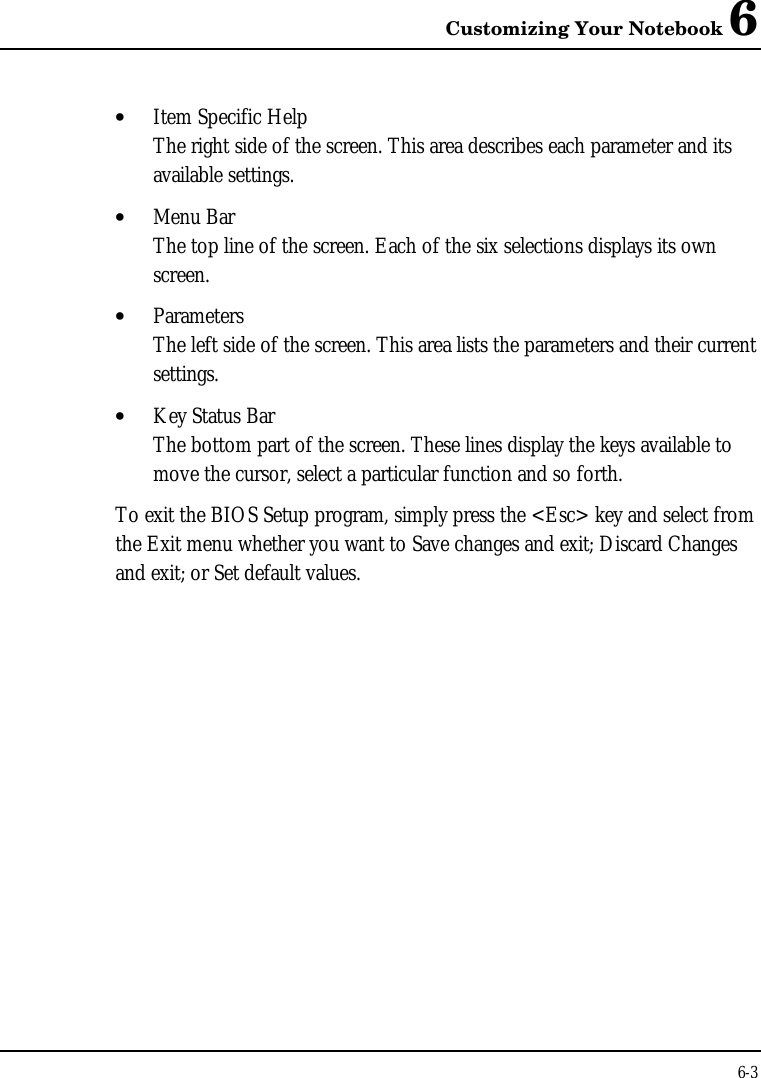
![Customizing Your Notebook 66-76.2.1 INTERNAL HDD SUB-MENUPhoenixBIOS Setup UtilityMainInternal HDD: [12073MB] Item Specific HelpType:[Auto]User = you enterCylinders: [16383] parameters of hard-Heads: [16] disk drive installedSectors: [63] at the Connection.Maximum Capacity: 12073MB Auto = autotypesHard-disk driveMulti-Sector Transfers: [16 Sectors] installed here.LBA Mode Control: [Enabled] None = no device is32 Bit I/O: [Disabled] installed here.Transfer Mode: [Fast PIO 4] CD-ROM = a CD-SMART Monitoring: Disabled ROM drive isUltra DMA Mode: [Mode 2] installed here.F1 Helpá âSelect Item−/+Change Values F9 Setup DefaultsEsc ExitßàSelect Menu Enter Select 4Sub-Menu F10 Save and ExitUse the Type field to select the drive type installed. You can select differentdrive types as CD-ROM, User, or None by pressing <Space> bar. Set thisoption to Auto so your computer will automatically detect the drive typeduring power on. Set this option to None when your computer is not installedany devices. Press <Esc> to return to the Main Menu.](https://usermanual.wiki/First-Computer/A430.Chap-6/User-Guide-92185-Page-7.png)
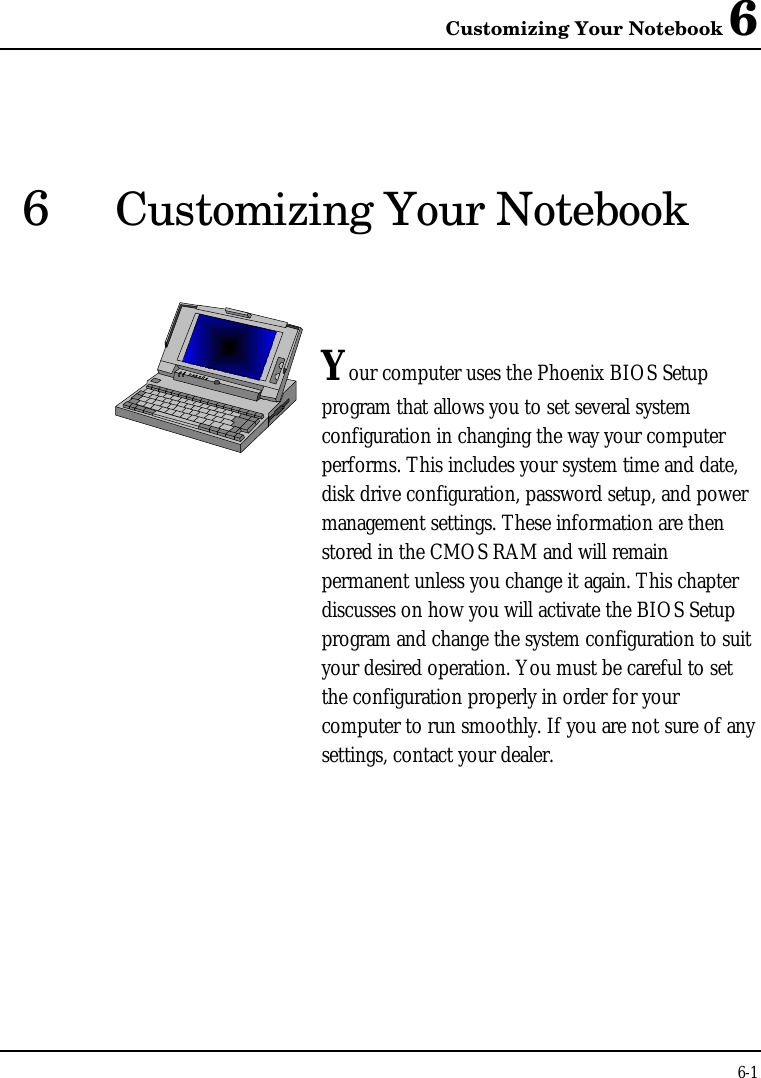
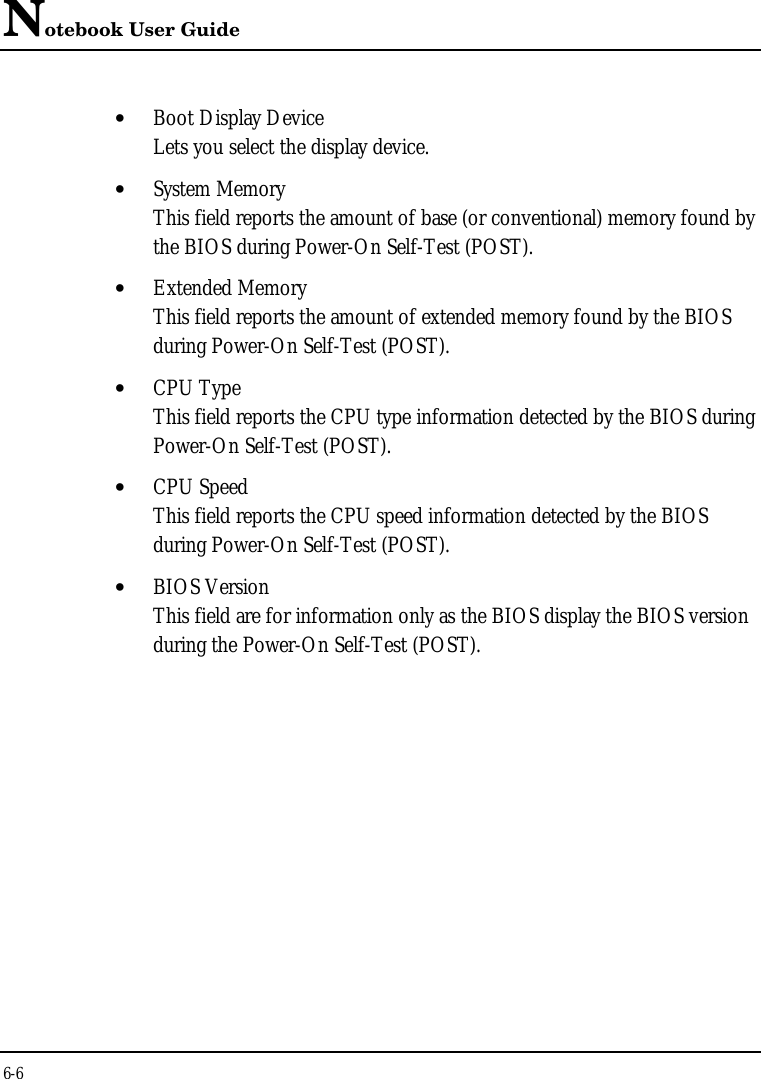
![Notebook User Guide6-86.3 Using the Advanced CMOS SetupPhoenixBIOS Setup UtilityMain Advanced Security Power Boot ExitItem Specific HelpPS/2 Mouse: [Enabled] ‘Disabled’ prevents anySilent Boot: [Disabled] installed PS/2 mouseLocal Bus IDE adapter: [Both] from functioning, but4I/O Device Configuration frees up IRQ12.‘Enabled’ allows theoperating system todetermine whetherto enable or disablethe mouseF1 Helpá âSelect Item−/+Change Values F9 Setup DefaultsEsc ExitßàSelect Menu Enter Select 4Sub-Menu F10 Save and Exit• PS/2 Mouse[Enabled] allows the OS to determine whether to enable or disable thePS/2 mouse. [Disabled] prevents any installed PS/2 mouse fromfunctioning.• Silent BootLets you specify the boot screen as Logo screen, POST screen, or Blackscreen by choosing Enabled, Disabled, or Black option, respectively.• Local Bus IDE adapterAllows you to enable/disable the IDE hardware such as HDD and CD-ROM.• I/O Device ConfigurationLets you configure input/output device such as Serial Port, Infrared Port,Parallel Port, and Floppy disk controller.](https://usermanual.wiki/First-Computer/A430.Chap-6/User-Guide-92185-Page-8.png)
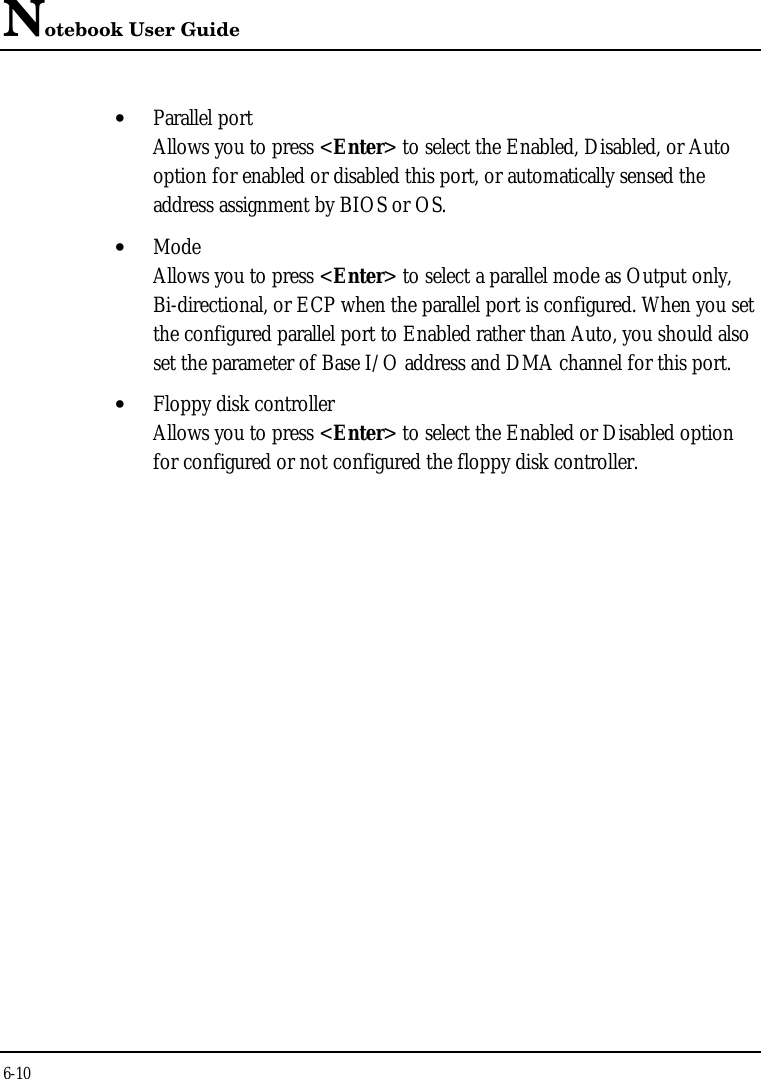
![Customizing Your Notebook 66-96.3.1 PERIPHERAL SUB-MENUPhoenixBIOS Setup UtilityAdvancedI/O Device Configuration Item Specific HelpSerial port: [Auto] Configure serial port AInfrared port: [Disabled] using options:Parallel port: [Auto] [Disabled] Mode: [Bi-directional] No configuration, Floppy disk controller: [Enable] [Enabled] User configuration,[Auto] BIOS or OS choosesconfiguration,F1 Helpá âSelect Item−/+Change Values F9 Setup DefaultsEsc ExitßàSelect Menu Enter Select 4Sub-Menu F10 Save and Exit• Serial portYou can press <Enter> to select the Enabled, Disabled, or Auto optionfor enabled or disabled the port, or automatically sensed the addressassignment by BIOS or OS.• Infrared portLets you press <Enter> to select the Enabled, Disabled, or Auto optionfor enabled or disabled the port, or automatically sensed the addressassignment by BIOS or OS.](https://usermanual.wiki/First-Computer/A430.Chap-6/User-Guide-92185-Page-9.png)
![Customizing Your Notebook 66-116.4 Security Menu SetupPhoenixBIOS Setup Utility Main Advanced Security Power Boot ExitItem Specific HelpSet Supervisor Password:[Enter]Supervisor PasswordSet User Password: [Enter] controls access to thesetup utility.Password on boot: [Disabled]Password on Resume: [Disabled]Fixed disk boot sector: [Normal]Diskette access: [Supervisor]F1 Helpá âSelect Item−/+Change Values F9 Setup DefaultsEsc ExitßàSelect Menu Enter Select 4Sub-Menu F10 Save and Exit• Set Supervisor PasswordSupervisor password gives you the authority in accessing the setup utility.You can also enter the supervisor password in booting the system andresuming from suspend mode. When you press <Enter> in this field,the Set Supervisor Password dialog box appears. Enter a new passwordwith up to 8 alpha-numeric characters, and then enter this same newpassword again for confirmation.• Set User PasswordThis field is only available when you have set Supervisor Passwordpreviously. You can enter the user password when boot the system orresume from suspend mode. But if you set Write Protect in the Fixeddisk boot sector field, you should enter a supervisor password to accessthe fixed disk when boot the system or resume from suspend mode.](https://usermanual.wiki/First-Computer/A430.Chap-6/User-Guide-92185-Page-11.png)
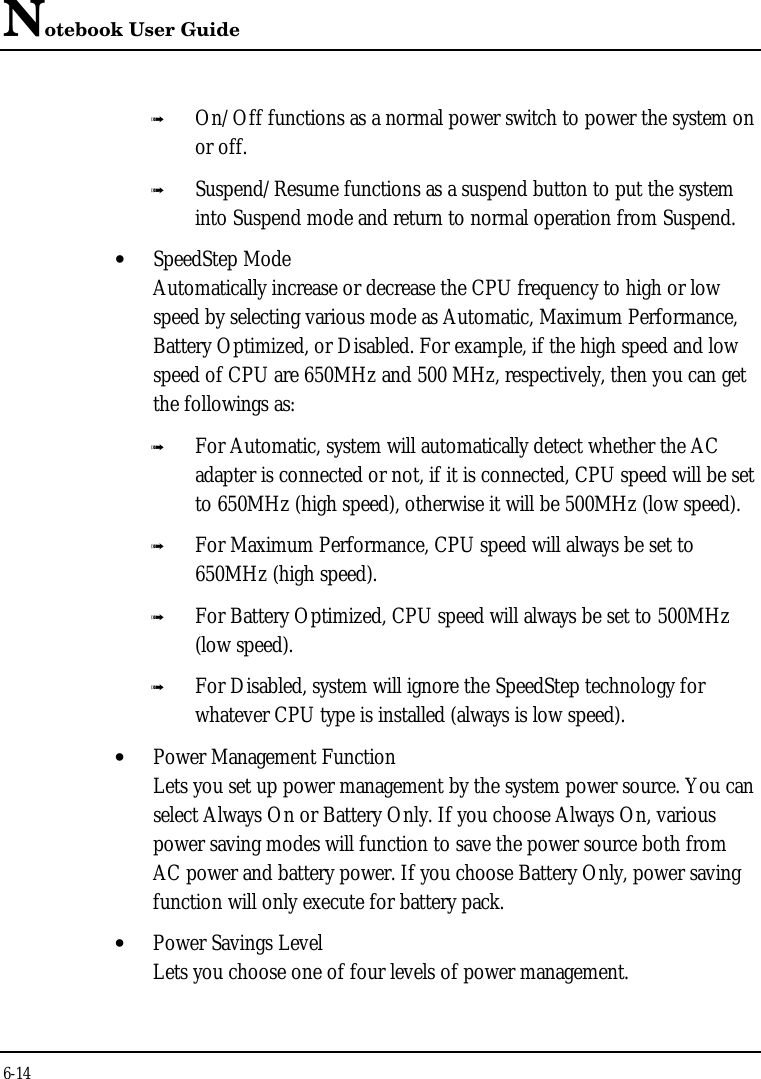
![Customizing Your Notebook 66-136.5 Using Power Saving SetupPhoenixBIOS Setup UtilityMain Advanced Security Power Boot ExitItem Specific Help Power Button Mode:[On/Off]Behavior of the SpeedStep Mode [Automatic]Power switch. Power Management Function[Battery only] ‘Suspend/Resume’ Power Savings Level[Disabled] causes the PC toSuspend/Resume, Standby Timeout: [Off] Suspend Timeout: [Off] ‘On/Off’ causes the Suspend Mode:[Suspend] PC to Power Auto Save To Disk:[Off] On/Off. Hard Disk Timeout: [Disabled] Video Timeout: [Disabled] Please be noticedthat all the Power Resume On Modem Ring:[Off] menu settings will Resume On Time:[Off] be ineffective in Resume Time:[00:00:00] the ACPI mode.F1 Helpá âSelect Item−/+Change Values F9 Setup DefaultsEsc ExitßàSelect Menu Enter Select 4Sub-Menu F10 Save and Exit• Power Button ModeThe power button operates as both an On/Off and Suspend/Resumebutton.](https://usermanual.wiki/First-Computer/A430.Chap-6/User-Guide-92185-Page-13.png)