Faurecia Clarion Electronics QY5014 2DIN DVD AUDIO-VISUAL-NAVI UNIT User Manual Navigation Manual
Clarion Co Ltd 2DIN DVD AUDIO-VISUAL-NAVI UNIT Navigation Manual
UserManual.wiki
>
Faurecia Clarion Electronics
>
QY5014 User Manual
>
Navigation Manual
Contents
1.
BT Manual
2.
Installation Manual
3.
Navigation Manual
4.
Quick Start Guide
Navigation Manual
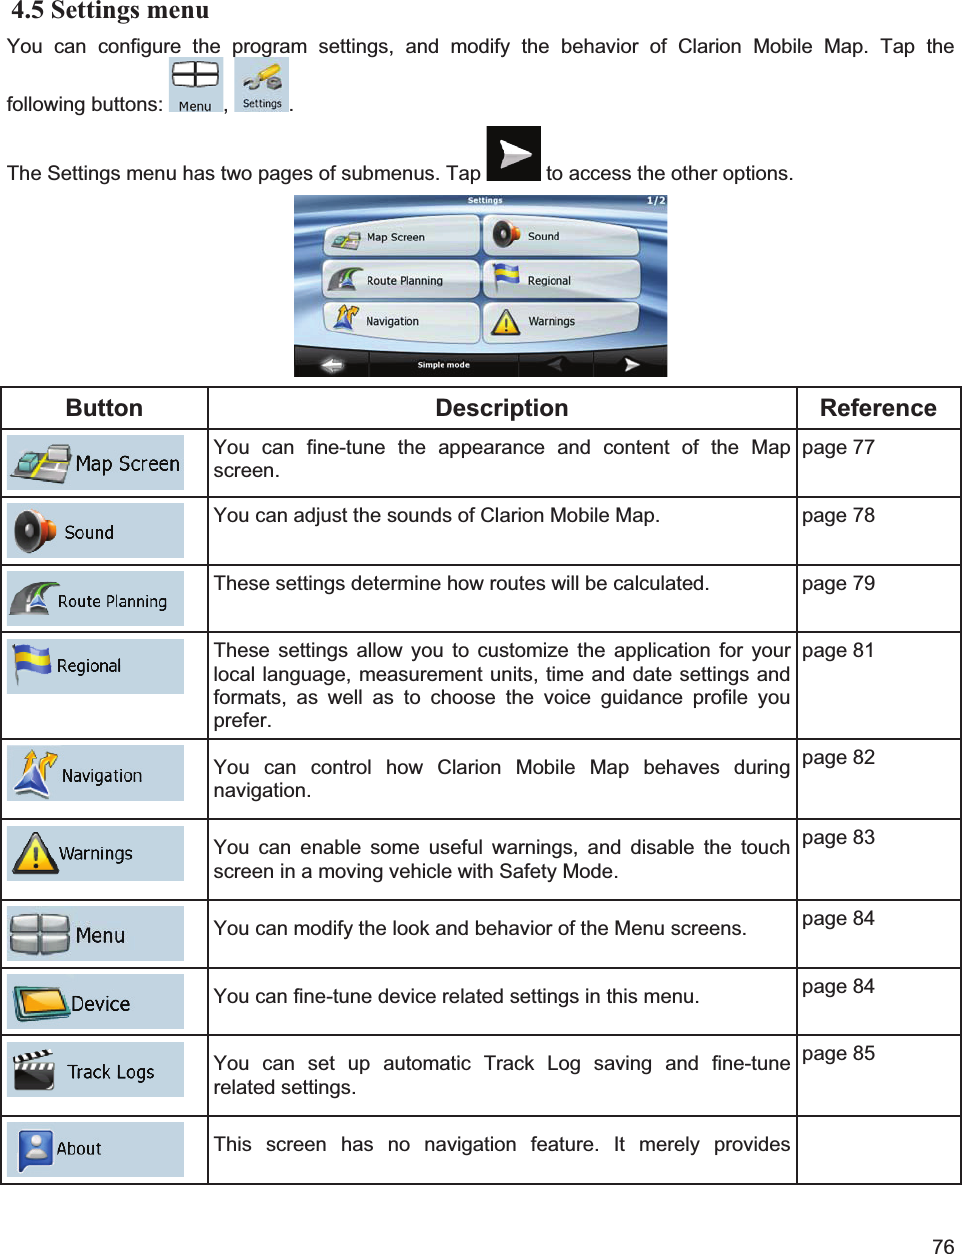
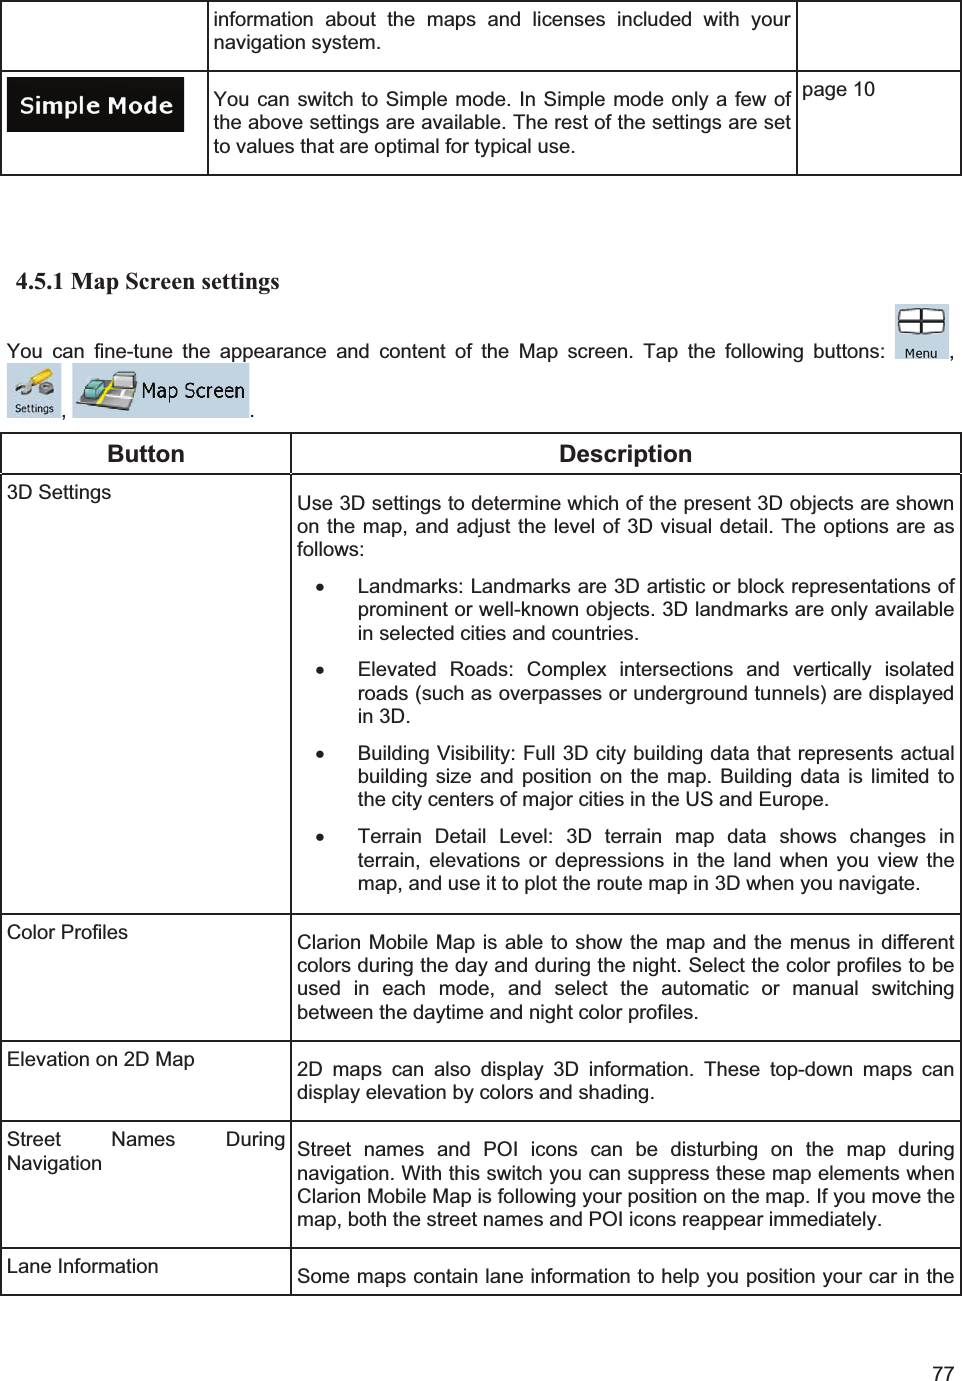
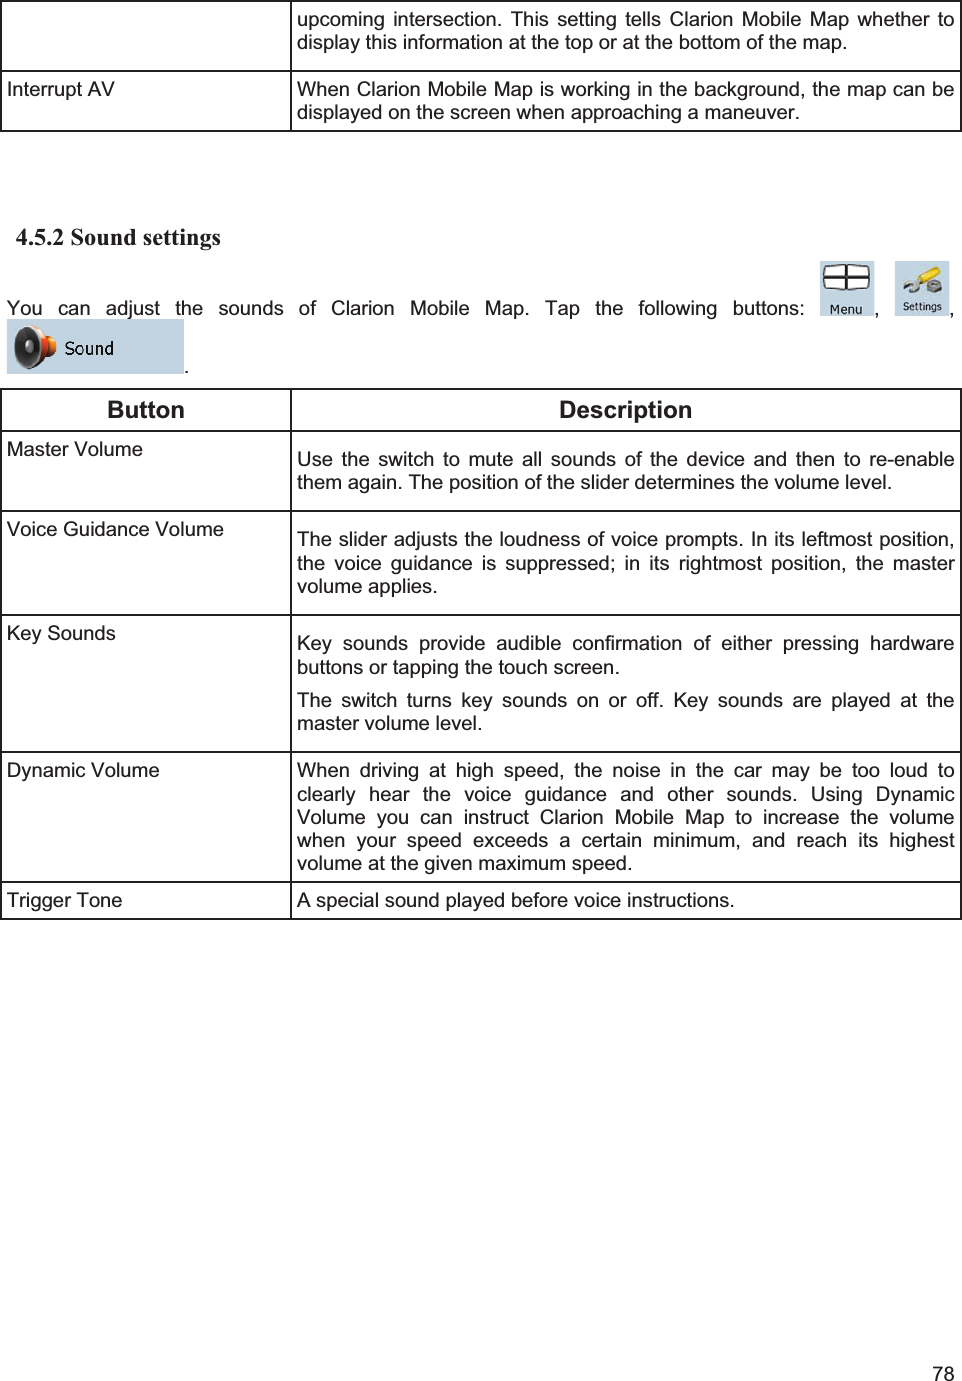
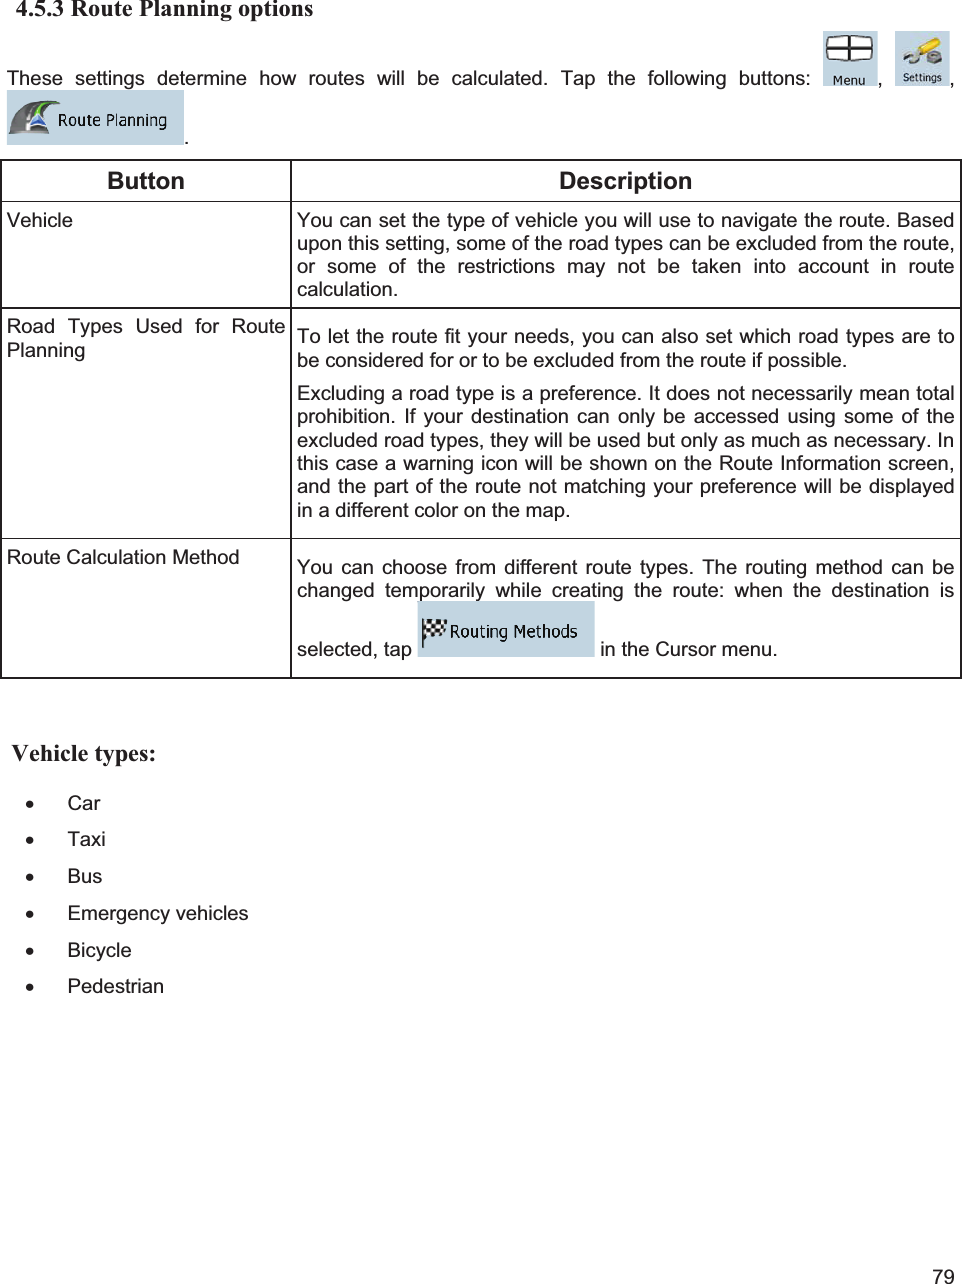
Navigation menu
Upload a User Manual
Namespaces
Wiki Guide
HTML
PDF
Info
Views
User Manual
Discussion / Help
Navigation
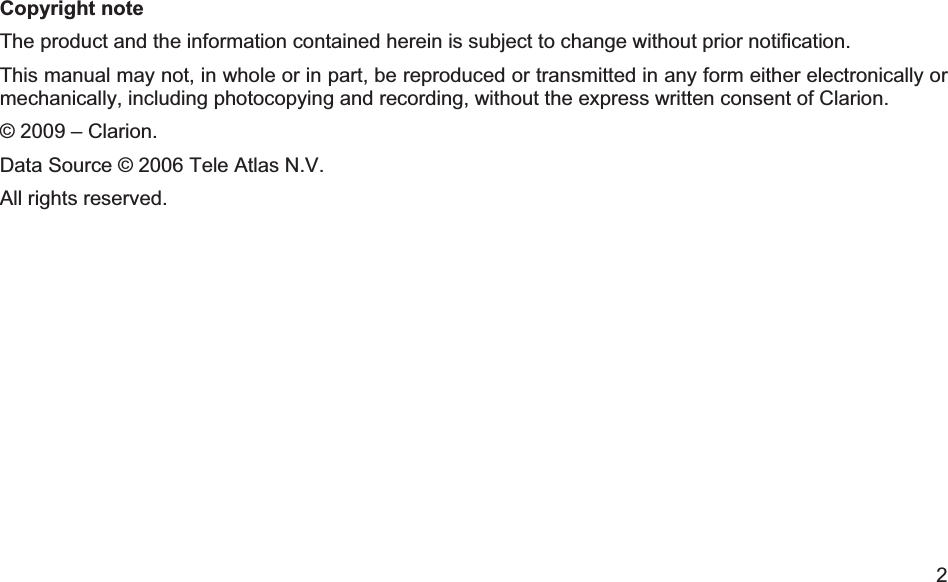

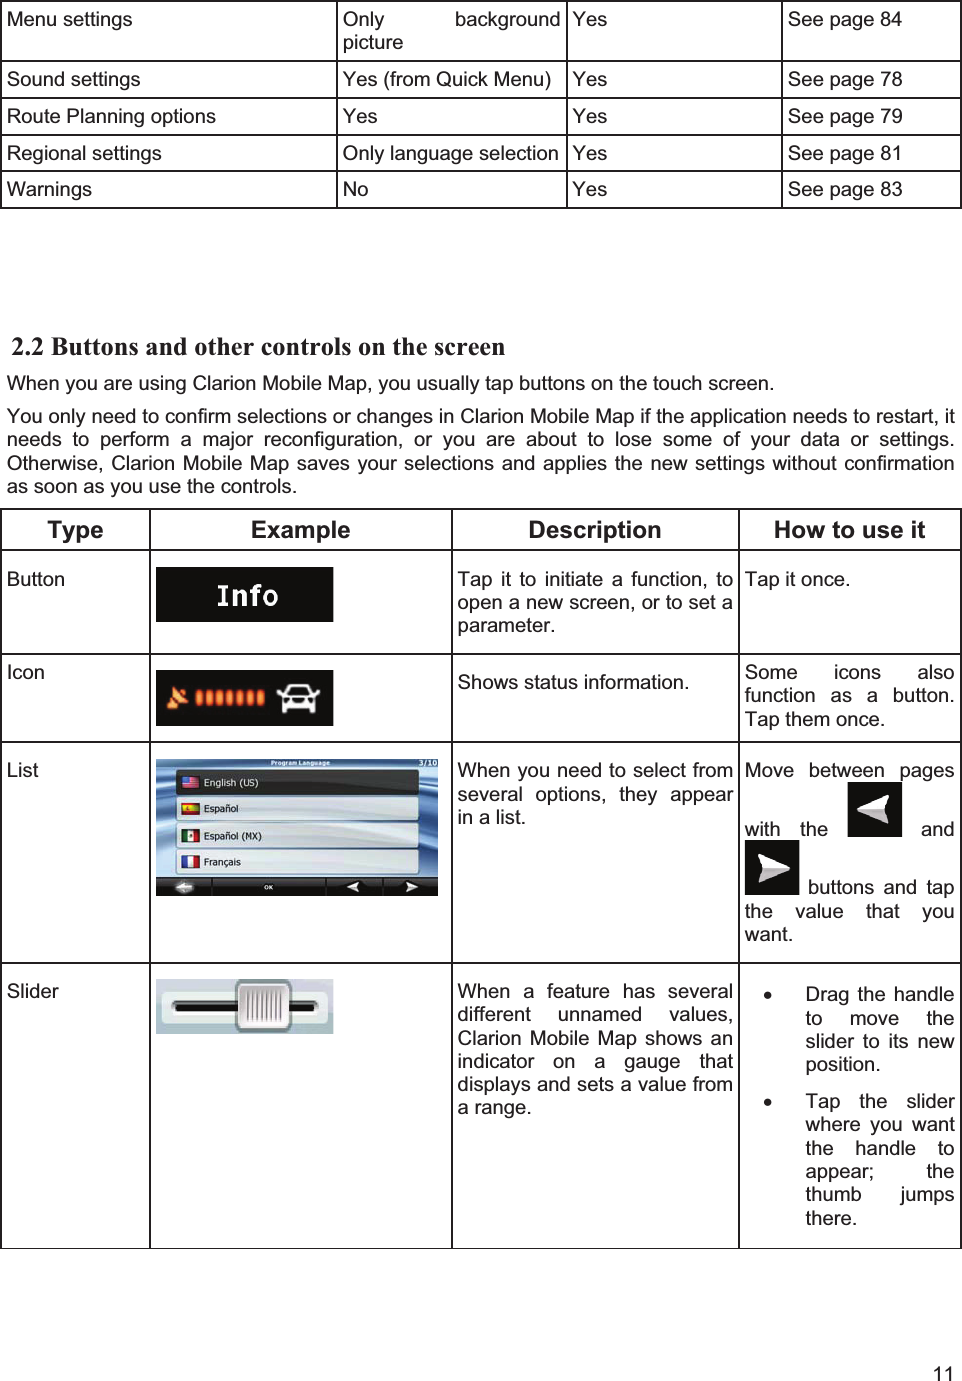
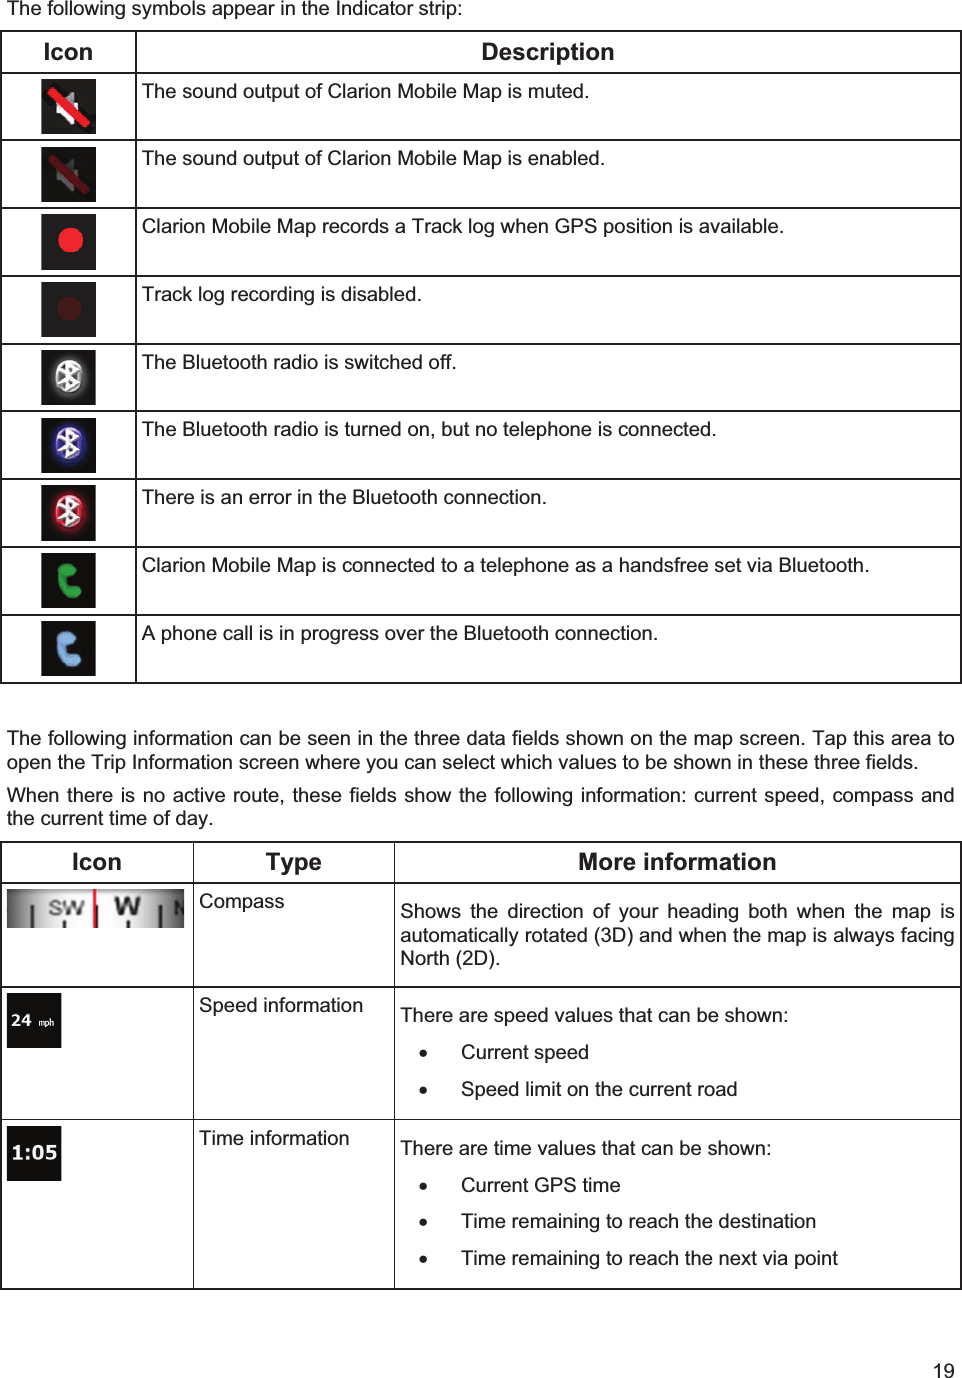
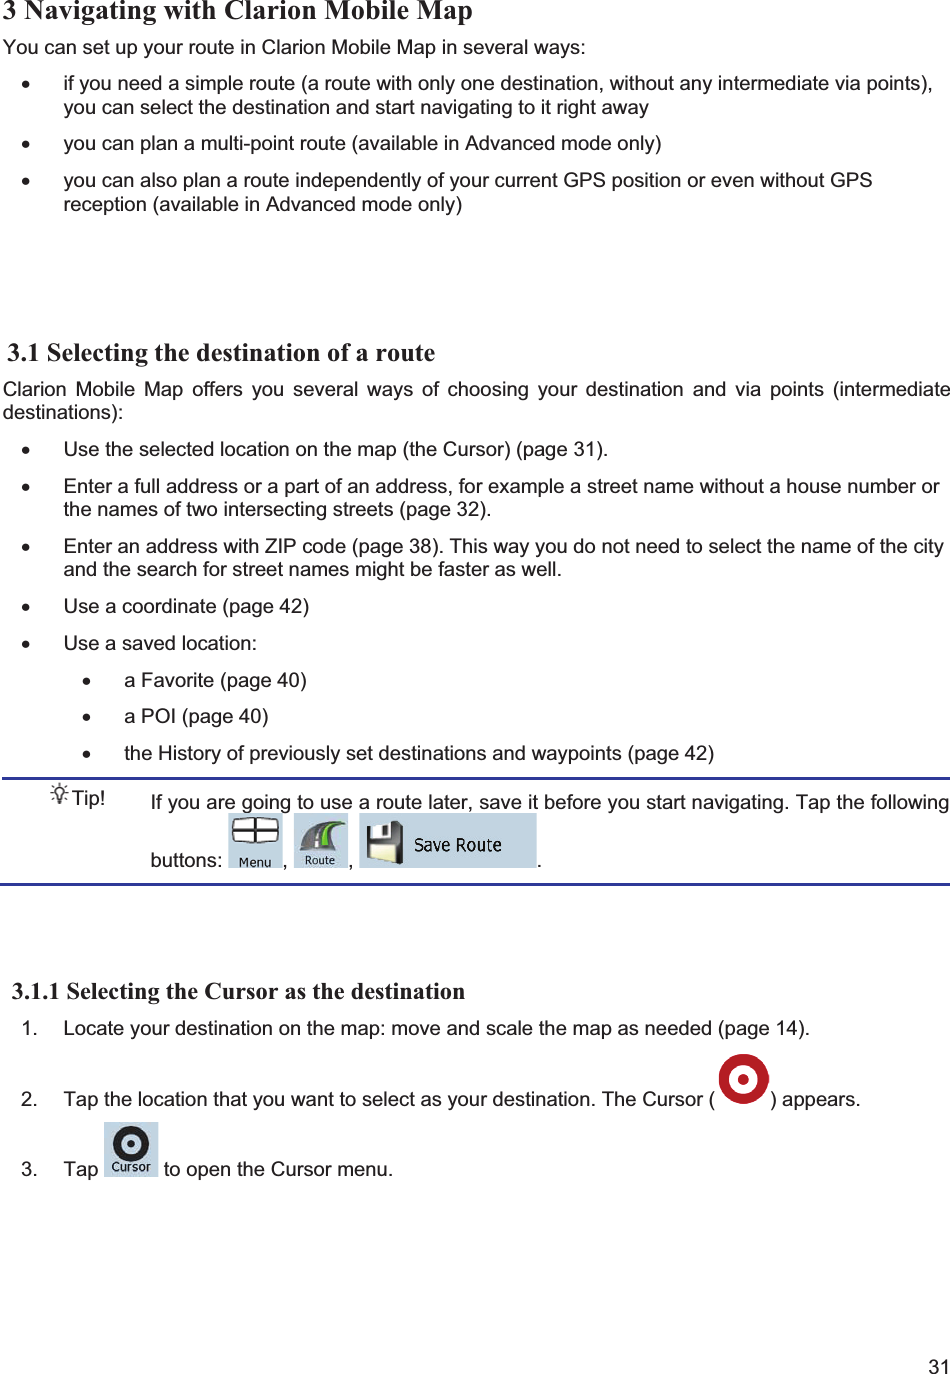

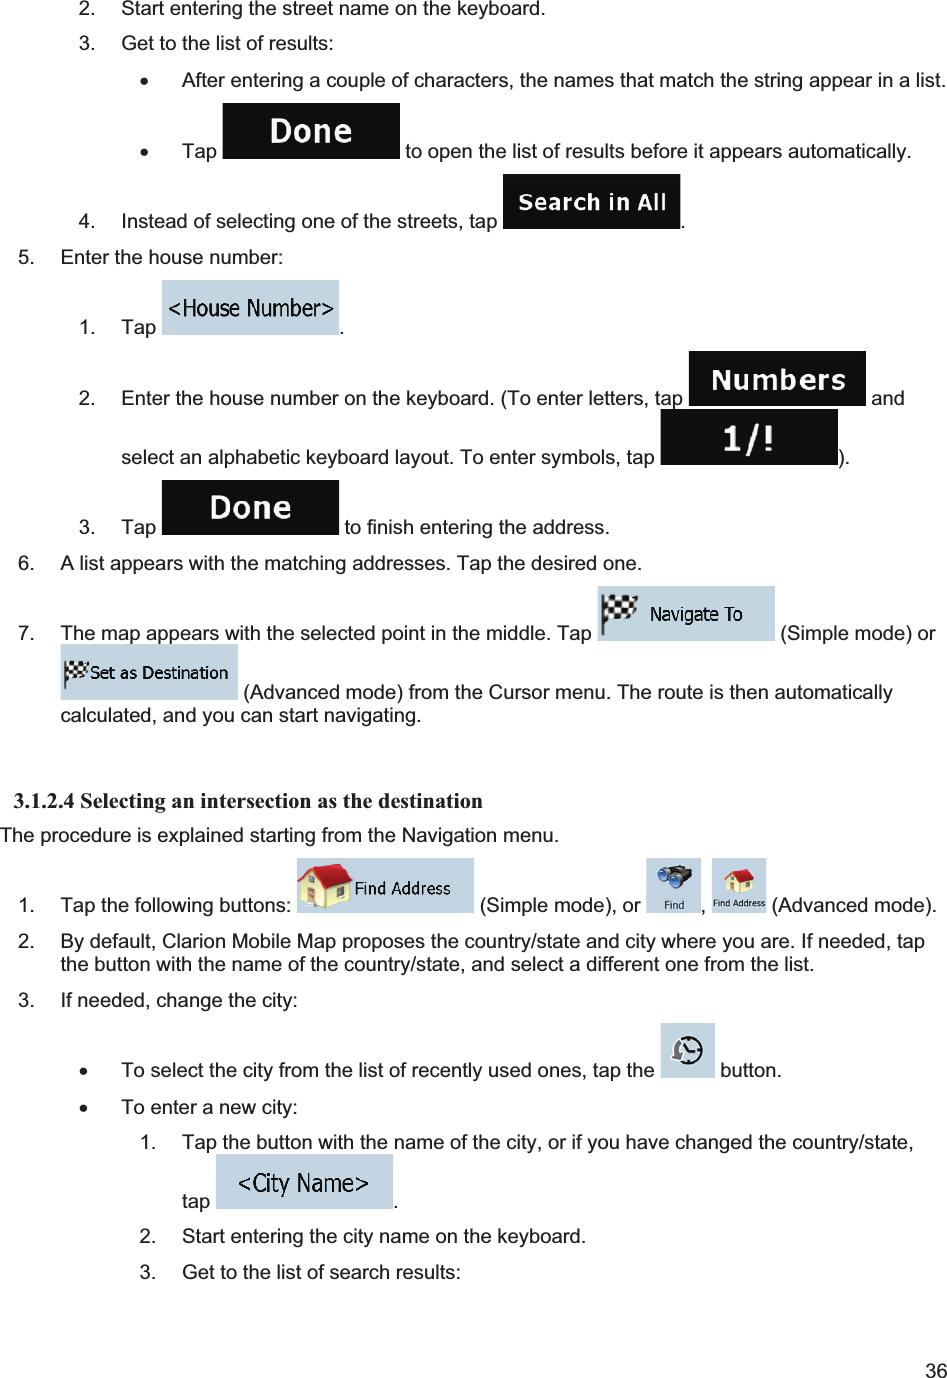
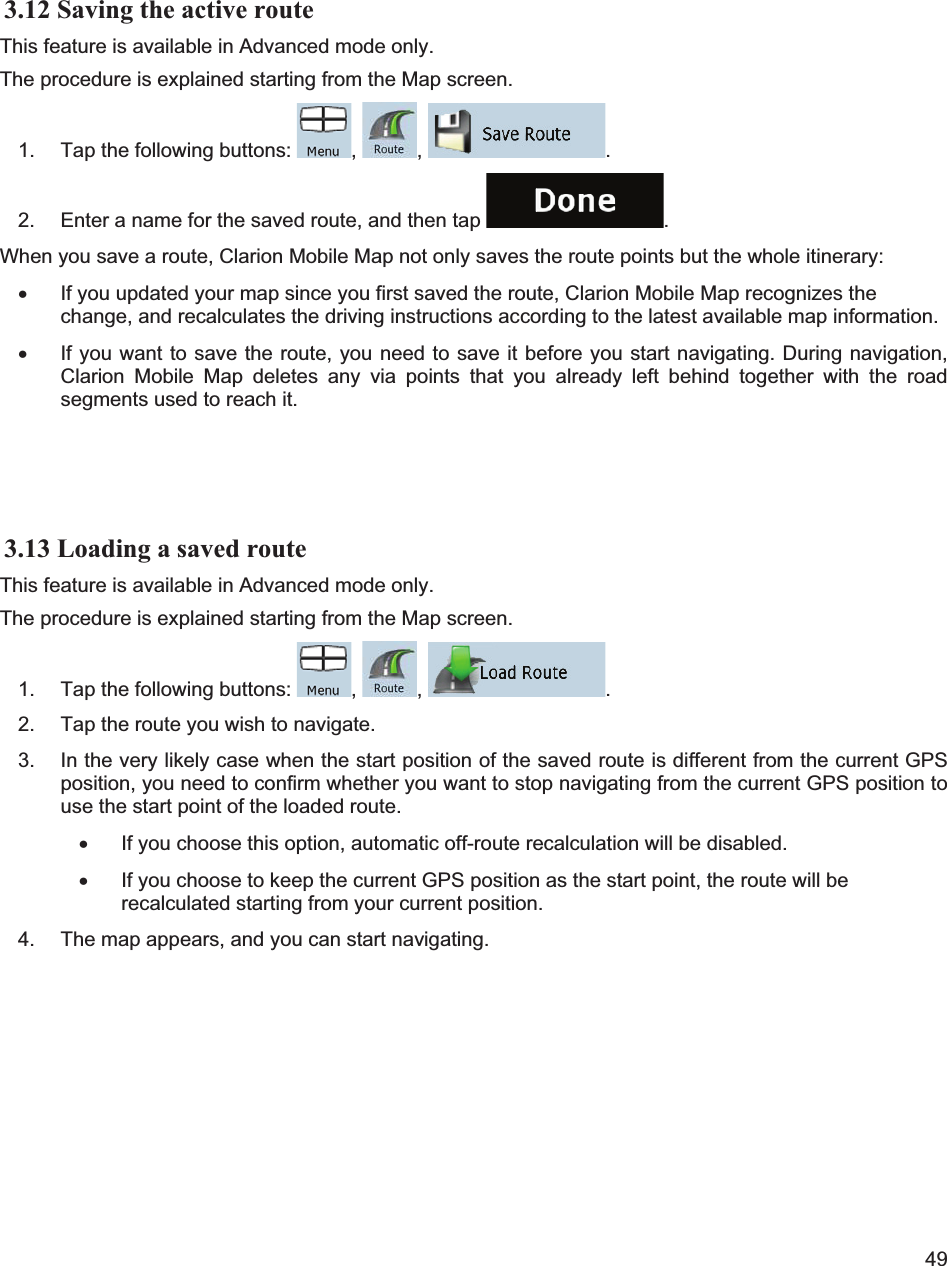
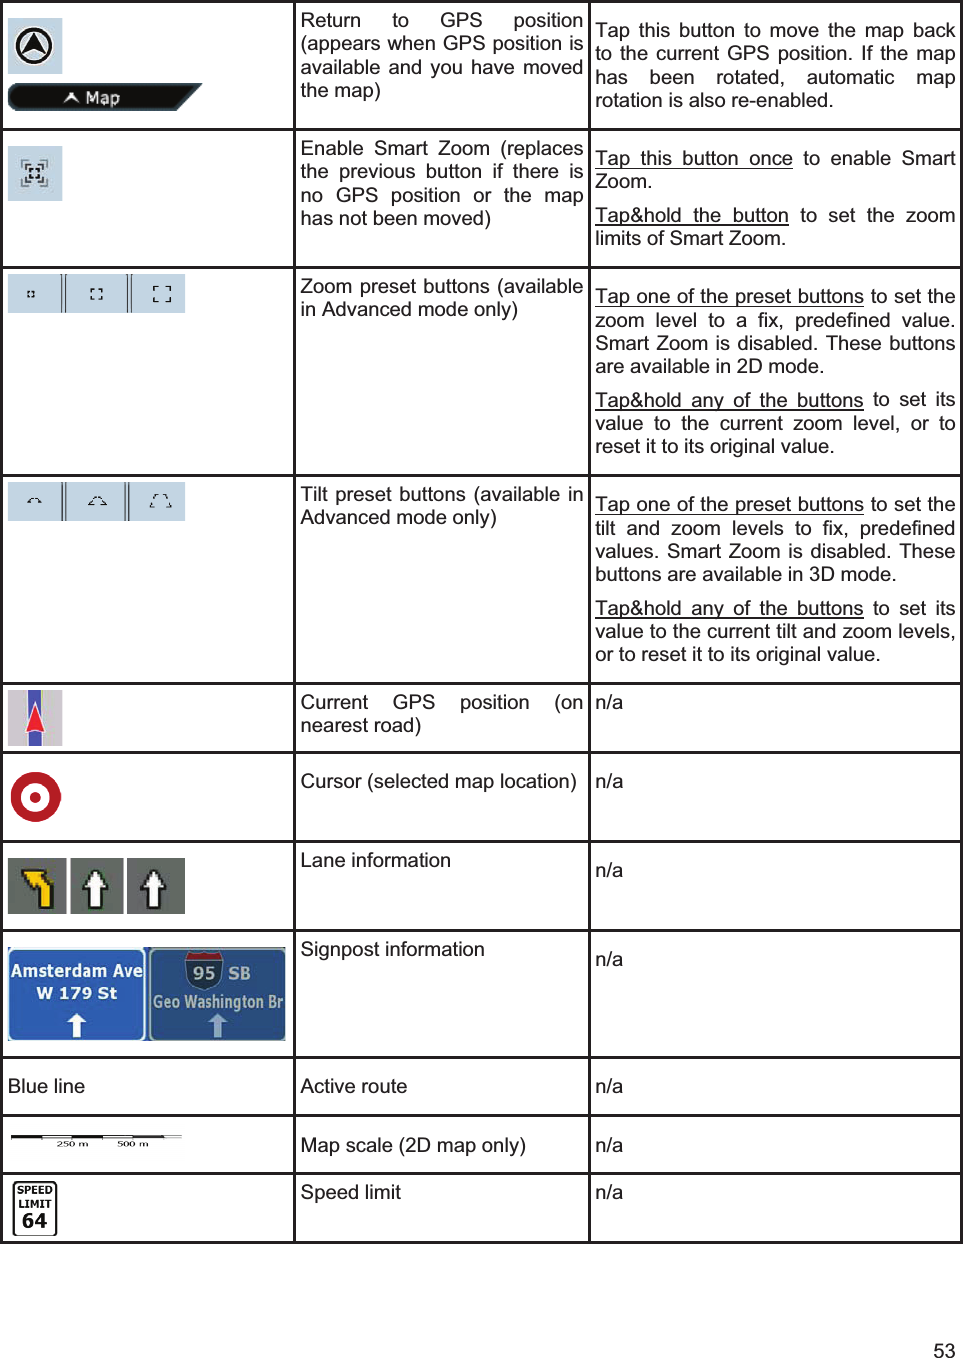
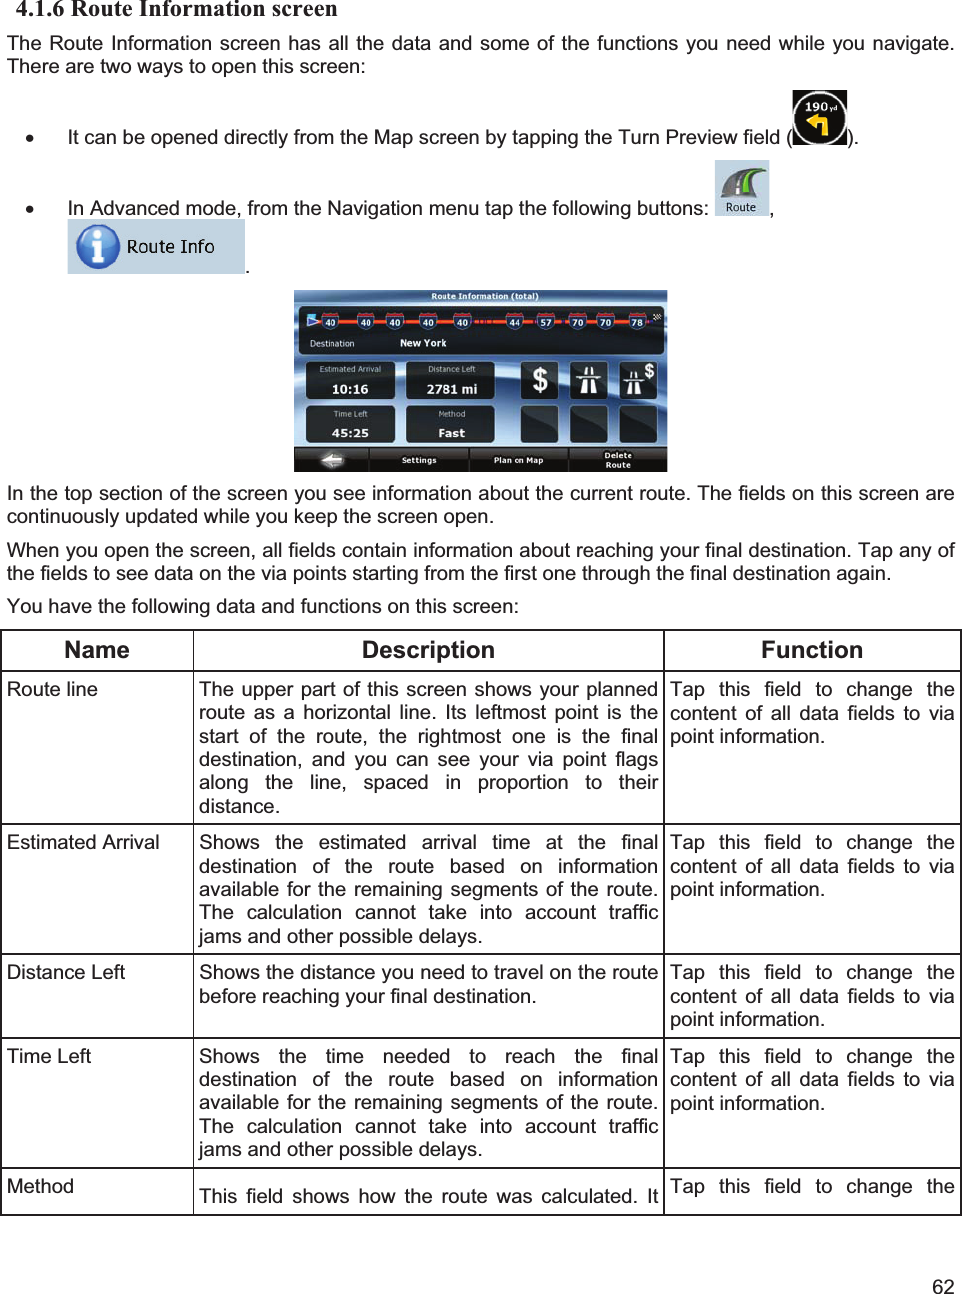
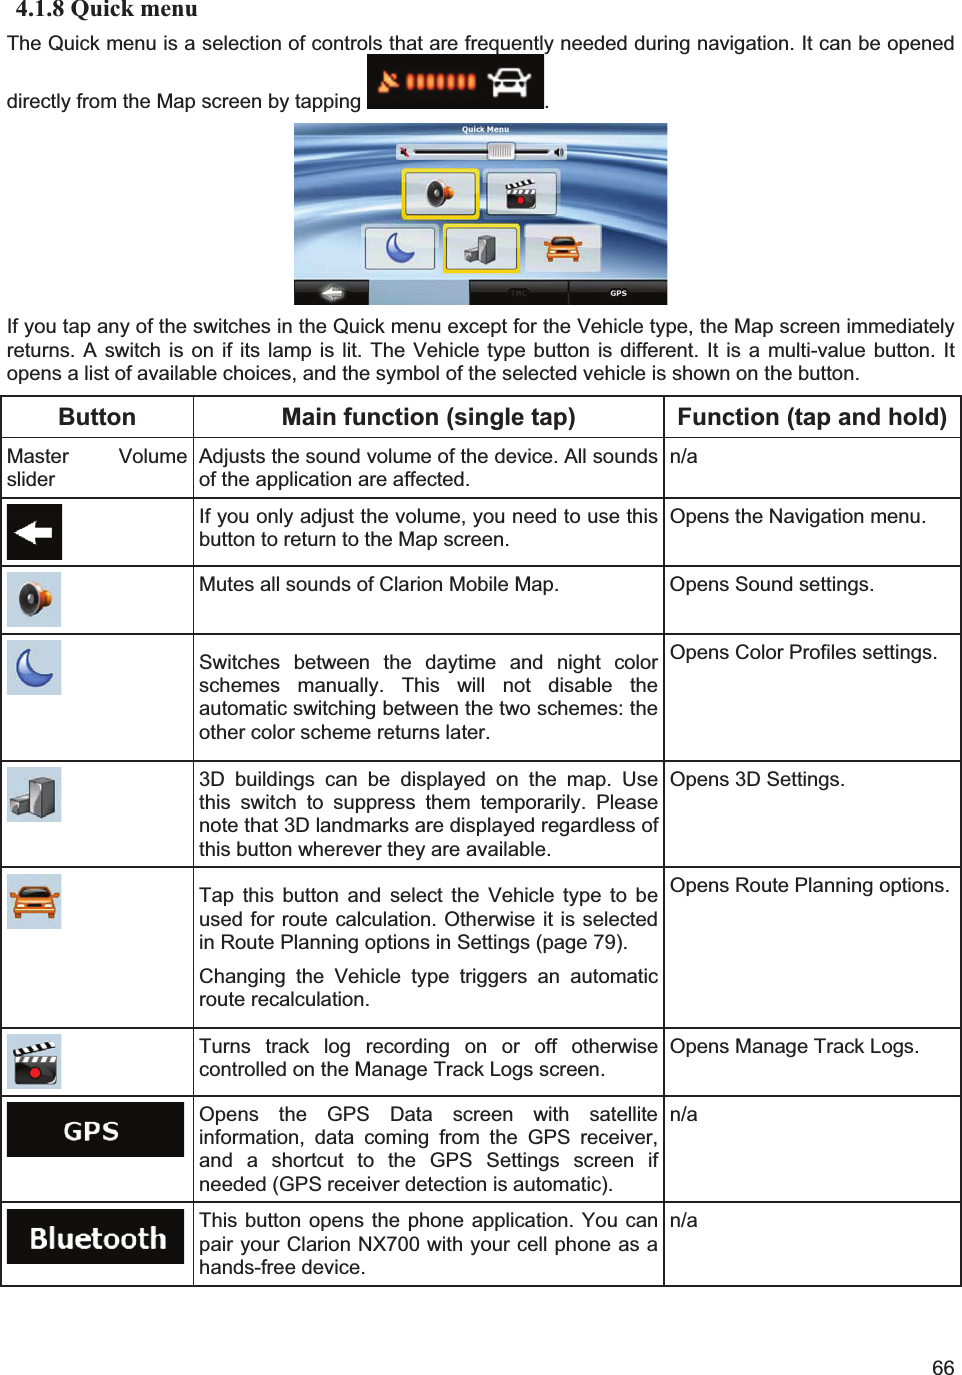
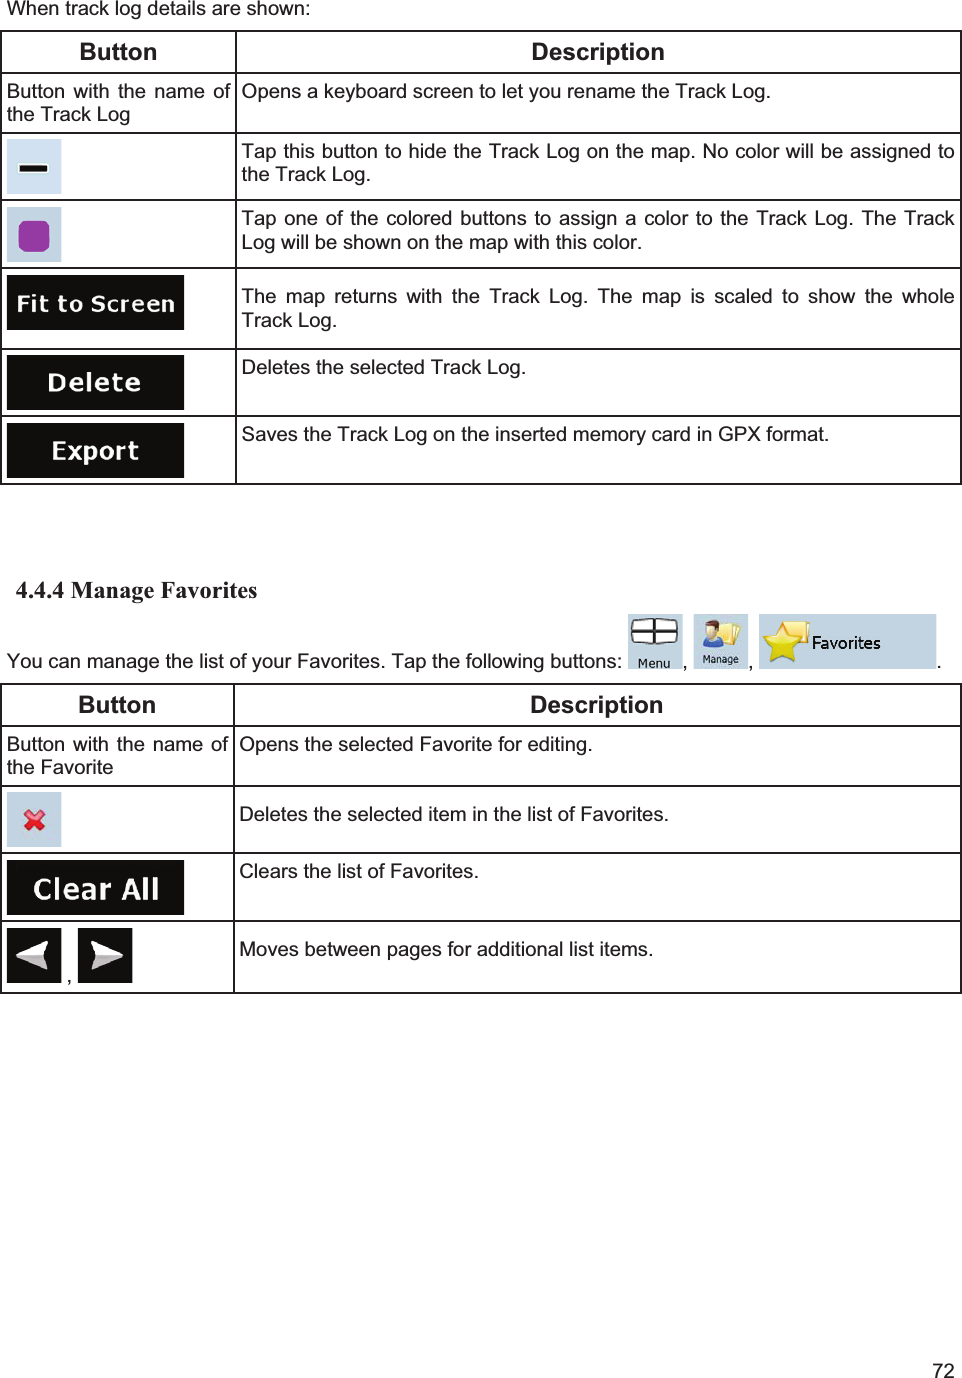
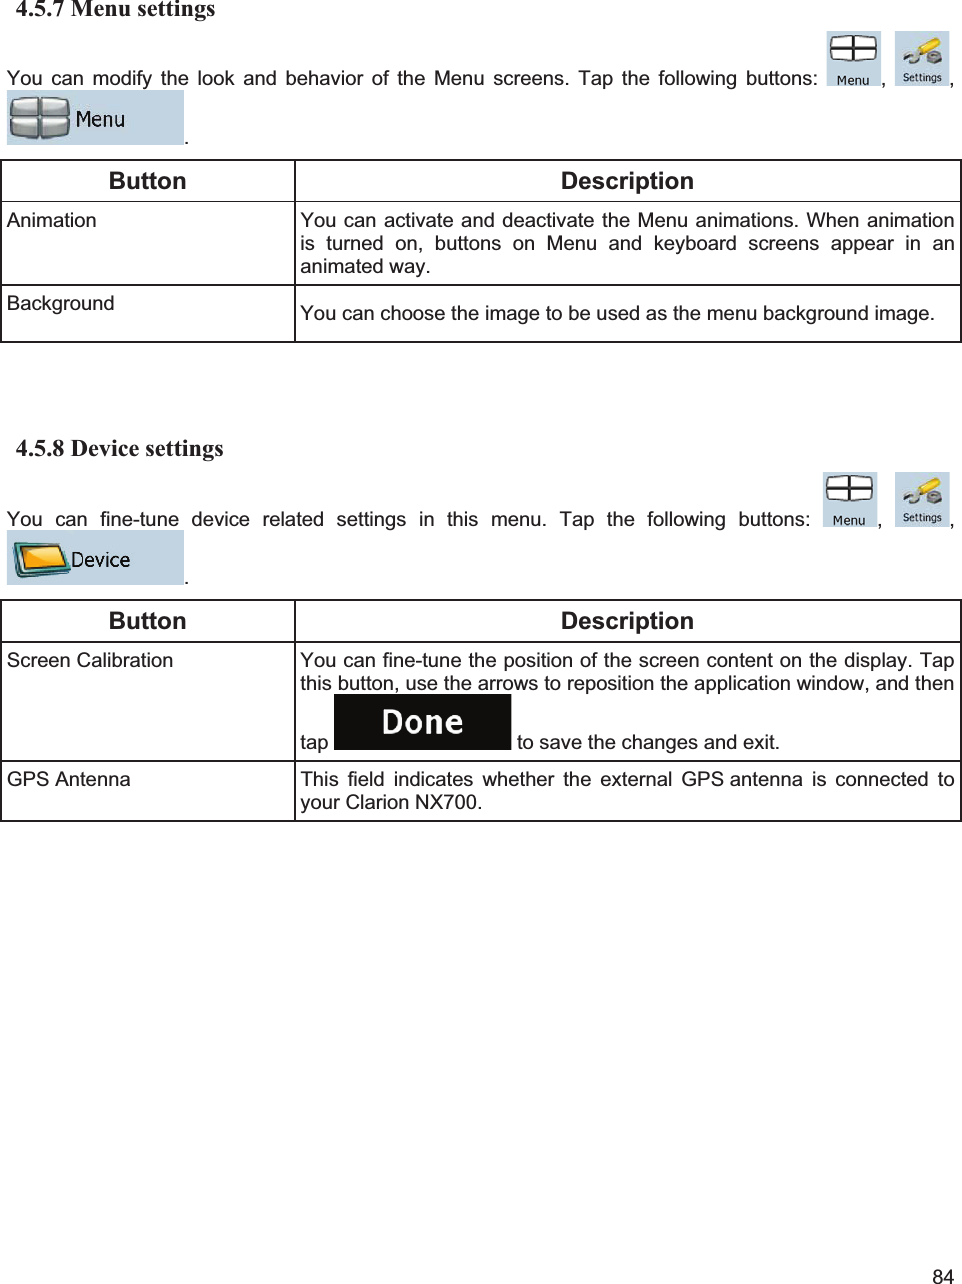
![41x To find the POI by its name, tap , and use the keyboard to enter a part of the name. x To list all POIs in a given POI group, tap . 4. [optional] When finally the list of results appear, you can sort the list: x : sort the list alphabetically (available when you search around a single location) x : sort the list by the distance from your current position in a straight line (available when you search around a single location) x : sort the list by the distance to drive on route from your current position (available when you search along the active route) x : sort the list by the size of the needed detour (available when you search along the active route) 5. Tap the desired POI in the list. 6. Review the details of the selected item and tap . 7. The map appears with the selected point in the middle. Tap (Simple mode) or (Advanced mode) from the Cursor menu. The route is then automatically calculated, and you can start navigating. 3.1.5 Selecting the destination with saved POI search criteria POI search criteria can be saved in the POI section of the Manage menu, but Clarion Mobile Map is already shipped with some saved criteria you can use instantly when searching for a POI. The procedure is explained starting from the Navigation menu. 1. Tap the following buttons: (Simple mode), or , (Advanced mode). 2. Tap . 3. Select one of the saved criteria, and the list of matching POIs appears. 4. Tap the desired POI in the list.](https://usermanual.wiki/Faurecia-Clarion-Electronics/QY5014.Navigation-Manual/User-Guide-1211548-Page-41.png)
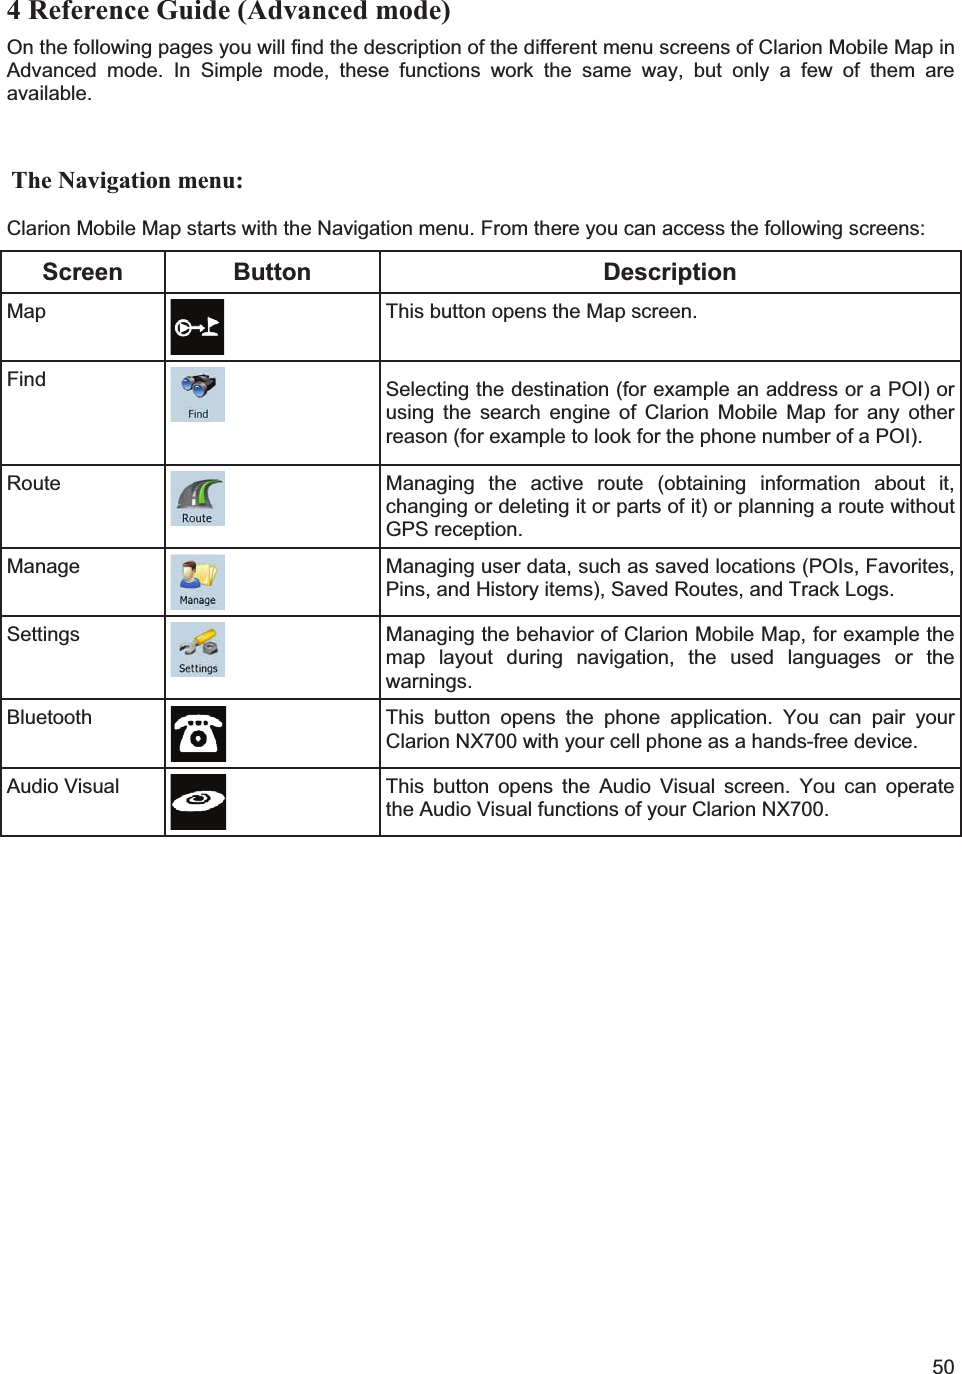
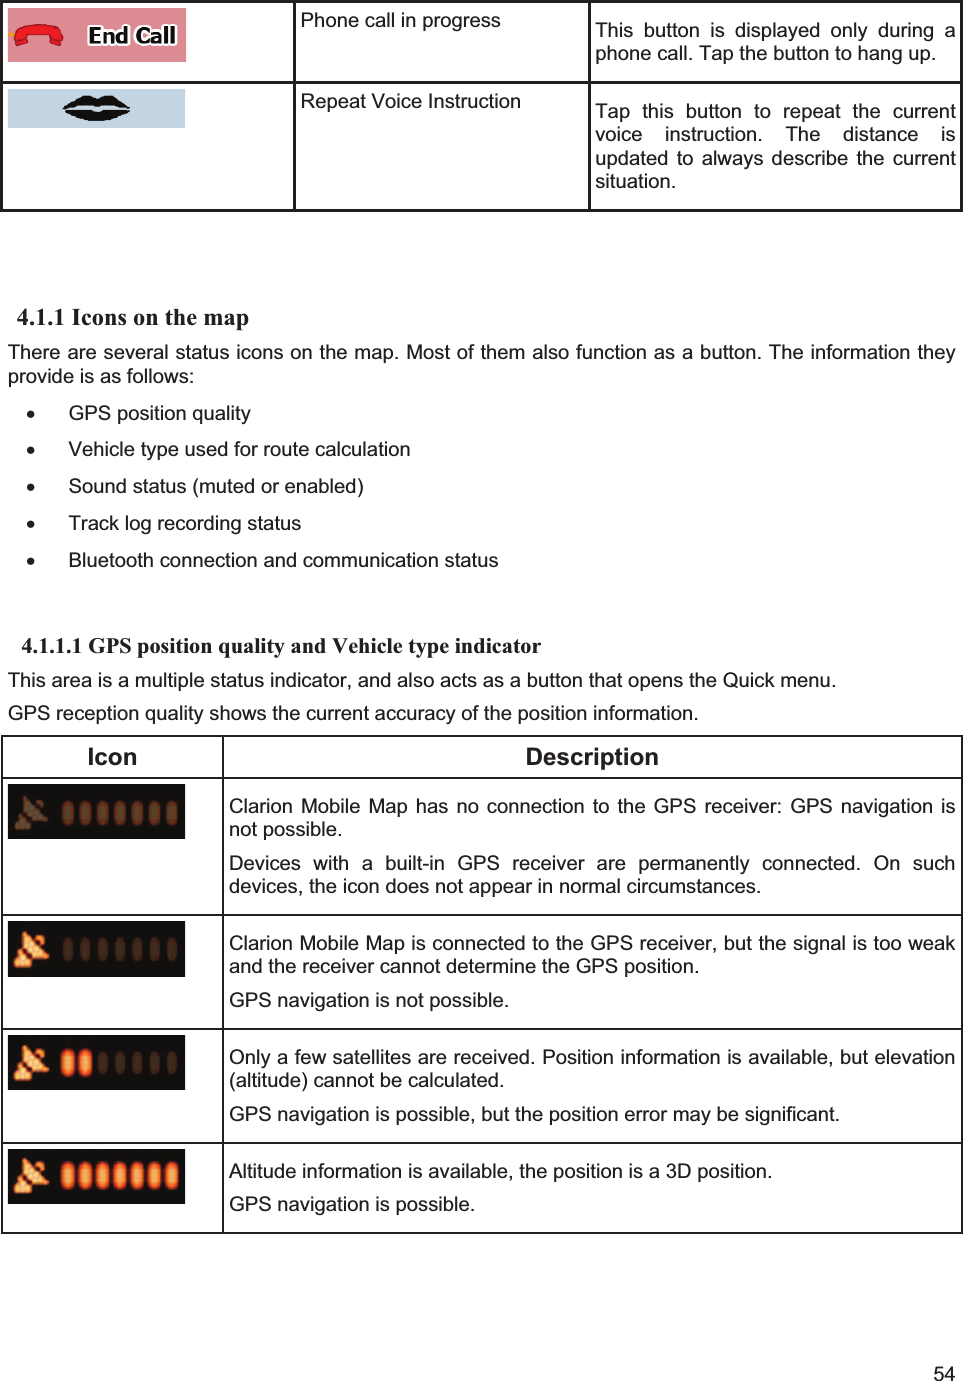
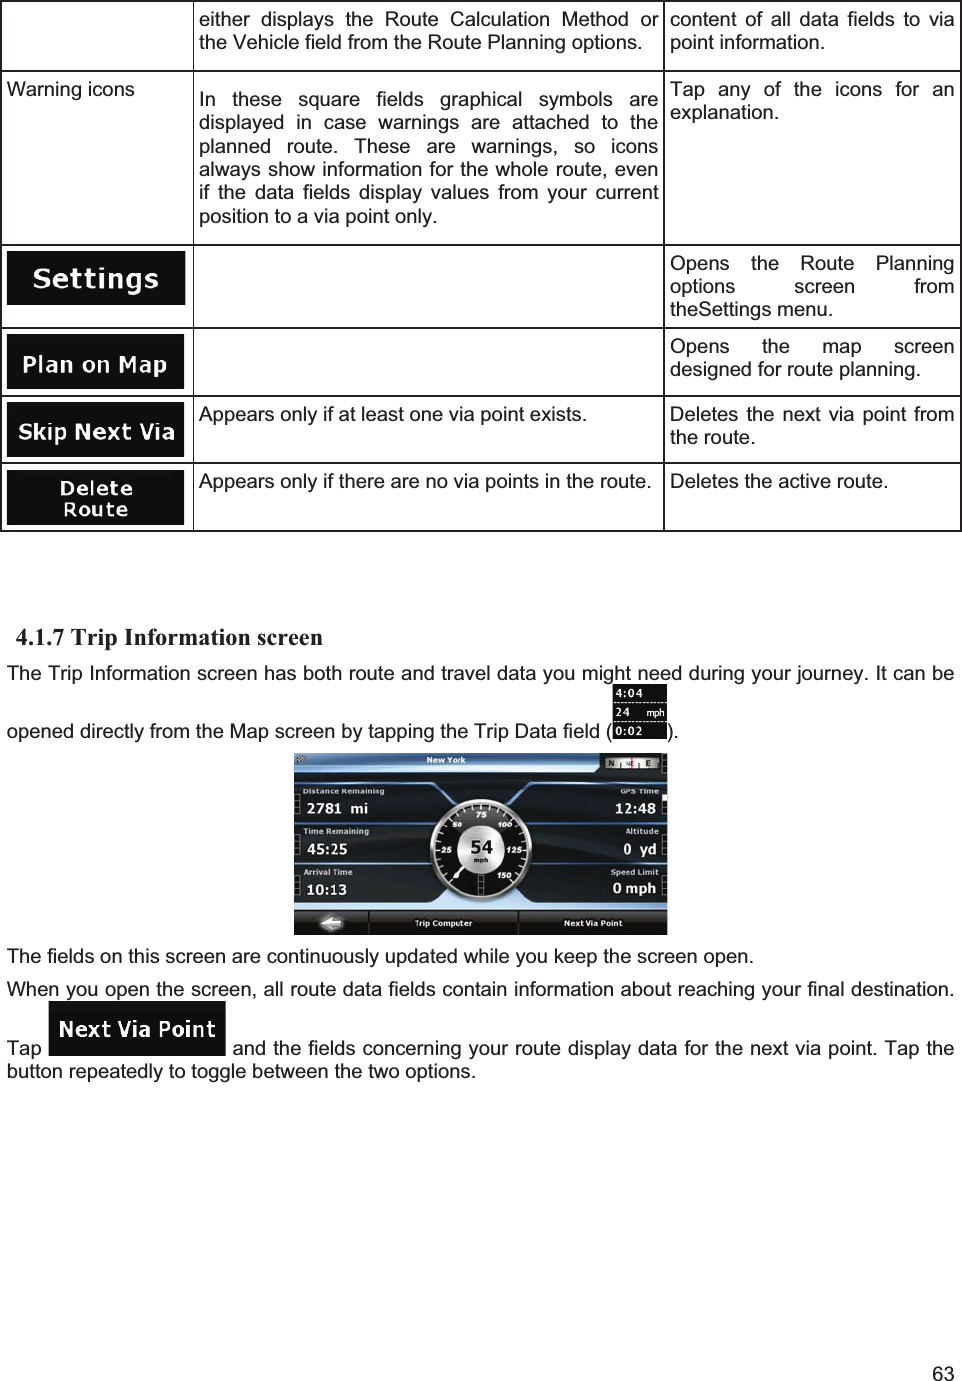
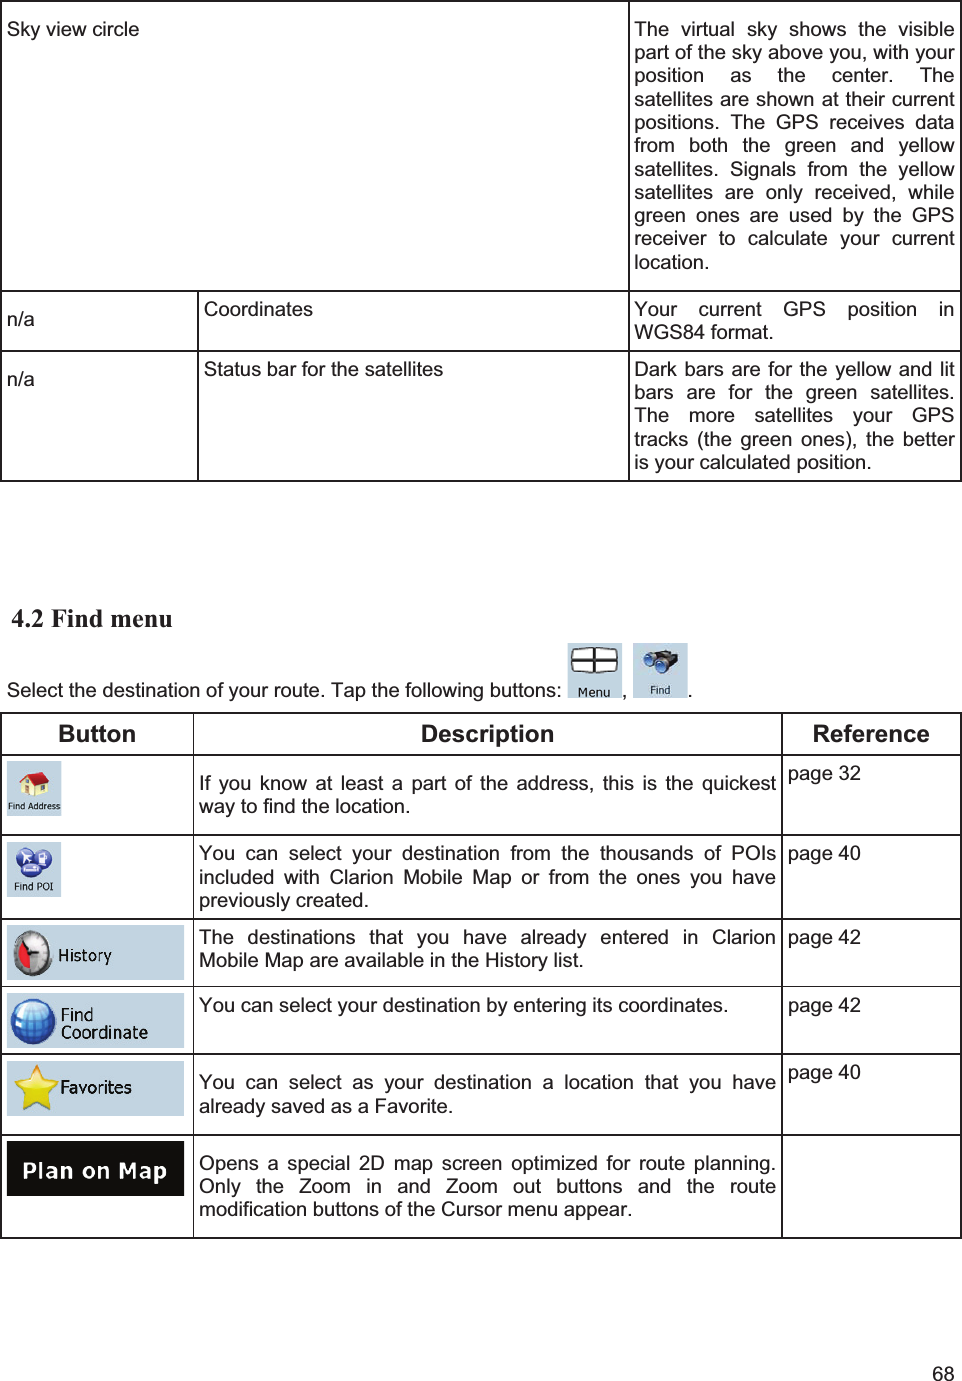
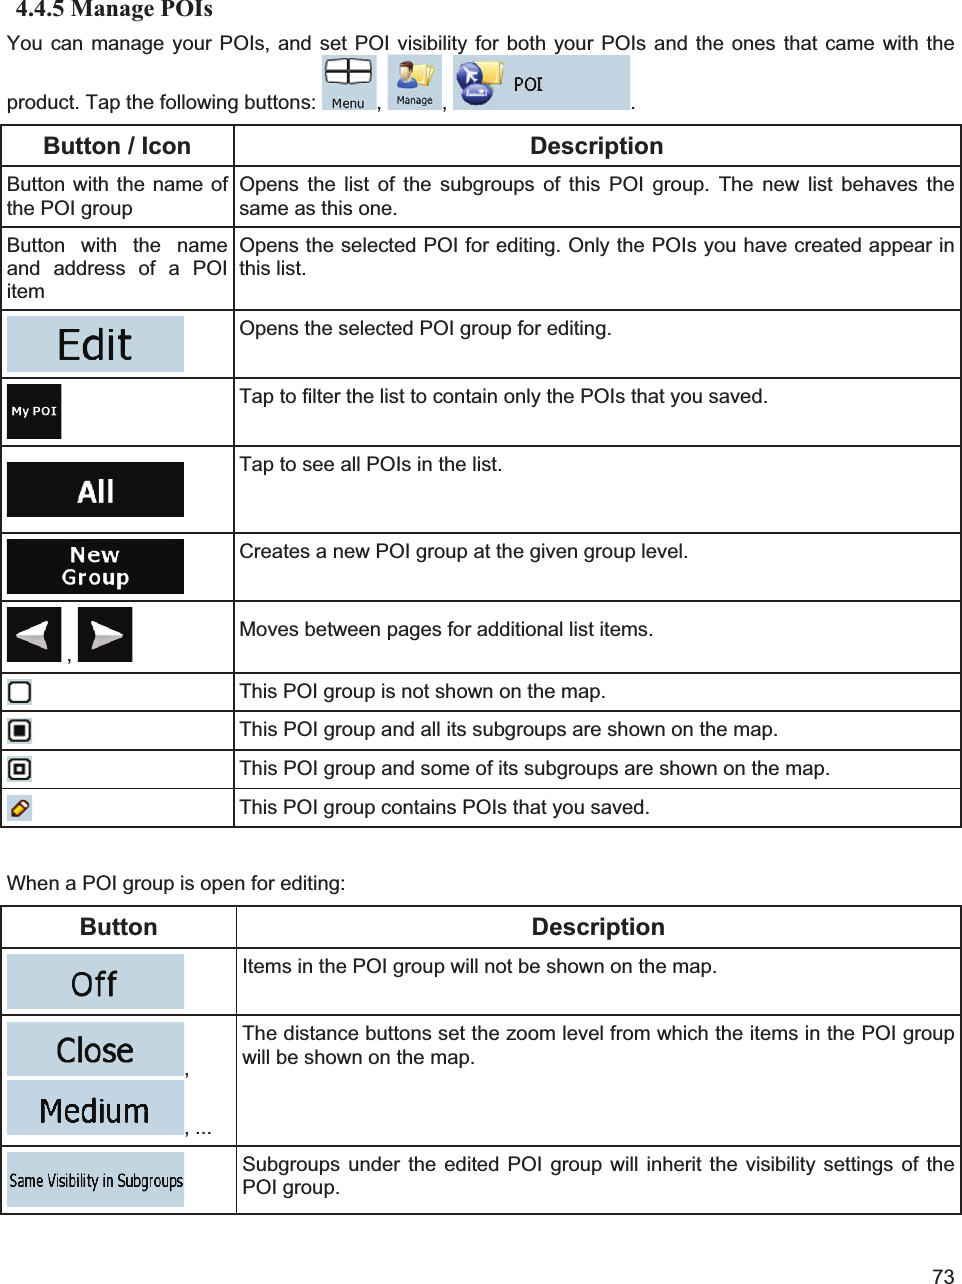
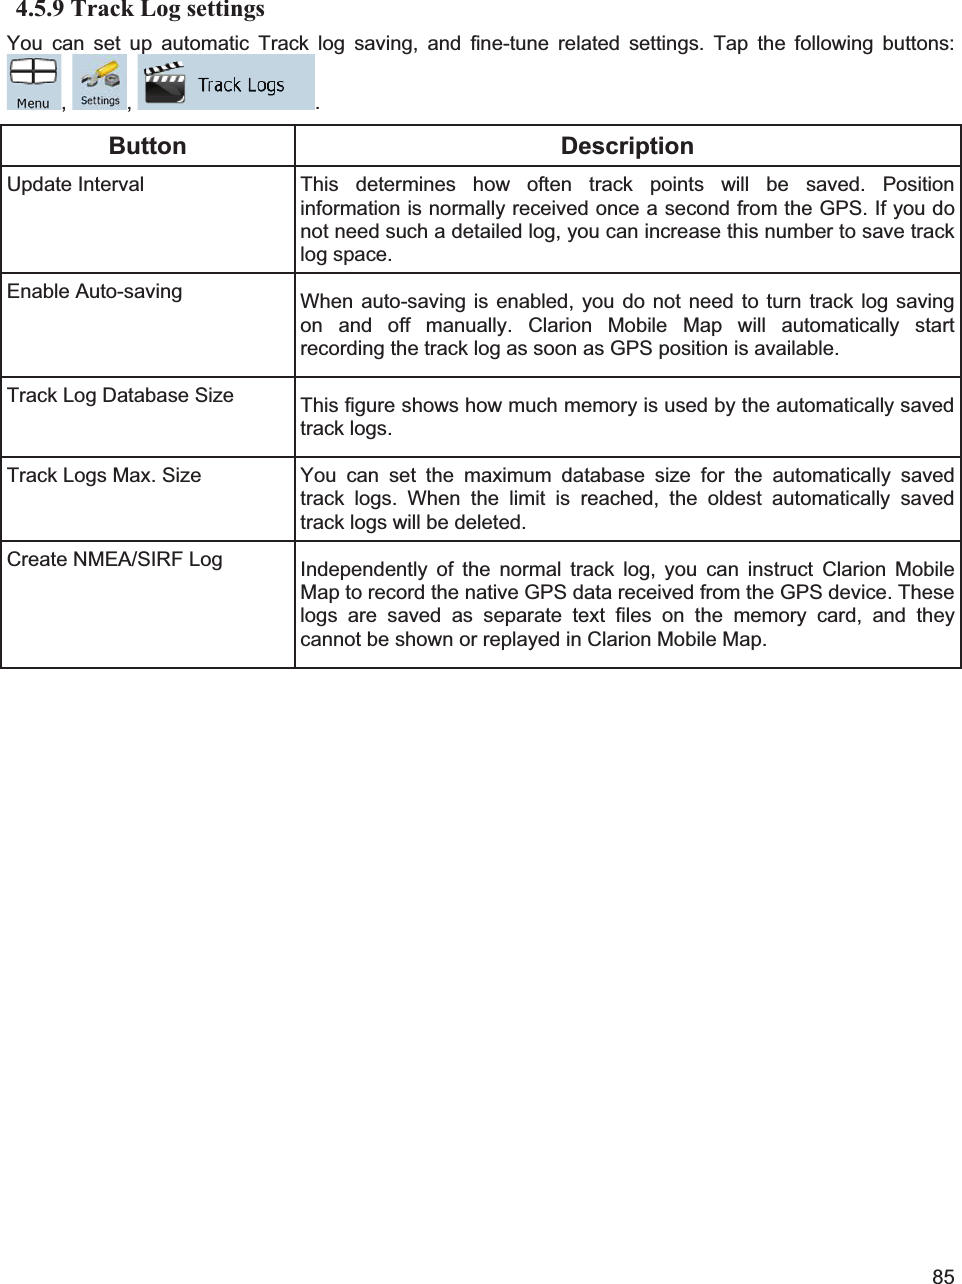
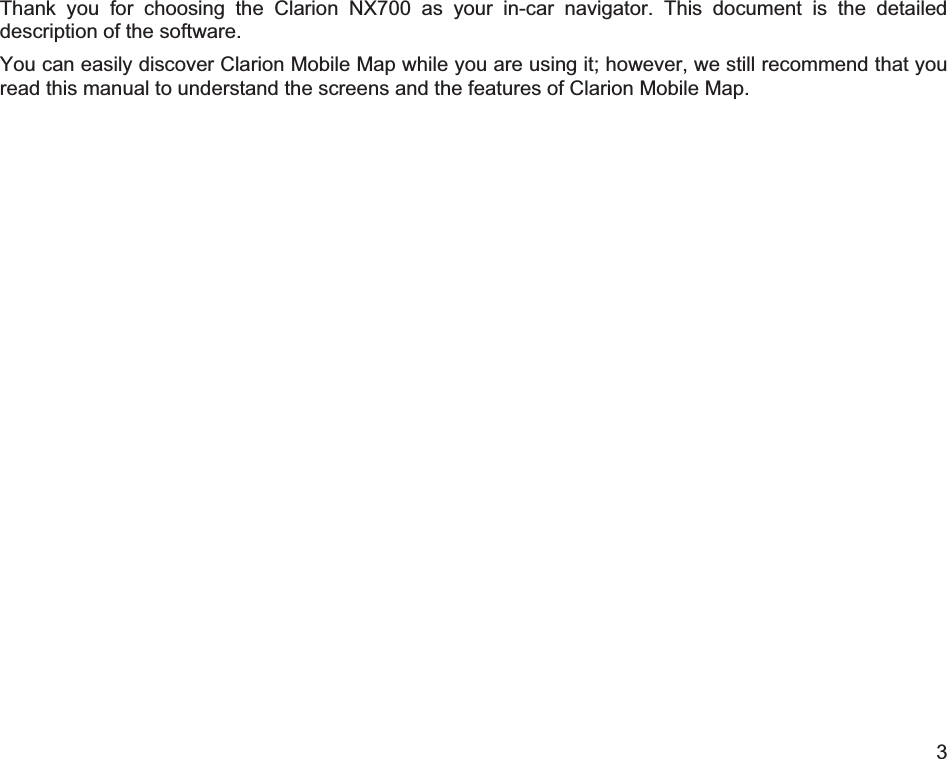
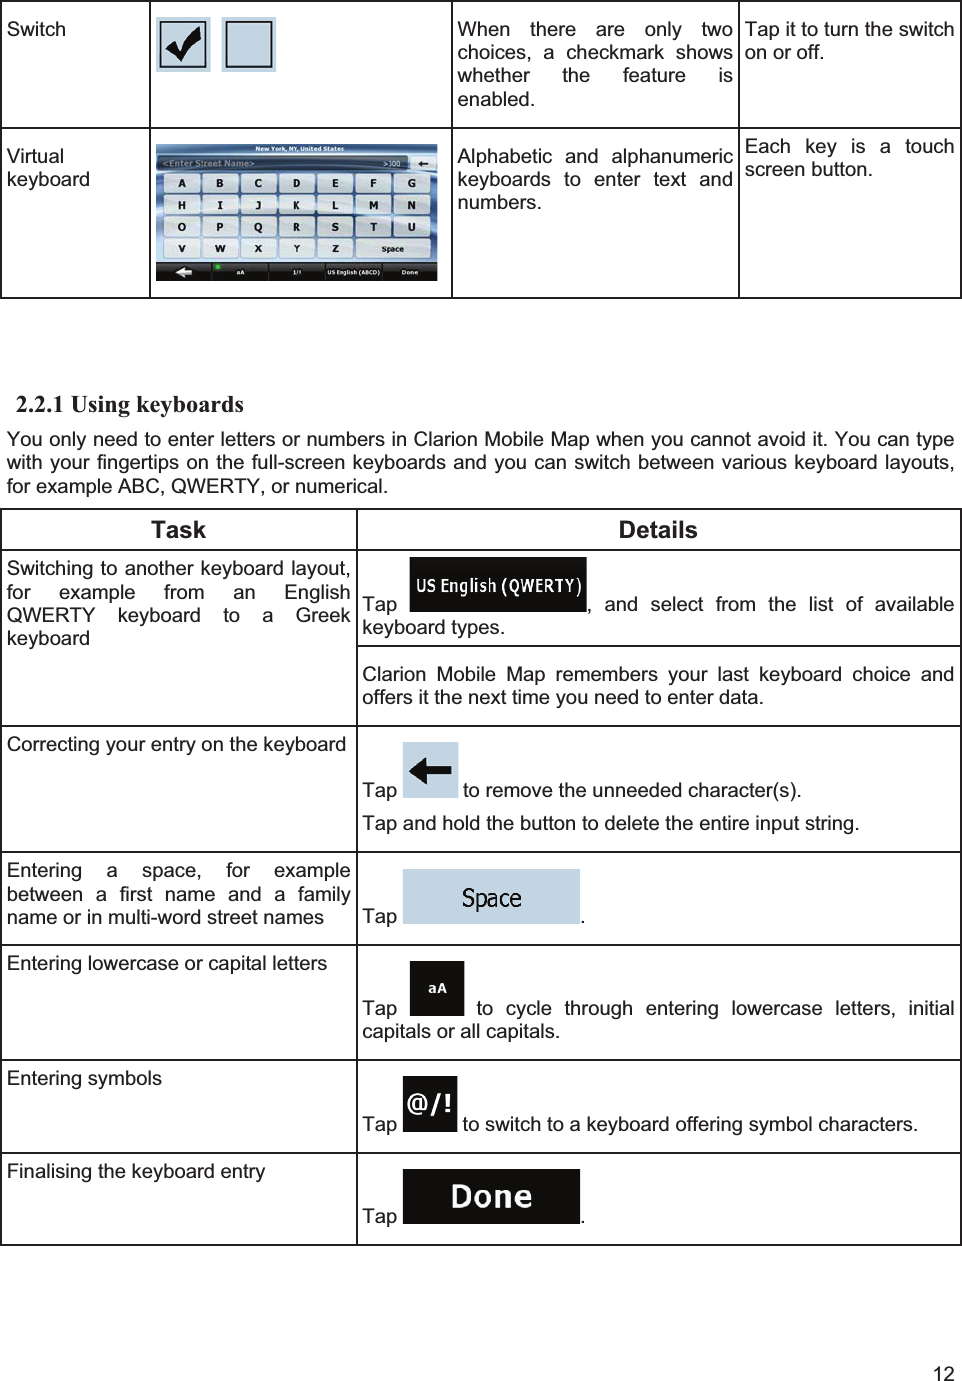
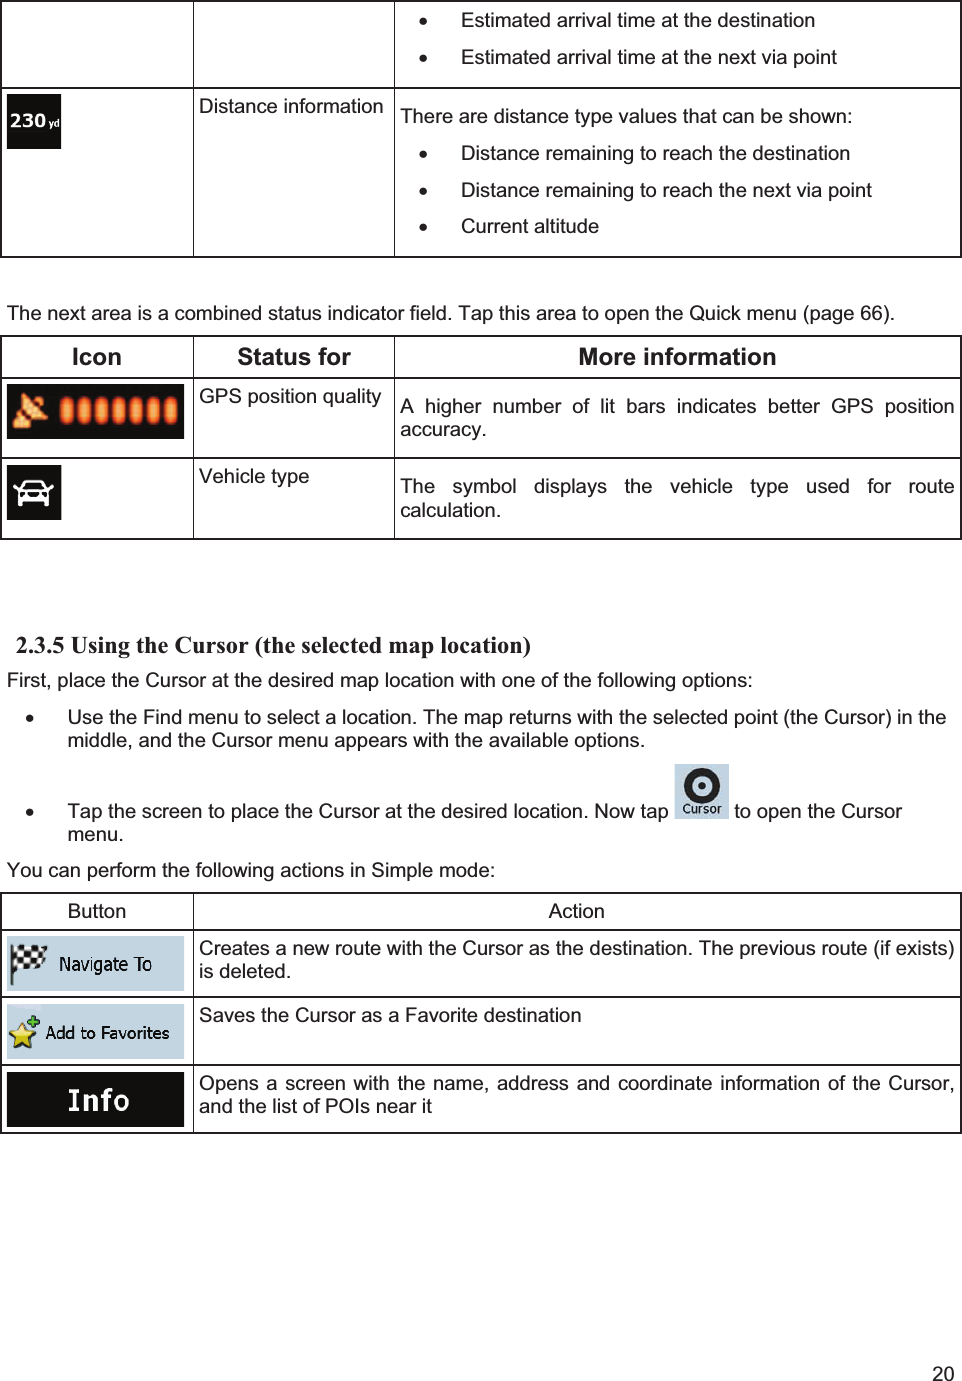
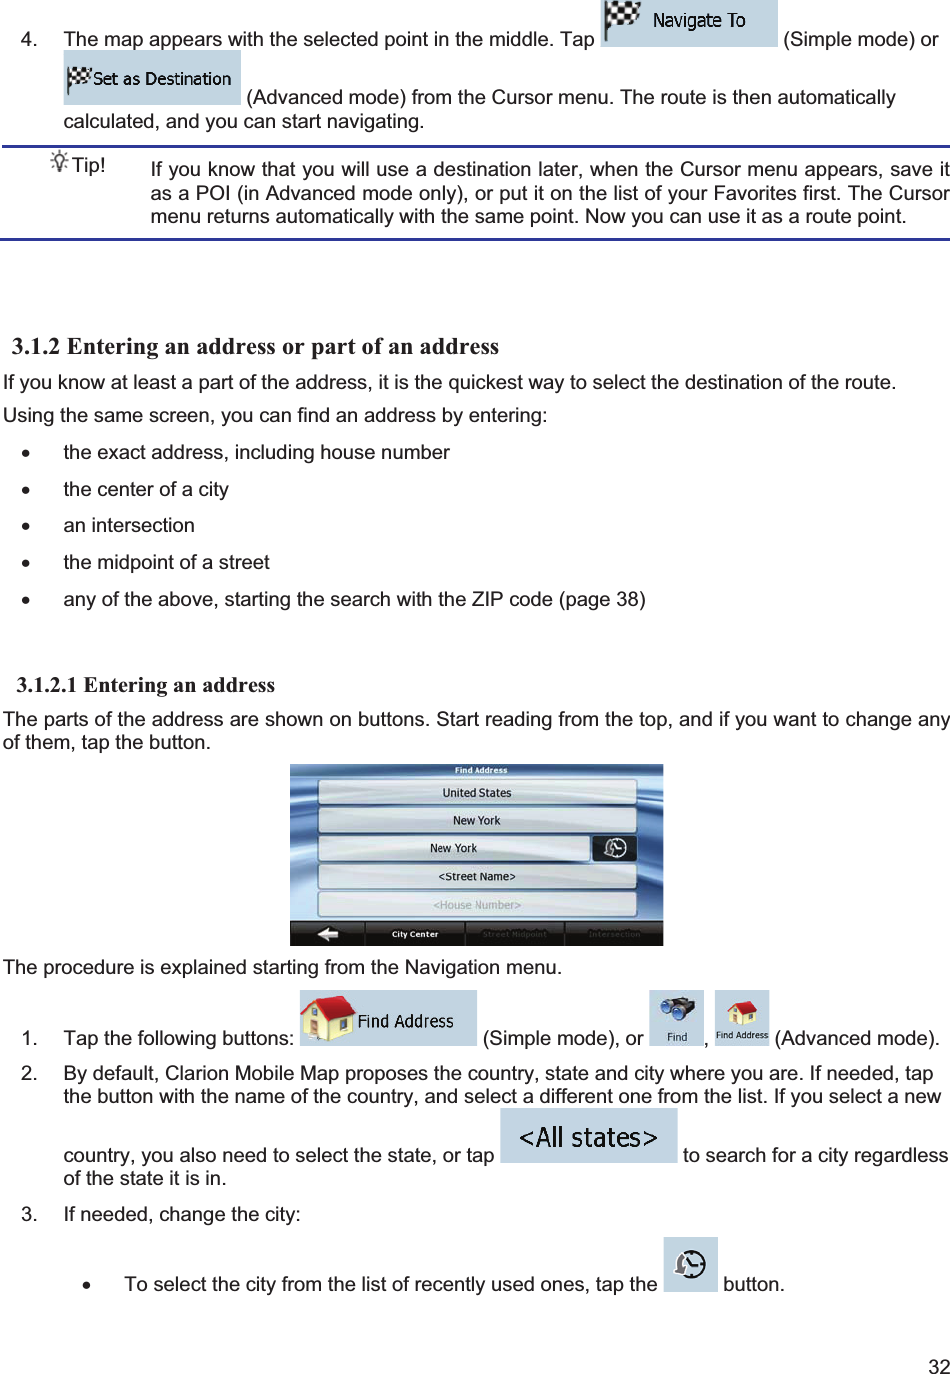
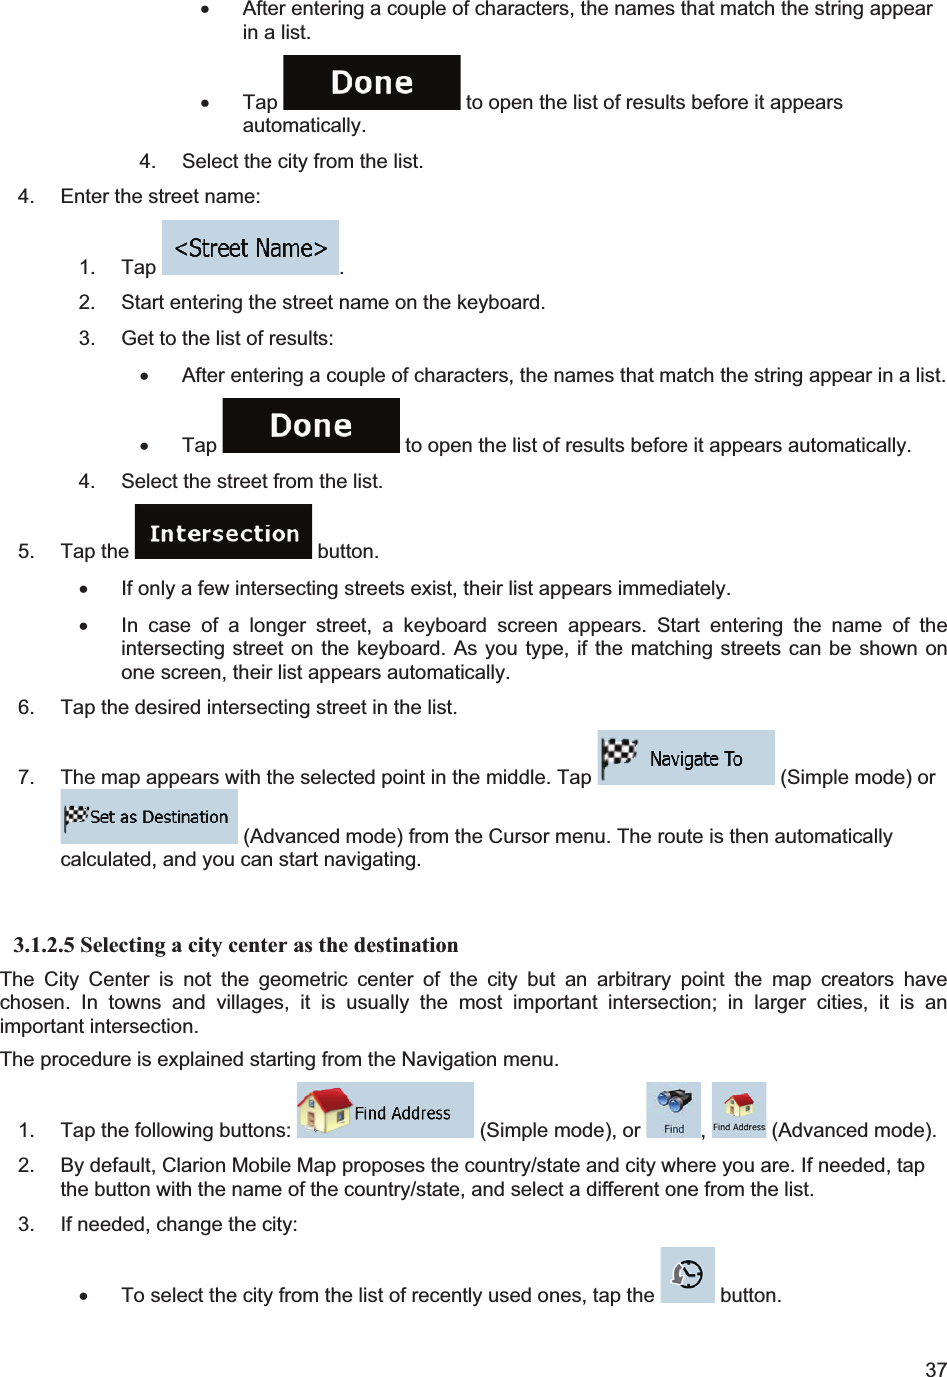
![425. The map appears with the selected point in the middle. Tap (Simple mode) or (Advanced mode) from the Cursor menu. The route is then automatically calculated, and you can start navigating. 3.1.6 Selecting the destination from the History The destinations that you have set earlier appear in the History. The procedure is explained starting from the Navigation menu. 1. Tap the following buttons: (Simple mode), or , (Advanced mode). 2. If necessary, move between pages with to see earlier destinations. 3. Tap the desired item. 4. The map appears with the selected point in the middle. Tap (Simple mode) or (Advanced mode) from the Cursor menu. The route is then automatically calculated, and you can start navigating. 3.1.7 Selecting the destination by entering its coordinates This feature is available in Advanced mode only. The procedure is explained starting from the Navigation menu. 1. Tap the following buttons: , . 2. [optional] Tap to change the format of the displayed coordinates. 3. Tap the latitude or longitude value to change the coordinates. 4. Enter the coordinate values in WGS84 format on the keyboard: the latitude (N or S) and the longitude (E or W). 5. Tap .](https://usermanual.wiki/Faurecia-Clarion-Electronics/QY5014.Navigation-Manual/User-Guide-1211548-Page-42.png)
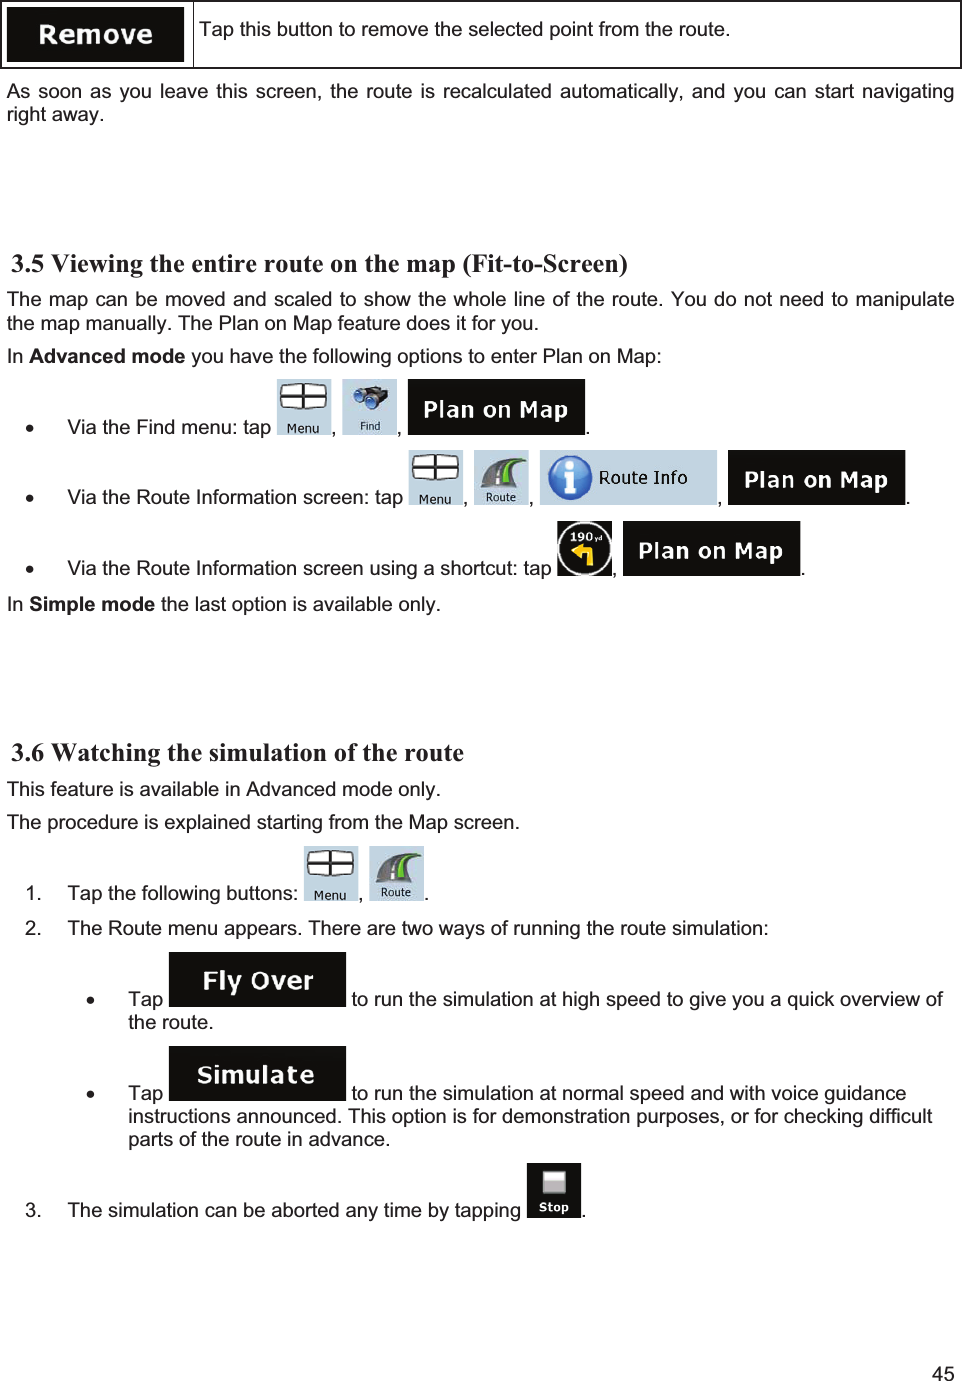
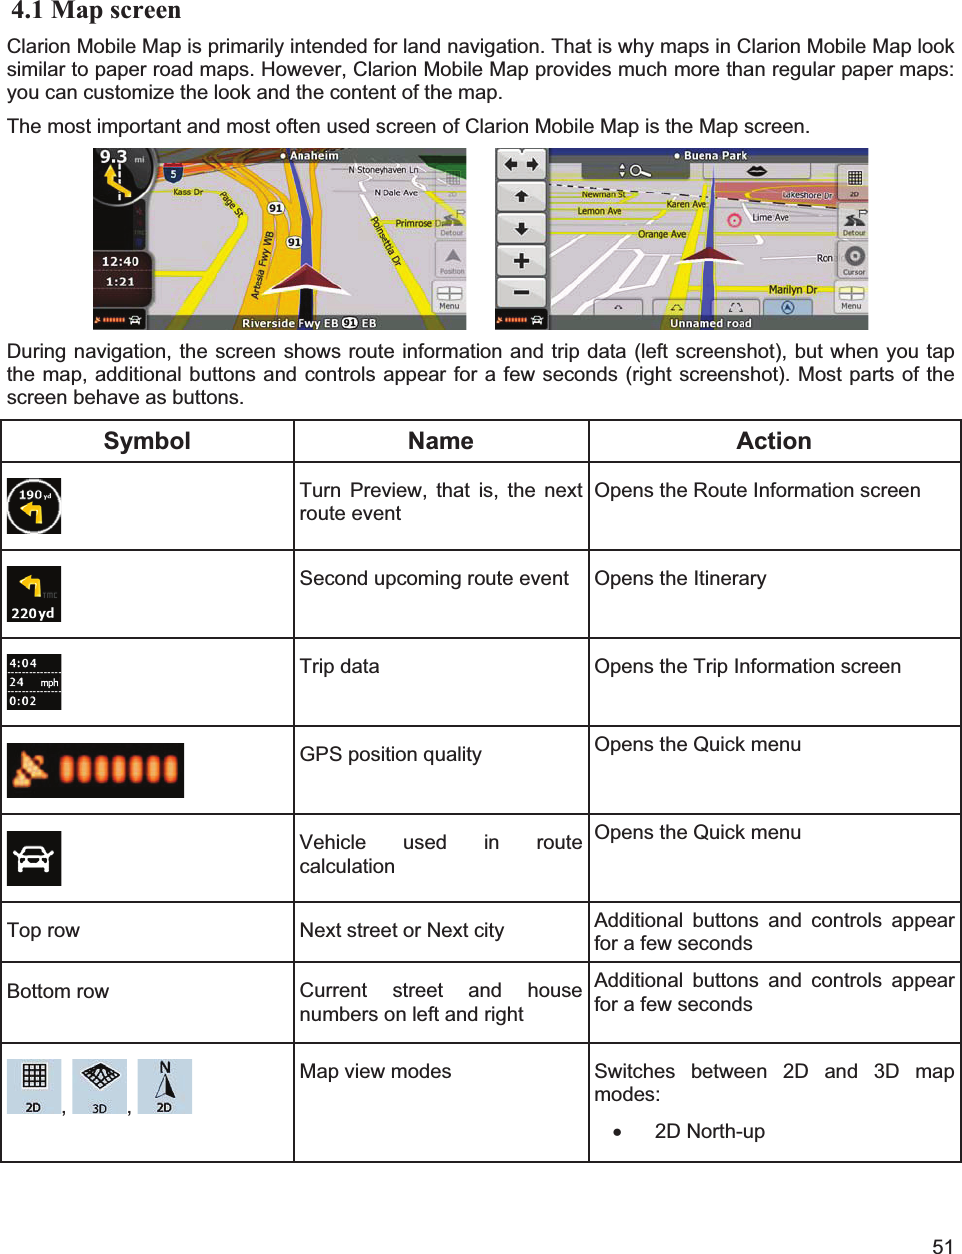
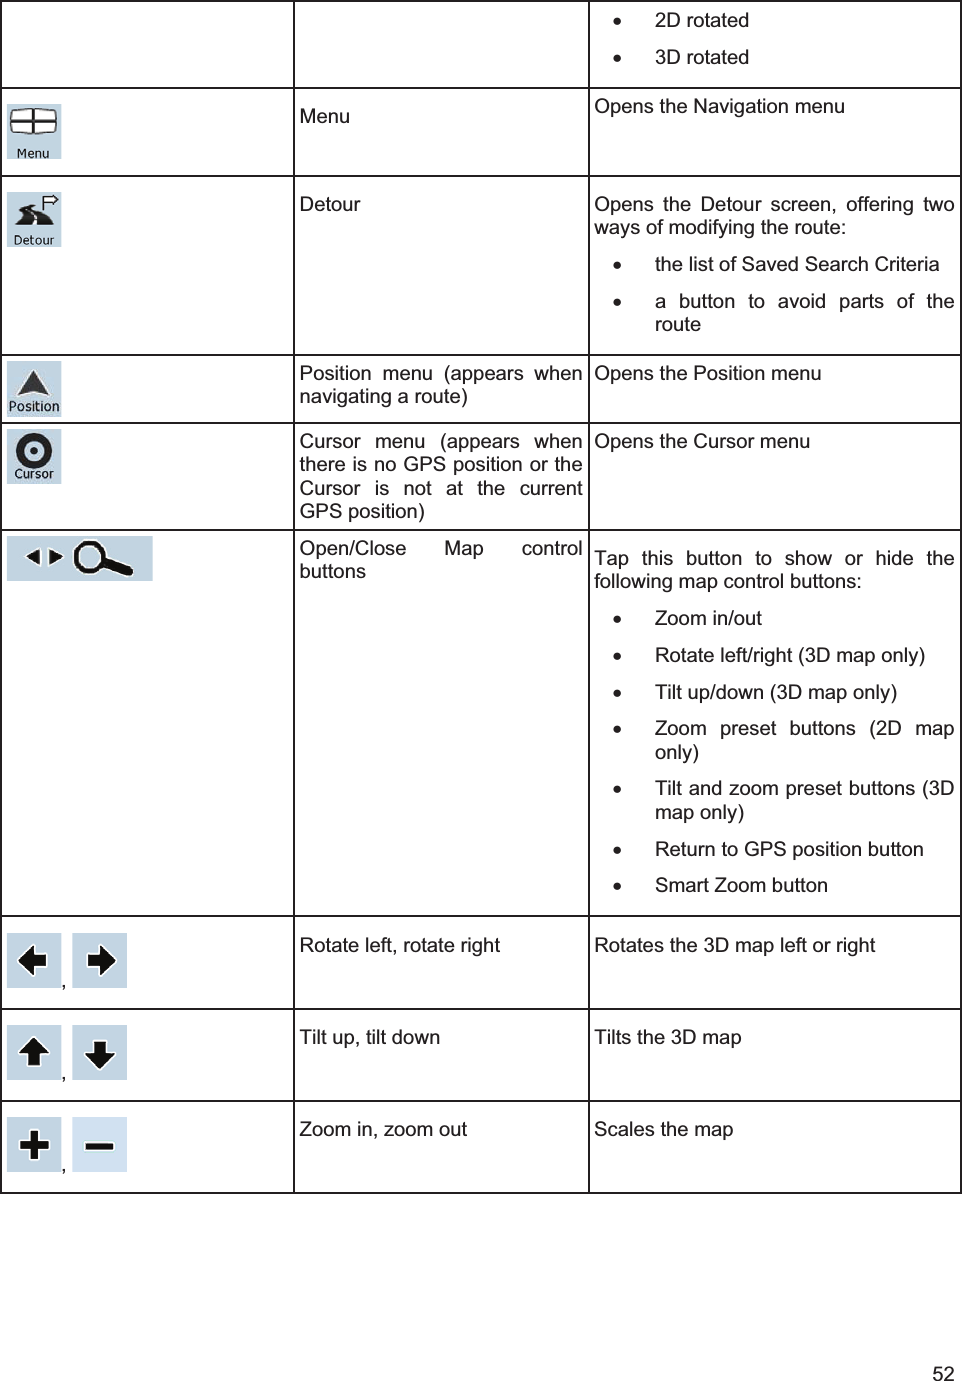
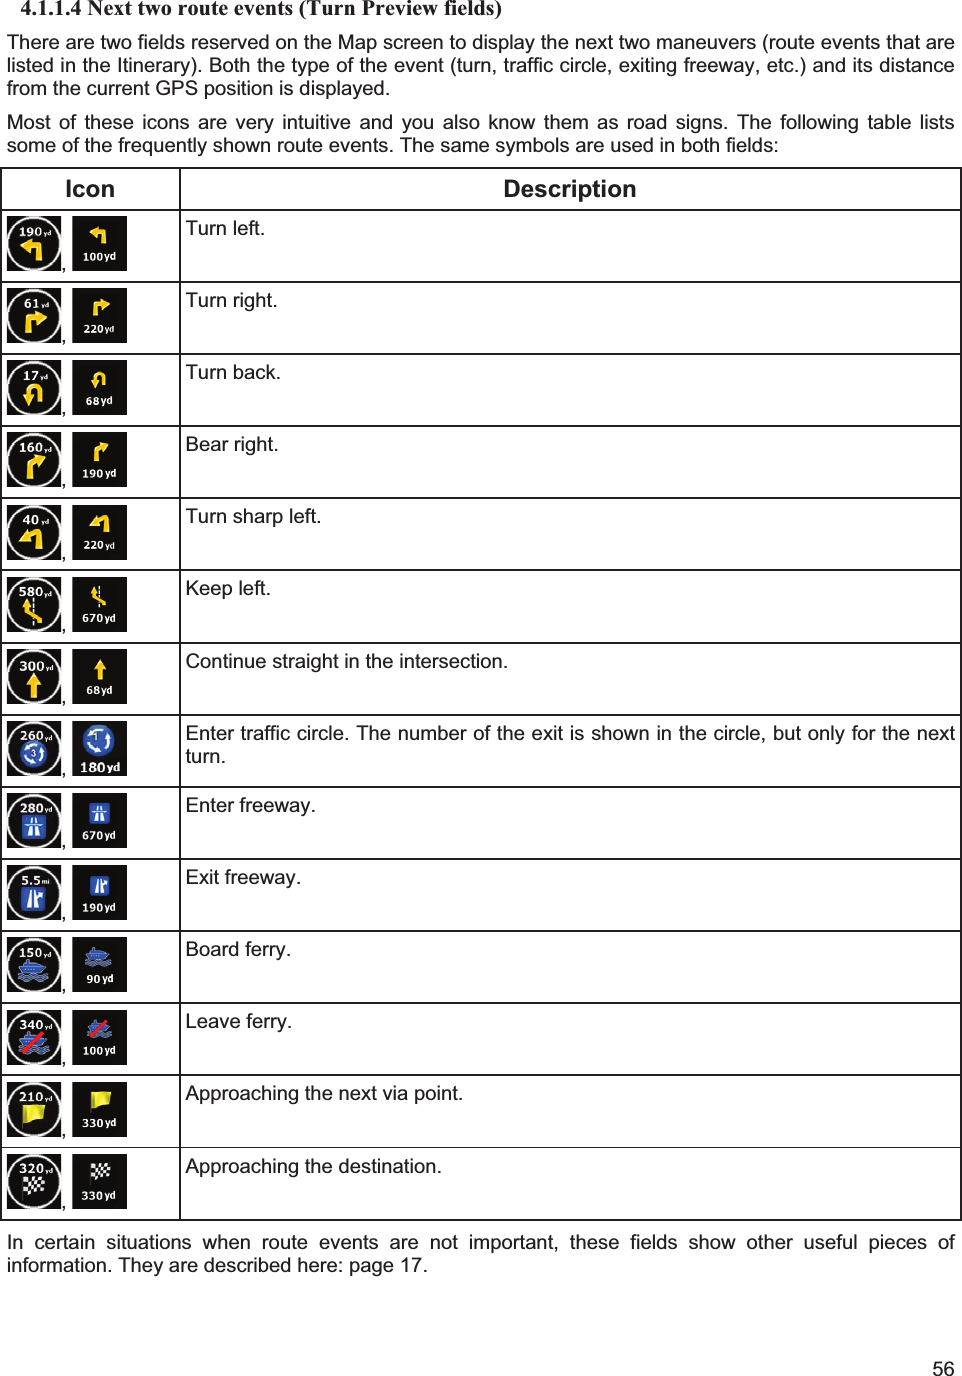
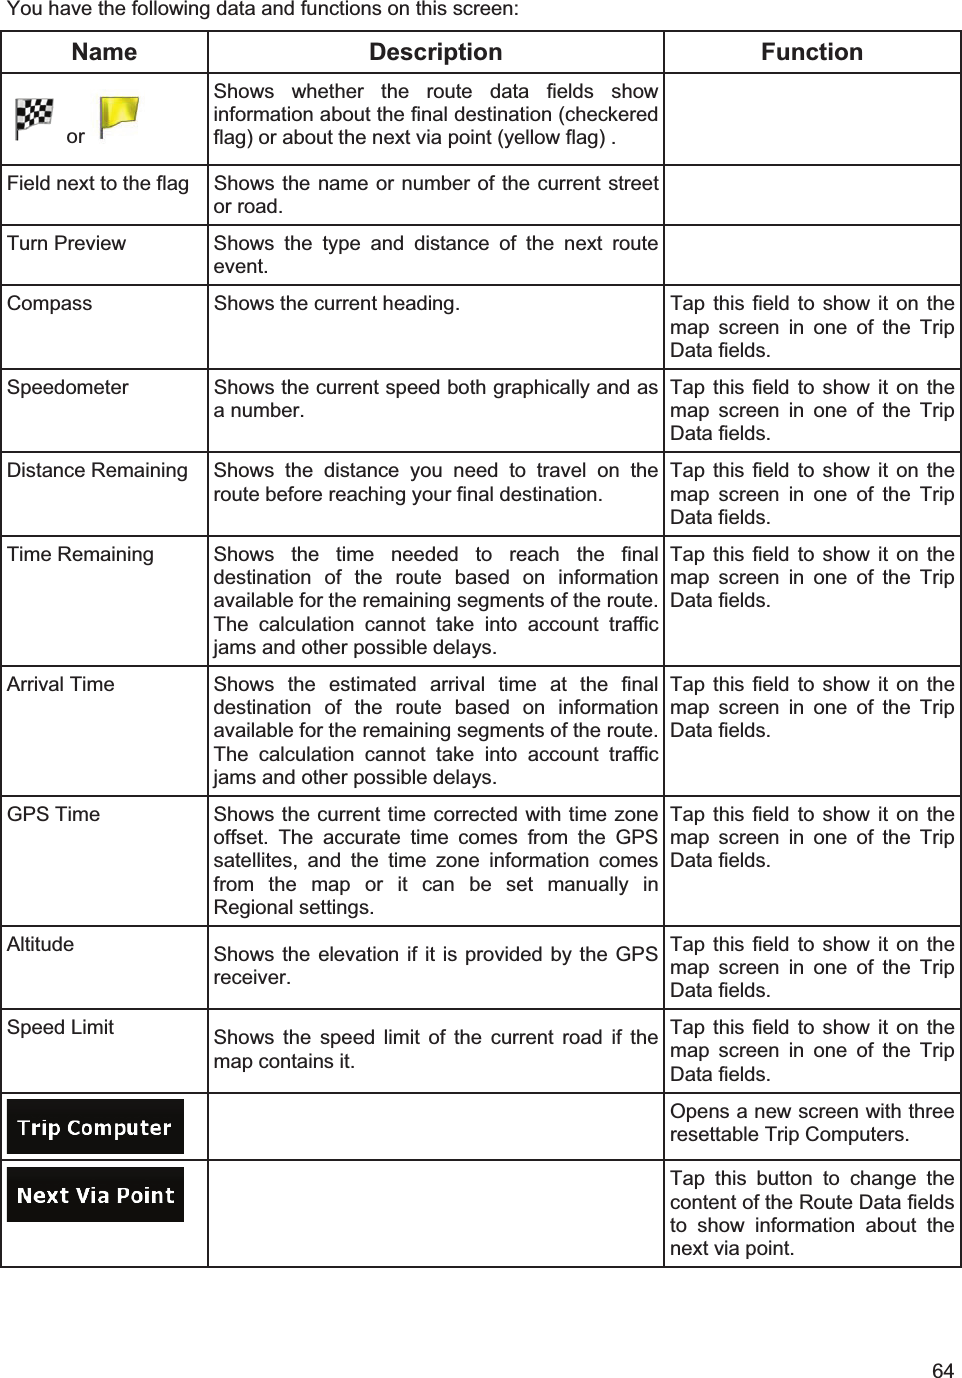
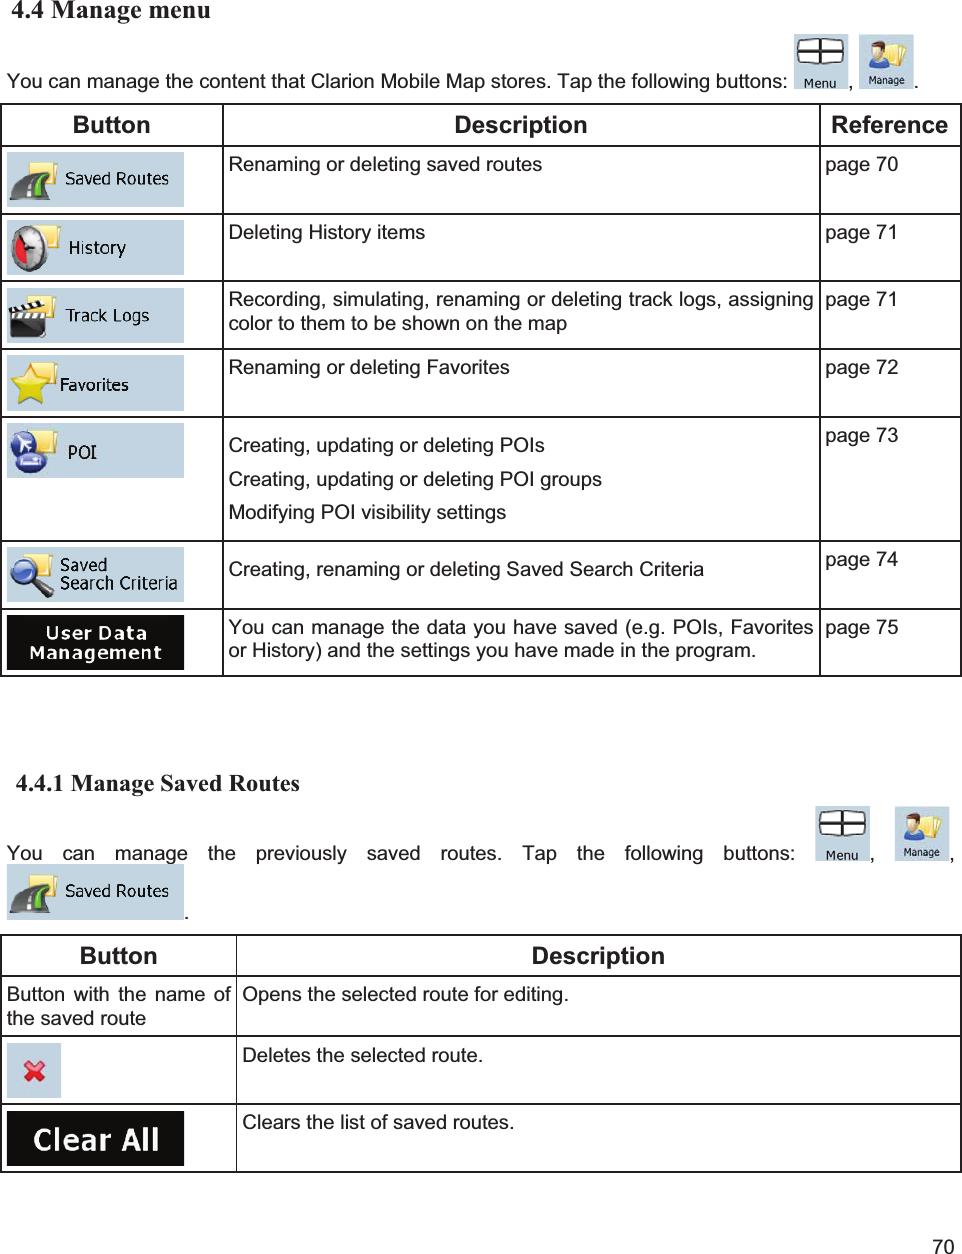
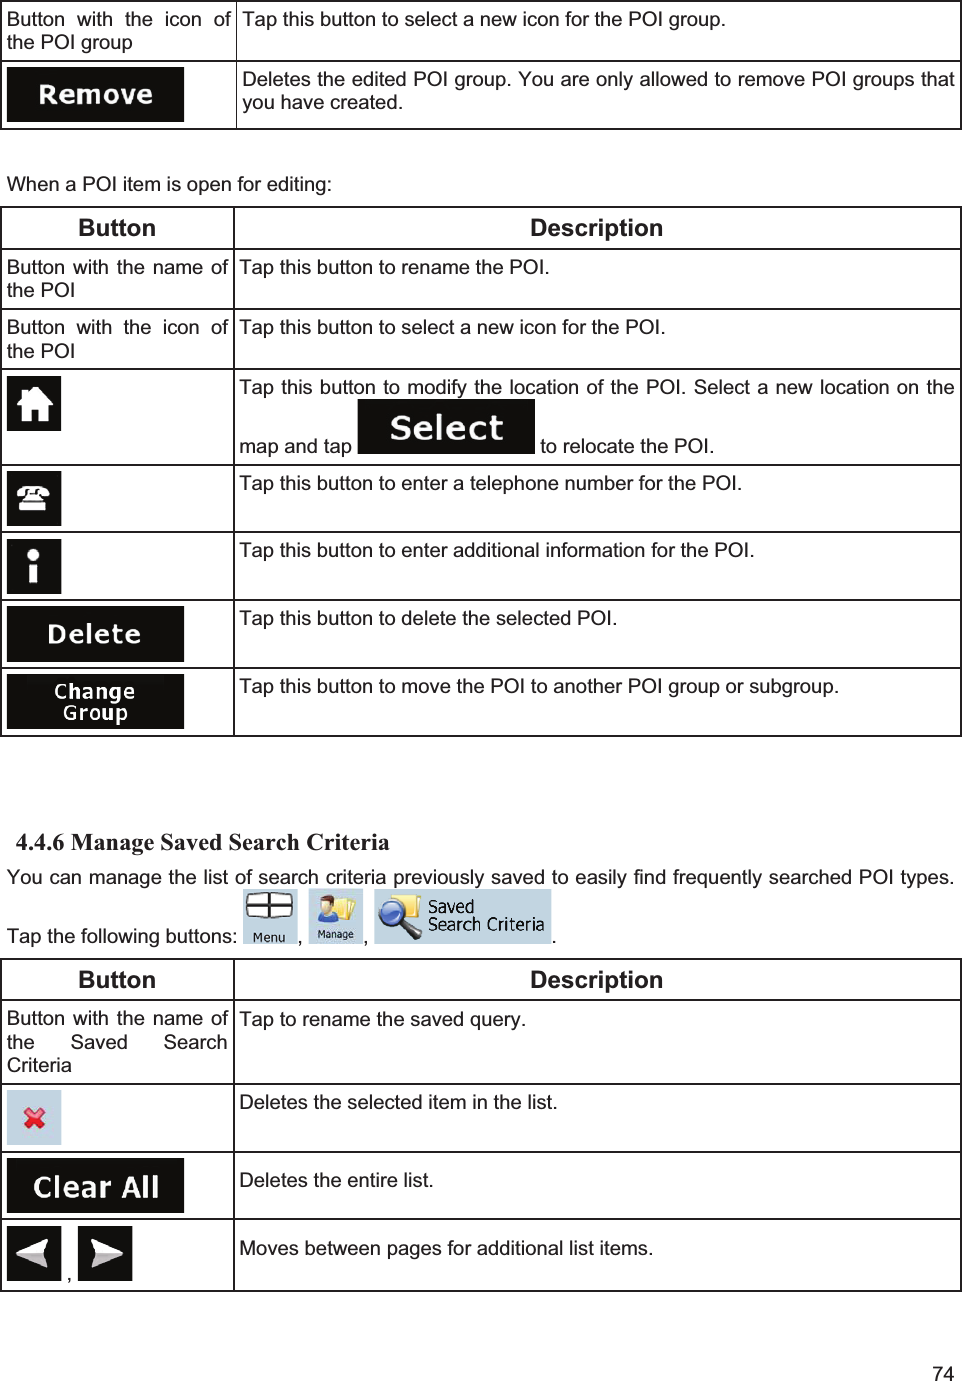
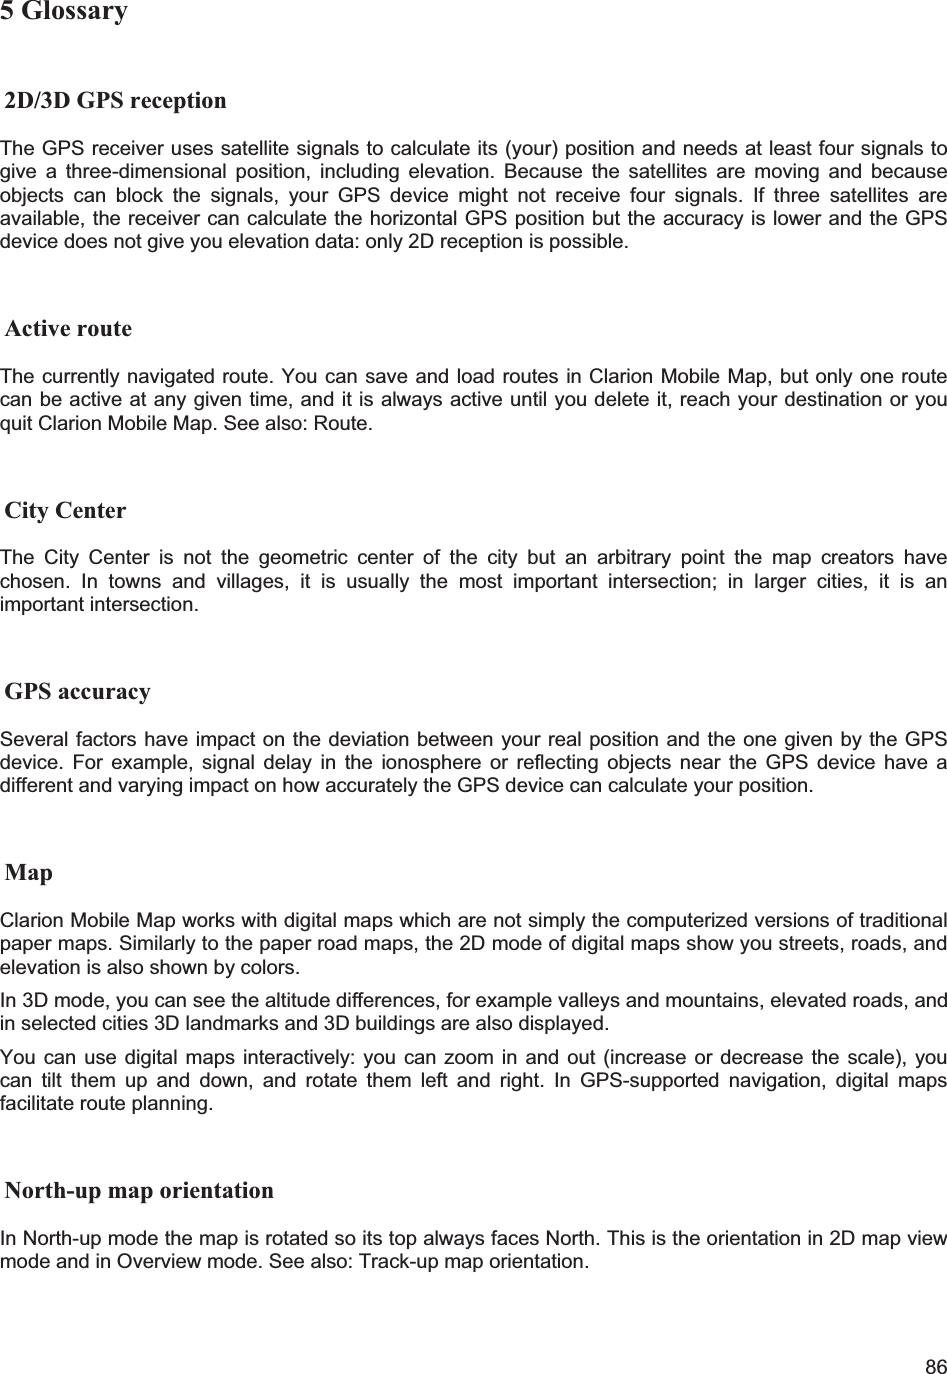
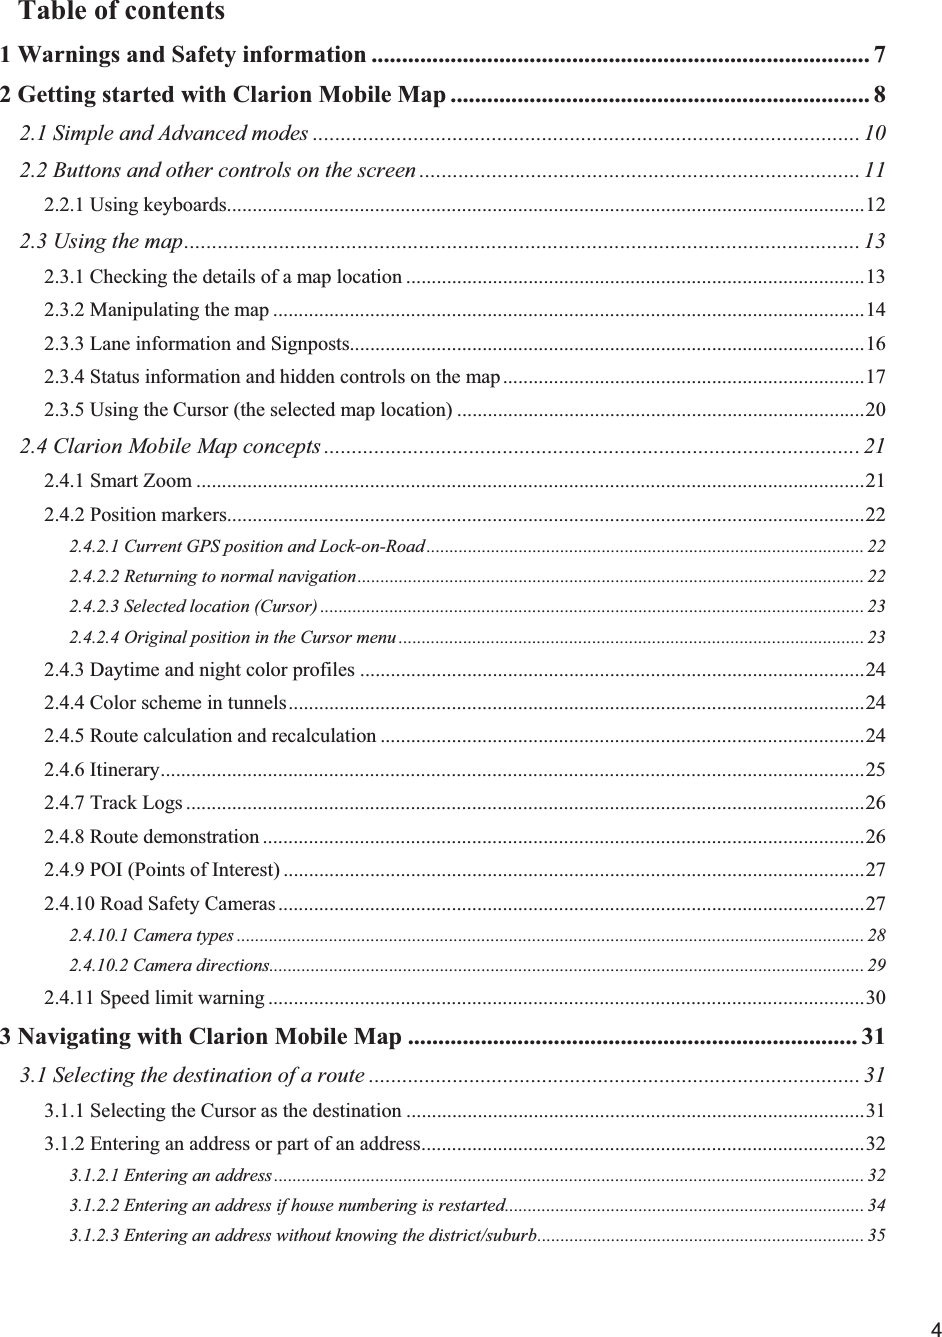
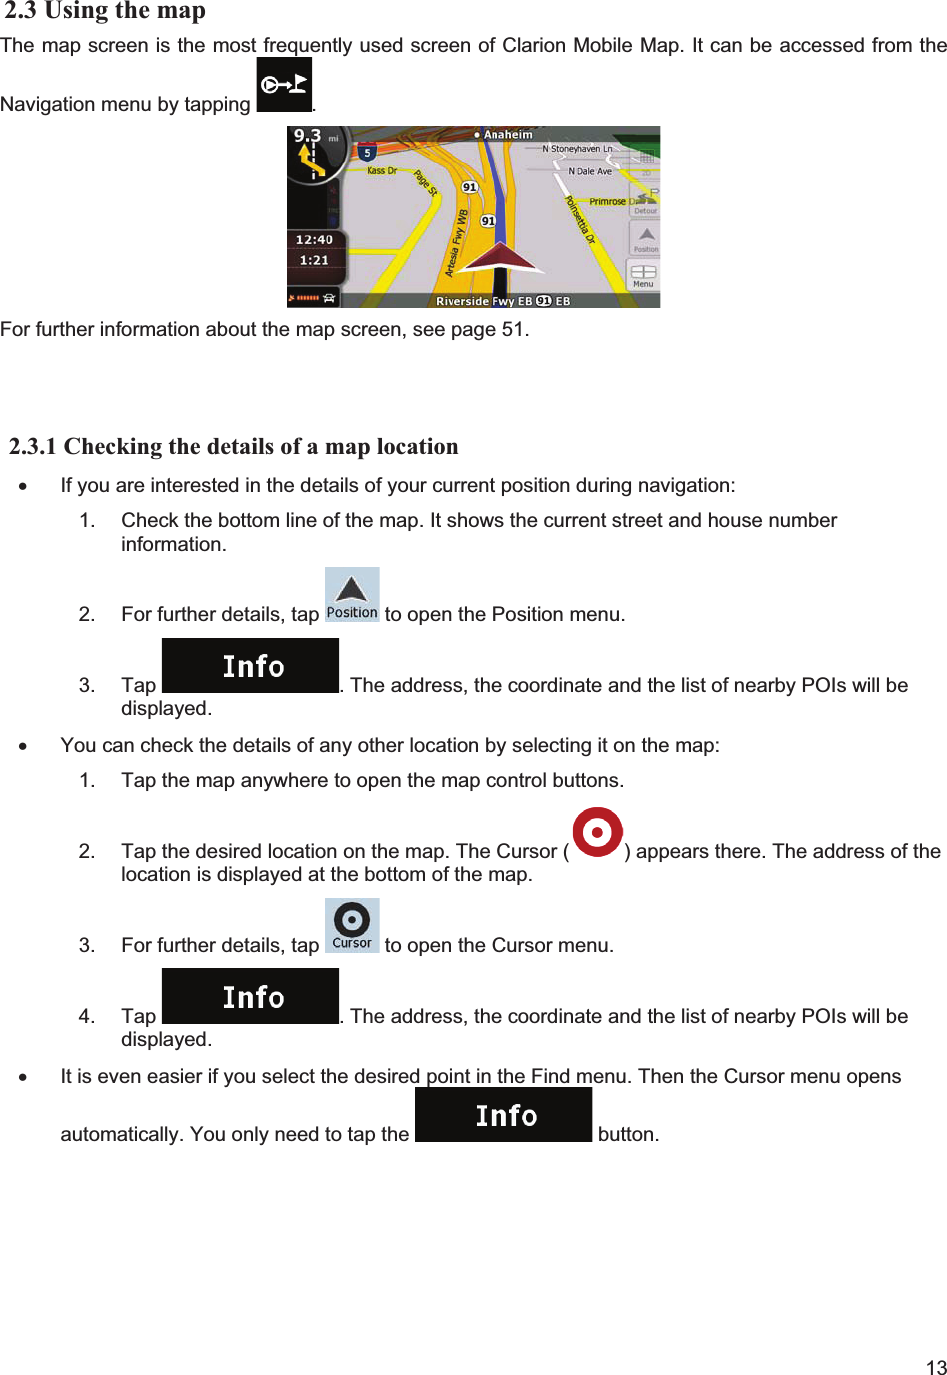
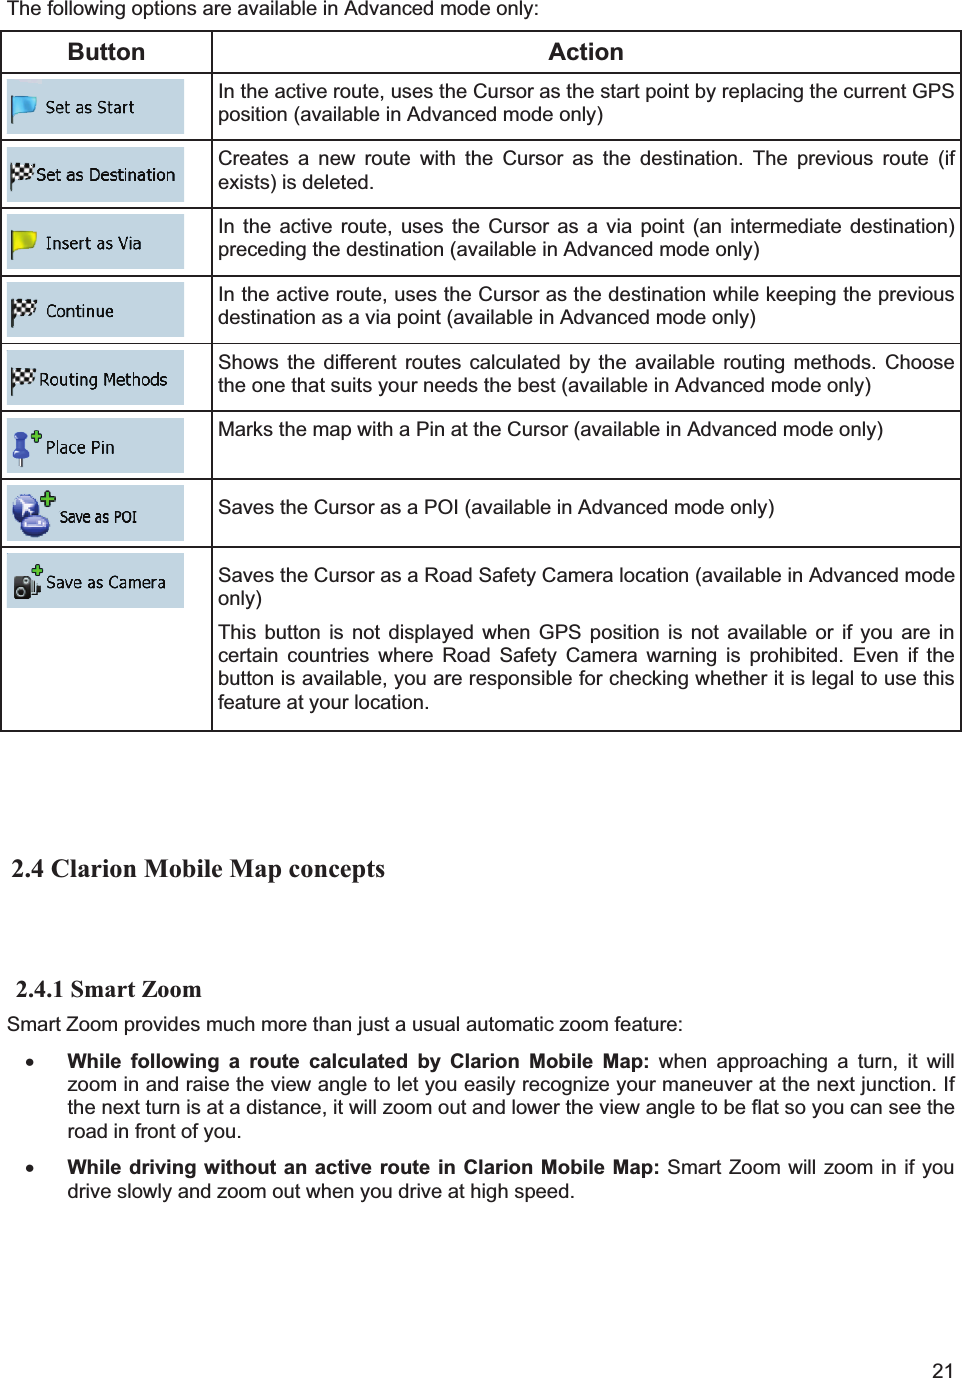
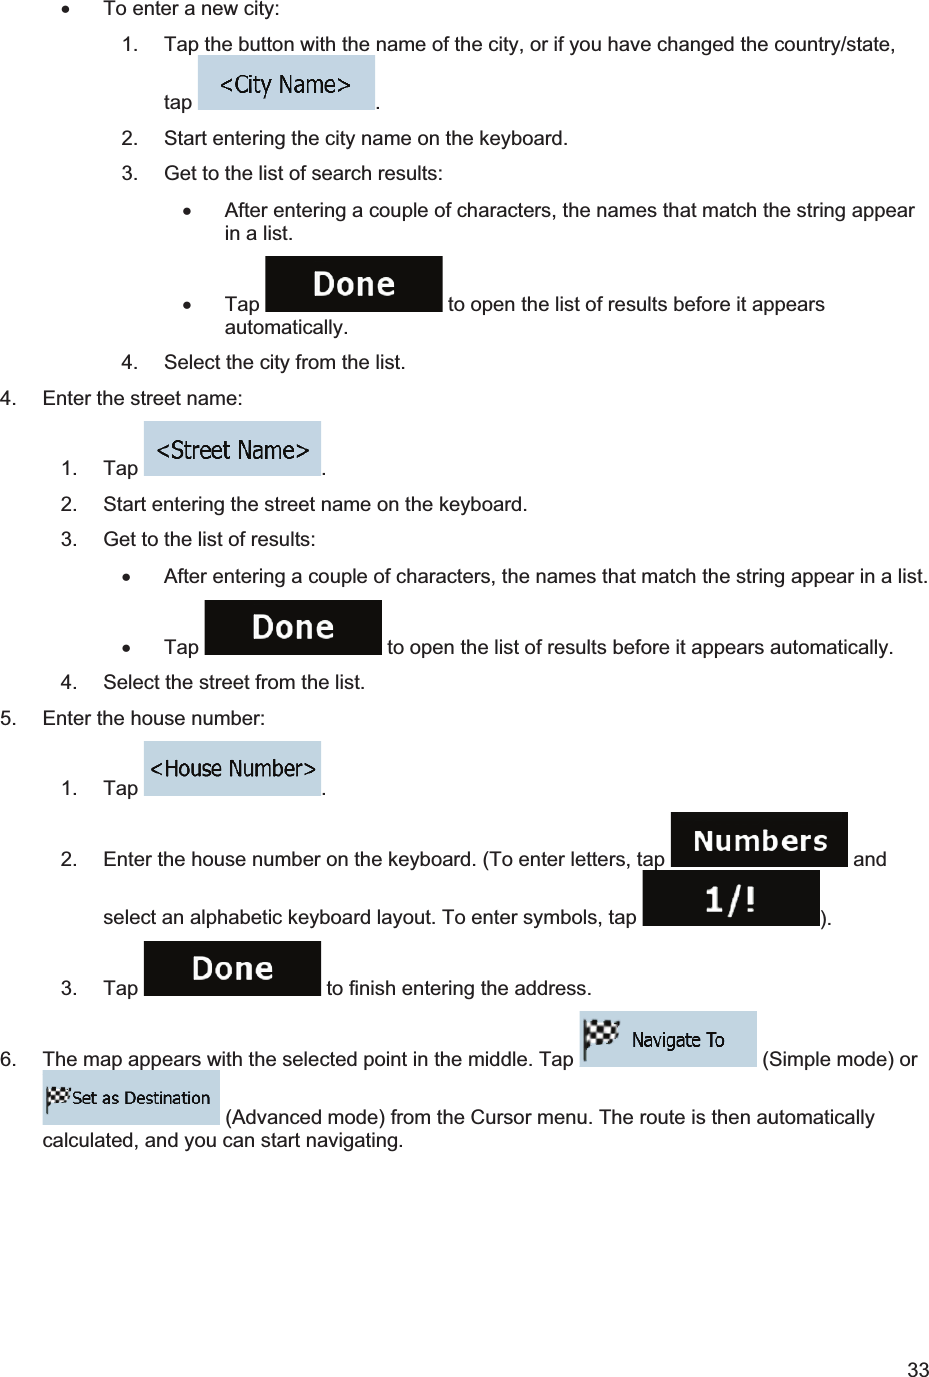
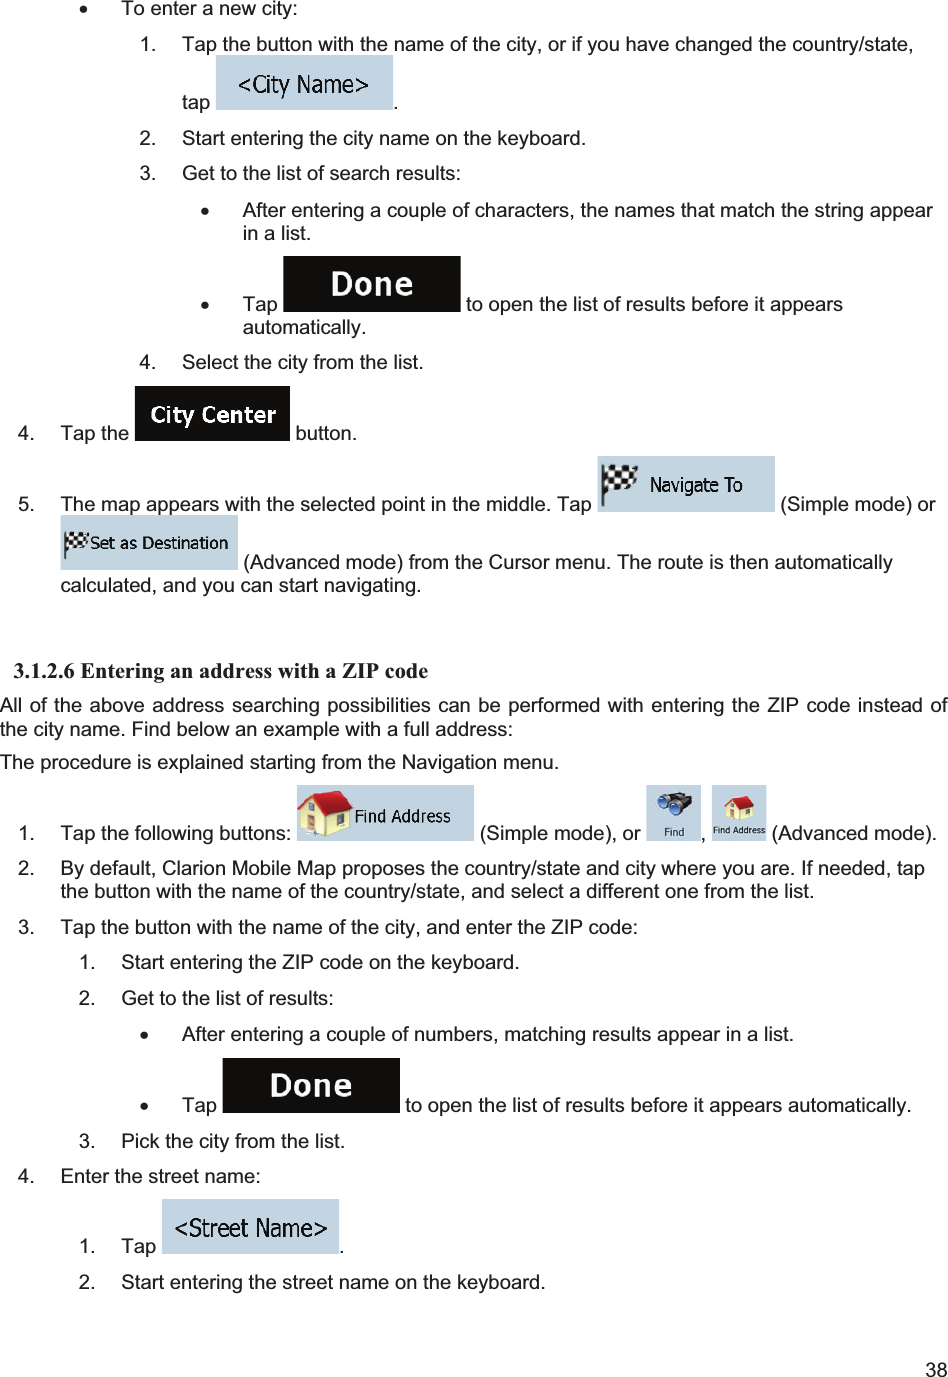
![436. The map appears with the selected point in the middle. Tap (Simple mode) or (Advanced mode) from the Cursor menu. The route is then automatically calculated, and you can start navigating. 3.2 Creating a multi-point route (inserting a via point) Multi-point routes are created from simple routes, so a route must be active first. One of the ways of expanding the route is to keep the destination, and to add via points (intermediate destinations). This feature is available in Advanced mode only. 1. Select a new location as you did in the previous sections. This will be the additional destination in the route. 2. The map appears with the selected point in the middle, and the Cursor menu opens automatically. 3. Tap to add the point as an intermediate destination preceding the final destination of the route. 4. [optional] To add more points to the route, repeat the above steps as many times as you like. If you insert a via point in a route that is already a multi-point route, you will automatically be taken to the Edit Route screen where you can determine the position of the intermediate route point. When you enter the screen, the new via point is placed as the first via point to be reached. The new point is the highlighted point in the list. You have the following options: Button Action The selected point moves up in the list (becomes a via point to be reached earlier).Tap this button repeatedly, and the point becomes the start point of the route(when routing from a given location) or the first via point to reach (when routing from the GPS position). The selected point moves down in the list (becomes a via point to be reached later). Tap this button repeatedly, and the point becomes the final destination of the route. Tap this button to reverse the route. The start point becomes the destination, the destination becomes the start point, and all via points are to be reached in the opposite order than before. Tap this button to optimize the route. The start point and the destination remain at their position, but the via points are reordered to make the shortest possible route. Tap this button to remove the selected point from the route. The route remains as it was before adding the new point. Every time a new point is added, the route is recalculated automatically, and you can start navigating right away.](https://usermanual.wiki/Faurecia-Clarion-Electronics/QY5014.Navigation-Manual/User-Guide-1211548-Page-43.png)
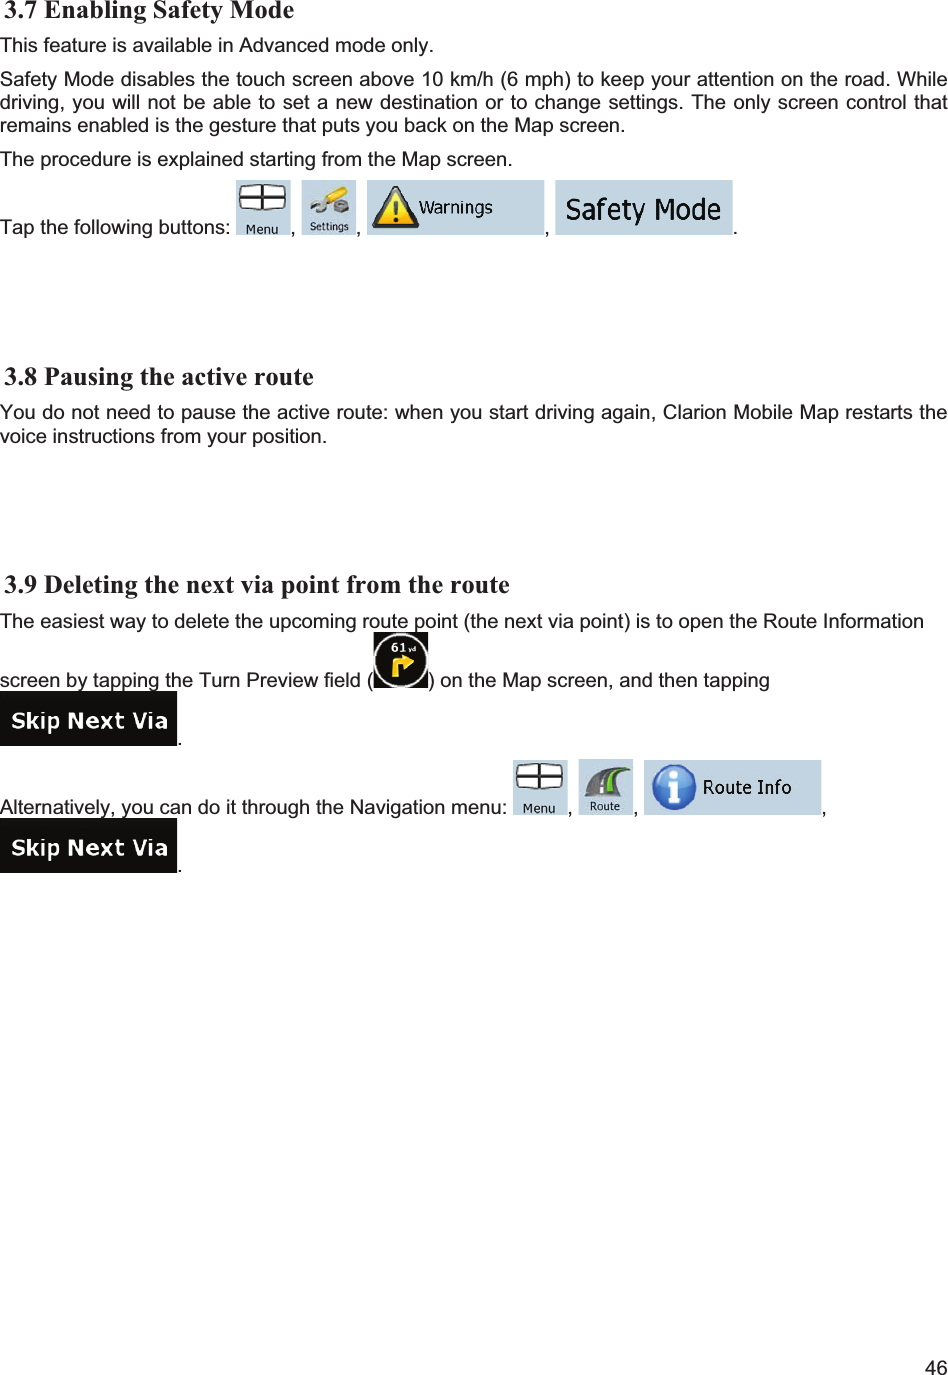
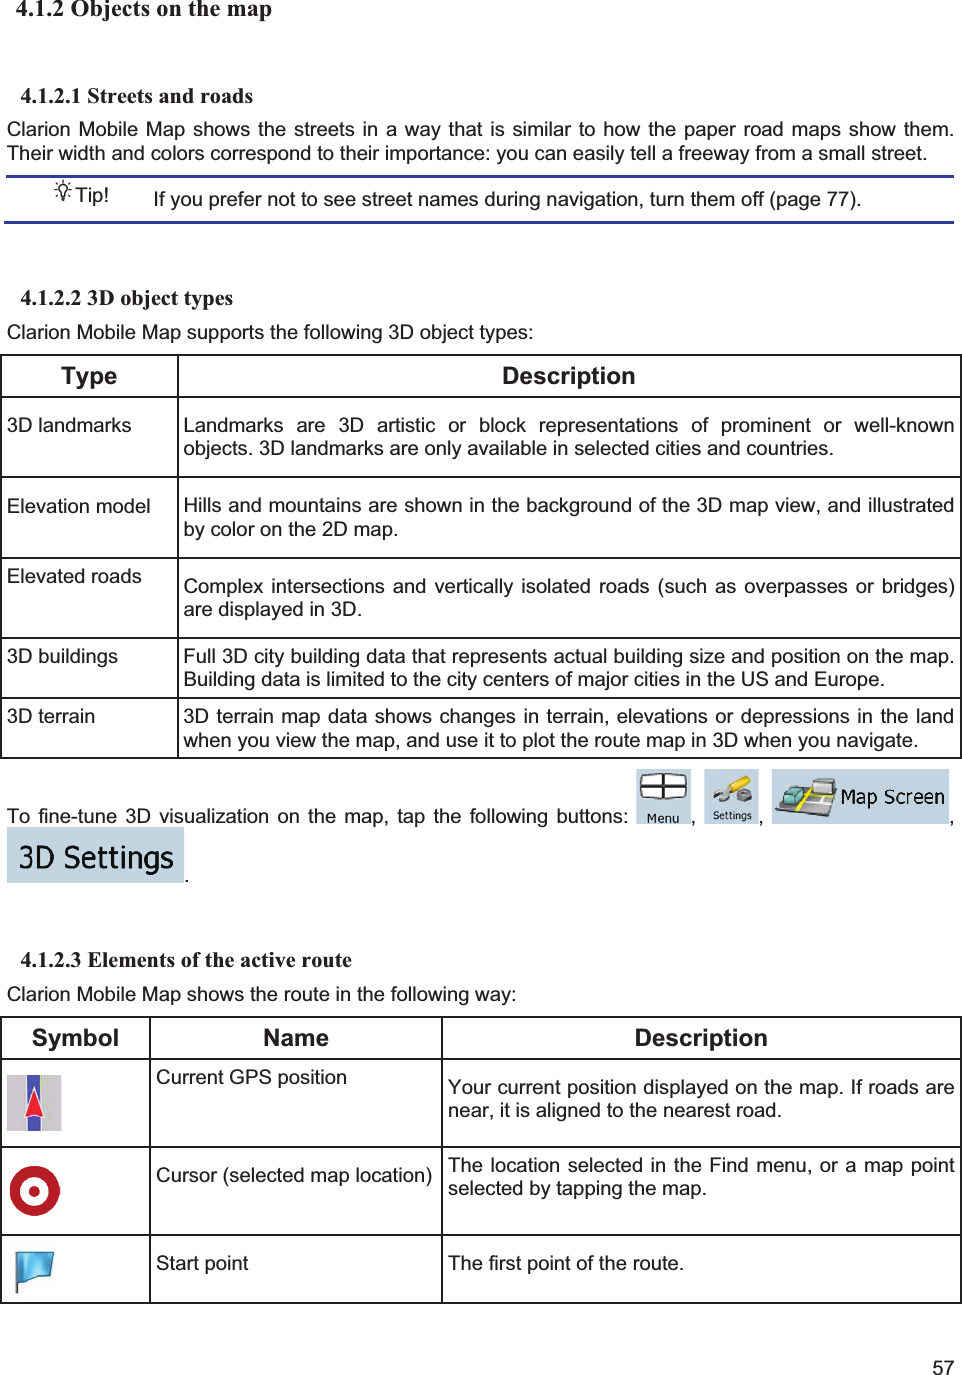
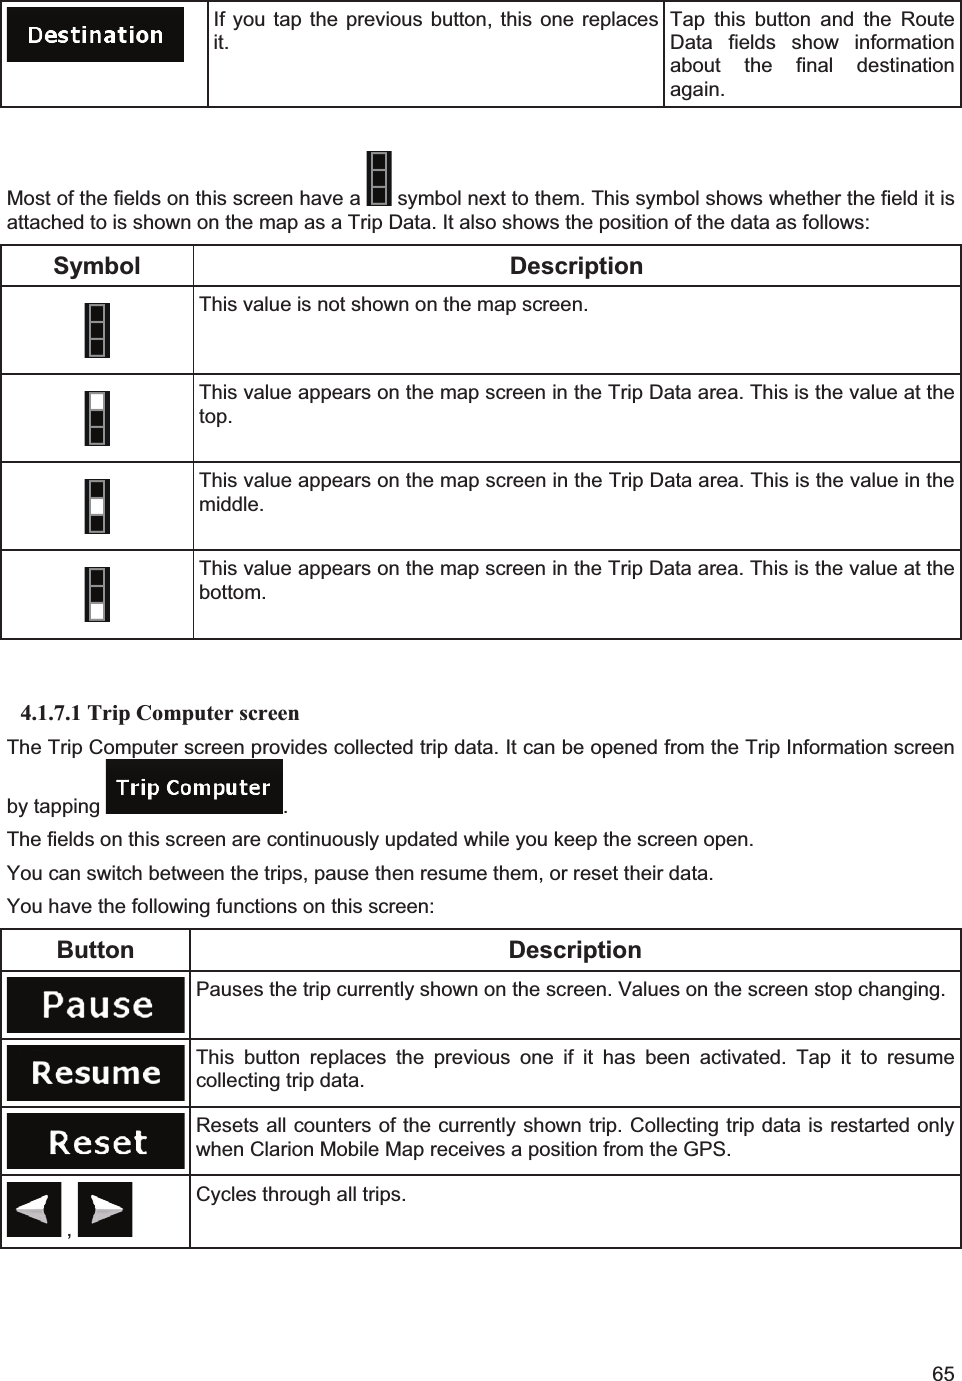
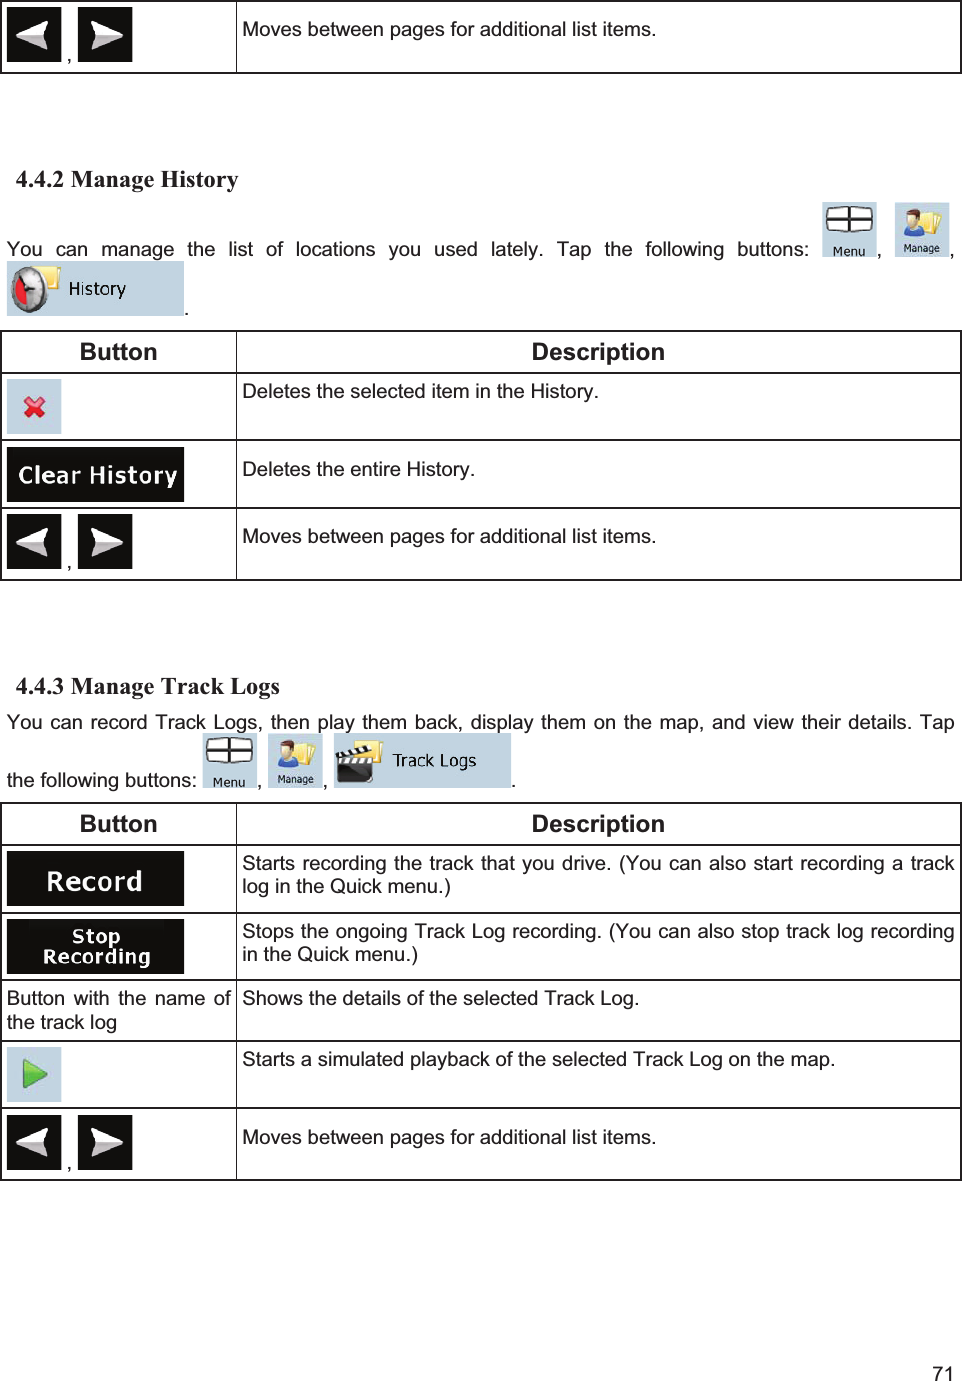
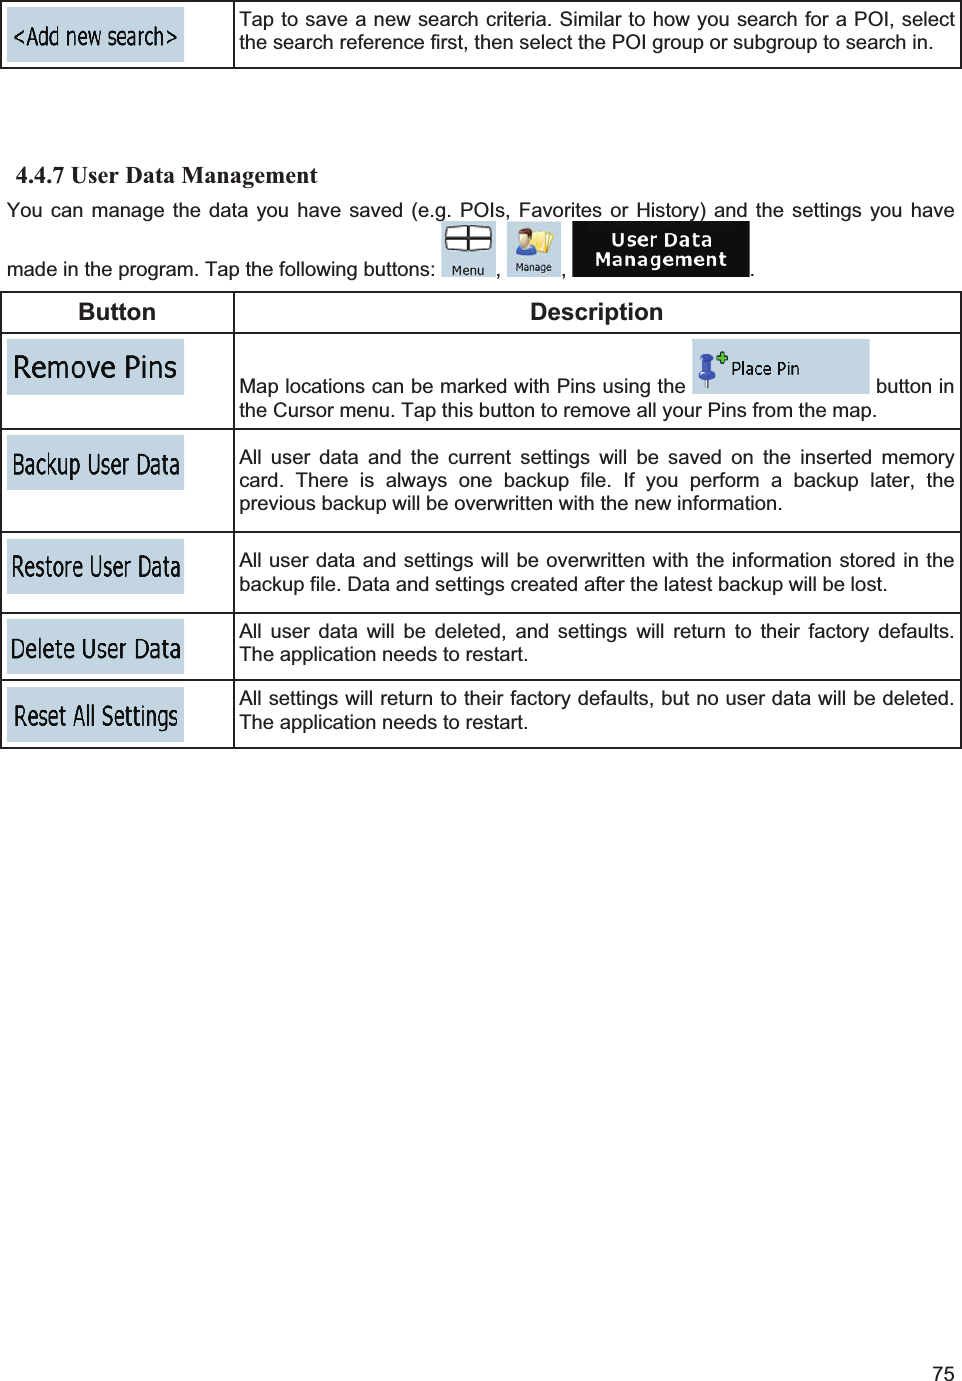
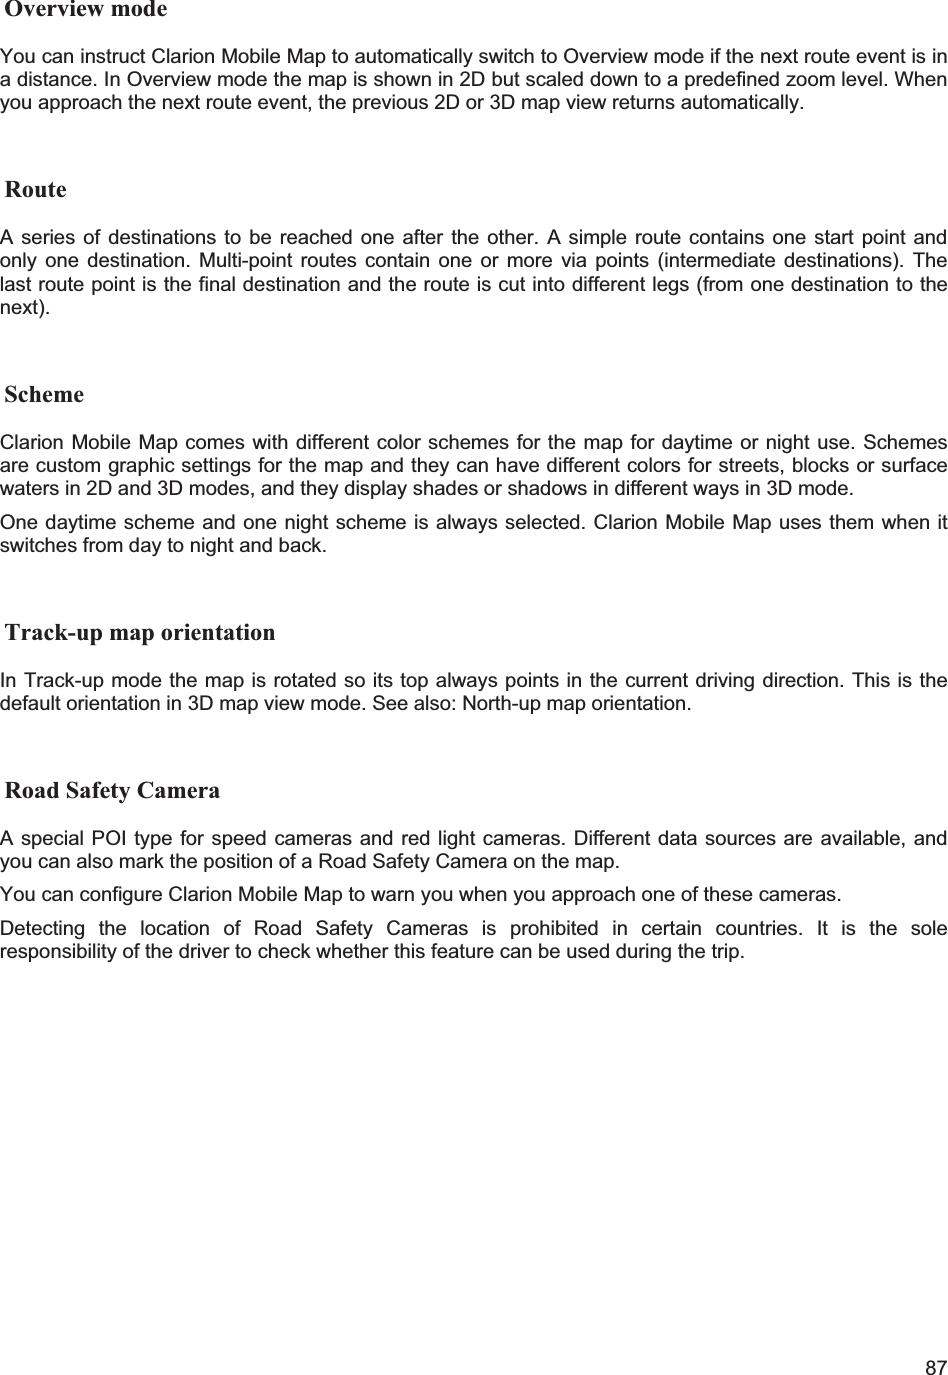
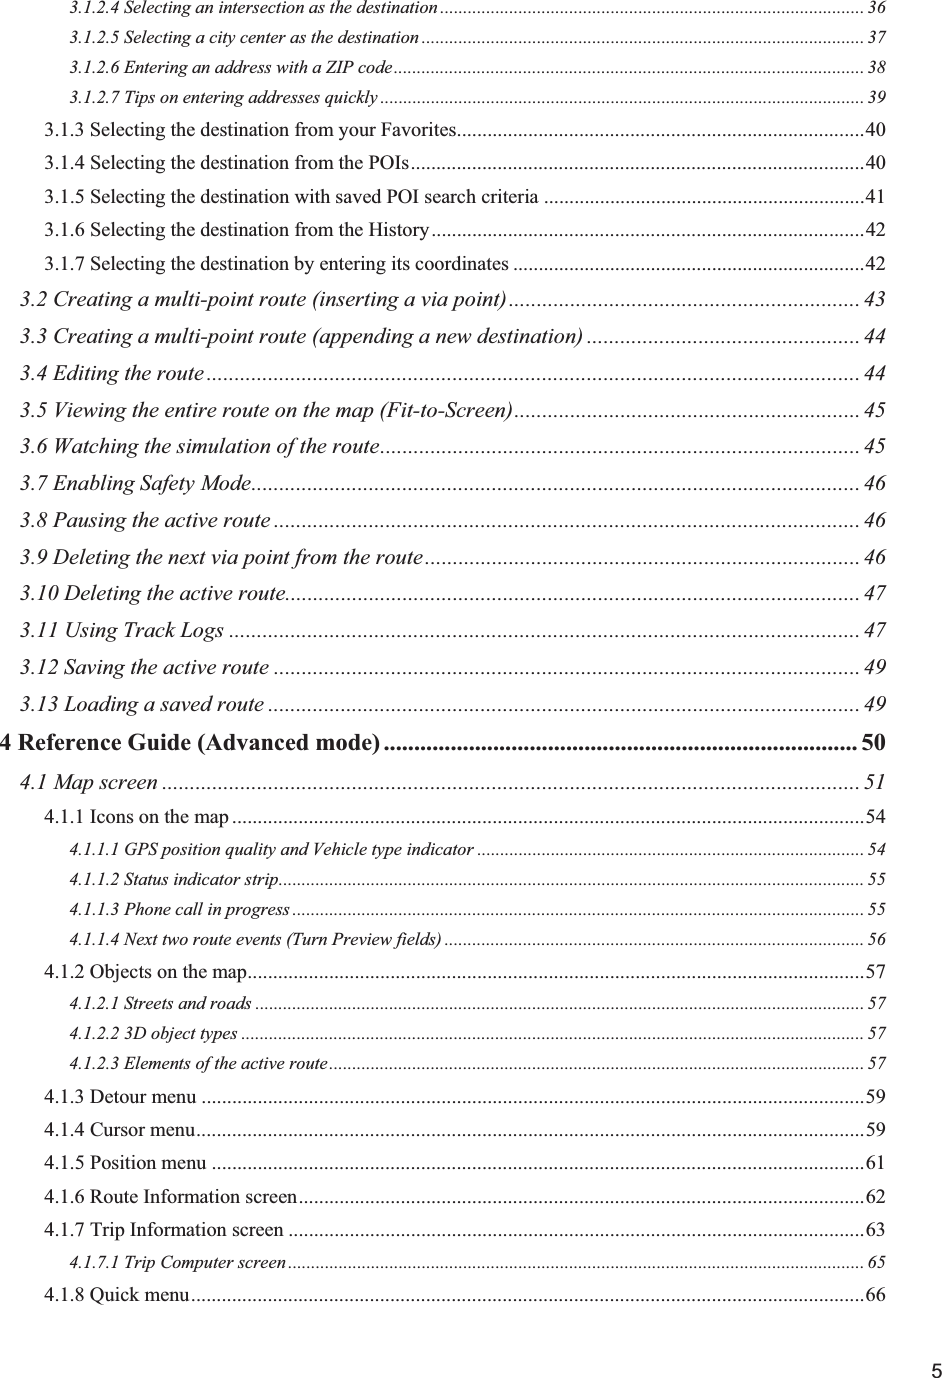
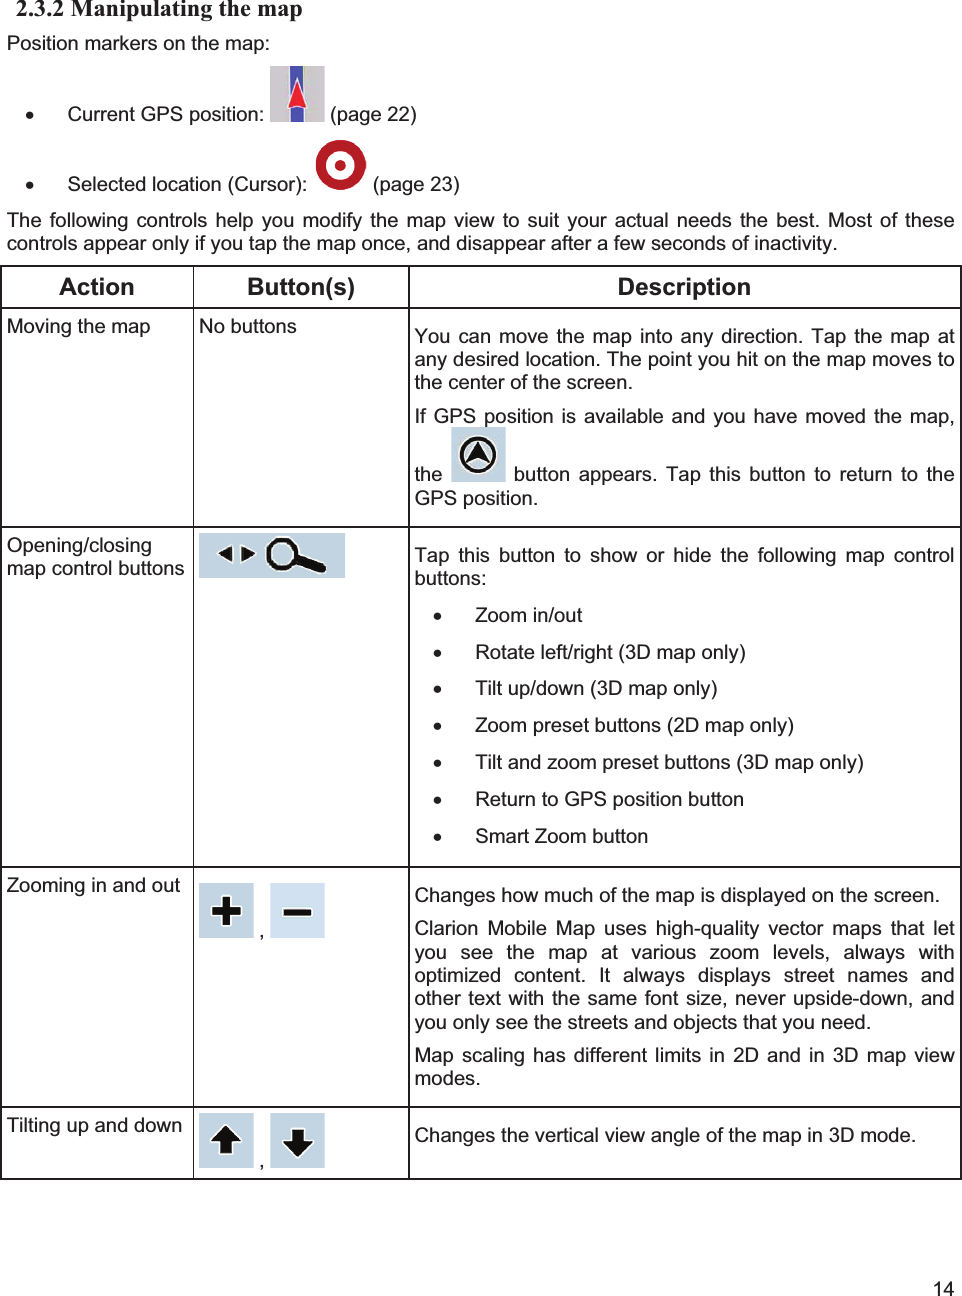
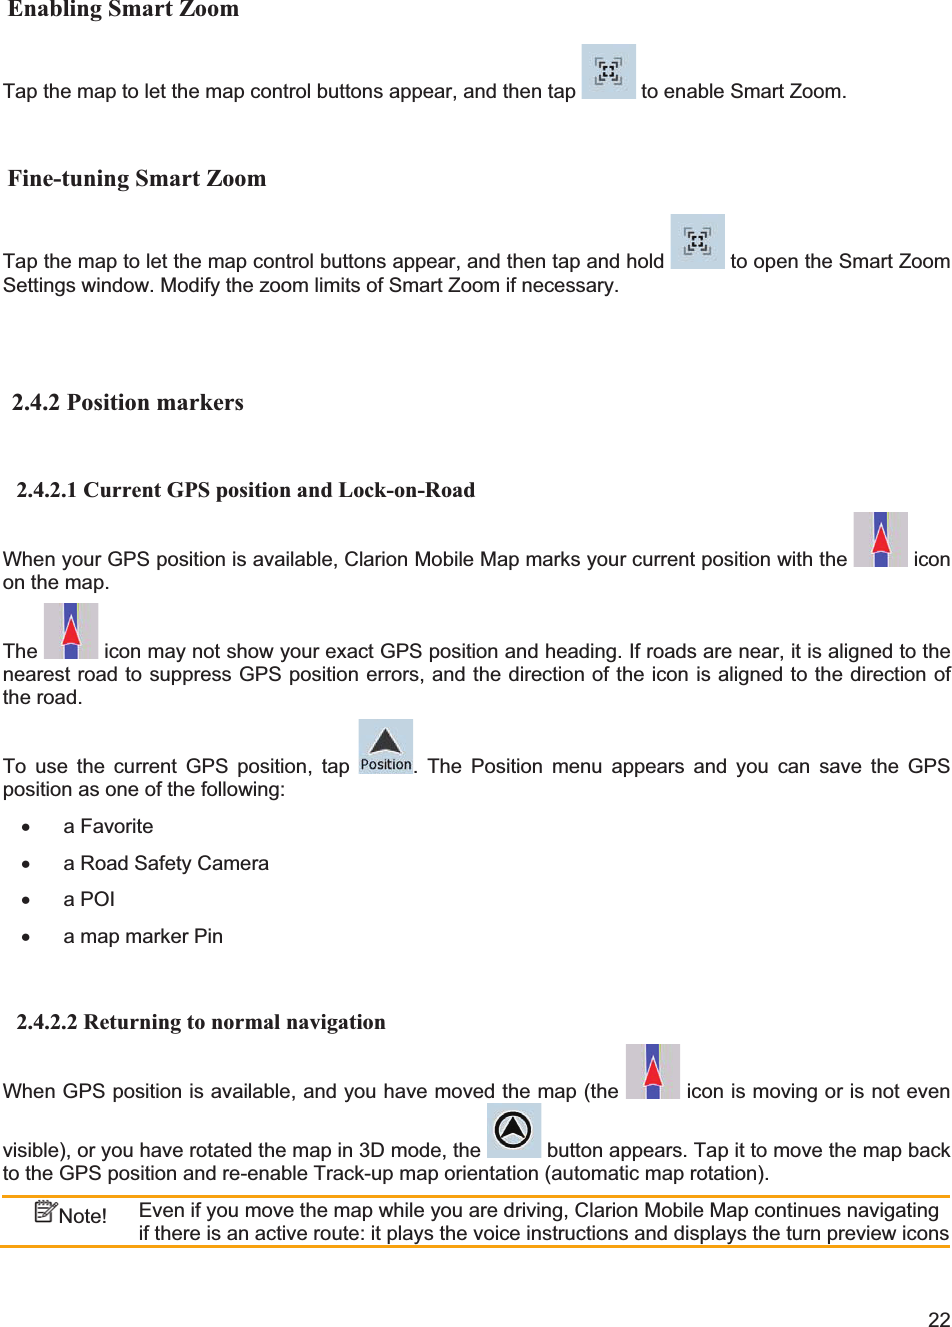
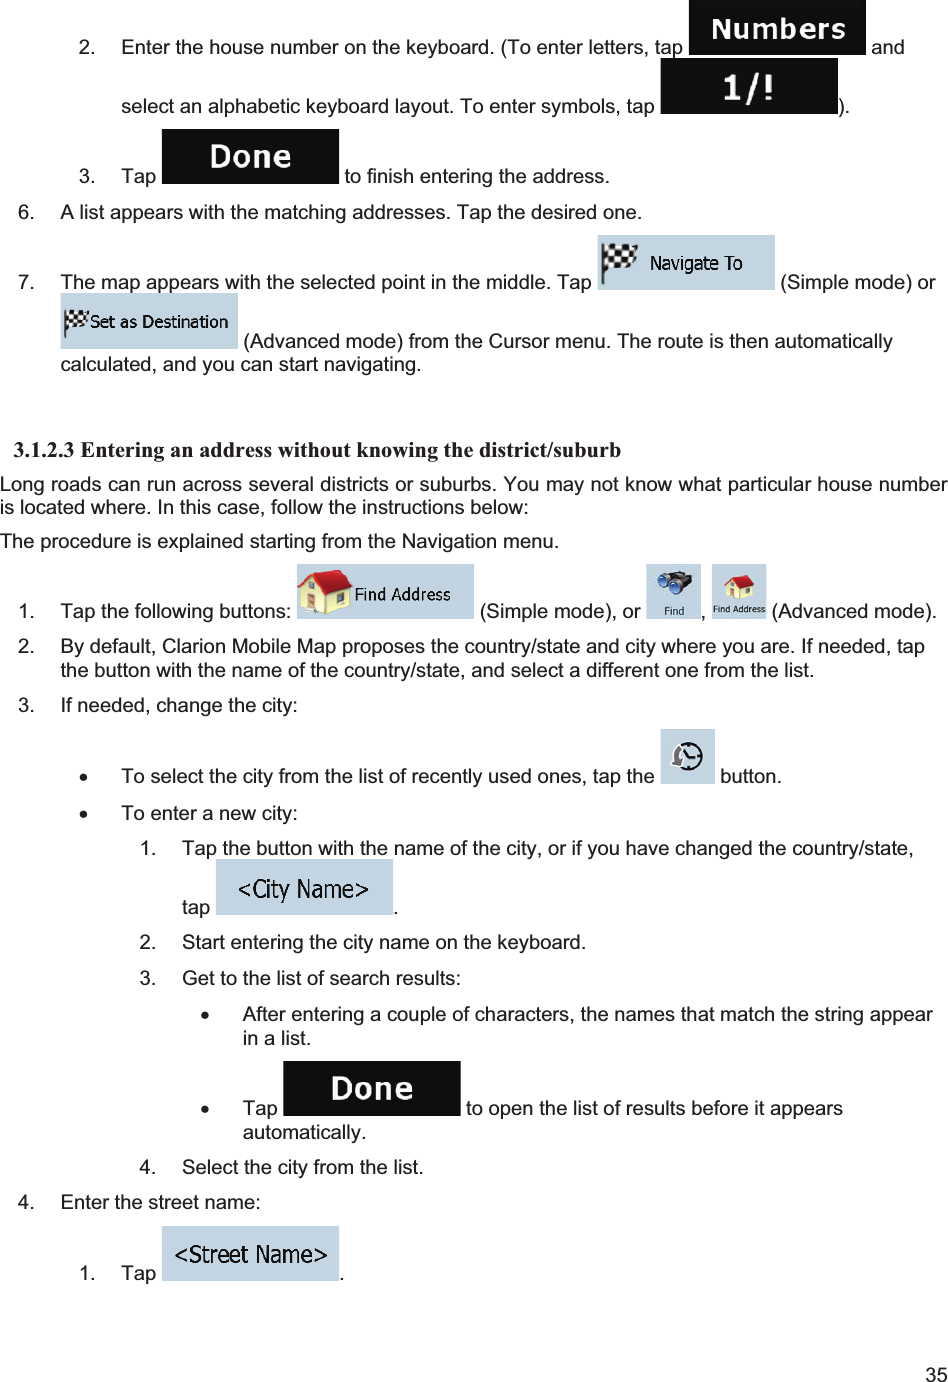
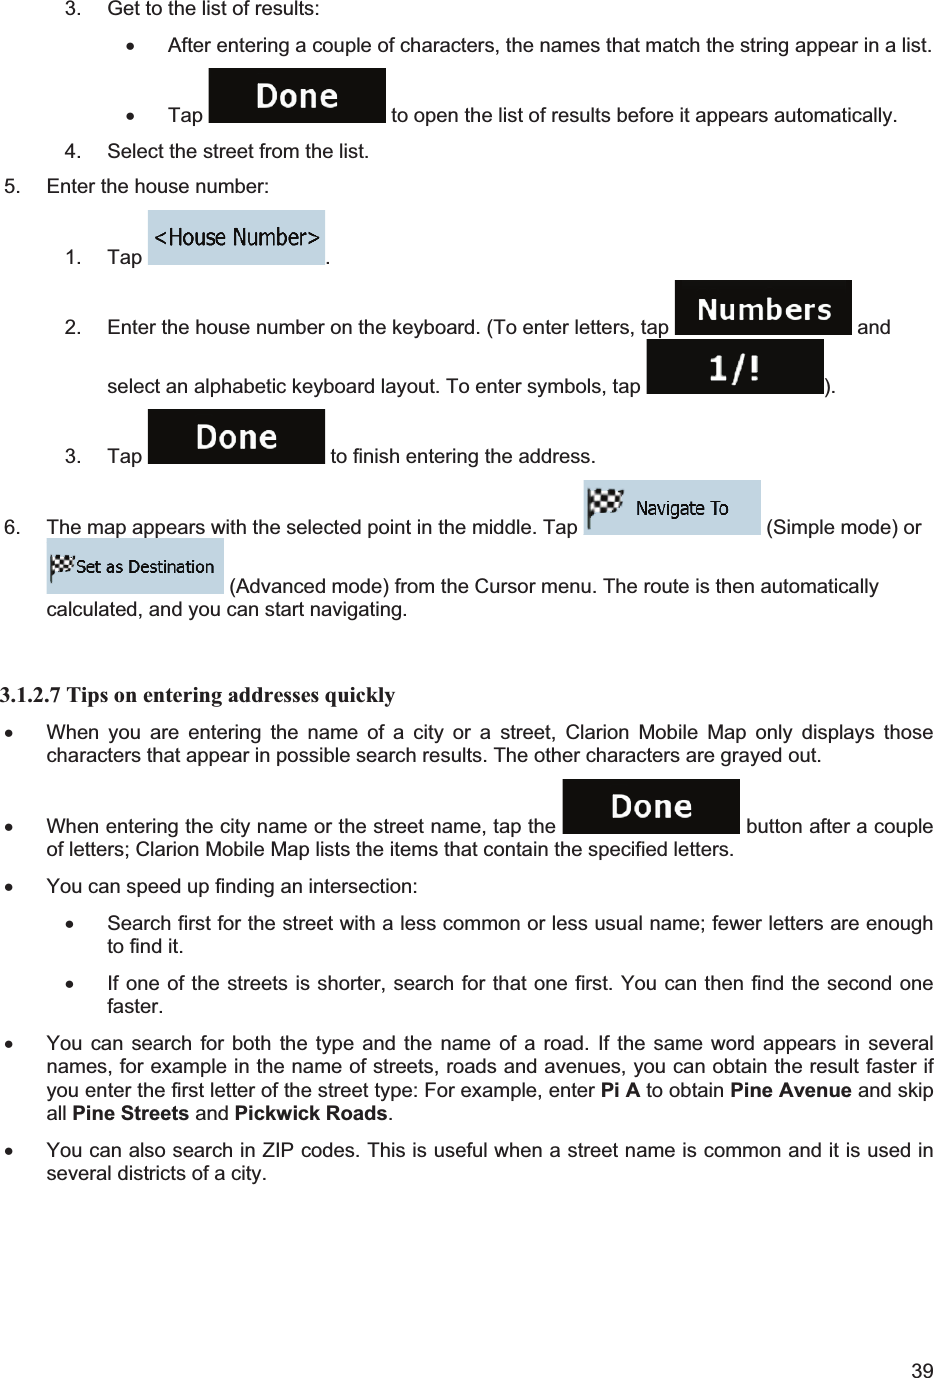
![443.3 Creating a multi-point route (appending a new destination) destination Multi-point routes are created from simple routes, so a route must be active first. One of the ways of expanding the route is to add a new destination. The previous destination becomes the last via point of the route. This feature is available in Advanced mode only. 1. Select a new location as you did in the previous sections. This will be the additional destination in the route. 2. The map appears with the selected point in the middle, and the Cursor menu opens automatically. 3. Tap to open the full Cursor menu with the additional functions. 4. Tap to add the point as a new final destination demoting the previous one to the last intermediate destination. 5. [optional] To add more points to the route, repeat the above steps as many times as you like. Every time a new point is added, the route is recalculated automatically and you can start navigating right away. 3.4 Editing the route This feature is available in Advanced mode only. Tap the following buttons: , , . The list of route points appear with the start point at the top of the list and the final destination at the bottom. If several via points exist, you might need to scroll between pages. Tap one of the route points in the list. You have the following options: Button Action The selected point moves up in the list (becomes a via point to be reached earlier).Tap this button repeatedly, and the point becomes the start point of the route (when routing from a given location) or the first via point to reach (when routing from the GPS position). The selected point moves down in the list (becomes a via point to be reached later).Tap this button repeatedly, and the point becomes the final destination of the route. Tap this button to reverse the route. The start point becomes the destination, the destination becomes the start point, and all via points are to be reached in the opposite order than before. Tap this button to optimize the route. The start point and the destination remain at their position, but the via points are reordered to make the shortest possible route.](https://usermanual.wiki/Faurecia-Clarion-Electronics/QY5014.Navigation-Manual/User-Guide-1211548-Page-44.png)