Ericsson LG LDP-7000BTU KEY TELEPHONE UNIT User Manual Microsoft PowerPoint LDP 7024LD
Ericsson-LG Co., Ltd. KEY TELEPHONE UNIT Microsoft PowerPoint LDP 7024LD
UserManual.wiki
>
Ericsson LG
>
LDP-7000BTU User Manual
>
Users Manual 2
Contents
1.
Users Manual 1
2.
Users Manual 2
Users Manual 2
Navigation menu
Upload a User Manual
Namespaces
Wiki Guide
HTML
PDF
Info
Views
User Manual
Discussion / Help
Navigation

![User Program Codeshttp://www.LG-Nortel.com•Press the [TRANS/PGM] button ▶Press the flexible button to be programmed •▶Press [Trans/Pgm] button again ▶Enter the desired feature code below table •▶Press the [HOLD/SAVE] button to save.PTT Button9 9-Erase User Greeting-6 6Register Bluetooth* 8* 3Erase Page MSG-6 7Bluetooth Usage* 9* 4LCD Display Language7 17 1Background Music7 37 3FWD Button9 8-Record Page MSG-6 5-------* ** 09 *9 99 89 79 69 59 4-9 18 *8 98 78 68 58 48 18 07 67 57 4LDKCode----5 78 05 25 1-1 45 45 34 24 1-3 93 83 7-3 3-2 32 22 11 21 11 91 0-iPECSCodeRegister Station Name7 4Ring Type1 1Speakerphone / Headset6 1Enblock mode1 4Headset Ring Mode6 2Ear-Mic Headset1 7Account Code8 4ICM Ring1 87 97 77 67 53 53 23 1* ** 0---9 79 69 59 49 39 1-8 9-8 68 88 53 4iPECSCodeDisplay Phone VersionListen Station Status6 4Display Phone MAC IP AddressListen Station Number6 3Change Phone IP Address Listen Time & Date6 2Display Phone IP Address Record User Greeting6 1Msg. Wait in Exec/Sec pairCall Log5 7CLI/IP Msg. Wait RetrieveTwo Way Record5 4STA Msg. Wait RetrieveSet Customer MSG5 2HOTDESK Agent LogoutSet Pre-Selected MSG5 1HOTDESK Agent LoginCall Coverage For STA XXX4 6USB CALL RECORDCall Coverage4 5DISA RESTRICTIONConf-Room Deactivate4 4DID RESTRICTIONConf-Room Activate4 3REDIAL ButtonWake-Up Erase4 2MON ButtonSet Wake-up Time4 1MUTE ButtonMobile Ext Hunt Call3 6FLASH ButtonRegister Mobile Ext CLI-DND ButtonMobile Ext Activation3 4CONF ButtonRegister Mobile Extension-ACD STATUS (supervisor only)Auth. Code Change3 2KEY PAD FACILITYAuth. Code Register3 1HUNT DND (group only)COS Change2 4INTURSIONWalking COS2 3Camp-onCOS Restore2 2LOOP ButtonCOS Down2 1DID Call WaitCO Ring1 9FunctionFunctionLDKCode](https://usermanual.wiki/Ericsson-LG/LDP-7000BTU.Users-Manual-2/User-Guide-1112058-Page-4.png)
![KullanıcıProgramlama Kodlarıhttp://www.LG-Nortel.com | http://www.MNiletisim.com.tr•[AKTAR/PRG] tuşuna basınız ▶Programlanabilir bir tuşa basınız•▶[Aktar/Prg] tuşuna tekrar basınız▶Aşağıdaki tablodan istenilen özellik kodunu giriniz•▶[BEKLET/KAYDET] tuşuna basınız.Abone KullanıcıAdıKaydı7 47 4FLASH Tuşu9 49 4Register Mobile Ext CLI39-Geri Ara Tuşu9 29 2Register Mobile Extension37-IPLDKKodu iPECSKodu Özellik IPLDKKodu iPECSKodu Özellik1 1 - Zil Tipi 7 5 6 1 Hoparlör / Kulaklık1 4 1 0 Engelleme Modu 7 6 6 2 Kulaklık Zil Modu1 7 1 9 Mikrofonlu Kulaklık 8 0 8 4 Hesap Kodu1 8 1 1 Dahili Zil 8 1 3 4 DID ÇağrıBekletme1 9 1 2 Harici Zil 8 4 8 5 Döngü (LOOP) Tuşu2 1 2 1 Yetki Kapama 8 5 8 8 Bekletme2 2 2 2 Yetki Açma 8 6 8 6 Araya Girrme2 3 2 3 Yetki Aktarma 8 7 - Grup Rahatsız Etme 2 4 -Yetki Değiştirme 8 9 8 9 TuşTakımıÖzelliği3 1 3 3 Yetkilendirme Kodu Kaydı8 * - ACD Durumu (Sadece Grup)3 2 -Yetkilendirme Kodu Değiştirme 9 1 9 1 Konferans Tuşu3 6 - Mobil Dahili Grup Çağrı9 5 9 5 Sessizlik (MUTE) Tuşu4 1 4 1 Uyandırma Zamanı9 6 9 6 Hoparlör (MON) Tuşu4 2 4 2 Uyandırma Saati İptali 9 7 9 7 Tekrar Arama Tuşu4 3 5 3 Konferans OdasıTanımlama 9 8 - DID Kısıtlama4 4 5 4 Konferans Odasıİptali 9 9 - DISA Kısıtlama4 5 1 4 ÇağrıKapsama Alanı9 * - USB ÇağrıKaydetme4 6 - ÇağrıKapsama Dahili XXX * 0 * 0 Özgür Masa MT(Agent) Kaydı5 1 5 1 Önceden SeçilmişMesaj Etkin * * * * Özgür Masa MT(Agent) Çıkışı5 2 5 2 Özel Mesaja Ayarla - 3 1 Dahili Numarasıyla Mesaja Erişim5 4 8 0 İki Yönlü Kayıt-3 2CLI/IP Numarasıyla Mesaja Erişim5 7 5 7 ÇağrıKaydı- 3 5 Yönetici/Sekreter Mesaj Erişimi6 1 - Kişisel Karşılama Mesajı- 7 5 Telefonun IP Adresini Göster6 2 - Saat ve Tarihi Dinle - 7 6 Telefonun IP Adresini Değiştir6 3 - Abone NumarasınıDinle - 7 7 Telefonun MAC IP Adresini Göster6 4 - Abone Durumunu Dinle - 7 9 Telefonun Versiyonunu Göster6 5 - Anons MesajınıKaydet - 9 3 Meşgul /Rahatsız Etme Tuşu6 6 - Kişisel Karşılama MesajınıSil - 9 8 Yönlendirme Tuşu6 7 - Anons MesajınıSilin - 9 9 Bas-Konuş(PTT) Tuşu7 1 7 1 LCD Ekran Dilini Seçin * 3 * 8 Register Bluetooth7 3 7 3 Arka Plan Müziği* 4 * 9 Bluetooth Usage](https://usermanual.wiki/Ericsson-LG/LDP-7000BTU.Users-Manual-2/User-Guide-1112058-Page-8.png)
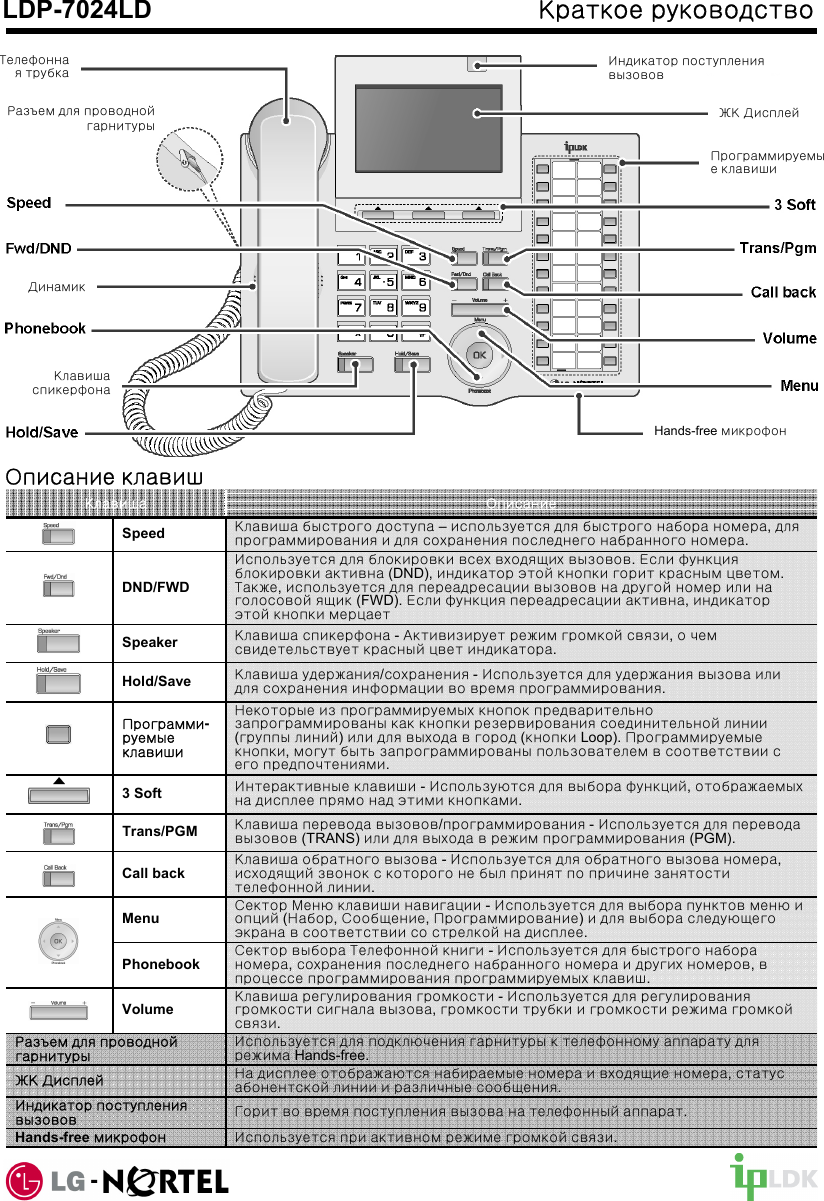
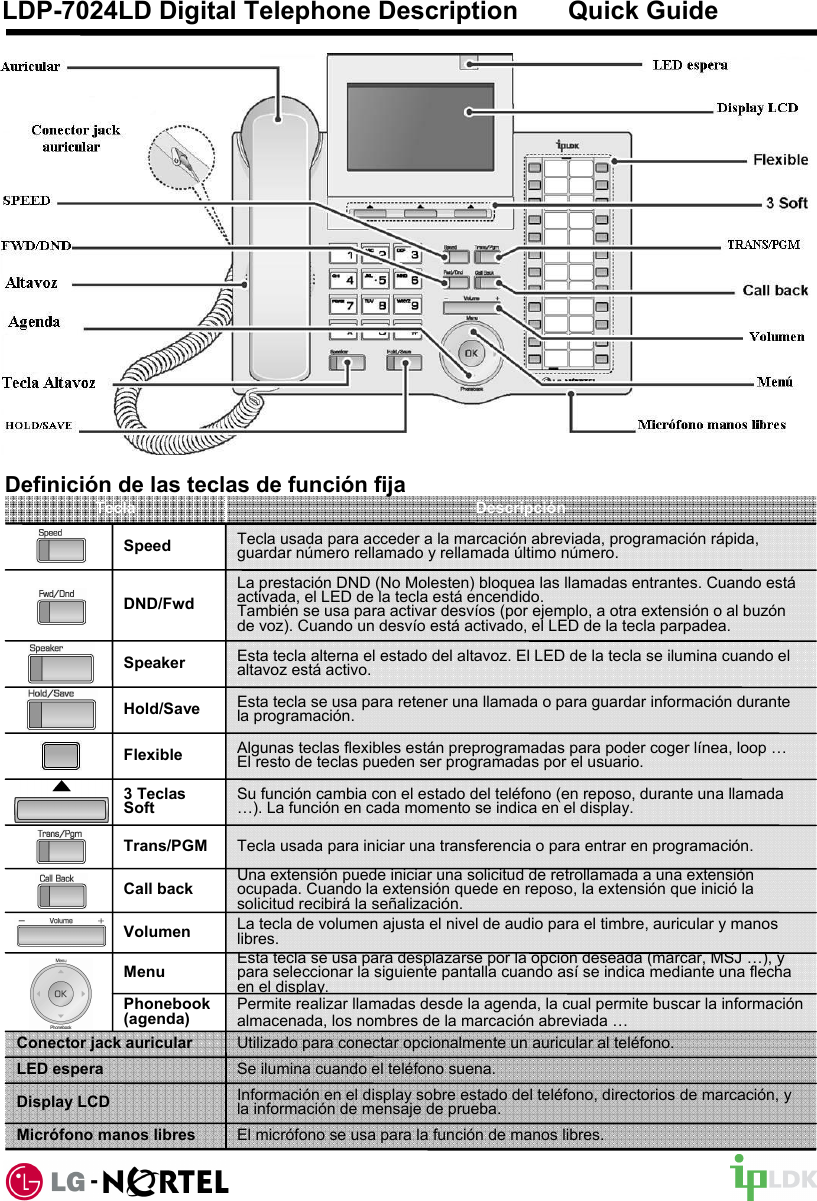
![LDP-7000 serien, modell 7016D / 7024D og 7024LDLDP-7000 serien består av 6 digitale systemapparater med avanserte og brukervennlige funksjoner.- Display på 3 eller 12 linjer á 24 tegn.- 3 aktive displayknapper. - 16 eller 24 fleksible knapper med tofargede indikatorlamper.Benyttes for å sette over samtaler når man ikke har en internlinjeknapp.Benyttes også i forbindelse med programmering av telefonen.[OVERF/PROG]TELEFONBOKBenyttes for å regulere lyden i telefonrøret, høyttalende telefon og når det ringer.[VOLUM]Apparatet har 3 aktive displayknapper som forandre funksjon avhengig av apparatets status (apparatet er ledig eller i bruk).DisplayknappBeskrivelseKnapperBenyttes for å sette samtaler på vent, samt for å lagre programmering.Benyttes også for å ringe fra samtalelogg og kortnummerliste.[VENT/LAGRE]Benyttes til å programmere og ringe lagrede telefonnummer (kortnummer).[KORTNR.]Benyttes til å sette apparatet i opptatt/ ikke forstyrr.Knappen lyser rødt når den er aktivert.[OPPTATT]Benyttes til å legge igjen interne beskjeder eller aktivere tilbakering funksjon og for å avlese tapte anrop og andre beskjeder.[OPPKALL]Benyttes for å svare og legge på høyttalende samtaler. Benyttes også sammen med hodesett.[HØYTTALER]Benyttes for å programmere tjenester og funksjoner direkte på en knapp.Kan benyttes til internnummer, viderekobling, fravær, Mobile extension etc.Fleksible knapperBenyttes til å gå inn i apparatets programmeringsmeny eller for å søke i den alfabetiske telefonboken (ringe internt, personlige eller fellese kortnummer).Navigasjonsknappen benyttes også til å bla seg frem og tilbake i displayet. MENYIntroduksjonLDP-7016D LDP-7024DLDP-7024LD](https://usermanual.wiki/Ericsson-LG/LDP-7000BTU.Users-Manual-2/User-Guide-1112058-Page-10.png)
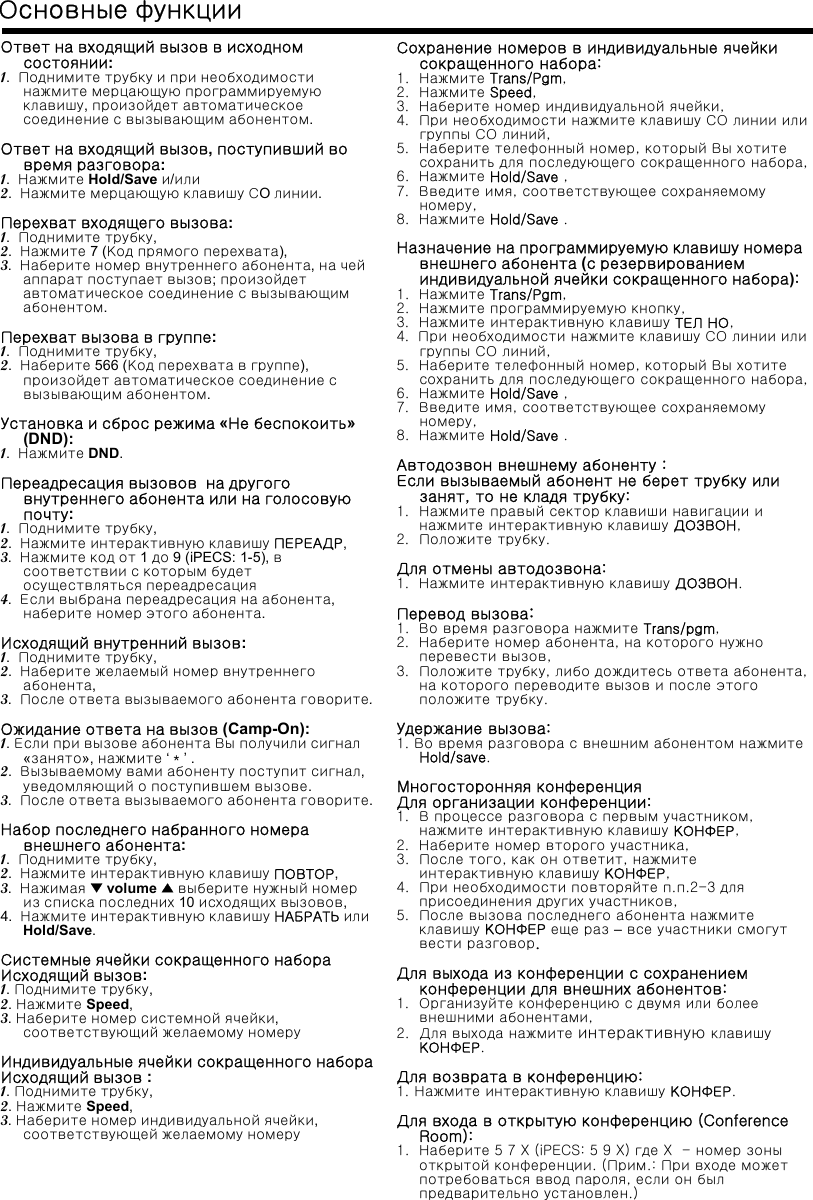
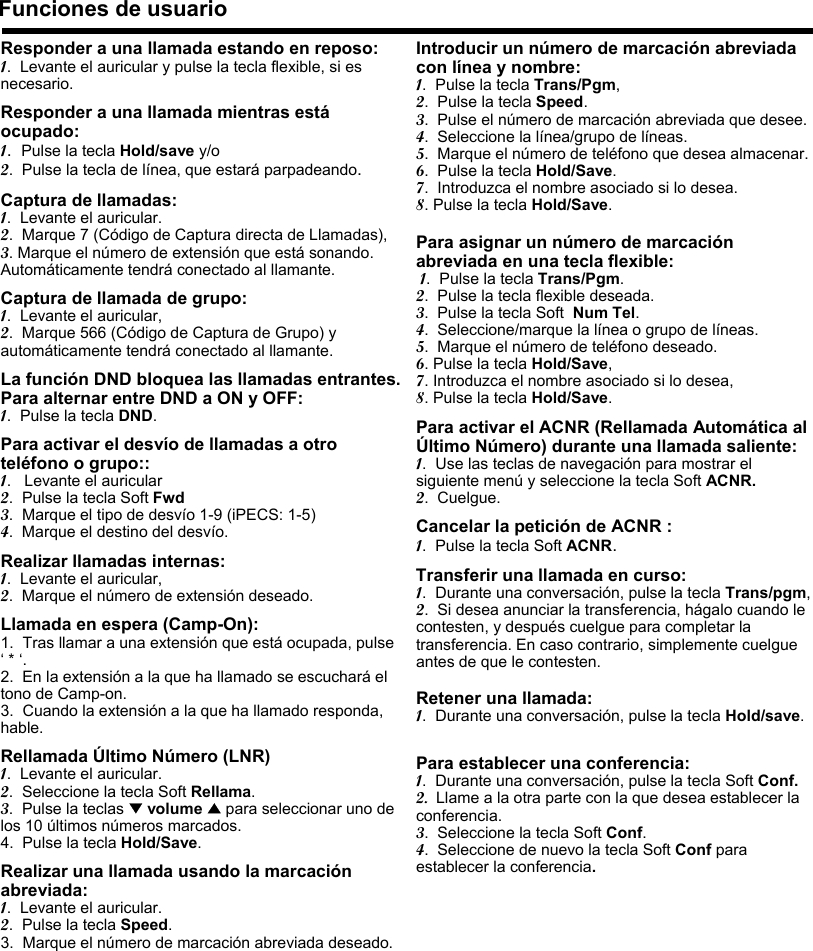
![1. Besvare anropLøft av telefonrøret, eller trykk på [HØYTTALER].2. Ringe en samtaleTast ”0” for ekstern linje og ønsket telefonnummer.Repetisjon – Trykk på [REDIAL] (displayknapp).3. Hente opp en samtale fra et apparatTrykk på internlinjeknapp som blinker ellertast *7 + internnummeret til telefonen som ringer.Hente opp samtale fra en programmert gruppe.Trykk på [HENTE] (displayknapp).4. Sette over en samtaleTrykk på [OVERF/PROG] og tast internnummer ellertrykk direkte på programmert internlinjeknapp.Sette over en samtale eksterntTrykk på [OVERF/PROG], tast 0 og telefonnummer(obs du må høre at det ringer før du setter over).5. Veksle mellom flere samtalerTrykk på [VENT/LAGRE] (en linjeknapp vil nå blinke). - Svar ny samtale ved å trykke på gaffelbryteren eller- Ring en ny intern eller ekstern samtale.Trykk på blinkende knapp for å hente tilbake samtalen.6. Samtalevarsling for å gi viktig meldingNår du ringer et internnummer og får opptatt.Tast * (varseltone sendes).Besvare samtalevarslingTrykk på [VENT/LAGRE] (samtalen settes på vent).Det opprettes nå kontakt med den som kaller opp. Når oppkaller avslutter får du første samtale tilbake.7. Viderekople telefonenTrykk på [HØYTTALER] og [OPPT/VK], velg:Tast 1 + internnummer (vk. med en gang).Tast 2 + internnummer (vk. ved opptatt).Tast 3 + internnummer (vk. ved ikke svar).Tast 4 + internnummer (vk. ved ikke svar og opptatt).Tast 5 + kortnummerplass (vk. til eksternt nr.).Slå av viderekopling.Trykk på [OPPT/VK].8. Henvise telefonen til fraværsbeskjederTrykk på [OVERF/PROG] og tast 51, velg fraværsårsak.Tast 01 – Lunsj til kl, tast klokkeslett.Tast 02 – Ferie til dato, tast dato (dag/ mnd).Tast 03 – Ute til kl, tast klokkeslett.Tast 04 – Ute til dato, tast dato (dag/ mnd).Tast 05 – Ute (ukjent tid tilbake).Tast 06 – Ring, tast telefonnummer.Tast 07 – Ring internnummer, tast internnummer.Tast 08 – I møte til kl, tast klokkeslett.Tast 09 – Hjemmekontor.Tast 10 – Syk.Tast # for å slå av beskjedene.Trykk på [KORTNR] hvis du ønsker opplesing av fravær.Trykk på [VENT/LAGRE] når en av beskjedene er valgt.9. Opptatt/ Ikke forstyrr – Trykk på [OPPT/VK].10. Mobil ExtensionMobiltelefonen knyttes sammen med din kontortelefon.Programmere mobilnummer.Trykk på [OVERF/PROG] og tast 33.Tast inn mobil nr. og trykk på [OK].Aktivere/ deaktivere Mobil Extension.Trykk på [OVERF/PROG] og tast 34. Tast 1 for På eller 0 for Av, trykk på [OK].Samtale via Mobil Extension til mobilen.Sette over – trykk * og tast internnummer, legg på.11. KortnummerProgrammere kortnummer.Trykk på [OVERF/PROG] og [KORTNR.].Trykk på [OK] og tast telefonnummer.Trykk på [OK] og tast inn navn.Trykk på [OK] for å lagre kortnummeret.Ringe med personlige kortnummer.Trykk på [TELEFONBOK] og tast 2.Søk alfabetisk og/ eller bla deg frem med [MENY].Trykk [OK] for å ringe markert nummer.12. Voice mailPersonlige beskjed.Løft av telefonrøret og trykk på [OVERF/PROG].Tast 61 og tast # hvis du ønsker å lese inn ny beskjed. Trykk [OK] for å lagre innspillingen.Viderekopling til Voice mail.Trykk på [HØYTTALER] og [OPPT/VK], velg:Tast 1# (vk. med en gang).Tast 2# (vk. ved opptatt).Tast 3# (vk. ved ikke svar).Tast 4# (vk. ved ikke svar eller opptatt).Slå av viderekopling til Voice mail.Trykk på [OPPT/VK].Avspilling av mottatte beskjeder.Trykk på [OPPKALL].Benytt aktive displayknapper for flere valg.Fjernstyring av Voice Mail.Ring ditt eget direktenummer, din beskjed avspilles.Tast * du må nå taste ditt passord og #.(passord må allerede være programmert, 3-5 siffer).13. Tapte anrop (BESKJED: TLF X)Trykk på [OPPKALL] bla med [MENY] knappenTrykk på [OK] for å ringe tilbake.14. Mottatte og ringte samtalerDet må programmeres en [CALL LOGG] knapp.Trykk på [OVERF/PROG] og en ledig fleksibel knapp.Trykk på [OVERF/PROG] og tast 57.Trykk på [OK] og [HØYTTALER].Samtalelogg.Trykk på [CALL LOGG].Tast 1 for Mottatte eller 2 for Ringte samtaler.Bla gjennom numrene med [MENY] knappen.Trykk på [OK] knappen for å ringe ut.Oppsett og programmering av telefonen](https://usermanual.wiki/Ericsson-LG/LDP-7000BTU.Users-Manual-2/User-Guide-1112058-Page-11.png)
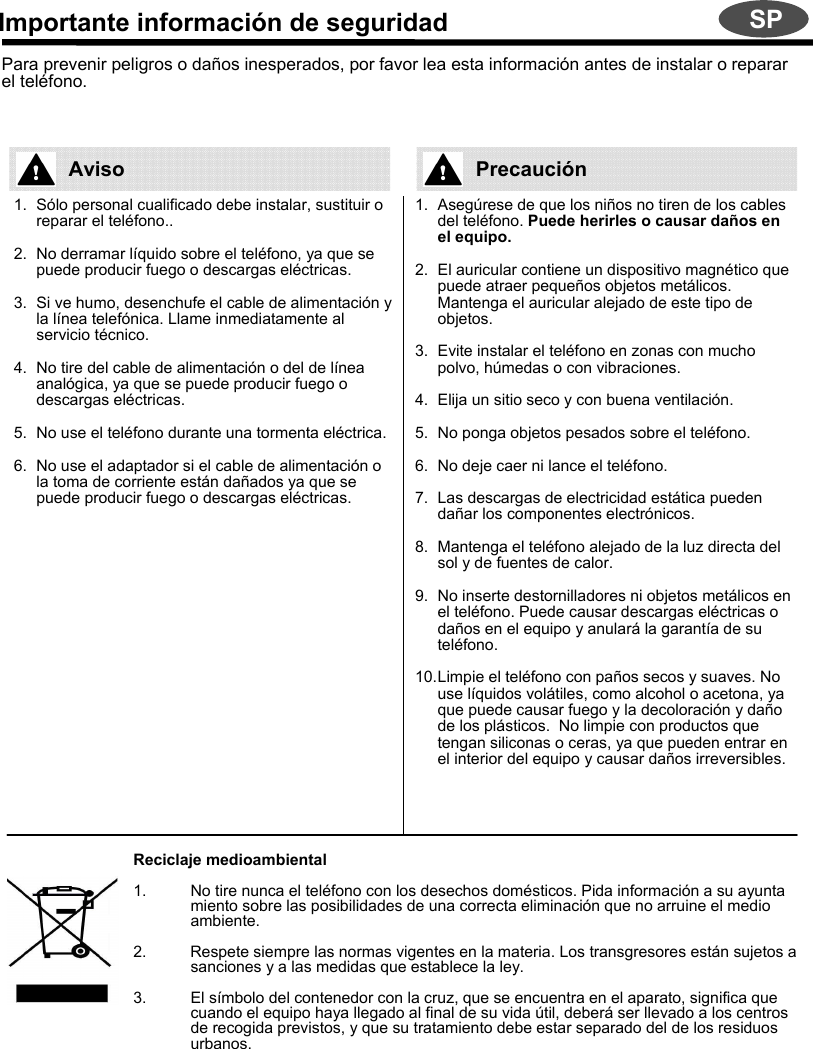
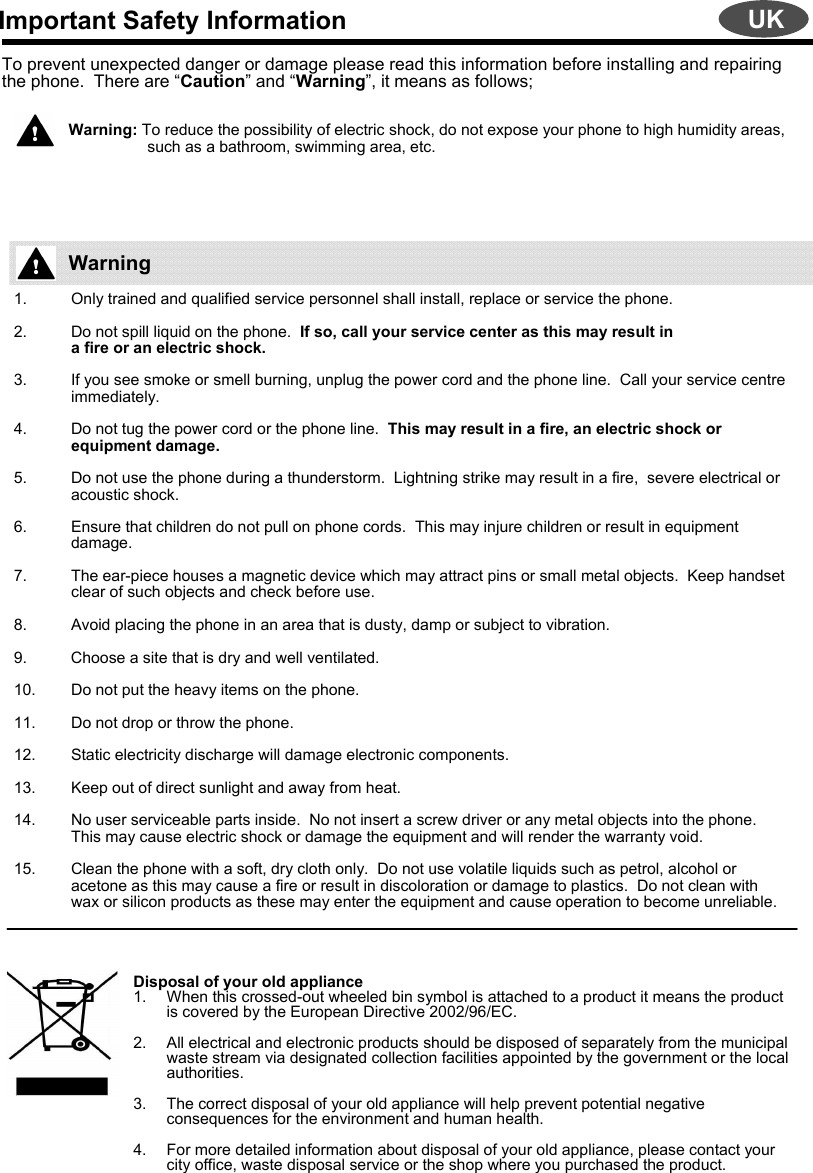
![Oppsett og programmering av telefonen5 3--9 89 79 59 39 29 18 78 17 47 37 15 7IP LDKSamtalelogg (*)Hodesett7 5Skifte Norsk/ Engelsk tekstHodesett utgang (minijack)1 7Bakgrunns musikkRingestilling for hodesett7 6Aktivere fraværsbeskjed- Lunsj til kl.- Møte til kl.5 10108Slå av og på visning av eget nr. (*)Slette personlig talebeskjed6 6Lese av tapte anrop (4/8 taster) (*)Personlig talebeskjed6 1Lese av beskjeder (4/8 taster) (*)Slette konferanserom4 4Oppheve direkte innvalg (*)Opprette konferanserom4 3[REPETISJON] knapp (8 taster) (*)Slette alarm og vekking4 2[MIKROFON] knapp (8 taster) (*)Sett alarm og vekking4 1[OPPTATT] knapp (8 taster) (*)Aktivere Mobile Ext. funksjon3 4[OPPKALL] knapp (8 taster) (*)Programmere Mobile Ext nr.3 3[KONFER] knapp (8 taster) (*)Endre passord3 2Utmelding av gruppe (*)Registrere passord3 1Samtale venter (*)Eksterne ringetoner1 9ApparatnavnInterne ringetoner1 8FunksjonFunksjonIP LDKTabellen under har 2 forskjellige bruksmønster, enten ved å taste kodene direkte eller ved å programmere funksjonen under en fleksibel knapp slik at bruken av en tjeneste blir tilgjengelig ved ett taste trykk. Merk at enkelt funksjoner, markert med (*), må programmeres under en knapp for å kunne benyttes.Svarstilling for interne anrop.Trykk på [OVERF/PROG] og tast 12.Tast 1 for høyttalende calling (H). Tast 2 for ringetone (T). Tast 3 for calling uten mikrofon (P). Trykk på [OK] når ett av valgene er gjort.Ringesignal og ringevolum.Intern ring – Trykk på [OVERF/PROG] og tast 18.Ekstern ring – Trykk på [OVERF/PROG] og tast 19.Tast fra 01 til 15 for de forskjellige ringetoner. Trykk på [OK] når et av valgene er gjort.Programmere apparatnavn.Trykk på [OVERF/PROG] og tast 74.Tast inn navn og trykk på [OK].Programmere internnummer på en fleksibel knapp.Trykk på [OVERF/PROG] og en ledig fleksibel knapp.Tast ønsket internnummer, 2-4 siffer.Trykk på [OK] for å lagre programmeringen.Hodesett koblet sammen med telefonrøretTrykk på [OVERF/PROG] og tast 75.Tast 0 for hodesett.Tast 1 for normal høyttalende. Trykk på [OK] når ett av valgene er gjort.Samtaler besvares nå med [HØYTTALER] knappen.Hodesett utgang (minijack)Trykk på [OVERF/PROG] og tast 17Tast 1 for å aktivere hodesett utgang. Tast 0 for å slå av hodesett utgang.Trykk på [OK] når et av valgene er gjort.Samtaler besvares nå med [HØYTTALER] knappen.Volumknappen. Volumknappen regulerer lyden i telefonrøret, høyttalende telefon og ringestyrke når det ringer.Programmering av bokstaver.Trykk på knappen som har den bokstaven du ønsker.Tast så siffer 1 til 4 for ønsket bokstav.Eks. P=71, Q=72, R=73 og S=74(Mellomrom=*1, Ø=00 og Punktum=13).Programmering av en fleksibel knapp.Trykk på [OVERF/PROG] og en ledig fleksibel knapp.Trykk på [OVERF/PROG] og tast funksjonskode (se tabell).Trykk på [OK] for å lagre programmeringen.Bruk av en funksjon.Trykk på [OVERF/PROG] knappen. Se tabell, tast funksjonskode og velg innstilling. Trykk på [OK] når innstillingene er gjort.](https://usermanual.wiki/Ericsson-LG/LDP-7000BTU.Users-Manual-2/User-Guide-1112058-Page-12.png)
![Коды программируемых функцийhttp://www.LG-Nortel.com•Программирование : Нажмите [TRANS/PGM] ▶ Нажмите одну из программируемых клавиш•▶Нажмите [Trans/Pgm] ▶Наберите код программируемой функции•▶Для сохранения нажмите [HOLD/SAVE].«Не беспокоить»/ «Переадресация»(DND / FWD)-9 3Регистрация CLI мобильногоабонента39-Конференция9 19 1Регистрация мобильного абонента37-Назначение клавиши {PTT}9 9-Выбор языка отображения7 17 1Регистрация Bluetooth*8*3Музыкальное сопровождение7 37 3Использование Bluetooth*9*4Регистрация имени абонента7 47 4Спикерфон / гарнитура6 17 5«Переадресация»(FWD)9 8-Удаление поискового сообщения-6 7--------* ** 09 *9 99 89 79 69 59 49 28 *8 98 78 68 58 48 18 07 *7 87 6LDKкод------5 78 05 25 1-1 45 45 34 24 1-3 83 3-2 32 22 11 21 11 91 0-iPECSкодРежим звонка при работе с гарнитурой6 2Тон звонка1 1Отображение серийного номера системы/ номера открытой лицензии(Display Serial number/Package for SMEMU)7 *Блочная передача номера1 4Запись всех разговоров через USB порт(USB Always Record)-Выбор режима работы с гарнитурой1 7Доступ к функции Код учета8 4Выбор типа внутреннего вызова1 89 37 97 77 67 53 53 23 1* ** 0---9 79 69 59 49 2-8 9-8 68 88 53 4iPECSкод«Не беспокоить» (DND)Удаление приветствия6 6Отображение версии телефонаЗапись поискового сообщения6 5Отображение MAC IPадреса телефонаПрослушивание абонентскогостатуса6 4Изменение IP адреса телефонаПрослушивание абонентскогономера6 3Отображение IP адреса телефонаПрослушивание времени и даты6 2Доступ к сообщениям парыДиректор/секретарь(Msg. Wait in Exec/Sec pair)Запись приветствия6 1Доступ к ожидающим сообщениямвнешних и IP абонентов (CLI/IP Msg. Wait Retrieve)Журнал вызовов5 7Доступ к ожидающим сообщениямвнутренних абонентов(STA Msg. Wait Retrieve )Запись разговора5 4Процедура выхода Виртуальноговнутреннего абонентаСоздание сообщения при отсутствии5 2Процедура входа Виртуальноговнутреннего абонентаВыбор сообщения при отсутствии (изимеющихся)5 1Запись разговора через USB порт(USB CALL RECORD)Дублирование приема вызовов (Call Coverage For STA XXX)4 6Запрет прямого доступа в систему(DISA RESTRICTION)Разрешение на дублирование приемавызовов (Call Coverage)4 5Запрет прямого входящего набора номера(DID RESTRICTION)Деактивация Conf-Room4 4Повторный набор номера (REDIAL)Активация Conf-Room4 3СпикерфонСброс будильника4 2Отключение микрофона (MUTE)Установка будильника4 1FLASHСервис мобильного абонента вгруппе поиска3 6Обратный вызовАктивизация мобильного абонента3 4Назначение клавиши {ACD Group} (толькодля супервизора)Смена пароля3 2Передача абонентского набора (KEY PAD FACILITY)Регистрация пароля3 1Режим «Не беспокоить»для группы (HUNT DND)Изменение COS2 4Принудительное соединение с занятымвнутр. абонентом (NTURSION)Удаленное изменение СOS2 3Ожидание ответа на вызов (Camp-on)Восстановление COS2 2Резервирование СО линии или группы СОлинийПонижение COS2 1Ожидающий вызов при прямом входящемнаборе номераВыбор типа внешнего вызова1 9ФункцияФункцияLDKкод](https://usermanual.wiki/Ericsson-LG/LDP-7000BTU.Users-Manual-2/User-Guide-1112058-Page-16.png)
![Códigos de programación de las teclas flexiblesTecla FLASH9 49 4Register Mobile Ext CLI3 9-Tecla CALLBK9 29 2Register Mobile Extension3 7-Tecla PTT9 9-Idioma display LCD7 17 1Register Bluetooth* 8* 3Música de fondo7 37 3Bluetooth Usage* 9* 4Registrar nombre de extensión7 47 4Tecla FWD9 8-Borrar mensaje de megafonía-6 7--------* ** 09 *9 99 89 79 69 59 39 18 *8 98 78 68 58 48 18 07 67 5CódigoLDK------5 78 05 25 1-1 45 45 34 24 1-3 8-3 3-2 32 22 11 21 11 91 0-CódigoiPECSAuriculares / Altavoz6 1Tipo de timbre1 1Modo timbre auriculares6 2Modo Enblock1 4Código de cuenta8 4Auricular1 7Llamada en espera DID3 4Timbre llamadas internas1 89 37 97 77 67 53 53 23 1* ** 0---9 79 69 5-9 1-8 9-8 68 88 5CódigoiPECSTecla DNDBorrar mensaje de bienvenida6 6Mostrar versión teléfonoGrabar mensaje de megafonía6 5Escuchar estado de extensión6 4Mostrar dirección MACEscuchar número de extensión6 3Cambiar dirección IP teléfonoEscuchar fecha y hora6 2Mostrar dirección IP teléfonoGrabar mensaje de buzón6 1Mensaje espera jefe/secretariaRegistro de llamadas5 7Recuperar mensaje esperaCLI/IPGrabación bidireccional5 4Recuperar mensaje espera EXTFijar mensaje personalizado5 2Logout agente HOTDESKFijar mensaje preseleccionado5 1Login agente HOTDESKCall Coverage para EXT XXX4 6GRABACIÓN LLAMADA USBCall Coverage4 5Restricción DISADesactivar sala conferencias4 4Restricción DIDActivar sala conferencias4 3Tecla REDIALBorrar hora de despertador4 2Tecla MONFijar hora de despertador4 1Tecla MUTEExtensión móvil a grupo3 6Tecla DND / FWDActivación extensión móvil3 4Tecla CONF Cambio código autorización3 2ESTADO ACD (sólo grupo)Registro código autorización3 1PRESTACIÓN KEYPADCambiar COS 2 4DND DE GRUPOWalking COS2 3INTRUSIÓNRestaurar COS2 2Camp-onRestringir COS2 1Tecla LOOPTimbre llamadas externas1 9FunciónFunciónCódigoLDK• Pulse la tecla [TRANS/PGM] ▶Pulse la tecla flexible que desea programar ▶Pulse la tecla [TRANS/PGM] otra vez ▶Marque el código de función deseado, según la siguiente tabla▶Pulse la tecla [HOLD/SAVE] para guardar los cambios.](https://usermanual.wiki/Ericsson-LG/LDP-7000BTU.Users-Manual-2/User-Guide-1112058-Page-20.png)
![User Program Codeshttp://www.LG-Nortel.com•Press the [TRANS/PGM] button ▶Press the flexible button to be programmed •▶Press [Trans/Pgm] button again ▶Enter the desired feature code below table •▶Press the [HOLD/SAVE] button to save.DND Button9 3-Erase User Greeting-6 6FWD Button9 8-Erase Page MSG-6 7PTT Button9 9-LCD Display Language7 17 1Background Music7 37 3Display Phone Version7 9-Record Page MSG-6 5------* ** 09 *9 99 89 79 69 59 49 39 29 18 *8 98 78 68 58 48 18 07 67 57 4LDKCode----5 78 05 25 1-1 45 45 34 24 1-3 93 83 7-3 3-2 32 22 11 21 11 91 0-iPECSCodeRegister Station Name7 4Ring Type1 1Speakerphone / Headset6 1Enblock mode1 4Headset Ring Mode6 2Ear-Mic Headset1 7Account Code8 4ICM Ring1 87 77 67 53 53 23 1* ** 0---9 79 69 59 4-9 29 1-8 9-8 68 88 53 4iPECSCodeDisplay Phone MAC IP AddressListen Station Status6 4Change Phone IP Address Listen Station Number6 3Display Phone IP Address Listen Time & Date6 2Msg. Wait in Exec/Sec pairRecord User Greeting6 1CLI/IP Msg. Wait RetrieveCall Log5 7STA Msg. Wait RetrieveTwo Way Record5 4HOTDESK Agent LogoutSet Customer MSG5 2HOTDESK Agent LoginSet Pre-Selected MSG5 1USB CALL RECORDCall Coverage For STA XXX4 6DISA RESTRICTIONCall Coverage4 5DID RESTRICTIONConf-Room Deactivate4 4REDIAL ButtonConf-Room Activate4 3MON ButtonWake-Up Erase4 2MUTE ButtonSet Wake-up Time4 1FLASH ButtonMobile Ext Hunt Call3 6DND / FWD ButtonRegister Mobile Ext CLI-CALLBK ButtonMobile Ext Activation3 4CONF ButtonRegister Mobile Extension-ACD STATUS (supervisor only)Auth. Code Change3 2KEY PAD FACILITYAuth. Code Register3 1HUNT DND (group only)COS Change2 4INTURSIONWalking COS2 3Camp-onCOS Restore2 2LOOP ButtonCOS Down2 1DID Call WaitCO Ring1 9FunctionFunctionLDKCode](https://usermanual.wiki/Ericsson-LG/LDP-7000BTU.Users-Manual-2/User-Guide-1112058-Page-24.png)
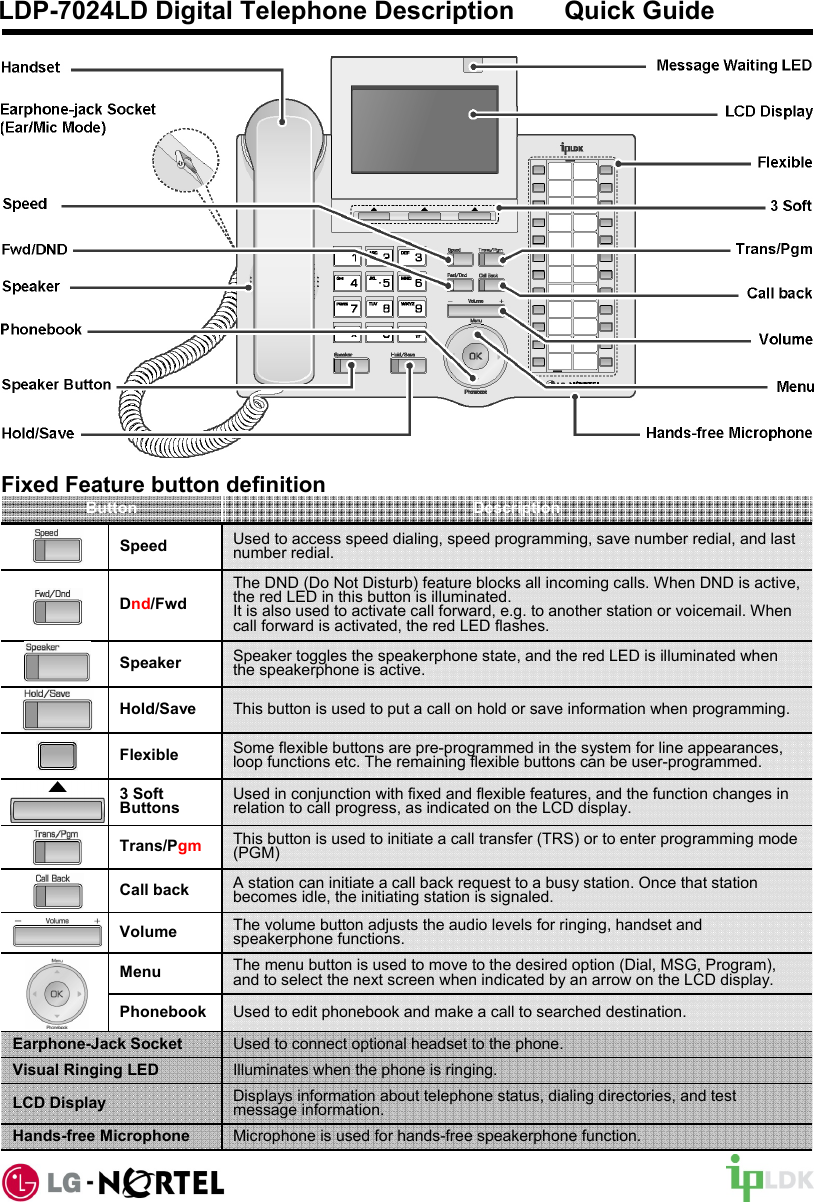
![45. Using Bluetooth menu [ PGM+ Ҭ+ 3 ]In case of CS1000 system [ MENU + 3 + 1 ]5-1. When Blutooth Usage is enable.5-2. When Blutooth Usage is disable.[ USING BUTTON ]EXIT EXIT BLUETOOTH MENUNEXT or Ɗ,ƌScroll the menu SELECT, Save, OK Select the menu [LDP-7024LD] [LDP-7024D][LDP-7024LD] [LDP-7024D]](https://usermanual.wiki/Ericsson-LG/LDP-7000BTU.Users-Manual-2/User-Guide-1112058-Page-31.png)
![56. PAIRING6.1 When already paired6.2 Searching for Device 1. Before you can pair your headset you need to put itinto pairing mode.(Note: Pairing must be done every time the Headsetestablishes a link with LDP-7000BTU.Refer to headset’s user guide for more detailinformation.)2. During pairing it is recommended that the headset andLDP-7000BTU are not more than 1 metre apart - withno solid objects in between.3. LDP-7000BTU starts searching for audio enableddevices and accessories. [LDP-7024LD] [LDP-7024D][LDP-7024LD] [LDP-7024D]ſNote.it may take about 15seconds to finishsearching for devices.](https://usermanual.wiki/Ericsson-LG/LDP-7000BTU.Users-Manual-2/User-Guide-1112058-Page-32.png)
![66.3 Select device1. Devices responding to the inquiry appear on a list ofBluetooth device starting from the device found firstafter 15 seconds. 2. Scroll to the device you want and press OK or Save.Note : Device informationDEVICE NAME (PROFILE NAME)[2/2] : JABRA 250 (HS)00-07-A4-05-95-7B[ DEVICE NO / TOTAL NO ] DEVICE ADDRESS[LDP-7024LD] [LDP-7024D]](https://usermanual.wiki/Ericsson-LG/LDP-7000BTU.Users-Manual-2/User-Guide-1112058-Page-33.png)
![76.4 Enter device PIN CODE(PASSWORD)1. The desired bluetooth device requests to enter thepincode of it.(The Bluetooth Passcode is a 1 to 16 character-longnumeric code. )2. Enter the pincode and send to headset by pressingOK.3. When the connection has been established, the deviceshows connected to followed by the device's nameand address.( Note that you can have only one active connection ata time. )4. If the connection is failed, you can try to connectdevice again. 5. Once the headset and LDP-7000BTU havesuccessfully paired, you are ready to place and receivecalls. (see section 9, 10.)[LDP-7024LD] [LDP-7024D]](https://usermanual.wiki/Ericsson-LG/LDP-7000BTU.Users-Manual-2/User-Guide-1112058-Page-34.png)
![87. UNPAIRING1. If you want use another headset, you can erase pairedinformation and pair with the another headset desired2. It will take a few seconds to erase paired information.3. If it is unpaired already, it will display “UNPAIRINGFAILED”[LDP-7024LD] [LDP-7024D]](https://usermanual.wiki/Ericsson-LG/LDP-7000BTU.Users-Manual-2/User-Guide-1112058-Page-35.png)
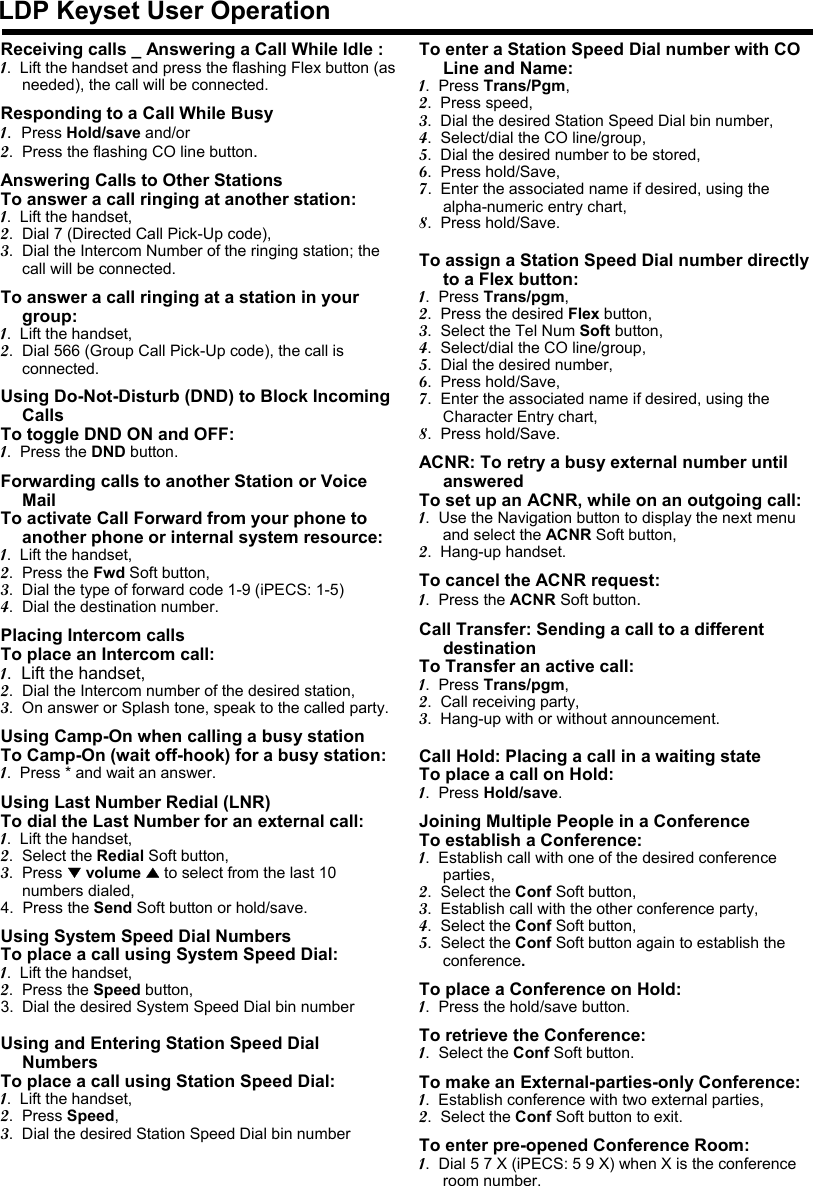
![98. PAIRED INFORMATIONNAME:JABRA BT ( HS - C )DEVICE STATUSD(DISCONNECT) Already paired but not linked-radio with headsetC(CONNECT) Ready to make and answer a call9. ICON ( only in the LDP-7024LD )OFF not paired or Bluetooth Usage disable stateON Already paired but not linked-radio with headsetSTADY ON Ready to make and answer a callBLINK ongoing communication via bluetooth headset10. Using your LDP-7000BTU You will need to make sure that you pair / link yourheadset and LDP-7000BTU.10.1 Answer a call1. If there is an incoming call while you are wearing theheadset a ring tone will sound in your headset. 2. Just press the headset's function button to answer thecall. [LDP-7024LD] [LDP-7024D]](https://usermanual.wiki/Ericsson-LG/LDP-7000BTU.Users-Manual-2/User-Guide-1112058-Page-36.png)