Ensemble Communications ODU-2800-002 LMDS Base Station Transceiver User Manual Install Guide BS ODU

Ensemble Communications Inc. LMDS Base Station Transceiver Install Guide BS ODU

Install Guide BS ODU
4Ensemble Communications Inc.Installing the Base Station Outdoor Unit (ODU) 4This chapter details how to install the base station Outdoor Unit (ODU). Before beginning the process, review the preinformation in Chapter 3. Chapter Topics Ancillary Materials 4-2Antenna Installation 4-6Antenna Polarization 4-6Azimuth Alignment 4-7Bracket Mounting 4-3Cable Terminations 4-8Elevation Alignment 4-7Ground Mast 4-3IF Cable Installation 4-8Lightning Suppressor Installation 4-4ODU Components 4-2ODU Installation 4-3Redundant ODU Installation 4-7Tools for Installation 4-2Unpacking and Inventory 4-2
Ensemble Communications Inc.4-2Operator’s Guide to the Fiberless SystemUnpacking and Inventory•Unpack the equipment on a flat, clean surface at the installa-tion site. •Check the items received against the packing list and a copy of the purchase order to ensure that the order is complete. •Check that the ODU has the frequency band and polarity ordered. This information is on the manufacturer label.•Inspect all components to determine that they are not dam-aged. If a component appears to be damaged or is missing, con-tact your shipper and Ensemble Customer Service immediately. •Save all packing materials. Note Ensemble Customer Support is available at 888-710-8910.ODU Components The following components comprise a baseline ODU:•Outdoor radio-antenna unit (ODU)•Pipe or wall mount kitNote The type of mount is specified at the time of ordering. Mounts may be ordered in either standard or metric measure.Ancillary Materials The following materials are required to install the base station ODU, depending on your site specific requirements. See “Ancillary Equipment” on page 10 for a list of recommended materials and manufacturers. If in doubt, check with Ensemble Customer Service.•3M type 33 electrical tape•3M electrical coating (PN 054007-1483)•Wire ties•Black nylon wire ties for outdoor use•RG-6 75 Ohm cable (Belden 9248)•TNC connectors and connector kitTools for Installation •1/2-inch and 7/16-inch sockets with wrench•2-inch extension (optional)
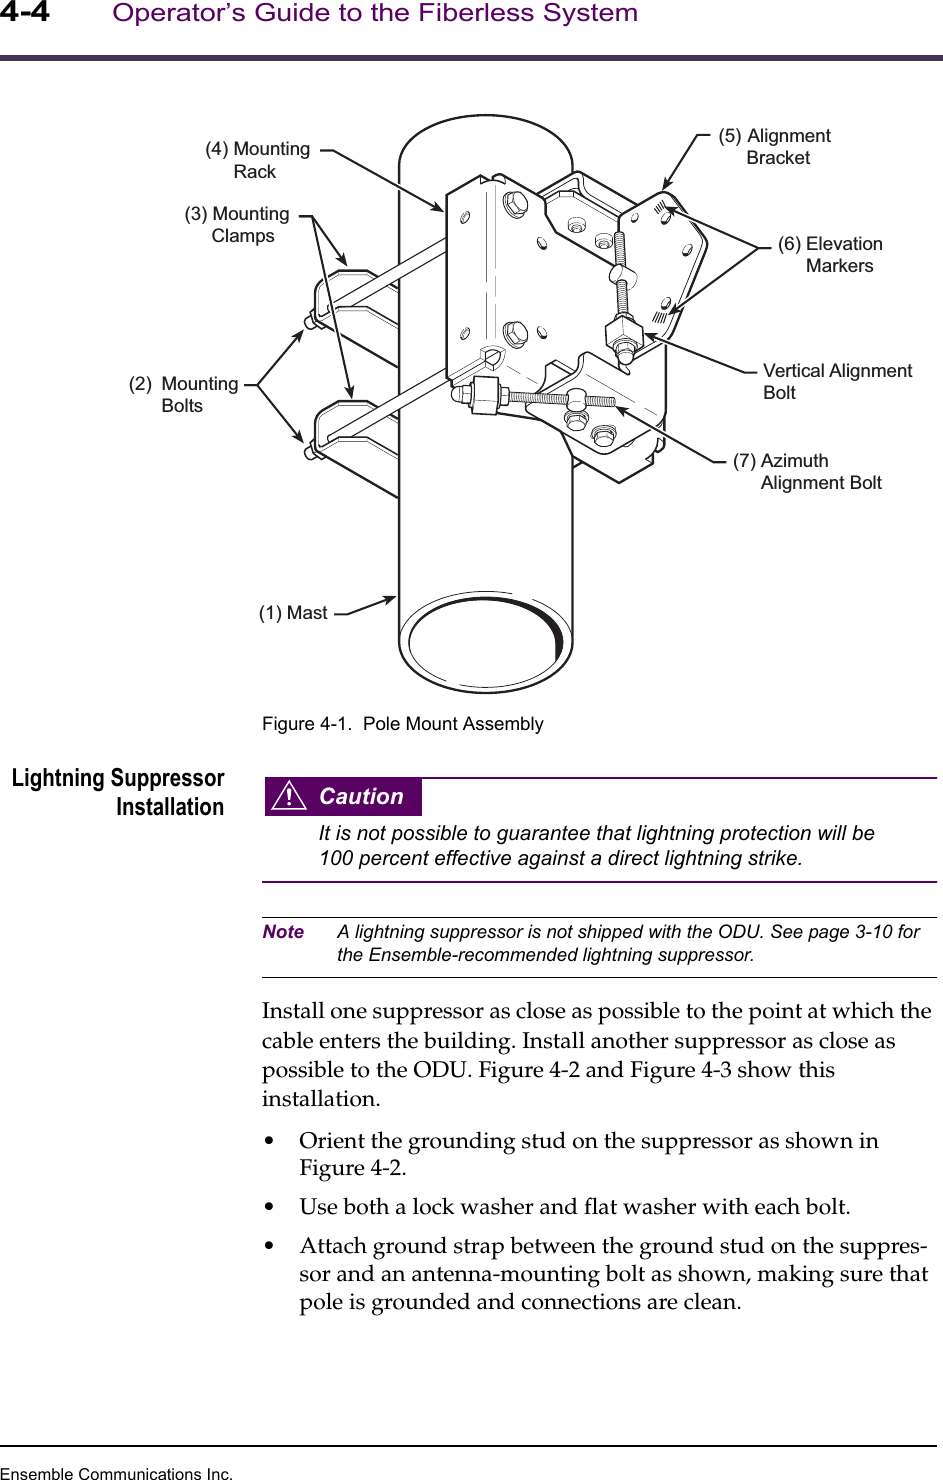
Ensemble Communications Inc.Installing the Base Station Outdoor Unit (ODU)4-3ODU InstallationNote Installers are responsible for supplying mounting bolts.Ground Mast All steel mounting structures attached to the building and the antenna mast must be connected to the building grounding system. If no grounding system or ring is available, ground the antenna mounting structures to the nearest structural beam. The grounding conductor should be at least a # 2 (AWG) solid tinned copper wire. Use exothermic welds (Cad Welds) when possible to connect to the mounting structure and the building grounding system.Bracket Mounting 1. Attach the ODU mounting bracket to a mast between 2- and 4-inches in diameter (1 in Figure 4-1). 2. Remove the nuts and washers (2 in Figure 4-1) from one side of each of the two mounting clamps (3 in Figure 4-1) and slide the mounting clamps off the bolts. Set them aside in a safe place.3. Slip the mounting bracket (4 in Figure 4-1) around the mast.4. Reattach each of the two mounting clamps with the flat washer, lock washer, and nut.5. Tighten with a 1/2-inch socket wrench until secure.
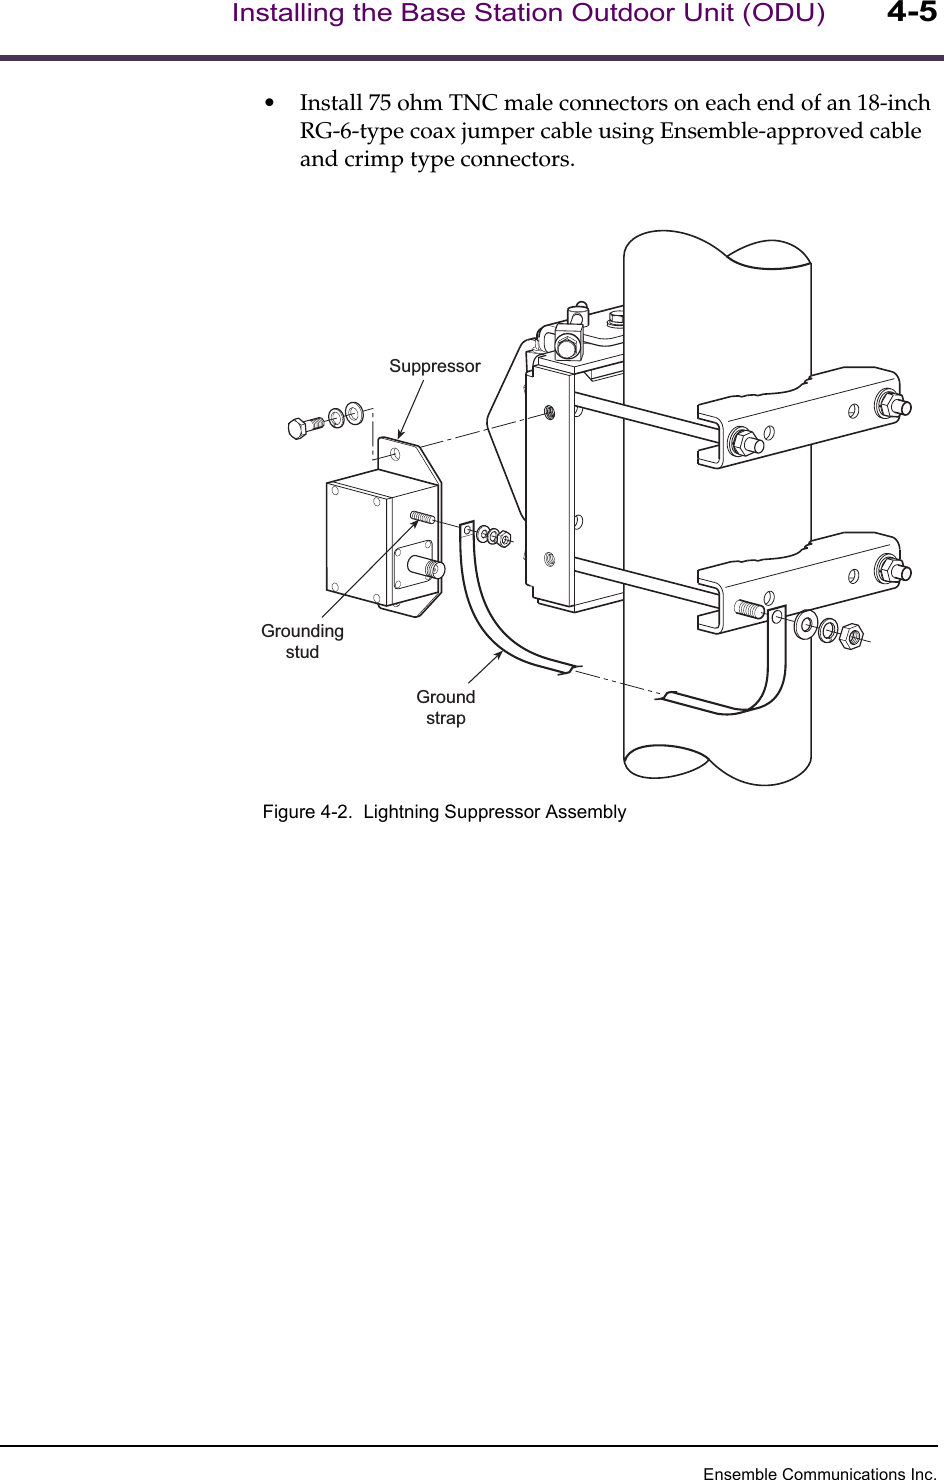
Ensemble Communications Inc.4-4Operator’s Guide to the Fiberless SystemFigure 4-1.  Pole Mount AssemblyLightning SuppressorInstallation CautionIt is not possible to guarantee that lightning protection will be 100 percent effective against a direct lightning strike.Note A lightning suppressor is not shipped with the ODU. See page 3-10 for the Ensemble-recommended lightning suppressor.Install one suppressor as close as possible to the point at which the cable enters the building. Install another suppressor as close as possible to the ODU. Figure 4-2 and Figure 4-3 show this installation.•Orient the grounding stud on the suppressor as shown in Figure 4-2.•Use both a lock washer and flat washer with each bolt. •Attach ground strap between the ground stud on the suppres-sor and an antenna-mounting bolt as shown, making sure that pole is grounded and connections are clean. (1) Mast(3) MountingClamps(4) MountingRack(6) ElevationMarkers(5) AlignmentBracket(7) AzimuthAlignment BoltVertical AlignmentBolt(2) MountingBolts
Ensemble Communications Inc.Installing the Base Station Outdoor Unit (ODU)4-5•Install 75 ohm TNC male connectors on each end of an 18-inch RG-6-type coax jumper cable using Ensemble-approved cable and crimp type connectors.Figure 4-2.  Lightning Suppressor AssemblyGroundingstudGroundstrapSuppressor
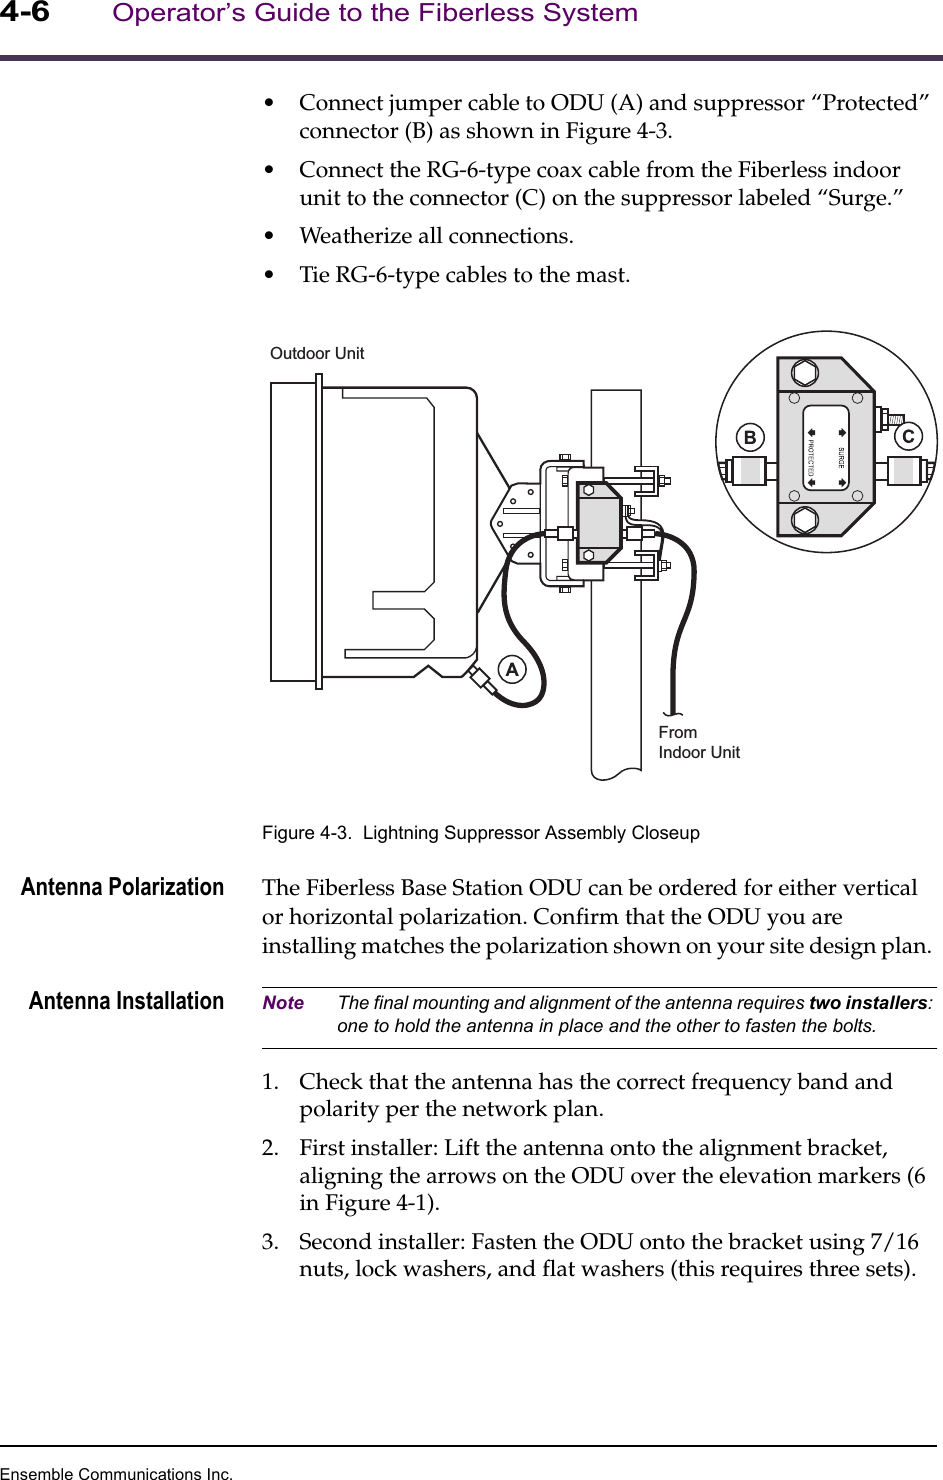
Ensemble Communications Inc.4-6Operator’s Guide to the Fiberless System•Connect jumper cable to ODU (A) and suppressor “Protected” connector (B) as shown in Figure 4-3. •Connect the RG-6-type coax cable from the Fiberless indoor unit to the connector (C) on the suppressor labeled “Surge.” •Weatherize all connections. •Tie RG-6-type cables to the mast.Figure 4-3.  Lightning Suppressor Assembly CloseupAntenna Polarization The Fiberless Base Station ODU can be ordered for either vertical or horizontal polarization. Confirm that the ODU you are installing matches the polarization shown on your site design plan. Antenna Installation Note The final mounting and alignment of the antenna requires two installers: one to hold the antenna in place and the other to fasten the bolts.1. Check that the antenna has the correct frequency band and polarity per the network plan.2. First installer: Lift the antenna onto the alignment bracket, aligning the arrows on the ODU over the elevation markers (6 in Figure 4-1).3. Second installer: Fasten the ODU onto the bracket using 7/16 nuts, lock washers, and flat washers (this requires three sets).FromIndoor UnitOutdoor Unit
Ensemble Communications Inc.Installing the Base Station Outdoor Unit (ODU)4-7Azimuth Alignment 1. As needed, use a ratchet wrench and a 7/16-inch socket to loosen the azimuth alignment bolt (7 in Figure 4-1).2. Verify the mounting bracket is aligned with the correct azimuth according to your site design plan.Note If necessary, consult an USGS geographic map to identify distinctive landmarks to get a precise bearing. 3. Point the base station ODU in the appropriate azimuth direc-tion. Note A compass may not give an accurate reading because of nearby metallic objects or surfaces.4. After the antenna is properly pointed, tighten the alignment bolt until the ODU is secure, taking care not to over tighten it. Note While fastening the mounting clamps, ensure the mounting bracket remains aligned with the correct azimuth according to the site design plan. 5. Verify that the antenna direction has not changed.Elevation Alignment 1. As needed, loosen the elevation alignment bolt using a 7/16-inch ratchet wrench.2. Using a level, set the base station ODU at the proper elevation angle.3. After the antenna is properly pointed, tighten the alignment bolt.Redundant ODUInstallationTo protect against both ODU and cable failure, cable and install a second (redundant) ODU separately from the primary unit. Such ODUs are installed in the same manner as the primary ODU. Note For redundancy, a second ODU is required for each sector of one or more primary ODUs.
Ensemble Communications Inc.4-8Operator’s Guide to the Fiberless SystemIF Cable InstallationCautionIf the base station has been powered up, power it off before connecting or disconnecting the RG-6 cable at either end because the cable may have –48 VDC across the connector.1. Run RG-6 coaxial cable between the base station and the ODU. The maximum permissible individual cable run length is 1,000 feet (300 meters). Ensure there is an 18-inch (45 cm) service loop at each end of the cable.When required, encase cables in plastic or metal conduit or cable duct, maintaining a minimum bend radius of two inches.Note Depending on local codes and the HVAC design of a particular building, plenum-rated cable may be required.Normally, cables between the ODU and the indoor base station equipment should not be spliced. However, if a cable splice cannot be avoided, use only approved connectors. 2. Label each end of the cable individually with numbers or col-ors using a cable labeling tape such as is available from 3M.Cable Terminations The RG-6-type coaxial cable uses a male TNC connector to connect to the ODU. Follow the instructions from the connector manufacturer to prepare the cable and install the connector. Use only the recommended crimping tool. (See page 3-10 for the recommended tool.)1. Install the TNC connector on the IF cable.2. Connect the cable to the lightning suppressor.3. Make an 18-inch (45 cm) IF jumper cable with a TNC connector on each end.4. Install the 18-inch IF jumper cable between the ODU and the lightning suppressor.5. Waterproof the connector using a sealing type of heat shrink-able tubing, cold shrink tubing, or 3M type 66 vinyl tape with a coating of 3M electrical coating.Note Waterproofing is not required for connectors terminating inside.6. At the base station, install a TNC connector on each IF cable.See page 5-7 for connections at the base station indoor equipment.

Navigation menu