Diebold 41020285 RFID device oper at 13.56 MHz, read/trans data User Manual Operation Guide

Diebold Inc RFID device oper at 13.56 MHz, read/trans data Users Manual Operation Guide
Contents

Users Manual Operation Guide
PRELIMINARY - DRAFT COPYMon Jun 01 08:53:30 2009Electronic Vault Attendant (EVA) EliteHardware Installation GuideTP-821320-001A PD 6520
PRELIMINARY - DRAFT COPYMon Jun 01 08:53:30 2009Electronic Vault Attendant (EVA) EliteHardware Installation GuideJune 2009TP-821320-001A PD 6520
PRELIMINARY - DRAFT COPYMon Jun 01 08:53:30 2009Document HistoryDocument Number Date RemarksTP-821320-001A 6/2009 Original editionCopyright protection is claimed for each revision listed in the document history, as of the date indicated.Any trademarks, service marks, product names or company names not owned by Diebold, Incorporated or itssubsidiaries (collectively "Diebold") that appear in this document are used for informational purposes only andDiebold claims no rights thereto, nor does such use indicate any affiliation with or any endorsement of Diebold orDiebold products by the owners thereof.This document contains proprietary information. If the document pages state the information is confidential(or words of similar import), then this document is intended solely for the use of the copyright owner'semployees or other personnel expressly authorized in writing by the copyright owner. Other uses of thisinformation without the express written consent of the copyright owner are prohibited. This document shouldbe treated as confidential material for security reasons. Any unauthorized disclosure or use of confidentialmaterial may violate Section 1832 of Title 18 of the United States Code as well as other laws, and may bepunishable by fine and imprisonment.The information contained in this document is subject to change without notice. When using the document for systemimplementation, please call your authorized sales or service representative for any applicable changes.This document and the information contained herein are provided AS IS AND WITHOUT WARRANTY. Inno event shall the copyright owner or its suppliers be liable for any special, indirect, or consequential damagesof any nature resulting from the use of information in this manual.No part of this document may be reproduced, stored in a retrieval system, or transmitted, in any form or by anymeans: electronic, mechanical, photocopying, recording, or otherwise, without prior written permission from thecopyright owner.Your use of this document and/or any of the information contained herein constitutes your agreement to all of theterms stated on this page.Diebold continually strives to improve its products. If you would like to comment on the accuracy, clarity,organization or value of this document, please contact us at documentationservices@diebold.com or addresscorrespondence to:Diebold, IncorporatedAtt: Documentation Services 9-B-165995 Mayfair RoadNorth Canton, OH 44720ii Copyright ©Diebold, Incorporated (6/2009) - All Rights ReservedTP-821320-001A
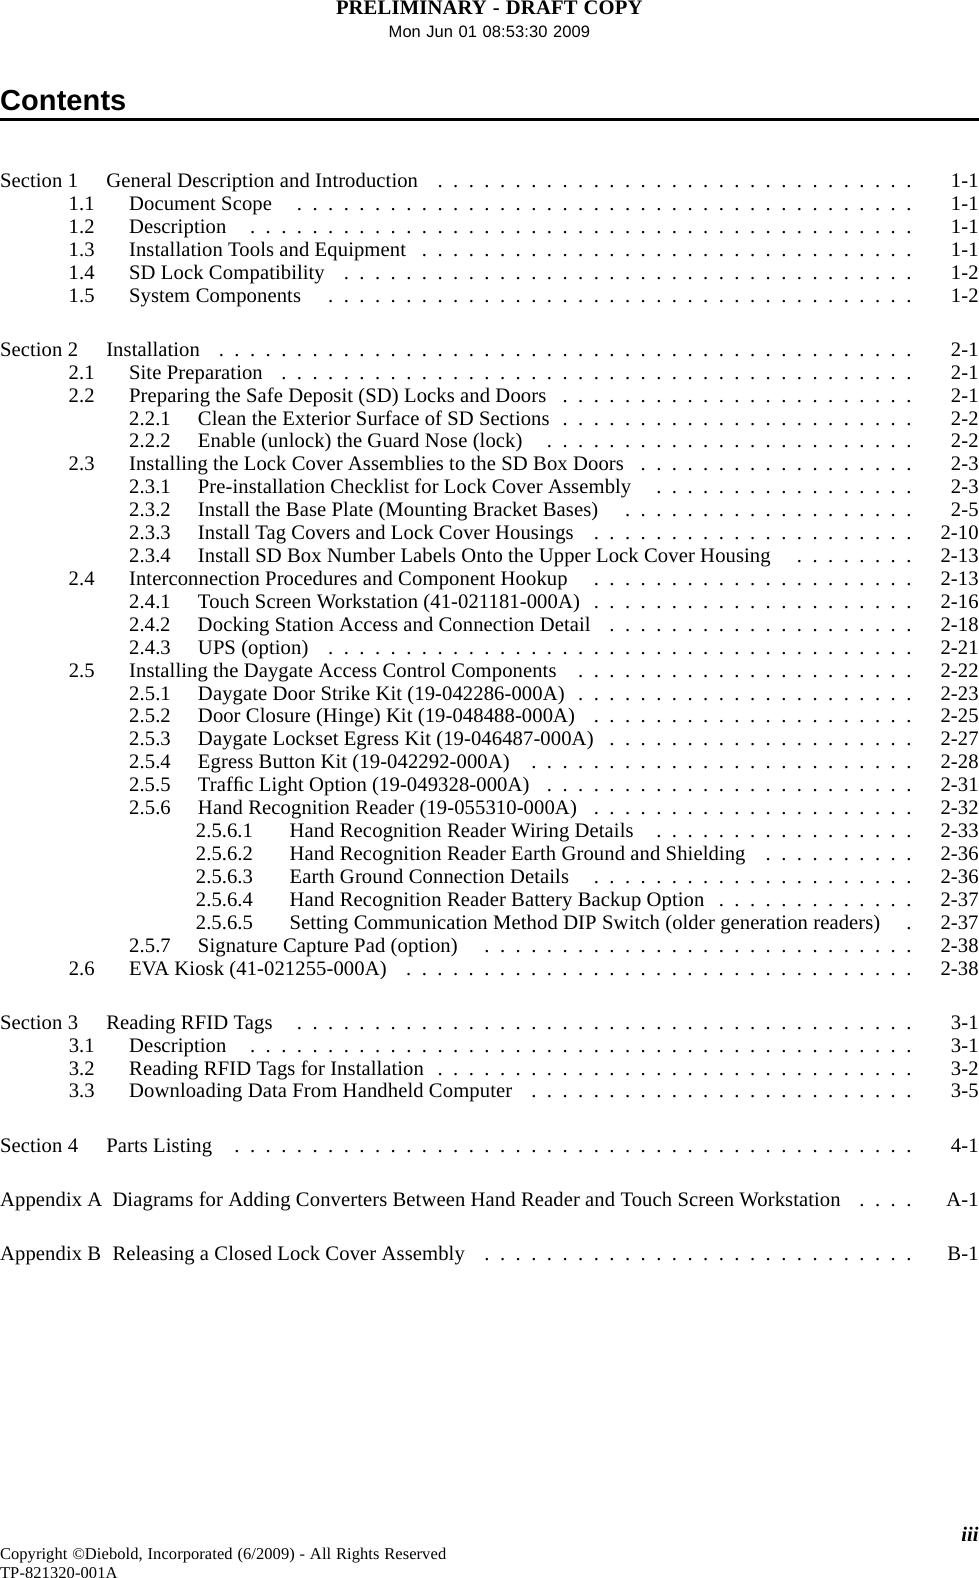
PRELIMINARY - DRAFT COPYMon Jun 01 08:53:30 2009ContentsSection1 GeneralDescriptionandIntroduction ............................... 1-11.1 DocumentScope ........................................ 1-11.2 Description ........................................... 1-11.3 InstallationToolsandEquipment ................................ 1-11.4 SDLockCompatibility ..................................... 1-21.5 SystemComponents ...................................... 1-2Section2 Installation ............................................. 2-12.1 SitePreparation ......................................... 2-12.2 PreparingtheSafeDeposit(SD)LocksandDoors ....................... 2-12.2.1 CleantheExteriorSurfaceofSDSections....................... 2-22.2.2 Enable(unlock)theGuardNose(lock) ........................ 2-22.3 InstallingtheLockCoverAssembliestotheSDBoxDoors .................. 2-32.3.1 Pre-installationChecklistforLockCoverAssembly ................. 2-32.3.2 InstalltheBasePlate(MountingBracketBases) ................... 2-52.3.3 InstallTagCoversandLockCoverHousings ..................... 2-102.3.4 InstallSDBoxNumberLabelsOntotheUpperLockCoverHousing ........ 2-132.4 InterconnectionProceduresandComponentHookup ..................... 2-132.4.1 TouchScreenWorkstation(41-021181-000A) ..................... 2-162.4.2 Docking Station Access and Connection Detail .................... 2-182.4.3 UPS(option) ...................................... 2-212.5 Installing the Daygate Access Control Components ...................... 2-222.5.1 DaygateDoorStrikeKit(19-042286-000A)...................... 2-232.5.2 DoorClosure(Hinge)Kit(19-048488-000A) ..................... 2-252.5.3 DaygateLocksetEgressKit(19-046487-000A) .................... 2-272.5.4 EgressButtonKit(19-042292-000A) ......................... 2-282.5.5 TrafficLightOption(19-049328-000A) ........................ 2-312.5.6 HandRecognitionReader(19-055310-000A) ..................... 2-322.5.6.1 HandRecognitionReaderWiringDetails ................. 2-332.5.6.2 HandRecognitionReaderEarthGroundandShielding .......... 2-362.5.6.3 EarthGroundConnectionDetails ..................... 2-362.5.6.4 HandRecognitionReaderBatteryBackupOption ............. 2-372.5.6.5 Setting Communication Method DIP Switch (older generation readers) . 2-372.5.7 SignatureCapturePad(option) ............................ 2-382.6 EVAKiosk(41-021255-000A) ................................. 2-38Section3 ReadingRFIDTags ........................................ 3-13.1 Description ........................................... 3-13.2 ReadingRFIDTagsforInstallation ............................... 3-23.3 DownloadingDataFromHandheldComputer ......................... 3-5Section4 PartsListing ............................................ 4-1AppendixADiagramsforAddingConvertersBetweenHandReaderandTouchScreenWorkstation .... A-1AppendixBReleasingaClosedLockCoverAssembly ............................ B-1iiiCopyright ©Diebold, Incorporated (6/2009) - All Rights ReservedTP-821320-001A
PRELIMINARY - DRAFT COPYMon Jun 01 08:53:30 2009FiguresFigure1-1 SystemComponents ....................................... 1-4Figure2-1 SDSection,OverheadView ................................... 2-1Figure2-2 PreparationDetails,SDBoxDoor ................................ 2-3Figure2-3 LockCoverAssemblyParts ................................... 2-3Figure2-4 BasePlate(MountingBracketBase) .............................. 2-8Figure2-5 InstallingtheBasePlate ..................................... 2-8Figure2-6 UsingaDoorTemplate ..................................... 2-9Figure2-7 ApplyPressuretoMountingBracketBase ........................... 2-10Figure2-8 UsingaLaserLevel ....................................... 2-10Figure2-9 MountingtheLockCoverAssembly .............................. 2-11Figure2-10 MountingtheTagCover ..................................... 2-12Figure2-11 LockCoverAssembliesinClosedPosition ........................... 2-12Figure2-12 InstallingNumberLabels .................................... 2-13Figure2-13 SystemInterconnectionDiagram ................................ 2-14Figure2-14 TouchScreenWorkstation,SideView .............................. 2-16Figure2-15 TouchScreenWorkstationConnectionDiagram ........................ 2-17Figure2-16 InstallingtheCompactFlashCard ................................ 2-18Figure2-17 DockingStation,Base(bottomview) .............................. 2-19Figure2-18 SDDockCCA .......................................... 2-19Figure2-19 RearofUPS ........................................... 2-22Figure 2-20 Daygate Access Control Components .............................. 2-23Figure2-21 DaygateDoorStrikeKitInstallation .............................. 2-24Figure2-22 DaygateDoorStrikeKitWiringDiagram ............................ 2-25Figure2-23 DoorClosureKitInstallationGuidelines ............................ 2-26Figure2-24 DaygateLocksetEgressKitWireRoutingDetail(GlassDaygate) ............... 2-27Figure2-25 DaygateLockEgressKitWiringDiagram ........................... 2-28Figure2-26 EgressButtonKit(19-042292-000A) .............................. 2-29Figure2-27 VaultInteriorwithEgressButtonKit(bardaygate) ....................... 2-30Figure2-28 EgressButtonKitWiringDiagram ............................... 2-30Figure 2-29 Faceplate for TrafficLight .................................... 2-31Figure 2-30 Lamp Removal for TrafficLight ................................. 2-32Figure2-31 HandRecognitionReaderWallMountingDetail ........................ 2-32Figure2-32 HandRecognitionReaderDimensionDetail .......................... 2-33Figure2-33 HandRecognitionReaderWiringDetails ............................ 2-35Figure2-34 HandRecognitionReaderEarthGroundConnection(mandatory) ............... 2-36Figure2-35 EVAKiosk ............................................ 2-39Figure3-1 TypicalHandheldComputer(RFIDtagreader) ......................... 3-1Figure3-2 ReadingtheRFIDTag ...................................... 3-5Figure4-1 SDLockCoverKitIllustratedParts ............................... 4-3Figure4-2 DockAssemblyIllustratedParts ................................. 4-3Figure4-3 KeyAssembly .......................................... 4-3Figure4-4 InstallationTemplates ...................................... 4-4Figure4-5 USBAdapter/Extender ..................................... 4-4Figure4-6 4-portUSBHub ......................................... 4-4Figure A-1 Connections Required When Distance Between Hand Reader and Touch Screen WorkstationExceeds 50 Feet ......................................... A-1FigureA-2 InterfaceConverterWiringDiagram .............................. A-2FigureB-1 ReleasingaClosedLockCoverAssembly ........................... B-1iv Copyright ©Diebold, Incorporated (6/2009) - All Rights ReservedTP-821320-001A
PRELIMINARY - DRAFT COPYMon Jun 01 08:53:30 2009TablesTable2-1 Pre-installationChecklistforLockCoverAssembly ...................... 2-4Table2-2 AddedProceduresforPeripheralDevices ............................ 2-15Table2-3 SDDockCCAInterconnectionDetail .............................. 2-19Table4-1 PartsListing .......................................... 4-2vCopyright ©Diebold, Incorporated (6/2009) - All Rights ReservedTP-821320-001A
PRELIMINARY - DRAFT COPYMon Jun 01 08:53:30 2009PREFACE TO FCC NOTICEDiebold requires each of its products to undergo complete testing before shipment. Each product must pass stringentrequirements of quality control. In addition, much effort and consideration has been devoted to assure the utmostin reliable equipment operation.FCC NOTICEThis device complies with part 15 of the FCC Rules. Operation is subject to the following two conditions: (1) Thisdevice may not cause harmful interference, and (2) this device must accept any interference received, includinginterference that may cause undesired operation.CAUTIONChanges or modifications of this product not expressly approved by Diebold could void theuser's authority to operate the equipment.vi Copyright ©Diebold, Incorporated (6/2009) - All Rights ReservedTP-821320-001A
PRELIMINARY - DRAFT COPYMon Jun 01 08:53:30 2009Section 1General Description and Introduction1.1 Document ScopeThis document provides installation and setup guidelines for the followingcomponents of the Electronic Vault Attendant (EVA) Elite system:• Mounting lock cover assemblies to SD doors• Interconnection cabling and setup for the touch screen workstation, dockassembly, and peripheral componentsRefer to the EVA and EVA Elite Electronic Vault Attendant Setup andAdministration Guide (TP-821366-001B) for details relating to softwareinstallation, setup, and administration.1.2 DescriptionThe EVA Elite system may be configured to provide institution customers withthe following functions:• Register and access to a secure vault area without assistance.• Access control to safe deposit boxes.• Unassisted access to safe deposit boxes for which the customer has a key.1.3 Installation Tools and EquipmentHave the following tools on site for installation of the EVA Elite system:• Standard hand tools• Level (36-inch minimum)Special ToolsThe following special tools are required to complete the installation:• simple green® concentrated cleaner degreaser/deodorizer• Hand held computer (RFID reader)• Installation template kit (41-021051-000A)• Laser level• Isopropyl alcohol• Tin snips, heavy-duty, straight cut• Plumb bob and string line• Carpenter's square1-1Copyright ©Diebold, Incorporated (6/2009) - All Rights ReservedTP-821320-001A
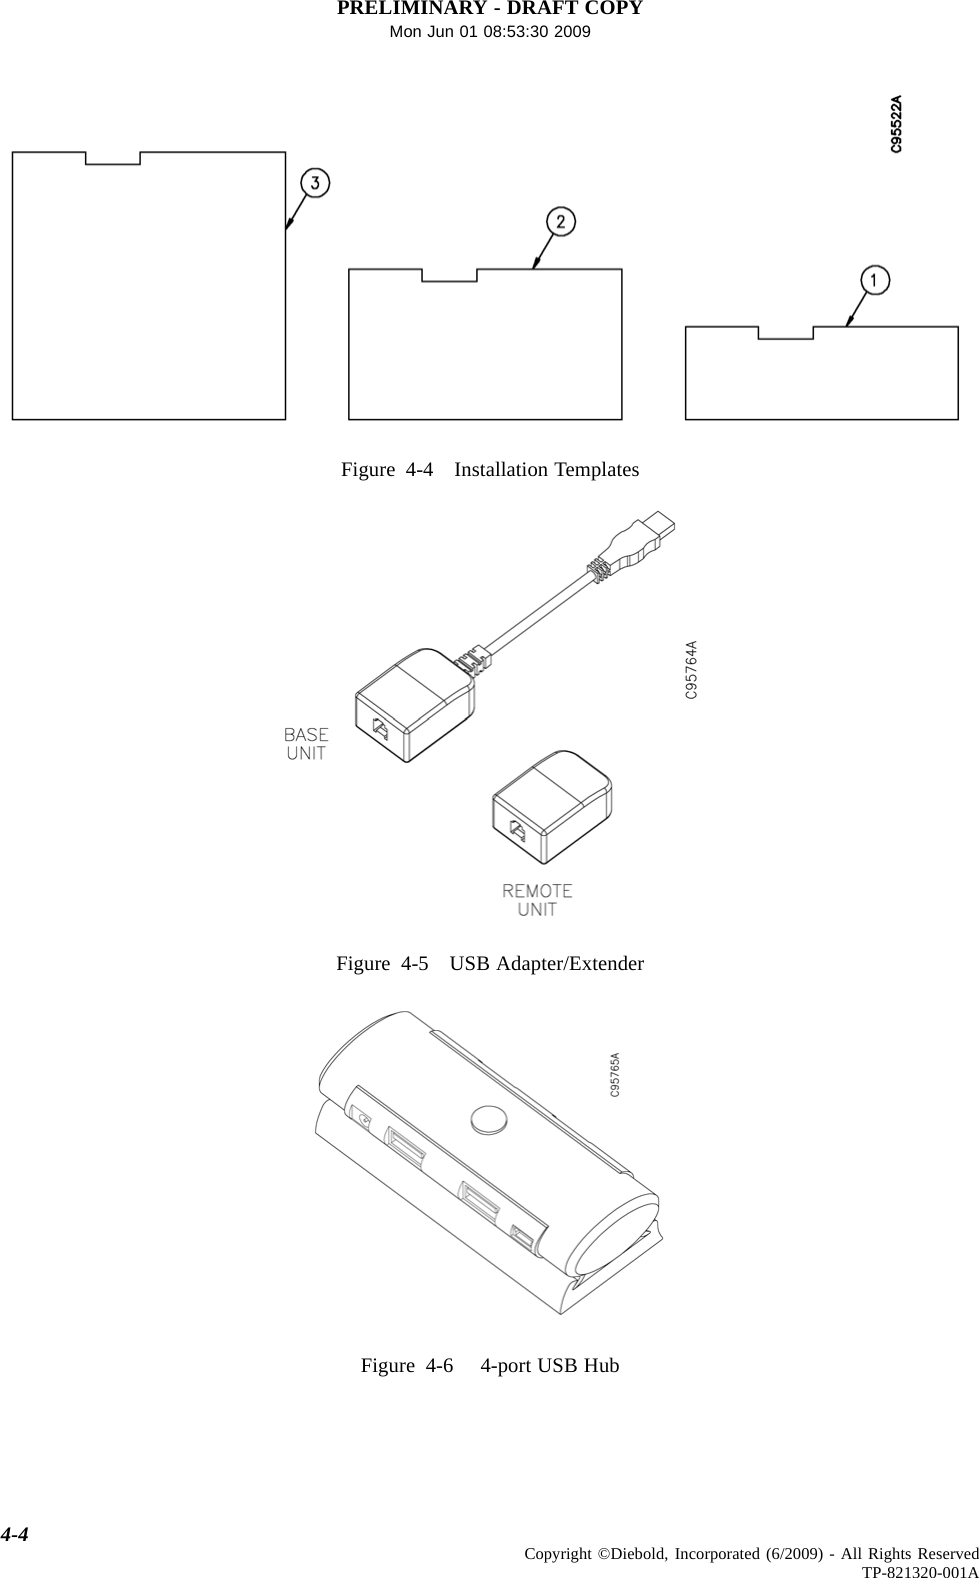
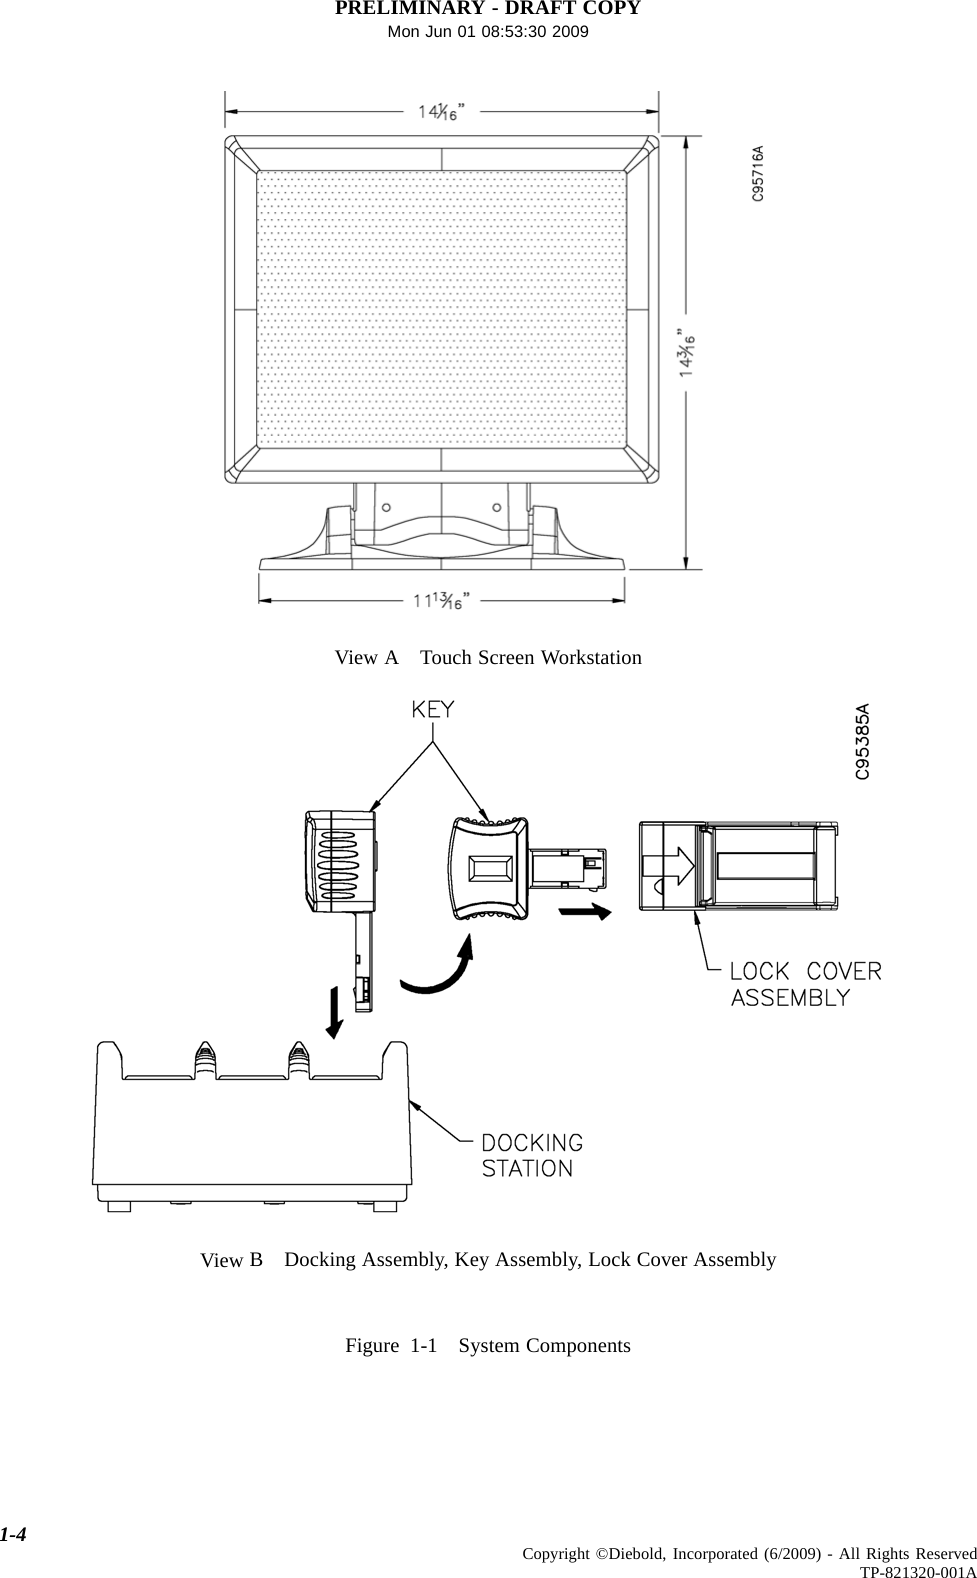
PRELIMINARY - DRAFT COPYMon Jun 01 08:53:30 2009The installation template kit (41-021051-000A) contains the following doortemplates that may be used to locate the base plate onto a Diebold SD box door:• Five-inch door template (41-021048-000A)• Seven-inch door template (41-021048-000B)• 10-inch door template (41-021048-000C)If this is a retrofit install (SD sections are already installed and operational),confirm that a sufficient quantity of guard keys are on hand. One guard key isrequired for each SD box door that will be retrofitted with a new lock coverassembly.Reference DocumentationRefer to the following manuals for additional information:•EVA and EVA Elite Electronic Vault Attendant Setup and AdministrationGuide (TP-821366-001B)•Safe Deposit (SD) Sections Parts List Manual (AA-000126-000B)•LM Series SD Box Installation Manual (AA-000208-0000)•223-Series Daygate Installation Guide (TP-821074-001B)Additional information about products, support, and replacement items isavailable on Diebold's Web site at http://www.diebold.com/.1.4 SD Lock CompatibilityNot all models of SD locks are compatible with the EVA Elite system. Forexample, a single-nose lock, where the guard key functions as a prep key, cannotbe adapted for the EVA Elite system. Additionally, the configuration and size ofcertain SD locks or SD doors may not allow for the installation of the lock coverassembly. Prior to installing the EVA Elite system, always confirm that the SDsections currently installed are adaptable for installation of the system.1.5 System ComponentsStandard components (Figure 1-1) of the EVA Elite system are as follows:• Touch screen workstation• Docking assembly• Key assembly• Lock cover assemblyTouch Screen Workstation (41-021181-000A)The touch screen workstation functions as the user interface, the host controllerfor peripheral devices, and the administration control point for the systemapplication. Generally, peripheral devices are connected to the touch screenworkstation via USB 2.0 cable.1-2 Copyright ©Diebold, Incorporated (6/2009) - All Rights ReservedTP-821320-001A
PRELIMINARY - DRAFT COPYMon Jun 01 08:53:30 2009Docking Assembly (41-020278-000A)The docking assembly stores up to three key assemblies. The docking assemblycommunicates with the touch screen workstation to control distribution of thekey assemblies. The docking assembly also serves as the charging station forthe key assemblies.Key Assembly (41-020285-000A)Up to three key assemblies (keys) are stored in the docking assembly untilretrieved by a user. Each key is an RFID (radio-frequency identification) device,that when activated, contains the data requiredtoopenadesignatedlockcoverassembly.Lock Cover Assembly (41-020895-000A)One lock cover assembly is attached to each SD box door. The lock coverassembly is opened via an activated key to provide access to a specificSDcustomer keylock nose.1-3Copyright ©Diebold, Incorporated (6/2009) - All Rights ReservedTP-821320-001A
PRELIMINARY - DRAFT COPYMon Jun 01 08:53:30 2009View A Touch Screen WorkstationView B Docking Assembly, Key Assembly, Lock Cover AssemblyFigure 1-1 System Components1-4 Copyright ©Diebold, Incorporated (6/2009) - All Rights ReservedTP-821320-001A
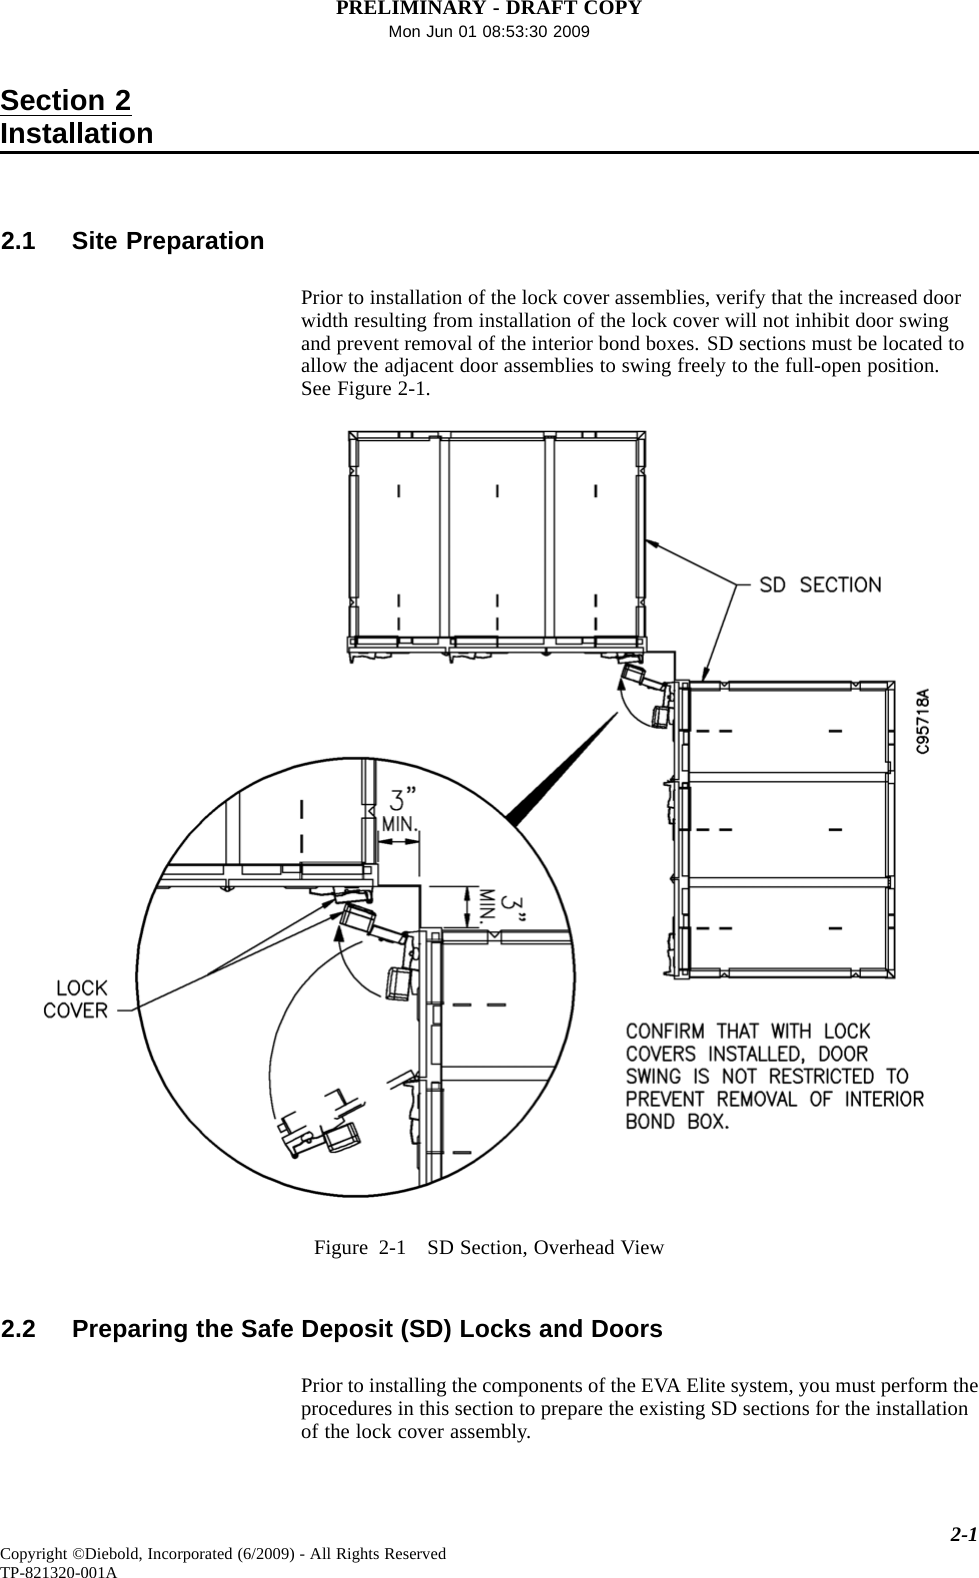
PRELIMINARY - DRAFT COPYMon Jun 01 08:53:30 2009Section 2Installation2.1 Site PreparationPrior to installation of the lock cover assemblies, verify that the increased doorwidth resulting from installation of the lock cover will not inhibit door swingand prevent removal of the interior bond boxes. SD sections must be located toallow the adjacent door assemblies to swing freely to the full-open position.SeeFigure2-1.Figure 2-1 SD Section, Overhead View2.2 Preparing the Safe Deposit (SD) Locks and DoorsPrior to installing the components of the EVA Elite system, you must perform theprocedures in this section to prepare the existing SD sections for the installationof the lock cover assembly.2-1Copyright ©Diebold, Incorporated (6/2009) - All Rights ReservedTP-821320-001A
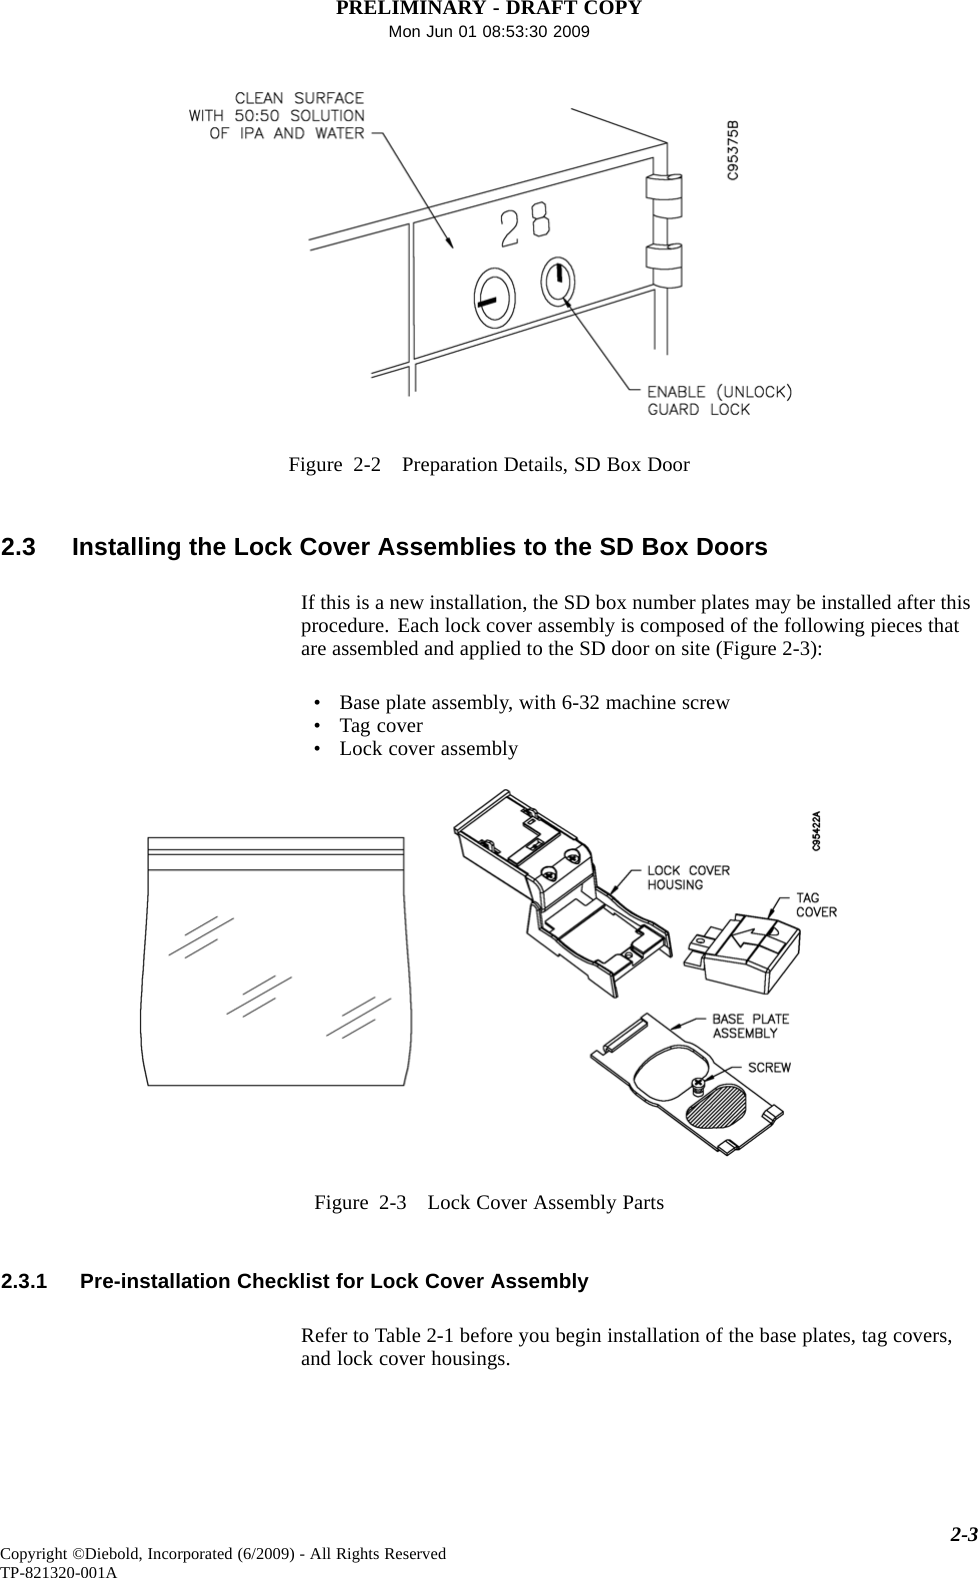
PRELIMINARY - DRAFT COPYMon Jun 01 08:53:30 20092.2.1 Clean the Exterior Surface of SD SectionsCAUTIONThe information provided in this section describes theonly approved method for cleaning SD exteriors prior toinstalling the lock cover assemblies. Use of other cleaningmethods or solutions may impair the reliability of theadhesive that is used to secure the lock cover to the SDbox door.1. Wipe the exterior, finished surface of the SD sections with aclean rag saturated with simple green® Concentrated CleanerDegreaser/Deodorizer. Do not dilute with water.2. With a clean, dry rag wipe the surface of the SD sections until dry.3. Wipe the exterior, finished surface of the SD sections with a clean ragsaturated with isopropyl alcohol (minimum 70% by volume). Do notdilute the isopropyl alcohol with water.4. Use a clean, dry rag to wipe the surface of the SD sections until dry.2.2.2 Enable (unlock) the Guard Nose (lock)If the SD sections to be modified are equipped with double-nose locks, the guardnose (Figure 2-2) of each lock must be enabled.The following procedure is one method that may be used to enable the guard nose.1. Insert the guard key into the nose farthest from the bolt side of the SDlock. Turn the guard key to the right (clockwise) to a full stop.2. Snap off the bow of the guard key so that the blade of the key remainslodged in the keyway of the lock (the section of guard key that remains inthe lock should be flush with the nose). This procedure keeps the guardnose in the unlocked position.2-2 Copyright ©Diebold, Incorporated (6/2009) - All Rights ReservedTP-821320-001A
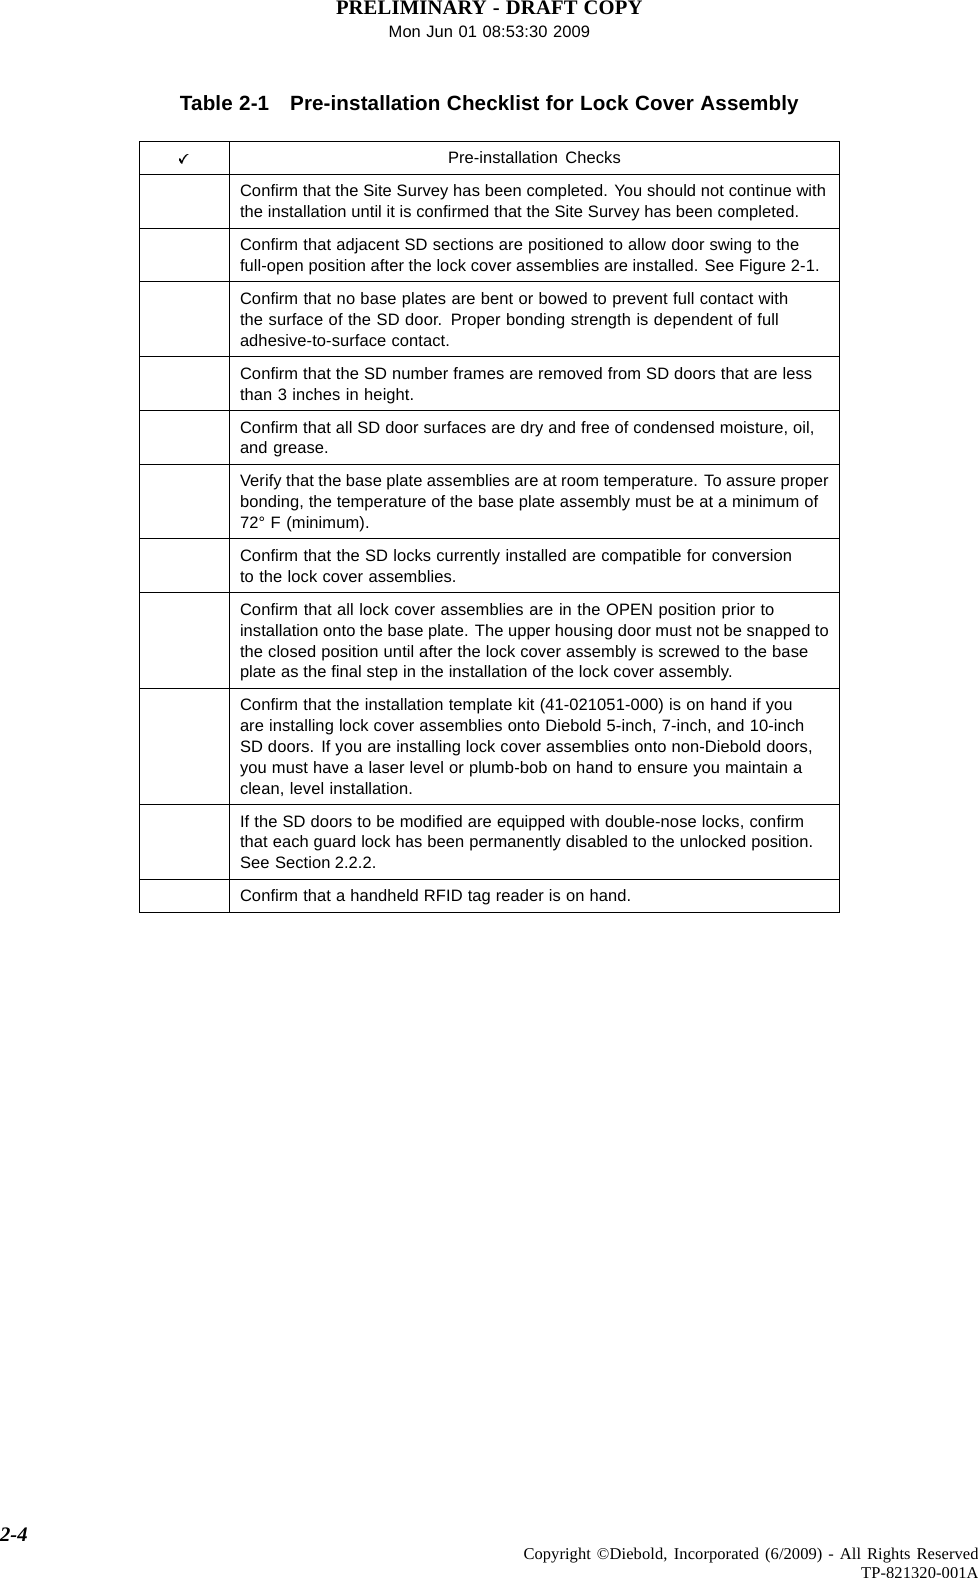
PRELIMINARY - DRAFT COPYMon Jun 01 08:53:30 2009Figure 2-2 Preparation Details, SD Box Door2.3 Installing the Lock Cover Assemblies to the SD Box DoorsIf this is a new installation, the SD box number plates may be installed after thisprocedure. Each lock cover assembly is composed of the following pieces thatare assembled and applied to the SD door on site (Figure 2-3):• Base plate assembly, with 6-32 machine screw• Tag cover• Lock cover assemblyFigure 2-3 Lock Cover Assembly Parts2.3.1 Pre-installation Checklist for Lock Cover AssemblyRefer to Table 2-1 before you begin installation of the base plates, tag covers,and lock cover housings.2-3Copyright ©Diebold, Incorporated (6/2009) - All Rights ReservedTP-821320-001A
PRELIMINARY - DRAFT COPYMon Jun 01 08:53:30 2009Table 2-1 Pre-installation Checklist for Lock Cover AssemblyPre-installation ChecksConfirm that the Site Survey has been completed. You should not continue withthe installation until it is confirmed that the Site Survey has been completed.Confirm that adjacent SD sections are positioned to allow door swing to thefull-open position after the lock cover assemblies are installed. See Figure 2-1.Confirm that no base plates are bent or bowed to prevent full contact withthe surface of the SD door. Proper bonding strength is dependent of fulladhesive-to-surface contact.Confirm that the SD number frames are removed from SD doors that are lessthan 3 inches in height.Confirm that all SD door surfaces are dry and free of condensed moisture, oil,and grease.Verify that the base plate assemblies are at room temperature. To assure properbonding, the temperature of the base plate assembly must be at a minimum of72° F (minimum).Confirm that the SD locks currently installed are compatible for conversionto the lock cover assemblies.Confirm that all lock cover assemblies are in the OPEN position prior toinstallation onto the base plate. The upper housing door must not be snapped tothe closed position until after the lock cover assembly is screwed to the baseplate as the final step in the installation of the lock cover assembly.Confirm that the installation template kit (41-021051-000) is on hand if youare installing lock cover assemblies onto Diebold 5-inch, 7-inch, and 10-inchSD doors. If you are installing lock cover assemblies onto non-Diebold doors,you must have a laser level or plumb-bob on hand to ensure you maintain aclean, level installation.If the SD doors to be modified are equipped with double-nose locks, confirmthat each guard lock has been permanently disabled to the unlocked position.See Section 2.2.2.Confirm that a handheld RFID tag reader is on hand.2-4 Copyright ©Diebold, Incorporated (6/2009) - All Rights ReservedTP-821320-001A
PRELIMINARY - DRAFT COPYMon Jun 01 08:53:30 20092.3.2 Install the Base Plate (Mounting Bracket Bases)NOTEDiebold recommends that you install ALL base plates beforeyou proceed with installation of the tag covers and lockhousings. This provides time for the adhesive to cure andimprove the bonding strength of the base plate to the SD door.NOTETo accommodate installation of the base plate, the numberframe must be removed on SD box doors that are less thanthree inches high.1. Verify that all procedures in Section 2.2 are complete.2. Confirm the following before you begin installing lock cover assemblies:• Ensure all surfaces are dry and free of condensed moisture.• Verify the temperature range at the installation site is within theadequate range as defined by the following guidelines:- Best: 70°F to 100°F (21°C to 38C°)- Adequate: 50°F to 60°F (10°C to 15C°)- Not recommended: below 50°F (10°C)• Once the base plate is attached to the SD door, the adhesive tape onthe base plate will achieve about 50% of ultimate bonding strengthafter 20 minutes. Total bonding strength is achieved after 72 hours.3. Install the first base plate to an SD box door. Diebold recommends thatyou install the first base plate on an SD box door that can easily be usedas a plumb reference point for aligning all the remaining base plates thatare to be installed. Observe the following guidelines and precautionsas you install the initial base plate:2-5Copyright ©Diebold, Incorporated (6/2009) - All Rights ReservedTP-821320-001A
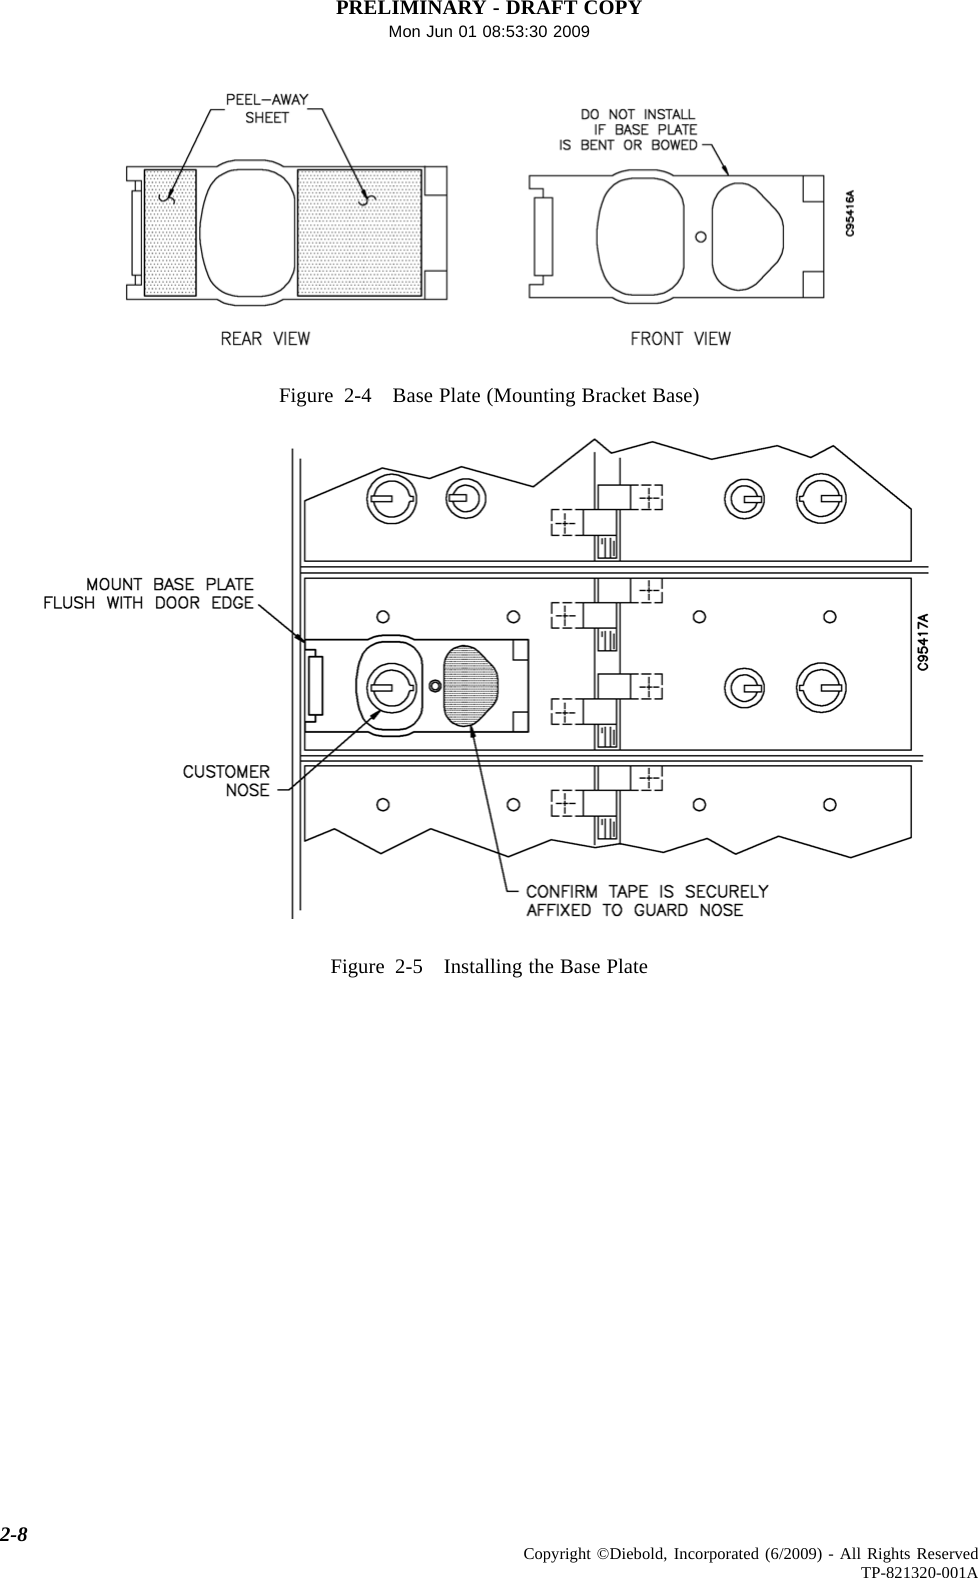
PRELIMINARY - DRAFT COPYMon Jun 01 08:53:30 2009CAUTIONIf access to the lock nose or guard key stub isrequired after a lock cover assembly has beeninstalled, youmustremovetheadhesivetapethatsecures the lock nose. The guard key stub can begrasped by tweezers, pliers, or another suitabletool and the guard lock can be placed in a lockedposition. The guard key stub may then be removedif desired. To reinstall a new lock cover assembly,you must reinstall the guard key stub and secure thelock nose with an adhesive tape.• On a double-nose lock, the guard nose will be concealed by thedouble-sided tape.• The hinge-side edge of each base plate is aligned flush along theopening edge of the SD door. See Figure 2-5. Confirm the base platedoes not inhibit opening or closing the SD door.• The left-most opening at the bottom of the base is centered over thecustomer nose of the SD lock.•Confirm that the bubble edge of the mounting bracket base does notmake contact with the number frame on the SD box door. A smallgap between the bracket base and number frame is required to allowfor installation of the lock cover assembly.• Door templates may be used to locate the base plate onto SD boxdoors that are 5", 7", or 10" high. Door templates are not availablefor 2" and 3" high SD box doors.CAUTIONThe adhesive used on the double-sided tape toaffixthelockcoverassemblytotheSDdoorisdesigned for one-time installation. Once the lockcover assembly is affixed to the door, it cannot bemoved or removed without great difficulty. Test fiteach lock cover assembly with the tape attached.Attempting to remove a lock cover assembly thathas been affixed to the door may cause damageto the assembly and may result in an undesirablefinished appearance.a. Remove the protective peel-away sheet attached to the two pieces ofdouble-sided tape located on the rear of the bracket mounting base.2-6 Copyright ©Diebold, Incorporated (6/2009) - All Rights ReservedTP-821320-001A
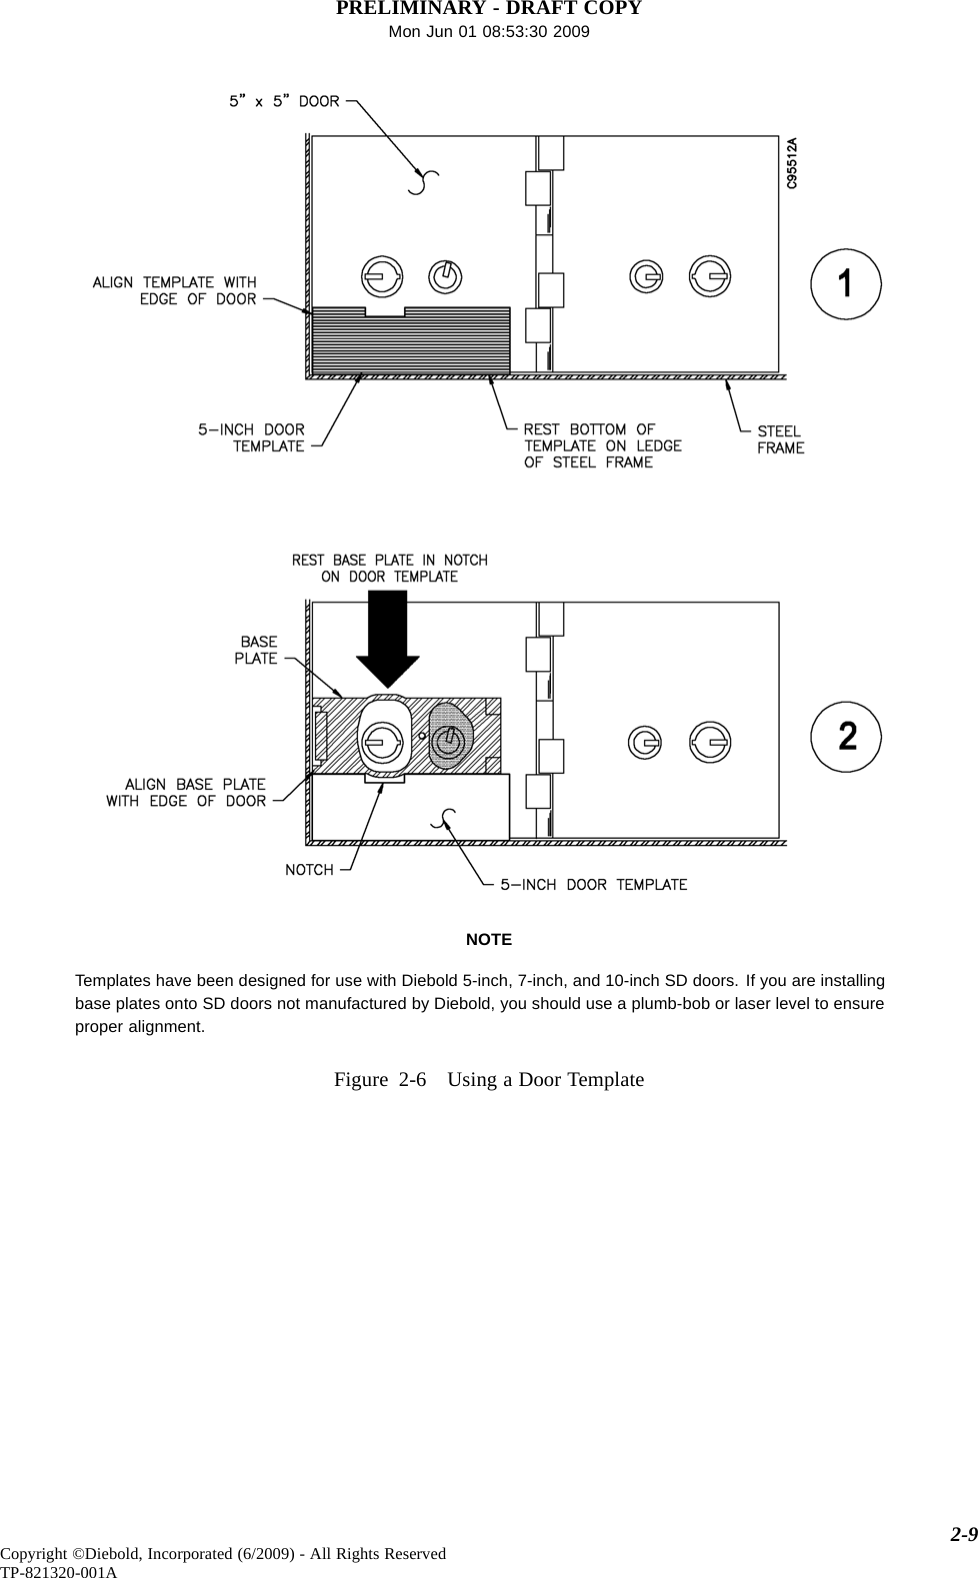
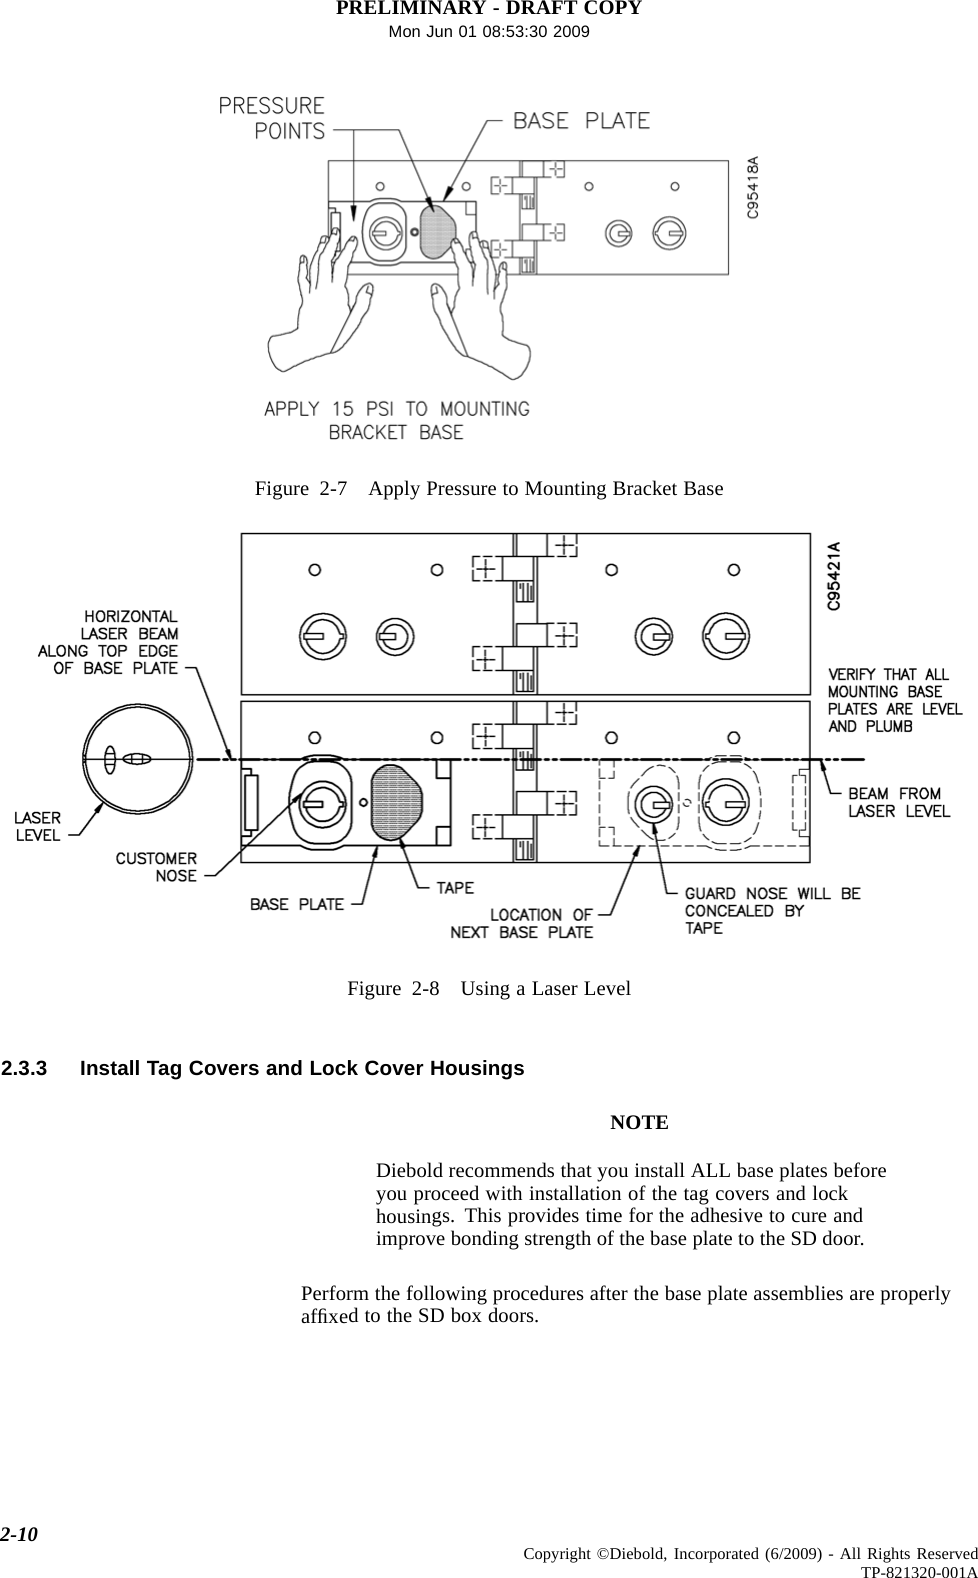
PRELIMINARY - DRAFT COPYMon Jun 01 08:53:30 2009See Figure 2-4. Prior to attachment to the SD door, visually confirmthat the tape has maintained its adhesive quality.b. Observe the following guidelines as you affix the base plate to theSD box door:• If a door template is used to locate the base plate (5", 7", and 10"high doors only), rest the bottom of the template on the steel frameas you align the hinge side of the base plate so that it is flush alongthe opening edge of the SD box door. See Figure 2-6.CAUTIONConfirm that the base plate is properlyaligned and positioned on the SD box door.If not positioned properly, remove the baseplate immediately before you apply pressureto permanently affix the base plate to thedoor. DO NOT reuse the base plate.• With the base plate properly aligned and affixed to the door, applya minimum of 15 psi to the base for approximately 5 seconds.To ensure proper bonding, apply pressure at the points noted inFigure 2-7.•Confirm that the tape on the rear of the base is securely affixed tothe guard nose. This will ensure that the guard nose remains in theunlocked position and does not rotate over time. See Figure 2-5.NOTEIf, at a later date, the customer desires to changean SD door to operate using the guard noseand guard key, the tape that conceals the guardnose is readily removable to allow removal ofthe key stub.4. Using the top or bottom edge of the base plate installed in the previousstep as a plumb point, use a laser line level (Figure 2-8) to project alaser "chalk line" along the remaining doors of a section. Observe thefollowing guidelines as you install the remaining base plates:• The top of each base plate in the SD section (modular group of safedeposit boxes of uniform size) should be parallel side-to-side.• The vertical edges of each base plate in the SD section should bevertically plumb.5. Verify that all base plates are installed and securely attached to the SD boxdoors. Confirm that the base plates do not inhibit the SD door operation.2-7Copyright ©Diebold, Incorporated (6/2009) - All Rights ReservedTP-821320-001A
PRELIMINARY - DRAFT COPYMon Jun 01 08:53:30 2009Figure 2-4 Base Plate (Mounting Bracket Base)Figure 2-5 Installing the Base Plate2-8 Copyright ©Diebold, Incorporated (6/2009) - All Rights ReservedTP-821320-001A
PRELIMINARY - DRAFT COPYMon Jun 01 08:53:30 2009NOTETemplates have been designed for use with Diebold 5-inch, 7-inch, and 10-inch SD doors. If you are installingbase plates onto SD doors not manufactured by Diebold, you should use a plumb-bob or laser level to ensureproper alignment.Figure 2-6 Using a Door Template2-9Copyright ©Diebold, Incorporated (6/2009) - All Rights ReservedTP-821320-001A
PRELIMINARY - DRAFT COPYMon Jun 01 08:53:30 2009Figure 2-7 Apply Pressure to Mounting Bracket BaseFigure 2-8 Using a Laser Level2.3.3 Install Tag Covers and Lock Cover HousingsNOTEDiebold recommends that you install ALL base plates beforeyou proceed with installation of the tag covers and lockhousings. This provides time for the adhesive to cure andimprove bonding strength of the base plate to the SD door.Perform the following procedures after the base plate assemblies are properlyaffixedtotheSDboxdoors.2-10 Copyright ©Diebold, Incorporated (6/2009) - All Rights ReservedTP-821320-001A
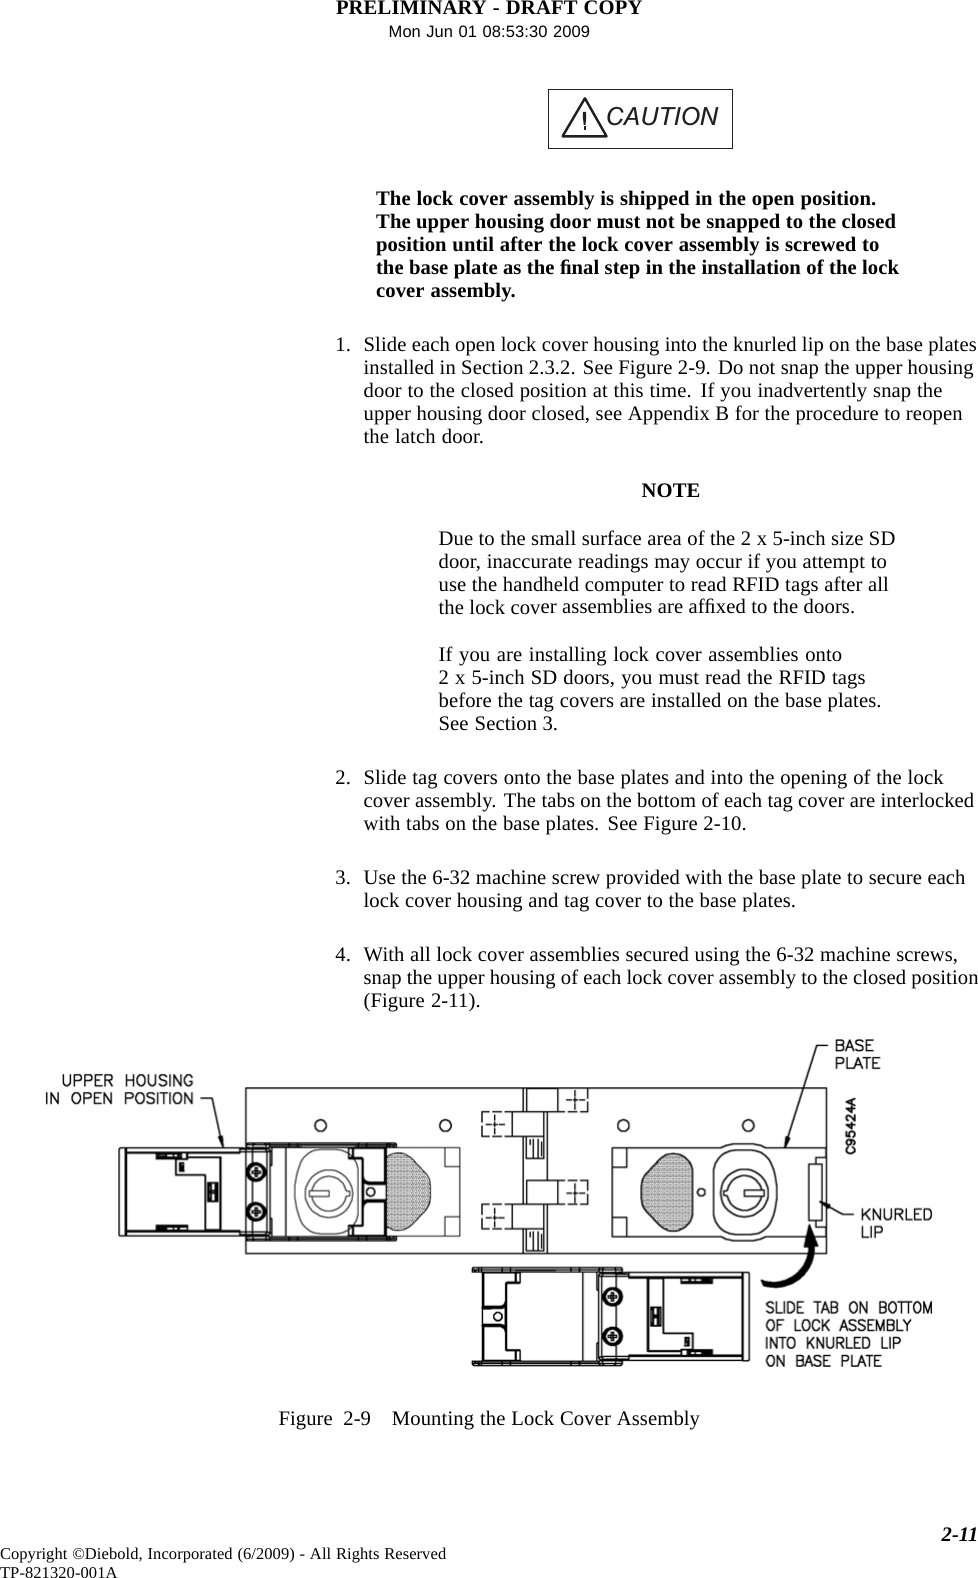
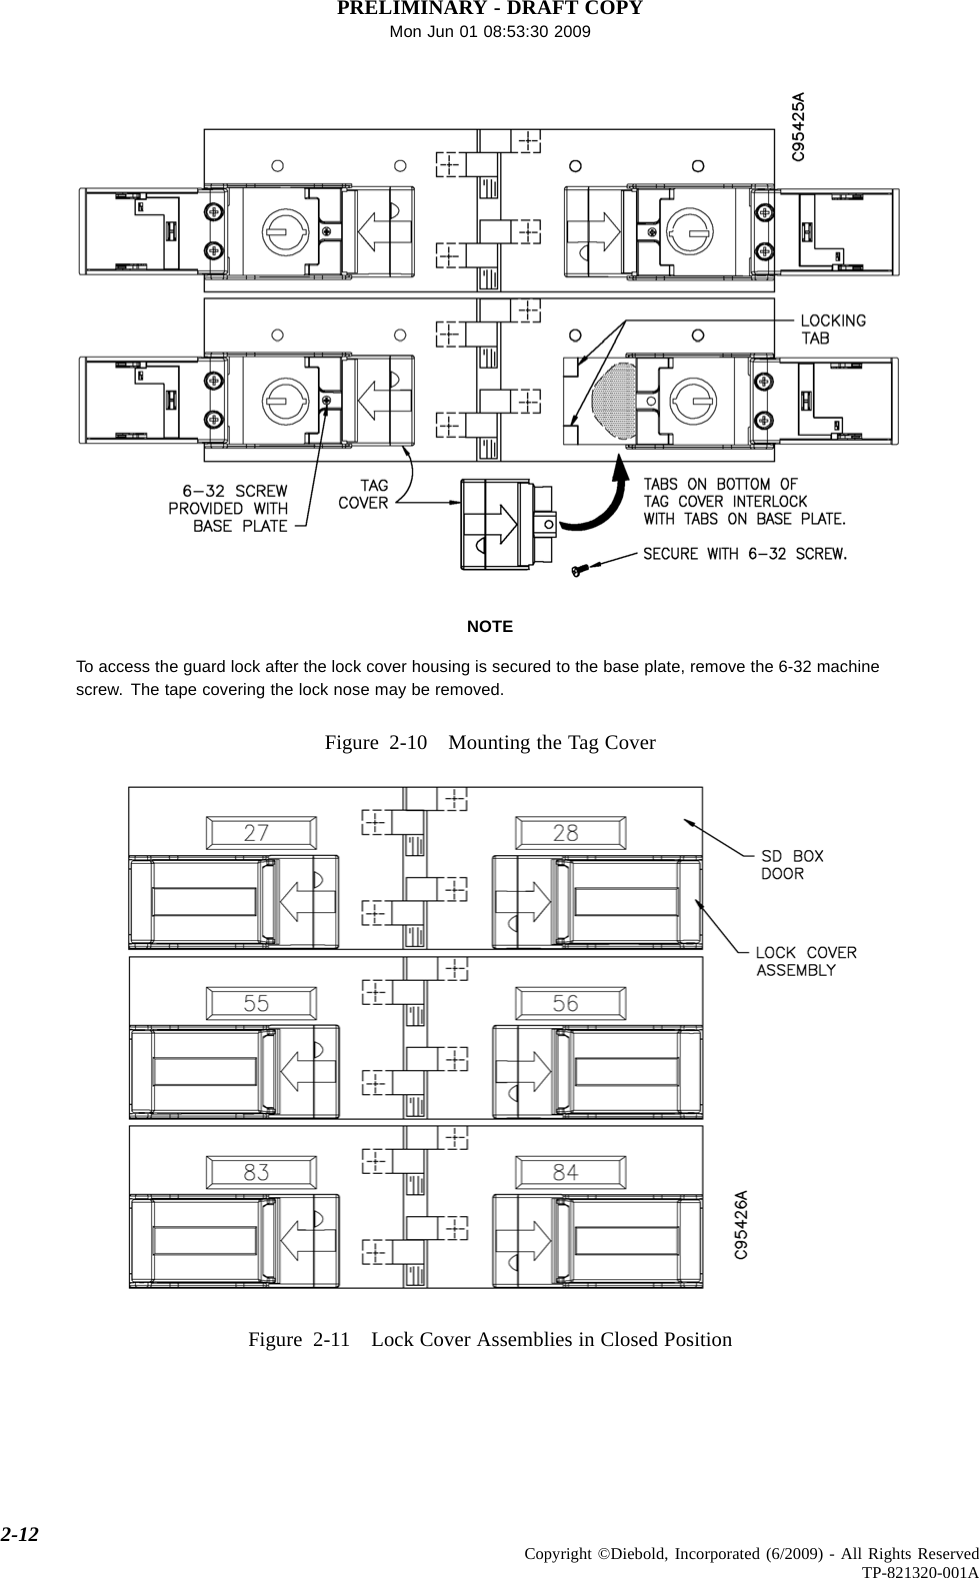
PRELIMINARY - DRAFT COPYMon Jun 01 08:53:30 2009CAUTIONThe lock cover assembly is shippedintheopenposition.The upper housing door must not be snapped to the closedposition until after the lock cover assembly is screwed tothebaseplateasthefinal step in the installation of the lockcover assembly.1. Slide each open lock cover housing into the knurled lip on the base platesinstalled in Section 2.3.2. See Figure 2-9. Do not snap the upper housingdoor to the closed position at this time. If you inadvertently snap theupper housing door closed, see Appendix B for the procedure to reopenthe latch door.NOTEDue to the small surface area of the 2 x 5-inch size SDdoor, inaccurate readings may occur if you attempt touse the handheld computer to read RFID tags after allthe lock cover assemblies are affixed to the doors.If you are installing lock cover assemblies onto2 x 5-inch SD doors, you must read the RFID tagsbefore the tag covers are installed on the base plates.See Section 3.2. Slide tag covers onto the base plates and into the opening of the lockcover assembly. The tabs on the bottom of each tag cover are interlockedwith tabs on the base plates. See Figure 2-10.3. Use the 6-32 machine screw provided with the base plate to secure eachlock cover housing and tag cover to the base plates.4. With all lock cover assemblies secured using the 6-32 machine screws,snap the upper housing of each lock cover assembly to the closed position(Figure 2-11).Figure 2-9 Mounting the Lock Cover Assembly2-11Copyright ©Diebold, Incorporated (6/2009) - All Rights ReservedTP-821320-001A
PRELIMINARY - DRAFT COPYMon Jun 01 08:53:30 2009NOTETo access the guard lock after the lock cover housing is secured to the base plate, remove the 6-32 machinescrew. The tape covering the lock nose may be removed.Figure 2-10 Mounting the Tag CoverFigure 2-11 Lock Cover Assemblies in Closed Position2-12 Copyright ©Diebold, Incorporated (6/2009) - All Rights ReservedTP-821320-001A
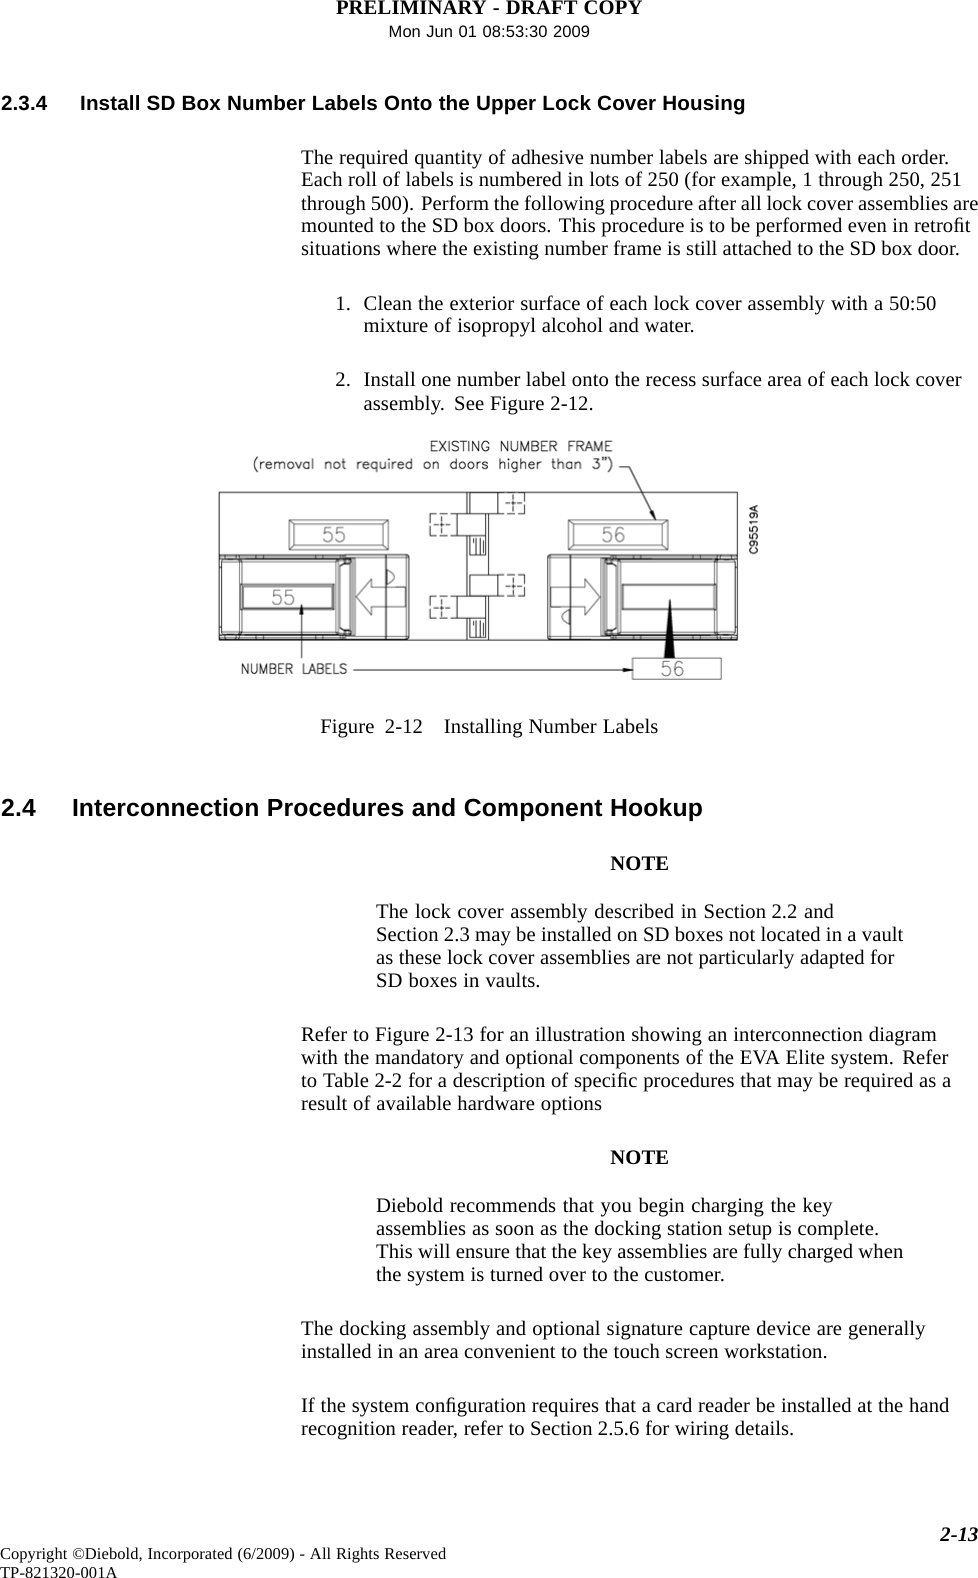
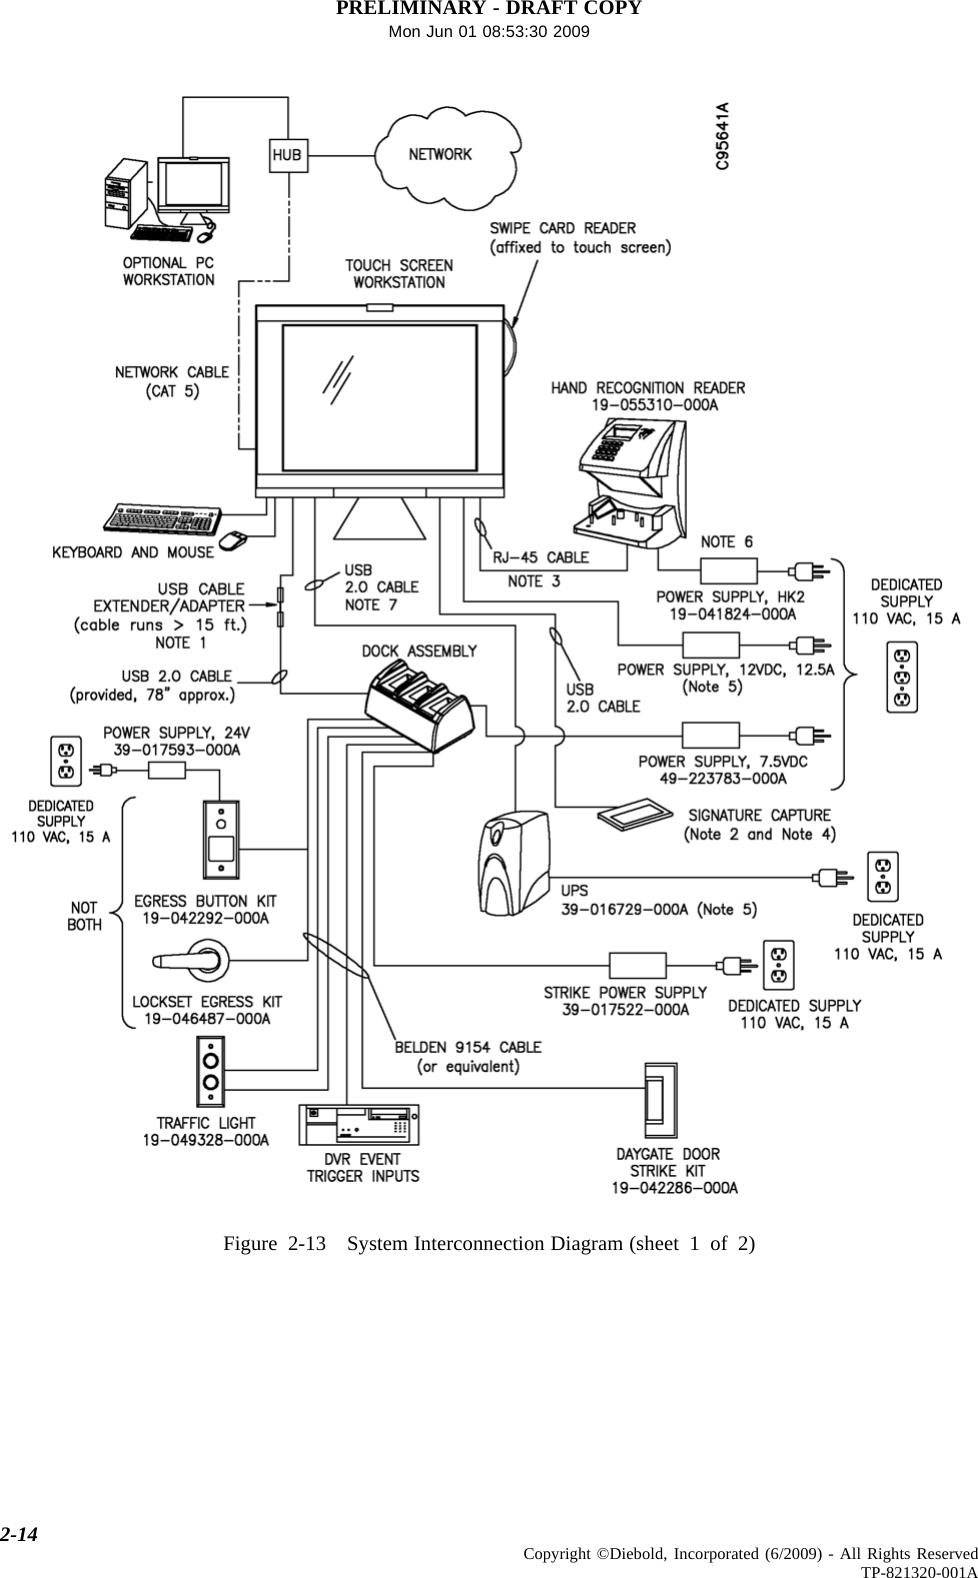
PRELIMINARY - DRAFT COPYMon Jun 01 08:53:30 20092.3.4 Install SD Box Number Labels Onto the Upper Lock Cover HousingThe required quantity of adhesive number labels are shipped with each order.Each roll of labels is numbered in lots of 250 (for example, 1 through 250, 251through 500). Perform the following procedure after all lock cover assemblies aremounted to the SD box doors. This procedure is to be performed even in retrofitsituations where the existing number frame is still attached to the SD box door.1. Clean the exterior surface of each lock cover assembly with a 50:50mixture of isopropyl alcohol and water.2. Install one number label onto the recess surface area of each lock coverassembly. See Figure 2-12.Figure 2-12 Installing Number Labels2.4 Interconnection Procedures and Component HookupNOTEThe lock cover assembly described in Section 2.2 andSection 2.3 may be installed on SD boxes not located in a vaultas these lock cover assemblies are not particularly adapted forSD boxes invaults.Refer to Figure 2-13 for an illustration showing an interconnection diagramwith the mandatory and optional components of the EVA Elite system. Referto Table 2-2 for a description of specific procedures that may be required as aresult of available hardware optionsNOTEDiebold recommends that you begin charging the keyassemblies as soon as the docking station setup is complete.This will ensure that the key assemblies are fully charged whenthe system is turned over to the customer.The docking assembly and optional signature capture device are generallyinstalled in an area convenient to the touch screen workstation.If the system configuration requires that a card reader be installed at the handrecognition reader, refer to Section 2.5.6 for wiring details.2-13Copyright ©Diebold, Incorporated (6/2009) - All Rights ReservedTP-821320-001A
PRELIMINARY - DRAFT COPYMon Jun 01 08:53:30 2009Figure 2-13 System Interconnection Diagram (sheet 1 of 2)2-14 Copyright ©Diebold, Incorporated (6/2009) - All Rights ReservedTP-821320-001A
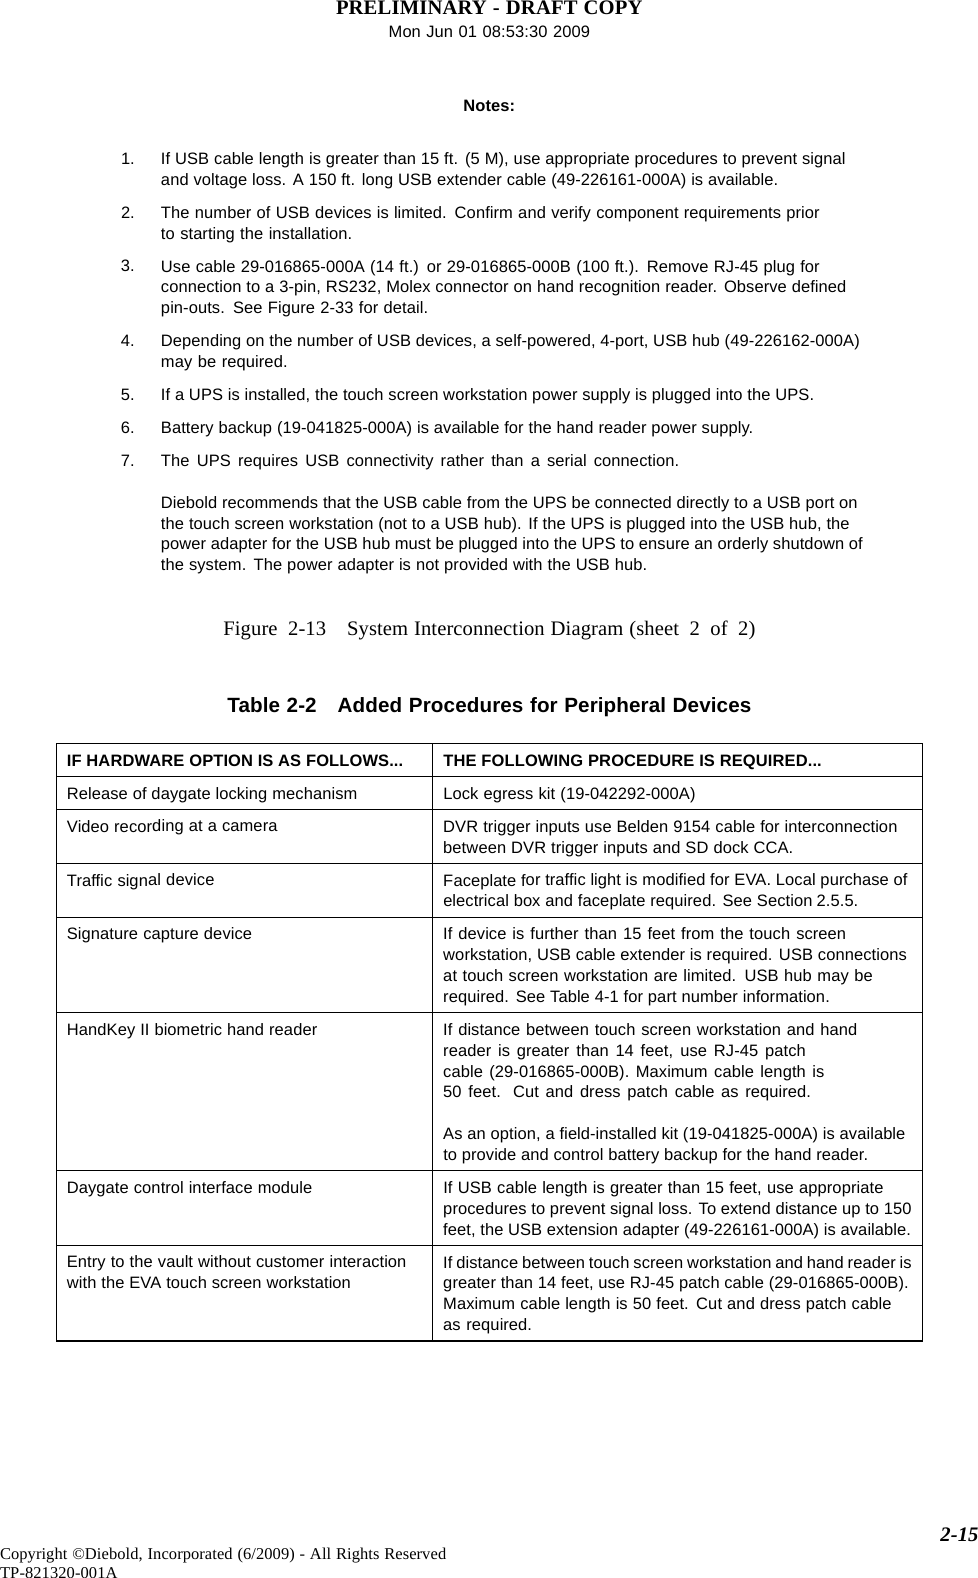
PRELIMINARY - DRAFT COPYMon Jun 01 08:53:30 2009Notes:1. If USB cable length is greater than 15 ft. (5 M), use appropriate procedures to prevent signaland voltage loss. A 150 ft. long USB extender cable (49-226161-000A) is available.2. The number of USB devices is limited. Confirm and verify component requirements priorto starting the installation.3. Use cable 29-016865-000A (14 ft.) or 29-016865-000B (100 ft.). Remove RJ-45 plug forconnection to a 3-pin, RS232, Molex connector on hand recognition reader. Observe definedpin-outs. See Figure 2-33 for detail.4. Depending on the number of USB devices, a self-powered, 4-port, USB hub (49-226162-000A)may be required.5. If a UPS is installed, the touch screen workstation power supply is plugged into the UPS.6. Battery backup (19-041825-000A) is available for the hand reader power supply.7. The UPS requires USB connectivity rather than a serial connection.Diebold recommends that the USB cable from the UPS be connected directly to a USB port onthe touch screen workstation (not to a USB hub). If the UPS is plugged into the USB hub, thepower adapter for the USB hub must be plugged into the UPS to ensure an orderly shutdown ofthe system. The power adapter is not provided with the USB hub.Figure 2-13 System Interconnection Diagram (sheet 2 of 2)Table 2-2 Added Procedures for Peripheral DevicesIF HARDWARE OPTION IS AS FOLLOWS... THE FOLLOWING PROCEDURE IS REQUIRED...Release of daygate locking mechanism Lock egress kit (19-042292-000A)Video recording at a camera DVR trigger inputs use Belden 9154 cable for interconnectionbetween DVR trigger inputs and SD dock CCA.Trafficsignal device Faceplate for trafficlightismodified for EVA. Local purchase ofelectrical box and faceplate required. See Section 2.5.5.Signature capture device If device is further than 15 feet from the touch screenworkstation, USB cable extender is required. USB connectionsat touch screen workstation are limited. USB hub may berequired. See Table 4-1 for part number information.HandKey II biometric hand reader If distance between touch screen workstation and handreader is greater than 14 feet, use RJ-45 patchcable (29-016865-000B). Maximum cable length is50 feet. Cut and dress patch cable as required.As an option, a field-installed kit (19-041825-000A) is availableto provide and control battery backup for the hand reader.Daygate control interface module If USB cable length is greater than 15 feet, use appropriateprocedures to prevent signal loss. To extend distance up to 150feet, the USB extension adapter (49-226161-000A) is available.Entry to the vault without customer interactionwith the EVA touch screen workstationIf distance between touch screen workstation and hand reader isgreater than 14 feet, use RJ-45 patch cable (29-016865-000B).Maximum cable length is 50 feet. Cut and dress patch cableas required.2-15Copyright ©Diebold, Incorporated (6/2009) - All Rights ReservedTP-821320-001A
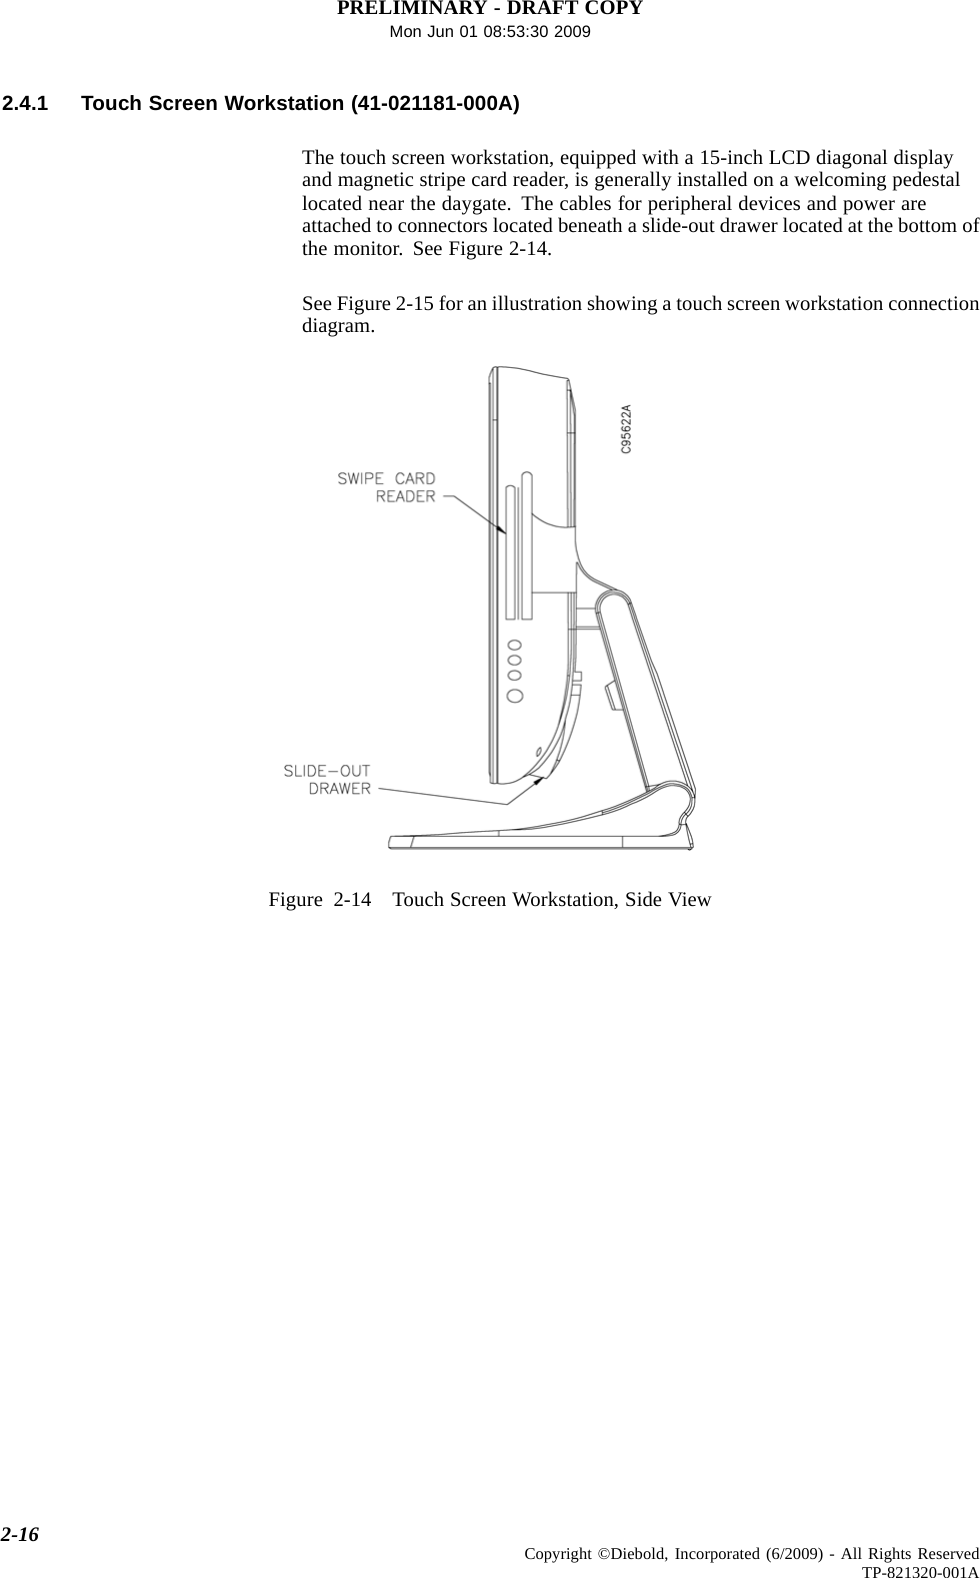
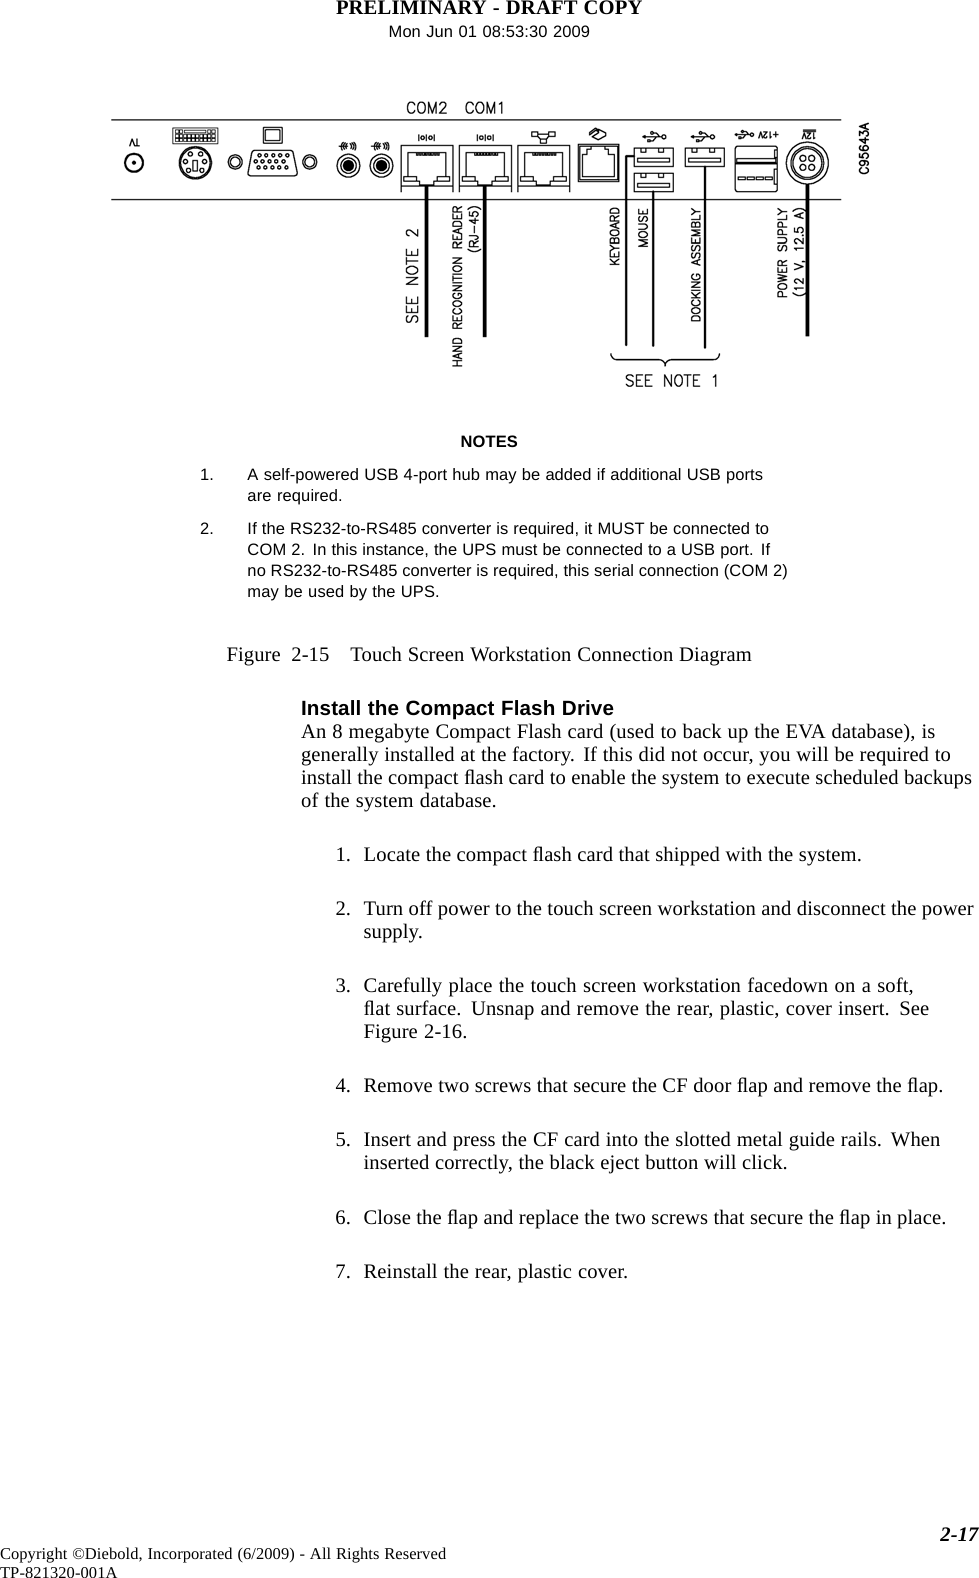
PRELIMINARY - DRAFT COPYMon Jun 01 08:53:30 20092.4.1 Touch Screen Workstation (41-021181-000A)The touch screen workstation, equipped with a 15-inch LCD diagonal displayand magnetic stripe card reader, is generally installed on a welcoming pedestallocated near the daygate. The cables for peripheral devices and power areattached to connectors located beneath a slide-out drawer located at the bottom ofthe monitor. See Figure 2-14.See Figure 2-15 for an illustration showing a touch screen workstation connectiondiagram.Figure 2-14 Touch Screen Workstation, Side View2-16 Copyright ©Diebold, Incorporated (6/2009) - All Rights ReservedTP-821320-001A
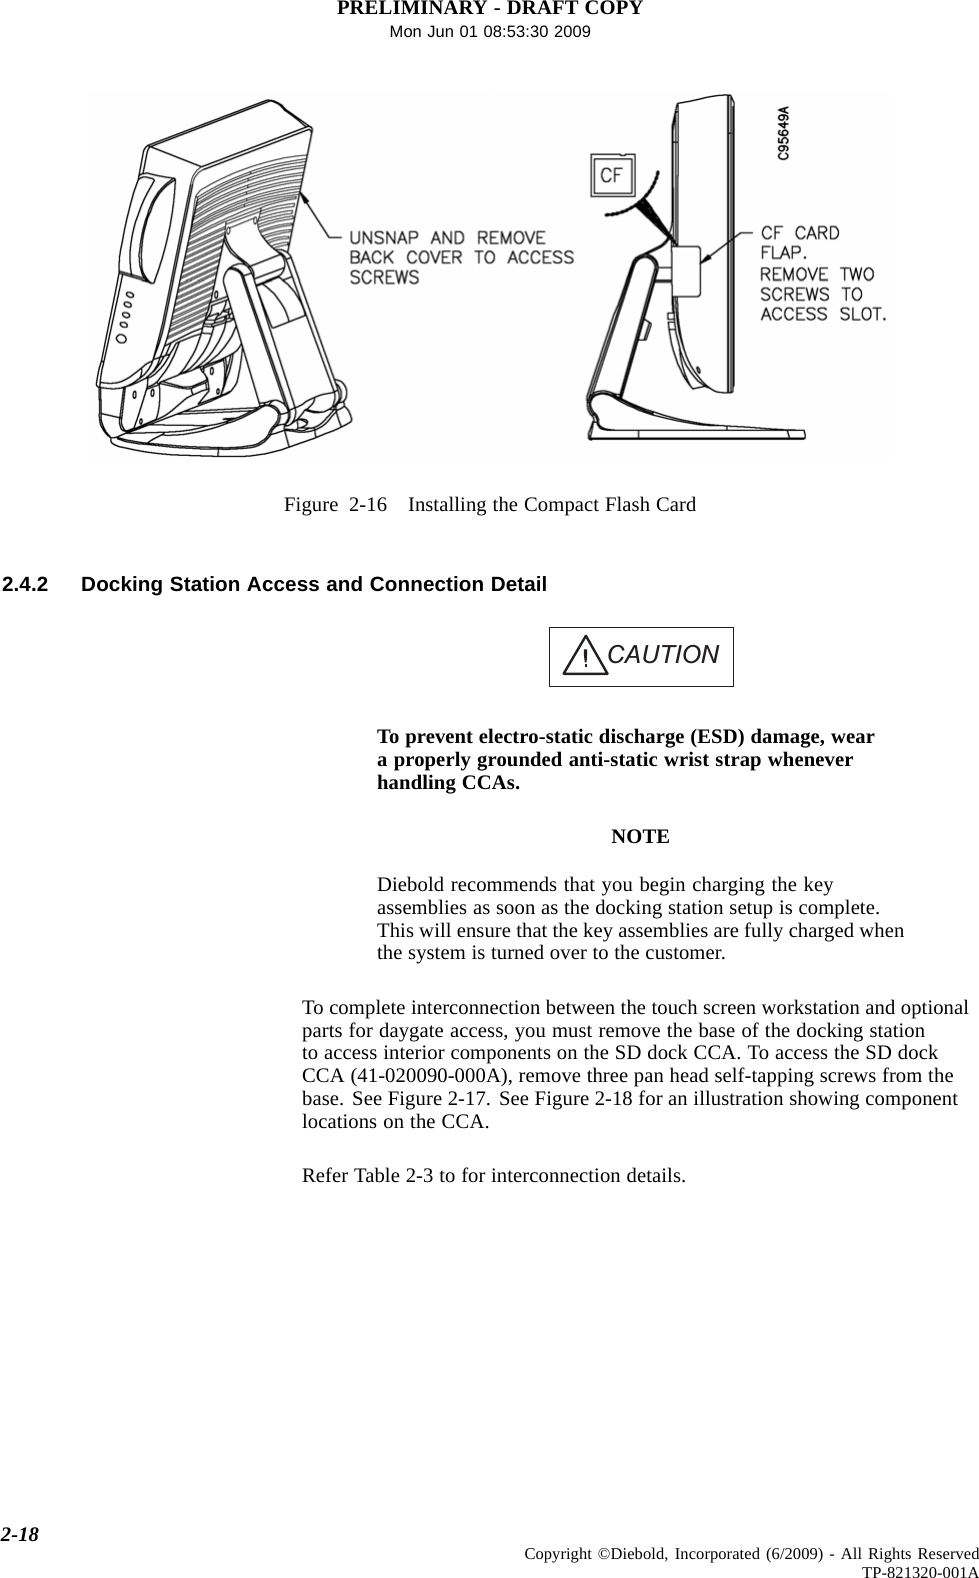
PRELIMINARY - DRAFT COPYMon Jun 01 08:53:30 2009NOTES1. A self-powered USB 4-port hub may be added if additional USB portsare required.2. If the RS232-to-RS485 converter is required, it MUST be connected toCOM 2. In this instance, the UPS must be connected to a USB port. Ifno RS232-to-RS485 converter is required, this serial connection (COM 2)maybeusedbytheUPS.Figure 2-15 Touch Screen Workstation Connection DiagramInstall the Compact Flash DriveAn 8 megabyte Compact Flash card (used to back up the EVA database), isgenerally installed at the factory. If this did not occur, you will be required toinstall the compact flash card to enable the system to execute scheduled backupsof the system database.1. Locate the compact flash card that shipped with the system.2. Turn off power to the touch screen workstation and disconnect the powersupply.3. Carefully place the touch screen workstation facedown on a soft,flat surface. Unsnap and remove the rear, plastic, cover insert. SeeFigure 2-16.4. Remove two screws that secure the CF door flap and remove the flap.5. Insert and press the CF card into the slotted metal guide rails. Wheninserted correctly, the black eject button will click.6. Close the flap and replace the two screws that secure the flap in place.7. Reinstall the rear, plastic cover.2-17Copyright ©Diebold, Incorporated (6/2009) - All Rights ReservedTP-821320-001A
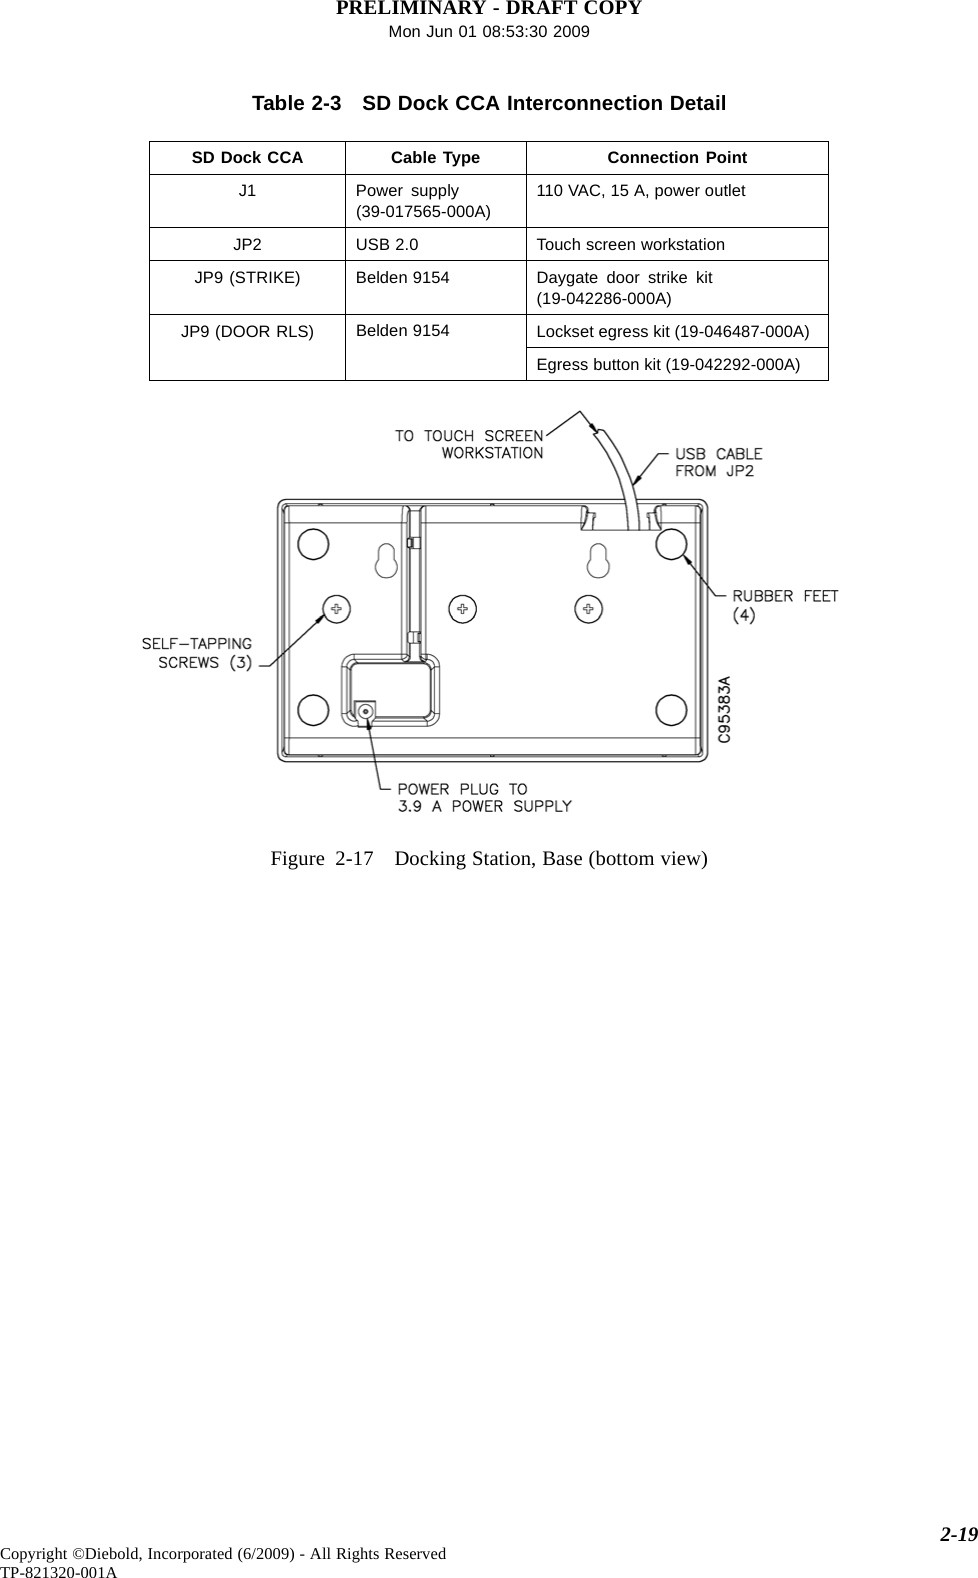
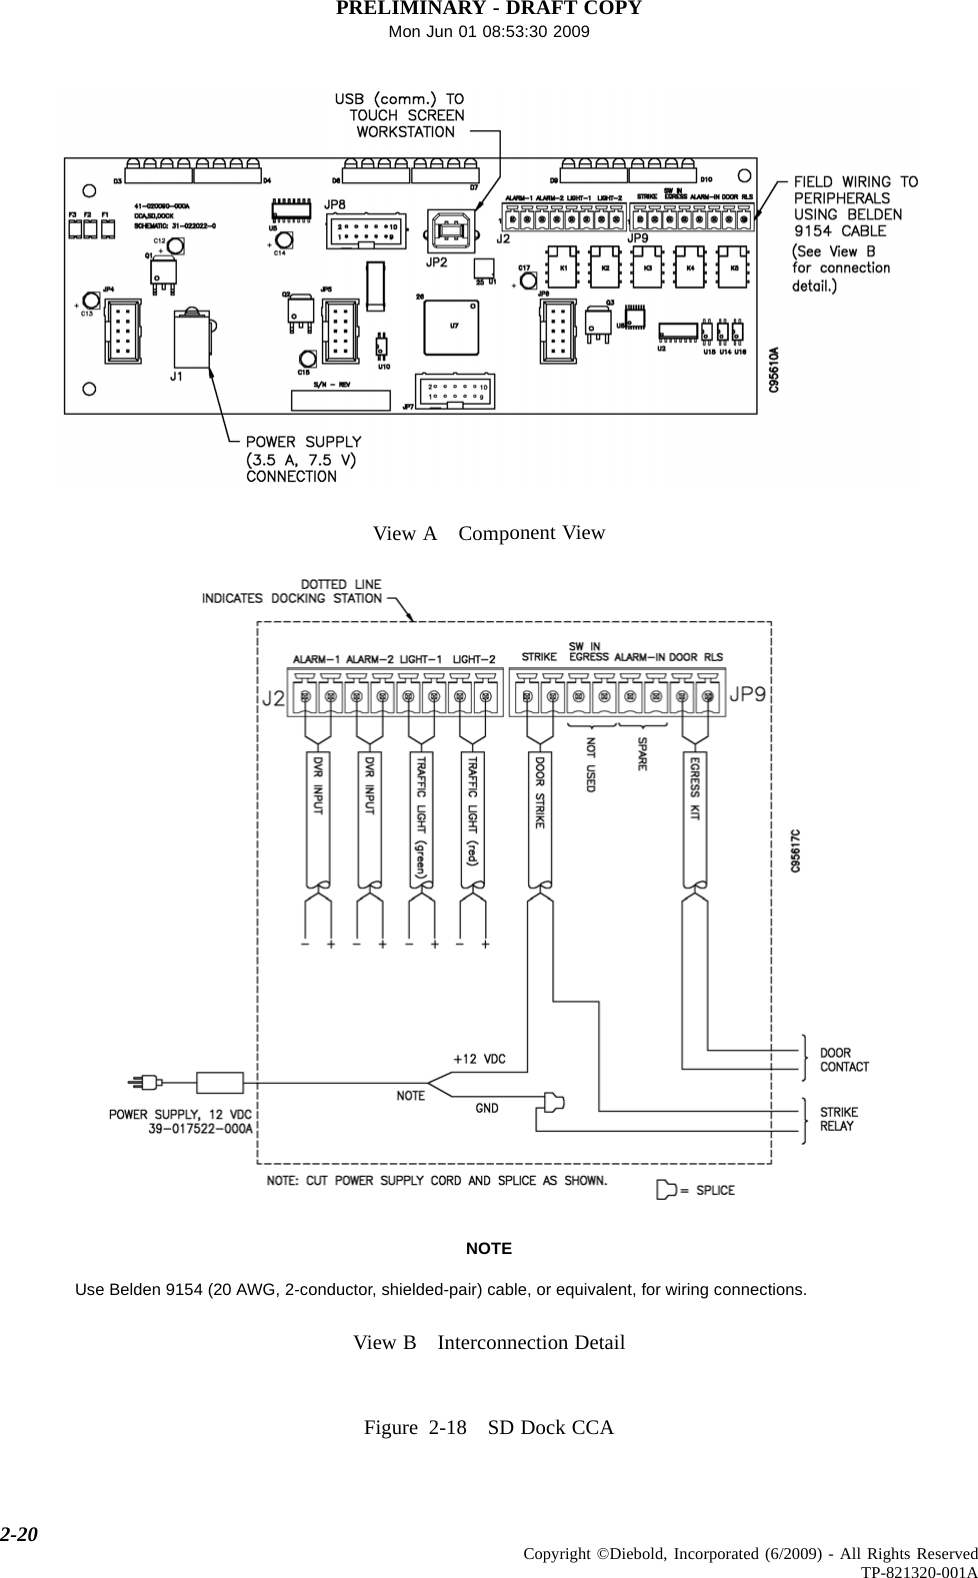
PRELIMINARY - DRAFT COPYMon Jun 01 08:53:30 2009Figure 2-16 Installing the Compact Flash Card2.4.2 Docking Station Access and Connection DetailCAUTIONTo prevent electro-static discharge (ESD) damage, weara properly grounded anti-static wrist strap wheneverhandling CCAs.NOTEDiebold recommends that you begin charging the keyassemblies as soon as the docking station setup is complete.This will ensure that the key assemblies are fully charged whenthe system is turned over to the customer.To complete interconnection between the touch screen workstation and optionalparts for daygate access, you must remove the base of the docking stationto access interior components on the SD dock CCA. To access the SD dockCCA (41-020090-000A), remove three pan head self-tapping screws from thebase. See Figure 2-17. See Figure 2-18 for an illustration showing componentlocations on the CCA.Refer Table 2-3 to for interconnection details.2-18 Copyright ©Diebold, Incorporated (6/2009) - All Rights ReservedTP-821320-001A
PRELIMINARY - DRAFT COPYMon Jun 01 08:53:30 2009Table 2-3 SD Dock CCA Interconnection DetailSD Dock CCA Cable Type Connection PointJ1 Power supply(39-017565-000A)110 VAC, 15 A, power outletJP2 USB 2.0 Touch screen workstationJP9 (STRIKE) Belden 9154 Daygate door strike kit(19-042286-000A)Lockset egress kit (19-046487-000A)JP9 (DOOR RLS) Belden 9154Egress button kit (19-042292-000A)Figure 2-17 Docking Station, Base (bottom view)2-19Copyright ©Diebold, Incorporated (6/2009) - All Rights ReservedTP-821320-001A
PRELIMINARY - DRAFT COPYMon Jun 01 08:53:30 2009View A Component ViewNOTEUse Belden 9154 (20 AWG, 2-conductor, shielded-pair) cable, or equivalent, for wiring connections.View B Interconnection DetailFigure 2-18 SD Dock CCA2-20 Copyright ©Diebold, Incorporated (6/2009) - All Rights ReservedTP-821320-001A
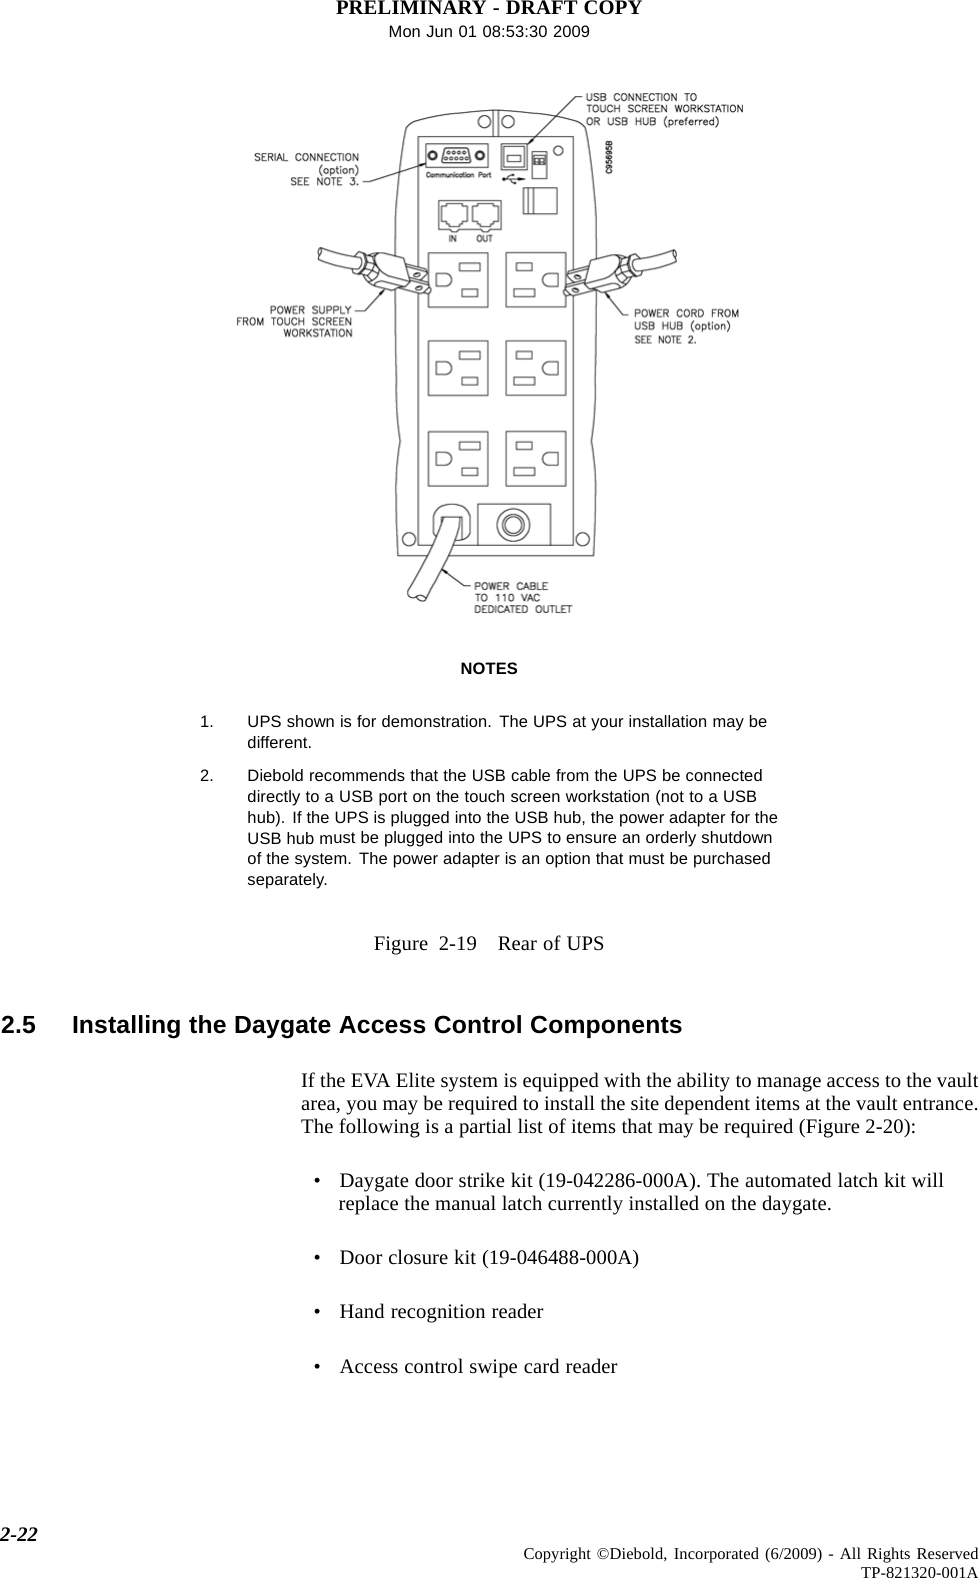
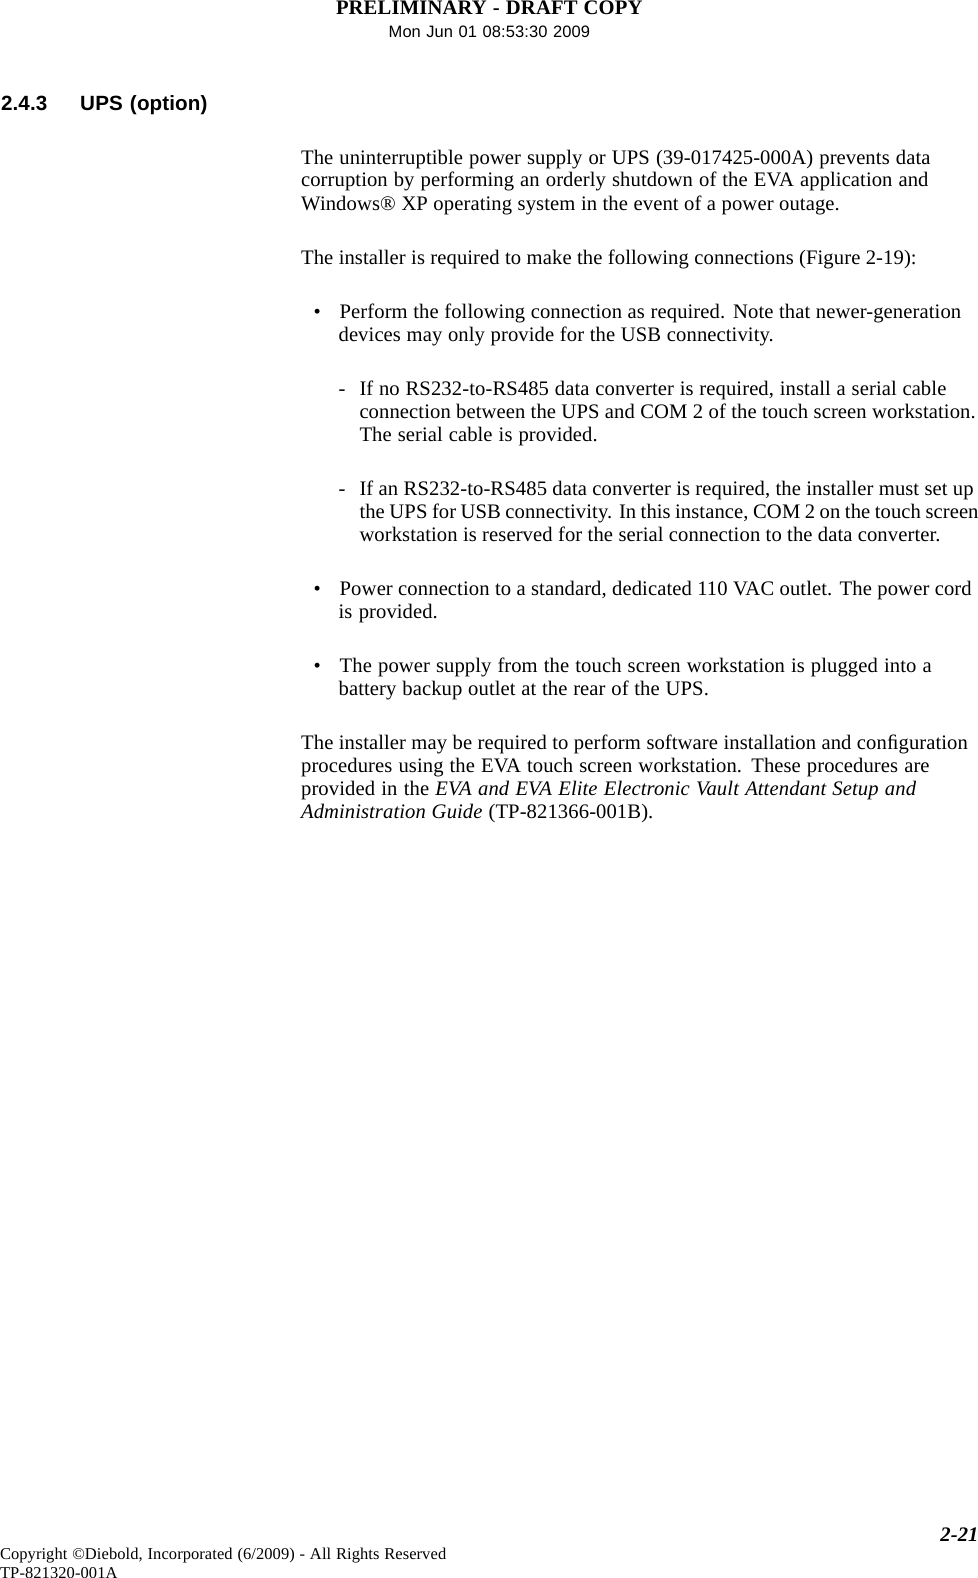
PRELIMINARY - DRAFT COPYMon Jun 01 08:53:30 20092.4.3 UPS (option)The uninterruptible power supply or UPS (39-017425-000A) prevents datacorruption by performing an orderly shutdown of the EVA application andWindows® XP operating system in the event of a power outage.The installer is required to make the following connections (Figure 2-19):• Perform the following connection as required. Note that newer-generationdevices may only provide for the USB connectivity.- If no RS232-to-RS485 data converter is required, install a serial cableconnection between the UPS and COM 2 of the touch screen workstation.The serial cable is provided.- If an RS232-to-RS485 data converter is required, the installer must set upthe UPS for USB connectivity. In this instance, COM 2 on the touch screenworkstation is reserved for the serial connection to the data converter.• Power connection to a standard, dedicated 110 VAC outlet. The power cordis provided.• The power supply from the touch screen workstation is plugged into abattery backup outlet at the rear of the UPS.The installer may be required to perform software installation and configurationprocedures using the EVA touch screen workstation. These procedures areprovided in the EVA and EVA Elite Electronic Vault Attendant Setup andAdministration Guide (TP-821366-001B).2-21Copyright ©Diebold, Incorporated (6/2009) - All Rights ReservedTP-821320-001A
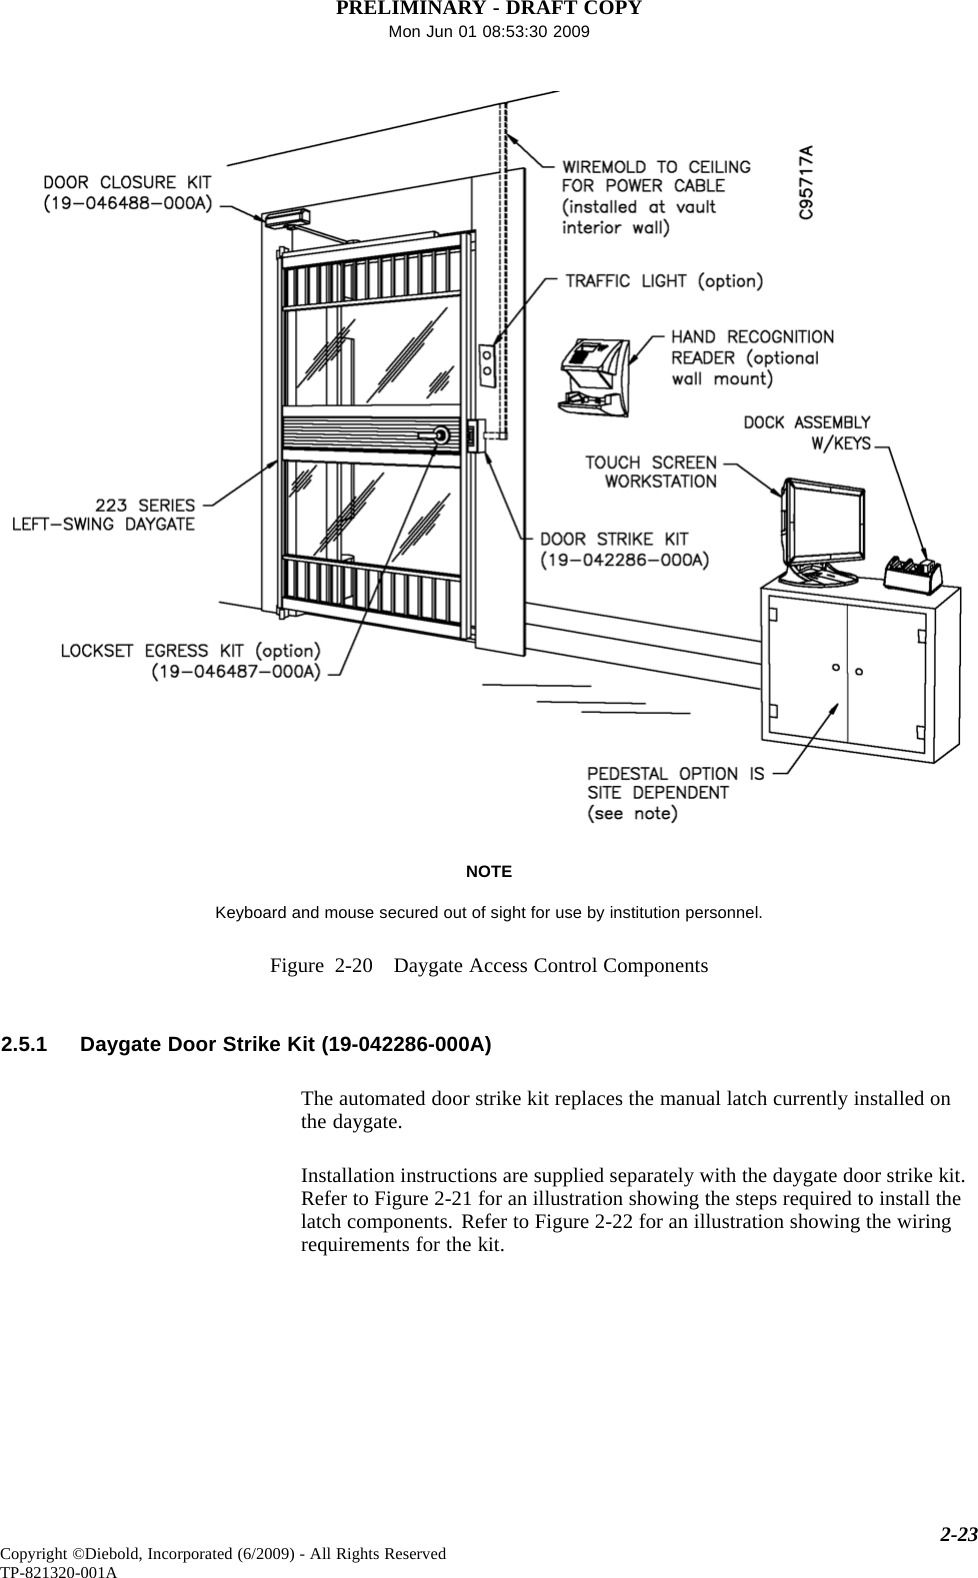
PRELIMINARY - DRAFT COPYMon Jun 01 08:53:30 2009NOTES1. UPS shown is for demonstration. The UPS at your installation may bedifferent.2. Diebold recommends that the USB cable from the UPS be connecteddirectly to a USB port on the touch screen workstation (not to a USBhub). If the UPS is plugged into the USB hub, the power adapter for theUSB hub must be plugged into the UPS to ensure an orderly shutdownof the system. The power adapter is an option that must be purchasedseparately.Figure 2-19 Rear of UPS2.5 Installing the Daygate Access Control ComponentsIf the EVA Elite system is equipped with the ability to manage access to the vaultarea, you may be required to install the site dependent items at the vault entrance.The following is a partial list of items that may be required (Figure 2-20):•Daygate door strike kit (19-042286-000A). The automated latch kit willreplace the manual latch currently installed on the daygate.• Door closure kit (19-046488-000A)•Handrecognition reader• Access control swipe card reader2-22 Copyright ©Diebold, Incorporated (6/2009) - All Rights ReservedTP-821320-001A
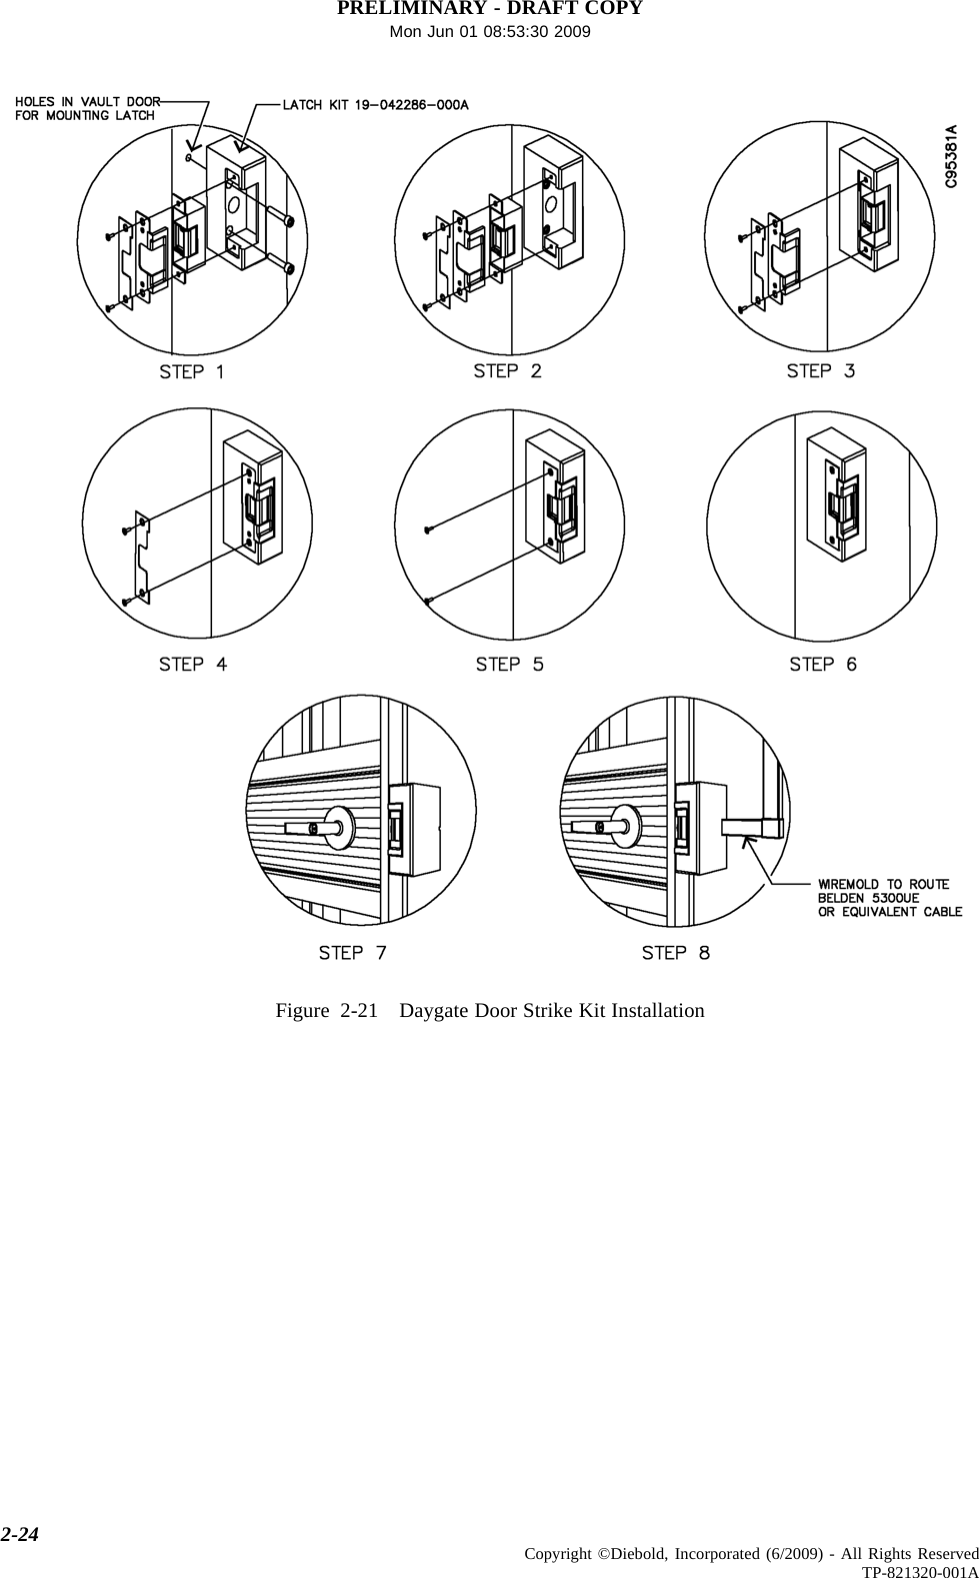
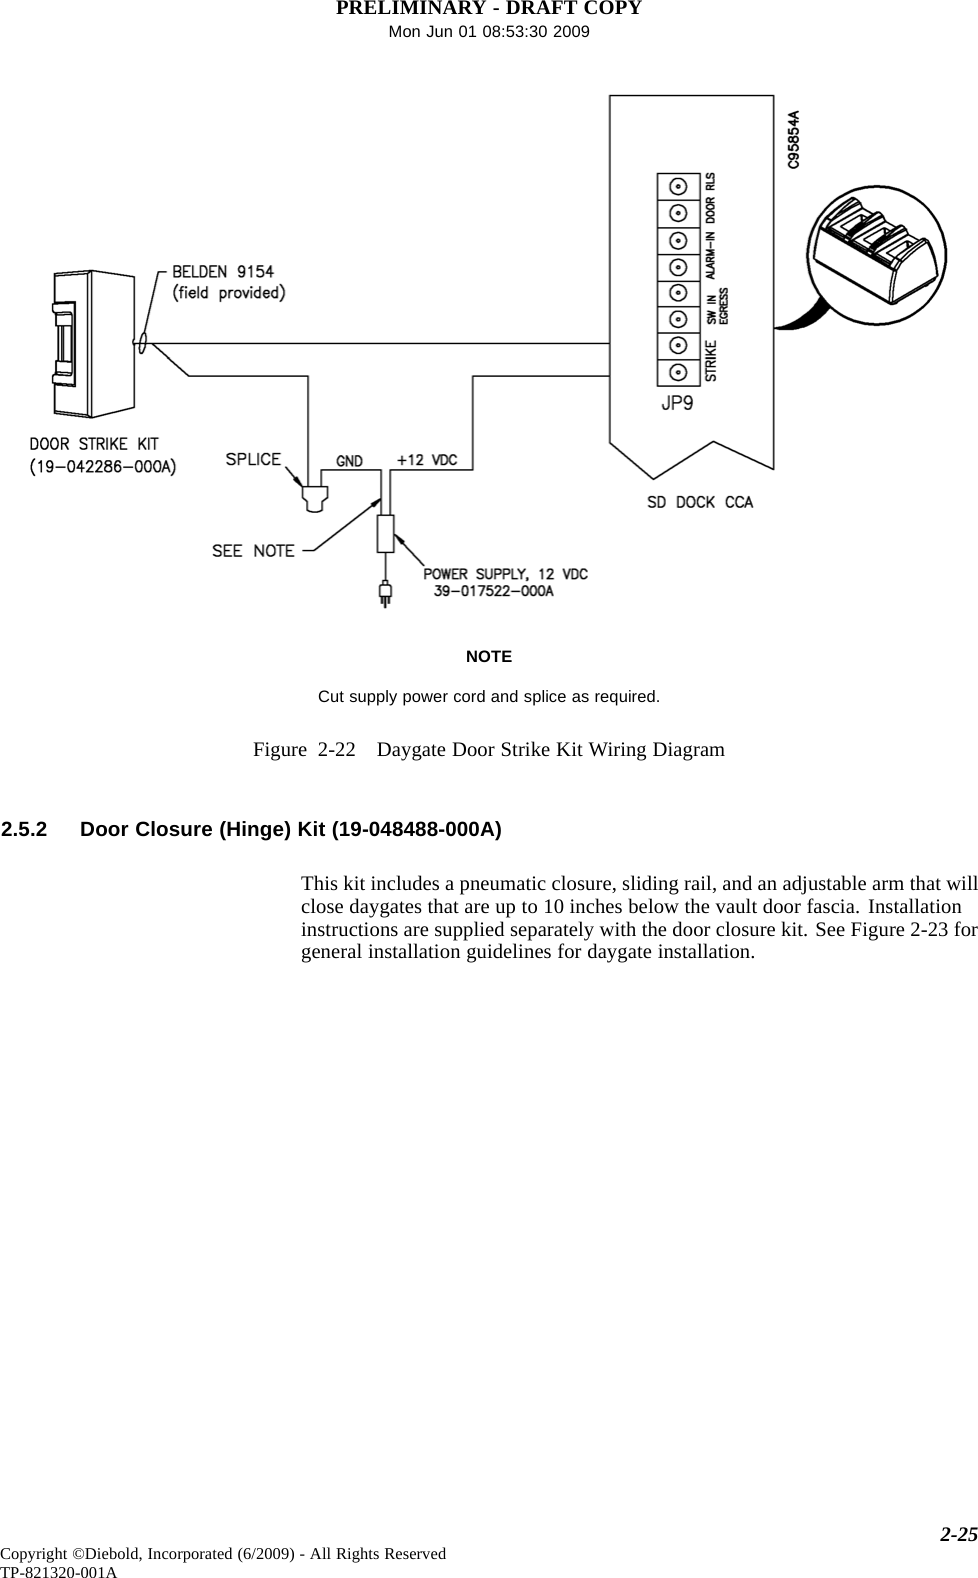
PRELIMINARY - DRAFT COPYMon Jun 01 08:53:30 2009NOTEKeyboard and mouse secured out of sight for use by institution personnel.Figure 2-20 Daygate Access Control Components2.5.1 Daygate Door Strike Kit (19-042286-000A)The automated door strike kit replaces the manual latch currently installed onthe daygate.Installation instructions are supplied separately with the daygate door strike kit.Refer to Figure 2-21 for an illustration showing the steps required to install thelatch components. Refer to Figure 2-22 for an illustration showing the wiringrequirements for the kit.2-23Copyright ©Diebold, Incorporated (6/2009) - All Rights ReservedTP-821320-001A
PRELIMINARY - DRAFT COPYMon Jun 01 08:53:30 2009Figure 2-21 Daygate Door Strike Kit Installation2-24 Copyright ©Diebold, Incorporated (6/2009) - All Rights ReservedTP-821320-001A
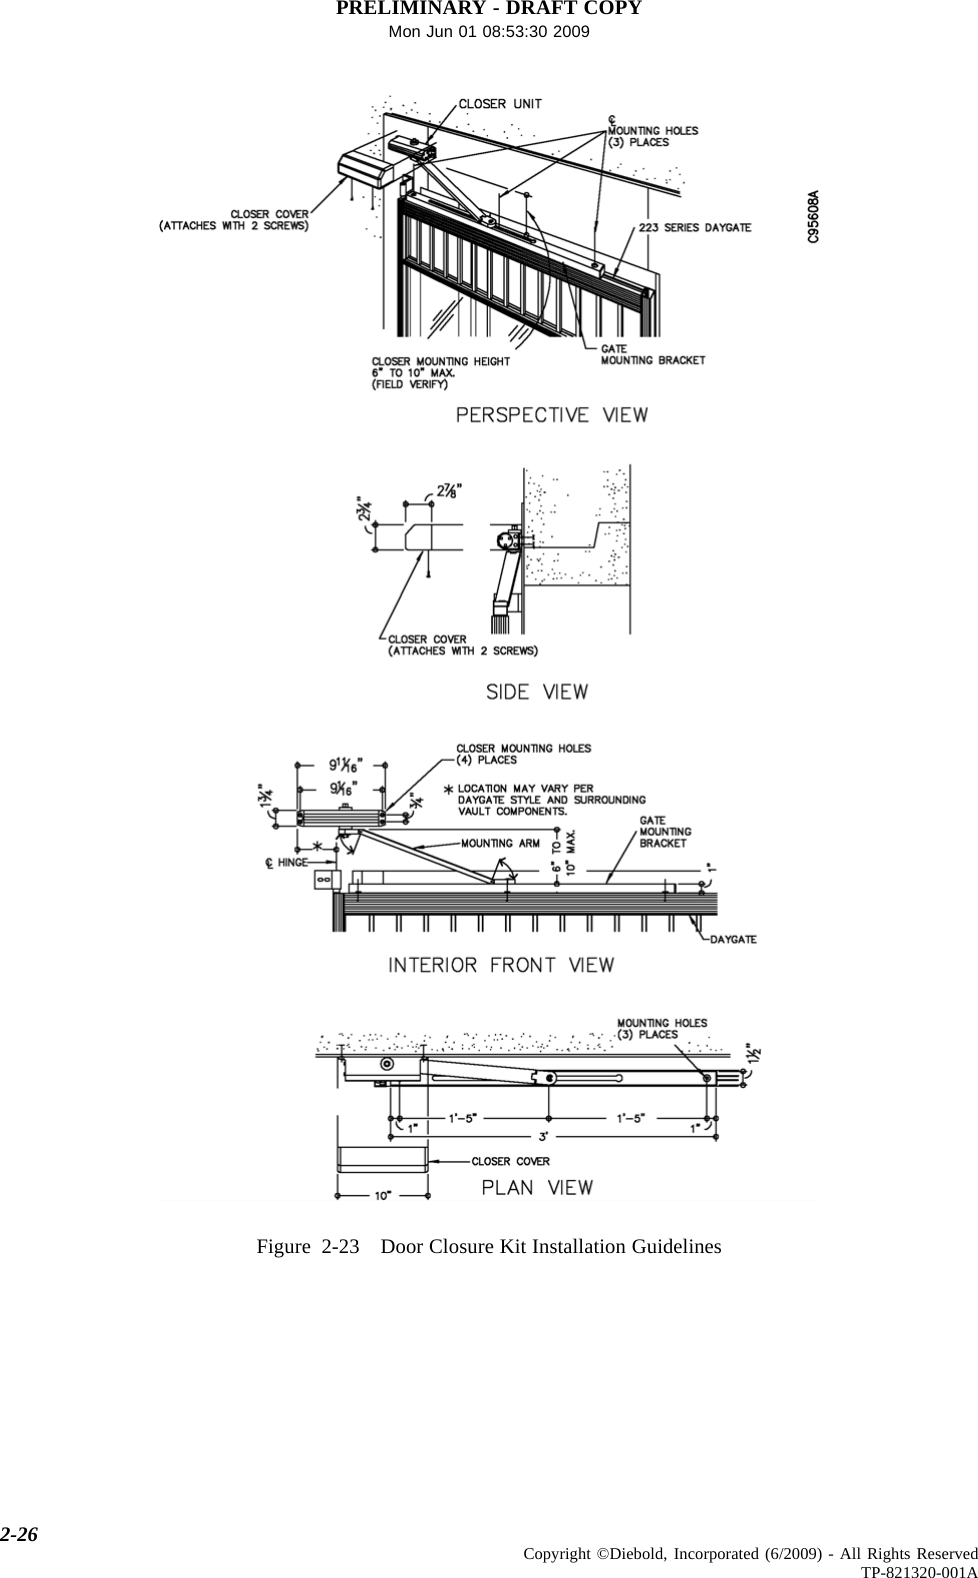
PRELIMINARY - DRAFT COPYMon Jun 01 08:53:30 2009NOTECut supply power cord and splice as required.Figure 2-22 Daygate Door Strike Kit Wiring Diagram2.5.2 Door Closure (Hinge) Kit (19-048488-000A)This kit includes a pneumatic closure, sliding rail, and an adjustable arm that willclose daygates that are up to 10 inches below the vault door fascia. Installationinstructions are supplied separately with the door closure kit. See Figure 2-23 forgeneral installation guidelines for daygate installation.2-25Copyright ©Diebold, Incorporated (6/2009) - All Rights ReservedTP-821320-001A
PRELIMINARY - DRAFT COPYMon Jun 01 08:53:30 2009Figure 2-23 Door Closure Kit Installation Guidelines2-26 Copyright ©Diebold, Incorporated (6/2009) - All Rights ReservedTP-821320-001A
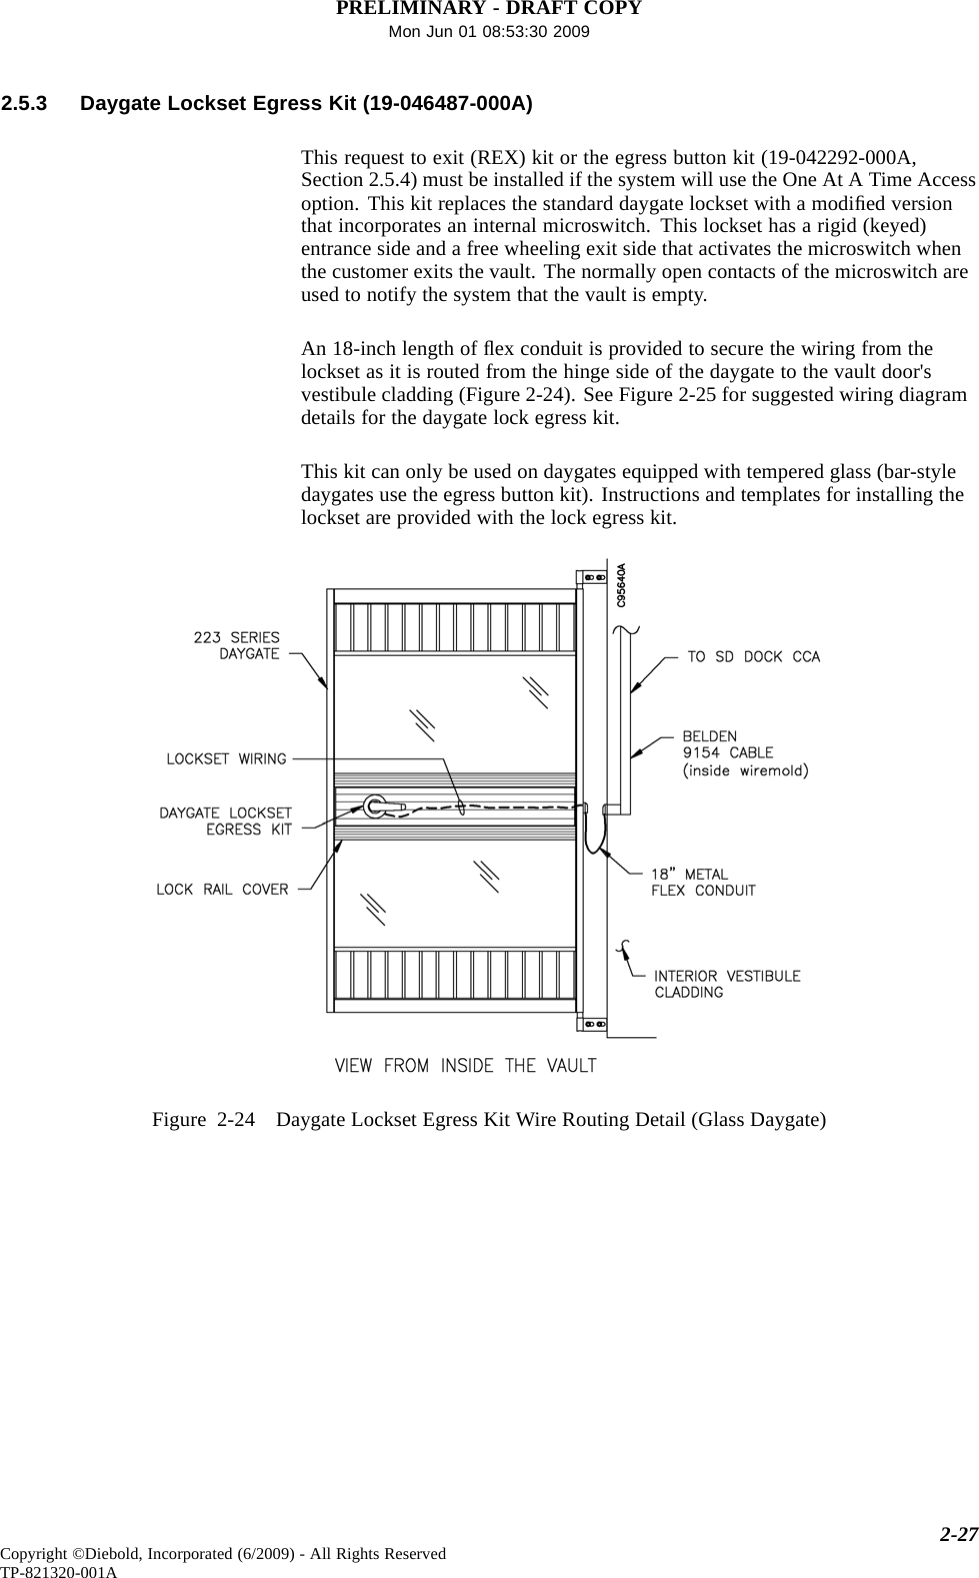
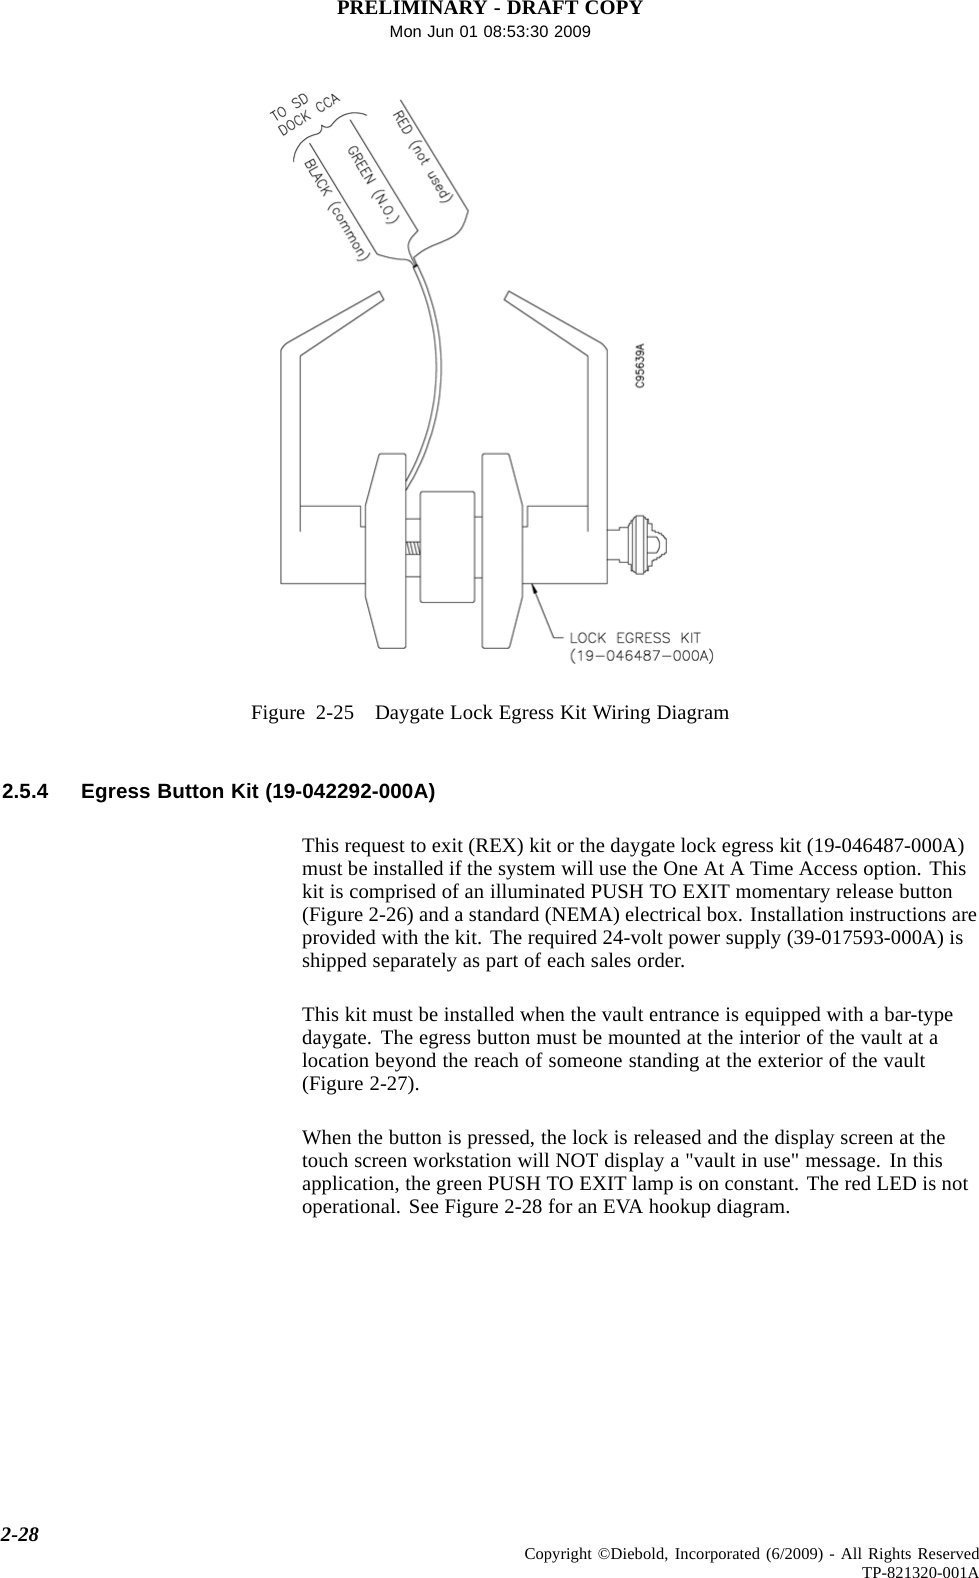
PRELIMINARY - DRAFT COPYMon Jun 01 08:53:30 20092.5.3 Daygate Lockset Egress Kit (19-046487-000A)This request to exit (REX) kit or the egress button kit (19-042292-000A,Section 2.5.4) must be installed if the system will use the One At A Time Accessoption. This kit replaces the standard daygate lockset with a modified versionthat incorporates an internal microswitch. This lockset has a rigid (keyed)entrance side and a free wheeling exit side that activates the microswitch whenthe customer exits the vault. The normally open contacts of the microswitch areused to notify the system that the vault is empty.An 18-inch length of flex conduit is provided to secure the wiring from thelockset as it is routed from the hinge side of the daygate to the vault door'svestibule cladding (Figure 2-24). See Figure 2-25 for suggested wiring diagramdetails for the daygate lock egress kit.This kit can only be used on daygates equipped with tempered glass (bar-styledaygates use the egress button kit). Instructions and templates for installing thelockset are provided with the lock egress kit.Figure 2-24 Daygate Lockset Egress Kit Wire Routing Detail (Glass Daygate)2-27Copyright ©Diebold, Incorporated (6/2009) - All Rights ReservedTP-821320-001A
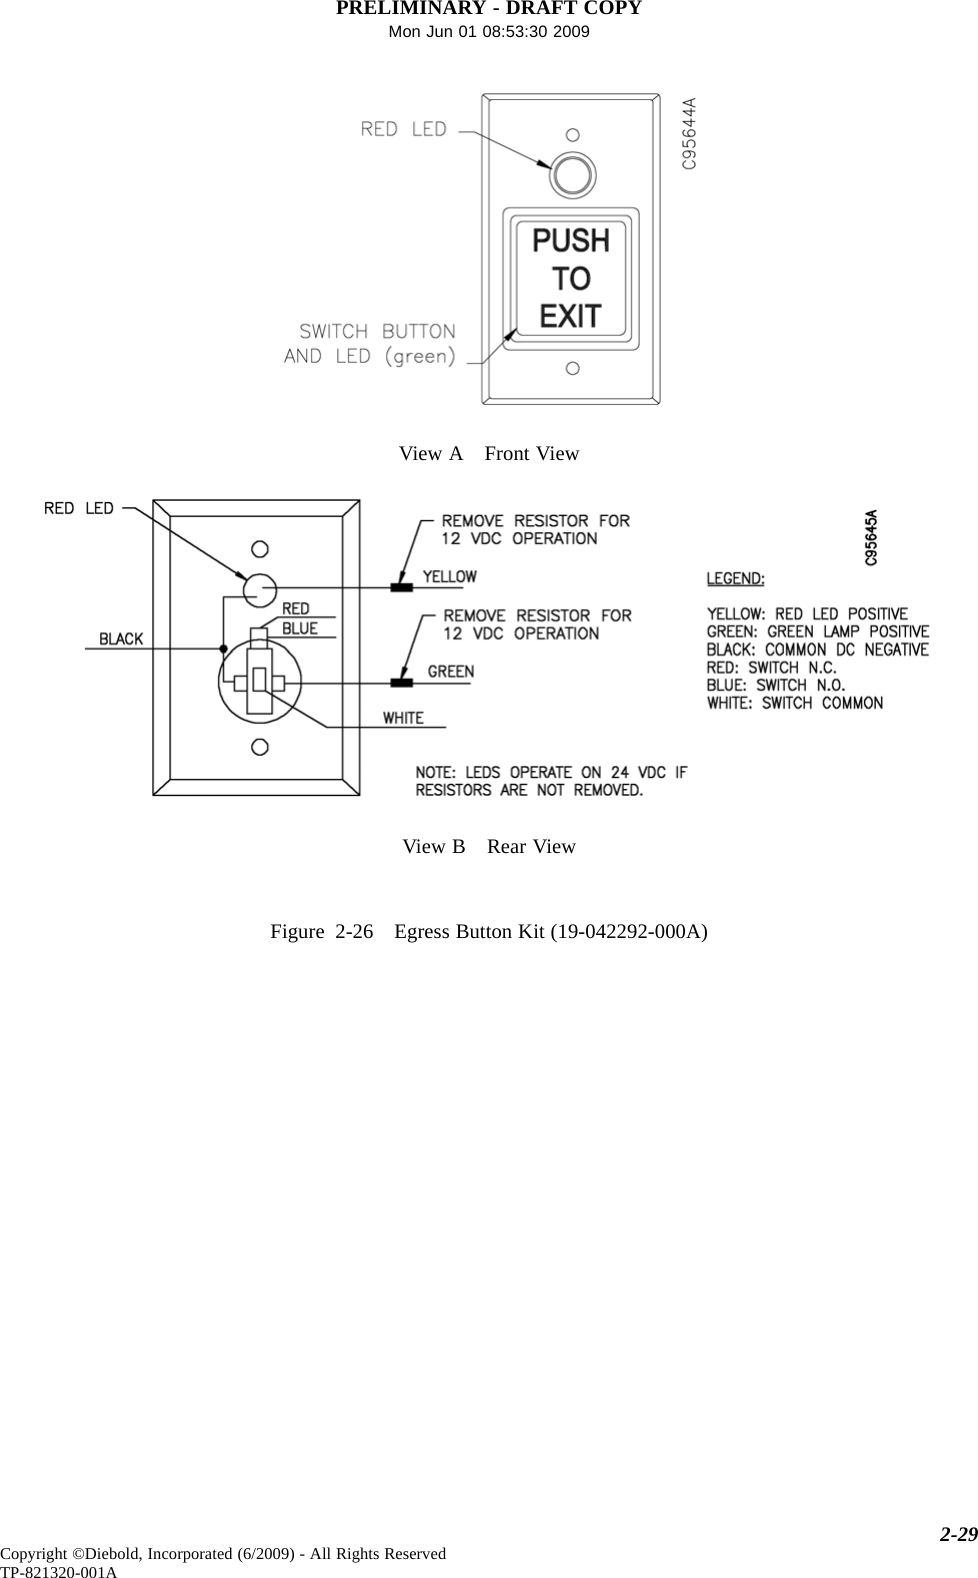
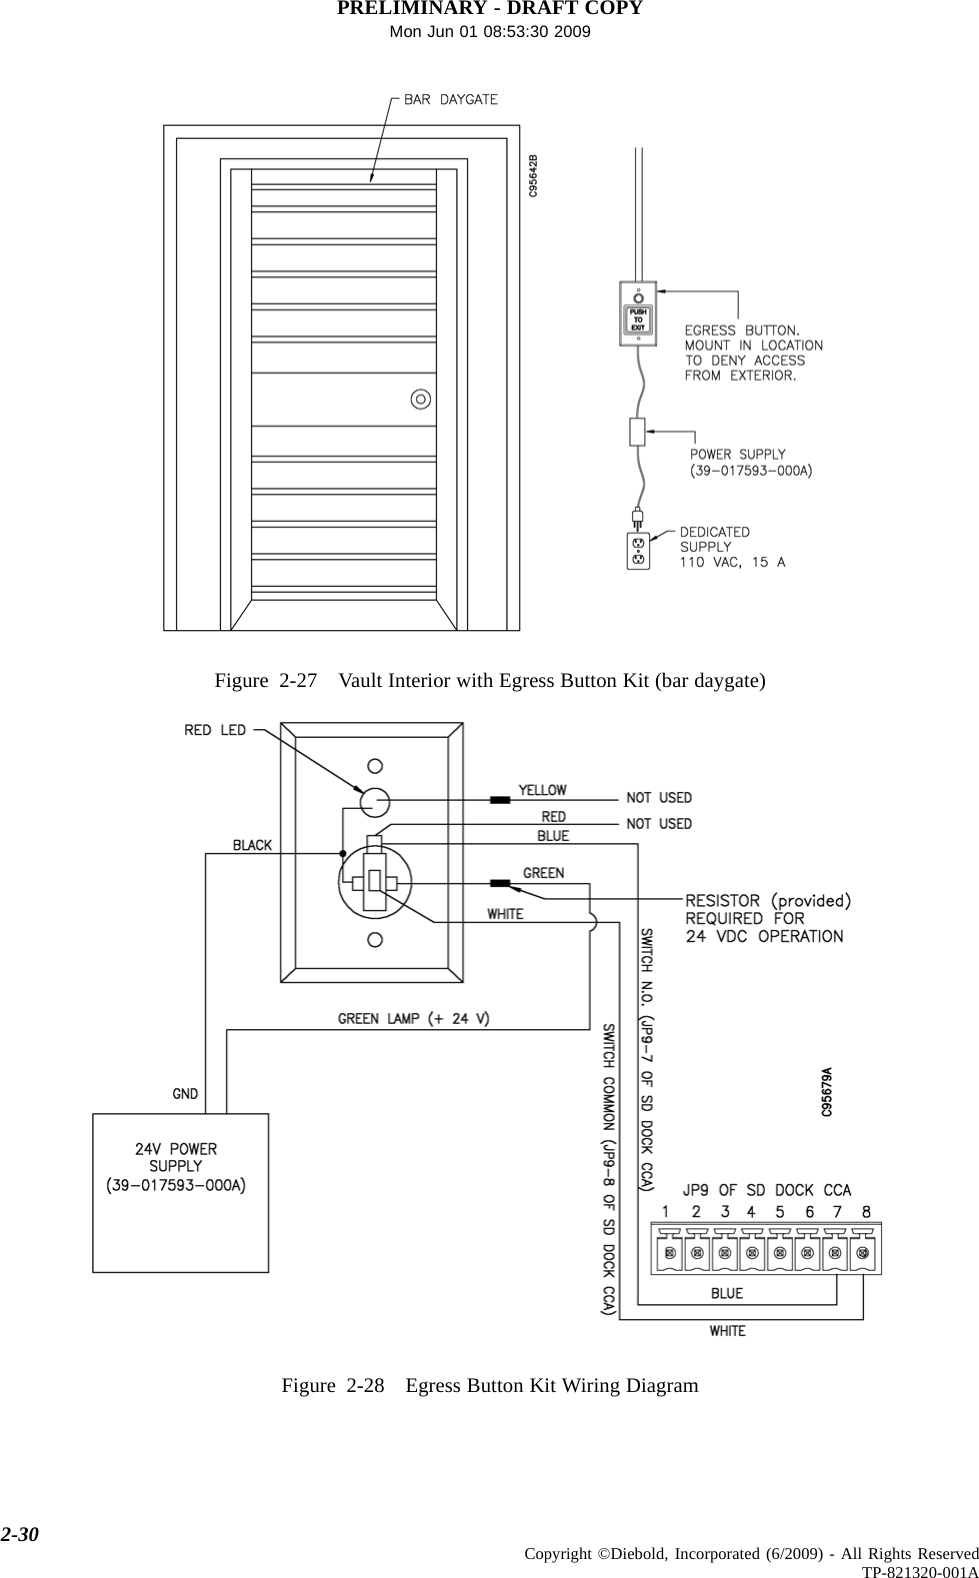
PRELIMINARY - DRAFT COPYMon Jun 01 08:53:30 2009Figure 2-25 Daygate Lock Egress Kit Wiring Diagram2.5.4 Egress Button Kit (19-042292-000A)This request to exit (REX) kit or the daygate lock egress kit (19-046487-000A)must be installed if the system will use the One At A Time Access option. Thiskit is comprised of an illuminated PUSH TO EXIT momentary release button(Figure 2-26) and a standard (NEMA) electrical box. Installation instructions areprovided with the kit. The required 24-volt power supply (39-017593-000A) isshipped separately as part of each sales order.This kit must be installed when the vault entrance is equipped with a bar-typedaygate. The egress button must be mounted at the interior of the vault at alocation beyond the reach of someone standing at the exterior of the vault(Figure 2-27).When the button is pressed, the lock is released and the display screen at thetouch screen workstation will NOT display a "vault in use" message. In thisapplication, the green PUSH TO EXIT lamp is on constant. The red LED is notoperational. See Figure 2-28 for an EVA hookup diagram.2-28 Copyright ©Diebold, Incorporated (6/2009) - All Rights ReservedTP-821320-001A
PRELIMINARY - DRAFT COPYMon Jun 01 08:53:30 2009View A Front ViewView B Rear ViewFigure 2-26 Egress Button Kit (19-042292-000A)2-29Copyright ©Diebold, Incorporated (6/2009) - All Rights ReservedTP-821320-001A
PRELIMINARY - DRAFT COPYMon Jun 01 08:53:30 2009Figure 2-27 Vault Interior with Egress Button Kit (bar daygate)Figure 2-28 Egress Button Kit Wiring Diagram2-30 Copyright ©Diebold, Incorporated (6/2009) - All Rights ReservedTP-821320-001A
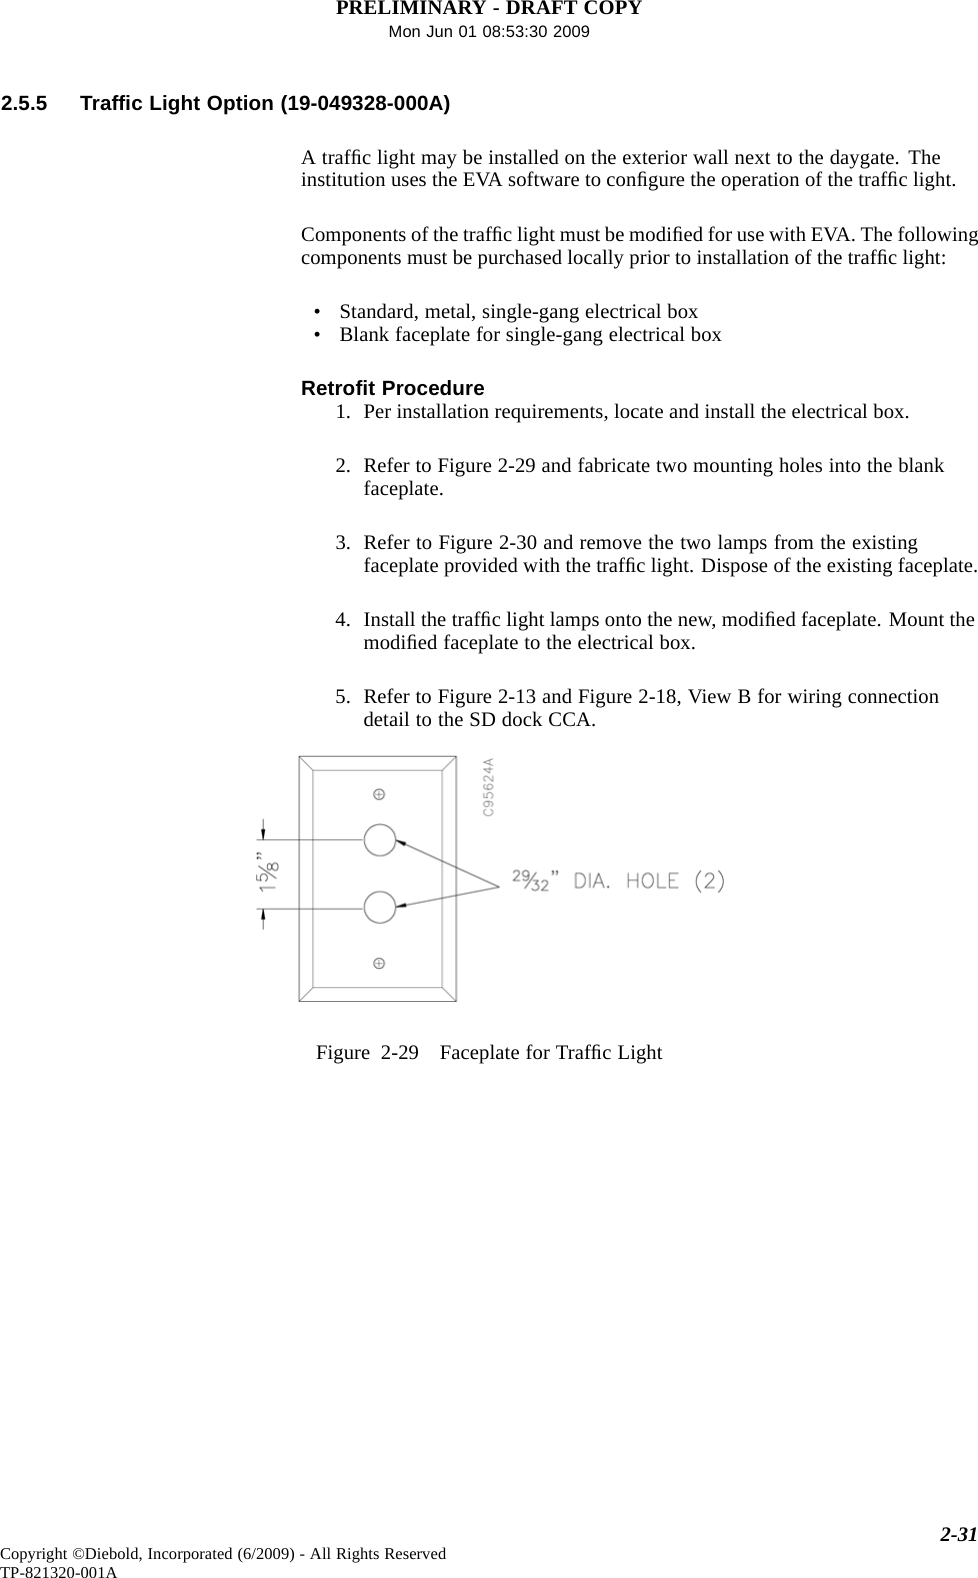
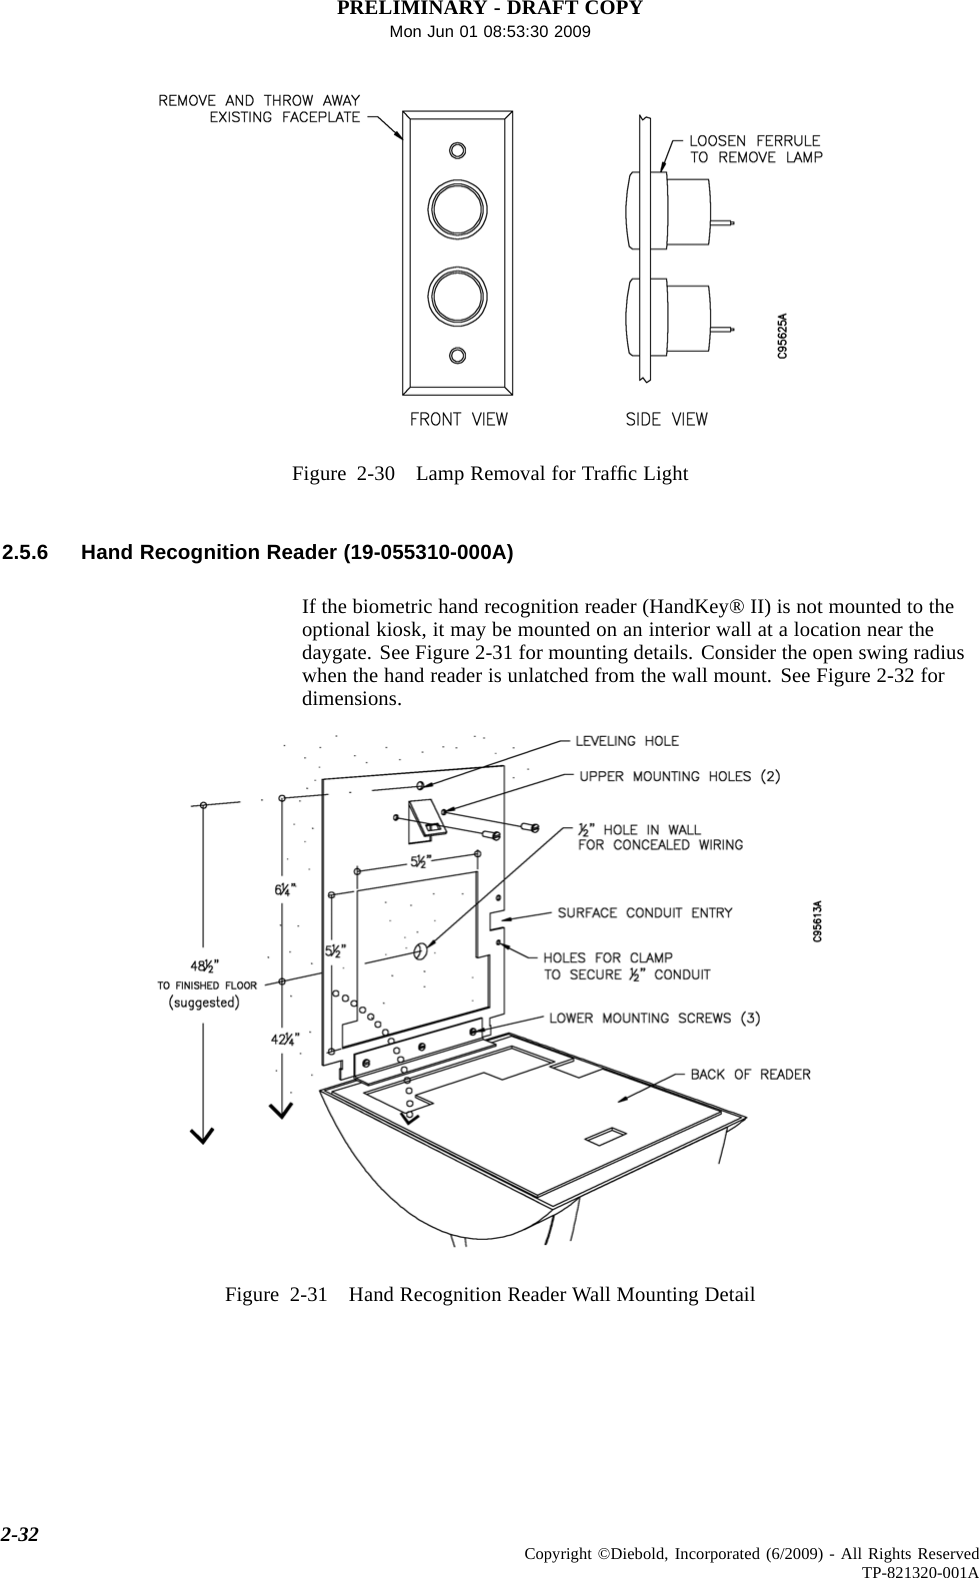
PRELIMINARY - DRAFT COPYMon Jun 01 08:53:30 20092.5.5 Traffic Light Option (19-049328-000A)Atraffic light may be installed on the exterior wall next to the daygate. Theinstitution uses the EVA software to configure the operation of the trafficlight.Components of the traffic light must be modified for use with EVA. The followingcomponents must be purchased locally prior to installation of the traffic light:• Standard, metal, single-gang electrical box• Blank faceplate for single-gang electrical boxRetrofit Procedure1. Per installation requirements, locate and install the electrical box.2. Refer to Figure 2-29 and fabricate two mounting holes into the blankfaceplate.3. Refer to Figure 2-30 and remove the two lamps from the existingfaceplate provided with the traffic light. Dispose of the existing faceplate.4. Install the traffic light lamps onto the new, modified faceplate. Mount themodified faceplate to the electrical box.5. Refer to Figure 2-13 and Figure 2-18, View B for wiring connectiondetail to the SD dock CCA.Figure 2-29 Faceplate for TrafficLight2-31Copyright ©Diebold, Incorporated (6/2009) - All Rights ReservedTP-821320-001A
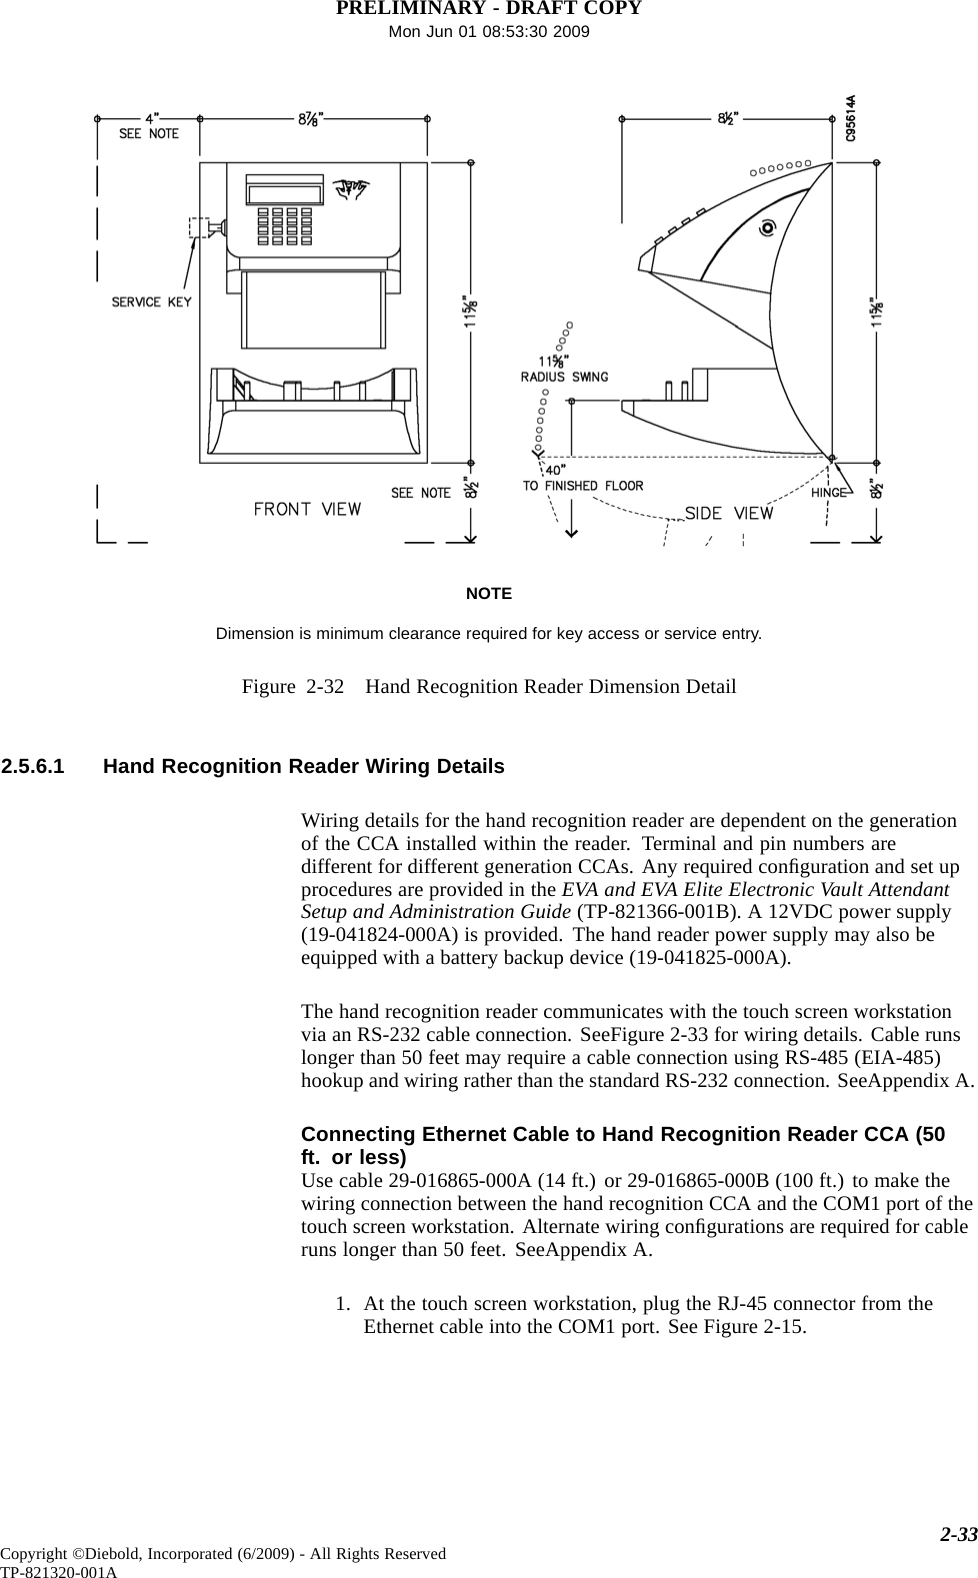
PRELIMINARY - DRAFT COPYMon Jun 01 08:53:30 2009Figure 2-30 Lamp Removal for TrafficLight2.5.6 Hand Recognition Reader (19-055310-000A)If the biometric hand recognition reader (HandKey® II) is not mounted to theoptional kiosk, it may be mounted on an interior wall at a location near thedaygate. See Figure 2-31 for mounting details. Consider the open swing radiuswhen the hand reader is unlatched from the wall mount. See Figure 2-32 fordimensions.Figure 2-31 Hand Recognition Reader Wall Mounting Detail2-32 Copyright ©Diebold, Incorporated (6/2009) - All Rights ReservedTP-821320-001A
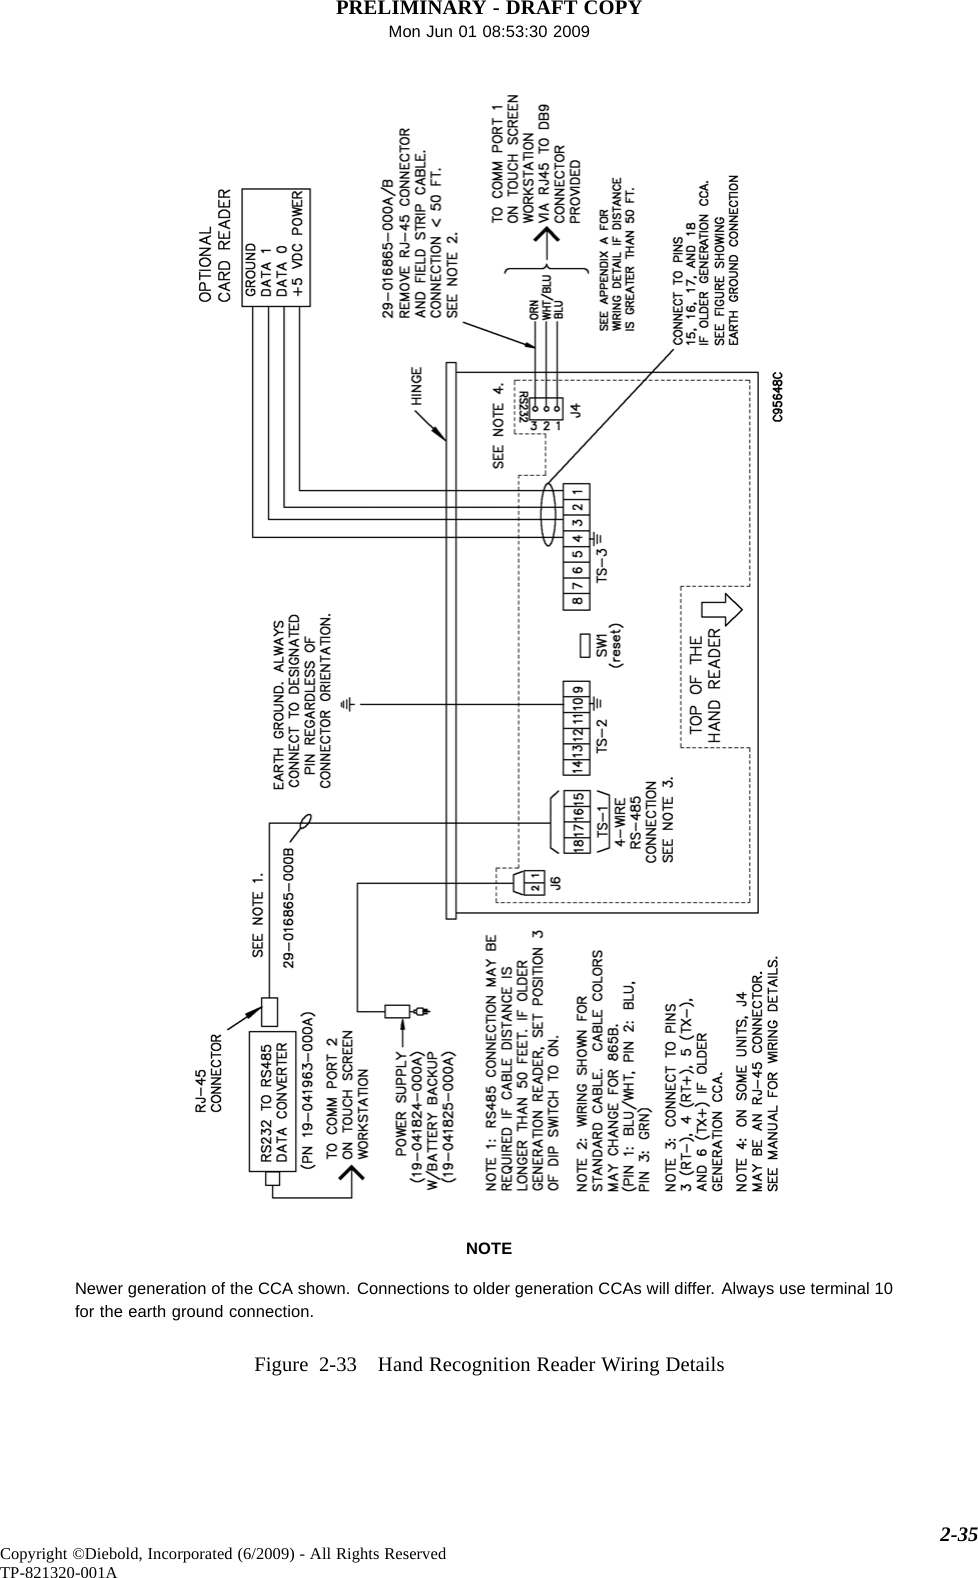
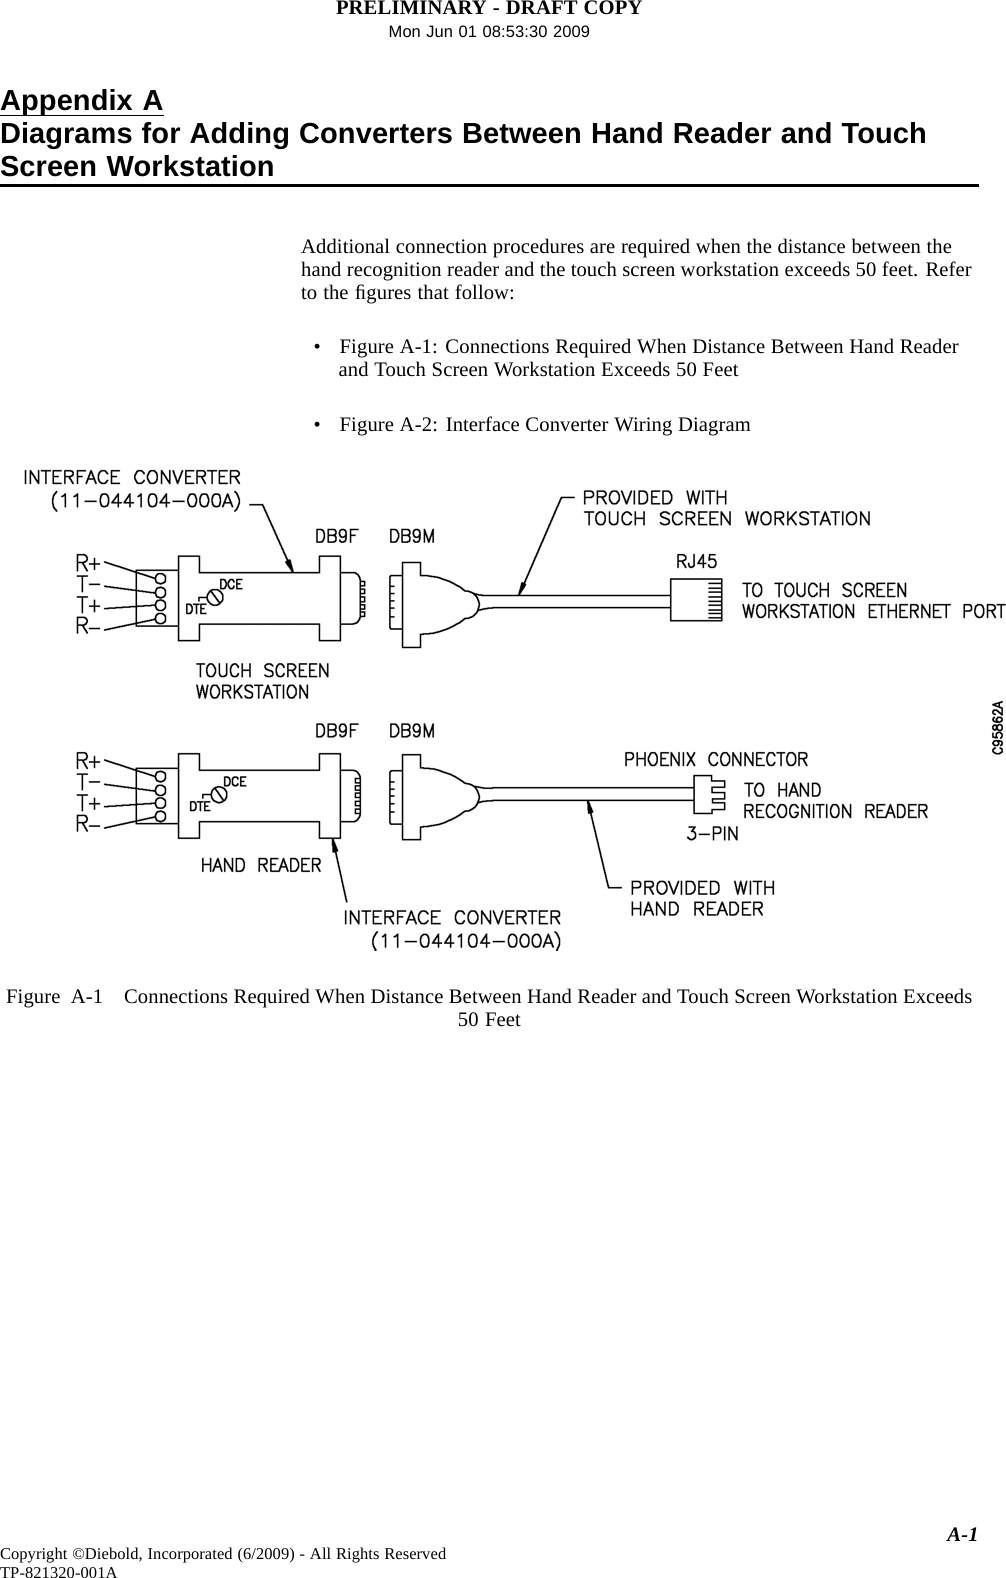
PRELIMINARY - DRAFT COPYMon Jun 01 08:53:30 2009NOTEDimension is minimum clearance required for key access or service entry.Figure 2-32 Hand Recognition Reader Dimension Detail2.5.6.1 Hand Recognition Reader Wiring DetailsWiring details for the hand recognition reader are dependent on the generationof the CCA installed within the reader. Terminal and pin numbers aredifferent for different generation CCAs. Any required configuration and set upprocedures are provided in the EVA and EVA Elite Electronic Vault AttendantSetup and Administration Guide (TP-821366-001B). A 12VDC power supply(19-041824-000A) is provided. The hand reader power supply may also beequipped with a battery backup device (19-041825-000A).The hand recognition reader communicates with the touch screen workstationvia an RS-232 cable connection. SeeFigure 2-33 for wiring details. Cable runslonger than 50 feet may require a cable connection using RS-485 (EIA-485)hookup and wiring rather than the standard RS-232 connection. SeeAppendix A.Connecting Ethernet Cable to Hand Recognition Reader CCA (50ft. or less)Use cable 29-016865-000A (14 ft.) or 29-016865-000B (100 ft.) to make thewiring connection between the hand recognition CCA and the COM1 port of thetouch screen workstation. Alternate wiring configurations are required for cableruns longer than 50 feet. SeeAppendix A.1. At the touch screen workstation, plug the RJ-45 connector from theEthernet cable into the COM1 port. See Figure 2-15.2-33Copyright ©Diebold, Incorporated (6/2009) - All Rights ReservedTP-821320-001A
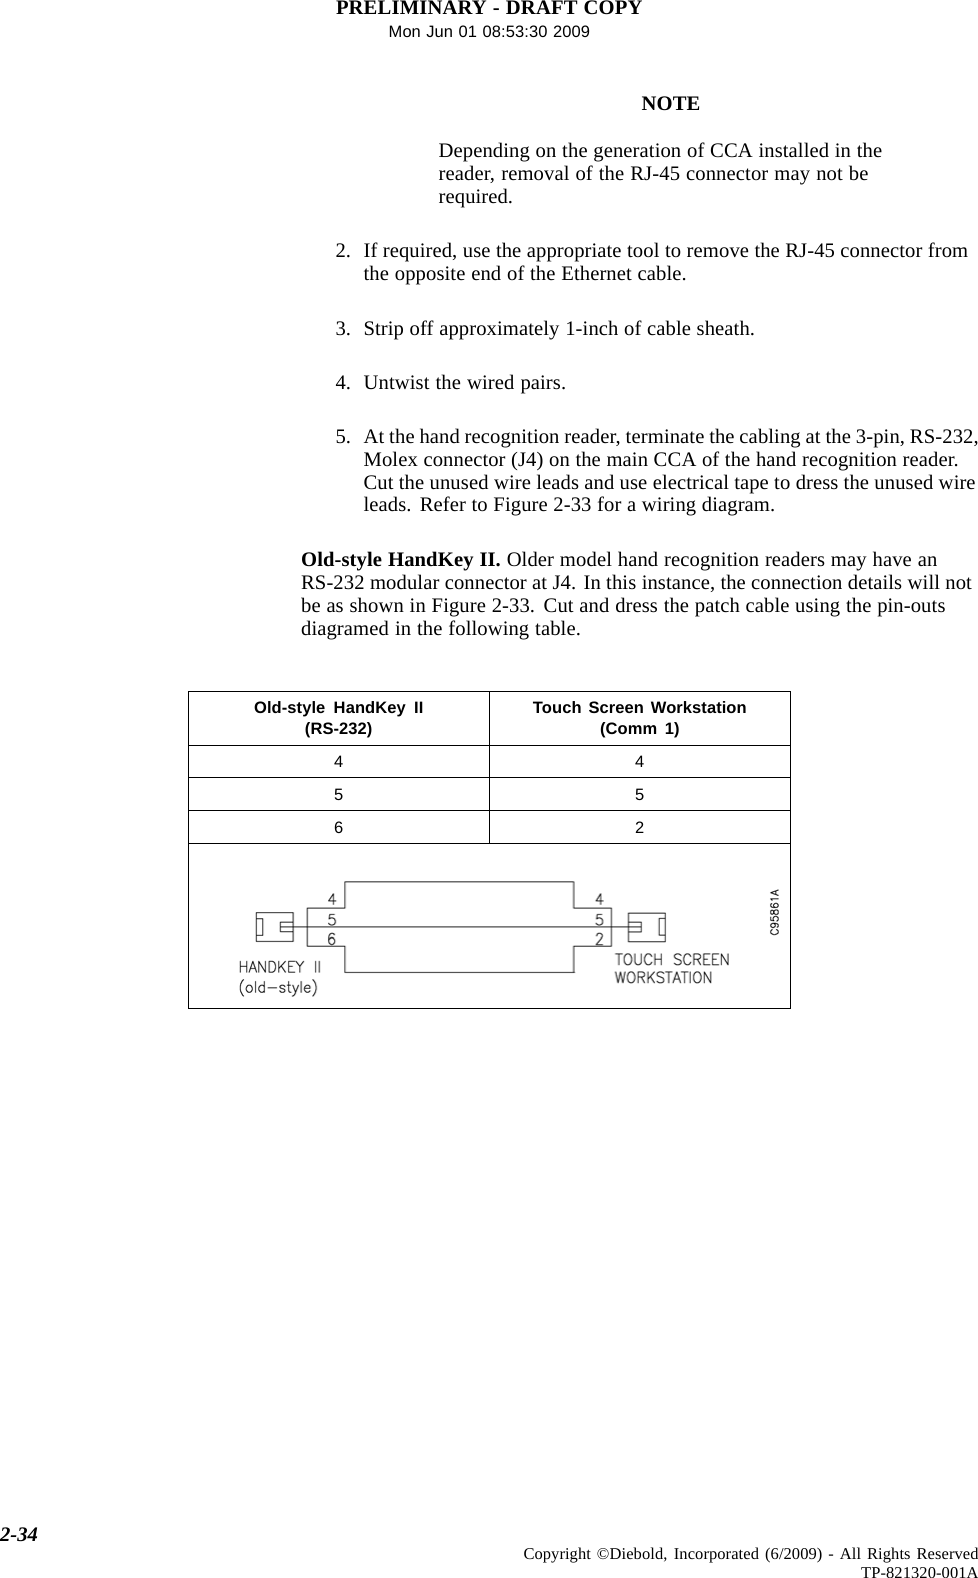
PRELIMINARY - DRAFT COPYMon Jun 01 08:53:30 2009NOTEDepending on the generation of CCA installed in thereader, removal of the RJ-45 connector may not berequired.2. If required, use the appropriate tool to remove the RJ-45 connector fromthe opposite end of the Ethernet cable.3. Strip off approximately 1-inch of cable sheath.4. Untwist the wired pairs.5. At the hand recognition reader, terminate the cabling at the 3-pin, RS-232,Molex connector (J4) on the main CCA of the hand recognition reader.Cut the unused wire leads and use electrical tape to dress the unused wireleads.RefertoFigure2-33forawiringdiagram.Old-style HandKey II. Older model hand recognition readers may have anRS-232 modular connector at J4. In this instance, the connection details will notbe as shown in Figure 2-33. Cut and dress the patch cable using the pin-outsdiagramed in the following table.Old-style HandKey II(RS-232) Touch Screen Workstation(Comm 1)4455622-34 Copyright ©Diebold, Incorporated (6/2009) - All Rights ReservedTP-821320-001A
PRELIMINARY - DRAFT COPYMon Jun 01 08:53:30 2009NOTENewer generation of the CCA shown. Connections to older generation CCAs will differ. Always use terminal 10for the earth ground connection.Figure 2-33 Hand Recognition Reader Wiring Details2-35Copyright ©Diebold, Incorporated (6/2009) - All Rights ReservedTP-821320-001A
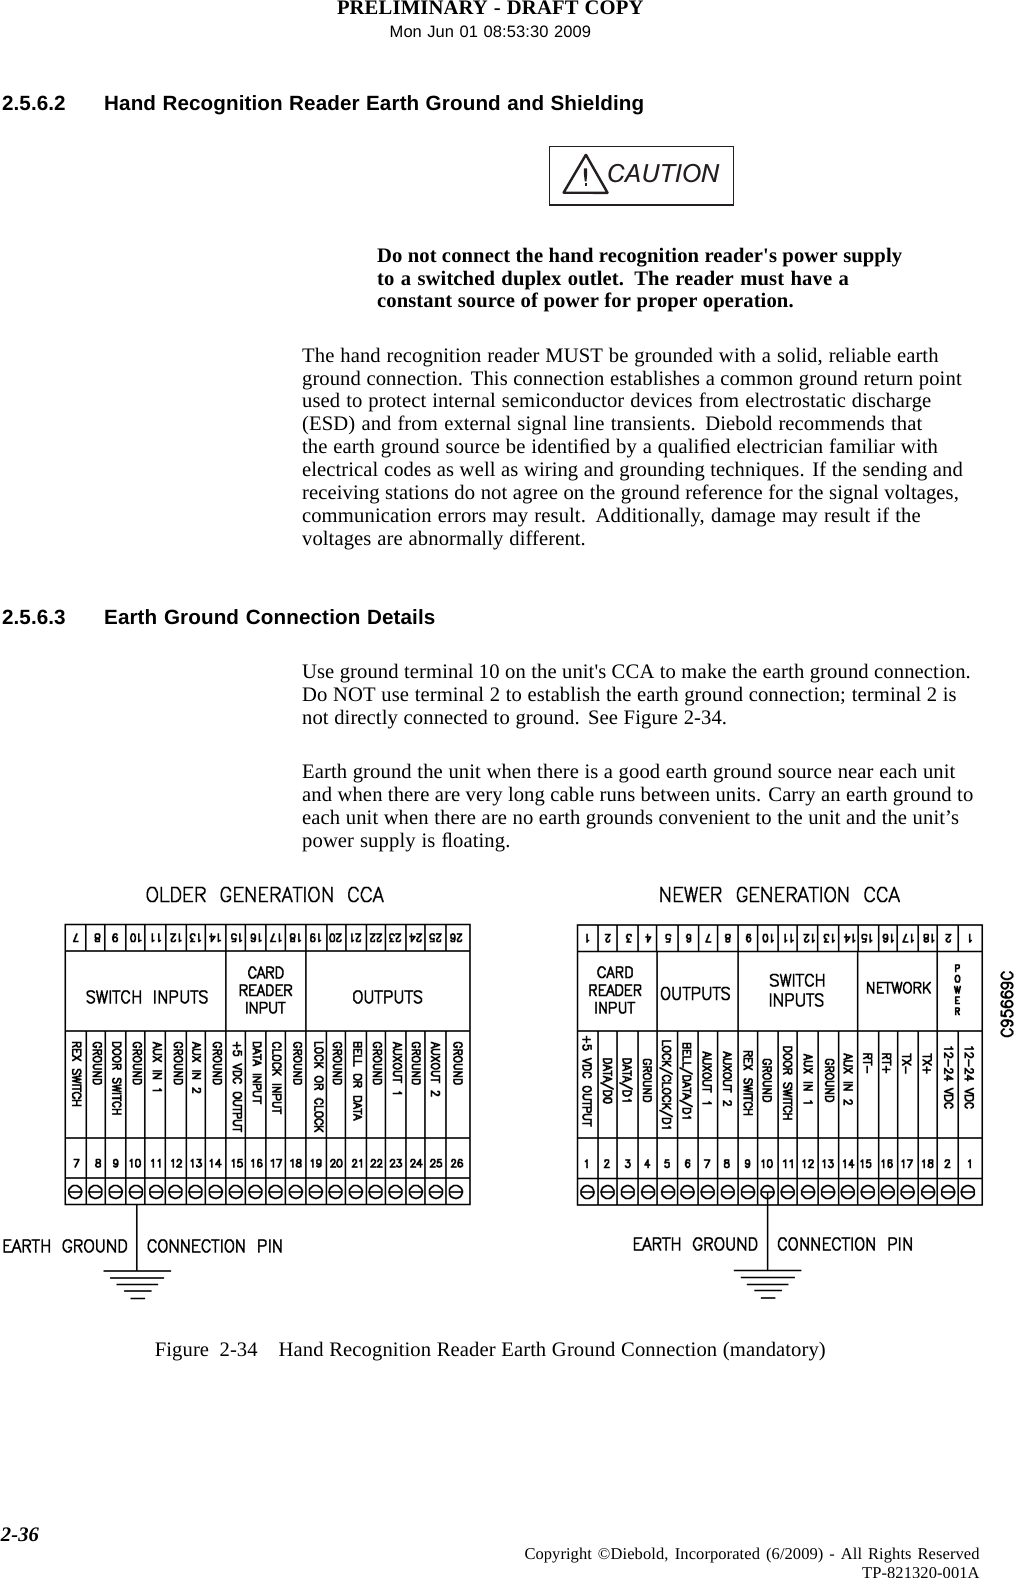
PRELIMINARY - DRAFT COPYMon Jun 01 08:53:30 20092.5.6.2 Hand Recognition Reader Earth Ground and ShieldingCAUTIONDo not connect the hand recognition reader's power supplyto a switched duplex outlet. The reader must have aconstant source of power for proper operation.The hand recognition reader MUST be grounded with a solid, reliable earthground connection. This connection establishes a common ground return pointused to protect internal semiconductor devices from electrostatic discharge(ESD) and from external signal line transients. Diebold recommends thatthe earth ground source be identified by a qualified electrician familiar withelectrical codes as well as wiring and grounding techniques. If the sending andreceiving stations do not agree on the ground reference for the signal voltages,communication errors may result. Additionally, damage may result if thevoltages are abnormally different.2.5.6.3 Earth Ground Connection DetailsUse ground terminal 10 on the unit's CCA to make the earth ground connection.Do NOT use terminal 2 to establish the earth ground connection; terminal 2 isnot directly connected to ground. See Figure 2-34.Earth ground the unit when there is a good earth ground source near each unitand when there are very long cable runs between units. Carry an earth ground toeach unit when there are no earth grounds convenient to the unit and the unit’spower supply is floating.Figure 2-34 Hand Recognition Reader EarthGroundConnection(mandatory)2-36 Copyright ©Diebold, Incorporated (6/2009) - All Rights ReservedTP-821320-001A
PRELIMINARY - DRAFT COPYMon Jun 01 08:53:30 2009Earth GroundOne method of establishing a ground reference is to connect each unit’s mainboard ground to earth ground. Earth ground is found on the third pin on standardAC line sockets (round one in the middle). If the building wiring is functioningcorrectly, this should be a low-impedance path to a true ground.2.5.6.4 Hand Recognition Reader Battery Backup OptionAs an option, a field-installed kit (19-041825-000A) is available to provide andcontrol battery backup for the hand recognition reader.OperationThe switch to battery power is automatic and occurs when the input voltage fallsto about 10.5 volts. When input power is restored, the unit switches off of batteryoperation and the battery charger is re-enabled to recharge the battery. Generally,a fully-charged battery will provide approximately two hours of operation.Components and InstallationIn addition to installation instructions, the following items ship with the batterybackup kit and are installed internally on the hand recognition reader:• Power fail PCB. Using standoffs and nuts provided, P8 of this PCB isplugged into J8 on the underside of the main PCB.• 2-pin, plastic jumper. This jumper is installed on J7 of the main PCB.• 12-volt, sealed lead acid battery. The battery is mounted internally into thechassis provided. The battery plug is connected to J4 on the main PCB.Refer to the instructions that ship with the kit for complete installationprocedures, warnings, and guidelines.2.5.6.5 Setting Communication Method DIP Switch (older generation readers)Older-generation hand recognition readers are equipped with a 5-position DIPswitch (S1). As default, position 3 of this DIP switch is set to the OFF positionfor RS-232 communication. If the hand reader is using RS-485 cabling forconnection to the touch screen workstation, you must reset position 3 of thisDIP switch to the ON position. Generally, all other switch positions will beset to the OFF position.Newer-generation hand recognition readers are not equipped with a DIP switch.2-37Copyright ©Diebold, Incorporated (6/2009) - All Rights ReservedTP-821320-001A
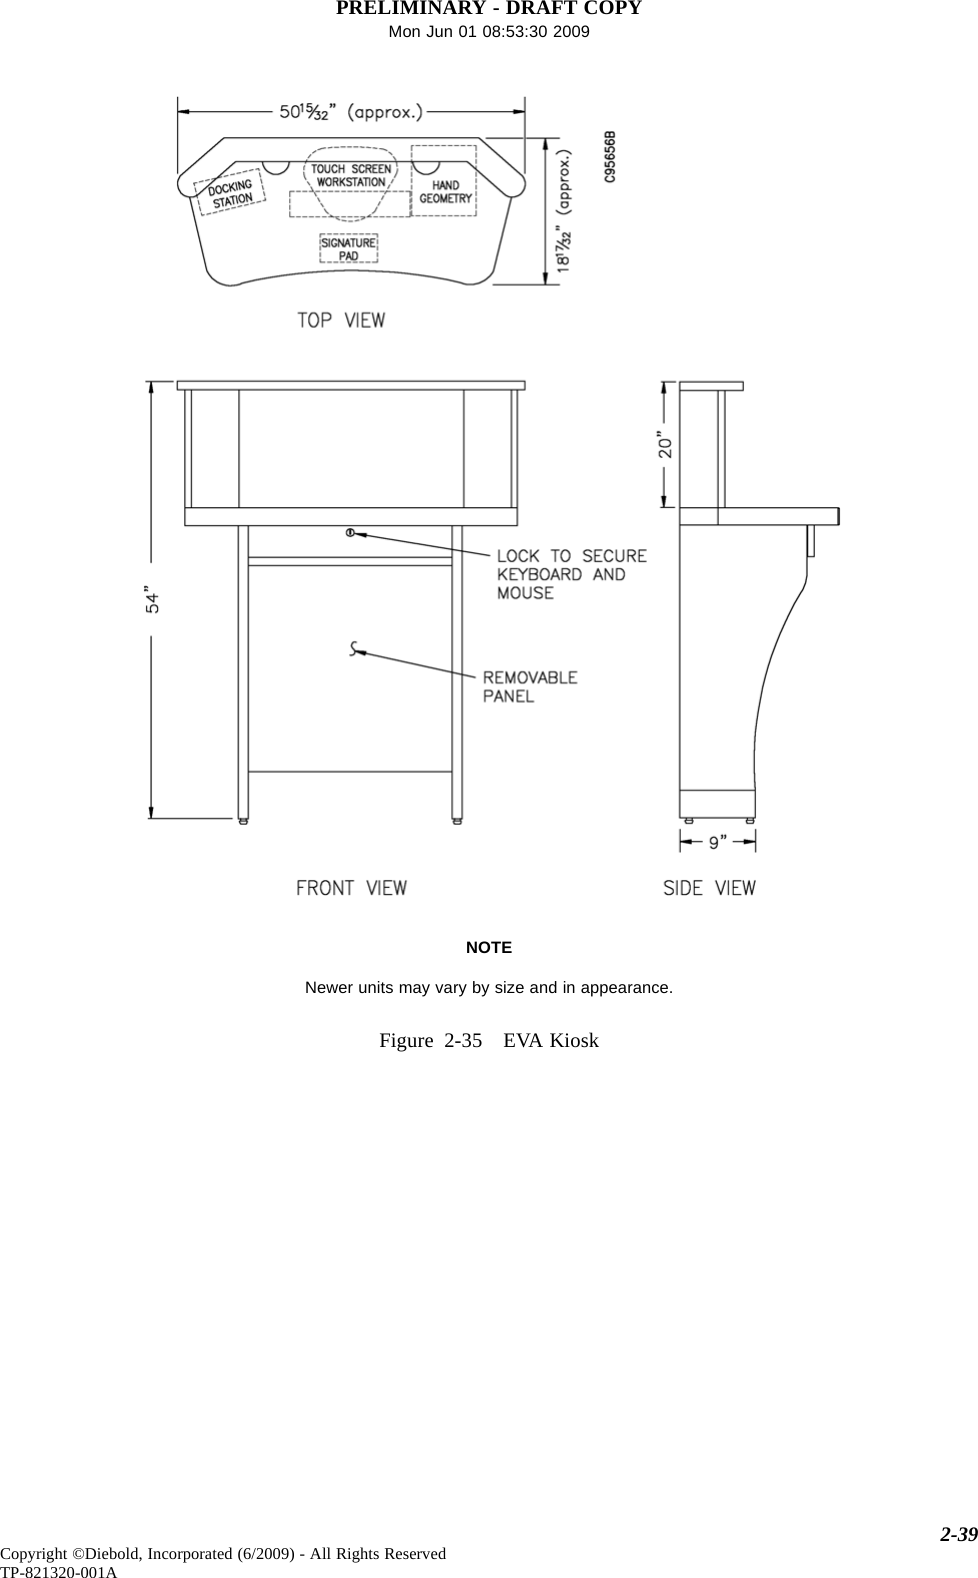
PRELIMINARY - DRAFT COPYMon Jun 01 08:53:30 20092.5.7 Signature Capture Pad (option)As an option, a signature capture device may be installed on the countertop inthe area near the touch screen workstation. This device interfaces with the touchscreen workstation via USB 2.0 cable (provided). This device is not connected toan AC power source. Two styles of signature capture pads are available:• Signaturepad,1x5(economy):49-224003-000A• Signature pad, 1 x 5, LCD: 49-224004-000A2.6 EVA Kiosk (41-021255-000A)The optional EVA kiosk (Figure 2-35) is installed at a location near the vaultentrance. The EVA kiosk is pedestal desk designed to support input devices (forexample, touch screen workstation and hand geometry reader) that will be usedby the institution's customers. The EVA kiosk is equipped with a locked drawerto secure the keyboard and mouse. The unit is also equipped with a removablepanel to provide access to cables and electrical outlets.2-38 Copyright ©Diebold, Incorporated (6/2009) - All Rights ReservedTP-821320-001A
PRELIMINARY - DRAFT COPYMon Jun 01 08:53:30 2009NOTENewer units may vary by size and in appearance.Figure 2-35 EVA Kiosk2-39Copyright ©Diebold, Incorporated (6/2009) - All Rights ReservedTP-821320-001A
PRELIMINARY - DRAFT COPYMon Jun 01 08:53:30 20092-40 Copyright ©Diebold, Incorporated (6/2009) - All Rights ReservedTP-821320-001A
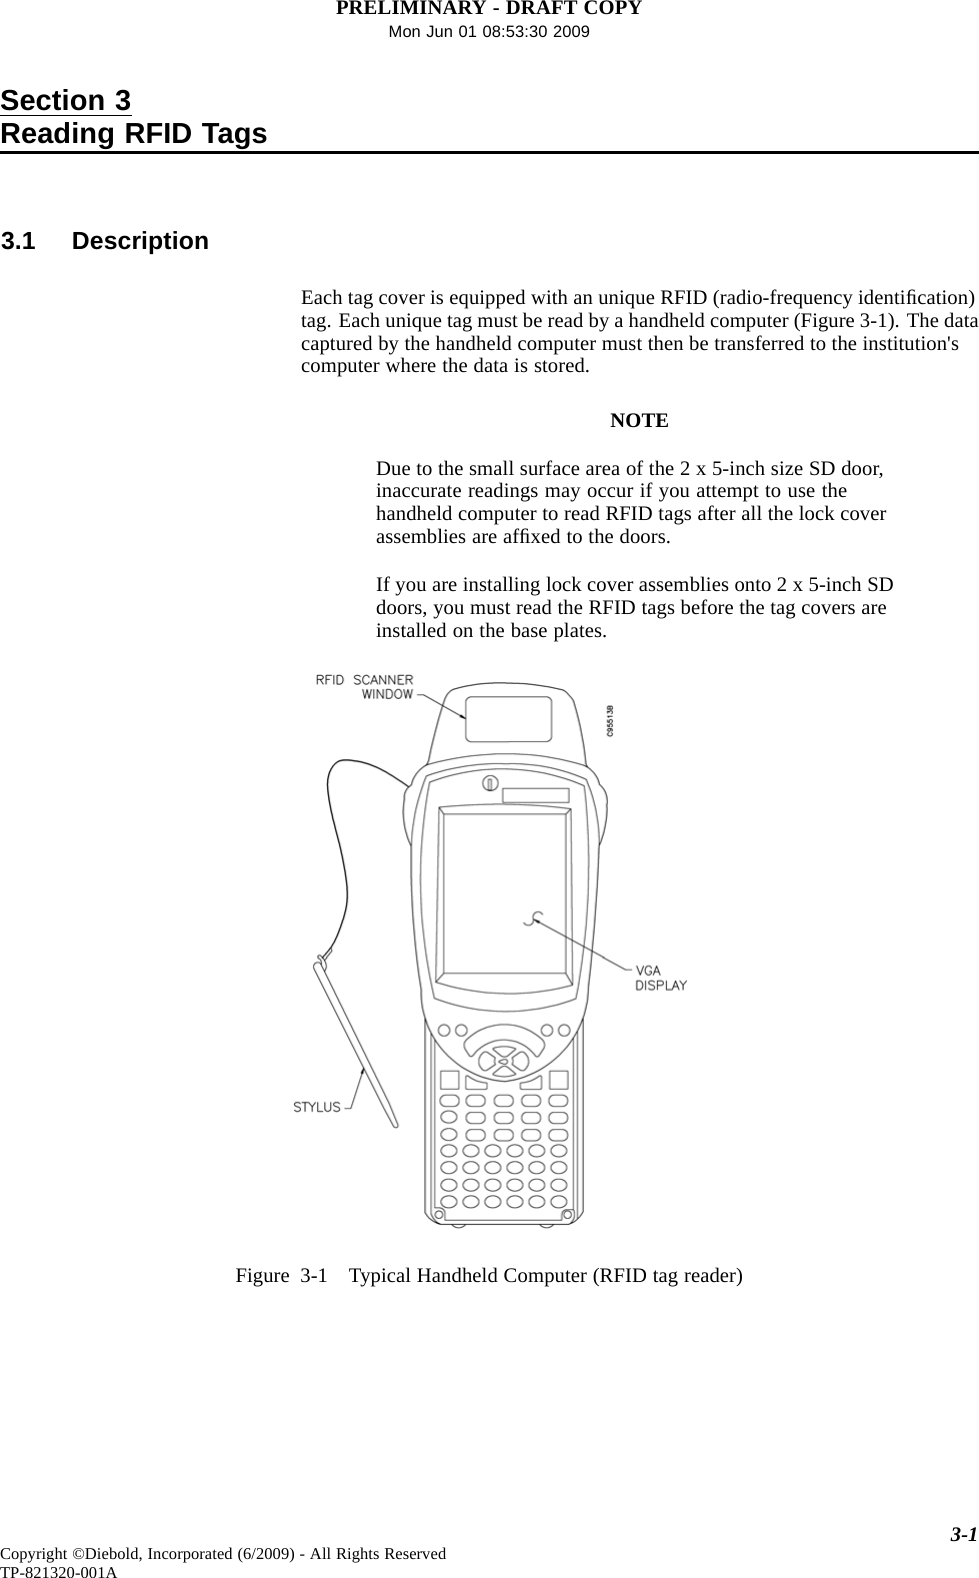
PRELIMINARY - DRAFT COPYMon Jun 01 08:53:30 2009Section 3Reading RFID Tags3.1 DescriptionEach tag cover is equipped with an unique RFID (radio-frequency identification)tag. Each unique tag must be read by a handheld computer (Figure 3-1). The datacaptured by the handheld computer must then be transferred to the institution'scomputer where the data is stored.NOTEDue to the small surface area of the 2 x 5-inch size SD door,inaccurate readings may occur if you attempt to use thehandheld computer to read RFID tags after all the lock coverassemblies are affixed to the doors.If you are installing lock coverassembliesonto2x5-inchSDdoors, you must read the RFID tags before the tag covers areinstalled on the base plates.Figure 3-1 Typical Handheld Computer (RFID tag reader)3-1Copyright ©Diebold, Incorporated (6/2009) - All Rights ReservedTP-821320-001A
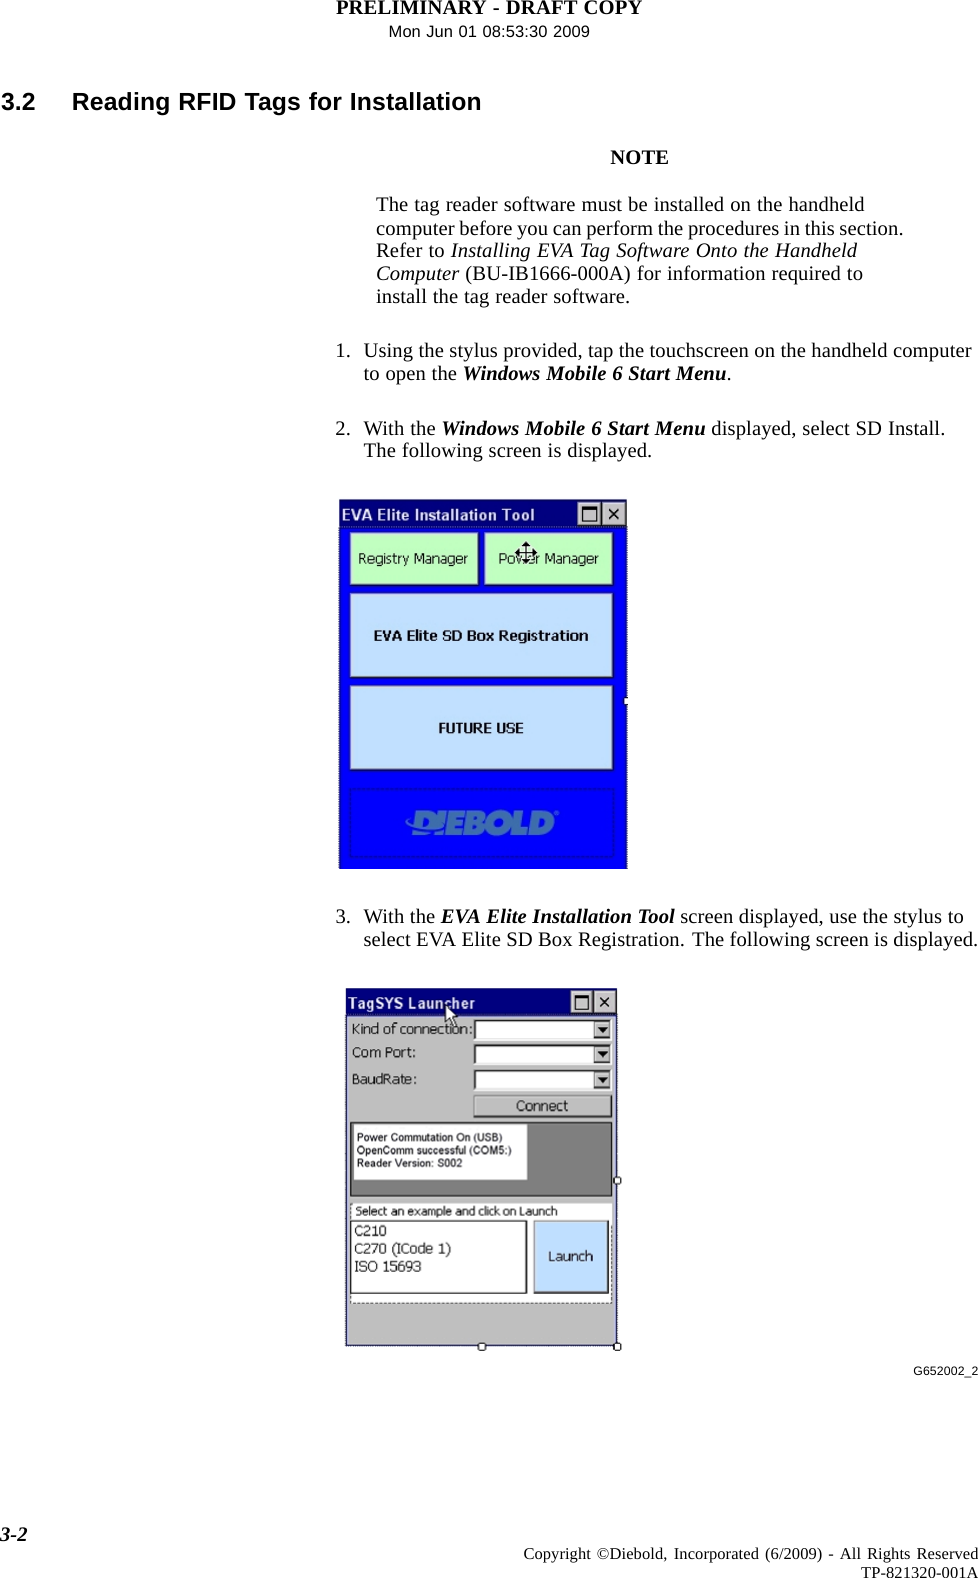
PRELIMINARY - DRAFT COPYMon Jun 01 08:53:30 20093.2 Reading RFID Tags for InstallationNOTEThe tag reader software must be installed on the handheldcomputer before you can perform the procedures in this section.Refer to Installing EVA Tag Software Onto the HandheldComputer (BU-IB1666-000A) for information required toinstall the tag reader software.1. Using the stylus provided, tap the touchscreen on the handheld computerto open the Windows Mobile 6 Start Menu.2. With the Windows Mobile 6 Start Menu displayed, select SD Install.The following screen is displayed.3. With the EVA Elite Installation Tool screen displayed, use the stylus toselect EVA Elite SD Box Registration. The following screen is displayed.G652002_23-2 Copyright ©Diebold, Incorporated (6/2009) - All Rights ReservedTP-821320-001A
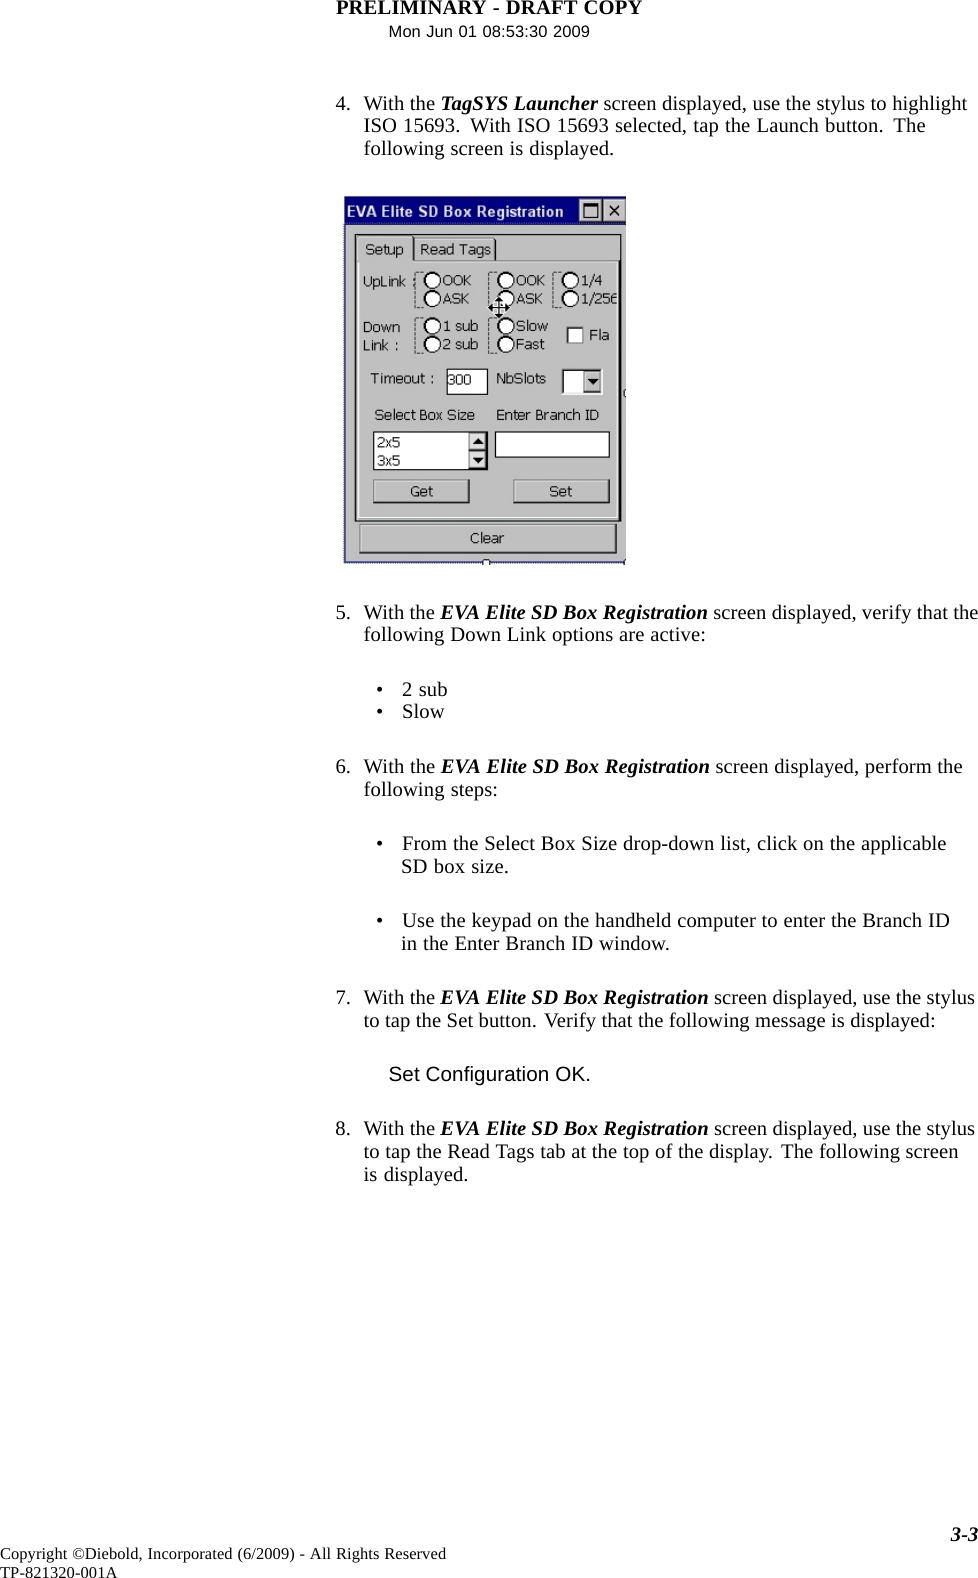
PRELIMINARY - DRAFT COPYMon Jun 01 08:53:30 20094. With the TagSYS Launcher screen displayed, use the stylus to highlightISO 15693. With ISO 15693 selected, tap the Launch button. Thefollowing screen is displayed.5. With the EVA Elite SD Box Registration screen displayed, verify that thefollowing Down Link options are active:•2sub•Slow6. With the EVA Elite SD Box Registration screen displayed, perform thefollowing steps:• From the Select Box Size drop-down list, click on the applicableSD box size.• Use the keypad on the handheld computer to enter the Branch IDin the Enter Branch ID window.7. With the EVA Elite SD Box Registration screen displayed, use the stylusto tap the Set button. Verify that the following message is displayed:Set Configuration OK.8. With the EVA Elite SD Box Registration screen displayed, use the stylusto tap the Read Tags tab at the top of the display. The following screenis displayed.3-3Copyright ©Diebold, Incorporated (6/2009) - All Rights ReservedTP-821320-001A
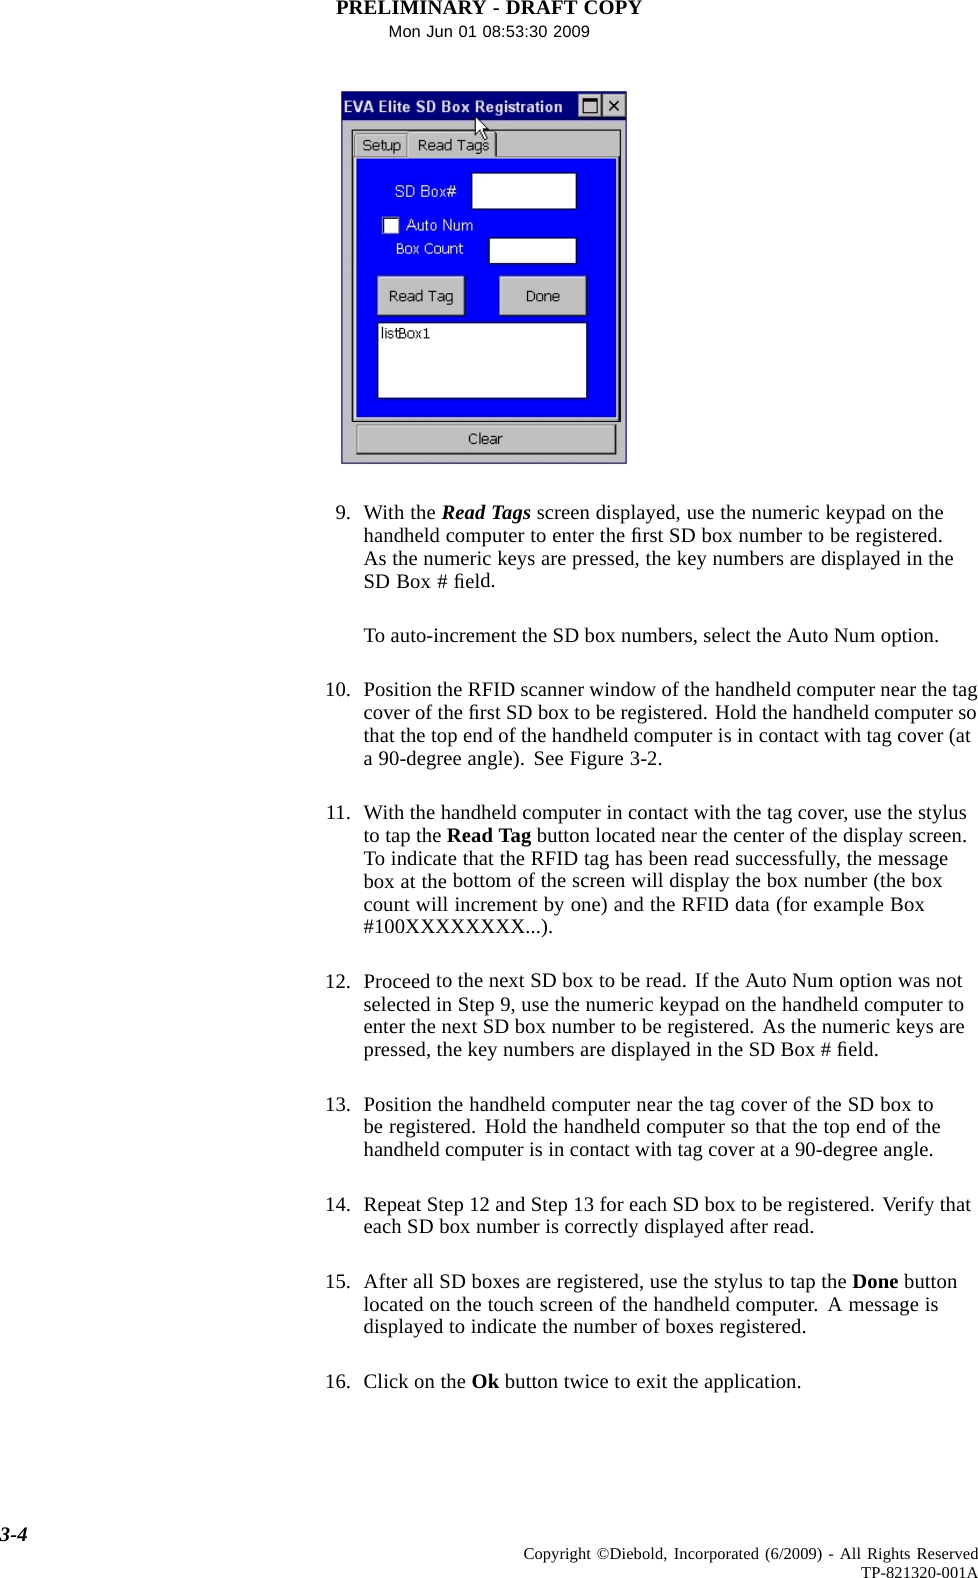
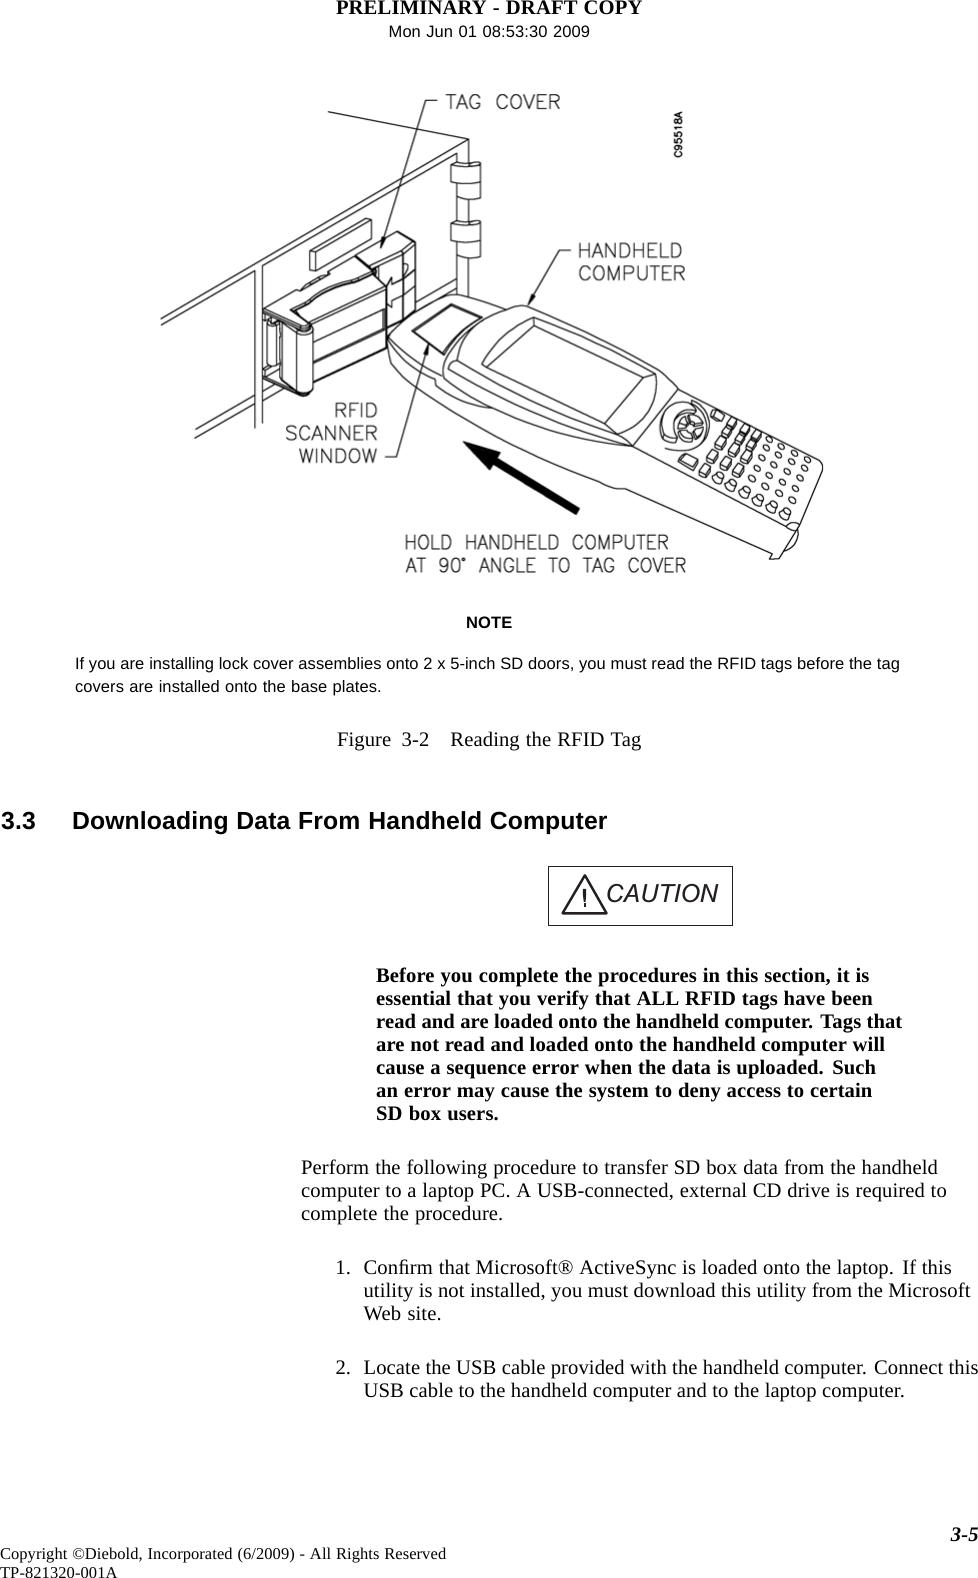
PRELIMINARY - DRAFT COPYMon Jun 01 08:53:30 20099. With the ReadTagsscreen displayed, use the numeric keypad on thehandheld computer to enter the first SD box number to be registered.As the numeric keys are pressed, the key numbers are displayed in theSD Box # field.To auto-increment the SD box numbers, select the Auto Num option.10. Position the RFID scanner window of the handheld computer near the tagcover of thefirst SD box to be registered. Hold the handheld computer sothat the top end of the handheld computer is in contact with tag cover (ata 90-degree angle). See Figure 3-2.11. With the handheld computer in contact with the tag cover, use the stylusto tap the Read Tag button located near the center of the display screen.To indicate that the RFID tag has been read successfully, the messagebox at the bottom of the screen will display the box number (the boxcount will increment by one) and the RFID data (for example Box#100XXXXXXXX...).12. Proceed to the next SD box to be read. If the Auto Num option was notselected in Step 9, use the numeric keypad on the handheld computer toenter the next SD box number to be registered. As the numeric keys arepressed, the key numbers are displayed in the SD Box # field.13. Position the handheld computer near the tag cover of the SD box tobe registered. Hold the handheld computer so that the top end of thehandheld computer is in contact with tag cover at a 90-degree angle.14. Repeat Step 12 and Step 13 for each SD box to be registered. Verify thateach SD box number is correctly displayed after read.15. After all SD boxes are registered, use the stylus to tap the Done buttonlocated on the touch screen of the handheld computer. A message isdisplayed to indicate the number of boxes registered.16. Click ontheOk button twice to exit the application.3-4 Copyright ©Diebold, Incorporated (6/2009) - All Rights ReservedTP-821320-001A
PRELIMINARY - DRAFT COPYMon Jun 01 08:53:30 2009NOTEIf you are installing lock cover assemblies onto 2 x 5-inch SD doors, you must read the RFID tags before the tagcovers are installed onto the base plates.Figure 3-2 Reading the RFID Tag3.3 Downloading Data From Handheld ComputerCAUTIONBefore you complete the procedures in this section, it isessential that you verify that ALL RFID tags have beenread and are loaded onto the handheld computer. Tags thatare not read and loaded onto the handheld computer willcause a sequence error when the data is uploaded. Suchan error may cause the system to deny access to certainSD box users.Perform the following procedure to transfer SD box data from the handheldcomputer to a laptop PC. A USB-connected, external CD drive is required tocomplete the procedure.1. Confirm that Microsoft® ActiveSync is loaded onto the laptop. If thisutility is not installed, you must download this utility from the MicrosoftWeb site.2. Locate the USB cable provided with the handheld computer. Connect thisUSB cable to the handheld computer and to the laptop computer.3-5Copyright ©Diebold, Incorporated (6/2009) - All Rights ReservedTP-821320-001A
PRELIMINARY - DRAFT COPYMon Jun 01 08:53:30 20093. Using the ActiveSync utility, download the *.csv file from the handheldcomputer to the laptop. The *.csv file contains the SD box data thatwill eventually be loaded into the EVA database on the touch screenworkstation.4. Using your laptop PC, copy the SDBoxData.txt file to a CD.5. Refer to EVA and EVA Elite Electronic Vault Attendant Setup andAdministration Guide (TP-821366-001B) for procedures required totransfer the *.csv file to the EVA touch screen workstation.3-6 Copyright ©Diebold, Incorporated (6/2009) - All Rights ReservedTP-821320-001A
PRELIMINARY - DRAFT COPYMon Jun 01 08:53:30 2009Section 4Parts ListingRefer to Table 4-1 for a listing of parts that may be required during the installationprocess.4-1Copyright ©Diebold, Incorporated (6/2009) - All Rights ReservedTP-821320-001A
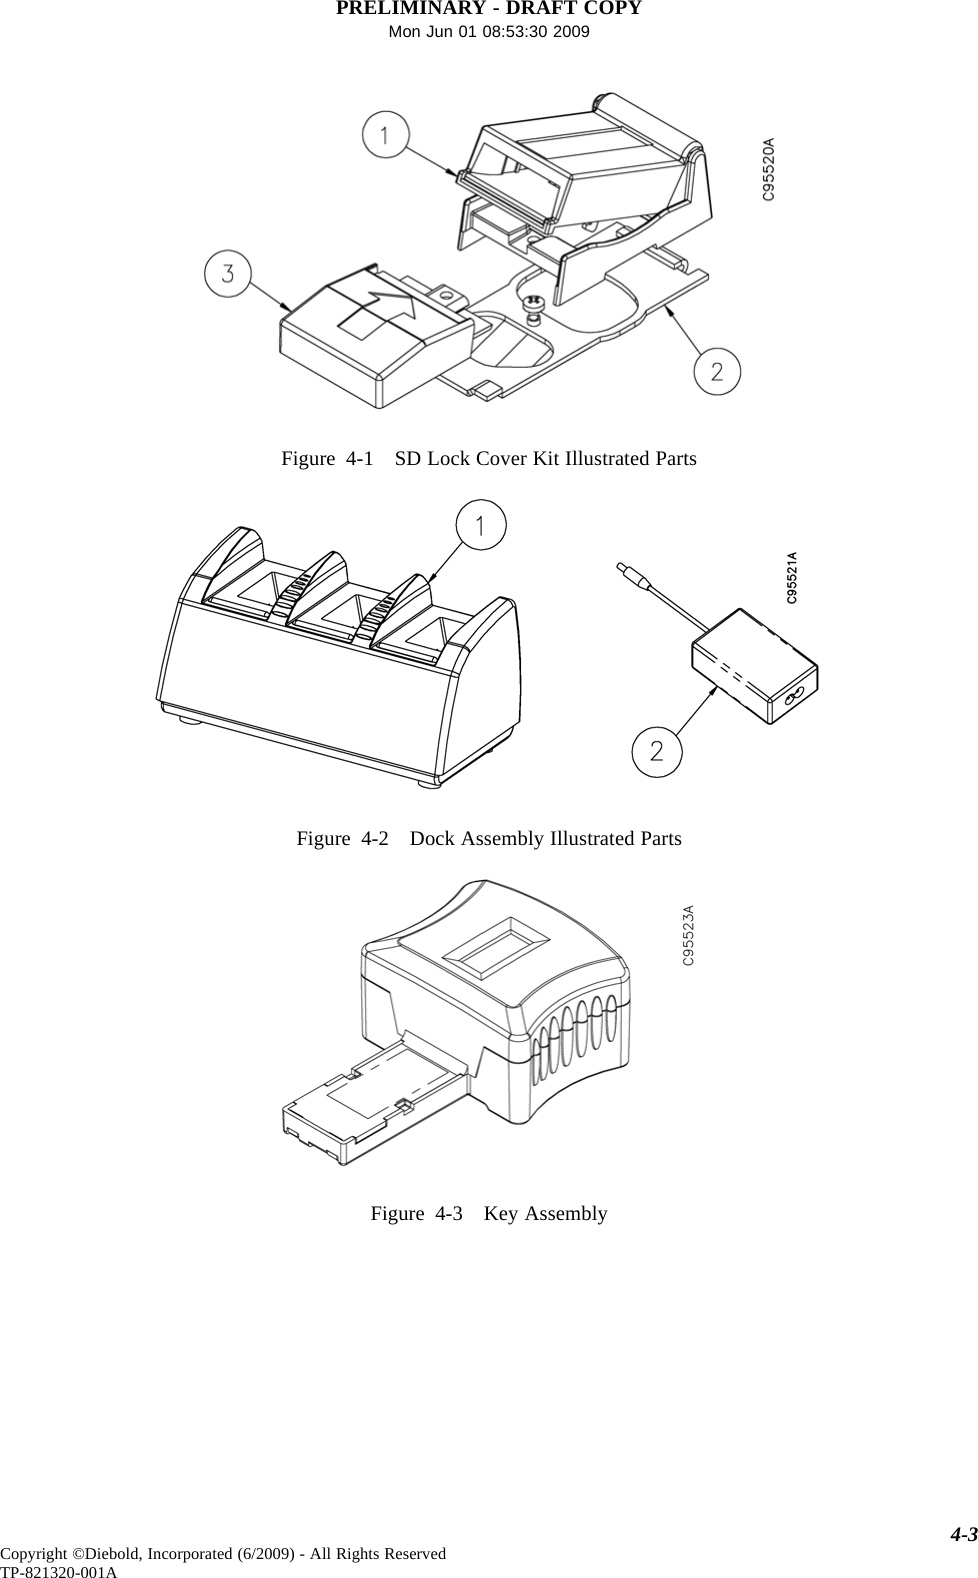
PRELIMINARY - DRAFT COPYMon Jun 01 08:53:30 2009Table4-1 PartsListingFigure/Item Description Part Number Qty.Figure 4-1 SD lock cover kit 41-021050-000A 11 Lock cover assembly 41-020895-000A 12Base plate, w/mounting screw 41-020897-000A 13 Tag cover 41-020896-000A 1Figure 4-21 Dock assembly 41-020278-000A 12 Power supply, swtchr., 9.0V, 3.9 A, desktop 49-223783-000A 1not shown Cable, logic, USB, A-B, 78-3/4" 49-211496-000B 1Figure 4-3 Key Assembly 41-020285-000A 1Figure 3-1 EVA handheld computer[1] 41-021685-000A 1Figure 4-4 Kit, installation template[2] 41-021051-000A 11 Template, 5-inch door 41-021048-000A 12 Template, 7-inch door 41-021048-000B 13 Template, 10-inch door 41-021048-000C 1not shown SD number labels, adhesive, roll of 250 (1 through 250) 11-034642-000A 1not shown SD number labels, adhesive, roll of 250 (251 through 500) 11-034642-000B 1not shown SD number labels, adhesive, roll of 250 (501 through 750) 11-034642-000C 1not shown SD number labels, adhesive, roll of 250 (751 through 1000) 11-034642-000D 1Figure 2-14 Touch screen workstation 41-021181-000A 1Figure 2-19 Uninterruptible power supply 39-017425-000A 1Figure 2-21 Door strike kit[3] 19-042286-000A 1Figure 2-23 Door closure kit 19-048488-000A 1Figure 2-25 Daygate lockset egress kit 19-046487-000A 1Figure 2-26 Egress button kit 19-042292-000A 1Figure 2-31 Hand recognition reader 19-055310-000A 1not shown Power supply, hand recognition reader[4] 19-041824-000A 1not shown Battery backup, hand recognition reader 19-041825-000A 1Figure 2-30 Traffic light 19-049328-000A 1not shown Signature pad, 1 x 5, economy 49-224003-000A 1not shown Signature pad, 1 x 5, LCD 49-224004-000A 1Figure 2-35 Kiosk 41-021255-000A 1Figure 4-5 USB cable extender/adapter[5] 49-226161-000A --Figure 4-6 USB hub, 4-port, self-powered, 2.0[6] 49-226162-000A --[1] Part number for EVA scanner kit which is part of the tool loaner program. Part number includes the Psion TeklogixWorkabout Pro G2 handheld computer and an installation CD containing the EVA handheld software (tag reader).[2] Templates have been designed for use with Diebold 5-inch, 7-inch, and 10-inch SD doors. If you are installing baseplates onto SD doors not manufactured by Diebold, use a plumb-bob or laser level to ensure proper alignment.[3] Includes door strike w/prep faceplate, latch bolt, mounting box, and hardware.[4] Housed locally within the Handkey reader. Charging power provided by the wall outlet power supply.[5] Extends distance of USB device from a USB-enabled computer up to 150 ft.[6] Powered by USB 2.0 upstream connection to USB port of touch screen workstation (3 ft. cable provided).Optional 5V, 2A power adapter must be purchased separately.4-2 Copyright ©Diebold, Incorporated (6/2009) - All Rights ReservedTP-821320-001A
PRELIMINARY - DRAFT COPYMon Jun 01 08:53:30 2009Figure 4-1 SD Lock Cover Kit Illustrated PartsFigure 4-2 Dock Assembly Illustrated PartsFigure 4-3 Key Assembly4-3Copyright ©Diebold, Incorporated (6/2009) - All Rights ReservedTP-821320-001A
PRELIMINARY - DRAFT COPYMon Jun 01 08:53:30 2009Figure 4-4 Installation TemplatesFigure 4-5 USB Adapter/ExtenderFigure 4-6 4-port USB Hub4-4 Copyright ©Diebold, Incorporated (6/2009) - All Rights ReservedTP-821320-001A
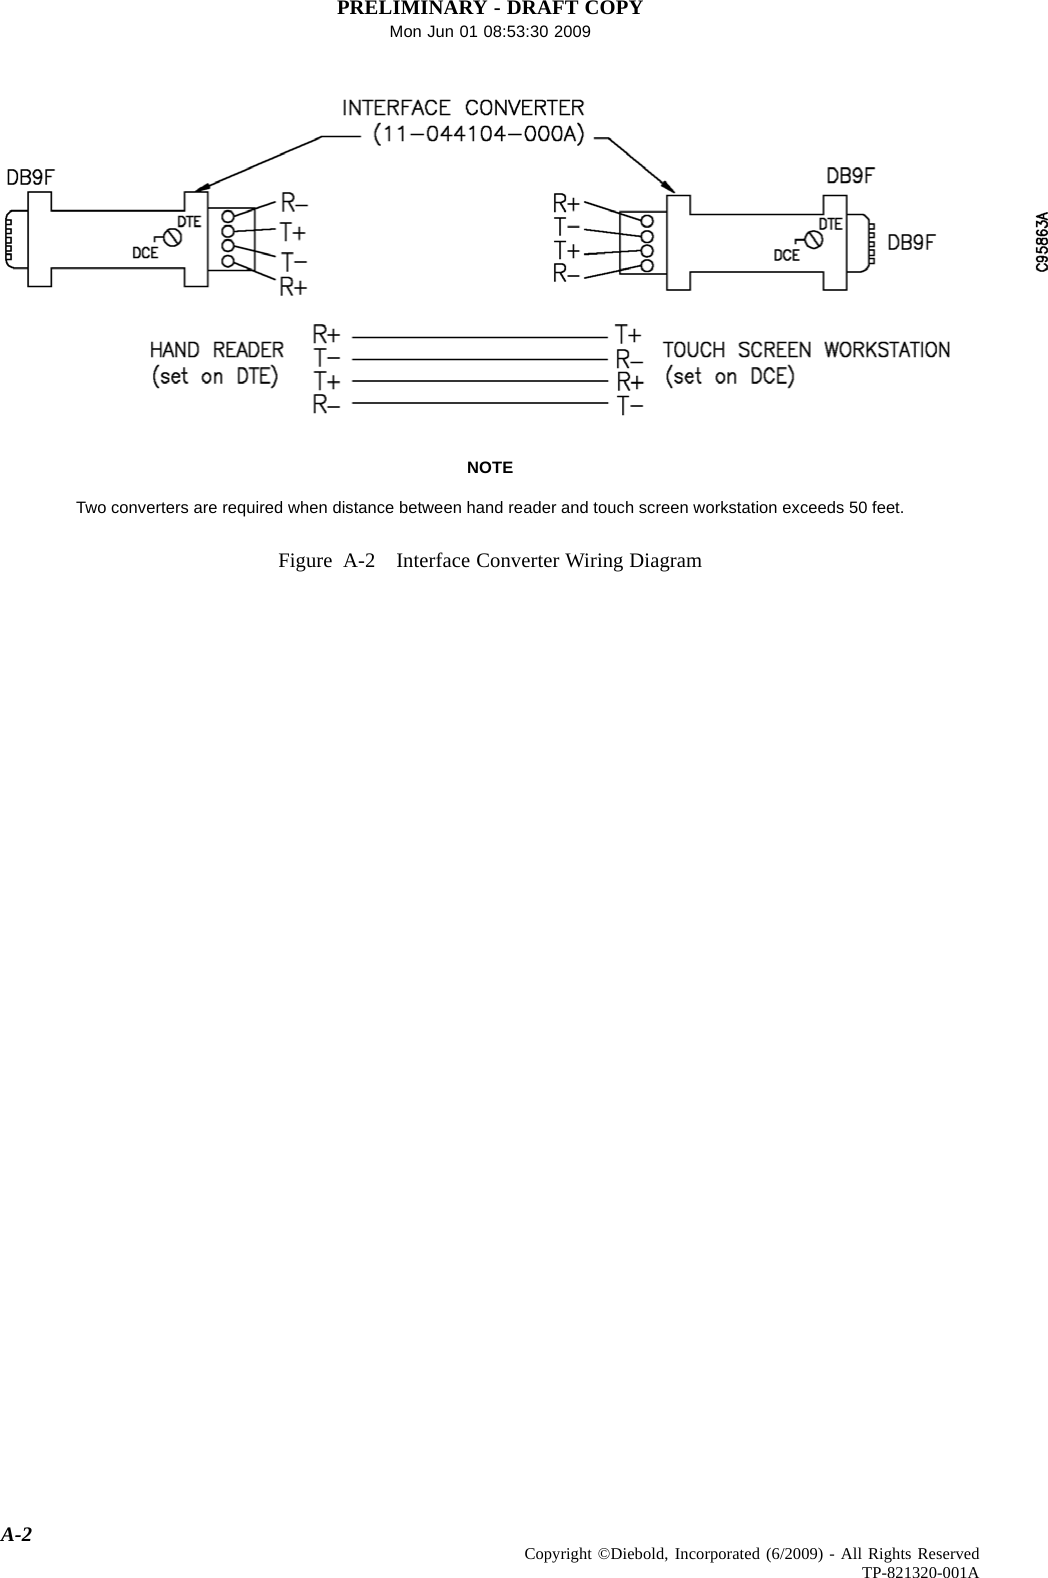
PRELIMINARY - DRAFT COPYMon Jun 01 08:53:30 2009Appendix ADiagrams for Adding Converters Between Hand Reader and TouchScreen WorkstationAdditional connection procedures are required when the distance between thehand recognition reader and the touch screen workstation exceeds 50 feet. Referto the figures that follow:• Figure A-1: Connections Required When Distance Between Hand Readerand Touch Screen Workstation Exceeds 50 Feet• Figure A-2: Interface Converter Wiring DiagramFigure A-1 Connections Required When Distance Between Hand Reader and Touch Screen Workstation Exceeds50 FeetA-1Copyright ©Diebold, Incorporated (6/2009) - All Rights ReservedTP-821320-001A
PRELIMINARY - DRAFT COPYMon Jun 01 08:53:30 2009NOTETwo converters are required when distance between hand reader and touch screen workstation exceeds 50 feet.Figure A-2 Interface Converter Wiring DiagramA-2 Copyright ©Diebold, Incorporated (6/2009) - All Rights ReservedTP-821320-001A
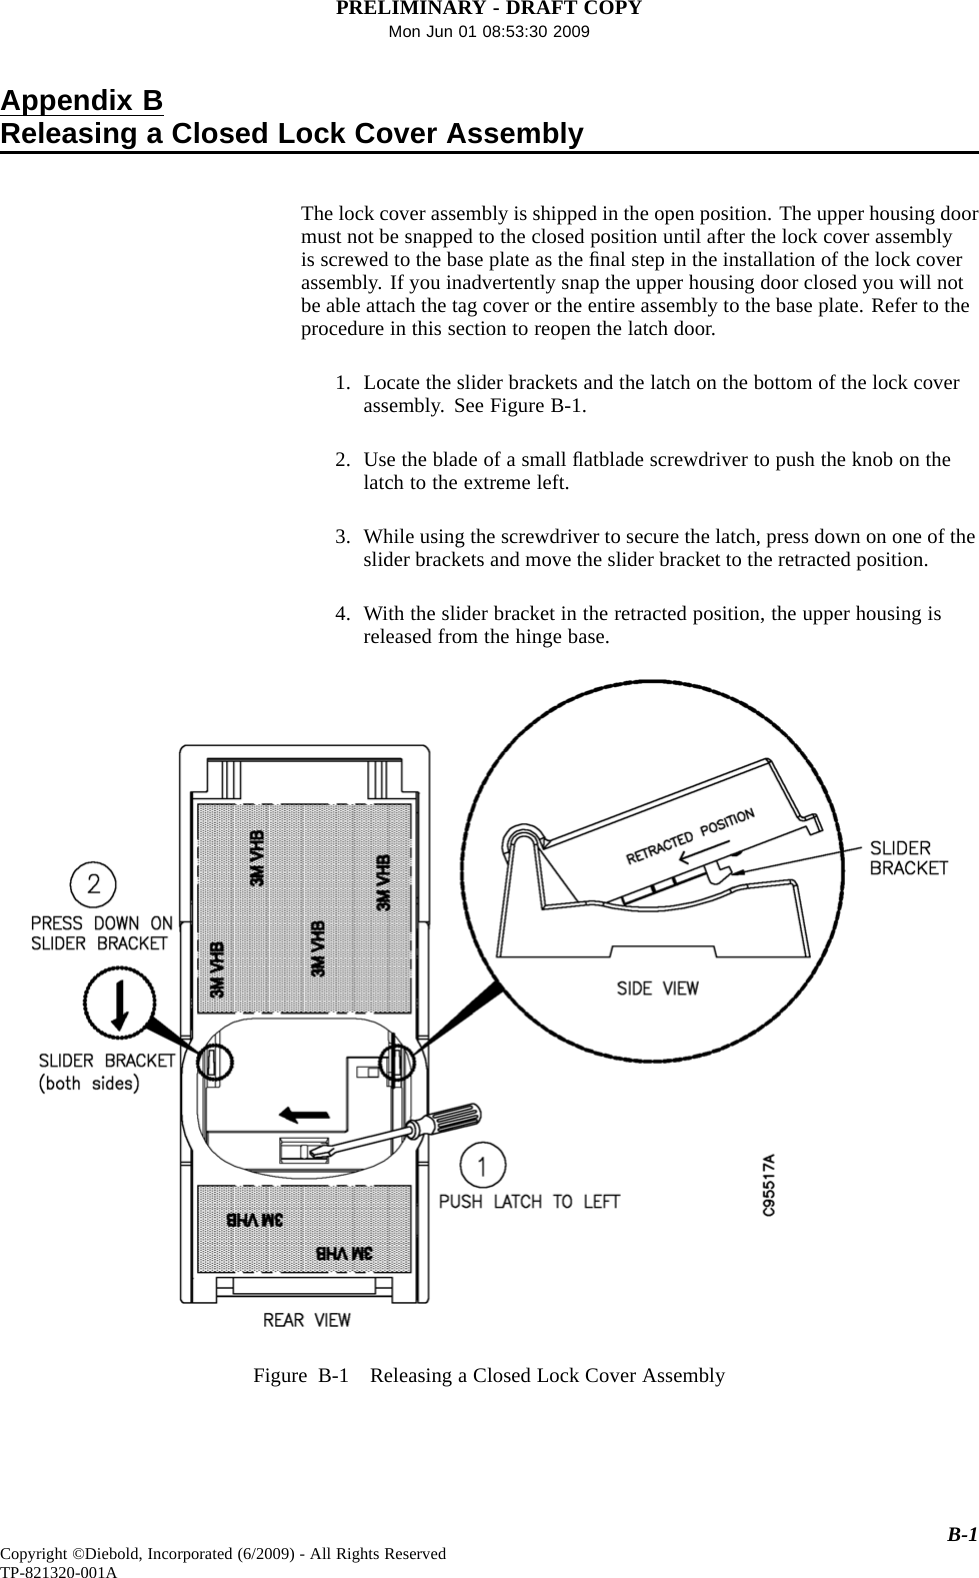
PRELIMINARY - DRAFT COPYMon Jun 01 08:53:30 2009Appendix BReleasing a Closed Lock Cover AssemblyThe lock cover assembly is shipped in the open position. The upper housing doormust not be snapped to the closed position until after the lock cover assemblyis screwed to the base plate as the final step in the installation of the lock coverassembly. If you inadvertently snap the upper housing door closed you will notbe able attach the tag cover or the entire assembly to the base plate. Refer to theprocedureinthissectiontoreopenthelatchdoor.1. Locate the slider brackets and the latch on the bottom of the lock coverassembly. See Figure B-1.2. Use the blade of a small flatblade screwdriver to push the knob on thelatch to the extreme left.3. While using the screwdriver to secure the latch, press down on one of theslider brackets and move the slider bracket to the retracted position.4. With the slider bracket in the retracted position, the upper housing isreleased from the hinge base.Figure B-1 Releasing a Closed Lock Cover AssemblyB-1Copyright ©Diebold, Incorporated (6/2009) - All Rights ReservedTP-821320-001A
Navigation menu