Datalogic 0015 RADIO STAR-MODULE 910 User Manual OM Dragon Eng

Datalogic SpA RADIO STAR-MODULE 910 OM Dragon Eng

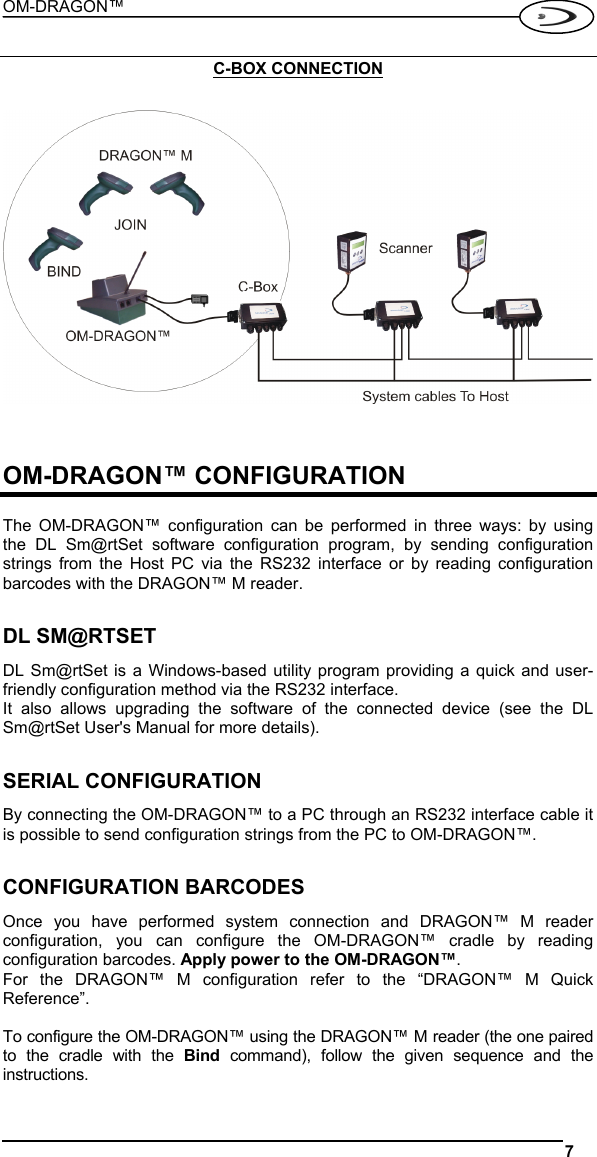
OM Dragon User Guide

      OM-DRAGON™ SERIES  QUICK REFERENCE
               DATALOGIC S.p.A. Via Candini 2 40012 - Lippo di Calderara di Reno Bologna - Italy    OM-DRAGON™  Ed.: 11/2005                   ALL RIGHTS RESERVED Datalogic reserves the right to make modifications and improvements without prior notification.  Datalogic shall not be liable for technical or editorial errors or omissions contained herein, nor for incidental or consequential damages resulting from the use of this material.  Product names mentioned herein are for identification purposes only and may be trademarks and or registered trademarks of their respective companies.  © Datalogic S.p.A. 2002-2005  Preliminary
  iii  CONTENTS  Updates and Language Availability.....................................................................iv Using OM-DRAGON™ Radio Cradle.................................................................. 1 Installation ........................................................................................................... 2 System Connections ........................................................................................... 5 Connecting and Disconnecting the OM-DRAGON™ Interface Cable................. 5 OM-DRAGON™ Configuration ........................................................................... 7 Wedge Keyboard Nationality............................................................................. 11 Operating Test .................................................................................................. 13 OM-DRAGON™ Default Configuration ............................................................. 14 Technical Features............................................................................................ 15 Warranty............................................................................................................ 16 Services And Support ....................................................................................... 16 Compliance ....................................................................................................... 16
 iv   UPDATES AND LANGUAGE AVAILABILITY     UK/US  The latest drivers and documentation updates for this product are available on Internet. Log on to : www.datalogic.com    I  Su Internet sono disponibili le versioni aggiornate di driver e documentazione di questo prodotto. Questo manuale è disponibile anche nella versione italiana. Collegarsi a : www.datalogic.com    F  Les versions mises à jour de drivers et documentation de ce produit sont disponibles sur Internet. Ce manuel est aussi disponible en version française. Cliquez sur : www.datalogic.com    D  Im Internet finden Sie die aktuellsten Versionen der Treiber und Dokumentation von diesem Produkt. Die deutschsprachige Version dieses Handbuches ist auch verfügbar. Adresse : www.datalogic.com    E  En Internet están disponibles las versiones actualizadas de los drivers y documentación de este producto. También está disponible la versión en español de este manual. Dirección Internet : www.datalogic.com
OM-DRAGON™  1   USING OM-DRAGON™ RADIO CRADLE  The OM-DRAGON™ cradle, paired with one or more DRAGON™ M series laser guns, builds a Cordless Reading System for the collection, decoding and transmission of barcoded data.  It can be connected to a Host PC through an RS232, Wedge or Pen cable and is suited for both single-cradle and multi-cradle layouts.  It can also be connected to a C-Box and therefore integrated into a fixed scanner application.    To setup your OM-DRAGON™ cradle you must:  1.  Physically install the cradle.  2.  Make all system connections.  3.  Configure the OM-DRAGON™ cradle.
DATALOGIC 2   INSTALLATION  The OM-DRAGON™ can be mounted for portable or fixed desktop usage, or it can be fixed to a wall. In all cases, the mounting base must be used.  The OM-DRAGON™ package contains the following:  OM-DRAGON™ 3 screws This Quick Reference Manual  3 threaded dowels 2 adhesive strips  1 alignment plate 4 rubber feet  1 Antenna     Figure 1 - OM-DRAGON™ Mounting Base bottom view   PORTABLE DESKTOP USE  For desktop use, the OM-DRAGON™ is already correctly positioned on the base.  1.  Referring to Figure 1, carefully clean the rubber feet seat of the base to remove any impurities that could reduce adhesion. 2.  Remove the protective plastic from the rubber feet and stick them onto the bottom surface of the base. 3.  Insert the antenna in the appropriate hole on the body of the cradle and screw it clockwise until tight.
OM-DRAGON™  3   FIXED DESKTOP USE  For fixed desktop installation use the adhesive strips referring to Figure 1.  1.  If you are installing several cradles and you desire to align them, you can use the alignment plate (see Alignment Plate Installation), otherwise continue with step 2. 2.  Carefully clean the adhesive strip seat of the base to remove any impurities that could reduce adhesion. 3.  Remove the protective plastic from one side of the adhesive strips and stick them onto the base surface. 4.  Remove the plastic from the other side of the strips and affix the base to the table. 5.  Insert the antenna in the appropriate hole on the body of the cradle and screw it clockwise until tight.   WALL MOUNTING  Since the OM-DRAGON™ is mounted on its base when delivered, before performing the following operation, unscrew the fixing screw and detach the cradle from the base by holding the base tight and pushing the cradle backwards.     Figure 2- OM-DRAGON™ top view
DATALOGIC 4   For wall mounting, the cradle is positioned as shown in Figure 3:   Figure 3 - OM-DRAGON™ Base  1.  If you are installing several cradles and you desire to align them, you can use the alignment plate (see Alignment Plate Installation), otherwise continue with step 2. 2.  Using the mounting holes on the base as a pattern mark the wall where you desire to mount the OM-DRAGON™. 3.  Drill three appropriate size holes. 4.  Insert the threaded dowels into the holes. 5.  Position the base on the wall and affix it by means of the three screws. 6.  Reattach the cradle body by sliding it along the mounting tabs until aligned. 7.  Fix the cradle to the base by means of the fixing screw. (See Figure 2). 8.  Insert the antenna in the appropriate hole on the body of the cradle and screw it clockwise until tight.   ALIGNMENT PLATE  1.  Referring to Figure 1 and Figure 4, snap the Alignment Plate into the holes provided on the base so that the plate remains extended from the side of the base. 2.  Snap the next base onto the remaining pins of the Alignment Plate.  Figure 4 - Alignment Plate
OM-DRAGON™  5   SYSTEM CONNECTIONS   CAUTION Connections should always be made with power off!  You can connect the OM-DRAGON™ cradle to the Host through the dedicated connector, using the cable corresponding to the desired interface type.   CONNECTING AND DISCONNECTING THE OM-DRAGON™ INTERFACE CABLE  The OM-DRAGON™ can be connected to a Host by means of an RS232, Wedge or Pen cable which must be simply plugged into the Host connector, visible on the rear panel of the cradle.  To disconnect the cable, insert a paper clip or other similar object into the hole corresponding to the Host connector on the body of the cradle. Push down on the clip while unplugging the cable. Refer to the following figure:           Figure 5 – Connecting/Disconnecting the cable.  Multi-standard interface RS232, WEDGE, or PEN Emulation to Host Power
DATALOGIC 6    RS232 CONNECTION        WEDGE CONNECTION        PEN CONNECTION
OM-DRAGON™  7   C-BOX CONNECTION      OM-DRAGON™ CONFIGURATION  The OM-DRAGON™ configuration can be performed in three ways: by using the DL Sm@rtSet software configuration program, by sending configuration strings from the Host PC via the RS232 interface or by reading configuration barcodes with the DRAGON™ M reader.  DL SM@RTSET DL Sm@rtSet is a Windows-based utility program providing a quick and user-friendly configuration method via the RS232 interface. It also allows upgrading the software of the connected device (see the DL Sm@rtSet User's Manual for more details).  SERIAL CONFIGURATION By connecting the OM-DRAGON™ to a PC through an RS232 interface cable it is possible to send configuration strings from the PC to OM-DRAGON™.   CONFIGURATION BARCODES Once you have performed system connection and DRAGON™ M reader configuration, you can configure the OM-DRAGON™ cradle by reading configuration barcodes. Apply power to the OM-DRAGON™. For the DRAGON™ M configuration refer to the “DRAGON™ M Quick Reference”.  To configure the OM-DRAGON™ using the DRAGON™ M reader (the one paired to the cradle with the Bind command), follow the given sequence and the instructions.
DATALOGIC 8   1. Read the OM-DRAGON™ restore default code, then read the interface selection code for your application:  RESTORE OM-DRAGON™ DEFAULT Ì$+RX0$-qÎ  2. Among the following interface selection codes, read only the code that suits your application:   RS232 INTERFACE Ì$+CP0$-$Î   PEN INTERFACE Ì$+CP6$-BÎ   WEDGE INTERFACE  IBM AT or PS/2 PCs Ì$+CP500$-aÎ IBM XT Ì$+CP503$-vÎ PC Notebook Ì$+CP505$-ÈÎ IBM SURE1 Ì$+CP506$-$Î IBM Terminal 3153 Ì$+CP504$-}Î
OM-DRAGON™  9    WEDGE INTERFACE (CONTINUED)  IBM Terminals 31xx, 32xx, 34xx, 37xx:  To select the interface for these IBM Terminals, read the correct key transmission code. Select the keyboard type if necessary (default = advanced keyboard).  KEY TRANSMISSION MODE  make-only keyboard Ì$+CP502$-oÎ   make-break keyboard Ì$+CP501$-hÎ    KEYBOARD TYPE  advanced keyboard Ì$+FK1$-ÉÎ   typewriter keyboard Ì$+FK0$-ÄÎ   ALT MODE The following interface selection allows barcodes sent to the PC to be interpreted correctly independently from the Keyboard Nationality used. You do not need to make a Keyboard Nationality selection. (default = Num Lock Unchanged) Make sure the Num Lock key on your keyboard is ON.  IBM AT - ALT mode Ì$+CP507$-+Î   PC Notebook - ALT mode Ì$+CP508$-2Î
DATALOGIC 10    WEDGE INTERFACE (CONTINUED)  WYSE TERMINALS  ANSI Keyboard Ì$+CP509$-9Î    PC Keyboard Ì$+CP510$-gÎ    ASCII Keyboard Ì$+CP511$-nÎ    VT220 style Keyboard Ì$+CP514$-ÇÎ    DIGITAL TERMINALS VT2xx/VT3xx/VT4xx Ì$+CP512$-uÎ    APPLE APPLE ADB Bus Ì$+CP513$-|Î
OM-DRAGON™  11   WEDGE KEYBOARD NATIONALITY  If you selected the Wedge interface, you should also read among the following codes the one that matches your Keyboard Nationality:  Belge Ì$+FJ7$-8Î    Deutsch Ì$+FJ3$-$Î    English Ì$+FJ4$-)Î    Español Ì$+FJ6$-3Î    Français Ì$+FJ2$-ÊÎ    Italiano Ì$+FJ1$-ÅÎ    Svenskt Ì$+FJ5$-.Î    USA Ì$+FJ0$-|Î
DATALOGIC 12    The following Keyboard Nationality selections are only valid for IBM AT compatible PCs:  Japanese Ì$+FJ8$-=Î    Russian (Latin) Ì$+FJ9$-BÎ    Russian (Cyrillic) Ì$+FJA$-jÎ    Hungarian Ì$+FJB$-oÎ    Yugoslavian Ì$+FJC$-tÎ    Romanian Ì$+FJD$-yÎ    Czechoslovakian Ì$+FJE$-~Î
OM-DRAGON™  13   OPERATING TEST  Read the TEST codes below.  EAN-8   1234 5670      EAN-13 1 234567 000992    Code 39 (Normal) 17162   Code 128 test  Interleaved 2 of 5 0123456784  PDF417        DATALOGIC PDF417 Test Code  YOUR SYSTEM IS NOW READY TO READ CODES AND TO SEND THE DATA TO THE HOST. To change the defaults refer to the "Dragon™ Reference Manual", part number 90ACC1855, or to the DL Sm@rtSet™ Configuration program, both downloadable from the website.
DATALOGIC 14   OM-DRAGON™ DEFAULT CONFIGURATION  RS232 DEFAULT SETTINGS 9600 baud, parity disabled, 8 data bits, 1 stop bit, handshaking disabled, ack/nack protocol disabled, FIFO enabled, delay disabled, 5 sec. rx timeout  WEDGE DEFAULT SETTINGS USA keyboard, Caps Lock Auto-Recognition enabled, num lock unchanged, inter-character and intercode delay disabled, control character emulation = Ctrl+Shift+key  PEN DEFAULT SETTINGS Interpret operating mode, conversion to code 39 enabled, output level normal, idle level normal, minimum output pulse 600µs, overflow medium, interblock delay disabled  DATA FORMAT no header, terminator: RS232 = CR-LF; WEDGE = CR, gun and cradle address stamping and address stamping delimiter disabled  RADIO PARAMETERS Battery Type: Auto-detect  NETWORK PARAMETERS RS485 network disabled
OM-DRAGON™  15   TECHNICAL FEATURES  OM-DRAGON™ Electrical Features Supply voltage  9..28 Vdc Power consumption  max. 8 W (charging) * Indicators  Charger on LED (red) Charge completed LED (green) Power / Data LED (yellow) Time of recharge  NiMh / NiCd batteries: 2 hours Radio Features  European Models  USA Models Working Frequency  433.92 MHz  910 MHz Bit rate  19200 baud  36800 baud Range (in open air)  50 m  30 m System Configuration  OM-DRAGON™ STARGATE™ Max number of devices per base station   32 255 Max number of devices in the same reading area  2000 Max number of base stations in network  16 (including cradle Master) Environmental Features Working temperature  -10° to +40 °C / +14° to +104 °F Storage temperature  -20° to +60 °C / -4° to +140 °F Humidity  90 % non condensing Protection IP40 Mechanical Features Weight with mounting support  about 600 g. / 21.12 oz Dimensions (without antenna)  185 x 115 x 104 mm / 7.2 x 4.5 x 4 in Material ABS  *  Having a switching regulator inside, the OM-DRAGON™ draws the same power, regardless of the supply voltage. i.e. as the input voltage increases the current drawn decreases.    NOTE After many recharging cycles NiMh and NiCd batteries may tend to lose their operating autonomy. To limit this effect avoid inserting the DRAGON™ M into the OM-DRAGON™ cradle frequently. This condition can be overcome by inserting the laser reader into the  OM-DRAGON™ cradle and pressing the "battery reconditioning" button (see DRAGON™ M Series Quick Reference Manual).
DATALOGIC 16   WARRANTY  Datalogic warranties this product against defects in workmanship and materials, for a period of 24 months from the date of shipment, provided that the product is operated under normal and proper conditions.  Datalogic has the faculty to repair or replace the product, these provisions do not prolong the original warranty term. The warranty does not apply to any product that has been subject to misuse, accidental damage, unauthorized repair or tampering.    SERVICES AND SUPPORT  Datalogic provides several services as well as technical support through its website. Log on to www.datalogic.com and click on the links indicated for further information including: •  PRODUCTS Search through the links to arrive at your product page where you can download specific Manuals and Software & Utilities including: - DL Sm@rtSet™ a Windows-based utility program which allows device configuration using a PC. It provides RS232 interface configuration as well as configuration barcode printing. •  SERVICES & SUPPORT - Datalogic  Services - Warranty Extensions and Maintenance Agreements -  Authorised Repair Centres •  CONTACT US E-mail form and listing of Datalogic Subsidiaries    COMPLIANCE   POWER SUPPLY  This device is intended to be supplied by a UL Listed or CSA Certified Direct Plug-in Power Unit marked "Class 2" output rated 9-28 V DC, minimum 0.8 A and having a cable length <3 m.  This device must be opened by qualified personnel only.
OM-DRAGON™  17   FCC COMPLIANCE  Modifications or changes to this equipment without the expressed written approval of Datalogic could void the authority to use the equipment.  This device complies with PART 15 of the FCC Rules. Operation is subject to the following two conditions: (1) This device may not cause harmful interference, and (2) this device must accept any interference received, including interference which may cause undesired operation.  This device contains FCC ID OMJ0015.  This equipment has been tested and found to comply with the limits for a Class B digital device, pursuant to part 15 of the FCC Rules. These limits are designed to provide reasonable protection against harmful interference in a residential installation. This equipment generates, uses and can radiate radio frequency energy and, if not installed and used in accordance with the instructions, may cause harmful interference to radio communications. However, there is no guarantee that interference will not occur in a particular installation. If this equipment does cause harmful interference to radio or television reception, which can be determined by turning the equipment off and on, the user is encouraged to try to correct the interference by one or more of the following measures: -  Reorient or relocate the receiving antenna. -  Increase the separation between the equipment and receiver. -  Connect the equipment into an outlet on a circuit different from that to which the receiver is connected. -  Consult the dealer or an experienced radio/TV technician for help.   RADIO COMPLIANCE  Contact the competent authority responsible for the management of radio frequency devices of your country to verify the eventual necessity of a user license. Refer to the web site http://europa.eu.int/comm/enterprise/rtte/spectr.htm for further information.     WEEE COMPLIANCE
    05 DATALOGIC S.p.A., Via Candini, 2 40012 - Lippo di Calderara Bologna - Italy   dichiara che declares that the déclare que le bescheinigt, daß das Gerät declare que el   OM-DRAGON, RF Base charger    e tutti i suoi modelli   and all its models   et tous ses modèles   und seine modelle   y todos sus modelos  sono conformi alla Direttiva del Consiglio Europeo sottoelencata: are in conformity with the requirements of the European Council Directive listed below: sont conformes aux spécifications de la Directive de l'Union Européenne ci-dessous: der nachstehenden angeführten Direktive des Europäischen Rats entsprechen: cumple con los requisitos de la Directiva del Consejo Europeo, según la lista siguiente: 1999/5/EEC R&TTE  Questa dichiarazione è basata sulla conformità dei prodotti alle norme seguenti: This declaration is based upon compliance of the products to the following standards: Cette déclaration repose sur la conformité des produits aux normes suivantes: Diese Erklärung basiert darauf, daß das Produkt den folgenden Normen entspricht: Esta declaración se basa en el cumplimiento de los productos con las siguientes normas:   ETSI EN 301 489-3 v.1.4.1, AUGUST 2002: ELECTROMAGNETIC  COMPATIBILITY AND RADIO SPECTRUM MATTERS  (ERM); ELECTROMAGNETIC  COMPATIBILITY  (EMC) STANDARD FOR RADIO EQUIPMENT AND SERVICES; PART  3: SPECIFIC CONDITIONS FOR SHORT-RANGE  DEVICES  (SRD) OPERATING ON FREQUENCIES BETWEEN 9 KHZ AND 40 GHZ   ETSI EN 300 220 v.1.1.1, SEPTEMBER 2004:ELECTROMAGNETIC COMPATIBILITY AND RADIO SPECTRUM MATTERS  (ERM); SHORT  RANGE  DEVICES  (SRD); RADIO EQUIPMENT TO BE USED IN THE 25 MHZ TO 1000 MHZ FREQUENCY RANGE WITH POWER LEVELS RANGING UP TO 500 MW; PART  3: HARMONIZED  EN  COVERING ESSENTIAL REQUIREMENTS UNDER ARTICLE 3.2 OF THE R&TTE DIRECTIVE   EN 60950-1, December 2001: INFORMATION TECHNOLOGY EQUIPMENT – SAFETY – PART 1: GENERAL REQUIREMENTS     Lippo di Calderara, September 8th, 2005        Ruggero Cacioppo   Quality Assurance Laboratory Manager

Navigation menu