DREAMUS DPF11 Network Audio Player User Manual 2 of 2
IRIVER LIMITED Network Audio Player Users Manual 2 of 2
UserManual.wiki
>
DREAMUS
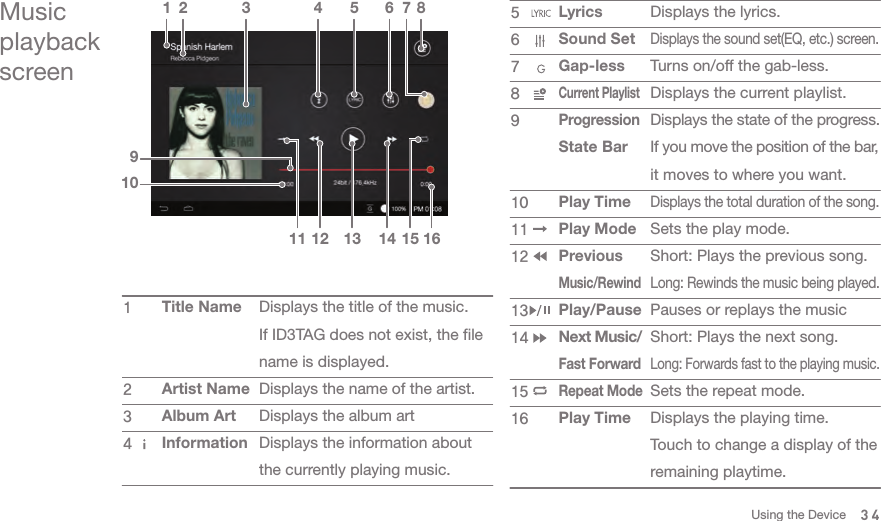
>
DPF11 User Manual
>
Users Manual - 2 of 2
Contents
1.
Users Manual - 1of 2
2.
Users Manual - 2 of 2
Users Manual - 2 of 2
Navigation menu
Upload a User Manual
Namespaces
Wiki Guide
HTML
PDF
Info
Views
User Manual
Discussion / Help
Navigation
![Displays a music list of the current position. Press and hold the [ ] next to the desired music to delete a file, add to the play list, or add to the current play list.You can select the music list sorting method as ‘ALL/MQS/DSD/Ripping’.You can select the music list sorting method as ‘Bit/Sample Rate’.Displays the add-ones window of the music lists.The functions are displays differently by music retrieval scheme. : Copies the file. (Activates only in folders) : Moves the file. (Activates only in folders) : Adds the file to the play list. : Adds the file to the current play list. : Changes the name. (Activates only in the play list/folders) : Deletes the file. (Activates only in folders)You can choose the album list display method as ‘Thumbnail/List’.334Music ListSort by ListAdd-ons ListAlbum List Display123421 3Using the Device](https://usermanual.wiki/DREAMUS/DPF11.Users-Manual-2-of-2/User-Guide-2451751-Page-1.png)
![- Turn the [Volume Wheel] to adjust the volume. - Press [ ] to pause, and [ ] to restart during playback.- Press [ / ] to play the previous/next music during playback. + You can play the previous/next music by dragging the album art image in the music playback screen in [up down]/[down up] direction. - Press and hold the [ / ] to rewind/fast forward.- Move the position of the progress bar during playback to move to the desired location. - Press [ ] to display the previous screen. - Press [ ] to display the home screen. - Press [ ] to display a list of currently playing music. Select Music1. Select a music retrieval method from the menu located on the left to display the music list for that classification. 2. Press the music to play on the music list that appears on the screen to play music.Listening to musicListening to MusicYou can browse the music by folders in the [Folder].Playback Time: About 7 hours (16bit/44.1kHz, Unbalanced output, Volume 75, EQ OFF, LCD OFF Standard)Supported File Formats: WAV[8~384kHz(8/16/32bit)], FLAC[8~352kHz(8/16/24bit)]35Using the Device](https://usermanual.wiki/DREAMUS/DPF11.Users-Manual-2-of-2/User-Guide-2451751-Page-3.png)
![Ripping the CDRipping the CD Automatically1. Insert the CD into the CD insertion slot of the product2. Import the metadata information of the CD that is inserted in the Grace Notes.3. When you have finished importing the information, CD ripping starts.4. When ripping is complete and if you press [OK] in the results window, the CD automatically comes out from the insertion slot. Ripping the CD ManuallyYou can select auto/manual ripping from [Settings- CD Ripping- Automatic CD Ripping].1. If you insert the CD to the insertion slot of the product, [CD Ripping] menu on the left menu, gets activated.2. Press the [CD Ripping] menu, and select the ripping file format as FLAC or WAV. 3. If select the file format, it starts search for the Grace Note DB.4. When DB search is completed, click [Start] to start ripping. 5. You can directly choose the song to rip in the selection box in front of each track. 36Using the Device](https://usermanual.wiki/DREAMUS/DPF11.Users-Manual-2-of-2/User-Guide-2451751-Page-4.png)
![CD Ripping Results CD Ripping Screen- : Tells CD Ripping is successfully completed. - : Indicates a failure of CD ripping, because of a physical scratch generated in the CD, etc. - : Tells an error occurred, but CD ripping is completed through error correction. 1 23456789Displays the ripping speed. Displays the information about the album. Displays the album art.Displays the ripping progress.Displays the ripping error.Displays the ripping progress state.Displays the success of the ripping. Displays the failure of the ripping. Skips the ripping.Ripping SpeedAlbum InformationAlbum ArtRipping Progress BarRipping Error InformationRipping Progress StateRipping SuccessRipping FailureSkip Ripping123456789To recall the Grace Note DB data, DPF11 has to be connected to the network before ripping. Refer to page 56 for the network connection method. Set the location of the ripped file from [Settings-CD Ripping]. If you have not set the location, it will be saved in the current folder. It is possible there is not the relevant information about Grace Note, depending on the CD. Grace Note DB search time may be longer depending on the network environment. File formats and the ripping speed can be selected from [Settings > CD Ripping]. If you enable error-checking function in [Settings > CD Ripping] menu, it attempts to compensate for data errors several times. So if you enable this function, the CD ripping becomes slow. If you rip a CD manually, press and hold the song you want to change from the whole music information screen to select the name of the album, artist, and genre on the touch keypad. During CD ripping, the playback will be stopped if WAV, FLAC files that are 24bit/352kHz or more are converted into DSD64.37Using the Device](https://usermanual.wiki/DREAMUS/DPF11.Users-Manual-2-of-2/User-Guide-2451751-Page-5.png)
![38Deleting songs in the current playlist1. Select [ ] next to the song. 2. Press [ ] to remove the selected song from the current playlist. Changing the music order of the current playlist1. Press [ ] next to the song. 2. Hold [ ], and move the selected song to up/down to change the position of the song selected. Managing the current playlistAdding the song in the current playlist to the playlist1. Press [ ] next to the song, and select [ ].2. You can add the selected songs to your playlist. - Add a playlist: Create a new playlist and add the songs you selected. - Add to the playlist: Select the playlist to add the songs that you selected to the list.Using the Device](https://usermanual.wiki/DREAMUS/DPF11.Users-Manual-2-of-2/User-Guide-2451751-Page-6.png)
![Creating the Playlist1. If you select [Playlist] from the left menu, the playlist is displayed. 2. Select [Playlist], and press [Add Playlist] at the top.3. If you set the name of the playlist, and click [OK], a new playlist will be added. Managing the playlistAdd a playlist to the current playlist1. Press [ ] next to the desired playlist from the playlist, and select [ ]. 2. Select the location you want to add. - Add after the current playlist: Adds the selected playlist at the end of the playlist. - Add after the currently playing song: Adds the selected playlist after the current playing song. You can also add a playlist to the current playlist in the following way: - If you press and hold the desired playlist from the playlist, a check box is displayed. Select the check box, and then select [Add to the current playlist] on the top. 39Using the Device](https://usermanual.wiki/DREAMUS/DPF11.Users-Manual-2-of-2/User-Guide-2451751-Page-7.png)
![1. Select [ ] next to the desired playlist from the playlist, and select [ ], then a window for changing name will be displayed.2. Type a new name and press [OK], then the name of the playlist will be changed. Adding music to playlists1. A playlist is displayed, if you press [Add Song] on the top of the playlist.2. Check a select box in front of the music you want to add, and press [Add], then the selected music will be added to the playlist. Deleting a playlist1. Press [ ] next to the desired playlist from the playlist, select [ ] and press [OK], then the selected playlist will be deleted. Changing the name of the playlist40Using the Device](https://usermanual.wiki/DREAMUS/DPF11.Users-Manual-2-of-2/User-Guide-2451751-Page-8.png)
![41Adding a song in the playlist to the current playlist1. Select the desired playlist from the playlist, and select [ ] next to the song you want to add. 2. Press [ ], and select the location you want to add. - Add after the current playlist: Adds the selected playlist at the end of the playlist. - Add after the currently playing song: Adds the selected playlist after the current playing song. You can also add a playlist to the current playlist in the following way: - If you press and hold the desired playlist from the playlist, a check box is displayed. Select the check box, and select [Add to the current playlist] on the top. Add a song in the playlist to the playlist1. Select the desired playlist from the playlist, and select [ ] next to the song you want to add.2. Press [ ], and add the selected song to the playlist you want. - Add a playlist: Create a new playlist and add the songs you selected. - Add to the playlist: Select the playlist to add the songs that you selected to the list.Songs in the USB memory or a USB external disk can be played in the folder menu, but they cannot be added to the play list.Using the Device](https://usermanual.wiki/DREAMUS/DPF11.Users-Manual-2-of-2/User-Guide-2451751-Page-9.png)
![1. Select the server to search files from the music searching method. 2. If you press [ ] on the top right of the playlist, a search bar will be displayed.3. Select the genre you want to search. 4. Type search term in the search input window, and browse the file. If you press [ ] on the right of a music list, the music list add-ons window will be displayed. Copying a folder is only available if you selected [Folder] from the menu. Searching filesSearching filesManaging FilesManaging files1. Select [ ] next to the folder you want to copy.2. Select [ ], and press [Paste]. Then the selected folder will be copied. 3. You can make a new folder by pressing [New Folder].Moving Folders 1. Select [ ] next to the folder you want to move. 2. Select [ ], and press [Paste]. Then the selected folder will be moved. 3. You can make a new folder by pressing [New Folder].42Using the Device](https://usermanual.wiki/DREAMUS/DPF11.Users-Manual-2-of-2/User-Guide-2451751-Page-10.png)
![Deleting folders1. Select [ ] next to the folder you want to delete. 2. If you press [ ] on the music list add-ons window, the selected folder will be deleted. Adding to the playlist1. Select [ ] next to the folder you want to add to the playlist. 2. Select [ ] on the music list add-ons window, then select the list you want to add.3. If you press [OK], the selected file will be added to the playlist. 43 You can also ad folders to the playlist in the following way:- If you press and hold the folder you want to add to the playlist, a check box appears in front of the folder list. Select the check box, and then select [Add to the playlist] on the top.Using the Device](https://usermanual.wiki/DREAMUS/DPF11.Users-Manual-2-of-2/User-Guide-2451751-Page-11.png)
![Changing a name1. Select [ ] next to the folder you want to change the name. 2. If you select [ ] on the music add-ons window, a name-changing window will be displayed. 3. If you press [OK], the folder name will be changed. Adding to the current playlist1. Select [ ] next to the file you want to add to the current playlist. 2. If you select [ ] on the music add-ons window, the selected file will be added to the current playlist. The name can be changed only if you select one folder. Playlist applies only to the internal storage. It does not support an external storage. During a media scan, you can add to the playlist or the current playlist or modify. You can use the file browser navigation and playback during a media scan. 44Using the Device](https://usermanual.wiki/DREAMUS/DPF11.Users-Manual-2-of-2/User-Guide-2451751-Page-12.png)
![PC/MAC must meet the following conditions.Supported PC Specifications- OS: Windows XP, Windows 7, 8(32, 64 bit)Supported MAC Specifications- MAC OS 10.7 (Lion) or later versionMQSstreamingYou can play or download the music from a PC on the same network via DPF11 in real time.Installing MQS Streaming Server1. Download MQS Streaming Server from [Support > Download of http://www.astellnkern.com/] depending on the version of the PC. 2. After running the setup file, install it according to the installation guide screen. 3. You can check the using method for MQS Streaming Server via the Help in the Server Program. Choosing MQS Streaming Server1. Install the MQS streaming server from the PC, and run it. 2. If you press [500N] on the left menu when DPF11 and PC are connected in the same network, the PC list will be displayed on the [Network Server] list. 3. If you select the PC you want to connect, the left menu will be displayed as the list that PC has. 4. If you select [Network Player], wireless network devices that are on the same network will be searched. If you select those devices, you can output the sound. 45You can connect to the NAS products that support DLNA function. Using the Device](https://usermanual.wiki/DREAMUS/DPF11.Users-Manual-2-of-2/User-Guide-2451751-Page-13.png)
![Purchasing music in the storePurchasing music1. Connect DPF11 to the network. 2. If you press [Store] in the menu, and select ‘Groovers’ from the list appears, the APP will be activated. 3. You can check the using method through the user guide and help in the STORE. For the network connection method, refer to page 56.The currently supported STORE is ‘Groovers’.‘Groovers’ of the store menu is displayed if you currently select [Setting> Date and Time > GMT+09:00, Korea Standard Time]. Purchase/Payment via ‘Groovers’ is only available in the Republic of Korea. 47Using the Device](https://usermanual.wiki/DREAMUS/DPF11.Users-Manual-2-of-2/User-Guide-2451751-Page-15.png)
![49Installing USB DAC1. Set [Settings-Connecting USB] as [DAC input]. 2. Connect the product and a PC by using a USB cable for data transfer.3. Run the ‘Setup.ext’ file on the Driver. 4. Press [Next] if the following screen appears. - When the following screen appears, please check if [Settings- Connecting USB] is set as [DAC Input]. <After installing the driver>5. Press [Browser] to set the folder to install the driver, and then press [Install].6. If the following screen is displayed, press [Finish] to complete the installation. Using the Device](https://usermanual.wiki/DREAMUS/DPF11.Users-Manual-2-of-2/User-Guide-2451751-Page-17.png)
![507. According to the operating system, you can change the default device to output the sound with the following methods: - XP: Change the default sound playback device to [DPF11 USB DAC] from ‘Control Panel> Sounds and Audio Device’. - 7/8: Select [DPF11 USB DAC] from ‘Control Panel>Sound>Playback’ tab, and select [Set as Default Device] on the bottom. You need to complete this step, only if you are using DPF11 with USB DAC for the first time. You do not need a separate follow-up to select DPF11 for the sound output.If you connect to USB DAC when paying PCM or Native DSD, the music being played will be stopped automatically. If you press [Connect to a Media device] on the screen when it is connected to the USB DAC, the USB DAC will be disconnected, and reconnect to MTP mode again.If you reboot DPF11 after the connection to the USB DAC, it will be changed MTP mode again. For high sound quality, it is recommended to change the default format to [24bit, 192000Hz(Studio quality)] on the advanced tab, after clicking the ‘Properties’ button of [DPF11 USB DAC] from Panel>Sound in Windows 7/8. - MAC OS X: Select the Output tab from the sound menu under the System Preferences, and select [DPF11 USB DAC]. Using the Device](https://usermanual.wiki/DREAMUS/DPF11.Users-Manual-2-of-2/User-Guide-2451751-Page-18.png)
![Please refer to the page 56 for a detail method of setting the network. You can also select the setting menu by selecting [ ] on the top, or [Notification bar] screen at the bottom of the screen. This product does not support playing a CD.If you activate the Error checking function, it will attempts compensate for data errors for several times. So the CD ripping speed will be slow if you activate this function. Please refer to [Using Bluetooth] on the page 45 for a detail method of setting the Bluetooth.SettingsYou can manually set your own production environment. Set menu structure may vary depending on the firmware version.Settings1. Select [DPF11-Settings] on the home screen. 2. Set by selecting the desired item.EthernetConnect of disable the wired network. - Auto IP: IP is set automatically.- Manual IP: Set by directly entering information such as IP address, DNS.Wi-FiConnect of disable the wireless network. BluetoothConnect of disable the Bluetooth remote control. Ripping the CDAutomatic CD Ripping: Set an automatic CD ripping.Manual CD Ripping: If you set the ‘Manual CD Ripping’, [CD Ripping] menu will be activated after the device recognizes the CD from the CD insertion slot. Ripping folder: Set the folder to save the ripped files.Ripping file format: Set the format of the file for ripping. Ripping speed: Set the ripping speed.Set Error checking: Turn on/off the function that checks errors while ripping. 52Using the Device](https://usermanual.wiki/DREAMUS/DPF11.Users-Manual-2-of-2/User-Guide-2451751-Page-20.png)
![It does not convert PCM files in the internal storage to DSD64 files. The equalizer is not applied when playing DSD.Using the equalizer function can slow down the operation of the product.For details on how to set up the equalizer, please refer to the page 57-58.SoundEqualizer: Set the equalizer to suit your tastes.- PRO EQ: Recommend Preset EQ by experts- USER EQ: Change the height of the equalizer on your tastesSound In/out: Connect or disconnect Sound in/out If Sound In/Out is connected to Digital In(Coax, OPT, AES /EBU, BNC), you cannot output the sound as ‘Digital Out’. - If you select ‘Digital In’ on the ‘Sound In/Out’ select screen, you cannot select ‘Digital out’. If ‘Sound In/Out’ is connected to ‘Digital In(Coax, OPT, QES/ EBU, BNC)’, it will be disconnected if you click the icon of the connected port again, and [CLOSE] menu on the bottom will be activated. If you try to connect to ‘USB DAC’ when it is connected to ‘Digital In(Coax, OPT, AES/EU, BNC)’, ‘Sound In/Out’ automatically changes to a internal storage. You can only adjust the volume if ‘Variable Analog Out’ and [BAL], [PHONES] on the left side is selected on the ‘Sound In/Out’ selecting screen. Gap-less: Plays music files after the currently playing music and continue to the next file in a row without interruption. - It only works if the currently playing music and the following music have the same specification (the sample rate, bit, channel). In order to use the PCM to DSD feature, you have to activate it from ‘Settings> Sound’. This feature supports only WAV, FLAC files with DXD format. (DXD format means WAV, FLAC files with 24bit / 352kHz or more.) If Sound In / Out is connected to the Digital Out (Coax, OPT, AES / EBU, BNC), Native DSD cannot be played. - If it is set to Digital Out, Native DSD will automatically be changed to PCM and played. - If it is set to Digital Out DXD will automatically be changed to PCM and played. If it is played or paused as Native DSD, you cannot select ‘Digital Out’ from ‘Sound In/Out’.Balance Output: Set the left/right balance of the sound output. PCM to DSD: Converts PCM file to DSD64 data, and turns on/off the playing function.53Using the Device](https://usermanual.wiki/DREAMUS/DPF11.Users-Manual-2-of-2/User-Guide-2451751-Page-21.png)
![Connecting to a wireless network1. If you press and hold [ ] in the notification bar, or turns on [Settings – Wireless Network], the AP lists of available connection appear. 2. If you choose the AP to connect, the wireless network will be connected. - You may need to type the key index and network key according to the AP setting. 3. If you press and hold [Modify Network] with the connected AP, you can modify the AP history. Connecting to a wired network1. Connect the wired LAN cable to the [ETHERNET] on the back of the product. 2. If the IP information is confirmed in the IP address field, you can use the network. 3. If you want to change the IP address, click [Change] button, type the information such as IP address, DNS, and then click [OK].Connecting to the networkYou cannot use if you need an additional certification except wireless network connection, such as a web browser certifications. It supports channels up to 1-13. 56It is recommended to use a wired network for smooth network feature utilization. If you use a wireless network feature, please set AP to connect to this product as ‘802.11/g’ or ‘802.11/n’.Using the Device](https://usermanual.wiki/DREAMUS/DPF11.Users-Manual-2-of-2/User-Guide-2451751-Page-24.png)
![57Setting the equalizer1. Activate the equalizer menu at [Settings – Sound – Equalizer].2. Press [PRO EQ] on the bottom.3. Select [Create] on the bottom.4. Set the name of the equalizer, and select [OK].5. Set by changing the height of the equalizer to suit your tastes. Setting the equalizerUsing the Device](https://usermanual.wiki/DREAMUS/DPF11.Users-Manual-2-of-2/User-Guide-2451751-Page-25.png)
![Reset Equalizer1. Press [ ] to reset the equalizer. Deleting Equalizer1. Select the equalizer you want to delete. 2. Press [Delete] on the bottom of the equalizer, and press [OK] to delete the selected equalizer. Renaming the equalizer1. Press [Rename] on the bottom of the equalizer, and type a new name. 2. If you press [OK] after typing a new name of the equalizer, the name of the equalizer will be changed. 58Using the Device](https://usermanual.wiki/DREAMUS/DPF11.Users-Manual-2-of-2/User-Guide-2451751-Page-26.png)
![Trouble shootingCheck!1. The device won’t turn on. Please check if the power supply is correctly connected. 2. The operation of the product is unstable. If you press and hold the power button on the side longer than 10 seconds, the product will be turned off. Please turn on the product again and check. 3. The screen turns off repeatedly. After a certain period time, the screen turns off to reduce power consumption when playing the file. Set the time on [Settings – Power- Screen off]. 4. The screen is not displaying properly. Check whether debris is on the screen. 5. There is no sound or there’s static. Verify that the volume isn’t set to [0]. Check that the earphones are plugged in properly, and make sure debris isn’t in the port or on the plug. Verify that the music file is not corrupted. Verify that the audio settings have been properly set (balanced, line out, etc.)6. File will not playback or a specific file causes instability. The Following may occur due to the condition of the file: - Playback is unstable or difficult. - The device may not function properly. - The file may sound different from a computer. - There may be a difference in the performance of playback or other functions. - The file may not be compatible with playback specifications. A file conversion or using a different file is recommended. 59Miscellaneous](https://usermanual.wiki/DREAMUS/DPF11.Users-Manual-2-of-2/User-Guide-2451751-Page-27.png)