Casio Computer W001 Bluetooth Watch User Manual 3417 3418 ninsho E DI
Casio Computer Co Ltd Bluetooth Watch 3417 3418 ninsho E DI
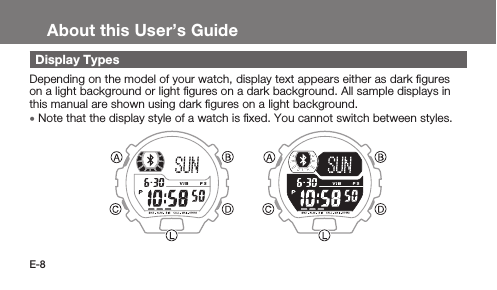
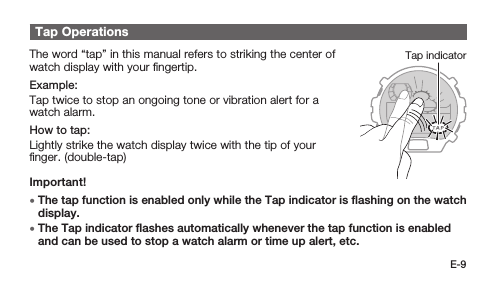
Contents
- 1. GB-5600B_User_Giode_Statement
- 2. GB-5600B_Users_Guide
- 3. GB-6900B,X6900B_User_Guide_Statement
- 4. GB-X6900B_6900B_Users_Guide
GB-X6900B_6900B_Users_Guide

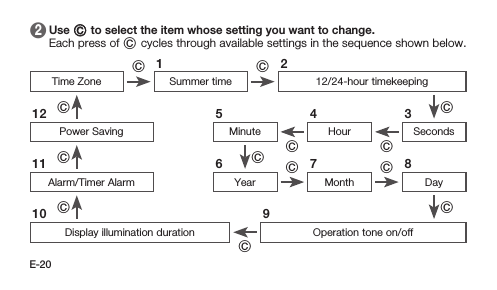
![E-19Configuring Current Time and Date Settings Manually To configure time and date settings 1 In the Timekeeping Mode, hold down A for about two seconds until the time zone setting screen appears. [SET Hold] will appear on the watch display, followed by the time zone setting screen.Time zone](https://usermanual.wiki/Casio-Computer/W001.GB-X6900B-6900B-Users-Guide/User-Guide-2004631-Page-20.png)
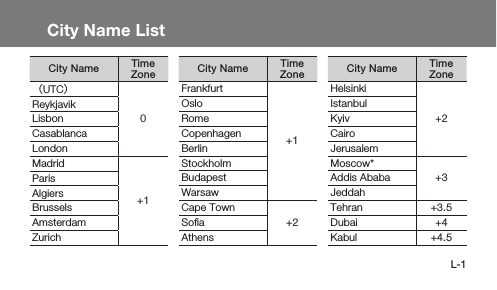
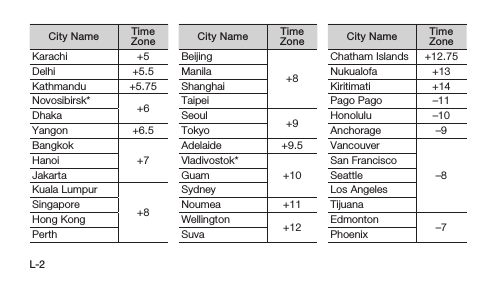
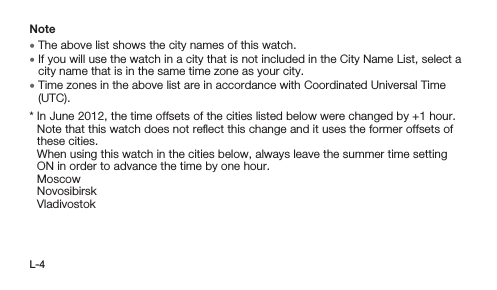
![E-24World TimeWorld Time lets you display the current time in any one of 100 cities (35 time zones) around the world.To view the times in other time zones 1 In the Timekeeping Mode, press C twice to enter the World Time Mode.See “Using Modes” (page E-14).1 [WT100] will appear on the display for about one second, and then the name of the currently selected World Time City will appear.Current time in World Time cityCurrent date in World Time city City name](https://usermanual.wiki/Casio-Computer/W001.GB-X6900B-6900B-Users-Guide/User-Guide-2004631-Page-25.png)
![E-26To configure the Summer Time (DST) setting In the World Time Mode, hold down A for about two seconds. • [DST Hold] will appear on the display. After that, [DST Hold] will disappear and the summer time setting will toggle to either on or off. • DST on the display indicates that summer time is turned on.Important! • Even when Mobile Link is enabled, you need to turn the summer time (DST) on or off manually for World Time.DST indicator](https://usermanual.wiki/Casio-Computer/W001.GB-X6900B-6900B-Users-Guide/User-Guide-2004631-Page-27.png)
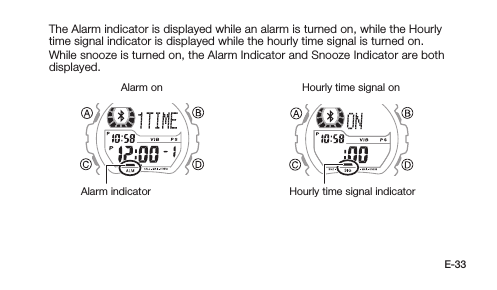
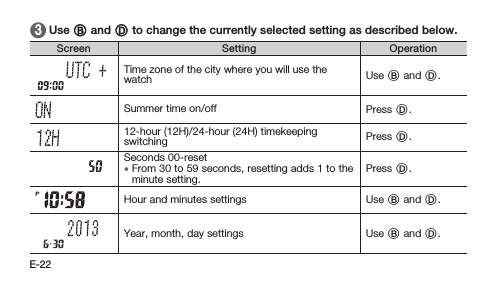
![E-34 3 To change an alarm time setting, hold down A for about two seconds until the hour digits of the current alarm time start to flash. [SET Hold] will appear on the display. After that, [SET Hold] will disappear and the hour digits will flash. 4 Each press of C causes the flashing to move between the hour and the minutes digits. The flashing digits are the ones that are selected. 5 Use B and D to change the flashing setting, and set the hour and minutes you want. • Holding down either button scrolls the setting at high speed. • If you are using 12-hour timekeeping, the PM indicator will appear for times between noon and 11:59 p.m.](https://usermanual.wiki/Casio-Computer/W001.GB-X6900B-6900B-Users-Guide/User-Guide-2004631-Page-35.png)
![E-37StopwatchThe stopwatch measures elapsed time in units of 1/100 seconds up to 999 hours, 59 minutes, 59.99 seconds. Elapsed time returns to zero automatically and timing continues from there when the maximum limit is reached.To enter the Stopwatch Mode In the Timekeeping Mode, press C four times to enter the Stopwatch Mode.See “Using Modes” (page E-14). [STW] will appear on the display for about one second, and then the stopwatch screen will appear.SecondsMinutesHoursCurrent time1/100 second](https://usermanual.wiki/Casio-Computer/W001.GB-X6900B-6900B-Users-Guide/User-Guide-2004631-Page-38.png)
![E-38To measure time with the stopwatch The following shows button operations for stopwatch operations. • Elapsed time/cumulative timeDD D D BStart Stop (Restart) (Stop) Reset • Split time (paused elapsed time reading)DB B D BStart Split Split time display cancelStop Reset Pressing B while timing is being performed displays the split time (with [SPLIT] flashing), but elapsed timing continues internally.](https://usermanual.wiki/Casio-Computer/W001.GB-X6900B-6900B-Users-Guide/User-Guide-2004631-Page-39.png)
![E-41To set the timer start time 1 In the Timer Mode, hold down A for about two seconds. [SET Hold] will appear on the display. After that, [SET Hold] will disappear and the hours digits will flash.Note • If a timer countdown operation is in progress, press D to stop it and then press B to reset the timer to its start time before performing the above step. • If a timer countdown operation is paused, press B to reset the timer to its start time before performing the above step. 2 Each press of C causes the flashing to move between the hours and the minutes digits. The flashing digits are the ones that are selected.](https://usermanual.wiki/Casio-Computer/W001.GB-X6900B-6900B-Users-Guide/User-Guide-2004631-Page-42.png)
![E-48To specify the illumination duration 1 In the Timekeeping Mode, hold down A for about two seconds until the time zone setting screen appears. 2 Press C 10 times to display the illumination duration setting screen. See “Configuring Current Time and Date Settings Manually” (page E-19). The screen will show either [LT1] or [LT3].](https://usermanual.wiki/Casio-Computer/W001.GB-X6900B-6900B-Users-Guide/User-Guide-2004631-Page-49.png)
![E-49 3 Press D to toggle the illumination duration setting between [LT1] (1.5seconds) and [LT3] (3 seconds). 4 To return to the Timekeeping Mode, press A.](https://usermanual.wiki/Casio-Computer/W001.GB-X6900B-6900B-Users-Guide/User-Guide-2004631-Page-50.png)
![E-51 2 Press C nine times to display the button operation tone setting screen. See “Configuring Current Time and Date Settings Manually” (page E-19). The screen will show either [KEY ] or [MUTE]. 3 Press D to toggle the setting between [KEY ] (ON) and [MUTE] (OFF). When [MUTE] (OFF) is selected, a Mute indicator is displayed to indicate that the button operation tone will not sound.Mute indicator](https://usermanual.wiki/Casio-Computer/W001.GB-X6900B-6900B-Users-Guide/User-Guide-2004631-Page-52.png)
![E-52 4 To return to the Timekeeping Mode, press A.Note The above procedure affects the button operation tone only. The alarm, hourly time signal, and time up alarm are not affected.To change the alarm/timer alert method 1 In the Timekeeping Mode, hold down A for about two seconds until the time zone setting screen appears.1 2 Press C 11 times to display alert setting screen. See “Configuring Current Time and Date Settings Manually” (page E-19). The screen will show either [VIB] or [BEEP].](https://usermanual.wiki/Casio-Computer/W001.GB-X6900B-6900B-Users-Guide/User-Guide-2004631-Page-53.png)
![E-53 3 Press D to toggle the setting between [VIB] and [BEEP]. The Vibration indicator is shown on the display while [VIB] is selected.: Alert by vibration.: Alert by tone.Vibration alertVibration indicatorTone alert 4 To return to the Timekeeping Mode, press A.](https://usermanual.wiki/Casio-Computer/W001.GB-X6900B-6900B-Users-Guide/User-Guide-2004631-Page-54.png)