Cardo Systems ER08 scala rider Q2 User Manual QGQ2 114 QG0132 indd
Cardo Systems, Inc. scala rider Q2 QGQ2 114 QG0132 indd
UserManual.wiki
>
Cardo Systems
>
ER08 User Manual
Manual
Navigation menu
Upload a User Manual
Namespaces
Wiki Guide
HTML
PDF
Info
Views
User Manual
Discussion / Help
Navigation
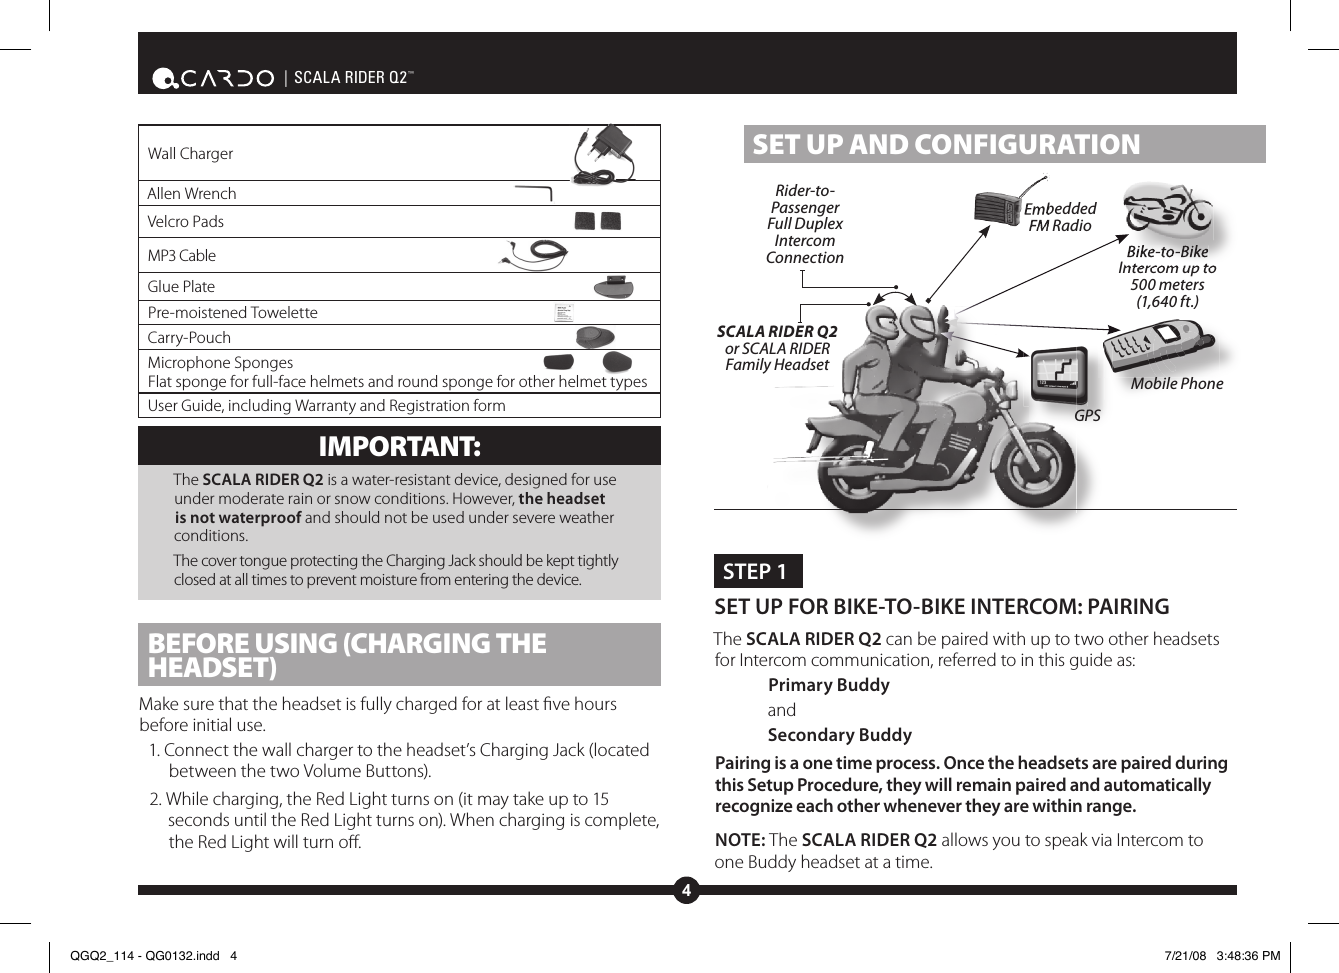
![3EnglishSCALA RIDER Q2™ | CONTENTS OF RETAIL BOX INTRODUCTIONCongratulations, and thank you for having chosen the SCALA RIDER Q2 Bluetooth® Headset for bikers. This Manual will help you operate the headset, but you should rst familiarize yourself with the Bluetooth functionality of your cellular phone and/or GPS device before using the SCALA RIDER Q2.The retail box of the SCALA RIDER Q2 contains one headset unit. When paired with another SCALA RIDER Q2, the headsets can be used as an Intercom at a range of up to 1,640 ft (500m). The SCALA RIDER Q2 oers the following uses:1. Bluetooth headset for mobile phone communication, supporting headset* and Handsfree* proles (10m range) 2. Bike-to-Bike Intercom Communication with another Q2 unit (up to 1,640 ft. / 500 m range) in Full Duplex** mode [purchased separately]3. Turn-by-Turn GPS Navigation instructions and Streaming Audio from compatible Bluetooth devices4. FM Radio – built in FM radio receiver with six preset stations5. MP3 Connectivity – Listen to your MP3 player while ridingThe SCALA RIDER Q2 can establish an audio connection with one Bluetooth device at a time. Please read the section “Using the Headset” to see how you can switch the audio connection between the paired devices.____________________* Mobile phones that do not support the Bluetooth Handsfree profile may prevent you from using the Redial and Call Reject features** Full duplex calls allow you to speak and hear the other party speak simultaneouslyMC – Multi-Connection• Radio On/O/change stations• Initiate/Terminate Buddy Intercom call with Primary or Secondary BuddyCTRL – Control Button • Power On, Power O• Answer/EndCharging JackVolume DownVolume UpNOTE: The use of two speakers may be illegal in certain jurisdictions. Please check the local regulations and act accordingly. Headset Helmet Clamp The use of two speakers may be illegal in certain jurisdictions. Please check the local regulations and act Helmet ClampTabSliding PlateMicrophoneRight Speaker(long cord)Left Speaker(short cord)MP3 JackBack PlateQGQ2_114 - QG0132.indd 3 7/21/08 3:48:27 PM](https://usermanual.wiki/Cardo-Systems/ER08/User-Guide-1030700-Page-3.png)

![8| SCALA RIDER Q2™4. Use the pre-moistened Towelette to clean the helmet area where you want to install the Glue Plate. Allow to dry thoroughly.5. Peel the foil cover from the Glue Plates’ adhesive pad. 6. Place the Glue Plate into position according to #3. Press rmly 15 seconds on all 3 parts of the Glue Plate. 7. The adhesive pad bonds to full strength over the next 24 hours. Therefore it is recommended to not use the headset during this 24 hour period. 8. Fasten the Clamp to the Glue Plate using the Allen screws that were previously removed. POSITIONING THE SPEAKERSAttach the speakers to the Velcro inside your helmet opposite your ears (short speaker cord for the left ear [A] and the long speaker cord [B] for the right ear). You may want to use the supplied Velcro pad.Using two speakers inside the helmet may be prohibited in certain jurisdictions. If this is the case, you should tuck away the long corded speaker underneath the helmet padding as follows: Lead the speaker [B] alongside the rim of the padding to the right side and then back to the left side, near speaker [A]. Then place the speaker [B] underneath the padding. ATTACHING AND REMOVING THE HEADSET FROM THE HELMET CLAMPATTACHING:Slide the headset downwards along the sliding panel until a clicking sound indicates that the headset is locked in place.REMOVING:Your headset can be removed for charging and storage by pressing your finger gently against the tab and sliding the headset up with the other hand.We recommend that you remove the headset from the helmet when not in use.Press here to removeSpeaker ASpeaker BSpeaker BCableSpeaker ASpeaker BQGQ2_114 - QG0132.indd 8 7/21/08 3:48:48 PM](https://usermanual.wiki/Cardo-Systems/ER08/User-Guide-1030700-Page-8.png)