Brightstar IP850 Fixed Wireless Phone User Manual
Brightstar Corporation Fixed Wireless Phone
UserManual.wiki
>
Brightstar
>
IP850 User Manual
user manual
Navigation menu
Upload a User Manual
Namespaces
Wiki Guide
HTML
PDF
Info
Views
User Manual
Discussion / Help
Navigation
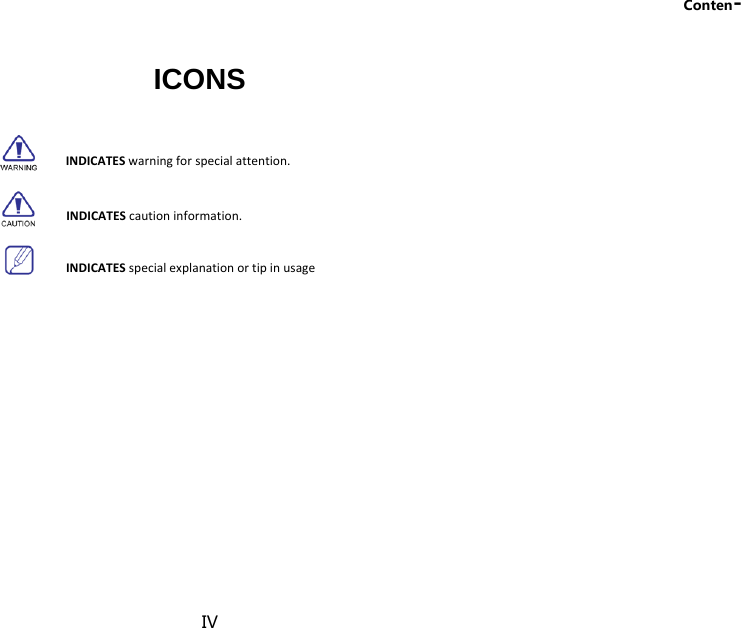
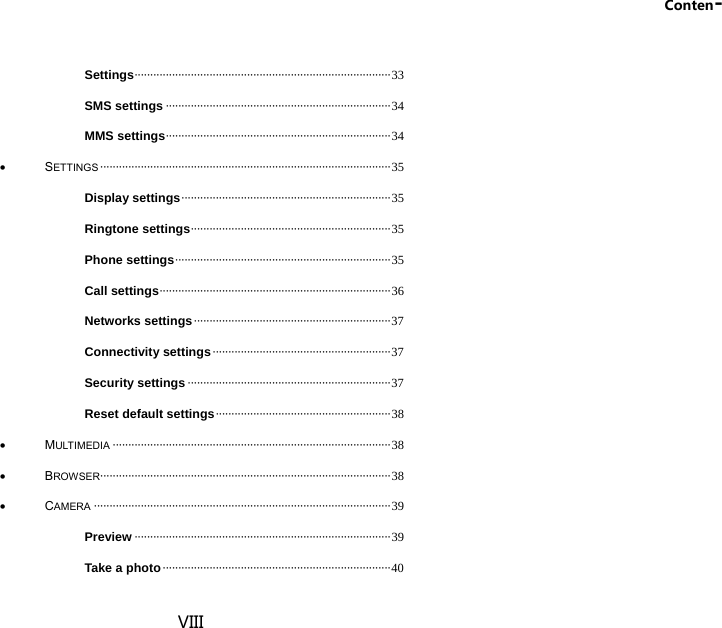

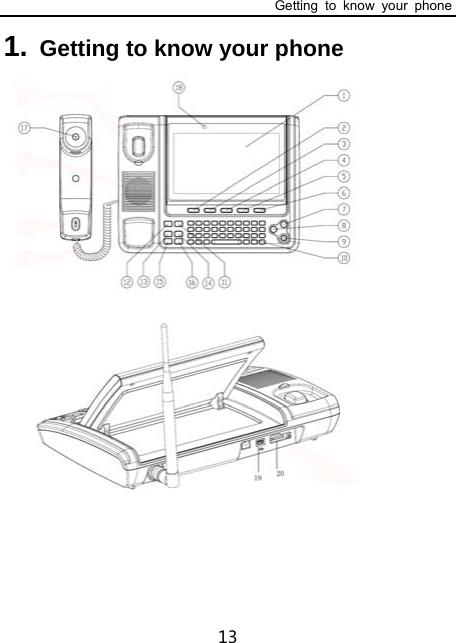
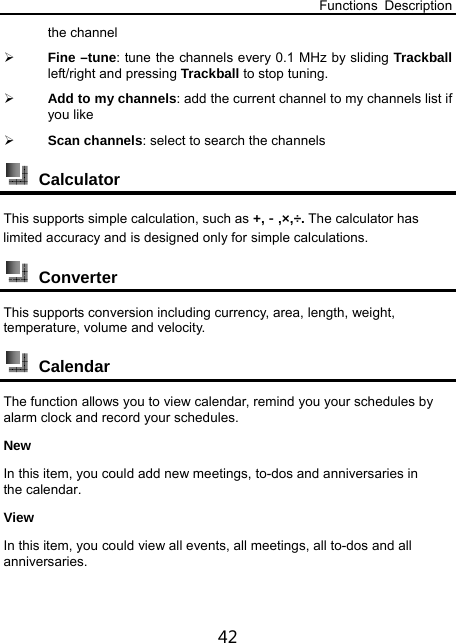
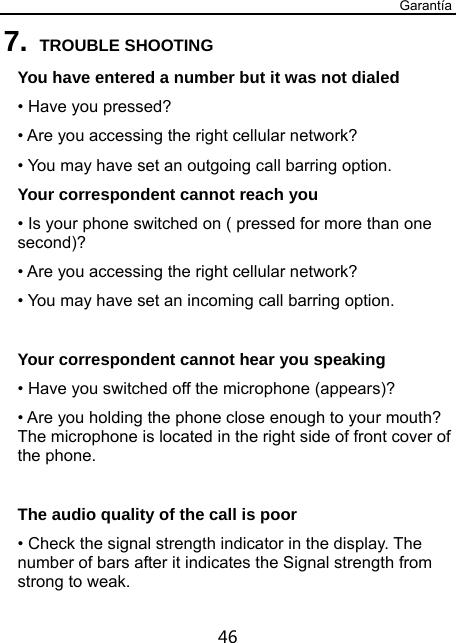
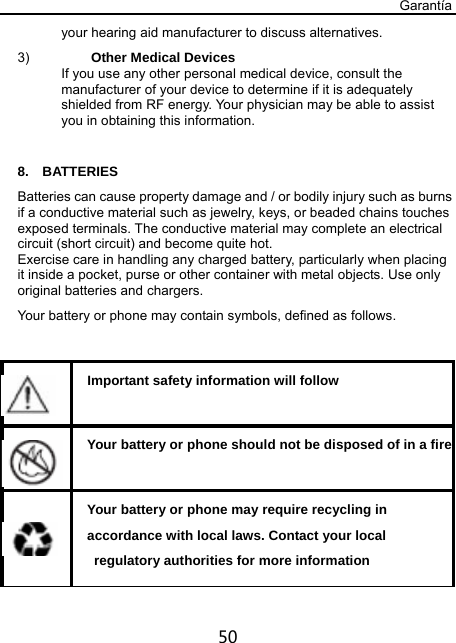
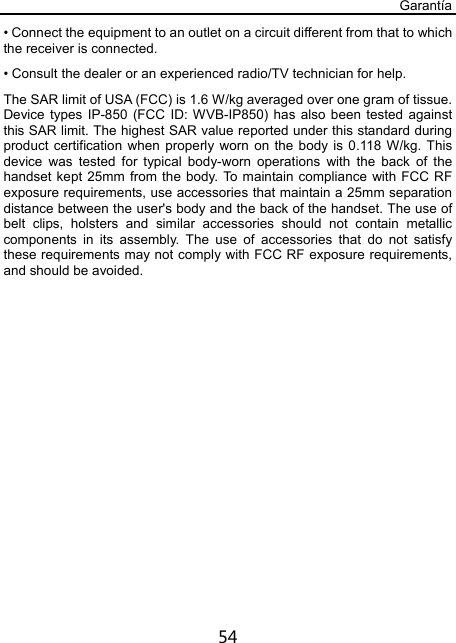
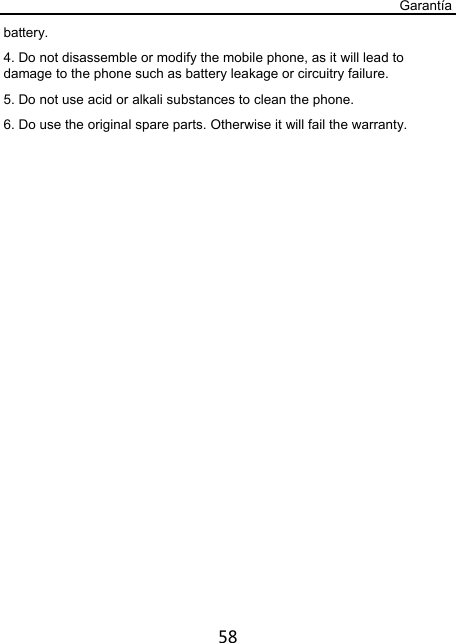
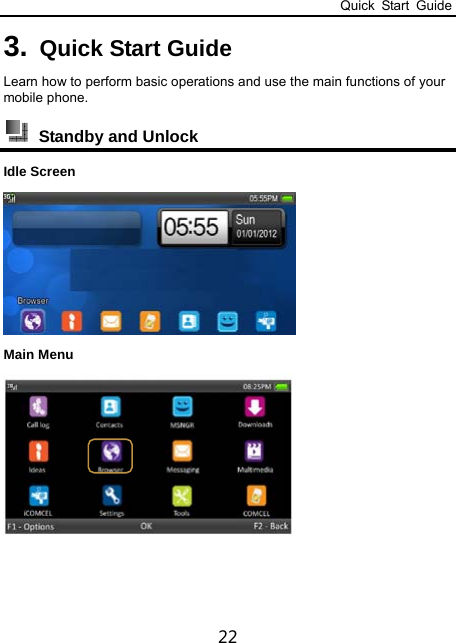
![Getting to know your phone 14 No. Name Description 1 LCD Screen to display. 2 [ Home key ] Enter the standby screen quickly. 3 [ Email key ] Access to Email quickly. 4 [ Browser key ] Connect to the Internet quickly. 5 [ Facebook key ] Access to Facebook quickly. 6 [ Chat key ] Access to MSNGR quickly. 7 [ F1-key ] Corresponding to the operation on bottom of the screen. 8 [ F2-key ] Corresponding to the operation on bottom of the screen. 9 Trackball Slide trackball up/down/left/right to use as [Up/Down/Left/Right key]. [Up/Down/Left/Right key] 1) Move focus / cursor. 2) Shortcuts on idle screen. (Can be set in settings menu) 3) Up/Down key to regulate the volume during a call. 4) Right/Left key to regulate the ring volume of the current profile. Press trackball to use as [OK key]. [OK key]](https://usermanual.wiki/Brightstar/IP850/User-Guide-1687806-Page-14.png)
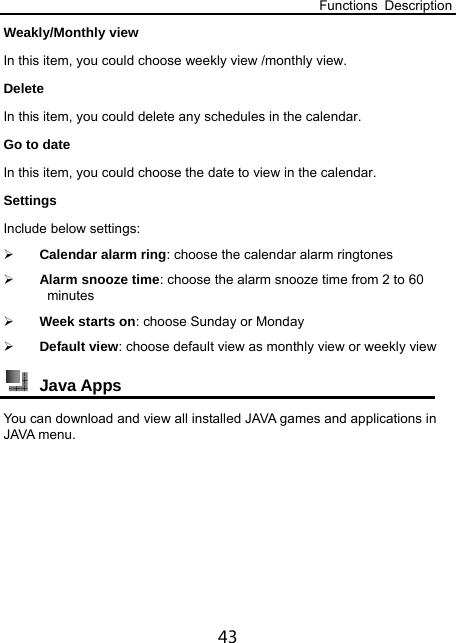
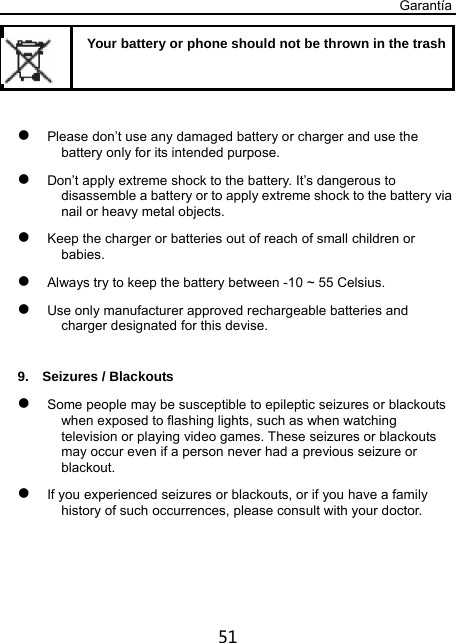
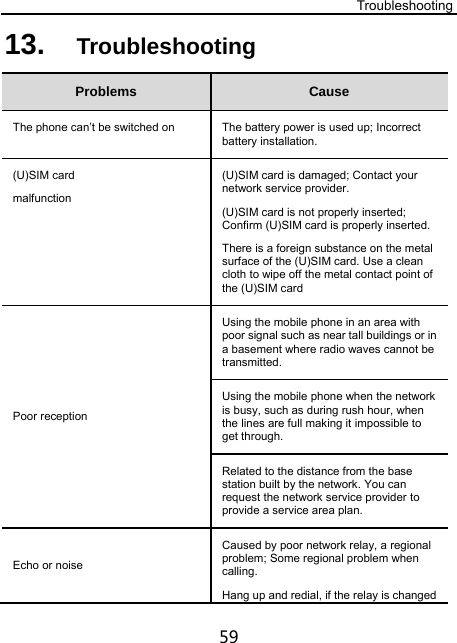
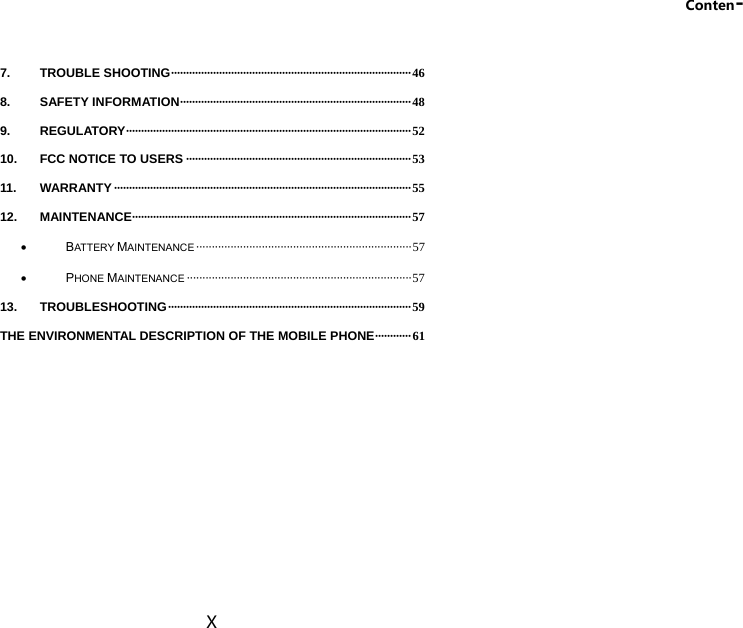
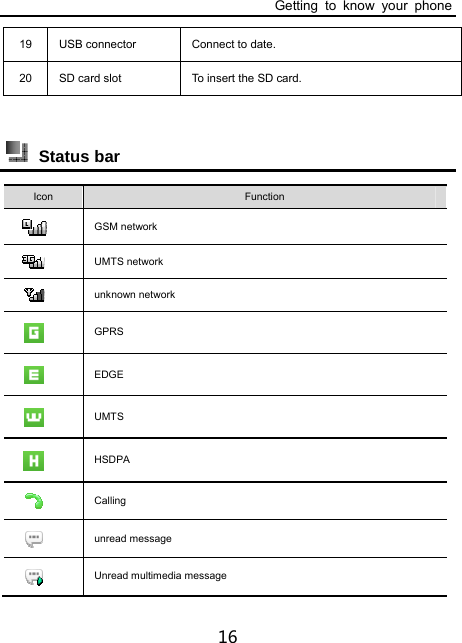
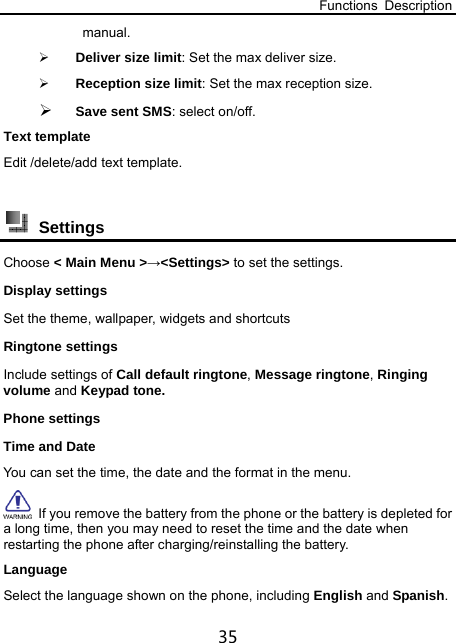
![Getting to know your phone 15 1) Carry out Select, Confirm, etc. 2) Enter into function of the current focused item. 10 [Number key ] and [ QWERTY keypad ] [Number key] 1) Enter call number in the standby mode. 2) Enter number in the input mode. [QWERTY keypad] Enter text in input mode. 11 [ End/Power key ] 1) Power on/off with a long press. 2) Refuse a coming call/End calling. 3) Exit app and return to idle screen. 12 [ Send key ] 1) Make a call. 2) Enter call history screen in standby mode. 13 [ FM Radio key ] Access to FM quickly. 14 [ Menu key ] Enter the main menu screen quickly. 15 [ Speaker key ] 1) Make a call in hand-free mode. 2) Answer a call in hand-free mode. 16 [ Contacts key ] Access to Contacts quickly. 17 Earpiece 1) Receive a call when incoming call. 2) End the call when calling. 18 Camera Use when dialing a video call.](https://usermanual.wiki/Brightstar/IP850/User-Guide-1687806-Page-15.png)
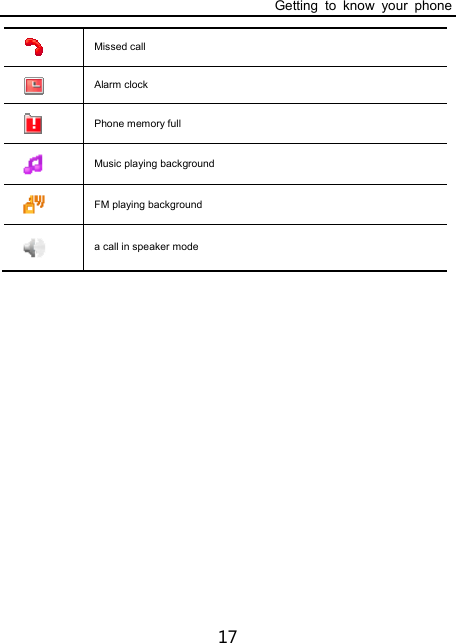

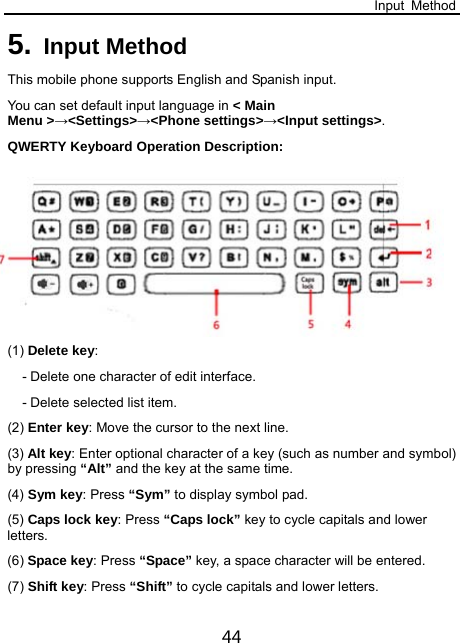
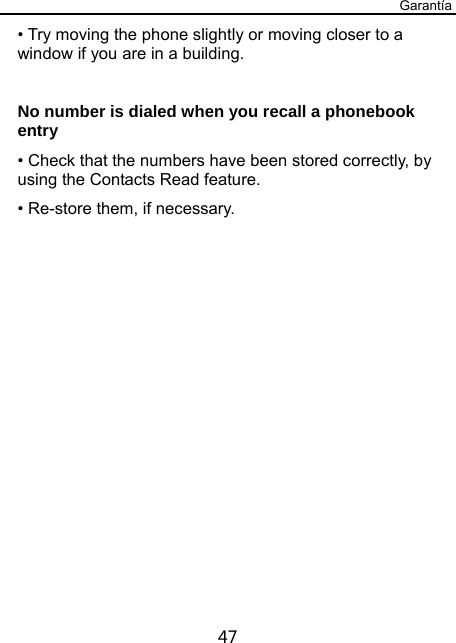
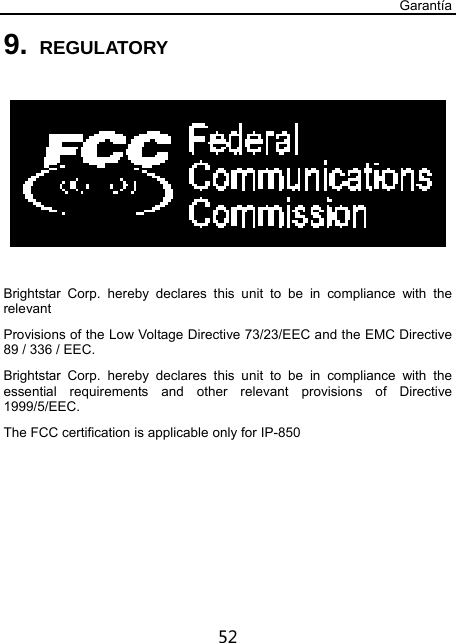
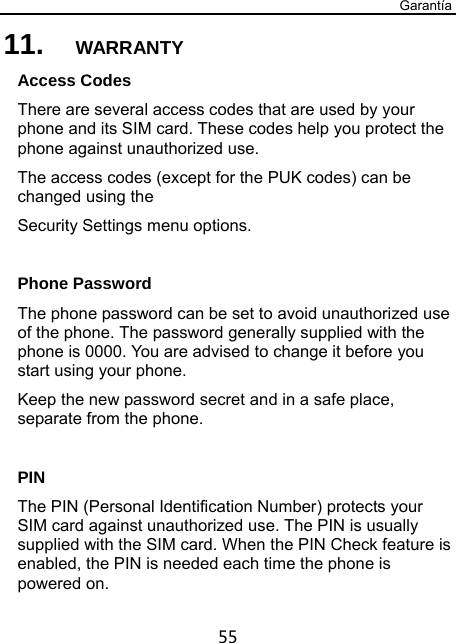
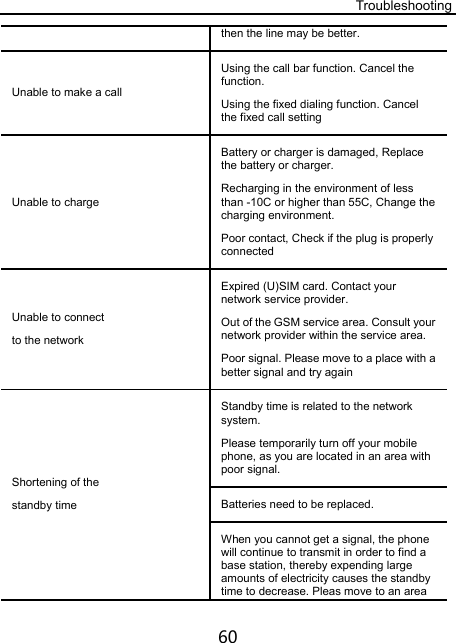
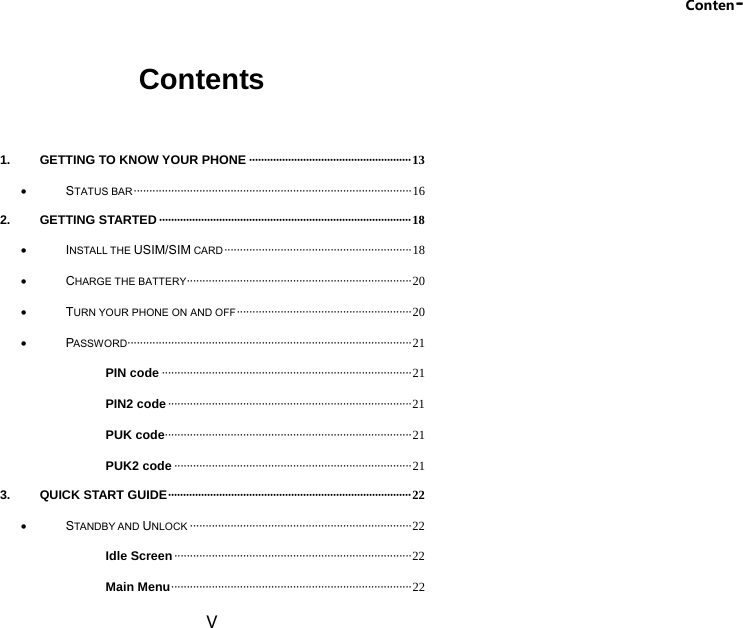
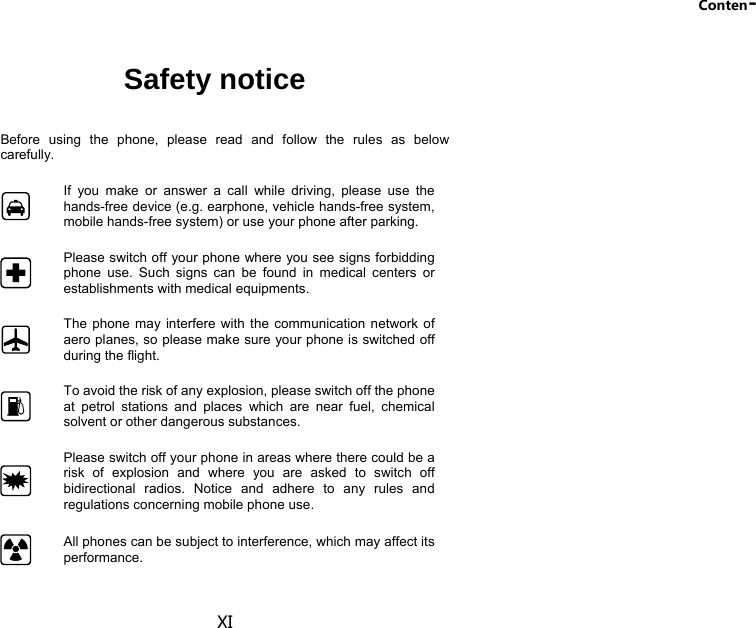
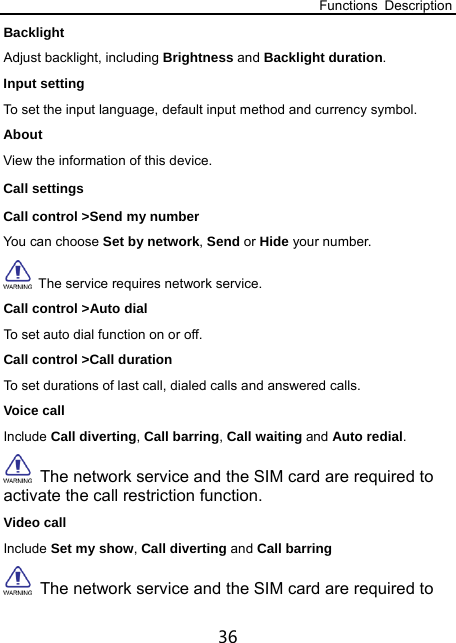
![Getting Started 19 for the first time, charge it for over 6 hours to ensure optimum battery charge. Remove the rear cover: (1) If the phone is on, press and hold [Power key] to turn it off. (2) Hold the device with the front panel facing down, and remove the rear cover. Insert the SIM card: (3) Place the SIM card in the phone with the gold-colored contact area facing down. (4) Place back the rear cover. Note:](https://usermanual.wiki/Brightstar/IP850/User-Guide-1687806-Page-19.png)
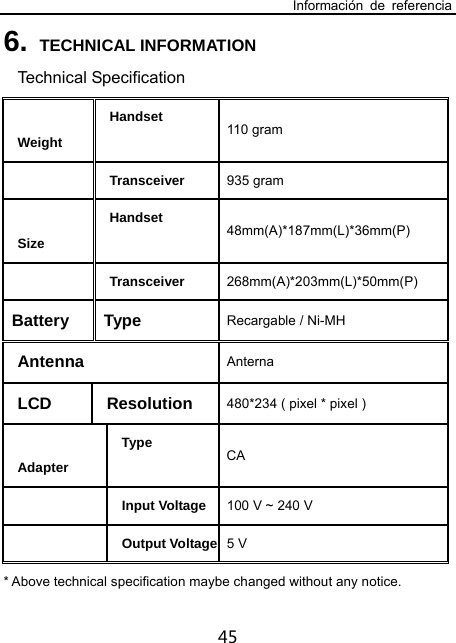
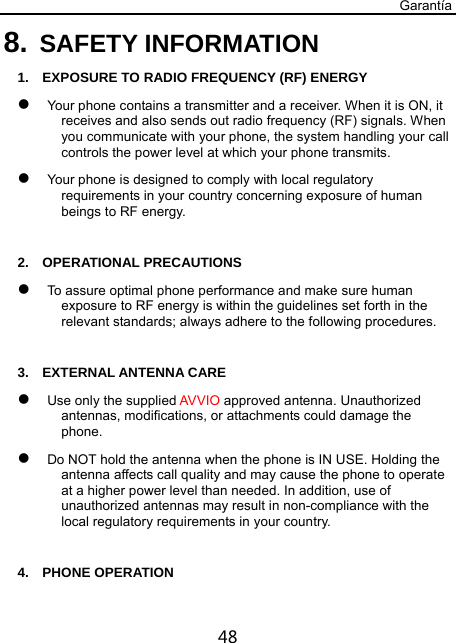
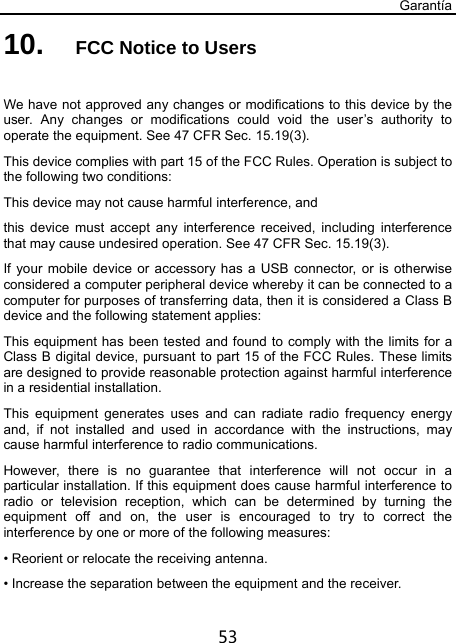
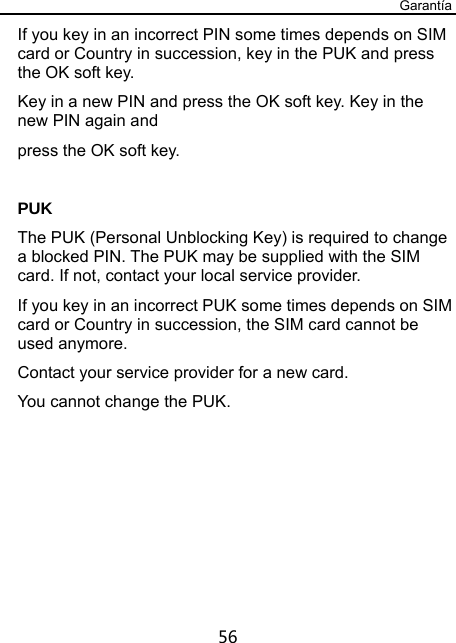
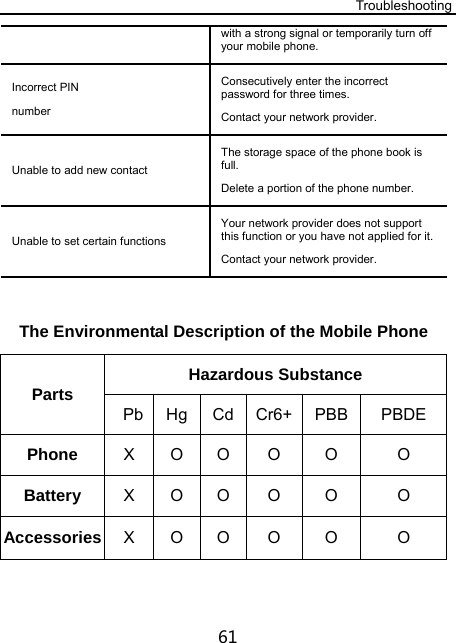
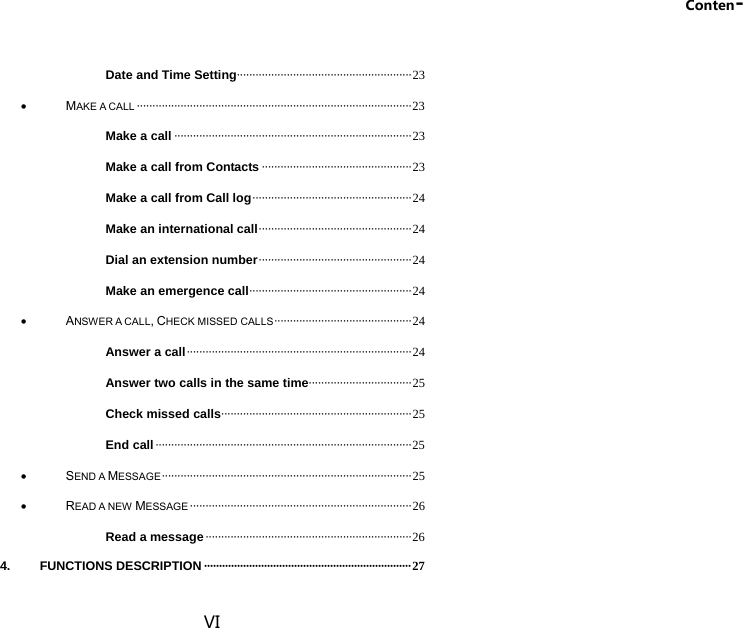
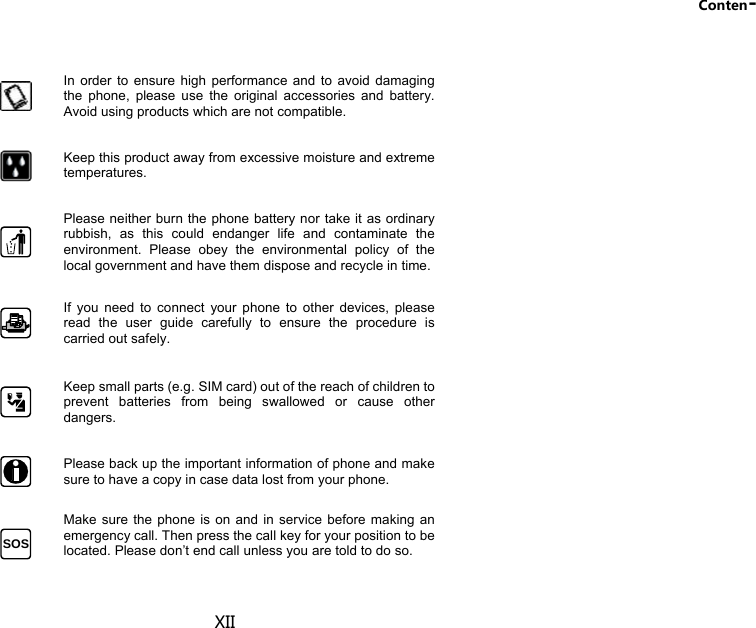
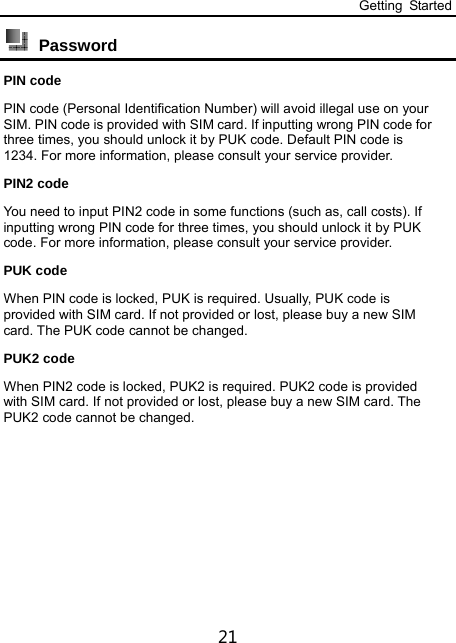
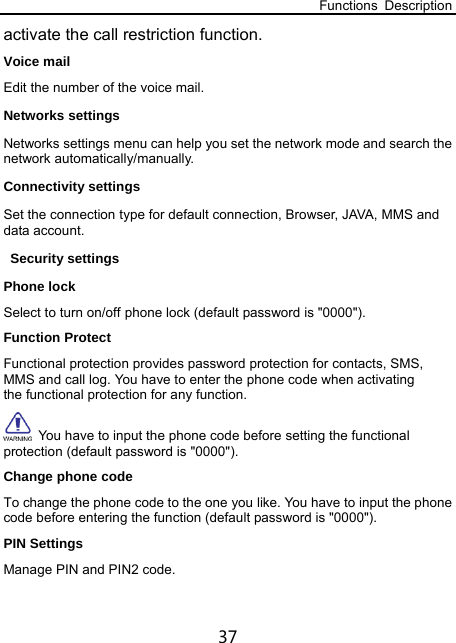
![Getting Started 20 When using the phone,please fix it on the desk or the wall. Charge the battery Charging the battery by the charger: (1) Connect the charger to the phone through the charging port. (2) Connect the charger to a standard wall outlet. (3) When the battery is fully charged (the icon is no longer moving), unplug the travel charger from the power outlet. New batteries have been pre-charged partially before shipment. Before you start using your device, it is recommended that you insert and charge the battery. Some batteries perform best after several full charge/discharge cycles. Do not remove the battery from the device while charging. Turn your phone on and off After installing your SIM card and battery and charging the battery, you can now power on and start using your device. Press and hold the [End/Power key] for a few seconds.](https://usermanual.wiki/Brightstar/IP850/User-Guide-1687806-Page-20.png)
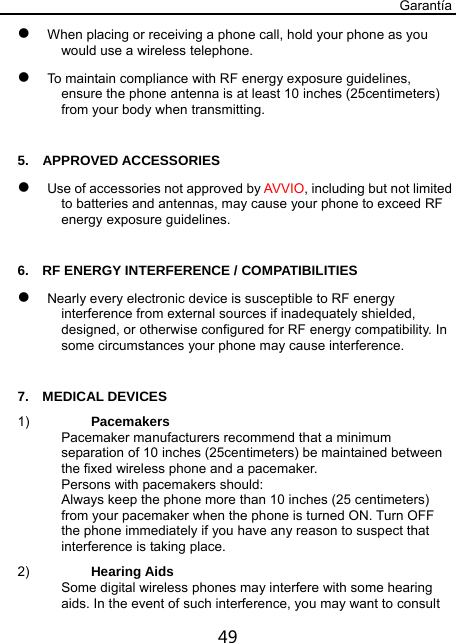
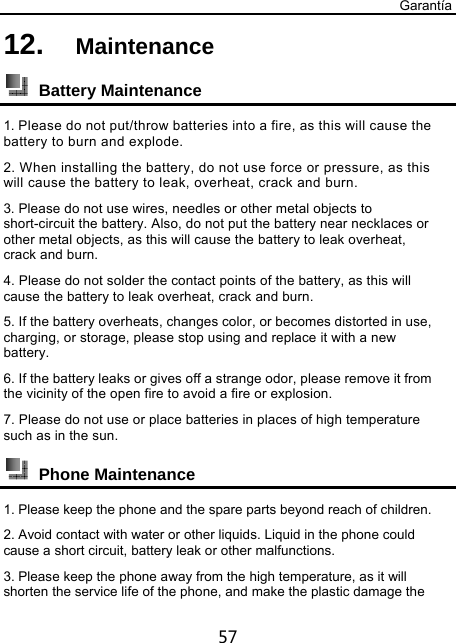
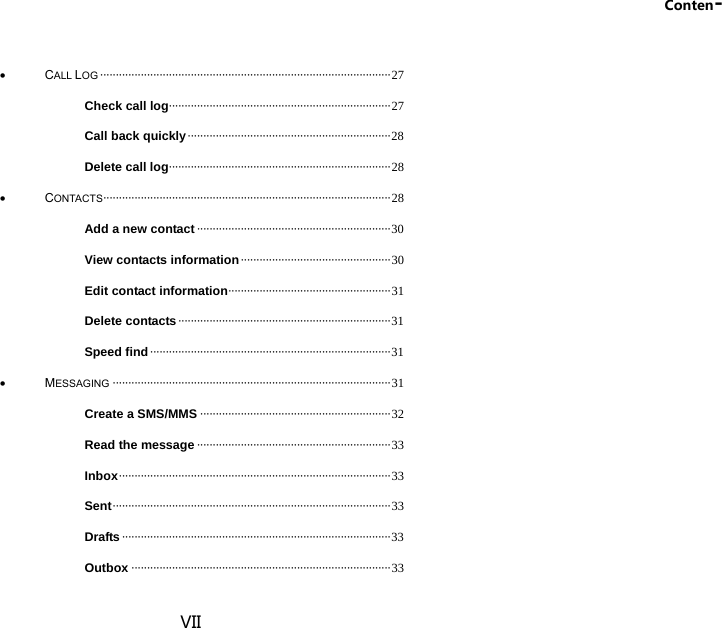
![Quick Start Guide 23 Date and Time Setting 错误!未找到引用源。 (1) < Main Menu >→<Settings>→<Phone settings>→<Time and date>. (2) Choose <Time>, input to adjust the time, and then press [F1-key] to save. (3) Choose <Date>, input to adjust the date, and then press [F1-key] to save. (4) Set <Time zone>, <Use 24-hour format > and <Date format>. Make a call Make a call (1) In standby or main menu, press any number key to enter Dial board, input numbers to make a call. (2) Press [End key] to end the call. When inputting numbers, you can press [Delete key] to delete an error inputting. Make a call from Contacts (1) In main menu, select <Contacts> to enter the Contacts menu. (2) Slide Trackball up/down to search for the contact, or search for a contact through instant initial letter searching. (3) Press [Send key] to make a call.](https://usermanual.wiki/Brightstar/IP850/User-Guide-1687806-Page-23.png)
![Quick Start Guide 24 Make a call from Call log (1) In standby mode, press [Send key] to enter Call log menu. (2) Slide Trackball up/down to search for a Call log. (3) Press [Send key] to make a call. Make an international call (1) Press [O] key in QWERTY keypad to input “+” in dial board (2) Input country code and phone number (3) Press [Send key] to make a call. Dial an extension number Long press [*] key in QWERTY keypad to input “P” in dial board. You should dial the phone number first and then dial the extension number. If you insert “P” between phone number and the extension number, then press [Send key], so call to the extension will be made automatically. Make an emergence call Input the emergence number and then press [Send key]. Answer a call, Check missed calls Answer a call When a call comes in, a dialog box will appear, showing the incoming number or a contact, press [Send key] to answer, or [End key]/ [F2-key] to reject the call. When a call comes in, you can press [F1-key] to stop ringing.](https://usermanual.wiki/Brightstar/IP850/User-Guide-1687806-Page-24.png)
![Quick Start Guide 25 Answer two calls in the same time If call waiting is on (service from the operator is required), you can follow as below when the second call comes: Press [Send key] to answer the second call, the current call will be on hold. Press [End key] to reject the second call, the current call continuous. Check missed calls Your phone will display a pop-up box to prompt the calls you have missed, to check details, press Trackball; to cancel, press [End key] /[F2-key], and a missed call icon will appear in status line. You can also enter the <Call Log> to check missed calls. End call Press [End key] to end call. Send a Message Create and send SMS message from your device. (1) In message screen, choose <SMS>-><New SMS>to create a new message. (2) Input the phone number or choose from <Contacts>. (3) Input message text, press [F1-key] and select<Send> to send it. Press [F1-key] - <Insert> to choose and insert Contact info or Text template.](https://usermanual.wiki/Brightstar/IP850/User-Guide-1687806-Page-25.png)
![Quick Start Guide 26 Read a new Message Read a message When you have a new message, a pop-up box appears. To read the message, press the item; to cancel, press [End key]/ [F2-key], and a missed message icon <> appears in status bar.](https://usermanual.wiki/Brightstar/IP850/User-Guide-1687806-Page-26.png)
![Functions Description 27 4. Functions Description Call Log Call log can record the numbers of all calls, missed calls, dialed calls and answered calls. Only if the network supports these functions, with the device switched on and located within the network service area, the phone can record missed calls and answered calls. In idle screen, press [Send key] to enter the call log screen. Check call log Call logs display the contact’s name and the phone number, the times of calling from/ to the same contact and the last time of the incoming / outgoing call. Choose a record you want to enter the detailed call log. (1) If the current number is not recorded in the contacts, you can view the details of call time and operate as follows: Voice call : make a voice call to the focus number Video call : make a video call to call the focus number Copy to dialer: copy the number to the dialer Send SMS: enter to send a SMS to the focus number Send MMS: enter to send a MMS to the focus number Save to contacts: enter and choose New contact to add this number to a new contact; or choose Existing contact to add this number to an existed contact. Delete: press Trackball to delete the focus call log.](https://usermanual.wiki/Brightstar/IP850/User-Guide-1687806-Page-27.png)
![Functions Description 28 Delete more: select to delete one or more call logs. (2) If the current numbers have been recorded in the contacts, you can view the details of call time and the contact, and operate as below: Voice call : make a voice call to the focus number Video call : make a video call to the focus number Copy to dialer: copy the number to the dialer Send SMS: enter to send a SMS to the focus number Send MMS: enter to send a MMS to the focus number Contact detail: view the details of the contact Delete: press Trackball to delete the focus call log. Delete more: select to delete one or more call logs. Call back quickly In the call log, select the number and press [Send key] to call back quickly. Delete call log In the call log, press [F1-key], choose <Delete>menu, select the item you want to delete, or <Delete more>, then press [F1-key] to delete selected items. Contacts You can manage your contact information in contacts menu. if the contacts are saved in USIM/SIM card,only contact name and one number can be recorded and edited. (1) In main menu, choose <Contacts> to enter the contact list.](https://usermanual.wiki/Brightstar/IP850/User-Guide-1687806-Page-28.png)
![Functions Description 29 (2) The contact list can display the contact name and the storage location. You can press [Send key] to make a call. (3) In the contact list, press [F1-key], operate as below: Add new contact: enter the new contact’s editing screen, choose the contact will be saved in the phone or SIM. And input the contact name, number, email and etc., and then press [F1-key] to save all the information. Send SMS: enter to send a SMS to the focus contact Send MMS: enter to send a MMS to the focus contact Voice call: make a voice call to the focus contact Video call : make a video call to the focus contact Copy to dialer: copy this number to dialer Send as vCard: send contact as v-card via SMS Group: view all the contacts in groups and to add new group, send message to a group, edit group and delete Delete: delete this number from contacts Move to Phone or SIM card: move the contact from phone to SIM, or from SIM to phone. After that, the contact will be not in the previous phone or SIM. Copy to Phone or SIM card: move the contact from phone to SIM, or Mark: mark contacts to send messages, send as vCard, delete, move to and copy to SD card. Settings: includes Speed dial, Contacts to display, Default storage location and Fixed dial numbers Memory status: view all the contact information in the phone, SIM and groups.](https://usermanual.wiki/Brightstar/IP850/User-Guide-1687806-Page-29.png)
![Functions Description 30 My number(SIM Card): view the SIM card’s number Service numbers: numbers built-in SIM card Add a new contact (1) In the contact list, press [F1-key] - <Add new contact> to enter the new contact’s editing screen. (2) In the editing screen, input the contact name, number, email and etc., then press [F1-key] to save all the information. Choose <Phone Contact> on the editing screen to select the storage location. Choose the image to add contact picture from photos. To add more information, you can choose <Add detail>. View contacts information (1) In the contacts list, click the contact name to view details. (2) Press [F1- key] to have : Send SMS: enter to send a SMS to this contact Send MMS: enter to send a MMS to this contact Edit: edit the information of this contact Voice call: make a voice call to this contact Video call: make a video call to this contact Copy to dialer: copy this number to dialer Send as vCard: send contact as v-card via SMS Delete: delete this contact from contacts Move to Phone or SIM card: move the contact from phone to](https://usermanual.wiki/Brightstar/IP850/User-Guide-1687806-Page-30.png)
![Functions Description 31 SIM, or from SIM to phone. After that, the contact will be not in the previous phone or SIM. Copy to Phone or SIM card: move the contact from phone to SIM, or from SIM to phone. Duplicate contact: duplicate this contact in the same phone or SIM Add to speed dial: add as one of the speed dials and choose a number from 2-9 as the speed dial number for this number. Edit contact information In the contact detailed screen, press [F1-key], and choose <Edit>. Delete contacts In the contact list, press [F1-key], choose <Delete> to delete the focus contact, or choose <Mark> to select one or more contacts to delete. Speed find In the contact list, input the first letter to find the contact. Messaging In messaging screen, you can create, send, receive, view, edit and set the SMS/ MMS. You can also receive network service message and broadcasting message. SMS and MMS functions require the service from service provider. Only the devices that are compatible with MMS function can receive and display MMS. In main menu, choose <SMS>/<MMS> to enter the message function.](https://usermanual.wiki/Brightstar/IP850/User-Guide-1687806-Page-31.png)
![Functions Description 32 Create a SMS/MMS Create a SMS (1) In the SMS function screen, choose the <New SMS> on top of the screen to edit a new message. (2) Enter the phone number in the receiver column or choose <Contacts> to select one or more numbers and then press [F1-key] to add to the receiver list. Choose <Add from Contacts> to add a receiver. (3) Input the message content in message column. - Choose <Insert> to insert Contact info or Text template. - Choose <Send> to send the message. - Choose <Save to drafts> to save the message in Drafts. - Choose <Save as template> to save the message as template. Create a MMS (1) In the MMS function screen, choose the <New MMS> on top of the screen to edit a new message. (2) Enter the phone number in the receiver column or choose <Contacts> to select one or more numbers and then press [F1-key] to add to the receiver list. Choose <Add from Contacts> to add a receiver. (3) Input the message content in message column.](https://usermanual.wiki/Brightstar/IP850/User-Guide-1687806-Page-32.png)
![Functions Description 33 - Choose <Insert picture/video/ sound/ other>to insert picture/video/sound/other. - Choose <Add subject/Cc/Bcc> to add subject/Cc/Bcc to the message. - Choose<MMS control> to preview the MMS, remove slide, set slide timing or add attachments. - Choose <Send> to send the message. - Choose <Save to drafts> to save the message in Drafts. Read the message (1) When a new message comes, a dialogue box will appear on the screen. Choose the item to enter the Inbox. (2) Choose unread message to read it. Inbox View message list and read/unread status. Sent Save and view/delete sent message. Drafts Save and view/delete drafts. Outbox Save and view/delete messages waiting to be sent Settings In SMS screen, press [Options] - <Settings> to set SMS settings, Text template and Cell Broadcast.](https://usermanual.wiki/Brightstar/IP850/User-Guide-1687806-Page-33.png)
![Functions Description 34 In MMS screen, press [Options] - <Settings> to set MMS setting and Text template. SMS settings SMS setting Service center: To view and edit the service center’s number. Usually, there is a default number and don’t have to change. Delivery report: When it is on, message center will send you the delivery report. SMS Type: select the type for SMS. Validity period: Set the period that messages stay in the message center. Save sent SMS: select on/off. Text template Edit /delete/add text template. Cell broadcast On/off to receive cell broadcast or not and also set channel. MMS settings MMS setting Validity period: Set the period that messages stay in the message center. Priority: Set the MMS’s priority to be low, normal or high. Delivery report: When it is on, message center will send you the delivery report. Fetch mode: Set the fetch mode for MMS. Auto-Playback: Set the MMS’s playback to be automatic or](https://usermanual.wiki/Brightstar/IP850/User-Guide-1687806-Page-34.png)
![Functions Description 38 Reset default settings You can select the functions to be restored as default value. Input password (default password is "0000"). Multimedia You may manage files including images, videos, sounds, downloads and others. In the screen of file manager, press [F1-key] to obtain more items as below: Delete: select to delete the item Delete more: select to delete one or more items Send via MMS: select to send the item via MMS Rename: select to rename the item Manage: select to move/copy the item to folder or create a new folder. Properties: select to view the details of the item Memory status: select to view the memory status of Multimedia and SD card Browser Your mobile phone supports wireless application protocol WAP and WWW service. Please make sure that you have launched the mobile Internet services before you use the function. It may be charged to use the internet service. The charge information is provided by the network service providers. You can access many different Internet services such as news, weather reports, flight information, and others. These services are](https://usermanual.wiki/Brightstar/IP850/User-Guide-1687806-Page-38.png)
![Functions Description 39 especially designed for mobile phones and maintained by WAP/WWW service providers. Network service is necessary for WAP. Please contact your network provider and/or the service provider of the desired service. The service provider will also provide instructions about how to use their service. The charge information and other specific settings are provided by the network service providers. Camera You can use the phone’s camera to take photos and adjust the camera’s settings. The camera is on the front of the phone and takes the screen as a viewfinder. The photos taken by the camera are saved as JPG format. Please install the memory card before using Camera. Preview In the preview screen, press [F1-key] to view options menu: Resolution: set the photo’s resolution to VGA or QVGA Scenes: select Normal or MMS mode EV: adjust Exposure value. Settings: select to storage the photo in Phone or SD card Album: view photos in the album.](https://usermanual.wiki/Brightstar/IP850/User-Guide-1687806-Page-39.png)
![Functions Description 40 Take a photo To a take photo, press Trackball when there is no option menu in the interface. Then you can choose to delete, send, rename the taken photo or set it as wallpaper or slideshow. Media Player The device supports to play music in MP3, WMA, AMR, AAC, MIDI format and play video in MP4, WMV, 3GP format. Please install the memory card before using Media Player. You may see the following submenu in Media Player screen: Now playing: to view all the music files being played now All Tracks: to view all the music files in memory Artists: to search music files and play the album by Artist’s name Albums: to search music files and play the album by album’s name Playlists: to view the playlists and play songs in lists. Videos: to view all the video files in memory. Press [F1-key] to have below options: Settings: includes Equalizer setting, Play mode, Sleeping mode and Lyrics display Update: to update the music files in the Media player](https://usermanual.wiki/Brightstar/IP850/User-Guide-1687806-Page-40.png)
![Functions Description 41 In the menu screen, choose <Now playing>on the screen to enter the player. Play music Choose a music file to play. The phone supports to play MP3 as the background music. In Media player screen, press [End-key] to return to standby mode and music will be played as the background music. If you want to close the media player, please enter the media screen to close. Play video Choose a video file to play. Alarm You can set several alarm clocks at different times and you can set the alarm on or off and delete in this menu. FM Radio The phone supports FM radio. Press the [FM Radio key] or select <Main menu>→<Tools>→<FM Radio> to enter the function. Please install the memory card before using FM Radio. The operations of FM are as follows: My channels:list the channels you save All channels : list all the channels searched Manual tuning: enter the channel’s frequency you like to tune to](https://usermanual.wiki/Brightstar/IP850/User-Guide-1687806-Page-41.png)