Brightstar FXP860 Fixed Wireless Phone User Manual FXP 860 EN common 20120613
Brightstar Corporation Fixed Wireless Phone FXP 860 EN common 20120613
UserManual.wiki
>
Brightstar
>
FXP860 User Manual
User Manual
Navigation menu
Upload a User Manual
Namespaces
Wiki Guide
HTML
PDF
Info
Views
User Manual
Discussion / Help
Navigation


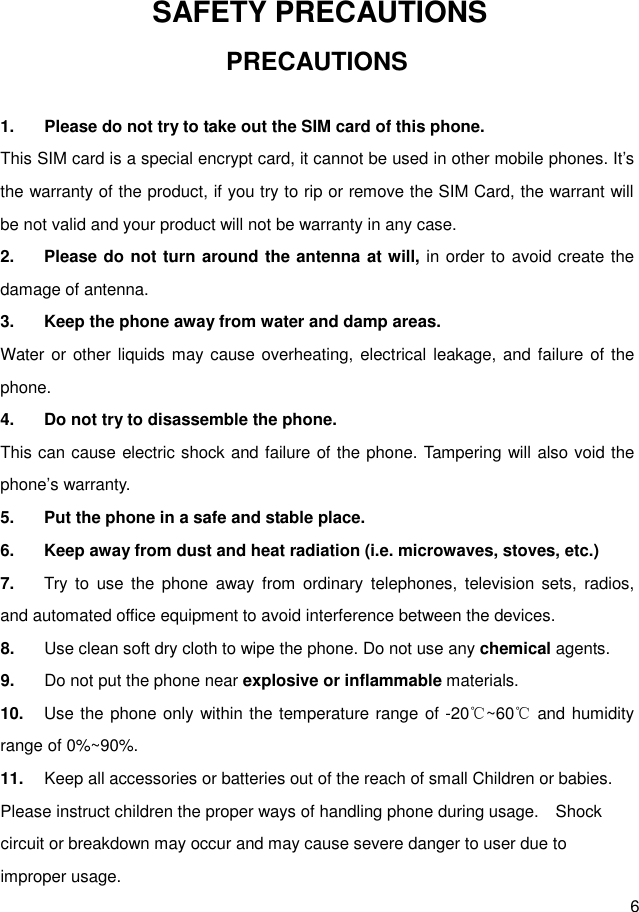
![13 INSTALLATION [1] Installing Coil Cord Connect the coil cord to both the handset and the transceiver (phone). [2] Installing Antenna Install the antenna to the antenna connector. Hold the plastic portion of the antenna and turn the metal screw clock-wise. [3] Plugging AC/DC Adapter Connect the adaptor to the AC Wall outlet and put adapter jack into the hole on the rear side of transceiver [4] SIM Card and battery 1) Remove the battery door. 2) Insert SIM card into the SIM slot in the right direction. 3) Connect the rechargeable battery pack into the battery plug. 4) Replace the battery door. [5] Turning Phone’s Power On/Off After installing the handset correctly, press the power key which is on the right of the front panel for about 3 seconds, the phone will then automatically test whether the SIM Card is inserted and valid. Wait for the antenna icon to display indicator bars before you make a call. 1) When the battery icon is empty, connect the external power adapter’s barrel connector to the external power input on back panel of unit. 2) Plug the external power adapter into the power socket. The unit will power up automatically. 3) Check the cellular signal strength and move the unit until the best signal possible is achieved. 4) In state of power-on, press and hold power key button, LCD screen closes.](https://usermanual.wiki/Brightstar/FXP860/User-Guide-1760851-Page-14.png)
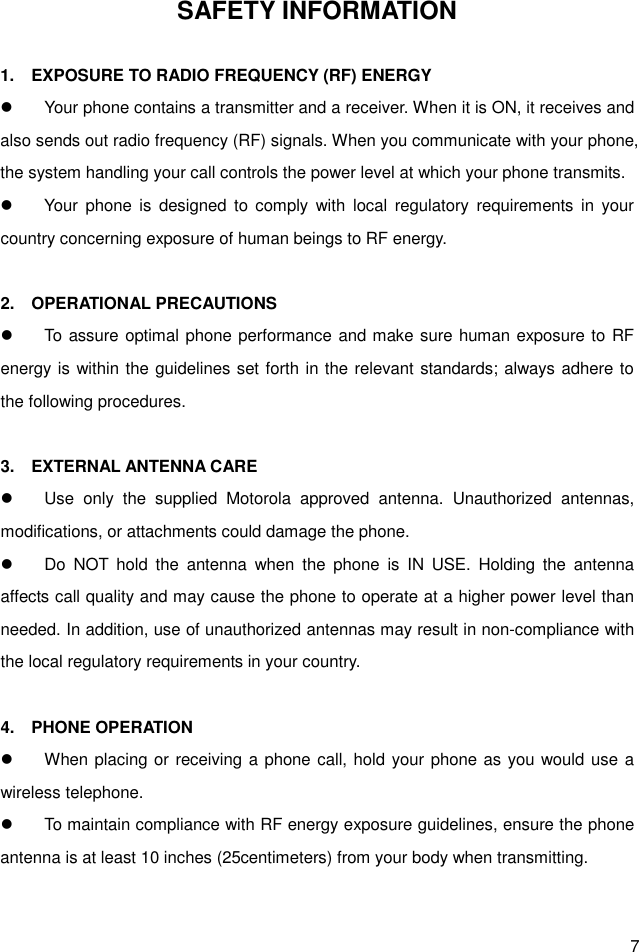
![15 KEY FUNCTION [1] Left / Right Soft Key ( Menu / Contacts key ) Press the left soft key (Menu/OK) to perform the function indicated by the text on the screen above the key. Press the right soft key (Dial Record/Back) to directly access the Dial Record list Note: The functions of the soft keys depend on the guiding text shown above the keys. For example, when the text Menu is above the left soft key, press, and the left key enters the menu functions. Similarly, pressing the right soft key under the text Dial Record accesses the Dial Record list functions [2] Send key Press to make a call to a name / number shown on the screen. Press to answer a call. Press to access the list of recently outgoing call . [3] End key Press to end a call. Press once to exit a function and return to the idle screen. [4] Numeric Keys / ‘****’ keys / ‘#’ Keys Used for entering numbers and letters. Press and hold number 1 key to call the voice mailbox. Press ‘#’ key to toggle between upper case, lower case and numeric modes in message mode.](https://usermanual.wiki/Brightstar/FXP860/User-Guide-1760851-Page-16.png)
![16 Press ‘****’ key to toggle between letters and symbols in message mode. [5] Scroll keys Press up/down key to up / down the phone’s menu. [6] Speaker key If you are using the handset to call and you want to transfer the call to the speakerphone mode, press the Speaker key button and hang up the receiver to transfer the call to the speakerphone. [7] Volume key Press Volume up/down key to change volume level. Press Volume up/down key to move the cursor when entering letters.](https://usermanual.wiki/Brightstar/FXP860/User-Guide-1760851-Page-17.png)

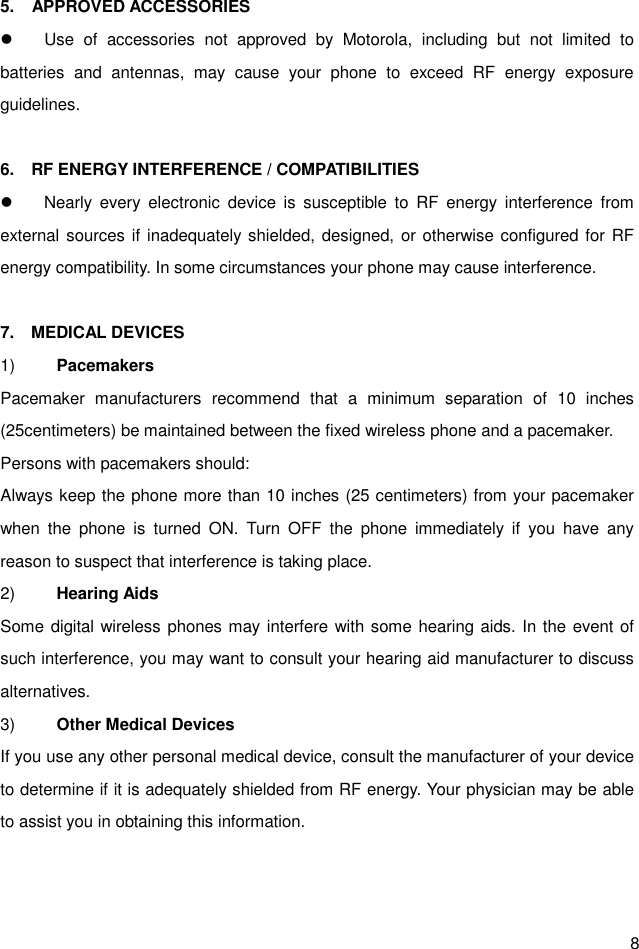
![18 BASIC FUNCTION BASIC OPERATION [1] Switching the phone ON and OFF 1) To turn on your phone, press and hold “End key” for a few seconds or until the display turns on. 2) To turn off your phone, press and hold “End key” for a few seconds. [2] Making a call 1) Dial a Call Raise your receiver and enter phone number which you want to call. After entering phone number and press “Call key” to make a call. Tip: In some menus like Contacts, Dial Records, etc. which have individual phone number, Press “Call key” directly to make a call. 2) Dial the Fixed Phone Extension Number Some fixed phone extension can’t be called directly, it need a phone exchange. If you input the pause character ‘P’ between the exchange phone number and extension number, the phone will finish the dial procedure, connect to the extension. To get the “P”, press the “****” key some time till the “P” displayed on the phone screen. 3) Dial a International Call Press the “****” key some time till the character “+” displayed on the phone screen. Input the country code and the phone number after the prefix. 4) Dial From Contacts Press Contact key to get into the phone book. Press Up / Down key to scroll the list t](https://usermanual.wiki/Brightstar/FXP860/User-Guide-1760851-Page-19.png)
![19 o search the caller’s name. Then press call key to make a call. 5) Speed Dial Press 2 -9 keys for a while, the phone number stored in speed dial list will be sent out. Make sure the speed dial key has been set up. [3] Answering a call When your phone rings, just raise your receiver to answer, or press “Call key” or “Speaker key” to answer in speaker phone mode. [4] Speaker mode. You can make or answer a phone call by pressing Speaker key when the handset is on the base To make a call: 1) Press the number you want to connect to without pick the handset up. 2) Press Send key Note: The call is automatically made without pressing, approximately 3 seconds after you dial the number. To answer a call When the phone rings, press Speaker key to turn ON the speaker phone mode. [5] Adjusting the Ring Volume You can adjust the ring tone volume by pressing the Volume keys on the phone in setting menu.](https://usermanual.wiki/Brightstar/FXP860/User-Guide-1760851-Page-20.png)
![20 [6] Redialing the last-dialed number The phone stores up to 10 last dialed numbers. 1) Press Send key to find the most recently dialed numbers. 2) Press navigation key to scroll to the number you wish to dial. 3) Press Send key once. Note: If no recently dialed numbers are stored, you will not be able to use this function. [7] Caller ID Requires a subscription to a calling plan that supports this feature. Not available in all areas. Contact you telephone service provider for availability and details. When Caller ID is active, your phone shows the caller’s phone number during an incoming call, as long as this number is a part of your service provider’s wireless network. The wireless network lets you know if it does not recognize the caller’s phone number. The wireless network will also let you know if the calling party has blocked the Caller ID feature. If you have stored the name and number of the calling party in your Contacts and that number is supported by the wireless network, the caller’s name will also appear. [8] SMS and Voice Mail Requires a subscription to a calling plan that supports this feature. Not available in all areas. Contact you telephone service provider for availability and details. A new SMS arrives: The back light of the LCD is ON and the display shows “New Message, Read Now ?” text message with SMS icon . And if you want to read received new Message, press the left soft key ( Yes ). If you want to check message later, press the right soft key ( No ).](https://usermanual.wiki/Brightstar/FXP860/User-Guide-1760851-Page-21.png)

![22 USING PHONE MENUS [1] Menus A menu is a list of choices you can make. Your phone has 5 menus. ( And your service provider may add STK menu extra depending on network service ) Each menu contains options that allow you to use the message, change the ring tone, etc. You can use menus and sub-menus in two ways: by scrolling or by using shortcuts. [2] Scrolling through menus 1) From the Start screen, press Menu, and then scroll through the menus using Up / Down key. 2) Use the scroll and OK key to select the submenus and back key to return to the Start screen. [3] Exiting menu levels 1) To return to the previous menu level, press Back key. 2) To return to the Start screen, press End key. No menu setting changes will be saved. [4] Menu Tree You can refer to pages 25 about Menu tree for more details. [5] Using shortcuts through menu 1) Dial Record : press the right soft key directly 2) Outgoing call: press Call key one time for a second.](https://usermanual.wiki/Brightstar/FXP860/User-Guide-1760851-Page-23.png)
![23 ENTER LETTERS AND NUMBERS You can enter letters, as well as numbers, when storing information in your phone by using your phone’s keypad. To enter letters, press the key associated with the letter you wish to enter until it appears on the screen (numbers will also appear). [1] Entering Letters When you want to add new names or when you view names in the Contacts, your phone automatically switches to the abc (ABC) mode and displays the abc icon on the right upper side in Display. Key Characters Key Characters Key Characters 1 , . ? ! 1 2 a b c 2 å æ ä à ç á 3 d e f 3 è é 4 g h i 4 ì í 5 j k l 5 £ 6 m n o 6 ö ø ò ñ ó 7 p q r s 7 β $ 8 t u v 8 ù ü ú 9 w x y z 9 0 (Space) 0 **** , . ‘ ? ! “ @ ¥¥¥¥ $ _ ‘ ˆ { } ﹨﹨﹨﹨ [∼∼∼∼] | # ¤ % & ( ) * + - / : ; < = > ¡ § ¿ # Change letter case(※※※※) ※※※※: abc → Abc →ABC →123 rotated [2] Editing name or phone number To edit a name already stored in the Contacts:](https://usermanual.wiki/Brightstar/FXP860/User-Guide-1760851-Page-24.png)
![24 1) From the main screen, press Contact shortcut key. 2) From the Contacts list ( Read ), select the name you want to edit by scrolling Up / Down key and press OK key. 3) To edit, press the left soft key and scroll down to the edit option and press OK key. 4) Edit the name you want to change and / or press again OK key to change the phone number. 5) Press Volume down key to scroll the cursor to the left. 6) Press Volume up key to scroll the cursor to the right. 7) Press Clear key to correct any mistakes or press hold to clear all. 8) Press the OK key to save changes or the Back key to cancel. [3] Changing the case of letters and numbers You can switch the mode among uppercase and lowercase letters and numbers by pressing # key.](https://usermanual.wiki/Brightstar/FXP860/User-Guide-1760851-Page-25.png)

![28 THE CONTACTS New entries can be stored in the SIM card or in your Phone. You can store up to 100 entries in the phone and an additional 250 in the SIM depending on the SIM limitations. Entries stored in the phone allow numbers of up to 30 digits, and names of up to 16 characters. In standby mode, you can press Contact Shortcut key in the low right side of transceiver to immediately access the Contacts list. When the name is found by pressing Contacts, press OK key to select option sub menu ( you can choose to send Message to, edit, clear, add to group, copy ) Using Contact Menus The Contacts has several menus to select from. These menus appear when you press Menu/OK (Left Soft key) and select Contacts menu by pressing OK key. Press Back key (right soft key) to move back to the main menu. Read : Show the names stored in phone and / or SIM card. Add: Add new entry (s) Memory Status: Memory status of phone and SIM Service dial : Show service name provided by Service networks the phone Speed Dial: One button dialing Copy: Copy from SIM (Phone) to Phone (SIM) Clear All Records : Clear all Phone or SIM entries Group: Organizing group of Contacts My number: Inputting or check your own number [1] Read (by name)](https://usermanual.wiki/Brightstar/FXP860/User-Guide-1760851-Page-29.png)
![29 From the Contacts menu, select Read and press OK key Enter the first letters of the name you need and then the cursor goes to the name you wanted directly after one second or select name using to scroll and press OK key After choosing one of the name, you can press OK key and you can choose five sub menus. Send Message To: You can send SMS to this entry Edit : You can edit the name and number of this entry Clear : You can delete this entry only ( You need to re-confirm ) Add to group: You can put this entry to group, but you cannot use SIM entry to a group. Copy: If you select a SIM card’s entry and select Copy, you can copy it to phone memory. If your selection is Phone memory’s entry, Copy means copy chosen entry to SIM card [2] Adding a new Contacts Entry To create a Contacts entry: 1) Press Menu > Contacts > Scroll to Add and press OK key 2) Press Save To SIM or Save To Phone depending on where you want to store the phone entry. 3) Add Name and press OK key 4) Add Number and press OK key [3] Memory Status](https://usermanual.wiki/Brightstar/FXP860/User-Guide-1760851-Page-30.png)
![30 To press’ Memory Status’ and you can see the capacity of SIM card used / SIM card total and Phone used / Phone total. [4] Service dial You can check or / and call service number provided by your network Service. This menu may differ depending on the Network services to which you have subscribed. Not available in all areas. Contact your telephone service provider for availability and details. [5] Speed Dial 1) Press Menu > Contacts 2) Scroll to Speed Dial and press OK key 3) Select one entry. If the numbers are Empty, Press OK key > Select Set/Change and press OK key, you can assign one phone number. After choosing one, press OK key 4) If you assigned one phone number already, you can see four sub categories Set / Changes : You can change the assigned number Detail : You can see the number of this entry Clear : You can delete this entry Dial to : You can dial to this entry You can use only phone entries and SIM entries and appoint 8 entries. On the idle display, press one assigned button and press Call button or press one assigned number for about 3 seconds till make a call. Ex> If the number assigned in 2 is 01-34-567, just press 2 and Call button [6] Copy](https://usermanual.wiki/Brightstar/FXP860/User-Guide-1760851-Page-31.png)
![31 You can use this function to copy all numbers from the SIM card to your fixed phone, or vice versa: 1) Press Menu > Contacts 2) Scroll to Copy and press OK key 3) Press SIM to phone or Phone to SIM depending on where you want to copy all Contacts entries. 4) Press OK key, then the copy process is done promptly [7] Clear All Records You can delete all Contacts entries: 1) Press Menu > Contacts 2) Scroll to Clear all Records and press OK key 3) Press Phone Records or SIM Records, depending on where you want to delete all Contacts entries. 4) Press OK key to confirm the deletion of all Contacts entries. 5) Select OK key if you want to delete. Otherwise, select Back key to go back to the previous menu. Caution: When complete all information stored in your Contacts will be deleted and can no longer be restored. [8] Group Contacts entries can be grouped to some units:](https://usermanual.wiki/Brightstar/FXP860/User-Guide-1760851-Page-32.png)
![32 1) Press Menu > Contacts 2) Scroll to Group and press OK key 3) And you can see four groups 1) Family 2) Friends 3) Office 4) Others 4) Select one and press left OK key and you can see the sub menus In one group, you can select three sub menus Group Member: You can see entry (s) belongs to the group Rename : You can edit the name of this group itself (Ex> Family→ Home) Alert Tone: You can change the tone when the member of this group called you. Note: Only phone memory numbers can be added to group [9] My Number You can check, edit, erase and save your owner name and number 1) Press Menu > Contacts 2) Scroll to My number and press OK 3) Select Line 1 Number or Line 2 Number and press OK key Press Option>Edit to edit your own name and number and press OK key. Press Option>Clear to remove your own name and number and press OK key.](https://usermanual.wiki/Brightstar/FXP860/User-Guide-1760851-Page-33.png)
![33 MESSAGE Requires a subscription to a calling plan that supports this feature. Not available in all areas. Contact you telephone service provider for availability and details. You can send or receive text messages with your phone. Text messages that you receive may contain ring tones that you can store in your phone. It supports 160 characters. You can also send maximum about 600 characters. If your message is about 600 characters, the phone divides the message into four parts and sends these in each time. This function is called SMS concatenation. After completing the message content, you can choose to send it out right away, or save it as a draft. Write New Inbox Outbox Drafts Voice Mail Broadcast Message Message Settings Template Memory Status [1] Write New You can send a text message to one recipient. You can manually enter each Recipient’s phone number, or you can select the numbers from the Contacts. Note: The maximum length of a text message differs, depending on the](https://usermanual.wiki/Brightstar/FXP860/User-Guide-1760851-Page-34.png)
![34 capabilities of the network from which it originated. Also, text messages may appear different at different times because messages can originate in networks other than your own. Contact your service provider for more information about this feature. 1) Press Menu > Message> OK key. 2) Scroll to Write New and press OK key 3) You can create the message. 4) When you press OK key, you can see three submenus; Only Send: After sending, the message is deleted Only save: No sending. The message is saved into Drafts. Send and Save : After sending the message is saved into Outbox [2] Inbox When a message arrives, a pop-up message is displayed and a new message icon appears. You can read it immediately, or read it later in your Inbox. You can see the icon 1) Press Menu > Message. 2) Scroll to the Inbox and press OK key. 3) From the list, highlight the one you need and press OK key. 4) You can choose six options Reply: You can reply your messages. Forward : You can forward the chosen message Edit: You can edit the chosen message. Clear: You can delete the chosen one. Clear All: You can empty the Inbox](https://usermanual.wiki/Brightstar/FXP860/User-Guide-1760851-Page-35.png)
![35 Cut Number : You can cut and save the phone number from Inbox message [3] Outbox The Outbox stores messages sent and saved. 1) Press Menu > Message. 2) Scroll to the Outbox and press OK key. 3) From the list, highlight the one you need and press OK key. 4) You can choose six options Send: You can send the chosen message. Forward : You can forward the chosen message to others Edit: You can edit the chosen message. Clear: You can delete the chosen one. Clear All: You can empty the Out box Cut Number: You can cut and save the phone number from outbox message. [4] Drafts You can see draft messages which you already saved. After choosing one of them, you can have four choices Forward: You can send the chosen message. Edit: You can edit and save the chosen message. Clear: You can delete the chosen one. Clear All: You can empty the draft box.](https://usermanual.wiki/Brightstar/FXP860/User-Guide-1760851-Page-36.png)
![36 [5] Voicemail (Network Service) You can listen to your voicemail messages by calling your network voicemail phone number. Voicemail messages are stored in the network voicemail box, not in your phone. Also refer to [ 8 ] section in page 20. 1) Press MENU > Message. 2) Scroll to Voice Mail and press OK key. 3) There are three submenus. Select one and press OK key Number: Enter or modify the network service number. Clear: Delete Pre-saved service number Call Voice Mail: Dial the network service number and connect to the Voicemail Server. [6] Broadcast Message There are 2 submenus you can choose Receive Mode Languages [7] Message Settings There are 5 submenus you can choose. Service Center Number: The SMS Center Number is required in order to send messages. Ask your service provider for this number. Expire Period: Set the period of time the message is stored in the service center. You can set the period for 1 hour, 12 hours, 1 day, 1week, maximum. When](https://usermanual.wiki/Brightstar/FXP860/User-Guide-1760851-Page-37.png)
![37 the set period expires, the service center will delete all messages, even if the user has not received the message. Message Type: When you set the message type, the network will convert the message to the type you have set. (Text//Fax//E-mail) Status Report: If you turn On this option, you can be notified if the recipient received your message. Alert Period: you can choose message alert time with one time // Every 2 min // Off when we receive new message. [ 8 ] Template There are some sample messages in SMS template and you can edit & save the template or send the message you selected. 1) Press Menu > Message. 2) Scroll to the Template and press OK key. There are 2 options as below Edit: press Option>Edit, you can edit the message template and press save. Forward: press Option>Forward, you can use SMS template to send the message [ 9 ] Memory Status Check memory status in the SIM and in the Phone. The total capacity of SIM is depends on your SIM card, total capacity of phone is 100. Also you can see used area of SIM and phone.](https://usermanual.wiki/Brightstar/FXP860/User-Guide-1760851-Page-38.png)
![38 DIAL RECORDS The Call History function keeps track of: Incoming Calls Outgoing Calls Missed Calls Call Duration Note: Your phone can store up to 30 call numbers including missed, received and dialed calls. When you miss a call (s), the Missed Calls message appears on your phone’s screen. You can press OK key to view the Missed Calls list or press Back key to ignore the message and go back to Standby. The records will be stored in Call History. You are notified of missed calls only when your phone is turned ON in the service area from which the missed call originated. [ 1 ] Checking Incoming/Outgoing/Missed Call 1) Press Menu > Dial Records 2) Select Incoming // Outgoing // Missed Call and press OK key 3) From the list of records, scroll the one you need 4) The screen shows Call Information including Number, Date and Time of receiving.](https://usermanual.wiki/Brightstar/FXP860/User-Guide-1760851-Page-39.png)
![39 [ 2 ] Call options You can choose some options in related with Missed Calls, Dialed Calls or Received Calls when you have any call log. 1) Press Menu > Dial Records 2) Choose one of them; Incoming call / Outgoing call / Missed call and press OK key 3) You can press left Option 4) You can see six different menus; Dial To: When you choose one entry and select OK key, directly calls to. Send Message To: You can send this entry the SMS message without selecting recipient. Clear : You can delete chosen entry Save Number: You can save chosen number to SIM or Phone. Clear all: You can delete all entries in the category (If you select Outgoing call all the Outgoing call entries are deleted) Show Number: You can see the number of chosen entry [ 3 ] Call Duration You can check the total duration of incoming call and last call duration You can see Outgoing Duration, Incoming Duration and Last Call Duration in one display. The type of checking time is hh : mm : ss ( h: Hours, m: Minute, s: Second ) You can press left Reset to erase all call duration time.](https://usermanual.wiki/Brightstar/FXP860/User-Guide-1760851-Page-40.png)
![40 SETTINGS Setting menu includes: Phone Settings Melody Display Call Setup Network Setup Security Setup Factory Default [1] Phone Settings [ 1.1 ] Clock settings This menu guides you to set Time/Date. Date/Time Setting: Set the correct time and date. Date & Time Setting 1) Press Menu > Settings > OK key 2) Scroll Phone Settings and press OK key. 3) Select Clock Settings then press OK key. 4) Select Date & Time Setting and press OK key. 5) Input month / day / year and hour/minute/am or pm by using numeric keys and left / right key. 6) Press Save key](https://usermanual.wiki/Brightstar/FXP860/User-Guide-1760851-Page-41.png)
![41 Date Format: There are four types of expressions of dates DD / MM / YY (day / month / last two digits of this year) MM / DD / YY DD / MM / YYYY (day / month / full digits of this year) MM / DD / YYYY Date Separator: There are four types of separators of date digits OO-OO-OO (Hyphen) OO/OO/OO (Slash) OO.OO.OO (Dot) OO OO OO (Blank) Time Format: You can choose 12h or 24 hours. For example, if the time is 1:22 pm ( 12h expression) , it can be shown as 13:22 (24h expression) [ 1.2 ] Language Three languages options can be selected: English / Spanish ( Español ). Also you may choose automatic option; Your native language can be chosen without manual selection. 1) Press Menu > Settings and press OK key 2) Scroll Phone Settings and press OK key 3) Select Language and then press OK key 4) Select the language you need and press OK key [ 1.3 ] Answer Mode Normal answer: You can press only answer key and speaker phone key to receive the](https://usermanual.wiki/Brightstar/FXP860/User-Guide-1760851-Page-42.png)
![42 incoming call. You can also receive the incoming call by pick the handset up without press any other key. Any key answer: To answer your receiving call, you can press any key except End key and Back key. [2] Melody [ 2.1 ] Melody setup Set Melody for Incoming Call and Message Tone Note: For each tone setup, you can choose one of 10 ring tones for Incoming call and 4 ring tones for Message Tone. [ 2.2 ] Volume Eight volume levels are available for Call, ring tone and keypad tone. Adjust the volume to your preference using Volume up / down key. Also you can use this Volume key on the keyboard to adjust the volume directly. [3] Display [ 3.1 ] Idle Display Clock and Date When you choose Enable, you can see the date and clock on your idle display (The phone should be in full service state, otherwise display net state) [ 3.2 ] Contrast](https://usermanual.wiki/Brightstar/FXP860/User-Guide-1760851-Page-43.png)
![43 There are 20 levels for LCD contrast. Press Volume up key then the contrast goes up. Press Volume down key then the contrast is down. [ 3.3 ] Backlight Set Specific LCD and Keypad Backlight time. 1) Select Backlight and press OK key 2) Toggle Always off, 5 sec, 15 sec, 30 sec or 45 sec and press OK key [4] Call Setup The following features may require a subscription to a calling plan that supports them. Not available in all areas. Contact you telephone service provider for availability and details [ 4.1 ] Call Divert Call Divert is a network or subscription dependent service. It allows you to forward a call to another number, based on various conditions. 1) Press Menu > Settings and press OK key 2) Scroll Call Setup and press OK key 3) Press Call Divert and press OK key 4) Select one of the options below, and then press OK key All Voice Calls: All incoming calls to a designated number. On Busy: Divert all incoming calls when there is at least one call in progress. No Answer : Divert the incoming call if it is not answered Unreachable: Divert all incoming calls when the phone is not reachable due to a network error or some other reason.](https://usermanual.wiki/Brightstar/FXP860/User-Guide-1760851-Page-44.png)
![44 5) Select Check Status, Activate, or Deactivate and press OK key Check Status: Check current Call Divert setting status. Activate: Activate the chosen Call Divert option. Type the number you want a call to be forwarded to. Deactivate: Deactivate the chosen Call Divert option. [ 4.2 ] Call Barring (Network Service) Call Barring is a network or subscription dependent service. This feature allows you to restrict or bar certain or all types of calls to and from your phone. 1) Press Menu > Settings and press OK key 2) Scroll Call Setup and press OK key 3) Press Call Barring and press OK key 4) Select one of the options below, and then press OK key All Outgoing Calls: Bar all outgoing calls. All Calls abroad: Bar all outgoing international calls. Abroad but Home: Prevent users from making any international calls other than to home All Incoming Calls: All Calls Bar all incoming calls. Incoming While Roam: Bar all incoming calls when the phone is roaming. 5) Select Check Status, Activate, Deactivate and press OK key Check Status: Check current Call Barring setting status. Activate: the chosen Call Barring option. Deactivate: Deactivate the chosen Call Barring option. Note: To activate and deactivate Outgoing, Incoming, and Cancel Calls, the SIM password may be required. Contact your service provider.](https://usermanual.wiki/Brightstar/FXP860/User-Guide-1760851-Page-45.png)
![45 [ 4.3 ] Call waiting (Network service) Call Waiting is a network or subscription dependent service. If set it to Activate, the Call Waiting feature enables the network to remind you of other incoming calls during a call in progress. 1) Press Menu > Settings and press OK key 2) Scroll Call Setup and press OK key 3) Select Call Waiting and press OK key 4) Select Check Status, Activate, Deactivate and then press OK key Check Status: Check current Call Waiting setting status. Active: Activate Call Waiting function Deactivate: Deactivate Call Waiting function. [ 4.4 ] Auto Redial If set the Auto Redial to toggle enable, the phone would keep dialing until the called party is available or end the call. 1) Press Menu > Settings and press OK key 2) Scroll Call Setup and press OK key 3) Select Auto Redial and press OK key 4) Toggle Enable or Disable, and then press OK key [ 4.5 ] Caller ID Caller ID is a network or subscription dependent service. Not available in all areas. Contact you telephone service provider for availability and details. If call ID enable, you can choose to send/hide your phone number to/from the calling party under your network service provider’s support.](https://usermanual.wiki/Brightstar/FXP860/User-Guide-1760851-Page-46.png)
![46 If call ID disable, the phone number show or not in call party depend on your network service provider’s support. You can not choose send/hide your phone number to/from the calling party. 1) Press Menu > Settings and press OK key 2) Scroll Call Setup and press OK key 3) Select Caller ID and press OK key 4) Toggle Set by Network, Hide Number or Show Number and then press OK key Set By Network: Accepts the default value set by Network. Show Number: Shows your phone number to the calling party. Hide Number: Does not show your phone number to the calling party. [5] Network Setup [ 5.1 ] Network Select mode You can set the phone to automatically search the most suitable network to camp on or to manually select the network you need. 1) Press Menu > Settings and press OK 2) Scroll Network Setup and press OK 3) Select Network Select mode and press OK 4) Select Automatic selection or Manual selection and then press OK Manual mode: The phone starts searching available networks. Use the up and down key to browse the network list, and press OK to set the highlighted networks [6] Security Setup There are three options available:](https://usermanual.wiki/Brightstar/FXP860/User-Guide-1760851-Page-47.png)
![47 SIM PIN : Prevent unauthorized use of the SIM card and or the some features of services of telephone service provider Phone Lock: Prevent unauthorized use of the phone Change Password : Change by inputting the phone password two times [ 6.1 ] SIM PIN SIM PIN (SIM Personal Identification number) is a four-to-eight digit numeric or password. It is related with the service of your service provider. For more detail, contact your service provider. 1) Press Menu > Settings and press OK key 2) Scroll Security Set Up and press OK key 3) Select SIM PIN and press OK key 4) Select PIN Check, Change PIN1, Change PIN2 and then press OK key. PIN Check : Allow or disallow the use of SIM PIN by entering SIM PIN code Change PIN 1: This is a pin code that locks the SIM card until you enter the correct code. The default code is set by the Service Provider. You can change it if you like by entering defaulted PIN code by Service provider, but make sure you don't forget the new code Change PIN 2: This SIM card code controls access to some of the more advanced features of the phone. The default code is set by the Service Provider. You can change it if you like by entering defaulted PIN code by Service provider, but make sure you don't forget the new code. Not all networks support pin 2. Caution: If you unsuccessfully enter the SIM PIN code some times depends on SIM card or country in succession the SIM card will be Locked. And then contact your telephone service provider to get PUK code to unlock](https://usermanual.wiki/Brightstar/FXP860/User-Guide-1760851-Page-48.png)
![48 SIM card. [ 6.2 ] Phone Lock The default password is “0000”. 1) Press Menu > Settings and press OK key 2) Scroll Security Set Up and press OK key 3) Select Phone Lock and press OK key 4) When ‘On’ is chosen, there are two options. Verify when Power-on: Every time you must enter password when power on Verify with new SIM: When you change SIM card, you enter the password Change Password This feature allows you to change the password. 1) Press Menu > Settings and press OK key 2) Scroll Security Setup and press OK key 3) Select Change Password and press OK key Note: You need to input three times. Old password, the new password and confirmation. Every time you enter the input press OK key [ 7 ] Factory Default This feature resets the current settings to the factory default values. The default phone code is “0000”. 1) Press Menu > Settings and press OK key 2) Select Factory Default and press OK key](https://usermanual.wiki/Brightstar/FXP860/User-Guide-1760851-Page-49.png)
![50 APPLICATIONS Applications include: Alarm Calculator Calendar Radio [ 1 ] Alarm When alarm is set, the icon appears on the standby screen. 1) Press Menu > Applications and press OK 2) Select Alarm and press OK 3) Select Alarm 1and or 2 and or 3 for setting alarm and Press OK 4) You can select four cases. Off//One time // Mon~Fri // Everyday. Select your favorite by scrolling Volume up /down key 5) After selecting one type, you can go down using up down navigation key and set the alarm time by pressing numeric key ( time ) and Volume up/down key ( am / pm ). 6) After setting the time, you can go down using up down navigation key and choose alarm ring tone by pressing Volume up/down key. There are 3 options of ring tone. 7) Press Save [ 2 ] Calculator You can calculate 9 digits. Key description:](https://usermanual.wiki/Brightstar/FXP860/User-Guide-1760851-Page-51.png)
![51 +, -, /, x: Use up / down navigation keys to select. Clear: Press once to clear one digit. . (Point) : Press ‘ # ’ Key. 1) Press Menu > Applications and press OK 2) Select Calculator and press OK. 3) Enter the first value by number keys 4) Select the calculating mark by the up and down navigation keys. 5) The calculating mark will toggle among ﹢﹢﹢﹢, ﹣﹣﹣﹣, × , ÷ by turns 6) Enter the second value by number keys 7) Press OK to display the result of calculation. And you can press OK again to use calculated results in the next calculation. [ 3 ] Calendar You can examine the month and date by Navigation keys . 1) Press Menu > Applications and press OK 2) Select Calendar and press OK [ 4 ] Radio ( Note : This function can be supported in FXP-860R model only) 1) Press Menu > Applications and press OK 2) Select Radio and press OK. 3) Press Option key you can chose Switch to AM / PM: you can change to AM or PM All channels: Display all channels Manual tune: you can input the channel you want.](https://usermanual.wiki/Brightstar/FXP860/User-Guide-1760851-Page-52.png)

![59 Access Codes There are several access codes that are used by your phone and its SIM card. These codes help you protect the phone against unauthorized use. The access codes (except for the PUK codes) can be changed using the Security Settings menu options. Phone Password The phone password can be set to avoid unauthorized use of the phone. The password generally supplied with the phone is 0000. You are advised to change it before you start using your phone. Keep the new password secret and in a safe place, separate from the phone. PIN The PIN (Personal Identification Number) protects your SIM card against unauthorized use. The PIN is usually supplied with the SIM card. When the PIN Check feature is enabled, the PIN is needed each time the phone is powered on. If you key in an incorrect PIN sometimes depends on SIM card or Country in succession, key in the PUK and press the OK soft key. Key in a new PIN and press the OK soft key. Key in the new PIN again and press the OK soft key. PUK The PUK (Personal Unblocking Key) is required to change a blocked PIN. The PUK may be supplied with the SIM card. If not, contact your local service provider. If you key in an incorrect PUK sometimes depends on SIM card or Country in succession, the SIM card cannot be used anymore. Contact your service provider for a new card. You cannot change the PUK. User Manual of FXP-860 / FXP-860R / FXP-960 version 1.0 [ENG] 13/6/2012 Copyright 2012, Motorola Inc., All rights reserved.](https://usermanual.wiki/Brightstar/FXP860/User-Guide-1760851-Page-60.png)