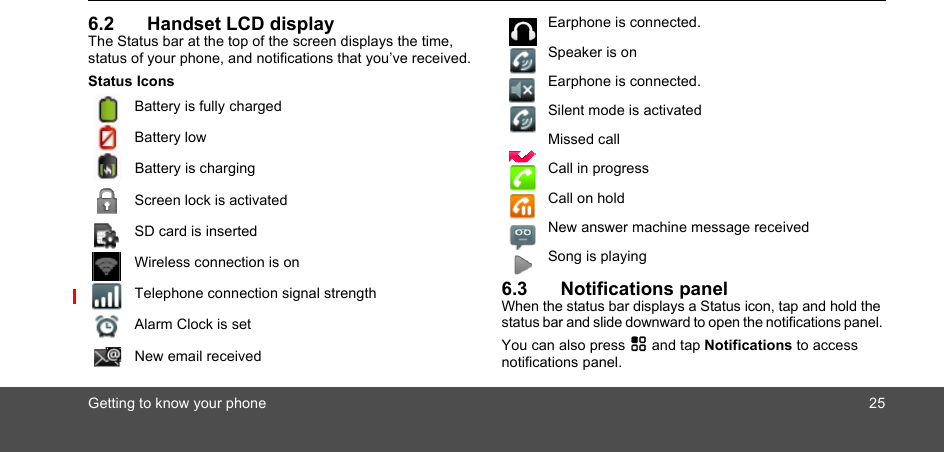
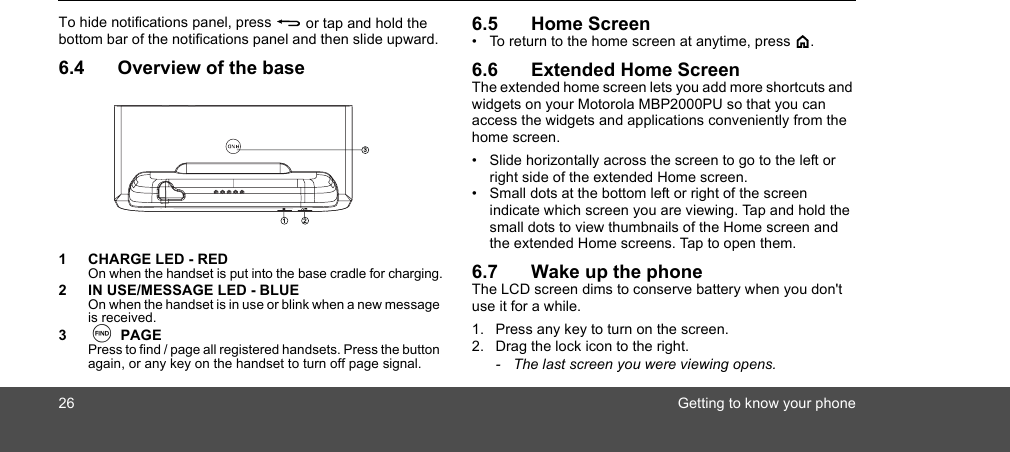
Binatone Electronics 80-8388-00 1.9GHz DECT Cordless Phone_Base Unit User Manual HS1101 IFU Booklet US EN

Binatone Electronics International Ltd. 1.9GHz DECT Cordless Phone_Base Unit HS1101 IFU Booklet US EN

manual_MBP2000PU.pdf

User’s GuideMBP2000PU Android Home PhoneWarningUse only the power adapter, battery pack andtelephone line cord provided in the box.
•  Make and receive calls•  Receive telephone messages and record memos using the digital answer machine•  Send and receive Emails•  Take photos and record videos•  Surf the Internet via wireless connection•  Listen to music via loud speaker or earphones•  View pictures, videos and slideshows•  Listen to Internet radio broadcasts• Read and download eBooks •  Discover and download Android applications•  Check Stock Prices and Stock Information•  Check current weather and weather forecast •  Read News with RssFeed•  Check Calendar and Agenda• Set alarm• Perform simple CalculationWelcome...to your new Motorola Android Home Phone!Please retain your original dated sales receipt for your records. For warranty service of your Motorola product, you will need to provide a copy of your dated sales receipt to confirm warranty status. Registration is not required for warranty coverage.For product-related questions, please call:US and Canada: 1-888-331-3383On the Web: www.motorola.com
IMPORTANTOnly use the telephone line cord supplied.This equipment is not designed to make emergency telephone calls during power failures. Alternative arrangements should be made for access to emergency services.Got everything?• Handset• Base•  Li-ion Rechargeable Battery Pack• Handset Back Cover• Power Adapter• Telephone Line Cord• Micro-USB cable• User's Guide•  Quick Start GuideThis User's Guide provides you with all the information you need to get the most from your phone.Before you make your first call or surf the Internet, you will need to set up your phone. Follow the simple instructions in 'Getting Started', on the next few pages.
41. Getting started ..............................................121.1  Connecting the base......................................... 141.2  Installing and charging the handset battery pack ...................................................... 141.3  Insert and Mount memory card......................... 151.4  Unmount and Remove memory card................ 161.5  Switch on your Motorola MBP2000PU.............. 161.6  Switch off your Motorola MBP2000PU.............. 162. Using the touchscreen .................................173. Using the onscreen keyboard .....................183.1  Enter text and numbers .................................... 183.2  Switch between input modes............................ 183.3  Change keyboard language ............................. 183.4  Modify keyboard settings.................................. 183.5  Add words to User dictionary............................ 183.6  Accept or Reject Dictionary Suggestions ......... 193.7  Edit text............................................................. 194. Set up your Motorola MBP2000PU with Welcome Wizard ...........................................194.1  Display.............................................................. 204.2  Sound settings...................................................204.2.1 Phone ringtone .....................................204.2.2 Volume .................................................204.3  Wi-Fi settings.....................................................204.4  Date & time settings ..........................................214.4.1 Set time zone  .......................................214.4.2 Set time  ................................................214.4.3 Set time format  .....................................214.4.4 Select date format  ................................215. Set date and time.......................................... 225.0.1 Set Date  ...............................................225.0.2 Set Time  ...............................................225.0.3 Select Time Zone  .................................225.0.4 Select Time Format  ..............................225.0.5 Select Date Format  ..............................226. Getting to know your phone........................ 236.1  Overview of the handset....................................236.2  Handset LCD display.........................................256.3  Notifications panel .............................................256.4  Overview of the base.........................................26
56.5  Home Screen ....................................................266.6  Extended Home Screen ....................................266.7  Wake up the phone ...........................................266.8  Lock the screen of your Motorola MBP2000PU.276.8.1 Lock with a pattern, PIN or password ....276.8.2 Disable screen unlock security .............276.9  Screen Rotation................................................. 276.10 Recalibrate the touch screen.............................287. Personalizing your MBP2000PU.................. 287.1  Display Settings................................................. 287.1.1 Set Wallpaper .......................................287.1.2 Adjust Screen Brightness .....................297.1.3 Set screen timeout  ...............................297.1.4 Re-arrange items on your home screen  ........................................ 297.1.5 Add apps to your home screen  ............297.1.6 Remove an item from your home screen  ........................................ 297.1.7 Add Folders to your home screen  ........297.1.8 To rename a folder ...............................307.1.9 Add items to the folders on your home screen  ........................................ 307.2  Sound Settings.................................................. 307.2.1 Set silent mode  .................................... 307.2.2 Set volume  ...........................................307.2.3 Set Phone ringtone  .............................. 317.2.4 Set Intercom ringtone ...........................317.2.5 Set Paging ringtone  ............................. 317.2.6 Set default notification ringtone ............317.2.7 Enable or Disable Audible Touch tones  ......................................... 317.2.8 Enable or Disable Audible Selection ......327.2.9 Enable or Disable screen lock sounds .................................................328. DECT Settings .............................................. 328.1  Handset Settings...............................................328.1.1 Registering your MBP2000PU to the base station .......................................... 328.1.2 Registering your MBP2000PU to another base station .......................................... 33
68.1.3 Synchronize your MBP2000PU with another  base station  ........................... 338.1.4 Rename Handset  ................................ 338.1.5 Set Auto Answer .................................. 348.2  Base Settings ................................................... 348.2.1 Change PIN code  ................................ 348.2.2 Deregister Handset  ............................. 348.2.3 Reset Base Settings to Default  ........... 348.2.4 Set Dialing Mode  ................................. 348.2.5 Set Flash Duration ............................... 359. Voicemail .......................................................359.1  Set Voicemail Number ...................................... 359.2  Listen to Voicemail ........................................... 3510. Using the Phone Functions .........................3610.1 Call another handset registered to the same base station (Intercom) ........................... 3610.2 Make an external call........................................ 3610.2.1 In-call options  ...................................... 3610.3 Make an external call from Call Log ................. 3710.4 Clear call log ..................................................... 3710.5 Make an external call from Contacts list............3710.6 Make an external call from Favorites.................3710.7 Answer a call in earpiece mode.........................3810.8 Answer a Call in Speakerphone mode ..............3810.9 Reject a call.......................................................3810.10 End a Call ........................................................3810.11 Adjust volume level during a Call.....................3810.12 Mute the microphone during a call...................3810.13 Caller Identity Delivery (CID) ...........................3810.14 Caller ID Directory Matching ............................3911. Using the Answer Machine.......................... 3911.1 Open Digital Answer Machine ...........................3911.2 Switch Digital Answer Machine off ....................4011.3 Set Number of Rings .........................................4011.4 Set Remote Pin .................................................4011.5 Playback recorded messages ...........................4111.6 Delete recorded messages ...............................4111.7 Memo Recording ...............................................4111.8 Outgoing Message Setting ................................4211.8.1 Select OGM Option  ..............................42
711.8.2 Record Personalized Outgoing Message ...............................................4211.8.3 Playback Personalized Outgoing Message ...............................................4311.8.4 Delete Personalized Outgoing Message ...............................................4311.9 Remote Operation .............................................4312. Contacts List................................................. 4412.1 Open Contacts list ............................................. 4412.2 Search for a contact in Contacts list..................4412.3 Add an entry to Contacts list .............................4412.4 Assign Ringtone to a Contact............................ 4512.5 Import/Export Contacts......................................4612.6 Enable forwarding of calls to voicemail .............4612.7 Add a Contact as Favorite.................................4612.8 Edit a Contact in Contacts list ...........................4612.9 Set display options ............................................4712.10 Delete a Contact from Contacts list .................4712.11 Link Picture to a Contact .................................4712.11.1 Take photo  ...........................................4712.11.2 Select from Gallery  ..............................4812.11.3 Change picture of a Contact  ................4812.11.4 Remove picture of a Contact  ...............4812.12 Call a contact from contacts list....................... 4913. Internet Function.......................................... 4913.1 Register your Motorola MBP2000PU to a Wi-Fi Network.................................................... 4913.2 Set Number of Wi-Fi Network Channels ...........5013.3 Select Wi-Fi Sleep Policy .................................. 5113.4 Check Motorola MBP2000PU MAC Address..... 5113.5 Configure Static IP Settings .............................. 5114. Using the Web Browser............................... 5214.1 Open Browser ................................................... 5214.2 Set home page.................................................. 5214.3 Open a web page.............................................. 5214.4 Automatic screen rotation ................................. 5214.5 Display web page in landscape only.................5214.6 Zoom in and out of a webpage..........................5314.7 Open a new browser window............................5314.8 Switch between browser windows .................... 53
814.9 Finding text within a webpage .......................... 5314.10 Selecting links in web pages........................... 5314.10.1 Web page links .................................... 5314.10.2 Email links  ........................................... 5314.11 Downloading web applications........................ 5414.12 View your downloads ...................................... 5414.13 Manage bookmarks ........................................ 5414.13.1 To bookmark a web page .................... 5414.13.2 To open a bookmark  ........................... 5414.14 Customize Browser Options ........................... 5515. Email ..............................................................5515.1 Open Email....................................................... 5515.2 Set up the first email account ........................... 5615.3 Set up another email account ........................... 5615.4 Combined Inbox ............................................... 5715.5 Account settings ............................................... 5715.5.1 Edit Account name  .............................. 5715.6 Compose and send email messages ............... 5715.7 Read messages................................................ 5815.8 Open an attached file ....................................... 5815.9 Check for new messages ..................................5915.10 Reply to an email message .............................5915.11 Delete an email message ................................5915.12 Forward an email message .............................5915.13 Mark message as unread ................................6015.14 Delete an email account ..................................6016. TuneIn Radio................................................. 6016.1 Open TuneIn Radio ...........................................6116.2 Listen to a Radio Broadcast ..............................6116.3 Search Station by Name ...................................6116.4 Search Station by Location ...............................6116.5 Search Station by Language .............................6217. RssFeed ........................................................ 6217.1 Open RssFeed ..................................................6217.2 Add a category to the RssFeed Reader ............6317.3 Selecting a Category for the Widget..................6317.4 Adding an RSS Feed into a Category ...............6318. Stock.............................................................. 6418.1 Open Stock........................................................6418.2 Add a stock to the Portfolio list ..........................64
918.3 Delete a stock from the portfolio list ..................6418.4 View more information about a stock in your portfolio .....................................................6418.5 Get more information about a stock ..................6519. Weather ......................................................... 6519.1 Open Weather Application ................................6519.2 Check the current weather of a city...................6519.3 Display the weather forecast of a city................6619.4 Change Temperature Unit.................................6619.5 Delete a city.......................................................6620. Take photos and record videos .................. 6620.1 Open Camera.................................................... 6620.2 Switch between camera and camcorder mode ...............................................6620.3 Take picture.......................................................6620.4 Camera options .................................................6720.5 View photos.......................................................6720.6 Record video .....................................................6820.7 Video options.....................................................6820.8 Play videos ........................................................6921. Music ............................................................. 6921.1 Listen to Music on your Motorola MBP2000PU. 6921.1.1 Using earphones ..................................6921.1.2 Using the speaker on the base station .......................................... 6921.2 Open Music application..................................... 7021.3 Music Library..................................................... 7021.4 Search for a song.............................................. 7021.5 Party Shuffle all songs ...................................... 7021.6 Turn party shuffle off ......................................... 7121.7 Create playlists.................................................. 7121.8 Add songs to current playlist ............................. 7121.9 Play songs in a playlist......................................7121.10 Add songs to a playlist ....................................7121.11 Remove a song from playlist ........................... 7121.12 Delete a playlist ............................................... 7221.13 Rename a playlist ............................................ 7221.14 Set song as ringtone ....................................... 7221.15 Set sound effects............................................. 7221.16 Delete current song ......................................... 7221.17 Set current song as ringtone ........................... 73
1022. Gallery............................................................7322.1 Open Gallery .................................................... 7322.2 View pictures .................................................... 7322.2.1 View pictures in full screen  .................. 7423. Clock ..............................................................7423.1 Open Clock....................................................... 7423.2 Set an alarm ..................................................... 7423.3 Activate an alarm setting .................................. 7523.4 Deactivate an alarm setting .............................. 7523.5 Activate alarm in silent mode............................ 7523.6 Other Alarm Clock Settings .............................. 7524. Calendar ........................................................7624.1 Open Calendar ................................................. 7624.2 View Agenda for the day .................................. 7624.3 Go to Today's date ........................................... 7624.4 Change Calendar view ..................................... 7624.5 Modify Calendar Settings ................................. 7724.6 Add new event.................................................. 7724.7 View, dismiss, or snooze a reminder................ 7825. Performing Calculations .............................. 7825.1 Open Calculator ................................................7825.2 Perform Calculations .........................................7826. Downloading and Reading eBooks ............ 7926.1 Downloading and Reading eBooks ...................7926.2  Open Aldiko ......................................................7926.3  Start reading .....................................................7926.4 Buy Books .........................................................8026.5 Download Free Books .......................................8026.6 Add eBooks from your SD card into your Library .......................................................8027. ES FILE EXPLORER .....................................8127.1 Open ES File Explorer.......................................8127.2 Open file as .......................................................8127.3 Select all files in a directory ...............................8127.4 Create a new folder ...........................................8127.5 Rename a file ....................................................8127.6 Copy a file to another location...........................8227.7 Move a file to another location ..........................8227.8 Delete a file .......................................................82
1127.9 Compress a file .................................................8227.10 View file details................................................8227.11 Modify View Settings in ES File Explorer ........8328. Discover and Download Android Applications.................................................. 8328.1 Open SlideME ...................................................8328.2 Download an application ...................................8428.3 Search by Top Apps..........................................8428.4 Search by Latest Apps ......................................8428.5 Search by Local Apps .......................................8528.6 Search for Apps manually .................................8529. Install apps.................................................... 8630. Connect your handset to a computer......... 8731. ES Task Manager.......................................... 8831.1 Open ES Task Manager....................................8832. Settings ......................................................... 8833. Advanced Features ...................................... 8933.1 Firmware Upgrade with SD card .......................8933.2 Factory data reset .............................................9034. Help ............................................................... 9135. General information ..................................... 93
Important safety instructionsFollow these safety precautions when using your phone to reduce the risk of fire, electric shock, and injury to persons or property:1. Keep all vents and openings of the phone unblocked. Do not set the phone on a heating register or over a radiator. Ensure that proper ventilation is provided at the installation site.2. Do not use while wet or while standing in water.3. Do not use this product near water (for example, near a bath tub, kitchen sink, or swimming pool).4. Do not allow anything to rest on the power cord. Place the power cord so that it will not be walked on.5. Never insert objects of any kind into the product vents as that may result in fire or electric shock.6. Unplug this product from the electrical outlet before cleaning. Do not use liquid cleaners or aerosol cleaners. Use a damp cloth for cleaning.7. Do not disassemble this product. If service or repair work is required, contact the customer service helpline found in this User's Guide.8. Do not overload wall outlets and extension cords.9. Avoid using during an electrical storm. Use a surge protector to protect the equipment.10. Do not use this phone to report a gas leak, especially if you are in the vicinity of the gas line.CAUTIONTo reduce the risk of fire, use only No. 26 AWG or larger UL Listed or CSA Certified Telecommunication Line Cord.Important safety instructions 11ASAVE THESE INSTRUCTIONS
12 Getting started1. Getting startedWARNINGDo not place your phone in the bathroom or other humid areas.LocationWhen choosing a location for your new phone, here are some important guidelines you should consider:•  Avoid sources of noise and heat, such as motors, fluorescent lighting, microwave ovens, heating appliances and direct sunlight.•  Avoid areas of excessive dust, moisture and low temperature.•  Avoid other cordless telephones or personal computers.•  Never install telephone wiring during a lightning storm.•  Never install telephone jacks in wet locations unless the jack is specifically designed for wet locations.•  Never touch non-insulated telephone wires or terminals, unless the telephone line has been disconnected at the network interface.•  Use caution when installing or modifying telephone lines.Handset RangeThe Android Home Phone has a range of up to 300 meters for telephone calls, when there is clear line of sight between the base and handset. Any obstruction between the base and handset will reduce the range significantly. With the base indoors and handset either indoors or outdoors, the range will normally be up to 50 meters. Thick stone walls can severely affect the range.Signal StrengthThe icon on your handset indicates when you are in range of telephone calls.When out of range of the base, the signal strength will drop out. If you are on a call, the line will hang up. Move back within range. The handset will automatically re-connect to the base.
Getting started 13Battery low warningIf the following appears on the display, you will need to charge the handset.Battery performanceNote that new batteries will not reach full capacity until they have been in normal use for several days.To keep your batteries in the best condition, leave the handset off the base for a few hours at a time.Drain the batteries completely at least once a week before charging will help to prolong battery life.The charge capacity of rechargeable batteries will reduce with time as they wear out, giving the handset lesser talk/standby time. Eventually they will need to be replaced.After charging your handset for the first time, subsequent charging time will be about 6 hours a day. Batteries and handset may become warm during charging. This is normal.Setting upIMPORTANTThe base must be plugged into an electrical outlet at all times. Do not connect the telephone line cord into the telephone wall jack until the handset is fully charged. Only use the adapter and telephone line cord supplied with the product.
14 Getting started1.1 Connecting the base1. Plug one end of the power cable and telephone line cord into the power jack and phone jack respectively on the bottom of the base station.2. Plug the other end into a power outlet and telephone wall jack.IMPORTANTUse only the supplied power adapter. 1.2 Installing and charging the handset battery pack1. Hold the phone with both hands and the front panel facing down. Gently press the back cover with your thumbs, and then slide it down until it disengages from the phone.2. Remove the back cover completely.
Getting started 153. Place the supplied rechargeable battery pack in the battery compartment, with the battery connector plugged in, as shown.4. Align the back cover tabs with the notches located at the edges of the exposed back panel. 5. Slide up the back cover until it clicks in place. 6. Place the handset on the base station to charge for at least 6 hours. When the handset is fully charged,         is displayed.NoteIf the Red Charging LED did not light up, you need to re-align the phone to get a good charging contact with the base station.IMPORTANTUse only the rechargeable battery pack supplied with the product.1.3 Insert and Mount memory cardYour Motorola MBP2000PU supports micro SD cards.You can store music, pictures, files and applications on a memory card and access them on the phone.
16 Getting startedInsert the memory card by pushing the card firmly into the slot with the metal contacts facing up, and in the direction as indicated above.-  The phone will prepare the SD card for mounting and perform media scanning.If the SD card fails to mount on the phone, press H and tap Settings > Storage > SD Card Settings > Mount SD card.1.4 Unmount and Remove memory cardIf the Motorola MBP2000PU is powered off•  Push the card gently inwards to eject the memory card.If the Motorola MBP2000PU is powered on1. Press H and tap Settings > Storage > SD Card Settings > Unmount SD card.2. Remove the SD card by pushing the card gently inwards to eject it.1.5 Switch on your Motorola MBP2000PU• Press and hold L on the side panel of the handset until the LCD screen starts to display the Motorola logo.-  It takes about 1 minute for the phone to boot up.-  The home screen is displayed.•  The Home screen provides access to all the features on your MBP2000PU. It displays application icons, widgets, shortcuts, and other features. You can also customize the Home screen with different wallpaper and display the items you want (see “Display Settings” on page 28).• Tap   (Program launcher) at the bottom of the screen to view all installed applications.NoteIf your Motorola MBP2000PU is totally out of battery, it may take a while to charge before you can power up the phone.1.6 Switch off your Motorola MBP2000PU1. Press and hold L on the side panel of the handset to activate the Phone options menu.2. Tap to select Power off.3. Tap OK to confirm or press B to cancel.
Using the touchscreen 172. Using the touchscreenAction Function OperationsTap Select onscreen items such as application and settings iconsSelect onscreen buttonsType using the onscreen keyboardGently tap an item on the screen to select the item that you wish to activate.Tap and hold Open the available options for an item, for example, tap and hold a contact or a link on a web page. Think of this as using the right-click button on a mouse.Tap an item on the screen and hold in place for 2-3 seconds.Drag Move items on the screen or shift the view on the screen.  Apply light pressure against an item on the screen then, without raising your finger, move it across the screen until you have reached the target position.Slide Quickly move vertically or horizontally across the screen.Flick Quickly browse a list of items in a vertical direction.Flick is similar to slide, except that flick involves swiping the screen in lighter and quicker strokes.
18 Using the onscreen keyboard3. Using the onscreen keyboardYour Motorola MBP2000PU features a Qwerty keyboard by which the key arrangement is exactly the same as that of a standard computer keyboard.The onscreen keyboard lets you enter text, such as contact information, email messages, etc. It appears automatically when you launch certain applications or when you tap on a text or number field.To hide the onscreen keyboard, press B.3.1 Enter text and numbers•  Tap on a text or number field to bring up the keyboard.-  When entering texts or numbers, each letter or number will appear above the key you have pressed.3.2 Switch between input modes• Tap ABC (lower case), ⇑ (upper case), ?123 (number), or ALT (symbols) on the onscreen keyboard to switch between different input modes. 3.3 Change keyboard language1. From the home screen, press H.2. Tap Settings > Language & keyboard  > Select language.3. Scroll to your preferred keyboard language and tap to select.3.4 Modify keyboard settings1. From the home screen, press H.2. Tap Settings > Language & keyboard  > Android keyboard.3. Tap to select or de-select the options and settings.3.5 Add words to User dictionary1. From the home screen, press H.2. Tap Settings > Language & keyboard  > User dictionary.3. Press H and tap Add.4. Enter the word in the edit box and tap OK.
Set up your Motorola MBP2000PU with Welcome Wizard 193.6 Accept or Reject Dictionary SuggestionsDepending on the application you are using, Motorola MBP2000PU uses a dictionary to suggest corrections or complete the word you are typing. •  To accept the suggested word, simply tap on the suggested entry.•  To reject the suggested word, simply continue typing.NoteUser dictionary function needs to be set up separately. You can do so by selecting Language & keyboard > User dictionary in the Settings menu to add or remove words.3.7 Edit text•  Tap and hold on the word you have typed to activate Edit text options and tap to select an option.4. Set up your Motorola MBP2000PU with Welcome WizardWhen you first power up the phone or after doing a factory data reset (see “Factory data reset” page 90), the Welcome Wizard will help you set up and personalize your phone, such as language, date, time, Wi-Fi setting, etc. 1. To start, tap Select your language to select your preferred language and then tap Next to begin phone setup.NoteIf the Welcome Wizard did not appear when you power up the phone, press H and tap Settings > Privacy > Factory data reset to reset the phone  (see “Factory data reset” page 90).
20Set up your Motorola MBP2000PU with Welcome Wizard4.1 Display1. Tap Brightness.2. Slide the brightness control bar right or left to increase to decrease screen brightness.3. Tap OK to confirm.4.2 Sound settings4.2.1 Phone ringtone1. Tap Phone ringtone.2. Tap to select a ringtone.-  The ringtone is played.3. Tap OK to confirm.4.2.2 Volume1. Tap Volume.2. Slide the volume bar right or left to increase or decrease volume.3. Tap to enable or disable Use incoming call volume for notifications. - If enabled,  ✓ appears next to the option. 4. Tap OK to confirm.5. Tap Next to proceed with Wi-Fi settings.4.3 Wi-Fi settings1. Tap Wi-Fi settings.2. Tap Turn on Wi-Fi.3. Under Network notification, tap to enable Notify me when an open network is available. -   If enabled,  ✓ appears next to the option.-  The screen displays a list of available Wi-Fi networks.4. Tap to select the network you want to connect.-  If the network is secured, you will be prompted to enter password.-  If you cannot find your favorite Wi-Fi network name, press H and then tap Scan.5. Tap on the Password edit box to launch the onscreen keyboard.6. Enter password and tap Done.7. Tap Connect.-  The phone will start to obtain the IP address of the network you have selected.-  This may take a few minutes.-  When connected,  appears on the status bar of the handset.8. Tap Next to proceed with date & time settings.
Set up your Motorola MBP2000PU with Welcome Wizard 214.4 Date & time settings1. Tap Date & time.2. Tap Set date.3. Tap + or - to set Month, Day and Year. 4. Tap Set to confirm.4.4.1 Set time zone1. Tap Select time zone.2. Scroll to your time zone and tap to select.4.4.2 Set time1. Tap Set time.2. Tap + or - to set hour and minutes. 3. Tap to select AM or PM.NoteThis option is not available if Use 24-hour format is activated. See “Set time format” on page 21 for details.4. Tap Set to confirm.4.4.3 Set time format• Tap Use 24-hour format to enable it. Tap again to disable.-  24-hour format is activated when ✓ appears next to the option. 4.4.4 Select date format1. Tap to select your preferred date format.You can configure your phone more thoroughly via Settings menu (see “Settings” on page 88).Your phone is now ready for use.
22 Set date and time5. Set date and timeNote:If you remove the battery of your Motorola MBP2000PU,  you may need to set the date and time again.5.0.1 Set Date1. Press H and then tap Settings >Date & time.2. Tap Set date and then tap + or - on each date field to change the Month, Day and Year.3. Tap Set to confirm date setting.5.0.2 Set Time1. Press H and then tap Settings > Date & time.2. Tap Set time and then tap + or - on each time field to change Hours and Minutes. 3. Tap AM/PM to select AM (morning) or PM (afternoon). Tip: This option is not available if 24-hour format is activated (see “Select Date Format” on page 22).4. Tap Set to confirm time setting.5.0.3 Select Time Zone1. Press H and then tap Settings > Date & time.2. Tap Select time zone. 3. Scroll to your location and tap to select. 5.0.4 Select Time Format1. Press H and then tap Settings > Date & time.2. Tap Use 24-hour format to activate or deactivate it.-  24-hour format is activated when ✓ appears next to the option. 5.0.5 Select Date Format1. Press H and then tap Settings > Date & time.2. Tap Select date format.3. Tap to select your preferred date format.
Getting to know your phone 236. Getting to know your phone6.1 Overview of the handset 1H MENU keyPress once to access the menu options2C PHONE ON keyPress once to access the dialer. Press once to make or answer a call.3 Microphone4 FUNCTION buttons<  HOME keyPress to return to the home screen.> SEARCH keyOn the homescreen: Open google search for searching on your phone or the webIn other applications: Open a search box for searching within the application+ / - VOLUME UP/DOWN keyOn the homescreen: Press to increase / decrease ringtone volume; press and hold to increase / decrease ringtone volume quicklyWhen a call is in progress: Press to increase / decrease volume during a callIn other applications: Press to increase/decrease media volume5D PHONE OFF keyPress once to end a call.6B BACK keyPress to return to previous screen.
24 Getting to know your phonePress to hide the onscreen keyboard, dialog box, options menu or notifications panel.7Earpiece8     Camera Lens9L Lock / Unlock / Power On & Off keyWhen the handset is off, press and hold for 2 seconds to turn on the handsetWhen the handset is in operation, press and hold for 2 seconds to activate Phone options menu and power off the phone.During operation, press once to lock and unlock the handset.10 E Earphone JackPlug in a 3.5mm headset for listening to music.11 Charge and Audio Output Contacts12 S Micro SD card slot13 Handset Speaker14 U Micro USB portFor handset charging, internal storage and Micro-SD card access.91011121314
Getting to know your phone 256.2 Handset LCD displayThe Status bar at the top of the screen displays the time, status of your phone, and notifications that you’ve received.Status Icons Battery is fully charged Battery low   Battery is charging Screen lock is activated SD card is inserted Wireless connection is on Telephone connection signal strength Alarm Clock is set New email received Earphone is connected. Speaker is on Earphone is connected. Silent mode is activated Missed call Call in progress Call on hold New answer machine message received Song is playing6.3 Notifications panelWhen the status bar displays a Status icon, tap and hold the status bar and slide downward to open the notifications panel. You can also press H and tap Notifications to access notifications panel.
26 Getting to know your phoneTo hide notifications panel, press B or tap and hold the bottom bar of the notifications panel and then slide upward. 6.4 Overview of the base1 CHARGE LED - REDOn when the handset is put into the base cradle for charging.2 IN USE/MESSAGE LED - BLUEOn when the handset is in use or blink when a new message is received.3N PAGEPress to find / page all registered handsets. Press the button again, or any key on the handset to turn off page signal.6.5 Home Screen•  To return to the home screen at anytime, press <.6.6 Extended Home ScreenThe extended home screen lets you add more shortcuts and widgets on your Motorola MBP2000PU so that you can  access the widgets and applications conveniently from the home screen.•  Slide horizontally across the screen to go to the left or right side of the extended Home screen. •  Small dots at the bottom left or right of the screen indicate which screen you are viewing. Tap and hold the small dots to view thumbnails of the Home screen and the extended Home screens. Tap to open them.6.7 Wake up the phoneThe LCD screen dims to conserve battery when you don't use it for a while.1. Press any key to turn on the screen. 2. Drag the lock icon to the right.-  The last screen you were viewing opens.1 23
Getting to know your phone 273. If you have locked your LCD screen with a pattern, PIN or password, you must draw an unlock pattern or enter a PIN or password to unlock it.4. See “Lock the screen of your Motorola MBP2000PU”  on page 27.6.8 Lock the screen of your Motorola MBP2000PU1. You can lock the screen of your phone such that onscreen functions will not be accessed accidentally.2. Press L on the side of the handset to lock the screen. Press again to unlock.6.8.1 Lock with a pattern, PIN or password1. Press  H.2. Tap Settings > Security > Set up screen lock.3. Tap to select Pattern, PIN or Password.4. Follow the onscreen instructions to set up screen lock.NoteIf you set up screen lock with a pattern, PIN or password, you need to draw the pattern, or enter the PIN or password each time you unlock the screen. See “Wake up the phone” on page 26.6.8.2 Disable screen unlock security 1. Press H.2. Tap Settings > Security > Set up screen lock.3. Tap to select None. 6.9 Screen RotationThe Motorola MBP2000PU has a tilt/orientation sensor, which detects if you are holding it in Portrait or Landscape mode. The screen will be adjusted accordingly.Tip Automatic screen rotation is enabled by default. To disable automatic screen rotation, press H and then tap Settings > Display > Auto-rotate screen. -  Automatic screen rotation is disabled when ✓ disappears.
28 Personalizing your MBP2000PUTo enable automatic screen rotation, press H and then tap Settings > Display > Auto-rotate screen again.6.10 Recalibrate the touch screenThe Motorola MBP2000PU uses a built-in G-Sensor that  the phone. If you feel that the screen orientation does not respond properly to the way you hold the phone, you can recalibrate the screen as follows:• Press H and then tap Settings > Display > G-Sensor Calibration.7. Personalizing your MBP2000PU7.1 Display Settings7.1.1 Set Wallpaper1. From the home screen, press H.2. Tap Wallpaper.3. Tap to select Gallery, Live wallpapers or Wallpapers.Tip: If you select Live wallpapers or Wallpapers, simply tap to select a wallpaper from the list and tap Set wallpaper.4. If you select Gallery, tap to select your desired picture.-  An image position box will appear at the center of the picture. -  To resize the picture, tap and hold the edge of the box, and drag inward or outward. -  To move the box to another area on the picture, tap and hold inside the box, then drag it to the desired position. 5. Tap Save to set the picture as wallpaper. -  You will see that the background image is now changed to the picture you have selected. changes the screen orientation based on the way you hold
Personalizing your MBP2000PU 297.1.2 Adjust Screen Brightness1. From the home screen, press H.2. Tap Settings > Display > Brightness.3. Drag the slider left or right to reduce or increase screen brightness and tap OK to confirm. 7.1.3 Set screen timeoutThis option lets you adjust the delay before the screen automatically turns off.1. From the home screen, press H.2. Tap Settings > Display > Screen timeout.3. Tap to select 15 seconds, 30 seconds, 1 minute, 2 minutes, 10 minutes or 30 minutes.7.1.4 Re-arrange items on your home screen1. Tap and hold the item that you wish to re-arrange until it turns bigger.2. Slide to the position on which you wish to place the item or slide and pause at the edge of the screen to drag the item onto another Home screen.3. Release the item when it is correctly placed.7.1.5 Add apps to your home screen1. Tap   to open the launcher and view all your applications.2. Tap and hold an application icon until it turns bigger. -  The application icon will be placed on the home screen. NoteYou can also add a shortcut or widget by pressing H from the homescreen and then tap Add > Shortcuts or Widgets or tap and hold any empty spot on the homescreen and then select Shortcuts or Widgets.7.1.6 Remove an item from your home screen1. Tap and hold the item that you wish to remove until it turns bigger.-  A recycle bin appears at the bottom of the screen.2. Drag and drop item into the trash bin. -  The item will be trashed.7.1.7 Add Folders to your home screenFolders allow you to organize your Home screen items, and they can also contain all your contacts, contacts with phone
30 Personalizing your MBP2000PUnumbers, or starred contacts. The folder contents are kept up to date automatically.1. From the home screen, press H.2. Tap Add > Folders.3. Tap to select New folder, All contacts, Contacts with phone numbers or Starred contacts.-  A new folder will be added to your home screen. TipYou can also tap and hold any empty spot on the homescreen and then select Folders.7.1.8 To rename a folder1. Tap the folder to open it.2. Tap and hold the folder’s title bar.3. Enter a new name in the dialog that appears.4. Tap OK.7.1.9 Add items to the folders on your home screen1. Tap and hold the item until it turns bigger.2. Drag the item to the folder in which you wish to place it.7.2 Sound Settings7.2.1 Set silent modeThis option enables you to mute all sounds except media and alarms.1. From the home screen, press H.2. Tap Settings > Sound > Silent mode.- ✓ appears next to the option to indicate that silent mode is activated.To turn silent mode off, tap Silent mode option again.7.2.2 Set volumeThis option enables you to set Ringtone, Media and Alarm volume on your Motorola MBP2000PU.1. From the home screen, press H.2. Tap Settings > Sound > Volume.3. Drag the slider to the left or right to decrease or increase volume and tap OK to confirm.NoteIf you wish to use incoming call volume for notifications as well, tap to select the option. ✓  appears to indicate that the option is selected.
Personalizing your MBP2000PU 317.2.3 Set Phone ringtoneThis option enables you to set the default ringtone on your Motorola MBP2000PU.1. From the home screen, press H.2. Tap Settings > Sound > Phone ringtone.3. Tap to select a ringtone from the list.-  The ringtone is played.4. Tap OK to confirm.7.2.4 Set Intercom ringtoneThis option enables you to set the default incoming intercom ringtone on your Motorola MBP2000PU.1. From the home screen, press H.2. Tap Settings > Sound > Intercom ringtone.3. Tap to select a ringtone from the list.-  The ringtone is played.4. Tap OK to confirm.7.2.5 Set Paging ringtoneThis option enables you to set the default incoming paging ringtone on your Motorola MBP2000PU.1. From the home screen, press H.2. Tap Settings > Sound > Paging ringtone.3. Tap to select a ringtone from the list.-  The ringtone is played.4. Tap OK to confirm.7.2.6 Set default notification ringtoneThis option enables you to set the default notification ringtone on your Motorola MBP2000PU.1. From the home screen, press H.2. Tap Settings > Sound > Notification ringtone.3. Tap to select a ringtone from the list.-  The ringtone is played.4. Tap OK to confirm.7.2.7 Enable or Disable Audible Touch tonesThis option lets you enable or disable the playing of touch tones on your phone when using the dial pad.
32 DECT Settings1. From the home screen, press H.2. Tap Settings > Sound > Audible touch tones.- ✓ appears next to the option to indicate that audible touch tone is enabled.3. To disable, tap Audible touch tones again.7.2.8 Enable or Disable Audible SelectionThis option lets you enable or disable the playing of sounds on your phone when making screen selection. 1. From the home screen, press H.2. Tap Settings > Sound > Audible selection.- ✓ appears next to the option to indicate that audible selection is enabled.3. To disable, tap Audible selection again.7.2.9 Enable or Disable screen lock soundsThis option lets you enable or disable the playing of sounds when locking or unlocking the screen. 1. From the home screen, press H.2. Tap Settings > Sound > Screen lock sounds.- ✓ appears next to the option to indicate that screen lock sound is enabled. 3. To disable, tap Screen lock sounds again.8. DECT Settings8.1 Handset SettingsHandset settings allows you to view and modify the settings of your handset. 8.1.1 Registering your MBP2000PU to the base stationYour Motorola MBP2000PU handset has been pre-registered to the Base station by factory default. If you have another Motorola MBP2000PU handset, you can follow the procedures here to register it to the same Base station to form a multiple handset network.1. Press and hold N on the base station for about 4 seconds until the In Use / Message LED light turns on. 2. Release N. 3. On your Motorola MBP2000PU, press H.4. Tap Settings > Dect Settings > Handset Settings > Registration.5. Tap Base 1 and tap Register.-  Motorola MBP2000PU will start to search for the base station.6. Tap on Enter Pin box to launch the onscreen keyboard.
DECT Settings 337. Enter the PIN code of the base station and tap Register. - If successful, "Success" is displayed.NoteIf the PIN for the base station is set as "0000" (default), Motorola MBP2000PU will register to the base station without prompting for the PIN.8.1.2 Registering your MBP2000PU to another base stationThe base station to which you wish to register the Motorola MBP2000PU handset must have a FREE Handset location. You must also know the PIN code of the base.1. Press and hold N on the base station for about 4 seconds until the Talk/Message LED light turns on. 2. Release N. 3. On your Motorola MBP2000PU, press H.4. Tap Settings > Dect Settings > Handset Settings > Registration.5. Tap to select the base number and tap Register.-  Motorola MBP2000PU will start to search for the base station.6. Tap on Enter Pin box to launch the onscreen keyboard. 7. Enter the PIN code of the base station and tap Register. - If successful, "Success" is displayed.NoteIf the PIN of the base station is set as "0000" (default), Motorola MBP2000PU will register to the base station without prompting for the PIN.8.1.3 Synchronize your MBP2000PU with another  base station1. On your Motorola MBP2000PU, press H.2. Tap to select Settings > Dect Settings > Handset Settings > Select Base.3. Tap to select the base number and tap Synchronize.8.1.4 Rename Handset1. On your Motorola MBP2000PU, press H.2. Tap Settings > Dect Settings > Handset Settings > Rename Handset.3. Enter the handset name using the onscreen keyboard and tap OK.
34 DECT Settings8.1.5 Set Auto Answer1. On your Motorola MBP2000PU, press H.2. Tap Settings > Dect Settings > Handset Settings > Auto Answer.3. Tap to enable or disable auto answer. - ✓ appears next to the option to indicate that auto answer is enabled.8.2 Base SettingsBase settings allows you to view and modify the settings on your Motorola MBP2000PU base. 8.2.1 Change PIN code1. On your Motorola MBP2000PU, press H.2. Tap Settings > Dect Settings > Base Settings.3. Enter the PIN code and tap Authenticate. (Note: The default PIN code is 0000)4. Tap Change Pin Code.5. Enter the new pin code using the onscreen keyboard and tap Modify.8.2.2 Deregister Handset1. On your Motorola MBP2000PU, press H.2. Tap Settings > Dect Settings > Base Settings.3. Enter the PIN code and tap Authenticate. (Note: The default PIN code is 0000)4. Tap Deregister Handset.5. Tap to select a handset and tap Deregister. 8.2.3 Reset Base Settings to Default1. On your Motorola MBP2000PU, press H.2. Tap Settings > Dect Settings > Base Settings.3. Enter the PIN code and tap Authenticate. (Note: The default PIN code is 0000)4. Tap Reset to Default.5. Tap Reset to confirm.8.2.4 Set Dialing Mode1. On your Motorola MBP2000PU, press H.2. Tap Settings > Dect Settings > Base Settings.3. Enter the PIN code and tap Authenticate. (Note: The default PIN code is 0000)
Voicemail 354. Tap Dialing Mode.5. Tap to select Tone or Pulse. 8.2.5 Set Flash Duration1. On your Motorola MBP2000PU, press H.2. Tap Settings > Dect Settings > Base Settings.3. Enter the PIN code and tap Authenticate. (Note: The default PIN code is 0000)4. Tap Flash Duration.5. Tap to select Short, Normal or Long.9. Voicemail9.1 Set Voicemail Number1. On your Motorola MBP2000PU, press H.2. Tap Settings > Call Settings > Voicemail settings.3. Enter the voicemail number and tap OK.9.2 Listen to VoicemailYou can access your voicemail through your Motorola MBP2000PU handset.1. From the home screen, press C.2. Tap Phone to access the phone tab.3. Tap the voicemail icon  .
36 Using the Phone Functions10. Using the Phone Functions10.1 Call another handset registered to the same base station (Intercom)1. From the home screen, press C.2. Tap Intercom tab.3. Tap to select a Handset Number (0 to 5) to call.4. Press D to hang up.10.2 Make an external callPlacing an external call using the Motorola MBP2000PU is similar to dialing with a mobile phone. 1. From the home screen, press C.2. Tap Phone tab to access the dial pad.3. Enter the phone number.4. Tap   to dial the number.5. Press D to hang up.TipIf you enter a wrong number, tap   to delete the number one by one. Tap and hold   to erase the entire number.10.2.1 In-call optionsDuring a call, press H to access the following options:Show dialpadDisplays dialpadEnd callEnd the current callMuteMute the callSpeakerSwitch to speaker modeSwap callsSwap between 2 callsMerge callsMerge 2 calls to hold a conference callAdd callPut the current call on hold and dial another numberHoldPut the current call on holdII
Using the Phone Functions 37FlashMake a recall (for PBX and some network functions)10.3 Make an external call from Call LogThe call log contains details of dialed, missed and received calls. 1. From the home screen, press C.2. Tap Call log tab to access the list of numbers and contacts in the call log. 3. Tap  next to the call log entry to call that number again. 10.4 Clear call log1. From the home screen, press C.2. Tap Call log tab.3. Press H and tap Clear call log.10.5 Make an external call from Contacts listThe Contacts list is like a phonebook that stores the name, telephone numbers and other information of your contacts on the phone. The person you want to call must have the telephone number stored in the Contacts list.(see “Add an entry to Contacts list” on page 44 for more information on how to add contacts to the Contacts list) 1. From the home screen, press C.2. Tap Contacts tab.3. Select the contact in the contact list.4. Tap   to dial the number.5. Press D to hang up.10.6 Make an external call from FavoritesThe Favorites list stores the name, telephone numbers and other information of your favorite contacts on the Motorola MBP2000PU. (see “Add a Contact as Favorite” on page 46 for more information on how to add contacts to the favorites list) 1. From the home screen, press C.2. Tap Favorites tab.3. Tap  next to the favorite contact to dial the number.4. Press D to hang up.
38 Using the Phone Functions10.7 Answer a call in earpiece modeWhen the phone rings, press C to accept the call and listen through the earpiece of the Motorola MBP2000PU.10.8 Answer a Call in Speakerphone mode1. When the phone rings, press C to accept the call.2. Press H, and then tap Speaker.10.9 Reject a callPress D to reject a call and stop the ringing.10.10 End a CallPress D to end the call.10.11 Adjust volume level during a Call During a call, press + or - to increase or decrease volume. 10.12 Mute the microphone during a call During a call, press H, then tap Mute.10.13 Caller Identity Delivery (CID)Caller Identity Delivery (CID) feature lets you see who is calling on the line. It also lets you know who called you in your absence. If you have subscribed to Caller ID, and provided the identity of the caller is not withheld, the number of the caller will be displayed together with the date and time of the call (if provided by the network).Note:Information about incoming calls will vary by country and network operator. Some operators may charge a subscription for their Caller ID service.
Using the Answer Machine 3910.14 Caller ID Directory MatchingIf you have subscribed to Caller ID and the caller's number matches the telephone number you have stored in your Contacts, it will display the name of the Contact rather than the telephone number. If it is a missed call, when you review the call log, it will display the name of the Contact as well.11. Using the Answer MachineYour Motorola MBP2000PU comes with a Digital Answer Machine that is switched on by default to enable callers to leave you a message when you are not available to answer the call.Callers will be prompted to leave a message or call back later if a call is not answered after a preset number of rings. Each message can be up to 2 minutes. The total recording time available for all messages (including voice prompts) is about 15 minutes.The Digital Answer Machine can work through remote connection to the base station as well as through direct connection when docked.The Message LED on the base station blinks if there are new unread messages.11.1 Open Digital Answer Machine1. Tap  > AnswerMachine.2. Under ICM INFORMATION, the number of New Messages and Total Messages are displayed.
40 Using the Answer Machine11.2 Switch Digital Answer Machine offWhen the Digital Answer Machine is on,  will appear on the status bar. In the Digital Answer Machine screen, you will see the icon indication TAM OFF.1. Tap   > AnswerMachine.2. Tap TAM OFF to turn off Digital Answer Machine function.3. Tap TAM ON to turn it on again.-  The status bar shows .11.3 Set Number of RingsYou can customize the number of times (2 to 9 times) the phone will ring before callers are greeted with the outgoing message. Alternatively, you can choose Toll Saver option such that the phone will ring 5 times if there is no message and only 2 times if there are messages on the Digital Answer Machine. 1. In the Digital Answer Machine screen, press H.2. Tap TAM Setting > Number of Rings.3. Choose the number of times you would like the phone to ring or select Toll Saver.4. If you do not wish to make any changes to the current setting, simply tap Cancel to exit. 11.4 Set Remote PinSet a remote pin code for your Motorola MBP2000PU to improve the security of your personal messages. Onceenabled, users will need to enter the pin code to accessrecorded messages on the Digital Answer Machine.1. In the Digital Answer Machine screen, press H.2. Tap TAM Setting > Set Remote Pin.3. Enter the old pin code under Enter OLD Pin and then enter the new pin code under Enter New Pin. (Note: The default PIN code is 0000)4. Enter the new pin code again under Retype New Pin to verify the pin.5. Tap OK to confirm pin change.
Using the Answer Machine 4111.5 Playback recorded messagesWhen a new message is received, the Message LED on the base station will blink and  appears on the status bar.  1. Tap  > AnswerMachine.You can choose to playback the messages from the handset or speaker.   1. During message playback, tap H.2. Select Handset or Speaker playback.11.6 Delete recorded messages1. Tap  > AnswerMachine.2. Tap   to start message playback.3. To delete current message, tap  .4. To delete all old recorded messages, tap DELETE ALL.-  There will be a voice and message notification once all the old messages have been deleted. 11.7 Memo RecordingYou can record a memo that can be played back later. This is useful when you wish to leave a message for other users of the Motorola MBP2000PU.Tap to go to previous messageTap to play message. The answer machine will play all the new messages followed by old messages.Tap to go to next messageTap to record memoTap to stop playing messageTap to delete current messageTAM ON/OFFTap to turn Digital Answer Machine on or offDELETE ALLTap to delete all played messages
42 Using the Answer MachineNoteA memo will be played back along with other recorded messages from external callers.1. Tap  > AnswerMachine.2. Tap .3. Record the memo you wish to leave for other users of the Motorola MBP2000PU when prompted.4. When you are done with the recording, tap  .- The Digital Answer Machine will playback your memo once to confirm that all essential information has been recorded.11.8 Outgoing Message SettingExternal callers are greeted with an outgoing message when the call is answered by the Digital Answer Machine.The Digital Answer Machine has pre-recorded default messages for this purpose. You can also record a personalized outgoing message for this greeting.11.8.1 Select OGM OptionYou can set the Digital Answer Machine to greet unanswered calls with either an Answer & Record OGM or Answer Only OGM. With Answer & Record OGM, callers will be asked to leave a message after the prompt. However, with Answer Only OGM, callers will be asked to call back and no message will be recorded.1. Tap  > AnswerMachine.2. Press H and tap OGM Setting > Select OGM Option.3. Select Answer & Record or Answer Only.NoteWhen the answer machine memory is full and cannot record anymore new messages, it will automatically switch to Answer Only OGM.11.8.2 Record Personalized Outgoing Message 1. Tap  > AnswerMachine.2. Press H and tap OGM Setting > Record OGM.3. Choose to record a personalized message for Answer & Record or Answer Only.4. Record your the personalized outgoing message when prompted.
Using the Answer Machine 435. When you are done with the recording, tap Stop OGM. If you are not satisfied with the message, tap Delete OGM.6. The Digital Answer Machine will repeat your personalized outgoing message once before finalizing.11.8.3 Playback Personalized Outgoing Message1. Tap  > AnswerMachine.2. Press H and tap OGM Setting > Play OGM.3. Choose to play the personalized message for Answer & Record or Answer Only.4. Tap Stop OGM when you are done or let the message play till the end.11.8.4 Delete Personalized Outgoing Message1. Tap  > AnswerMachine.2. Press H and tap OGM Setting > Play OGM.3. Choose to play the personalized message for Answer & Record or Answer Only.4. Tap Delete OGM to delete the personalized outgoing message.NoteDefault OGM cannot be deleted.11.9 Remote OperationYou can access your answer machine remotely from any touchtone telephone. This allows you to listen to your messages even when you are away from your phone.To begin remote access, dial your telephone number. When the answer machine answers and begins to play the OGM, press * followed by your Remote PIN. When remote access is successful, the phone will announce "Press 1 for main menu".You can perform the following functions using the dialing keys on your keypad:Dialing Key Function1Playback the Voice Prompt Help menu2Play or stop message playback4Go to previous message
44 Contacts List12. Contacts ListThe Contacts list is like a Phonebook that stores the name, telephone numbers and other information of your contacts.12.1 Open Contacts listFrom the home screen, press C and tap Contacts tab.12.2 Search for a contact in Contacts list1. From the home screen, press C and tap Contacts tab.2. Press H and tap Search.3. Enter the name of the contact in the Search contacts box and tap Done.4. Press B to return to the previous menu level.12.3 Add an entry to Contacts list1. From the home screen, press C and tap Contacts tab.2. Press H and tap New contact.5Delete current message6Go to next message7Turn On Answer Machine9Turn Off Answer Machine
Contacts List 453. Tap on First name input box, enter the first name and tap Next.4. Enter the Last name of the contact and tap Next. 5. Proceed to enter the following information: •  Phone (tap Home label to switch between Home, Mobile, Work, Work fax, Home fax, Pager, Other, Custom, etc)•  Email  (tap Home label to switch between Home, Work, Other, Mobile or Custom)•  Postal address (tap Home label to switch between Home, Work, Other or Custom)•  Organization (tap Work label to switch between Work, Other or Custom)TipTo add an input field, tap +To close an input field, tap -Press B to hide the onscreen keyboard.6. Tap More to add more information about the contact, such as IM, Notes, Website, Internet call.7. Tap Done when finished.-  The new contact will be stored in your Contacts list.12.4 Assign Ringtone to a Contact1. From the home screen, press C and tap Contacts tab.2. Tap to select the contact from the contacts list.3. Press H and tap Options > Ringtone.4. Tap to select a ringtone.-  The ringtone is played.5. Tap OK to confirm.NoteThe default ringtone will be used if a specific ringtone is not assigned to a contact.
46 Contacts List12.5 Import/Export Contacts1. From the home screen, press C and tap Contacts tab.2. Press H and tap Import/Export.3. Select Import from SD card, Export to SD card or Share visible contacts.NoteContacts can only be imported or exported in .vCard file format. 12.6 Enable forwarding of calls to voicemail1. From the home screen, press C and tap Contacts tab.2. Tap to select the contact from the contacts list.3. Press H and tap Options > Incoming calls.-  Calls from the contact will be forwarded directly to voicemail.4. To cancel forwarding, tap Options > Incoming calls again.12.7 Add a Contact as Favorite1. From the home screen, press C and tap Contacts tab.2. Tap and hold a contact from the contacts list.-  A list of options appear on the screen. 3. Tap Add to favorites.-  The contact is saved to your favorites list.12.8 Edit a Contact in Contacts list1. From the home screen, press C and tap Contacts tab.2. Tap to select the contact from the contacts list.3. Press H and tap Edit contact.4. Go to the information field you wish to edit and tap + to add input field.5. Tap Done when you are done with the changes.NoteTo discard the changes you have made, tap Revert.
Contacts List 4712.9 Set display options 1. From the home screen, press C and tap Contacts tab.2. Press H and tap Display options.3. You can then choose the following:Only contacts with phoneThis will only display contacts with phone numbersSort list bySort contacts list by First name or Last nameView contact names asView contact names as First name first or Surname first12.10 Delete a Contact from Contacts list1. From the home screen, press C and tap Contacts tab.2. Tap to select the contact from the contacts list.3. Press H and tap Delete contact.4. Tap OK to confirm.12.11 Link Picture to a ContactYou can link a picture to your contact so that you can see the picture of the contact when you search for the contact from the Contacts list or when the contact calls you. You can either take a photo or select it from Gallery.12.11.1 Take photo1. From the home screen, press C and tap Contacts tab.2. Tap to select a contact from the contacts list.3. Press H and then tap Edit contact.4. Tap on the contact icon and tap Take photo.-  The camera is activated. 5. Tap   to take a picture and tap OK.-  An image position box will appear at the center of the picture.-  To resize the picture, tap and hold the edge of the box, and drag inward or outward.-  To move the crop box to another area on the picture, tap and hold inside the box, then drag it to the desired position.
48 Contacts List6. Tap Save to link the picture to the contact.7. Tap Done to save or Revert to cancel.12.11.2 Select from Gallery1. From the home screen, press C and tap Contacts tab.2. Tap to select a contact from the contacts list.3. Press H and then tap Edit contact.4. Tap on the contact icon and tap Select photo from Gallery.5. Tap to select a picture from the Gallery.-  An image position box will appear at the center of the picture.-  To resize the picture, tap and hold the edge of the box, and drag inward or outward.-  To move the crop box to another area on the picture, tap and hold inside the box, then drag it to the desired position.6. Tap Save to link the picture to the contact.7. Tap Done to save or Revert to cancel.12.11.3 Change picture of a Contact1. From the home screen, press C and tap Contacts tab.2. Tap to select a contact from the contacts list.3. Press H and tap Edit contact.4. Tap on the contact icon and then tap Change icon. 5. Follow steps 5 to 7 of sections “12.11.1 Take photo”  and “12.11.2 Select from Gallery” to take photo or select photo from gallery.6. Tap Done to save or Revert to cancel.12.11.4 Remove picture of a Contact1. From the home screen, press C and tap Contacts tab.2. Tap to select a contact from the contacts list.3. Press H and tap Edit contact.4. Tap on the contact icon and then tap Remove icon.5. Tap Done to save or Revert to cancel.
Internet Function 4912.12 Call a contact from contacts list1. From the home screen, press C and tap Contacts tab.2. Tap to select the contact from the contacts list.3. Tap   next to the contact to call. 13. Internet FunctionBefore you can surf the Internet, send and receive emails, listen to Internet radio broadcasts, check weather, stock prices, etc., you must be joined to a Wi-Fi network that is connected to the Internet. For Wi-Fi networks that are not secured with a PIN code, you can easily connect to them and access the Internet freely. However, for Wi-Fi networks that are secured with wireless password/key, you need to have the wireless password/key to access the Internet.13.1 Register your Motorola MBP2000PU to a Wi-Fi Network1. Press H.2. Tap to select Settings > Wireless & networks.- Tap Wi-Fi to activate Wi-Fi connection.- ✓ appears to indicate that it is activated.3. Tap Wi-Fi settings > Network notification to activate notification.
50 Internet Function-  ✓  appears to indicate that it is activated. -  The screen displays a list of available Wi-Fi networks.4. Tap the Wi-Fi network that you want your Motorola MBP2000PU to be connected to. If you cannot find your favorite Wi-Fi network name, press H and then tap Scan.-  If the network is not secured with a wireless password/key, Motorola MBP2000PU will start to establish a link with it. -  If it is a secured network, you will be prompted to enter the wireless password/key. 5. Tap on the password edit box to launch the onscreen keyboard. Enter the wireless password/key and tap Done. 6. Tap Connect. -  Your Motorola MBP2000PU will start to establish a link to the network. Once it is established,   appears on the status bar of your home screen. You can now use the Internet function.NoteThe connection speed is dependent on the capability of the Wi-Fi network.Once you have joined a Wi-Fi network manually, the Motorola MBP2000PU will automatically connect to it whenever the network is in range. If more than one  previously used network is in range, the Motorola  MBP2000PU will join the one last used.If you encounter problems connecting to the Wi-Fi network using preconfigured settings, tap on the network and select Forget to forget the "Remembered" network, then perform setup again.13.2 Set Number of Wi-Fi Network ChannelsDifferent regions utilize different channel schemes for their Wi-Fi networks. For example, North America uses 11 channels, ETSI uses 13 channels while Japan uses 14 channels. It is recommended that you set up your Motorola MBP2000PU according to your country's network scheme to achieve optimum connection.
Internet Function 511. Press H.2. Tap to select Settings > Wireless & networks > Wi-Fi settings.3. Press H.4. Tap Advanced > Regulatory domain.5. Select from 11 channels, 13 channels or 14 channels.13.3 Select Wi-Fi Sleep Policy1. Press H.2. Tap to select Settings > Wireless & networks > Wi-Fi settings.3. Press H.4. Select Advanced > Wi-Fi sleep policy.5. Select When screen turns off, Never when plugged in or Never.13.4 Check Motorola MBP2000PU MAC AddressFor secured Wi-Fi network with MAC address filtering, you will need to include the MAC address of your Motorola MBP2000PU into the filter list before a connection can be established. To check the MAC address of your Motorola MBP2000PU: 1. Press H.2. Tap to select Settings > Wireless & networks > Wi-Fi settings.3. Press H and tap Advanced.13.5 Configure Static IP Settings1. Press H.2. Tap to select Settings > Wireless & networks > Wi-Fi settings.3. Press H.4. Select Advanced > Use Static IP.5. Enter the Static IP Settings.
52 Using the Web Browser14. Using the Web BrowserYOU MUST JOIN A WI-FI NETWORK THAT IS CONNECTED TO THE INTERNET BEFORE YOU CAN SURF THE WEB VIA THE BROWSER APPLICATION. SEE PAGE 49 ON HOW TO JOIN A WI-FI NETWORK.You can use the Browser to surf the web. The Browser is fully optimized and comes with advanced features that let you enjoy Internet browsing on your Motorola MBP2000PU.By default, the home page is www.google.com14.1 Open BrowserTap  > Browser.14.2 Set home page1. In the Browser window, press H and tap More.2. Tap Settings > Set home page. 3. Enter the home page address in the Set home page input box and tap OK.14.3 Open a web pageIn the Browser window, enter the web address in the address bar and tap Go.NoteAs you enter the address, matching web page addresses will appear on the screen. Tap to select an address to go directly to the web page or continue to enter the complete web page address and tap Go.14.4 Automatic screen rotationThe phone automatically changes the screen orientation depending on how you are holding your phone.NoteTo enable/disable automatic screen orientation, from the home screen, press H and tap Settings > Display > Auto-rotate screen.14.5 Display web page in landscape only1. When viewing a webpage, press H and tap More.2. Tap Settings > Landscape-only display.
Using the Web Browser 5314.6 Zoom in and out of a webpageWhen viewing a webpage, double tap on the screen to zoom in and out, or launch the zoom control by sliding your finger across the screen in one direction and tap + to zoom in and - to zoom out.14.7 Open a new browser windowYou can open multiple browser windows and switch between different web pages.In the Browser window, press H and tap New window.-  A new browser window opens and enters the home page.14.8 Switch between browser windows1. In the Browser window, press H and tap Windows.2. Tap to select the browser window you wish to display.14.9 Finding text within a webpage1. When viewing a webpage, press H and tap More > Find on page.2. Enter the text in the input box using the onscreen keyboard and tap Next.-  Matching texts are highlighted on the screen.3. Tap < or > to go to the previous or next matching text.4. Tap x to close the search box.14.10 Selecting links in web pages14.10.1 Web page links1. Tap to go to the link directly or tap and hold the link.-  A pop-up menu opens.2. Tap to select Open, Open in new window, Bookmark link, Save link or Copy link URL.14.10.2 Email links1. Tap on the link.- The Email application will launch automatically.2. Enter the subject using the onscreen keyboard, tap Next.3. Enter the message and then tap Send to send the email, Save as draft or Discard. (for more information on how to use the email application, see “Compose and send email messages” on page 57).
54 Using the Web Browser14.11 Downloading web applicationsBefore you can download web applications, you must first enable downloading from the phone settings.1. From the home screen, press H, and then select Settings > Applications.2. Tap to select Unknown sources check box and tap OK.NoteAll downloaded applications are saved to the storage card. Before you download an application from the web, make sure that you have installed a storage card on your phone. Warning! Applications downloaded from the web can be from unknown sources. To protect your phone and personal data, download applications only from trusted sources such as Android Market. 14.12 View your downloadsIn the Browser window, press H and then select More > Downloads.14.13 Manage bookmarksYou can store as many bookmarks as you want on your phone.14.13.1 To bookmark a web page1. In the Browser window, go to the web page you want to book mark.2. Press H and then tap Bookmarks. -  The bookmark window opens.3. Tap Add and OK to confirm, or edit the bookmark name and tap Next.4. Edit the location if needed, tap Done and OK.14.13.2 To open a bookmark1. In the Browser window, press H and then tap Bookmarks. -  The bookmark window opens.2. Tap to select the bookmark to open it.
Email 5514.14 Customize Browser OptionsYou can customize the Browser to suit your browsing preferences by setting the display, privacy, and security options. 1. In the Browser window, press H, and then tap More > Settings to modify the browser settings according to your preference.- When ✓ appears next to the option, the setting is enabled. To disable, tap the option again.15. EmailYOU MUST JOIN A WI-FI NETWORK THAT IS CONNECTED TO THE INTERNET BEFORE YOU CAN SETUP, SEND AND RECEIVE EMAILS. SEE PAGE 49 ON HOW TO JOIN A WI-FI NETWORK.IT IS IMPORTANT TO SET THE CORRECT DATE AND TIME INFORMATION BEFORE YOU SET UP YOUR FIRST EMAIL ACCOUNT AND START TO ACCESS YOUR EMAILS. The Mail application lets you send and receive emails and it works with most popular email systems such as Google mail, Hotmail as well as POP3 and IMAP accounts. Free email accounts such as www.google.com/mail, www.aol.com, etc. are available online if you do not have an email account. 15.1 Open Email 1. Tap  > Email.
56 Email15.2 Set up the first email account 1. Tap  > Email.2. Enter your Email address and tap Next.3. Enter Password and tap Done.4. Tap Next to proceed to the next step.NoteIf the account type you want to set up is not in the phone database, you will be asked to enter more details. It is recommended that you get all the necessary information for the email account such as incoming/outgoing server settings before you proceed. For example, you need to enter the following to set up a Gmail account: POP3 server = pop.gmail.com Port = 995 Security = SSL (if available) SMTP server = smtp.gmail.com Port = 465 Security = SSL (if available) Authentication = Yes 5. Tap OK.-  The email application will check your incoming and outgoing server settings. It might take a few minutes.6. Enter the Account name (optional) and tap Done.7. Enter Your name (optional) to be displayed on outgoing messages, and then tap Done.-  The email application will start to load your messages. It might take a few minutes for the messages to load completely.15.3 Set up another email account1. Press H, and then tap Accounts to go to the email accounts window.2. In the Accounts window, press H, and then tap Add account.3. Follow the onscreen instructions to set up your email account.NoteIf you have set up more than one email account, your email accounts will appear in the Accounts window. Your email messages from the different accounts will be consolidated into a Combined Inbox.
Email 57Tap to select the email account you wish to access.15.4 Combined InboxIf you have set up more than one email account, your unread email messages from the different accounts will be integrated into a Combined Inbox in the email accounts window.• Press H, and then tap Accounts to go to the email accounts window and tap Combined Inbox.15.5 Account settings15.5.1 Edit Account name1. Tap  > Email.2. Tap to select an email account from the Accounts window. 3. Press H and tap Account settings to modify the following settings:  15.6 Compose and send email messagesYou can send an email message to anyone who has an email address. You can send the message to one person or to a group of people.1. Tap  > Email.2. Tap to select an email account from the Accounts window. 3. Press H and tap Compose. 4. Enter the message recipient's email address in To field.TipIf you are sending the email to several recipients, separate the email addresses with a comma. You can add as many message recipients as you want.• Account name • Email notifications•  Your name •  Select ringtone• Signature • Inbox check frequency• Incoming settings • Default account• Outgoing settings
58 EmailIf you want to send a carbon copy (Cc) or a blind carbon copy (Bcc) of the email to other recipients, press H and then tap Add Cc/Bcc:. 5. Enter the subject in the Subject field, tap Next, and then compose your message. 6. Tap Send.NoteTap Save as draft to save the message as a draft or tap Discard to delete the message you have just composed.TipIf you exit the email application without saving the message you have composed, the message will be automatically saved as a draft in the Drafts folder of your email account.15.7 Read messages1. Tap  > Email.2. In the Accounts window, tap on the folder icon next to the email account you want to access. -  The available mailboxes are displayed.3. Tap to select the folder you want to view.-  The messages are displayed.4. Tap to select the message you want to view. 5. Tap < or > at the top of the message window to go to the previous or next message.15.8 Open an attached fileYou can open and view some types of files and images attached to messages you receive. Tap the attachment. It downloads to the Motorola MBP2000PU and then opens.If the format of an attached file is not supported by the Motorola MBP2000PU, you can see the name of the file but you can't open it.
Email 5915.9 Check for new messages•  In the mailbox window, press H and tap Refresh.15.10 Reply to an email message1. Tap  > Email.2. In the Accounts window, tap on the folder icon next to the email account you want to access. -  The available folders are displayed.3. Tap to select the folder you want to check.-  The messages are displayed.4. Tap to select the message you want to reply.5. Tap Reply or Reply all. 6. Compose your message and tap Send.15.11 Delete an email message1. Tap  > Email.2. In the Accounts window, tap on the folder icon next to the email account you want to access. -  The available folders are displayed.3. Tap to select the folder you want to check.-  The messages are displayed.4. Tap to select the message you want to delete.5. Tap Delete to delete the message.15.12 Forward an email message1. Tap  > Email.2. In the Accounts window, tap on the folder icon next to the email account you want to access. -  The available folders are displayed.3. Tap to select the folder you want to check.-  The messages are displayed.4. Tap to select the messagel you want to forward.5. Press H and tap Forward to forward the message.6. Enter the message recipient's email address in To field.7. Enter the subject in the Subject field, tap Next, and then compose your message. 8. Tap Send.
60 TuneIn Radio15.13 Mark message as unread1. Tap  > Email.2. In the Accounts window, tap on the folder icon next to the email account you want to access. -  The available folders are displayed.3. Tap to select the folder you want to check.-  The messages are displayed.4. Tap to select the message you want to mark as unread.5. Press H and tap Mark as unread to mark the message.15.14 Delete an email account1. Tap  > Email.2. From the Accounts window, tap and hold the email account you wish to delete until an option box appears.3. Tap Remove Account and OK to delete the email account.16. TuneIn RadioYOU MUST JOIN A WI-FI NETWORK THAT IS CONNECTED TO THE INTERNET BEFORE YOU CAN LISTEN TO RADIO BROADCASTS FROM THE INTERNET. SEE PAGE 49 ON HOW TO JOIN A WI-FI NETWORK.TuneIn Radio is an audio service transmitted via the Internet. With this application, you can listen live to your favorite radio stations and programs as well as find new ones by genre, language or location. TuneIn Radio also lists available podcasts from popular stations such as the BBC, so you can catch up with programs you missed on the live stream.NoteOccasionally, the radio stations cannot be accessed if the server or stations are not available.
TuneIn Radio 6116.1 Open TuneIn RadioTap  > TuneIn Radio. -  The screen displays a list of options by which you can search for a radio station by genre, location, language etc. 16.2 Listen to a Radio Broadcast1. Tap  > TuneIn Radio. -  The screen displays a list of options by which you can search for a radio station by genre, location, language, etc.2. Tap to select an option.-  The screen displays a list of stations under the option you have selected.3. Tap to select a station and listen to the station broadcast.•  To add a station to the favorites list for easy access in future, tap [         ].-  The station is added to presets and you can access it by tapping My Presets tab. •  Tap   or   at the bottom of the screen to stop or resume playback.• Press + or - to increase to decrease volume.• Press  B to return to the previous menu.• Press  H , tap Exit and select OK to stop and exit.16.3 Search Station by Name1. Tap  > TuneIn Radio. -  The screen displays a list of options for you to search for a radio station by genre, location, language etc.2. Press >.3. Enter the station name in the search box and tap Done.-  The screen displays the search results.4. Tap to select a station and listen to the station broadcast.16.4 Search Station by Location1. Tap  > TuneIn Radio. -  The screen displays a list of options by which you can search for a radio station by genre, location, language etc.
62 RssFeed2. Tap By Location.3. Follow the onscreen instructions to select the country or region. -  The screen displays a list of options based on the selected country or region.4. Tap to select an option or station and listen to the station broadcast.16.5 Search Station by Language1. Tap  > TuneIn Radio. -  The screen displays a list of options by which you can search for a radio station by genre, location, language etc.2. Tap By Language.3. Follow the onscreen instructions to select a language. -  The screen displays a list of options based on the selected language.4. Tap to select an option or station and listen to the station broadcast.17. RssFeedYOU MUST JOIN A WI-FI NETWORK THAT IS CONNECTED TO THE INTERNET BEFORE YOU CAN RECEIVE AND READ RSSFEED. SEE PAGE 49 ON HOW TO JOIN A WI-FI NETWORK.RSS Feed is a web feed used to publish frequently updated works such as blog entries, news headlines and audio.You can subscribe to timely updates from your favorite websites by entering the Feed's URL or by clicking an RSS icon in a web browser that initiates the subscription process. The RSS Feed reader checks your subscribed feeds regularly for new works, downloads any updates that it finds, and provides a user interface to monitor and read the feeds. 17.1 Open RssFeedTap  > RssFeed.
RssFeed 6317.2 Add a category to the RssFeed Reader 1. In the RssFeed window, tap Add Category and tap on the input box to launch the onscreen keyboard.2. Enter the new category in the input box, tap Done and then tap Add.17.3 Selecting a Category for the WidgetAdding a RssFeed widget lets you view RSS Feeds of your choice straight on your home screen. You can change the RSS feed category which is shown on the home screen widget.• In the RssFeed window, tap Settings and select a category for the Widget.17.4 Adding an RSS Feed into a CategoryFollow the steps below to search and save the real Feed path into the Category of your choice.1. In the RssFeed window, tap to select a Category from the list.2. Tap Search Feed.3. Enter the key words to search for relevant Rss Feeds on the web, for example, News, Sports etc, tap Done and then tap Search.4. Tap Save Feed to save the selected feed into the category.NoteIf you want to view or delete a Feed that you have saved previously, simply tap and hold the selected feed in the list and select View Feed or Delete Feed.
64 Stock18. StockYOU MUST JOIN A WI-FI NETWORK THAT IS CONNECTED TO THE INTERNET BEFORE YOU CAN CHECK STOCK PRICES. SEE PAGE 49 ON HOW TO JOIN A WI-FI NETWORK.The Stock reader shows updated quotes for the stocks in your portfolio list. Quotes are updated every time you open the Stock reader while connected to the Internet. NoteQuotes may be delayed by up to 20 minutes. 18.1 Open StockTap   and tap Stock.-  The Portfolio list is opened by default. -  To get updated stock prices in your portfolio list, tap Refresh.18.2 Add a stock to the Portfolio list 1. In the Stock window, tap to select Portfolio List.2. Tap on the input box to launch the onscreen keyboard.3. Enter the name of the stock you wish to add and tap Add.-  A list of query results appears.4. Tap to select the stock you wish to add.18.3 Delete a stock from the portfolio listTap x next to the stock in the portfolio list.18.4 View more information about a stock in your portfolio 1. In the Stock window, tap to select Portfolio List.2. Tap on a stock symbol to enter the Get Quote tab to view more information about the stock.
Weather 6518.5 Get more information about a stock 1. In the Stock window, tap to select Get Quote.2. Tap on the Search input box to launch the onscreen keyboard. 3. Enter the name of the stock you wish to check and tap Search.-  A list of query results appears.4. Tap to select the stock you wish to view more information. 19. WeatherYOU MUST JOIN A WI-FI NETWORK THAT IS CONNECTED TO THE INTERNET BEFORE YOU CAN CHECK WEATHER. SEE PAGE 49 ON HOW TO JOIN A WI-FI NETWORK.The Weather application lets you view the current weather as well as the weather forecast for the next four days of the week. You can display the weather conditions in your current location and the weather in up to ten cities.19.1 Open Weather ApplicationTap  > Weather.-  The Current weather list is opened by default. -  To get updated weather condition, tap Refresh.19.2 Check the current weather of a city1. In Weather window, tap Current.2. Enter the city in the input box and tap Search. -  The current weather of the city appears on the screen.
66 Take photos and record videos19.3 Display the weather forecast of a city1. In Weather window, tap Forecast.2. Enter the city in the input box and tap Search. -  The 4-day weather forecast of the city appears on the screen.19.4 Change Temperature Unit1. In Weather window, press H and tap Setting.2. Tap to select Celsius or Fahrenheit and tap OK to confirm.NoteThe temperature unit will change only when you tap Refresh.19.5 Delete a cityIn Weather window, tap x next to the city to delete it. 20. Take photos and record videosNoteTo get clear photographs, wipe the lens clean with a soft, dry cloth before you take photo.20.1 Open CameraTap  > Camera.20.2 Switch between camera and camcorder modeDrag slider to camera or camcorder icon to switch mode.20.3 Take pictureTap .-  A thumbnail of the photo you have just taken is shown.-  Tap on the thumbnail to view it in full screen.Delete photoTap Delete > Confirm Delete.Share photo via emailTap Share > Email.
Take photos and record videos 67Set photo as wallpaper or contact iconTap More > Set as > Wallpaper or Contact icon.For more options such as Rotate, Crop, etc, tap More.Press B to return to viewfinder.20.4 Camera options20.5 View photosIn the viewfinder, press H and tap Gallery.-  Thumbnail images of the photos you have taken are displayed.-  Tap on a thumbnail to view it in full screen.- Tap Delete to delete the photo.- Tap Share to send the photo via email- Tap More for other photo options such as rotate, crop, set as wallpaper, etc.Press B to return to viewfinder.Drag slider to select zoom factor from 1x to 4xShows thumbnail of last photoTap to take photoDrag up to switch to camcorderTap to select white balance: Auto, Incandescent, Daylight, Fluorescent, CloudySelect Incandescent or Fluorescent for indoor lighting or Daylight or Cloudy for outdoor lighting.Tap to select exposure: +2,  +1,  0, -1 or -2
68 Take photos and record videos20.6 Record video1. Drag slider  to camcorder icon.2. Tap   to start/stop video recording.-  A recording timer appears on the top left of the screen.-  A thumbnail of the video you have just recorded is shown.-  Tap on the thumbnail to view it in full screen.- Tap > and tap ES Video Player or Movies to play it.- Tap Delete to delete the video.- Tap Share to send the video via email- Tap More for other video options.Press B to return to viewfinder.20.7 Video optionsTap to select video quality: High, Low, MMS, YouTubeSelect Low if sending the video via MMS, High if storing the video on an SD card.Tap to select white balance: Auto, Incandescent, Daylight, Fluorsecent, CloudySelect Incandescent or Fluorescent for indoor lighting or Daylight or Cloudy for outdoor lighting.
Music 6920.8 Play videos1. In the viewfinder, press H and tap Gallery.-  Thumbnail images of the photos and videos you have taken are displayed.2. Tap on a video thumbnail and tap ES Video Player or Movies to play it.Press B to return to Gallery.21. MusicThe Music application lets you play digital audio files stored in a memory card. You must copy your audio files to a memory card and insert it into the Motorola MBP2000PU before you launch the music application. See “Insert and Mount memory card” on page 15.21.1 Listen to Music on your Motorola MBP2000PU21.1.1 Using earphonesYou can insert earphones (not included) into the Motorola MBP2000PU earphone jack to listen to music. 21.1.2 Using the speaker on the base stationYou can also listen to music using the speaker on the base station of your Motorola MBP2000PU.Place the Motorola MBP2000PU handset on the cradle of the base stationTap to select color effect: None, Mono, Sepia, Negative, Posterise, AquaSelect Sepia for an "antique" look, Mono for black and white, Negative to invert the videoimage, etc.
70 Music21.2 Open Music applicationTap  > Music. 21.3 Music LibraryYour music is organized into different categories such as Artists, Albums, Songs and Playlists. Tap to select a category and tap a song in the category to play it back.NotePress + or - to adjust the playback volumeIf you do not see the playback controls, tap on the screen to display the playback controls. TipsTo return to the Music Library during music playback, press H and tap Library.To return to the playback window from the Music Library, tap Now playing or the green playback button.21.4 Search for a song1. Press >.2. Enter the song name and tap Go.-  A list of songs related to the song name is displayed.-  Tap to select and playback the song.TipPress B  to hide keyboard. 21.5 Party Shuffle all songsPress H and tap Party shuffle.Tap to select songs from the list.Tap to turn shuffle on and off. (Shuffle is off when button is gray)Tap to cycle through the repeat modes: Repeating all songs, Repeating current song, Repeat is off.Tap to pause or to resume playing the song.Tap to rewind.Tap to forward.
Music 7121.6 Turn party shuffle offPress H and tap Party shuffle off.21.7 Create playlistsYou can use playlists to organize your music files. You can create as many playlists as you want on your Motorola MBP2000PU.1. In the playback window, press H.2. Tap Add to playlist.3. Tap to select New.4. Enter playlist name, tap Done and Save.21.8 Add songs to current playlist1. In the playback window, press H.2. Tap Add to playlist.3. Tap to select Current playlist.21.9 Play songs in a playlist1. From the main music library, tap Playlists.2. Tap and hold the playlist that you wish to play. -  A pop-up options menu appears.3. Tap Play.21.10 Add songs to a playlist1. From the main music library, tap to select a category from which you wish to add songs to a playlist.Tip Go to Songs category to show all the available songs.2. Tap and hold the song you wish to add to playlist. -  A pop-up options menu appears.3. Tap Add to playlist.  4. Tap to select the playlist.-  The song is added to the selected playlist.21.11 Remove a song from playlist1. From the main music library, tap Playlists.2. Tap to select the playlist from which you wish to remove a song.3. Tap and hold the song you wish to remove.-  A pop-up options menu appears.
72 Music4. Tap Remove from playlist to remove the song from the playlist.21.12 Delete a playlist1. From the main music library, tap Playlists.2. Tap and hold the playlist that you wish to delete. -  A pop-up options menu appears.3. Tap Delete to delete the playlist.21.13 Rename a playlist1. From the main music library, tap Playlists.2. Tap and hold the playlist that you wish to delete. -  A pop-up options menu appears.3. Tap Rename.4. Enter playlist name and tap Save.21.14 Set song as ringtoneYou can use songs as your phone ringtone.1. From the main music library, tap to select a category from which you wish to use song as ringtone.Tip Go to Songs category to show all the available songs.2. Tap and hold the song you wish to use as ringtone. -  A pop-up options menu appears.3. Tap Use as phone ringtone.  -  The song is set as phone ringtone.NoteTo learn how to set phone ringtone, see “Set Phone ringtone” on page 31. 21.15 Set sound effects1. In the Playback window, press H and then tap Sound effects.2. Tap EQ preset or Bass boost and adjust the settings accordingly. 21.16 Delete current song1. In the Playback window, press H and then tap Delete.2. Tap OK to confirm.
Gallery 73WARNINGThe song will be permanently deleted from the SD card.21.17 Set current song as ringtoneIn the Playback window, press H and then tap Use as ringtone.-  The song is set as phone ringtone.22. GalleryThe Gallery application lets you view photos and videos on the phone. It presents the pictures and videos on your SD card, including those you have taken with Camera and those you have downloaded from the web or other locations.22.1 Open GalleryTap  > Gallery.-  If you have stored your files in folders on the memory card, the Gallery application will display these folders as separate albums.NoteDepending on the number of pictures stored on the memory card, it may take a while for the application to load the pictures on the screen.22.2 View pictures•  When viewing pictures in Gallery, slide your finger up, down, left or right across the screen to view more albums. Tap to open an album.
74 Clock•  Return to the main Gallery screen at any time, tap   at the top left of the screen.• Drag the Album View switch    to the right to view the contents of the album in stacks.22.2.1 View pictures in full screenTap on a thumbnail to view the picture in full screen. Tap on the picture in full screen to launch the navigation and zoom controlsThe zoom control buttons appear when you view a picture in full screen. When viewing pictures in full screen, you can:•  Swipe left or right to view the previous or next picture in the album.• Tap + to zoom in or - zoom out.• Tap Slideshow to view the pictures in the album as a slideshow.• Tap More to access more options such as Crop, Rotate, etc.23. Clock23.1 Open ClockTap  > Clock. 23.2 Set an alarm1. Tap  > Clock. 2. Tap .3. Tap Add alarm.4. Tap + or - or the hour and minute fields to set the alarm time.5. Tap to select AM or PM.NoteThis option is not available if Use 24-hour format is activated. See “Select Time Format” on page 22 for details.6. Tap Set.7. Tap Repeat to select the days of the week that you want the alarm to ring and tap OK.8. Tap Ringtone to select the alarm ringtone and tap OK.
Clock 759. Tap Label to enter a name for the alarm and tap OK.10. Tap Done to confirm setting.23.3 Activate an alarm setting1. Tap  > Clock. 2. Tap .-  A list of alarm settings is displayed.3. Tap on the alarm icon to activate an alarm setting.-  The alarm icon is underlined in green.NoteWhen the alarm rings, tap Snooze or Dismiss to snooze or dismiss the alarm.23.4 Deactivate an alarm setting1. Tap  > Clock. 2. Tap .-  A list of alarm settings is displayed.3. Tap on the alarm icon to deactivate an alarm setting.-  The alarm icon is not underlined in green.23.5 Activate alarm in silent mode4. You can set your alarm clock to sound an alarm even when the phone is in silent mode.1. Tap  > Clock. 2. Tap .3. Press H and tap Settings. 4. Tap Alarm in silent mode.- ✓ appears next to the option. -  To disable alarm in silent mode, tap the option again.23.6 Other Alarm Clock Settings1. Tap  > Clock. 2. Tap .3. Press H and tap Settings.  Alarm volume Slide the volume bar left or right to decrease or increase alarm volume.
76 Calendar24. CalendarYou can use the Calendar to create and manage events, meetings, and appointments. 24.1 Open CalendarTap   > Calendar.NoteThe last Calendar view opens by default.24.2 View Agenda for the dayIn any Calendar view, press H and tap Agenda.24.3 Go to Today's dateIn any Calendar view, press H and tap Today.24.4 Change Calendar viewYou can display the Calendar in daily, weekly, monthly, or agenda view. To change Calendar view, press H, then tap Day, Week, Agenda, or Month.Snooze duration Select from 10 minutes, 15 minutes, 20 minutes, 25 minutes and 30 minutes.Volume and CameraSet the desired behavior of the buttons when pressed during an alarm. Select from None, Snooze and Dismiss.
Calendar 7724.5 Modify Calendar Settings1. In any Calendar view, press H and tap More > Settings.2. You can then modify the following calendar view and reminder settings:24.6 Add new event1. In any Calendar view, press H and tap More > New event to open event details screen.2. Tap on Event name edit box to launch the onscreen keyboard and enter event name.3. If there is a time frame for the event, tap From and To to set the date and time.4. If it is a special occasion such as a birthday or a whole-day event, tap From to set date, and then select All day check box.5. Enter Event location and description.6. If you have more than one calendar, tap the down arrow on the right of L-Calendar to select the Calendar where you want to save the event.7. Enter email addresses of Guests.8. Select the frequency of event recurrence in Repetition and then select the event reminder time in Reminders.NoteTo add another reminder, tap Add reminder +.9. When finished, tap Done. Hide declined eventsTap to enable or disableSet alerts & notificationSelect from Alert, Status bar notification and OffSelect ringtone Select a ringtone and tap OK.Default reminder timeSelect from 10 minutes, 15 minutes, 20 minutes, 25 minutes, etc.
78 Performing Calculations24.7 View, dismiss, or snooze a reminder1. Tap on the status bar, then slide your finger down the screen to open the Notifications panel.2. Tap the upcoming event name to display the event.NoteIf you have other pending event reminders, these events will also appear on the screen.3. Tap Snooze all to snooze all event reminders for five minutes.4. Tap Dismiss all to dismiss all event reminders.5. Press B to keep the reminders pending in the notifications area of the status bar. 25. Performing CalculationsYou can use the Calculator to perform simple and advanced arithmetical calculations. 25.1 Open CalculatorTap   > Calculator.25.2 Perform Calculations1. Tap on the numbers and mathematical operators to perform simple calculations.2. Press H and tap Advanced panel to access advanced operators such as sin, cos, tan, log etc. 3. Press H and tap Basic panel to return to basic numbers and mathematical operators. 4. To clear calculation histories, press H and tap Clear history.
Downloading and Reading eBooks 7926. Downloading and Reading eBooksAldiko is an e-book reader application for Android devices. You can browse, shop, download, read and organize eBooks right from the application. The e-book reader supports Adobe DRMed ePub and PDF as well as non-encrypted ePub and PDF formats.26.1 Downloading and Reading eBooksWarning!Some books available for download contain subject matters that are not suitable for children. Parental guidance is strongly advised for children under 18. 26.2  Open Aldiko1. Tap  > Aldiko.-  You will be presented with an opening message and tips on Aldiko when you open it for the first time. Otherwise, Aldiko keeps the last open book and the last read positions for all opened books.26.3  Start reading•  Tap to select a book from the bookshelf to start reading.•  You can scroll through the pages by swiping your finger left to go to the next page and swiping right to go to the previous page. •  You can also simply tap on the right side of the page to move forward and the left side to move back. •  Alternatively, you can use the volume keys on your device to scroll through the pages.Tap on the centre of the page to launch a series of options.<: Tap < on the top left of the screen to return to the "home screen" of Aldiko where you can access Store, Bookshelf, SD card etc.>: Tap >on the top right of the screen to search for words or phrases in the book you are currently reading.Location Bar: The location bar at the bottom of the page shows you how many pages into the book you have read. You can move the bar to scroll through the book you are reading.
80 Downloading and Reading eBooksGo To: Tap to jump to a particular point in the book.Day/Night: Tap to toggle between Day view and Night view. It alternates the colour of the text and the colour of the background depending on your preference.Settings: Tap to adjust font, screen brightness, orientation, etc.More: Tap to share the book or access Help.26.4 Buy BooksTo browse the eBook store, select Store from the "home screen" of Aldiko.NoteYou will need to create an Aldiko account before you are able to purchase a book. You will also presumably have to provide credit card details.26.5 Download Free BooksTo browse an eBook store, select Store from the "home screen" of Aldiko.1. Tap to select your desired category. 2. Tap to select a book and tap Download.-  Your MBP2000PU begins to download the book in the background. Once the download is complete, it will appear as New content in your Aldiko library.26.6 Add eBooks from your SD card into your Library1. Tap < and then select SD card.2. Scroll through your SD card and select the checkbox next to the eBook you would like to add. Then select Import to Aldiko (1).NoteIf you are importing Adobe DRM protected ePub and PDF files, you need to authorize your Android Homephone with an Adobe ID before import. To learn more about Adobe ID, visit: http://www.adobe.com/products/digitaleditions/help/http://www.adobe.com/products/digitaleditions/help/
ES FILE EXPLORER 8127. ES FILE EXPLORERES File Explorer is a free file manager for Android devices. It allows you to browse files and folders stored on your Motorola MBP2000PU, memory card, LAN and FTP.You can also copy/paste, rename, delete, create folder, send file as email attachment features using ES File Explorer. 27.1 Open ES File ExplorerTap  > ES File Explorer.Tap   to browse the files and folders in your Motorola MBP2000PU or memory card.Tap   to go to the root directory.Tap   to search for files or folders.Tap   to go to the previous directory or folder.For more information on the short cut keys, tap   for help.27.2 Open file as1. Tap and hold the file you wish to open.-  A pop-up menu appears.2. Tap Open As and select Text, Audio, Video or Image.27.3 Select all files in a directory1. Go to the directory that you want to select all files.2. Press H, tap Operations > Select All.27.4 Create a new folder1. In the SD card directory, go to the location that you wish to create a new directory.2. Press H, then tap New.3. Tap to select Folder.4. Enter Folder Name and tap OK.NoteYou can only create new folders in the SD card directory.27.5 Rename a file1. Tap and hold the file you wish to rename.-  A pop-up menu appears.
82 ES FILE EXPLORER2. Tap Rename.3. Enter the new file name and tap OK. 27.6 Copy a file to another location1. Tap and hold the file you wish to copy.-  A pop-up menu appears.2. Tap Copy to copy the file.3. Go to another folder or directory that you wish to place a copy of the file.4. Press H and tap Operations > Paste to paste the file into the new location.27.7 Move a file to another location1. Tap and hold the file you wish to move.-  A pop-up menu appears.2. Tap Cut.3. Go to the folder or directory that you wish to place the file.4. Press H and tap Operations > Paste to paste the file into the new location.27.8 Delete a file1. Tap and hold the file you wish to delete.-  A pop-up menu appears.2. Tap Delete and tap OK to delete the file.27.9 Compress a file1. Tap and hold the file you wish to compress.-  A pop-up menu appears.2. Tap Compress.3. Enter a name for the compress file, select the compression mode and tap OK.27.10 View file details1. Tap and hold the file you wish to view details.-  A pop-up menu appears.2. Tap Properties. 3. Tap OK to close the information box.
Discover and Download Android Applications 8327.11 Modify View Settings in ES File Explorer1. In ES File Explorer window, press H and tap Settings.2. You can then modify the follow settings:• Theme Settings• Layout Settings• File Settings• View• Size• Sort By• Home Directory• App Backup Directory28. Discover and Download Android ApplicationsYOU MUST JOIN A WI-FI NETWORK THAT IS CONNECTED TO THE INTERNET BEFORE YOU CAN DISCOVER AND DOWNLOAD APPLICATIONS FROM THE INTERNET. SEE PAGE 49 ON HOW TO JOIN A WI-FI NETWORK.SlideME Application Manager is an Android client that facilitates the discovery and download of Android applications to your phone. The catalog within the SlideMe Application Manager contains both free and paid applications. 28.1 Open SlideMETap  > SlideME Market.-  When you launch SlideME market for the first time, you will be presented with a User Agreement.- Tap Agree to indicate acceptance.
84 Discover and Download Android Applications-  The screen displays a list of categories by which you can search for an application, such as Fun & Games, Entertainment, Tools & Utilities, etc.  28.2 Download an application1. Tap  > SlideME Market. -  The screen displays a list of categories.2. Tap to select a category.-  The screen displays a list of applications under the category you have selected.- Press H and tap Sort to sort the list by alphabetical order, rating, price, etc.3. Tap to select an application.4. Tap Download > Install > OK to download the application.- Downloading starts.5. Once the downloading is completed, tap Install to install the application on your phone.6. You may be prompted to enable Unknown sources in Settings > Applications (see “Downloading web applications” on page 54 for details).28.3 Search by Top Apps1. Tap  > SlideME Market. -  The screen displays a list of categories.2. Press H and tap Top Apps.-  The screen displays a list of top apps.- Press H and tap Sort to sort the list by alphabetical order, rating, price, etc.3. Tap to select an application.4. Tap Download > Install > OK to download the application.- Downloading starts.5. Once the downloading is completed, tap Install to install the application on your phone.6. You may be prompted to enable Unknown sources in Settings > Applications (see “Downloading web applications” on page 54 for details).28.4 Search by Latest Apps1. Tap  > SlideME Market. -  The screen displays a list of categories.
Discover and Download Android Applications 852. Press H and tap Latest.-  The screen displays a list of the latest apps.- Press H and tap Sort to sort the list by alphabetical order, rating, price, etc.3. Tap to select an application.4. Tap Download > Install > OK to download the application.- Downloading starts.5. Once the downloading is completed, tap Install to install the application on your phone.6. You may be prompted to enable Unknown sources in Settings > Applications (see “Downloading web applications” on page 54 for details).28.5 Search by Local Apps1. Tap  > SlideME Market. -  The screen displays a list of categories.2. Press H and tap Local Apps.-  The screen displays a list of the local apps.- Press H and tap Sort to sort the list by alphabetical order, rating, price, etc.3. Tap to select an application.4. Tap Download > Install > OK to download the application.- Downloading starts.5. Once the downloading is completed, tap Install to install the application on your phone.6. You may be prompted to enable Unknown sources in Settings > Applications (see “Downloading web applications” on page 54 for details).28.6 Search for Apps manually1. Tap  > SlideME Market. -  The screen displays a list of categories.2. Press H and tap Search.-  A search box appears at the top of the screen. 3. Enter the search text in the box and tap Go. -  A list of apps associated with the search text appears. - Press H and tap Sort to sort the list by alphabetical order, rating, price, etc.4. Tap to select an application.
86 Install apps5. Tap Download > Install > OK to download the application.- Downloading starts.6. Once the downloading is completed, tap Install to install the application on your phone.7. You may be prompted to enable Unknown sources in Settings > Applications (see “Downloading web applications” on page 54 for details).29. Install appsYou can install the Apps (usually in .apk format) into your MBP2000PU with a Micro-SD Card.1. Copy the Apps files into a Micro-SD card2. Insert the Micro-SD card into the card slot of the handset3. Run ES File Explorer.4. Select the Apps inside the SD card and double-click to run the Installation. NoteYou may be prompted to enable Unknown sources in Settings > Applications. Tap Unknown sources to enable downloading of non-Market applications (see “Downloading web applications” on page 54 for details).5. Tap Install to install the application.
Connect your handset to a computer 8730. Connect your handset to a computerYou can transfer you pictures, videos, music, ringtones and application from your computer to either the Micro-SD card or Internal Phone Memory.WARNINGWhen connecting your phone to a computer and mounting its SD card, you must follow your computer’s instructions for connecting and disconnecting USB devices, to avoid damaging or corrupting the files on your SD card.1. Connect one end of the Micro-USB cable to the handset and the other end to the USB port on your computer.   -   A pop up window appears on the screen.-  If the window did not appear, drag down the status bar and then tap USB Connected. 2. Tap Turn on USB Storage.   -  After a few seconds, USB storage in use appears.3. On My Computer windows, a new device NANDStorage is displayed. This is the internal Phone memory.  -  You can store data in the Android folder of NANDStorage. -  If a Micro-SD card is inserted into the handset, you will find another device Removable Disk in My Computer windows.4. After you finished the data transfer/access,  tap Turn off USB storage on the handset to disconnect.
88 ES Task Manager31. ES Task ManagerThis Android program helps you free memory, kill task, close all the running applications, and speed up your Motorola MBP2000PU.31.1 Open ES Task Manager1. Tap  > ES Task Manager.-  A list of current tasks is displayed.2. To clear a selected task, tap on the task and then tap Kill Selected button. 3. Tap Refresh to display all current tasks again.4. Tap Kill All to clear all current tasks.32. SettingsFrom the home screen, press H and then tap Settings. You can modify the different settings of your Motorola MBP2000PU. Wireless & networksConfigure your phone's wireless connections, such as Wi-Fi.Call settings Set up voicemail.Dect Settings View and configure base station and handset settings.Sound  Set the phone and notification ring tones, silent mode, etc.Display Set screen calibration, brightness and screen timeout, etc.Security Set screen unlock pattern or manage the phone's credential storage lock.Applications Manage applications and install new programs.
Advanced Features 8933. Advanced FeaturesAdvanced Features are for users who do more than using the Motorola MBP2000PU for Telephony and Internet surfing. It allows the user to perform advance operations.WARNINGThese Advanced Features are not for trial and error or testing out the menu; some settings may cause your Motorola MBP2000PU to malfunction when set improperly.33.1 Firmware Upgrade with SD cardYou may need to upgrade the firmware of your Motorola MBP2000PU from time to time to improve its performance and enable other future features.You can obtain new firmware releases from Binatone website www.binatonetelecom.com when it is available. Firmware Upgrade can only be done via a memory card. Internet Firmware Upgrade may be possible in the future.Get the firmware (files) from Binatone and save these files into a memory card - make sure that the files are not Accounts & sync Select background data, auto-sync and add sync accounts.Privacy Factory data resetStorage Check the available storage card and phone memory, mount or unmount SD card. Language & keyboardSelect locale (language and region), text input and auto-correction, etc.Voice input & outputConfigure Text-to-speech settingsDock Enable or disable dock insertion sound.Date & time Set date, time, time zone & formats.About phone Select this if you want to upgrade Firmware through memory Card and view legal info, phone status and software version.
90 Advanced Featurescorrupted or infected with software virus. You need to insert the memory card into your Motorola MBP2000PU.Make sure that your Motorola MBP2000PU has been sufficiently charged. If not, please put the Motorola MBP2000PU into the base station to charge.The software is compressed with the name "update.zip". Put this file into the root directory of a Micro-SD card.Insert the Micro-SD card into the handset.1. Press H and tap Settings > About Phone > System updates.2. Tap Install system update.3. Tap From SD card.4. Tap Install now to proceed.-  The firmware is now upgrading your Motorola MBP2000PU software.-  This procedure may take up to 3~5 minutes.IMPORTANTDo not remove the battery of your Motorola MBP2000PU while performing the Firmware Upgrade.5. After Firmware upgrade, the phone will power down automatically. 6. Press and hold L to power up the phone again.33.2 Factory data resetThis erases all data from the phone's memory, and sets it back to original factory settings. Make sure you have backed up any important application-specific data to the SD card.  It does not erase data stored in the SD card. 1. Press H and tap Settings > Privacy > Factory data reset.2. Tap Reset phone.-  The phone will power down automatically for reset.3. The phone will automatically power up again and launch Welcome Wizard to help you configure the basic settings on your phone. See “Set up your Motorola MBP2000PU with Welcome Wizard” on page 19 for  details.
Help 9134. HelpMy Motorola MBP2000PU does not turn on.•  Make sure the power adapter is securely connected •  Make sure you are using the power adapter that was included with your Motorola MBP2000PU.•  Make sure the Motorola MBP2000PU is turned on.My Motorola MBP2000PU does not recognize the memory card.•  Make sure you have inserted a certified memory card.•  Make sure you have inserted the memory card correctly.•  See page 15 on how to insert a memory card.My Motorola MBP2000PU shows a low-battery  •  The Motorola MBP2000PU is low on power and needs to be charged before you can use it. •  See page 14 on how to charge your Motorola MBP2000PU.I cannot send or receive emails or access the web•  Check the wireless signal indicator in the status bar at the top of the screen. If there is no signal, you are not connected. I cannot make or receive calls•  Your Motorola MBP2000PU may not be registered to a base station. •  Check if the telephone cord and power adaptor are connected properly.The display freezes or does not respond•  Turn the Motorola MBP2000PU off and turn it on again.   is not scrolling when the handset is placed on the base•  Incomplete battery contact - adjust the handset on the  base station.•  Dirty contact - clean the battery contact by wiping with an alcohol moistened cloth.•  Battery is full - charging is not necessary at this time.There is no sound when the headset is connected to Motorola MBP2000PU•  Unplug and reconnect the headset. Make sure that the connector is pushed in all the way.•  The volume may be deactivated or set too lwarning
92 HelpI cannot register my Motorola MBP2000PU to the base station•  Try resetting the base station. You can do this by:• Holding N on the base station for about 9 seconds until the Talk/Message LED blinks. • Release N and press it again immediately.•  The Talk/Message LED light should light up once more.•  Register your Motorola MBP2000PU to the base station. See page 32 on how to register your Motorola MBP2000PU to he base station.My email could not be delivered due to connection to the server on port 25 timed out•  You may need to change the port setting on an outgoing mail server for one of your email accounts. I cannot access Internet radio broadcast•  Your Motorola MBP2000PU must join a Wi-Fi network that is connected to the Internet. •  For information about joining a Wi-Fi network, see page 49. Interference•  Noise interference on your radio or television•  Your base may be too close. Move it as far away as possible.There is no dial tone•  Your Motorola MBP2000PU may not be registered to a base station.There is no ring tone•  The ring tone is deactivated, see page 31.•  Increase the volume. Caller ID does not work•  Check your subscription with your network operator.•  If you subscribe to high-speed Internet service (Digital Subscriber Line - DSL) through your telephone lines, you must install a DSL filter between the base and the telephone wall jack. The filter will prevent noise and caller ID problems caused by DSL interference. Please contact your DSL service provider for more information about DSL filters.A new contact cannot be stored•  The contacts list is full. Delete an entry to free memory.
General information 9335. General informationIf your product is not working properly...1. Read this User's Guide.2. Visit our website: www.motorola.com3. Contact Customer Service in the US and Canada at 1-888-331-3383.To order a replacement battery pack contact customer service or visit our website.Unplug this cordless phone immediately from an outlet if:•  The power cord or plug is damaged or frayed.•  Liquid has been spilled on the product.•  The product has been exposed to rain or water. Do not retrieve the handset or base until after you have unplugged the power and phone from the wall. Then retrieve the unit by the unplugged cords.•  The product has been dropped or the cabinet has been damaged.•  The product exhibits a distinct change in performance.Installation Guidelines1. Read all instructions and save them for future reference.2. Follow all warnings and instructions marked on the product.3. Do not install this product near a bath tub, sink, or shower.4. Operate this phone using only the power source that is indicated on the marking label. If you are unsure of the  power supply to your home, consult with your dealer or local power company.5. Do not place this product on an unstable cart, stand, or table. This product may fall, causing serious damage to the product.6. Adjust only those controls that are covered by the operating instructions. Improper adjustment of other controls may result in damage and will often require extensive work to restore the product to normal operation.7. Clean this product with a soft, damp cloth. Do not use chemicals or cleaning agents to clean this phone.
94 General information8. Use only the power supply that came with this unit. Using other power supplies may damage the unit.9. Because this phone operates on electricity, you should have at least one phone in your home that operates without electricity in case of a power outage.10. To avoid interference to nearby appliances, do not place the base of the phone on or near a TV, microwave oven, or VCR.CAUTIONTo maintain compliance with the FCC's RF exposure guidelines, place the base unit at least 20 cm from nearby persons.Battery Safety Instructions•  Do not burn, disassemble, mutilate, or puncture the battery. The battery contains toxic materials that could be released, resulting in injury.CAUTIONThere is a risk of explosion if you replace the battery with an incorrect battery type. Use only the battery pack that came with your phone or an authorized replacement recommended by the manufacturer.•  Keep battery packs out of the reach of children.•  Remove battery packs if storing over 30 days.•  Do not dispose of battery packs in fire, which could result in explosion.•  The rechargeable battery packs that power this product must be disposed of properly and may need to be recycled. Refer to the battery label for battery type. Contact your local recycling center for proper disposal methods.SAVE THESE INSTRUCTIONS
General information 95Consumer Products and Accessories Limited Warranty ("Warranty")Thank you for purchasing this Motorola branded product manufactured under license by Binatone Electronics International LTD  ("BINATONE").What Does this Warranty Cover? Subject to the exclusions contained below, BINATONE warrants that this Motorola branded product ("Product") or certified accessory ("Accessory") sold for use with this product that it manufactured  to be free from defects in materials and workmanship under normal consumer usage for the period outlined below. This Warranty is your exclusive warranty and is not transferable.Who is covered?This Warranty extends only to the first consumer purchaser, and is not transferable.What will BINATONE do?BINATONE or its authorized distributor at its option and within a commercially reasonable time, will at no charge repair or replace any Products or Accessories that does not conform to this Warranty. We may use functionally equivalent reconditioned/ refurbished/ pre-owned or new Products, Accessories or parts.What Other Limitations Are There?ANY IMPLIED WARRANTIES, INCLUDING WITHOUT LIMITATION THE IMPLIED WARRANTIES OF MERCHANTABILITY AND FITNESS FOR A PARTICULAR PURPOSE, SHALL BE LIMITED TO THE DURATION OF THIS LIMITED WARRANTY, OTHERWISE THE REPAIR OR REPLACEMENT PROVIDED UNDER THIS EXPRESS LIMITED WARRANTY IS THE EXCLUSIVE REMEDY OF THE CONSUMER, AND IS PROVIDED IN LIEU OF ALL OTHER WARRANTIES, EXPRESS OF IMPLIED. IN NO EVENT SHALL MOTOROLA OR BINATONE BE LIABLE, WHETHER IN CONTRACT OR TORT (INCLUDING NEGLIGENCE) FOR DAMAGES IN EXCESS OF THE PURCHASE PRICE OF THE PRODUCT OR ACCESSORY,
96 General informationOR FOR ANY INDIRECT, INCIDENTAL, SPECIAL OR CONSEQUENTIAL DAMAGES OF ANY KIND, OR LOSS OF REVENUE OR PROFITS, LOSS OF BUSINESS, LOSS OF INFORMATION OR OTHER FINANCIAL LOSS ARISING OUT OF OR IN CONNECTION WITH THE ABILITY OR INABILITY TO USE THE PRODUCTS OR ACCESSORIES TO THE FULL EXTENT THESE DAMAGES MAY BE DISCLAIMED BY LAW.Some jurisdictions do not allow the limitation or exclusion of incidental or consequential damages, or limitation on the length of an implied warranty, so the above limitations or exclusions may not apply to you. This Warranty gives you specific legal rights, and you may also have other rights that vary from one jurisdiction to another.
General information 97ExclusionsNormal Wear and Tear. Periodic maintenance, repair and replacement of parts due to normal wear and tear are excluded from coverage. Batteries. Only batteries whose fully charged capacity falls below 80% of their rated capacity and batteries that leak are covered by this Warranty.Abuse & Misuse. Defects or damage that result from: (a) improper operation, storage, misuse or abuse, accident or neglect, such as physical damage (cracks, scratches, etc.) to the surface of the product resulting from misuse; (b) contact with liquid, water, rain, extreme humidity or heavy perspiration, sand, dirt or the like, extreme heat, or food; (c) use of the Products or Accessories for commercial purposes or subjecting the Product or Accessory to abnormal usage or conditions; or (d) other acts which are not the fault of MOTOROLA or BINATONE., are excluded from coverage. Use of Non-Motorola branded Products and Accessories. Defects or damage that result from the use of Non-Motorola branded or certified Products or Accessories or other peripheral equipment are excluded from coverage. Unauthorized Service or Modification. Defects or damages resulting from service, testing, adjustment, installation, maintenance, alteration, or modification in any way by someone other than MOTOROLA, BINATONE or its authorized service centers, are excluded from coverage. Products Covered Length of CoverageConsumer Products One (1) year from the date of the products original purchase by the first consumer purchaser of the product.Consumer Accessories Ninety (90) days from the date of the accessories original purchase by the first consumer purchaser of the product.Consumer Products and Accessories that are Repaired or ReplacedThe balance of the original warranty or for ninety (90) days from the date returned to the consumer, whichever is longer.
98 General informationAltered Products. Products or Accessories with (a) serial numbers or date tags that have been removed, altered or obliterated; (b) broken seals or that show evidence of tampering; (c) mismatched board serial numbers; or (d) nonconforming or non-Motorola branded housings, or parts, are excluded from coverage. Communication Services. Defects, damages, or the failure of Products or Accessories due to any communication service or signal you may subscribe to or use with the Products or Accessories is excluded from coverage.How to Obtain Warranty Service or Other Information?To obtain service or information, please call:US and Canada: 1-888-331-3383You will receive instructions on how to ship the Products or Accessories at your expense and risk, to a BINATONE Authorized Repair Center.  To obtain service, you must include: (a) the Product or Accessory; (b) the original proof of purchase (receipt) which includes the date, place and seller of the Product; (c) if a warranty card was included in your box, a completed warranty card showing the serial number of the Product; (d) a written description of the problem; and, most importantly; (e) your address and telephone number.These terms and conditions constitute the complete warranty agreement between you and BINATONE. regarding the Products or Accessories purchased by you, and supersede any prior agreement or representations, including representations made in any literature publications or promotional materials issued by BINATONE. or representations made by any agent employee or staff of BINATONE, that may have been made in connection with the said purchase.FCC, ACTA and IC regulations FCC Part 15 This equipment has been tested and found to comply with the requirements for a Class B digital device under Part 15 of the Federal Communications Commission (FCC) rules. These requirements are intended to provide reasonable
General information 99protection against harmful interference in a residential installation. This equipment generates, uses and can radiate radio frequency energy and, if not installed and used in accordance with the instructions, may cause harmful interference to radio communications. However, there is no guarantee that interference will not occur in a particular installation. If this equipment does cause harmful interference to radio or television reception, which can be determined by turning the equipment off and on, the user is encouraged to try to correct the interference by one or more of the following measures:•  Reorient or relocate the receiving antenna.•  Increase the separation between the equipment and receiver.•  Connect the equipment into an outlet on a circuit different from that to which the receiver is connected.•  Consult the dealer or an experienced radio/TV technician for help. "For body worn operation, this handset has been tested and meets FCC RF exposure guidelines when used with an accessory that contains no metal and that positions the handset a minimum of 0m from the body. Use of other accessories may not ensure compliance with FCC RF exposure guidelines." Changes or modifications to this equipment not expressly approved by the party responsible for compliance could void the user's authority to operate the equipment. This device complies with Part 15 of the FCC rules. Operation is subject to the following two conditions: (1) this device may not cause harmful interference, and (2) this device must accept any interference received, including interference that may cause undesired operation. Privacy of communications may not be ensured when using this telephone.To ensure safety of users, the FCC has established criteria for the amount of radio frequency energy that can be safely absorbed by a user or bystander according to the intended usage of the product. This product has been tested and found to comply with the FCC criteria. The handset may be safely held against the ear of the user. The telephone base shall be installed and used such that parts of the user's body
100 General informationother than the hands are maintained at a distance of approximately 20 cm (8 inches) or more.This Class B digital apparatus complies with Canadian ICES-003. Product Description :  DECT 6.0 Cordless Phone with WiFiModel Number(s)       MBP2000PUResponsible Party in USALegal Company Name :  Binatone North America Inc.,Address :     Castle Creek 4, 5875 Castle       Creek Parkway, Suite 315     Indianapolis, IN 46250,USAPhone :    1-317-408-9126Fax :    1-317-436-8380E-mail address :     Jordanriggs@binatonetelecom.       com.hkContact Person :    Jordan RiggsFCC Part 68 and ACTA This equipment complies with Part 68 of the FCC rules and with technical requirements adopted by the Administrative Council for Terminal Attachments (ACTA). The label on the back or bottom of this equipment contains, among other things, a product identifier in the format US: AAAEQ##TXXXX. This identifier must be provided to your local telephone company upon request.The plug and jack used to connect this equipment to premises wiring and the telephone network must comply with applicable Part 68 rules and technical requirements adopted by ACTA. A compliant telephone cord and modular plug is provided with this product. It is designed to be connected to a compatible modular jack that is also compliant. An RJ11 jack should normally be used for connecting to a single line and an RJ14 jack for two lines. See Installation Instructions in the User's Guide.The Ringer Equivalence Number (REN) is used to determine how many devices you may connect to your telephone line and still have them ring when you are called. The REN for this product is encoded as the 6th and 7th characters
General information 101following the US: in the product identifier (e.g., if ## is 03, the REN is 0.3). In most, but not all areas, the sum of all RENs should be five (5.0) or less. For more information, please contact your local telephone company.This equipment may not be used with Party Lines. If you have specially wired alarm dialing equipment connected to your telephone line, ensure the connection of this equipment does not disable your alarm equipment. If you have questions about what will disable alarm equipment, consult your telephone company or a qualified installer.If this equipment is malfunctioning, it must be unplugged from the modular jack until the problem has been corrected. Repairs to this telephone equipment can only be made by the manufacturer or its authorized agents. For repair procedures, follow the instructions outlined under the Limited Warranty.If this equipment is causing harm to the telephone network, the telephone company may temporarily discontinue your telephone service. The telephone company is required to notify you before interrupting service. If advance notice is not practical, you will be notified as soon as possible. You will be given the opportunity to correct the problem and the telephone company is required to inform you of your right to file a complaint with the FCC. Your telephone company may make changes in its facilities, equipment, operation, or procedures that could affect the proper functioning of this product. The telephone company is required to notify you if such changes are planned.If this product is equipped with a corded or cordless handset, it is hearing aid compatible.If this product has memory dialing locations, you may choose to store emergency telephone numbers (e.g., police, fire, medical) in these locations. If you do store or test emergency numbers, please: •  Remain on the line and briefly explain the reason for the call before hanging up.•  Perform such activities in off-peak hours, such as early morning or late evening.
102General informationIndustry Canada Operation is subject to the following two conditions: (1) this device may not cause harmful interference, and (2) this device must accept any interference, including interference that may cause undesired operation of the device. Privacy The term "IC: " before the certification/registration number only signifies that the Industry Canada technical specifications were met.The Ringer Equivalence Number (REN) for this terminal equipment is 0.0. The REN is an indication of the maximum number of devices allowed to be connected to a telephone interface. The termination on an interface may consist of any combination of devices subject only to the requirement that the sum of the RENs of all the devices does not exceed five.This product meets the applicable Industry Canada technical specifications.of communications may not be ensured when using thistelephone.
General information 103Technical SpecificationsRF frequency band DECT: 1921.536-1928.448MHzChannels                     5(for DECT)  11(for WiFi in US)Operating Temperature0  C to 40ºCStorage Temperature-20ºC to 60ºCPower Adaptor           (1) Base AdaptorInput : 100-120VAC 60Hz 0.3AOutput 1 : 5.8VDC 600mA0ºWiFi in US: 2412.000-2462.000MHzOutput 2 : 5.8VDC 1000mA(2) Handset USB AdaptorInput : 100-240VAC 50/60Hz 0.3AOutput : 5VDC 1000mA3.7V 910mAh Li-ion Rechargeable Battery Pack, Motorola BQ50Screen Size 3.2"Backlight LEDPanel Resolution 400 x 240Supported Memory Card TypeMicro-SDMicro-USB Port IncludedHeadphone 3.5mm jackHandset Speaker Stereo System with 2pcs of 1.5W 8ohm speakersHandset Battery
 Manufactured, distributed or sold by Binatone Electronics International LTD., official licensee for this product. MOTOROLA and the Stylized M Logo are trademarks or registered trademarks of Motorola Trademark Holdings, LLC. and are used under license. All other trademarks are the property of their respective owners.© 2011 Motorola Mobility, Inc. All rights reserved.Version 1.0Printed in China

Navigation menu