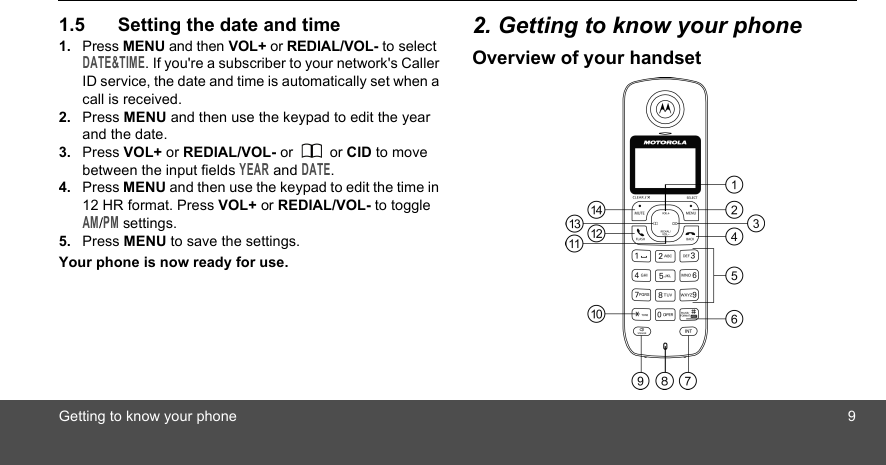
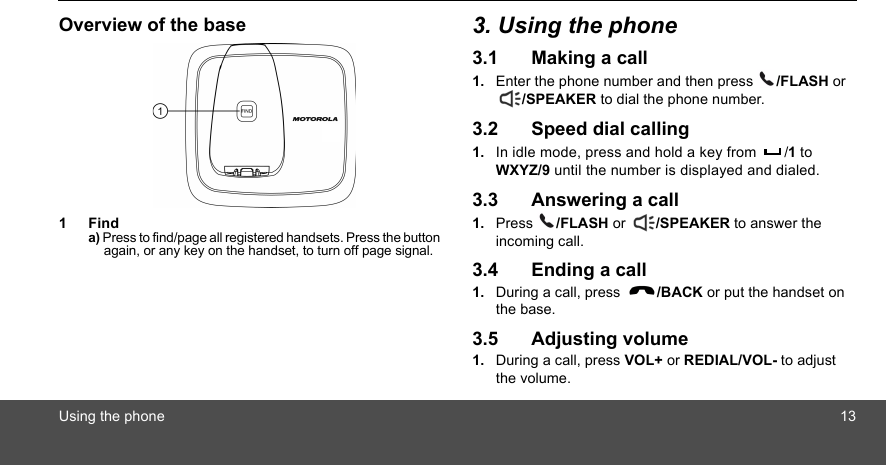
Binatone Electronics 80-8160-01 1.9GHz DECT Cordless Phone - Base Unit User Manual L60x IFU Booklet US EN

Binatone Electronics International Ltd. 1.9GHz DECT Cordless Phone - Base Unit L60x IFU Booklet US EN

Contents

manual (L602).pdf

User’s GuideL601 / L602 / L603 / L604 / L605L601M / L602M / L603M / L604M / L605M DECT 6.0 Digital Cordless PhoneWarningUse only the adapter and telephone line cord providedin the box.
•  30 name and number phonebook.•  Caller ID shows you who is calling and includes details of the last 30 callers in a calls list.** •  Register up to 5 cordless handsets to a single base.•  Make internal calls, transfer external calls, hold 3-way conversation between two internal callers and an external caller.       **You must subscribe to your network provider's Caller ID or Call Waiting service for these features to work.Please note that this equipment is not designed for making emergency telephone calls when the power fails.Alternative arrangements should be made if emergency telephone call is necessary.Welcome...to your new Motorola Phone!Please retain your original dated sales receipt for your records. For warranty service of your Motorola product, you will need to provide a copy of your dated sales receipt to confirm warranty status. Registration is not required for warranty coverage.For product-related questions, please call:US and Canada: 1-888-331-3383On the Web: www.motorola.com
IMPORTANTOnly use the telephone line cord supplied.This equipment is not designed to make emergency telephone calls during power failures. Alternative arrangements should be made for access to emergency services.Got everything?• Handset• Base• NiMH Rechargeable Battery Pack• Battery Door• Power Adapter• Telephone Line Cord• User's Guide•  Quick Start GuideIn multi-handset packs, you will find one or more additional handsets, chargers with power adapter units, additional rechargeable battery packs and battery doors.This User's Guide provides you with all the information you need to get the most from your phone.Before you make your first call you will need to set up your phone. Follow the simple instructions in 'Getting Started', on the next few pages.
41. Getting started ................................................61.1  Connecting the base........................................... 71.2  Installing and charging the handset battery pack ........................................................ 71.3  Assembling the rubber band of cordless handset (Not applicable for L60xM models) ....... 81.4  Setting the display language .............................. 81.5  Setting the date and time.................................... 92. Getting to know your phone ..........................93. Using the phone............................................133.1  Making a call..................................................... 133.2  Speed dial calling ............................................. 133.3  Answering a call ............................................... 133.4  Ending a call ..................................................... 133.5  Adjusting volume .............................................. 133.6  Muting a call ..................................................... 143.7  Dialing from the redial list ................................. 143.8  Dialing from the calls list ................................... 143.9  Adding an entry to the phonebook.................... 143.10 Storing a phonebook entry as a one touch number .............................................143.11 Dialing from the phonebook ..............................153.12 Caller ID ............................................................153.12.1 Calls List  ................................................153.12.2 Viewing the calls list ...............................163.12.3 Saving a number from the calls list to the phonebook  ...................................163.12.4 Deleting a calls list entry  ........................163.12.5 Deleting the entire calls list  ....................163.13 Personal Settings ..............................................173.14 Intercom ............................................................183.14.1 Calling another handset .........................183.14.2 Transferring a call to another handset ..................................................183.14.3 Three-party conference call  ...................193.15 Setting the dial mode.........................................193.16 Setting the flash time .........................................193.17 Setting the area code ........................................20
53.18 Registration .......................................................203.18.1 Registering a handset ............................203.19 Resetting all settings .........................................213.20 Paging/Finding a handset..................................214. Help................................................................ 215. General information ..................................... 23
6Getting started1. Getting startedWARNINGDo not place your phone in the bathroom or other humid areas.LocationWhen choosing a location for your new phone, here are some important guidelines you should consider:•  Avoid sources of noise and heat, such as motors, fluorescent lighting, microwave ovens, heating appliances and direct sunlight.•  Avoid areas of excessive dust, moisture and low temperature.•  Avoid other cordless telephones or personal computers.•  Never install telephone wiring during a lightning storm.•  Never install telephone jacks in wet locations unless the jack is specifically designed for wet locations.•  Never touch non-insulated telephone wires or terminals, unless the telephone line has been disconnected at the network interface.•  Use caution when installing or modifying telephone lines.HANDSET RANGEOptimal range is reached when there are no other electrical appliances working within the range area. Any obstruction between the base and handset will also reduce the range significantly.SIGNAL STRENGTHWhen out of range of the corded base, the screen shows OUT OF RANGE. If you are on a call, the line will hang up. Move back within in range. The cordless handset will automatically re-connect to the corded base.Setting upIMPORTANTThe base must be plugged into an electrical outlet at all times. Do not connect the telephone line cord into the telephone wall jack until the handset is fully charged. Only use the adapter and telephone line cord supplied with the product.WHICH POWER ADAPTER?The power adapter with the smaller pin is for the base unit and the power adapter with the larger pin is for the charger unit (only for multi-handset packs).
Getting started 71.1 Connecting the base1. Plug the power adapter and the telephone line cord into the base. The power adapter with the larger pin is for the charger (only in multi-handset packs).2. Plug the other end of the power adapter into a power outlet and the telephone line cord into a telephone wall jack.3. Use only the provided power adapter.1.2 Installing and charging the handset battery pack1. Slide off the battery compartment cover to remove it. Place the supplied rechargeable battery pack in the battery compartment, with the battery connector plugged in, as shown.
8Getting started2. Slide the battery compartment cover back on.3. Put the handset on the base to charge for at least 24 hours. Once charged, the   will indicate that the handset is fully charged.IMPORTANTUse only the rechargeable battery pack provided with the product.1.3 Assembling the rubber band of cordless handset (Not applicable for L60xM models)If you have purchased additional rubber band(s) of the cordless handset separately, refer to the following steps for replacement. To remove the originally installed rubber band, dig out the rubber band from handset bottom gap and then take it off from handset around.1. To assemble the rubber band, align the protuberant pins of the rubber band with the holes around of the handset sides and click the rubber band into place. Respect the direction, side with gap should be attached to the handset bottom, as shown.2. Press and smooth out the rubber band to enwrap the handset firmly.1.4 Setting the display language1. Press MENU and then VOL+ or REDIAL/VOL- to select SETUP HS.2. Press MENU and then VOL+ or REDIAL/VOL- to select LANGUAGE.3. Press MENU and then VOL+ or REDIAL/VOL- to select the desired language.4. Press MENU to save.
Getting to know your phone 91.5 Setting the date and time1. Press MENU and then VOL+ or REDIAL/VOL- to select DATE&TIME. If you're a subscriber to your network's Caller ID service, the date and time is automatically set when a call is received.2. Press MENU and then use the keypad to edit the year and the date.3. Press VOL+ or REDIAL/VOL- or   or CID to move between the input fields YEAR and DATE.4. Press MENU and then use the keypad to edit the time in 12 HR format. Press VOL+ or REDIAL/VOL- to toggle AM/PM settings.5. Press MENU to save the settings.Your phone is now ready for use.2. Getting to know your phoneOverview of your handset
10 Getting to know your phoneGet acquainted with the following 14 buttons on your handset and their multi-function tasks.1 Scroll up / Volume upa) In menu mode: Press to scroll up.b) In editing mode: Press to move the cursor to the left.c) During a call: Press to increase the volume.d) Calls list / phonebook / redial list entry: Press to scroll up the list.2 Menu / Selecta) In idle mode: Press to access menu list.b) In menu / editing mode: Press to confirm and save the settings.c) During a call: Press to transfer the call to another handset.d) In calls list entry: Press to save the entry to the phonebook.e) In phonebook entry: Press to go to sub-menus of phonebook.3 Right / Calls lista) In idle mode / during a call: Press to access calls list.b) In editing mode: Press to move the cursor to the right.4 Talk off / Backa) In menu / editing mode: Press to exit to previous level.b) In pre-dial mode / phonebook / calls list / redial list entry: Press to exit to idle.c) During ringing: Press to silence the incoming ringer temporarily.d) During a call: Press to end a call.5 Alphanumeric keypada) In idle / pre-dial / editing mode / during a call: Press to enter characters / numbers.b) In idle mode: Press and hold to activate speed dial.6 #/Pause / ABC / Formata) In idle / pre-dial / number editing mode / during a call: Press to insert a "#", press and hold to insert a pause (P).b) In name editing mode: Toggle ABC/abc. Press and hold to insert a space.c) In calls list entry: Press to toggle Caller ID display format between 7, 8, 10 and 11 digits when returning calls from Caller ID list.d) In phonebook list entry: If the number is more than 16 digits, press to view the next page of remaining digits.7 Intercoma) In idle mode / during a call: Press to initiate an intercom call.8 Microphone
Getting to know your phone 119 Speakera) In idle / pre-dial mode: Press to make a call with the speakerphone.b) During a call: Press to toggle between the speakerphone and the earpiece.c) Calls List / phonebook / redial list entry: Press to make a call with the speakerphone.d) During ringing: Press to answer a call with the speakerphone.10 */Tonea) In idle / pre-dial / editing mode: Press to insert a *.b) During a call: Press to switch from pulse to tone dialing temporarily if pulse mode was selected before. After the call has ended, the dial mode will change back to pulse.c) In phonebook list entry: If the number is more than 16 digits, press to view the previous page of remaining digits.11 Scroll Down / Volume Down / Redial Lista) In idle mode: Press to access the redial list.b) In menu mode: Press to scroll down.c) In editing mode: Press to move the cursor to the right.d) During a call: Press to decrease the volume.e) Calls list / phonebook / redial list entry: Press to scroll down the list.12 Talk On / Flasha) In idle / pre-dial mode: Press to make a call.b) Calls List / phonebook / redial list entry: Press to make a call to the selected entry.c) During a call: Press to switch another call.d) During an incoming call: Press to answer a call.13 Left / Phonebooka) In idle mode / during a call: Press to access the phonebook.b) In editing mode: Press to move the cursor to the left.14 Mute / Clear / Back / X a) In menu / phonebook entry mode: Press to exit to the previous level.b) In pre-dial / editing mode: Press to delete one character / digit. Press and hold to delete all characters / digits.c) During a call: Press to mute / unmute the call.d) In calls list entry: Press to delete the entry. Press and hold to delete all call log entries.
12 Getting to know your phoneCordless Handset LCD DisplayDisplay Icons On when speakerphone is turned on. Indicates when new call is received. Off when new call has been viewed. On when ringer volume is turned off. On when there is received new voice mail not yet listened to. Off when new voice mail has been listened to. On when a call is muted. Full battery power level. 2/3 battery power level. 1/3 battery power level. Flashes when low battery level is detected, needs charging. Animation in cycle. Battery is charging. In idle mode, the current time is displayed. In Caller ID mode, the time of call is displayed.    On when the line is in use.   In idle mode the current date is displayed. In Caller ID mode, the date of the call is displayed.Off when the line is idle.
Using the phone 13Overview of the base1Finda) Press to find/page all registered handsets. Press the button again, or any key on the handset, to turn off page signal.3. Using the phone3.1 Making a call1. Enter the phone number and then press  /FLASH or /SPEAKER to dial the phone number.3.2 Speed dial calling1. In idle mode, press and hold a key from  /1 to WXYZ/9 until the number is displayed and dialed.3.3 Answering a call1. Press  /FLASH or  /SPEAKER to answer the incoming call.3.4 Ending a call1. During a call, press  /BACK or put the handset on the base.3.5 Adjusting volume1. During a call, press VOL+ or REDIAL/VOL- to adjust the volume.
14 Using the phone3.6 Muting a call1. During a call, press MUTE to mute the microphone, so that you can talk to someone else in the room without your caller hearing you.2. Press MUTE again to unmute.3.7 Dialing from the redial list1. Press REDIAL/VOL- and then VOL+ or REDIAL/VOL- to scroll and select an entry you want to redial.2. Press  /FLASH or  /SPEAKER to dial the number.3.8 Dialing from the calls list1. Press CID and then VOL+ or REDIAL/VOL- to select the entry you want to dial.2. Toggle the #/ /PAUSE/FORMAT key to format the dialing number.3. Press  /FLASH or  /SPEAKER to dial the number.3.9 Adding an entry to the phonebook1. Press . 2. Press MENU and then VOL+ or REDIAL/VOL- to scroll and select ADD.3. Press MENU and then enter the name.4. Press MENU and then enter the number.5. Press MENU to save.NOTENumbers can be up to 24 digits long and names up to 16 characters long. Entries are stored in alphabetical order.3.10 Storing a phonebook entry as a one touch number1. Press .2. Press MENU and then VOL+ or REDIAL/VOL- to select SPEED DIAL.3. Press MENU and then VOL+ or REDIAL/VOL- to select the speed dial key from  /1 to WXYZ/9.4. Press MENU and then VOL+ or REDIAL/VOL- to scroll to the entry you want.5. Press MENU to save.
Using the phone 153.11 Dialing from the phonebook1. Press  and then VOL+ or REDIAL/VOL- to scroll and select the entry you want to dial.2. Press  /FLASH or  /SPEAKER to dial the number.TIPSInstead of scrolling to browse the phonebook entries, press the numeric key corresponding to the first letter of the entry you wish to locate. For example, pressing 2 will show the entries starting with A. Pressing 2 again will show the entries starting with B, etc.3.12 Caller IDIf you have subscribed to Caller ID service, and provided the identity of the caller is not withheld, the number of the caller will be displayed together with the date and time of the call (if provided by the network).NOTE•  If the telephone number is not available for incoming calls, the handset will display UNAVAILABLE.•  If the incoming call is from a withheld telephone number, the handset will display PRIVATE.•  Information about incoming calls will vary by country and network operator. Some operators may charge a subscription for their Caller ID service.3.12.1 Calls ListThe calls list contains details of missed and received calls. Details include the date and time of the call. Entries are displayed in chronological order with the most recent call at the top of the list.NOTE•  When the calls list is full, a new call replaces the oldest one in the list.•  Details of up to 30 calls may be stored.•  If you receive more than one call from the same number, only the most recent call is kept in the calls list. When       you have missed calls (incoming calls that you haven't answered) the   icon will be displayed in the display on all handsets registered to the base. If one handset is used to view the calls log, the   icon on the other handsets remains on (for multi-pack use only).
16 Using the phone3.12.2 Viewing the calls list1. Press CID to enter the calls list.2. Scroll VOL+ or REDIAL/VOL- to browse the calls list.NOTE•  When reviewing an entry from the calls list, press #/ /PAUSE/FORMAT repeatedly to display the number in different format.For example, if a caller number is displayed as 888-331-3383, the various formats will be:          331-3383       1-331-3383   888-331-33831-888-331-3383You may choose the desired number format for local and long distance numbers before dialing or saving it into the phonebook. •  The   icon is removed once the new call has been viewed.3.12.3 Saving a number from the calls list to the phonebook1. Press CID to enter the calls list.2. Press VOL+ or REDIAL/VOL- to select the entry you want.3. Press MENU and then enter the name if desired.4. Press MENU and then edit the number if desired.5. Press MENU to save.3.12.4 Deleting a calls list entry1. Press CID to enter the calls list.2. Press VOL+ or REDIAL/VOL- to scroll to the entry you want.3. Press MUTE to delete the entry.3.12.5 Deleting the entire calls list1. Press CID to enter the calls list.2. Press and hold MUTE. DELETE ALL CALL LOG ENTRIES? is displayed.3. Press MENU to confirm. All entries will be deleted.NOTEYou need to review a call before you delete the record from the call list.
Using the phone 173.13 Personal SettingsMenu mapMAIN MENU DATE & TIME PHONEBOOK SETUP HS SETUP BS RESET SETTINGSSUB MENU YEARDATETIMEVIEWADDEDITDELETEDELETE ALLPB CAPACITYSPEED DIALRINGER TONERINGER VOLUMEKEY TONELOW BATT TONEOUT RANGE TONEHANDSET NAMELANGUAGELCD CONTRASTREGISTRATIONDIAL MODEFLASH TIMEAREA CODECLR VOICE MAILALL SETTINGS
18 Using the phone1. Press MENU.2. Press VOL+ or REDIAL/VOL- to scroll through the menu.3. Press MENU for opening sub-menus and/or saving. Press MUTE to go back to the previous menu level or cancel an action.If you do not press any button on the handset for 30 seconds, the display will automatically return to standby. It will also return to standby when the handset is placed on the base or charger.3.14 IntercomThis feature is only available when there are at least two registered handsets. It allows you to make internal calls, transfer external calls from one handset to another handset, and use the conference option.3.14.1 Calling another handset1. Press INT. Except for the originating handset, all registered handsets will be displayed in the list.2. Press VOL+ or REDIAL/VOL- to select the handset you want to call.3. Press MENU to call the handset.4. Press  /BACK to hang up.NOTEIf the handset is not within the valid operation range, this function may not be available. During an intercom call, you will hear an alert tone if there is an incoming external call. You need to press  /BACK to hang up the intercom call before answering the incoming external call.3.14.2 Transferring a call to another handset1. During an external call, press INT.- Your call is put on hold.2. Press VOL+ or REDIAL/VOL- to select the handset you want to call.3. Press MENU to call the handset.
Using the phone 194. When the other handset answers by pressing  /FLASH or  /SPEAKER, press  /BACK to transfer the call. If the other handset does not answer, press MUTE to talk to your caller again.3.14.3 Three-party conference call1. During an external call, press INT.- Your caller is put on hold.2. Press VOL+ or REDIAL/VOL- to select the handset you want to call.3. Press MENU to call the handset.4. When the other handset answers the intercom call, press MENU on the calling handset to set up the conference call. 5. Press  /BACK on any handset to end a three-party conference call and leave the other handset engaged with the caller.NOTEDuring an external call, pressing  /FLASH or  /SPEAKER on any handset will join in the call and set up a conference call.3.15 Setting the dial modeThe default dialing mode is suitable for your country and network operator. It is unlikely that you should need to change this setting unless advised to do so.1. Press MENU and then VOL+ or REDIAL/VOL- to select SETUP BS.2. Press MENU to select DIAL MODE.3. Press MENU and then VOL+ or REDIAL/VOL- to select TONE or PULSE.4. Press MENU to save.NOTEIf the pulse mode is selected, press TONE/* to switch from pulse to tone dialing temporarily when dialing out. After the call is ended, the dial mode will change back to pulse.3.16 Setting the flash timeThe default flash time is 600MS. It is unlikely that you should need to change this setting unless advised to do so.1. Press MENU and then VOL+ or REDIAL/VOL- to select SETUP BS.
20 Using the phone2. Press MENU and then VOL+ or REDIAL/VOL- to select FLASH TIME.3. Press MENU and then VOL+ or REDIAL/VOL- to the flash time you want. (8 options are available : 90, 100, 110, 250, 300, 400, 600 and 700MS)4. Press MENU to save.3.17 Setting the area code1. Press MENU and then VOL+ or REDIAL/VOL- to select SETUP BS.2. Press MENU and then VOL+ or REDIAL/VOL- to select AREA CODE.3. Press MENU and then enter the area code.4. Press MENU to save.3.18 Registration3.18.1 Registering a handsetUp to 5 handsets can be registered to one base. The original handset is pre-registered to use. Additional handsets must be registered to the base before you can use them.To register an additional handset,1. Press MENU and then VOL+ or REDIAL/VOL- to select SETUP HS.2. Press MENU and then VOL+ or REDIAL/VOL- to select REGISTRATION.3. Press MENU and then VOL+ or REDIAL/VOL- to select YES or NO.4. Select YES then press MENU to enter the registration procedure as follows:1. Press and hold FIND for around 4 seconds on the base.2. Place the unregistered cordless handset on the base or charger.3. A confirmation tone is generated if registration is successful. HANDSET X is displayed where X denotes the number of handsets, and then the phone returns to idle.To register an originally unregistered handset, follow steps 1 through 3 above.
Help 213.19 Resetting all settings1. Press MENU and then VOL+ or REDIAL/VOL- to select RESET SETTINGS.2. Press MENU and then VOL+ or REDIAL/VOL- to select ALL SETTINGS.3. Press MENU to select YES. All personalized settings will be reset to default.NOTEAll of your phonebook entries, calls list, and redial list, will remained unchanged.3.20 Paging/Finding a handsetPress FIND on the base. All handsets registered to the base will ring.To stop the paging, press FIND again, or press any key on the handset, or place the handset on the base.4. HelpThe   icon is not scrolling when the handset is placed on the base•  Handset not properly seated on the base cradle -readjust the handset on the base.•  Dirty contact - clean the charge contacts by wiping with an alcohol moistened cloth.•  Battery is full - charging is not necessary at this time.No dial tone•  If there is no base power, check the connections. Reset the phone by unplugging then plugging it back into an electrical outlet.•  If the handset batteries are empty, recharge the battery pack for at least 24 hours.•  Move the handset closer to the base.•  Be sure to use only the provided telephone cords.Poor audio quality•  If the base is too close to electrical appliances, reinforced concrete walls, or metal door frames, move the base from these areas.
22 HelpNo ring tone•  The ringer may be off.•  The volume may need to be increased.Caller ID does not work•  Check your subscription with your network operator.•  If you subscribe to high-speed internet service (Digital Subscriber Line - DSL) through your telephone lines, you must install a DSL filter between the telephone base and the telephone wall jack. The filter will prevent noise and caller ID problems caused by DSL interference. Please contact your DSL service provider for more information about DSL filters.A phonebook entry cannot be stored•  The phonebook is full. Delete an entry to free memory.No display•  Try recharging or replacing the rechargeable battery pack.•  Reset the base. Unplug the unit's electrical, then plug it back in.•  If the LED is not lit up, then try to unplug the unit's electrical power, and then plug it back in.If the handset disconnects from the base during a phone call•  Check that the power cord is connected properly into the base.•  Check that the power adapter is connected properly into the electrical outlet.•  Move the handset closer to the base. It may be out of range.•  Reset the base by unplugging the unit's electrical power. Reset the handset by unplugging and re-plugging its battery pack. Wait for around 15 seconds and re-plug the power again. Allow up to one minute for the handset to synchronize with the registered base again.Noise interference on your radio or television•  Your base or charger may be too close. Move it as far away as possible.
General information 235. General informationIf your product is not working properly...1. Read this User's Guide.2. Visit our website: www.motorola.com3. Contact Customer Service in the US and Canada at 1-888-331-3383.To order a replacement battery pack contact customer service or visit our website.Important safety instructionsFollow these safety precautions when using your phone to reduce the risk of fire, electric shock, and injury to persons or property:1. Keep all vents and openings of the phone unblocked. Do not set the phone on a heating register or over a radiator. Ensure that proper ventilation is provided at the installation site.2. Do not use while wet or while standing in water.3. Do not use this product near water (for example, near a bath tub, kitchen sink, or swimming pool).4. Do not allow anything to rest on the power cord. Place the power cord so that it will not be walked on.5. Never insert objects of any kind into the product vents as that may result in fire or electric shock.6. Unplug this product from the electrical outlet before cleaning. Do not use liquid cleaners or aerosol cleaners. Use a damp cloth for cleaning.7. Do not disassemble this product. If service or repair work is required, contact the customer service helpline found in this User's Guide.8. Do not overload wall outlets and extension cords.9. Avoid using during an electrical storm. Use a surge protector to protect the equipment.10. Do not use this phone to report a gas leak, especially if you are in the vicinity of the gas line.CAUTIONTo reduce the risk of fire, use only No. 26 AWG or larger UL Listed or CSA Certified Telecommunication Line Cord.
24 General informationUnplug this cordless phone immediately from an outlet if:•  The power cord or plug is damaged or frayed.•  Liquid has been spilled on the product.•  The product has been exposed to rain or water. Do not retrieve the handset or base until after you have unplugged the power and phone from the wall. Then retrieve the unit by the unplugged cords.•  The product has been dropped or the cabinet has been damaged.•  The product exhibits a distinct change in performance.Installation Guidelines1. Read all instructions and save them for future reference.2. Follow all warnings and instructions marked on the product.3. Do not install this product near a bath tub, sink, or shower.4. Operate this phone using only the power source that is indicated on the marking label. If you are unsure of the  power supply to your home, consult with your dealer or local power company.5. Do not place this product on an unstable cart, stand, or table. This product may fall, causing serious damage to the product.6. Adjust only those controls that are covered by the operating instructions. Improper adjustment of other controls may result in damage and will often require extensive work to restore the product to normal operation.7. Clean this product with a soft, damp cloth. Do not use chemicals or cleaning agents to clean this phone.8. Use only the power supply that came with this unit. Using other power supplies may damage the unit.9. Because this phone operates on electricity, you should have at least one phone in your home that operates without electricity in case of a power outage.10. To avoid interference to nearby appliances, do not place the base of the phone on or near a TV, microwave oven, or VCR.CAUTIONTo maintain compliance with the FCC's RF exposure guidelines, place the base unit at least 20 cm from nearby persons.
General information 25Battery Safety Instructions•  Do not burn, disassemble, mutilate, or puncture the battery. The battery contains toxic materials that could be released, resulting in injury.CAUTIONThere is a risk of explosion if you replace the battery with an incorrect battery type. Use only the battery pack that came with your phone or an authorized replacement recommended by the manufacturer.•  Keep battery packs out of the reach of children.•  Remove battery packs if storing over 30 days.•  Do not dispose of battery packs in fire, which could result in explosion.•  The rechargeable battery packs that power this product must be disposed of properly and may need to be recycled. Refer to the battery label for battery type. Contact your local recycling center for proper disposal methods.SAVE THESE INSTRUCTIONSConsumer Products and Accessories Limited Warranty ("Warranty")Thank you for purchasing this Motorola branded product manufactured under license by Binatone Electronics International LTD  ("BINATONE").What Does this Warranty Cover? Subject to the exclusions contained below, BINATONE warrants that this Motorola branded product ("Product") or certified accessory ("Accessory") sold for use with this product that it manufactured  to be free from defects in materials and workmanship under normal consumer usage for the period outlined below. This Warranty is your exclusive warranty and is not transferable.Who is covered?This Warranty extends only to the first consumer purchaser, and is not transferable.
26 General informationWhat will BINATONE do?BINATONE or its authorized distributor at its option and within a commercially reasonable time, will at no charge repair or replace any Products or Accessories that does not conform to this Warranty. We may use functionally equivalent reconditioned/ refurbished/ pre-owned or new Products, Accessories or parts.What Other Limitations Are There?ANY IMPLIED WARRANTIES, INCLUDING WITHOUT LIMITATION THE IMPLIED WARRANTIES OF MERCHANTABILITY AND FITNESS FOR A PARTICULAR PURPOSE, SHALL BE LIMITED TO THE DURATION OF THIS LIMITED WARRANTY, OTHERWISE THE REPAIR OR REPLACEMENT PROVIDED UNDER THIS EXPRESS LIMITED WARRANTY IS THE EXCLUSIVE REMEDY OF THE CONSUMER, AND IS PROVIDED IN LIEU OF ALL OTHER WARRANTIES, EXPRESS OF IMPLIED. IN NO EVENT SHALL MOTOROLA OR BINATONE BE LIABLE, WHETHER IN CONTRACT OR TORT (INCLUDING NEGLIGENCE) FOR DAMAGES IN EXCESS OF THE PURCHASE PRICE OF THE PRODUCT OR ACCESSORY, OR FOR ANY INDIRECT, INCIDENTAL, SPECIAL OR CONSEQUENTIAL DAMAGES OF ANY KIND, OR LOSS OF REVENUE OR PROFITS, LOSS OF BUSINESS, LOSS OF INFORMATION OR OTHER FINANCIAL LOSS ARISING OUT OF OR IN CONNECTION WITH THE ABILITY OR INABILITY TO USE THE PRODUCTS OR ACCESSORIES TO THE FULL EXTENT THESE DAMAGES MAY BE DISCLAIMED BY LAW.Some jurisdictions do not allow the limitation or exclusion of incidental or consequential damages, or limitation on the length of an implied warranty, so the above limitations or exclusions may not apply to you. This Warranty gives you specific legal rights, and you may also have other rights that vary from one jurisdiction to another.
General information 27ExclusionsNormal Wear and Tear. Periodic maintenance, repair and replacement of parts due to normal wear and tear are excluded from coverage. Batteries. Only batteries whose fully charged capacity falls below 80% of their rated capacity and batteries that leak are covered by this Warranty.Abuse & Misuse. Defects or damage that result from: (a) improper operation, storage, misuse or abuse, accident or neglect, such as physical damage (cracks, scratches, etc.) to the surface of the product resulting from misuse; (b) contact with liquid, water, rain, extreme humidity or heavy perspiration, sand, dirt or the like, extreme heat, or food; (c) use of the Products or Accessories for commercial purposes or subjecting the Product or Accessory to abnormal usage or conditions; or (d) other acts which are not the fault of MOTOROLA or BINATONE are excluded from coverage. Use of Non-Motorola branded Products and Accessories. Defects or damage that result from the use of Non-Motorola branded or certified Products or Accessories or other peripheral equipment are excluded from coverage. Unauthorized Service or Modification. Defects or damages resulting from service, testing, adjustment, installation, maintenance, alteration, or modification in any way by someone other than MOTOROLA, BINATONE or its authorized service centers, are excluded from coverage. Products Covered Length of CoverageConsumer Products One (1) year from the date of the products original purchase by the first consumer purchaser of the product.Consumer Accessories Ninety (90) days from the date of the accessories original purchase by the first consumer purchaser of the product.Consumer Products and Accessories that are Repaired or ReplacedThe balance of the original warranty or for ninety (90) days from the date returned to the consumer, whichever is longer.
28 General informationAltered Products. Products or Accessories with (a) serial numbers or date tags that have been removed, altered or obliterated; (b) broken seals or that show evidence of tampering; (c) mismatched board serial numbers; or (d) nonconforming or non-Motorola branded housings, or parts, are excluded from coverage. Communication Services. Defects, damages, or the failure of Products or Accessories due to any communication service or signal you may subscribe to or use with the Products or Accessories is excluded from coverage.How to Obtain Warranty Service or Other Information?To obtain service or information, please call:US and Canada: 1-888-331-3383You will receive instructions on how to ship the Products or Accessories at your expense and risk, to a BINATONE Authorized Repair Center.  To obtain service, you must include: (a) the Product or Accessory; (b) the original proof of purchase (receipt) which includes the date, place and seller of the Product; (c) if a warranty card was included in your box, a completed warranty card showing the serial number of the Product; (d) a written description of the problem; and, most importantly; (e) your address and telephone number.These terms and conditions constitute the complete warranty agreement between you and BINATONEregarding the Products or Accessories purchased by you, and supersede any prior agreement or representations, including representations made in any literature publications or promotional materials issued by BINATONE or representations made by any agent employee or staff of BINATONE, that may have been made in connection with the said purchase.FCC, ACTA and IC regulations FCC Part 15 This equipment has been tested and found to comply with the requirements for a Class B digital device under Part 15 of the Federal Communications Commission (FCC) rules. These requirements are intended to provide reasonable protection against harmful interference in a residential installation. This equipment generates, uses and can radiate
General information 29radio frequency energy and, if not installed and used in accordance with the instructions, may cause harmful interference to radio communications. However, there is no guarantee that interference will not occur in a particular installation. If this equipment does cause harmful interference to radio or television reception, which can be determined by turning the equipment off and on, the user is encouraged to try to correct the interference by one or more of the following measures:•  Reorient or relocate the receiving antenna.•  Increase the separation between the equipment and receiver.•  Connect the equipment into an outlet on a circuit different from that to which the receiver is connected.•  Consult the dealer or an experienced radio/TV technician for help.Changes or modifications to this equipment not expressly approved by the party responsible for compliance could void the user's authority to operate the equipment. This device complies with Part 15 of the FCC rules. Operation is subject to the following two conditions: (1) this device may not cause harmful interference, and (2) this device must accept any interference received, including interference that may cause undesired operation. Privacy of communications may not be ensured when using this telephone. To ensure safety of users, the FCC has established criteria for the amount of radio frequency energy that can be safely absorbed by a user or bystander according to the intended usage of the product. This product has been tested and found to comply with the FCC criteria. Both the Handset may be safely held against the ear of the user. The telephone base shall be installed and used such that parts of the user's body other than the hands are maintained at a distance of approximately 20 cm (8 inches) or more.This Class B digital apparatus complies with Canadian CAN ICES-3 (B) /NMB-3(B). FCC Part 68 and ACTA This equipment complies with Part 68 of the FCC rules and with technical requirements adopted by the Administrative Council for Terminal Attachments (ACTA). The label on the back or bottom of this equipment contains, among other things, a product identifier in the format US:
30 General informationAAAEQ##TXXXX. This identifier must be provided to your local telephone company upon request. The plug and jack used to connect this equipment to premises wiring and the telephone network must comply with applicable Part 68 rules and technical requirements adopted by ACTA. A compliant telephone cord and modular plug is provided with this product. It is designed to be connected to a compatible modular jack that is also compliant. An RJ11 jack should normally be used for connecting to a single line and an RJ14 jack for two lines. See Installation Instructions in the User's Guide.The Ringer Equivalence Number (REN) is used to determine how many devices you may connect to your telephone line and still have them ring when you are called. The REN for this product is encoded as the 6th and 7th characters following the US: in the product identifier (e.g., if ## is 03, the REN is 0.3). In most, but not all areas, the sum of all RENs should be five (5.0) or less. For more information, please contact your local telephone company. This equipment may not be used with Party Lines. If you have specially wired alarm dialing equipment connected to your telephone line, ensure the connection of this equipment does not disable your alarm equipment. If you have questions about what will disable alarm equipment, consult your telephone company or a qualified installer. If this equipment is malfunctioning, it must be unplugged from the modular jack until the problem has been corrected. Repairs to this telephone equipment can only be made by the manufacturer or its authorized agents. For repair procedures, follow the instructions outlined under the Limited Warranty. If this equipment is causing harm to the telephone network, the telephone company may temporarily discontinue your telephone service. The telephone company is required to notify you before interrupting service. If advance notice is not practical, you will be notified as soon as possible. You will be given the opportunity to correct the problem and the telephone company is required to inform you of your right to file a complaint with the FCC. Your telephone company may make changes in its facilities, equipment, operation, or procedures that could affect the proper functioning of this product. The telephone company is required to notify you if such changes are planned.
General information 31If this product is equipped with a corded or cordless handset, it is hearing aid compatible. If this product has memory dialing locations, you may choose to store emergency telephone numbers (e.g., police, fire, medical) in these locations. If you do store or test emergency numbers, please: •  Remain on the line and briefly explain the reason for the call before hanging up.•  Perform such activities in off-peak hours, such as early morning or late evening. Industry Canada Operation is subject to the following two conditions: (1) this device may not cause harmful interference, and (2) this device must accept any interference, including interference that may cause undesired operation. The term "IC: " before the certification/registration number only signifies that the Industry Canada technical specifications were met.The Ringer Equivalence Number (REN) for this terminal equipment is 0.0. The REN is an indication of the maximum number of devices allowed to be connected to a telephone interface. The termination on an interface may consist of any combination of devices subject only to the requirement that the sum of the RENs of all the devices does not exceed five.This product meets the applicable Industry Canada technical specifications.
6A4
P/N:91-004510-040-1005.0

Navigation menu