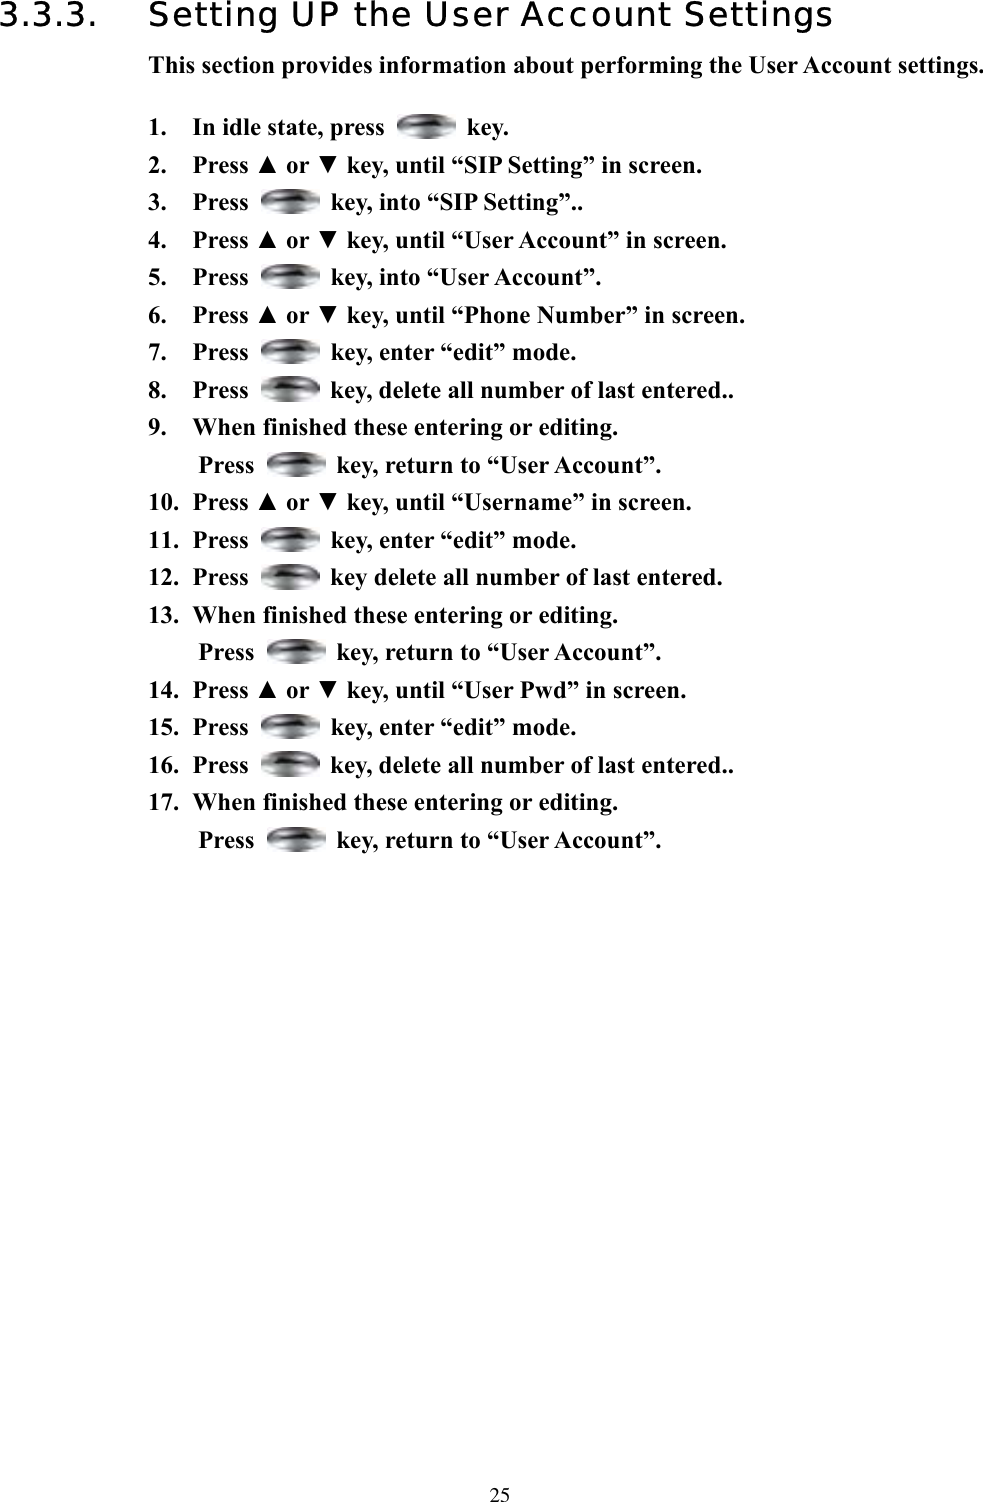
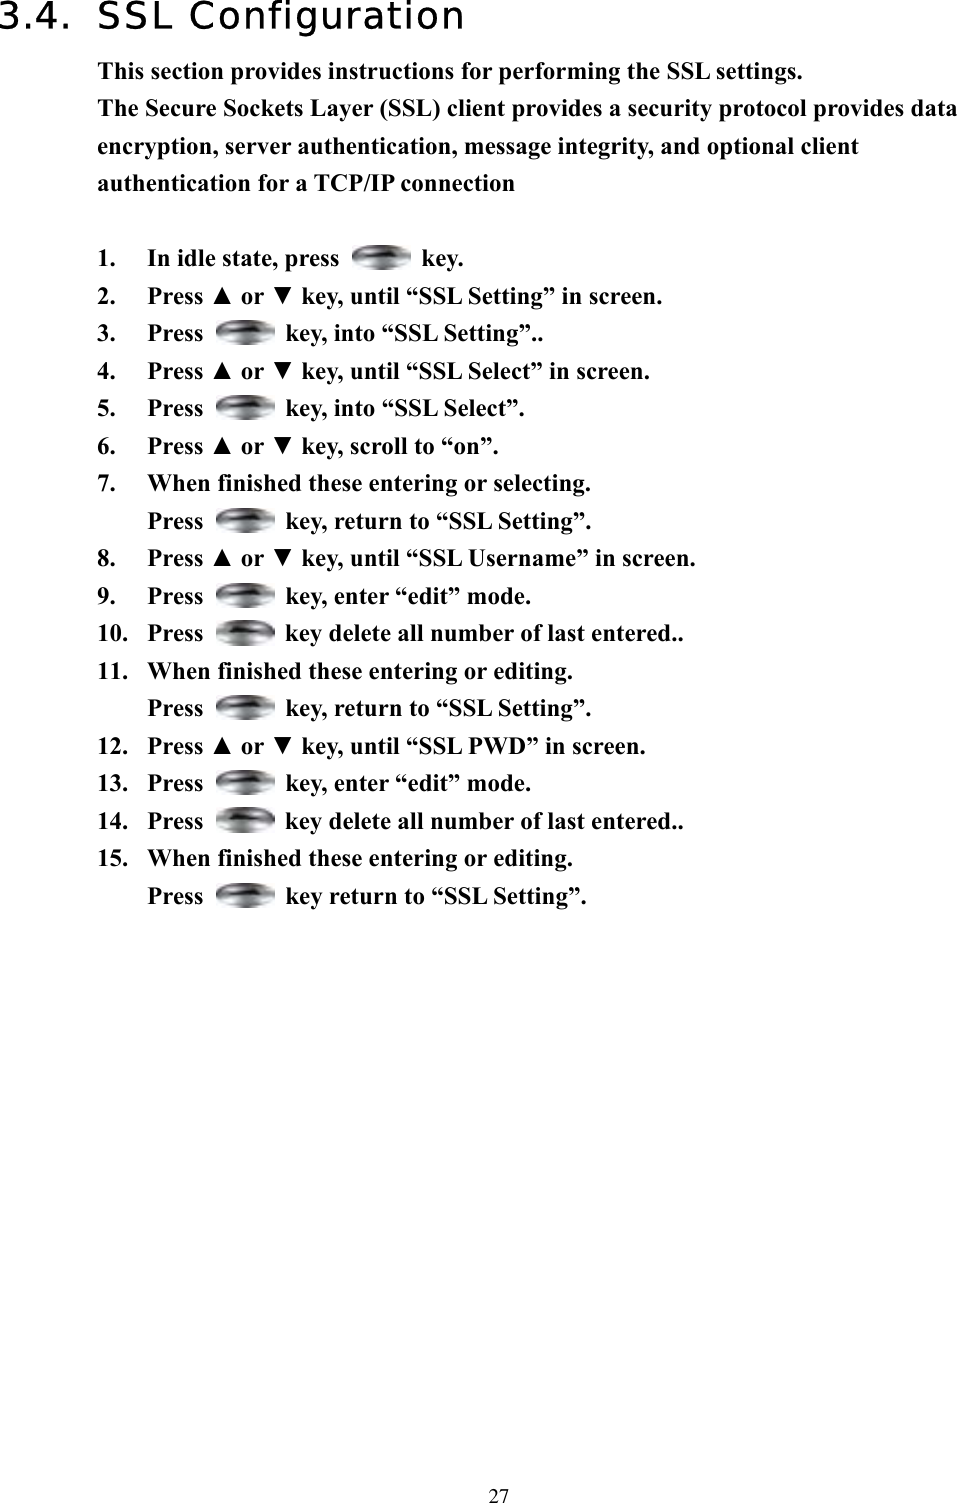
BCM Communication WLAN600 WIRELESS IP PHONE User Manual manual
BCM Communication Co., Ltd. WIRELESS IP PHONE manual
UserManual.wiki
>
BCM Communication
>
WLAN600 User Manual
manual
Navigation menu
Upload a User Manual
Namespaces
Wiki Guide
HTML
PDF
Info
Views
User Manual
Discussion / Help
Navigation


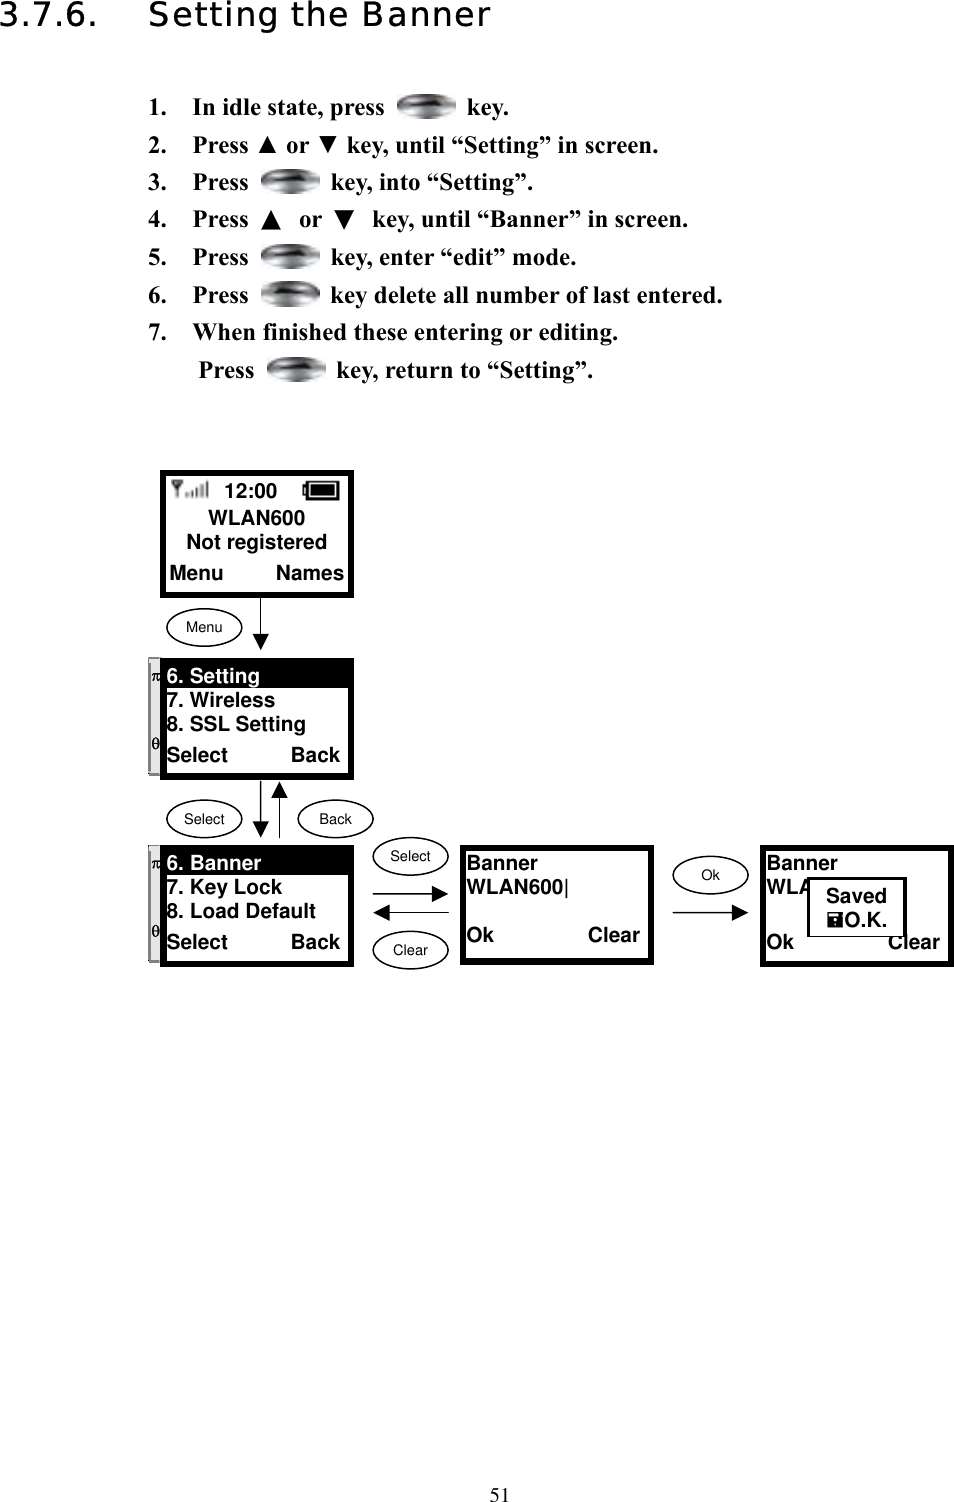
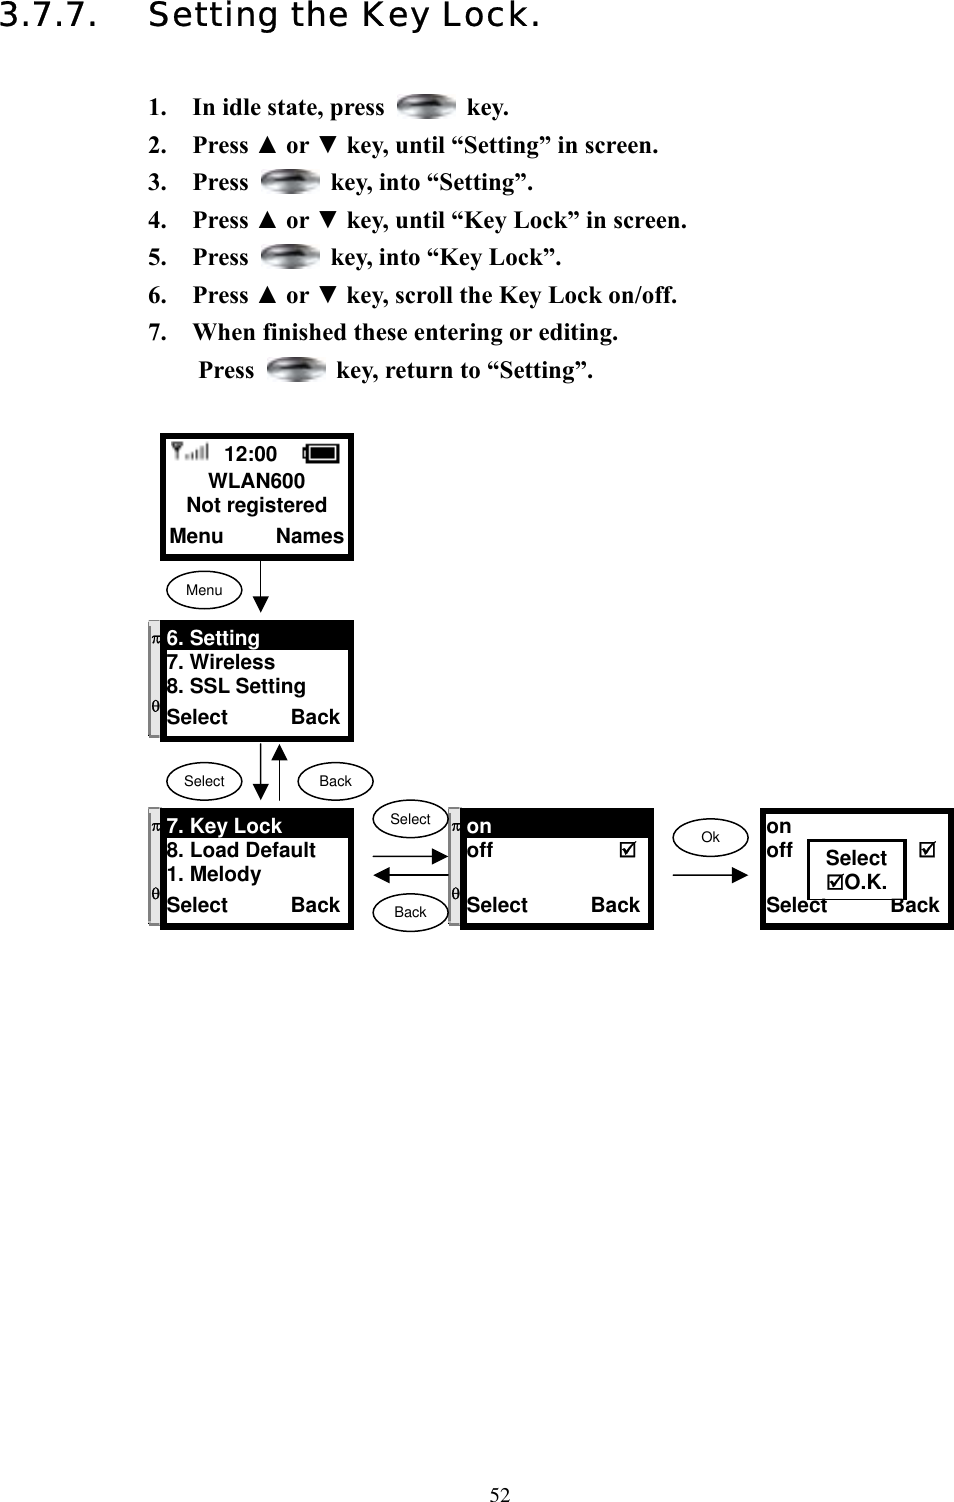
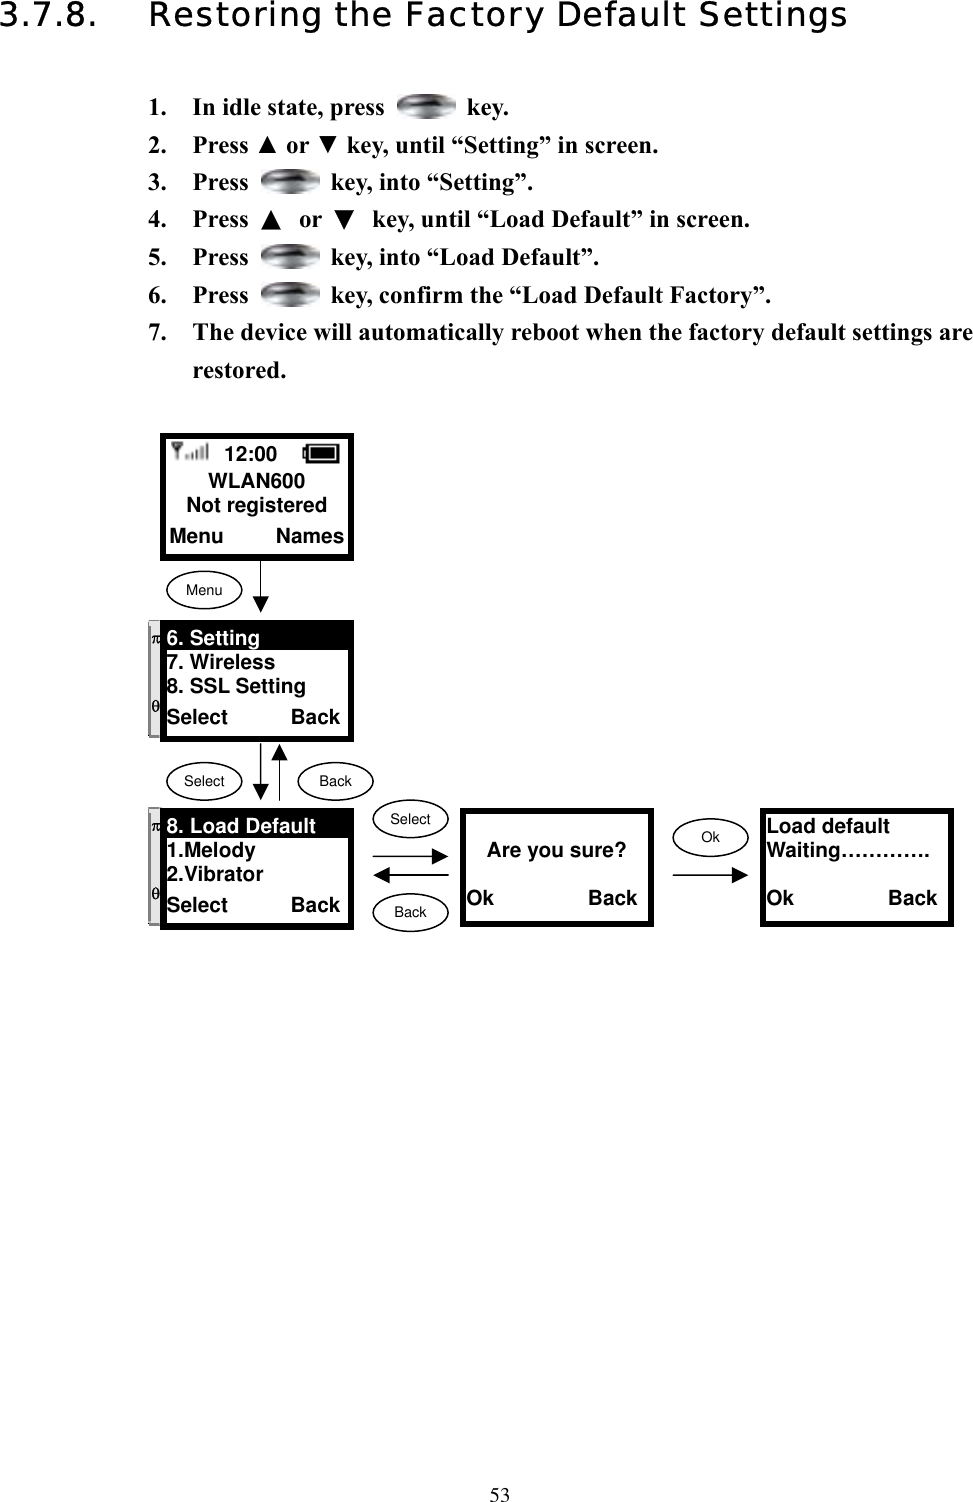
![13 12:00 WLAN600 Not registered Menu Names Menu Select Select Back IP Address 61.123.111.224| Ok BackOk Subnet Mask 255.255.255.224| Ok BackSelectOk BackGateway 61.123.111.124| Ok BackSelectOk BackBack Back Back Gateway 61.168.0.254 Ok BackSavedO.K.π θ 4. Net Setting 5. SIP Setting 6. Setting Select Back πθ 1. Network Mode2. IP Address 3. Subnet Mask Select BackSelectBackπθ[1]Fixed IP [2]DHCP [3]PPPoE Select Backπθ 2. IP Address 3. Subnet Mask 4. Gateway Select BackSelectBackπθ 3. Subnet Mask 4. Gateway 1. Network ModeSelect Backπθ 4. Gateway 1. Network Mode2. IP Address Select BackSubnet Mask 255.255.255.224 Ok Back SavedO.K.IP Address 61.168.0.6 Ok BackSavedO.K.[1]Fixed [2]DHCP [3]PPPoE Select BackSelectO.K.Input the IP addressInput the subnet maskInput the gateway](https://usermanual.wiki/BCM-Communication/WLAN600/User-Guide-384952-Page-13.png)
![143.1.2. Setting UP/modify the DHCP Client This section provides instructions for performing the DHCP settings. The Dynamic Host Configuration Protocol (DHCP) client provides a mechanism for allocating IP address dynamically so that addresses can be reused when hosts no longer need them. 1. In idle state, press key. 2. Press ▲ or ▼ key, until “Network Setting” in screen. 3. Press key, into “Network Setting”. 4. Press ▲ or ▼ key, until “Network Mode” in screen. 5. Press key, into “Network Mode”. 6. Press ▲ or ▼ key, scroll to “DHCP”. 7. When finished these entering or selecting. Press key, return to “Net Setting”. 12:00 WLAN600 Not registered Menu Names Menu Select SelectSelect Back Back[2]DHCP [3]PPPoE [1]Fixed IP Select BackSelectO.K.π θ 4. Net Setting 5. SIP Setting 6. Setting Select Back πθ 1. Network Mode 2. IP Address 3. Subnet Mask Select Backπθ[2]DHCP [3]PPPoE [1]Fixed IP Select Back](https://usermanual.wiki/BCM-Communication/WLAN600/User-Guide-384952-Page-14.png)
![16 PPPoE Name t03040506| Ok ClearSelectOk ClearPPPoE Pwd 5711438| Ok ClearSelectOk ClearBack Back 12:00 WLAN600 Not registered Menu Names Menu Select SelectSelect Back Back[2]PPPoE [3]Fix IP [1]DHCP Select BackSelectO.K.π θ 4. Net Setting 5. SIP Setting 6. Setting Select Back πθ 1. Network Mode 2. IP Address 3. Subnet Mask Select Backπθ[3]PPPoE [1]Fixed IP [2]DHCP Select BackPPPoE Pwd 5711438 Ok ClearSavedO.K.πθ 3. PPPoE Pwd 1. Network Mode2. PPPoE Name Select BackPPPoE Name t0304150 Ok ClearSavedO.K.πθ 2. PPPoE Name 3. PPPoE Pwd 1. Network ModeSelect BackInput the name Input the password](https://usermanual.wiki/BCM-Communication/WLAN600/User-Guide-384952-Page-16.png)
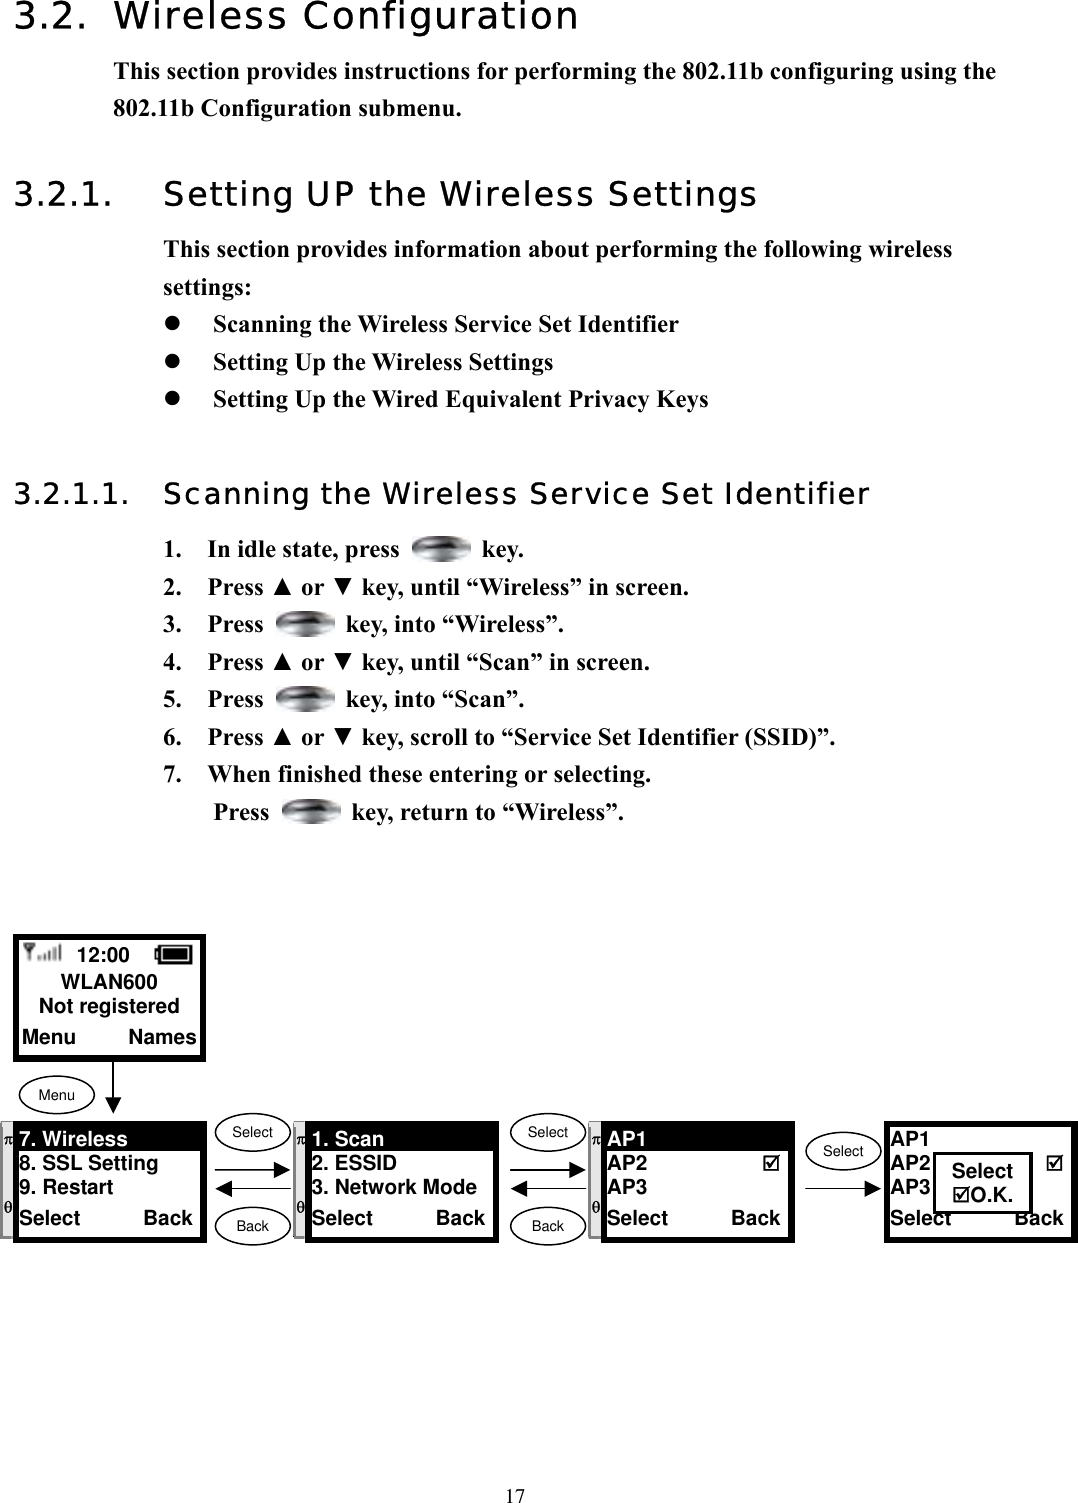
![19 12:00 WLAN600 Not registered Menu Names Menu Select SelectOk Back ClearESSID bcm-test| Ok ClearSavedO.K.SelectSelect ClearSelectSelect BackBack Back π θ 7. Wireless 8. SSL Setting 9. Restart Select Back πθ 2. ESSID 3. Network Mode4. Channel Select Backπθ[1]Public [2]Ad Hoc Select Backπθ 3. Network Mode4. Channel 5. Rate Select Back[1]Public [2]Ad Hoc Select BackSelectO.K.πθ 4. Channel 5. Rate 6. WEP Select Select BackπθChannel 1 Channel 2 Channel 3 Select BackChannel 1 Channel 2 Channel 3 Select BackSelectO.K.SelectSelect BackBack πθ 5. Rate 6. WEP Select 7. Wep Key1 Select Backπθ[1]Auto [2]1M [3]2M Select Back[1]Auto [2]1M [3]2M Select BackSelectO.K.Input the ESSID ESSID bcm-test| Ok ClearSelectBackSelectSelect BackBack πθ 6. WEP Select 7. WEP Key1 8. WEP Key2 Select Backπθ[1]None [2]64bit [3]128bit Select Back[1]Auto [2]1M [3]2M Select BackSelectO.K.](https://usermanual.wiki/BCM-Communication/WLAN600/User-Guide-384952-Page-19.png)
![21 12:00 WLAN600 Not registered Menu Names Menu Select SelectOk ClearWep Key 1 aa:aa:aa:aa:aa Ok ClearSavedO.K.SelectOk ClearOk Back Back π θ 7. Wireless 8. SSL Setting 9. Restart Select Back πθ 7. Wep Key 1 8. Wep Key 2 9. Wep Key 3 Select Backπθ 8. Wep Key 2 9. Wep Key 3 10. Wep Key 4 Select BackWep Key 2 bb:bb:bb:bb:bb Ok ClearSavedO.K.πθ 9. Wep Key 3 10. Wep Key 4 11. Key Select Select BackWep Key 3 cc:cc:cc:cc:cc Ok ClearSavedO.K.SelectOk ClearBack πθ 10. Wep Key 4 11. Key Select 1. Scan Select BackWep Key 4 dd:dd:dd:dd:dd Ok ClearSavedO.K.Input the wep key 1Wep Key 1 aa:aa:aa:aa:aa Ok Clear SelectClearWep Key 2 bb:bb:bb:bb:bb Ok ClearWep Key 3 cc:cc:cc:cc:cc Ok Clear Wep Key 4 dd:dd:dd:dd:dd Ok Clear SelectSelect ClearBack π θ 11. Key Select 1. Scan 2. ESSID Select Back[1]Key 1 [2]Key 2 [3]Key 3 Select BackSelectO.K πθ[1]Key 1 [2]Key 2 [3]Key 3 Select BackInput the wep key 2Input the wep key 3Input the wep key 4Select SelectSelect Back Back[2]64bit [3]128bit [1]None Select BackSelectO.K πθ 6. WEP Select 7. Wep Key 1 8. Wep Key 2 Select Backπθ[2]64bit [3]128bit [1]None Select Back](https://usermanual.wiki/BCM-Communication/WLAN600/User-Guide-384952-Page-21.png)

![28 12:00 BCM Not registered Menu Names Menu Select SelectSelect Back Back[1]on [2]off Select BackSelectO.K.SSL Username bcm-test| Ok Clear SelectOk ClearSelectOk ClearBackBackπ θ 8. SSL Setting 9. Restart 1. Information Select Back π θ 1. SSL Select 2. SSL Username3. SSL Pwd Select Backπθ[1]on [2]off Select Back π θ 2. SSL Username3. SSL Pwd 1. SSL Select Select BackSSL Username bcm-test Ok BackSavedO.K.π θ 3. SSL Pwd 1. SSL Select 2. SSL UsernameSelect BackSSL Pwd A1b2c3-test Ok ClearSavedO.K.SSL Pwd A1b2c3 Ok Clear Input the name Input the password](https://usermanual.wiki/BCM-Communication/WLAN600/User-Guide-384952-Page-28.png)
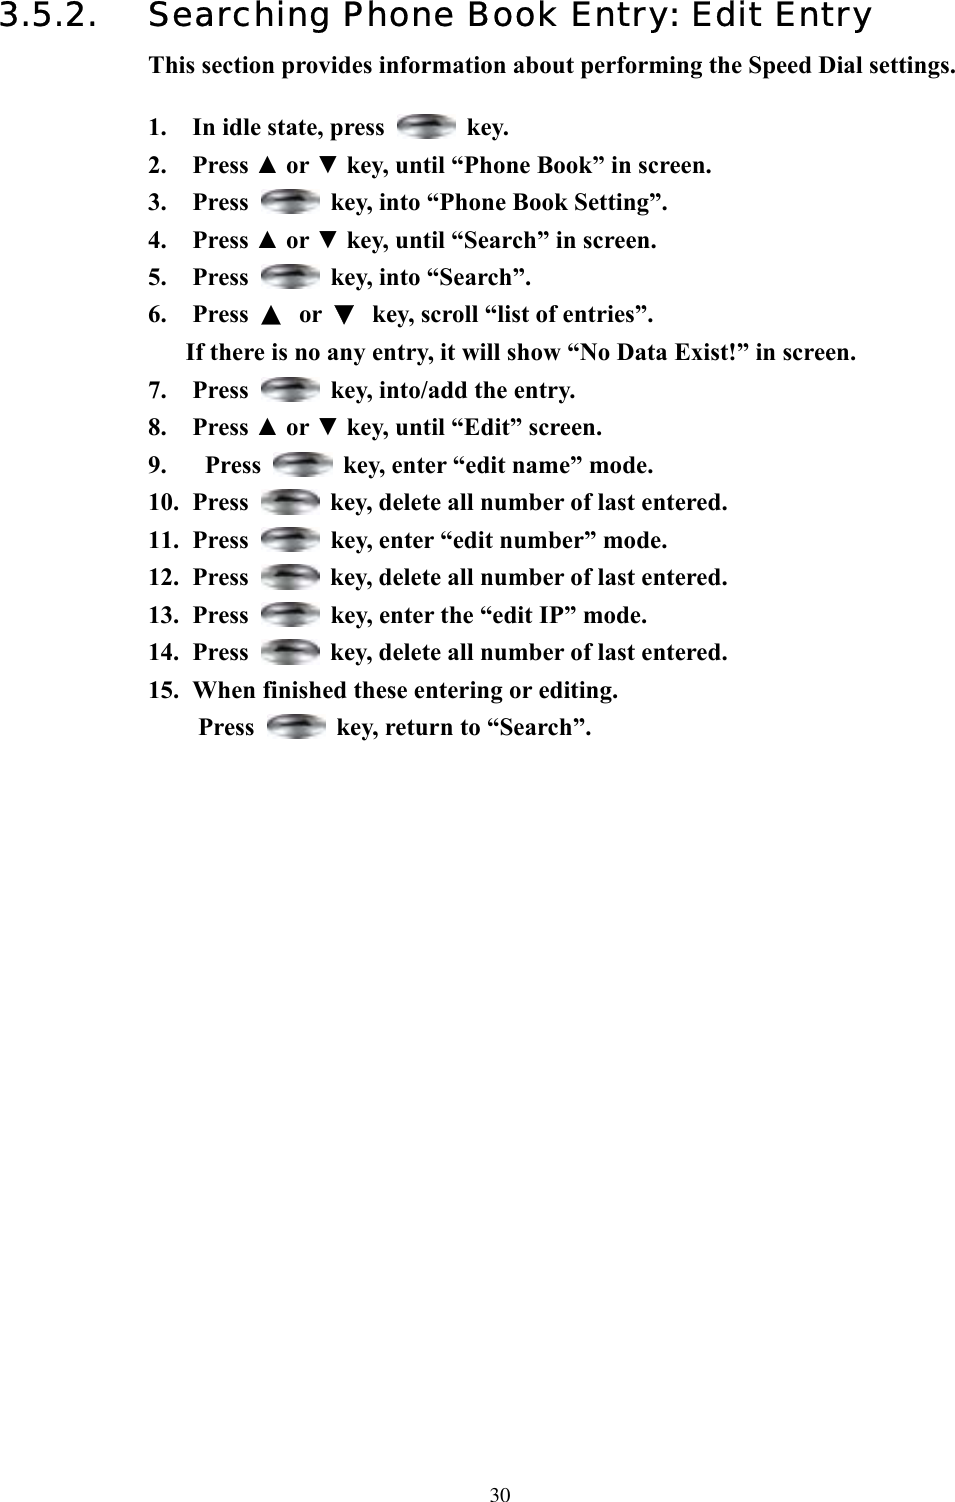
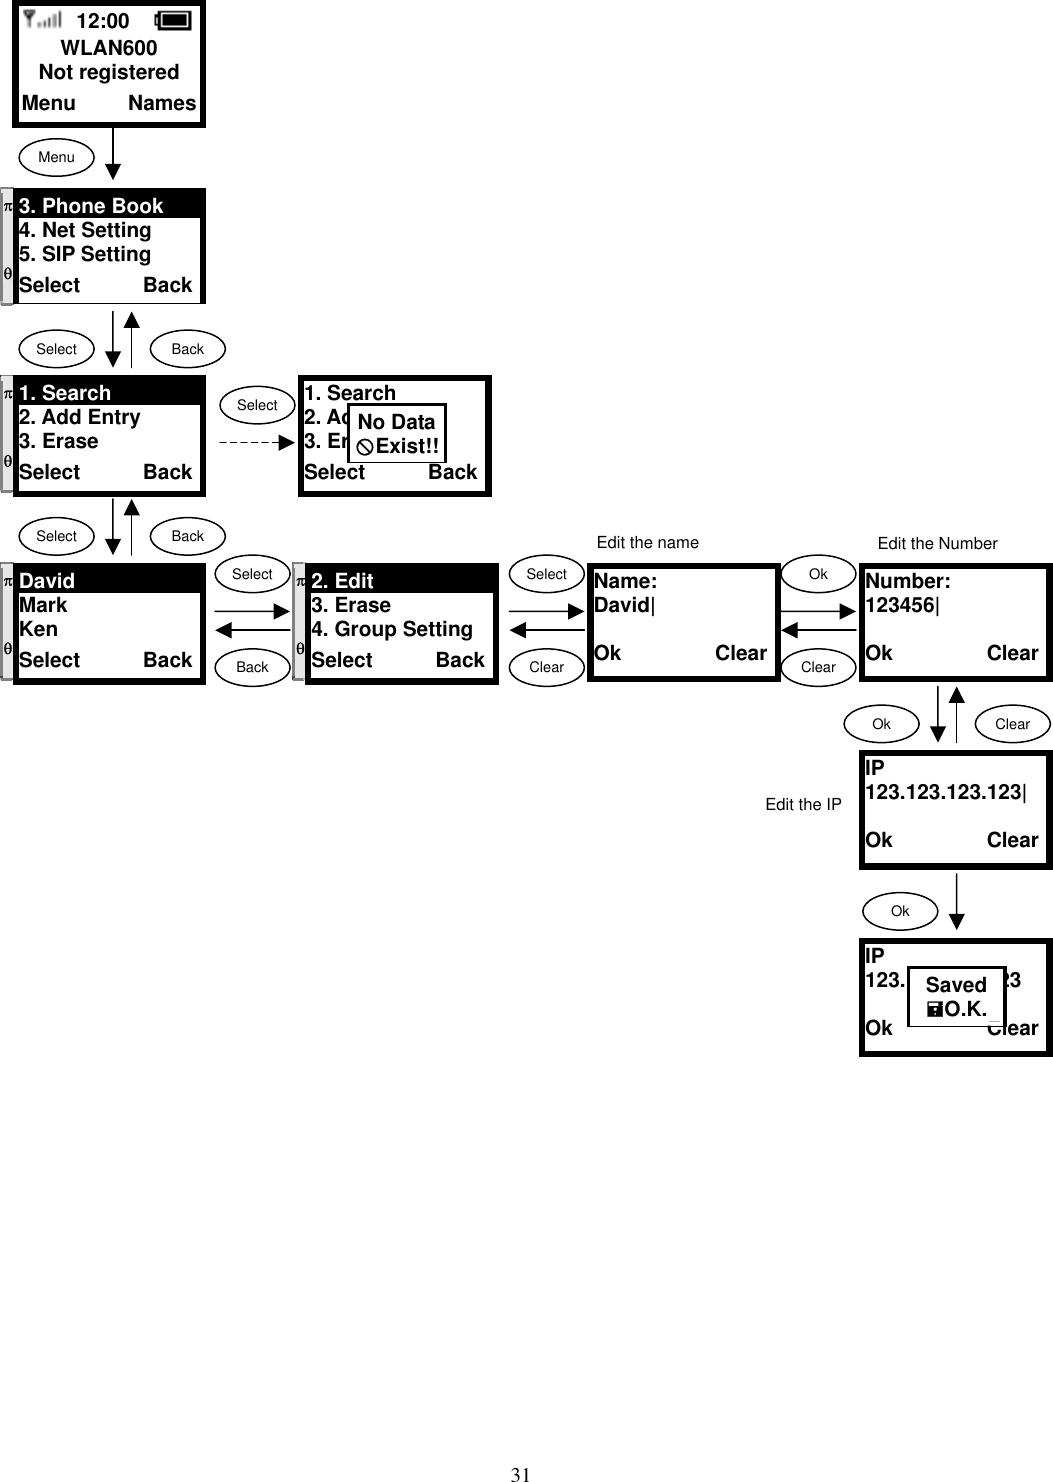
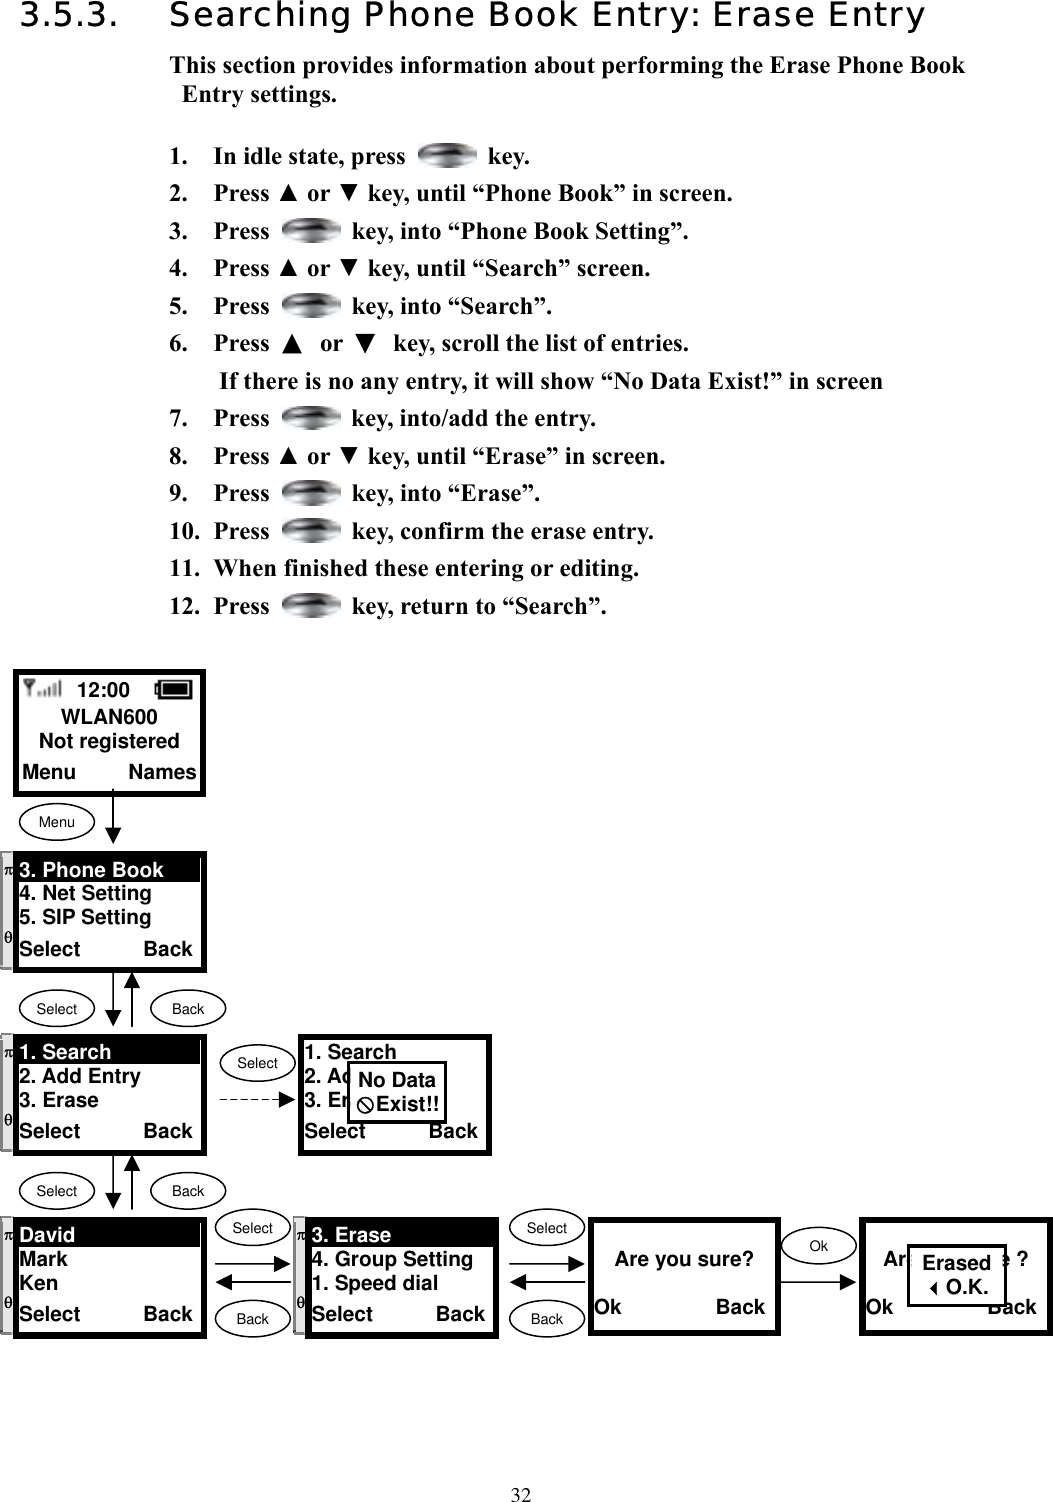
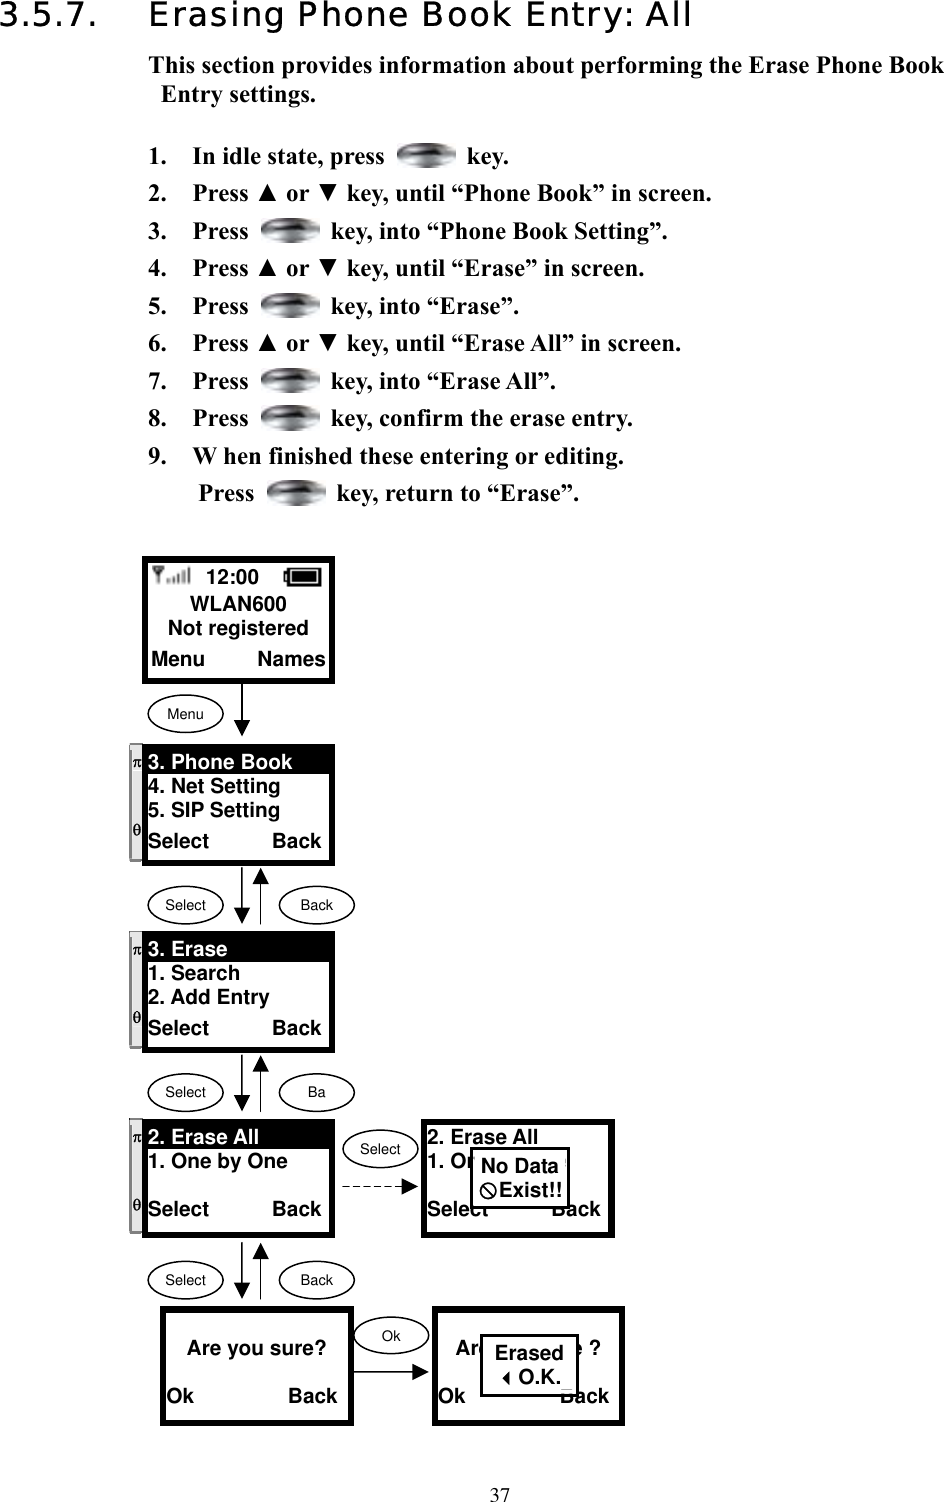
![333.5.4. Searching Phone Book Entry: Group Setting This section provides information about performing the Phone Book Entry Group Settings. 1. In idle state, press key. 2. Press ▲ or ▼ key, until “Phone Book” in screen. 3. Press key, into “Phone Book Setting”. 4. Press ▲ or ▼ key, until “Search” in screen. 5. Press key, into “Search”. 6. Press ▲ or ▼ key, scroll to the list of entries. If there is no any entry, it will show “No Data Exist!” in screen. 7. Press key, into/add the entry. 8. Press ▲ or ▼ key, until “Group Setting” in screen. 9. Press key, into “Group Setting”. 10. Press ▲ or ▼ key, scroll to “Group” format. 11. When finished these entering or editing. Press key, return to “Group Setting”. 12:00 WLAN600 Not registered Menu Names Menu Select Back No Group [1]Company [2]Other1 Select BackSelectOk BackNo Group [1]Company [2]Other1 Select BackSelectO.K.SelectBackπ θ 3. Phone Book 4. Net Setting 5. SIP Setting Select Back π θ 1. Search 2. Add Entry 3. Erase Select Back Select Back π θ David Mark Ken Select Back π θ 4. Group Setting 1. Speed dial 2. Edit Select Back1. Search 2. Add Entry 3. Erase Select BackNo Data[Exist!!Select](https://usermanual.wiki/BCM-Communication/WLAN600/User-Guide-384952-Page-33.png)

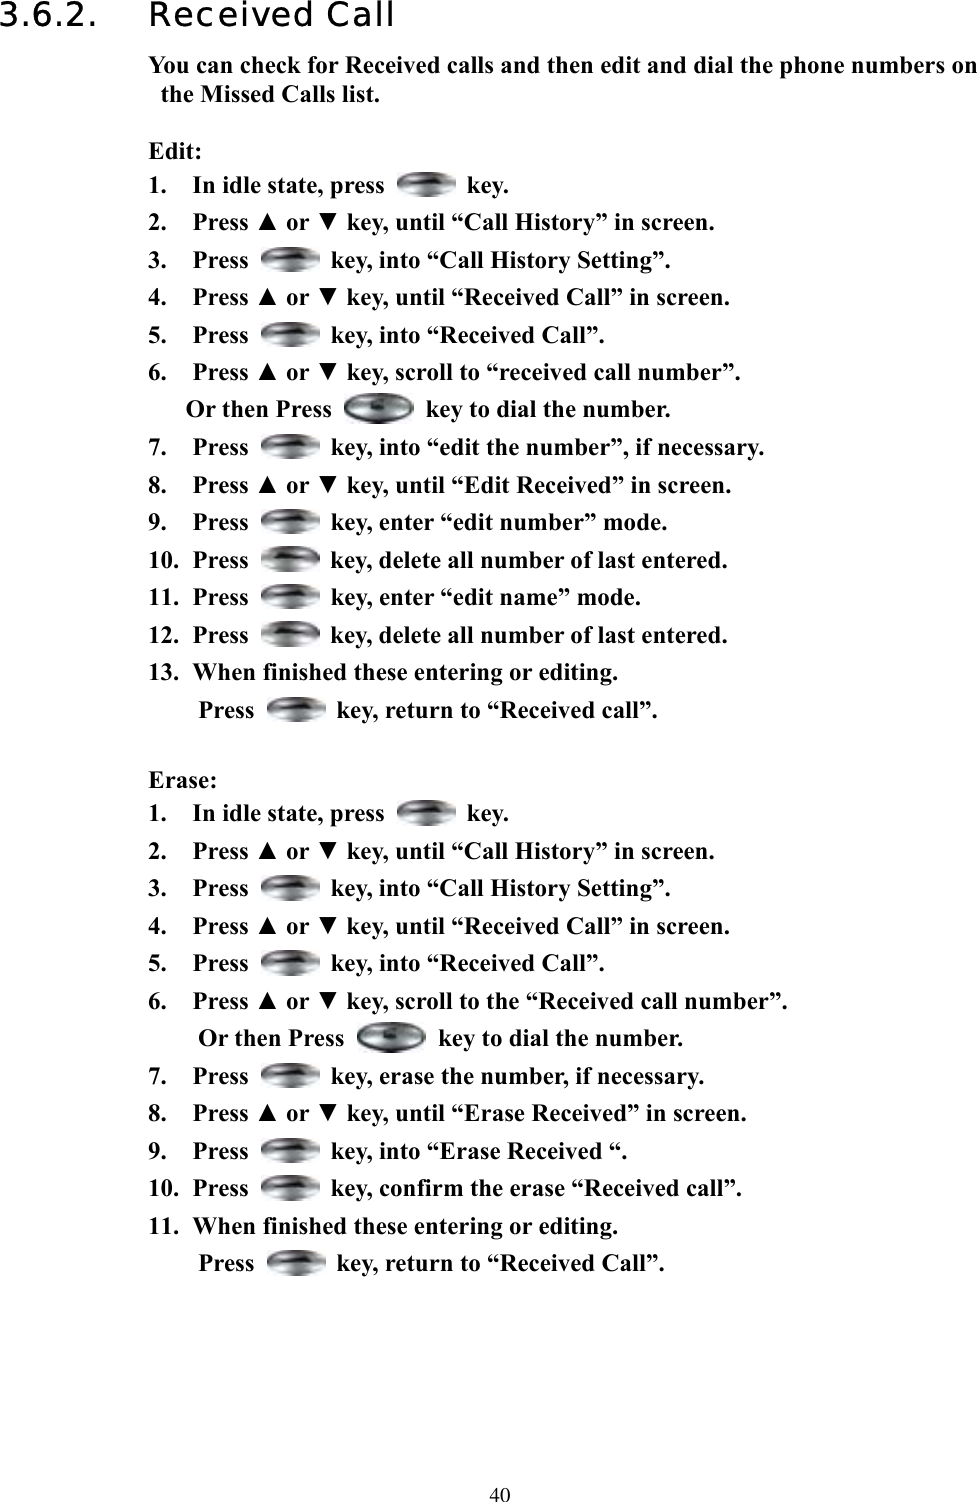

![463.7. Setting The Call History is a useful feature for checking missed calls, received calls, and dialed calls. 3.7.1. Adjusting the Ring Volume 1. In idle state, press key. 2. Press ▲ or ▼ key, until “Setting” in screen. 3. Press key, into “Setting”. 4. Press ▲ or ▼ key, until “Ring Volume” in screen. 5. Press key, into “Ring volume”. 6. Press ▲ or ▼ key, scroll the Ring Volume. 7. When finished these entering or editing. Press key, return to “Setting”. 12:00 WLAN600 Not registered Menu Names Menu Select Back π θ 6. Setting 7. Wireless 8. SSL Setting Select Back πθ[1] Level 5 [2] Level 4 [3] Level 3 Select Backπ θ 3. Ring Volume 4. Time Format 5. Time Edit Select Back SelectBackOk [1] Level 5 [2] Level 4 4 [3] Level 3 Select BackSelect O.K.](https://usermanual.wiki/BCM-Communication/WLAN600/User-Guide-384952-Page-46.png)