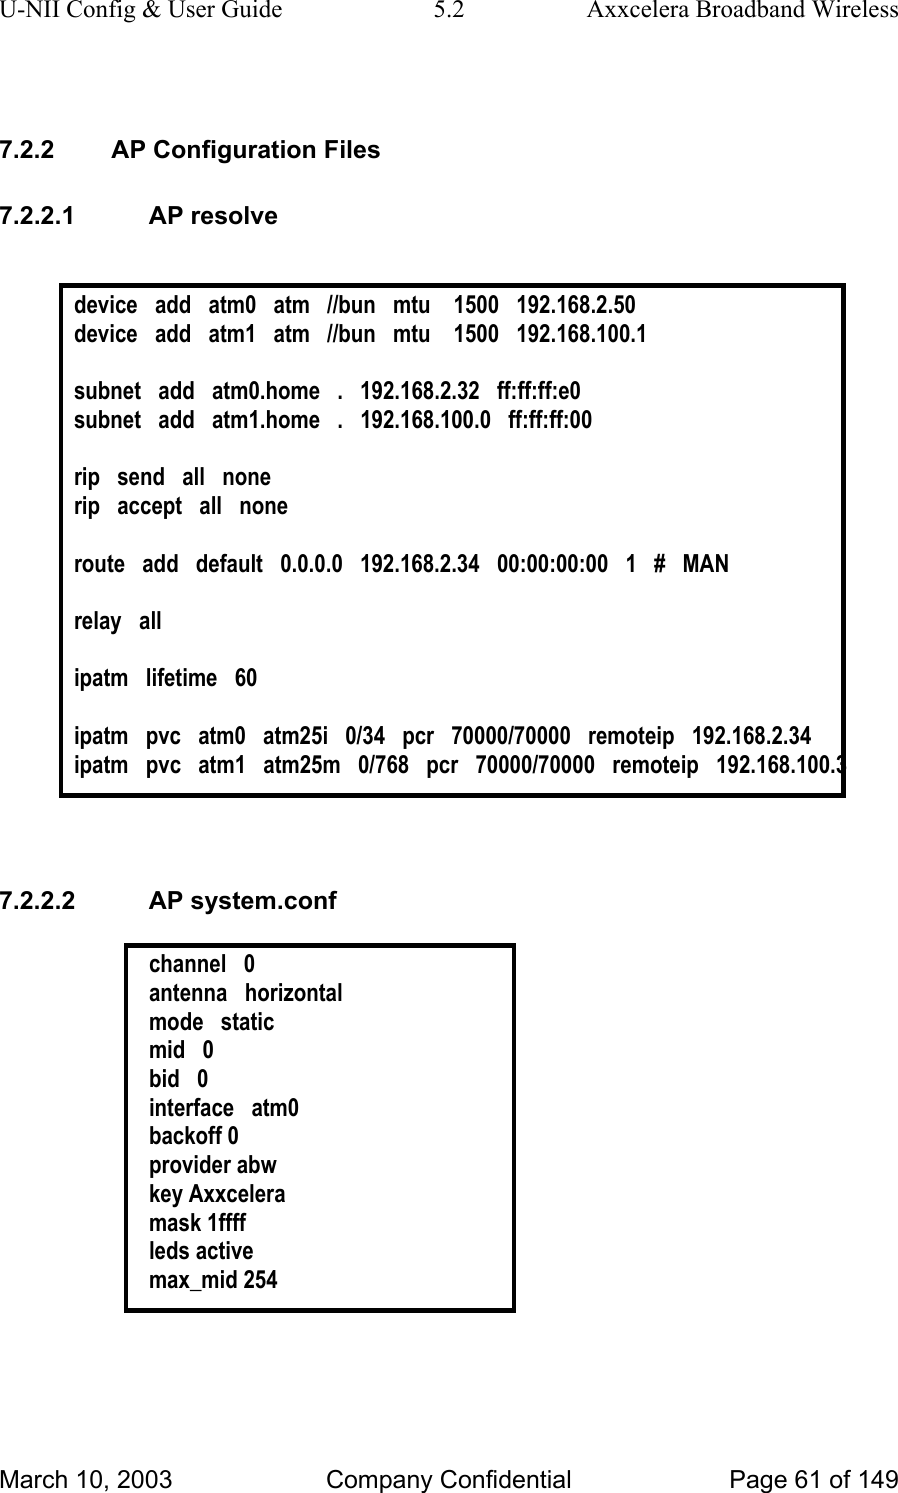
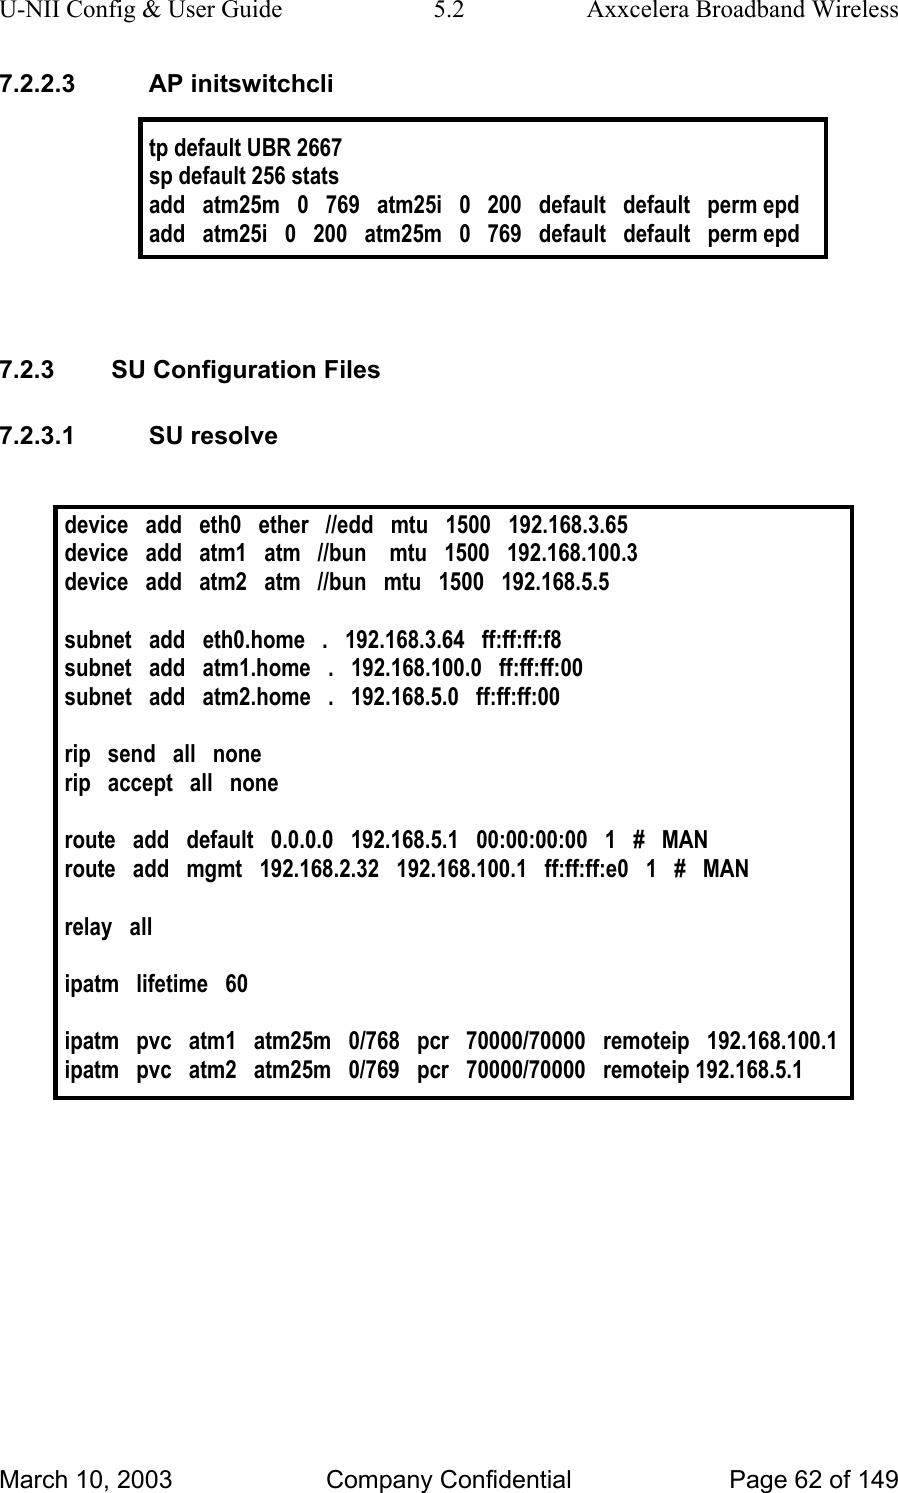
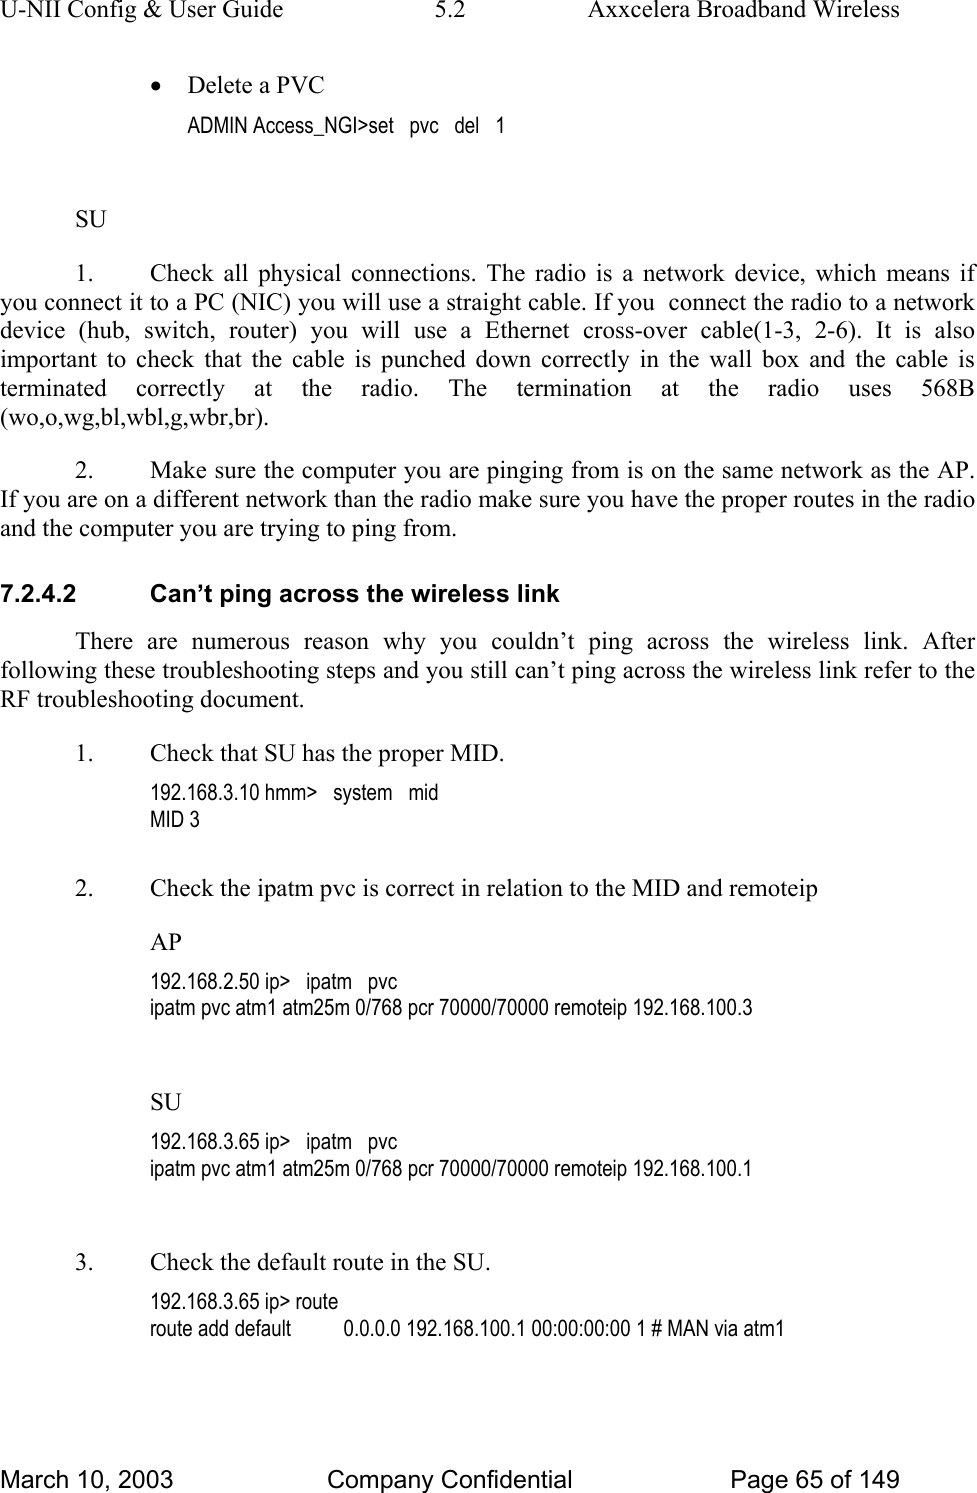
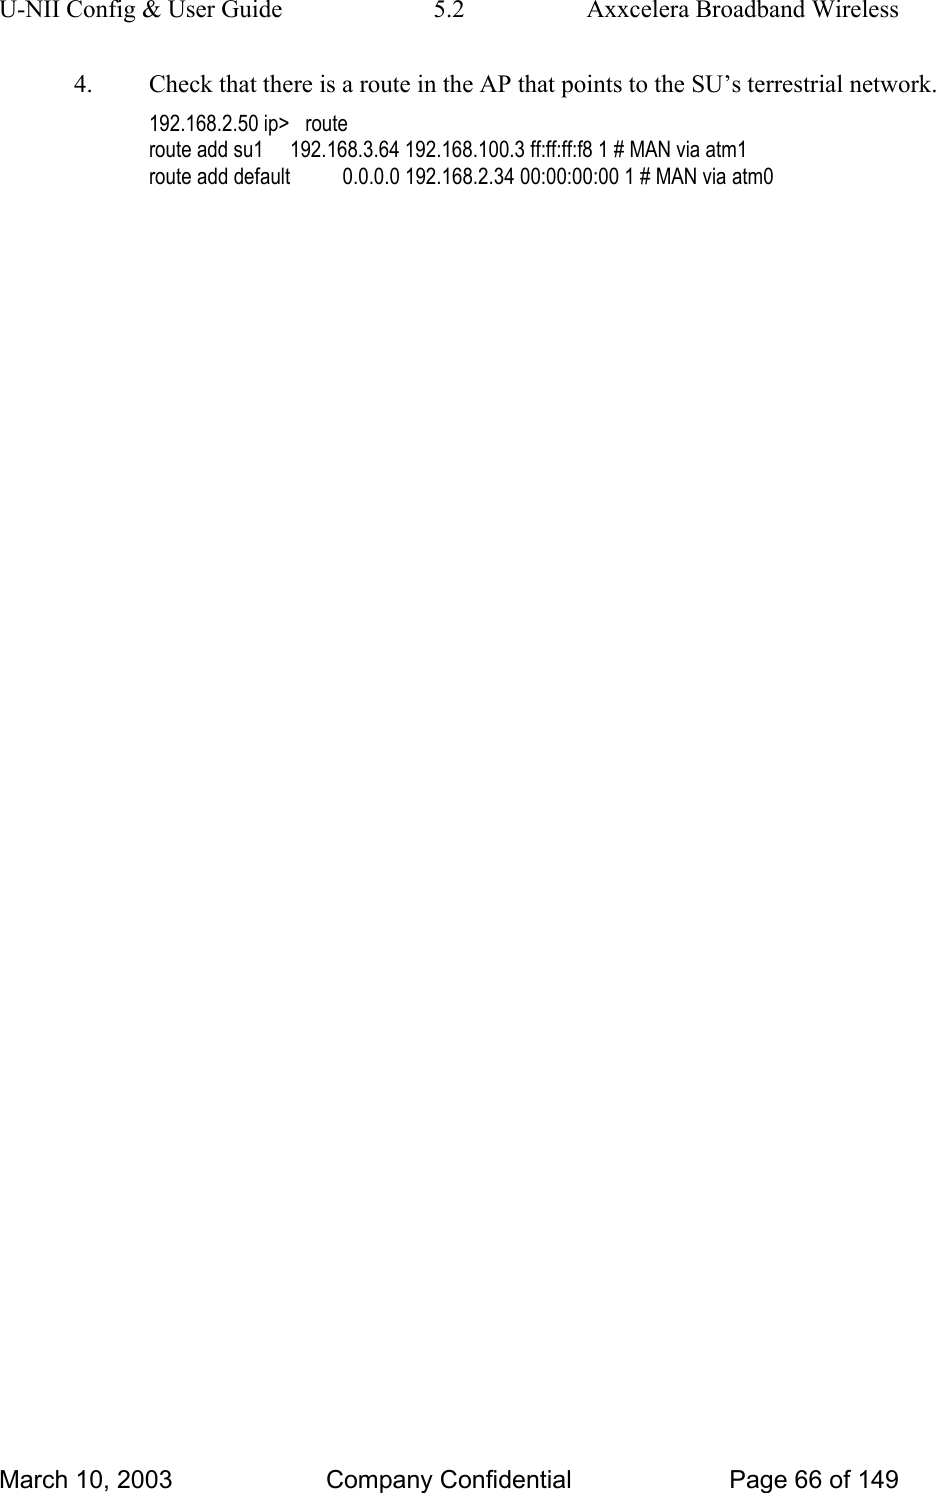
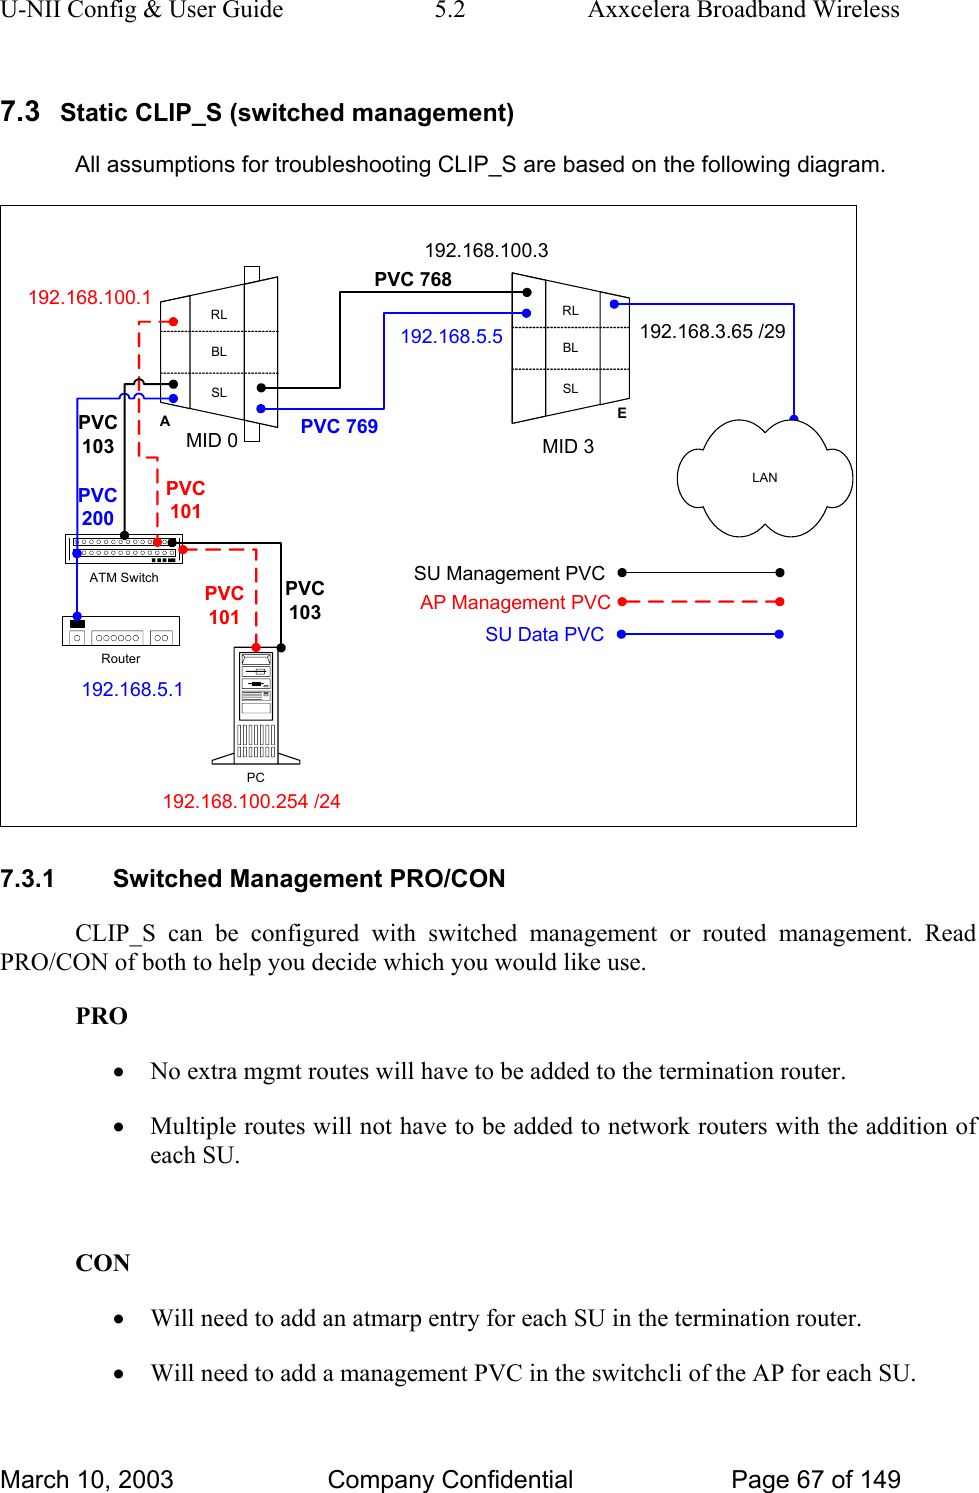
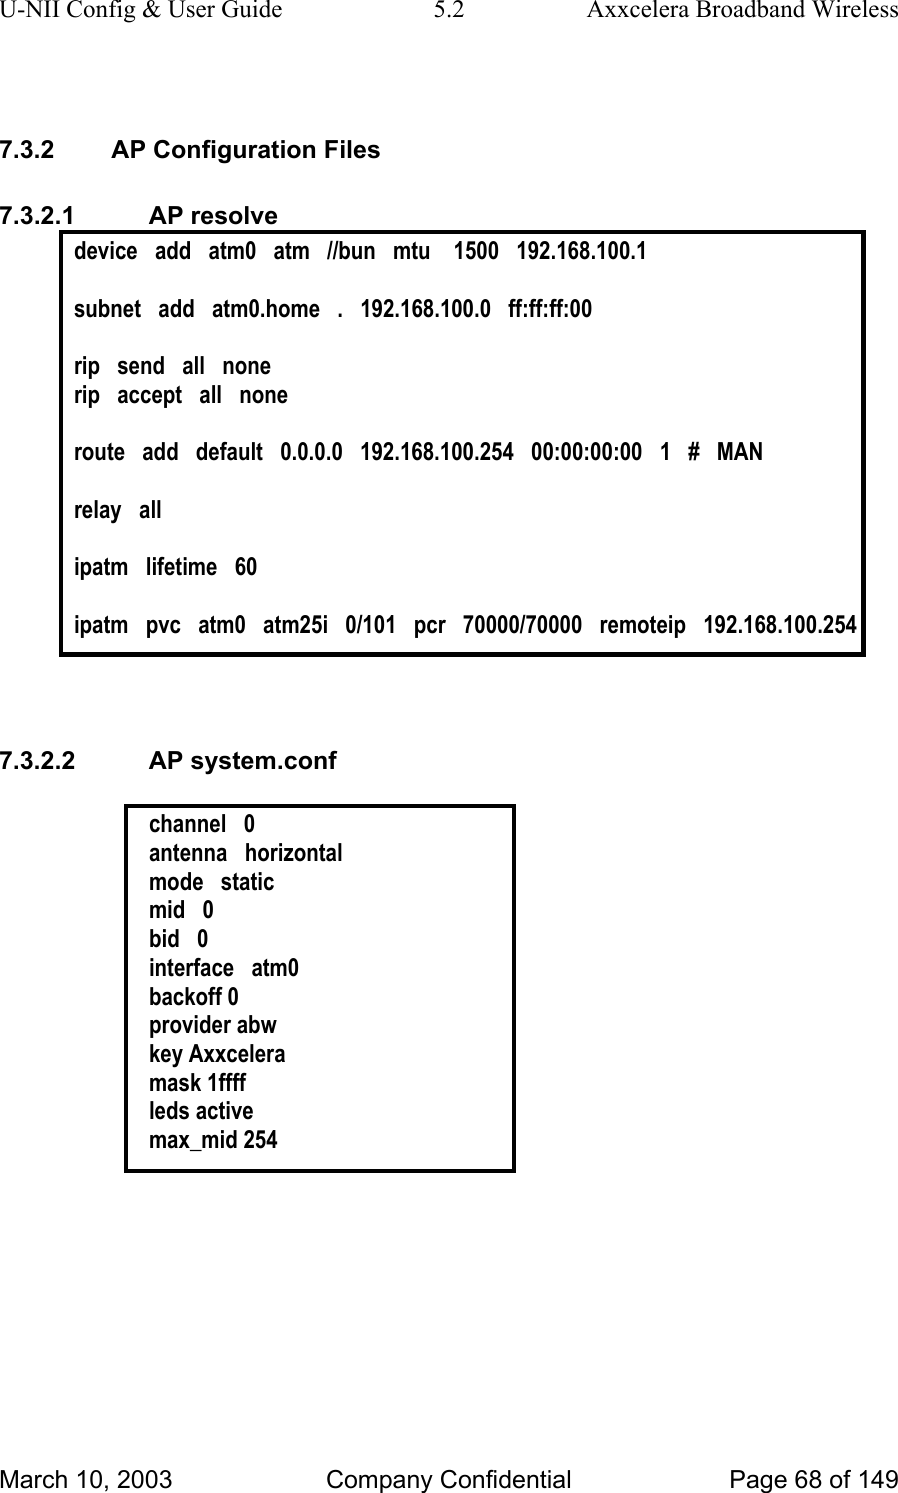
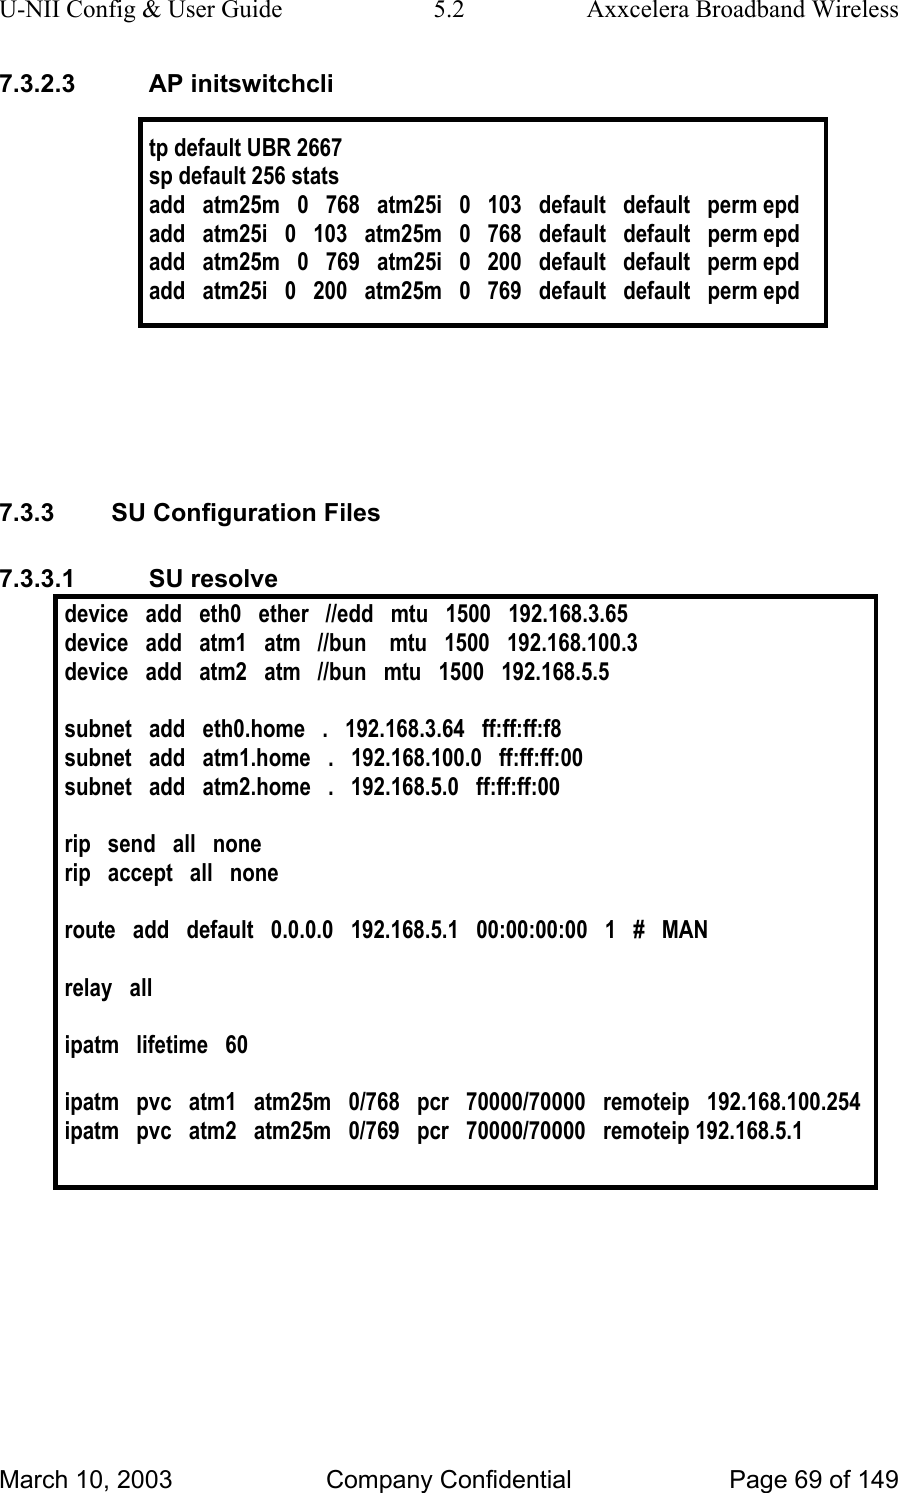
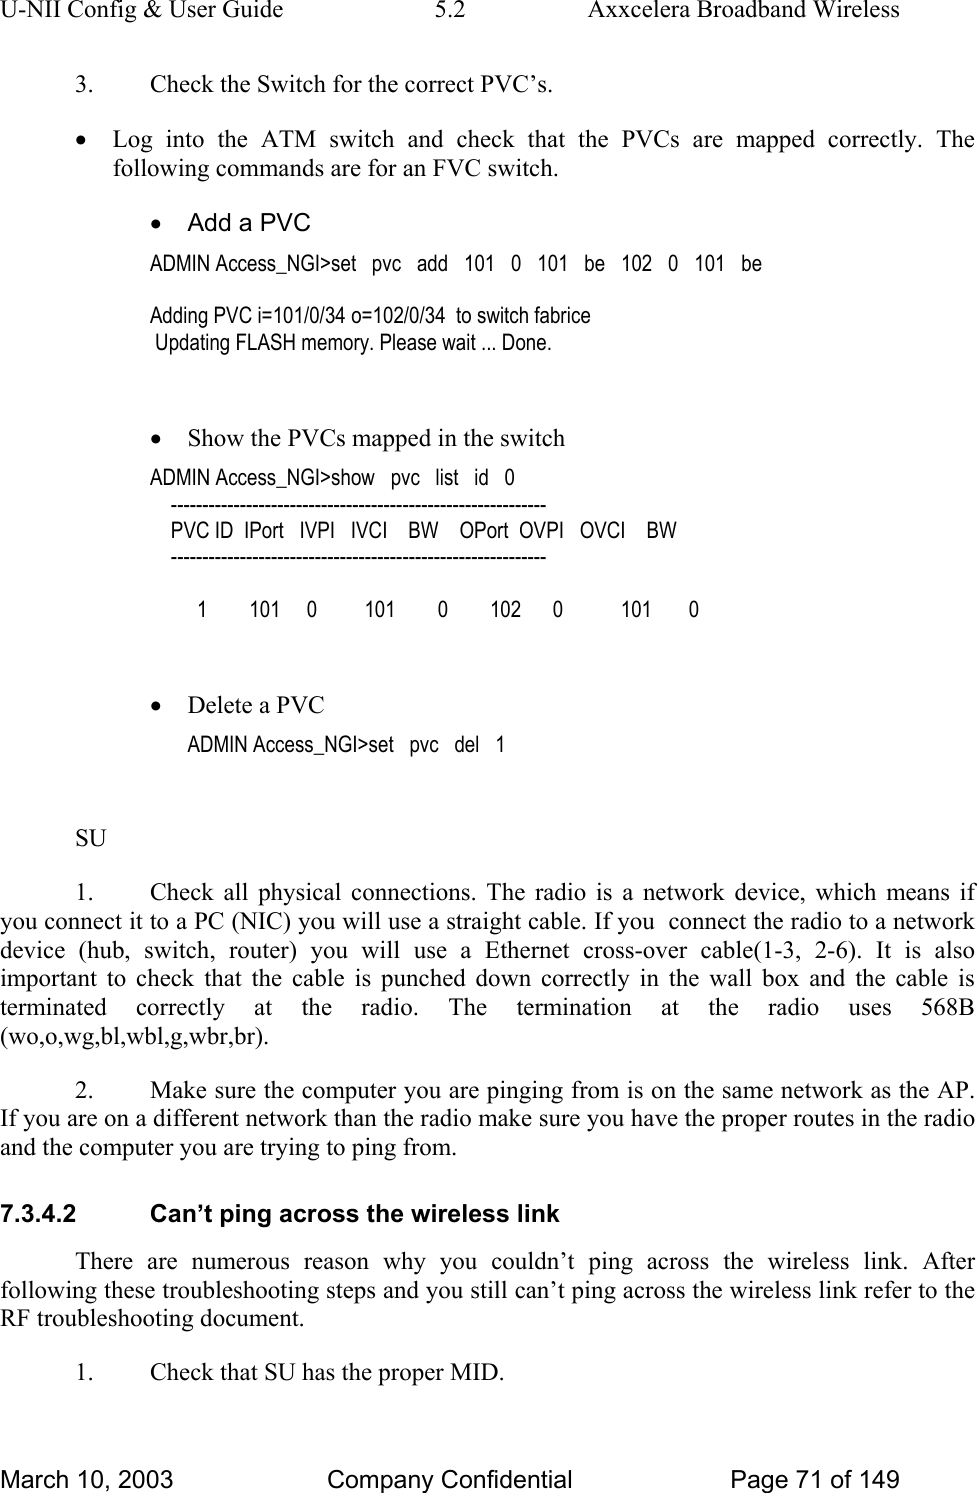
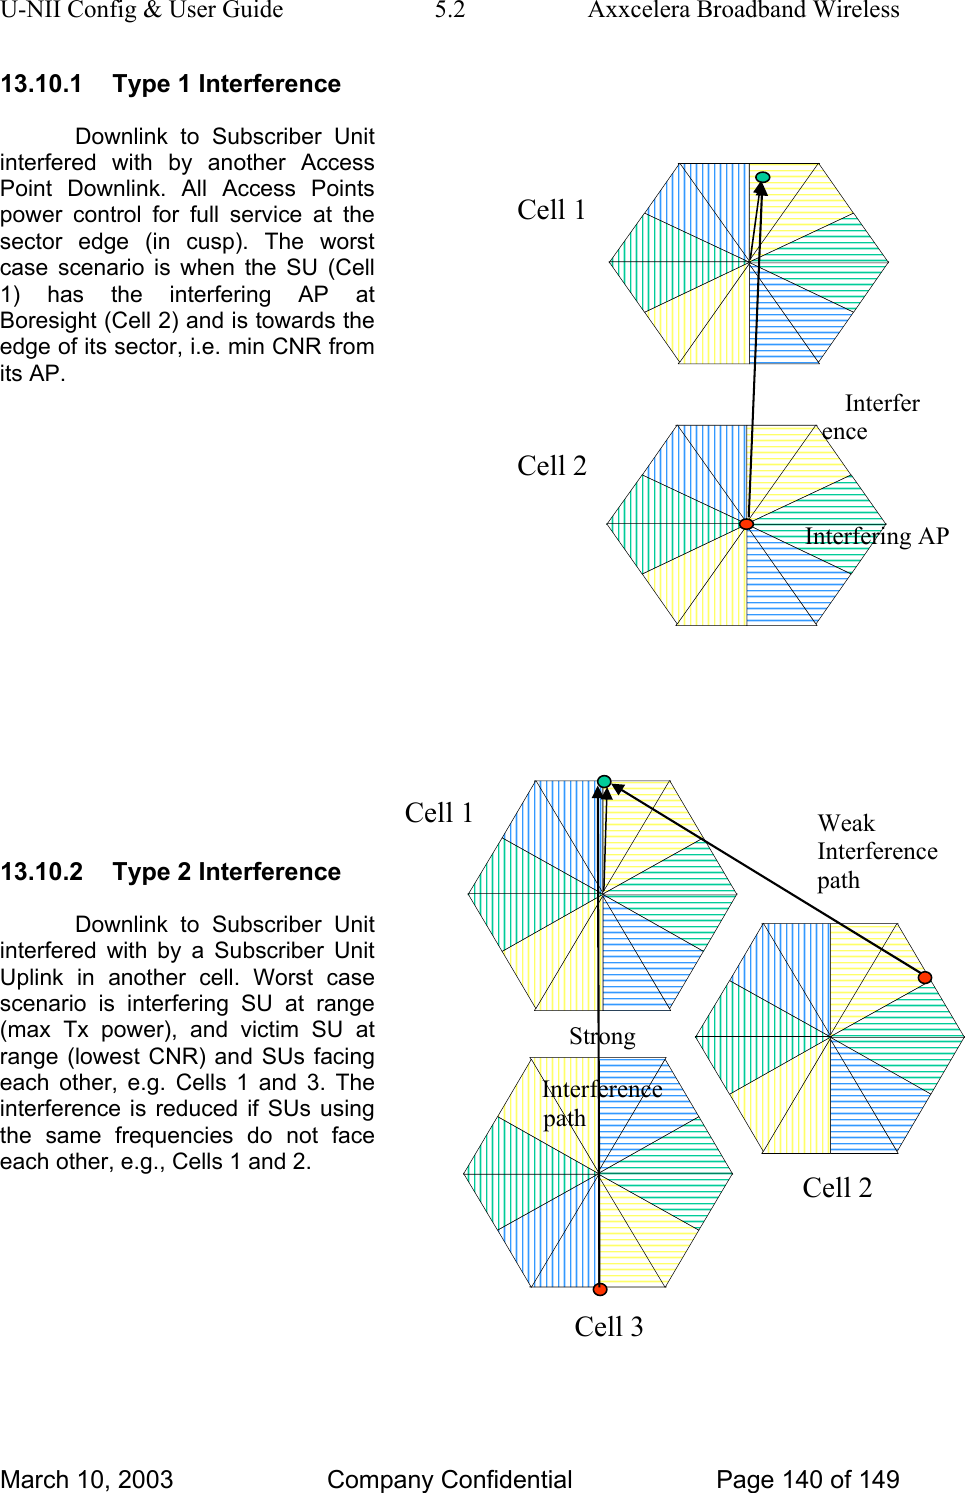
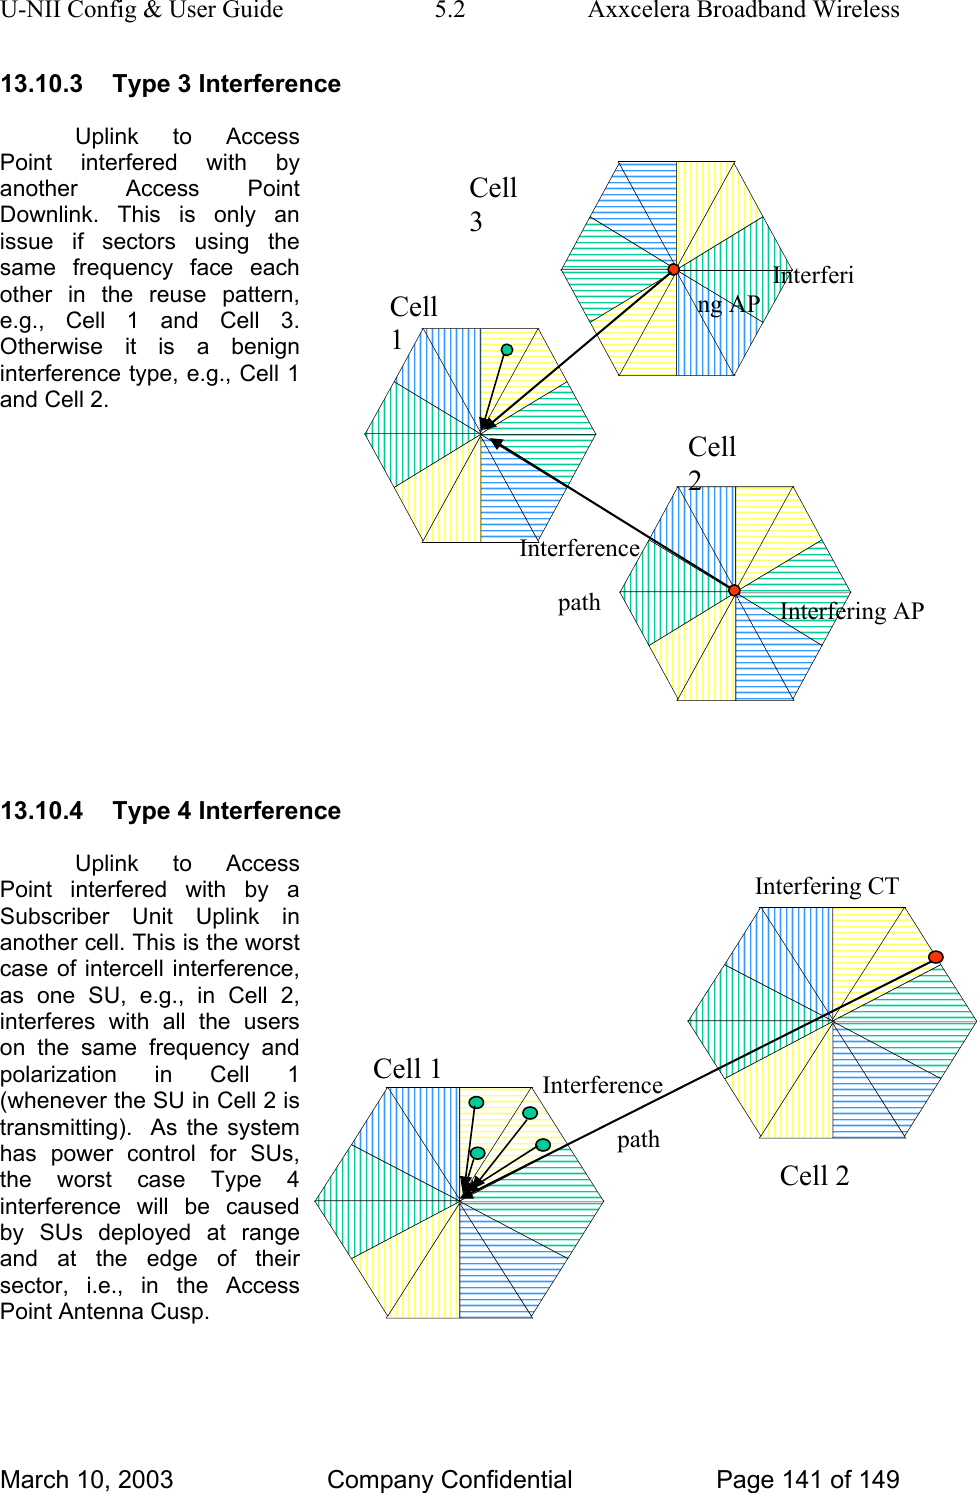
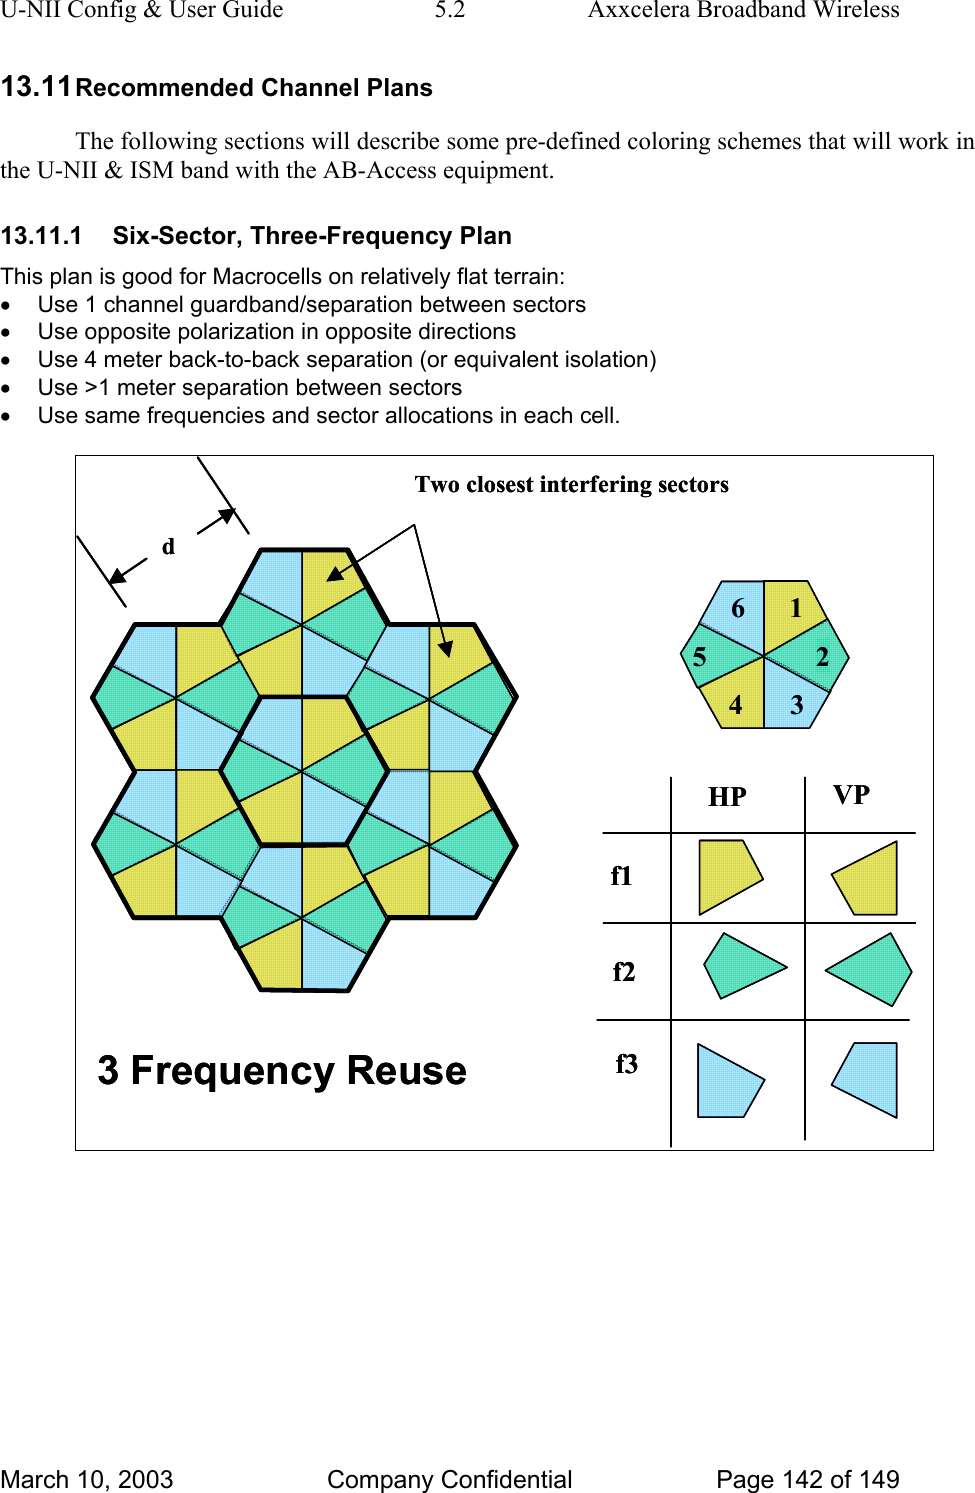
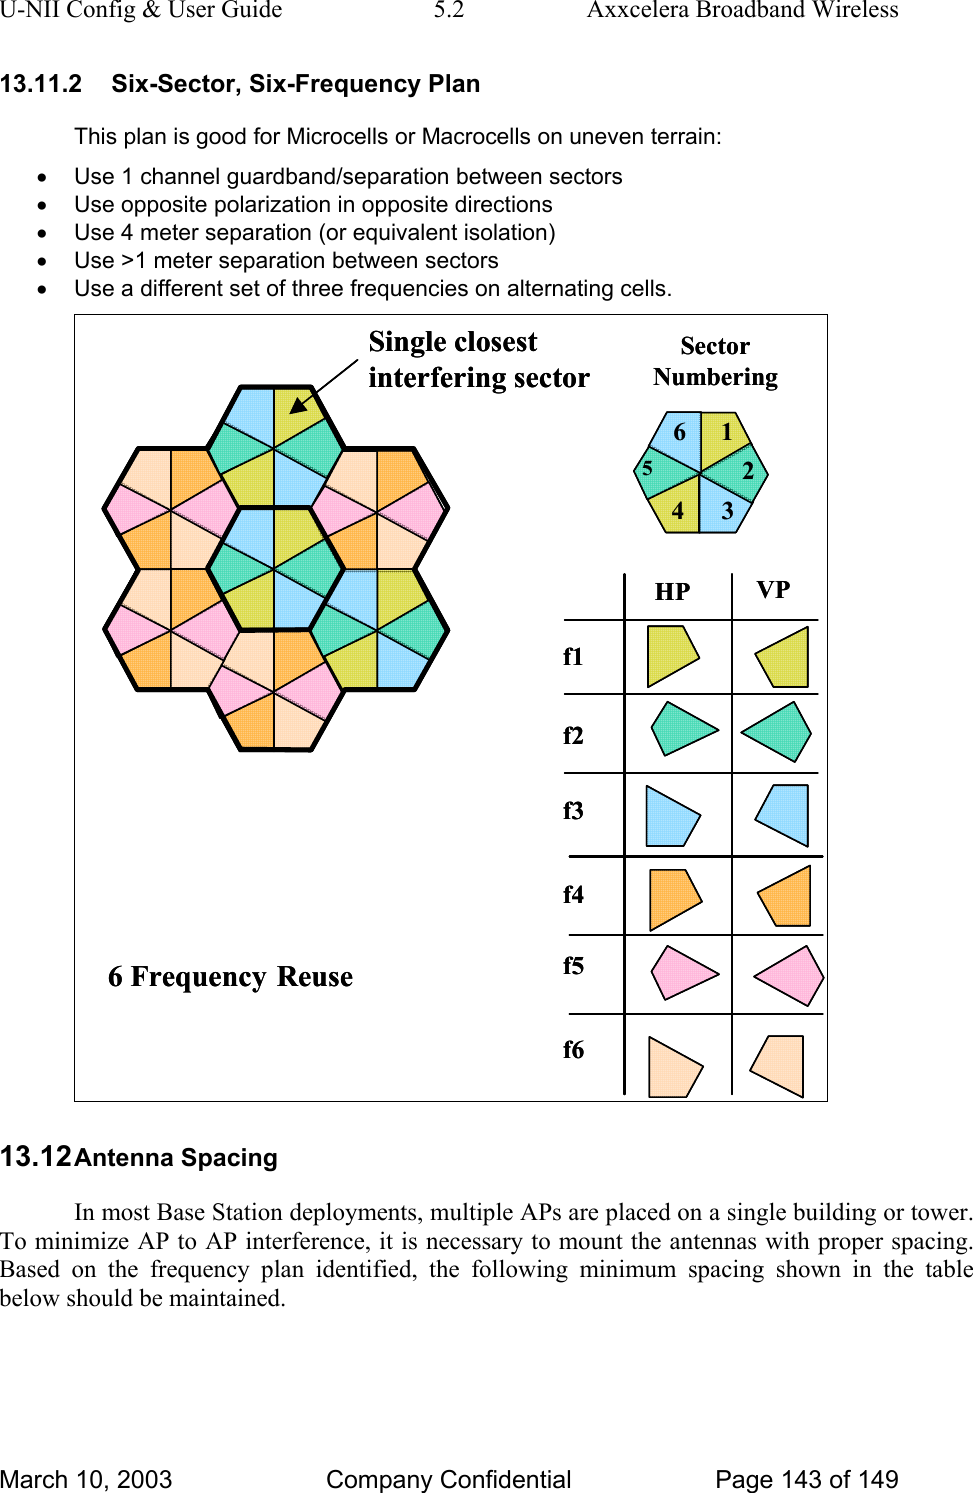
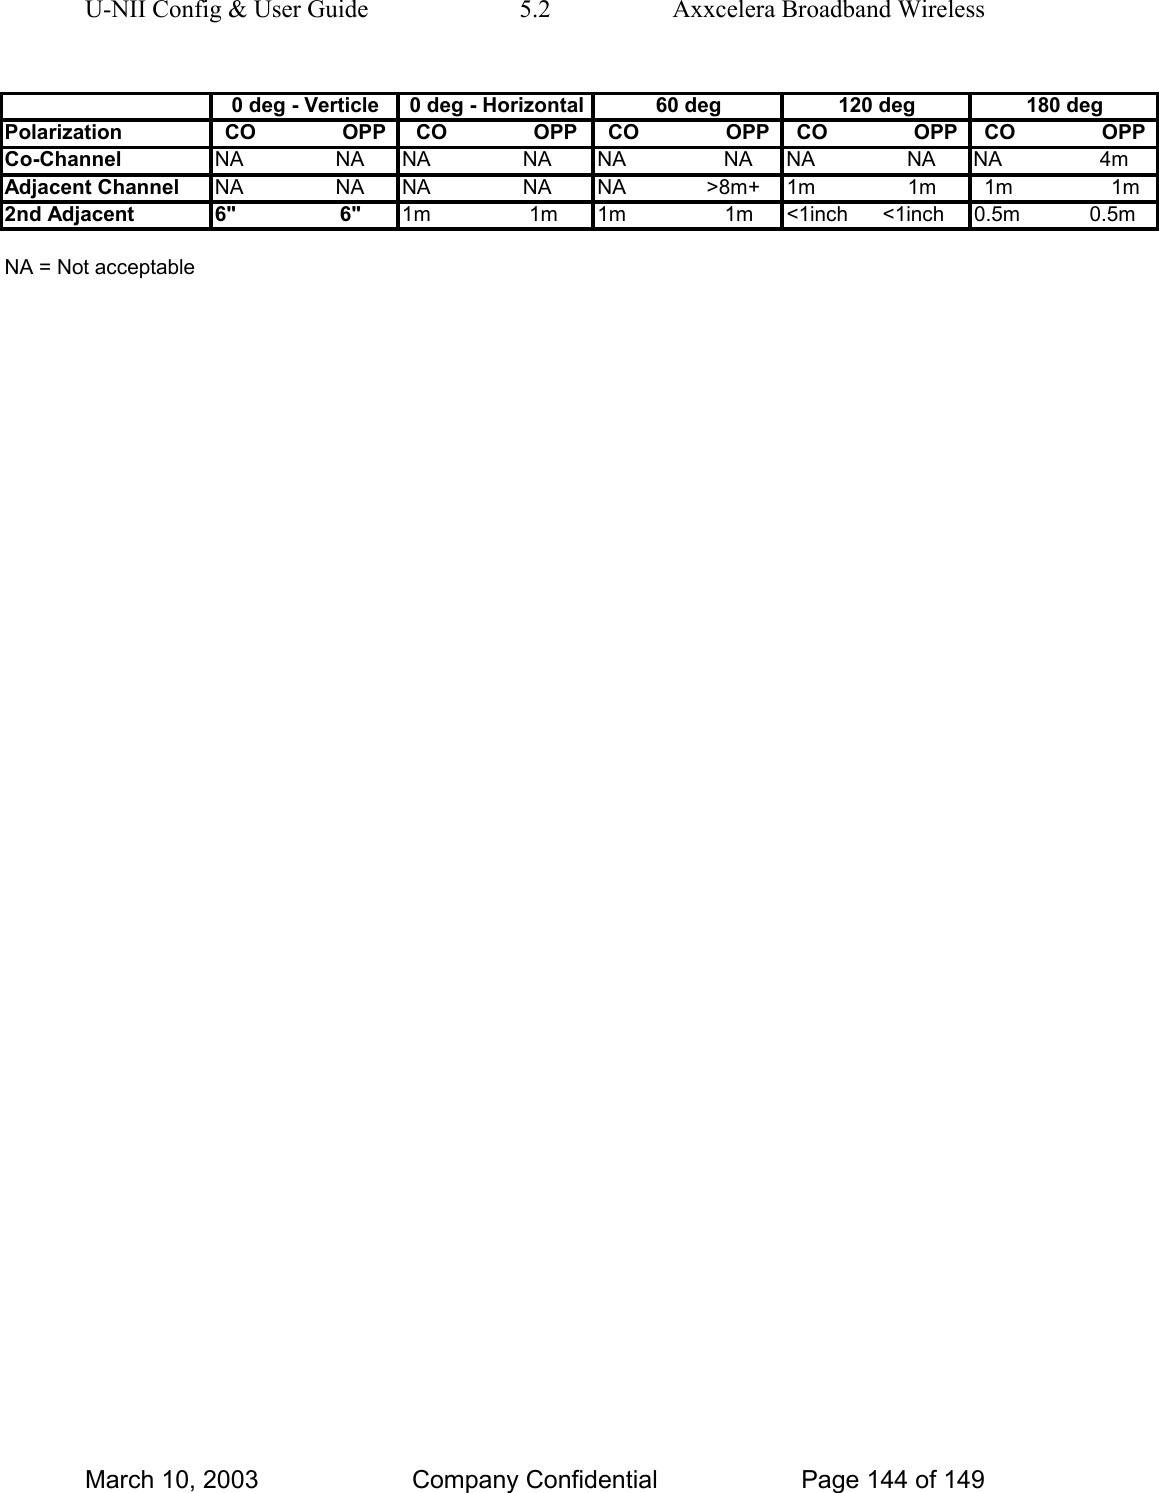
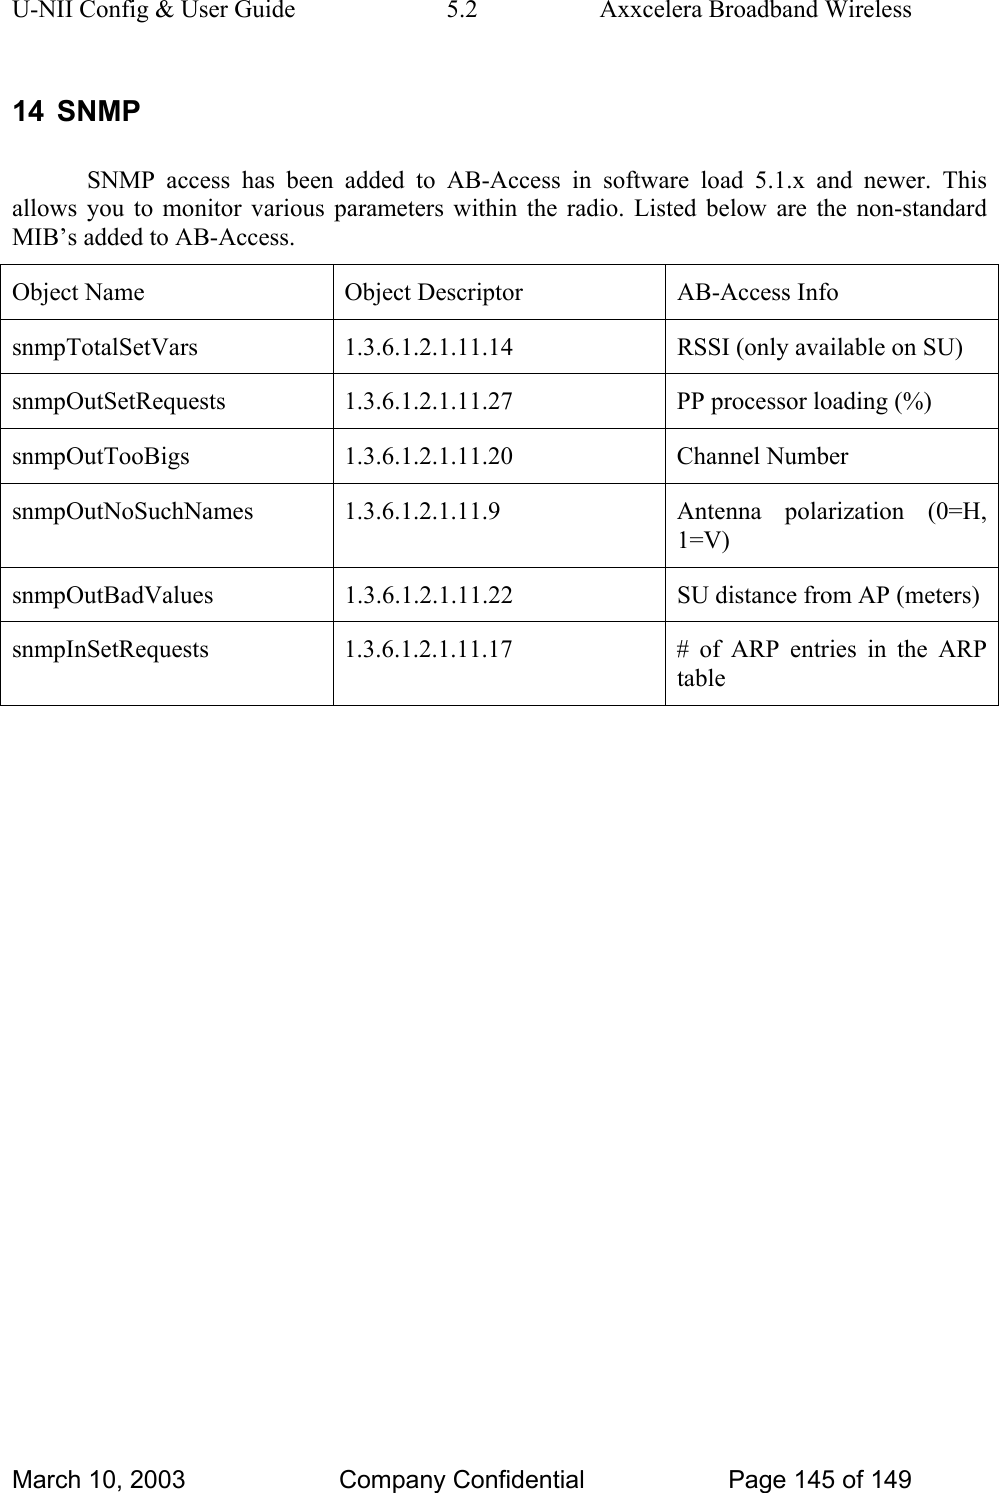
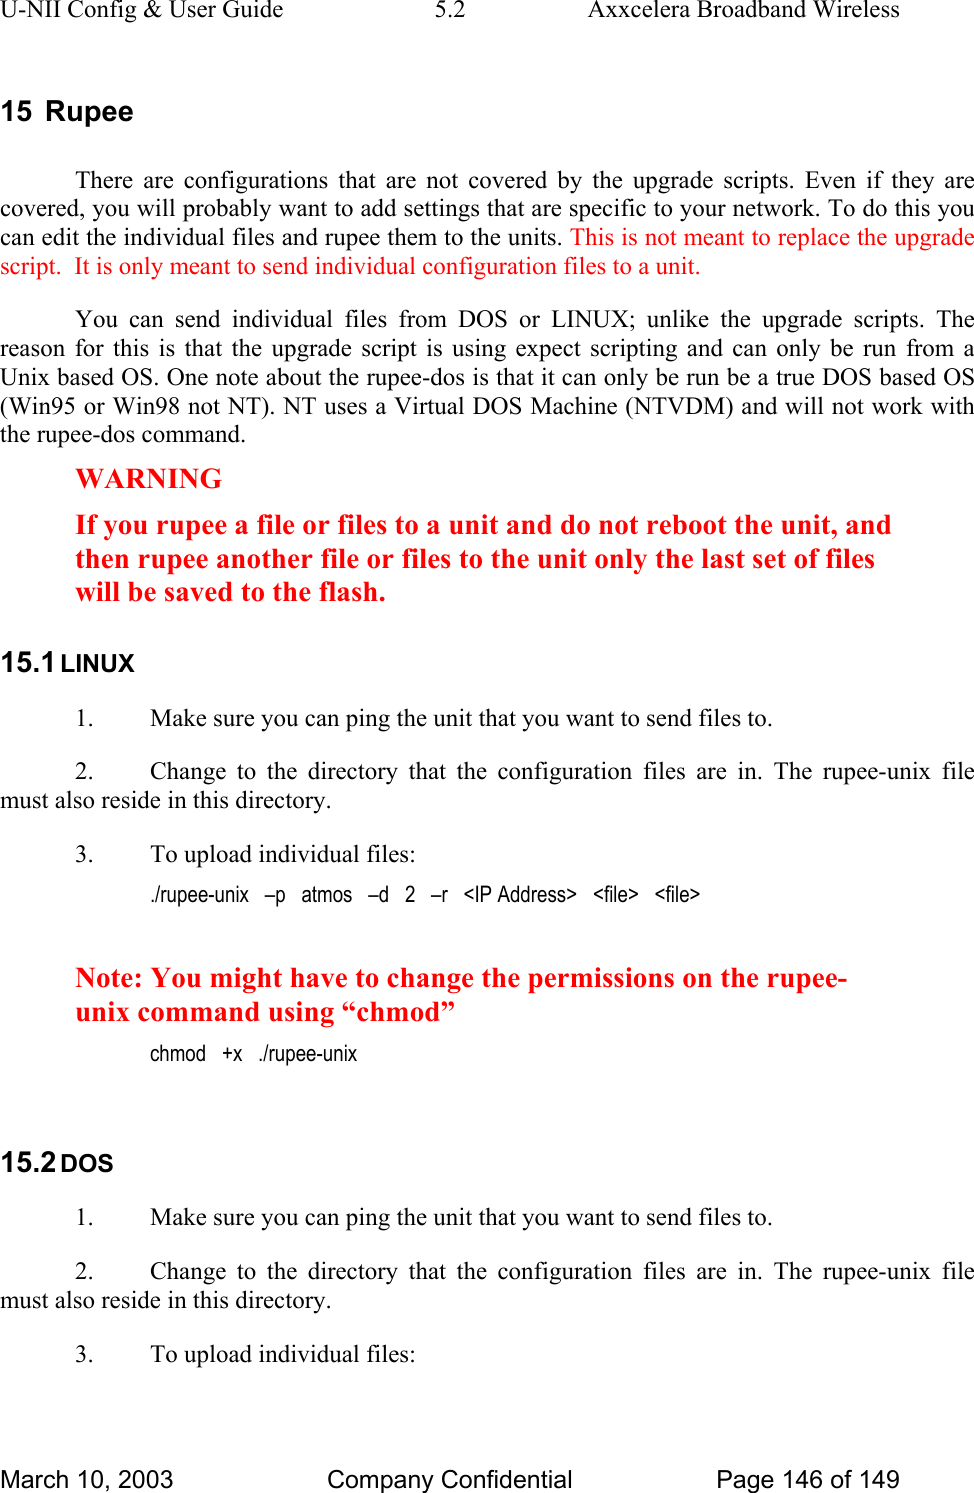
Axxcelera Broand Wireless AB-ACCESS-AP02 Fixed Broadband Wireless Access Network User Manual AB Access Quick Reference

Axxcelera Broadband Wireless, Inc. Fixed Broadband Wireless Access Network AB Access Quick Reference

Contents

Users Manual

 UNII Config & User Guide    version 5.2 March 10, 2003   Company Confidential    Axxcelera Broadband Wireless   175 Science Pkwy.   Rochester, NY 14620
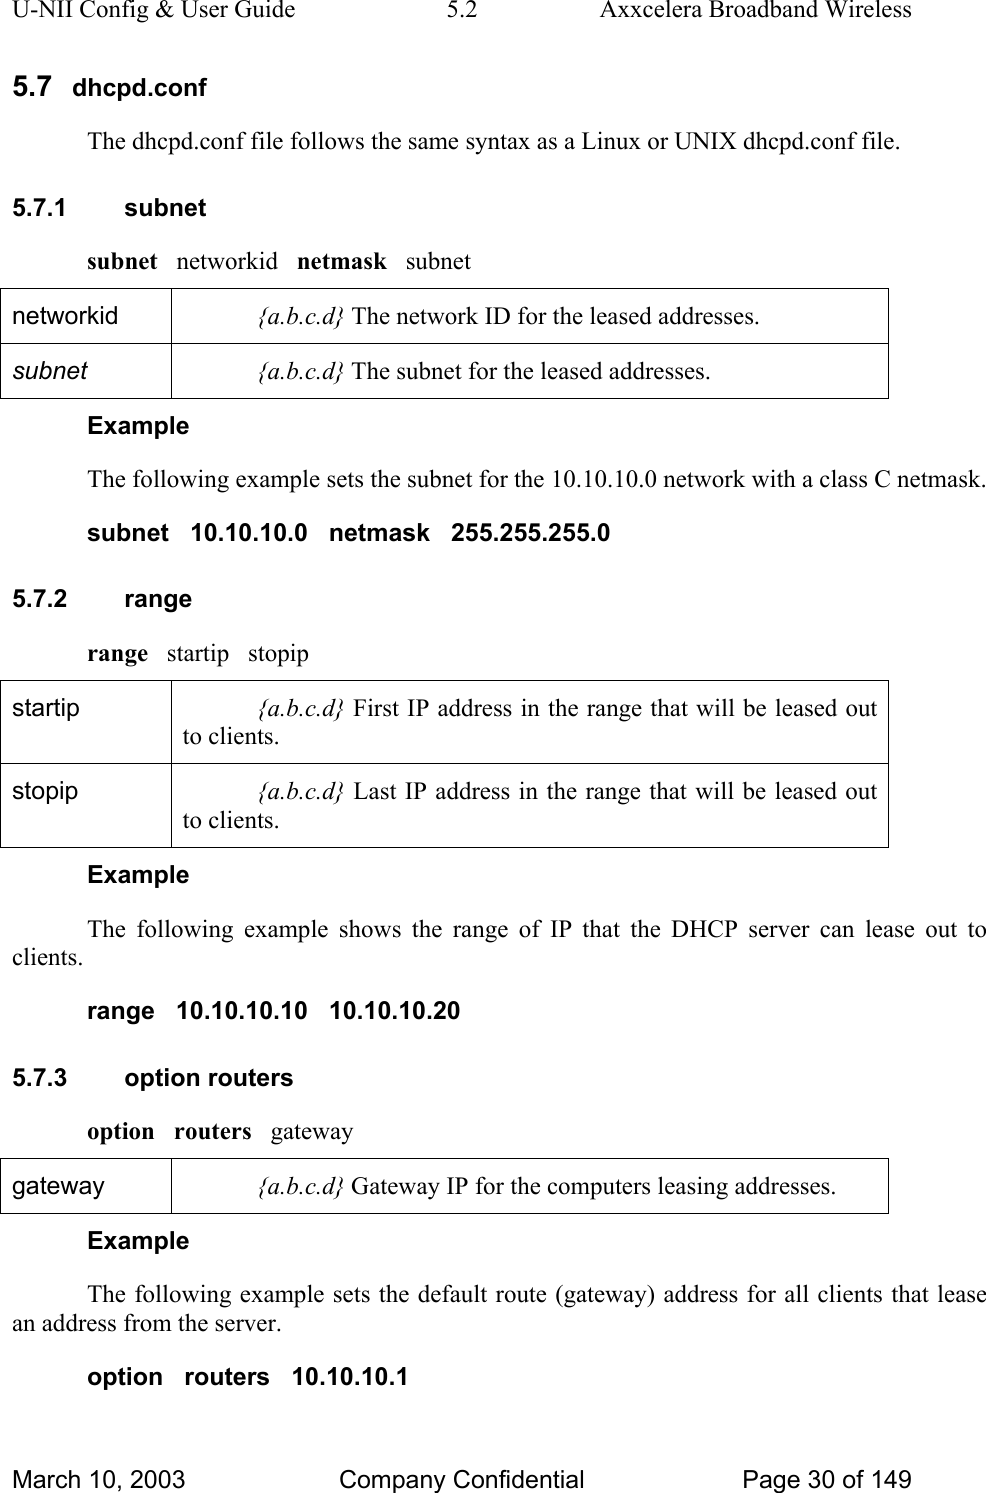
U-NII Config & User Guide  5.2  Axxcelera Broadband Wireless 1  Revision History Version  Date  Author  Comments 5.0  Jan 9, 02  Matt Olson Updated for 5.0 system software  5.0  Jan 14, 2002  Joe Higgs Format edits 5.0  Feb 19, 2002  Matt Olson More 5.0 updates 5.0  Feb 20, 2002  Matt Olson Added sections from old UNII Config & User Guide.  5.1  Dec 13, 2002  Matt Olson Updated for the 5.1.8 System Software & 5.1.6 EMS. 5.2.x  Apr 17, 2003  Matt Olson Updated for the 5.2.x System software.  March 10, 2003  Company Confidential  Page 2 of 149
U-NII Config & User Guide  5.2  Axxcelera Broadband Wireless PLEASE READ THESE SAFETY PRECAUTIONS!  RF Energy Health Hazard  The radio equipment described in this guide uses radio frequency transmitters.  Although the power level is low, the concentrated energy from a directional antenna may pose a health hazard.  Do not allow people to come in within 20cm to the front of the antenna while the transmitter is operating. Protection from Lightning  Article 810 of the US National Electric Department of Energy Handbook 1996 specifies that radio and television lead-in cables must have adequate surge protection at or near the point of entry to the building.  The code specifies that any shielded cable from an external antenna must have the shield directly connected to a 10 AWG wire that connects to the building ground electrode. FCC Notice, USA The AB-Access units comply with Part 15 of the FCC rules.  Operation is subject to the following two conditions: •  This device may not cause harmful interference. •  This device must accept any interference received including interference that may cause undesired operation. This device is specifically designed to be used under Part 15, Subpart E of the FCC Rules and Regulations.  Any unauthorized modification or changes to this device without the express approval of Axxcelera Broadband may void the user’s authority to operate this device.  Furthermore, this device is intended to be used only when installed in accordance with the instructions outlined in this manual.  Failure to comply with these instructions may also void the user’s authority to operate this device and/or the manufacturer’s warranty   Conditions specific to AB-Extender:  March 10, 2003  Company Confidential  Page 3 of 149
U-NII Config & User Guide  5.2  Axxcelera Broadband Wireless AB-Extender complies with Part 15 of the FCC rules. The device is specifically designed to be used under Part 15, Sub-part E of the FCC rules and regulations. Operation is subject to following conditions:  •  The device to utilize a fixed mount antenna, for use on a permanent outdoor structure. •  The device to be installed by qualified installation/deployment personnel, and a minimum of 1.5 meters of separation must exist between the device and persons, when the device is operating. •  The device installers and operators should be aware of the transmitter operating conditions, specified in the AB-Extender installation manual and other associated user documentation, as well as the antenna co-location requirements of Part 1.1307 (b) (3), of FCC rules, pertaining to RF exposure. •  The device may not cause harmful interference. •  The device must accept interference received, including interference that may cause undesired operation.  The device is intended to be used only when installed in accordance with instructions outlined in this manual. Failure to comply with these instructions may void the user's authority to operate this device and/or the manufacturer's warranty. Furthermore, any unauthorized modification or changes to this device without the express approval of Axxcelera Broadband may also void the user's authority to operate this device.  March 10, 2003  Company Confidential  Page 4 of 149
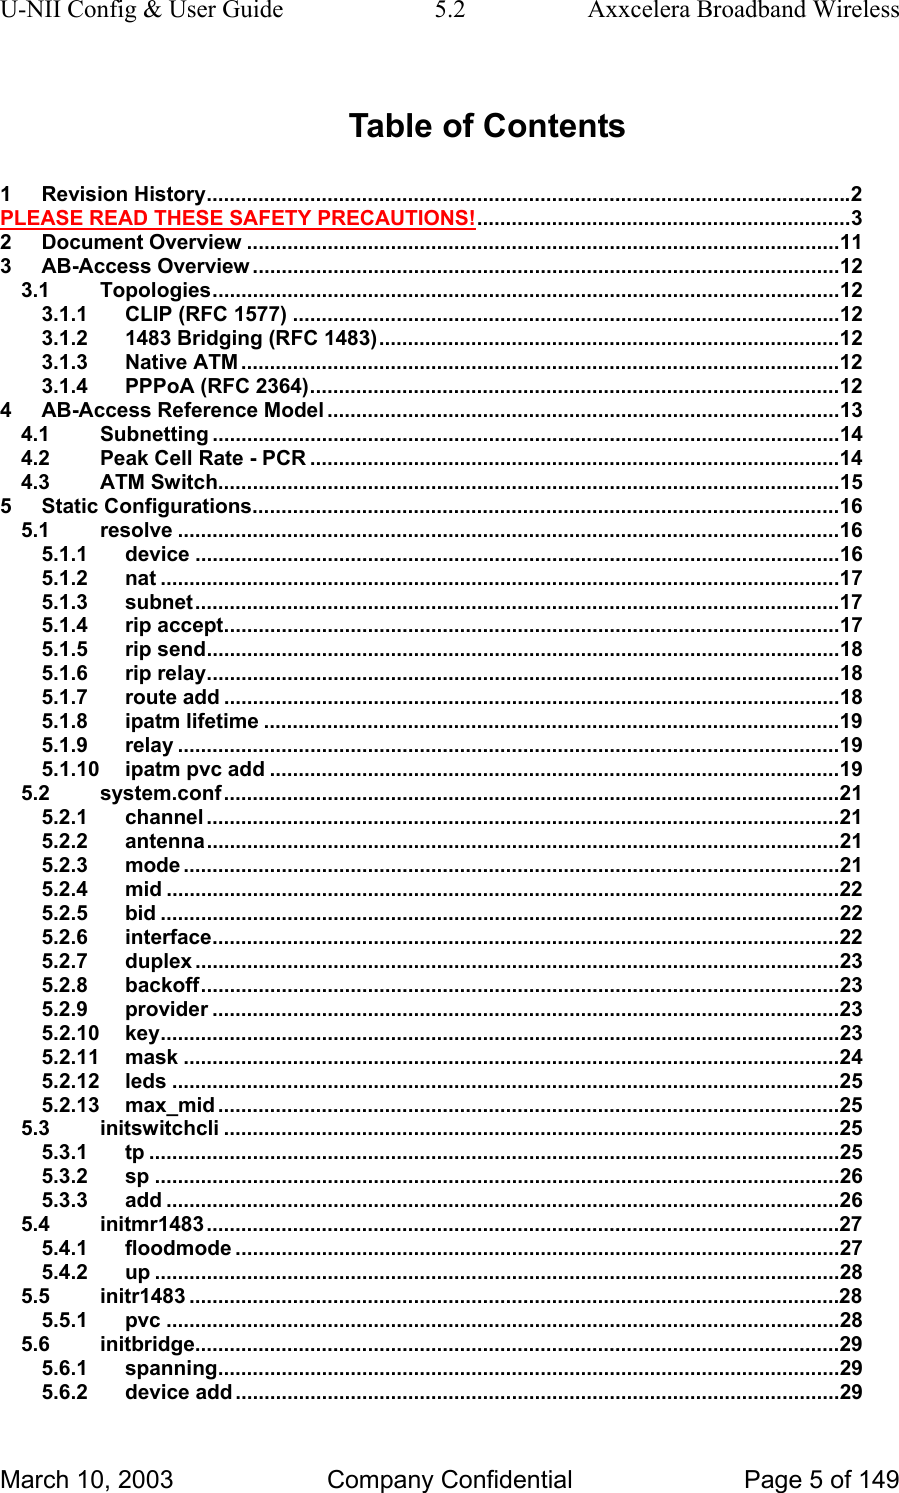
U-NII Config & User Guide  5.2  Axxcelera Broadband Wireless Table of Contents 1 Revision History................................................................................................................2 PLEASE READ THESE SAFETY PRECAUTIONS!.................................................................3 2 Document Overview .......................................................................................................11 3 AB-Access Overview ......................................................................................................12 3.1 Topologies.............................................................................................................12 3.1.1 CLIP (RFC 1577) ...............................................................................................12 3.1.2 1483 Bridging (RFC 1483)................................................................................12 3.1.3 Native ATM ........................................................................................................12 3.1.4 PPPoA (RFC 2364)............................................................................................12 4 AB-Access Reference Model .........................................................................................13 4.1 Subnetting .............................................................................................................14 4.2 Peak Cell Rate - PCR ............................................................................................14 4.3 ATM Switch............................................................................................................15 5 Static Configurations......................................................................................................16 5.1 resolve ...................................................................................................................16 5.1.1 device ................................................................................................................16 5.1.2 nat ......................................................................................................................17 5.1.3 subnet................................................................................................................17 5.1.4 rip accept...........................................................................................................17 5.1.5 rip send..............................................................................................................18 5.1.6 rip relay..............................................................................................................18 5.1.7 route add ...........................................................................................................18 5.1.8 ipatm lifetime ....................................................................................................19 5.1.9 relay ...................................................................................................................19 5.1.10 ipatm pvc add ...................................................................................................19 5.2 system.conf...........................................................................................................21 5.2.1 channel ..............................................................................................................21 5.2.2 antenna..............................................................................................................21 5.2.3 mode ..................................................................................................................21 5.2.4 mid .....................................................................................................................22 5.2.5 bid ......................................................................................................................22 5.2.6 interface.............................................................................................................22 5.2.7 duplex ................................................................................................................23 5.2.8 backoff...............................................................................................................23 5.2.9 provider .............................................................................................................23 5.2.10 key......................................................................................................................23 5.2.11 mask ..................................................................................................................24 5.2.12 leds ....................................................................................................................25 5.2.13 max_mid ............................................................................................................25 5.3 initswitchcli ...........................................................................................................25 5.3.1 tp ........................................................................................................................25 5.3.2 sp .......................................................................................................................26 5.3.3 add .....................................................................................................................26 5.4 initmr1483..............................................................................................................27 5.4.1 floodmode .........................................................................................................27 5.4.2 up .......................................................................................................................28 5.5 initr1483 .................................................................................................................28 5.5.1 pvc .....................................................................................................................28 5.6 initbridge................................................................................................................29 5.6.1 spanning............................................................................................................29 5.6.2 device add .........................................................................................................29 March 10, 2003  Company Confidential  Page 5 of 149
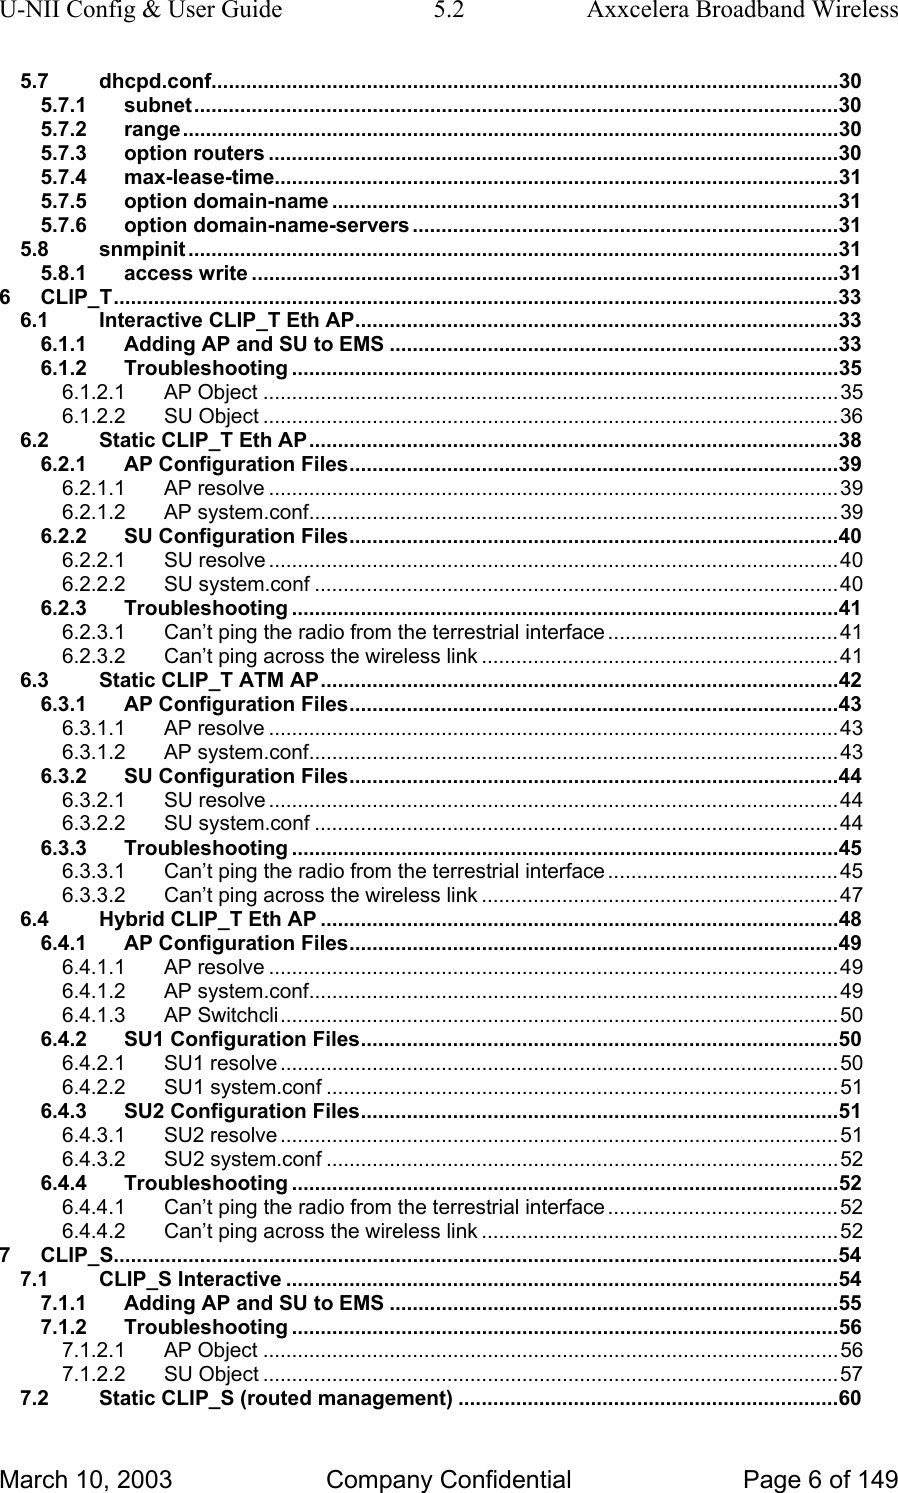
U-NII Config & User Guide  5.2  Axxcelera Broadband Wireless 5.7 dhcpd.conf.............................................................................................................30 5.7.1 subnet................................................................................................................30 5.7.2 range..................................................................................................................30 5.7.3 option routers ...................................................................................................30 5.7.4 max-lease-time..................................................................................................31 5.7.5 option domain-name ........................................................................................31 5.7.6 option domain-name-servers ..........................................................................31 5.8 snmpinit .................................................................................................................31 5.8.1 access write ......................................................................................................31 6 CLIP_T..............................................................................................................................33 6.1 Interactive CLIP_T Eth AP....................................................................................33 6.1.1 Adding AP and SU to EMS ..............................................................................33 6.1.2 Troubleshooting ...............................................................................................35 6.1.2.1 AP Object ....................................................................................................35 6.1.2.2 SU Object ....................................................................................................36 6.2 Static CLIP_T Eth AP............................................................................................38 6.2.1 AP Configuration Files.....................................................................................39 6.2.1.1 AP resolve ...................................................................................................39 6.2.1.2 AP system.conf............................................................................................39 6.2.2 SU Configuration Files.....................................................................................40 6.2.2.1 SU resolve ...................................................................................................40 6.2.2.2 SU system.conf ...........................................................................................40 6.2.3 Troubleshooting ...............................................................................................41 6.2.3.1 Can’t ping the radio from the terrestrial interface ........................................41 6.2.3.2 Can’t ping across the wireless link ..............................................................41 6.3 Static CLIP_T ATM AP..........................................................................................42 6.3.1 AP Configuration Files.....................................................................................43 6.3.1.1 AP resolve ...................................................................................................43 6.3.1.2 AP system.conf............................................................................................43 6.3.2 SU Configuration Files.....................................................................................44 6.3.2.1 SU resolve ...................................................................................................44 6.3.2.2 SU system.conf ...........................................................................................44 6.3.3 Troubleshooting ...............................................................................................45 6.3.3.1 Can’t ping the radio from the terrestrial interface ........................................45 6.3.3.2 Can’t ping across the wireless link ..............................................................47 6.4 Hybrid CLIP_T Eth AP ..........................................................................................48 6.4.1 AP Configuration Files.....................................................................................49 6.4.1.1 AP resolve ...................................................................................................49 6.4.1.2 AP system.conf............................................................................................49 6.4.1.3 AP Switchcli.................................................................................................50 6.4.2 SU1 Configuration Files...................................................................................50 6.4.2.1 SU1 resolve .................................................................................................50 6.4.2.2 SU1 system.conf .........................................................................................51 6.4.3 SU2 Configuration Files...................................................................................51 6.4.3.1 SU2 resolve .................................................................................................51 6.4.3.2 SU2 system.conf .........................................................................................52 6.4.4 Troubleshooting ...............................................................................................52 6.4.4.1 Can’t ping the radio from the terrestrial interface ........................................52 6.4.4.2 Can’t ping across the wireless link ..............................................................52 7 CLIP_S..............................................................................................................................54 7.1 CLIP_S Interactive ................................................................................................54 7.1.1 Adding AP and SU to EMS ..............................................................................55 7.1.2 Troubleshooting ...............................................................................................56 7.1.2.1 AP Object ....................................................................................................56 7.1.2.2 SU Object ....................................................................................................57 7.2 Static CLIP_S (routed management) ..................................................................60 March 10, 2003  Company Confidential  Page 6 of 149
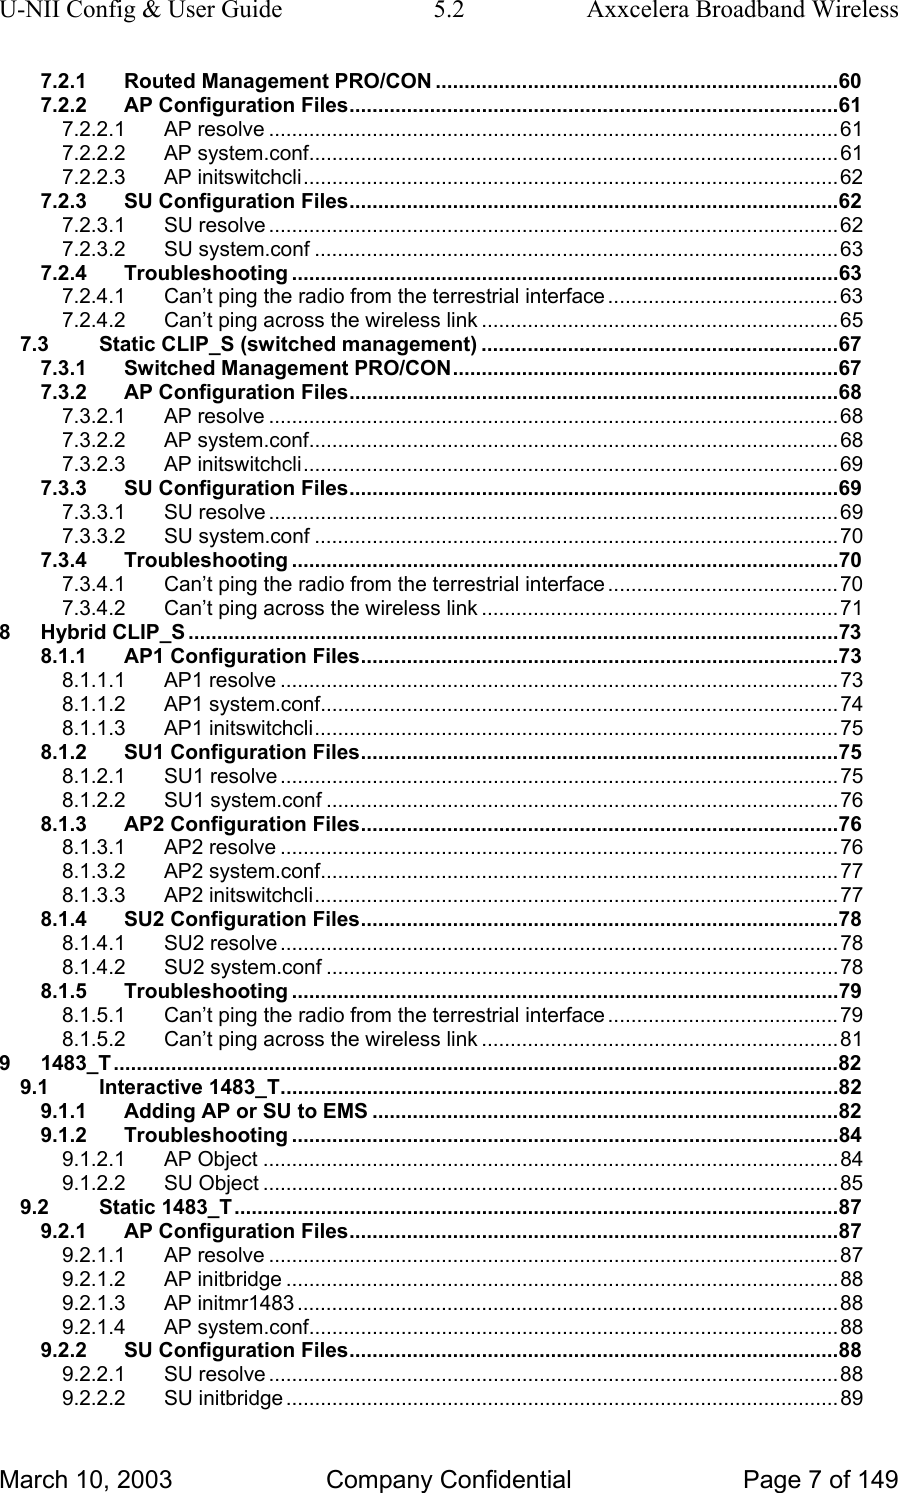
U-NII Config & User Guide  5.2  Axxcelera Broadband Wireless 7.2.1 Routed Management PRO/CON ......................................................................60 7.2.2 AP Configuration Files.....................................................................................61 7.2.2.1 AP resolve ...................................................................................................61 7.2.2.2 AP system.conf............................................................................................61 7.2.2.3 AP initswitchcli.............................................................................................62 7.2.3 SU Configuration Files.....................................................................................62 7.2.3.1 SU resolve ...................................................................................................62 7.2.3.2 SU system.conf ...........................................................................................63 7.2.4 Troubleshooting ...............................................................................................63 7.2.4.1 Can’t ping the radio from the terrestrial interface ........................................63 7.2.4.2 Can’t ping across the wireless link ..............................................................65 7.3 Static CLIP_S (switched management) ..............................................................67 7.3.1 Switched Management PRO/CON...................................................................67 7.3.2 AP Configuration Files.....................................................................................68 7.3.2.1 AP resolve ...................................................................................................68 7.3.2.2 AP system.conf............................................................................................68 7.3.2.3 AP initswitchcli.............................................................................................69 7.3.3 SU Configuration Files.....................................................................................69 7.3.3.1 SU resolve ...................................................................................................69 7.3.3.2 SU system.conf ...........................................................................................70 7.3.4 Troubleshooting ...............................................................................................70 7.3.4.1 Can’t ping the radio from the terrestrial interface ........................................70 7.3.4.2 Can’t ping across the wireless link ..............................................................71 8 Hybrid CLIP_S .................................................................................................................73 8.1.1 AP1 Configuration Files...................................................................................73 8.1.1.1 AP1 resolve .................................................................................................73 8.1.1.2 AP1 system.conf..........................................................................................74 8.1.1.3 AP1 initswitchcli...........................................................................................75 8.1.2 SU1 Configuration Files...................................................................................75 8.1.2.1 SU1 resolve .................................................................................................75 8.1.2.2 SU1 system.conf .........................................................................................76 8.1.3 AP2 Configuration Files...................................................................................76 8.1.3.1 AP2 resolve .................................................................................................76 8.1.3.2 AP2 system.conf..........................................................................................77 8.1.3.3 AP2 initswitchcli...........................................................................................77 8.1.4 SU2 Configuration Files...................................................................................78 8.1.4.1 SU2 resolve .................................................................................................78 8.1.4.2 SU2 system.conf .........................................................................................78 8.1.5 Troubleshooting ...............................................................................................79 8.1.5.1 Can’t ping the radio from the terrestrial interface ........................................79 8.1.5.2 Can’t ping across the wireless link ..............................................................81 9 1483_T..............................................................................................................................82 9.1 Interactive 1483_T.................................................................................................82 9.1.1 Adding AP or SU to EMS .................................................................................82 9.1.2 Troubleshooting ...............................................................................................84 9.1.2.1 AP Object ....................................................................................................84 9.1.2.2 SU Object ....................................................................................................85 9.2 Static 1483_T.........................................................................................................87 9.2.1 AP Configuration Files.....................................................................................87 9.2.1.1 AP resolve ...................................................................................................87 9.2.1.2 AP initbridge ................................................................................................88 9.2.1.3 AP initmr1483 ..............................................................................................88 9.2.1.4 AP system.conf............................................................................................88 9.2.2 SU Configuration Files.....................................................................................88 9.2.2.1 SU resolve ...................................................................................................88 9.2.2.2 SU initbridge ................................................................................................89 March 10, 2003  Company Confidential  Page 7 of 149
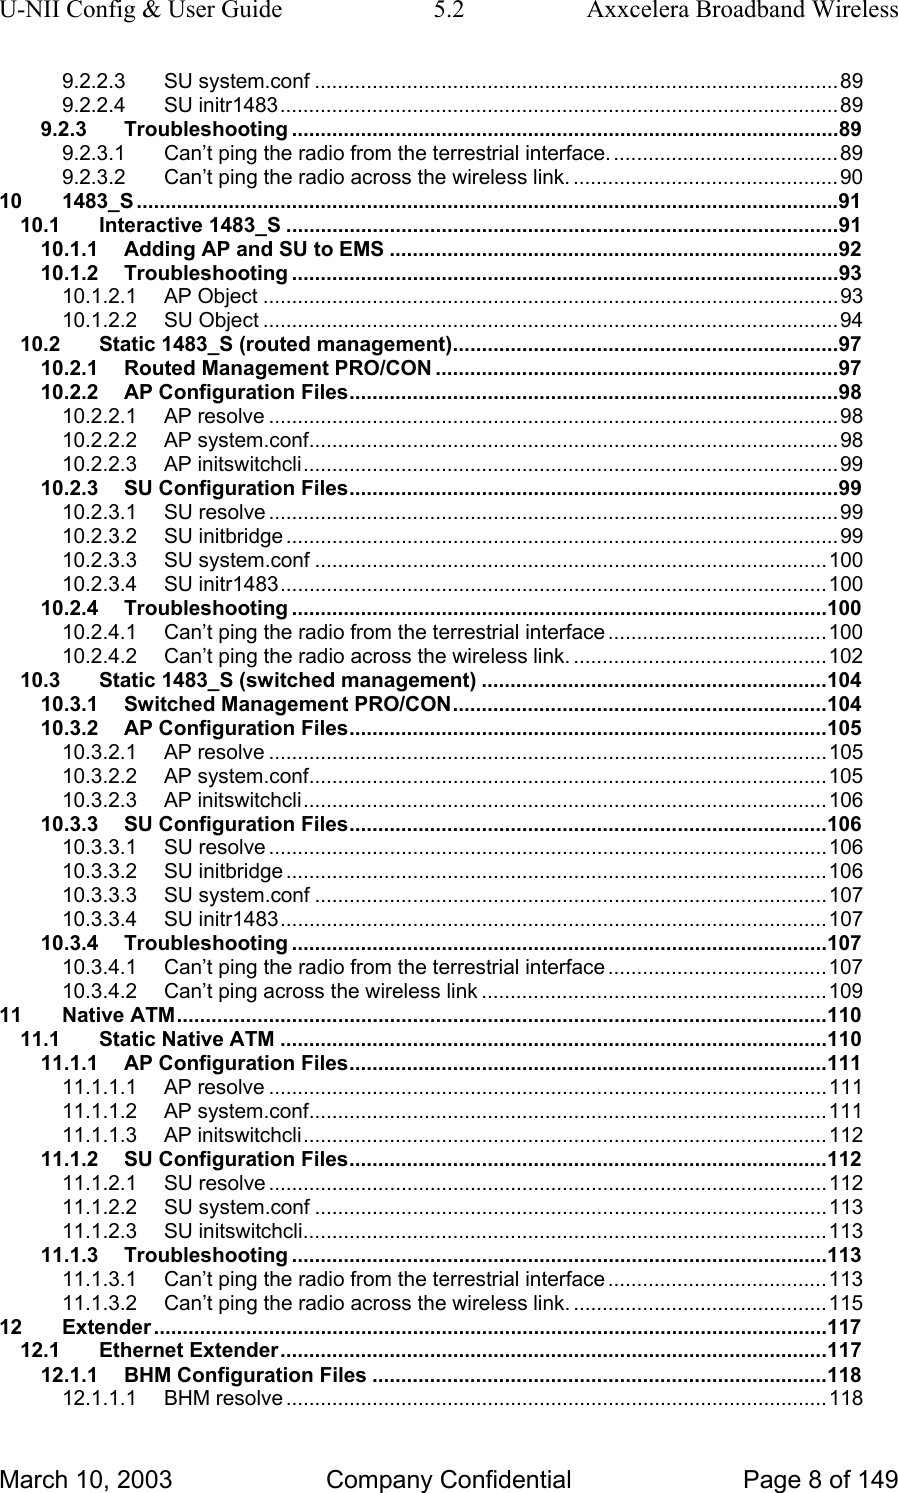
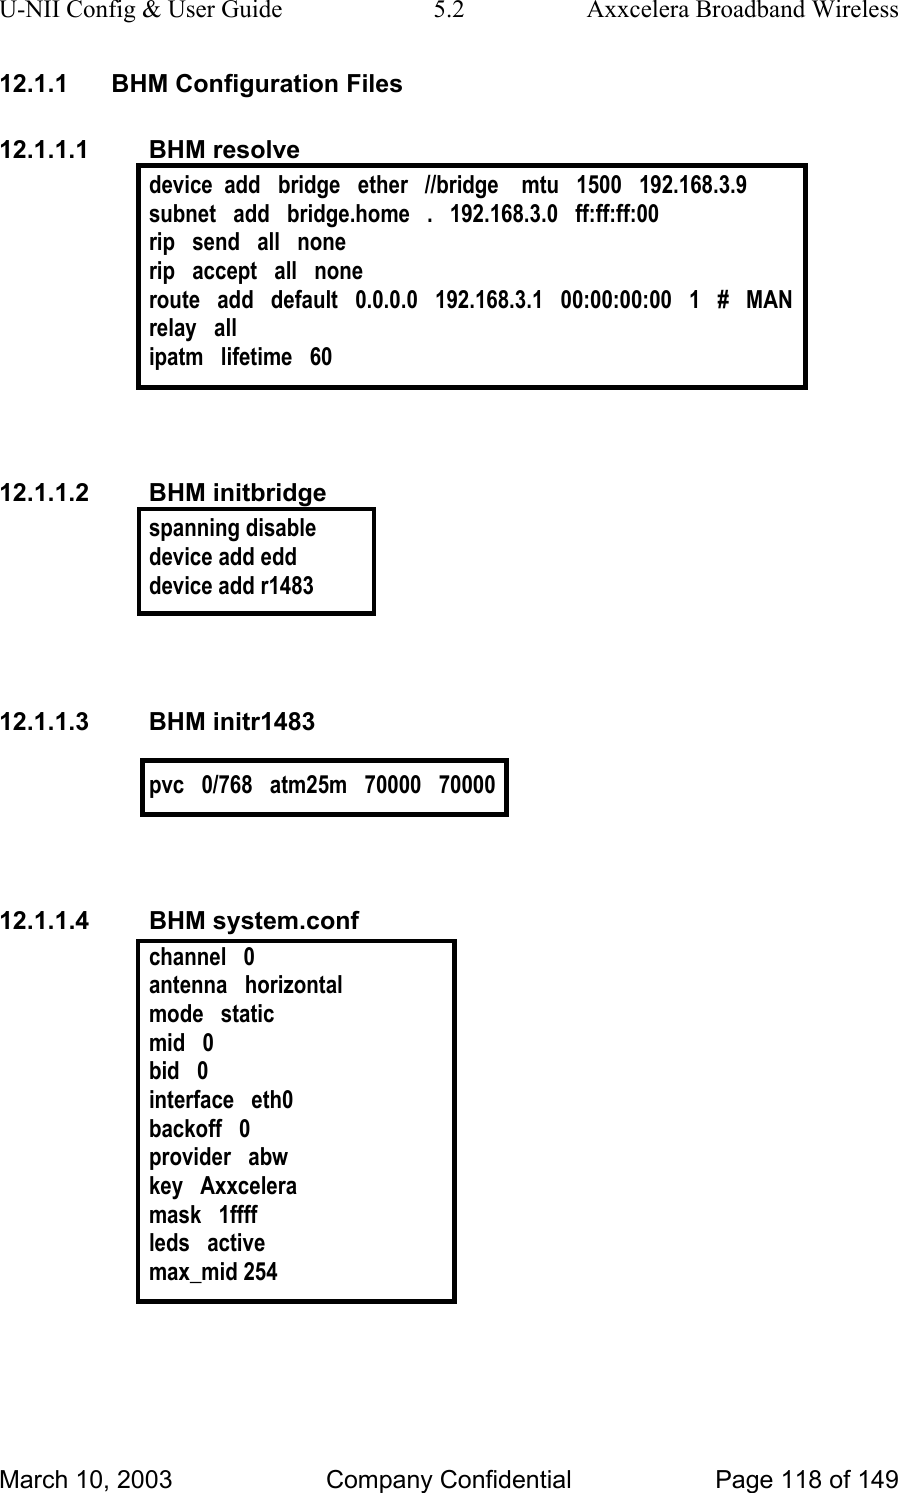
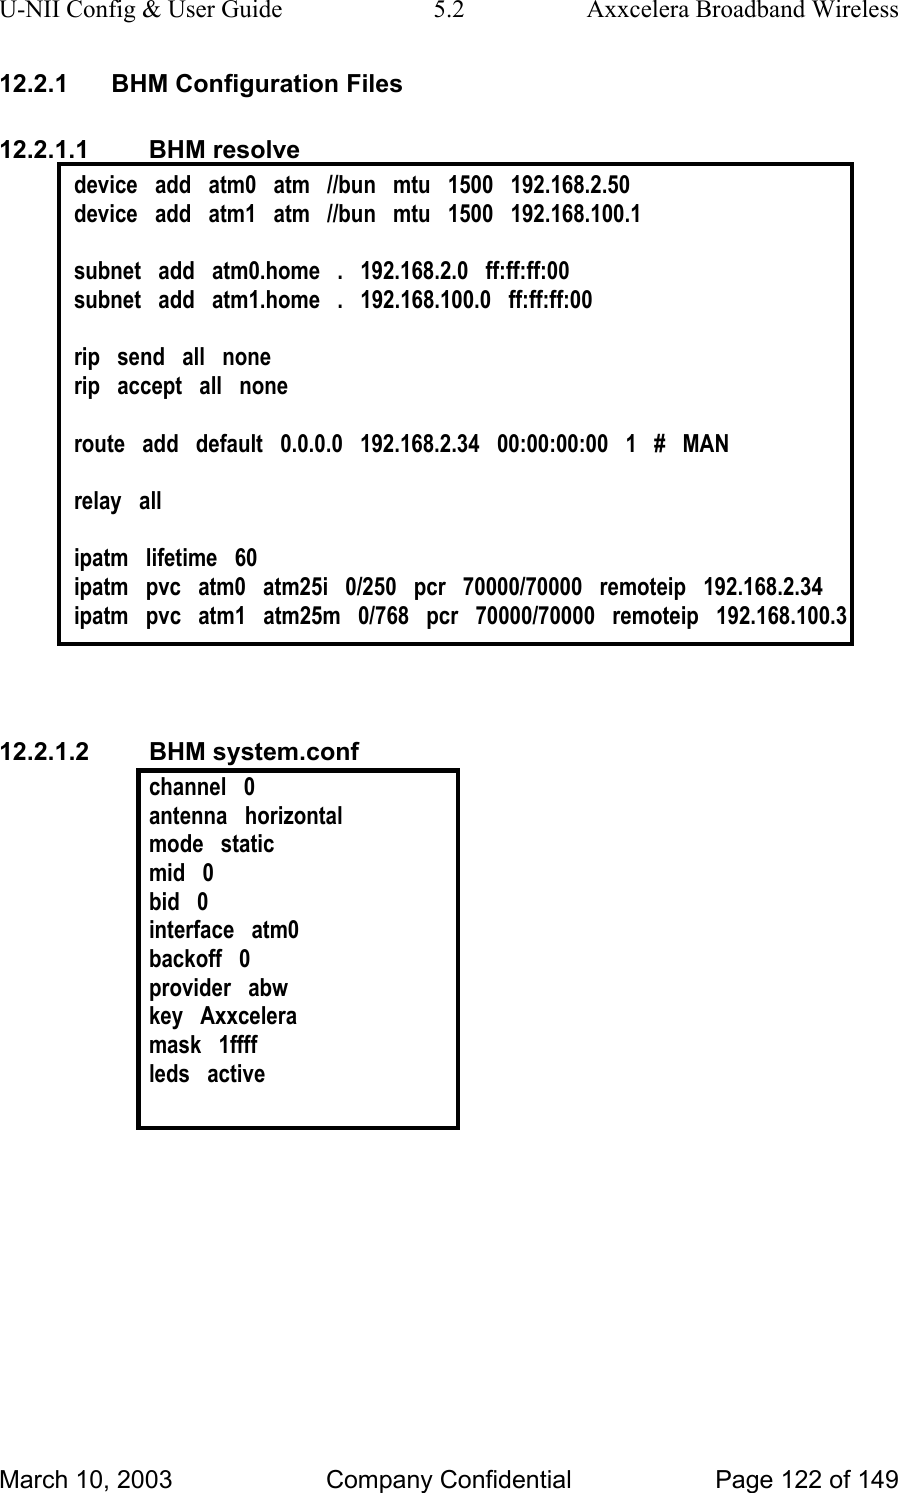
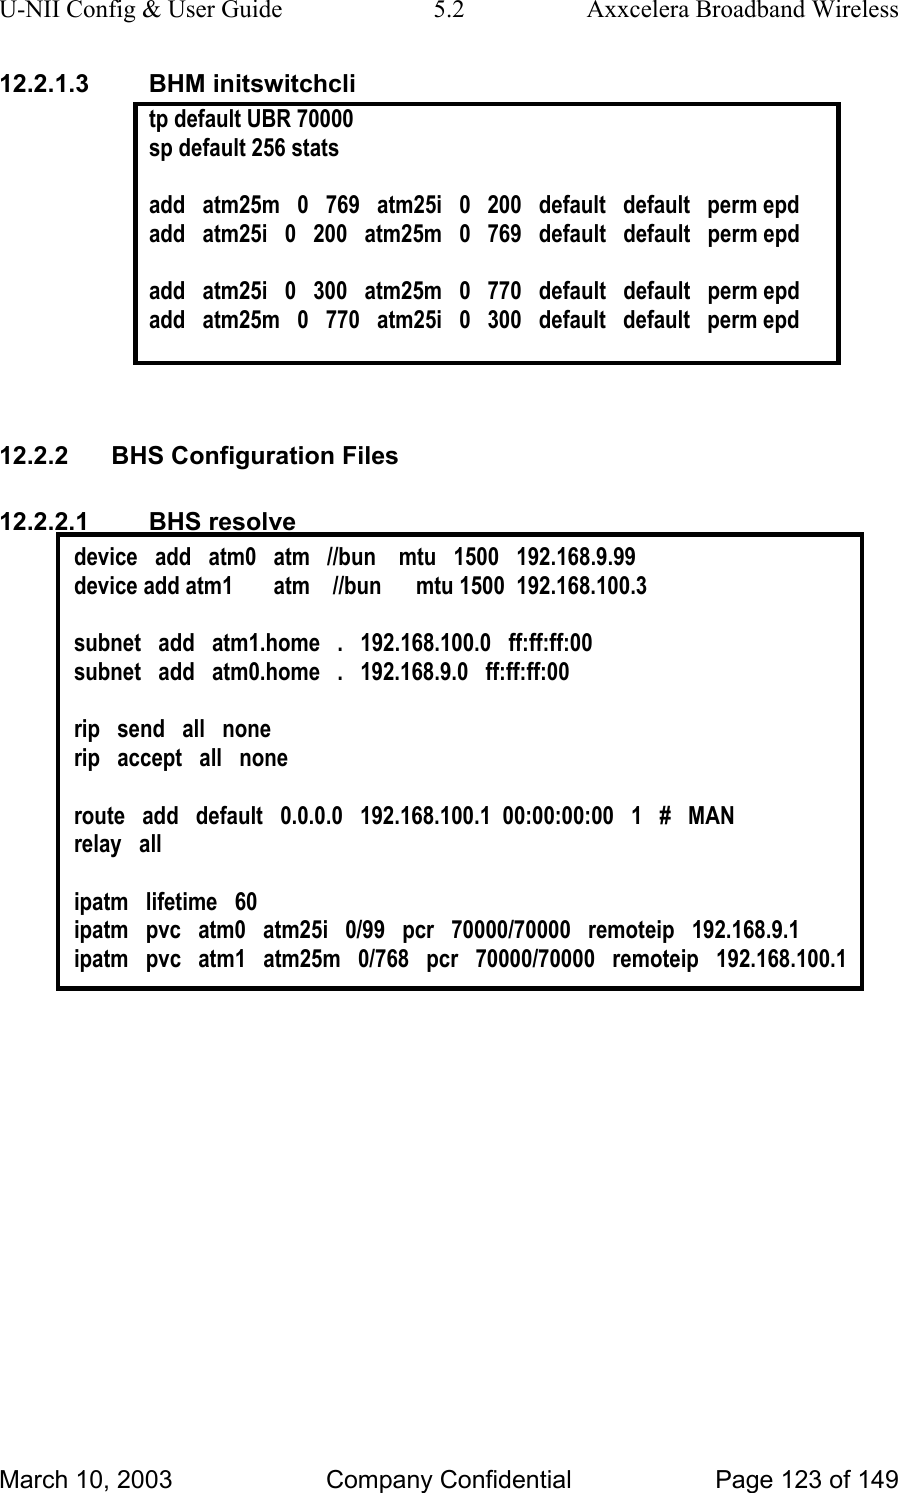
U-NII Config & User Guide  5.2  Axxcelera Broadband Wireless 9.2.2.3 SU system.conf ...........................................................................................89 9.2.2.4 SU initr1483.................................................................................................89 9.2.3 Troubleshooting ...............................................................................................89 9.2.3.1 Can’t ping the radio from the terrestrial interface. .......................................89 9.2.3.2 Can’t ping the radio across the wireless link. ..............................................90 10 1483_S ..........................................................................................................................91 10.1 Interactive 1483_S ................................................................................................91 10.1.1 Adding AP and SU to EMS ..............................................................................92 10.1.2 Troubleshooting ...............................................................................................93 10.1.2.1 AP Object ....................................................................................................93 10.1.2.2 SU Object ....................................................................................................94 10.2 Static 1483_S (routed management)...................................................................97 10.2.1 Routed Management PRO/CON ......................................................................97 10.2.2 AP Configuration Files.....................................................................................98 10.2.2.1 AP resolve ...................................................................................................98 10.2.2.2 AP system.conf............................................................................................98 10.2.2.3 AP initswitchcli.............................................................................................99 10.2.3 SU Configuration Files.....................................................................................99 10.2.3.1 SU resolve ...................................................................................................99 10.2.3.2 SU initbridge ................................................................................................99 10.2.3.3 SU system.conf .........................................................................................100 10.2.3.4 SU initr1483...............................................................................................100 10.2.4 Troubleshooting .............................................................................................100 10.2.4.1 Can’t ping the radio from the terrestrial interface ......................................100 10.2.4.2 Can’t ping the radio across the wireless link. ............................................102 10.3 Static 1483_S (switched management) ............................................................104 10.3.1 Switched Management PRO/CON.................................................................104 10.3.2 AP Configuration Files...................................................................................105 10.3.2.1 AP resolve .................................................................................................105 10.3.2.2 AP system.conf..........................................................................................105 10.3.2.3 AP initswitchcli...........................................................................................106 10.3.3 SU Configuration Files...................................................................................106 10.3.3.1 SU resolve .................................................................................................106 10.3.3.2 SU initbridge ..............................................................................................106 10.3.3.3 SU system.conf .........................................................................................107 10.3.3.4 SU initr1483...............................................................................................107 10.3.4 Troubleshooting .............................................................................................107 10.3.4.1 Can’t ping the radio from the terrestrial interface ......................................107 10.3.4.2 Can’t ping across the wireless link ............................................................109 11 Native ATM.................................................................................................................110 11.1 Static Native ATM ...............................................................................................110 11.1.1 AP Configuration Files...................................................................................111 11.1.1.1 AP resolve .................................................................................................111 11.1.1.2 AP system.conf..........................................................................................111 11.1.1.3 AP initswitchcli...........................................................................................112 11.1.2 SU Configuration Files...................................................................................112 11.1.2.1 SU resolve .................................................................................................112 11.1.2.2 SU system.conf .........................................................................................113 11.1.2.3 SU initswitchcli...........................................................................................113 11.1.3 Troubleshooting .............................................................................................113 11.1.3.1 Can’t ping the radio from the terrestrial interface ......................................113 11.1.3.2 Can’t ping the radio across the wireless link. ............................................115 12 Extender .....................................................................................................................117 12.1 Ethernet Extender...............................................................................................117 12.1.1 BHM Configuration Files ...............................................................................118 12.1.1.1 BHM resolve ..............................................................................................118 March 10, 2003  Company Confidential  Page 8 of 149
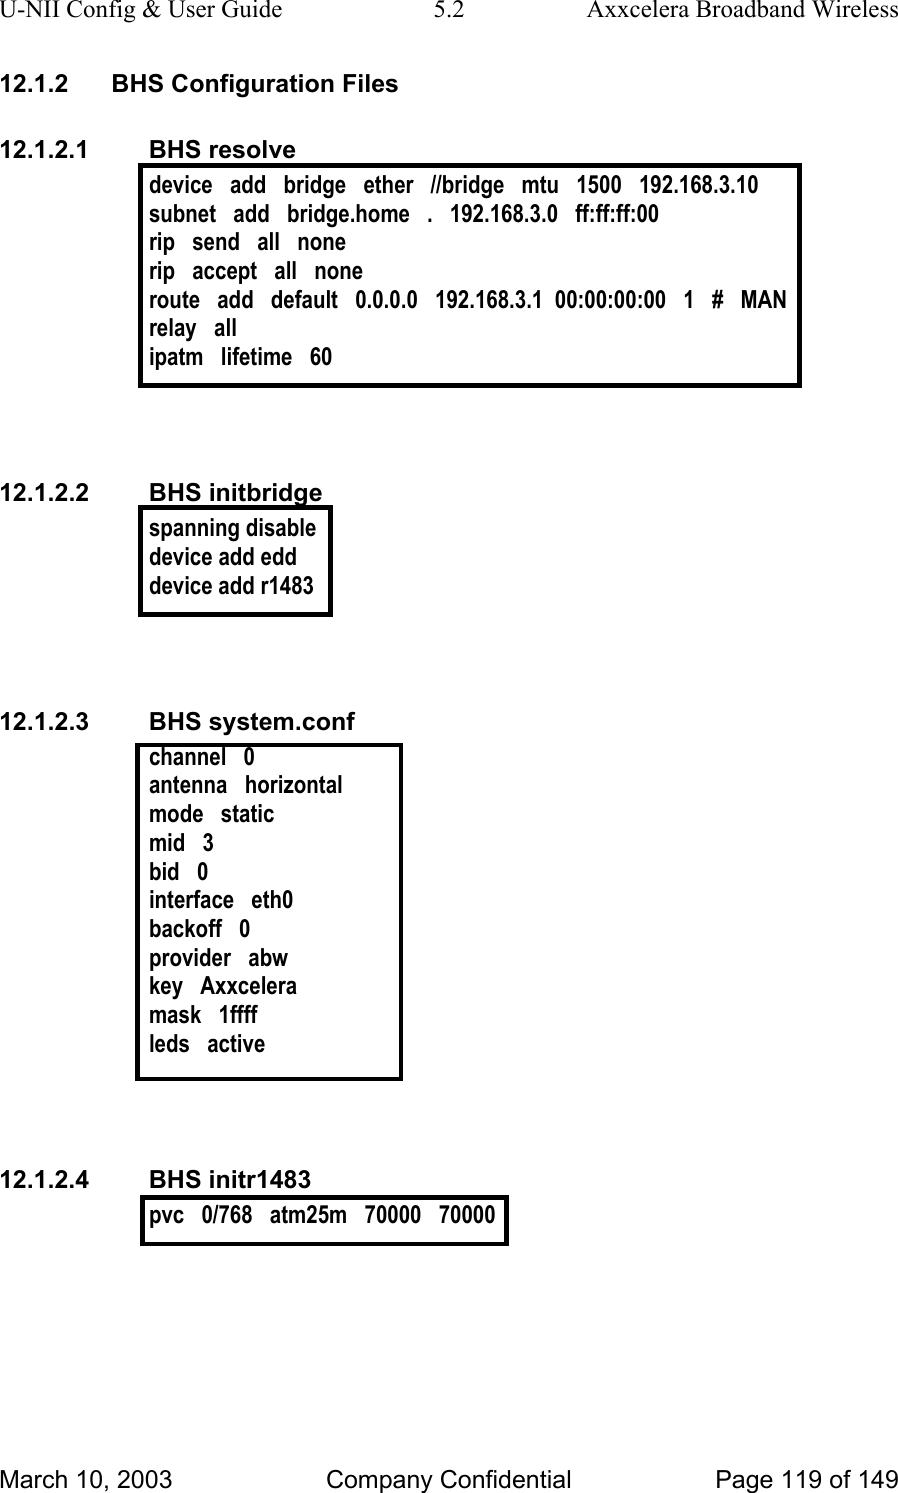
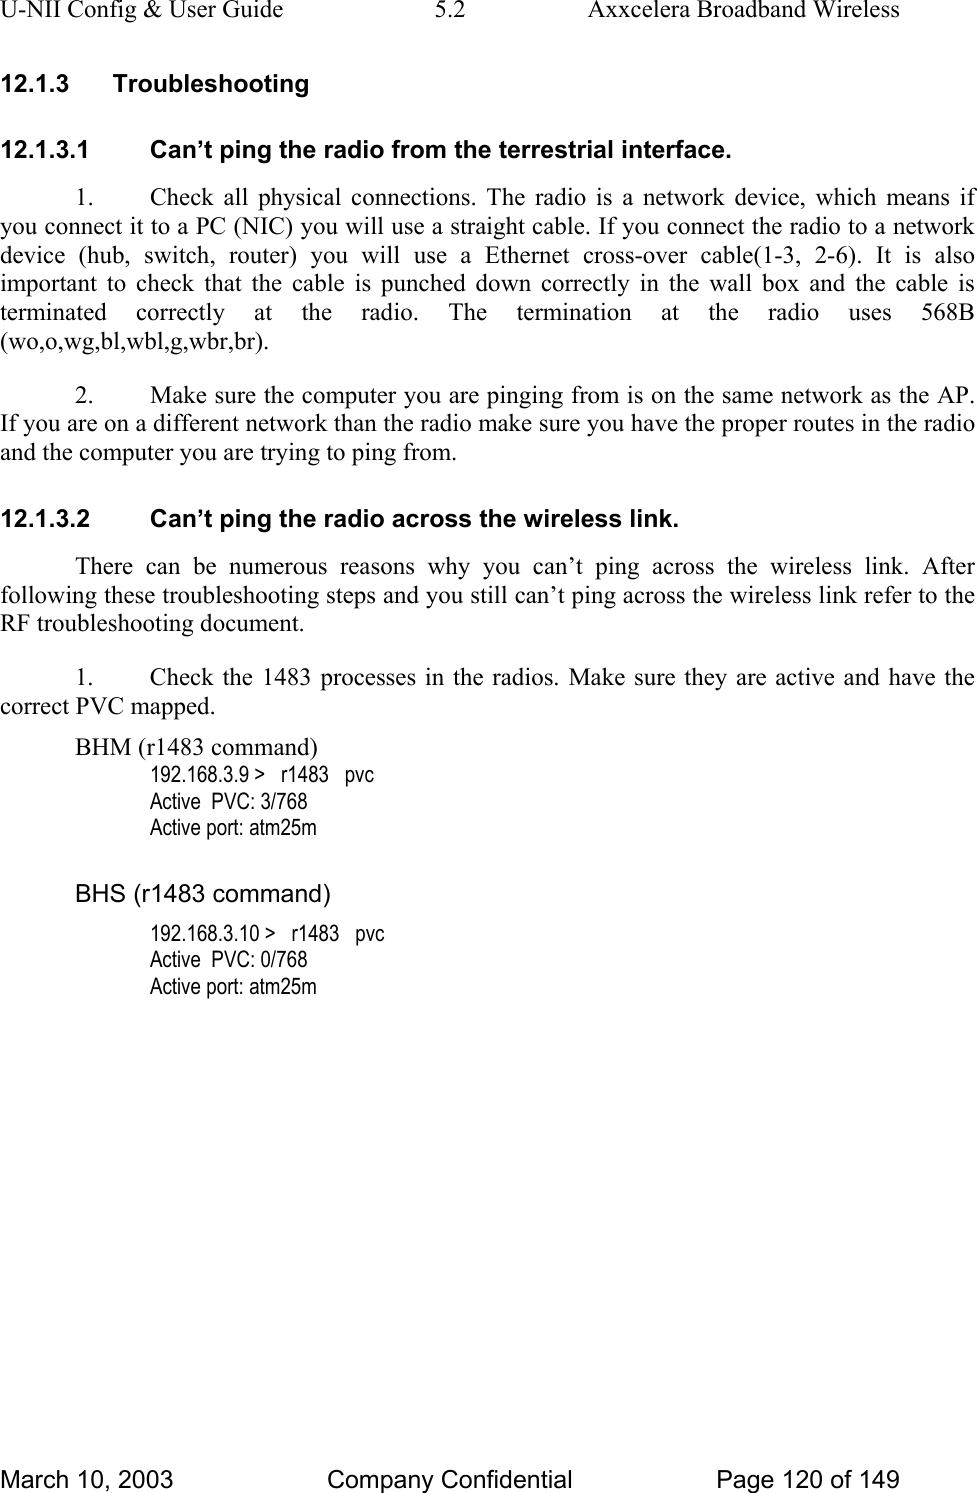
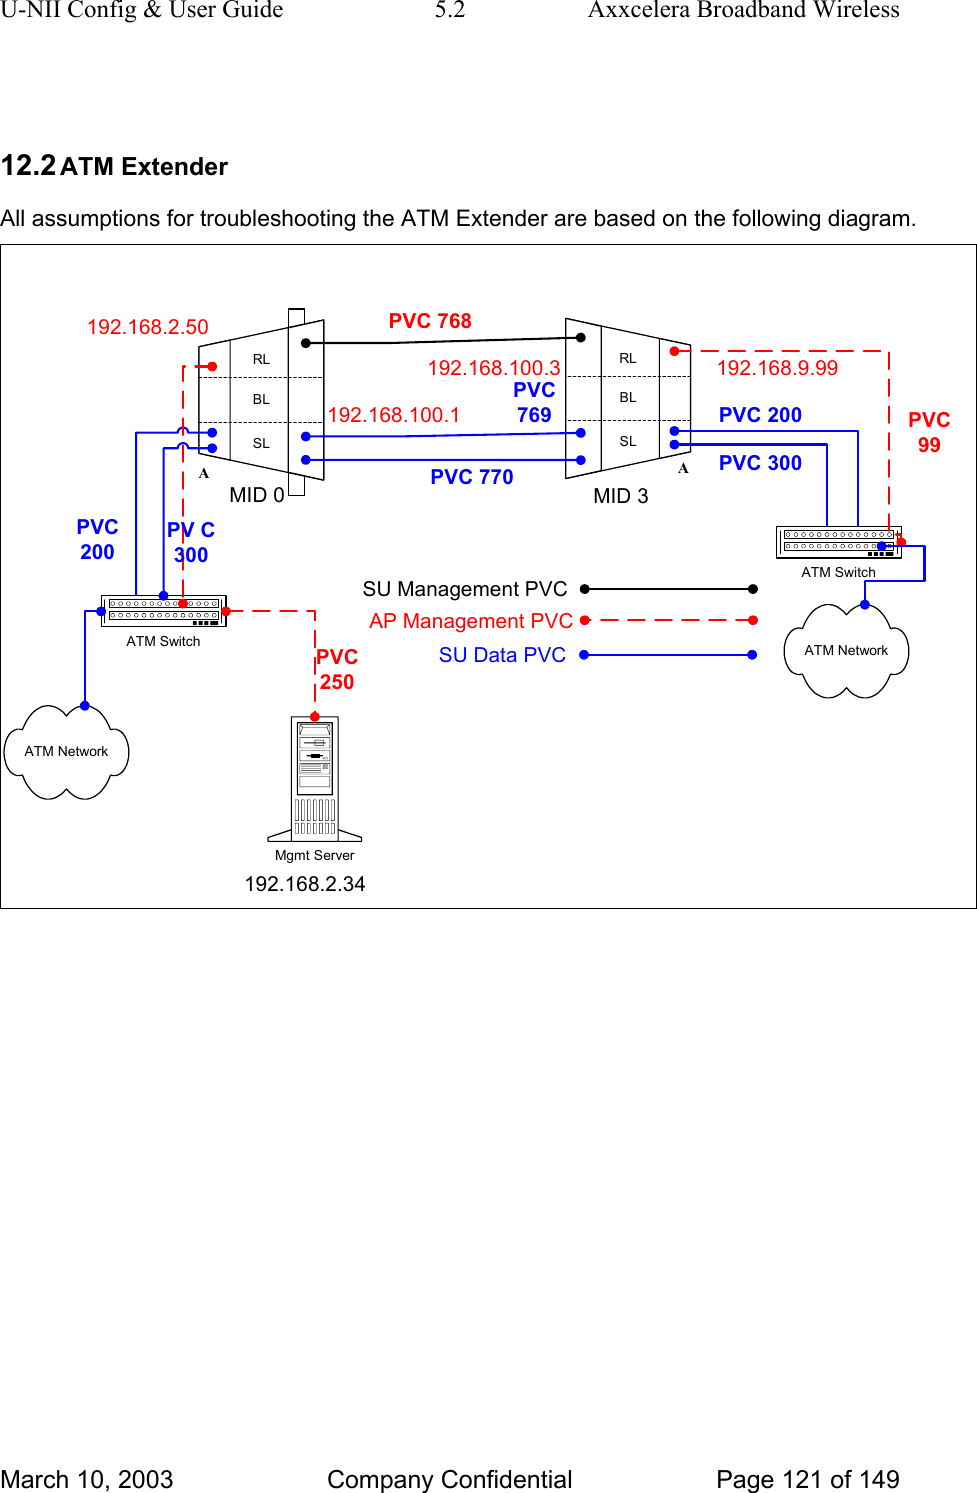
U-NII Config & User Guide  5.2  Axxcelera Broadband Wireless 12.1.1.2 BHM initbridge ...........................................................................................118 12.1.1.3 BHM initr1483............................................................................................118 12.1.1.4 BHM system.conf ......................................................................................118 12.1.2 BHS Configuration Files ................................................................................119 12.1.2.1 BHS resolve...............................................................................................119 12.1.2.2 BHS initbridge............................................................................................119 12.1.2.3 BHS system.conf.......................................................................................119 12.1.2.4 BHS initr1483 ............................................................................................119 12.1.3 Troubleshooting .............................................................................................120 12.1.3.1 Can’t ping the radio from the terrestrial interface. .....................................120 12.1.3.2 Can’t ping the radio across the wireless link. ............................................120 12.2 ATM Extender......................................................................................................121 12.2.1 BHM Configuration Files ...............................................................................122 12.2.1.1 BHM resolve ..............................................................................................122 12.2.1.2 BHM system.conf ......................................................................................122 12.2.1.3 BHM initswitchcli........................................................................................123 12.2.2 BHS Configuration Files ................................................................................123 12.2.2.1 BHS resolve...............................................................................................123 12.2.2.2 BHS system.conf.......................................................................................124 12.2.2.3 BHS initswitchcli ........................................................................................124 12.2.3 Troubleshooting .............................................................................................124 12.2.3.1 Can’t ping the radio from the terrestrial interface ......................................124 12.2.3.2 Can’t ping the radio across the wireless link. ............................................126 13 RF Design and Planning...........................................................................................128 13.1 Overview ..............................................................................................................128 13.2 The U-NII & ISM Channel Plan ...........................................................................128 13.3 Air Interface.........................................................................................................128 13.4 Wireless MAC......................................................................................................128 13.4.1 Downstream burst..........................................................................................129 13.4.1.1 Access Point Turnaround Time (ATT).......................................................129 13.4.1.2 Frame Descriptor Header (FDHDR)..........................................................129 13.4.1.3 Reservation Grant (RG) ............................................................................129 13.4.1.4 Downstream Acknowledgement (DACK) ..................................................130 13.4.1.5 Downstream Data Cells (DCELL)..............................................................130 13.4.1.6 Subscriber Turnaround Time (STT) ..........................................................130 13.4.1.7 Reservation Request (RR) ........................................................................130 13.4.1.8 Upstream Acknowledgement (UACK).......................................................130 13.4.1.9 Upstream Cell (UCELL/UCELLR) .............................................................130 13.5 Delay Compensation ..........................................................................................130 13.6 RF Channels spacing and output power..........................................................132 13.7 TDD (Time Division Duplex)...............................................................................132 13.8 AP and SU Specifications..................................................................................133 13.8.1 AP/SU/Extender Functional Block Diagram ................................................133 13.8.2 Radio Specifications ......................................................................................134 13.8.3 Subscriber Unit Antenna ...............................................................................135 13.8.4 Access Point Antenna ...................................................................................136 13.8.5 Extender Antenna...........................................................................................137 13.9 Topology Types ..................................................................................................138 13.10 Interference Types..............................................................................................139 13.10.1 Type 1 Interference ....................................................................................140 13.10.2 Type 2 Interference ....................................................................................140 13.10.3 Type 3 Interference ....................................................................................141 13.10.4 Type 4 Interference ....................................................................................141 13.11 Recommended Channel Plans ..........................................................................142 13.11.1 Six-Sector, Three-Frequency Plan ...........................................................142 13.11.2 Six-Sector, Six-Frequency Plan................................................................143 March 10, 2003  Company Confidential  Page 9 of 149
U-NII Config & User Guide  5.2  Axxcelera Broadband Wireless 13.12 Antenna Spacing ................................................................................................143 14 SNMP ..........................................................................................................................145 15 Rupee .........................................................................................................................146 15.1 LINUX ...................................................................................................................146 15.2 DOS ......................................................................................................................146 15.3 Rupee Option Definitions...................................................................................147 16 RTFD (Return To Factory Default)...........................................................................148 16.1 RTFD IP Configurations .....................................................................................148 16.2 Recover................................................................................................................148 16.3 Procedure to restore the default configuration...............................................149 16.4 Disabling the RTFD Feature...............................................................................149  March 10, 2003  Company Confidential  Page 10 of 149
U-NII Config & User Guide  5.2  Axxcelera Broadband Wireless 2 Document Overview This document covers technical specifications and configuration information for the AB-Access system. It also covers some general troubleshooting steps to resolve issues that may occur while configuring or deploying the AB-Access system. This document should only be used as a reference for the 5.1.6 EMS and 5.1.5 or newer System Software. March 10, 2003  Company Confidential  Page 11 of 149
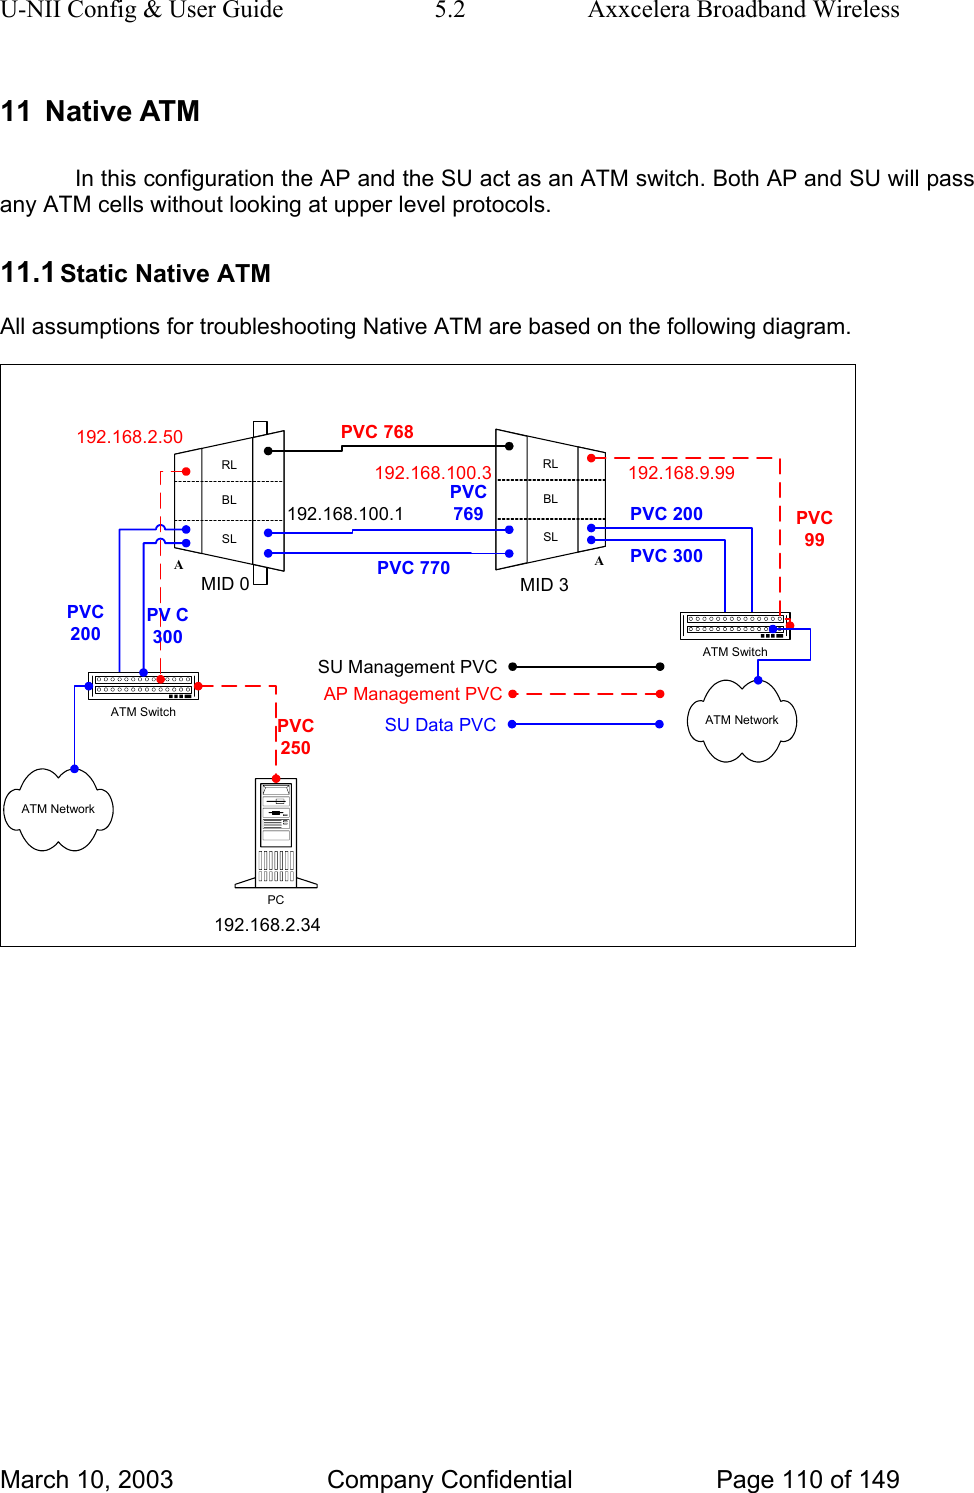
U-NII Config & User Guide  5.2  Axxcelera Broadband Wireless 3 AB-Access Overview 3.1  Topologies There are three topologies that are available with the AB-Access units CLIP, 1483 Bridging, and Native ATM. There are several configuration variations within these topologies but all will be referred by these names with an extension. 3.1.1  CLIP (RFC 1577) CLIP stands for Classical IP and is a routed topology. The AP or SU acts as a standard Layer 3 IP router, which means when data comes into the unit it analyzes the IP header and sends it out one of its interfaces based on the information in the header and its routing tables. It is important to note that only IP traffic can be passed over the units in this configuration. 3.1.2  1483 Bridging (RFC 1483) 1483 Bridging is a Layer 2 bridge, which will pass any valid Ethernet frame regardless of protocol. 1483 is also referred to as MPoA (Multi-protocol over ATM). The basic concept of how the bridge works is simple. It has two tables one for the terrestrial interface and one for the wireless interface. The terrestrial table stores all source MAC address it has learned from the terrestrial interface. It learns the MAC addresses by storing the source MAC address of any packet that has originated from a device on its terrestrial interface. If a packet is received that has a destination MAC address that is already in the table it will be discarded. The reason for this is if the destination MAC address is in the table it must mean that the device with that MAC address is on the terrestrial side of the radio. The wireless table works in the same manor except it learns the source MAC address of packets that have been received from the wireless interface. It is important to note that all broadcast packets will be sent over the link. It is also important to note that the implementation of 1483 bridging that the AB-Access system uses is LLC/SNAP encapsulation and we do not support the VC multiplexing implementation. 3.1.3 Native ATM Native ATM is a mode where both the AP and the SU act as an ATM switch. In this mode ATM cells are simply passed through the switching layer of the radio at layer 2. It is important to note that the AB-Access radio only supports PVC and not SVC.  3.1.4  PPPoA (RFC 2364) PPPoA is no longer supported. March 10, 2003  Company Confidential  Page 12 of 149
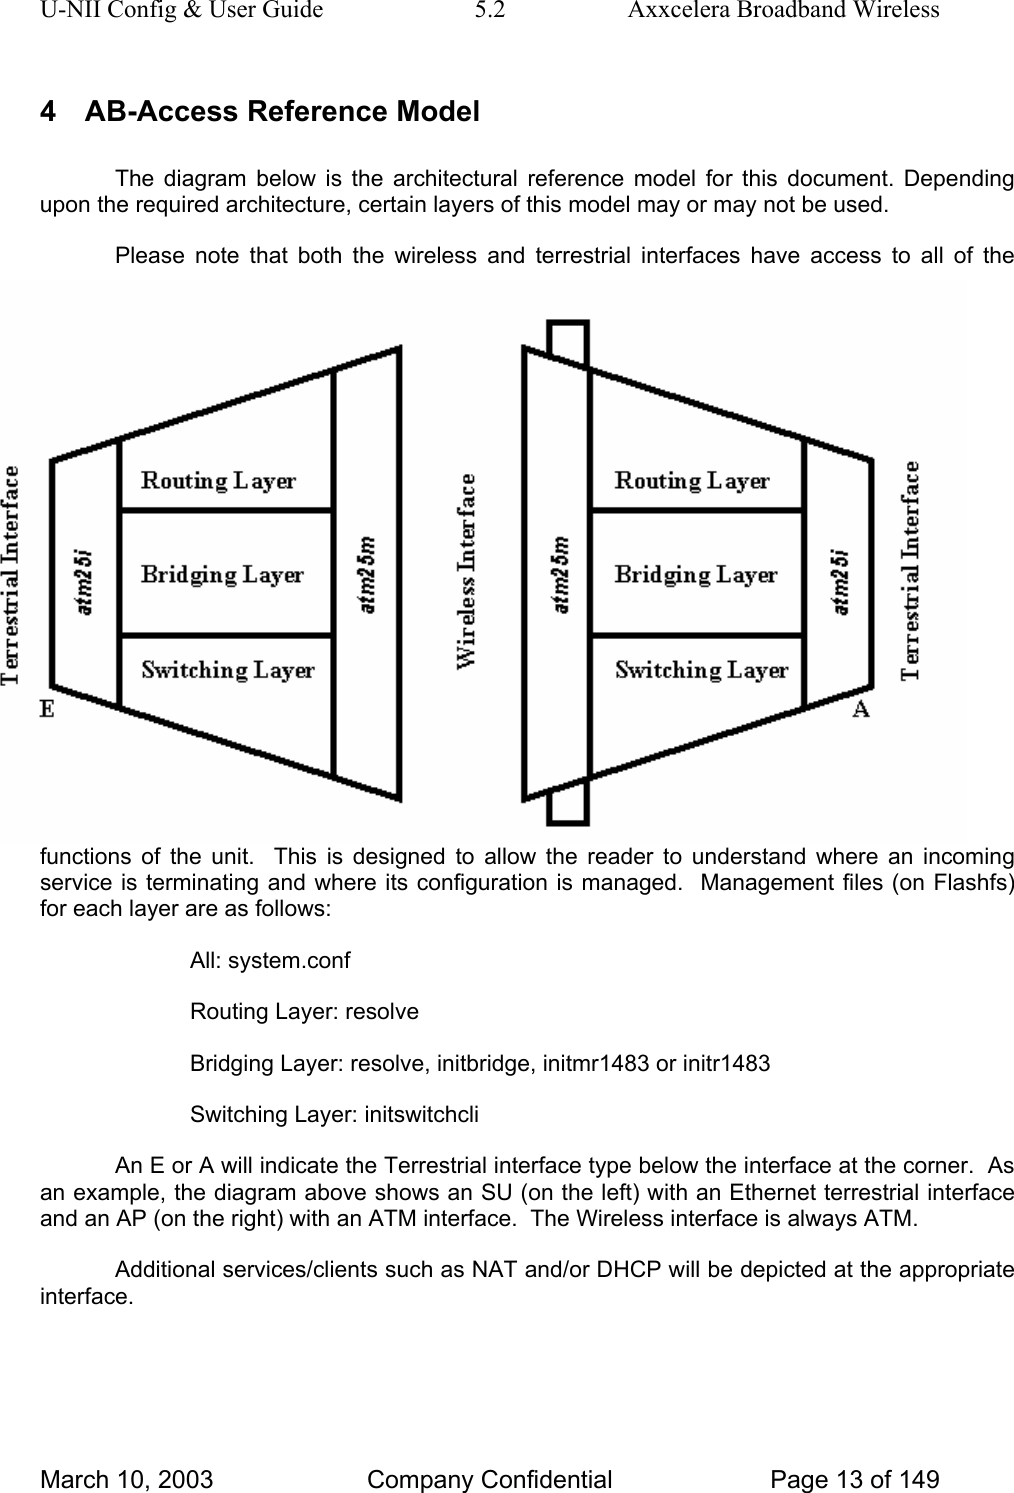
U-NII Config & User Guide  5.2  Axxcelera Broadband Wireless 4  AB-Access Reference Model The diagram below is the architectural reference model for this document. Depending upon the required architecture, certain layers of this model may or may not be used.  Please note that both the wireless and terrestrial interfaces have access to all of the functions of the unit.  This is designed to allow the reader to understand where an incoming service is terminating and where its configuration is managed.  Management files (on Flashfs) for each layer are as follows: All: system.conf Routing Layer: resolve Bridging Layer: resolve, initbridge, initmr1483 or initr1483 Switching Layer: initswitchcli An E or A will indicate the Terrestrial interface type below the interface at the corner.  As an example, the diagram above shows an SU (on the left) with an Ethernet terrestrial interface and an AP (on the right) with an ATM interface.  The Wireless interface is always ATM. Additional services/clients such as NAT and/or DHCP will be depicted at the appropriate interface.   March 10, 2003  Company Confidential  Page 13 of 149
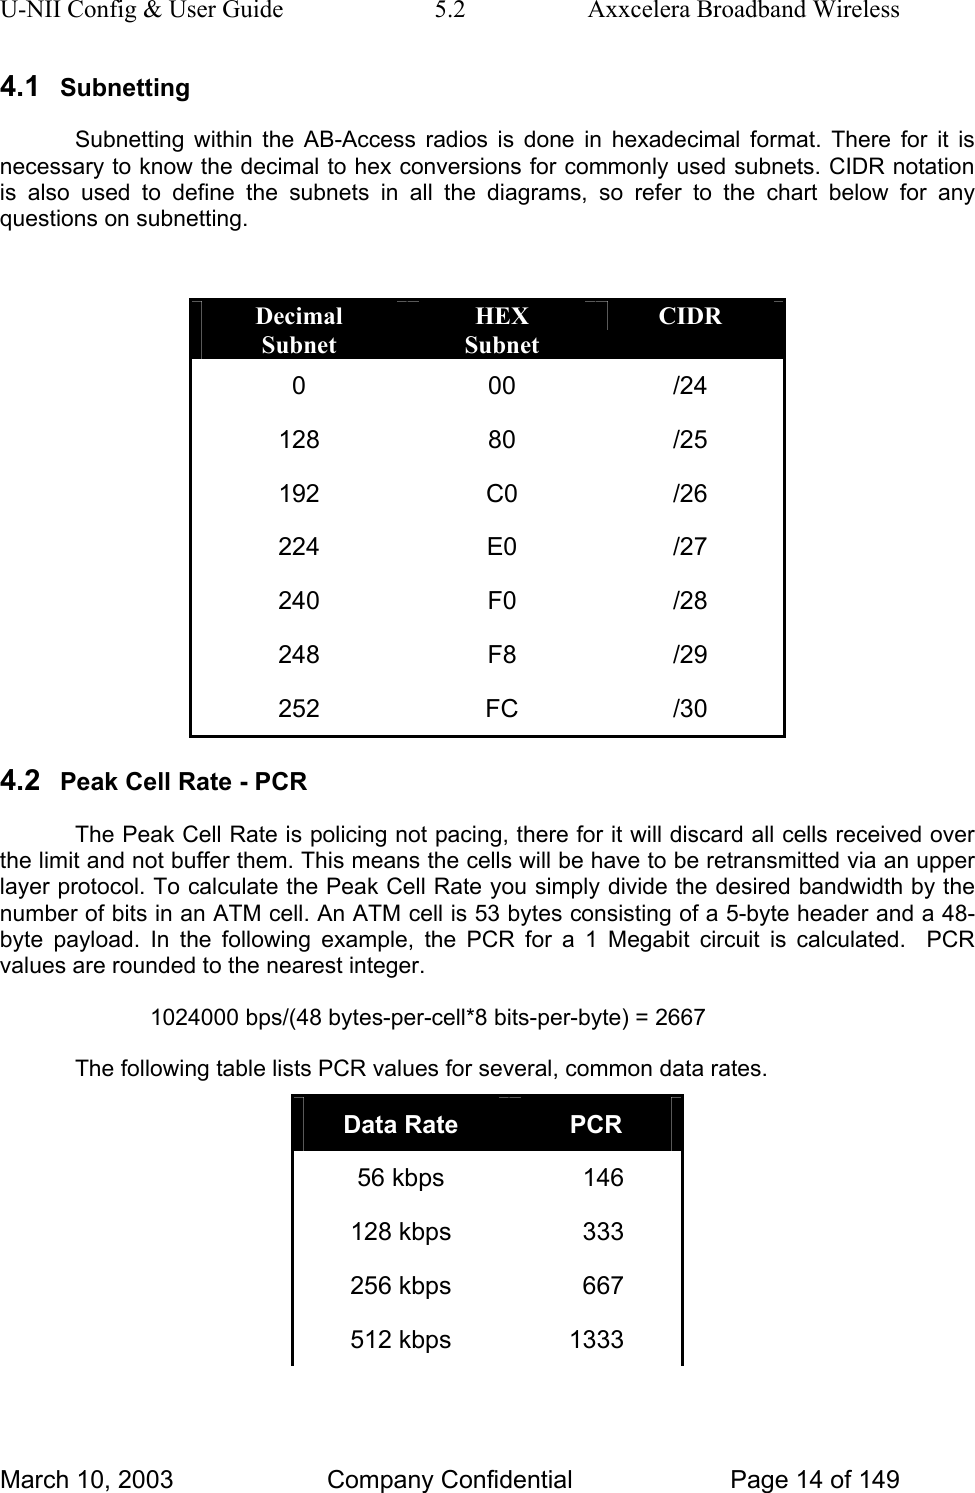
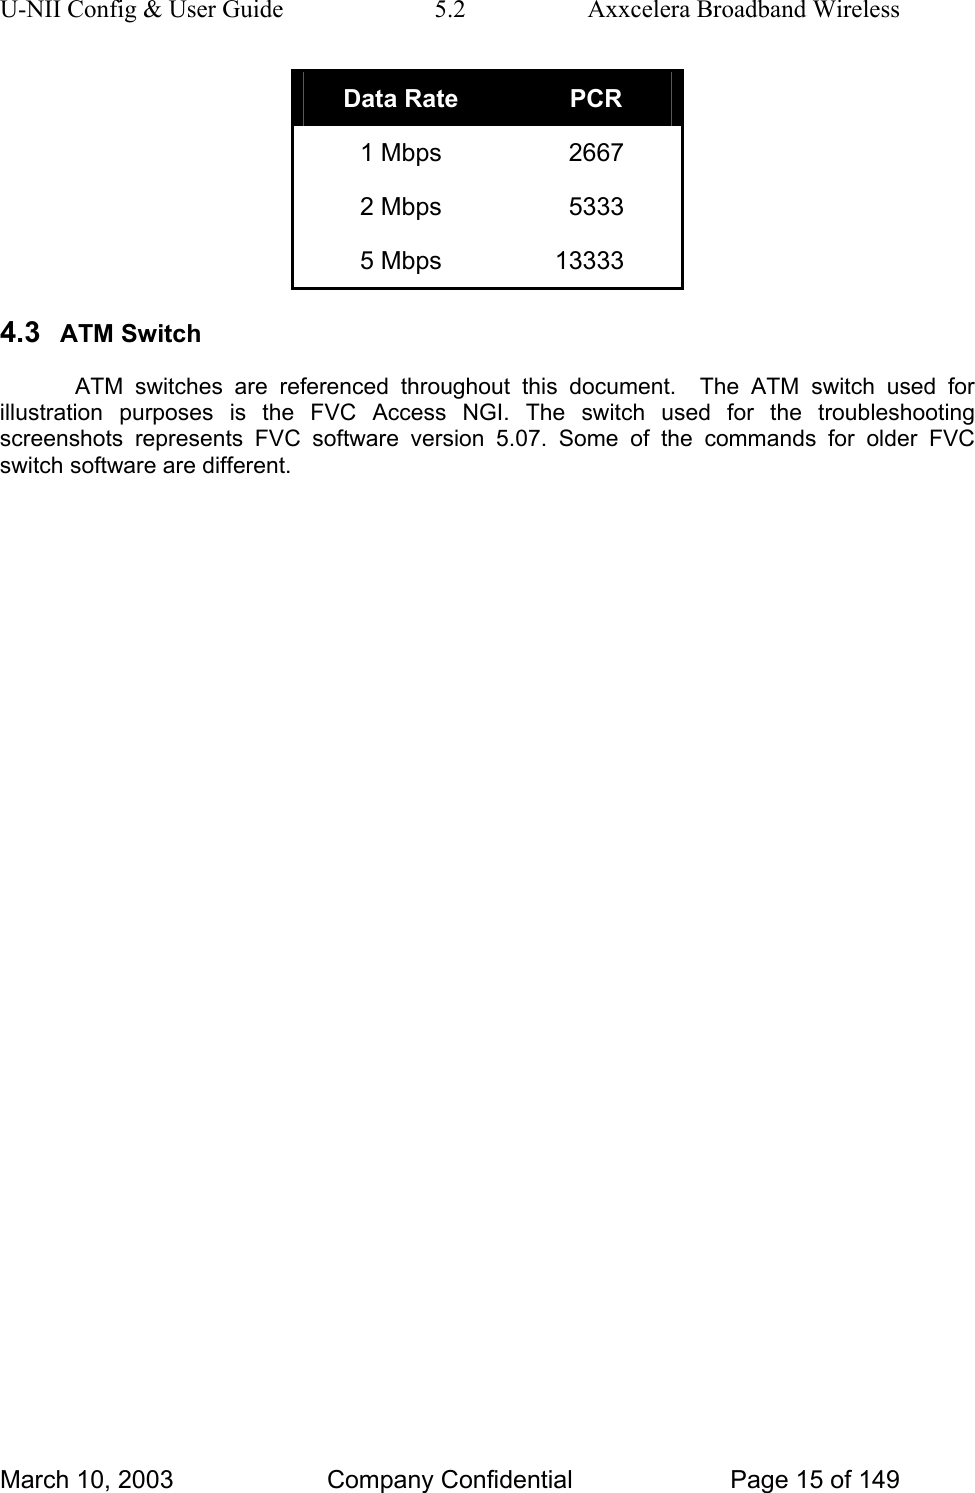
U-NII Config & User Guide  5.2  Axxcelera Broadband Wireless 4.1  Subnetting Subnetting within the AB-Access radios is done in hexadecimal format. There for it is necessary to know the decimal to hex conversions for commonly used subnets. CIDR notation is also used to define the subnets in all the diagrams, so refer to the chart below for any questions on subnetting.  Decimal Subnet HEX Subnet CIDR 0 00 /24 128 80 /25 192 C0 /26 224 E0 /27 240 F0 /28 248 F8 /29 252 FC /30 4.2  Peak Cell Rate - PCR The Peak Cell Rate is policing not pacing, there for it will discard all cells received over the limit and not buffer them. This means the cells will be have to be retransmitted via an upper layer protocol. To calculate the Peak Cell Rate you simply divide the desired bandwidth by the number of bits in an ATM cell. An ATM cell is 53 bytes consisting of a 5-byte header and a 48-byte payload. In the following example, the PCR for a 1 Megabit circuit is calculated.  PCR values are rounded to the nearest integer. 1024000 bps/(48 bytes-per-cell*8 bits-per-byte) = 2667 The following table lists PCR values for several, common data rates. Data Rate  PCR 56 kbps  146128 kbps  333  256 kbps  667  512 kbps  1333  March 10, 2003  Company Confidential  Page 14 of 149
U-NII Config & User Guide  5.2  Axxcelera Broadband Wireless Data Rate  PCR 1 Mbps  2667  2 Mbps  5333  5 Mbps  13333  4.3  ATM Switch ATM switches are referenced throughout this document.  The ATM switch used for illustration purposes is the FVC Access NGI. The switch used for the troubleshooting screenshots represents FVC software version 5.07. Some of the commands for older FVC switch software are different.    March 10, 2003  Company Confidential  Page 15 of 149
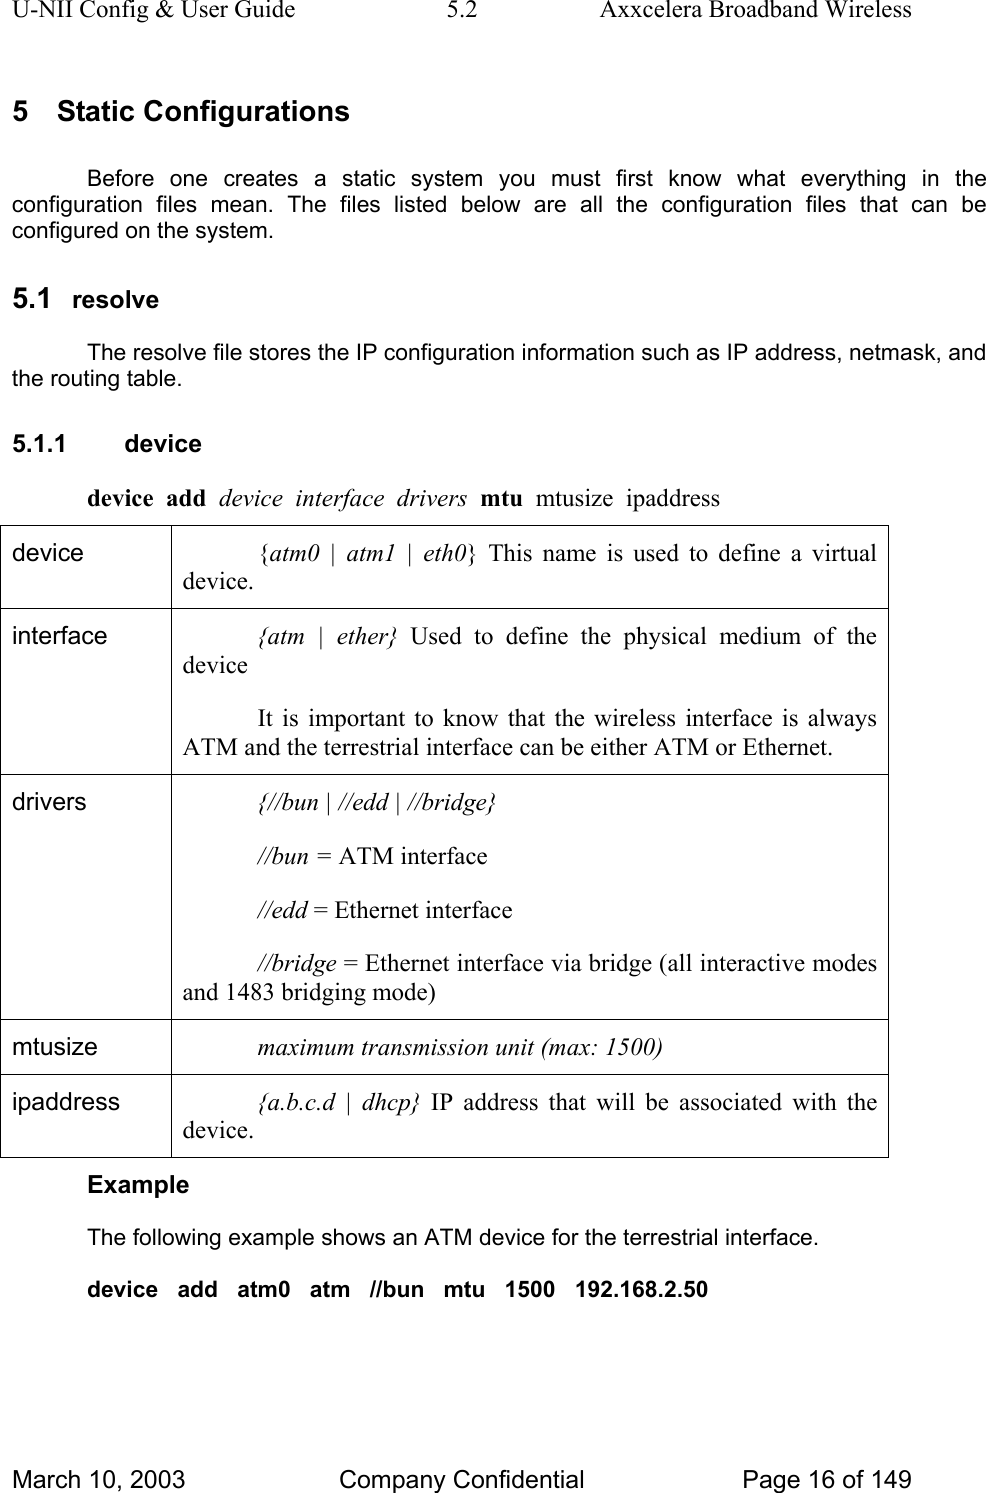
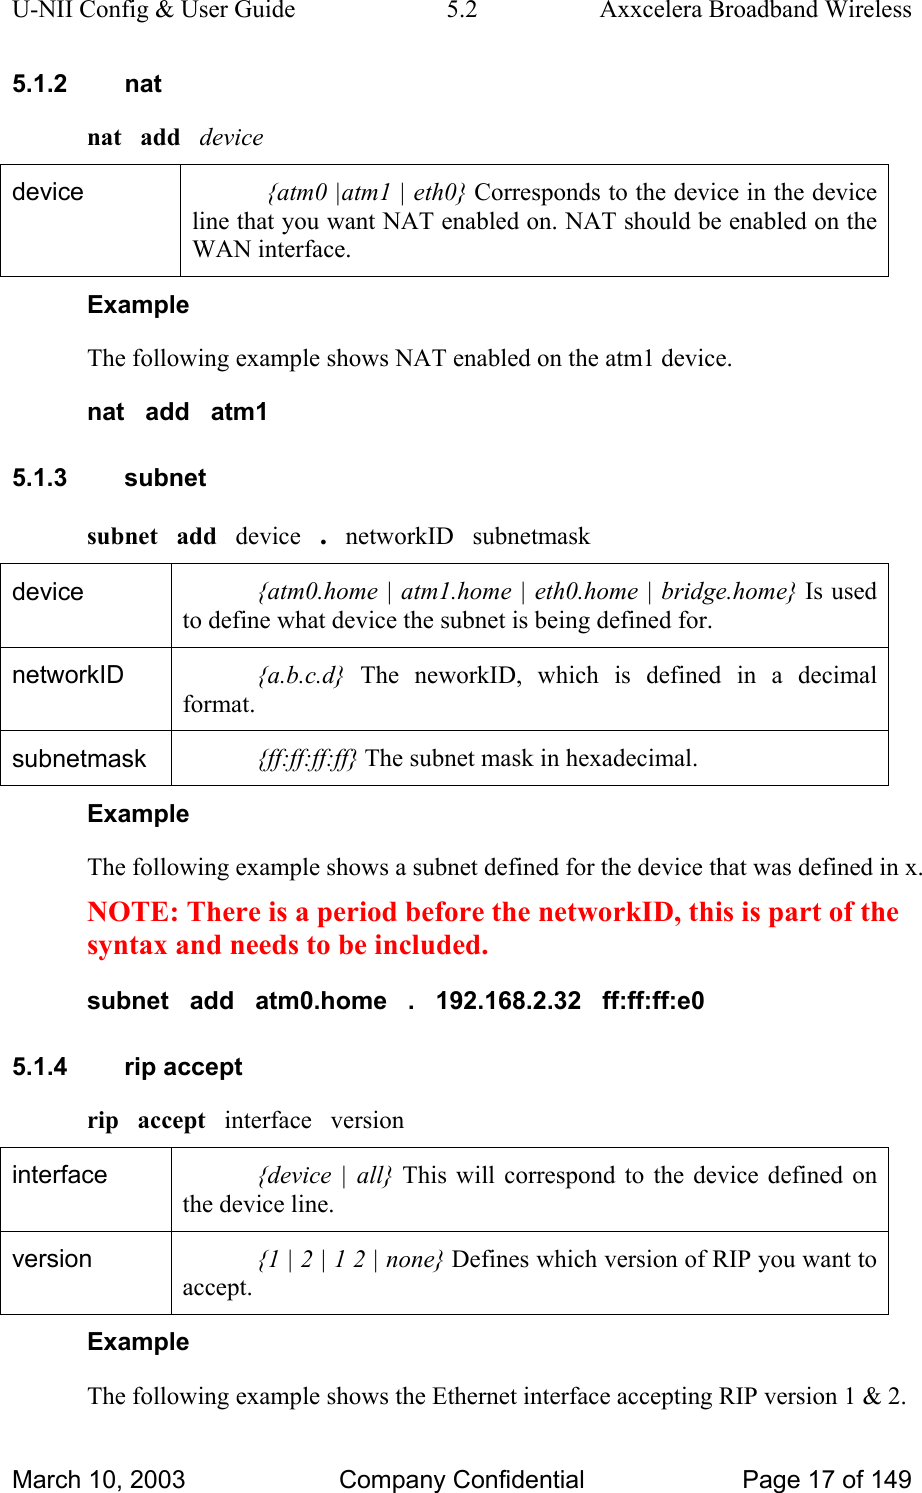
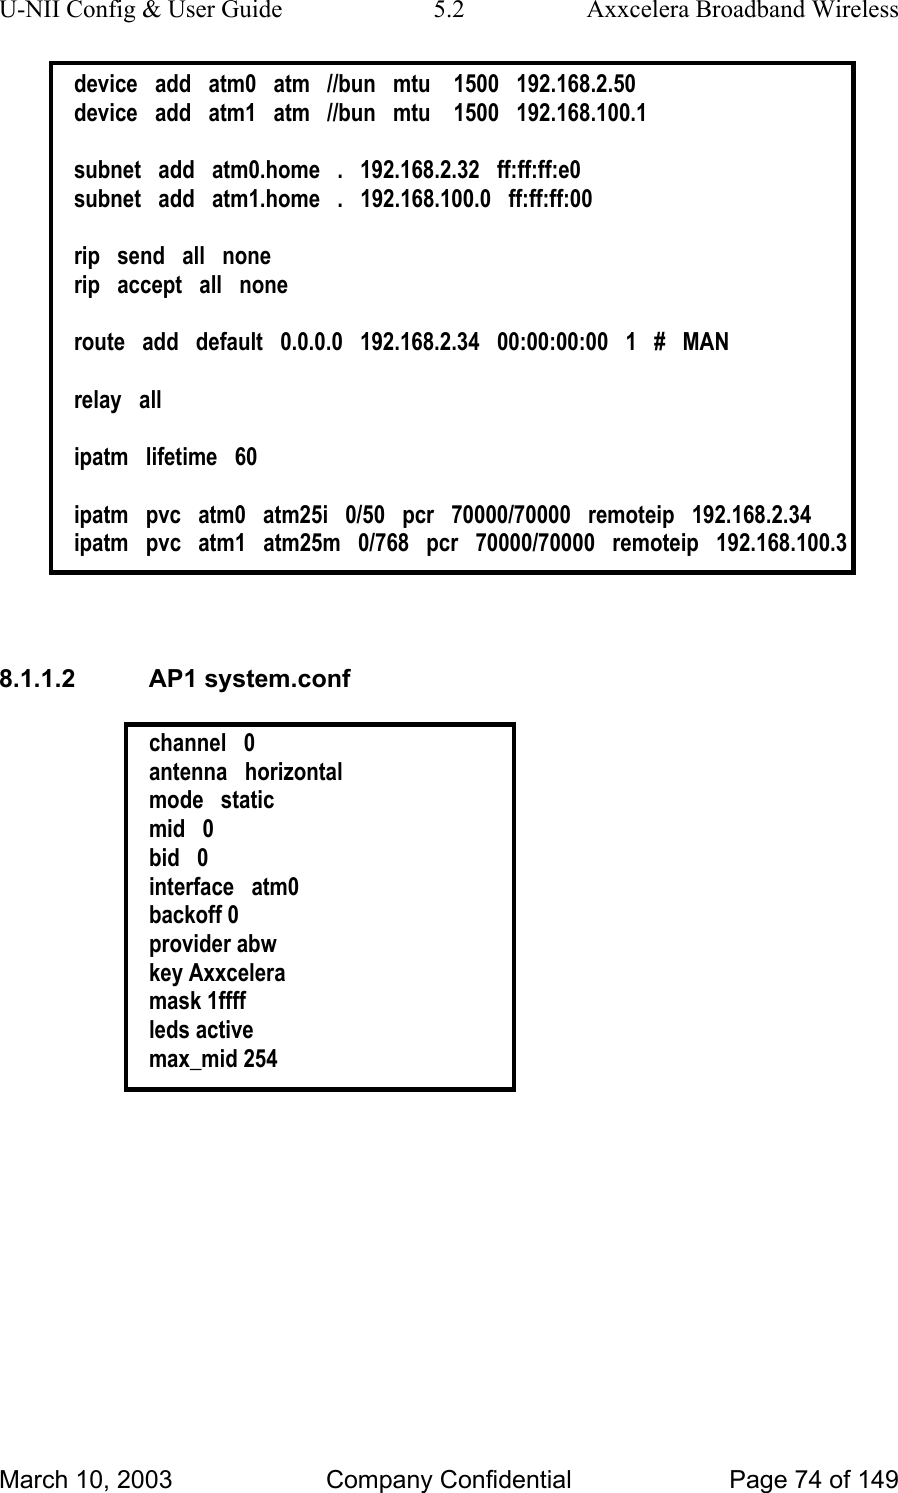
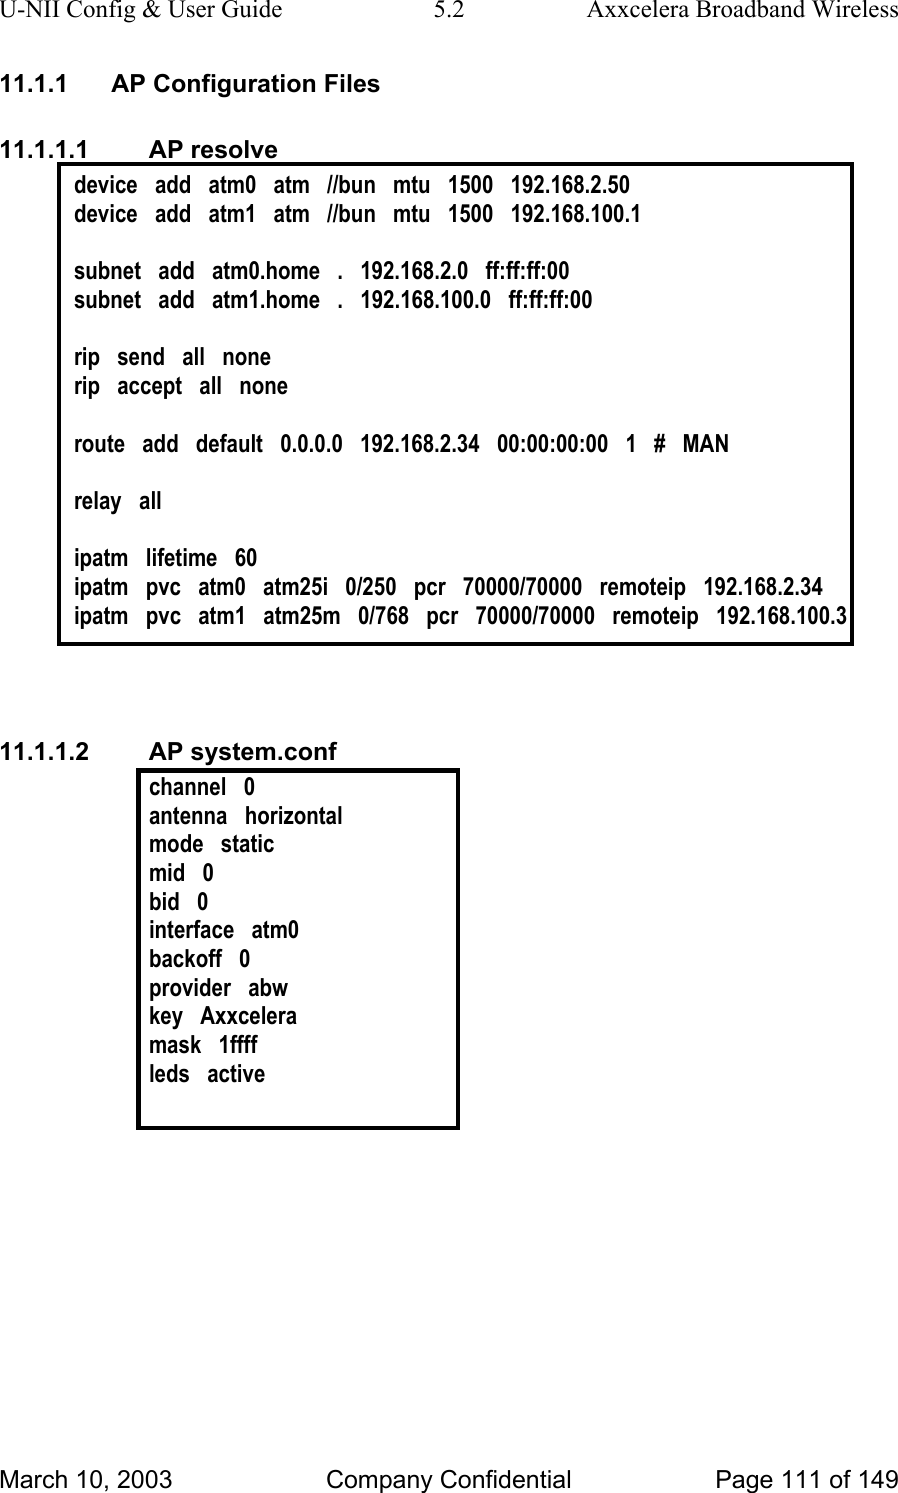
U-NII Config & User Guide  5.2  Axxcelera Broadband Wireless 5 Static Configurations Before one creates a static system you must first know what everything in the configuration files mean. The files listed below are all the configuration files that can be configured on the system. 5.1  resolve The resolve file stores the IP configuration information such as IP address, netmask, and the routing table. 5.1.1 device device  add  device  interface  drivers  mtu  mtusize  ipaddress device  {atm0 | atm1 | eth0} This name is used to define a virtual device. interface  {atm | ether} Used to define the physical medium of the device It is important to know that the wireless interface is always ATM and the terrestrial interface can be either ATM or Ethernet. drivers  {//bun | //edd | //bridge} //bun = ATM interface //edd = Ethernet interface //bridge = Ethernet interface via bridge (all interactive modes and 1483 bridging mode) mtusize  maximum transmission unit (max: 1500) ipaddress  {a.b.c.d | dhcp} IP address that will be associated with the device. Example The following example shows an ATM device for the terrestrial interface. device   add   atm0   atm   //bun   mtu   1500   192.168.2.50   March 10, 2003  Company Confidential  Page 16 of 149
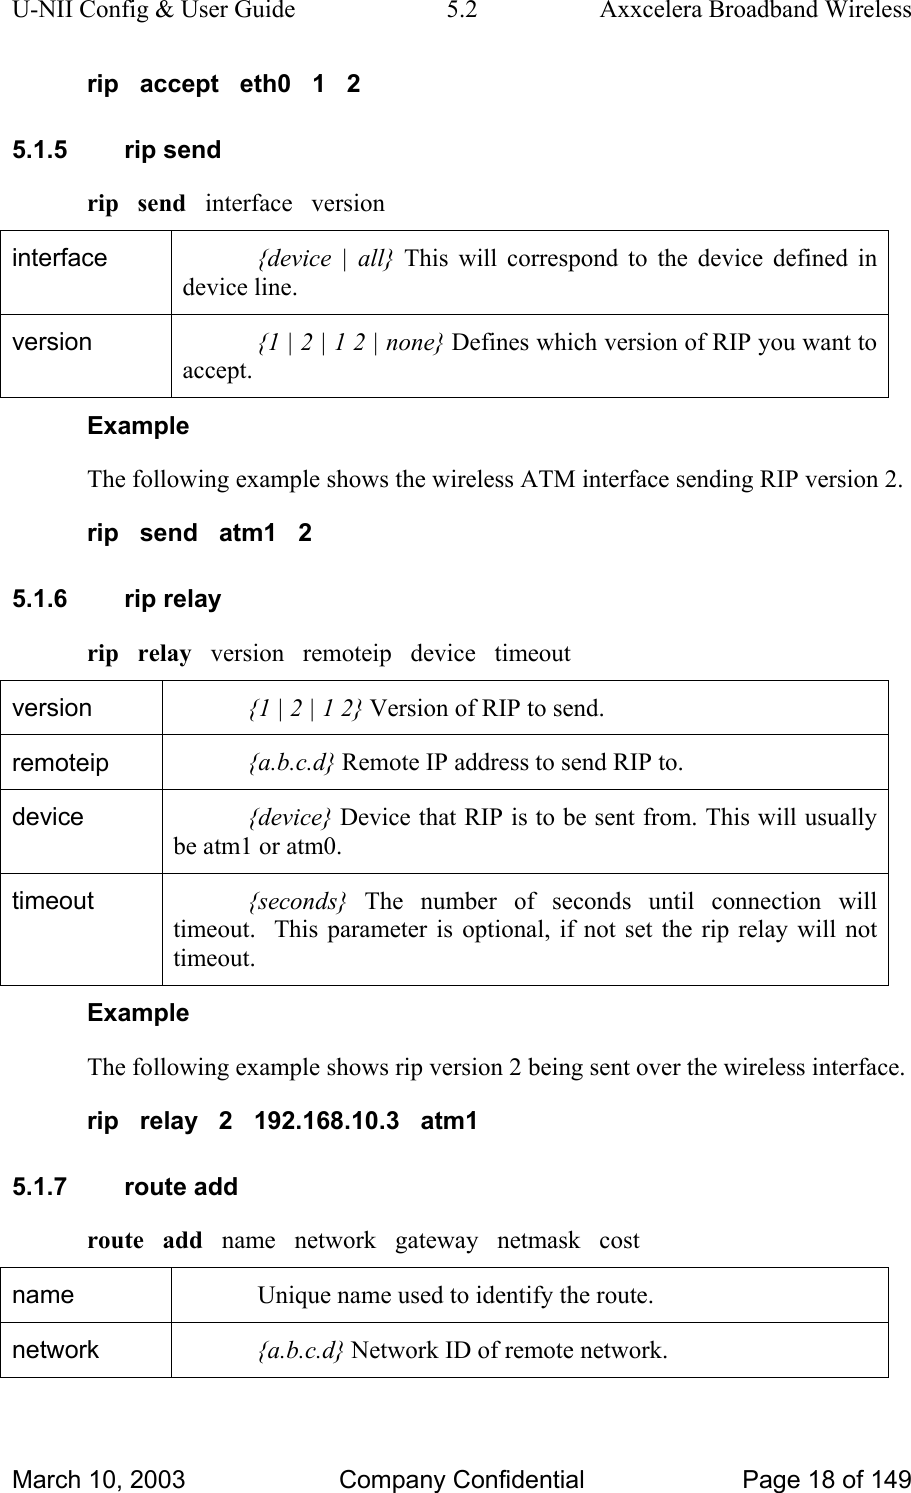
U-NII Config & User Guide  5.2  Axxcelera Broadband Wireless 5.1.2 nat nat   add   device device  {atm0 |atm1 | eth0} Corresponds to the device in the device line that you want NAT enabled on. NAT should be enabled on the WAN interface.  Example The following example shows NAT enabled on the atm1 device. nat   add   atm1 5.1.3 subnet subnet   add   device   .   networkID   subnetmask device  {atm0.home | atm1.home | eth0.home | bridge.home} Is used to define what device the subnet is being defined for. networkID  {a.b.c.d} The neworkID, which is defined in a decimal format.  subnetmask  {ff:ff:ff:ff} The subnet mask in hexadecimal.  Example The following example shows a subnet defined for the device that was defined in x. NOTE: There is a period before the networkID, this is part of the syntax and needs to be included. subnet   add   atm0.home   .   192.168.2.32   ff:ff:ff:e0 5.1.4 rip accept rip   accept   interface   version interface  {device | all} This will correspond to the device defined on the device line. version  {1 | 2 | 1 2 | none} Defines which version of RIP you want to accept.  Example The following example shows the Ethernet interface accepting RIP version 1 & 2. March 10, 2003  Company Confidential  Page 17 of 149
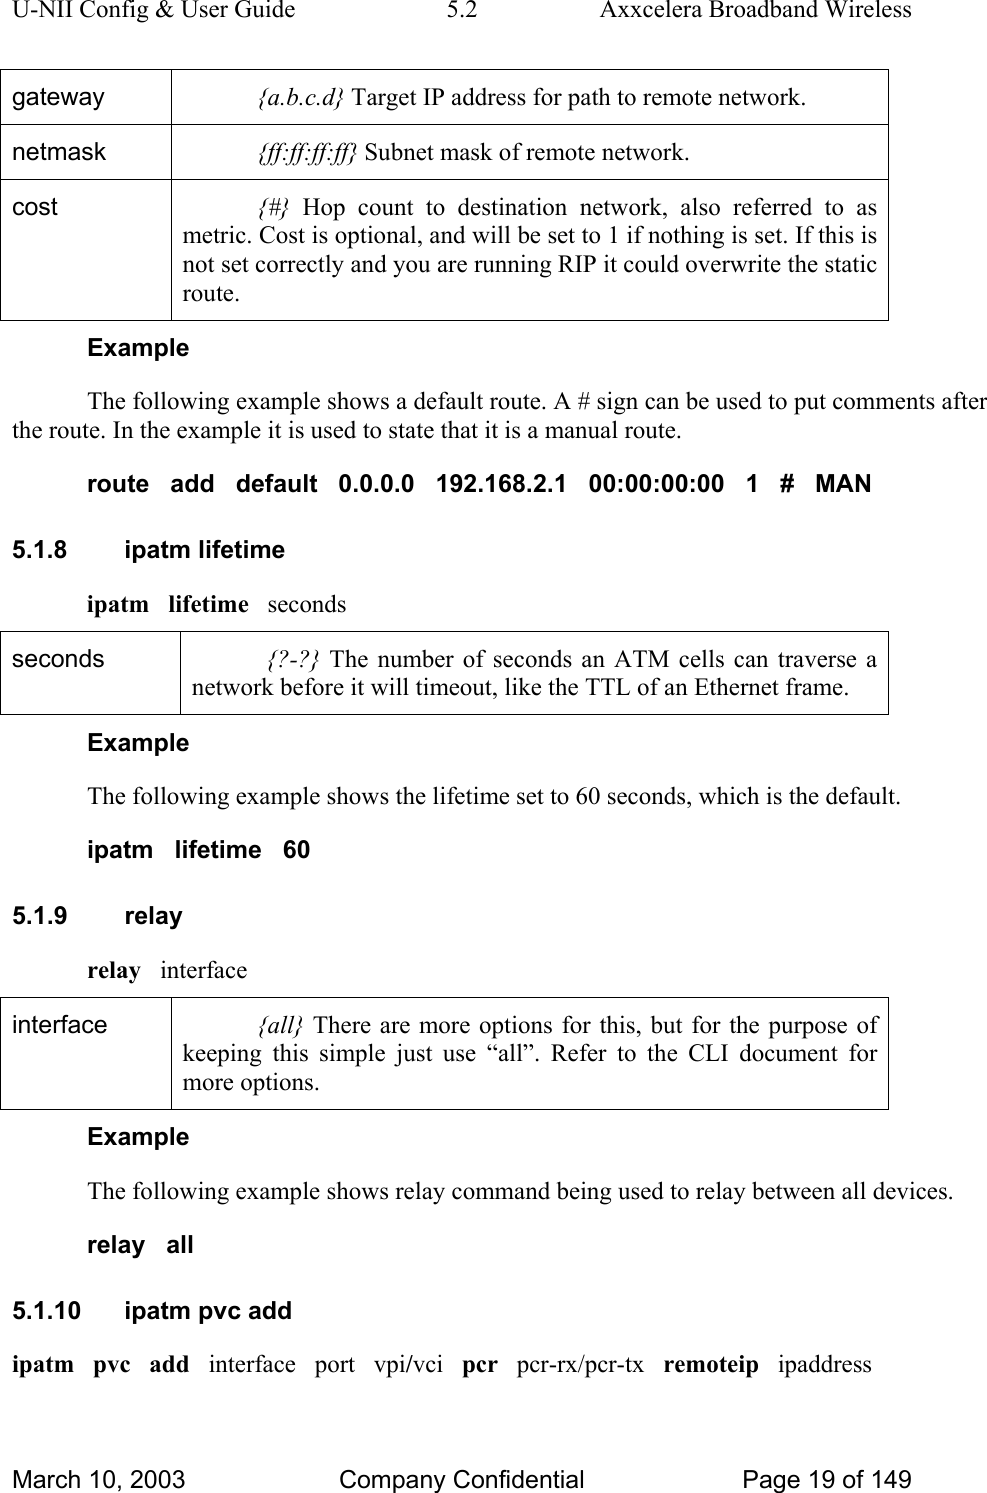
U-NII Config & User Guide  5.2  Axxcelera Broadband Wireless rip   accept   eth0   1   2 5.1.5 rip send rip   send   interface   version interface  {device | all} This will correspond to the device defined in device line.  version  {1 | 2 | 1 2 | none} Defines which version of RIP you want to accept.  Example The following example shows the wireless ATM interface sending RIP version 2. rip   send   atm1   2 5.1.6 rip relay rip   relay   version   remoteip   device   timeout version  {1 | 2 | 1 2} Version of RIP to send. remoteip  {a.b.c.d} Remote IP address to send RIP to. device  {device} Device that RIP is to be sent from. This will usually be atm1 or atm0. timeout  {seconds} The number of seconds until connection will timeout.  This parameter is optional, if not set the rip relay will not timeout.  Example The following example shows rip version 2 being sent over the wireless interface. rip   relay   2   192.168.10.3   atm1 5.1.7 route add route   add   name   network   gateway   netmask   cost name  Unique name used to identify the route. network  {a.b.c.d} Network ID of remote network. March 10, 2003  Company Confidential  Page 18 of 149
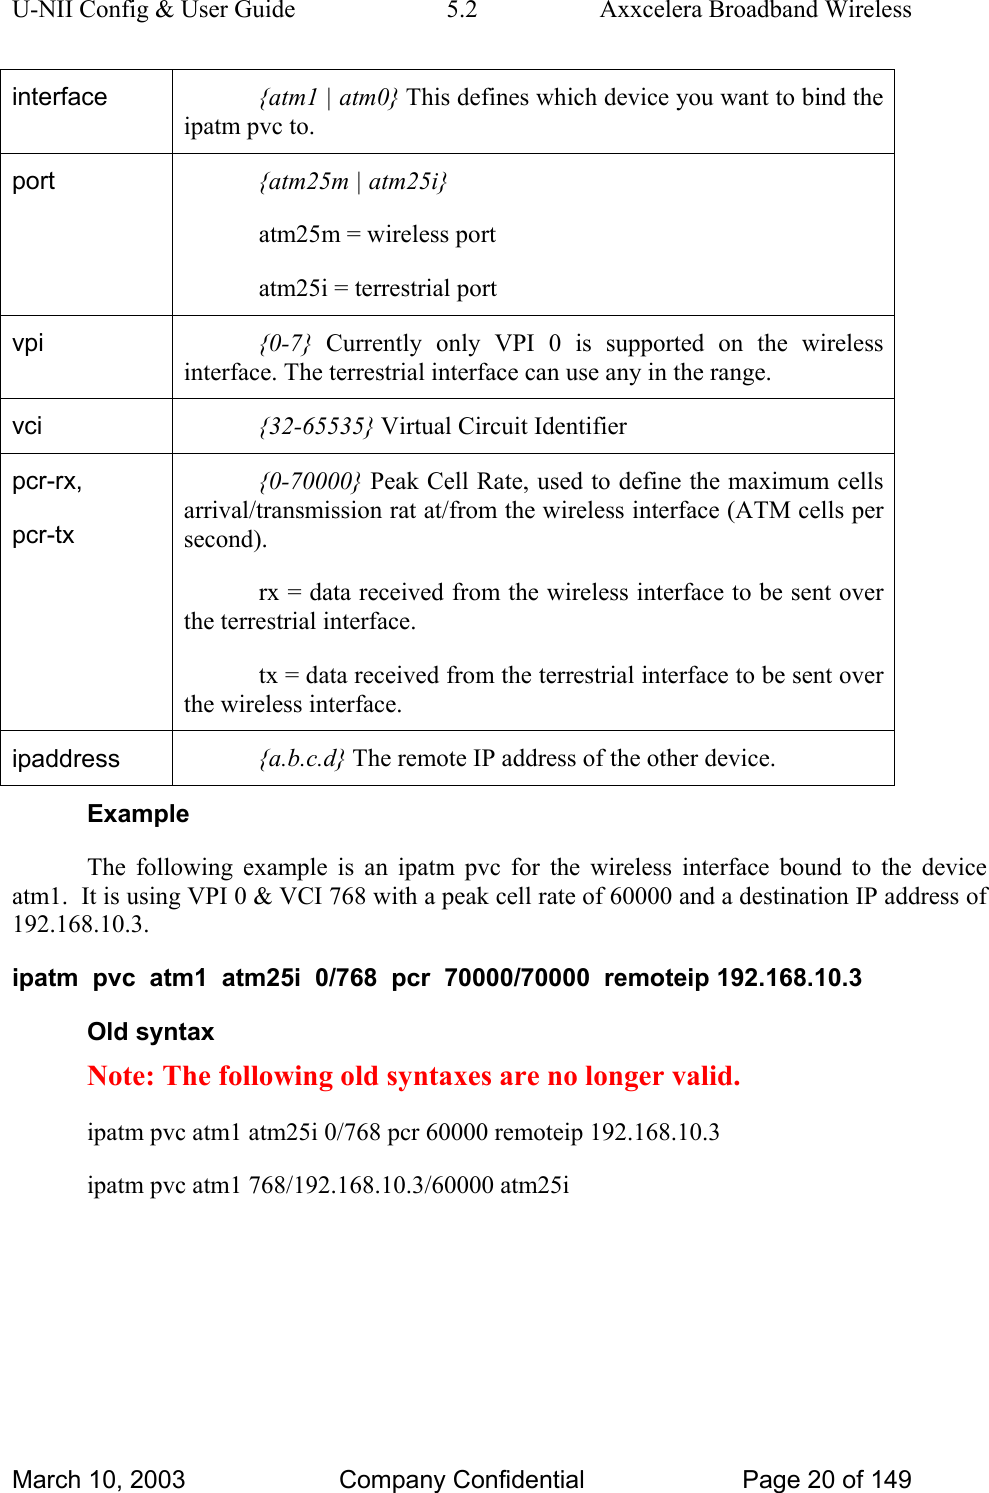
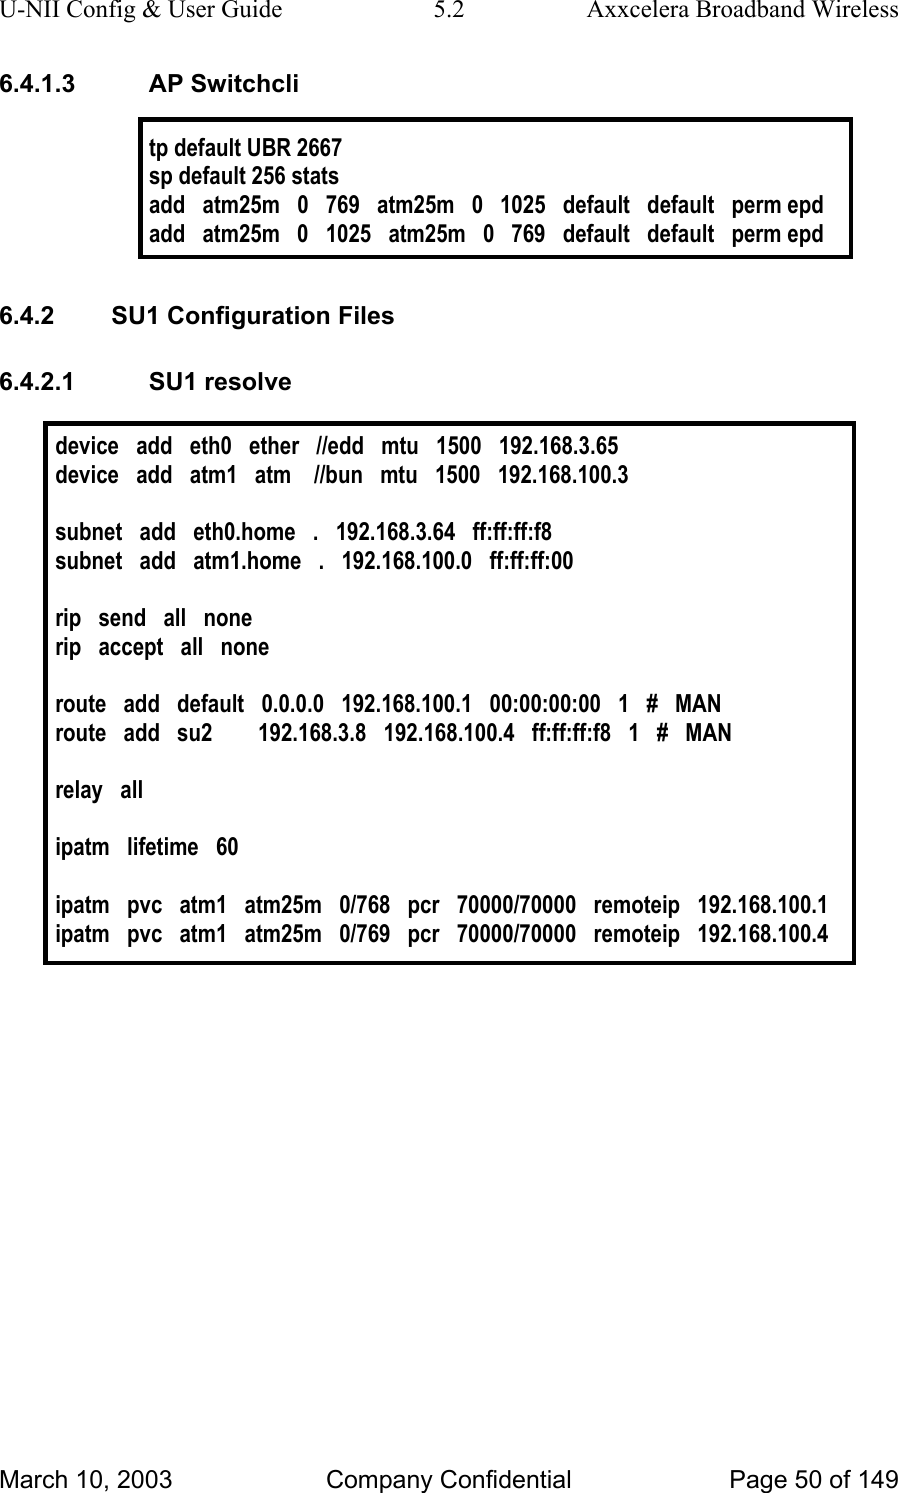
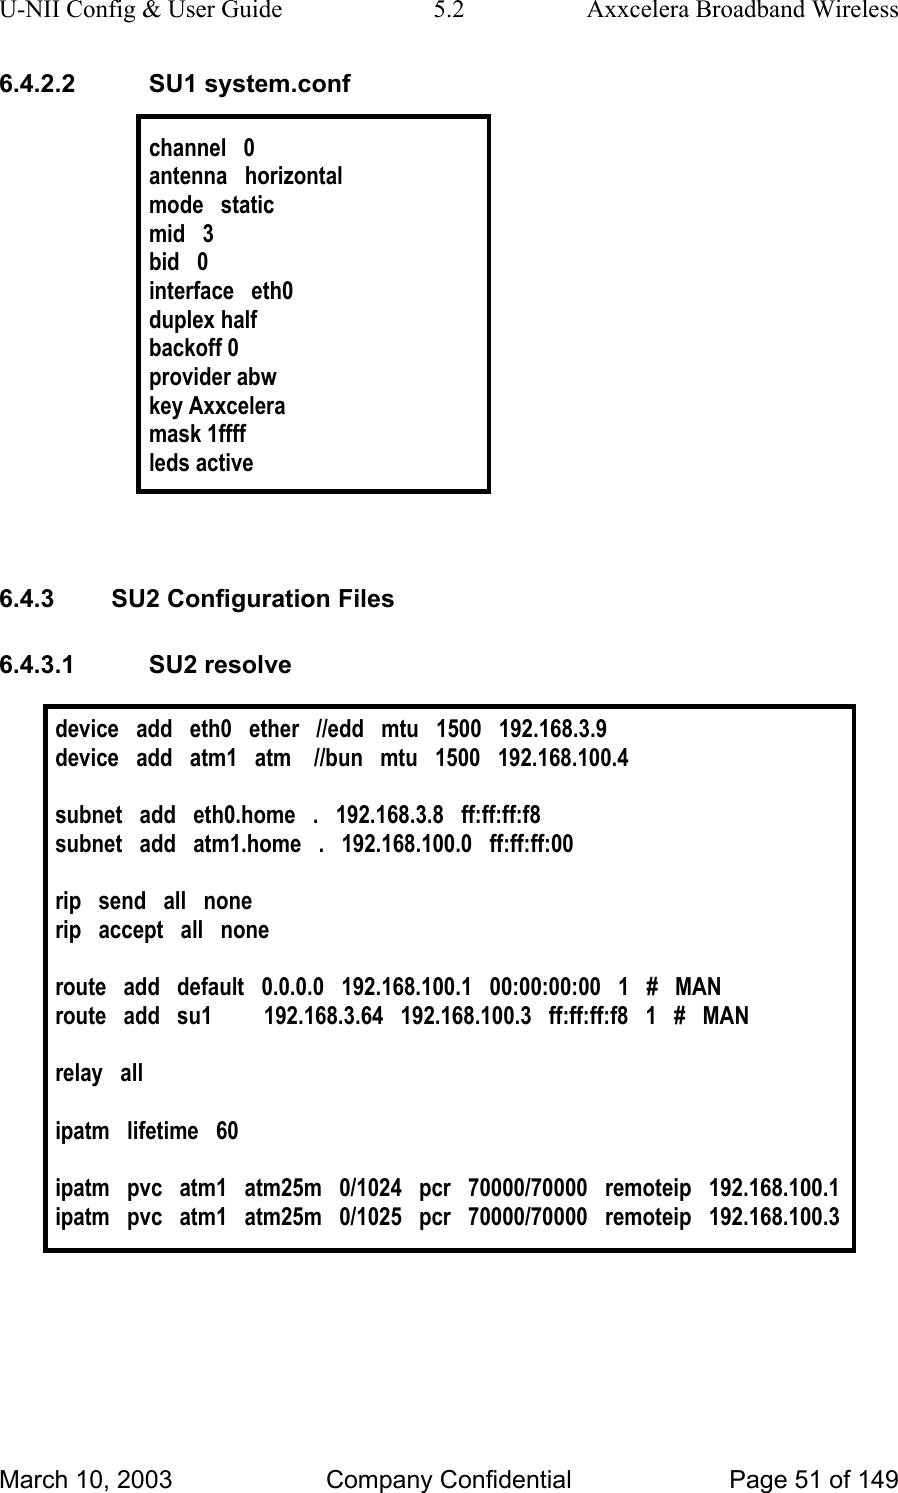
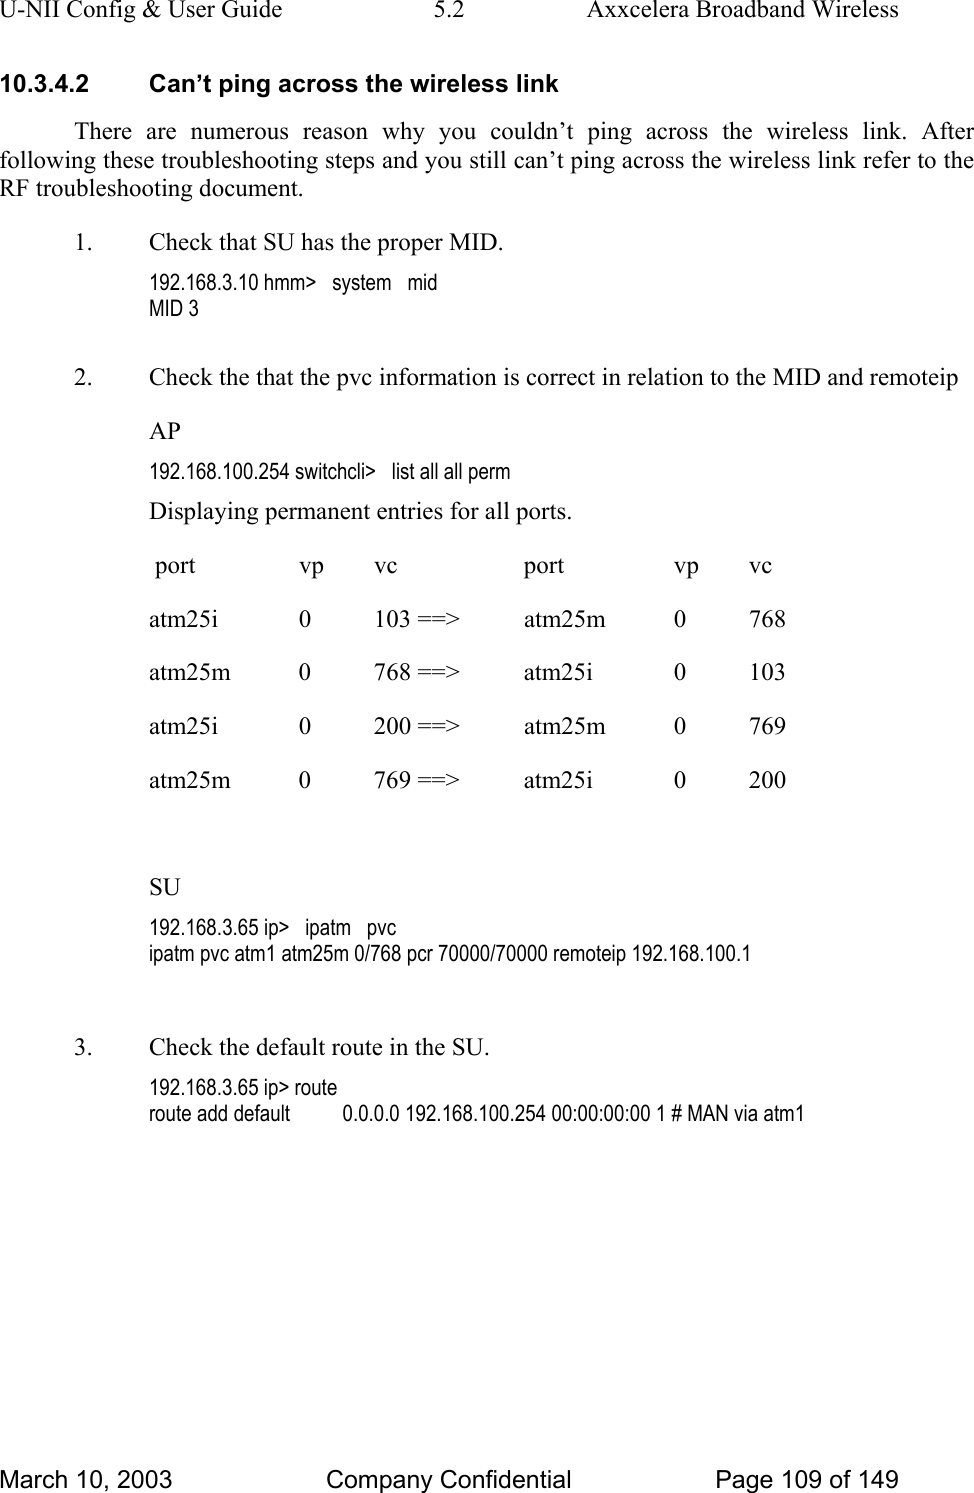
U-NII Config & User Guide  5.2  Axxcelera Broadband Wireless gateway  {a.b.c.d} Target IP address for path to remote network. netmask  {ff:ff:ff:ff} Subnet mask of remote network. cost  {#} Hop count to destination network, also referred to as metric. Cost is optional, and will be set to 1 if nothing is set. If this is not set correctly and you are running RIP it could overwrite the static route.  Example The following example shows a default route. A # sign can be used to put comments after the route. In the example it is used to state that it is a manual route. route   add   default   0.0.0.0   192.168.2.1   00:00:00:00   1   #   MAN 5.1.8 ipatm lifetime ipatm   lifetime   seconds seconds  {?-?} The number of seconds an ATM cells can traverse a network before it will timeout, like the TTL of an Ethernet frame. Example The following example shows the lifetime set to 60 seconds, which is the default. ipatm   lifetime   60 5.1.9 relay relay   interface interface  {all} There are more options for this, but for the purpose of keeping this simple just use “all”. Refer to the CLI document for more options. Example The following example shows relay command being used to relay between all devices. relay   all 5.1.10 ipatm pvc add ipatm   pvc   add   interface   port   vpi/vci   pcr   pcr-rx/pcr-tx   remoteip   ipaddress March 10, 2003  Company Confidential  Page 19 of 149
U-NII Config & User Guide  5.2  Axxcelera Broadband Wireless interface  {atm1 | atm0} This defines which device you want to bind the ipatm pvc to. port  {atm25m | atm25i} atm25m = wireless port atm25i = terrestrial port vpi  {0-7} Currently only VPI 0 is supported on the wireless interface. The terrestrial interface can use any in the range. vci  {32-65535} Virtual Circuit Identifier pcr-rx, pcr-tx {0-70000} Peak Cell Rate, used to define the maximum cells arrival/transmission rat at/from the wireless interface (ATM cells per second). rx = data received from the wireless interface to be sent over the terrestrial interface. tx = data received from the terrestrial interface to be sent over the wireless interface.  ipaddress  {a.b.c.d} The remote IP address of the other device. Example The following example is an ipatm pvc for the wireless interface bound to the device atm1.  It is using VPI 0 & VCI 768 with a peak cell rate of 60000 and a destination IP address of 192.168.10.3. ipatm  pvc  atm1  atm25i  0/768  pcr  70000/70000  remoteip 192.168.10.3 Old syntax Note: The following old syntaxes are no longer valid. ipatm pvc atm1 atm25i 0/768 pcr 60000 remoteip 192.168.10.3 ipatm pvc atm1 768/192.168.10.3/60000 atm25i March 10, 2003  Company Confidential  Page 20 of 149
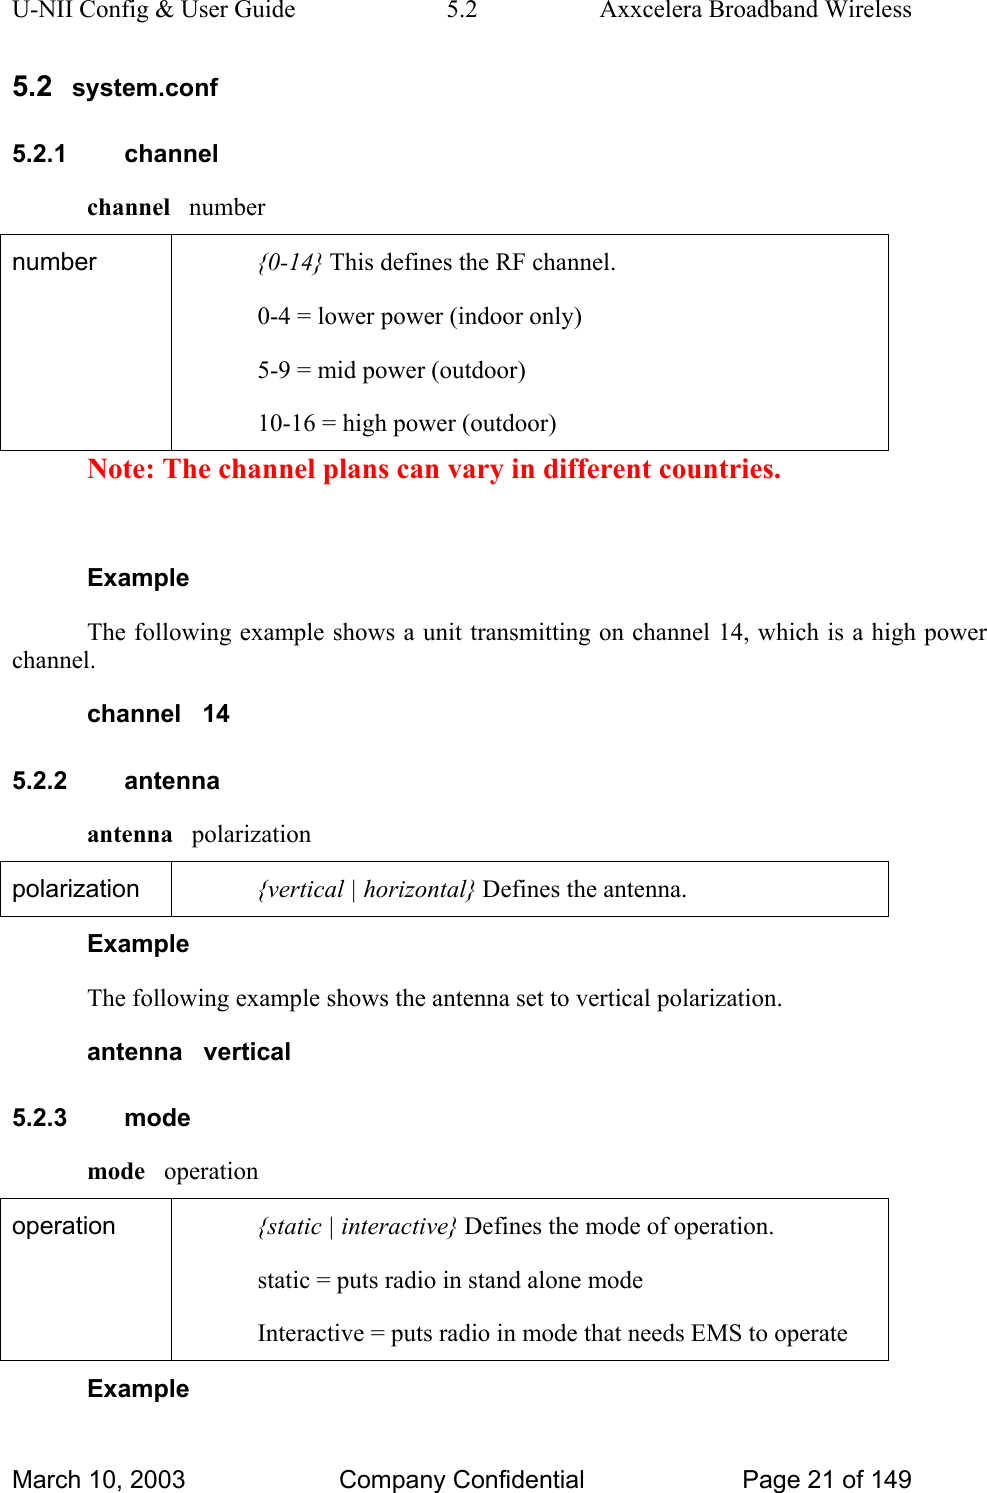
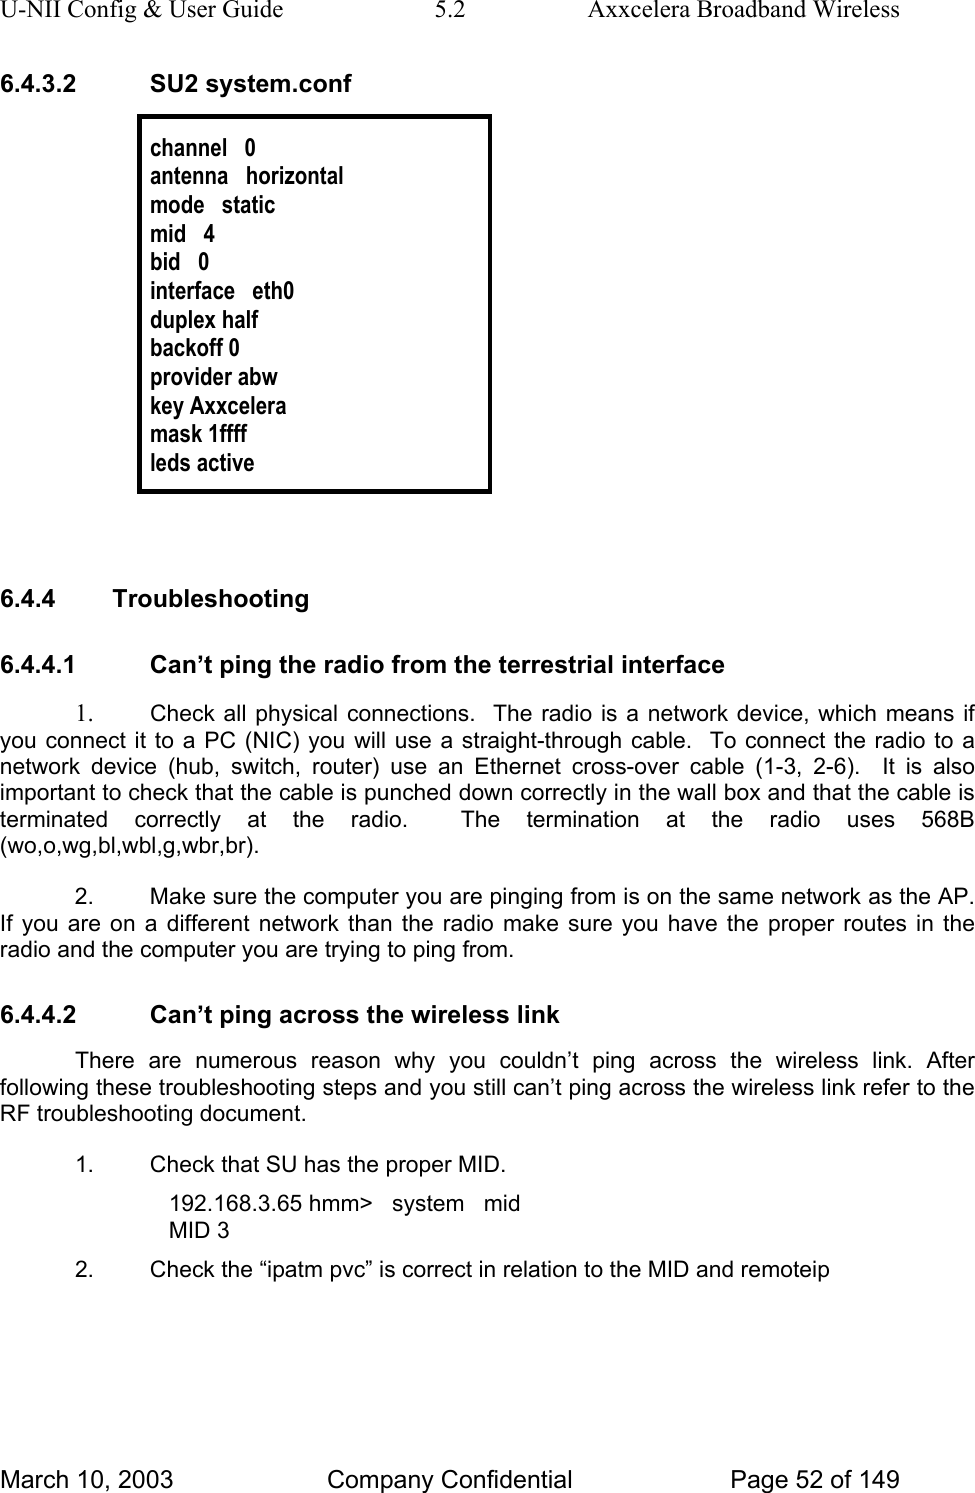
U-NII Config & User Guide  5.2  Axxcelera Broadband Wireless 5.2  system.conf 5.2.1 channel channel   number number  {0-14} This defines the RF channel. 0-4 = lower power (indoor only) 5-9 = mid power (outdoor) 10-16 = high power (outdoor) Note: The channel plans can vary in different countries.  Example The following example shows a unit transmitting on channel 14, which is a high power channel. channel   14 5.2.2 antenna antenna   polarization polarization  {vertical | horizontal} Defines the antenna. Example The following example shows the antenna set to vertical polarization. antenna   vertical 5.2.3 mode mode   operation operation  {static | interactive} Defines the mode of operation. static = puts radio in stand alone mode Interactive = puts radio in mode that needs EMS to operate Example March 10, 2003  Company Confidential  Page 21 of 149
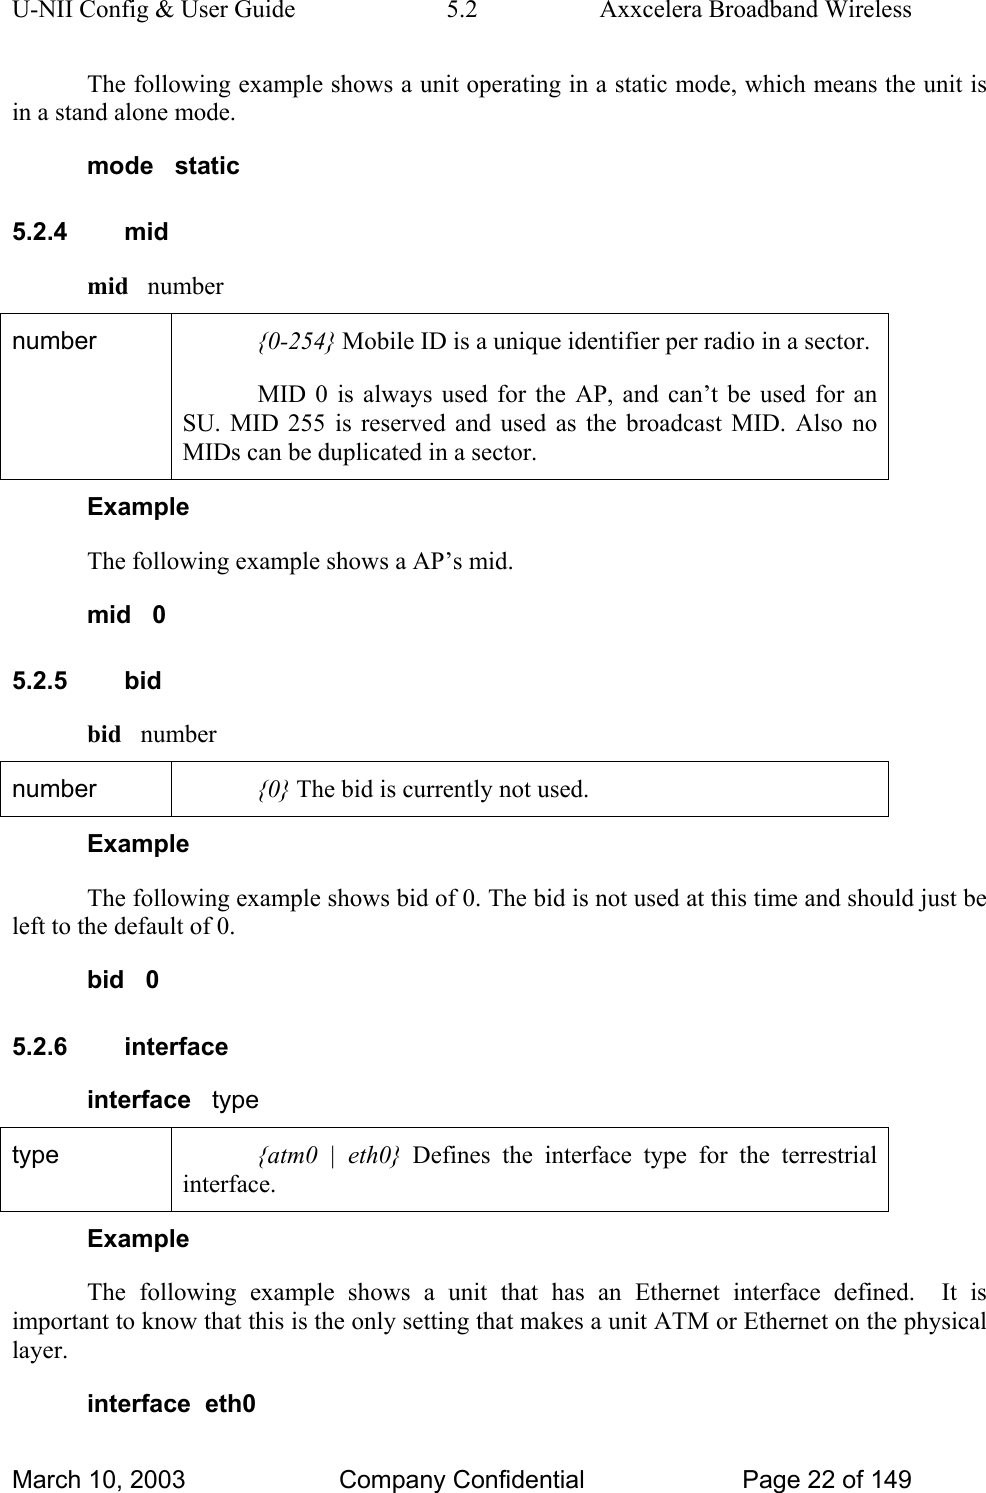
U-NII Config & User Guide  5.2  Axxcelera Broadband Wireless The following example shows a unit operating in a static mode, which means the unit is in a stand alone mode. mode   static 5.2.4 mid mid   number number  {0-254} Mobile ID is a unique identifier per radio in a sector. MID 0 is always used for the AP, and can’t be used for an SU. MID 255 is reserved and used as the broadcast MID. Also no MIDs can be duplicated in a sector.  Example The following example shows a AP’s mid. mid   0 5.2.5 bid bid   number number  {0} The bid is currently not used. Example The following example shows bid of 0. The bid is not used at this time and should just be left to the default of 0. bid   0 5.2.6 interface interface   type type  {atm0 | eth0} Defines the interface type for the terrestrial interface. Example The following example shows a unit that has an Ethernet interface defined.  It is important to know that this is the only setting that makes a unit ATM or Ethernet on the physical layer. interface  eth0 March 10, 2003  Company Confidential  Page 22 of 149
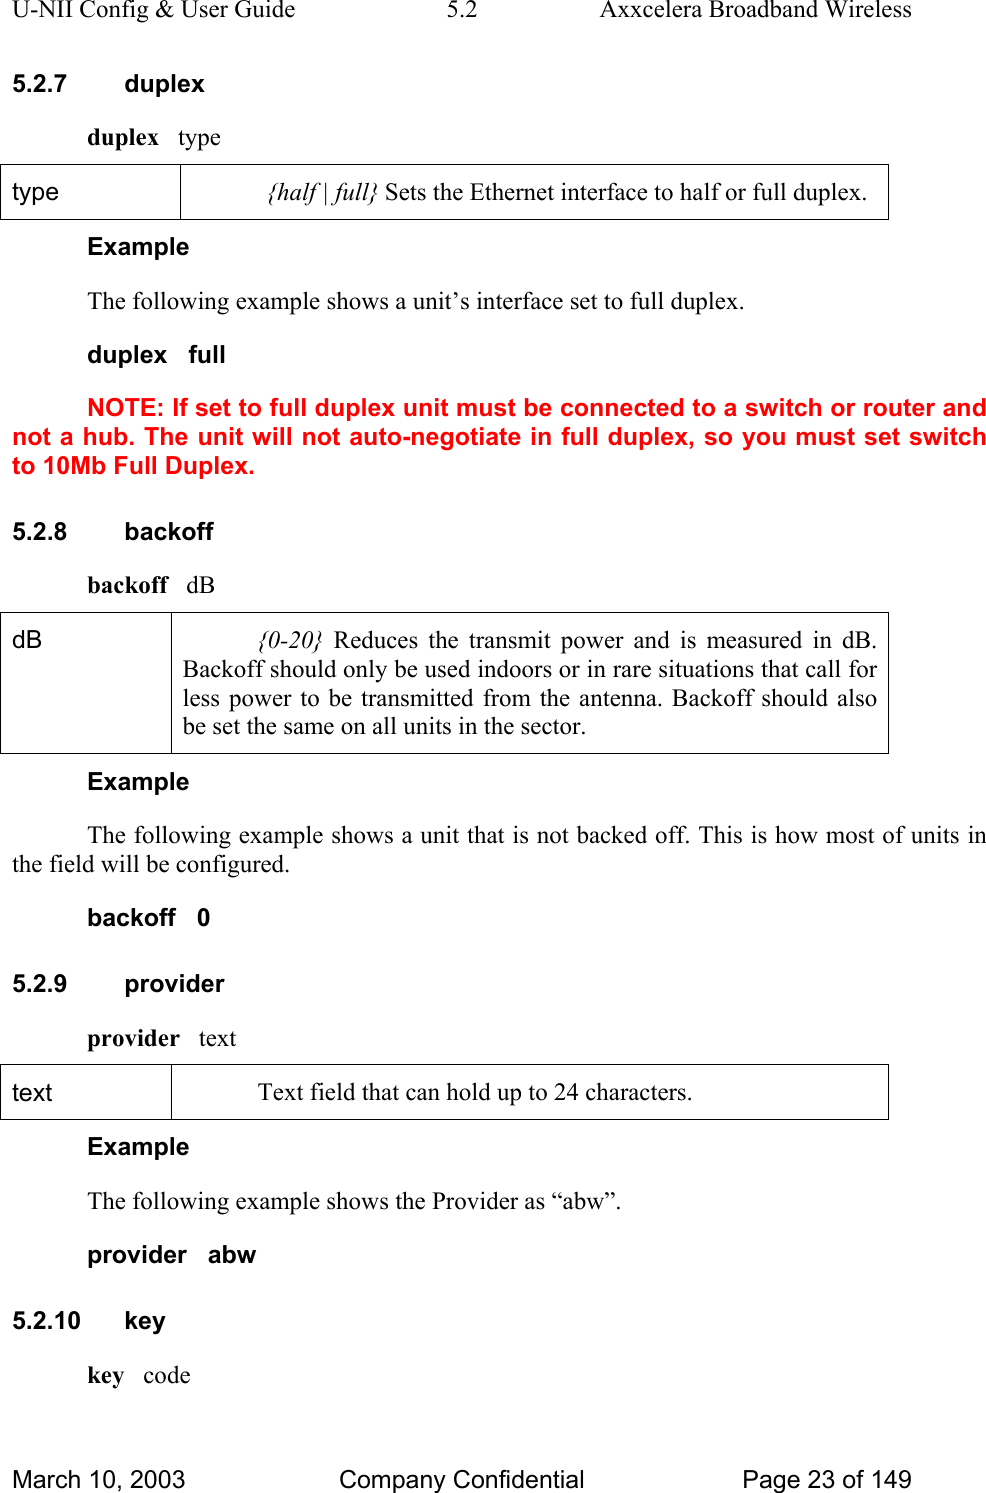
U-NII Config & User Guide  5.2  Axxcelera Broadband Wireless 5.2.7 duplex duplex   type type  {half | full} Sets the Ethernet interface to half or full duplex. Example The following example shows a unit’s interface set to full duplex. duplex   full NOTE: If set to full duplex unit must be connected to a switch or router and not a hub. The unit will not auto-negotiate in full duplex, so you must set switch to 10Mb Full Duplex.  5.2.8 backoff backoff   dB dB  {0-20} Reduces the transmit power and is measured in dB. Backoff should only be used indoors or in rare situations that call for less power to be transmitted from the antenna. Backoff should also be set the same on all units in the sector.  Example The following example shows a unit that is not backed off. This is how most of units in the field will be configured. backoff   0 5.2.9 provider provider   text text  Text field that can hold up to 24 characters. Example The following example shows the Provider as “abw”. provider   abw 5.2.10 key key   code March 10, 2003  Company Confidential  Page 23 of 149
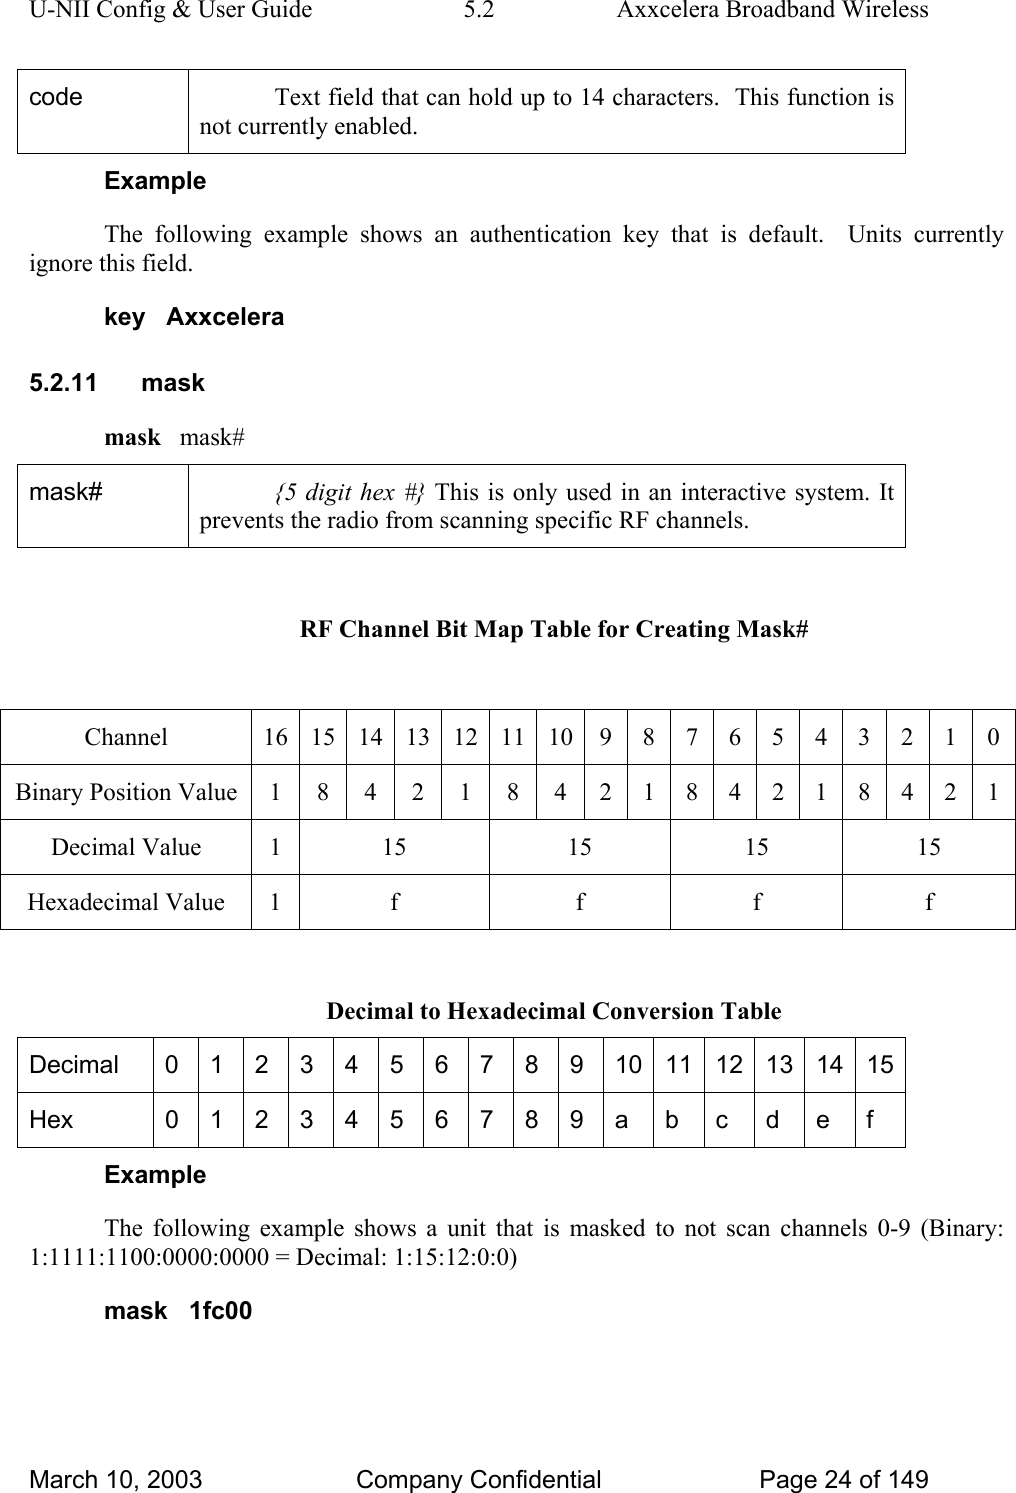
U-NII Config & User Guide  5.2  Axxcelera Broadband Wireless code  Text field that can hold up to 14 characters.  This function is not currently enabled. Example The following example shows an authentication key that is default.  Units currently ignore this field. key   Axxcelera 5.2.11 mask mask   mask# mask#  {5 digit hex #} This is only used in an interactive system. It prevents the radio from scanning specific RF channels.  RF Channel Bit Map Table for Creating Mask#  Channel  16 15 14 13 12 11 10 9 8 7 6 5 4 3 2 1 0 Binary Position Value 1 8 4 2 1 8 4 2 1 8 4 2 1 8 4 2 1 Decimal Value  1  15  15  15  15 Hexadecimal Value  1  f  f  f  f  Decimal to Hexadecimal Conversion Table Decimal  0 1 2 3 4 5 6 7 8 9 10 11 12 13 14 15 Hex  0 1 2 3 4 5 6 7 8 9 a  b  c  d  e  f Example The following example shows a unit that is masked to not scan channels 0-9 (Binary: 1:1111:1100:0000:0000 = Decimal: 1:15:12:0:0) mask   1fc00 March 10, 2003  Company Confidential  Page 24 of 149
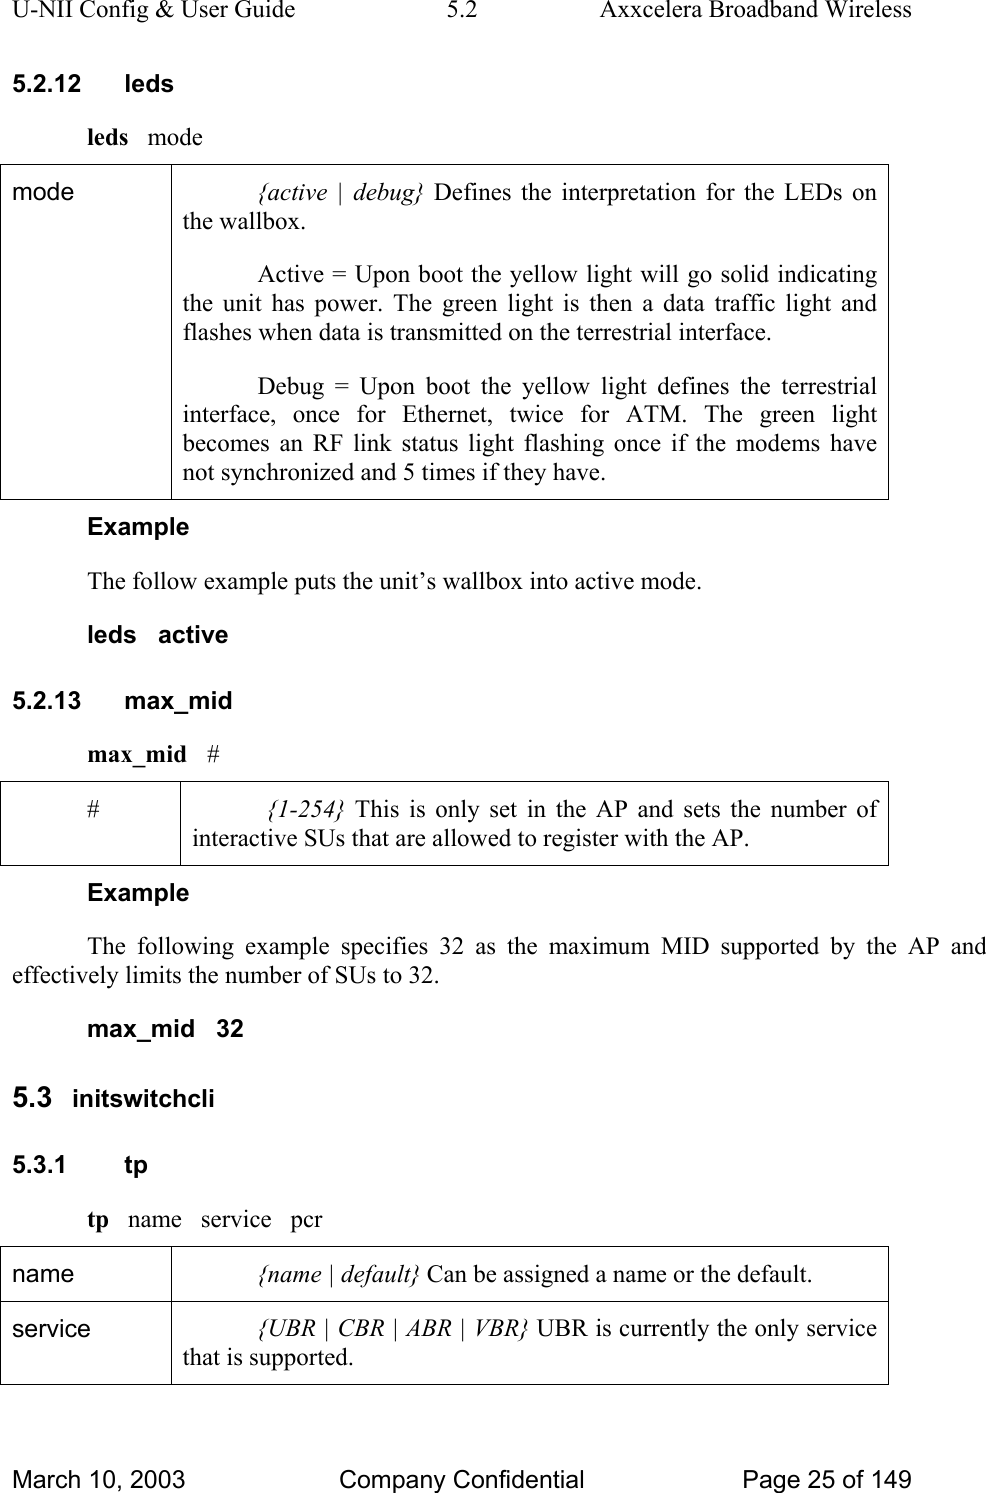
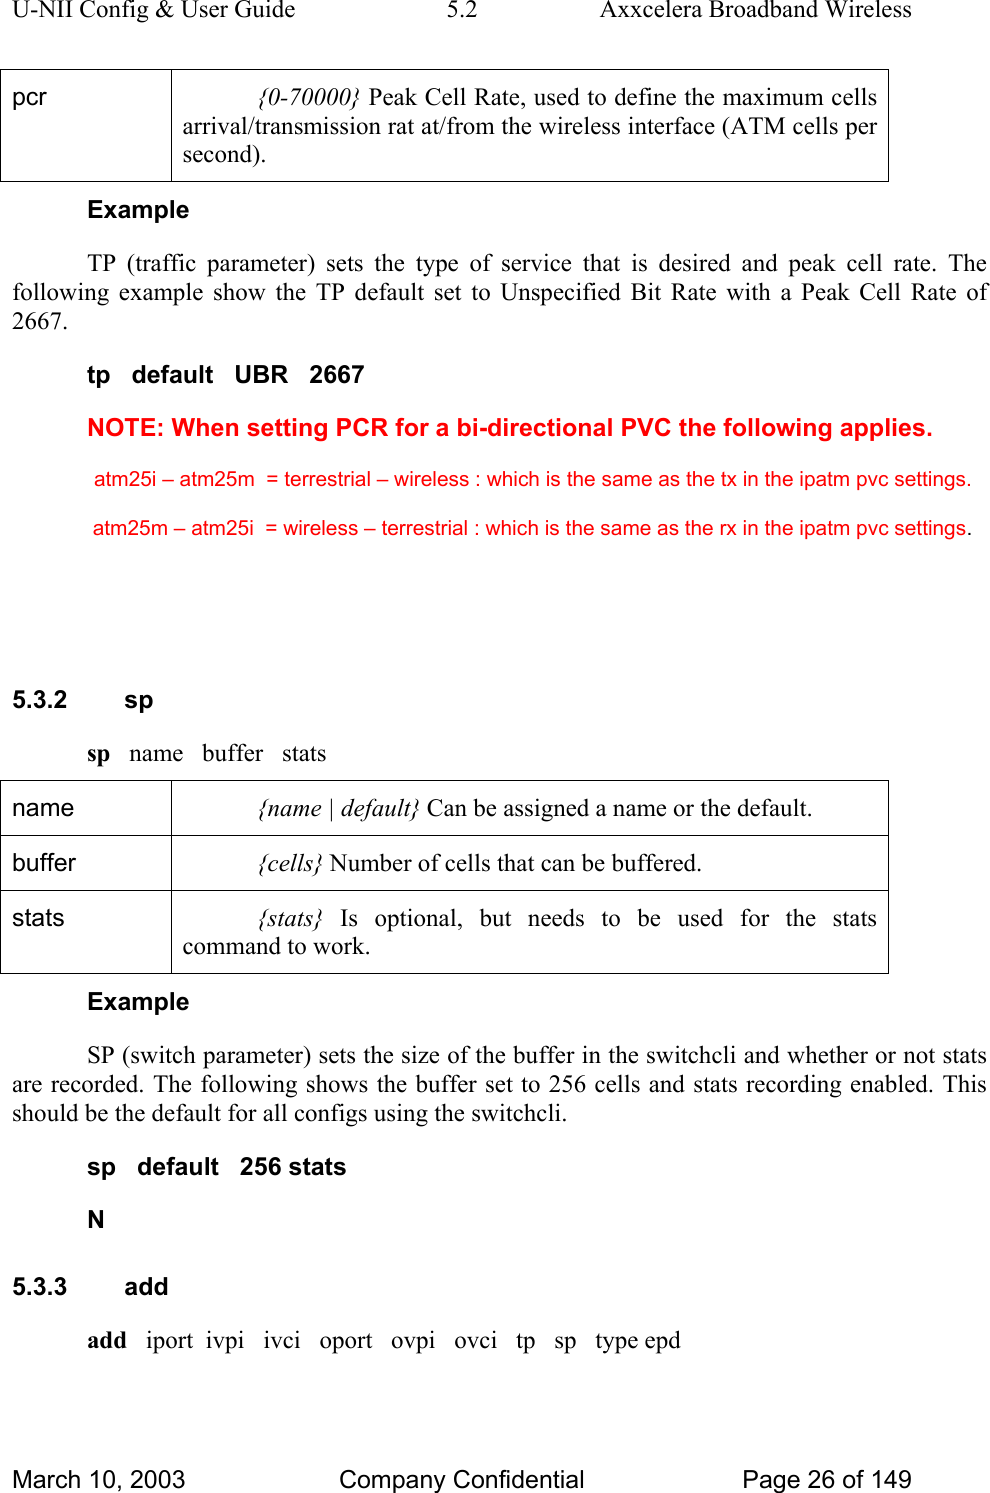
U-NII Config & User Guide  5.2  Axxcelera Broadband Wireless 5.2.12 leds leds   mode mode  {active | debug} Defines the interpretation for the LEDs on the wallbox. Active = Upon boot the yellow light will go solid indicating the unit has power. The green light is then a data traffic light and flashes when data is transmitted on the terrestrial interface. Debug = Upon boot the yellow light defines the terrestrial interface, once for Ethernet, twice for ATM. The green light becomes an RF link status light flashing once if the modems have not synchronized and 5 times if they have. Example The follow example puts the unit’s wallbox into active mode. leds   active 5.2.13 max_mid max_mid   # #  {1-254} This is only set in the AP and sets the number of interactive SUs that are allowed to register with the AP. Example The following example specifies 32 as the maximum MID supported by the AP and effectively limits the number of SUs to 32. max_mid   32 5.3  initswitchcli 5.3.1 tp tp   name   service   pcr name  {name | default} Can be assigned a name or the default. service  {UBR | CBR | ABR | VBR} UBR is currently the only service that is supported. March 10, 2003  Company Confidential  Page 25 of 149
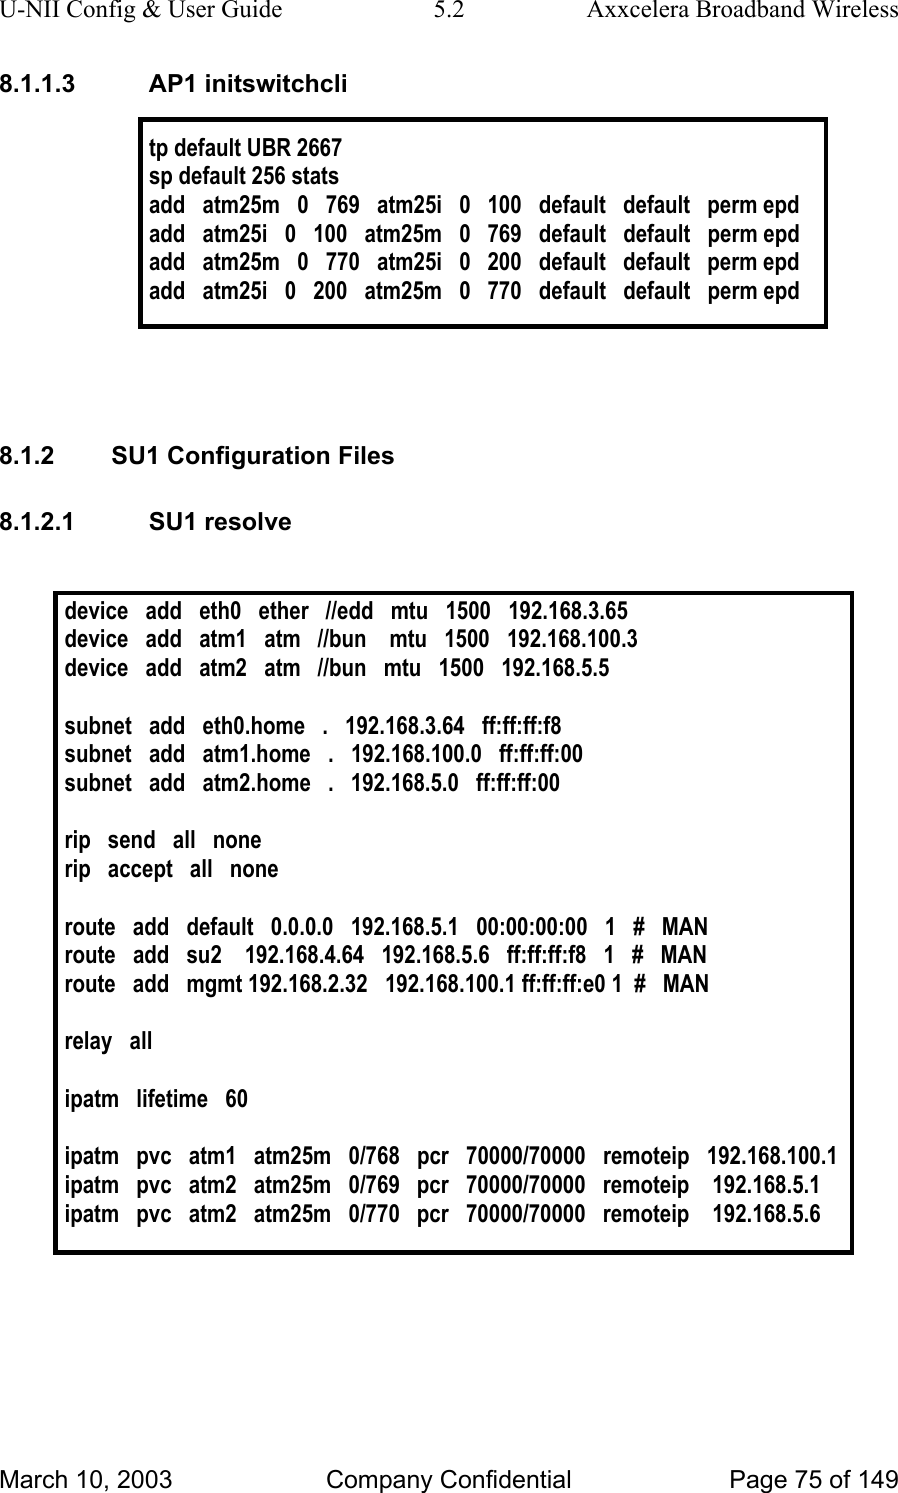
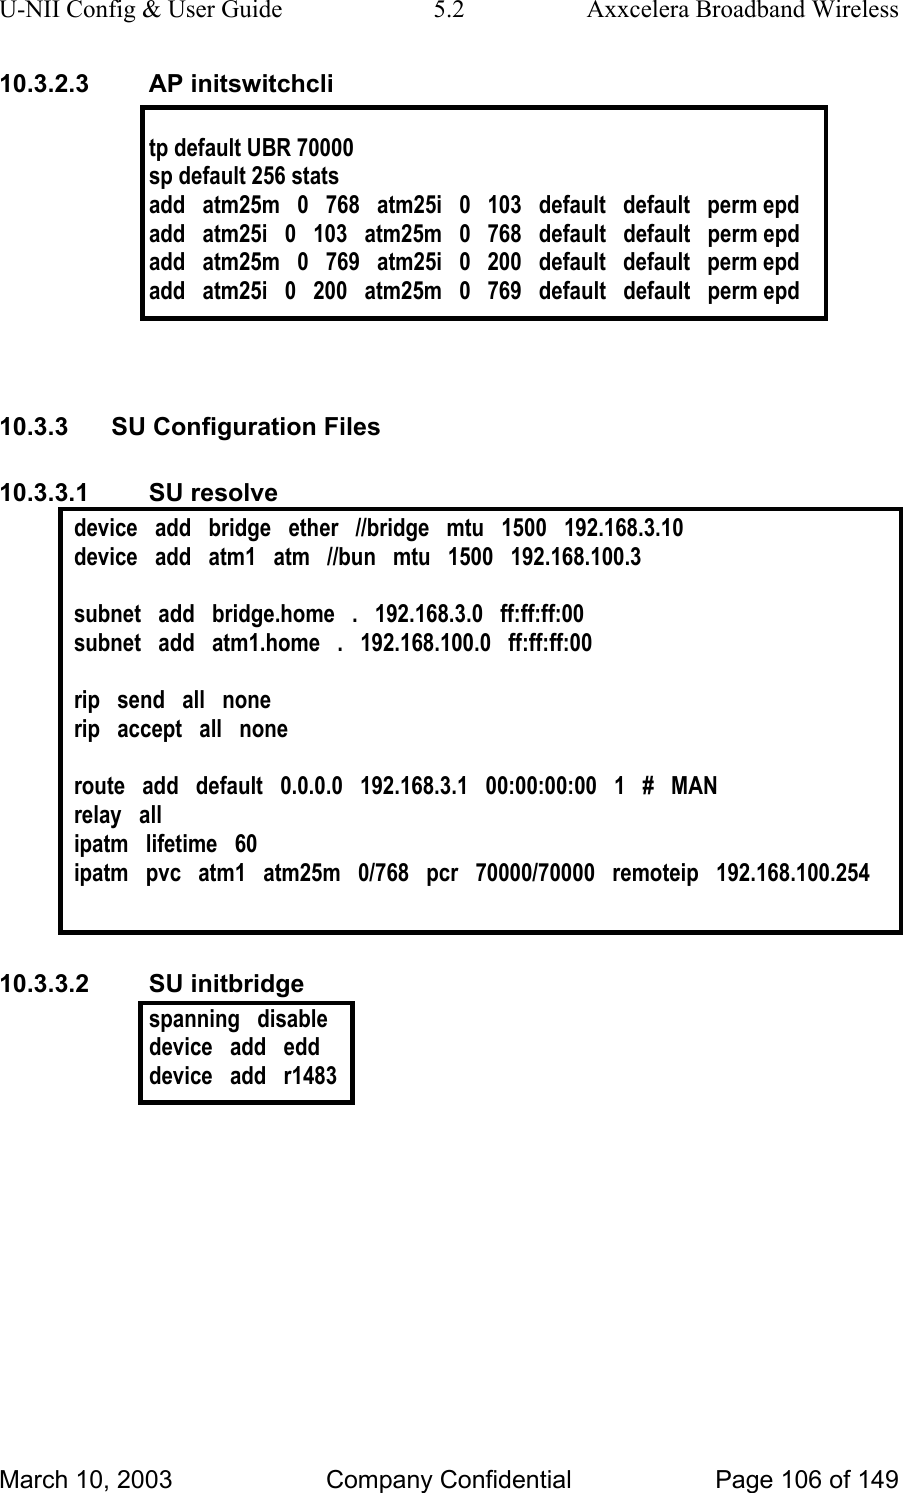
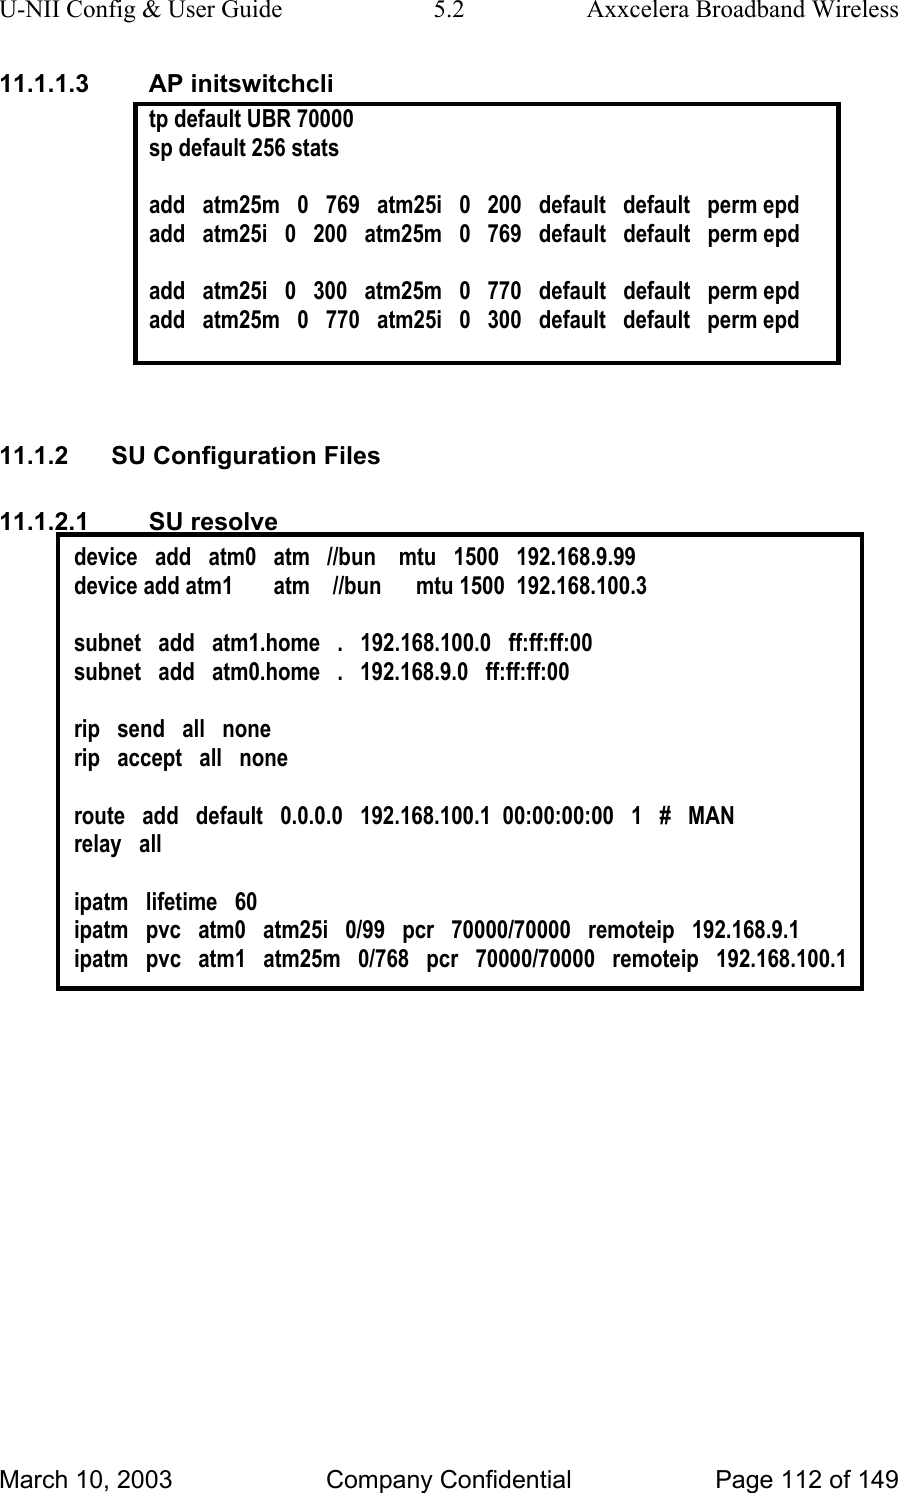
U-NII Config & User Guide  5.2  Axxcelera Broadband Wireless pcr  {0-70000} Peak Cell Rate, used to define the maximum cells arrival/transmission rat at/from the wireless interface (ATM cells per second). Example TP (traffic parameter) sets the type of service that is desired and peak cell rate. The following example show the TP default set to Unspecified Bit Rate with a Peak Cell Rate of 2667.  tp   default   UBR   2667 NOTE: When setting PCR for a bi-directional PVC the following applies.   atm25i – atm25m  = terrestrial – wireless : which is the same as the tx in the ipatm pvc settings.   atm25m – atm25i  = wireless – terrestrial : which is the same as the rx in the ipatm pvc settings.   5.3.2 sp sp   name   buffer   stats name  {name | default} Can be assigned a name or the default.  buffer  {cells} Number of cells that can be buffered.  stats  {stats} Is optional, but needs to be used for the stats command to work. Example SP (switch parameter) sets the size of the buffer in the switchcli and whether or not stats are recorded. The following shows the buffer set to 256 cells and stats recording enabled. This should be the default for all configs using the switchcli. sp   default   256 stats N 5.3.3 add add   iport  ivpi   ivci   oport   ovpi   ovci   tp   sp   type epd March 10, 2003  Company Confidential  Page 26 of 149
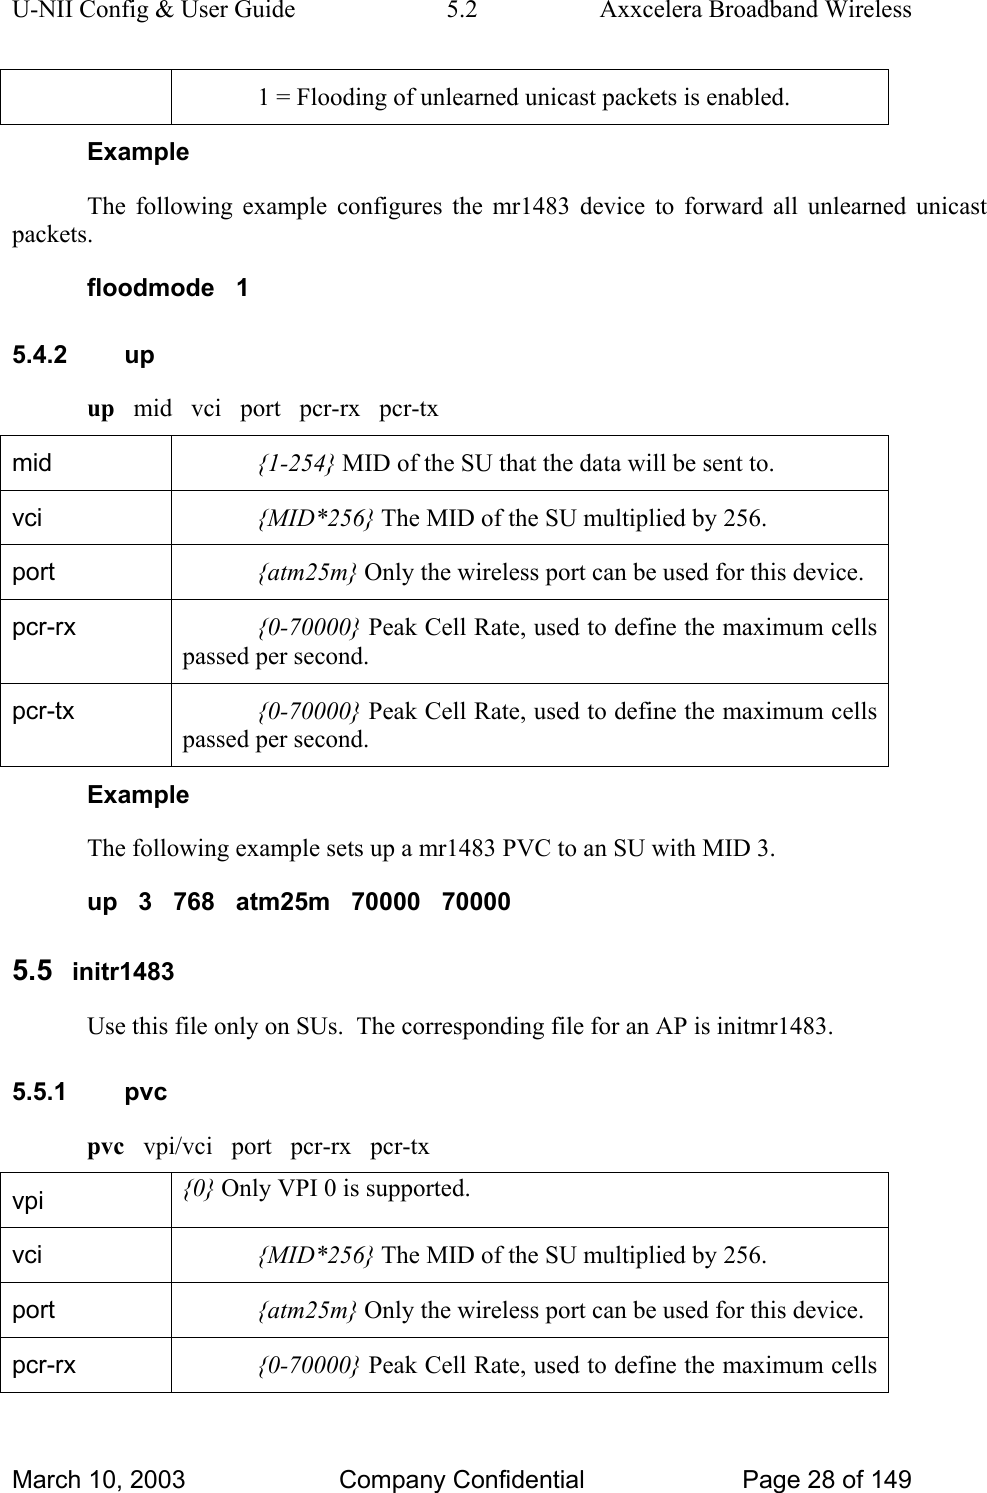
U-NII Config & User Guide  5.2  Axxcelera Broadband Wireless iport  {atm25i | atm25m} In port of uni-directional PVC. atm25i = terrestrial atm25m = wireless ivpi  {0-7} Currently only VPI 0 is supported on the wireless interface. The terrestrial interface can use any in the range. ivci  {32-65535} In port VCI. oport  {atm25i | atm25m} Out port of the uni-directional PVC. ovpi  {0-7} Currently only VPI 0 is supported on the wireless interface. The terrestrial interface can use any in the range. ovci  {32-65535} Out port VCI. tp  {name} This is the name of the traffic parameter (previously set) that applies to this PVC mapping.  sp  {name} This is the name of the switch parameter (previously set) that applies to this PVC mapping. type  {perm | soft | none} For all static configurations “perm” should be used. epd  {epd]  Early Packet Discard will discard arriving cells when buffering is below 32 cells.  Example The following example shows a uni-directional PVC mapped from the terrestrial to wireless port. add atm25i 0 100 atm25m 0 256 default default perm epd 5.4  initmr1483 Use this file only on APs.  The corresponding file for an SU is initr1483. 5.4.1 floodmode floodmode   mode mode  {0 | 1} 0 = Flooding of unlearned unicast packets is disabled. March 10, 2003  Company Confidential  Page 27 of 149
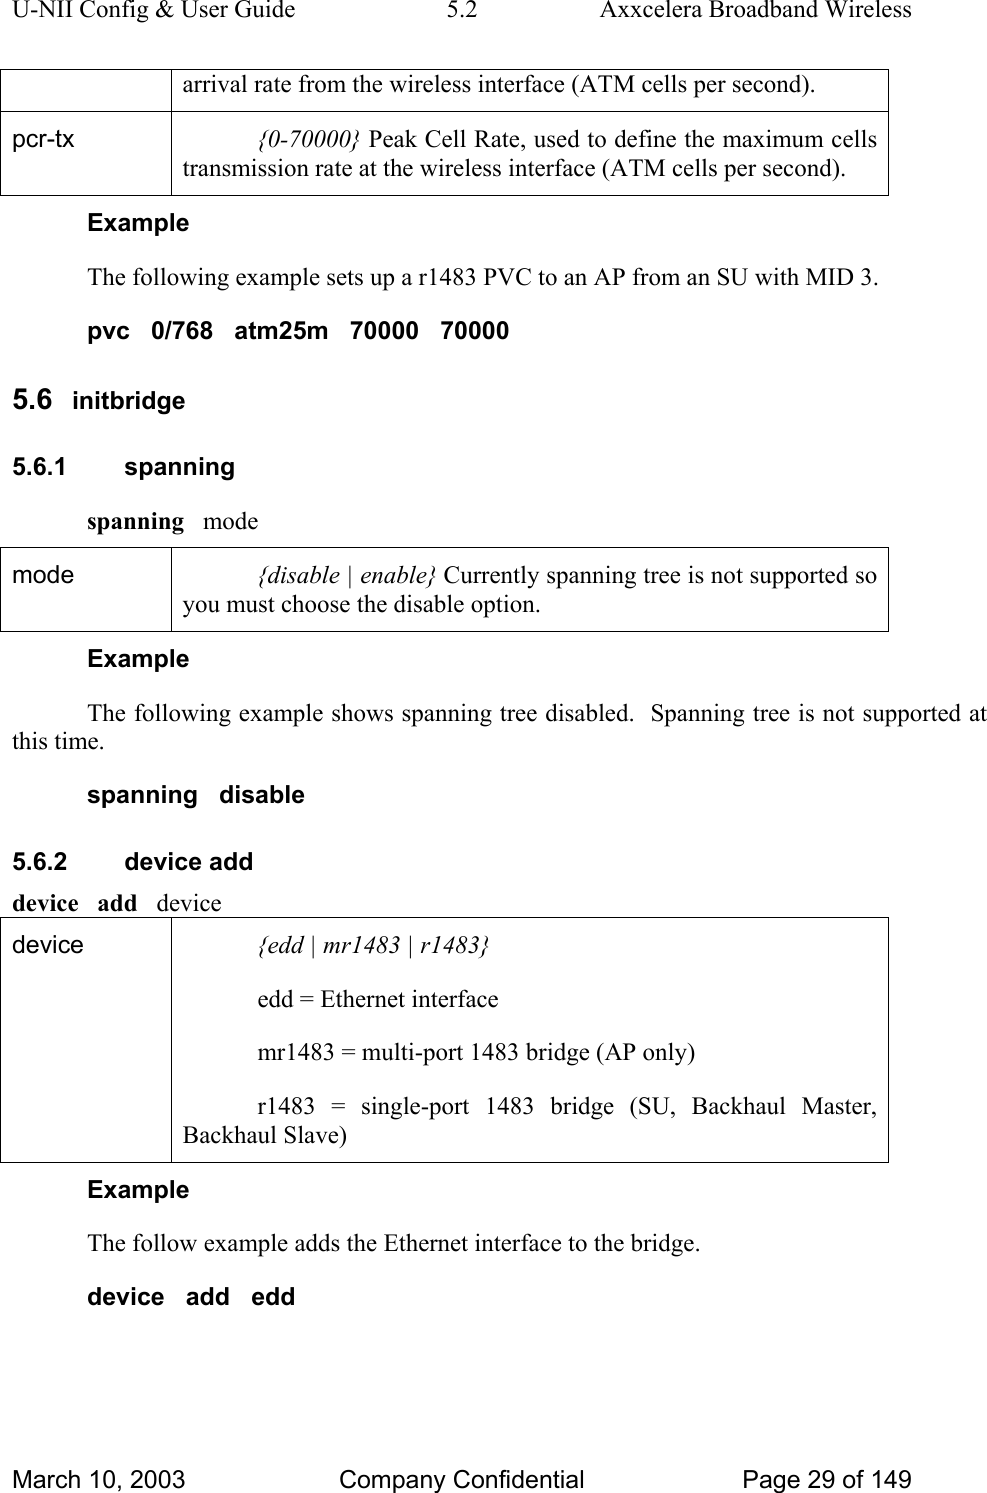
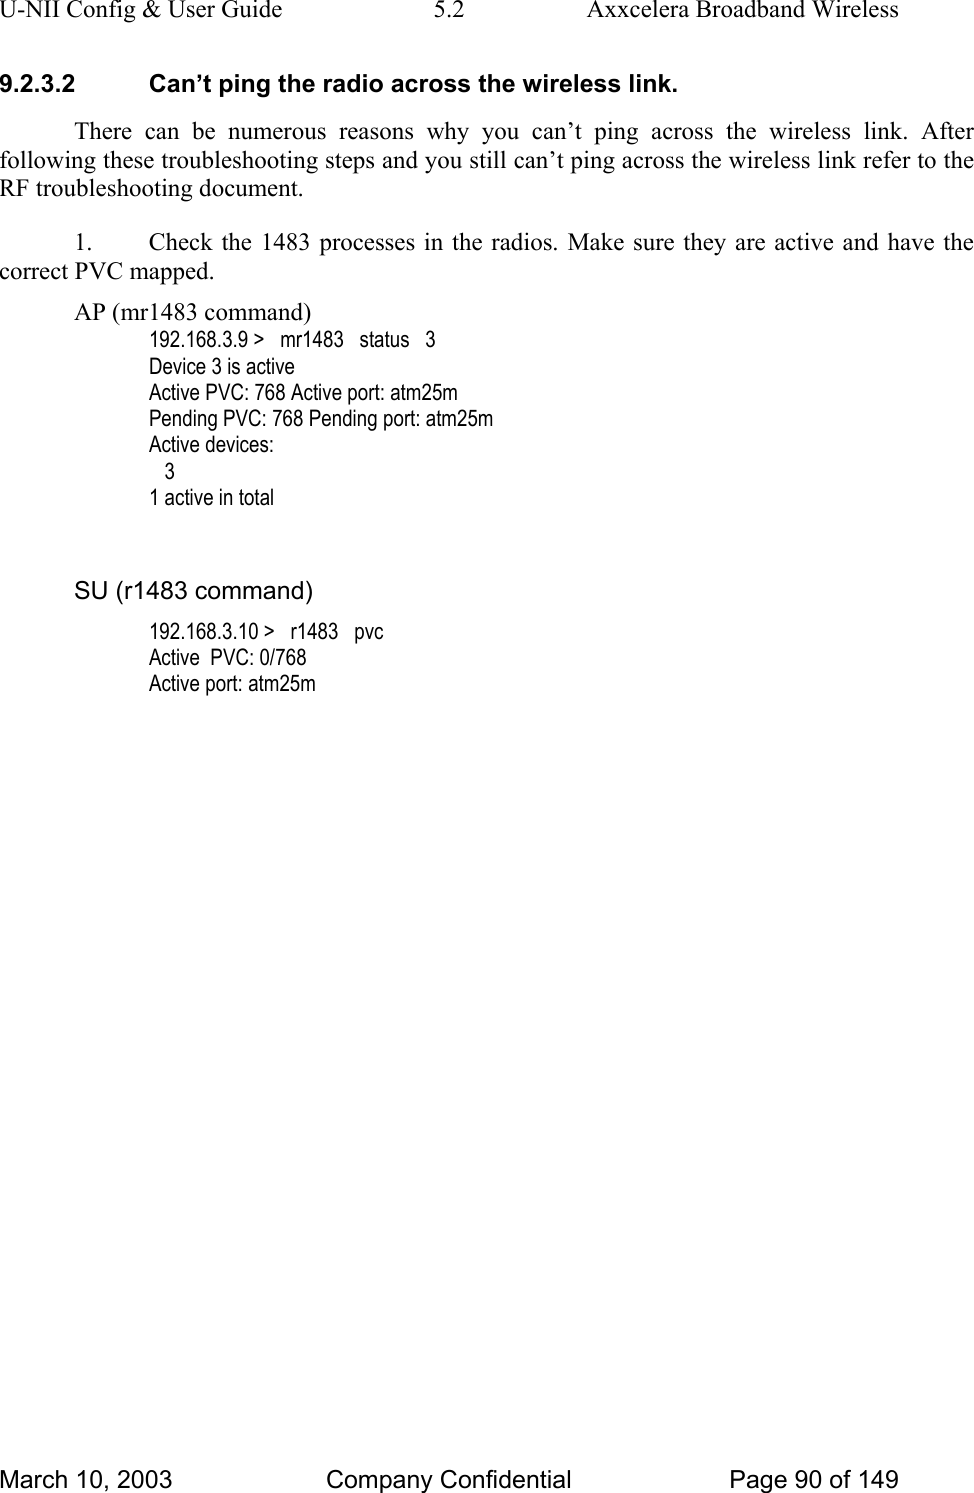
U-NII Config & User Guide  5.2  Axxcelera Broadband Wireless 1 = Flooding of unlearned unicast packets is enabled. Example The following example configures the mr1483 device to forward all unlearned unicast packets. floodmode   1 5.4.2 up up   mid   vci   port   pcr-rx   pcr-tx mid  {1-254} MID of the SU that the data will be sent to. vci  {MID*256} The MID of the SU multiplied by 256. port  {atm25m} Only the wireless port can be used for this device. pcr-rx  {0-70000} Peak Cell Rate, used to define the maximum cells passed per second. pcr-tx  {0-70000} Peak Cell Rate, used to define the maximum cells passed per second. Example The following example sets up a mr1483 PVC to an SU with MID 3. up   3   768   atm25m   70000   70000 5.5  initr1483 Use this file only on SUs.  The corresponding file for an AP is initmr1483. 5.5.1 pvc pvc   vpi/vci   port   pcr-rx   pcr-tx vpi  {0} Only VPI 0 is supported. vci  {MID*256} The MID of the SU multiplied by 256. port  {atm25m} Only the wireless port can be used for this device. pcr-rx  {0-70000} Peak Cell Rate, used to define the maximum cells March 10, 2003  Company Confidential  Page 28 of 149
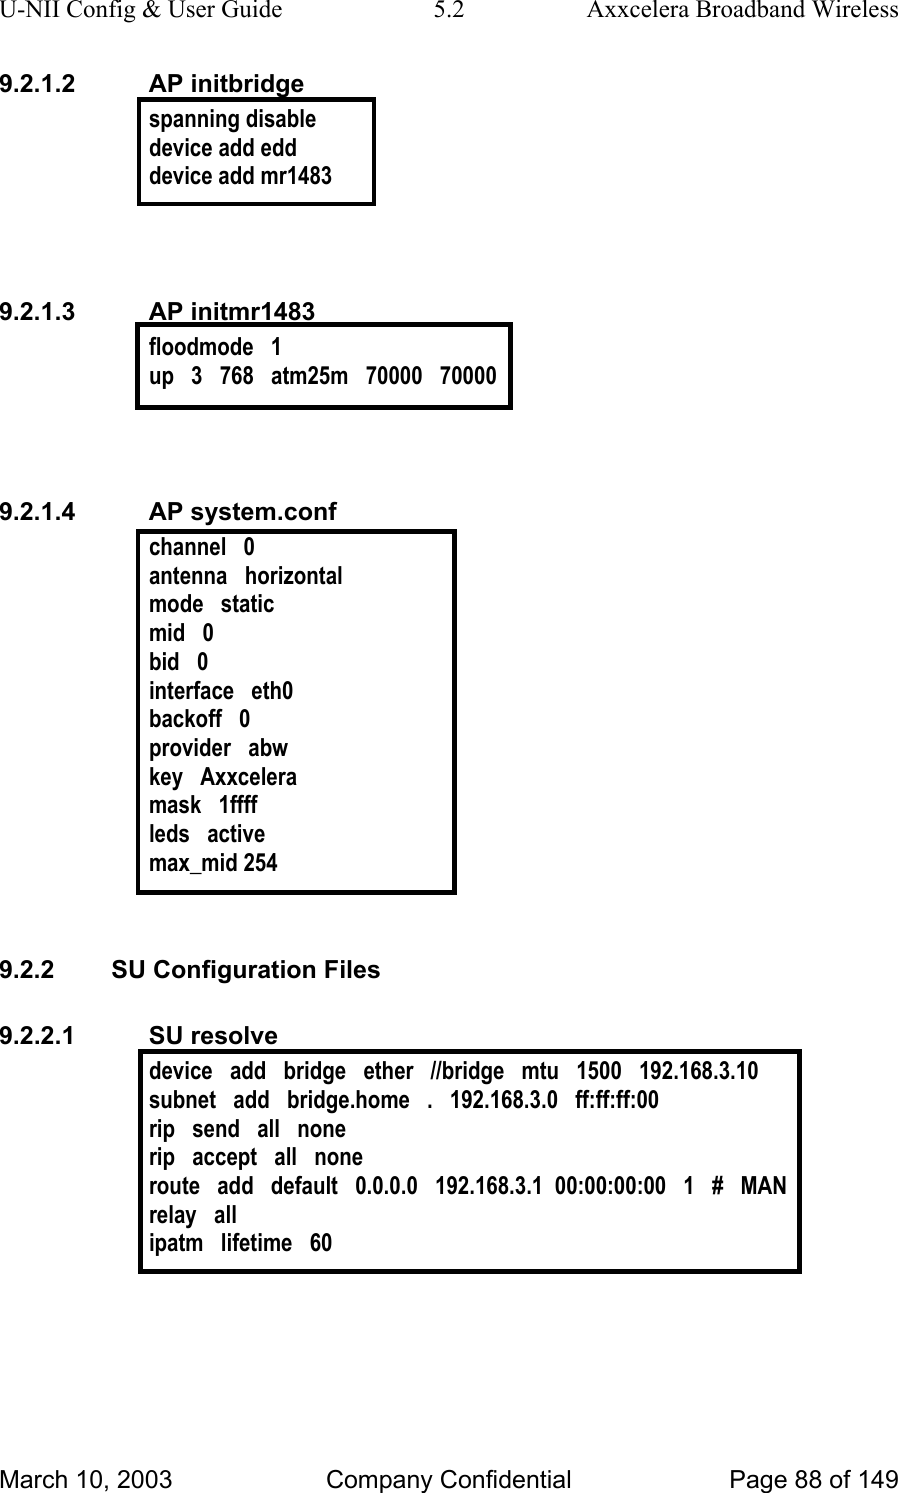
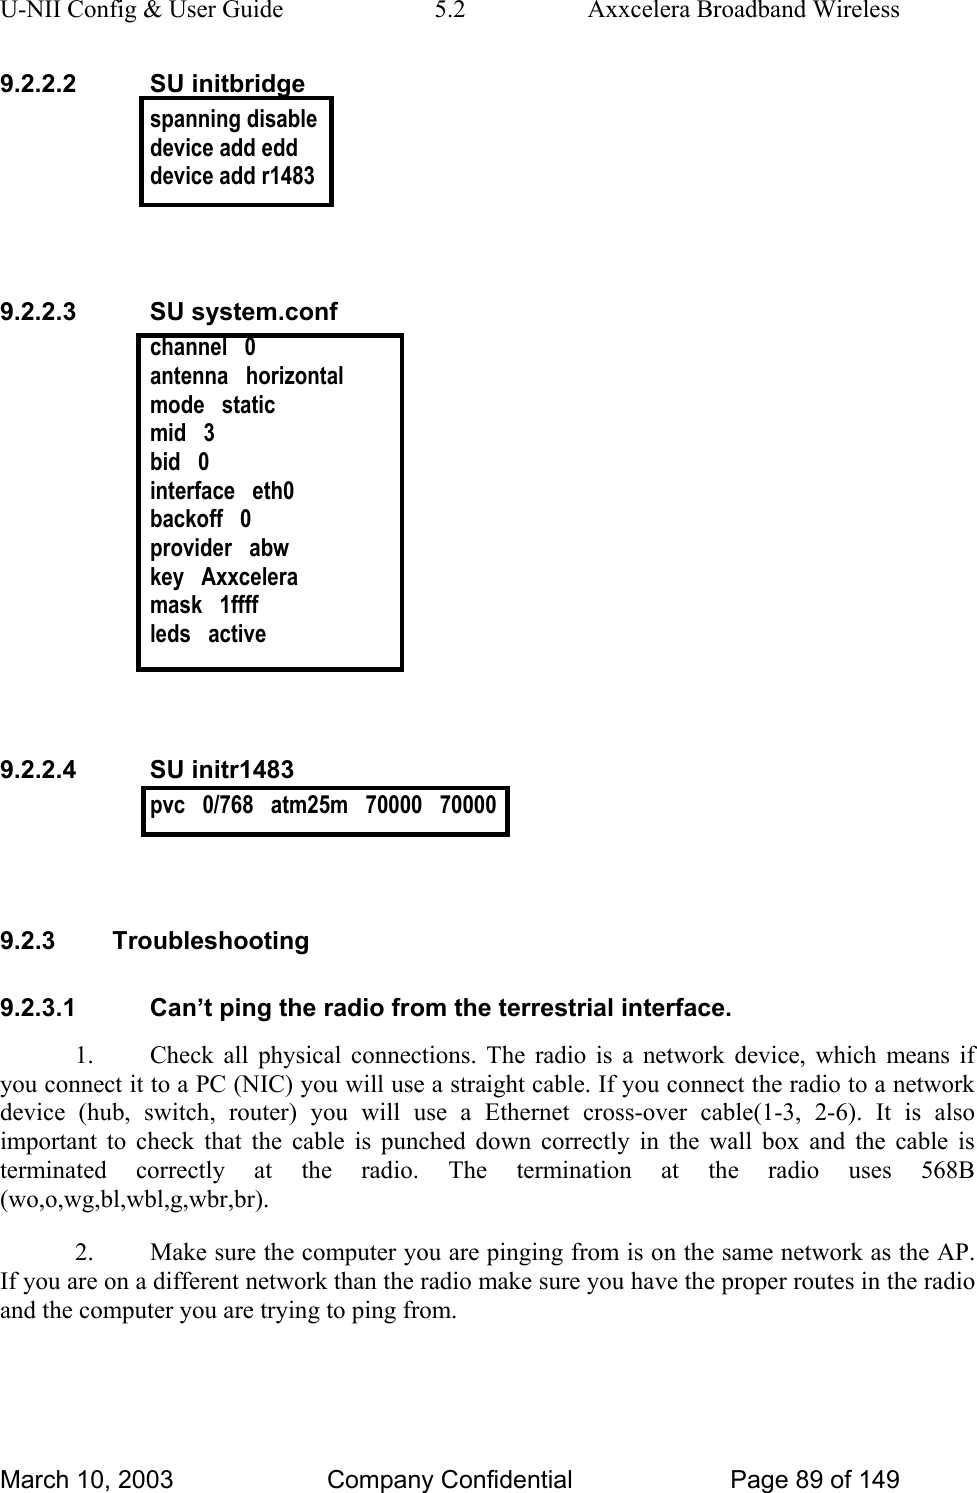
U-NII Config & User Guide  5.2  Axxcelera Broadband Wireless arrival rate from the wireless interface (ATM cells per second). pcr-tx  {0-70000} Peak Cell Rate, used to define the maximum cells transmission rate at the wireless interface (ATM cells per second). Example The following example sets up a r1483 PVC to an AP from an SU with MID 3. pvc   0/768   atm25m   70000   70000 5.6  initbridge 5.6.1 spanning spanning   mode mode  {disable | enable} Currently spanning tree is not supported so you must choose the disable option. Example The following example shows spanning tree disabled.  Spanning tree is not supported at this time. spanning   disable 5.6.2 device add device   add   device device   {edd | mr1483 | r1483} edd = Ethernet interface mr1483 = multi-port 1483 bridge (AP only) r1483 = single-port 1483 bridge (SU, Backhaul Master, Backhaul Slave) Example The follow example adds the Ethernet interface to the bridge. device   add   edd March 10, 2003  Company Confidential  Page 29 of 149
U-NII Config & User Guide  5.2  Axxcelera Broadband Wireless 5.7  dhcpd.conf The dhcpd.conf file follows the same syntax as a Linux or UNIX dhcpd.conf file. 5.7.1 subnet subnet   networkid   netmask   subnet networkid  {a.b.c.d} The network ID for the leased addresses. subnet  {a.b.c.d} The subnet for the leased addresses. Example The following example sets the subnet for the 10.10.10.0 network with a class C netmask. subnet   10.10.10.0   netmask   255.255.255.0 5.7.2 range range   startip   stopip startip  {a.b.c.d} First IP address in the range that will be leased out to clients. stopip  {a.b.c.d} Last IP address in the range that will be leased out to clients. Example The following example shows the range of IP that the DHCP server can lease out to clients. range   10.10.10.10   10.10.10.20 5.7.3 option routers option   routers   gateway gateway  {a.b.c.d} Gateway IP for the computers leasing addresses. Example The following example sets the default route (gateway) address for all clients that lease an address from the server. option   routers   10.10.10.1 March 10, 2003  Company Confidential  Page 30 of 149
U-NII Config & User Guide  5.2  Axxcelera Broadband Wireless 5.7.4 max-lease-time max-lease-time   seconds seconds  {0-86400} Time in seconds that a client can hold a leased address from the DHCP server. A setting of 0 seconds will make the lease never timeout. Example The following example sets the lease time to 24 hours (=24x60x60). max-lease-time   86400 5.7.5 option domain-name option domain-name   dnsname dnsname  {name} Name of the DNS Server. Example The following example sets the DNS suffixes that the clients will use. option   domain-name   www.dns.com 5.7.6 option domain-name-servers option   domain-name-servers   dnsip dnsip  {a.b.c.d} IP address of the DNS Server. Example The following example sets the DNS server that all the clients will use. option   domain-name-servers   192.168.1.254 5.8  snmpinit 5.8.1 access write access write   password password  {password} Sets the password for the unit. Example March 10, 2003  Company Confidential  Page 31 of 149
U-NII Config & User Guide  5.2  Axxcelera Broadband Wireless The following example sets the password to “atmos”. access   write   atmos NOTE: AB-Access only supports write access and does not support read access.    March 10, 2003  Company Confidential  Page 32 of 149
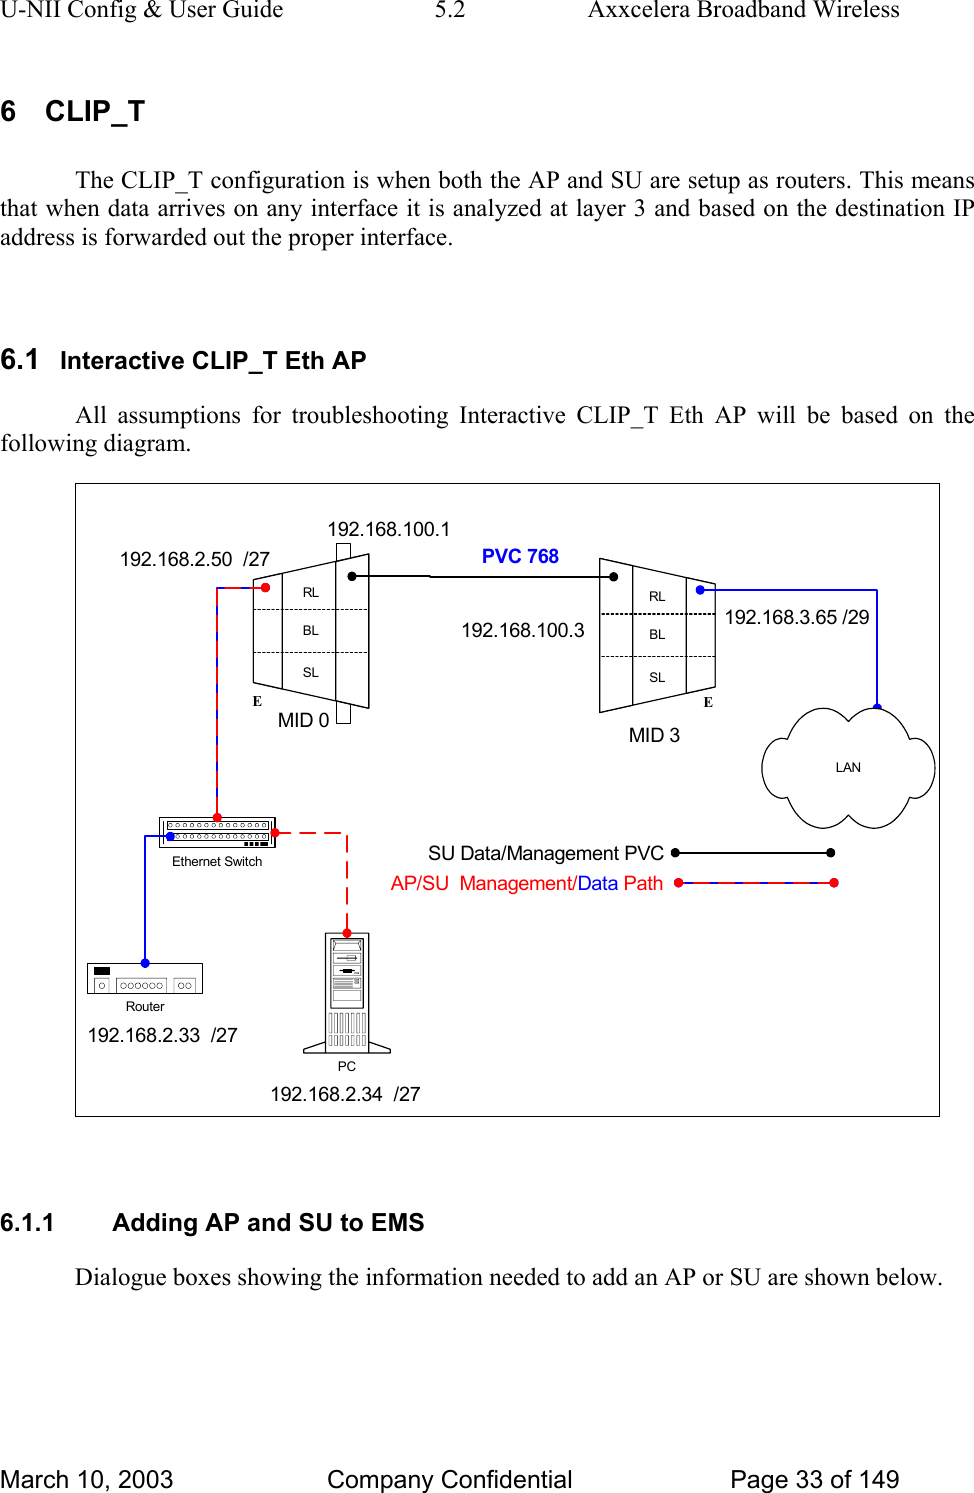
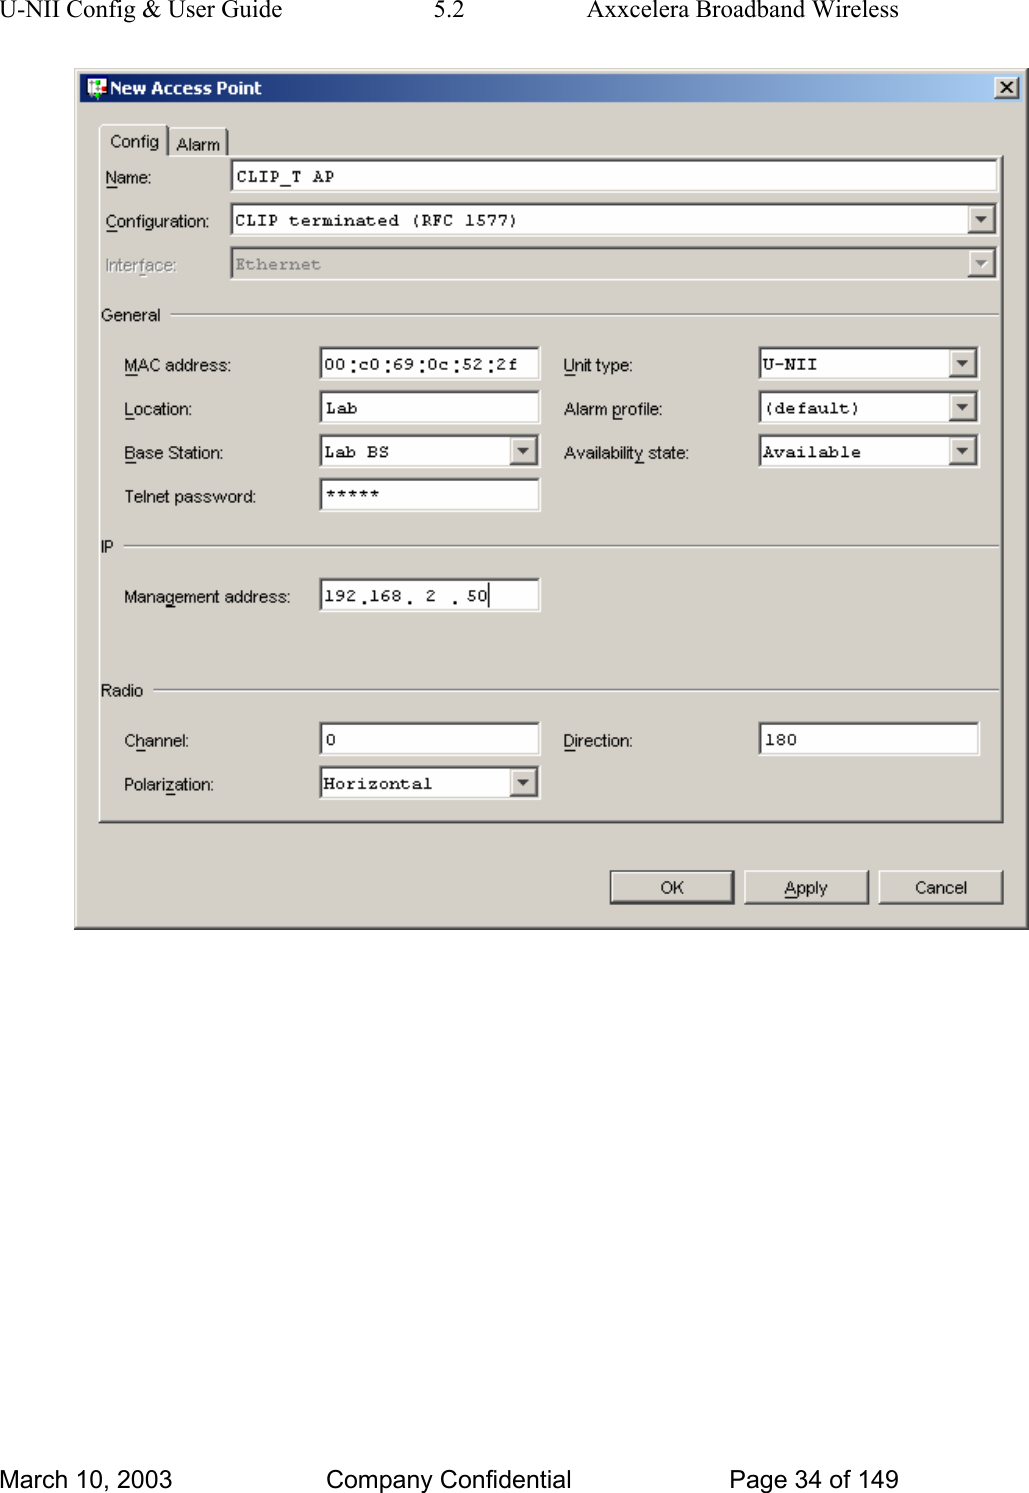
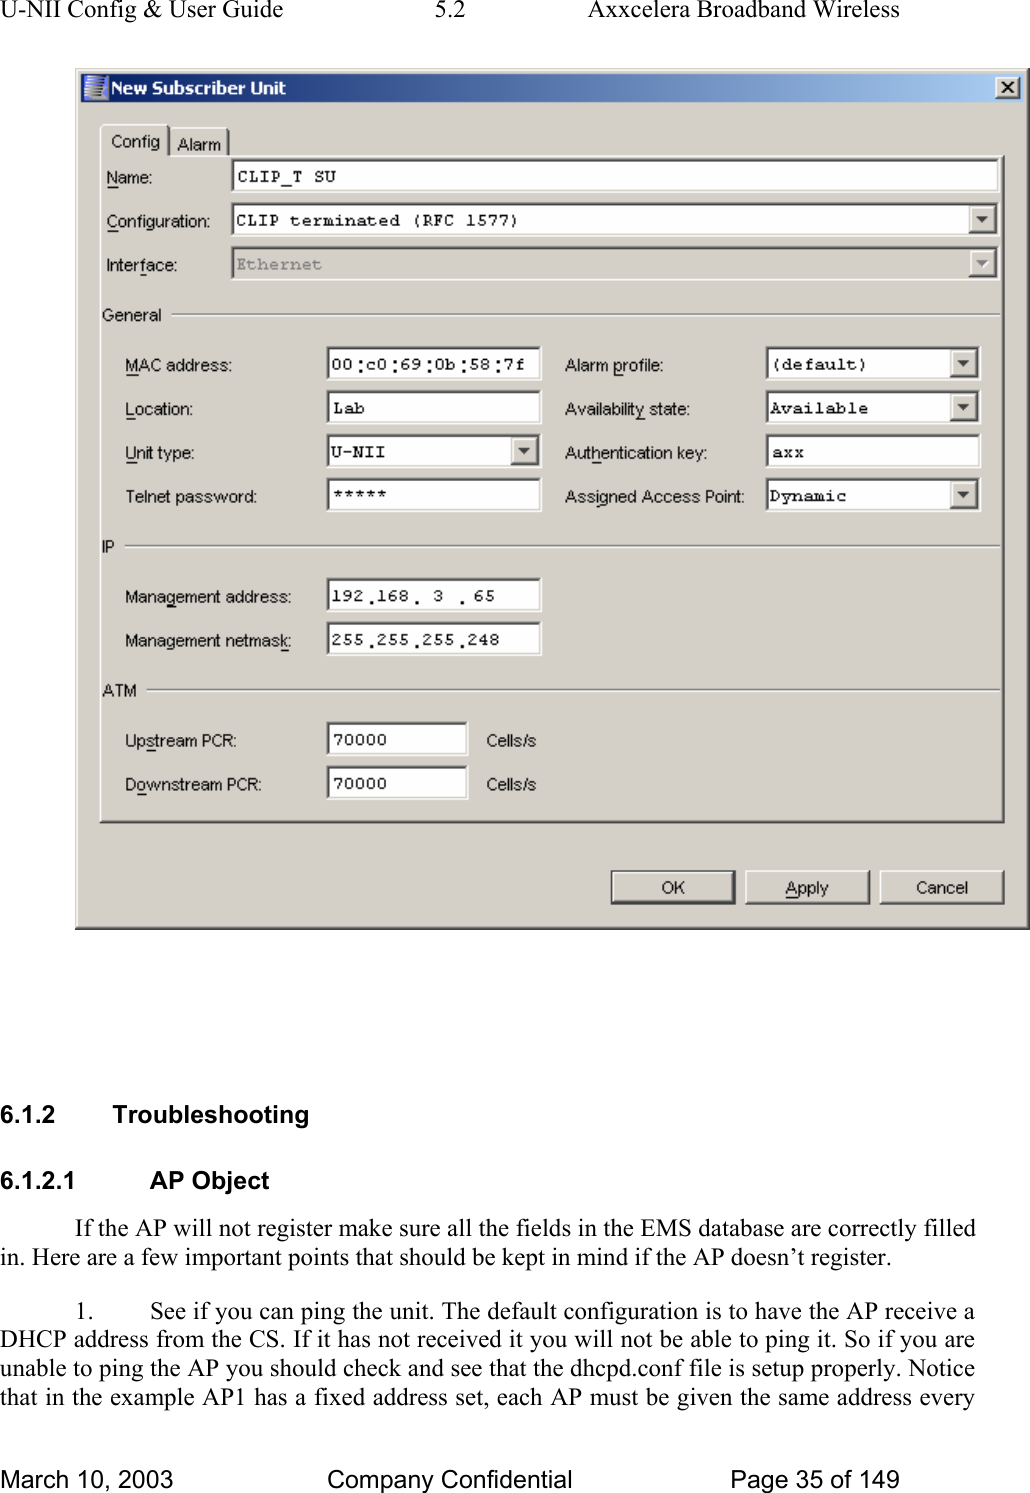
U-NII Config & User Guide  5.2  Axxcelera Broadband Wireless 6 CLIP_T The CLIP_T configuration is when both the AP and SU are setup as routers. This means that when data arrives on any interface it is analyzed at layer 3 and based on the destination IP address is forwarded out the proper interface.   6.1  Interactive CLIP_T Eth AP All assumptions for troubleshooting Interactive CLIP_T Eth AP will be based on the following diagram.  RLBLSLERLBLSLEEthernet SwitchPCRouter192.168.2.33  /27192.168.2.34  /27192.168.100.3 192.168.3.65 /29MID 0 MID 3192.168.2.50  /27 PVC 768LANSU Data/Management PVCData192.168.100.1 AP/SU  Management/  Path 6.1.1  Adding AP and SU to EMS Dialogue boxes showing the information needed to add an AP or SU are shown below. March 10, 2003  Company Confidential  Page 33 of 149
U-NII Config & User Guide  5.2  Axxcelera Broadband Wireless  March 10, 2003  Company Confidential  Page 34 of 149
U-NII Config & User Guide  5.2  Axxcelera Broadband Wireless    6.1.2 Troubleshooting 6.1.2.1 AP Object If the AP will not register make sure all the fields in the EMS database are correctly filled in. Here are a few important points that should be kept in mind if the AP doesn’t register. 1.  See if you can ping the unit. The default configuration is to have the AP receive a DHCP address from the CS. If it has not received it you will not be able to ping it. So if you are unable to ping the AP you should check and see that the dhcpd.conf file is setup properly. Notice that in the example AP1 has a fixed address set, each AP must be given the same address every March 10, 2003  Company Confidential  Page 35 of 149
U-NII Config & User Guide  5.2  Axxcelera Broadband Wireless time it leases an address. It is important to be aware that by default most routers will not pass DHCP request unless they are specifically configured to do so. #eth0 subnet   192.168.2.0   netmask   255.255.255.224    {   range   192.168.2.34   192.168.2.50;   option   routers   192.168.2.33; }   host   AP1    {   hardware    ethernet    0:c0:69:0c:52:2f;   fixed-address    192.168.2.50; }  For various reasons it may be desired to not use DHCP to give an AP an address. In this case the IP address can be statically assigned to the unit. To do this you will need to create a resolve file that looks identical to the CLIP_T static resolve file described in the section for Static 1483_T. 2.  Make sure the MAC address is correct.  Without the correct MAC address the AP can not register. You can verify this by tailing the adapcs.log file. In this example an SU with the indicated MAC address is trying to register and is not found in the database.  Either the SU was not added to the EMS or was entered with the wrong MAC address. [root@cs1 /root]#   tail   -f   /var/log/adapcs.log CS[12399.8192](16Dec 21:33:39.524 ): Protocol:  00 00 00 00 01 00 02 00 00 14 00 01 00 c0 69 0c 52 2f 77 94  CS[12399.8192](16Dec 21:33:39.524 ): DynAccessPointImpl (CLIP_T AP): handleEstablishConnection (AP 00c0690c522f) CS[12399.8192](16Dec 21:33:39.524 ): DynAccessPointImpl (CLIP_T AP): Received ESTABLISH_CONNECTION message from unknown AP ap_02 1216_135100016_111 3.  If the CS is on a different network, than the default route in the AP must be correct. 6.1.2.2 SU Object If the SU will not register make sure all the fields in the EMS database are filled in properly. Here are a few important points that should be kept in mind if the SU doesn’t register. Many different things can cause the SU not to register so after verifying all of these points and it still doesn’t register the next step will be to troubleshoot the RF link. See RF troubleshooting document. 1.  Make sure the MAC address is correct.  Without the correct MAC address the AP can not register. You can verify this by tailing the adapcs.log file. In this example an SU with this MAC address is trying to register and is not found in the database, which means when you created the object it had the wrong MAC address. March 10, 2003  Company Confidential  Page 36 of 149
U-NII Config & User Guide  5.2  Axxcelera Broadband Wireless [root@cs1 /root]#   tail   -f   /var/log/adapcs.log CS[12801.8192](16Dec 21:39:20.034 ): Protocol:  00 00 00 00 01 00 00 05 00 14 00 04 00 c0 69 0b 58 7f b5 10  CS[12801.8192](16Dec 21:39:20.034 ): RegistrarProtocol: SU 00c0690b587f is already registering CS[12801.8192](16Dec 21:39:20.555 ): EMSProtocol: received message REGMSG_REGISTER_SU for CS CS[12801.8192](16Dec 21:39:20.555 ): Protocol: message contents (20 bytes)  2.  Make sure the default route is correct if the SU is on a different network than the Control Server. 3.  Verify that the SU has been upgraded to the CLIP_T interactive configuration.   March 10, 2003  Company Confidential  Page 37 of 149
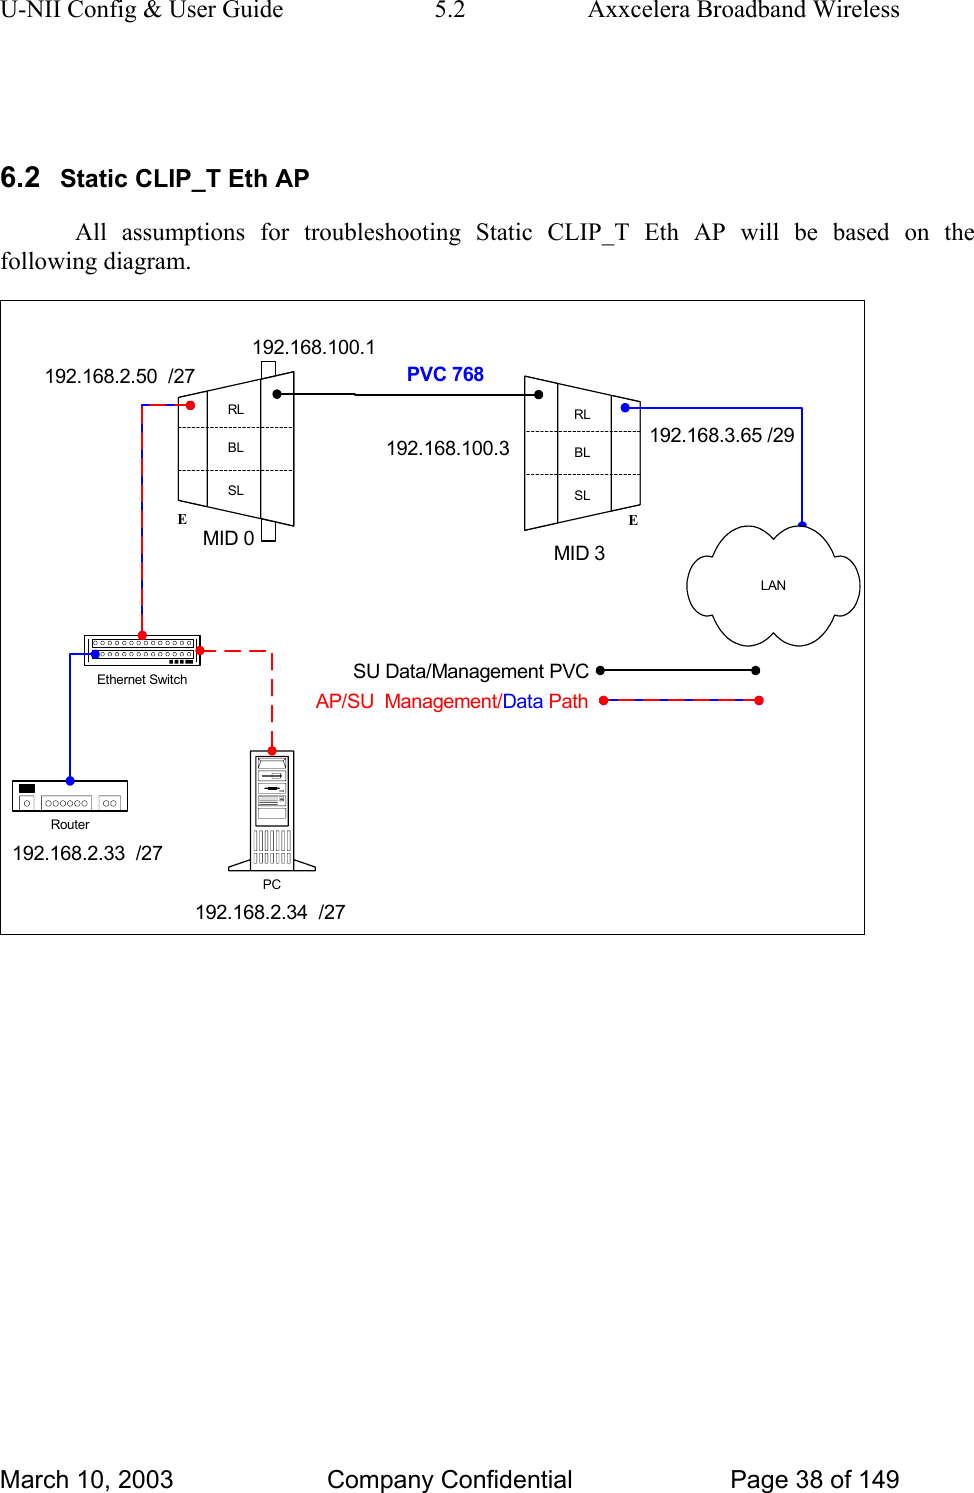
U-NII Config & User Guide  5.2  Axxcelera Broadband Wireless  6.2  Static CLIP_T Eth AP All assumptions for troubleshooting Static CLIP_T Eth AP will be based on the following diagram. RLBLSLERLBLSLEEthernet SwitchPCRouter192.168.2.33  /27192.168.2.34  /27192.168.100.3 192.168.3.65 /29MID 0 MID 3192.168.2.50  /27 PVC 768LANSU Data/Management PVCData192.168.100.1 AP/SU  Management/  PathMarch 10, 2003  Company Confidential  Page 38 of 149
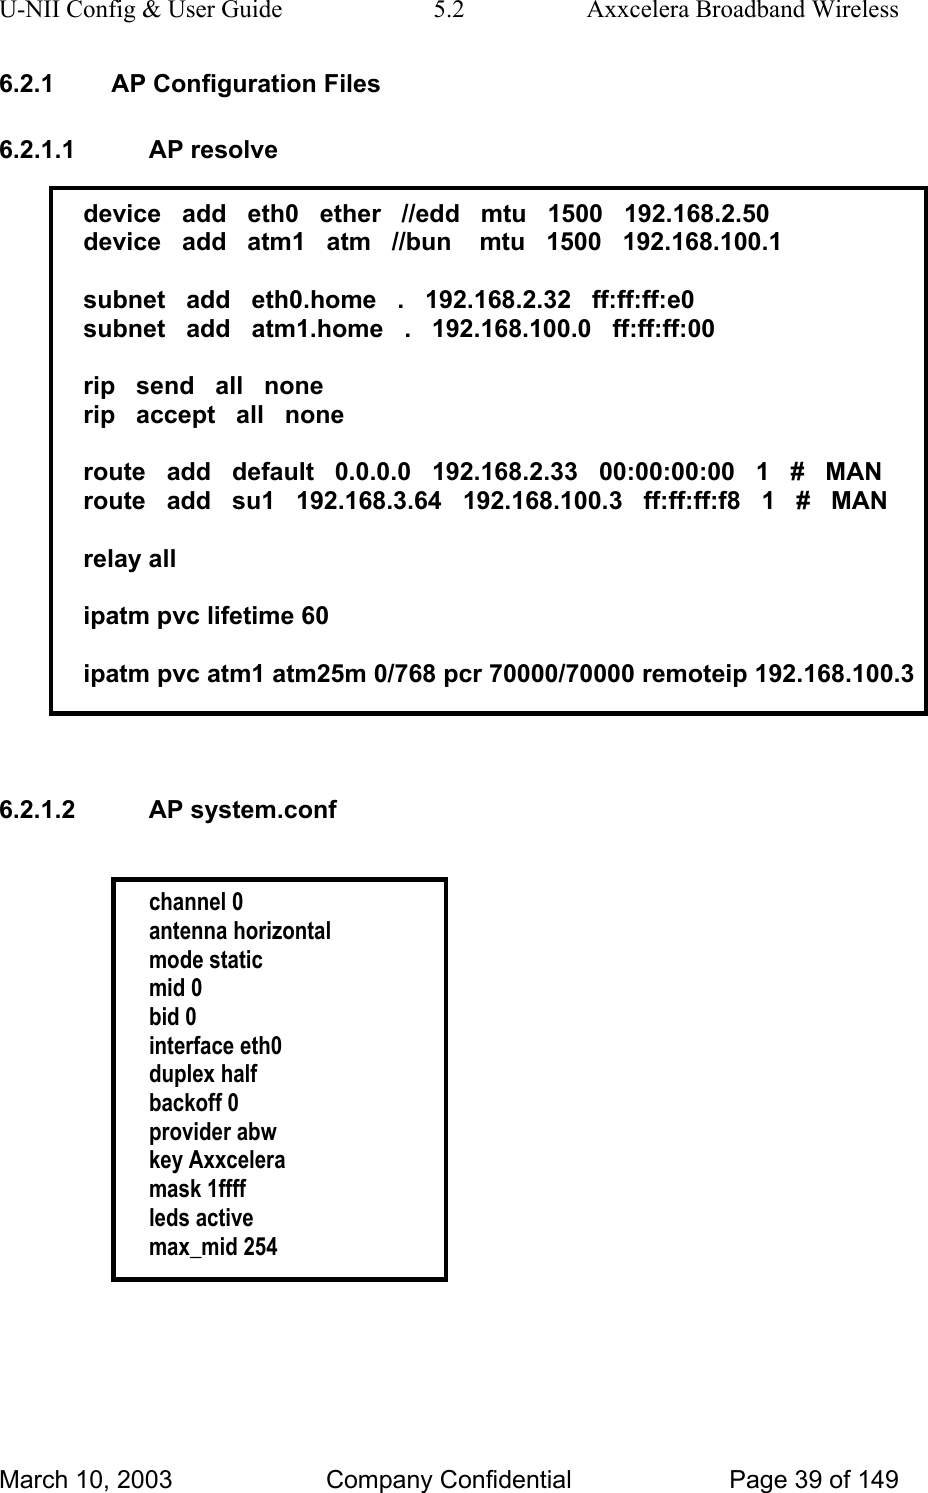
U-NII Config & User Guide  5.2  Axxcelera Broadband Wireless 6.2.1  AP Configuration Files 6.2.1.1 AP resolve  device   add   eth0   ether   //edd   mtu   1500   192.168.2.50 device   add   atm1   atm   //bun    mtu   1500   192.168.100.1  subnet   add   eth0.home   .   192.168.2.32   ff:ff:ff:e0 subnet   add   atm1.home   .   192.168.100.0   ff:ff:ff:00  rip   send   all   none rip   accept   all   none  route   add   default   0.0.0.0   192.168.2.33   00:00:00:00   1   #   MAN route   add   su1   192.168.3.64   192.168.100.3   ff:ff:ff:f8   1   #   MAN  relay all  ipatm pvc lifetime 60  ipatm pvc atm1 atm25m 0/768 pcr 70000/70000 remoteip 192.168.100.3   6.2.1.2 AP system.conf   channel 0 antenna horizontal mode static mid 0 bid 0 interface eth0 duplex half backoff 0 provider abw key Axxcelera mask 1ffff leds active max_mid 254   March 10, 2003  Company Confidential  Page 39 of 149
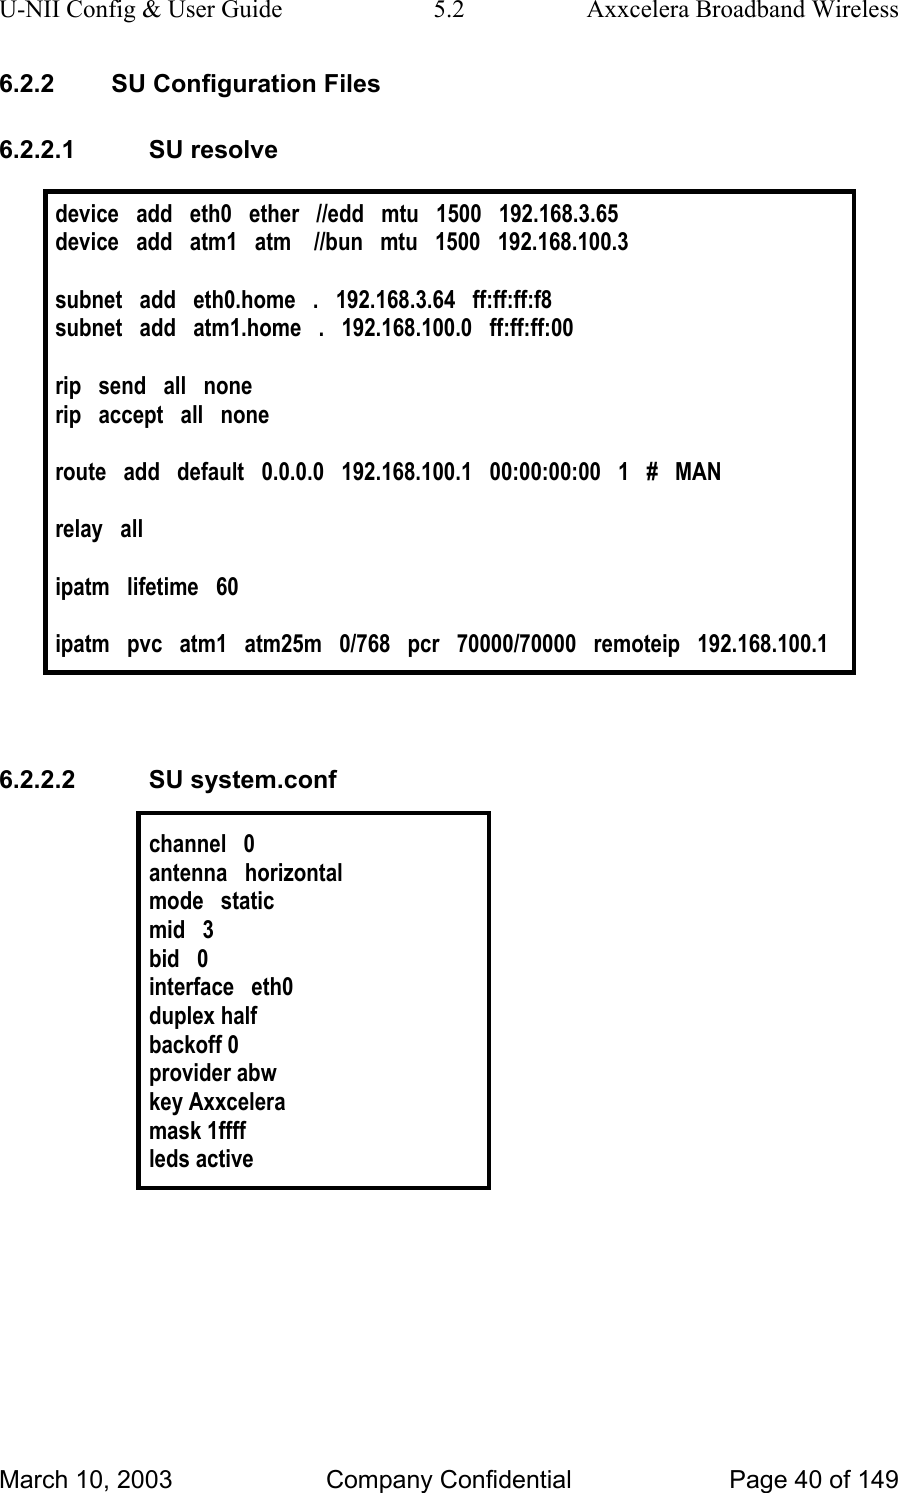
U-NII Config & User Guide  5.2  Axxcelera Broadband Wireless 6.2.2  SU Configuration Files 6.2.2.1 SU resolve  device   add   eth0   ether   //edd   mtu   1500   192.168.3.65 device   add   atm1   atm    //bun   mtu   1500   192.168.100.3  subnet   add   eth0.home   .   192.168.3.64   ff:ff:ff:f8 subnet   add   atm1.home   .   192.168.100.0   ff:ff:ff:00   rip   send   all   none rip   accept   all   none  route   add   default   0.0.0.0   192.168.100.1   00:00:00:00   1   #   MAN  relay   all  ipatm   lifetime   60  ipatm   pvc   atm1   atm25m   0/768   pcr   70000/70000   remoteip   192.168.100.1   6.2.2.2 SU system.conf  channel   0 antenna   horizontal mode   static mid   3 bid   0 interface   eth0 duplex half backoff 0 provider abw key Axxcelera mask 1ffff leds active   March 10, 2003  Company Confidential  Page 40 of 149
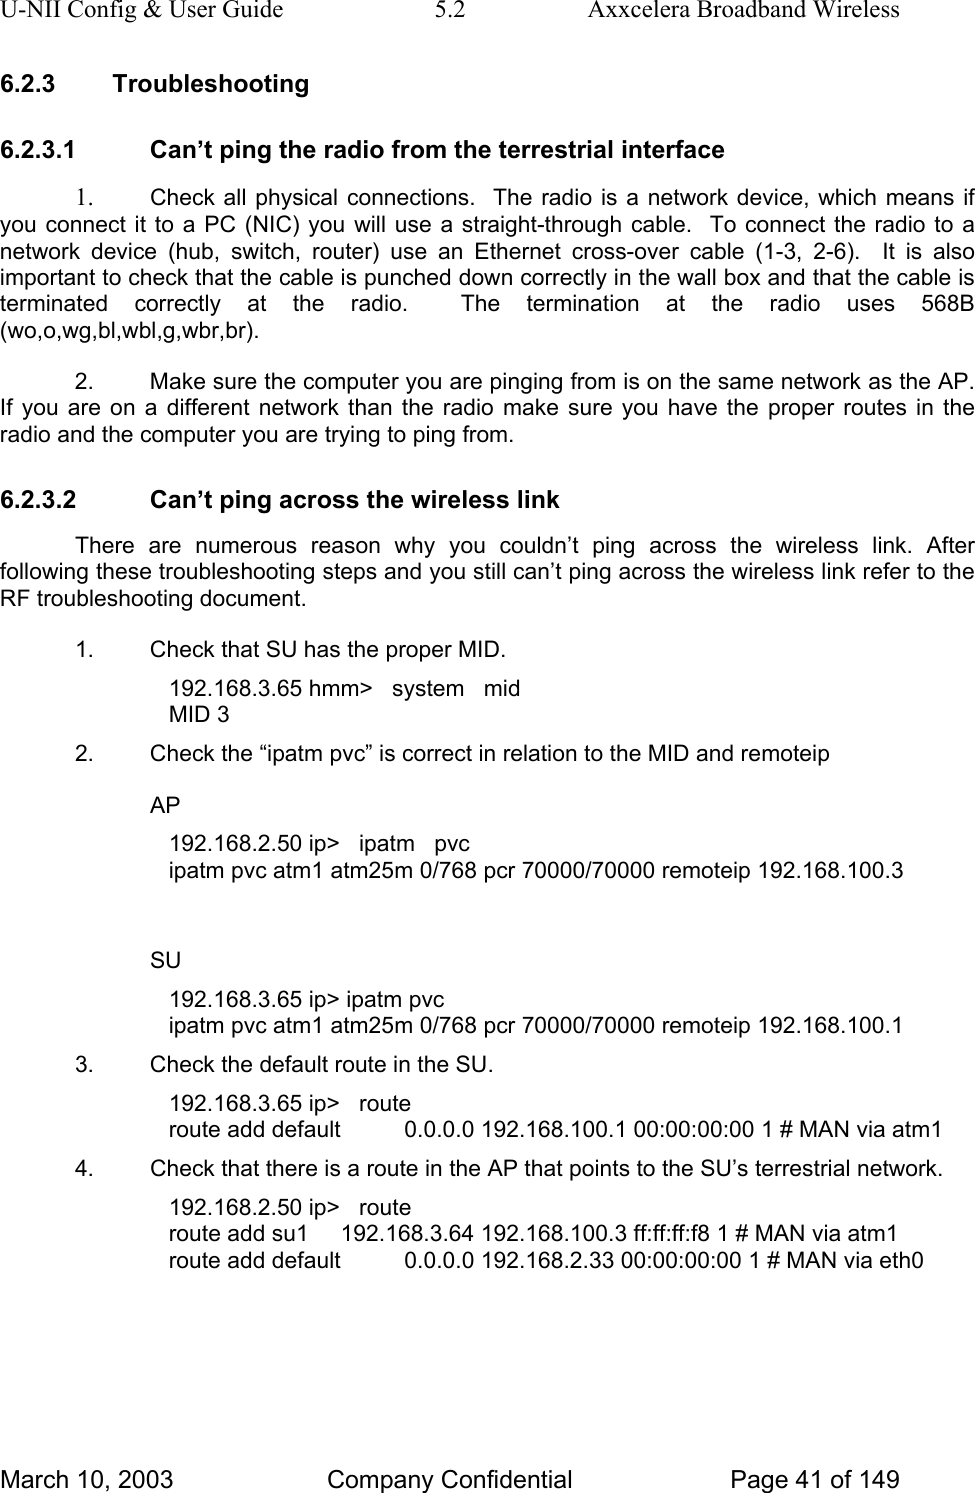
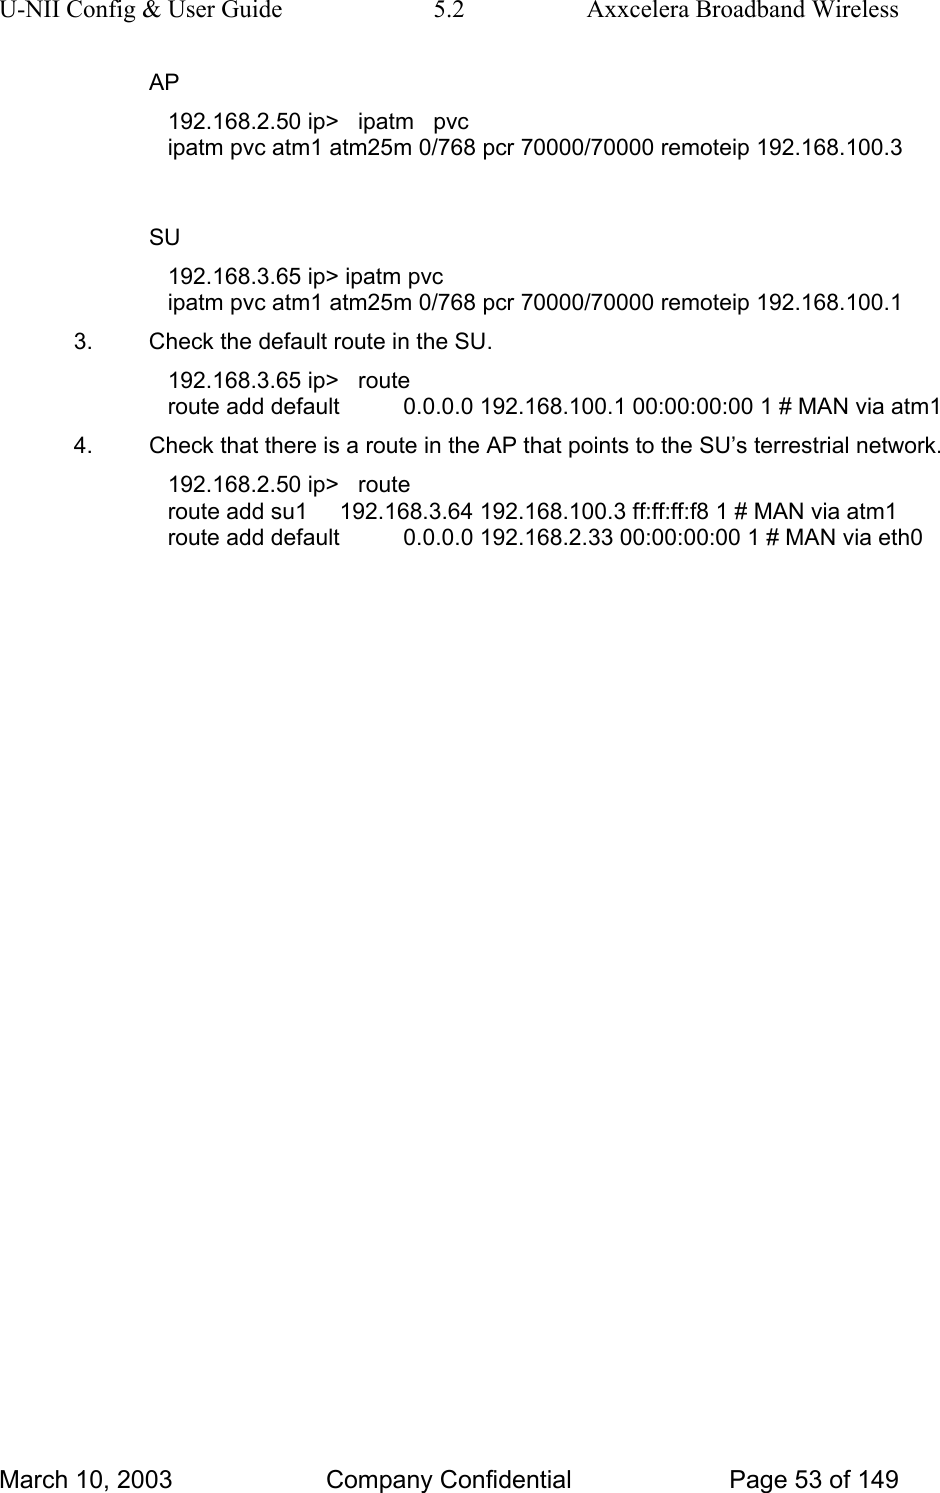
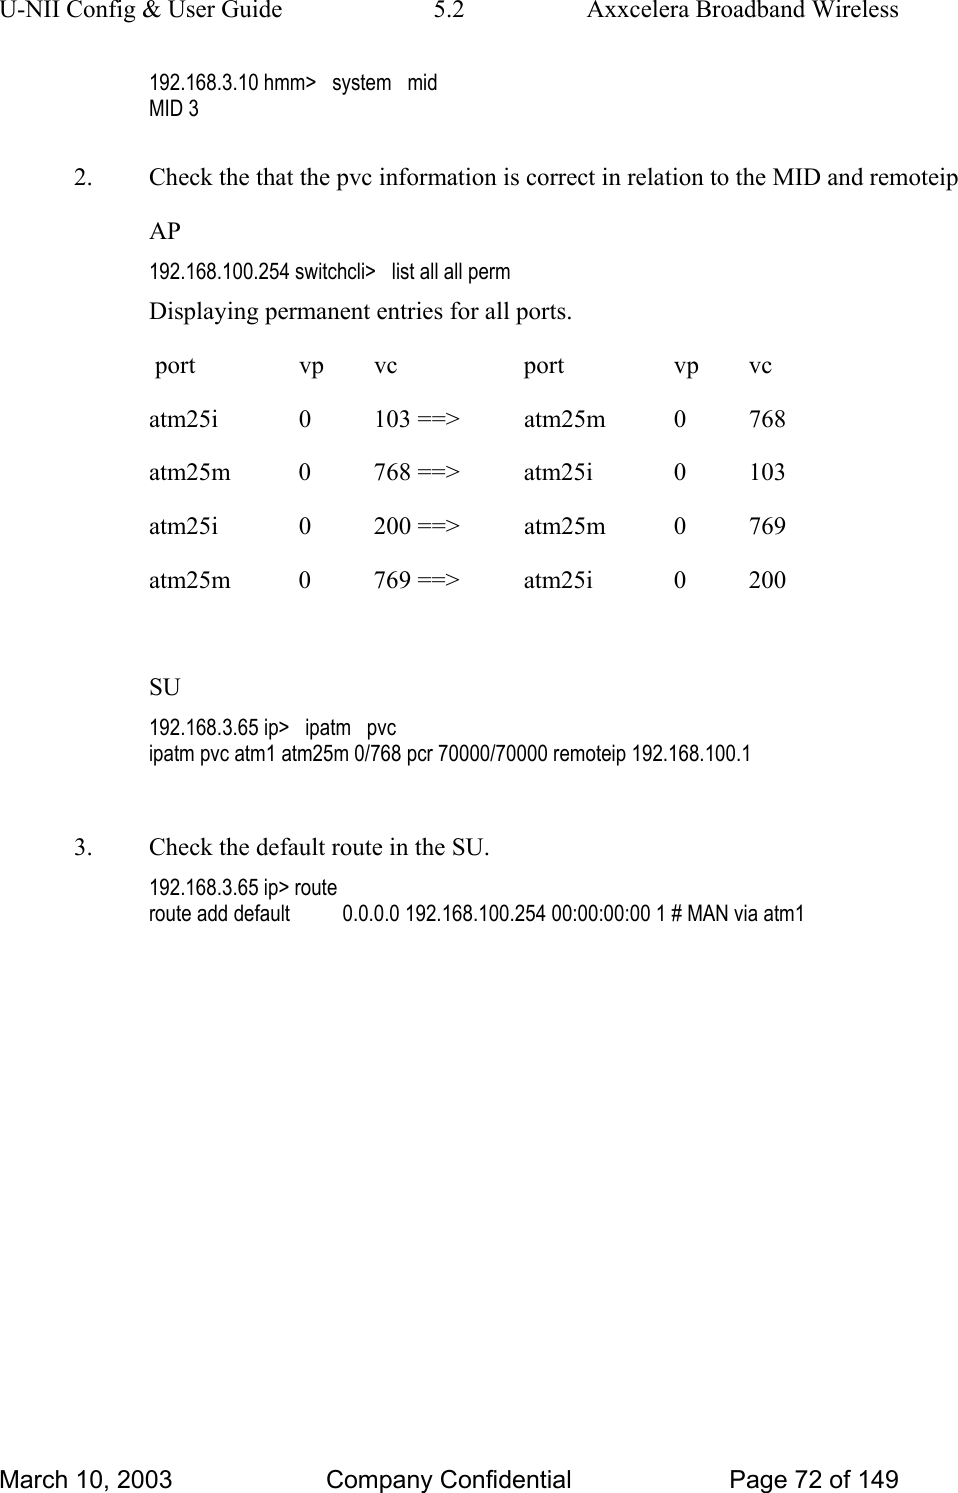
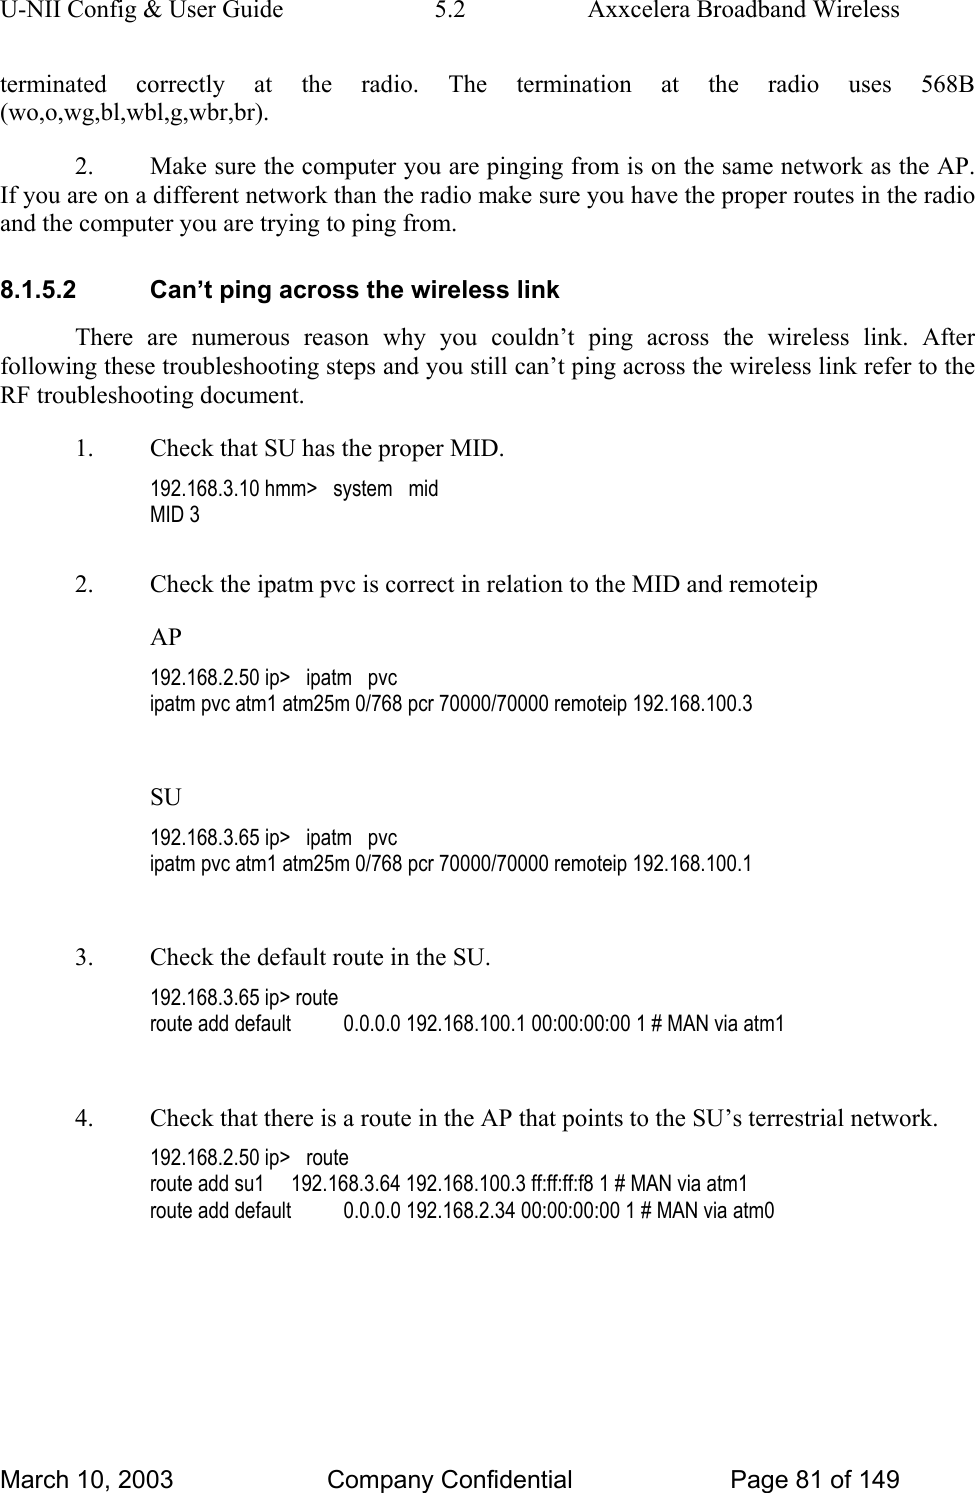
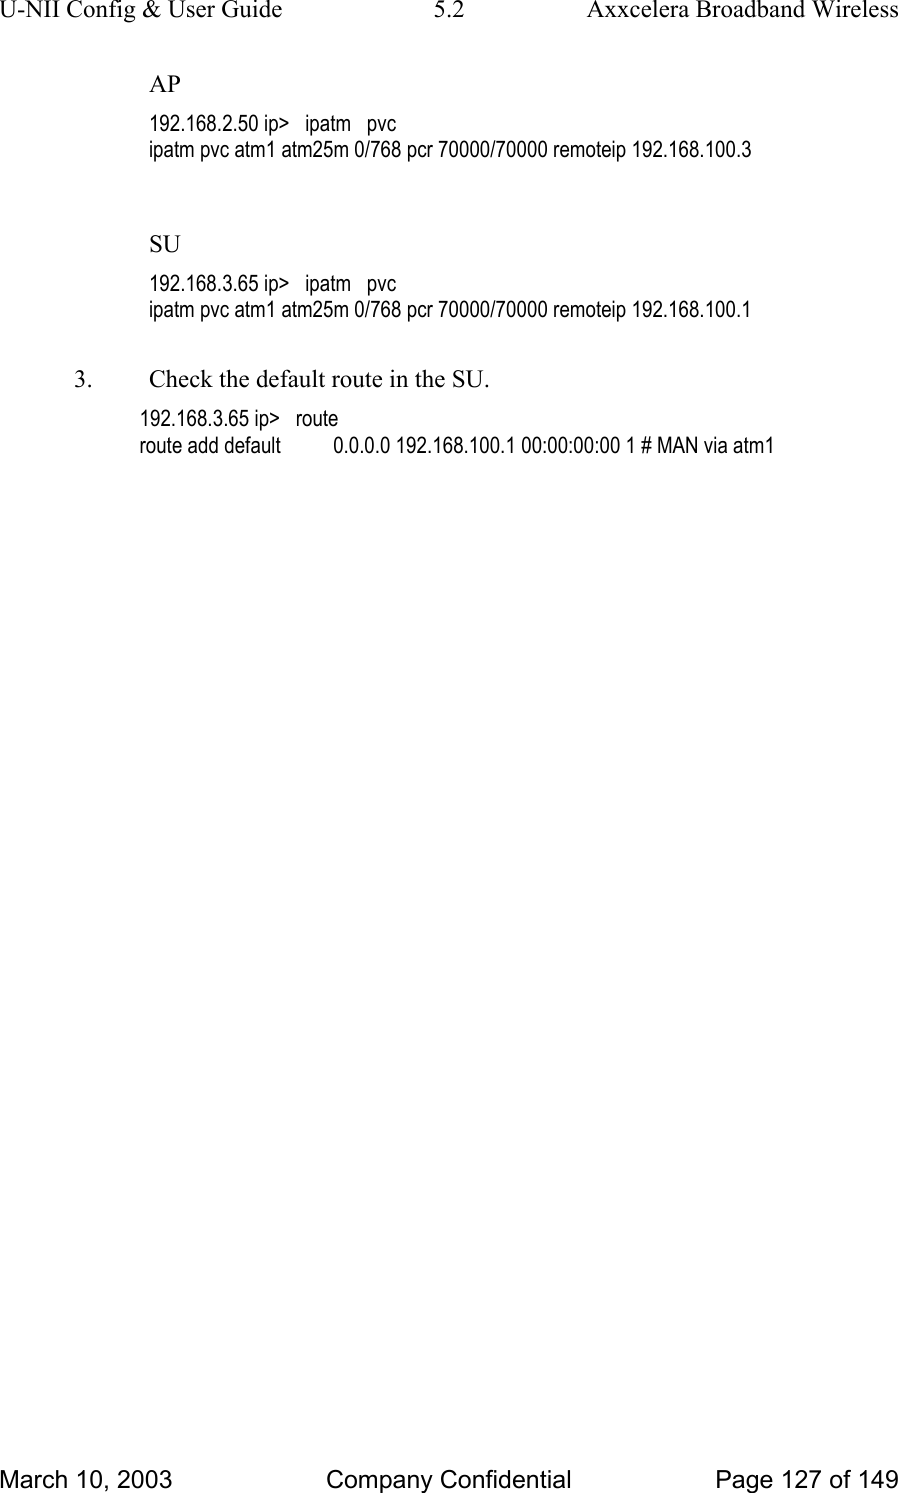
U-NII Config & User Guide  5.2  Axxcelera Broadband Wireless 6.2.3 Troubleshooting 6.2.3.1  Can’t ping the radio from the terrestrial interface 1.  Check all physical connections.  The radio is a network device, which means if you connect it to a PC (NIC) you will use a straight-through cable.  To connect the radio to a network device (hub, switch, router) use an Ethernet cross-over cable (1-3, 2-6).  It is also important to check that the cable is punched down correctly in the wall box and that the cable is terminated correctly at the radio.  The termination at the radio uses 568B (wo,o,wg,bl,wbl,g,wbr,br). 2.  Make sure the computer you are pinging from is on the same network as the AP. If you are on a different network than the radio make sure you have the proper routes in the radio and the computer you are trying to ping from. 6.2.3.2  Can’t ping across the wireless link There are numerous reason why you couldn’t ping across the wireless link. After following these troubleshooting steps and you still can’t ping across the wireless link refer to the RF troubleshooting document. 1.  Check that SU has the proper MID. 192.168.3.65 hmm>   system   mid MID 3 2.  Check the “ipatm pvc” is correct in relation to the MID and remoteip AP 192.168.2.50 ip>   ipatm   pvc ipatm pvc atm1 atm25m 0/768 pcr 70000/70000 remoteip 192.168.100.3  SU 192.168.3.65 ip> ipatm pvc ipatm pvc atm1 atm25m 0/768 pcr 70000/70000 remoteip 192.168.100.1 3.  Check the default route in the SU. 192.168.3.65 ip>   route route add default          0.0.0.0 192.168.100.1 00:00:00:00 1 # MAN via atm1 4.  Check that there is a route in the AP that points to the SU’s terrestrial network. 192.168.2.50 ip>   route route add su1     192.168.3.64 192.168.100.3 ff:ff:ff:f8 1 # MAN via atm1 route add default          0.0.0.0 192.168.2.33 00:00:00:00 1 # MAN via eth0 March 10, 2003  Company Confidential  Page 41 of 149
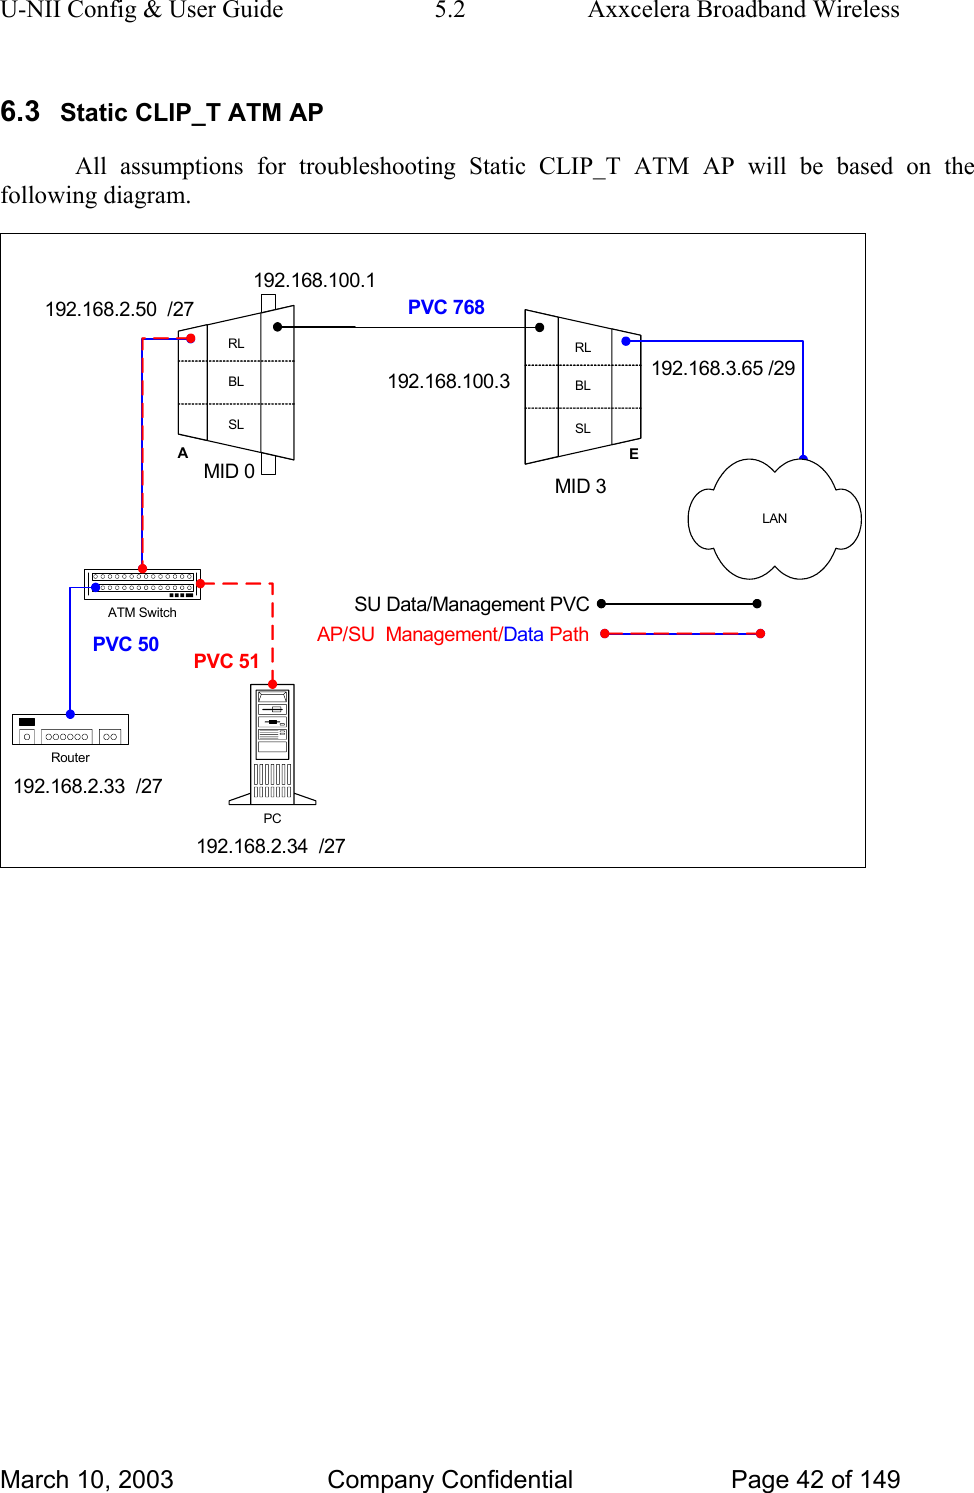
U-NII Config & User Guide  5.2  Axxcelera Broadband Wireless 6.3  Static CLIP_T ATM AP All assumptions for troubleshooting Static CLIP_T ATM AP will be based on the following diagram. RLBLSLARLBLSLEATM SwitchPCRouter192.168.2.33  /27192.168.2.34  /27192.168.100.3 192.168.3.65 /29MID 0 MID 3192.168.2.50  /27 PVC 768LANSU Data/Management PVCData192.168.100.1PVC 50 AP/SU  Management/  PathPVC 51March 10, 2003  Company Confidential  Page 42 of 149
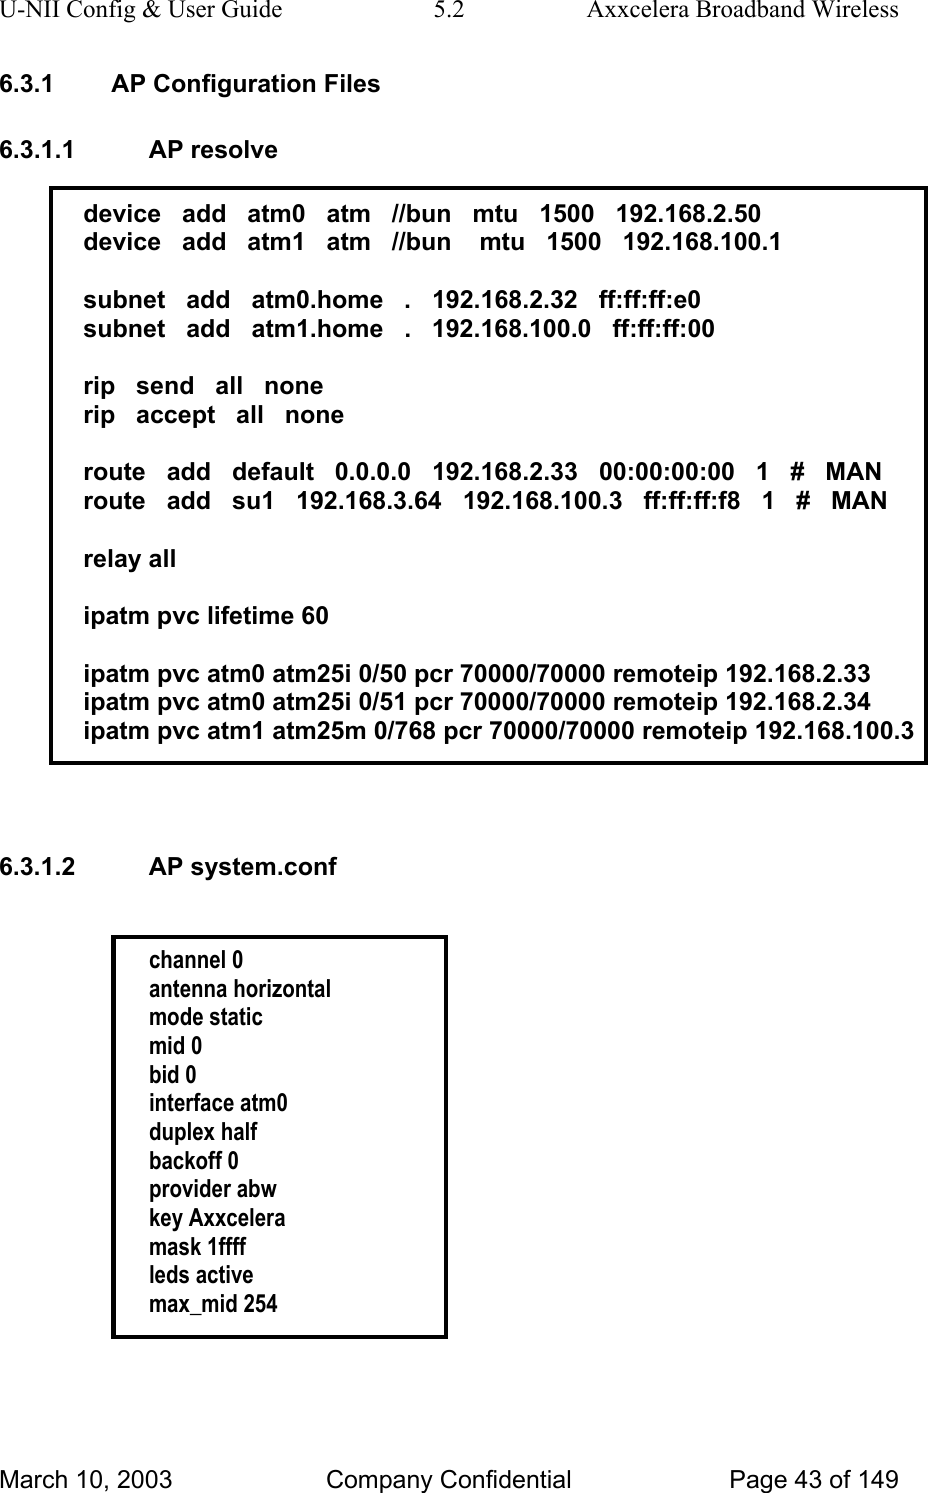
U-NII Config & User Guide  5.2  Axxcelera Broadband Wireless 6.3.1  AP Configuration Files 6.3.1.1 AP resolve  device   add   atm0   atm   //bun   mtu   1500   192.168.2.50 device   add   atm1   atm   //bun    mtu   1500   192.168.100.1  subnet   add   atm0.home   .   192.168.2.32   ff:ff:ff:e0 subnet   add   atm1.home   .   192.168.100.0   ff:ff:ff:00  rip   send   all   none rip   accept   all   none  route   add   default   0.0.0.0   192.168.2.33   00:00:00:00   1   #   MAN route   add   su1   192.168.3.64   192.168.100.3   ff:ff:ff:f8   1   #   MAN  relay all  ipatm pvc lifetime 60  ipatm pvc atm0 atm25i 0/50 pcr 70000/70000 remoteip 192.168.2.33 ipatm pvc atm0 atm25i 0/51 pcr 70000/70000 remoteip 192.168.2.34 ipatm pvc atm1 atm25m 0/768 pcr 70000/70000 remoteip 192.168.100.3   6.3.1.2 AP system.conf   channel 0 antenna horizontal mode static mid 0 bid 0 interface atm0 duplex half backoff 0 provider abw key Axxcelera mask 1ffff leds active max_mid 254   March 10, 2003  Company Confidential  Page 43 of 149
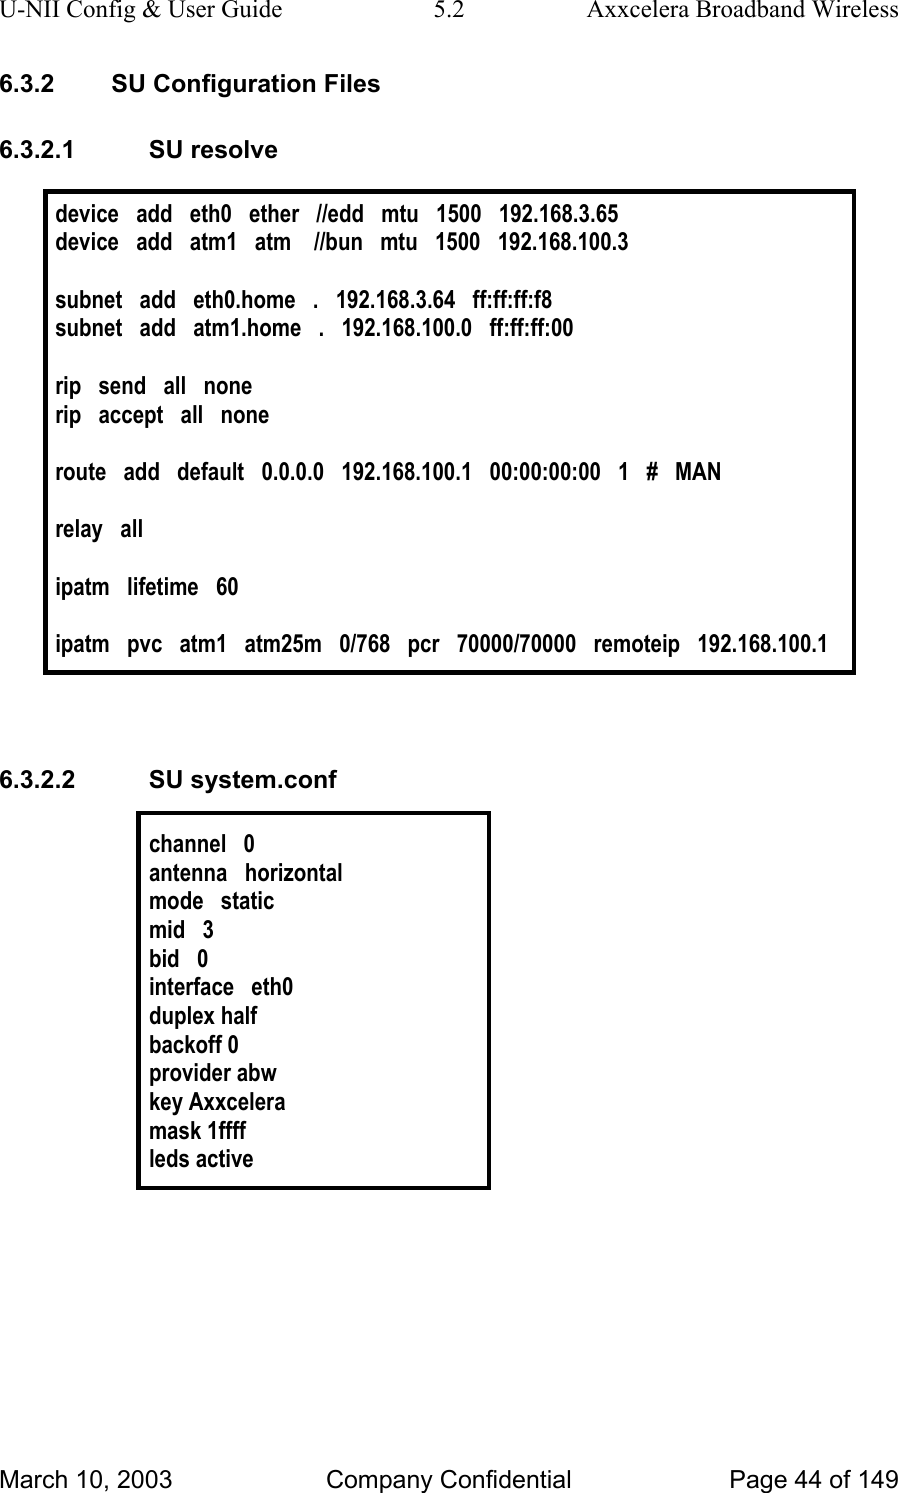
U-NII Config & User Guide  5.2  Axxcelera Broadband Wireless 6.3.2  SU Configuration Files 6.3.2.1 SU resolve  device   add   eth0   ether   //edd   mtu   1500   192.168.3.65 device   add   atm1   atm    //bun   mtu   1500   192.168.100.3  subnet   add   eth0.home   .   192.168.3.64   ff:ff:ff:f8 subnet   add   atm1.home   .   192.168.100.0   ff:ff:ff:00   rip   send   all   none rip   accept   all   none  route   add   default   0.0.0.0   192.168.100.1   00:00:00:00   1   #   MAN  relay   all  ipatm   lifetime   60  ipatm   pvc   atm1   atm25m   0/768   pcr   70000/70000   remoteip   192.168.100.1   6.3.2.2 SU system.conf  channel   0 antenna   horizontal mode   static mid   3 bid   0 interface   eth0 duplex half backoff 0 provider abw key Axxcelera mask 1ffff leds active   March 10, 2003  Company Confidential  Page 44 of 149
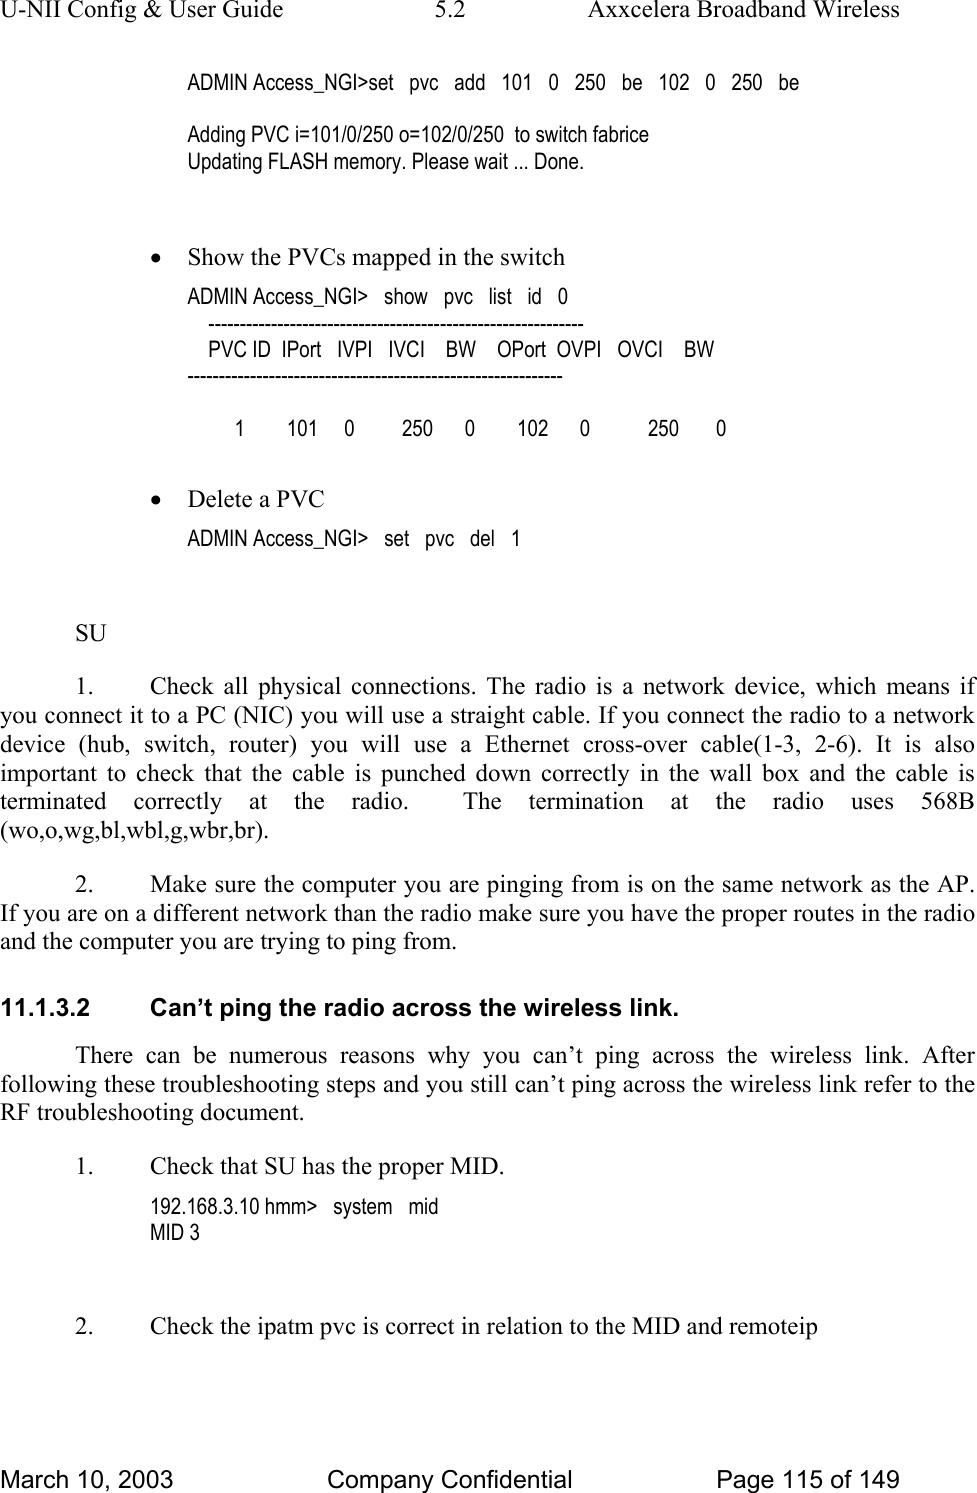
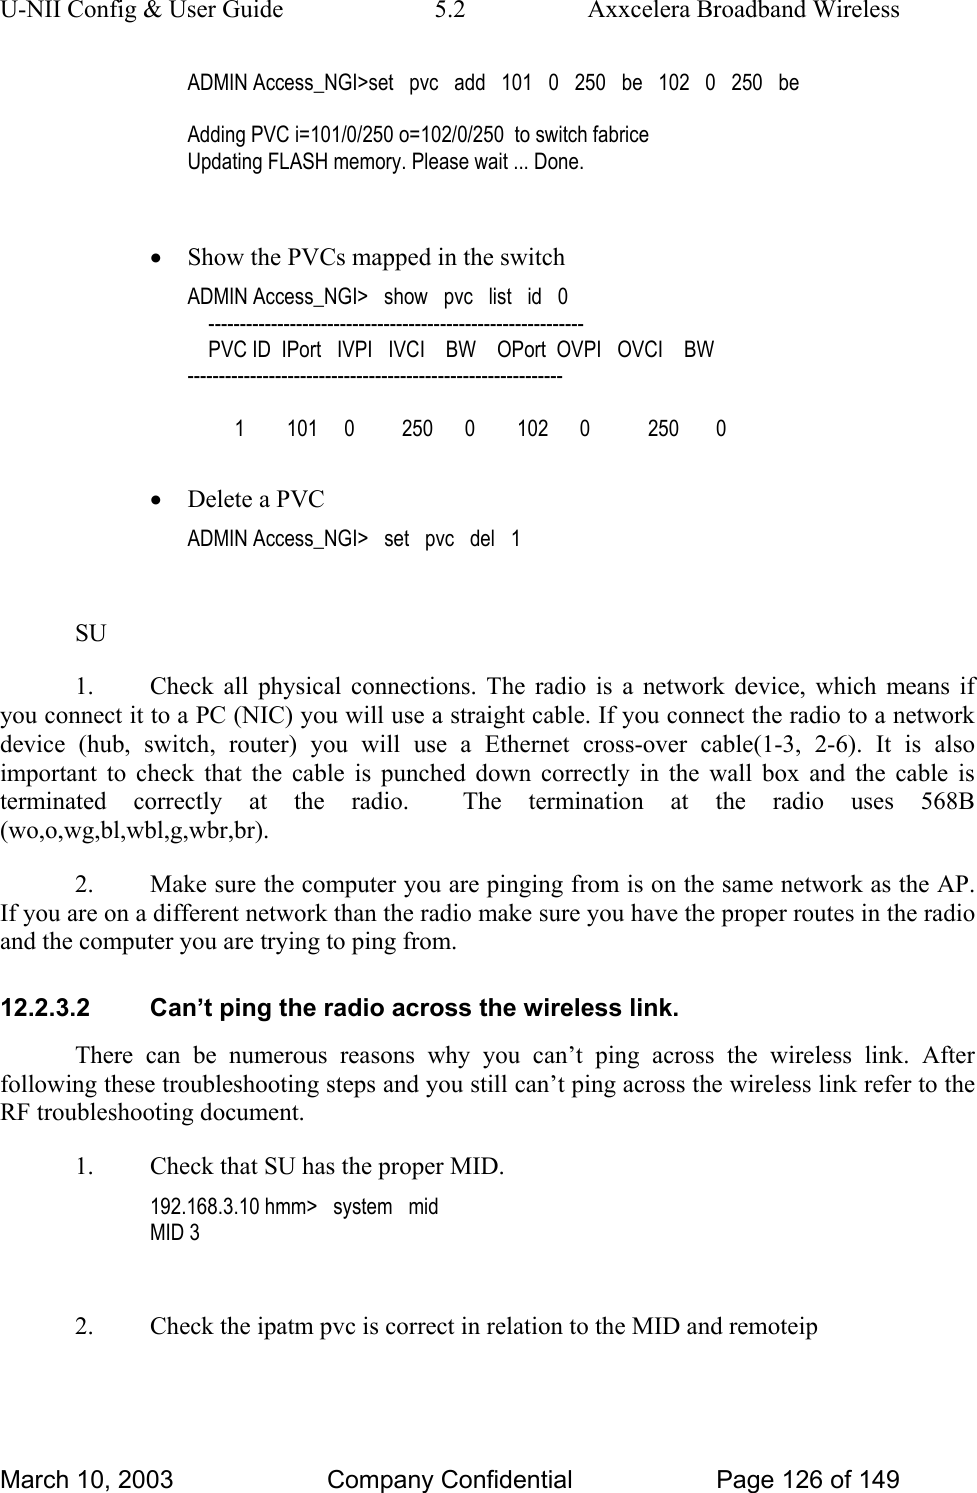
U-NII Config & User Guide  5.2  Axxcelera Broadband Wireless 6.3.3 Troubleshooting 6.3.3.1  Can’t ping the radio from the terrestrial interface AP 1.  Check all physical connections. It is a straight cable from the CS to the Switch, and a rollover twist from the wall box to the switch (1-7,2-8). 2.  Check to see if your atmarp entries are in the ARP table on the CS. ( ./atmarp if you are already in the /usr/local/sbin directory) • Add an atmarp entry root@cs1 11:11:14 (4) [~] #   atmarp   -s   192.168.2.50   0.0.34  • View an atmarp table root@cs1 11:12:52 (5) [~] #   atmarp   -a ----- Itf 0 (192.168.2.1, netmask 255.255.255.0) ----- Default QOS: ubr,aal5:max_sdu=9188 IP 192.168.2.50, state VALID, addr <none>, flags 0x4<PERM>  0.0.34 ----- Unknown incoming connections ----- ----- Incoming unidirectional connections ----- ----- End of dump -----  • Delete an atmarp entry root@cs1 11:13:42 (6) [~] #   atmarp   -d   192.168.2.50  3.  Check route on CS, by typing route at the Command line. •  Add a route root@cs1 11:17:19 (8) [~] #   route   add   -net   192.168.100.0   netmask   255.255.255.0   gw   192.168.2.50  •  View the routing table March 10, 2003  Company Confidential  Page 45 of 149
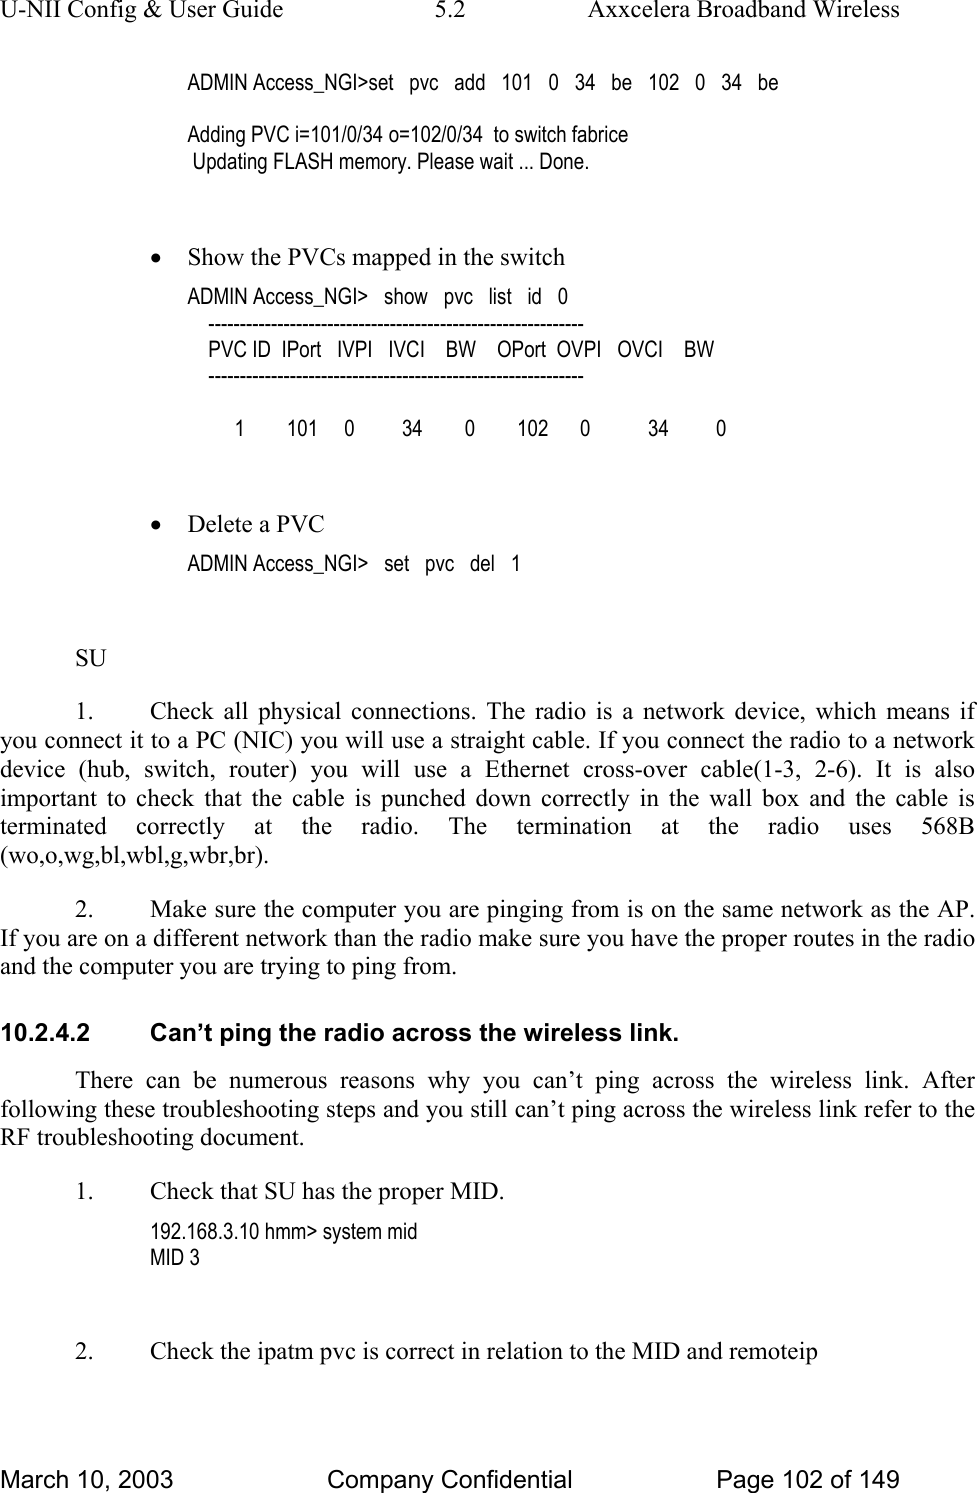
U-NII Config & User Guide  5.2  Axxcelera Broadband Wireless root@cs1 11:18:51 (9) [~] #   route Kernel IP routing table Destination      Gateway         Genmask              Flags Metric Ref    Use Iface 10.9.144.1       *                      255.255.255.255  UH    0          0        0     eth0 192.168.100.0 192.168.2.50   255.255.255.0      UG    0          0        0     atm0 192.168.2.0      *                     255.255.255.0      U       0          0        0     atm0 10.9.144.0        *                     255.255.255.0      U       0          0        0     eth0 127.0.0.0          *                     255.0.0.0              U       0          0        0     lo  • Delete a route root@cs1 11:20:26 (10) [~] #   route   del   -net   192.168.100.0   netmask   255.255.255.0  4.  Check the Switch for the correct PVC’s. • Log into the ATM switch and check that the PVCs are mapped correctly. The following commands are for an FVC switch. •  Add a PVC ADMIN Access_NGI>set   pvc   add   101   0   34   be   102   0   34   be  Adding PVC i=101/0/34 o=102/0/34  to switch fabrice  Updating FLASH memory. Please wait ... Done.  • Show the PVCs mapped in the switch ADMIN Access_NGI>show   pvc   list   id   0     ------------------------------------------------------------     PVC ID  IPort   IVPI   IVCI    BW    OPort  OVPI   OVCI    BW     ------------------------------------------------------------           1        101     0         34        0        102      0           34       0  • Delete a PVC ADMIN Access_NGI>set   pvc   del   1  SU 1.  Check all physical connections. The radio is a network device, which means if you connect it to a PC (NIC) you will use a straight cable. If you  connect the radio to a network device (hub, switch, router) you will use a Ethernet cross-over cable(1-3, 2-6). It is also important to check that the cable is punched down correctly in the wall box and the cable is March 10, 2003  Company Confidential  Page 46 of 149
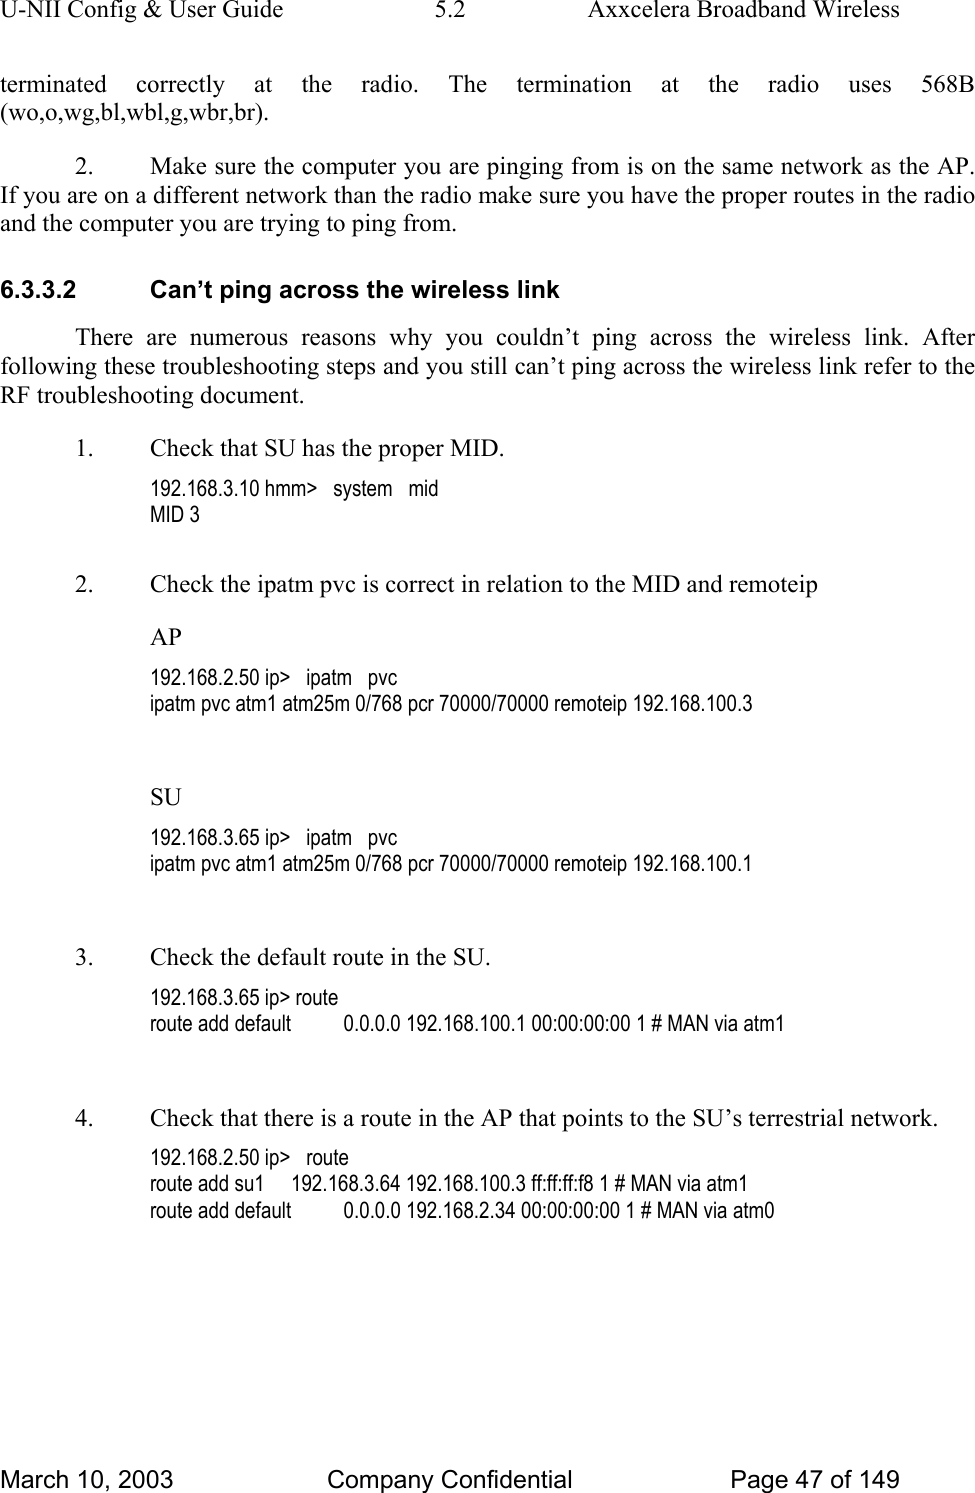
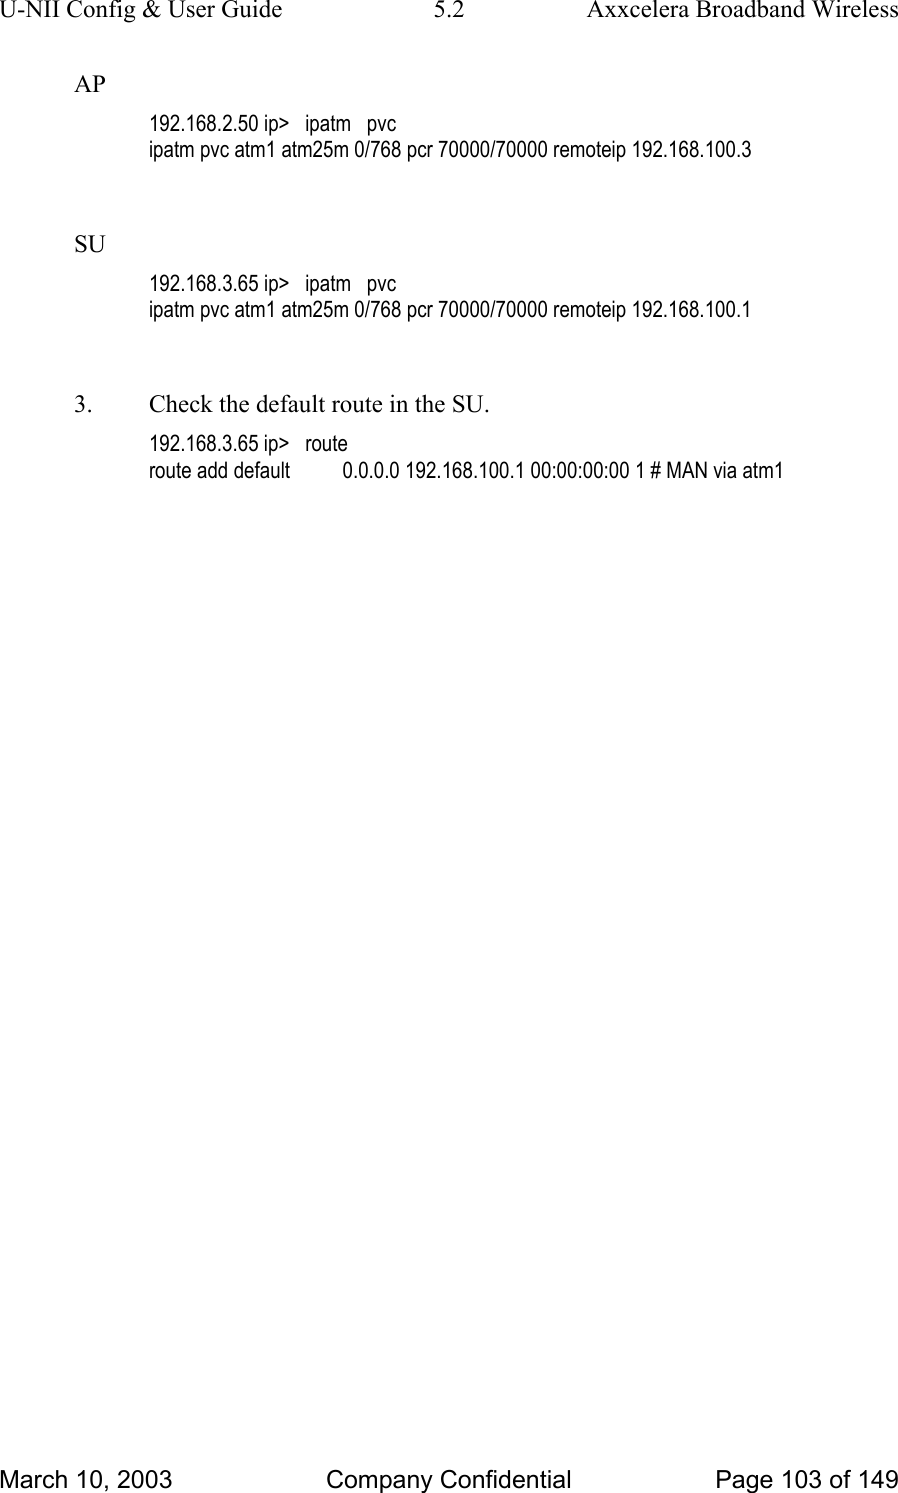
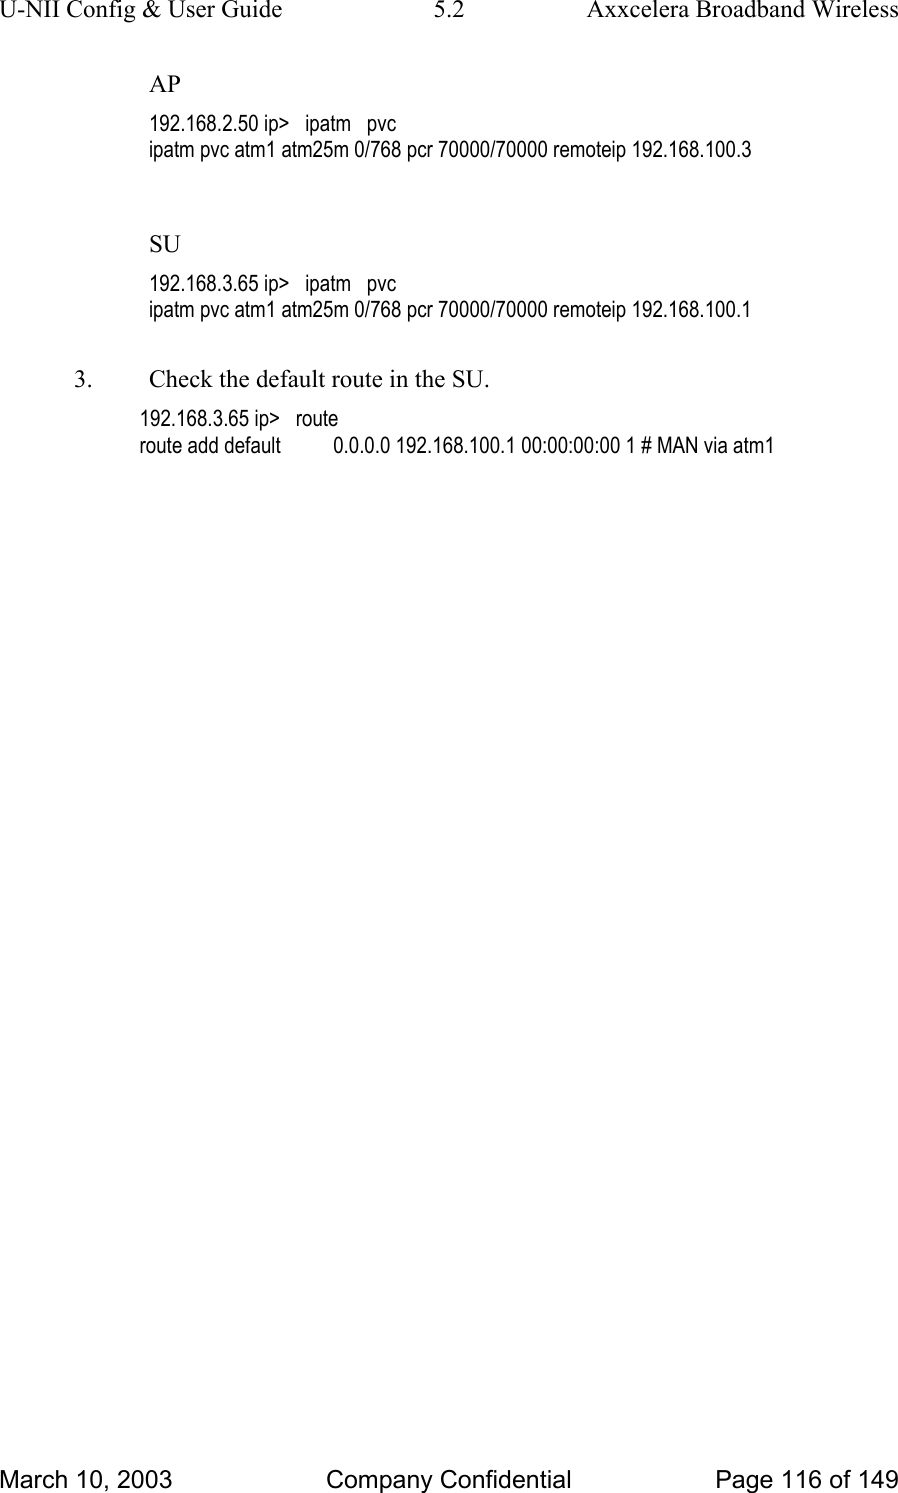
U-NII Config & User Guide  5.2  Axxcelera Broadband Wireless terminated correctly at the radio. The termination at the radio uses 568B (wo,o,wg,bl,wbl,g,wbr,br). 2.  Make sure the computer you are pinging from is on the same network as the AP. If you are on a different network than the radio make sure you have the proper routes in the radio and the computer you are trying to ping from. 6.3.3.2  Can’t ping across the wireless link There are numerous reasons why you couldn’t ping across the wireless link. After following these troubleshooting steps and you still can’t ping across the wireless link refer to the RF troubleshooting document.  1.  Check that SU has the proper MID. 192.168.3.10 hmm>   system   mid MID 3  2.  Check the ipatm pvc is correct in relation to the MID and remoteip AP 192.168.2.50 ip>   ipatm   pvc ipatm pvc atm1 atm25m 0/768 pcr 70000/70000 remoteip 192.168.100.3  SU 192.168.3.65 ip>   ipatm   pvc ipatm pvc atm1 atm25m 0/768 pcr 70000/70000 remoteip 192.168.100.1  3.  Check the default route in the SU. 192.168.3.65 ip> route route add default          0.0.0.0 192.168.100.1 00:00:00:00 1 # MAN via atm1  4.  Check that there is a route in the AP that points to the SU’s terrestrial network. 192.168.2.50 ip>   route route add su1     192.168.3.64 192.168.100.3 ff:ff:ff:f8 1 # MAN via atm1 route add default          0.0.0.0 192.168.2.34 00:00:00:00 1 # MAN via atm0 March 10, 2003  Company Confidential  Page 47 of 149
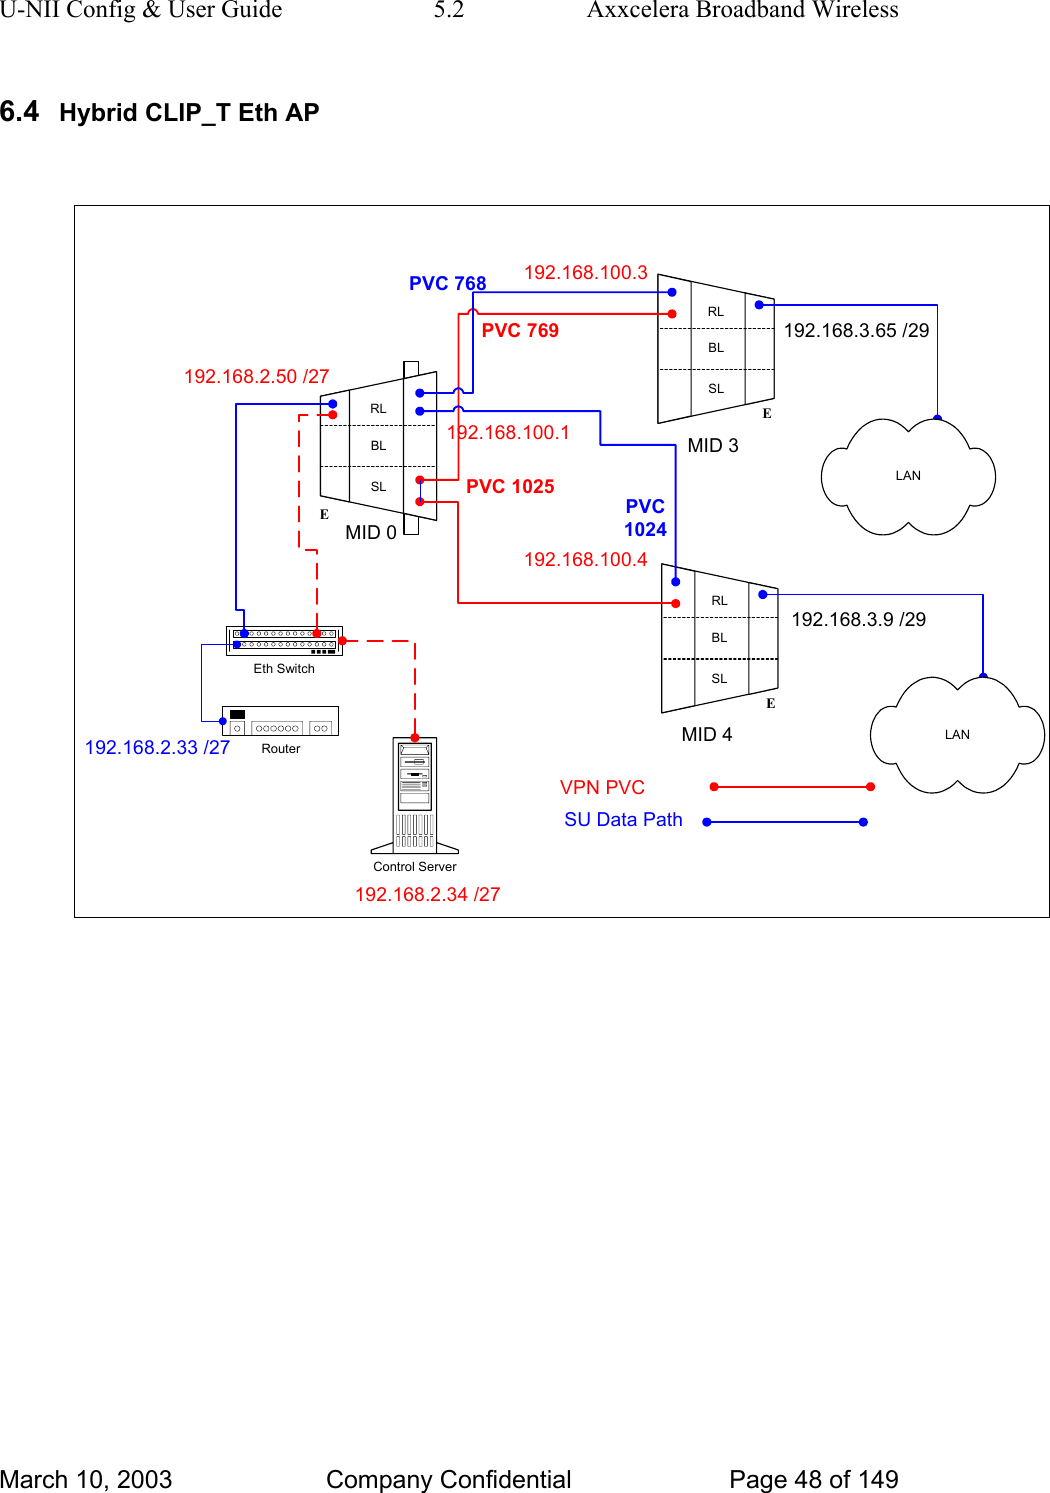
U-NII Config & User Guide  5.2  Axxcelera Broadband Wireless 6.4  Hybrid CLIP_T Eth AP  192.168.100.3192.168.2.34 /27192.168.100.4192.168.100.1192.168.2.50 /27PVC 769PVC 1025VPN PVCPVC 768RLBLSLERLBLSLEEth SwitchControl ServerRouterRLBLSLE192.168.3.65 /29192.168.3.9 /29MID 0MID 3MID 4PVC1024LANLAN192.168.2.33 /27SU Data Path         March 10, 2003  Company Confidential  Page 48 of 149
U-NII Config & User Guide  5.2  Axxcelera Broadband Wireless 6.4.1  AP Configuration Files 6.4.1.1 AP resolve  device   add   eth0   ether   //edd   mtu   1500   192.168.2.50 device   add   atm1   atm   //bun    mtu   1500   192.168.100.1  subnet   add   eth0.home   .   192.168.2.32   ff:ff:ff:e0 subnet   add   atm1.home   .   192.168.100.0   ff:ff:ff:00  rip   send   all   none rip   accept   all   none  route   add   default   0.0.0.0   192.168.2.33   00:00:00:00   1   #   MAN route   add   su1   192.168.3.64   192.168.100.3   ff:ff:ff:f8   1   #   MAN route   add   su2   192.168.3.8     192.168.100.4   ff:ff:ff:f8   1   #   MAN  relay all  ipatm pvc lifetime 60  ipatm pvc atm1 atm25m 0/768 pcr 70000/70000 remoteip 192.168.100.3 ipatm pvc atm1 atm25m 0/1024 pcr 70000/70000 remoteip 192.168.100.4  6.4.1.2 AP system.conf   channel 0 antenna horizontal mode static mid 0 bid 0 interface eth0 duplex half backoff 0 provider abw key Axxcelera mask 1ffff leds active max_mid 254     March 10, 2003  Company Confidential  Page 49 of 149
U-NII Config & User Guide  5.2  Axxcelera Broadband Wireless 6.4.1.3 AP Switchcli  tp default UBR 2667 sp default 256 stats add   atm25m   0   769   atm25m   0   1025   default   default   perm epd add   atm25m   0   1025   atm25m   0   769   default   default   perm epd  6.4.2  SU1 Configuration Files 6.4.2.1 SU1 resolve  device   add   eth0   ether   //edd   mtu   1500   192.168.3.65 device   add   atm1   atm    //bun   mtu   1500   192.168.100.3  subnet   add   eth0.home   .   192.168.3.64   ff:ff:ff:f8 subnet   add   atm1.home   .   192.168.100.0   ff:ff:ff:00   rip   send   all   none rip   accept   all   none  route   add   default   0.0.0.0   192.168.100.1   00:00:00:00   1   #   MAN route   add   su2        192.168.3.8   192.168.100.4   ff:ff:ff:f8   1   #   MAN  relay   all  ipatm   lifetime   60  ipatm   pvc   atm1   atm25m   0/768   pcr   70000/70000   remoteip   192.168.100.1 ipatm   pvc   atm1   atm25m   0/769   pcr   70000/70000   remoteip   192.168.100.4     March 10, 2003  Company Confidential  Page 50 of 149
U-NII Config & User Guide  5.2  Axxcelera Broadband Wireless 6.4.2.2 SU1 system.conf  channel   0 antenna   horizontal mode   static mid   3 bid   0 interface   eth0 duplex half backoff 0 provider abw key Axxcelera mask 1ffff leds active   6.4.3  SU2 Configuration Files 6.4.3.1 SU2 resolve  device   add   eth0   ether   //edd   mtu   1500   192.168.3.9 device   add   atm1   atm    //bun   mtu   1500   192.168.100.4  subnet   add   eth0.home   .   192.168.3.8   ff:ff:ff:f8 subnet   add   atm1.home   .   192.168.100.0   ff:ff:ff:00   rip   send   all   none rip   accept   all   none  route   add   default   0.0.0.0   192.168.100.1   00:00:00:00   1   #   MAN route   add   su1         192.168.3.64   192.168.100.3   ff:ff:ff:f8   1   #   MAN  relay   all  ipatm   lifetime   60  ipatm   pvc   atm1   atm25m   0/1024   pcr   70000/70000   remoteip   192.168.100.1 ipatm   pvc   atm1   atm25m   0/1025   pcr   70000/70000   remoteip   192.168.100.3   March 10, 2003  Company Confidential  Page 51 of 149
U-NII Config & User Guide  5.2  Axxcelera Broadband Wireless 6.4.3.2 SU2 system.conf  channel   0 antenna   horizontal mode   static mid   4 bid   0 interface   eth0 duplex half backoff 0 provider abw key Axxcelera mask 1ffff leds active   6.4.4 Troubleshooting 6.4.4.1  Can’t ping the radio from the terrestrial interface 1.  Check all physical connections.  The radio is a network device, which means if you connect it to a PC (NIC) you will use a straight-through cable.  To connect the radio to a network device (hub, switch, router) use an Ethernet cross-over cable (1-3, 2-6).  It is also important to check that the cable is punched down correctly in the wall box and that the cable is terminated correctly at the radio.  The termination at the radio uses 568B (wo,o,wg,bl,wbl,g,wbr,br). 2.  Make sure the computer you are pinging from is on the same network as the AP. If you are on a different network than the radio make sure you have the proper routes in the radio and the computer you are trying to ping from. 6.4.4.2  Can’t ping across the wireless link There are numerous reason why you couldn’t ping across the wireless link. After following these troubleshooting steps and you still can’t ping across the wireless link refer to the RF troubleshooting document. 1.  Check that SU has the proper MID. 192.168.3.65 hmm>   system   mid MID 3 2.  Check the “ipatm pvc” is correct in relation to the MID and remoteip March 10, 2003  Company Confidential  Page 52 of 149
U-NII Config & User Guide  5.2  Axxcelera Broadband Wireless AP 192.168.2.50 ip>   ipatm   pvc ipatm pvc atm1 atm25m 0/768 pcr 70000/70000 remoteip 192.168.100.3  SU 192.168.3.65 ip> ipatm pvc ipatm pvc atm1 atm25m 0/768 pcr 70000/70000 remoteip 192.168.100.1 3.  Check the default route in the SU. 192.168.3.65 ip>   route route add default          0.0.0.0 192.168.100.1 00:00:00:00 1 # MAN via atm1 4.  Check that there is a route in the AP that points to the SU’s terrestrial network. 192.168.2.50 ip>   route route add su1     192.168.3.64 192.168.100.3 ff:ff:ff:f8 1 # MAN via atm1 route add default          0.0.0.0 192.168.2.33 00:00:00:00 1 # MAN via eth0 March 10, 2003  Company Confidential  Page 53 of 149
U-NII Config & User Guide  5.2  Axxcelera Broadband Wireless 7 CLIP_S The CLIP_S configuration is when the AP acts as an ATM switch and the SU acts as a router. This means that the AP will pass ATM cells at layer 2, and the SU will act as a router analyzing all data at layer 3 and based upon destination IP address forward the data out the proper interface.  In static mode you can configure the management traffic in either routed or a switched configuration. Each section describes the pros and cons of each configuration so you can decide which is best for your network.  7.1  CLIP_S Interactive All assumptions for troubleshooting CLIP_S are based on the following diagram. 192.168.2.100 /24RLBLSLARLBLSLEATM SwitchControl ServerRouter192.168.5.1192.168.3.65 /29MID 0LANPVC35192.168.5.5PVC36SU Management PVCSU Data PVCPVC36 atm0 192.168.2.1 /24192.168.2.50 /24PVC33PVC33AP Management PVCPVC61PVC32AP Registration PVC     March 10, 2003  Company Confidential  Page 54 of 149
U-NII Config & User Guide  5.2  Axxcelera Broadband Wireless  7.1.1  Adding AP and SU to EMS Dialogue boxes showing the information needed to add an AP or SU are shown below.    March 10, 2003  Company Confidential  Page 55 of 149
U-NII Config & User Guide  5.2  Axxcelera Broadband Wireless    7.1.2 Troubleshooting 7.1.2.1 AP Object If the AP will not register make sure all the fields in the EMS database are correctly filled in. Here are a few important points that should be kept in mind if the AP doesn’t register. March 10, 2003  Company Confidential  Page 56 of 149
U-NII Config & User Guide  5.2  Axxcelera Broadband Wireless 1.  Make sure the MAC address is correct.  Without the correct MAC address the AP can not register. You can verify what MAC address the AP is attempting to register with by tailing the adapcs.log file. In the following example an AP is trying to register and is not found in the database, which means when you created the object it had the wrong MAC address. [root@cs1 /root]#   tail   -f   /var/log/adapcs.log CS[5025.8192](16Dec 12:36:03.027 ): AtmAccessPointImpl: Unknown ATM AP 00c0690c522f trying to register 2.  The management address must be on the same subnet as the atm0 interface on the Control Server. 3.  Check that the PVCs are mapped correctly in the switch.  Since the problem is with the AP registering, pay close attention to how the registration PVC (61) and management PVC are mapped. ADMIN Access_NGI>show   pvc   list   id   0 ADMIN Access_NGI>      ----------------------------------------------------------------------------     PVC ID IPort  IVPI   IVCI    BW    OPort  OVPI   OVCI    BW     ----------------------------------------------------------------------------           1      101      0        32        0        102      0           61         0          2      101      0        33        0        102      0           33         0  4.  The “AS Port” has to be filled in with the proper port if you have chosen to manage the anchor switch with the EMS (selected when creating the Control Server). 5.  Make sure the Control Server has the created the proper atmarp entries in it. There should be an atmarp entry for every management address. • Lists atmarp entries [root@cs1 /root]#   atmarp   -a ----- Itf 0 (192.168.2.1, netmask 255.255.255.0) ----- Default QOS: ubr,aal5:max_sdu=9188 IP 192.168.2.50, state VALID, addr <none>, flags 0x4<PERM>  0.0.33 ----- Unknown incoming connections ----- ----- Incoming unidirectional connections ----- ----- End of dump -----  7.1.2.2 SU Object If the SU will not register make sure all the fields in the EMS database are filled in properly. Here are a few important points that should be kept in mind if the SU doesn’t register. Many different things can cause the SU not to register so after verifying all of these points and it still doesn’t register the next step will be to troubleshoot the RF link. See RF troubleshooting document. March 10, 2003  Company Confidential  Page 57 of 149
U-NII Config & User Guide  5.2  Axxcelera Broadband Wireless 1.  Make sure the MAC address is correct.  Without the correct MAC address the SU can not register. You can verify this by tailing the adapcs.log file. In this example an SU with this MAC address is trying to register and is not found in the database, which means when you created the object it had the wrong MAC address. [root@cs1 /root]#   tail   -f   /var/log/adapcs.log CS[5494.8192](16Dec 12:48:34.926 ): Protocol:  00 00 00 00 01 00 00 01 00 14 00 04 00 c0 69 0b 58 7f b5 10  CS[5494.8192](16Dec 12:48:34.926 ): RegistrarProtocol: Registering SU 00c0690b587f (MID 1) CS[5494.8192](16Dec 12:48:34.926 ): DynAccessPointImpl (CLIP_S AP): handleRegisterSU (SU 00c0690b587f) CS[5494.8192](16Dec 12:48:34.926 ): DynAccessPointImpl (CLIP_S AP): no key - fetch details from EMSAgent CS[5494.8192](16Dec 12:48:34.930 ): DynAccessPointImpl: CORBA::BAD_PARAM exception thrown (minor code=0) CS[5494.8192](16Dec 12:48:34.930 ): DynAccessPointImpl: An SU is trying to register but I can't talk to an EMSAgent CS[5494.8192](16Dec 12:48:34.931 ): DynAP (CLIP_S AP): Couldn't get details for registering SU 00c0690b587f CS[5494.8192](16Dec 12:48:34.931 ): RegistrarProtocol: Deferring deregistration of MID 1 CS[5494.8192](16Dec 12:48:35.426 ): EMSProtocol: received message REGMSG_REGISTER_SU for CS CS[5494.8192](16Dec 12:48:35.426 ): Protocol: message contents (20 bytes)  CS[5494.8192](16Dec 12:48:35.426 ): Protocol:  00 00 00 00 01 00 00 01 00 14 00 04 00 c0 69 0b 58 7f b5 10  CS[5494.8192](16Dec 12:48:35.426 ): RegistrarProtocol: SU 00c0690b587f is already registering  2.  The management address must be on the same subnet as the atm0 interface on the Control Server. This only applies for the management address. 3.  Check that the PVCs are mapped correctly in the switch.  Since the problem is with the SU not registering, pay close attention to the registration (61) and management (280) PVC mapping. ADMIN Access_NGI>show   pvc   list   id   0 ADMIN Access_NGI>      ----------------------------------------------------------------------------     PVC ID IPort  IVPI   IVCI    BW    OPort  OVPI   OVCI    BW     ----------------------------------------------------------------------------           1      101      0        32        0        102      0           61         0          2      101      0        33        0        102      0           33         0          3      101      0        36        0        102      0           36         0          4      101      0        35        0        106      0           35         0  4.  Make sure the Control Server has the created the proper atmarp entries in it. There should be an atmarp entry for every management address. • Lists atmarp entries March 10, 2003  Company Confidential  Page 58 of 149
U-NII Config & User Guide  5.2  Axxcelera Broadband Wireless [root@cs1 /root]#   atmarp   -a ----- Itf 0 (192.168.2.1, netmask 255.255.255.0) ----- Default QOS: ubr,aal5:max_sdu=9188 IP 192.168.2.100, state VALID, addr <none>, flags 0x4<PERM>   0.0.36 IP 192.168.2.50, state VALID, addr <none>, flags 0x4<PERM>   0.0.33 ----- Unknown incoming connections ----- ----- Incoming unidirectional connections ----- ----- End of dump -----    March 10, 2003  Company Confidential  Page 59 of 149
U-NII Config & User Guide  5.2  Axxcelera Broadband Wireless 7.2  Static CLIP_S (routed management) All assumptions for troubleshooting CLIP_S (routed management) are based on the following diagram. 192.168.100.3192.168.2.34 /27192.168.100.1192.168.2.50 /27PVC34 AP Management PVCPVC 768RLBLSLARLBLSLEATM SwitchPCRouter192.168.5.1192.168.3.65 /29MID 0 MID 3LANPVC 769PVC200192.168.5.5SU Management PVCSU Data PVC 7.2.1  Routed Management PRO/CON CLIP_S can be configured with switched management or routed management. Read PRO/CON of both to help you decide which you would like use.  PRO • Only one ATMARP entry will need to be added to the termination router.  • Can be easier to troubleshoot and isolate a problem in the network.   CON • Need to add a route and ipatm pvc for every SU that is added to the AP. • May need to add a route to multiple routers for each SU depending upon network design.  March 10, 2003  Company Confidential  Page 60 of 149
U-NII Config & User Guide  5.2  Axxcelera Broadband Wireless  7.2.2  AP Configuration Files 7.2.2.1 AP resolve  device   add   atm0   atm   //bun   mtu    1500   192.168.2.50 device   add   atm1   atm   //bun   mtu    1500   192.168.100.1  subnet   add   atm0.home   .   192.168.2.32   ff:ff:ff:e0 subnet   add   atm1.home   .   192.168.100.0   ff:ff:ff:00  rip   send   all   none rip   accept   all   none  route   add   default   0.0.0.0   192.168.2.34   00:00:00:00   1   #   MAN  relay   all  ipatm   lifetime   60  ipatm   pvc   atm0   atm25i   0/34   pcr   70000/70000   remoteip   192.168.2.34 ipatm   pvc   atm1   atm25m   0/768   pcr   70000/70000   remoteip   192.168.100.3   7.2.2.2 AP system.conf  channel   0 antenna   horizontal mode   static mid   0 bid   0 interface   atm0 backoff 0 provider abw key Axxcelera mask 1ffff leds active max_mid 254  March 10, 2003  Company Confidential  Page 61 of 149
U-NII Config & User Guide  5.2  Axxcelera Broadband Wireless 7.2.2.3 AP initswitchcli  tp default UBR 2667 sp default 256 stats add   atm25m   0   769   atm25i   0   200   default   default   perm epd add   atm25i   0   200   atm25m   0   769   default   default   perm epd   7.2.3  SU Configuration Files 7.2.3.1 SU resolve  device   add   eth0   ether   //edd   mtu   1500   192.168.3.65 device   add   atm1   atm   //bun    mtu   1500   192.168.100.3 device   add   atm2   atm   //bun   mtu   1500   192.168.5.5  subnet   add   eth0.home   .   192.168.3.64   ff:ff:ff:f8 subnet   add   atm1.home   .   192.168.100.0   ff:ff:ff:00 subnet   add   atm2.home   .   192.168.5.0   ff:ff:ff:00  rip   send   all   none rip   accept   all   none  route   add   default   0.0.0.0   192.168.5.1   00:00:00:00   1   #   MAN route   add   mgmt   192.168.2.32   192.168.100.1   ff:ff:ff:e0   1   #   MAN  relay   all  ipatm   lifetime   60  ipatm   pvc   atm1   atm25m   0/768   pcr   70000/70000   remoteip   192.168.100.1 ipatm   pvc   atm2   atm25m   0/769   pcr   70000/70000   remoteip 192.168.5.1   March 10, 2003  Company Confidential  Page 62 of 149
U-NII Config & User Guide  5.2  Axxcelera Broadband Wireless 7.2.3.2 SU system.conf channel   0 antenna   horizontal mode   static mid   3 bid   0 interface   eth0 duplex half backoff 0 provider abw key Axxcelera mask 1ffff leds active   7.2.4 Troubleshooting 7.2.4.1  Can’t ping the radio from the terrestrial interface AP 1.  Check all physical connections. It is a straight cable from the CS to the Switch, and a rollover twist from the wall box to the switch (1-7,2-8). 2.  Check to see if your atmarp entries are in the ARP table on the CS. ( ./atmarp if you are already in the /usr/local/sbin directory) • Add an atmarp entry root@cs1 11:11:14 (4) [~] #   atmarp   -s   192.168.2.50   0.0.34  • View an atmarp table root@cs1 11:12:52 (5) [~] #   atmarp   -a ----- Itf 0 (192.168.2.1, netmask 255.255.255.0) ----- Default QOS: ubr,aal5:max_sdu=9188 IP 192.168.2.50, state VALID, addr <none>, flags 0x4<PERM>  0.0.34 ----- Unknown incoming connections ----- ----- Incoming unidirectional connections ----- ----- End of dump -----  • Delete an atmarp entry root@cs1 11:13:42 (6) [~] #   atmarp   -d   192.168.2.50  March 10, 2003  Company Confidential  Page 63 of 149
U-NII Config & User Guide  5.2  Axxcelera Broadband Wireless 3.  Check route on CS, by typing route at the Command line. •  Add a route root@cs1 11:17:19 (8) [~] #   route   add   -net   192.168.100.0   netmask   255.255.255.0   gw   192.168.2.50  •  View the routing table root@cs1 11:18:51 (9) [~] #   route Kernel IP routing table Destination      Gateway         Genmask              Flags Metric Ref    Use Iface 10.9.144.1       *                      255.255.255.255  UH    0          0        0     eth0 192.168.100.0 192.168.2.50   255.255.255.0      UG    0          0        0     atm0 192.168.2.0      *                     255.255.255.0      U       0          0        0     atm0 10.9.144.0        *                     255.255.255.0      U       0          0        0     eth0 127.0.0.0          *                     255.0.0.0              U       0          0        0     lo  • Delete a route root@cs1 11:20:26 (10) [~] #   route   del   -net   192.168.100.0   netmask   255.255.255.0  4.  Check the Switch for the correct PVC’s. • Log into the ATM switch and check that the PVCs are mapped correctly. The following commands are for an FVC switch. •  Add a PVC ADMIN Access_NGI>set   pvc   add   101   0   34   be   102   0   34   be  Adding PVC i=101/0/34 o=102/0/34  to switch fabrice  Updating FLASH memory. Please wait ... Done.  • Show the PVCs mapped in the switch ADMIN Access_NGI>show   pvc   list   id   0     ------------------------------------------------------------     PVC ID  IPort   IVPI   IVCI    BW    OPort  OVPI   OVCI    BW     ------------------------------------------------------------           1        101     0         34        0        102      0           34       0  March 10, 2003  Company Confidential  Page 64 of 149
U-NII Config & User Guide  5.2  Axxcelera Broadband Wireless • Delete a PVC ADMIN Access_NGI>set   pvc   del   1  SU 1.  Check all physical connections. The radio is a network device, which means if you connect it to a PC (NIC) you will use a straight cable. If you  connect the radio to a network device (hub, switch, router) you will use a Ethernet cross-over cable(1-3, 2-6). It is also important to check that the cable is punched down correctly in the wall box and the cable is terminated correctly at the radio. The termination at the radio uses 568B (wo,o,wg,bl,wbl,g,wbr,br). 2.  Make sure the computer you are pinging from is on the same network as the AP. If you are on a different network than the radio make sure you have the proper routes in the radio and the computer you are trying to ping from. 7.2.4.2  Can’t ping across the wireless link There are numerous reason why you couldn’t ping across the wireless link. After following these troubleshooting steps and you still can’t ping across the wireless link refer to the RF troubleshooting document. 1.  Check that SU has the proper MID. 192.168.3.10 hmm>   system   mid MID 3  2.  Check the ipatm pvc is correct in relation to the MID and remoteip AP 192.168.2.50 ip>   ipatm   pvc ipatm pvc atm1 atm25m 0/768 pcr 70000/70000 remoteip 192.168.100.3  SU 192.168.3.65 ip>   ipatm   pvc ipatm pvc atm1 atm25m 0/768 pcr 70000/70000 remoteip 192.168.100.1  3.  Check the default route in the SU. 192.168.3.65 ip> route route add default          0.0.0.0 192.168.100.1 00:00:00:00 1 # MAN via atm1  March 10, 2003  Company Confidential  Page 65 of 149
U-NII Config & User Guide  5.2  Axxcelera Broadband Wireless 4.  Check that there is a route in the AP that points to the SU’s terrestrial network. 192.168.2.50 ip>   route route add su1     192.168.3.64 192.168.100.3 ff:ff:ff:f8 1 # MAN via atm1 route add default          0.0.0.0 192.168.2.34 00:00:00:00 1 # MAN via atm0  March 10, 2003  Company Confidential  Page 66 of 149
U-NII Config & User Guide  5.2  Axxcelera Broadband Wireless 7.3  Static CLIP_S (switched management) All assumptions for troubleshooting CLIP_S are based on the following diagram. 192.168.100.3PVC 768RLBLSLARLBLSLEATM SwitchPCRouter192.168.5.1192.168.3.65 /29MID 0 MID 3LANPVC 769PVC200192.168.5.5SU Management PVCSU Data PVCPVC103PVC103 192.168.100.254 /24192.168.100.1PVC101 AP Management PVCPVC1017.3.1 Switched Management PRO/CON CLIP_S can be configured with switched management or routed management. Read PRO/CON of both to help you decide which you would like use.  PRO • No extra mgmt routes will have to be added to the termination router.  • Multiple routes will not have to be added to network routers with the addition of each SU.   CON • Will need to add an atmarp entry for each SU in the termination router.  • Will need to add a management PVC in the switchcli of the AP for each SU.  March 10, 2003  Company Confidential  Page 67 of 149
U-NII Config & User Guide  5.2  Axxcelera Broadband Wireless  7.3.2  AP Configuration Files 7.3.2.1 AP resolve device   add   atm0   atm   //bun   mtu    1500   192.168.100.1  subnet   add   atm0.home   .   192.168.100.0   ff:ff:ff:00  rip   send   all   none rip   accept   all   none  route   add   default   0.0.0.0   192.168.100.254   00:00:00:00   1   #   MAN  relay   all  ipatm   lifetime   60  ipatm   pvc   atm0   atm25i   0/101   pcr   70000/70000   remoteip   192.168.100.254   7.3.2.2 AP system.conf  channel   0 antenna   horizontal mode   static mid   0 bid   0 interface   atm0 backoff 0 provider abw key Axxcelera mask 1ffff leds active max_mid 254  March 10, 2003  Company Confidential  Page 68 of 149
U-NII Config & User Guide  5.2  Axxcelera Broadband Wireless 7.3.2.3 AP initswitchcli  tp default UBR 2667 sp default 256 stats add   atm25m   0   768   atm25i   0   103   default   default   perm epd add   atm25i   0   103   atm25m   0   768   default   default   perm epd add   atm25m   0   769   atm25i   0   200   default   default   perm epd add   atm25i   0   200   atm25m   0   769   default   default   perm epd      7.3.3  SU Configuration Files 7.3.3.1 SU resolve device   add   eth0   ether   //edd   mtu   1500   192.168.3.65 device   add   atm1   atm   //bun    mtu   1500   192.168.100.3 device   add   atm2   atm   //bun   mtu   1500   192.168.5.5  subnet   add   eth0.home   .   192.168.3.64   ff:ff:ff:f8 subnet   add   atm1.home   .   192.168.100.0   ff:ff:ff:00 subnet   add   atm2.home   .   192.168.5.0   ff:ff:ff:00  rip   send   all   none rip   accept   all   none  route   add   default   0.0.0.0   192.168.5.1   00:00:00:00   1   #   MAN  relay   all  ipatm   lifetime   60  ipatm   pvc   atm1   atm25m   0/768   pcr   70000/70000   remoteip   192.168.100.254 ipatm   pvc   atm2   atm25m   0/769   pcr   70000/70000   remoteip 192.168.5.1   March 10, 2003  Company Confidential  Page 69 of 149
U-NII Config & User Guide  5.2  Axxcelera Broadband Wireless 7.3.3.2 SU system.conf channel   0 antenna   horizontal mode   static mid   3 bid   0 interface   eth0 duplex half backoff 0 provider abw key Axxcelera mask 1ffff leds active   7.3.4 Troubleshooting 7.3.4.1  Can’t ping the radio from the terrestrial interface AP 1.  Check all physical connections. It is a straight cable from the CS to the Switch, and a rollover twist from the wall box to the switch (1-7,2-8). 2.  Check to see if your atmarp entries are in the ARP table on the CS. ( ./atmarp if you are already in the /usr/local/sbin directory) • Add an atmarp entry root@cs1 11:11:14 (4) [~] #   atmarp   -s   192.168.100.1   0.0.101  • View an atmarp table root@cs1 11:12:52 (5) [~] #   atmarp   -a ----- Itf 0 (192.168.100.254, netmask 255.255.255.0) ----- Default QOS: ubr,aal5:max_sdu=9188 IP 192.168.100.1, state VALID, addr <none>, flags 0x4<PERM>  0.0.101 ----- Unknown incoming connections ----- ----- Incoming unidirectional connections ----- ----- End of dump -----  • Delete an atmarp entry root@cs1 11:13:42 (6) [~] #   atmarp   -d   192.168.100.1  March 10, 2003  Company Confidential  Page 70 of 149
U-NII Config & User Guide  5.2  Axxcelera Broadband Wireless 3.  Check the Switch for the correct PVC’s. • Log into the ATM switch and check that the PVCs are mapped correctly. The following commands are for an FVC switch. •  Add a PVC ADMIN Access_NGI>set   pvc   add   101   0   101   be   102   0   101   be  Adding PVC i=101/0/34 o=102/0/34  to switch fabrice  Updating FLASH memory. Please wait ... Done.  • Show the PVCs mapped in the switch ADMIN Access_NGI>show   pvc   list   id   0     ------------------------------------------------------------     PVC ID  IPort   IVPI   IVCI    BW    OPort  OVPI   OVCI    BW     ------------------------------------------------------------           1        101     0         101        0        102      0           101       0  • Delete a PVC ADMIN Access_NGI>set   pvc   del   1  SU 1.  Check all physical connections. The radio is a network device, which means if you connect it to a PC (NIC) you will use a straight cable. If you  connect the radio to a network device (hub, switch, router) you will use a Ethernet cross-over cable(1-3, 2-6). It is also important to check that the cable is punched down correctly in the wall box and the cable is terminated correctly at the radio. The termination at the radio uses 568B (wo,o,wg,bl,wbl,g,wbr,br). 2.  Make sure the computer you are pinging from is on the same network as the AP. If you are on a different network than the radio make sure you have the proper routes in the radio and the computer you are trying to ping from. 7.3.4.2  Can’t ping across the wireless link There are numerous reason why you couldn’t ping across the wireless link. After following these troubleshooting steps and you still can’t ping across the wireless link refer to the RF troubleshooting document. 1.  Check that SU has the proper MID. March 10, 2003  Company Confidential  Page 71 of 149
U-NII Config & User Guide  5.2  Axxcelera Broadband Wireless 192.168.3.10 hmm>   system   mid MID 3  2.  Check the that the pvc information is correct in relation to the MID and remoteip AP 192.168.100.254 switchcli>   list all all perm Displaying permanent entries for all ports.                                                                                                  port       vp      vc           port       vp      vc                                          atm25i      0     103 ==>     atm25m      0     768                                          atm25m      0     768 ==>     atm25i      0     103         atm25i      0     200 ==>     atm25m      0     769                                          atm25m      0     769 ==>     atm25i      0     200                                                        SU 192.168.3.65 ip>   ipatm   pvc ipatm pvc atm1 atm25m 0/768 pcr 70000/70000 remoteip 192.168.100.1  3.  Check the default route in the SU. 192.168.3.65 ip> route route add default          0.0.0.0 192.168.100.254 00:00:00:00 1 # MAN via atm1  March 10, 2003  Company Confidential  Page 72 of 149
U-NII Config & User Guide  5.2  Axxcelera Broadband Wireless 8  Hybrid CLIP_S  The Hybrid CLIP_S configuration is a configuration that can be added onto an existing CLIP_S static configuration. What this configuration allows you to do is create a VPN type tunnel between two SUs across a network. This allows for two data paths: one to another private network, and another to the internet. This can be done with either a switched or routed management system.      8.1.1  AP1 Configuration Files 8.1.1.1 AP1 resolve  March 10, 2003  Company Confidential  Page 73 of 149
U-NII Config & User Guide  5.2  Axxcelera Broadband Wireless device   add   atm0   atm   //bun   mtu    1500   192.168.2.50 device   add   atm1   atm   //bun   mtu    1500   192.168.100.1  subnet   add   atm0.home   .   192.168.2.32   ff:ff:ff:e0 subnet   add   atm1.home   .   192.168.100.0   ff:ff:ff:00  rip   send   all   none rip   accept   all   none  route   add   default   0.0.0.0   192.168.2.34   00:00:00:00   1   #   MAN  relay   all  ipatm   lifetime   60  ipatm   pvc   atm0   atm25i   0/50   pcr   70000/70000   remoteip   192.168.2.34 ipatm   pvc   atm1   atm25m   0/768   pcr   70000/70000   remoteip   192.168.100.3   8.1.1.2 AP1 system.conf  channel   0 antenna   horizontal mode   static mid   0 bid   0 interface   atm0 backoff 0 provider abw key Axxcelera mask 1ffff leds active max_mid 254  March 10, 2003  Company Confidential  Page 74 of 149
U-NII Config & User Guide  5.2  Axxcelera Broadband Wireless 8.1.1.3 AP1 initswitchcli  tp default UBR 2667 sp default 256 stats add   atm25m   0   769   atm25i   0   100   default   default   perm epd add   atm25i   0   100   atm25m   0   769   default   default   perm epd add   atm25m   0   770   atm25i   0   200   default   default   perm epd add   atm25i   0   200   atm25m   0   770   default   default   perm epd    8.1.2  SU1 Configuration Files 8.1.2.1 SU1 resolve  device   add   eth0   ether   //edd   mtu   1500   192.168.3.65 device   add   atm1   atm   //bun    mtu   1500   192.168.100.3 device   add   atm2   atm   //bun   mtu   1500   192.168.5.5  subnet   add   eth0.home   .   192.168.3.64   ff:ff:ff:f8 subnet   add   atm1.home   .   192.168.100.0   ff:ff:ff:00 subnet   add   atm2.home   .   192.168.5.0   ff:ff:ff:00  rip   send   all   none rip   accept   all   none  route   add   default   0.0.0.0   192.168.5.1   00:00:00:00   1   #   MAN route   add   su2    192.168.4.64   192.168.5.6   ff:ff:ff:f8   1   #   MAN route   add   mgmt 192.168.2.32   192.168.100.1 ff:ff:ff:e0 1  #   MAN  relay   all  ipatm   lifetime   60  ipatm   pvc   atm1   atm25m   0/768   pcr   70000/70000   remoteip   192.168.100.1 ipatm   pvc   atm2   atm25m   0/769   pcr   70000/70000   remoteip    192.168.5.1 ipatm   pvc   atm2   atm25m   0/770   pcr   70000/70000   remoteip    192.168.5.6    March 10, 2003  Company Confidential  Page 75 of 149
U-NII Config & User Guide  5.2  Axxcelera Broadband Wireless 8.1.2.2 SU1 system.conf  channel   0 antenna   horizontal mode   static mid   3 bid   0 interface   eth0 duplex half backoff 0 provider abw key Axxcelera mask 1ffff leds active   8.1.3  AP2 Configuration Files 8.1.3.1 AP2 resolve  device   add   atm0   atm   //bun   mtu    1500   192.168.2.51 device   add   atm1   atm   //bun   mtu    1500   192.168.101.1  subnet   add   atm0.home   .   192.168.2.32   ff:ff:ff:e0 subnet   add   atm1.home   .   192.168.101.0   ff:ff:ff:00  rip   send   all   none rip   accept   all   none  route   add   default   0.0.0.0   192.168.2.34   00:00:00:00   1   #   MAN  relay   all  ipatm   lifetime   60  ipatm   pvc   atm0   atm25i   0/51   pcr   70000/70000   remoteip   192.168.2.34 ipatm   pvc   atm1   atm25m   0/768   pcr   70000/70000   remoteip   192.168.101.3   March 10, 2003  Company Confidential  Page 76 of 149
U-NII Config & User Guide  5.2  Axxcelera Broadband Wireless 8.1.3.2 AP2 system.conf  channel   2 antenna   horizontal mode   static mid   0 bid   0 interface   atm0 backoff 0 provider abw key Axxcelera mask 1ffff leds active max_mid 254  8.1.3.3 AP2 initswitchcli  tp default UBR 2667 sp default 256 stats add   atm25m   0   769   atm25i   0   101   default   default   perm epd add   atm25i   0   101   atm25m   0   769   default   default   perm epd add   atm25m   0   770   atm25i   0   200   default   default   perm epd add   atm25i   0   200   atm25m   0   770   default   default   perm epd    March 10, 2003  Company Confidential  Page 77 of 149
U-NII Config & User Guide  5.2  Axxcelera Broadband Wireless 8.1.4  SU2 Configuration Files 8.1.4.1 SU2 resolve device   add   eth0   ether   //edd   mtu   1500   192.168.4.65 device   add   atm1   atm   //bun    mtu   1500   192.168.101.3 device   add   atm2   atm   //bun   mtu   1500   192.168.5.6  subnet   add   eth0.home   .   192.168.4.64   ff:ff:ff:f8 subnet   add   atm1.home   .   192.168.101.0   ff:ff:ff:00 subnet   add   atm2.home   .   192.168.5.0   ff:ff:ff:00  rip   send   all   none rip   accept   all   none  route   add   default   0.0.0.0   192.168.5.1   00:00:00:00   1   #   MAN route   add   su1  192.168.3.64 192.168.5.5   ff:ff:ff:f8        1  #   MAN route   add   mgmt   192.168.2.32   192.168.101.1   ff:ff:ff:e0   1   #   MAN  relay   all  ipatm   lifetime   60  ipatm   pvc   atm1   atm25m   0/768   pcr   70000/70000   remoteip   192.168.101.1 ipatm   pvc   atm2   atm25m   0/769   pcr   70000/70000   remoteip 192.168.5.1 ipatm   pvc   atm2   atm25m   0/770   pcr   70000/70000   remoteip 192.168.5.5    8.1.4.2 SU2 system.conf channel   2 antenna   horizontal mode   static mid   3 bid   0 interface   eth0 duplex half backoff 0 provider abw key Axxcelera mask 1ffff leds active   March 10, 2003  Company Confidential  Page 78 of 149
U-NII Config & User Guide  5.2  Axxcelera Broadband Wireless   8.1.5 Troubleshooting 8.1.5.1  Can’t ping the radio from the terrestrial interface AP 1.  Check all physical connections. It is a straight cable from the CS to the Switch, and a rollover twist from the wall box to the switch (1-7,2-8). 2.  Check to see if your atmarp entries are in the ARP table on the CS. ( ./atmarp if you are already in the /usr/local/sbin directory) • Add an atmarp entry root@cs1 11:11:14 (4) [~] #   atmarp   -s   192.168.2.50   0.0.34  • View an atmarp table root@cs1 11:12:52 (5) [~] #   atmarp   -a ----- Itf 0 (192.168.2.1, netmask 255.255.255.0) ----- Default QOS: ubr,aal5:max_sdu=9188 IP 192.168.2.50, state VALID, addr <none>, flags 0x4<PERM>  0.0.34 ----- Unknown incoming connections ----- ----- Incoming unidirectional connections ----- ----- End of dump -----  • Delete an atmarp entry root@cs1 11:13:42 (6) [~] #   atmarp   -d   192.168.2.50  3.  Check route on CS, by typing route at the Command line. •  Add a route root@cs1 11:17:19 (8) [~] #   route   add   -net   192.168.100.0   netmask   255.255.255.0   gw   192.168.2.50  •  View the routing table March 10, 2003  Company Confidential  Page 79 of 149
U-NII Config & User Guide  5.2  Axxcelera Broadband Wireless root@cs1 11:18:51 (9) [~] #   route Kernel IP routing table Destination      Gateway         Genmask              Flags Metric Ref    Use Iface 10.9.144.1       *                      255.255.255.255  UH    0          0        0     eth0 192.168.100.0 192.168.2.50   255.255.255.0      UG    0          0        0     atm0 192.168.2.0      *                     255.255.255.0      U       0          0        0     atm0 10.9.144.0        *                     255.255.255.0      U       0          0        0     eth0 127.0.0.0          *                     255.0.0.0              U       0          0        0     lo  • Delete a route root@cs1 11:20:26 (10) [~] #   route   del   -net   192.168.100.0   netmask   255.255.255.0  4.  Check the Switch for the correct PVC’s. • Log into the ATM switch and check that the PVCs are mapped correctly. The following commands are for an FVC switch. •  Add a PVC ADMIN Access_NGI>set   pvc   add   101   0   34   be   102   0   34   be  Adding PVC i=101/0/34 o=102/0/34  to switch fabrice  Updating FLASH memory. Please wait ... Done.  • Show the PVCs mapped in the switch ADMIN Access_NGI>show   pvc   list   id   0     ------------------------------------------------------------     PVC ID  IPort   IVPI   IVCI    BW    OPort  OVPI   OVCI    BW     ------------------------------------------------------------           1        101     0         34        0        102      0           34       0  • Delete a PVC ADMIN Access_NGI>set   pvc   del   1  SU 1.  Check all physical connections. The radio is a network device, which means if you connect it to a PC (NIC) you will use a straight cable. If you  connect the radio to a network device (hub, switch, router) you will use a Ethernet cross-over cable(1-3, 2-6). It is also important to check that the cable is punched down correctly in the wall box and the cable is March 10, 2003  Company Confidential  Page 80 of 149
U-NII Config & User Guide  5.2  Axxcelera Broadband Wireless terminated correctly at the radio. The termination at the radio uses 568B (wo,o,wg,bl,wbl,g,wbr,br). 2.  Make sure the computer you are pinging from is on the same network as the AP. If you are on a different network than the radio make sure you have the proper routes in the radio and the computer you are trying to ping from. 8.1.5.2  Can’t ping across the wireless link There are numerous reason why you couldn’t ping across the wireless link. After following these troubleshooting steps and you still can’t ping across the wireless link refer to the RF troubleshooting document. 1.  Check that SU has the proper MID. 192.168.3.10 hmm>   system   mid MID 3  2.  Check the ipatm pvc is correct in relation to the MID and remoteip AP 192.168.2.50 ip>   ipatm   pvc ipatm pvc atm1 atm25m 0/768 pcr 70000/70000 remoteip 192.168.100.3  SU 192.168.3.65 ip>   ipatm   pvc ipatm pvc atm1 atm25m 0/768 pcr 70000/70000 remoteip 192.168.100.1  3.  Check the default route in the SU. 192.168.3.65 ip> route route add default          0.0.0.0 192.168.100.1 00:00:00:00 1 # MAN via atm1  4.  Check that there is a route in the AP that points to the SU’s terrestrial network. 192.168.2.50 ip>   route route add su1     192.168.3.64 192.168.100.3 ff:ff:ff:f8 1 # MAN via atm1 route add default          0.0.0.0 192.168.2.34 00:00:00:00 1 # MAN via atm0   March 10, 2003  Company Confidential  Page 81 of 149
U-NII Config & User Guide  5.2  Axxcelera Broadband Wireless 9 1483_T The 1483_T configuration is where both the AP and the SU act as a layer 2 bridge. It is important to understand that in this configuration data can only go from SU-AP & AP-SU within the sector. Data will not be able to from SU-SU within the same sector. This can only be done by connecting a router to the AP and redirecting that traffic back to the AP.  9.1  Interactive 1483_T All assumptions for troubleshooting 1483_T are based on the following diagram. RLBLSLERLBLSLEEthernet HUBControl ServerRouter192.168.3.1MID 0LANData 192.168.3.34192.168.3.10192.168.3.9Mgmt/9.1.1  Adding AP or SU to EMS Dialogue boxes showing the information needed to add an AP or SU are shown below. March 10, 2003  Company Confidential  Page 82 of 149
U-NII Config & User Guide  5.2  Axxcelera Broadband Wireless  March 10, 2003  Company Confidential  Page 83 of 149
U-NII Config & User Guide  5.2  Axxcelera Broadband Wireless   9.1.2 Troubleshooting 9.1.2.1 AP Object If the AP will not register make sure all the fields in the EMS database are correctly filled in. Here are a few important points that should be kept in mind if the AP doesn’t register. 1.  See if you can ping the unit. The default configuration is to have the AP receive a DHCP address from the CS. If it has not received it you will not be able to ping it. So if you are unable to ping the AP you should check and see that the dhcpd.conf file is setup properly. Notice that in the example AP1 has a fixed address set, each AP must be given the same address every time it leases an address. It is important to be aware that by default most routers will not pass DHCP request unless they are specifically configured to do so. March 10, 2003  Company Confidential  Page 84 of 149
U-NII Config & User Guide  5.2  Axxcelera Broadband Wireless #eth0 subnet   192.168.3.0   netmask   255.255.255.0    {   range   192.168.3.1   192.168.3.100;   option   routers   192.168.3.1; }   host   AP1    {   hardware    ethernet    0:c0:69:0c:52:2f;   fixed-address    192.168.3.9; }  For various reasons it may be desired to not use DHCP to give an AP an address. In this case the IP address can be statically assigned to the unit. To do this you will need to create a resolve file that looks identical to the 1483_T static resolve file described in the section for Static 1483_T. 2.  Make sure the MAC address is correct.  Without the correct MAC address the AP can not register. You can verify this by tailing the adapcs.log file. In this example an SU with the indicated MAC address is trying to register and is not found in the database.  Either the SU was not added to the EMS or was entered with the wrong MAC address. [root@cs1 /root]#   tail   -f   /var/log/adapcs.log CS[12399.8192](16Dec 21:33:39.524 ): Protocol:  00 00 00 00 01 00 02 00 00 14 00 01 00 c0 69 0c 52 2f 77 94  CS[12399.8192](16Dec 21:33:39.524 ): DynAccessPointImpl (1483_T AP): handleEstablishConnection (AP 00c0690c522f) CS[12399.8192](16Dec 21:33:39.524 ): DynAccessPointImpl (1483_T AP): Received ESTABLISH_CONNECTION message from unknown AP ap_02 1216_135100016_111  3.  If the CS is on a different network, than the default route in the AP must be correct. 9.1.2.2 SU Object If the SU will not register make sure all the fields in the EMS database are filled in properly. Here are a few important points that should be kept in mind if the SU doesn’t register. Many different things can cause the SU not to register so after verifying all of these points and it still doesn’t register the next step will be to troubleshoot the RF link. See RF troubleshooting. 1.  Make sure the MAC address is correct.  Without the correct MAC address the AP can not register. You can verify this by tailing the adapcs.log file. In this example an SU with this MAC address is trying to register and is not found in the database, which means when you created the object it had the wrong MAC address. [root@cs1 /root]#   tail   -f   /var/log/adapcs.log CS[12801.8192](16Dec 21:39:20.034 ): Protocol:  00 00 00 00 01 00 00 05 00 14 00 04 00 c0 69 0b 58 7f b5 10  CS[12801.8192](16Dec 21:39:20.034 ): RegistrarProtocol: SU 00c0690b587f is already registering March 10, 2003  Company Confidential  Page 85 of 149
U-NII Config & User Guide  5.2  Axxcelera Broadband Wireless CS[12801.8192](16Dec 21:39:20.555 ): EMSProtocol: received message REGMSG_REGISTER_SU for CS CS[12801.8192](16Dec 21:39:20.555 ): Protocol: message contents (20 bytes)  2.  Make sure the default route is correct if the SU is on a different network than the Control Server. 3.  Verify that the SU has been upgraded to the 1483_T interactive configuration.               March 10, 2003  Company Confidential  Page 86 of 149
U-NII Config & User Guide  5.2  Axxcelera Broadband Wireless 9.2  Static 1483_T All assumptions for troubleshooting 1483_T will be based on the following diagram. RLBLSLERLBLSLEEthernet HUBPCRouter192.168.3.1MID 0 MID 3LANPVC 768Data 192.168.3.34192.168.3.10192.168.3.9AP/SU  Management/  Path9.2.1  AP Configuration Files 9.2.1.1 AP resolve device  add   bridge   ether   //bridge    mtu   1500   192.168.3.9 subnet   add   bridge.home   .   192.168.3.0   ff:ff:ff:00 rip   send   all   none rip   accept   all   none route   add   default   0.0.0.0   192.168.3.1   00:00:00:00   1   #   MAN relay   all ipatm   lifetime   60   March 10, 2003  Company Confidential  Page 87 of 149
U-NII Config & User Guide  5.2  Axxcelera Broadband Wireless 9.2.1.2 AP initbridge spanning disable device add edd device add mr1483   9.2.1.3 AP initmr1483 floodmode   1 up   3   768   atm25m   70000   70000   9.2.1.4 AP system.conf channel   0 antenna   horizontal mode   static mid   0 bid   0 interface   eth0 backoff   0 provider   abw key   Axxcelera mask   1ffff leds   active max_mid 254  9.2.2  SU Configuration Files 9.2.2.1 SU resolve device   add   bridge   ether   //bridge   mtu   1500   192.168.3.10 subnet   add   bridge.home   .   192.168.3.0   ff:ff:ff:00 rip   send   all   none rip   accept   all   none route   add   default   0.0.0.0   192.168.3.1  00:00:00:00   1   #   MAN relay   all ipatm   lifetime   60   March 10, 2003  Company Confidential  Page 88 of 149
U-NII Config & User Guide  5.2  Axxcelera Broadband Wireless 9.2.2.2 SU initbridge spanning disable device add edd device add r1483   9.2.2.3 SU system.conf channel   0 antenna   horizontal mode   static mid   3 bid   0 interface   eth0 backoff   0 provider   abw key   Axxcelera mask   1ffff leds   active   9.2.2.4 SU initr1483 pvc   0/768   atm25m   70000   70000   9.2.3 Troubleshooting 9.2.3.1  Can’t ping the radio from the terrestrial interface. 1.  Check all physical connections. The radio is a network device, which means if you connect it to a PC (NIC) you will use a straight cable. If you connect the radio to a network device (hub, switch, router) you will use a Ethernet cross-over cable(1-3, 2-6). It is also important to check that the cable is punched down correctly in the wall box and the cable is terminated correctly at the radio. The termination at the radio uses 568B (wo,o,wg,bl,wbl,g,wbr,br). 2.  Make sure the computer you are pinging from is on the same network as the AP. If you are on a different network than the radio make sure you have the proper routes in the radio and the computer you are trying to ping from. March 10, 2003  Company Confidential  Page 89 of 149
U-NII Config & User Guide  5.2  Axxcelera Broadband Wireless 9.2.3.2  Can’t ping the radio across the wireless link. There can be numerous reasons why you can’t ping across the wireless link. After following these troubleshooting steps and you still can’t ping across the wireless link refer to the RF troubleshooting document. 1.  Check the 1483 processes in the radios. Make sure they are active and have the correct PVC mapped. AP (mr1483 command) 192.168.3.9 >   mr1483   status   3 Device 3 is active Active PVC: 768 Active port: atm25m Pending PVC: 768 Pending port: atm25m Active devices:    3 1 active in total  SU (r1483 command) 192.168.3.10 >   r1483   pvc Active  PVC: 0/768 Active port: atm25m   March 10, 2003  Company Confidential  Page 90 of 149
U-NII Config & User Guide  5.2  Axxcelera Broadband Wireless 10 1483_S In this configuration the AP acts as at ATM switch passing all cells at layer 2. The SU acts as a 1483 Bridge.  10.1 Interactive 1483_S All assumptions for troubleshooting 1483_S are based on the following diagram. 192.168.2.100 /24RLBLSLARLBLSLEControl Server192.168.254.254MID 0LANPVC35PVC36SU Management PVCSU Data PVCPVC36ATM SwitchRouter atm0 192.168.2.1 /24192.168.2.50 /24PVC33PVC33AP Management PVCPVC61PVC32AP Registration PVC       March 10, 2003  Company Confidential  Page 91 of 149
U-NII Config & User Guide  5.2  Axxcelera Broadband Wireless 10.1.1  Adding AP and SU to EMS Dialogue boxes showing the information needed to add an AP or SU are shown below.   March 10, 2003  Company Confidential  Page 92 of 149
U-NII Config & User Guide  5.2  Axxcelera Broadband Wireless  10.1.2 Troubleshooting 10.1.2.1 AP Object If the AP will not register make sure all the fields in the EMS database are correctly filled in. Here are a few important points that should be kept in mind if the AP doesn’t register. 1.  Make sure the MAC address is correct.  Without the correct MAC address the AP can not register. You can verify what MAC address the AP is attempting to register with by tailing the adapcs.log file. In the following example an AP is trying to register and is not found in the database, which means when you created the object it had the wrong MAC address. [root@cs1 /root]#   tail   -f   /var/log/adapcs.log CS[5025.8192](16Dec 12:36:03.027 ): AtmAccessPointImpl: Unknown ATM AP 00c0690c522f trying to register March 10, 2003  Company Confidential  Page 93 of 149
U-NII Config & User Guide  5.2  Axxcelera Broadband Wireless 2.  The management address must be on the same subnet as the atm0 interface on the Control Server. 3.  Check that the PVCs are mapped correctly in the switch.  Since the problem is with the AP registering, pay close attention to how the registration PVC (61) and management PVC are mapped. ADMIN Access_NGI>show   pvc   list   id   0 ADMIN Access_NGI>      ----------------------------------------------------------------------------     PVC ID IPort  IVPI   IVCI    BW    OPort  OVPI   OVCI    BW     ----------------------------------------------------------------------------           1      101      0        32        0        102      0           61         0          2      101      0        33        0        102      0           33         0  4.  The “AS Port” has to be filled in with the proper port if you have chosen to manage the anchor switch with the EMS (selected when creating the Control Server). 5.  Make sure the Control Server has the created the proper atmarp entries in it. There should be an atmarp entry for every management address. • Lists atmarp entries [root@cs1 /root]#   atmarp   -a ----- Itf 0 (192.168.2.1, netmask 255.255.255.0) ----- Default QOS: ubr,aal5:max_sdu=9188 IP 192.168.2.50, state VALID, addr <none>, flags 0x4<PERM>  0.0.33 ----- Unknown incoming connections ----- ----- Incoming unidirectional connections ----- ----- End of dump -----  10.1.2.2 SU Object If the SU will not register make sure all the fields in the EMS database are filled in properly. Here are a few important points that should be kept in mind if the SU doesn’t register. Many different things can cause the SU not to register so after verifying all of these points and it still doesn’t register the next step will be to troubleshoot the RF link. See RF troubleshooting document. 1.  Make sure the MAC address is correct.  Without the correct MAC address the SU can not register. You can verify this by tailing the adapcs.log file. In this example an SU with this MAC address is trying to register and is not found in the database, which means when you created the object it had the wrong MAC address. March 10, 2003  Company Confidential  Page 94 of 149
U-NII Config & User Guide  5.2  Axxcelera Broadband Wireless [root@cs1 /root]#   tail   -f   /var/log/adapcs.log CS[5494.8192](16Dec 12:48:34.926 ): Protocol:  00 00 00 00 01 00 00 01 00 14 00 04 00 c0 69 0b 58 7f b5 10  CS[5494.8192](16Dec 12:48:34.926 ): RegistrarProtocol: Registering SU 00c0690b587f (MID 1) CS[5494.8192](16Dec 12:48:34.926 ): DynAccessPointImpl (1483_S AP): handleRegisterSU (SU 00c0690b587f) CS[5494.8192](16Dec 12:48:34.926 ): DynAccessPointImpl (1483_S AP): no key - fetch details from EMSAgent CS[5494.8192](16Dec 12:48:34.930 ): DynAccessPointImpl: CORBA::BAD_PARAM exception thrown (minor code=0) CS[5494.8192](16Dec 12:48:34.930 ): DynAccessPointImpl: An SU is trying to register but I can't talk to an EMSAgent CS[5494.8192](16Dec 12:48:34.931 ): DynAP (1483_S AP): Couldn't get details for registering SU 00c0690b587f CS[5494.8192](16Dec 12:48:34.931 ): RegistrarProtocol: Deferring deregistration of MID 1 CS[5494.8192](16Dec 12:48:35.426 ): EMSProtocol: received message REGMSG_REGISTER_SU for CS CS[5494.8192](16Dec 12:48:35.426 ): Protocol: message contents (20 bytes)  CS[5494.8192](16Dec 12:48:35.426 ): Protocol:  00 00 00 00 01 00 00 01 00 14 00 04 00 c0 69 0b 58 7f b5 10  CS[5494.8192](16Dec 12:48:35.426 ): RegistrarProtocol: SU 00c0690b587f is already registering  2.  The management address must be on the same subnet as the atm0 interface on the Control Server. This only applies for the management address. 3.  Check that the PVCs are mapped correctly in the switch.  Since the problem is with the SU not registering, pay close attention to the registration (61) and management (280) PVC mapping. ADMIN Access_NGI>show   pvc   list   id   0 ADMIN Access_NGI>      ----------------------------------------------------------------------------     PVC ID IPort  IVPI   IVCI    BW    OPort  OVPI   OVCI    BW     ----------------------------------------------------------------------------           1      101      0        32        0        102      0           61         0          2      101      0        33        0        102      0           33         0          3      101      0        36        0        102      0           36         0          4      101      0        35        0        106      0           35         0  4.  Make sure the Control Server has the created the proper atmarp entries in it. There should be an atmarp entry for every management address. • Lists atmarp entries March 10, 2003  Company Confidential  Page 95 of 149
U-NII Config & User Guide  5.2  Axxcelera Broadband Wireless [root@cs1 /root]#   atmarp   -a ----- Itf 0 (192.168.2.1, netmask 255.255.255.0) ----- Default QOS: ubr,aal5:max_sdu=9188 IP 192.168.2.100, state VALID, addr <none>, flags 0x4<PERM>   0.0.36 IP 192.168.2.50, state VALID, addr <none>, flags 0x4<PERM>   0.0.33 ----- Unknown incoming connections ----- ----- Incoming unidirectional connections ----- ----- End of dump -----   March 10, 2003  Company Confidential  Page 96 of 149
U-NII Config & User Guide  5.2  Axxcelera Broadband Wireless  10.2 Static 1483_S (routed management) All assumptions for troubleshooting 1483_S are based on the following diagram. 192.168.100.3PVC 768192.168.2.34 /27192.168.100.1192.168.2.50 /27PVC34AP Management PVCRLBLSLARLBLSLEPC192.168.3.1MID 0 MID 3LANPVC 769PVC300192.168.3.10SU Management PVCSU Data PVCATM SwitchRouter 10.2.1  Routed Management PRO/CON 1483_S can be configured with switched management or routed management. Read PRO/CON of both to help you decide which you would like use.  PRO • Only one ATMARP entry will need to be added to the termination router.  • Can be easier to troubleshoot and isolate a problem in the network.  CON • Need to add a route and ipatm pvc for every SU that is added to the AP. • May need to add a route to multiple routers for each SU depending upon network design.  March 10, 2003  Company Confidential  Page 97 of 149
U-NII Config & User Guide  5.2  Axxcelera Broadband Wireless  10.2.2  AP Configuration Files 10.2.2.1 AP resolve device   add   atm0   atm   //bun   mtu   1500   192.168.2.50 device   add   atm1   atm   //bun   mtu   1500   192.168.100.1  subnet   add   atm0.home   .   192.168.2.32   ff:ff:ff:e0 subnet add atm1.home   .   192.168.100.0   ff:ff:ff:00  route add default   0.0.0.0   192.168.2.34   00:00:00:00   1   #   MAN  relay   all  ipatm   lifetime   60  ipatm   pvc   atm0   atm25i   0/34   pcr   70000/70000   remoteip   192.168.2.34 ipatm   pvc   atm1   atm25m   0/768   pcr   70000/70000   remoteip   192.168.100.3   10.2.2.2 AP system.conf channel   0 antenna   horizontal mode   static mid   0 bid   0 interface   atm0 backoff   0 provider   abw key   Axxcelera mask   1ffff leds   active max_mid 254   March 10, 2003  Company Confidential  Page 98 of 149
U-NII Config & User Guide  5.2  Axxcelera Broadband Wireless 10.2.2.3 AP initswitchcli tp default UBR 70000 sp default 256 stats  add   atm25m   0   769   atm25i   0   300   default   default   perm epd add   atm25i   0   300   atm25m   0   769   default   default   perm epd   10.2.3  SU Configuration Files 10.2.3.1 SU resolve device   add   bridge   ether   //bridge   mtu   1500   192.168.3.10 device   add   atm1   atm   //bun   mtu   1500   192.168.100.3  subnet   add   bridge.home   .   192.168.3.0   ff:ff:ff:00 subnet   add   atm1.home   .   192.168.100.0   ff:ff:ff:00  rip   send   all   none rip   accept   all   none  route   add   default   0.0.0.0   192.168.3.1   00:00:00:00   1   #   MAN route   add   mgmt   192.168.2.32   192.168.100.1   ff:ff:ff:e0   1   #   MAN relay   all ipatm   lifetime   60 ipatm   pvc   atm1   atm25m   0/768   pcr   70000/70000   remoteip   192.168.100.1   10.2.3.2 SU initbridge spanning   disable device   add   edd device   add   r1483   March 10, 2003  Company Confidential  Page 99 of 149
U-NII Config & User Guide  5.2  Axxcelera Broadband Wireless 10.2.3.3 SU system.conf channel   0 antenna   horizontal mode   static mid   3 bid   0 interface   eth0 backoff   0 provider   abw key   Axxcelera mask   1ffff leds   active   10.2.3.4 SU initr1483 pvc   0/769   atm25m   70000   70000   10.2.4 Troubleshooting 10.2.4.1  Can’t ping the radio from the terrestrial interface AP 1.  Check all physical connections. It is a straight cable from the CS to the Switch, and a rollover twist from the wallbox to the switch (1-7,2-8). 2.  Check to see if your atmarp entries are in the ARP table on the CS ( ./atmarp if you are already in the /usr/local/sbin directory). • Add an atmarp entry root@cs1 11:11:14 (4) [~] #   atmarp   -s   192.168.2.50   0.0.340 • View an atmarp table  March 10, 2003  Company Confidential  Page 100 of 149
U-NII Config & User Guide  5.2  Axxcelera Broadband Wireless root@cs1 11:12:52 (5) [~] #   atmarp   -a ----- Itf 0 (192.168.2.1, netmask 255.255.255.0) ----- Default QOS: ubr,aal5:max_sdu=9188 IP 192.168.2.50, state VALID, addr <none>, flags 0x4<PERM> 0.0.34 ----- Unknown incoming connections ----- ----- Incoming unidirectional connections ----- ----- End of dump -----  • Delete an atmarp entry root@cs1 11:13:42 (6) [~] #   atmarp   -d   192.168.2.50  3.  Check route on CS, by typing route at the Command line. • Add a route root@cs1 11:17:19 (8) [~] #   route   add   -net   192.168.100.0   netmask   255.255.255.0   gw   192.168.2.50  • View the routing table root@cs1 11:18:51 (9) [~] #   route Kernel IP routing table Destination      Gateway         Genmask              Flags Metric Ref    Use Iface 10.9.144.1       *                      255.255.255.255  UH    0          0        0     eth0 192.168.100.0 192.168.2.50   255.255.255.0      UG    0          0        0     atm0 192.168.2.0      *                     255.255.255.0      U       0          0        0     atm0 10.9.144.0        *                     255.255.255.0      U       0          0        0     eth0 127.0.0.0          *                     255.0.0.0              U       0          0        0     lo  • Delete a route root@cs1 11:20:26 (10) [~] #   route   del   -net   192.168.100.0   netmask   255.255.255.0  4.  Check the Switch for the correct PVC’s. • Log into the ATM switch and check that the PVCs are mapped correctly. The following commands are for an FVC switch. • Add a PVC March 10, 2003  Company Confidential  Page 101 of 149
U-NII Config & User Guide  5.2  Axxcelera Broadband Wireless ADMIN Access_NGI>set   pvc   add   101   0   34   be   102   0   34   be  Adding PVC i=101/0/34 o=102/0/34  to switch fabrice  Updating FLASH memory. Please wait ... Done.  • Show the PVCs mapped in the switch ADMIN Access_NGI>   show   pvc   list   id   0     ------------------------------------------------------------     PVC ID  IPort   IVPI   IVCI    BW    OPort  OVPI   OVCI    BW     ------------------------------------------------------------           1        101     0         34        0        102      0           34         0  • Delete a PVC ADMIN Access_NGI>   set   pvc   del   1  SU 1.  Check all physical connections. The radio is a network device, which means if you connect it to a PC (NIC) you will use a straight cable. If you connect the radio to a network device (hub, switch, router) you will use a Ethernet cross-over cable(1-3, 2-6). It is also important to check that the cable is punched down correctly in the wall box and the cable is terminated correctly at the radio. The termination at the radio uses 568B (wo,o,wg,bl,wbl,g,wbr,br). 2.  Make sure the computer you are pinging from is on the same network as the AP. If you are on a different network than the radio make sure you have the proper routes in the radio and the computer you are trying to ping from. 10.2.4.2  Can’t ping the radio across the wireless link. There can be numerous reasons why you can’t ping across the wireless link. After following these troubleshooting steps and you still can’t ping across the wireless link refer to the RF troubleshooting document. 1.  Check that SU has the proper MID. 192.168.3.10 hmm> system mid MID 3  2.  Check the ipatm pvc is correct in relation to the MID and remoteip March 10, 2003  Company Confidential  Page 102 of 149
U-NII Config & User Guide  5.2  Axxcelera Broadband Wireless AP 192.168.2.50 ip>   ipatm   pvc ipatm pvc atm1 atm25m 0/768 pcr 70000/70000 remoteip 192.168.100.3  SU 192.168.3.65 ip>   ipatm   pvc ipatm pvc atm1 atm25m 0/768 pcr 70000/70000 remoteip 192.168.100.1  3.  Check the default route in the SU. 192.168.3.65 ip>   route route add default          0.0.0.0 192.168.100.1 00:00:00:00 1 # MAN via atm1  March 10, 2003  Company Confidential  Page 103 of 149
U-NII Config & User Guide  5.2  Axxcelera Broadband Wireless 10.3 Static 1483_S (switched management) All assumptions for troubleshooting 1483_S are based on the following diagram. 192.168.100.3PVC 768RLBLSLARLBLSLEATM SwitchPCRouter192.168.3.1192.168.3.10MID 0 MID 3LANPVC 769PVC200SU Management PVCSU Data PVCPVC103PVC103 192.168.100.254 /24192.168.100.1PVC101 AP Management PVCPVC10110.3.1 Switched Management PRO/CON CLIP_S can be configured with switched management or routed management. Read PRO/CON of both to help you decide which you would like use.  PRO • No extra mgmt routes will have to be added to the termination router.  • Multiple routes will not have to be added to network routers with the addition of each SU.   CON • Will need to add an atmarp entry for each SU in the termination router.  • Will need to add a management PVC in the switchcli of the AP for each SU.  March 10, 2003  Company Confidential  Page 104 of 149
U-NII Config & User Guide  5.2  Axxcelera Broadband Wireless  10.3.2  AP Configuration Files 10.3.2.1 AP resolve device   add   atm0   atm   //bun   mtu   1500   192.168.100.1  subnet   add   atm0.home   .   192.168.100.0   ff:ff:ff:00  route add default   0.0.0.0   192.168.100.254   00:00:00:00   1   #   MAN  relay   all  ipatm   lifetime   60  ipatm   pvc   atm0   atm25i   0/101   pcr   70000/70000   remoteip   192.168.100.254  10.3.2.2 AP system.conf channel   0 antenna   horizontal mode   static mid   0 bid   0 interface   atm0 backoff   0 provider   abw key   Axxcelera mask   1ffff leds   active max_mid 254   March 10, 2003  Company Confidential  Page 105 of 149
U-NII Config & User Guide  5.2  Axxcelera Broadband Wireless 10.3.2.3 AP initswitchcli  tp default UBR 70000 sp default 256 stats  add   atm25m   0   768   atm25i   0   103   default   default   perm epd add   atm25i   0   103   atm25m   0   768   default   default   perm epd add   atm25m   0   769   atm25i   0   200   default   default   perm epd add   atm25i   0   200   atm25m   0   769   default   default   perm epd   10.3.3  SU Configuration Files 10.3.3.1 SU resolve device   add   bridge   ether   //bridge   mtu   1500   192.168.3.10 device   add   atm1   atm   //bun   mtu   1500   192.168.100.3  subnet   add   bridge.home   .   192.168.3.0   ff:ff:ff:00 subnet   add   atm1.home   .   192.168.100.0   ff:ff:ff:00  rip   send   all   none rip   accept   all   none  route   add   default   0.0.0.0   192.168.3.1   00:00:00:00   1   #   MAN relay   all ipatm   lifetime   60 ipatm   pvc   atm1   atm25m   0/768   pcr   70000/70000   remoteip   192.168.100.254   10.3.3.2 SU initbridge spanning   disable device   add   edd device   add   r1483   March 10, 2003  Company Confidential  Page 106 of 149
U-NII Config & User Guide  5.2  Axxcelera Broadband Wireless 10.3.3.3 SU system.conf channel   0 antenna   horizontal mode   static mid   3 bid   0 interface   eth0 backoff   0 provider   abw key   Axxcelera mask   1ffff leds   active   10.3.3.4 SU initr1483 pvc   0/769   atm25m   70000   70000   10.3.4 Troubleshooting 10.3.4.1  Can’t ping the radio from the terrestrial interface AP 1.  Check all physical connections. It is a straight cable from the CS to the Switch, and a rollover twist from the wall box to the switch (1-7,2-8). 2.  Check to see if your atmarp entries are in the ARP table on the CS. ( ./atmarp if you are already in the /usr/local/sbin directory) • Add an atmarp entry root@cs1 11:11:14 (4) [~] #   atmarp   -s   192.168.100.1   0.0.101  • View an atmarp table root@cs1 11:12:52 (5) [~] #   atmarp   -a ----- Itf 0 (192.168.100.254, netmask 255.255.255.0) ----- Default QOS: ubr,aal5:max_sdu=9188 IP 192.168.100.1, state VALID, addr <none>, flags 0x4<PERM>  0.0.101 ----- Unknown incoming connections ----- ----- Incoming unidirectional connections ----- ----- End of dump -----  March 10, 2003  Company Confidential  Page 107 of 149
U-NII Config & User Guide  5.2  Axxcelera Broadband Wireless • Delete an atmarp entry root@cs1 11:13:42 (6) [~] #   atmarp   -d   192.168.100.1  3.  Check the Switch for the correct PVC’s. • Log into the ATM switch and check that the PVCs are mapped correctly. The following commands are for an FVC switch. •  Add a PVC ADMIN Access_NGI>set   pvc   add   101   0   101   be   102   0   101   be  Adding PVC i=101/0/34 o=102/0/34  to switch fabrice  Updating FLASH memory. Please wait ... Done.  • Show the PVCs mapped in the switch ADMIN Access_NGI>show   pvc   list   id   0     ------------------------------------------------------------     PVC ID  IPort   IVPI   IVCI    BW    OPort  OVPI   OVCI    BW     ------------------------------------------------------------           1        101     0         101        0        102      0           101       0  • Delete a PVC ADMIN Access_NGI>set   pvc   del   1  SU 1.  Check all physical connections. The radio is a network device, which means if you connect it to a PC (NIC) you will use a straight cable. If you  connect the radio to a network device (hub, switch, router) you will use a Ethernet cross-over cable(1-3, 2-6). It is also important to check that the cable is punched down correctly in the wall box and the cable is terminated correctly at the radio. The termination at the radio uses 568B (wo,o,wg,bl,wbl,g,wbr,br). 2.  Make sure the computer you are pinging from is on the same network as the AP. If you are on a different network than the radio make sure you have the proper routes in the radio and the computer you are trying to ping from. March 10, 2003  Company Confidential  Page 108 of 149
U-NII Config & User Guide  5.2  Axxcelera Broadband Wireless 10.3.4.2  Can’t ping across the wireless link There are numerous reason why you couldn’t ping across the wireless link. After following these troubleshooting steps and you still can’t ping across the wireless link refer to the RF troubleshooting document. 1.  Check that SU has the proper MID. 192.168.3.10 hmm>   system   mid MID 3  2.  Check the that the pvc information is correct in relation to the MID and remoteip AP 192.168.100.254 switchcli>   list all all perm Displaying permanent entries for all ports.                                                                                                  port       vp      vc           port       vp      vc                                          atm25i      0     103 ==>     atm25m      0     768                                          atm25m      0     768 ==>     atm25i      0     103         atm25i      0     200 ==>     atm25m      0     769                                          atm25m      0     769 ==>     atm25i      0     200                                                       SU 192.168.3.65 ip>   ipatm   pvc ipatm pvc atm1 atm25m 0/768 pcr 70000/70000 remoteip 192.168.100.1  3.  Check the default route in the SU. 192.168.3.65 ip> route route add default          0.0.0.0 192.168.100.254 00:00:00:00 1 # MAN via atm1  March 10, 2003  Company Confidential  Page 109 of 149
U-NII Config & User Guide  5.2  Axxcelera Broadband Wireless 11 Native ATM In this configuration the AP and the SU act as an ATM switch. Both AP and SU will pass any ATM cells without looking at upper level protocols.  11.1 Static Native ATM All assumptions for troubleshooting Native ATM are based on the following diagram. RLBLSLARLBLSLAATM SwitchPC192.168.2.34192.168.100.1MID 0 MID 3ATM SwitchPVC769PVC 770PVC200PVC 300PVC 200PV C300SU Management PVCSU Data PVCATM NetworkATM Network 192.168.100.3 192.168.9.99192.168.2.50 PVC 768PVC250PVC99AP Management PVCMarch 10, 2003  Company Confidential  Page 110 of 149
U-NII Config & User Guide  5.2  Axxcelera Broadband Wireless 11.1.1  AP Configuration Files 11.1.1.1 AP resolve device   add   atm0   atm   //bun   mtu   1500   192.168.2.50 device   add   atm1   atm   //bun   mtu   1500   192.168.100.1  subnet   add   atm0.home   .   192.168.2.0   ff:ff:ff:00 subnet   add   atm1.home   .   192.168.100.0   ff:ff:ff:00  rip   send   all   none rip   accept   all   none  route   add   default   0.0.0.0   192.168.2.34   00:00:00:00   1   #   MAN  relay   all  ipatm   lifetime   60 ipatm   pvc   atm0   atm25i   0/250   pcr   70000/70000   remoteip   192.168.2.34 ipatm   pvc   atm1   atm25m   0/768   pcr   70000/70000   remoteip   192.168.100.3   11.1.1.2 AP system.conf channel   0 antenna   horizontal mode   static mid   0 bid   0 interface   atm0 backoff   0 provider   abw key   Axxcelera mask   1ffff leds   active   March 10, 2003  Company Confidential  Page 111 of 149
U-NII Config & User Guide  5.2  Axxcelera Broadband Wireless 11.1.1.3 AP initswitchcli tp default UBR 70000 sp default 256 stats   add   atm25m   0   769   atm25i   0   200   default   default   perm epd add   atm25i   0   200   atm25m   0   769   default   default   perm epd  add   atm25i   0   300   atm25m   0   770   default   default   perm epd add   atm25m   0   770   atm25i   0   300   default   default   perm epd   11.1.2  SU Configuration Files 11.1.2.1 SU resolve device   add   atm0   atm   //bun    mtu   1500   192.168.9.99 device add atm1       atm    //bun      mtu 1500  192.168.100.3  subnet   add   atm1.home   .   192.168.100.0   ff:ff:ff:00 subnet   add   atm0.home   .   192.168.9.0   ff:ff:ff:00  rip   send   all   none rip   accept   all   none  route   add   default   0.0.0.0   192.168.100.1  00:00:00:00   1   #   MAN relay   all  ipatm   lifetime   60 ipatm   pvc   atm0   atm25i   0/99   pcr   70000/70000   remoteip   192.168.9.1 ipatm   pvc   atm1   atm25m   0/768   pcr   70000/70000   remoteip   192.168.100.1   March 10, 2003  Company Confidential  Page 112 of 149
U-NII Config & User Guide  5.2  Axxcelera Broadband Wireless 11.1.2.2 SU system.conf channel   0 antenna   horizontal mode   static mid   3 bid   0 interface   atm0 backoff   0 provider   abw key   Axxcelera mask   1ffff leds   active   11.1.2.3 SU initswitchcli  tp default UBR 70000 sp default 256 stats add   atm25m   0   769   atm25i   0   200   default   default   perm epd add   atm25i   0   200   atm25m   0   769   default   default   perm epd  add   atm25i   0   300   atm25m   0   770   default   default   perm epd add   atm25m   0   770   atm25i   0   300   default   default   perm epd   11.1.3 Troubleshooting 11.1.3.1  Can’t ping the radio from the terrestrial interface AP 1.  Check all physical connections. It is a straight cable from the CS to the Switch, and a rollover twist from the wallbox to the switch (1-7,2-8).  2.  Check to see if your atmarp entries are in the ARP table on the CS. ( ./atmarp if you are already in the /usr/local/sbin directory) • Add an atmarp entry  root@cs1 11:11:14 (4) [~] #   atmarp   -s   192.168.2.50   0.0.250  March 10, 2003  Company Confidential  Page 113 of 149
U-NII Config & User Guide  5.2  Axxcelera Broadband Wireless • View an atmarp table  root@cs1 11:12:52 (5) [~] #   atmarp   -a ----- Itf 0 (192.168.2.1, netmask 255.255.255.0) ----- Default QOS: ubr,aal5:max_sdu=9188 IP 192.168.2.50, state VALID, addr <none>, flags 0x4<PERM> 0.0.250 ----- Unknown incoming connections ----- ----- Incoming unidirectional connections ----- ----- End of dump -----  • Delete an atmarp entry root@cs1 11:13:42 (6) [~] #   atmarp   -d   192.168.2.50  3.  Check route on CS, by typing route at the Command line. • Add a route root@cs1 11:17:19 (8) [~] #   route   add   -net   192.168.100.0   netmask   255.255.255.0   gw   192.168.2.50  • View the routing table root@cs1 11:18:51 (9) [~] #   route Kernel IP routing table Destination      Gateway         Genmask              Flags Metric Ref    Use Iface 10.9.144.1       *                      255.255.255.255  UH    0          0        0     eth0 192.168.100.0 192.168.2.50   255.255.255.0      UG    0          0        0     atm0 192.168.2.0      *                     255.255.255.0      U       0          0        0     atm0 192.168.2.0      *                     255.255.255.0      U       0          0        0     atm0 10.9.144.0        *                     255.255.255.0      U       0          0        0     eth0 127.0.0.0          *                     255.0.0.0              U       0          0        0     lo  • Delete a route root@cs1 11:20:26 (10) [~] #   route   del   -net   192.168.100.0   netmask   255.255.255.0  4.  Check the Switch for the correct PVC’s. • Log into the ATM switch and check that the PVCs are mapped correctly. The following commands are for an FVC switch. • Add a PVC March 10, 2003  Company Confidential  Page 114 of 149
U-NII Config & User Guide  5.2  Axxcelera Broadband Wireless ADMIN Access_NGI>set   pvc   add   101   0   250   be   102   0   250   be  Adding PVC i=101/0/250 o=102/0/250  to switch fabrice Updating FLASH memory. Please wait ... Done.  • Show the PVCs mapped in the switch ADMIN Access_NGI>   show   pvc   list   id   0     ------------------------------------------------------------     PVC ID  IPort   IVPI   IVCI    BW    OPort  OVPI   OVCI    BW ------------------------------------------------------------           1        101     0         250      0        102      0           250       0  • Delete a PVC ADMIN Access_NGI>   set   pvc   del   1  SU 1.  Check all physical connections. The radio is a network device, which means if you connect it to a PC (NIC) you will use a straight cable. If you connect the radio to a network device (hub, switch, router) you will use a Ethernet cross-over cable(1-3, 2-6). It is also important to check that the cable is punched down correctly in the wall box and the cable is terminated correctly at the radio.  The termination at the radio uses 568B (wo,o,wg,bl,wbl,g,wbr,br). 2.  Make sure the computer you are pinging from is on the same network as the AP. If you are on a different network than the radio make sure you have the proper routes in the radio and the computer you are trying to ping from. 11.1.3.2  Can’t ping the radio across the wireless link. There can be numerous reasons why you can’t ping across the wireless link. After following these troubleshooting steps and you still can’t ping across the wireless link refer to the RF troubleshooting document. 1.  Check that SU has the proper MID. 192.168.3.10 hmm>   system   mid MID 3  2.  Check the ipatm pvc is correct in relation to the MID and remoteip March 10, 2003  Company Confidential  Page 115 of 149
U-NII Config & User Guide  5.2  Axxcelera Broadband Wireless AP 192.168.2.50 ip>   ipatm   pvc ipatm pvc atm1 atm25m 0/768 pcr 70000/70000 remoteip 192.168.100.3  SU 192.168.3.65 ip>   ipatm   pvc ipatm pvc atm1 atm25m 0/768 pcr 70000/70000 remoteip 192.168.100.1  3.  Check the default route in the SU. 192.168.3.65 ip>   route route add default          0.0.0.0 192.168.100.1 00:00:00:00 1 # MAN via atm1     March 10, 2003  Company Confidential  Page 116 of 149
U-NII Config & User Guide  5.2  Axxcelera Broadband Wireless 12 Extender The Extender (PTP) units operate in the same manner as the AB-Access (PMP) units.  The Ethernet Extender configuration and operation are almost identical to the 1483_T configuration except they use a single port bridge which is more efficient.  The ATM Extender configuration and operation is identical to the Native_ATM configuration, where as the AP and the SU act as an ATM switch. Both AP and SU will pass any ATM cells without looking at upper level protocols.  BHM = Backhaul Master BHS = Backhaul Slave 12.1 Ethernet Extender All assumptions for troubleshooting the Ethernet Extender are based on the following diagram.   March 10, 2003  Company Confidential  Page 117 of 149
U-NII Config & User Guide  5.2  Axxcelera Broadband Wireless 12.1.1  BHM Configuration Files 12.1.1.1 BHM resolve device  add   bridge   ether   //bridge    mtu   1500   192.168.3.9 subnet   add   bridge.home   .   192.168.3.0   ff:ff:ff:00 rip   send   all   none rip   accept   all   none route   add   default   0.0.0.0   192.168.3.1   00:00:00:00   1   #   MAN relay   all ipatm   lifetime   60   12.1.1.2 BHM initbridge spanning disable device add edd device add r1483   12.1.1.3 BHM initr1483  pvc   0/768   atm25m   70000   70000   12.1.1.4 BHM system.conf channel   0 antenna   horizontal mode   static mid   0 bid   0 interface   eth0 backoff   0 provider   abw key   Axxcelera mask   1ffff leds   active max_mid 254  March 10, 2003  Company Confidential  Page 118 of 149
U-NII Config & User Guide  5.2  Axxcelera Broadband Wireless 12.1.2  BHS Configuration Files 12.1.2.1 BHS resolve device   add   bridge   ether   //bridge   mtu   1500   192.168.3.10 subnet   add   bridge.home   .   192.168.3.0   ff:ff:ff:00 rip   send   all   none rip   accept   all   none route   add   default   0.0.0.0   192.168.3.1  00:00:00:00   1   #   MAN relay   all ipatm   lifetime   60   12.1.2.2 BHS initbridge spanning disable device add edd device add r1483   12.1.2.3 BHS system.conf channel   0 antenna   horizontal mode   static mid   3 bid   0 interface   eth0 backoff   0 provider   abw key   Axxcelera mask   1ffff leds   active   12.1.2.4 BHS initr1483 pvc   0/768   atm25m   70000   70000   March 10, 2003  Company Confidential  Page 119 of 149
U-NII Config & User Guide  5.2  Axxcelera Broadband Wireless 12.1.3 Troubleshooting 12.1.3.1  Can’t ping the radio from the terrestrial interface. 1.  Check all physical connections. The radio is a network device, which means if you connect it to a PC (NIC) you will use a straight cable. If you connect the radio to a network device (hub, switch, router) you will use a Ethernet cross-over cable(1-3, 2-6). It is also important to check that the cable is punched down correctly in the wall box and the cable is terminated correctly at the radio. The termination at the radio uses 568B (wo,o,wg,bl,wbl,g,wbr,br). 2.  Make sure the computer you are pinging from is on the same network as the AP. If you are on a different network than the radio make sure you have the proper routes in the radio and the computer you are trying to ping from. 12.1.3.2  Can’t ping the radio across the wireless link. There can be numerous reasons why you can’t ping across the wireless link. After following these troubleshooting steps and you still can’t ping across the wireless link refer to the RF troubleshooting document. 1.  Check the 1483 processes in the radios. Make sure they are active and have the correct PVC mapped. BHM (r1483 command) 192.168.3.9 >   r1483   pvc Active  PVC: 3/768 Active port: atm25m  BHS (r1483 command) 192.168.3.10 >   r1483   pvc Active  PVC: 0/768 Active port: atm25m  March 10, 2003  Company Confidential  Page 120 of 149
U-NII Config & User Guide  5.2  Axxcelera Broadband Wireless  12.2 ATM Extender All assumptions for troubleshooting the ATM Extender are based on the following diagram. RLBLSLARLBLSLAATM SwitchMgmt Server192.168.2.34MID 0 MID 3ATM SwitchPVC769PVC 770PVC200PVC 300PVC 200PV C300SU Management PVCSU Data PVCATM NetworkATM Network 192.168.100.3192.168.100.1192.168.9.99192.168.2.50 PVC 768PVC250PVC99AP Management PVCMarch 10, 2003  Company Confidential  Page 121 of 149
U-NII Config & User Guide  5.2  Axxcelera Broadband Wireless 12.2.1  BHM Configuration Files 12.2.1.1 BHM resolve device   add   atm0   atm   //bun   mtu   1500   192.168.2.50 device   add   atm1   atm   //bun   mtu   1500   192.168.100.1  subnet   add   atm0.home   .   192.168.2.0   ff:ff:ff:00 subnet   add   atm1.home   .   192.168.100.0   ff:ff:ff:00  rip   send   all   none rip   accept   all   none  route   add   default   0.0.0.0   192.168.2.34   00:00:00:00   1   #   MAN  relay   all  ipatm   lifetime   60 ipatm   pvc   atm0   atm25i   0/250   pcr   70000/70000   remoteip   192.168.2.34 ipatm   pvc   atm1   atm25m   0/768   pcr   70000/70000   remoteip   192.168.100.3   12.2.1.2 BHM system.conf channel   0 antenna   horizontal mode   static mid   0 bid   0 interface   atm0 backoff   0 provider   abw key   Axxcelera mask   1ffff leds   active   March 10, 2003  Company Confidential  Page 122 of 149
U-NII Config & User Guide  5.2  Axxcelera Broadband Wireless 12.2.1.3 BHM initswitchcli tp default UBR 70000 sp default 256 stats   add   atm25m   0   769   atm25i   0   200   default   default   perm epd add   atm25i   0   200   atm25m   0   769   default   default   perm epd  add   atm25i   0   300   atm25m   0   770   default   default   perm epd add   atm25m   0   770   atm25i   0   300   default   default   perm epd   12.2.2  BHS Configuration Files 12.2.2.1 BHS resolve device   add   atm0   atm   //bun    mtu   1500   192.168.9.99 device add atm1       atm    //bun      mtu 1500  192.168.100.3  subnet   add   atm1.home   .   192.168.100.0   ff:ff:ff:00 subnet   add   atm0.home   .   192.168.9.0   ff:ff:ff:00  rip   send   all   none rip   accept   all   none  route   add   default   0.0.0.0   192.168.100.1  00:00:00:00   1   #   MAN relay   all  ipatm   lifetime   60 ipatm   pvc   atm0   atm25i   0/99   pcr   70000/70000   remoteip   192.168.9.1 ipatm   pvc   atm1   atm25m   0/768   pcr   70000/70000   remoteip   192.168.100.1   March 10, 2003  Company Confidential  Page 123 of 149
U-NII Config & User Guide  5.2  Axxcelera Broadband Wireless 12.2.2.2 BHS system.conf channel   0 antenna   horizontal mode   static mid   3 bid   0 interface   atm0 backoff   0 provider   abw key   Axxcelera mask   1ffff leds   debug   12.2.2.3 BHS initswitchcli  tp default UBR 70000 sp default 256 stats add   atm25m   0   769   atm25i   0   200   default   default   perm epd add   atm25i   0   200   atm25m   0   769   default   default   perm epd  add   atm25i   0   300   atm25m   0   770   default   default   perm epd add   atm25m   0   770   atm25i   0   300   default   default   perm epd   12.2.3 Troubleshooting 12.2.3.1  Can’t ping the radio from the terrestrial interface AP 1.  Check all physical connections. It is a straight cable from the CS to the Switch, and a rollover twist from the wallbox to the switch (1-7,2-8).  2.  Check to see if your atmarp entries are in the ARP table on the CS. ( ./atmarp if you are already in the /usr/local/sbin directory) • Add an atmarp entry  root@cs1 11:11:14 (4) [~] #   atmarp   -s   192.168.2.50   0.0.250  March 10, 2003  Company Confidential  Page 124 of 149
U-NII Config & User Guide  5.2  Axxcelera Broadband Wireless • View an atmarp table  root@cs1 11:12:52 (5) [~] #   atmarp   -a ----- Itf 0 (192.168.2.1, netmask 255.255.255.0) ----- Default QOS: ubr,aal5:max_sdu=9188 IP 192.168.2.50, state VALID, addr <none>, flags 0x4<PERM> 0.0.250 ----- Unknown incoming connections ----- ----- Incoming unidirectional connections ----- ----- End of dump -----  • Delete an atmarp entry root@cs1 11:13:42 (6) [~] #   atmarp   -d   192.168.2.50  3.  Check route on CS, by typing route at the Command line. • Add a route root@cs1 11:17:19 (8) [~] #   route   add   -net   192.168.100.0   netmask   255.255.255.0   gw   192.168.2.50  • View the routing table root@cs1 11:18:51 (9) [~] #   route Kernel IP routing table Destination      Gateway         Genmask              Flags Metric Ref    Use Iface 10.9.144.1       *                      255.255.255.255  UH    0          0        0     eth0 192.168.100.0 192.168.2.50   255.255.255.0      UG    0          0        0     atm0 192.168.2.0      *                     255.255.255.0      U       0          0        0     atm0 192.168.2.0      *                     255.255.255.0      U       0          0        0     atm0 10.9.144.0        *                     255.255.255.0      U       0          0        0     eth0 127.0.0.0          *                     255.0.0.0              U       0          0        0     lo  • Delete a route root@cs1 11:20:26 (10) [~] #   route   del   -net   192.168.100.0   netmask   255.255.255.0  4.  Check the Switch for the correct PVC’s. • Log into the ATM switch and check that the PVCs are mapped correctly. The following commands are for an FVC switch. • Add a PVC March 10, 2003  Company Confidential  Page 125 of 149
U-NII Config & User Guide  5.2  Axxcelera Broadband Wireless ADMIN Access_NGI>set   pvc   add   101   0   250   be   102   0   250   be  Adding PVC i=101/0/250 o=102/0/250  to switch fabrice Updating FLASH memory. Please wait ... Done.  • Show the PVCs mapped in the switch ADMIN Access_NGI>   show   pvc   list   id   0     ------------------------------------------------------------     PVC ID  IPort   IVPI   IVCI    BW    OPort  OVPI   OVCI    BW ------------------------------------------------------------           1        101     0         250      0        102      0           250       0  • Delete a PVC ADMIN Access_NGI>   set   pvc   del   1  SU 1.  Check all physical connections. The radio is a network device, which means if you connect it to a PC (NIC) you will use a straight cable. If you connect the radio to a network device (hub, switch, router) you will use a Ethernet cross-over cable(1-3, 2-6). It is also important to check that the cable is punched down correctly in the wall box and the cable is terminated correctly at the radio.  The termination at the radio uses 568B (wo,o,wg,bl,wbl,g,wbr,br). 2.  Make sure the computer you are pinging from is on the same network as the AP. If you are on a different network than the radio make sure you have the proper routes in the radio and the computer you are trying to ping from. 12.2.3.2  Can’t ping the radio across the wireless link. There can be numerous reasons why you can’t ping across the wireless link. After following these troubleshooting steps and you still can’t ping across the wireless link refer to the RF troubleshooting document. 1.  Check that SU has the proper MID. 192.168.3.10 hmm>   system   mid MID 3  2.  Check the ipatm pvc is correct in relation to the MID and remoteip March 10, 2003  Company Confidential  Page 126 of 149
U-NII Config & User Guide  5.2  Axxcelera Broadband Wireless AP 192.168.2.50 ip>   ipatm   pvc ipatm pvc atm1 atm25m 0/768 pcr 70000/70000 remoteip 192.168.100.3  SU 192.168.3.65 ip>   ipatm   pvc ipatm pvc atm1 atm25m 0/768 pcr 70000/70000 remoteip 192.168.100.1  3.  Check the default route in the SU. 192.168.3.65 ip>   route route add default          0.0.0.0 192.168.100.1 00:00:00:00 1 # MAN via atm1      March 10, 2003  Company Confidential  Page 127 of 149
U-NII Config & User Guide  5.2  Axxcelera Broadband Wireless 13  RF Design and Planning 13.1 Overview The AB-Access system is a communications system using wireless technology in the U-NII & ISM frequency bands. Therefore understanding Radio Frequency (RF) system design is necessary to ensure gook link quality and, thus, good system performance. This section discusses the basics of RF Design and Planning from the perspective of deploying the AB-Access System.  13.2 The U-NII & ISM Channel Plan In 1997 the FCC amended its Part 15 rules to make 300 MHz of spectrum available for high-speed wireless digital communications with unlicensed operation. This band, called the Unlicensed National Information Infrastructure or U-NII band, provides the spectrum at 5.15 to 5.25 GHz for indoor use, and 5.25 to 5.35 and 5.725 to 5.825 GHz for outdoor use. The peak output power permitted is limited to 23 dBm EIRP in the lower (indoor) band, 30 dBm in the mid-band, and 36 dBm in the upper band.  The 5.8 GHz ISM (Industrial Scientific and Medical) band ranges from 5.725-5.850 GHz. Which is an unlicensed frequency limited to 36 dBm for PTMP equipment. The limit for PTP is higher than PTMP.  NOTE:  AB-Access uses both the U-NII and ISM band for its upper band channels.  NOTE: BPSK modulation is only approved by the FCC for the upper band channels.  13.3 Air Interface The SU talks to the AP over a proprietary airlink protocol on a single 15 MHz channel using QPSK or BPSK modulation and a technique called Time Division Duplex (TDD). Both upstream and downstream traffic time-share this channel. 13.4 Wireless MAC March 10, 2003  Company Confidential  Page 128 of 149
U-NII Config & User Guide  5.2  Axxcelera Broadband Wireless When data is sent over the wireless link it must first be put into a structure that each end unit will understand. The hardware that does this is called the MAC (Medium Access Controller).  ASUSUSUACFRAC Cell Cell down-stream  up-stream R---Cell Cell- idlidlVariable length MAC RGFDHDR DACK DCELLATT STT RR UACK UCELL/UCELLR 13.4.1 Downstream burst 13.4.1.1  Access Point Turnaround Time (ATT) AB-Access system is TDD (Time Division Duplexing), meaning that the AP and SUs transmit and receive on the same frequency. It is therefore necessary to have a small delay between the transmit and receive processes, because it is using the same hardware to perform both functions. 13.4.1.2  Frame Descriptor Header (FDHDR) Downstream bursts begin with a Frame Descriptor Header (FDHDR) this portion of the MAC frame is seen by all SUs in that sector. The FDHDR contains a map of all traffic upstream and downstream, to occur within the MAC frame. This is why you assign a unit a MID, when an SU sees an FDHDR it looks for its MID in the FDHDR to see if it is going to receive any cells. If it does not see its MID it will ignore the rest of the frame. 13.4.1.3 Reservation Grant (RG) The next field in the downstream burst is the Reservation Grant Response (RGR). An RGR is a response to an Reservation Grant Request (Upstream Burst). The RGR acknowledges a request and tells the SU that it can transmit on the upstream burst. March 10, 2003  Company Confidential  Page 129 of 149
U-NII Config & User Guide  5.2  Axxcelera Broadband Wireless 13.4.1.4 Downstream Acknowledgement (DACK) The Downstream Acknowledgement (DACK) is an acknowledgement sent from the AP, which contains bit maps corresponding to the success or failure of individual cells sent to an SU in the previous frame. If any cells were missed or dropped they will be resent in the next frame. 13.4.1.5  Downstream Data Cells (DCELL) The Data Cells are the actual ATM cells that contain data. The maximum ATM cells per frame are 32. The maximum ATM cells that can be sent to an individual SU is 6 per frame. 13.4.1.6  Subscriber Turnaround Time (STT) AB-Access system is TDD (Time Division Duplexing), meaning that the AP and SUs transmit and receive on the same frequency. It is therefore necessary to have a small delay between transmit and receive processes, because it is using the same hardware to perform both functions. There is also a set delay for each individual SU. This delay in turnaround is to compensate for propagation delay.  13.4.1.7  Reservation Request (RR) The Reservation Grant Request (RR) is a request sent by the SU to the AP when it has data to send. The RGR is a contention based request, meaning it performs like an Ethernet network were there is no guarantee that it will be received by the AP on the first try. This would happen when another SU wants to transmit at the same time and would cause a collision. If a collision occurs the SU will try again until it is acknowledged with a Reservation Grant Response. 13.4.1.8 Upstream Acknowledgement (UACK) The Upstream Acknowledgement (UACK) contains bit maps corresponding to the success or failure of individual cells from an AP. If any cells were missed or dropped they will be resent in the next frame. 13.4.1.9  Upstream Cell (UCELL/UCELLR) The UCELL’s are the actual ATM cells that contain data. The maximum ATM cells per frame are 32. The maximum ATM cells that can be sent to an AP by an individual SU is 6 per frame. The UCELLR is a data cell that also has a Reservation Grant Request if the SU has more than 6 data cells to send. The reason for this is so that the SU doesn’t have to contend for another Reservation Grant in the contention slot. 13.5 Delay Compensation During the upstream portion of the MAC several SUs transmit in sequence. Since SUs are separated from the AP by anywhere from 0m to 16km, there is a wide range of propagation times for the full path for the AP to the SUs and back. In order for the SUs transmissions to March 10, 2003  Company Confidential  Page 130 of 149
U-NII Config & User Guide  5.2  Axxcelera Broadband Wireless arrive at the AP properly aligned, some active compensation of propagation delay is performed. An SU must delay compensate before it can transmit data, if it was allowed to transmit without delay compensating it would confuse the AP because it would be receiving cells out of order.  As you can see in this diagram the dark green portion of the MAC frame represent time delays.         FD RG ACK ACK Cell Cell -AckRR Cell Cell -FD RG ACK ACK Ce l l Cel l -Cel l Cel lFD RG ACK ACK Cell Cell -AckRRAPtimingWT1timingWT2timingmax propagationdelayAPtimingWT1timingWT2timingmax propagationdelayCellACKRRCell --FD RG ACK ACK Cell Cell -AckRR -FD RG ACK ACK Ce l l Cel l -FD RG ACK ACK Cell Cell -AckRR CellRRCell --CellACK CellCell Cell March 10, 2003  Company Confidential  Page 131 of 149
U-NII Config & User Guide  5.2  Axxcelera Broadband Wireless 13.6 RF Channels spacing and output power  Channel    Center Freq    EIRP    #             (GHz) (dBm )-----------------------------------------------0* 5.17 191* 5.185 192* 5.2 193* 5.215 194* 5.230 19-----------------------------------------------55.272665.2852675.32685.3152695.3326-----------------------------------------------10 5.745 3211 5.76 3212 5.775 3213 5.79 3214 5.805 3215 5.820 3216 5.835 32-18.5dB-18.5dBLow Band * Indoor OnlyMiddle BandUNII & ISM Frequency Spacingfor AB-Access 5-6GHzBand EdgeGuard5.7605.745 5.775 5.790 5.8055.8505.7255.820 5.835-18.5dBHigh Band5.355.255.2855.27 5.3 5.315 5.335.1855.17 5.2 5.215 5.2305.255.15           13.7 TDD (Time Division Duplex) The AB-Access system uses TDD (Time Division Duplex) to transfer data across the wireless link as opposed to FDD (Frequency Division Duplex). The AB-Access implementation of the TDD architecture allows the TDD frame to dynamically vary in size according to the offered load: short frames when fewer users are sharing the channel, longer frames when there are many simultaneous users. The TDD guard time is also adaptive, as it is set to round trip propagation delay to the farthest SU. TDD has a number of advantages over a FDD system. These include: • Spectral Efficiency – TDD can be deployed using less spectrum than a comparable FDD system. A single TDD channel can be deployed per sector instead of two channels needed for FDD. Likewise, a multi-cell deployment can be installed using a total of three RF channels (both polarizations), whereas FDD needs four to six channels.  • Complexity – Since each transceiver is wither transmitting or receiving, but never both at once, a single RF front end can  be shared reducing the radio complexity. • Power Control – In cellular systems, where channels are reused many times throughout the system in order to increase capacity, the highest efficiency is realized when the power in each direction can be minimized. This reduces the amount of March 10, 2003  Company Confidential  Page 132 of 149
U-NII Config & User Guide  5.2  Axxcelera Broadband Wireless energy that is ‘leaked’ into surrounding areas, which appears as interference. In FDD systems, it is quite difficult to accurately control the channel’s power since a feedback path is required. No such path is needed in a TDD system since the same channel is used in both directions. The SU needs to only measure the received power from the AP in order to know how much to attenuate its upstream transmission.  • Channel Efficiency – Because each frame carries upstream and downstream traffic in proportion to the offered load in each direction, adaptive TDD systems are highly efficient in its use of bandwidth. FDD systems have to make an estimate of the traffic mixture and allocate channel bandwidth accordingly. As shown in the chart below, any variation from this estimate (in this case 15:1 downlink) will result in wasted bandwidth. This variation is inevitable due to the diurnal variation of business usage during the daytime hours, residential usage in the afternoon and evening, a varying mixture of user types according to the geographic location, and an ever-changing set of user applications.   13.8 AP and SU Specifications 13.8.1  AP/SU/Extender Functional Block Diagram The Access Point and Subscriber Unit functional block diagram is shown below. The analog radio portion is highlighted in blue, while the digital section containing the modem is in yellow.  March 10, 2003  Company Confidential  Page 133 of 149
U-NII Config & User Guide  5.2  Axxcelera Broadband Wireless 13.8.2 Radio Specifications This table represents the radio specifications for AP, SU, and Extender units. Frequency of operation  5.150GHz to 5350GHz & 5.725GHz  to 5.850 GHz RF bandwidth  325 MHz Channelization  15 MHz FCC 26 dB Bandwidth  17.5 MHz (assumes QPSK with Raised Cosine Filtering, α=0.35) typical Output Power into antenna  Lower-band 1 dBm (include 3.5 dB backoff, max) Mid-band 8 dBm (includes 3.5 dB backoff, max) Upper-band 14 dBm (5.6km units) (includes 3.5 dB backoff, max) Upper –band 16 dBm (8.0km units)(includes 3.5 backoff, max) Spurious emissions  -17 dBm/MHz within 10 MHz of upper band (max) -27 dBm/MHz beyond 10 MHz of upper band (max) Blocking rejection  60 dB fc ± 50 MHz to ± 100 MHz (min) 70 dB fc + 100 MHz to 8 GHz (min) 70 dB fc 100 MHz to 4 GHz (min) 80 dB DC to 4 GHz and 7 to 12 GHz (min) U-NII & ISM band blocking level  -41 dBm Adjacent channel rejection  -25 dB (min) Receiver noise figure  -7 dB (max) Sensitivity  -81.6 dBm for 10^-4 demodulated BER AGC range  55 dB AGC accuracy  ±1 dB AGC response time  <200 ns Transmit / receive switching time  <5 µs Receive / transmit switching time  <2 µs March 10, 2003  Company Confidential  Page 134 of 149
U-NII Config & User Guide  5.2  Axxcelera Broadband Wireless Channel switching time  <100 µs Horizontal / Vertical antenna switching time <5 µs 13.8.3  Subscriber Unit Antenna Peak gain  18 dBi 3 dB beamwidth  20º azimuth x 20º elevation Front-to-back ratio  30 dB (min) Sidelobe suppression  15 dB (min) Input impedance  50 ohms Polarization  Linear – vertical or horizontal switchable VSWR 2:1 (max) March 10, 2003  Company Confidential  Page 135 of 149
U-NII Config & User Guide  5.2  Axxcelera Broadband Wireless  13.8.4  Access Point Antenna Peak gain  18 dBi 3 dB beamwidth  60º azimuth x 7º elevation Front-to-back ratio  25 dB (min) Sidelobe suppression  15 dB (min) Input impedance  50 ¾ ohms Polarization  Linear – vertical or horizontal switchable VSWR 2:1 (max)  March 10, 2003  Company Confidential  Page 136 of 149
U-NII Config & User Guide  5.2  Axxcelera Broadband Wireless  13.8.5 Extender Antenna Peak gain  23 dBi 3 dB beamwidth  10º azimuth x 10º elevation Front-to-back ratio  25 dB (min) Sidelobe suppression  15 dB (min) Input impedance  50 ¾ ohms Polarization  Linear – vertical or horizontal switchable VSWR 2:1 (max)  March 10, 2003  Company Confidential  Page 137 of 149
U-NII Config & User Guide  5.2  Axxcelera Broadband Wireless  13.9 Topology Types To properly deploy the AB-Access System, one must understand the geographical physical topology. While the real world possibilities are endless, the following three distinctive geographic topologies will be covered: • Macrocells • Microcells • Picocells A Macrocell design should be used when you are trying to provide ubiquitous coverage over a large area. Each cell has many Subscribers. The fundamental limit in deploying in this manner is usually coverage zone (cell radius) due to U-NII & ISM EIRP limits, as well as building and terrain obstructions. A Microcell is normally used when you are trying to provide high density coverage to a smaller geographic area. Each cell sector has many subscribers per sector. The fundamental limit in deploying in this manner is co-channel interference due to LOS interference paths. A Picocell design normally covers an extremely small geographic area such as a neighbourhood or a Multiple Dwelling Unit (MDU) complex. There are normally March 10, 2003  Company Confidential  Page 138 of 149
U-NII Config & User Guide  5.2  Axxcelera Broadband Wireless many sectors and few subscribers per sector. The fundamental limit in deploying in this manner is Line of Sight (LOS) coverage. While the above are generalizations, they can be used effectively as a starting point for developing an RF plan for deployment. However, based upon the specifications of the AB-Access equipment, it is necessary to have some pre-defined RF coloring schemes. To better understand the benefits of different coloring schemes, a basic concept of interference types should be understood. 13.10 Interference Types There are four distinct types of interference that can occur in a cellular reuse pattern. Each unique in its geometry and imposes unique frequency reuse constraints.  EFFECT INTERFERENCE TYPE Would affect only the one SU. Could affect other units if they are in the same area.  Type 1 – Downlink Downlink to Subscriber Unit Interfered with by another Access Point transmission.  Would affect only the one SU. Could affect other units if they are in the same area. Type 2 – Downlink  Downlink to Subscriber Unit Interfered with by a Subscriber Unit Uplink in another cell. Would affect all units in the sector. This would be a constant source of interference.  Type 3 – Uplink  Uplink to Access Point Interfered with by another Access Point transmission. Becomes critical if facets using same frequency face each other. Would affect all units in the sector. Could be an intermittent problem based on the amount of data that interfering SU is transmitting.   Type 4 – Uplink Uplink to Access Point Interfered with by a Subscriber Unit uplink from another cell.  Hardest to eliminate and will reduce the performance of the whole system.   March 10, 2003  Company Confidential  Page 139 of 149
U-NII Config & User Guide  5.2  Axxcelera Broadband Wireless 13.10.1  Type 1 Interference Downlink to Subscriber Unit interfered with by another Access Point Downlink. All Access Points power control for full service at the sector edge (in cusp). The worst case scenario is when the SU (Cell 1) has the interfering AP at Boresight (Cell 2) and is towards the edge of its sector, i.e. min CNR from its AP. Interference Interfering APCell 1  Cell 2        Strong Interference path Weak Interference path Cell 2 Cell 1  13.10.2  Type 2 Interference Downlink to Subscriber Unit interfered with by a Subscriber Unit Uplink in another cell. Worst case scenario is interfering SU at range (max Tx power), and victim SU at range (lowest CNR) and SUs facing each other, e.g. Cells 1 and 3. The interference is reduced if SUs using the same frequencies do not face each other, e.g., Cells 1 and 2.    Cell 3   March 10, 2003  Company Confidential  Page 140 of 149
U-NII Config & User Guide  5.2  Axxcelera Broadband Wireless 13.10.3  Type 3 Interference Uplink to Access Point interfered with by another Access Point Downlink. This is only an issue if sectors using the same frequency face each other in the reuse pattern, e.g., Cell 1 and Cell 3. Otherwise it is a benign interference type, e.g., Cell 1 and Cell 2. Interfering AP Cell 3Interferencepath  Interfering AP Cell 2Cell 1      13.10.4  Type 4 Interference Uplink to Access Point interfered with by a Subscriber Unit Uplink in another cell. This is the worst case of intercell interference, as one SU, e.g., in Cell 2, interferes with all the users on the same frequency and polarization in Cell 1 (whenever the SU in Cell 2 is transmitting).  As the system has power control for SUs, the worst case Type 4 interference will be caused by SUs deployed at range and at the edge of their sector, i.e., in the Access Point Antenna Cusp. Interfering CT Interference path Cell 2 Cell 1 March 10, 2003  Company Confidential  Page 141 of 149
U-NII Config & User Guide  5.2  Axxcelera Broadband Wireless 13.11 Recommended Channel Plans The following sections will describe some pre-defined coloring schemes that will work in the U-NII & ISM band with the AB-Access equipment. 13.11.1 Six-Sector, Three-Frequency Plan This plan is good for Macrocells on relatively flat terrain: •  Use 1 channel guardband/separation between sectors •  Use opposite polarization in opposite directions •  Use 4 meter back-to-back separation (or equivalent isolation) •  Use >1 meter separation between sectors •  Use same frequencies and sector allocations in each cell.  6132453 Frequency Reusedf1f2f3HP VPTwo closest interfering sectors6132453 Frequency Reusedf1f2f3HP VPTwo closest interfering sectors        March 10, 2003  Company Confidential  Page 142 of 149
U-NII Config & User Guide  5.2  Axxcelera Broadband Wireless 13.11.2 Six-Sector, Six-Frequency Plan This plan is good for Microcells or Macrocells on uneven terrain: •  Use 1 channel guardband/separation between sectors •  Use opposite polarization in opposite directions •  Use 4 meter separation (or equivalent isolation) •  Use >1 meter separation between sectors •  Use a different set of three frequencies on alternating cells. Single closest interfering sector6132456 Frequency Reusef1f2f3HP VPf4f5f6SectorNumberingSingle closest interfering sector6132456 Frequency Reusef1f2f3HP VPf4f5f6SectorNumbering 13.12 Antenna Spacing In most Base Station deployments, multiple APs are placed on a single building or tower. To minimize AP to AP interference, it is necessary to mount the antennas with proper spacing. Based on the frequency plan identified, the following minimum spacing shown in the table below should be maintained.  March 10, 2003  Company Confidential  Page 143 of 149
U-NII Config & User Guide  5.2  Axxcelera Broadband Wireless     0 deg - Verticle 0 deg - Horizontal 60 deg 120 deg 180 degPolarization CO               OPP CO               OPP CO               OPP CO               OPP CO               OPPCo-Channel NA                NANA                NANA                 NANA                NA NA                 4mAdjacent Channel NA                NANA                NANA              >8m+ 1m                1m 1m                 1m 2nd Adjacent  6"                  6" 1m                 1m 1m                 1m <1inch      <1inch 0.5m            0.5m NA = Not acceptable     March 10, 2003  Company Confidential  Page 144 of 149
U-NII Config & User Guide  5.2  Axxcelera Broadband Wireless 14 SNMP SNMP access has been added to AB-Access in software load 5.1.x and newer. This allows you to monitor various parameters within the radio. Listed below are the non-standard MIB’s added to AB-Access.  Object Name  Object Descriptor  AB-Access Info snmpTotalSetVars  1.3.6.1.2.1.11.14  RSSI (only available on SU) snmpOutSetRequests  1.3.6.1.2.1.11.27  PP processor loading (%) snmpOutTooBigs 1.3.6.1.2.1.11.20  Channel Number snmpOutNoSuchNames  1.3.6.1.2.1.11.9  Antenna polarization (0=H, 1=V) snmpOutBadValues  1.3.6.1.2.1.11.22  SU distance from AP (meters) snmpInSetRequests  1.3.6.1.2.1.11.17  # of ARP entries in the ARP table      March 10, 2003  Company Confidential  Page 145 of 149
U-NII Config & User Guide  5.2  Axxcelera Broadband Wireless 15 Rupee There are configurations that are not covered by the upgrade scripts. Even if they are covered, you will probably want to add settings that are specific to your network. To do this you can edit the individual files and rupee them to the units. This is not meant to replace the upgrade script.  It is only meant to send individual configuration files to a unit. You can send individual files from DOS or LINUX; unlike the upgrade scripts. The reason for this is that the upgrade script is using expect scripting and can only be run from a Unix based OS. One note about the rupee-dos is that it can only be run be a true DOS based OS (Win95 or Win98 not NT). NT uses a Virtual DOS Machine (NTVDM) and will not work with the rupee-dos command. WARNING If you rupee a file or files to a unit and do not reboot the unit, and then rupee another file or files to the unit only the last set of files will be saved to the flash.  15.1 LINUX 1.  Make sure you can ping the unit that you want to send files to. 2.  Change to the directory that the configuration files are in. The rupee-unix file must also reside in this directory. 3.  To upload individual files: ./rupee-unix   –p   atmos   –d   2   –r   <IP Address>   <file>   <file>  Note: You might have to change the permissions on the rupee-unix command using “chmod” chmod   +x   ./rupee-unix  15.2 DOS 1.  Make sure you can ping the unit that you want to send files to. 2.  Change to the directory that the configuration files are in. The rupee-unix file must also reside in this directory. 3.  To upload individual files: March 10, 2003  Company Confidential  Page 146 of 149
U-NII Config & User Guide  5.2  Axxcelera Broadband Wireless rupee-dos   –p   atmos   –d   2   –r   <IP Address>   <file>   <file>  15.3 Rupee Option Definitions -p   <passwd>  Specifies the password to use to allow write access to the AP/SU. -d   2  Display debug level 2.  Allows you to see what is being sent to the unit. -r  Reboot unit when done programming.  Make sure all of your configuration files are correct if you use this option. When the unit reboots, changes are final. March 10, 2003  Company Confidential  Page 147 of 149
U-NII Config & User Guide  5.2  Axxcelera Broadband Wireless 16  RTFD (Return To Factory Default) The new Return To Factory Default (RTFD) feature allows IP connectiviey to be established with units that have unknown or invalid configurations. Using this feature, the AB-Access unit wil adopt a known IP configuration enabling Command Line Interface access via telnet through the physical Ethernet interface. Following a restart or power up, the AB-Access/AB-Extender units will listen for 1 second for a proprietary coded UDP packet on their Ethernet interface; adopting the appropriate IP configurations as indicated below.  If the unit receives the UDP packet, it will retain the active configuration for 30 minutes, after which the normal start-up procedures will continue with the IP and interface configuration taken from the unit’s Flash files. If during the 30 minute period, a subsequent coded UDP packet is received, the timeout will be restarted.  NOTE On Windows 2K and XP you may need to disable the auto media sense. Some NICs will be capable of disabling this feature from their configuration parameters. If this option is not available on your NIC you will have to add a registry entry. Axxcelera has created a reg edit that can be installed by simply double clicking on the media-sense.reg file. Or you can enter the following register key via regedit. [HKEY_LOCAL_MACHINE\SYSTEM\CurrentControlSet\Services\Tcpip\Parameters] "DisableDHCPMediaSense"=dword:00000001  16.1 RTFD IP Configurations  Ethernet Interface Access:    IP Address    192.168.3.254     Netmask  255.255.255.0     Default Route  192.168.3.1 16.2 Recover To supply the coded UDP packet the “recover” utility is provided with the system software in two forms.   recover-dos.exe  -  For use with a DOS prompt under Microsoft Windows. March 10, 2003  Company Confidential  Page 148 of 149
U-NII Config & User Guide  5.2  Axxcelera Broadband Wireless March 10, 2003  Company Confidential  Page 149 of 149   Recover-unix  -  For use with Linux installations utilizing glibc 2.1.3. 16.3 Procedure to restore the default configuration 1. Connect a PC (Windows or Linux) to the wallbox of the unit, ensuring that there is appropriate connectivity at the physical and IP levels. 2. Start the recovery utility. A sequence of dots will be displayed to indicate successful network transmissions. [root@temp SU_TEMPLATE]# ./recover-unix ethernet SU/AP recovery client  ……………………………..  3. Restart the AB-Access unit. 4. When the recover utility terminates, the AB-Access unit has been successfully configured and can be contacted over the physical interface via a telnet session.  5. It is best to do a full system upgrade after a unit has been recovered to a state that IP connectivity is regained. This will insure the unit will function properly once redeployed.   16.4 Disabling the RTFD Feature RTFD can be disabled by writing a file to flash with the name “no_rtfd”. The file must be a text file; i.e. only containing ASCII characters. A suggested first line for the file is “disable RTFD” – though the actual content of the file will not be referenced: only the presence or absence of the file is significant.

Navigation menu