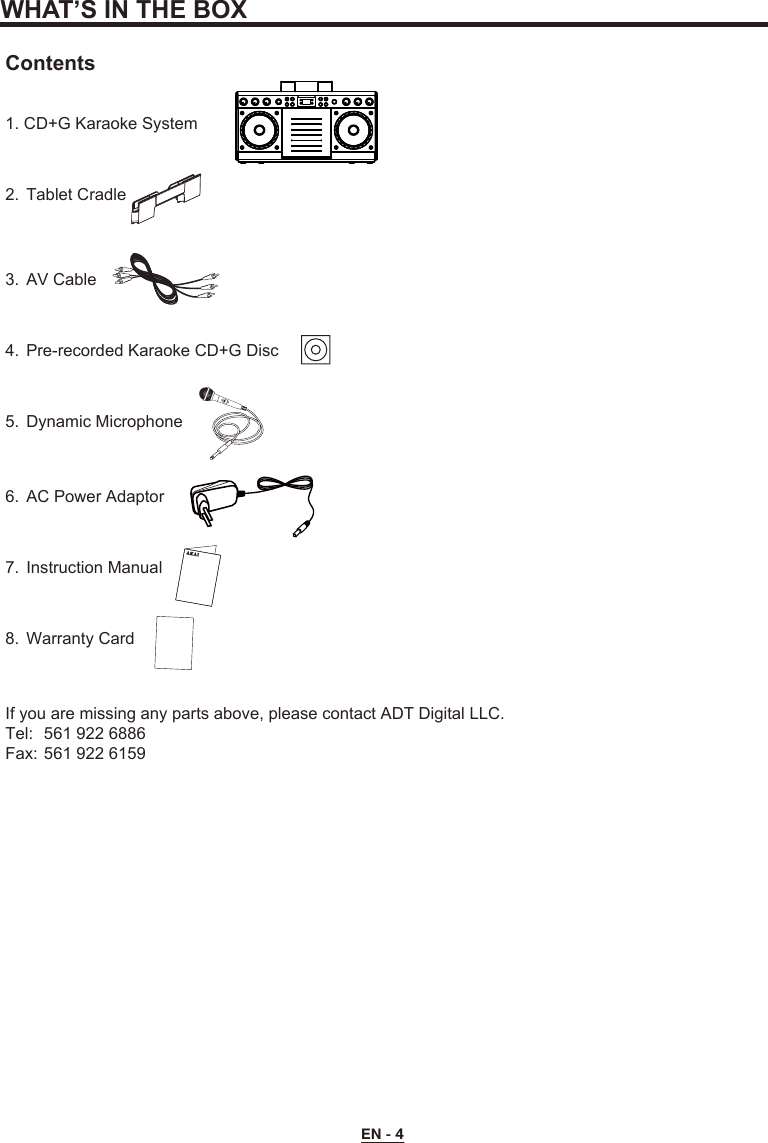
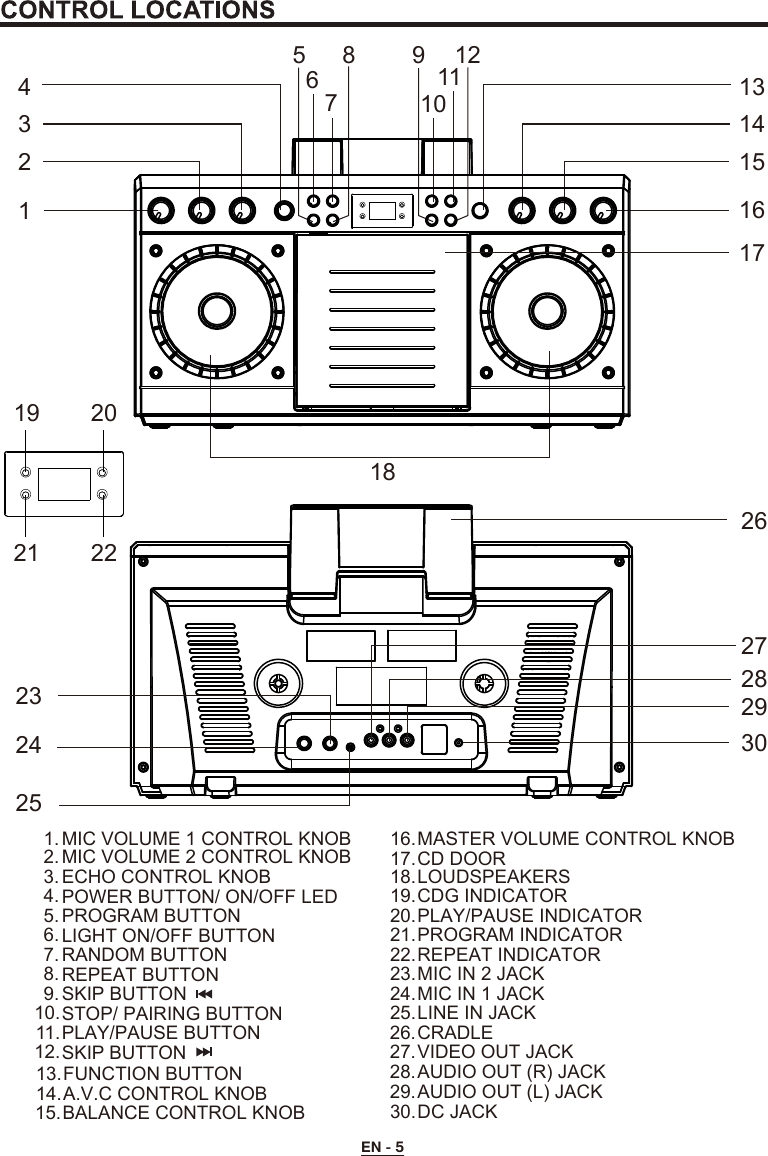
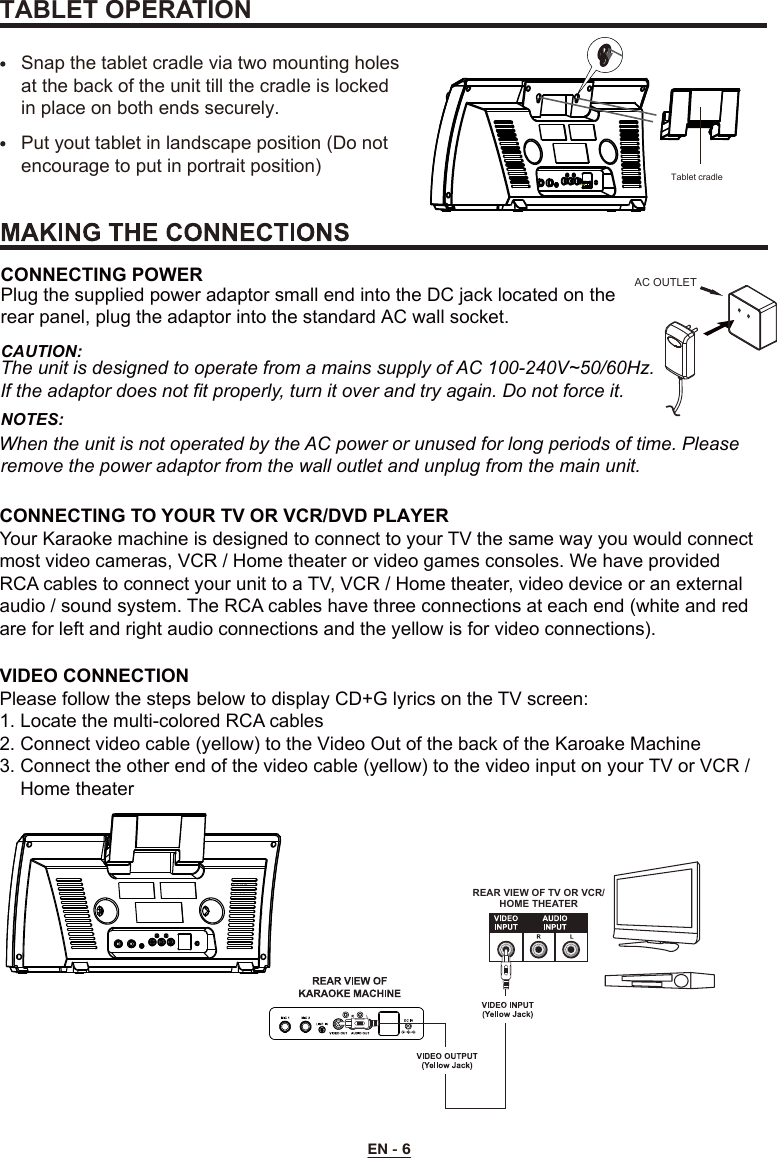
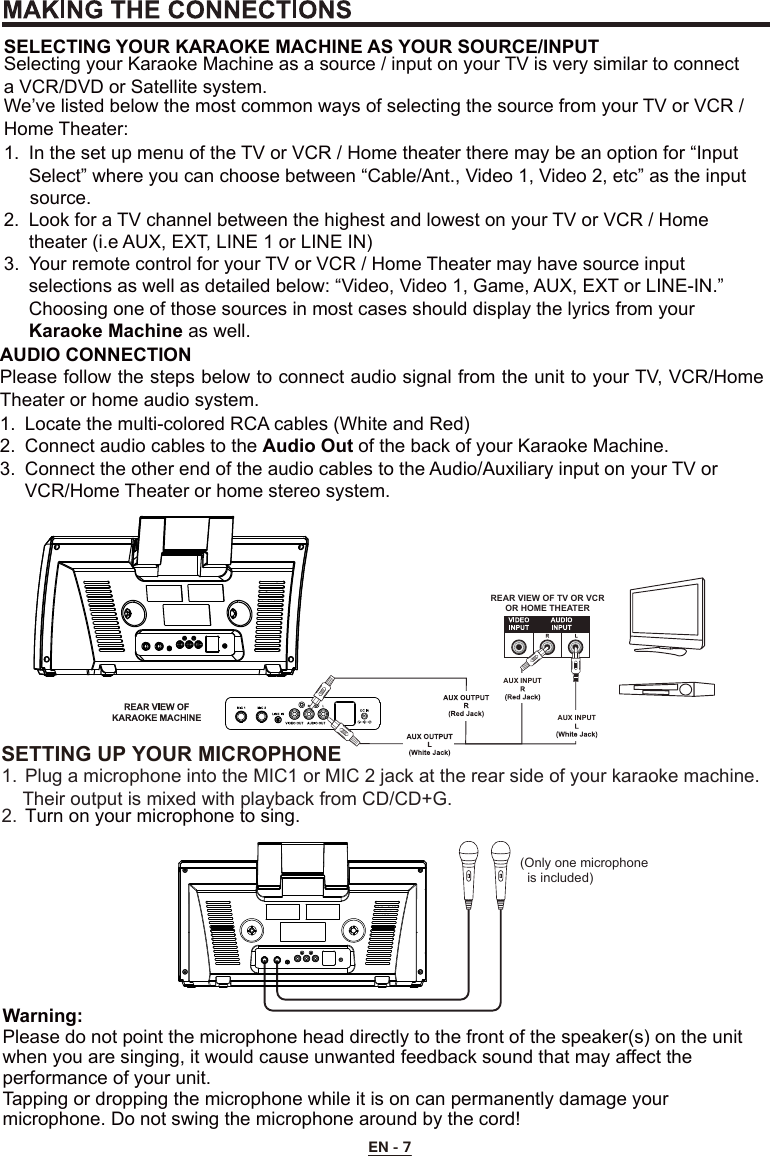
Arts Digital Technology KS303BT Bluetooth Karaoke with Speakers and Light Effects User Manual KS303 BT AKAI IM English 20160711 Preview

Arts Digital Technology (HK) Limited Bluetooth Karaoke with Speakers and Light Effects KS303 BT AKAI IM English 20160711 Preview

User Manual

INSTRUCTION MANUALKS303-BTBluetooth CD+G Karaoke System with Light Effectsand Tablet CradleThank you for purchasing this Bluetooth CD+G Karaoke System. Please read this instruction manual carefully before using this product to ensure proper use. Keep this manual in a safe place for future reference.
EN - 1WARNINGSC A UTION:TO   P R EVEN T   T H E   RI SK  O F ELECTRIC SHOCK, DO NOT REMO V E COVER OR BACK. NO USER-SERVICEABLE PARTS INSIDE. REFER SERVICING TO QUALIFIED PERSONNEL.CAUTIONRISK OF ELECTRIC SHOCK DO NOT OPENWARNING: TO REDUCE THE RISK OF FIRE OR SHOCK HAZARD, DO NOT EXPOSE THIS PRODUCT TO RAIN OR MOISTURE.This symbol is intended to alert you to the presence of uninsulated dangerous voltage within the product’s enclosure that might be of sufficient magnitude to constitute a risk of electric shock.  Do not open the product’s case.This symbol is intended to inform you t h at important  operating and maintenance instructions are included in the literature accompanying this product.DRIPPING WARNINGThe product shall not be exposed to dripping or splashing and that no objects filled with liquids, such as vases, shall be placed on the product.VENTILATION WARNINGThe normal ventilation of the product shall not be impeded for intended use.Warning: Changes or modifications to this unit not expressly approved by the party responsible for This device complies with Part 15 ofthe FCC Rules. Operation is subjectto the following two conditions: (1)this device may not cause harmfulinterference, and (2) this device mustaccept any interference recieved,including interference that may causeundesired operation.compliance could void the user’s authority to operate the equipment.Class ll equipment symbolThis symbol indicates that the power adaptor has a double insulation system.This equipment complies with FCC’s and IC’s RFradiation exposure limits set forth for anuncontrolled environment. The antenna(s) used forthis transmitter must be installed and operated toprovide a separation distance of at least 20 cm fromall persons and must not be collocated or operatingin conjunction with any other antenna or transmitter.Installer must ensure that 20 cm separationdistance will be maintained between the deviceand user.FCC RADIATION EXPOSURESTATEMENTDECLARATION DE LA FCC RELATIVE A L'EXPOSITION AU RAYONNEMENTCet appareil est conforme aux limites d'exposition au rayonnement RF stipulées par la FCC et IC pour une utilisation dans un environnement non contrôlé.Les antenne utilisées pour cet émetteur doivent être installées et doivent fonctionner à au moins 20 cm de distance des utilisateurs et ne doivent pas être placées près d’ autres antennes ou émetteurs ou fonctionner avec ceux-ci. Les installateurs doivent s'assurer qu’une distance de 20 cm sépare l’appareil des utilisateurs.FCC ID : OWT-KS303BT
EN - 2FCC AND CANADIAN ICESIMPORTANT SAFETY INSTRUCTIONSNOTE: This digital apparatus does not exceed the Class B limits for radio noise emissions from digital apparatus as set out in the radio interference regulations of Industry Canada.Le présent appareil numérique n’émet pas de bruits radioélectriques dépassant les limites applicables aux appareils numériques de Classe B prescrites dans le règlement sur le brouillage radioélectrique édicté par Industrie Canada.NOTE: This equipment has been tested and found to comply with the limits for a Class B digital device, pursuant to part 15 of the FCC Rules. These limits are designed to provide reasonable protection against harmful interference in a residential installation. This equipment generates, uses and can radiate radio frequency energy and, if not installed and used in accordance with the instructions, may cause harmful interference to radio communications. However, there is no guarantee that interference will not occur in a particular installation. If this equipment does cause harmful interference to radio or television (which can be determined by turning the equipment off), the user is encouraged to try to correct the interference by one or more of the following measures:Reorient or relocate the receiving antenna.Increase the separation between the equipment and receiver.Connect the equipment into an outlet on a circuit different from that to which the receiver is connected.Consult the dealer or an experienced / TV technician for help. 1.   Read these Instructions.  2.   Keep these Instructions.  3.   Heed all Warnings.  4.   Follow all instructions.  5.   Do not use this apparatus near water. 6.   Clean only with a dry cloth.  7.   Do not block any of the ventilation openings. Install in accordance with the manufacturers instructions. 8.   Do  not  install  near  any  heat  sources  such  as  radiators,  heat  registers,  stoves, or  other apparatus (including amplifiers) that produce heat. 9.   Do not defeat the safety purpose of the polarized  or  grounding  -  type  plug.  A  polarized plug has two blades with one wider than the other. A grounding type plug has two blades and  a  third grounding  prong. The  wide  blade  or  the  third  prong    are  provided  for  your safety.  When  the  provided  plug  does not  fit into  your  outlet,  consult  an  electrician  for replacement of the obsolete outlet. 10. Protect  the  power  cord  from  being  walked  on  or  pinched  particularly  at  plugs, convenience receptacles, and the point where they exit from the apparatus. 11. Only use attachments/accessories specified by the manufacturer. 12. Use only with a cart, stand, tripod, bracket, or table specified by the manufacturer, or sold with  theapparatus.  When  a  cart  is  used,  use  caution  when  moving  the  cart/apparatus combination to avoid injury from tip-over. Portable Cart Warning13.  Unplug this apparatus during lightning storms or when unused for long periods of time. 14.  Refer  all  servicing  to  qualified  service personnel.  Servicing  is  required  when  the apparatus  has  beendamaged in  any  way,  such  as  power-supply  cord  or  plug  is damaged, liquid has been spilled or objects have fallen into the apparatus, the apparatus has been exposed to rain or moisture , does not operate normally, or has been dropped.
EN - 3To reduce the risk of fire or electric shock, do not expose this apparatus to rain or moisture.Avertissement: pour réduire le risque d’incendie ou de choc électrique, ne pas exposer cet appareil sous la pluie et l’humidité.The apparatus shall not be exposed to dripping or splashing and that no objects filled with liquids, such as vases, shall be placed on apparatus.L’appareil ne doit pas être exposé aux écoulements ou aux éclaboussures et aucun objet ne contenant de liquide, tel qu’un vase, ne doit être placé sur l’objet.The MAINS plug / power adaptor is used as the disconnect device, it should remain readily operable during intended use.In order to disconnect the apparatus from the mains completely, the main plug / power adaptor should be disconnected from the mains socket outlet completely.La prise du secteur ne doit pas être obstruée ou doit être facilement accessible pendant son utilisation. Pour être complètement déconnecté de l’alimentation d’entrée, la prise doit être débranchée du secteur.WARNINGS:Battery shall not be exposed to excessive heat such as sunshine, fire or the like.Les piles ne doivent pas être exposées à de forte chaleur, tel qu’à la lumière du soleil, au feu ou autres choses de semblable. IMPORTANT SAFETY INSTRUCTIONSCaution Marking and rating plate was located at bottom enclosure of the apparatus. Les marquages sont inscrits en bas de l'appareil.Les précautions d'emploi sont inscrites en bas de l'appareil.DC voltageCaution Please refer for further information to the user manualRECYCLINGThis product bears the selective sorting symbol for Waste electrical and electronic equipment (WEEE). This means that this product must be handled pursuant to European directive 2012/19/EU in order to be recycled or dismantled to minimize its impact on the environment.User has the choice to give his product to a competent recycling organization or to the retailer when he buys an new electrical or electronic equipment.Polarity of d.c. power connector
EN - 4WHAT’S IN THE BOXContents1. CD+G Karaoke System2.  Tablet Cradle3.  AV Cable4.  Pre-recorded Karaoke CD+G Disc5.  Dynamic Microphone6.  AC Power Adaptor7.  Instruction Manual8.  Warranty CardIf you are missing any parts above, please contact ADT Digital LLC.Tel:  561 922 6886Fax: 561 922 6159
EN - 5MIC VOLUME 1 CONTROL KNOBMIC VOLUME 2 CONTROL KNOBECHO CONTROL KNOB POWER BUTTON/ ON/OFF LEDPROGRAM BUTTONLIGHT ON/OFF BUTTONRANDOM BUTTONREPEAT BUTTONSKIP BUTTONSTOP/ PAIRING BUTTONPLAY/PAUSE BUTTONSKIP BUTTON1.2.3.4.5.6.7.8.9.10.11.12.FUNCTION BUTTONA.V.C CONTROL KNOBBALANCE CONTROL KNOBMASTER VOLUME CONTROL KNOBLOUDSPEAKERSCDG INDICATORPLAY/PAUSE INDICATORPROGRAM INDICATORREPEAT INDICATORMIC IN 2 JACKMIC IN 1 JACKLINE IN JACK13.14.15.16.18.CD DOOR17.19.20.21.22.23.24.25.CRADLEVIDEO OUT JACKAUDIO OUT (R) JACK26.27.28.DC JACK30.AUDIO OUT (L) JACK29.1234262728291516171413675 810119122324251819 2021 2230
EN - 6REAR VIEW OF TV OR VCR/HOME THEATERCONNECTING TO YOUR TV OR VCR/DVD PLAYERYour Karaoke machine is designed to connect to your TV the same way you would connect most video cameras, VCR / Home theater or video games consoles. We have provided RCA cables to connect your unit to a TV, VCR / Home theater, video device or an external audio / sound system. The RCA cables have three connections at each end (white and red are for left and right audio connections and the yellow is for video connections).VIDEO CONNECTIONPlease follow the steps below to display CD+G lyrics on the TV screen:1. Locate the multi-colored RCA cables2. Connect video cable (yellow) to the Video Out of the back of the Karoake Machine3. Connect the other end of the video cable (yellow) to the video input on your TV or VCR /    Home theaterAC OUTLETCONNECTING POWERPlug the supplied power adaptor small end into the DC jack located on the rear panel, plug the adaptor into the standard AC wall socket. CAUTION: The unit is designed to operate from a mains supply of AC 100-240V~50/60Hz. If the adaptor does not fit properly, turn it over and try again. Do not force it. NOTES: When the unit is not operated by the AC power or unused for long periods of time. Please remove the power adaptor from the wall outlet and unplug from the main unit.Snap the tablet cradle via two mounting holes at the back of the unit till the cradle is locked in place on both ends securely.  Put yout tablet in landscape position (Do not encourage to put in portrait position)TABLET OPERATIONTablet cradle
EN - 7AUX INPUTAUX INPUTREAR VIEW OF TV OR VCROR HOME THEATER1.  Plug a microphone into the MIC1 or MIC 2 jack at the rear side of your karaoke machine.     Their output is mixed with playback from CD/CD+G. 2.  Turn on your microphone to sing.(Only one microphone   is included)SETTING UP YOUR MICROPHONE    SELECTING YOUR KARAOKE MACHINE AS YOUR SOURCE/INPUTSelecting your Karaoke Machine as a source / input on your TV is very similar to connect a VCR/DVD or Satellite system.We’ve listed below the most common ways of selecting the source from your TV or VCR / Home Theater:1.  In the set up menu of the TV or VCR / Home theater there may be an option for “Input      Select” where you can choose between “Cable/Ant., Video 1, Video 2, etc” as the input      source.   2.  Look for a TV channel between the highest and lowest on your TV or VCR / Home      theater (i.e AUX, EXT, LINE 1 or LINE IN)3.  Your remote control for your TV or VCR / Home Theater may have source input      selections as well as detailed below: “Video, Video 1, Game, AUX, EXT or LINE-IN.”      Choosing one of those sources in most cases should display the lyrics from your     Karaoke Machine as well.AUDIO CONNECTION Please follow the steps below to connect audio signal from the unit to your TV, VCR/Home Theater or home audio system.1.  Locate the multi-colored RCA cables (White and Red) 2.  Connect audio cables to the Audio Out of the back of your Karaoke Machine.3.  Connect the other end of the audio cables to the Audio/Auxiliary input on your TV or      VCR/Home Theater or home stereo system.Warning:Please do not point the microphone head directly to the front of the speaker(s) on the unit when you are singing, it would cause unwanted feedback sound that may affect the performance of your unit.Tapping or dropping the microphone while it is on can permanently damage your microphone. Do not swing the microphone around by the cord!
EN - 8NOTE: The unit may not be able to read CDR or CDRW disc correctly. The readability             depends on the quality of recording produced by CD recorder or CD writer. TURNING POWER ON/OFFThis unit is designed to play CDs and CD+Gs bearing the identification logo respectively. If the disc does not confrom to the standard, it may not play properly.To turn on the unit, press the POWER button once, the ON/OFF LED indicator will light up.To turn it off, press the POWER button again, the ON/OFF indicator will turn off.LOADING A DISCOpen the CD door, place a CD or CD+G disc in the compartment with the printed side facing front and the shiny side facing back.Gently close the CD door. The LED window will display the total number of tracks. (If no disc is loaded, it will display ”NO”. If a CD+G disc is loaded, the CDG indicator will light up.)Note:  - Never place anything except a compact disc in the disc tray. Foreign objects can damage the unit.           - Only place one disc on the disc tray at a time.           - Do not apply excessive force to disc cover.           - Do not open the disc cover of the CD compartment while it is playing.PLAY/PAUSE 1.  To start playing , press the PLAY/PAUSE button. The first track      and the PLAY/PAUSE LED will lit.2.  To temporarily stop playing, press the PLAY/PAUSE button. The PLAY/PAUSE LED      indicator will flash. 3.  To resume play, press the button again.STOP If the STOP button is pressed in the course of playing, the disc will cease to play.(The total number of tracks will be shown on the LED window.)NOTE: -   Pressing pause when a CD+G is playing may cause distorted lyrics on your TV screen until the whole screenis refreshed during an instrumental break or the song is stopped and/or the song is started from the beginning.   SKIP  (For both CD and CD+G discs)In stop or playback mode, you can skip up or down to a specific track by pressing the forward or backward SKIP Button.     SEARCH (For audio CD+G disc only)When playing a CD disc, press and hold the SKIP buttons (        or        )  to locate a specific point on a track. The system will search at high speed in the forward or reverse direction. By releasing the button, normal play will be resumed.
EN - 9LIGHT EFFECTPress LIGHT ON/OFF button once to switch on LED light effect. Press the button again to switch off.REPEAT (For both CD and CD+G discs)During playback, to repeat the track currently playing, press the REPEAT button once. The REPEAT LED will start to flash. To repeat all tracks, press the REPEAT button twice. The REPEAT LED will light up and stay lit.To clear the REPEAT function, press the REPEAT button again. The REPEAT LED will turn off.Use this button to program and play back songs in a separated preselected order.Step 1: Programming should be done in the stop mode only. Press the PROGRAM button once the PROGRAM LED flashes, the track will showStep 2: Press the SKIP buttons (       SKIP      )  to select a desired track.Step 3: Press PROGRAM button to confirm entry. You can repeat the same steps up to a maximum of 20 tracks.Step 4: Press PLAY button when you have completed programming and you are ready to start singing.Press the STOP button to clear all the programmed entries.PROGRAMBALANCEAdjust the BALANCE control between the pre-recorded singer’s voice and the music when using a multiplex karaoke disc.     AUTO VOICE CONTROLAUTO VOICE CONTROL can be activated and adjusted by the AVC control knob.The vocals on the Multiplex recording will be muted when the singer starts to sing through the microphone. When the singer stops singing, the vocals will resume to normal.MASTER VOLUMERANDOMMIC VOLUMEECHORotate to the MASTER VOLUME control to obtain the desired sound level. Press RANDOM button to start playback CD/CDG randomly. Press RANDOM button again to go back to normal playback.KARAOKE FUNCTIONSSing-along with the music by plugging in the provided microphone into either one of the microphone jacks on the unit.  Adjust the MIC VOLUME control to a desired level and obtain the best performance.Adjust the ECHO control to enhance your voice for a concert hall effect.
EN - 10LINE-IN OPERATIONBLUETOOTH OPERATIONExcept the tablet operation, LINE IN mode allows you to connect external music player or external sound source to your Karaoke Machine speakers.1.   Plug the 3.5mm line-in cable (not included) into your external music player and connect       the other end (3.5 mm jack) into the LINE IN jack on the rear of your Karaoke Machine.2.    Make sure your external music player is turned on.3.    Start music playback on your external music player.4.    Adjust MASTER VOLUME to control the sound level of music playback from the        speakers on the Karaoke Machine.2.  The LED display shows “BT” and flash quickly.3.  Using the native controls on your Bluetooth Device, select the "KS303-BT" in your     Bluetooth setting to pair.      4.  When successfully paired, “BT” on LED display will stop flashing.     After initial pairing, the unit will stay paired unless unpaired manually by the user or     erased due to a reset of the devices.     If your device become unpaired, follow the above steps to pair again.     If any pairing issues occur, un-pair the unit on your Bluetooth device and follow      the above steps and try again.BLUETOOTH SETUP1.  Follow the instructions for Pairing a Bluetooth Device.2.  Use the native controls on the connected Bluetooth Device to select a track.3.  To play, pause or skip the selected track, use the native controls on the connected      Bluetooth Device.  4.  Audio playback from the connected Bluetooth device can now be heard through the      speaker.PLAYING MUSIC VIA BLUETOOTHPairing is the term used when two Bluetooth devices are connected wirelessly for the first time.1 Press FUNCTION button to toggle to Bluetooth mode.NOTE:If the unit is in CD or Bluetooth mode, when you connect an external audio device to the LINE IN jack by an LINE-IN cable, this unit will automatically be switched to LINE IN mode. If you remove the LINE-IN cable from the LINE IN jack,the unit will resume to the previous mode.
EN - 11TROUBLE SHOOTING GUIDEIf you have followed the instructions and are having difficulty operating the unit, locate the PROBLEM in the left column below. Check the corresponding POSSIBLE CAUSE column to locate and remedy the problem.AUDIO OUT jacks notconnected. Follow directions on the ‘AudioConnection’ section. PROBLEM POSSIBLE CAUSE SOLUTIONNo power when ON/OFFbutton is on.No power when pluggedin.No sound.AC power adaptor is not connected to AC outlet. The AC outlet may have no powerAC power adaptor is not secure on the back of the unit.Volume control is set tominimum.Volume control in TV set isset to minimum.onTV set power is OFF.Connect AC power adaptor to AC outlet.Check the outlet with a workinglamp or other electrical appliance.Securely plug AC power adaptor small end into the DC jack of the unit.CD PLAYER does notwork normally or the LED displaysDisc is inserted upside down Disc is dirty Lens is dirty Disc is scratched Disc is warped A non standard disc is inserted.Moisture has formed inside the CD deck. Karaoke system needs to bereset. Insert the disc correctly. Wipe clean with a soft cloth. Use a new disc. Use a new disc. Use a CD lens cleanerOnly use discs bearing standard logo.Wait about 20 - 30 mins to let it dry out. Disconnect the machine from the power source for 30 seconds.
EN - 12TROUBLE SHOOTING GUIDEMic volume control is set tominimum.Adjust mic volume to max, andthen re-adjust to a comfortablelevel.Turn on mic with the ON/OFFswitch located on the microphone.Mic is off.Using your TV Remote to selectVIDEO input or select the properVIDEO input on TV itself.Connect from VIDEO OUT of thesystem to the VIDEO IN on yourVCR or Home theater. (Refer to“Making the Connections”). Checkthe disc to be sure it is a CD+G.PROBLEM POSSIBLE CAUSE SOLUTIONNo sound - if audio is going through TV, VCR or Home theater.No song lyrics appearon the TV screen.No sound from mic.Source Selection on your TV,VCR or Home theater is notset properly.Improper connection tostereo system.Video cable is not connectedproperly to the TV.Connect the video cable to the Karaoke Machine’s VIDEO OUTand to the TV VIDEO IN. Source selector on TV is notset to VIDEO.TV does not have video lineinput.A CD+G disc is loaded but the CDG indicator is not lit. Check disc to be sure it is clean.Select AUX IN as the source for your TV, VRC or Home theater.Follow direction on ‘Audioconnection’ page for connecting to a home stereo system.No sound when playing audio via Bluetooth.Your Bluetooth device does notpaired properly.Pair your Bluetooth device according to the "Bluetooth setup" section.The volume control of your Bluetooth device is set at too low.Increase the volume of your Bluetooth device.The volume control of the unit is set at too low.Increase the volume of the unit by VOLUME control.
EN - 13SPECIFICATIONS15.4 x 8.3 x 4.4 inches / 39.0 x  21.0 x 11.0 cmInput 100-240V~50/60HzOutput DC 5V     2A4.5 lbs / 2.0 kgs4
EN - 14THE KARAOKE MACHINE (GLOSSARY OF TERMS)Following are some brief descriptions of karaoke terms you may need:Echo:By adding some minor feedback to your voice the Echo feature adds depth and resonance to a singer's voice. Echo affects only your voice and not the music. It will make you sound like you are singing in a big concert hall.Multiplex:This karaoke system is capable of playing Multiplex CD+G Karaoke discs. Multiplex Karaoke discs feature two mono versions of the same recording on left and right channels. The right channel features a mono version of the song with the lead vocals pre-recorded. The left channel features the same song, without the lead vocals recorded.Auto Voice Control (A.V.C.):This is short for “Automatic Vocal Control”. When the AVC knob on the front panel of the player is turned clockwise, the AVC function is activated. AVC is used to eliminate the singer's vocals from specially made Multiplex CD+G karaoke discs. Once the AVC is activated, as you sing into the microphone, the pre-recorded vocals are eliminated and replaced with your singing voice. Set the AVC to a lower setting, and you'll be able to hear the pre-recorded vocals in low volume as well as your own singing voice. Set the AVC to maximum and as you sing into the microphone, the pre-recorded lead vocals will be completely eliminated, and only your own singing voice will be heard.NOTE: The AVC controls is only functional with specific Multiplex CD+G Karaoke Discs. AVC will not eliminate the vocals from standard music CDs, and will not function when playing standard Karaoke CD+G discs, such as the disc included with this system.CD+G:This is short for Compact Disc plus Graphics. This is a regular audio CD with the lyrics stored in a data track. While your karaoke player will play regular audio CDs they will not have the background data track that will allow the lyrics to be displayed.

Navigation menu