Acer orporated N50 PDA with Bluetooth and Wireless Lan 802.11b User Manual
Acer Incorporated PDA with Bluetooth and Wireless Lan 802.11b Users Manual
Users Manual

Manual for
Acer n50
o61!<!o61!qsfnjvn
COPYRIGHT
Copyright © 2004 Acer Inc. or its subsidiaries
All Rights Reserved. Printed in Taiwan.
Acer n50 Handheld Manual
Original issue: November 2004
Acer and the Acer logo are registered trademarks of Acer Inc.
Microsoft, ActiveSync, Outlook, Pocket Outlook, Windows, Windows NT, and the Windows logo are either registered
trademarks or trademarks of Microsoft Corporation in the United States and/or other countries. Microsoft products are licensed
to OEMs by Microsoft Licensing, Inc., a wholly owned subsidiary of Microsoft Corporation.
Other company’s product names or trademarks are used herein for identification purpose only and belong to their respective
companies.
Changes may be made periodically to the information in this publication without obligation to notify any person of such
revision or changes. Such changes will be incorporated in new editions of this Manual or supplementary documents and
publications.
No part of this publication may be reproduced, stored in a retrieval system, or transmitted, in any form or by any means,
electronic, mechanical, photocopy, recording, or otherwise, without the prior written permission of Acer Inc.
DISCLAIMER AND LIMITATION OF LIABILITY
Acer and its subsidiaries makes no representations or warranties, either expressed or implied, with respect to the contents
hereof and specifically disclaims the implied warranties of merchantability or fitness for a particular purpose. Acer and its
subsidiaries assume no responsibility for any damage or loss resulting from the use of this Acer n50 Handheld Manual.
NOTES
Record the serial number, purchase date, and place of purchase information in the space provided below. The serial number is
recorded on the label affixed to your Acer n50. All correspondence concerning your unit should include the serial number, and
purchase information.
Acer n50 Handheld
S/N: _______________________________________
Purchase Date: ____________________________
Place of Purchase: _________________________

About this Manual
iii
About this Manual
Welcome to the Acer n50 Handheld Manual. This Manual is designed to help you get
up and running quickly with your new Acer n50—a Windows®Powered Pocket PC
2004 handheld. It describes all you need to know about how to use your handheld as
well as the application programs that come with it.
This Manual will discuss the following topics:
• A tour of the Acer n50 system
• Setup and maintenance procedures
• Viewing and entering data
• Using the application programs bundled with your handheld
• Taking advantage of your handheld’s expansion features
• Synchronising data between your handheld and your computer
• Connecting your handheld to a computer, a network, or the Internet
• Personalising your handheld with your own preference settings
This Manual introduces you to the many ways your Acer n50 can help you organise
and manage both business and personal information to make your everyday activities
a more productive and satisfying experience.

About this Manual
iv

First things first
Your guides
v
First things first
We would like to thank you for making Acer n50 your choice for your handheld
needs. Your new sleek Acer n50 is a multi-functional tool packed with user-friendly
features and high-performance applications designed to make organising work-
related information and synchronising it with your personal activities a time-efficient
task. We hope you enjoy using your Acer n50 as much as we enjoyed creating it for
you.
Use your Acer n50 to effectively manage information related to both business and
personal tasks.
• Software installation and new applications
• Use the Microsoft® Pocket PC 2003 second edition software to perform
organising and computing tasks
• Synchronise the information on your computer with the information on your
handheld using Microsoft® ActiveSync®
• Get connected to the Internet with the Microsoft® Pocket Internet Explorer
• Create an on-the-go backup file
• Expand your handheld’s capabilities using either the built-in SD/MMC slot or
the CF slot
• Exchange information between devices that have Bluetooth®(optional) /
WLAN(optional) capabilities.
• Beam information to another IR-enabled device
• Customise your handheld based on your personal requirements and
preferences
Your guides
To help you use your Acer n50, we have designed a set of guides:
For information on: Refer to:
Programs on your handheld This Manual. Bundled in the Acer n50 Handheld
Companion CD, it provides online reference for using
your Acer n50.
The Acer n50 Handheld Help. To view Help,
tap and then Help.
Programs on your handheld
Additional programs that can be
installed on your handheld
The Acer n50 Handheld Companion CD.
Connecting to and synchronising
with your computer
The Acer n50 Handheld Quick Guide.
ActiveSync Help on your computer. To view Help, click
Help and then Microsoft ActiveSync Help.

First things first
Package contents
vi
Package contents
Your Acer n50 comes packed in a cardboard box. Carefully unpack the box and
remove the contents. If any of the following items are missing or damaged, contact
your dealer immediately:
Maintaining your Acer n50
This section provides information on the following:
• Proper care and usage of your handheld
• Resetting your handheld
Proper care and usage of your Acer n50
Your Acer n50’s rugged and tough construction is designed to provide you with years
of reliable and trouble-free service. Observing the following general maintenance
procedures will help ensure this:
1 Take care not to scratch the screen of your handheld. Keep the screen clean. When
working with your handheld, use the supplied stylus or plastic-tipped pens intended
for use with touch-sensitive screens. Never use an actual pen or pencil or other sharp
object on the screen surface.
2 Your handheld is not waterproof and should not be exposed to rain or moisture.
Under extreme conditions, water may enter the circuitry through the front panel
buttons or expansion slots. In general, treat your handheld as you would a pocket
calculator or other small electronic device.
3 Take care not to drop your handheld or subject it to any strong impact. Do not place
your handheld in your back pocket; if you sit on it, you may damage it.
Last-minute updates and detailed
technical information
The Read Me files. Located in the Microsoft ActiveSync
folder on your computer and on the Acer n50
Handheld Companion CD.
Up-to-date information regarding
your handheld
http://www.acer.com/
Service Enquiries http://global.acer.com/support/index.htm
For information on: Refer to:
• Acer n50 handheld • Acer n50 Handheld Quick Guide
• Stylus • Acer n50 Handheld Companion
CD
• Cradle (for n50 Premium) or Sync
Cable ( USB Client, DC-in ) (for
n50)
• End User License Agreement
• AC Power Adapter • International Travellers Warranty
• Slip Case • Battery Pack
First things first
Maintaining your Acer n50
vii
4 Protect your handheld from temperature extremes. For example, do not leave your
handheld on the dashboard of a car on a hot day or on a day when temperatures are
below the freezing point. Also, keep it away from heaters and other sources of heat.
5 Do not use or store your handheld in any location that is extremely dusty, damp or
wet. Always use the (included) SD dummy card to protect the connectors when not in
use.
6 Use a soft, damp cloth to clean your handheld. If the surface of the screen becomes
soiled, clean it with a soft cloth moistened with diluted window-cleaning solution.
Resetting your Acer n50
You may have to perform a reset if your handheld no longer responds to the buttons
on the screen.
Performing a soft reset
A soft reset allows your handheld to get a fresh start, similar to rebooting a computer.
All records and entries are retained after a soft reset.
To perform a soft reset:
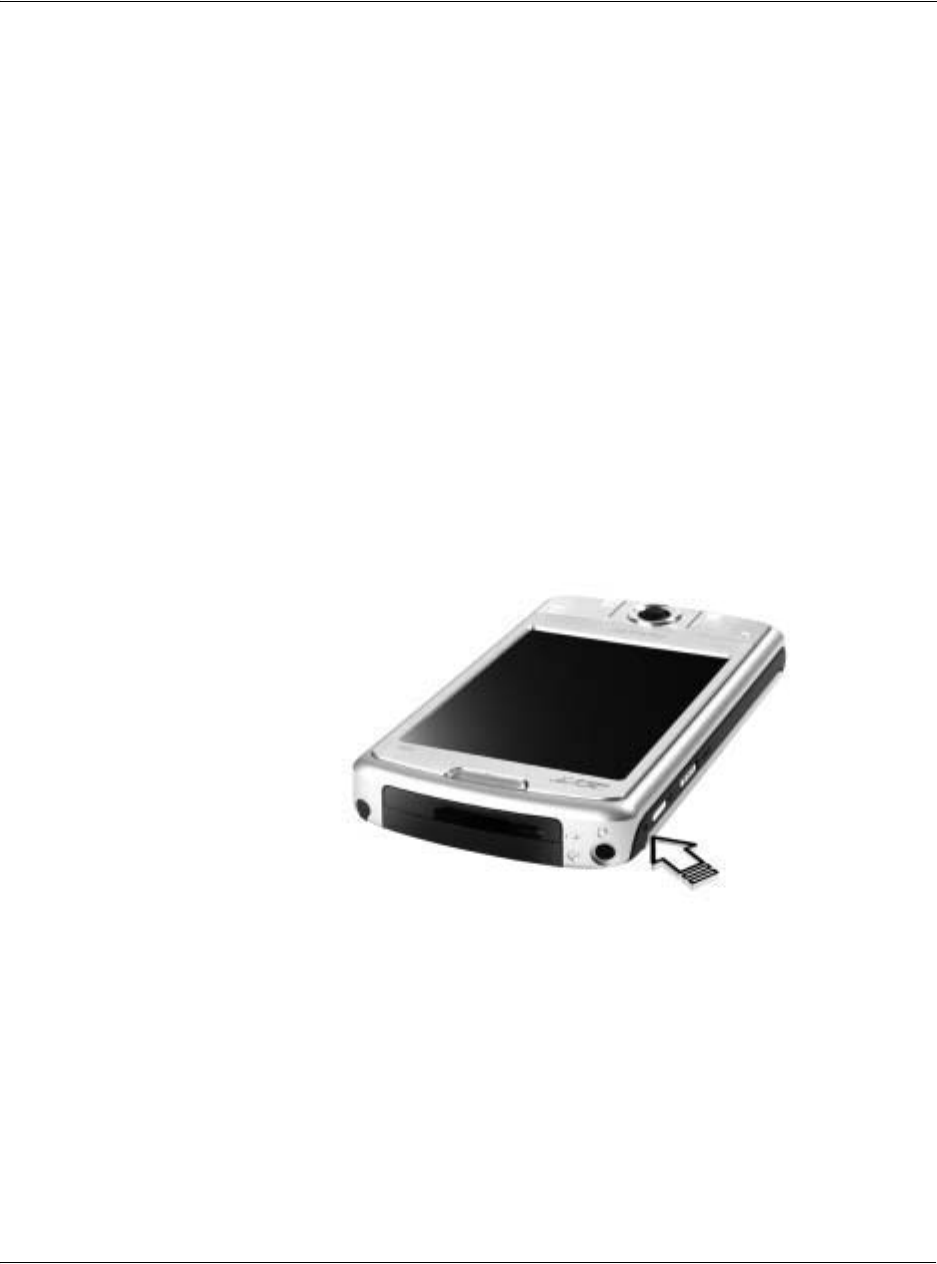
• Using the tip of your stylus, lightly press the reset button inside the hole on
the buttom of your handheld.
Performing a hard reset
A hard reset will erase all records and entries stored in your handheld. Never perform
a hard reset unless a soft reset does not correct your problem. When you perform your
next ActiveSync operation, you can restore any data that you previously synchronised
to your computer. To perform a hard reset:
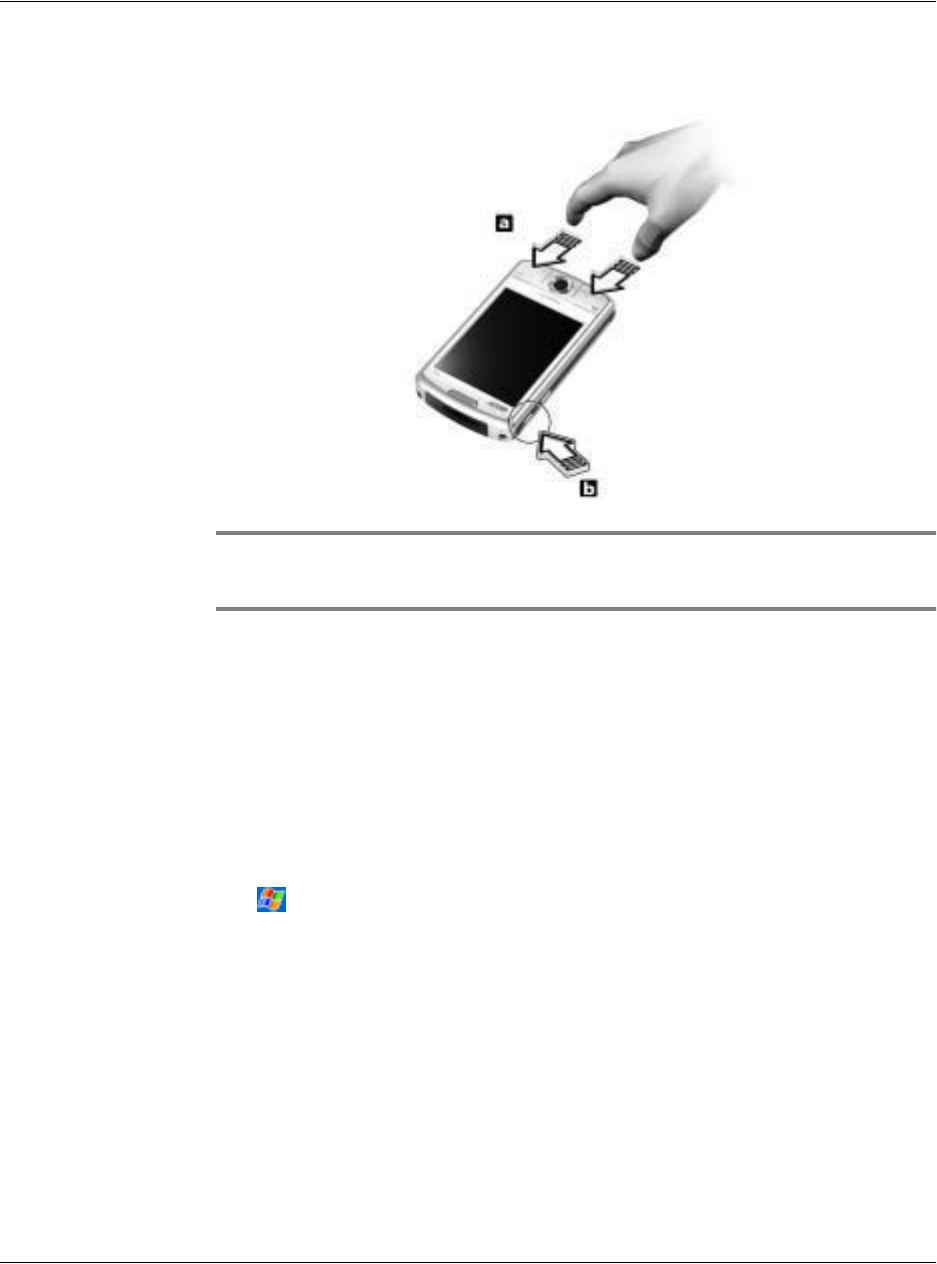
1. Press and hold the Today and Messaging (a) buttons on your Handheld.
First things first
Locking your Acer n50
viii
2. While holding the Today and Messaging buttons, Using the tip of your stylus, lightly
press the reset button inside the hole (b) on the left side of your handheld.
NOTE: When you perform a hard reset, formats, preferences, and other settings including
date and time are restored to their factory default settings. All data, records, and entries,
except for those stored in the ROM storage, will be erased.
Locking your Acer n50
Your handheld is not just a financial investment but a wealthy source of personal
information, some of which may be confidential so it is only logical to protect it from
any unauthorized access. The security setting of your handheld gives you the option
of assigning a lock password that will be required for access after a set period of
inactivity.
To assign a password
1 Tap , Settings.
2 On the Personal tab, tap Password.
3 Select a password option.
• Simple 4 digit password
• Strong alphanumeric password
4 Define the period of inactivity before the password will be required for access.
5 Enter password then retype it to confirm.
First things first
Installing Software on Your Acer n50
ix
Installing Software on Your Acer n50
When installing software on your Acer n50, you may receive the message:
The program you have installed may not display properly because it was designed for
a previous version of Microsoft® Windows MobileTM software.
If you receive this message, perform the following steps:
1 Tap ok to continue installing the software.
2 Run the software in portrait mode. See "Changing Display to Portrait Screen
Orientations."
Changing Display to Portrait Screen Orientations
To change the display setting on your Handheld:
1 Tap , Settings.
2 On the System tab, tap Screen icon.
3 The Screen Orientation options are displayed.
4 Make your selection and press the OK button. Your display screen is now in the new
orientation.
NOTE: Most applications will work with Windows Mobile 2003 Second Edition when using
portrait mode.
NOTE: The Acer n50 has the Windows Mobile 2003 Second Edition operating system
installed. Most PDA software packages currently available were designed for previous
versions of the Windows Mobile operating system. If you need technical assistance with the
software you are trying to install, contact the software manufacturer. Acer does not provide
support for third-party electronics and accessories. Support for all third-party electronics and
accessories is provided by the original manufacturer of the product.

First things first
Installing Software on Your Acer n50
x

Contents
1
About this Manual iii
First things first v
Your guides . . . . . . . . . . . . . . . . . . . . . . . . . . . . . . v
Package contents . . . . . . . . . . . . . . . . . . . . . . . . . . . . vi
Maintaining your Acer n50 . . . . . . . . . . . . . . . . . . . . . . . . vi
Proper care and usage of your Acer n50 . . . . . . . . . . . . . . . . . vi
Resetting your Acer n50 . . . . . . . . . . . . . . . . . . . . . . . . vii
Locking your Acer n50 . . . . . . . . . . . . . . . . . . . . . . . . . viii
Installing Software on Your Acer n50 . . . . . . . . . . . . . . . . . . . . ix
1 Getting started 1
System requirements . . . . . . . . . . . . . . . . . . . . . . . . . . 1
Features summary. . . . . . . . . . . . . . . . . . . . . . . . . . . . 1
Performance . . . . . . . . . . . . . . . . . . . . . . . . . . . . 1
Display . . . . . . . . . . . . . . . . . . . . . . . . . . . . . . . 1
Audio . . . . . . . . . . . . . . . . . . . . . . . . . . . . . . . 2
Proprietary 26-pin I/O connector . . . . . . . . . . . . . . . . . . . . 2
Connectivity. . . . . . . . . . . . . . . . . . . . . . . . . . . . . 2
Expansion . . . . . . . . . . . . . . . . . . . . . . . . . . . . . 2
Battery . . . . . . . . . . . . . . . . . . . . . . . . . . . . . . . 2
Design and ergonomics . . . . . . . . . . . . . . . . . . . . . . . . 2
Acer n50 tour . . . . . . . . . . . . . . . . . . . . . . . . . . . . . 4
Front view . . . . . . . . . . . . . . . . . . . . . . . . . . . . . 4
Left view . . . . . . . . . . . . . . . . . . . . . . . . . . . . . . 5
Top view . . . . . . . . . . . . . . . . . . . . . . . . . . . . . . 6
Bottom view . . . . . . . . . . . . . . . . . . . . . . . . . . . . 7
Preparing to use your Acer n50 . . . . . . . . . . . . . . . . . . . . . . 7
Installing the Microsoft® ActiveSync® software . . . . . . . . . . . . . . 8
Connecting the computer . . . . . . . . . . . . . . . . . . . . . . . 9
Charging your Acer n50 . . . . . . . . . . . . . . . . . . . . . . . .10
Setting up your Acer n50 . . . . . . . . . . . . . . . . . . . . . . .12
Performing the first synchronisation process . . . . . . . . . . . . . . .13
Command interface . . . . . . . . . . . . . . . . . . . . . . . . . . .15
Handheld buttons and the stylus . . . . . . . . . . . . . . . . . . . .15
Today screen . . . . . . . . . . . . . . . . . . . . . . . . . . . .15
Start menu . . . . . . . . . . . . . . . . . . . . . . . . . . . . .16
Command bar . . . . . . . . . . . . . . . . . . . . . . . . . . . .16
Pop-up menus . . . . . . . . . . . . . . . . . . . . . . . . . . . .17
2 Entering data in your Acer n50 19
Using the input panel . . . . . . . . . . . . . . . . . . . . . . . . . .19
To type with the soft keyboard . . . . . . . . . . . . . . . . . . . . .20
To use Letter Recognizer . . . . . . . . . . . . . . . . . . . . . . .20
To use Block Recognizer . . . . . . . . . . . . . . . . . . . . . . . .21
To use Transcriber . . . . . . . . . . . . . . . . . . . . . . . . . .21
Writing on the screen . . . . . . . . . . . . . . . . . . . . . . . . . .21

2
To write on the screen . . . . . . . . . . . . . . . . . . . . . . . . 22
Drawing on the screen . . . . . . . . . . . . . . . . . . . . . . . . . 24
To create a drawing . . . . . . . . . . . . . . . . . . . . . . . . . 24
Recording a message . . . . . . . . . . . . . . . . . . . . . . . . . . 26
To create a recording . . . . . . . . . . . . . . . . . . . . . . . . 26
To play a recording . . . . . . . . . . . . . . . . . . . . . . . . . 26
Using My Text . . . . . . . . . . . . . . . . . . . . . . . . . . . . . 27
To insert a My Text message . . . . . . . . . . . . . . . . . . . . . . 27
3 Managing applications and information 29
Opening an application . . . . . . . . . . . . . . . . . . . . . . . . . 29
Switching between applications . . . . . . . . . . . . . . . . . . . . . 29
Finding and organising information . . . . . . . . . . . . . . . . . . . . 31
To use Find . . . . . . . . . . . . . . . . . . . . . . . . . . . . . 31
To use File Explorer . . . . . . . . . . . . . . . . . . . . . . . . . 32
4 Managing Microsoft® Pocket Outlook applications 33
Calendar . . . . . . . . . . . . . . . . . . . . . . . . . . . . . . . 33
Scheduling an appointment . . . . . . . . . . . . . . . . . . . . . . 35
Creating a meeting request . . . . . . . . . . . . . . . . . . . . . . 36
Contacts . . . . . . . . . . . . . . . . . . . . . . . . . . . . . . . 37
Creating a contact . . . . . . . . . . . . . . . . . . . . . . . . . . 37
Finding a contact . . . . . . . . . . . . . . . . . . . . . . . . . . 38
Tasks . . . . . . . . . . . . . . . . . . . . . . . . . . . . . . . . . 39
Creating a task . . . . . . . . . . . . . . . . . . . . . . . . . . . 39
Notes . . . . . . . . . . . . . . . . . . . . . . . . . . . . . . . . 41
Creating a note . . . . . . . . . . . . . . . . . . . . . . . . . . . 41
Messaging . . . . . . . . . . . . . . . . . . . . . . . . . . . . . . 42
Synchronising email messages . . . . . . . . . . . . . . . . . . . . . 42
Connecting directly to an email server . . . . . . . . . . . . . . . . . 42
Using the Message list . . . . . . . . . . . . . . . . . . . . . . . . 43
Composing a message . . . . . . . . . . . . . . . . . . . . . . . . 43
Managing email messages and folders . . . . . . . . . . . . . . . . . 44
5 Managing Microsoft® Pocket PC 2003 companion programs 45
Pocket Word . . . . . . . . . . . . . . . . . . . . . . . . . . . . . 45
To create a new file . . . . . . . . . . . . . . . . . . . . . . . . . 45
To use the Pocket Word file list . . . . . . . . . . . . . . . . . . . . 46
To enter information. . . . . . . . . . . . . . . . . . . . . . . . . 46
Pocket Excel . . . . . . . . . . . . . . . . . . . . . . . . . . . . . . 49
Creating a new workbook . . . . . . . . . . . . . . . . . . . . . . 49
To create a Pocket Excel file list . . . . . . . . . . . . . . . . . . . . 49
MSN® Messenger . . . . . . . . . . . . . . . . . . . . . . . . . . . . 51
Setting up . . . . . . . . . . . . . . . . . . . . . . . . . . . . . 51
Working with contacts . . . . . . . . . . . . . . . . . . . . . . . . 51
Chatting with contacts . . . . . . . . . . . . . . . . . . . . . . . . 52
Microsoft® Windows Media™ Player for Pocket PC . . . . . . . . . . . . . . 53

Contents
3
Microsoft® Reader for Pocket PC . . . . . . . . . . . . . . . . . . . . . .54
Using the Guidebook . . . . . . . . . . . . . . . . . . . . . . . . .54
Getting books on your Acer n50 . . . . . . . . . . . . . . . . . . . .54
Using the Library. . . . . . . . . . . . . . . . . . . . . . . . . . .54
Opening a book . . . . . . . . . . . . . . . . . . . . . . . . . . .54
Reading a book . . . . . . . . . . . . . . . . . . . . . . . . . . .55
Using Reader features. . . . . . . . . . . . . . . . . . . . . . . . .56
Removing a book . . . . . . . . . . . . . . . . . . . . . . . . . .57
6 Backup and restore data 59
Backup function . . . . . . . . . . . . . . . . . . . . . . . . . . .60
AutoBackup function . . . . . . . . . . . . . . . . . . . . . . . . .61
Restore function . . . . . . . . . . . . . . . . . . . . . . . . . . .61
7 Using expansion features 65
Using an SD/CF card . . . . . . . . . . . . . . . . . . . . . . . . . . .65
Inserting an SD/CF card . . . . . . . . . . . . . . . . . . . . . . . .65
Removing an SD/CF card. . . . . . . . . . . . . . . . . . . . . . . .66
Using an USB thumb drive . . . . . . . . . . . . . . . . . . . . . . . .66
Inserting an USB thumb drive - Connecting the Cradle . . . . . . . . . . .66
Removing an USB thumb drive - Connecting the Cradle . . . . . . . . . . .66
Inserting an USB thumb drive - Connecting the Sync cable . . . . . . . . . .67
Removing an USB thumb drive - Connecting the Sync cable . . . . . . . . .67
8 Exchanging and updating data using ActiveSync®.69
Using ActiveSync®.. . . . . . . . . . . . . . . . . . . . . . . . . . . .69
9 Getting connected 71
Transferring items using infrared or Bluetooth®(optional) . . . . . . . . . . .71
To send information via infrared . . . . . . . . . . . . . . . . . . . .71
Connecting to the Internet . . . . . . . . . . . . . . . . . . . . . . . .72
To create a modem connection to an ISP . . . . . . . . . . . . . . . . .72
To create a connection to an ISP over Bluetooth® . . . . . . . . . . . . .73
To create a wireless Ethernet connection to an ISP . . . . . . . . . . . . .74
Connecting to a network . . . . . . . . . . . . . . . . . . . . . . . . .75
To create a modem connection to a network . . . . . . . . . . . . . . .75
To create a wireless Ethernet connection to a network . . . . . . . . . . .75
To create a connection to a network over Bluetooth® . . . . . . . . . . .75
Get help on connecting . . . . . . . . . . . . . . . . . . . . . . . .75
10 Using Microsoft® Pocket Internet Explorer 77
Mobile Favorites folder . . . . . . . . . . . . . . . . . . . . . . . . .77
Favorite links . . . . . . . . . . . . . . . . . . . . . . . . . . . .77
Mobile favorites . . . . . . . . . . . . . . . . . . . . . . . . . . .77
Using Pocket Internet Explorer . . . . . . . . . . . . . . . . . . . . . .78
To view mobile favorites and channels . . . . . . . . . . . . . . . . . .79
To browse the Internet . . . . . . . . . . . . . . . . . . . . . . . .79

4
11 Customising your handheld 81
Adjusting handheld settings . . . . . . . . . . . . . . . . . . . . . . . 81
Adding and removing programs . . . . . . . . . . . . . . . . . . . . . 81
Adding programs . . . . . . . . . . . . . . . . . . . . . . . . . . 81
Removing programs . . . . . . . . . . . . . . . . . . . . . . . . . 83
Appendix A: Exchanging and updating data using Bluetooth® Utility (optional) 85
Bluetooth® Utility . . . . . . . . . . . . . . . . . . . . . . . . . . . 85
Bluetooth® Settings . . . . . . . . . . . . . . . . . . . . . . . . . . 86
Bluetooth® Manager . . . . . . . . . . . . . . . . . . . . . . . . . . 86
Bluetooth® Browser . . . . . . . . . . . . . . . . . . . . . . . . . . 87
Remote Device Services . . . . . . . . . . . . . . . . . . . . . . . . . 87
Appendix B: Regulation & safety notices 91
Energy Star Guidelines Compliance . . . . . . . . . . . . . . . . . . . . 91
FCC notice . . . . . . . . . . . . . . . . . . . . . . . . . . . . . . 91
Notice: Shielded cables . . . . . . . . . . . . . . . . . . . . . . . . . 91
Notice: Peripheral devices . . . . . . . . . . . . . . . . . . . . . . . . 92
Caution . . . . . . . . . . . . . . . . . . . . . . . . . . . . . . . 92
Operation conditions . . . . . . . . . . . . . . . . . . . . . . . . . . 92
Notice: Canadian users . . . . . . . . . . . . . . . . . . . . . . . . . 92
Remarque à l’intention des utilisateurs canadiens . . . . . . . . . . . . . . 92
Declaration of Conformity for EU countries . . . . . . . . . . . . . . . . . 92
Important safety instructions . . . . . . . . . . . . . . . . . . . . . . . 93
LCD pixel statement . . . . . . . . . . . . . . . . . . . . . . . . . . 94
Macrovision® copyright protection notice . . . . . . . . . . . . . . . . . 94
Radio Device Regulatory Notice. . . . . . . . . . . . . . . . . . . . . . 94
General . . . . . . . . . . . . . . . . . . . . . . . . . . . . . . . 94
European Union (EU) . . . . . . . . . . . . . . . . . . . . . . . . . . 95
List of Applicable Countries . . . . . . . . . . . . . . . . . . . . . . . 95
The FCC RF safety requirement . . . . . . . . . . . . . . . . . . . . . . 95
Canada - Low power license-exempt radio communication devices (RSS-210) . . . 95
Exposure of humans to RF fields (RSS-102) . . . . . . . . . . . . . . . . . 96
Appendix C: Wireless communication 97
Tray Icon . . . . . . . . . . . . . . . . . . . . . . . . . . . . . . . 98
Activating the wireless feature . . . . . . . . . . . . . . . . . . . . . . 99
Configuring the wireless settings . . . . . . . . . . . . . . . . . . . . 100
Main configuration of utility . . . . . . . . . . . . . . . . . . . . . . 101
Status Tab . . . . . . . . . . . . . . . . . . . . . . . . . . . . 101
When use click a 'Configure' button . . . . . . . . . . . . . . . . . 101
When use click a 'More' button (DHCP IP case) . . . . . . . . . . . . . 102
When use click a 'More' button (Static IP case) . . . . . . . . . . . . . 103
SiteSurvey Tab . . . . . . . . . . . . . . . . . . . . . . . . . . 103
Version Tab. . . . . . . . . . . . . . . . . . . . . . . . . . . . 105

1 Getting started
System requirements
1
1 Getting started
This chapter will discuss the following topics:
• Basic requirements
• Feature highlights of your Acer n50
• Acer n50 system tour
• Step-by-step procedures on how to prepare your handheld for use
• Basic concepts in using your handheld
System requirements
In order to install the Microsoft® ActiveSync® software and use your new Acer n50
with a computer at work or at home, be sure the system(s) meet the following
minimum system and program requirements.
•Intel
®Pentium® processor (minimum 233 MHz)
• 64 MB RAM
• 120 MB disk space
• CD-ROM drive
• USB port or Infrared port
• SVGA (or compatible) graphics card supporting 256 colours
• Microsoft® Windows XP, 2000, ME or 98SE
• Microsoft® Internet Explorer 4.01
Features summary
Performance
•Intel
® PXA27X Application Processor with Intel XScale technology
• System memory:
– 64 MB SDRAM for application storage
– 64 MB / 128 MB Flash ROM for operating system
• Microsoft® Windows MobileTM 2003 Second Edition with Outlook® 2002
Display
• 3.5" Transflective TFT LCD
• 240 x 320 resolution
• 65536 colour support
• Microsoft®ClearType technology for clearer, crisper font display

1 Getting started
Features summary
2
Audio
• Embedded AC '97 CODEC with CD-quality stereo output
• Built-in industry standard 2.5 mm stereo earphone jack , 4 ring type
• Built-in mono primary speaker
• Built-in mono auxiliary speaker
Proprietary 26-pin I/O connector
• USB Host (female)
• USB Client(male)
•Serial
• DC power in
Connectivity
• SIR (Serial Infrared) capability
• Bluetooth® 1.2(optional)
• IEEE 802.11b WLAN (optional)
Expansion
• SD/MMC slot (SDIO compatible) and CF slot
• USB Host1.1
Battery
• Rechargeable 1040 mAH Lithium iron battery
• 8 hours operation time for normal usage (when backlight is inactive)
NOTE: Length of battery operation will depend on power consumption which is based on
system resource use. For example, constantly using the backlight or using power-demanding
applications will shorten battery life between charges.
• 3 hour charging time from empty to full capacity
Design and ergonomics
• Stylish, light and thin design
• User-friendly navigation features
Specifications Dimensions
Height 120 mm
Width 70 mm
Depth 17.4 mm
Weight 150 g (including stylus)

1 Getting started
Features summary
3
– 5-way directional pad for one-hand operation
– Quick buttons for easy launch of commonly-used applications
– Start button for one-tap access to all available applications
1 Getting started
Acer n50 tour
4
Acer n50 tour
Front view
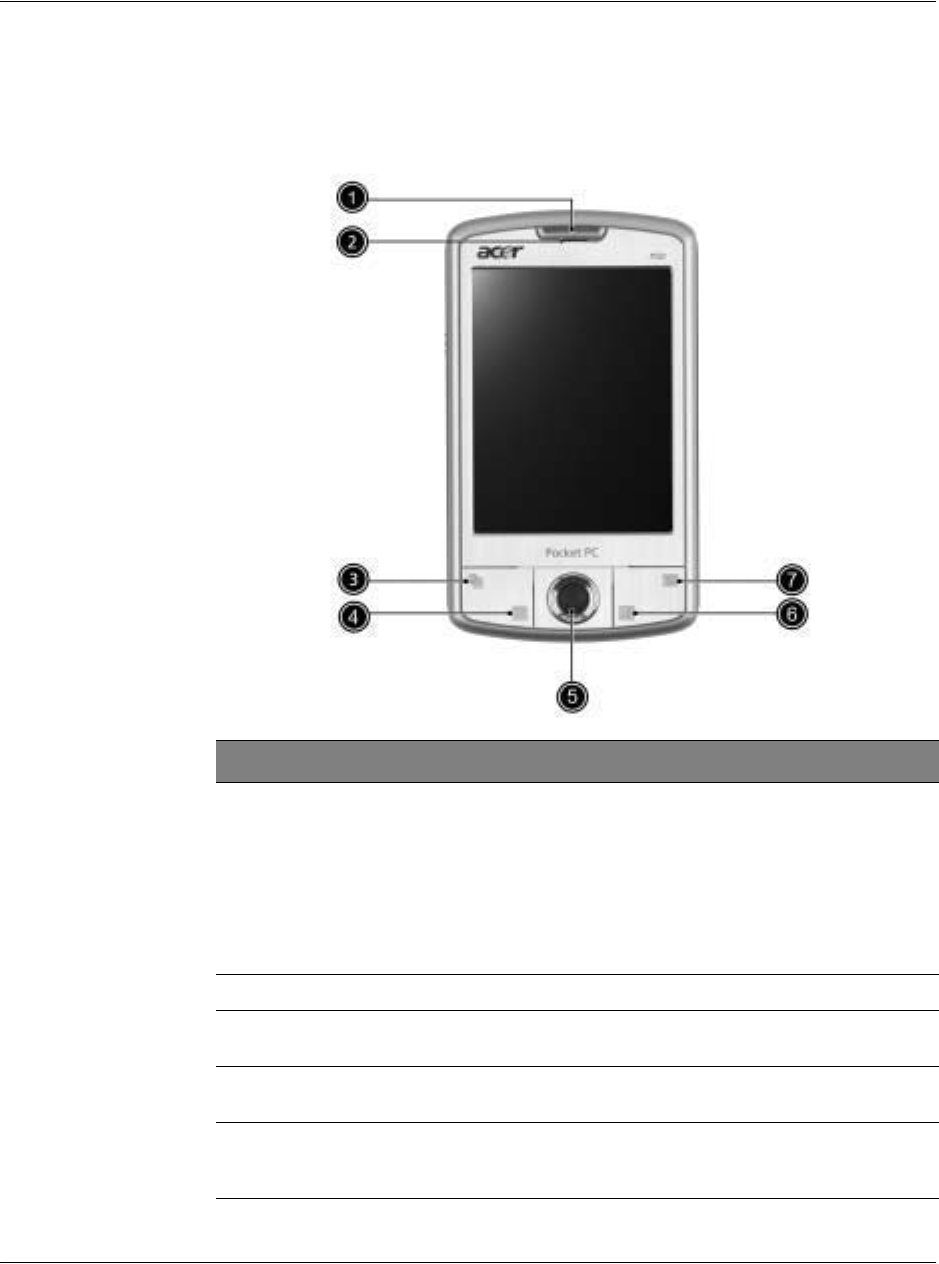
No. Component Description
1 Power / Bluetooth® /
802.11b WLAN LED
indicator
Power LED indicator.
- status description:
• Flashing green - Charging
• Steady green - Charging complete
• Flashing red - Alarm indicator, email receiving
Bluetooth / 802.11b WLAN LED indicator.
- status description:
•Flashing blue - Bluetooth / 802.11b WLAN is on
2 Microphone Inputs audio into your handheld.
3 Quick button for
Today
Displays the Today screen. For more information on this
screen, refer to page 15.
4 Quick button for
Calendar
Activates the Calendar program. For more information on
this program, refer to page 33.
5 Directional pad Enables 5 direction scrolling in various menus and applica-
tions. Press the center of the pad on to simulate the func-
tion of the Enter key.
1 Getting started
Acer n50 tour
5
NOTE: If your handheld is turned off, pressing any Quick button turns on the handheld and
opens the program assigned to that button.
Left view
Using the backlight
If lighting conditions make it difficult for you to see the information on your
handheld, use the backlight to illuminate your screen.
To activate the backlight:
• Press the power button and hold it down for about two seconds. Release the
button when the backlight turns on.
• To turn off the backlight, press the power button and hold it down for two
seconds. Release the button when the backlight turns off.
6 Quick button for
Contacts
Activates the Contacts program. For more information on
this program, refer to page 37.
7 Quick button for
Messaging
Activates the Messaging program. For more information
on this program, refer to page 42.
No. Component Description
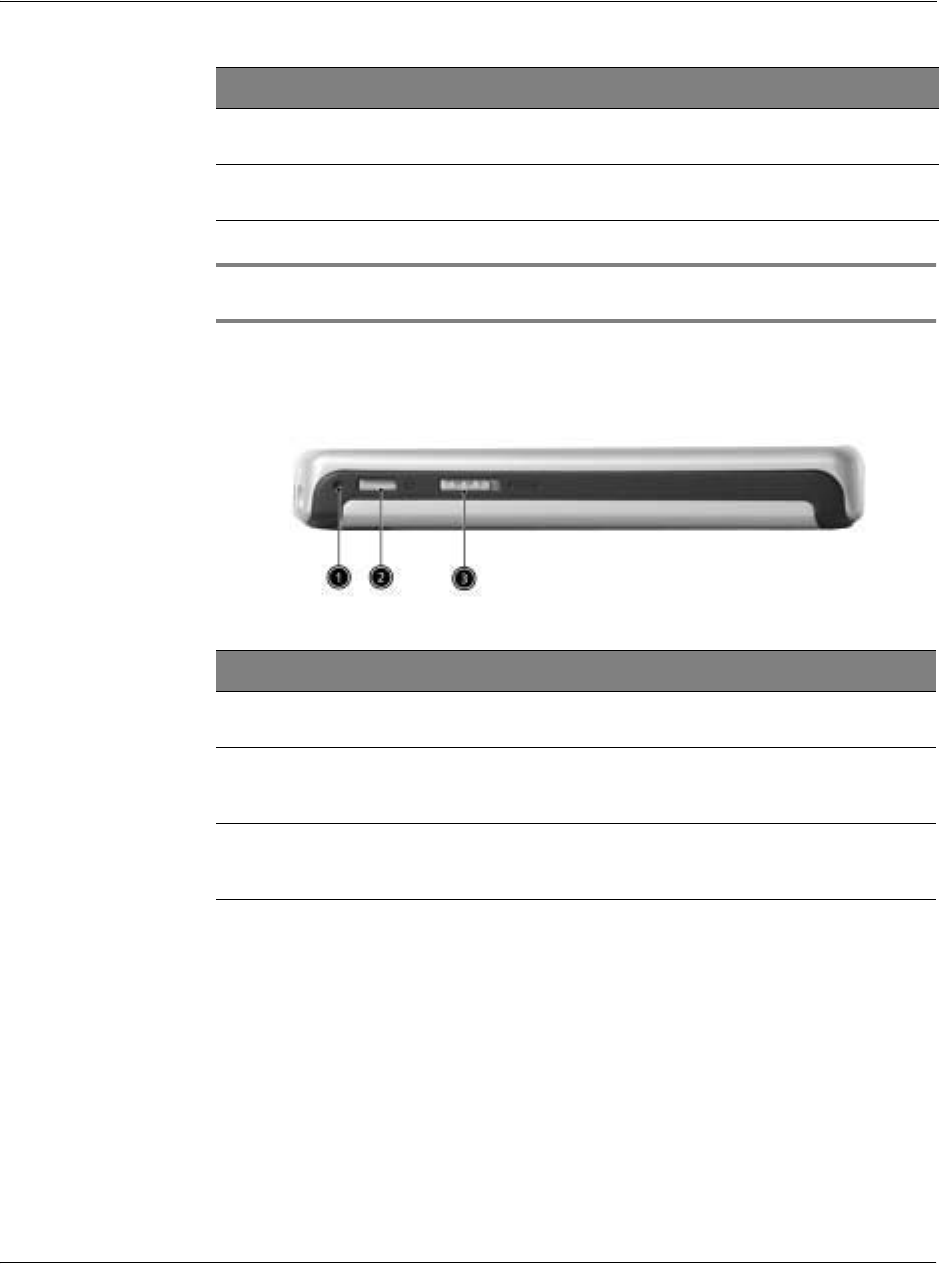
No. Label Description
1 Soft Reset Using the tip of your stylus, lightly press the reset button in-
side the hole on the buttom of your handheld.
2 Power button Press to turn on your handheld on (power LED lights up
green) if it is off and returns to the last screen that was
displayed and off if it is on.
3 Hold switch Slide to lock all buttons from being accidentally pressed when
handheld is placed in pocket or bag. A red dot is visible on
the hold switch when in hold state.
1 Getting started
Acer n50 tour
6
Top view
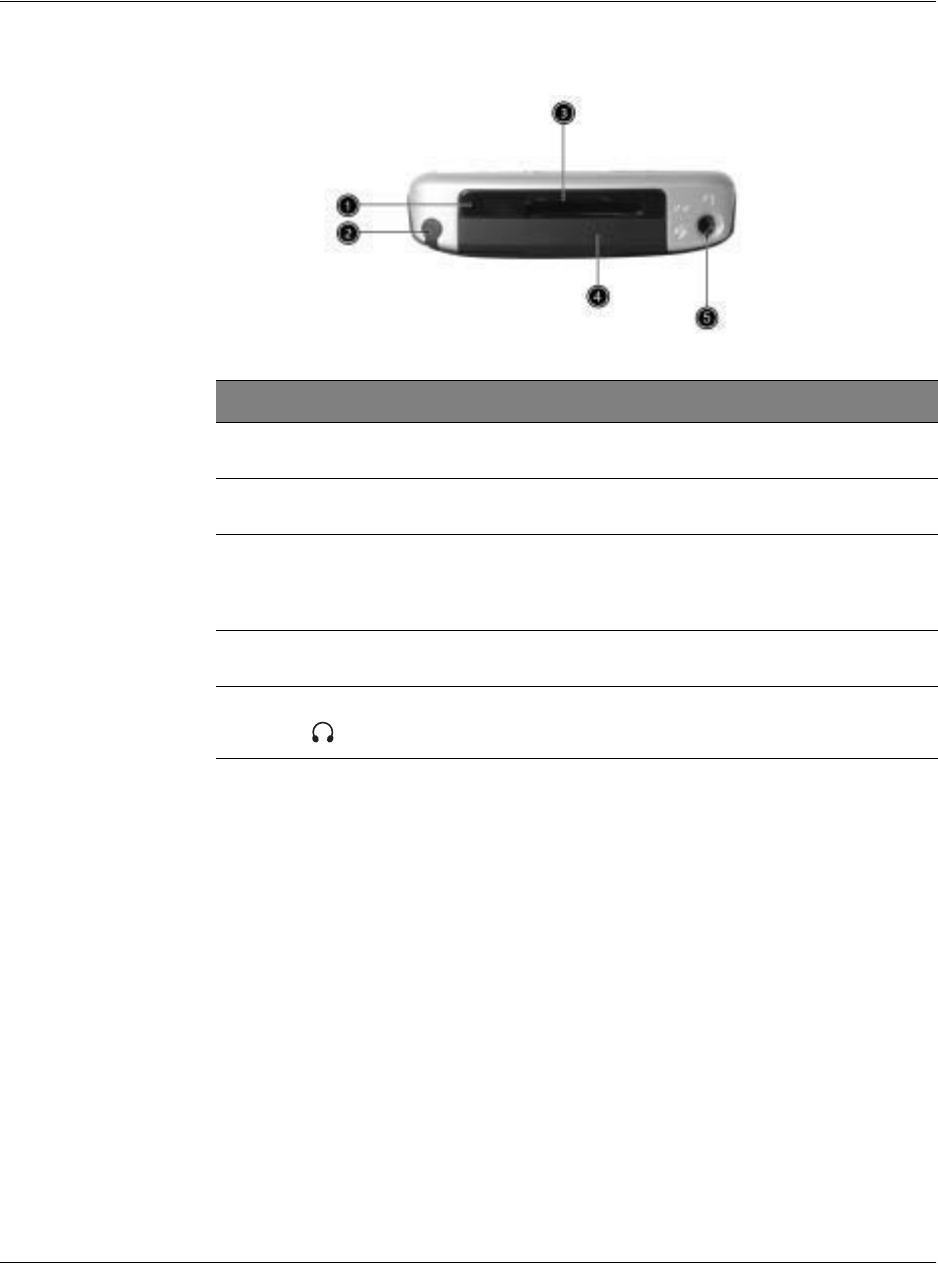
No. Label Description
1 IR port Uses infrared techbology to transmit and receive data from
other IR-enabled devices.
2 Stylus holder Secures the stylus to your handheld. To use the stylus, remove
from its holder and hold it as you would hold a pen or pencil.
3 SD/CF slot Accepts a Secure Digital or MultiMedia Card, allowing you to
add more memory, install add-on applications or use audio or
text files stored on it with internal applications. You can also use
expansion cards to back up data from your handheld.
4 Dummy CF-
card
Use this to protect the CF connector when no card is installed.
5 Earphone jack Connects to audio line-out devices (earphones/headphones).
1 Getting started
Preparing to use your Acer n50
7
Bottom view
Preparing to use your Acer n50
Perform the following easy installation tasks to begin using your handheld:
• Install the Microsoft® ActiveSync® software in your computer
• Connecting the computer
• Charge your handheld
• Set up your handheld
• Perform the first ActiveSync operation
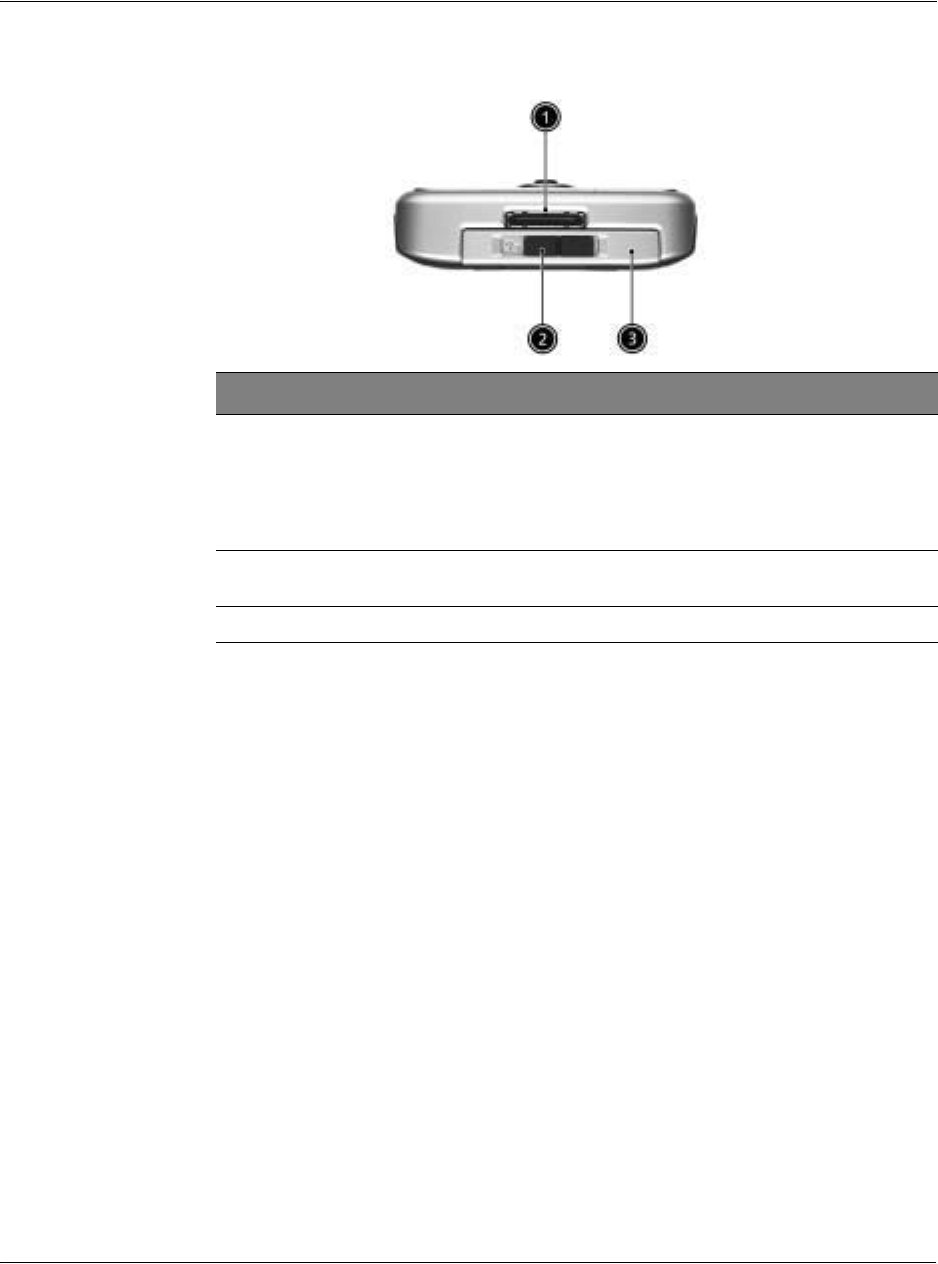
No. Label Description
1 Proprietary
26-pin I/O
connector
Connects your handheld to a portable or desktop computer and
DC power supply to an AC wall outlet to charge the battery.
- USB Host
- USB Client
- Serial
- DC power in
2 Battery re-
lease latch
Unlatches the battery to remove the battery pack.
3 Battery bay Houses the computer’s battery pack.

1 Getting started
Preparing to use your Acer n50
8
Installing the Microsoft® ActiveSync® software
The main function of the Microsoft® ActiveSync®software is to synchronise the
information on your computer with the information on your handheld.
Synchronisation compares the data on your handheld with your computer and
updates the information on both locations. This will then served as a backup data in
case something happens to your handheld.
The following instructions tells you how to install the ActiveSync®software.
Important installation notes
• Before installing ActiveSync, make sure that your handheld cradle is not yet
connected to your computer. Connect the cradle only after you have finished
installing ActiveSync.
• If you don’t have Microsoft® Outlook® 98 or later installed, please install
Microsoft® Outlook® 2002 now. Even if you have Outlook 98 or Outlook 2000
installed, you are encouraged to upgrade to Outlook 2002.
• It is recommended that users install Outlook 2002 from this CD before
installing ActiveSync.
• Do not copy the ActiveSync files to your computer’s hard disk. You must use
the Acer n50 Handheld Companion CD to place the files in their proper
locations and to decompress the files.
To install the Microsoft® ActiveSync® software
1 Exit any open programs, including those that run at startup, and disable any virus-
scanning software.
2 Insert the Acer n50 Handheld Companion CD into the computer’s CD-ROM drive.
The CD’s welcome page appears.
3 Click the animated forward icon to go to the next screen.
4 Click the Start Here tab on the right side of the screen.
5 Read the instructions and installation notes indicated on the Start Here screen.
6 Click the buttons on the left pane to install each of the individual applications.
• Outlook 2002 (recommended)
•ActiveSync
® 3.7.1
After installation, the ActiveSync icon will appear on your computer’s system tray
(on the lower right-hand corner of the screen).
Refer to the ActiveSync software online Help for information on how to use the
software. If at any time, you would like to restart this setup program, simply re-insert
the CD into the CD-ROM drive.
1 Getting started
Preparing to use your Acer n50
9
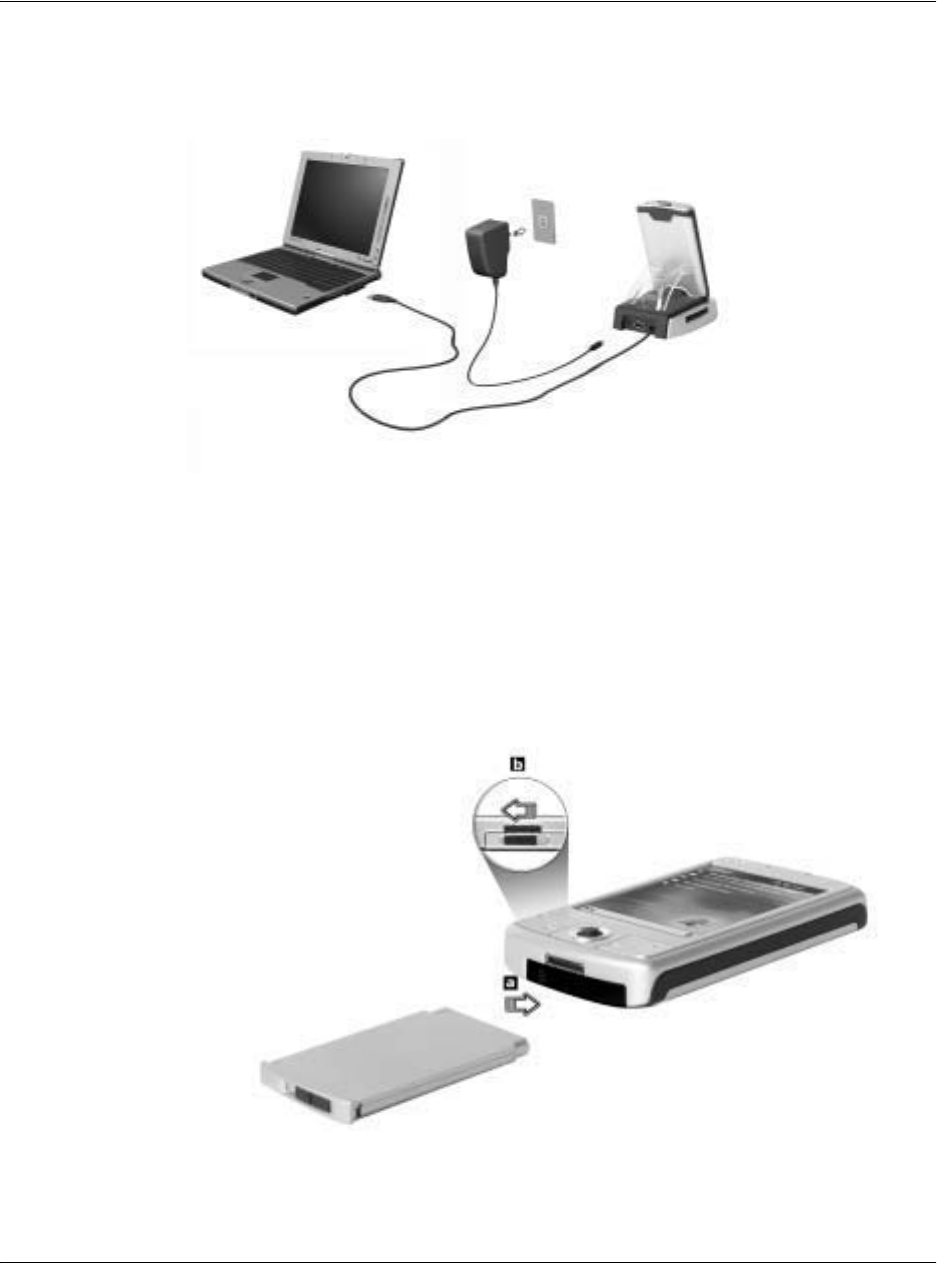
Connecting the computer
The sync cable that comes with your handheld enables you to synchronise the
information on your handheld with the data in your computer using ActiveSync
technology.
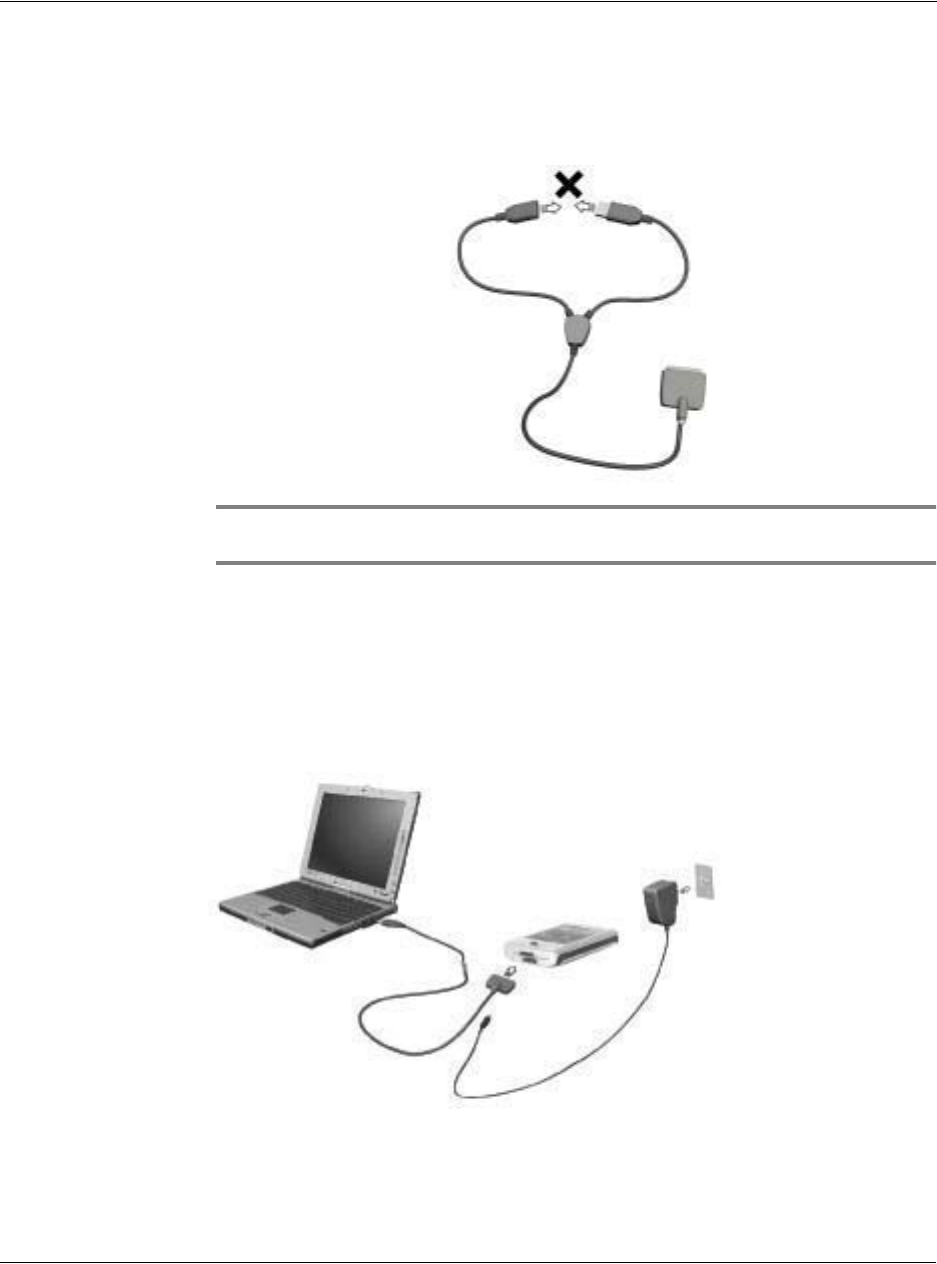
NOTE: If you are using the 3-in-one sync cable (an optional accessory), please do not plug
the USB host into the USB client.
To connect the computer
Connecting the Sync cable
1 Plug the sync cable into the 26-pin I/O connector on the bottom of your handheld.
2 Plug the AC adapter into any AC current outlet.
3 Plug the USB client connector into an available USB port on your computer.
Connecting the Cradle
1 Connect the AC adapter cord to the power socket at the back of the cradle.
1 Getting started
Preparing to use your Acer n50
10
2 Plug the AC adapter into any AC current outlet.
3 Plug the USB client connector into an available USB port on your computer.
Charging your Acer n50
For initial use, you need to charge your handheld for three hours. After that, you can
charge it for a few minutes each day to recharge the battery to full capacity. Normally,
you can use your handheld for 8 straight hours of operation (backlight inactive)
before you need to recharge the battery.
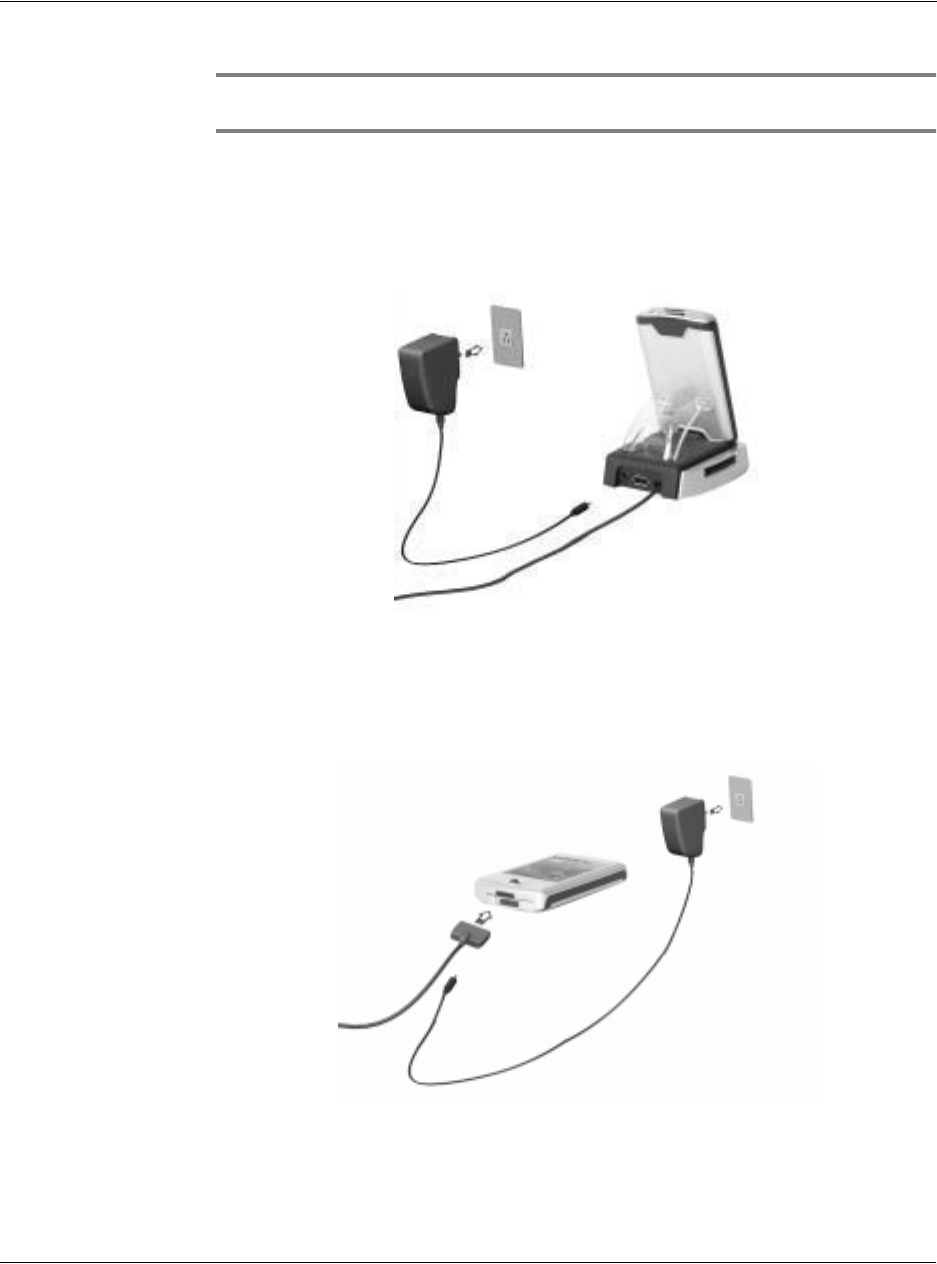
To charge your Acer n50
Insert the battery pack into the battery bay (a), then slide the battery release switch to
the locked position (b)..
1 Getting started
Preparing to use your Acer n50
11
NOTE: To take the battery pack out, first slide the battery release switch to the unlocked
position, then pull the battery pack out of the bay.
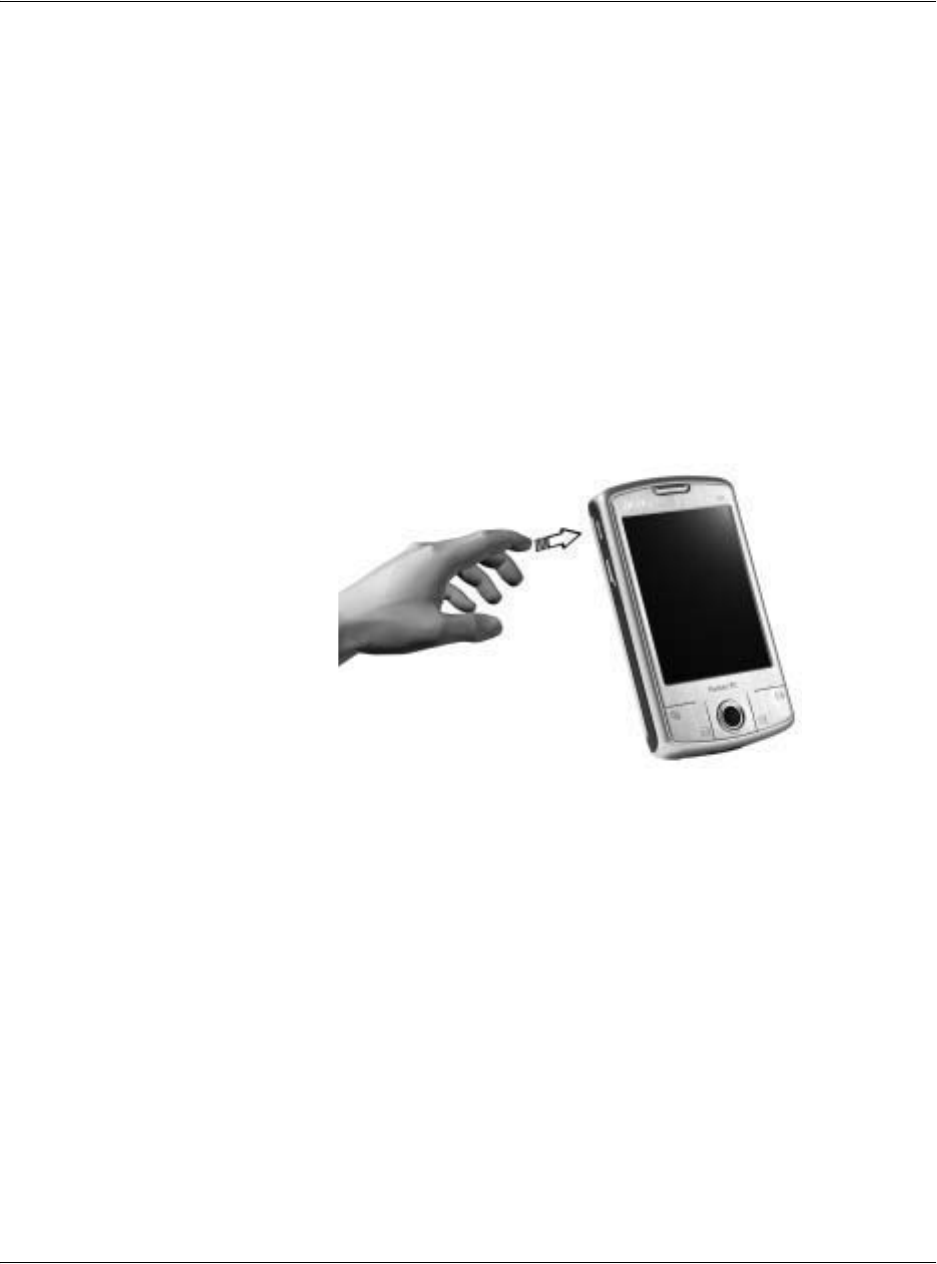
Connecting the Sync cable
1 Plug the sync cable into the 26-pin I/O connector on the bottom of your handheld.
2 Plug the AC adapter into any AC current outlet and charge the device for at least 4
hours.
Connecting the Cradle
1 Connect the AC adapter cord to the power socket at the back of the cradle.
2 Plug the AC adapter into any AC current outlet and charge the device for at least 4
hours.
Power LED status during charging:
• Charging - LED indicator flashes green
• Charging complete - LED indicator steady green
1 Getting started
Preparing to use your Acer n50
12
If the battery level becomes low in the course of normal use, a status icon appears on
the handheld screen indicating low or very low battery status. Perform an ActiveSync
operation to back up your data; then recharge the battery.
If your handheld shuts down (i.e., battery is competely drained out) you have about
72 hours (3 days) to recharge the battery before you lose all data on your handheld’s
internal memory.
Setting up your Acer n50
After you have initially charged your handheld for three hours, you can now set it up.
Refer to the instructions below.
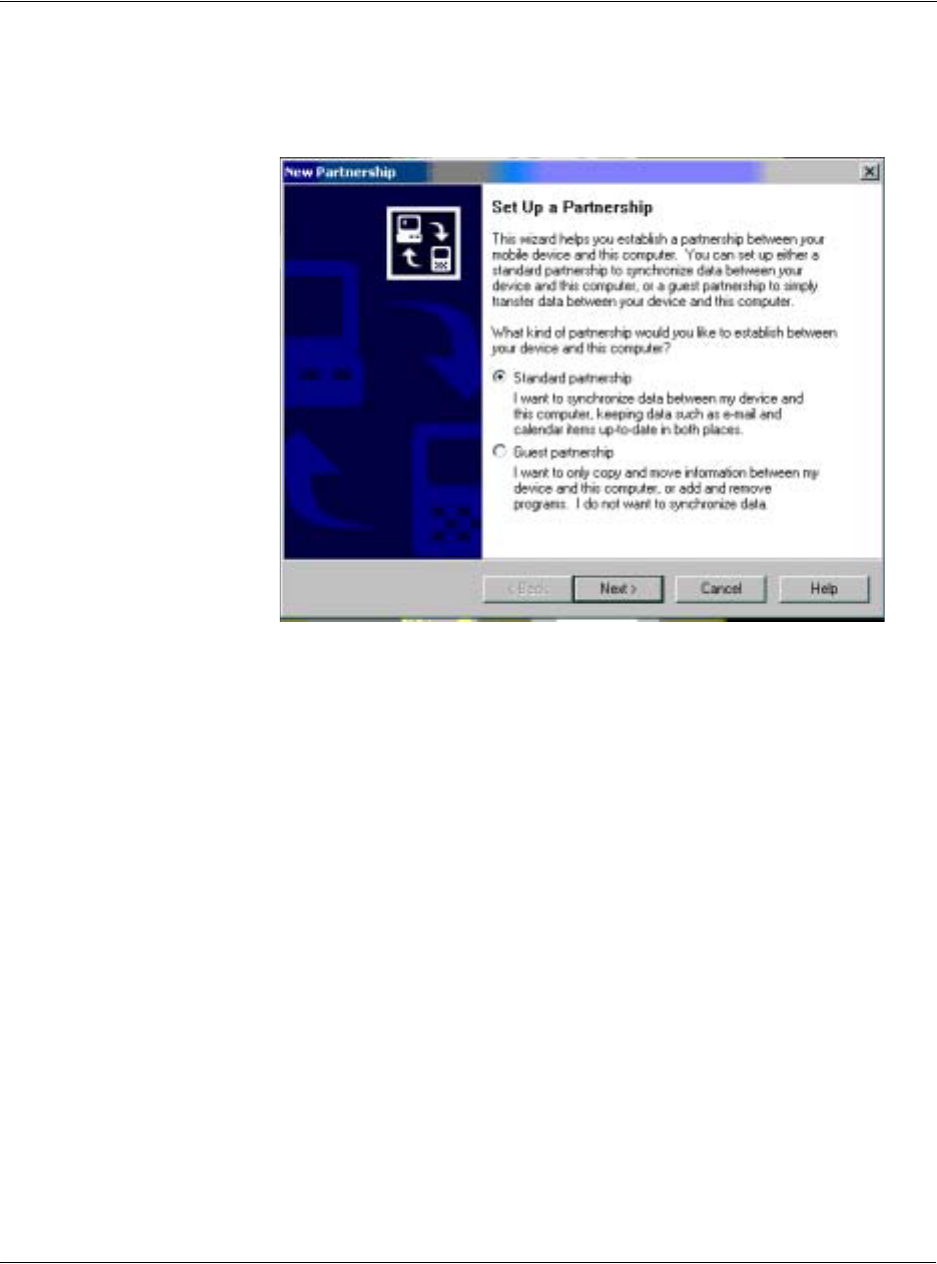
To set up your Acer n50
1 Turn on your handheld by pressing the power button on the left side.See "Left view"
on page 5, for the location of the power button.
2 Follow the onscreen instructions to set up your handheld.
1 Getting started
Preparing to use your Acer n50
13
Performing the first synchronisation process
After completing the setup procedures you can now perform the first ActiveSync
operation with the help of the 'New Partnership' setup wizard.
This wizard will help you:
• Set up a partnership so you can synchronise information between your
handheld and your computer
• Customise your synchronisation settings
To perform the first synchronisation process
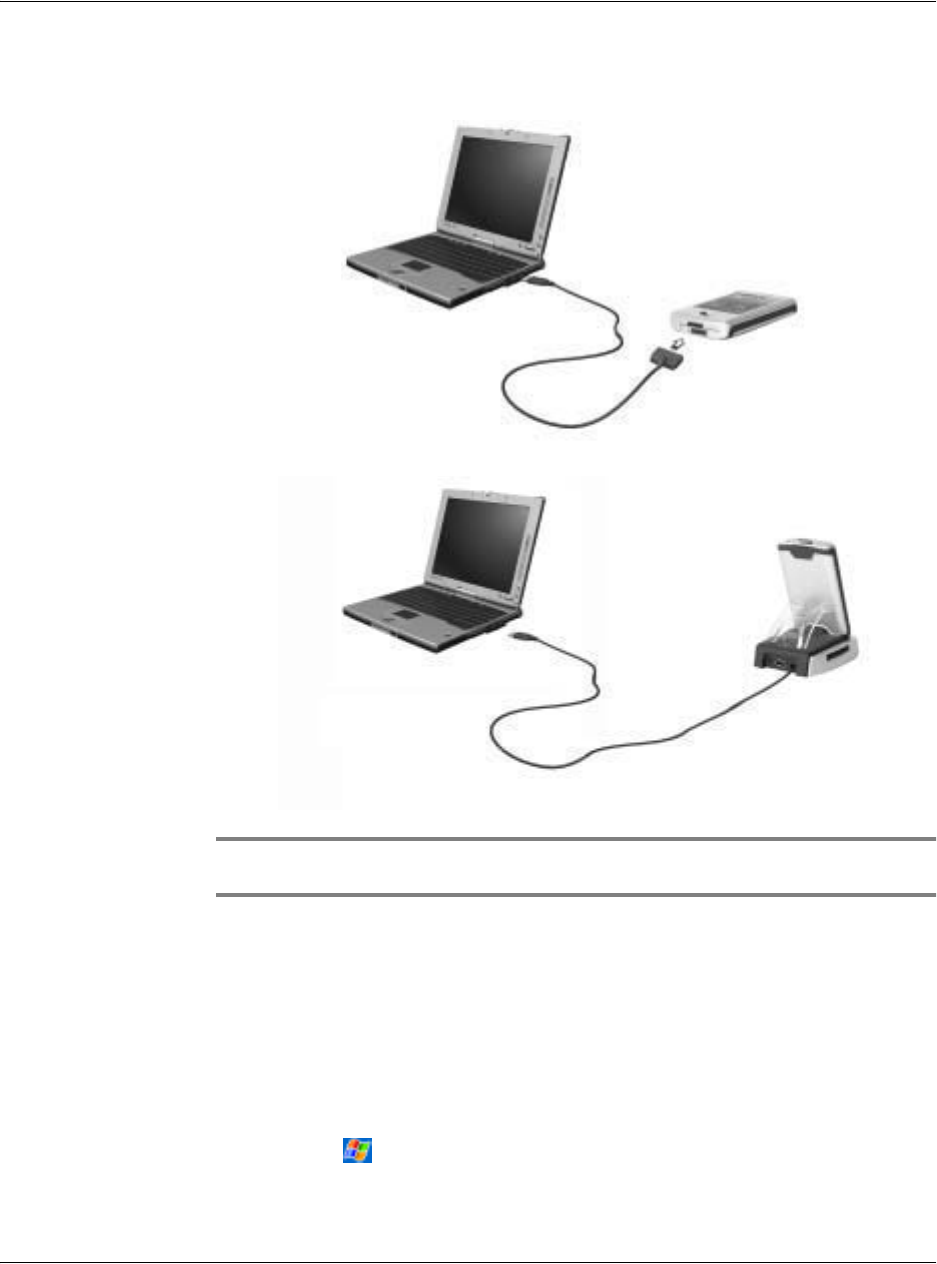
1 Connect the sync cable to your handheld.
1 Getting started
Preparing to use your Acer n50
14
2 Plug the USB client connector into a USB port on your computer.
The 'New Partnership' setup wizard will automatically start on your computer screen.
NOTE: If the wizard does not automatically appear, launch ActiveSync on your computer by
clicking on its icon from Start>Programs.
3 Follow the onscreen instructions.
The first synchronisation process will automatically begin when you finish using the
wizard.
After your first synchronisation, take a look at Calendar, Contacts, and Tasks on your
handheld. You'll notice that information you've stored in Microsoft Outlook on your
computer has been copied to your handheld, and you didn't have to type a word.
Disconnect your handheld from your computer and you're ready to go!
Once you have set up ActiveSync and completed the first synchronisation process, you
can initiate synchronisation from your handheld. To switch to ActiveSync on your
handheld, tap , and then tap ActiveSync.

1 Getting started
Command interface
15
Command interface
Handheld buttons and the stylus
Your handheld has hardware buttons that control actions and scroll functions, and a
stylus for selecting items and entering information.
On your handheld, the stylus replaces the mouse.
• Tap. Touch the screen once with the stylus to open items and select options.
• Drag. Hold the stylus on the screen and drag across the screen to select text
and images. Drag in a list to select multiple items.
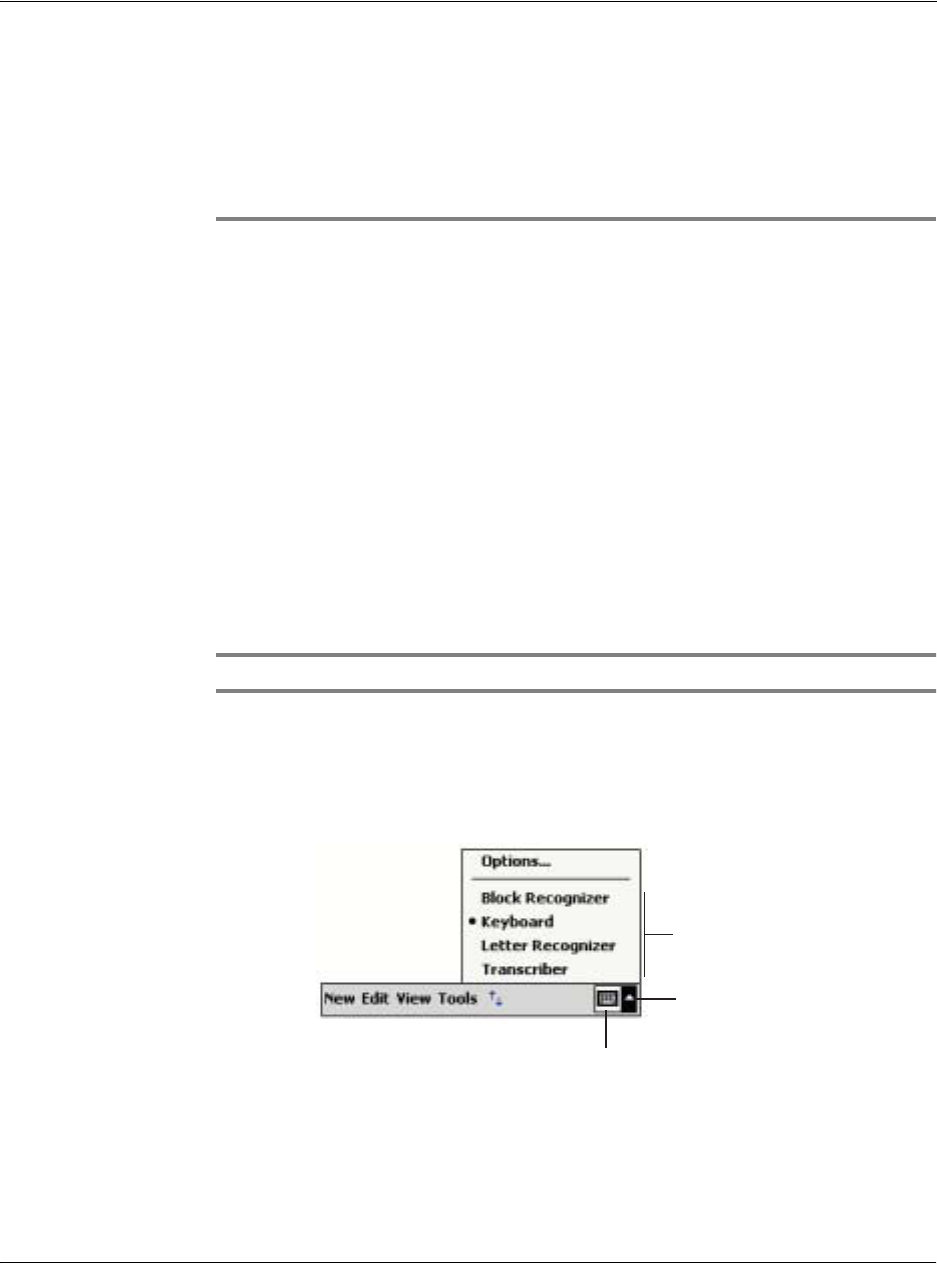
• Tap and hold. Tap and hold the stylus on an item to see a list of actions
available for that item. On the pop-up menu that appears, tap the action you
want to perform.
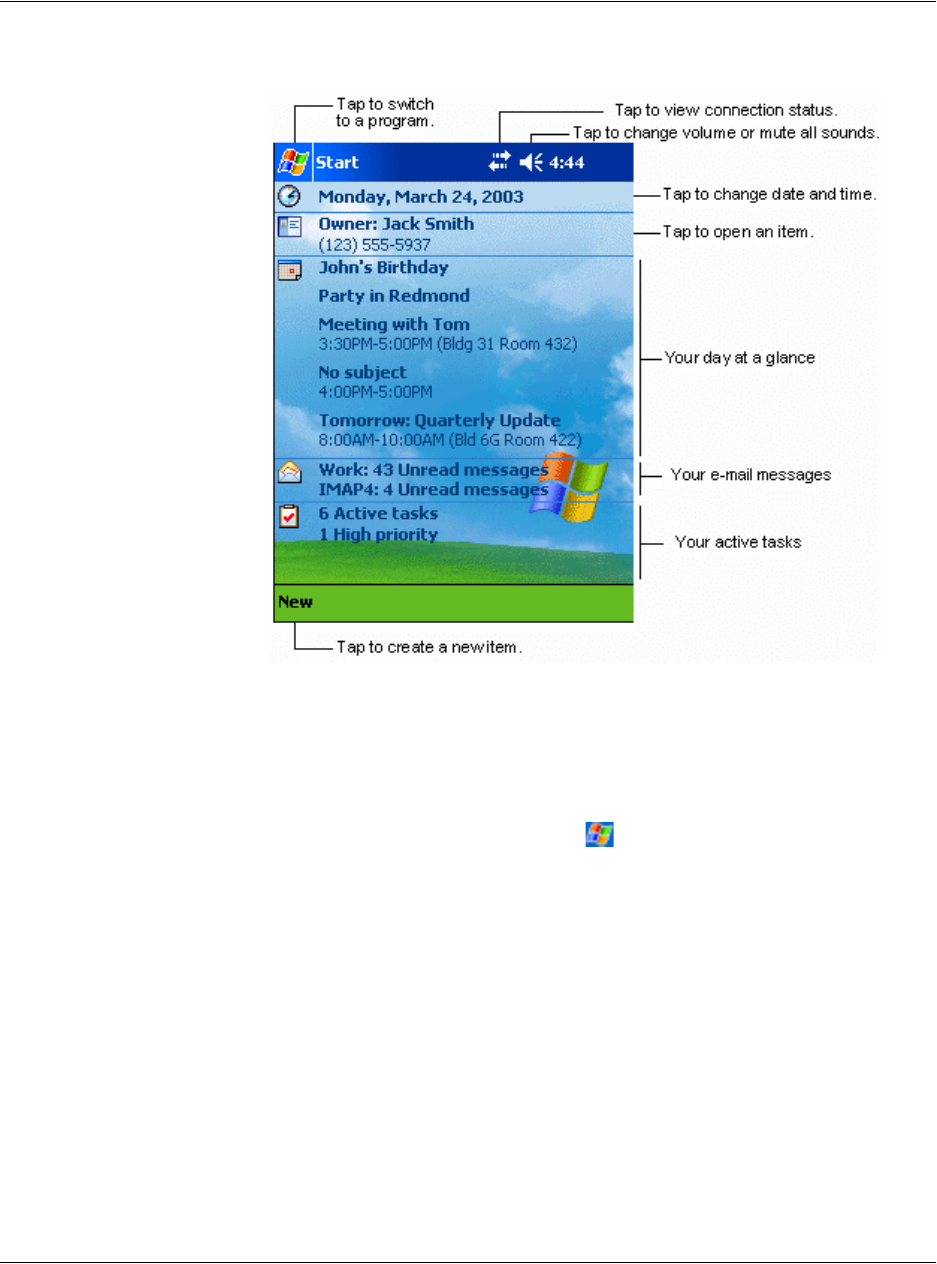
Today screen
The center of the Today screen provides, at a glance, information that you need for
the day. Tap an item to view or edit details.
At the top to the screen are status icons. Tap an icon to view details or change options.
These icons appear at the top of every screen on your handheld device, not just the
Today screen.
When you turn on your handheld device for the first time each day, or after hours of
inactivity, the Today screen is displayed.
You can also display it by tapping and then Today.
1 Getting started
Command interface
16
Start menu
From the Start menu, you can select programs, settings and Help topics. To display the
Start menu, from the top of any screen tap .
Command bar
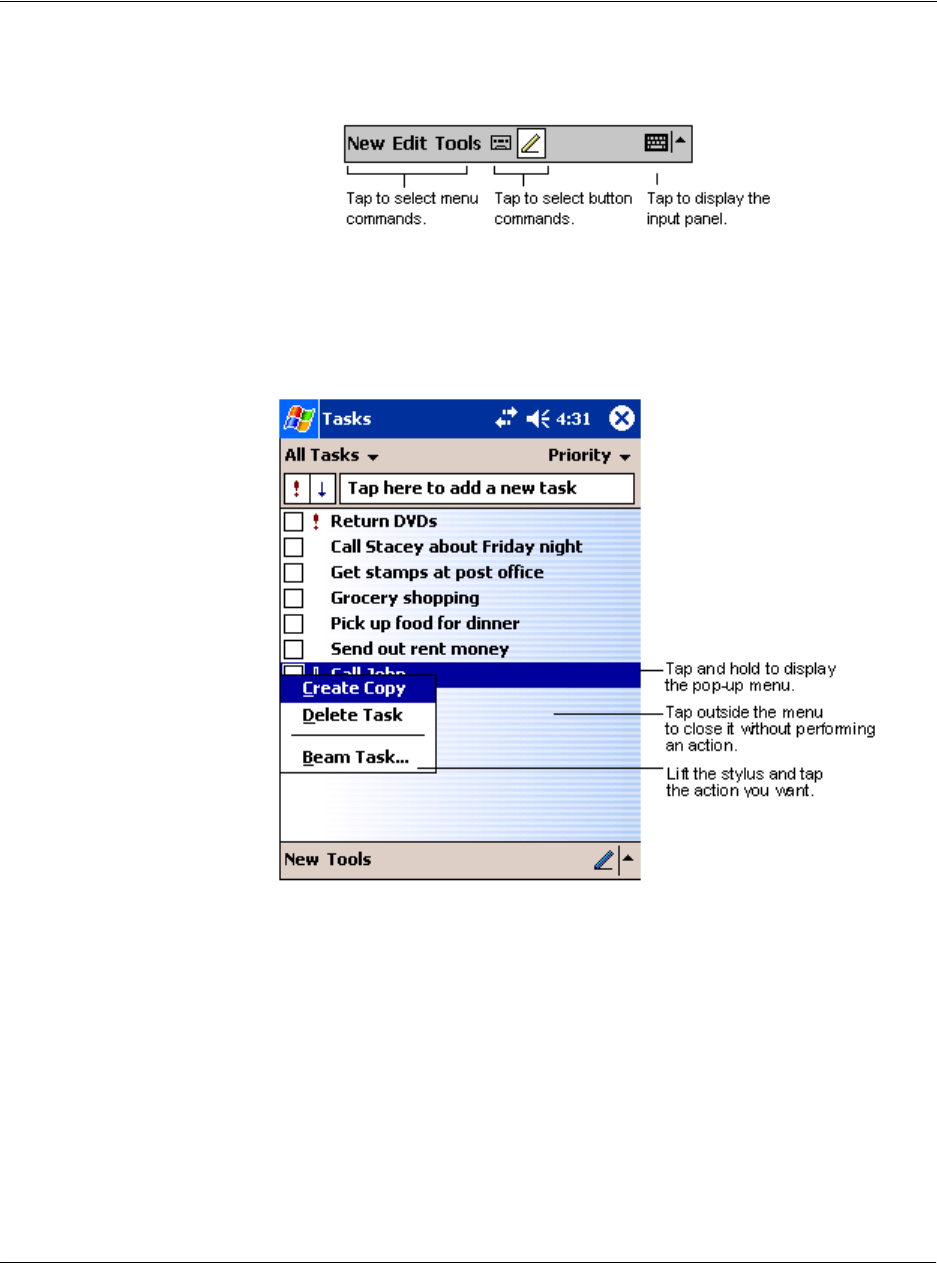
At the bottom of the screen is the command bar. You can use its menus and buttons to
perform tasks in programs. Depending upon which program you are using, the
buttons may vary from those depicted below.
• To create a new item in the current program, tap New.
1 Getting started
Command interface
17
• To see the name of a button, tap and hold the stylus on the button. Drag the
stylus off the button so that the command is not carried out.
Pop-up menus
You can use pop-up menus to quickly select an action for an item.

1 Getting started
Command interface
18
2 Entering data in your Acer n50
Using the input panel
19
2 Entering data in
your Acer n50
You can enter data into your handheld in several ways:
• Use the input panel to enter typed text, either by using the soft keyboard or
other input method.
• Write directly on the screen.
• Draw pictures on the screen.
• Speak into your handheld’s microphone to record a message.
• Use Microsoft® ActiveSync® to synchronise or copy information from your
computer to your handheld.
Refer to page 69 for detailed information on using Microsoft® ActiveSync®.
Using the input panel
Use the input panel to enter information in any program on your handheld. You can
either type using the soft keyboard or write using Letter Recognizer, Block Recognizer,
or Transcriber. In either case, the characters appear as typed text on the screen.
NOTE: Transcriber is available only for the English and European Acer n50 models.
To show or hide the input panel
1 Tap the Input Panel button.
2 Tap the arrow next to the Input Panel button to see your choices.
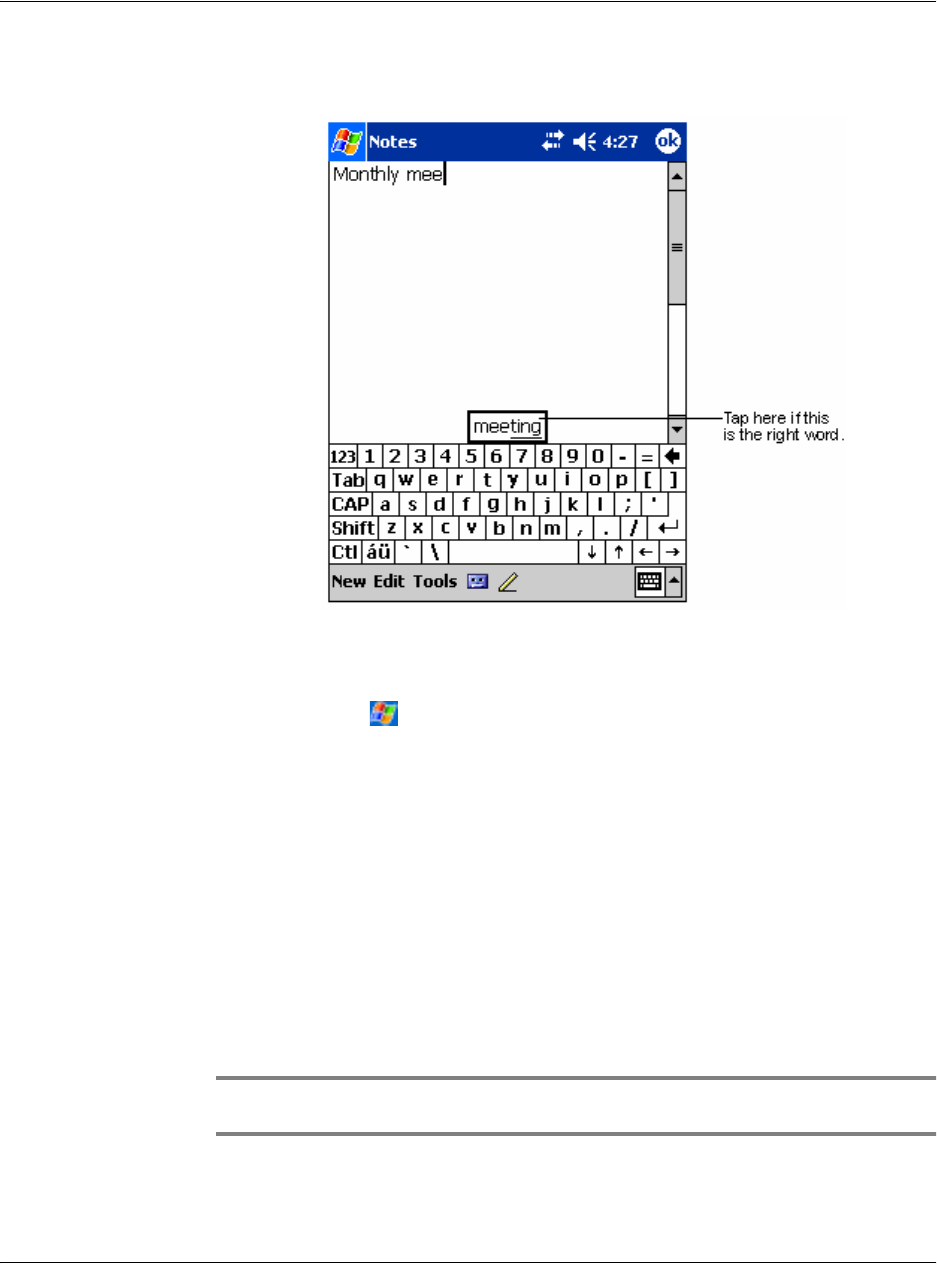
When you use the input panel, your handheld anticipates the word you are typing or
writing and displays it above the input panel. When you tap the displayed word, it is
Input Panel button.
Select an input method
.
Tap to see your choice
s.
2 Entering data in your Acer n50
Using the input panel
20
inserted into your text at the insertion point. The more you use your handheld, the
more words it learns to anticipate.
To change word suggestion options
• To set word suggestion options such as the number of words suggested at
one time, tap , Settings, Personal tab, Input, and then the Word
Completion tab.
To type with the soft keyboard
1 Tap the arrow next to the Input Panel button, then Keyboard.
2 On the soft keyboard that is displayed, tap the keys with your stylus.
To use Letter Recognizer
With Letter Recognizer you can write letters using the stylus just as you would on
paper.
1 Tap the arrow next to the Input Panel button, then Letter Recognizer.
2 Write a letter in the box.
When you write a letter, it is converted to typed text that appears on the screen.
NOTE: For specific instructions on using Letter Recognizer, with Letter Recognizer open, tap
the question mark next to the writing area.

2 Entering data in your Acer n50
Writing on the screen
21
To use Block Recognizer
With Block Recognizer you can input character strokes using the stylus that are similar
to those used on other devices.
1 Tap the arrow next to the Input Panel button, then Block Recognizer.
2 Write a letter in the box.
When you write a letter, it is converted to typed text that appears on the screen.
NOTE: For specific instructions on using Block Recognizer, with Block Recognizer open, tap
the question mark next to the writing area.
To use Transcriber
With Transcriber you can write anywhere on the screen using the stylus just as you
would on paper.
NOTE: Transcriber is available only for the English and European Acer n50 models.
Unlike Letter Recognizer and Block Recognizer, you can write a sentence or more of
information. Then, pause and let Transcriber change the written characters to typed
characters.
1 Tap the arrow next to the Input Panel button and then Transcriber.
2 Write anywhere on the screen.
NOTE: For specific instructions on using Transcriber, with the Transcriber Input Panel open,
tap the question mark in the lower right hand corner of the screen.
To select and edit typed text
If you want to edit or format typed text, you must select it first.
1 Drag the stylus across the text to select it.
2 To cut, copy, and paste typed text:
a Tap and hold the selected words
b Tapping an editing command on the pop-up menu, or tap a command on the Edit
menu.
Writing on the screen
In any program that accepts writing, such as the Notes program, and in the Notes tab
of Calendar, Contacts, and Tasks, you can use your stylus to write directly on the
screen. Write the way you do on paper. You can edit and format what you've written
and convert the information to text at a later time.
2 Entering data in your Acer n50
Writing on the screen
22
To write on the screen
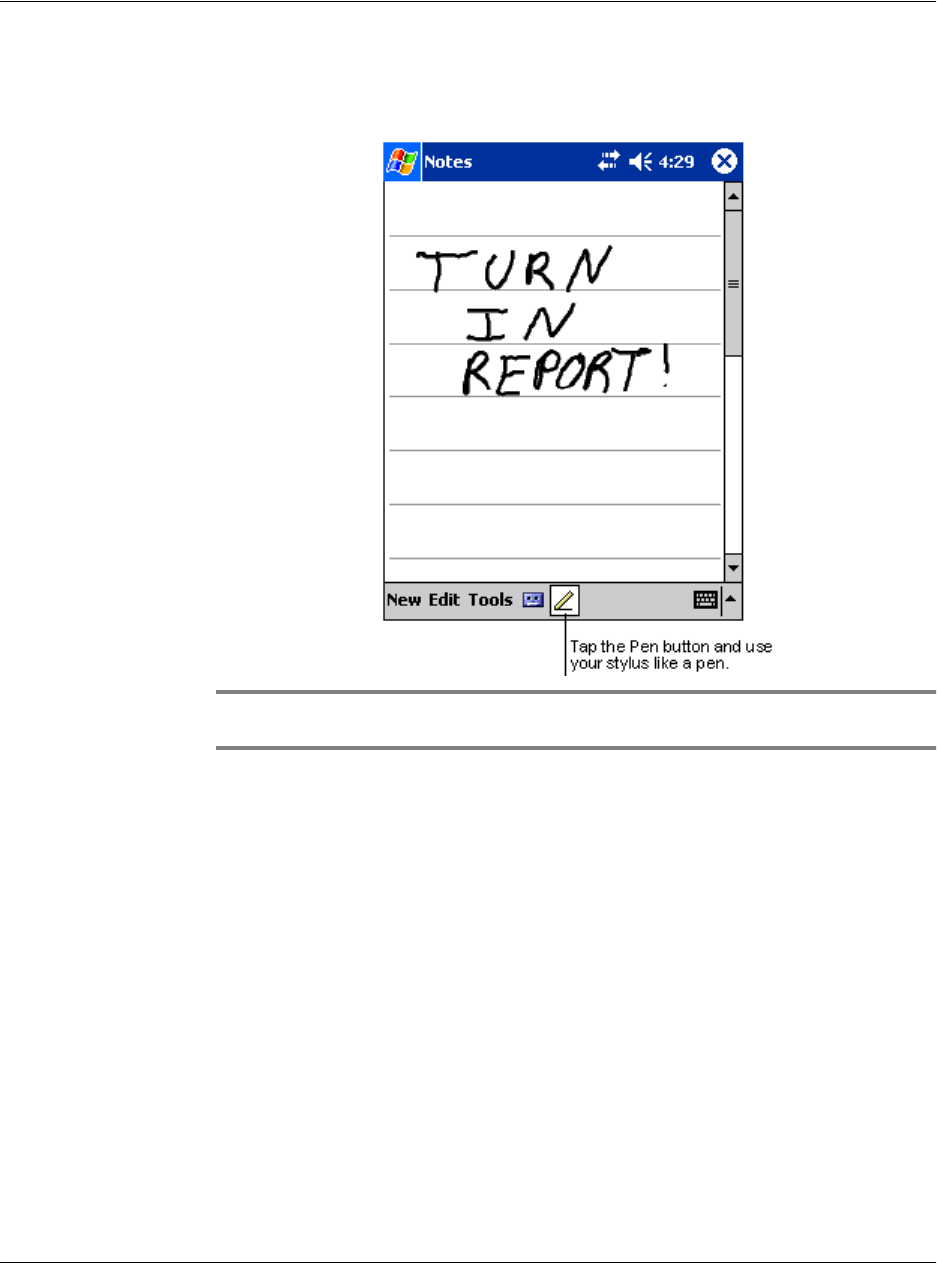
• Tap the Pen button to switch to writing mode. This action displays lines on
the screen to help you write.
NOTE: Some programs that accept writing may not have the Pen button. See the
documentation for that program to find out how to switch to writing mode.
To select and edit written text
If you want to edit or format written text, you must select it first.
1 Tap and hold the stylus next to the text you want to select until the insertion point
appears.
2 Without lifting, drag the stylus across the text you want to select.
If you accidentally write on the screen, tap Tools, then Undo and try again.
-or-
You can also select text by tapping the Pen button to deselect it and then dragging
the stylus across the screen.
3 You can cut, copy, and paste written text in the same way you work with typed text:
a Tap and hold the selected words
b Tapping an editing command on the pop-up menu, or tap a command on the Edit
menu.
2 Entering data in your Acer n50
Writing on the screen
23
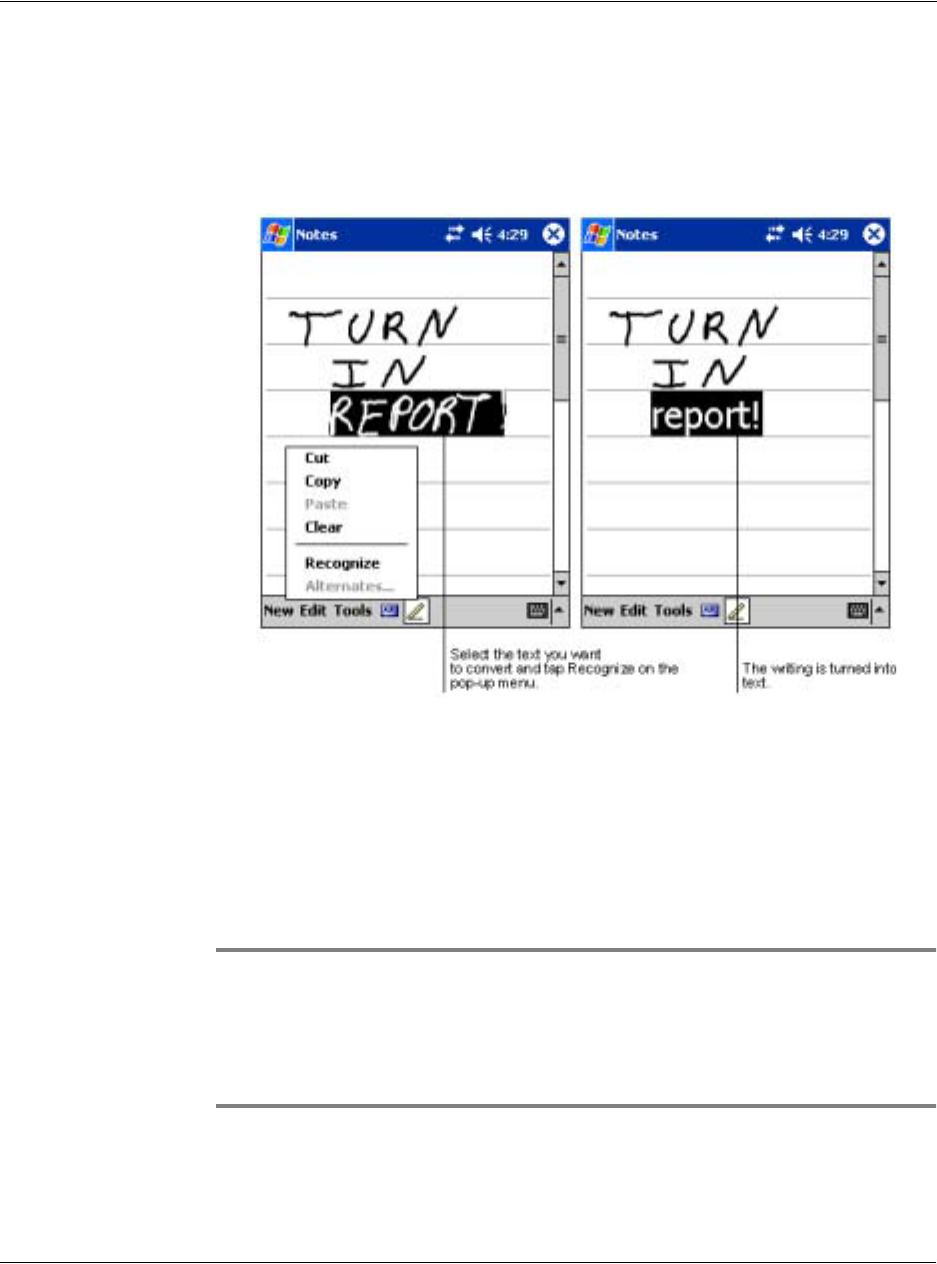
To convert writing to text
• Tap Tools and then Recognize.
If you want to convert only certain words, select them before tapping
Recognize on the Tools menu (or tap and hold the selected words and then
tap Recognize on the pop-up menu). If a word is not recognized, it is left as
writing.
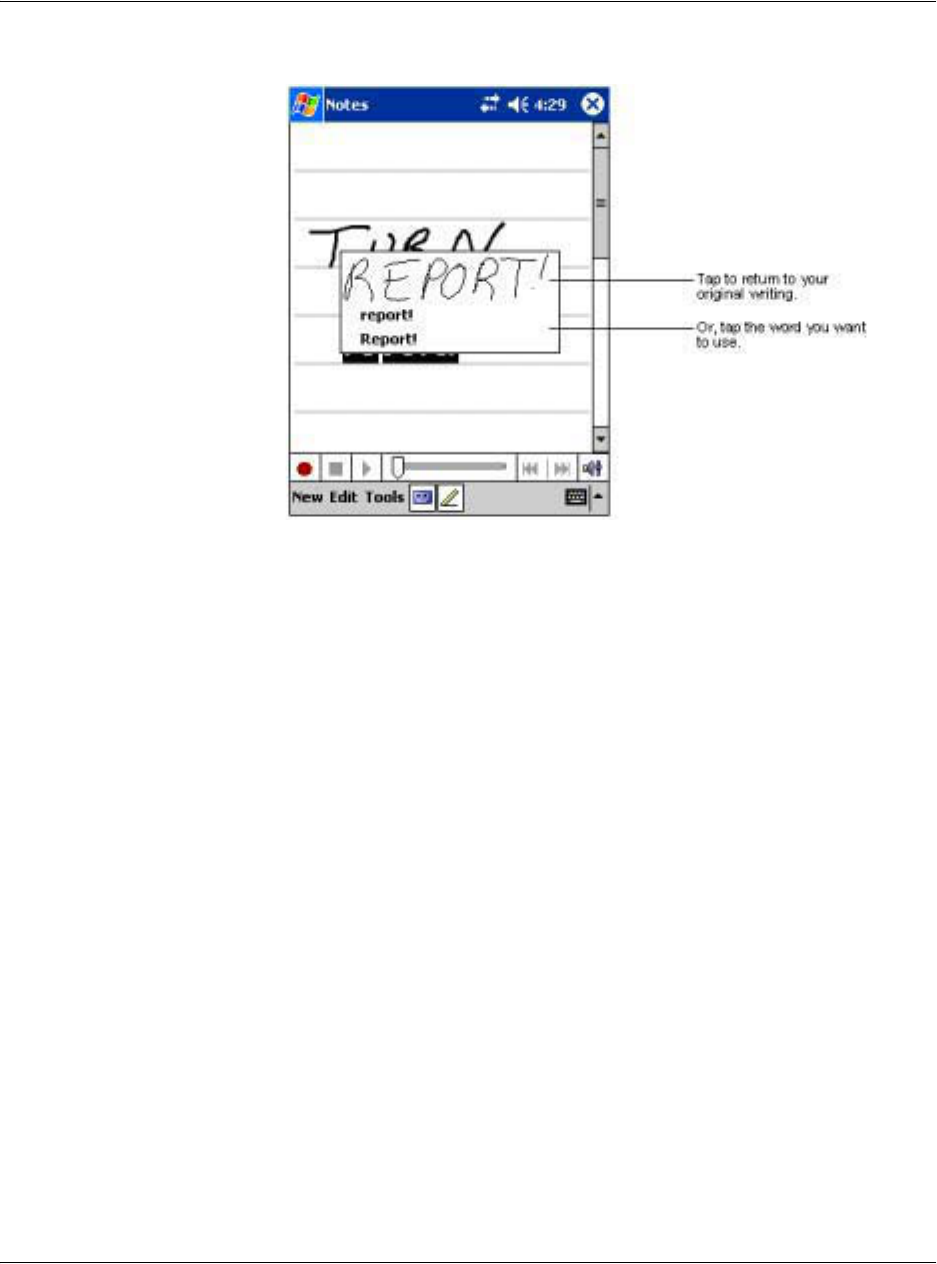
If the conversion is incorrect, you can select different words from a list of alternates or
return to the original writing. To do so:
1 Tap and hold the incorrect word (tap one word at a time).
2 On the pop-up menu, tap Alternates.
A menu with a list of alternate words appears.
3 Do either of the following:
a Tap the word you want to use.
b Tap the writing at the top of the menu to return to the original writing.
NOTE:
Hyphenated words, foreign words that use special characters such as accents, and some
punctuation cannot be converted.
If you add writing to a word to change it (such as changing a "3" to an "8") after you
attempt to recognise the word, the writing you add will not be included if you attempt to
recognise the writing again.
2 Entering data in your Acer n50
Drawing on the screen
24
.
Tips for getting good recognition
• Write neatly.
• Write on the lines. Write the cross of the "t" and apostrophes below the top
line so that they are not confused with the word above. Write periods and
commas above the line.
• For better recognition, try increasing the zoom level to 300% using the Tools
menu.
• Write the letters of a word closely and leave big gaps between words so that
your handheld can easily tell where words begin and end.
Drawing on the screen
You can draw on the screen in the same way that you write on the screen. The
difference between writing and drawing on the screen is how you select items and
how they can be edited. For example, selected drawings can be resized, while writing
cannot.
To create a drawing
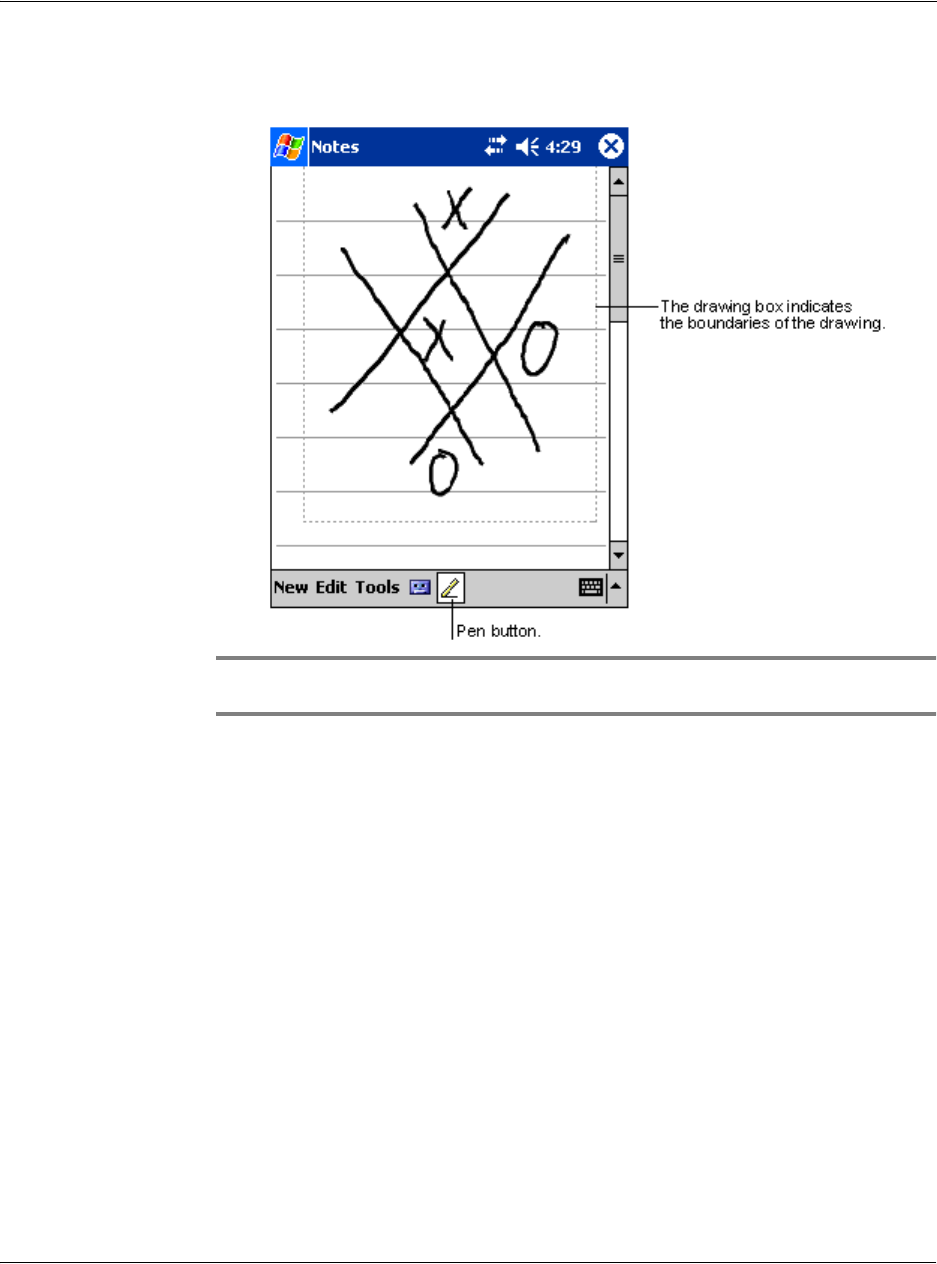
1 Cross three ruled lines on your first stroke.
A drawing box appears.
2 Entering data in your Acer n50
Drawing on the screen
25
2 Subsequent strokes in or touching the drawing box become part of the drawing.
Drawings that do not cross three ruled lines will be treated as writing.
TIP: You may want to change the zoom level so that you can more easily work on or view
your drawing. Tap Tools and then select a zoom level.
To select a drawing
If you want to edit or format a drawing, you must select it first.
• Tap and hold the stylus on the drawing until the selection handle appears.
• To select multiple drawings, deselect the Pen button and then drag to select
the drawings you want.
To edit a drawing
• To cut, copy, and paste selected drawings:
– Tap and hold the selected drawing.
– Tap an editing command on the pop-up menu, or tap a command on the
Edit menu.
• To resize a drawing:
– Make sure the Pen button is not selected.
– Drag a selection handle until required size is attained.
2 Entering data in your Acer n50
Recording a message
26
Recording a message
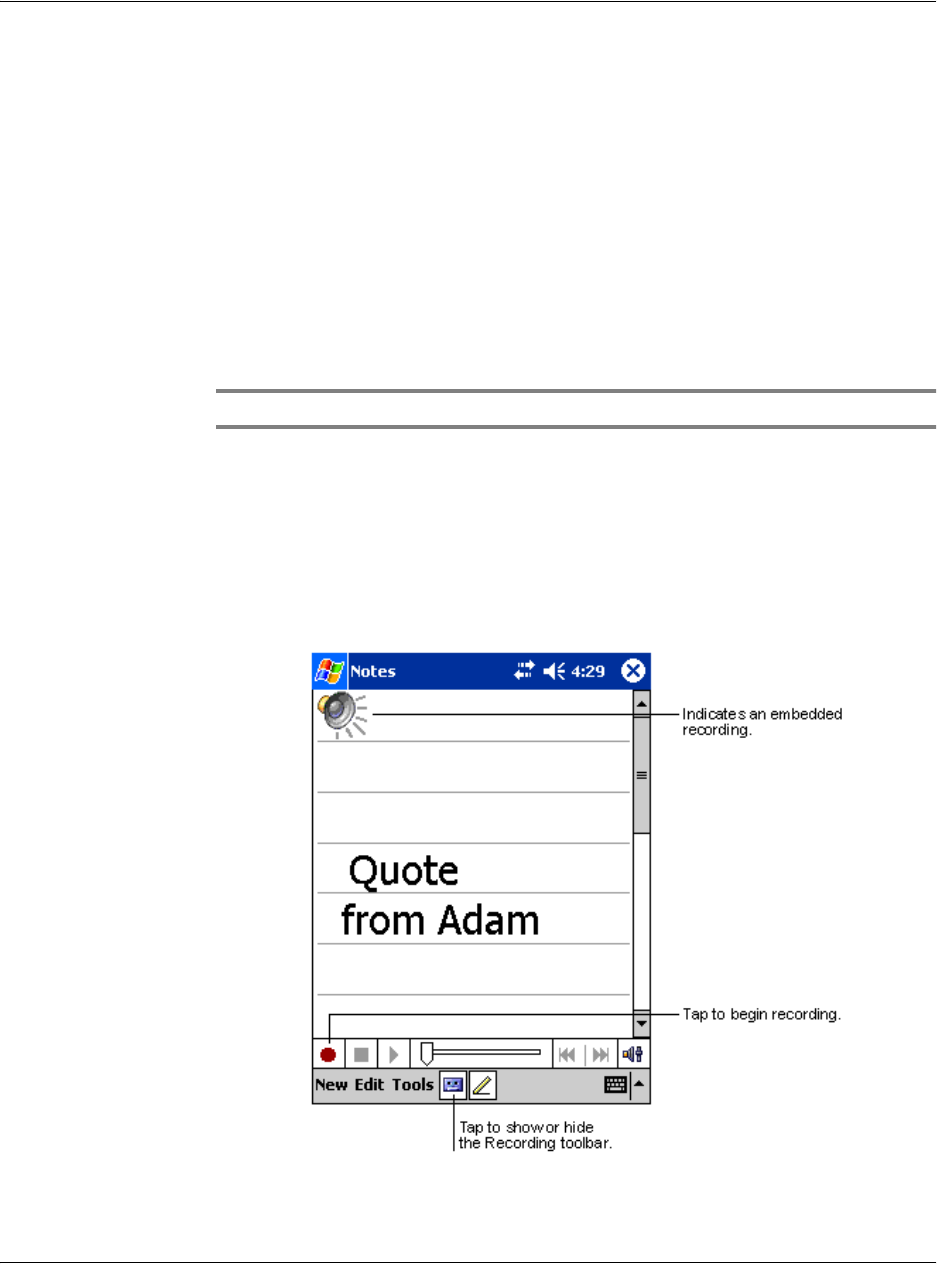
In any program where you can write or draw on the screen, you can also quickly
capture thoughts, reminders, and phone numbers by recording a message.
• In Calendar, Tasks, and Contacts, you can include a recording in the Notes
tab.
• In Notes, you can either create a stand-alone recording or include a recording
in a written note. If you want to include the recording in a note, open the
note first.
• In Inbox, you can add a recording to an email message.
To create a recording
1 Hold your handheld's microphone near your mouth or other source of sound.
NOTE: Refer to "Top view" on page 6 for the location of your handheld’s microphone.
2 Start recording by tapping the Record button on the Recording toolbar.
3 Make your recording.
4 To stop recording: Tap the Stop button on the Recording toolbar.
The new recording appears in the note list or as an embedded icon.
To play a recording
• Tap it in the list or tap its icon in the note.
2 Entering data in your Acer n50
Using My Text
27
Using My Text
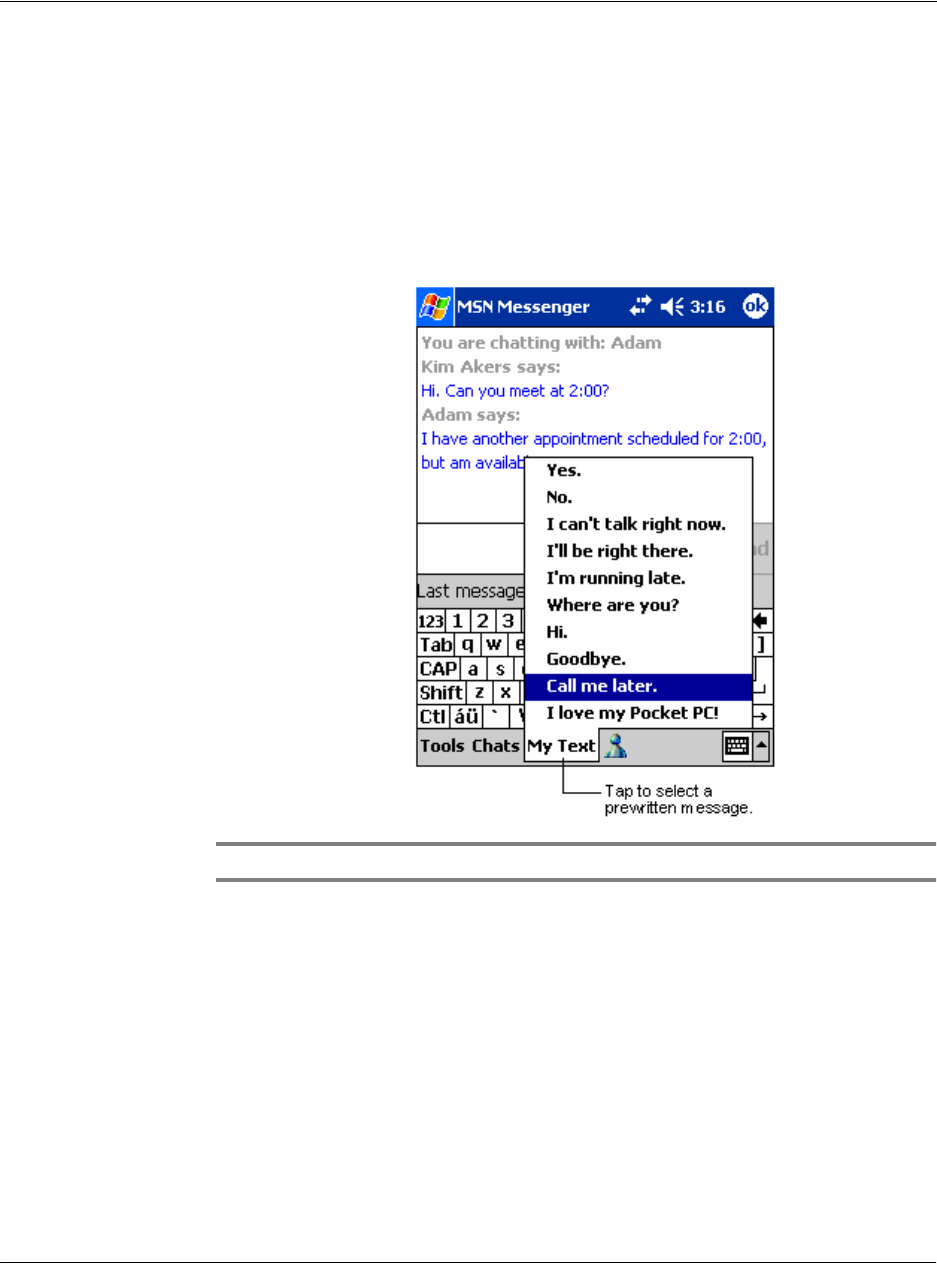
When using Inbox or MSN Messenger, use My Text to quickly insert preset or
frequently used messages into the text entry area.
To insert a My Text message
1 Tap My Text on the screen’s command bar.
2 Tap a message.
NOTE: You can add text after inserting a My Text message before sending it.
To edit a My Text message
1 In the Tools menu, tap Edit and then tap My Text Messages.
2 Select the message you wish to edit and make desired changes.

2 Entering data in your Acer n50
Using My Text
28

3 Managing applications and information
Opening an application
29
3Managing
applications and
information
This chapter will discuss the following topics:
• Opening and switching between applications in your handheld
• Using File Explorer to manage files
• Using the Find function to look for a specific file
Opening an application
You can open applications by doing either of the following:
• Tap , Programs, and then the program name.
If you have many applications installed on your handheld, tap the scroll bar
to see all the available applications.
• Press any of the Quick buttons on the front panel of your handheld.
The icons on the buttons identify the programs.
Switching between applications
Choose from the following options to switch between applications:
• Select another program from the menu.
• Press any of the Quick buttons on the front panel of your handheld.
NOTE: Some program names have been abbreviated in check boxes and drop-down menus.
To see the full spelling of an abbreviated label, tap and hold the stylus on the label. Drag the
stylus off the label so that the command is not carried out.
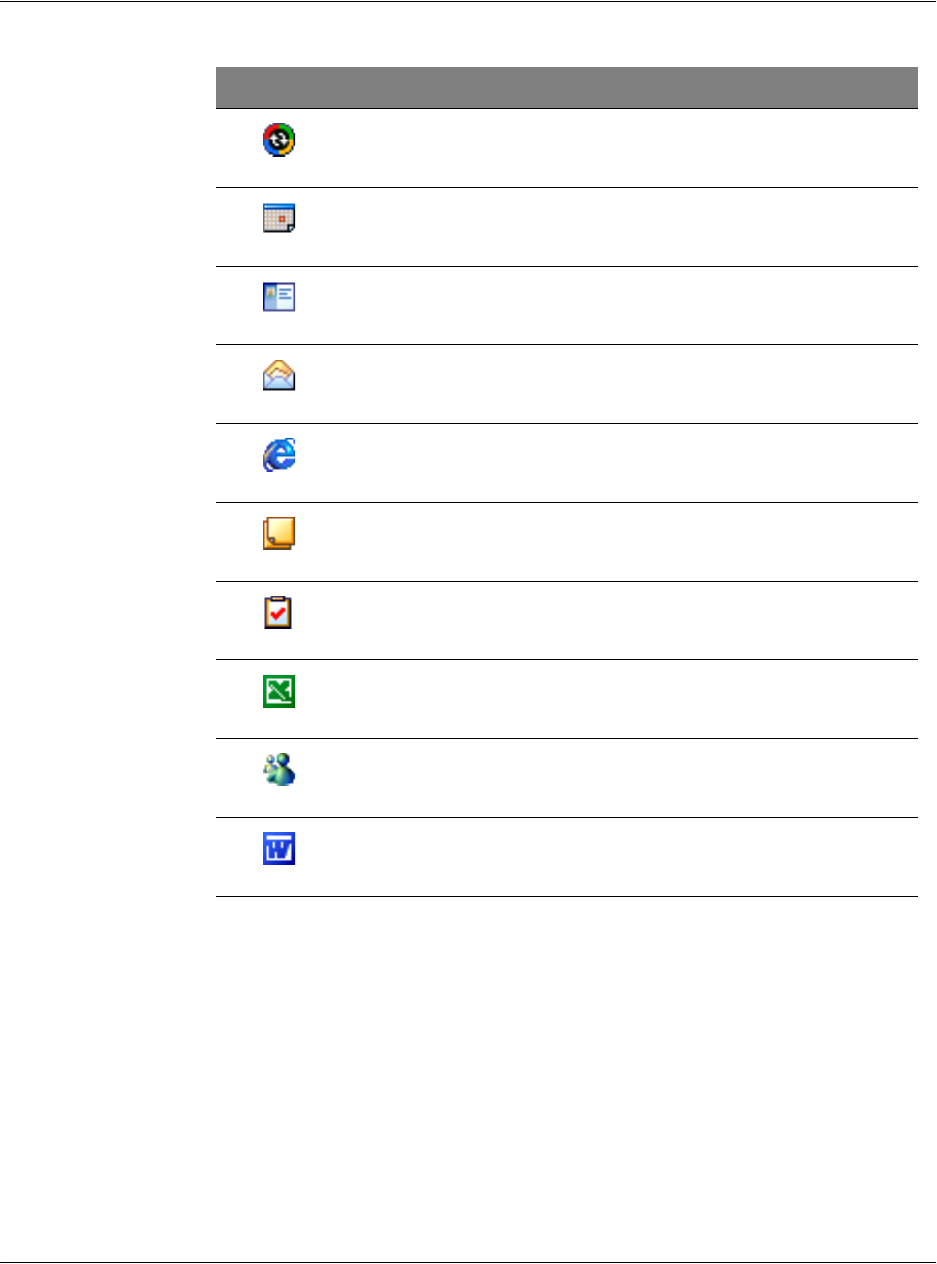
The following table contains a partial list of programs that are on available on your
handheld.
3 Managing applications and information
Switching between applications
30
Icon Program Usage
ActiveSync Synchronise information between your handheld and
computer.
Calendar Keep track of your appointments and create meeting
requests.
Contacts Keep track of your friends and colleagues.
Messaging Send and receive email messages.
Pocket Internet
Explorer
Browse Web and WAP sites, and download new
programs and files from the Internet.
Notes Create handwritten or typed notes, drawings, and
recordings.
Tasks Keep track of your tasks.
Pocket Excel Create new workbooks or view and edit Excel
workbooks created on your computer.
MSN Messenger Send and receive instant messages with your MSN
Messenger contacts.
Pocket Word Create new documents or view and edit Word
documents created on your computer.
3 Managing applications and information
Finding and organising information
31
Finding and organising information
Using the Find function and the File Explorer window will allow you to find and
manage your files easily.
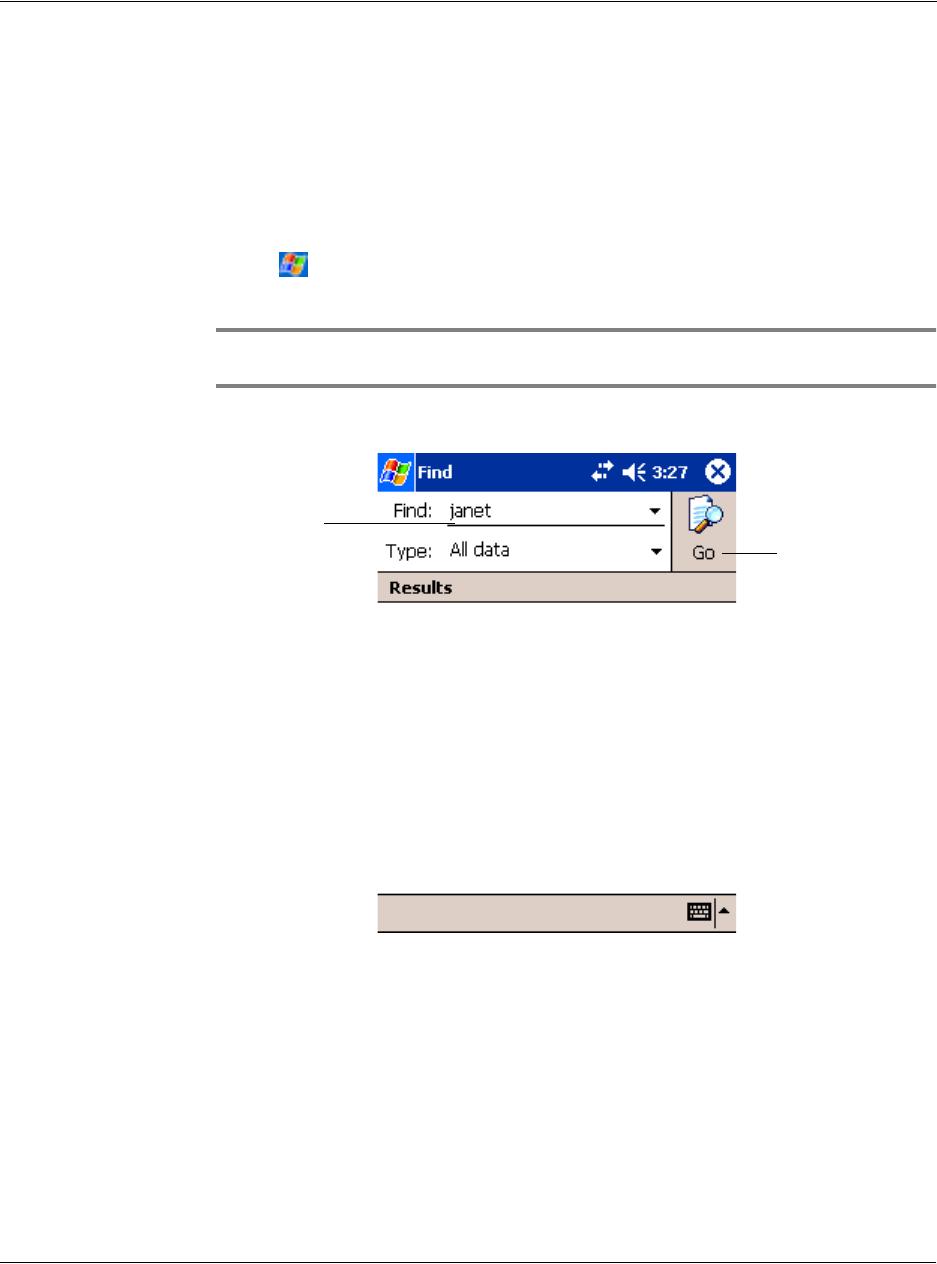
To use Find
The Find function on your handheld helps you quickly locate information.
1 On the menu, tap Find.
2 Enter the text you want to find, then select a data type.
TIP: To quickly find information that is taking up storage space on your handheld, select
Larger than 64 KB in Type.
3 Tap Go to start the search.
Tap here to
start search.
Type text you
want to find.
3 Managing applications and information
Finding and organising information
32
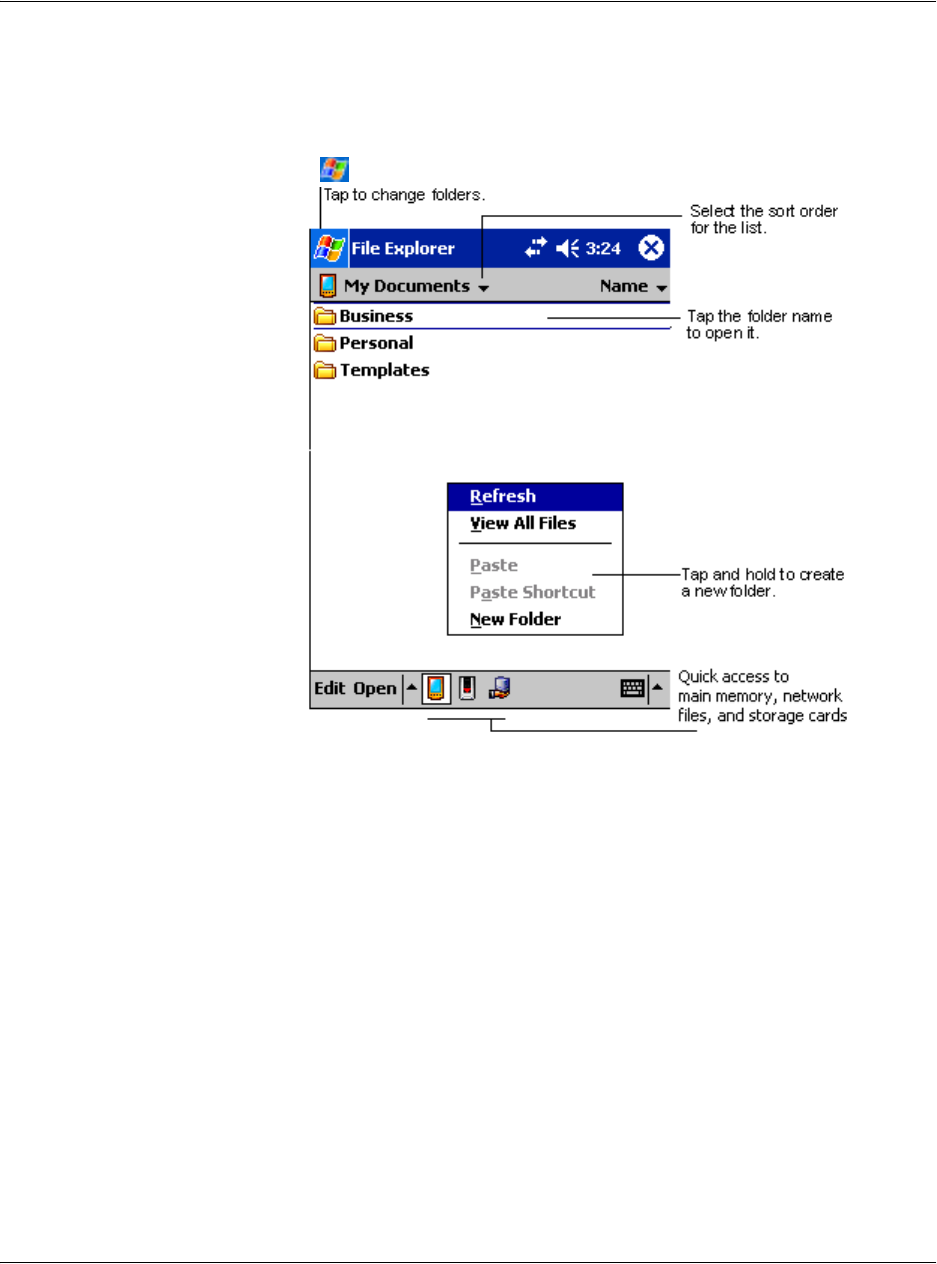
To use File Explorer
Use File Explorer to locate files on your handheld and to organise these files into
folders.
• On the menu, tap Programs, and then File Explorer.

4 Managing Microsoft® Pocket Outlook applications
Calendar
33
4Managing Microsoft®
Pocket Outlook
applications
This chapter will discuss the basic applications included in the Microsoft® Pocket
Outlook program installed in your handheld. This discussion will include:
• Calendar - schedule meetings and remind yourself of set appointments
• Contacts - keep at hand a directory of contact information
• Tasks - make a to-do list
• Notes - create textual or recorded notes of your thoughts and ideas
• Messaging - write, edit, and view your emails on the road
You can use these programs individually or together. For example, email addresses
stored in Contacts can be used to address e-mail messages in Inbox.
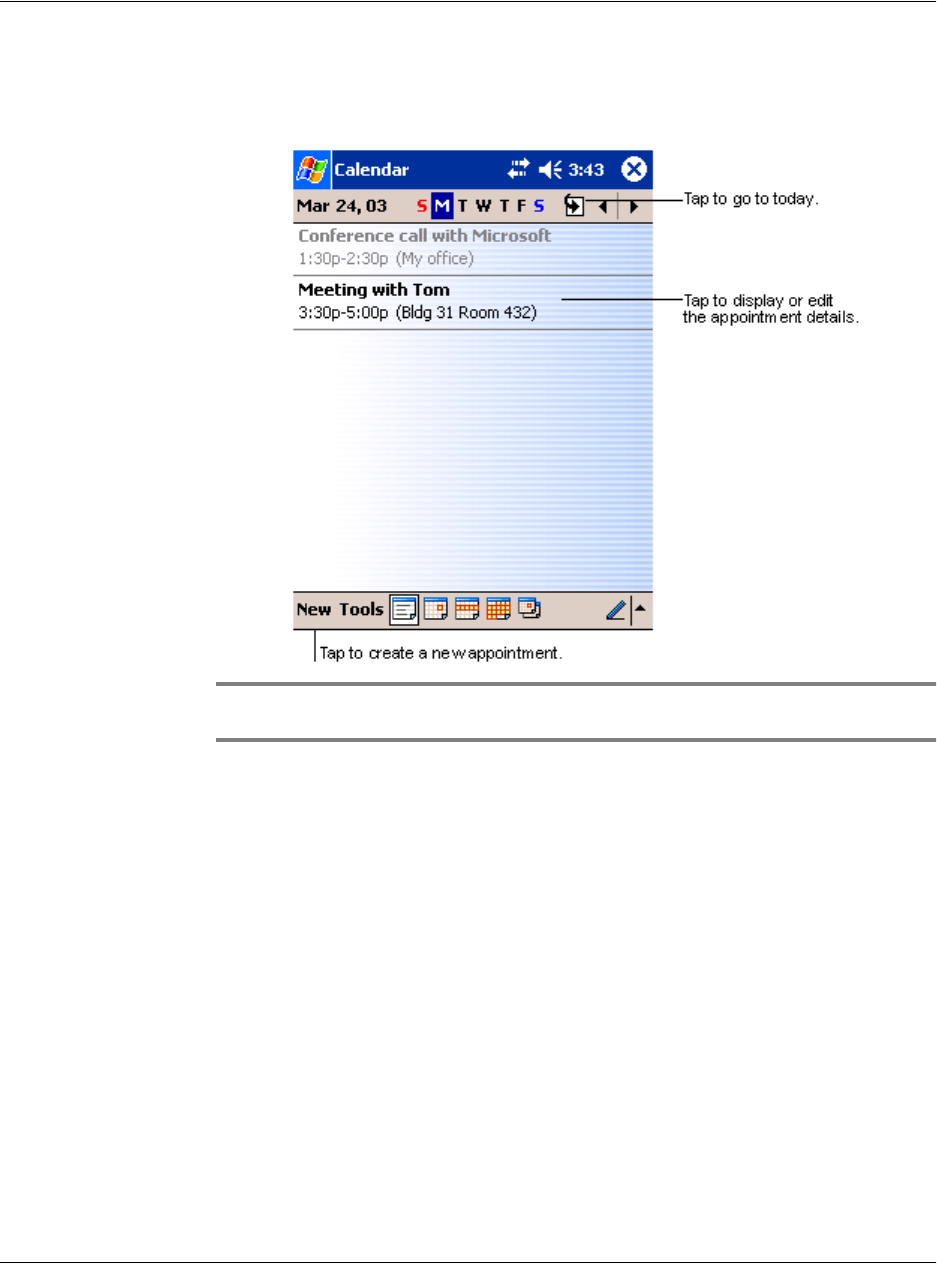
Calendar
Calendar enables you to conveniently manage your schedules and appointments or
any other activities associated with a time and date. You can schedule appointments,
including meetings and other events. Checking your appointments is easy using one
of several views—Agenda, Day, Week, Month, and Year.
NOTE: Switch view options by using the View menu.
4 Managing Microsoft® Pocket Outlook applications
Calendar
34
To open Calendar
• Press the Calendar Quick button on the front panel of your handheld.
Calendar will open to today’s schedule.
NOTE: You can customise the Calendar display, such as changing the first day of the week,
by tapping Options on the Tools menu.
4 Managing Microsoft® Pocket Outlook applications
Calendar
35
Scheduling an appointment
You can use Calendar to create or review appointments.
To create an appointment
1 If you are in Day or Week view, tap the desired date and time for the appointment.
2 Tap New.
3 Using the input panel, enter a description and a location.
Tap first to select the field.
4 If needed, tap the date and time to change them.
5 Enter other desired information.
You will need to hide the input panel to see all available fields.
6 To add notes, tap the Notes tab. You can enter text, draw, or create a recording. For
more information on creating notes, see "Notes" later in this chapter.
7 After entering the desired information, tap OK.
TIP: If you select Remind me in an appointment, your handheld will remind you according
to the options set in , Settings, Personal tab, Sounds & Reminders.
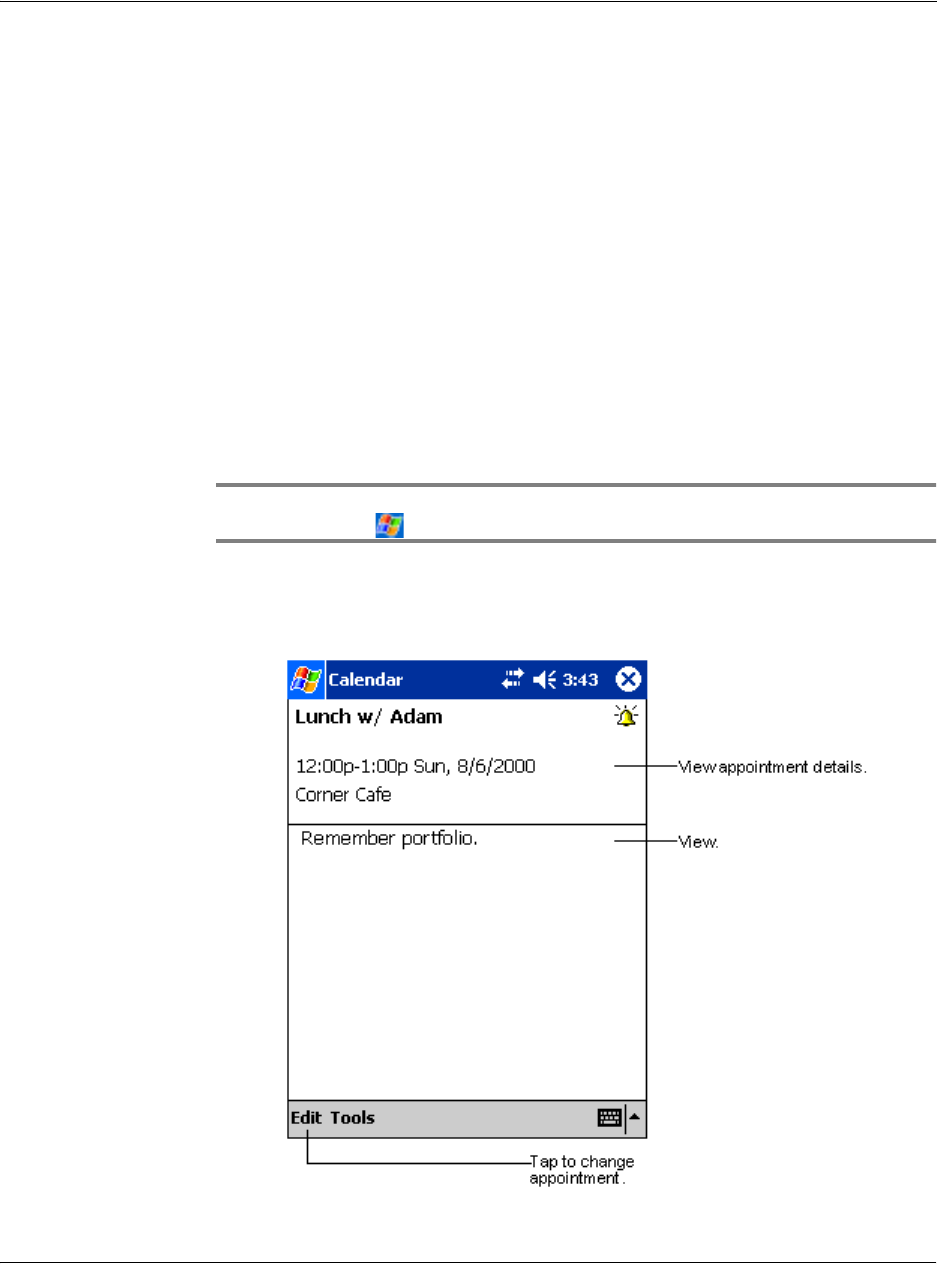
Using the Calendar summary screen
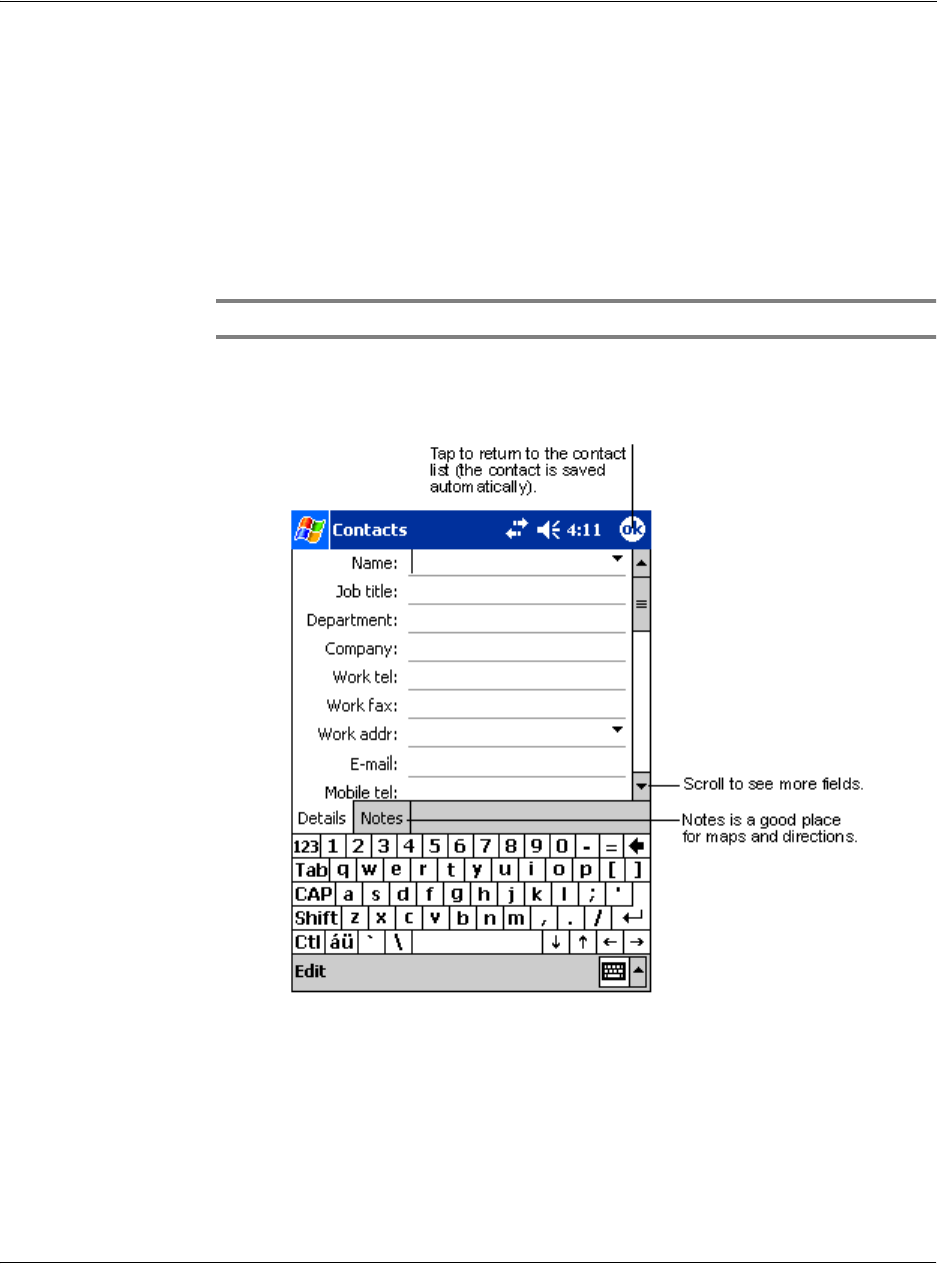
When you tap an appointment in Calendar, a summary screen is displayed. To change
the appointment, tap Edit.

4 Managing Microsoft® Pocket Outlook applications
Calendar
36
Creating a meeting request
You can use Calendar to set up meetings with users of Outlook or Pocket Outlook. The
meeting request will be created automatically and sent either when you synchronise
Inbox or when you connect to your email server. Indicate how you want meeting
requests sent by tapping Tools and then Options. If you send and receive email
messages through ActiveSync, select ActiveSync.
To schedule a meeting
1 Create an appointment.
2 In the appointment details, hide the input panel, and then tap Attendees.
3 From the list of email addresses you've entered in Contacts, select the meeting
attendees.
The meeting notice is created automatically and placed in the Outbox folder.
For more information on sending and receiving meeting requests, see the Help menu
of Calendar and Inbox in your handheld.
4 Managing Microsoft® Pocket Outlook applications
Contacts
37
Contacts
Contacts maintains a list of your friends’ and colleagues’ contact information. Using
your handheld’s infrared (IR) port or Bluetooth®, you can quickly share some or all of
this information with other device users.
To open Contacts
• Press the Contacts Quick button on the front panel of your handheld.
Contacts will open to the Contacts list.
NOTE: To change the way information is displayed in the list, tap Tools and then Options.
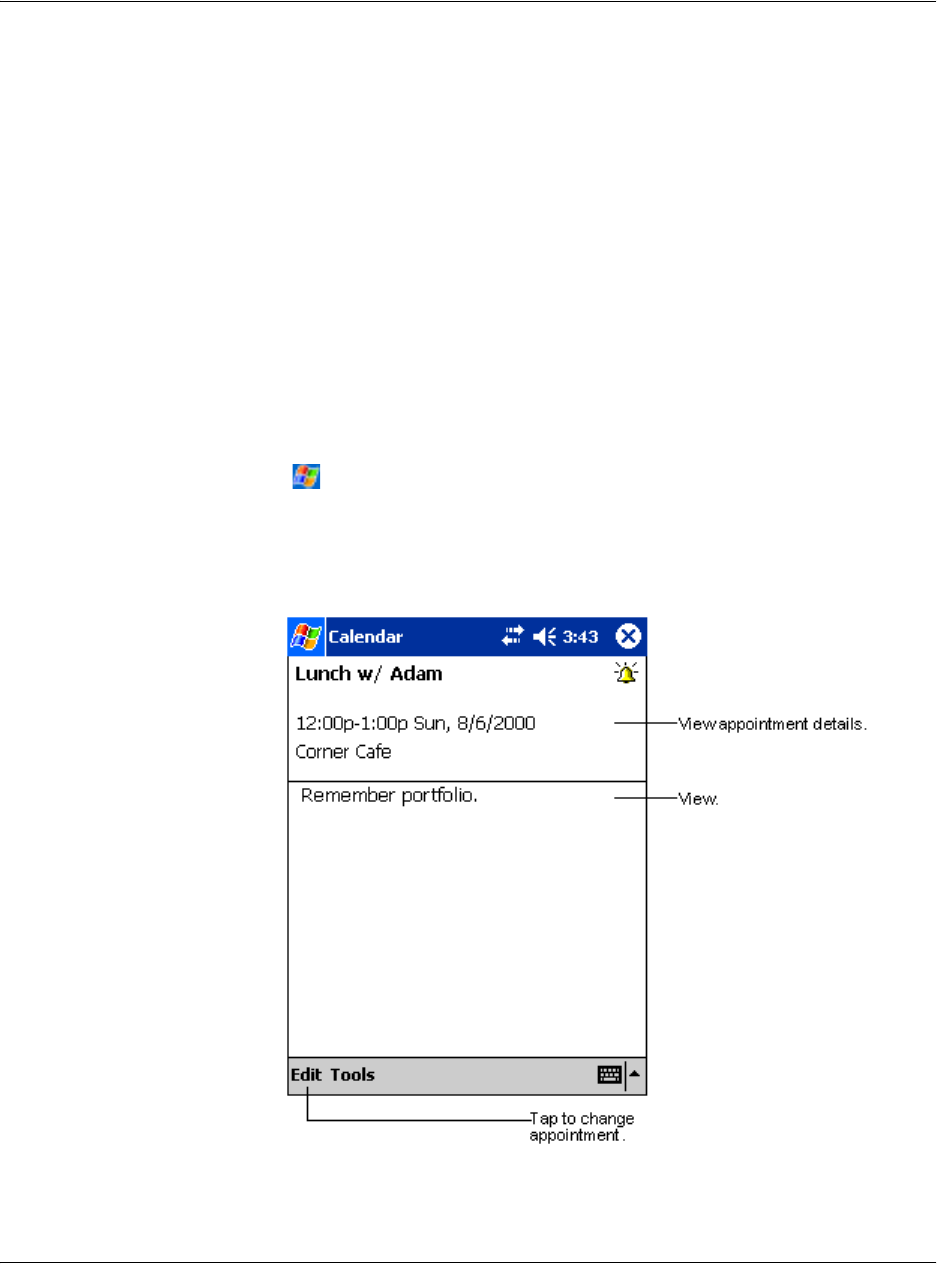
Creating a contact
1 Tap New.
2 Using the input panel, enter a name and other contact information.
You will need to scroll down to see all available fields.
3 To assign the contact to a category, scroll to and tap Categories and select a category
from the list.
In the contact list, you can display contacts by category.
4 To add notes, tap the Notes tab. You can enter text, draw, or create a recording. For
more information on creating notes, see "Notes," later in this chapter.
4 Managing Microsoft® Pocket Outlook applications
Contacts
38
5 After entering the desired information, tap OK to return to the Contact list.
Finding a contact
There are four ways to find a contact:
• In the Contact list, enter a contact name in the box under the navigation bar.
To show all contacts again, clear text from the box or tap the button to the
right of the box.
• In the Contact list, tap the category list (labeled All Contacts by default) and
select the type of contact that you want displayed.
To show all contacts again, select All Contacts.
To view a contact not assigned to a category, select None.
• To view the names of companies your contacts work for, in the contact list,
tap View > By Company.
The number of contacts that work for that company will be displayed to the
right of the company name.
• Tap , Find, enter the contact name, select Contacts for the type, and then
tap Go.
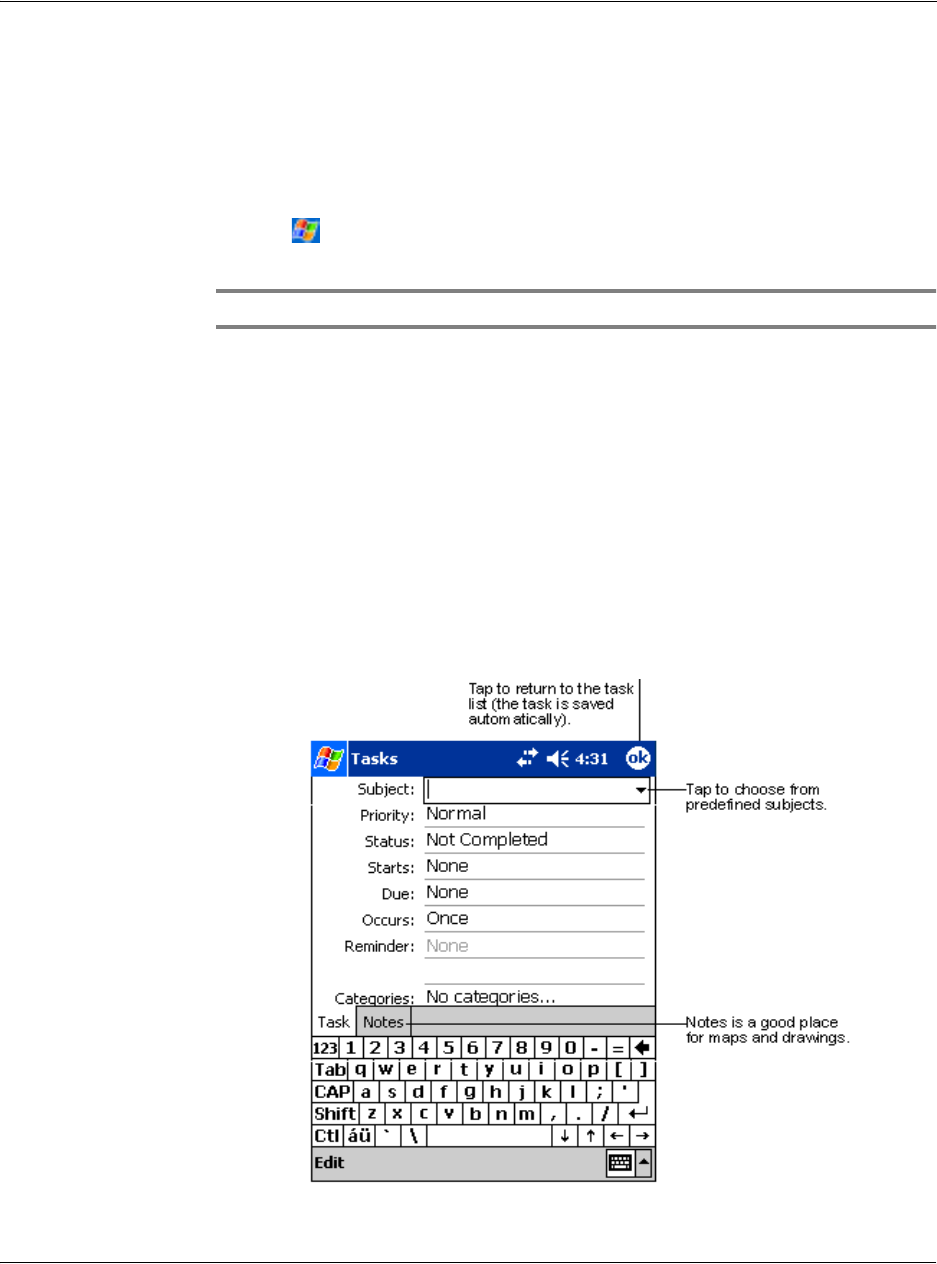
Using the Contacts summary screen
When you tap a contact in the Contact list, a summary screen is displayed. To change
the contact information, tap Edit.
4 Managing Microsoft® Pocket Outlook applications
Tasks
39
Tasks
Use Tasks to keep track of what you have to do and prioritise them based on their
importance and urgency.
To open Tasks
• Tap then, Tasks.
Tasks will open to the Tasks list.
NOTE: To change the way information is displayed in the list, tap Tools and then Options.
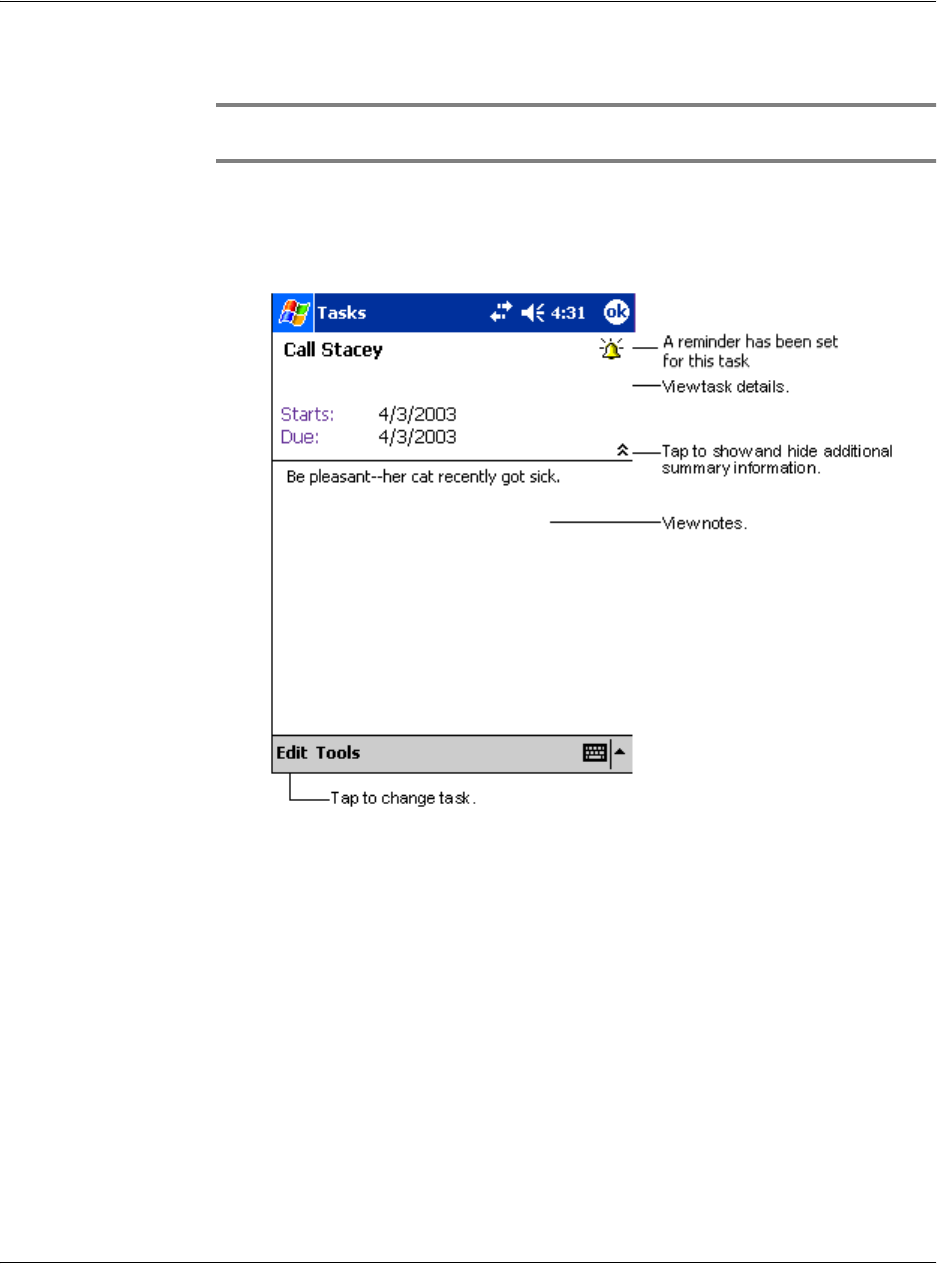
Creating a task
1 Tap New.
2 Using the input panel, enter a description.
3 You can enter a start date and due date or enter other information by first tapping
the field.
If the input panel is open, you will need to hide it to see all available fields.
4 To assign the task to a category, tap Categories and select a category from the list.
In the task list, you can display tasks by category.
5 To add notes, tap the Notes tab.
You can enter text, draw, or create a recording. For more information on creating
notes, see "Notes" later in this chapter.
4 Managing Microsoft® Pocket Outlook applications
Tasks
40
6 After entering the desired information, tap OK to return to the task list.
TIP: To quickly create a task with only a subject, tap Entry Bar on the Tools menu. Then, tap
Tap Here to add a new task and enter your task information.
Using the summary screen
When you tap a task in the task list, a summary screen is displayed. To change the task,
tap Edit.
.
4 Managing Microsoft® Pocket Outlook applications
Notes
41
Notes
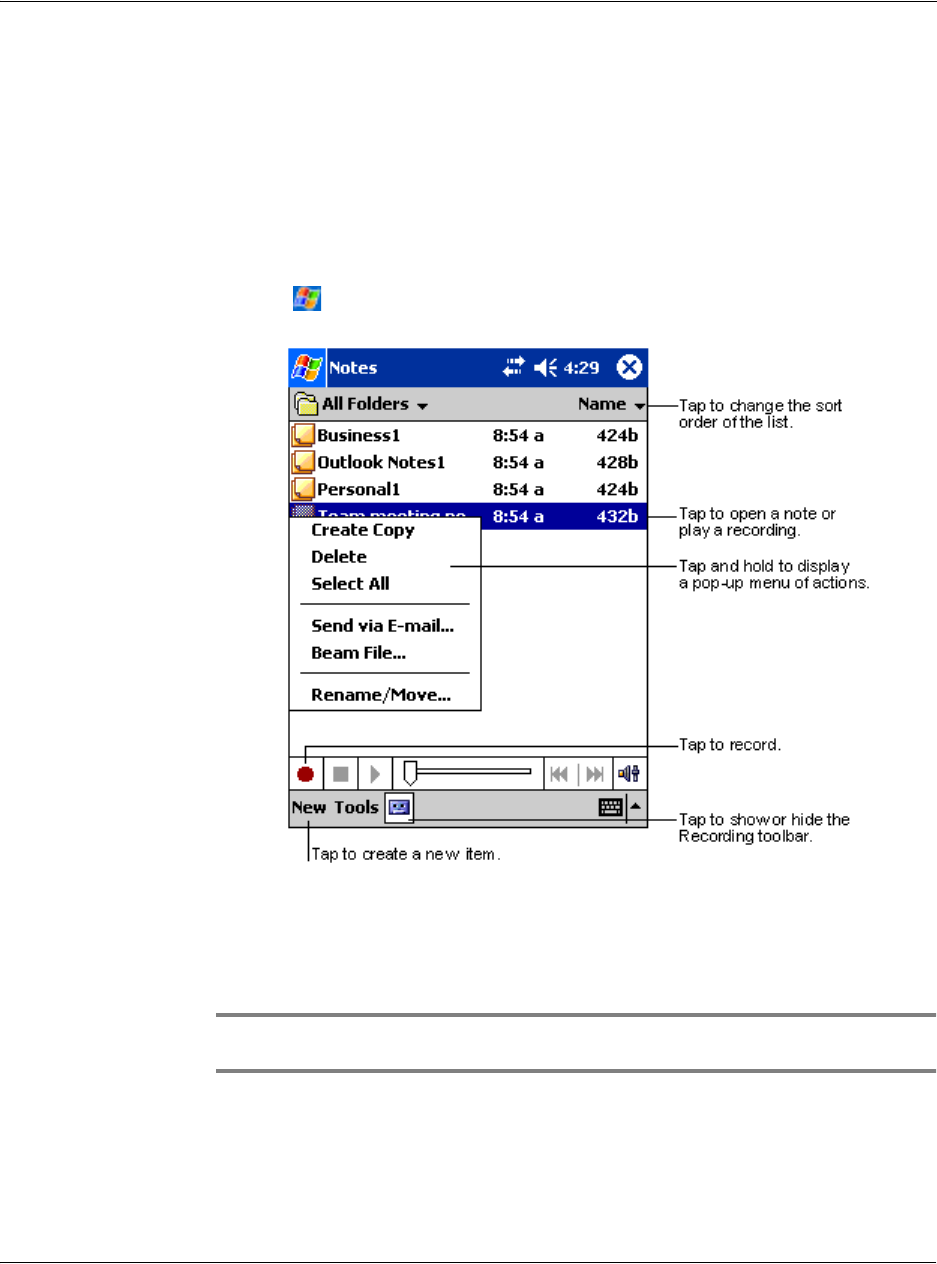
Quickly capture thoughts, reminders, ideas, drawings, and phone numbers with
Notes. You can create a written note or a recording. You can also include a recording
in a note. If a note is open when you create the recording, it will be included in the
note as an icon. If the note list is displayed, it will be created as a stand-alone
recording.
To open Notes
• Tap then, Notes.
Notes will open to the Notes list.
Creating a note
1 Tap New.
2 Create a note by writing, drawing, typing, or recording.
NOTE: For more information about using the input panel, writing and drawing on the
screen, and creating recordings, see "2 Entering data in your Acer n50" on page 19.

4 Managing Microsoft® Pocket Outlook applications
Messaging
42
Messaging
Use Messaging to send and receive e-mail messages by doing either of the following:
• Synchronise e-mail messages with Microsoft Exchange or Microsoft Outlook
on your computer.
• Send and receive e-mail messages by connecting directly to an e-mail server
through an Internet service provider (ISP) or a network.
Opening the Messaging
• Press the Messaging Quick button on the front panel of your handheld.
Inbox will open to the Messaging’ folder navigator.
Synchronising email messages
Email messages can be synchronised as part of the general synchronisation process.
You will need to enable Inbox synchronisation in ActiveSync.
For information on enabling Inbox synchronisation, see ActiveSync Help on your
computer.
During synchronisation:
• Messages are copied from the mail folders of Exchange or Outlook on your
computer to the ActiveSync folder in Inbox on your handheld. By default, you
will receive messages from the past three days only, the first 100 lines of each
message, and file attachments of less than 100 KB in size.
• Email messages in the Outbox folder on your handheld are transferred to
Exchange or Outlook, and then sent from those programs.
• Email messages in subfolders must be selected in ActiveSync on your
computer in order to be transferred.
TIP: You can also synchronise email messages with your computer from a remote location.
For more information, see the ActiveSync Help menu in your computer.
Connecting directly to an email server
In addition to synchronising email messages with your computer, you can send and
receive email messages by connecting to an email server using a modem or a network
card connected to your handheld. You'll need to set up a remote connection to a
network or an ISP, and a connection to your email server. For more information, refer
to "9 Getting connected" on page 71.
When you connect to the email server, new messages are downloaded to your
handheld’s Inbox folder, messages in the handheld’s Outbox folder are sent, and
messages that have been deleted on the email server are removed from the
handheld’s Inbox folder.
Messages that you receive directly from an email server are linked to your email server
rather than your computer. When you delete a message on your handheld, it is also
deleted from the email server the next time you connect based on the settings you
selected in ActiveSync.

4 Managing Microsoft® Pocket Outlook applications
Messaging
43
You can work online or offline. When working online, you read and respond to
messages while connected to the email server. Messages are sent as soon as you tap
Send, which saves space on your handheld.
When working offline, once you've downloaded new message headers or partial
messages, you can disconnect from the email server and then decide which messages
to download completely. The next time you connect, Inbox downloads the complete
messages you've marked for retrieval and sends the messages you've composed.
Using the Message list
Messages you receive are displayed in the message list. By default, the most recently
received messages are displayed first in the list.
When you receive a message, tap it to open it. Unread messages are displayed in bold.
When you connect to your email server or synchronise with your computer, by default,
you'll receive messages from the last five days only, the first 100 lines of each new
message, and file attachments of less than 100 KB in size. The original messages
remain on the email server or your computer.
You can mark the messages that you want to retrieve in full during your next
synchronisation or email server connection. Follow the steps below.
1 In the message list, tap and hold the message you want to retrieve.
2 On the pop-up menu, tap Mark for Download. The icons in the Inbox message list give
you visual indications of message status.
Specify your downloading preferences when you set up the service or select your
synchronisation options. You can change them at any time:
• Change options for Inbox synchronisation using ActiveSync options. For more
information, see ActiveSync Help.
• To change options for direct email server connections in Inbox on your
handheld.
a Tap Tools and then tap Options.
b On the Service tab, tap the service you want to change.
c Tap and hold the service and select Delete to remove a service.
Composing a message
1 Tap New.
2 In the To field, enter an email address of one or more recipients, separating them with
a semicolon, or select a name from the contact list by tapping the Address Book
button.
All e-mail addresses entered in the e-mail fields in Contacts appear in the Address
Book.
3 Compose your message.
To enter preset or frequently used messages, tap My Text and select a message.
4 Tap Send when you've finished the message.
If you are working offline, the message is moved to the Outbox folder and will be sent
the next time you connect.

4 Managing Microsoft® Pocket Outlook applications
Messaging
44
Managing email messages and folders
By default, messages are displayed in one of five folders for each service you have
created: Inbox, Deleted Items, Drafts, Outbox, and Sent Items.
• The behavior of the Deleted and Sent Items folders depends on the options
you have chosen. To set these options, in the message list:
a Tap Tools and then Options.
b On the Message tab, select your options.
• If you want to organise messages into additional folders tap Tools, and then
Manage Folders to create new folders.
• To move a message to another folder, in the message list, tap and hold the
message and then tap Move to on the pop-up menu.
Folder behavior with a direct connection to an email server
The behavior of the folders you create depends on whether you are using ActiveSync,
POP3, or IMAP4.
• If you use ActiveSync, email messages in the Inbox folder in Outlook will
automatically be synchronised with your handheld. You can select to
synchronise additional folders by designating them for ActiveSync. The
folders you create and the messages you move will then be mirrored on the
server. For example, if you move two messages from the Inbox folder to a
folder named Family, and you have designated Family for synchronisation,
the server creates a copy of the Family folder and copies the messages into
that folder. You can then read the messages while away from your computer.
• If you use POP3 and you move email messages to a folder you created, the
link is broken between the messages on your handheld and their copies on
the email server. The next time you connect, the email server will see that the
messages are missing from the handheld’s Inbox and delete them from the
server. This prevents you from having duplicate copies of a message, but it
also means that you will no longer have access to messages that you move to
folders created from anywhere except your handheld.
• If you use IMAP4, the folders you create and the email messages you move
are mirrored on the server. Therefore, messages are available to you anytime
you connect to your email server, whether it is from your handheld or from
your computer. This synchronisation of folders occurs whenever you connect
to your mail server, create new folders, or rename/delete folders when
connected.

5 Managing Microsoft® Pocket PC 2003 companion programs
Pocket Word
45
5Managing Microsoft®
Pocket PC 2003 companion
programs
Perform your usual computing tasks on-the-road using the Microsoft®Pocket PC 2003
companion programs which includes:
• Pocket Word
•Pocket Excel
•MSN
® Messenger
• Microsoft®Windows Media™ Player for Pocket PC
• Microsoft® Reader for Pocket PC
NOTE: Microsoft® Reader is available only for the English and European Acer n50 models.
To open a companion program on your handheld, tap Programs on the menu,
and then tap the program name.
Pocket Word
Pocket Word works with Microsoft Word on your computer to give you easy access to
copies of your documents. You can:
• Create new documents on your handheld, such as letters, meeting minutes,
and trip reports, or you can copy documents from your computer to your
handheld.
• Synchronise documents between your computer and your handheld so that
you have the most up-to-date content in both locations.
To create a new file
• Tap , Programs, Pocket Word, and then New.
A blank document appears. Or, if you've selected a template for new
documents in the Options dialog box, that template appears with
appropriate text and formatting already provided.
You can open only one document at a time; when you open a second document, you'll
be asked to save the first. You can save a document you create or edit in a variety of
formats, including:
• Word (.doc)
• Pocket Word (.psw)
• Rich Text Format (.rtf)
5 Managing Microsoft® Pocket PC 2003 companion programs
Pocket Word
46
• Plain Text (.txt)
NOTE: When you choose to create a new document, you will be prompted to save any
already open document.
To use the Pocket Word file list
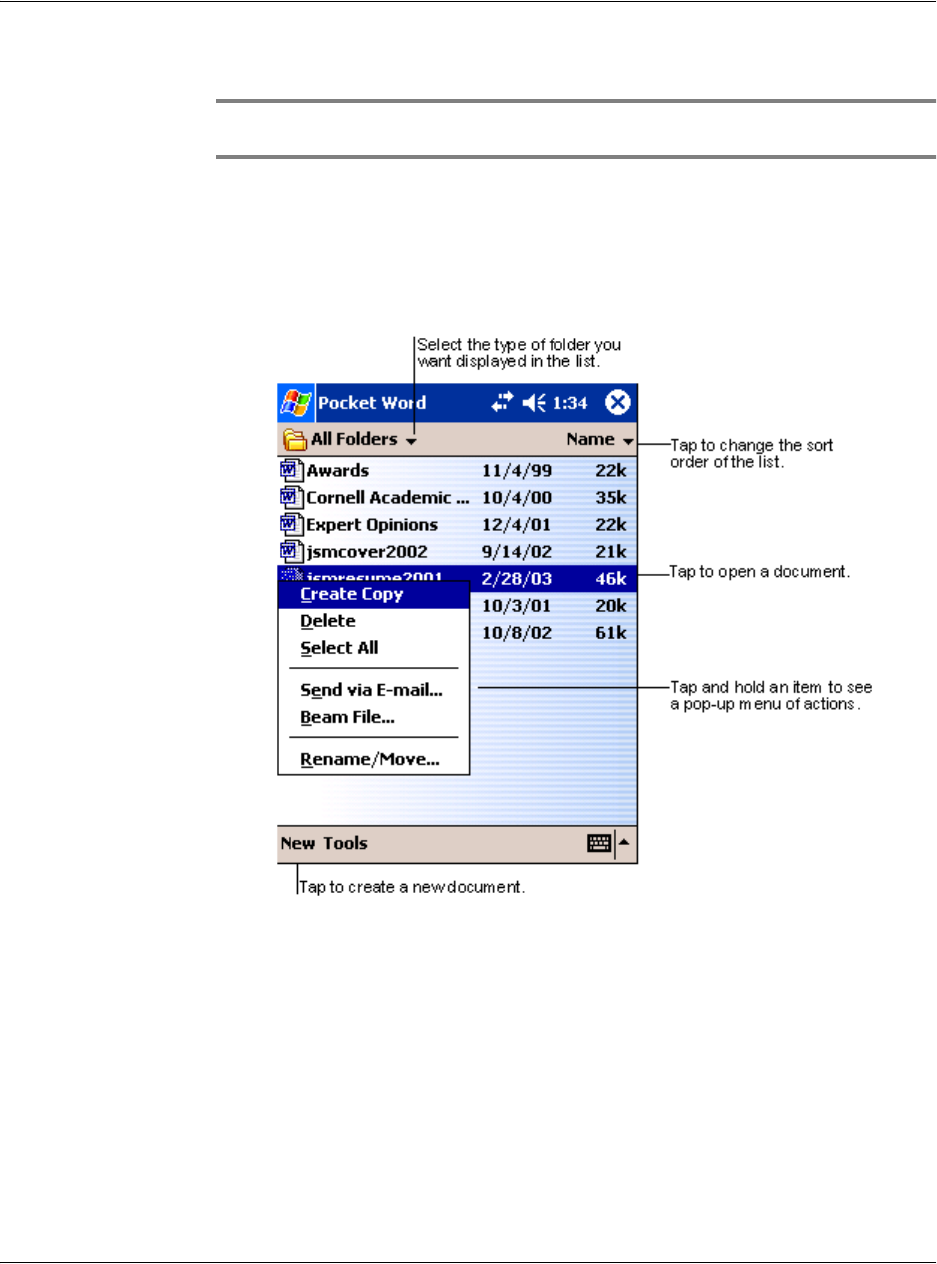
Pocket Word contains a list of the files stored on your handheld.
• Tap a file in the list to open it.
• To delete, make copies of, and send files, tap and hold a file in the list. Then,
select the appropriate action on the pop-up menu.
To enter information
You can enter information in Pocket Word in one of four modes—typing, writing,
drawing, and recording, which are displayed on the View menu. Each mode has its
own toolbar, which you can show and hide by tapping the Show/Hide Toolbar button
on the command bar.
If you're opening a Word document created on a computer, select Wrap to Window
on the View menu so that you can see the entire document.
5 Managing Microsoft® Pocket PC 2003 companion programs
Pocket Word
47
TIP: You can change the zoom magnification by tapping View and then Zoom. Then select
the percentage you want. Select a higher percentage to enter text and a lower one to see
more of your document.
Typing mode
• Using the input panel, enter typed text into the document.
For more information on entering typed text, see "Using the input panel" on
page 19.
• To format existing text and to edit text, first select the text. You can select
text as you do in a Word document, using your stylus instead of the mouse to
drag through the text you want to select.
• You can search a document to find text by tapping Edit and then Find/
Replace.
Writing mode
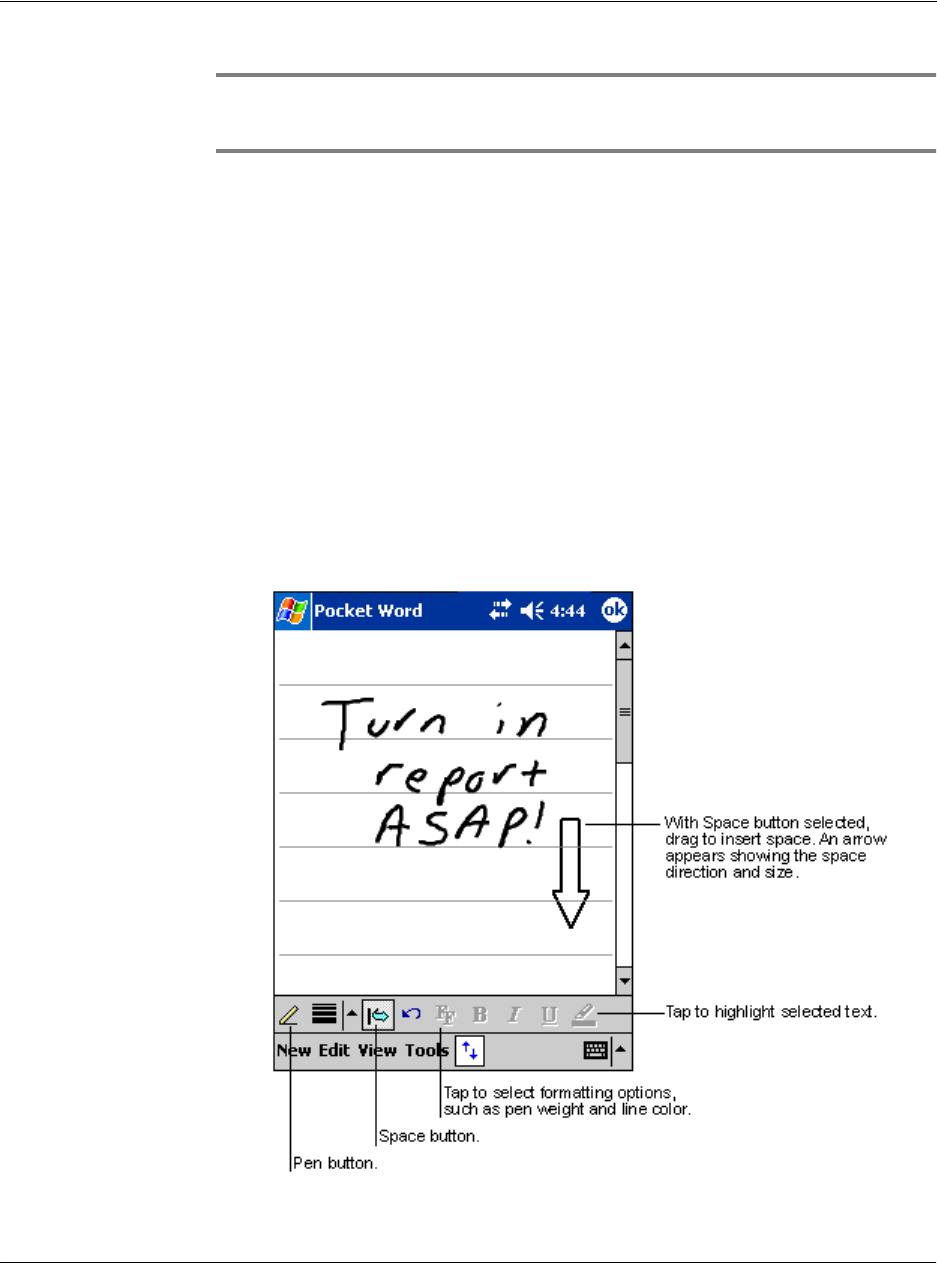
In writing mode, use your stylus to write directly on the screen. Ruled lines are
displayed as a guide, and the zoom magnification is greater than in typing mode to
allow you to write more easily.
For more information on writing and selecting writing, see "Writing on the screen"
on page 21.
5 Managing Microsoft® Pocket PC 2003 companion programs
Pocket Word
48
If you cross three ruled lines in a single stylus stroke, the writing becomes a drawing,
and can be edited and manipulated as described in the following section.
NOTE: Written words are converted to graphics (metafiles) when a Pocket Word document
is converted to a Word document on your computer.
Drawing mode
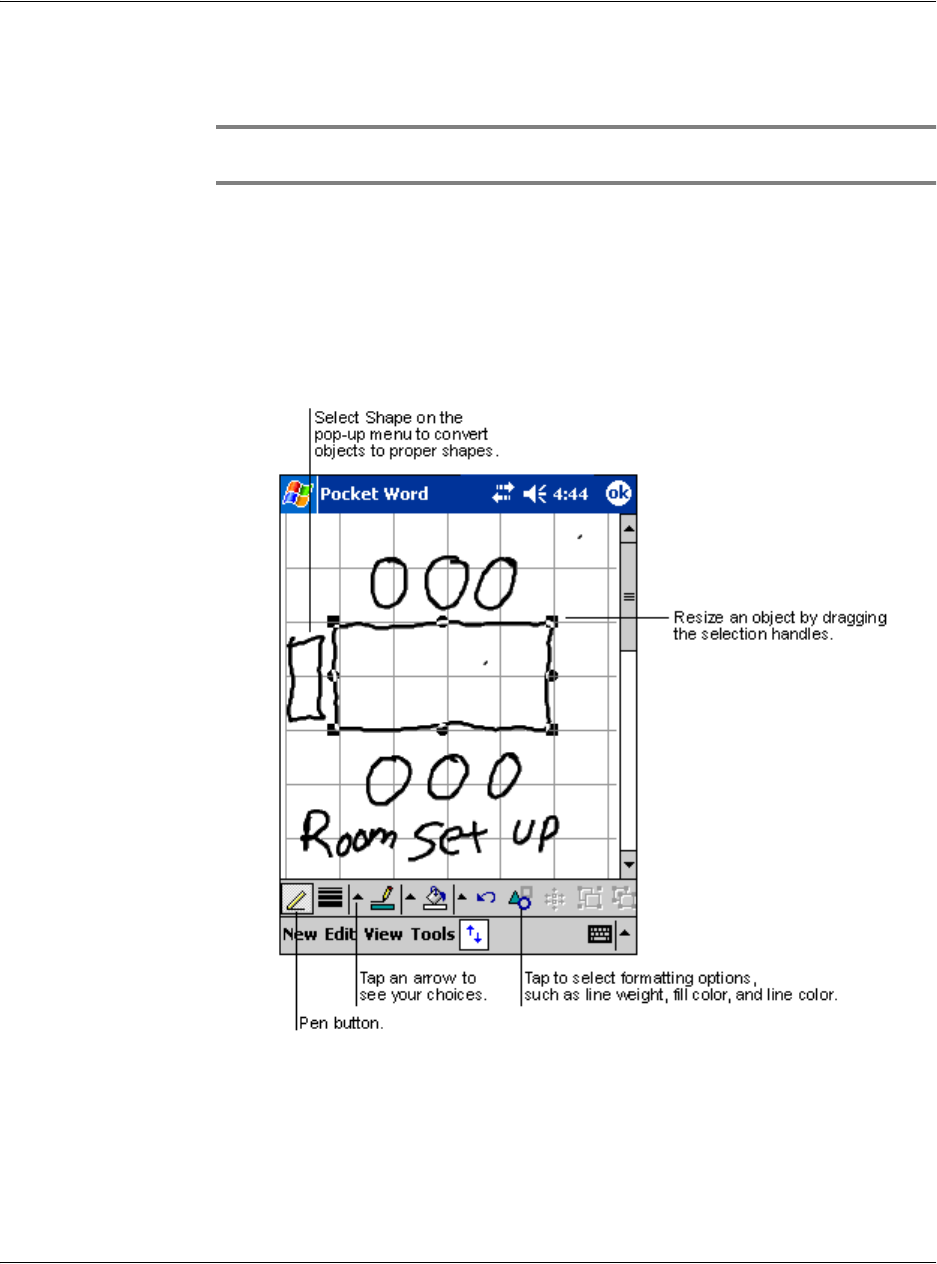
In drawing mode, use your stylus to draw on the screen. Gridlines appear as a guide.
When you lift your stylus off the screen after the first stroke, you'll see a drawing box
indicating the boundaries of the drawing. Every subsequent stroke within or touching
the drawing box becomes part of the drawing.
For more information on drawing and selecting drawings, see "Drawing on the
screen" on page 24.
Recording mode
In recording mode, embed a recording into your document. Recordings are saved as
.wav files.
For more information on recording, see "Recording a message" on page 26.

5 Managing Microsoft® Pocket PC 2003 companion programs
Pocket Excel
49
For more information on using Pocket Word, tap > Programs > Pocket Word then,
tap Help from the menu.
Pocket Excel
Pocket Excel works with Microsoft Excel on your computer to give you easy access to
copies of your workbooks. You can:
• Create new workbooks on your handheld, such as expense reports and
mileage logs, or you can copy workbooks from your computer to your
handheld.
• Synchronise workbooks between your computer and your handheld so that
you have the most up-to-date content in both locations.
Creating a new workbook
• Tap , Programs, Pocket Excel, and then New.
A blank workbook appears. Or, if you've selected a template for new
workbooks in the Options dialog box, that template appears with
appropriate text and formatting already provided.
You can open only one workbook at a time; when you open a second workbook,
you'll be asked to save the first. You can save a workbook you create or edit in a
variety of formats, including:
• Pocket Excel (.pxl)
• Excel (.xls).
NOTE: When you choose to create a new document, you will be prompted to save any
already open document.
To create a Pocket Excel file list
Pocket Excel contains a list of the files stored on your handheld.
• Tap a file in the list to open it.
• To delete, make copies of, and send files, tap and hold a file in the list. Then
select the appropriate action from the pop-up menu.
Displaying the toolbar
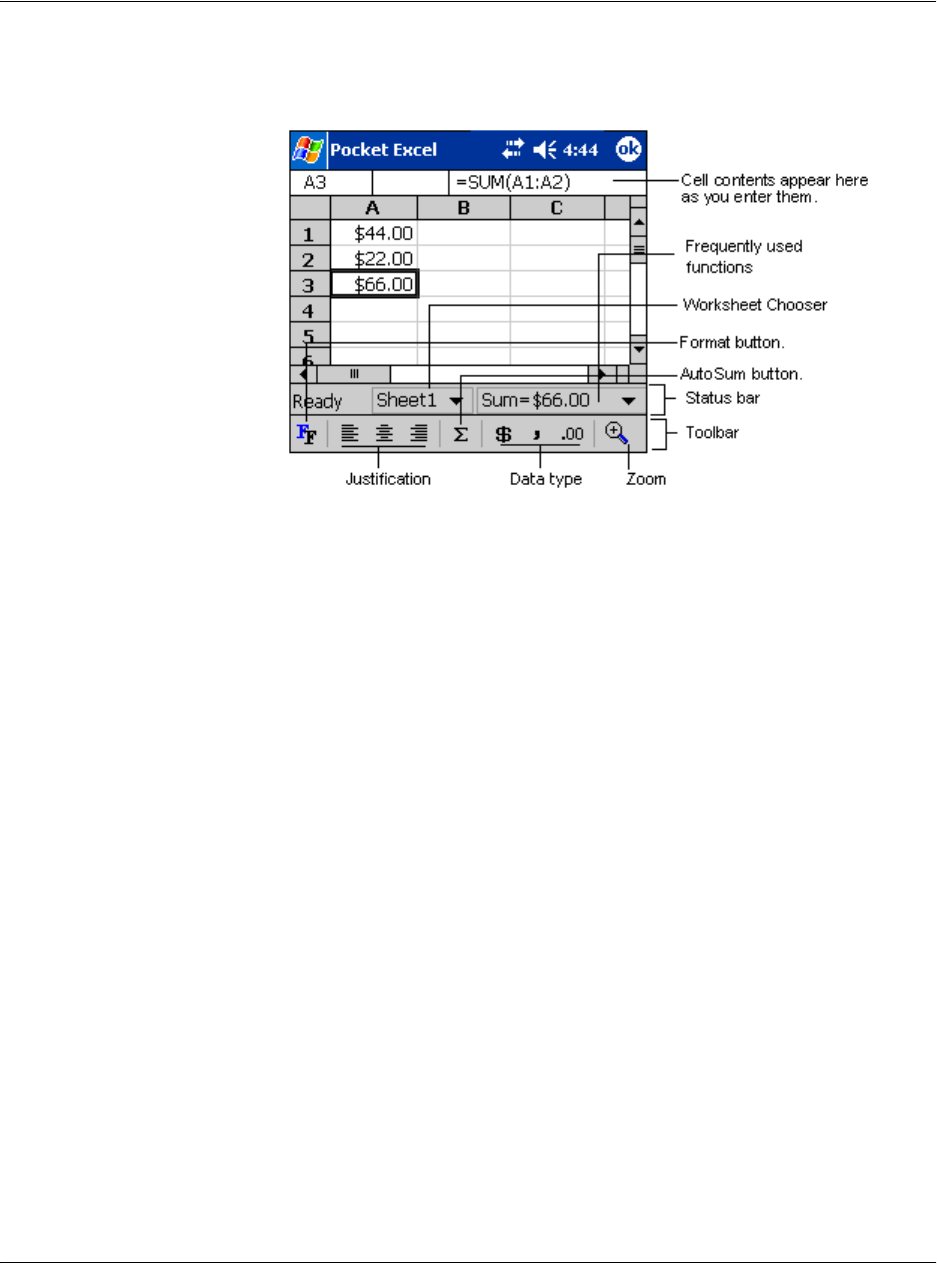
Pocket Excel provides fundamental spreadsheet tools, such as formulas, functions,
sorting, and filtering, in its toolbar.
5 Managing Microsoft® Pocket PC 2003 companion programs
Pocket Excel
50
• Tap View and then Toolbar.
Protecting your workbooks
If your workbook contains sensitive information, you can protect it with a password.
• Open the workbook, tap Edit, and then Password.
Every time you open the workbook, you will need to enter the password, so
choose one that is easy for you to remember but hard for others to guess.
Tips for working in Pocket Excel
Note the following when working in large worksheets in Pocket Excel:
• View in full-screen mode to see as much of your worksheet as possible.
– Tap View and then Full Screen.
– To exit full-screen mode, tap Restore.
• Show and hide window elements.
– Tap View and then tap the elements you want to show or hide.
• You might want to freeze the top and left most panes in a worksheet to keep
row and column labels visible as you scroll through a sheet.
a Select the cell where you want to freeze panes.
b Tap View and then Freeze Panes.
• Split panes to view different areas of a large worksheet.
a Tap View and then Split.
b Then drag the split bar to where you want it.
To remove the split, tap View and then Remove Split.
• Show and hide rows and columns.
– To hide a hidden row or column:

5 Managing Microsoft® Pocket PC 2003 companion programs
MSN® Messenger
51
a Select a cell in the row or column you want to hide.
b Tap Format, then Row or Column, and then Hide.
– To show a hidden row or column:
a Tap Tools, then Go To, and then type a reference that is in the hidden
row or column.
b Then tap Format, then Row or Column, and then Unhide.
For more information on using Pocket Excel, tap > Programs > Pocket Excel then,
tap Help from the menu.
MSN® Messenger
MSN® Messenger on your handheld is an instant messaging program that lets you:
• See who is online
• Send and receive instant messages
• Have instant message conversations with groups of contacts
Requirements to use MSN Messenger
• Microsoft Passport™ account or a Microsoft Exchange email account.
• Passport to use MSN Messenger Service. If you have a Hotmail®or MSN
account, you already have a Passport.
Once you have obtained either a Microsoft Passport or a Microsoft Exchange account,
you are ready to set up your account.
TIP: Sign up for a Microsoft Passport account at (http://www.passport.com/). Get a free
Microsoft Hotmail email address at (http://www.hotmail.com/).
Setting up
Before you can connect, you must enter Passport or Exchange account information.
To set up an account and sign in:
1 In the Tools menu, tap Options.
2 In the Accounts tab, enter your Passport or Exchange account information.
3 To sign in, tap the sign-in screen and enter your email address and password.
NOTE: If you already use MSN Messenger on your computer, your contacts will show up on
your handheld without being added again.
Working with contacts
The MSN Messenger window shows all of your messenger contacts at a glance, divided
into Online and Not Online categories. From this view, while connected, you can chat,
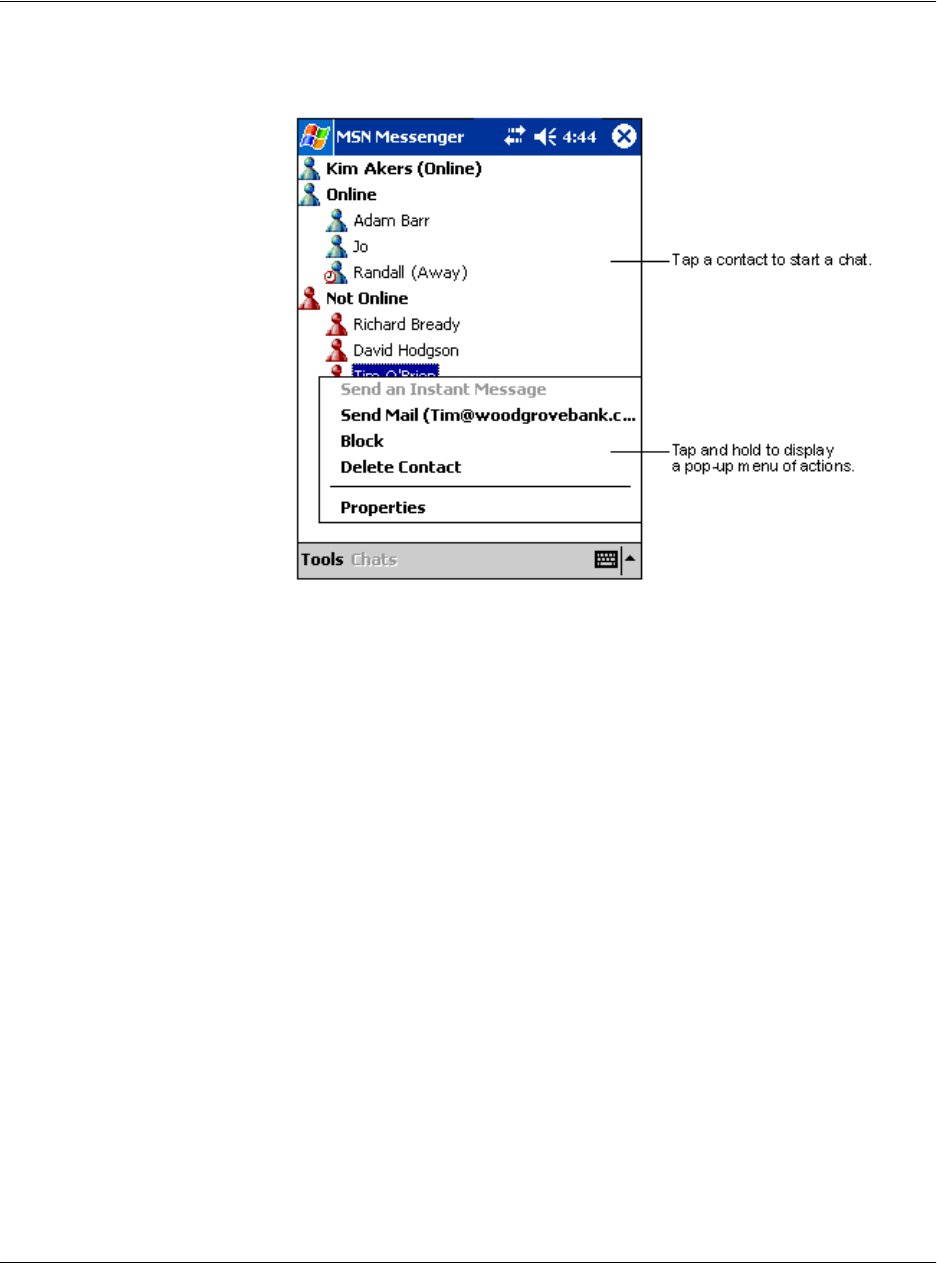
5 Managing Microsoft® Pocket PC 2003 companion programs
MSN® Messenger
52
send a email, block the contact from chatting with you, or delete contacts from your
list using the pop-up menu.
• To see others online without being seen, in the Tools menu, tap My Status
and select Appear Offline.
• If you block a contact, you will appear offline but will remain on the blocked
contact's list.
• To unblock a contact, tap and hold the contact, then tap Unblock on the pop-
up menu.
Chatting with contacts
1 Tap a contact name to open a chat window.
2 Enter your message in the text entry area at the bottom of the screen, or tap My Text
to enter a preset message.
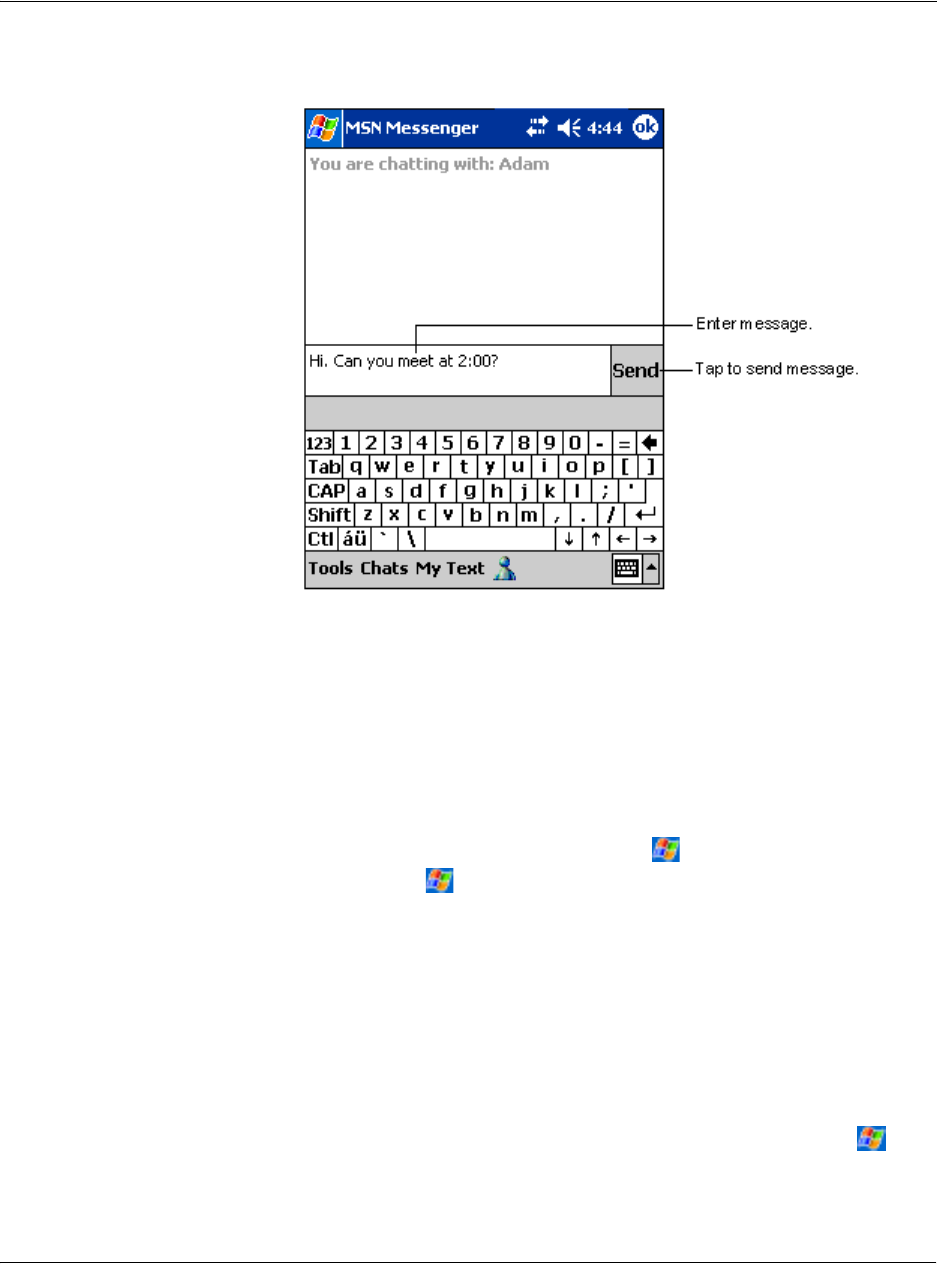
5 Managing Microsoft® Pocket PC 2003 companion programs
Microsoft® Windows Media™ Player for Pocket PC
53
3 Tap Send.
Tips when chatting with contacts
• To invite another contact to a multi-user chat, in the Tools menu, tap Invite
and tap the contact you want to invite.
• To switch back to the main window without closing a chat, tap the Contacts
button.
• To revert back to your chat window, tap Chats and select the person whom
you were chatting with.
• To know if the contact you are chatting with is responding, look for the
message under the text entry area.
For more information on using MSN Messenger, tap > Programs > MSN Messenger
then, tap Help from the menu.
Microsoft® Windows Media™Player for Pocket PC
Use Microsoft®Windows Media™ Player for Pocket PC to play digital audio and video
files (Windows Media and MP3 files) that are:
• Stored on your handheld
• Copied from Microsoft Windows Media Player on your computer to your
handheld
• On a network
For more information about using Windows Media Player for Pocket PC, tap , and
then tap Help.

5 Managing Microsoft® Pocket PC 2003 companion programs
Microsoft® Reader for Pocket PC
54
Microsoft® Reader for Pocket PC
Use Microsoft® Reader for Pocket PC to read eBooks on your handheld.
You can also download books from your favorite eBook Web site to your computer.
Then, use ActiveSync to copy the book files to your handheld. The books appear in the
Reader Library, where you can tap them in the list to open them.
NOTE: Microsoft® Reader is available only for the English and European Acer n50 models.
Using the Guidebook
The Guidebook contains all the information you'll need to use the Microsoft Reader.
To open the Guidebook:
• Tap Help on the Reader command bar.
-or-
• On a book page, tap and hold on the book title, and then tap Help on the
pop-up menu.
Getting books on your Acer n50
You can download book files from the Web. Just visit your favorite eBook retailer and
follow the instructions to download the book files.
Sample books and a dictionary are also included in the MSReader folder in the Extras
folder on the Acer n50 Handheld Companion CD.
Use ActiveSync to download the files from your computer to your handheld as
described in the Read Me file in the MSReader folder.
Using the Library
The Library is your Reader home page; it displays a list of all books stored on your
handheld or storage device.
To open the Library:
• On the Reader command bar, tap Library.
-or-
• On a book page, tap the book title, and then tap Library on the pop-up
menu.
Opening a book
• Tap a book title in the Library list.
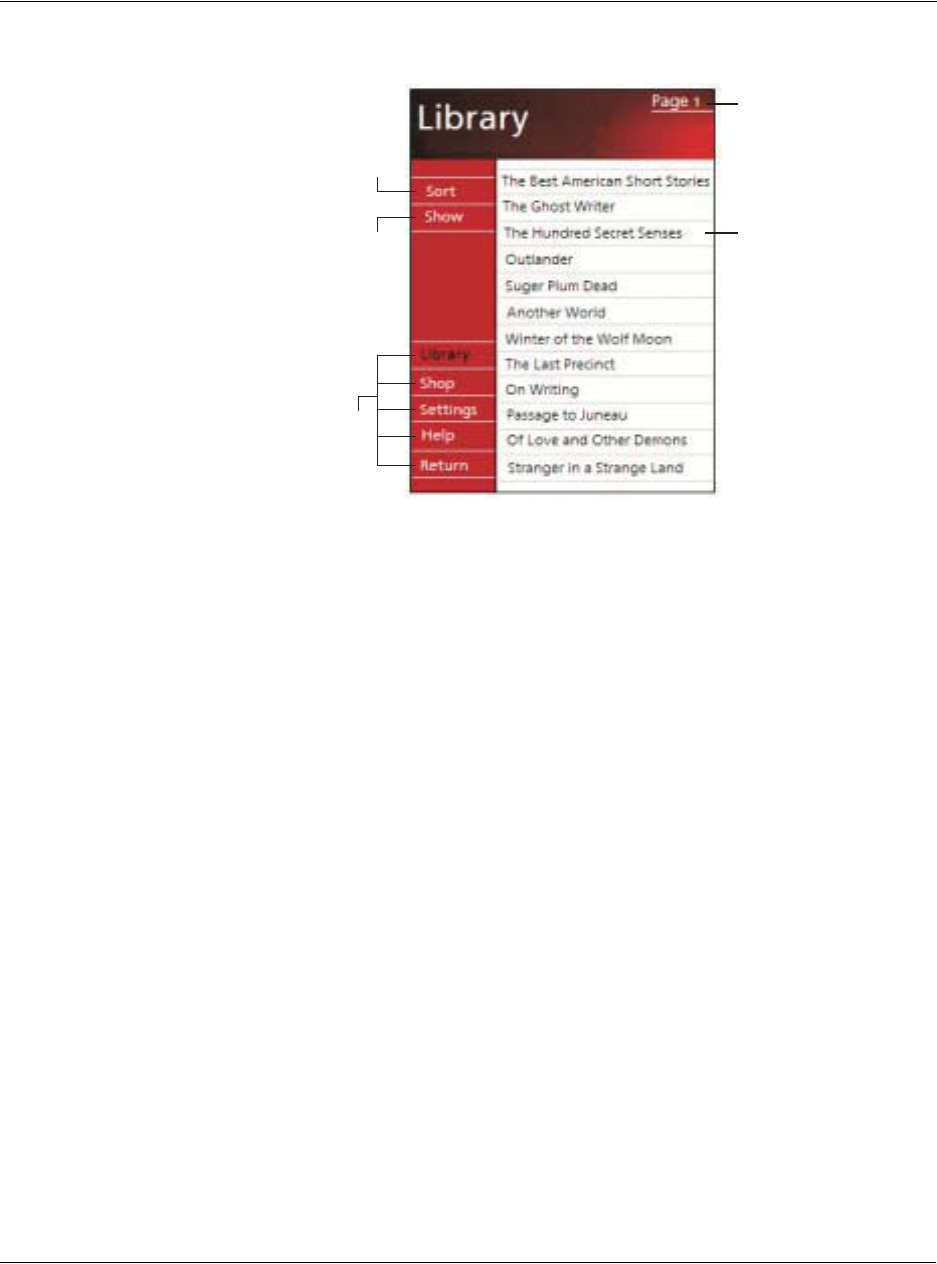
5 Managing Microsoft® Pocket PC 2003 companion programs
Microsoft® Reader for Pocket PC
55
Reading a book
Each book consists of a cover page, an optional table of contents, and the pages of
the book. You can:
• Annotate the book with highlighting, bookmarks, notes, and drawings.
• Search for text and look up definitions for words.
In addition to the text, each book page includes a page number and book title.
Navigation options are listed in the bottom portion of the cover page. Page through
the book by:
• Using the Scroll wheel on your handheld
• Tapping the page number on each page
The first time you open a book, you'll probably want to go to the first page or to the
table of contents, if there is one. Subsequently, whenever you open the book, you'll
be automatically taken to the last page read.
Tap to open a book
.
Tap to scroll throug
h
the Library list.
Tap to specify
the books you
want to display
in the list.
Tap to select
a sort order.
Tap here to
navigate to
other parts of
the Reader.
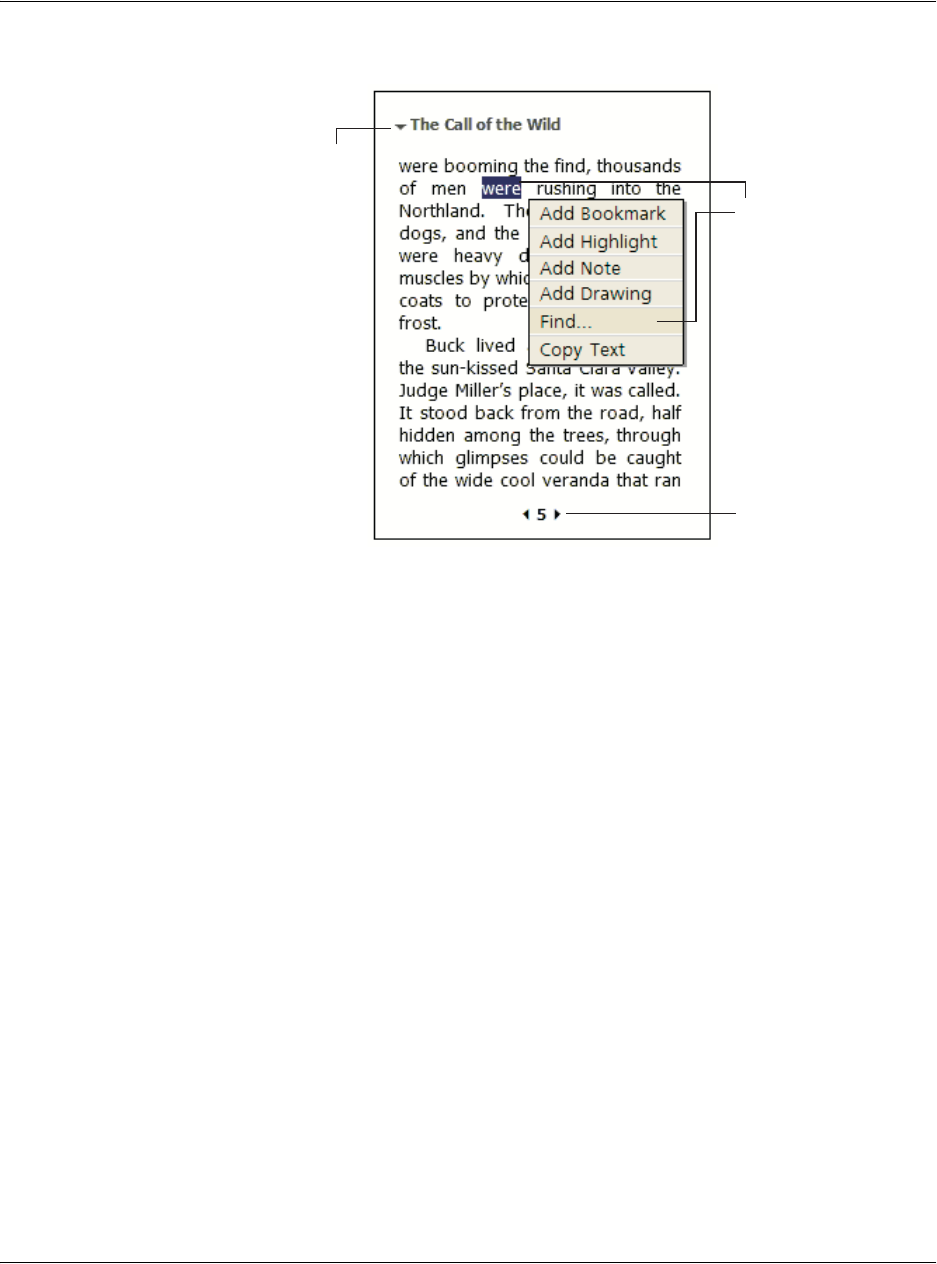
5 Managing Microsoft® Pocket PC 2003 companion programs
Microsoft® Reader for Pocket PC
56
.
Using Reader features
Reading a book electronically gives you several options not available with paper
books. These options are available from any book page.
Select text by dragging across the text on the page. Then, tap an option on the pop-
up menu, as described in the following sections.
Search for text
1 Tap Find on the pop-up menu.
2 Enter the word you want to search for.
3 Tap the desired Find option.
Reader highlights found text on the page.
• To close Find, tap outside the box.
• To return to your original page, tap the title and then tap Return on the pop-
up menu.
Copy text
You can copy text from books that support this feature into any program that accepts
text.
1 On a book page, select the text you want to copy.
2 Tap Copy Text on the pop-up menu.
The text can be pasted into the program of your choice.
Drag to select text an
d
then tap an option.
Tap arrows to turn
the page, or tap and
hold page # to bring
up page riffle.
Tap to select
a navigation
option.

5 Managing Microsoft® Pocket PC 2003 companion programs
Microsoft® Reader for Pocket PC
57
Book annotations
To see a list of a book's annotations, including bookmarks, highlights, text notes, and
drawings:
1 Tap Annotations Index on the book's cover page.
2 Tap an entry in the list to go to the annotated page.
To use bookmarks
• When you add a bookmark to a book, a color-coded bookmark icon appears
in the right margin. From anywhere in the book, tap the bookmark icon to go
to the bookmarked page.
NOTE: You can add multiple bookmarks to a book.
To use highlights
• When you highlight text, it appears with a colored background.
To use notes
• When you attach a note to text, you enter the text in a note pad that appears
on top of the book page. A Note icon will display in the left margin. To show
or hide the note, tap the icon.
To add drawings
• When you add a drawing, a Drawing icon appears in the bottom-left corner
of the page, and drawing tools appear across the bottom of the page. Draw
by dragging your stylus.
Removing a book
When you finish reading a book, you can delete it to conserve space on your
handheld. If a copy of the book is stored on your computer, you can download it again
at any time.
1 Tap and hold the title in the Library list.
2 Tap Delete on the pop-up menu.

5 Managing Microsoft® Pocket PC 2003 companion programs
Microsoft® Reader for Pocket PC
58

6 Backup and restore data
59
6Backup and
restore data
Backup/Restore enables you to back up data files and applications from your
handheld to a storage device and to restore data to your handheld. Advanced security
features offer password protection of sensitive documents/applications during Backup
and/or Restore operations. The expansion features of your handheld allow you to use
any of the following storage devices:
• SD Card (Secure Digita Card)
•MMC card
• CF card ( CompactFlash Card)
• USB thumb drive
• ROM storage(ROM storage is for PIM data backup and restore operations
only)
During a backup or restore operation, the power button serves as a pause/resume
button to control the pace of the operation.
There are three tabs (from left to right) in the program window corresponding to the
three functions of Backup and Restore.
• Backup
• AutoBackup
• Restore
To launch Backup/Restore:
1 Insert a storage device (SD/MMC/CF card or USB thumb drive) if you want to do
backup/restore operation on a storage device.
For instructions on how to insert storage devices, please refer to "7 Using expansion
features" on page 65.
2 Tap , Programs, and then Backup/Restore.
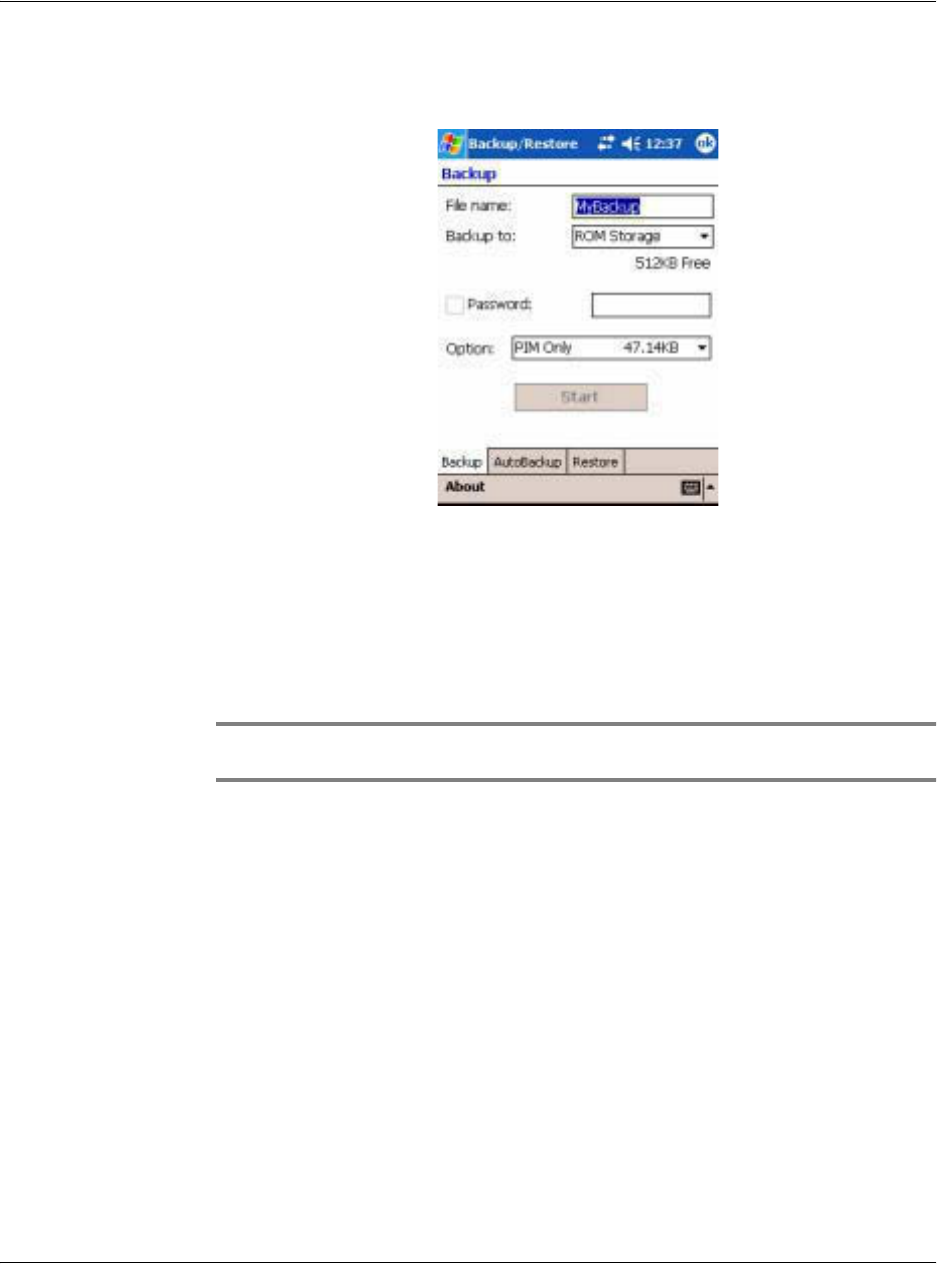
6 Backup and restore data
60
Backup function
To perform data backup
1 Close all running programs except for Backup/Restore.
2 In the Backup tab, choose whether to accept the default filename (MyBackup) or type
a new one by tapping on the keyboard icon on the bottom of the screen.
3 Select a storage device from the 'Backup to' pull-down menu.
4 Define the backup scope (default: PIM only) from ‘Option' pull-down menu.
NOTE: ROM storage is a valid backup destination only if PIM Only is defined as
backup scope.
5 Check the password box and enter a password if you want to secure the backup file.
6 Tap Start to proceed with the backup process.
During the backup process, a progress screen will appear displaying backup status.
7 When the backup process is completed, a message box appears, saying that backup
operation is completed.
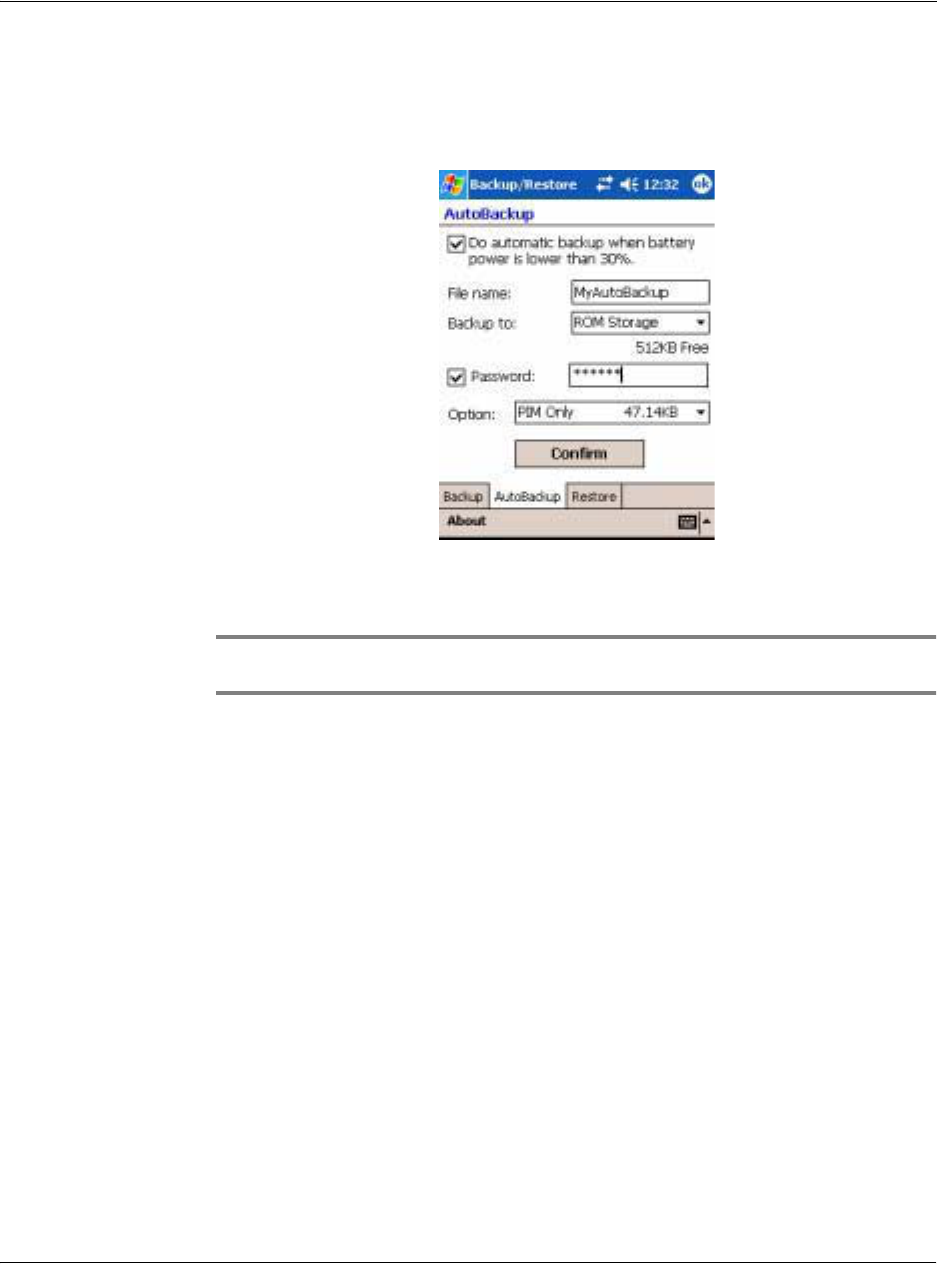
6 Backup and restore data
61
AutoBackup function
With AutoBackup, you can set your handheld to perform an automatic data backup
when battery power is lower than 30%. For configuring in AutoBackup screen, please
refer to the instructions described in "Backup function". For
When AutoBackup is activated and the specified storage device is not attached to
your handheld when 30% of battery level is reached, then no backup procedure will
be performed.
NOTE: 'MyAutoBackup' is the default file name of the backup file generated by the
AutoBackup operation.
Restore function
You can only restore backup files that are generated by Backup/Restore; file format is
*.abk (Acer backup).
To perform data restoration
1 Close all running programs except for Backup/Restore.
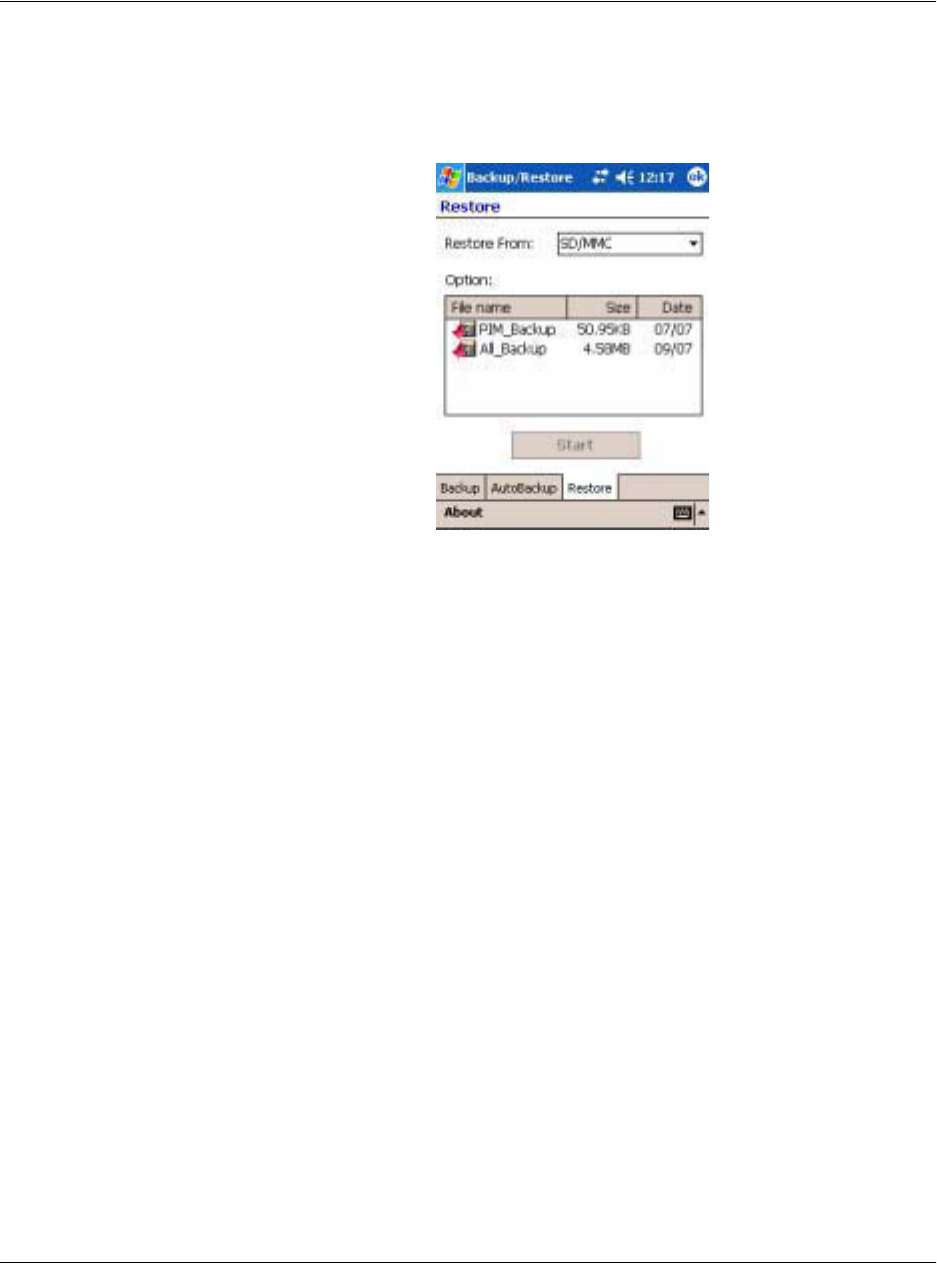
6 Backup and restore data
62
2 Select a source storage device from the 'Restore from' pulldown menu.
The lower half of the screen will display a list of files contained in the selected storage
device. Filename, file size and date when the backup file was created are indicated in
the list.
3 Tap a filename to select the file you wish to restore, and please note that non-.abk
files are not shown.
Select file, then tap "start" button. The window will shift to display the backup file
information including:
• File name - filename of the selected .abk file.
• Backup date - date when the selected .abk file was created.
• Backup option & file size.
• Main memory free size - free space in your handheld’s main storage memory.
This should be bigger than the file size of the selected .abk file for the restore
process to continue.
4 Tap Start again to proceed with the restore process.
5 During the restore process, a progress screen will appear displaying restore status.
6 When the restore process is completed, a message box appears, saying restore
operation is complete.
To delete a file from a storage device
To increase the size of available free space in a storage device, you can delete files that
you no longer need.
1 Tap the Restore tab.
2 Tap a menu item to select a storage device.
3 From the list, tap a filename until a delete pop-up menu is displayed.
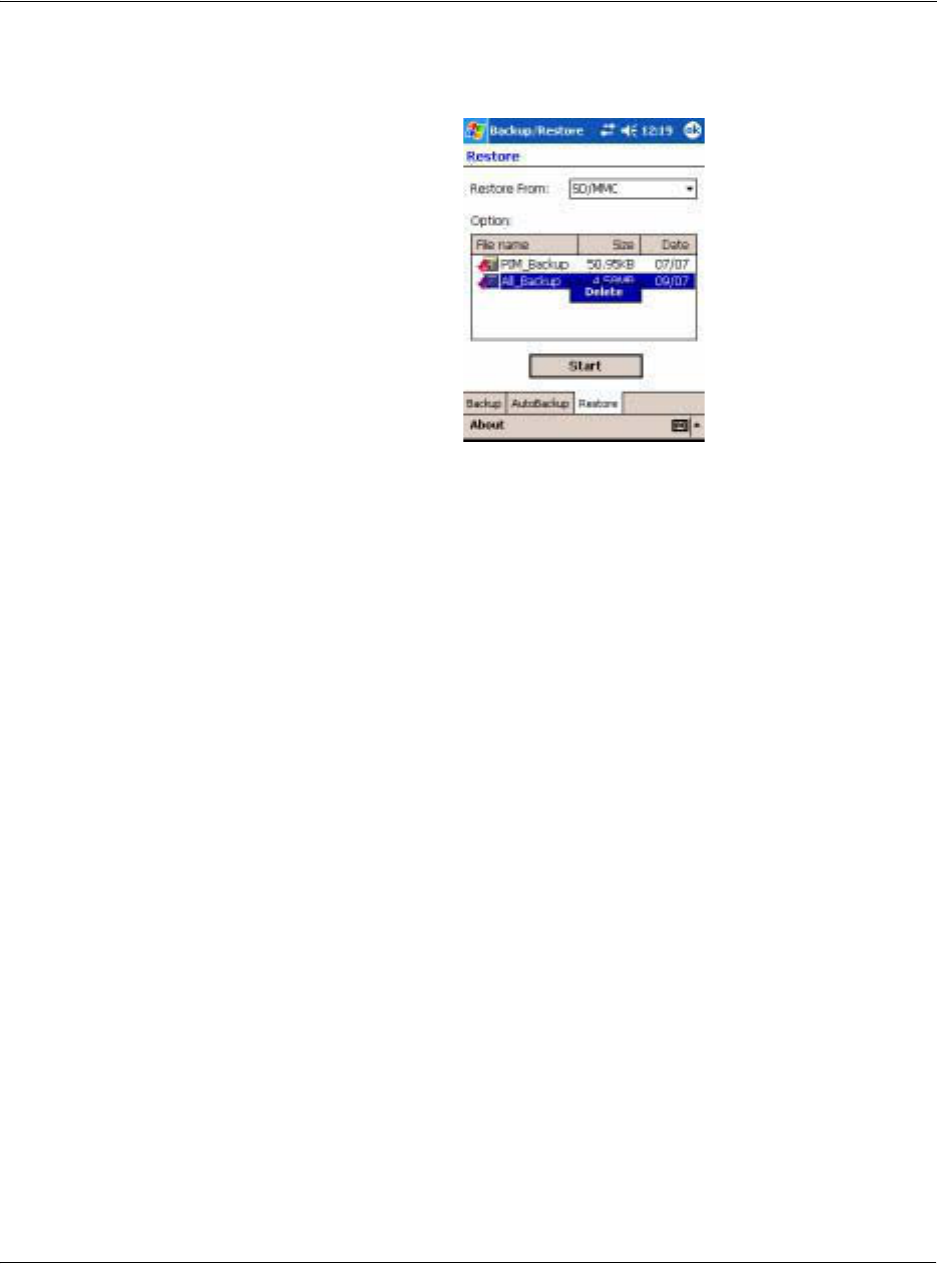
6 Backup and restore data
63
4 Tap Delete to remove the file.

6 Backup and restore data
64
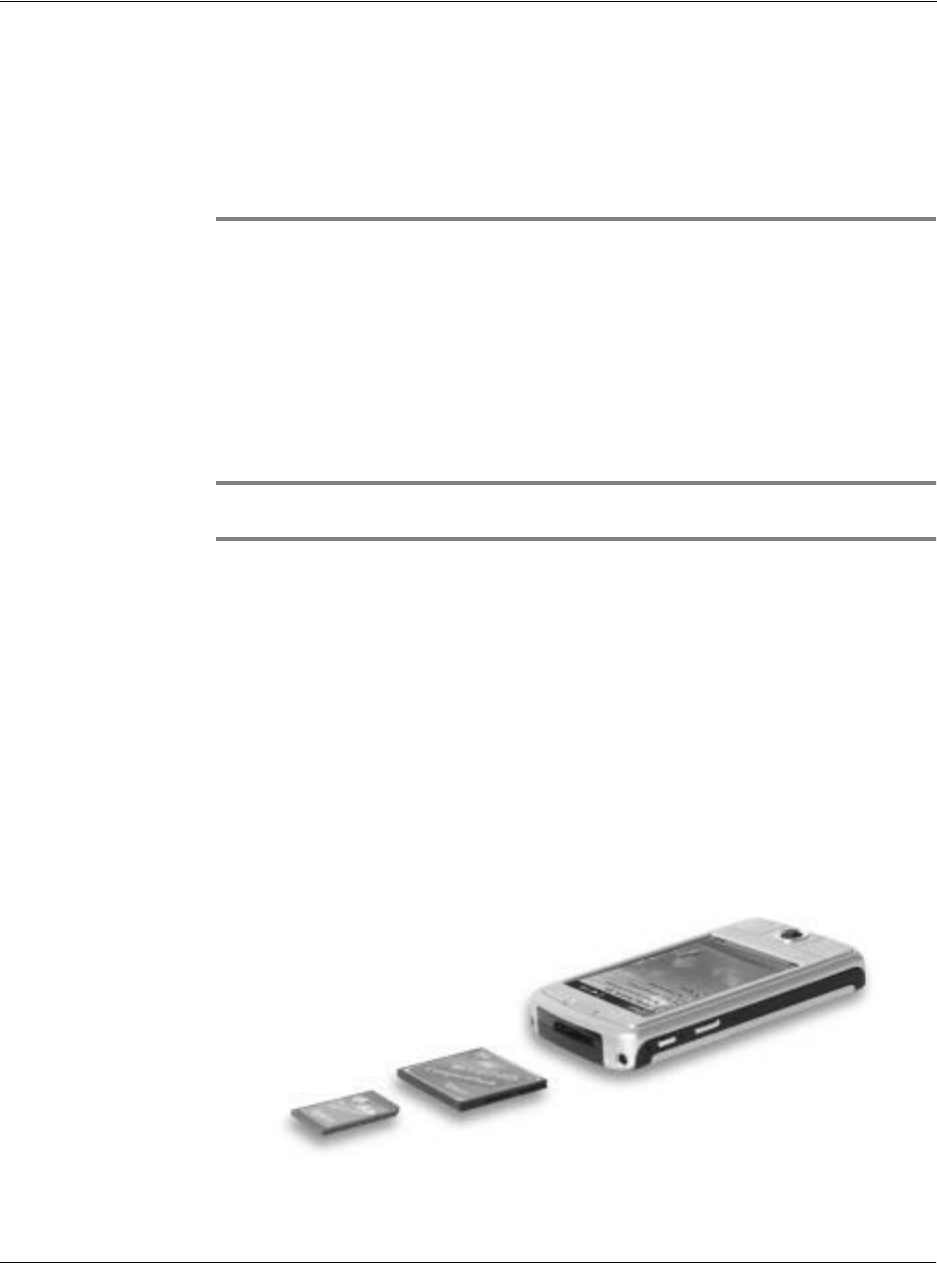
7 Using expansion features
Using an SD/CF card
65
7 Using expansion
features
The slim and lightweight design of your Acer n50 belies its impressive expansion
features . These expansion features include:
• Integrated dual use SD/CF slot
• USB host port via sync cable
These expansion features allow you to:
• Install additional applications
• Increase storage capacity
• Perform backup procedures
NOTE: When using any peripheral device with your handheld, please refer to the
documentation accompanying each device for information on how to install and operate it.
Using an SD/CF card
On the top side of your handheld is an SD/CF slot. This allows you to expand your
handheld memory and perform data backup.
Refer to "Top view" on page 6 for the location of the SD/CF slot.
Inserting an SD/CF card
1 Hold your handheld securely.
2 Insert the card into the SD/CF slot.
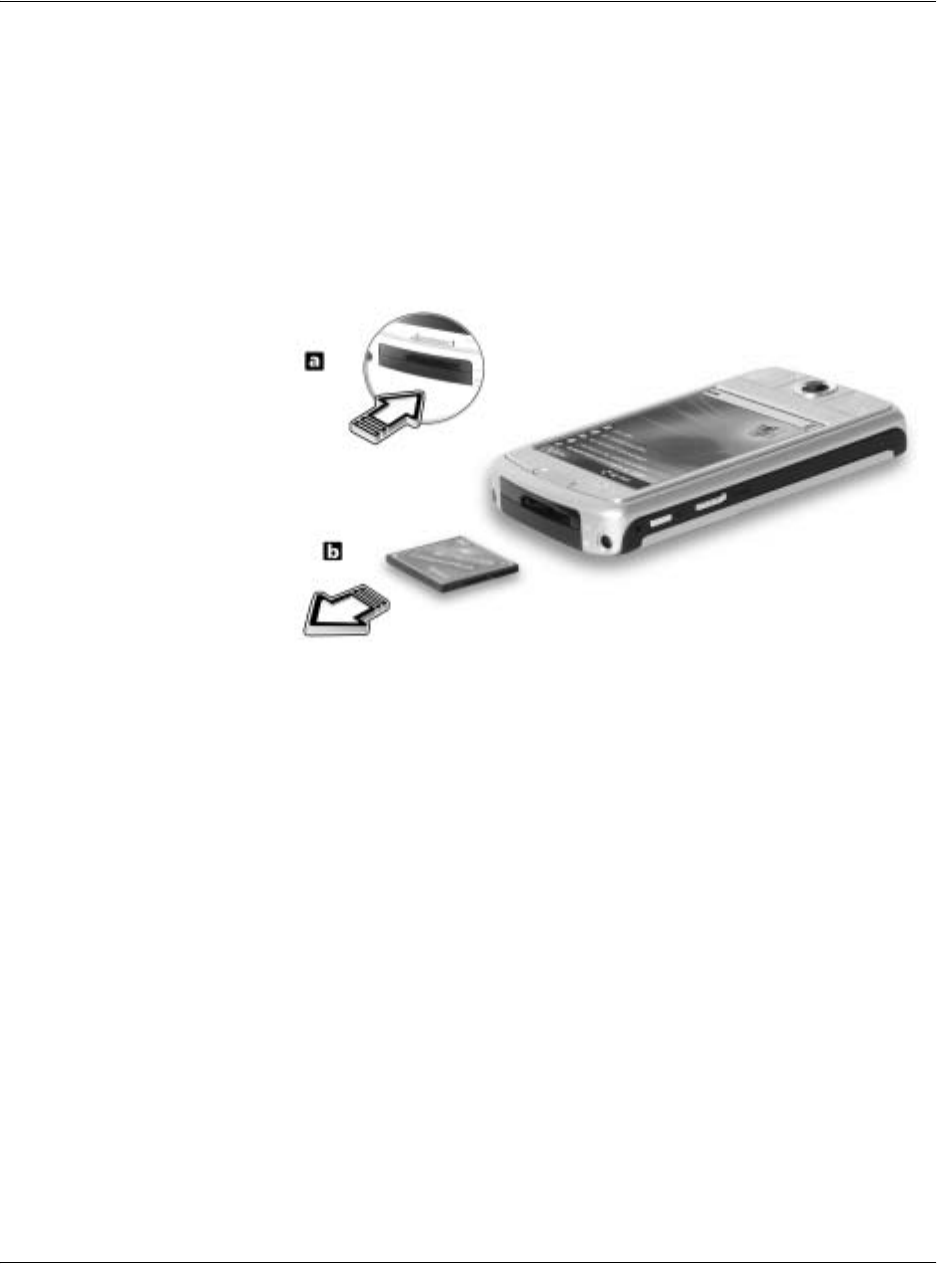
7 Using expansion features
Using an USB thumb drive
66
3 Push the card into the slot using your finger until you feel the card lock and hear an
audible system sound. This indicates that the card is properly seated within the slot.
Removing an SD/CF card
1 Hold your handheld securely.
2 Release the card from the slot by using your thumb to push against the top of the
card, as if you were pushing it further into the slot (a). An audible system sound and a
click will signal that the card has been released.
3 Gently remove the card from the slot (b).
Using an USB thumb drive
Your Acer n50 supports USB host expansion. Via cradle or sync cable, you can access a
USB thumb drive directly on your n50.
Inserting an USB thumb drive - Connecting the Cradle
1 Connect the AC adapter cord to the power socket at the back of the cradle.
2 Plug the AC adapter into any AC current outlet.
3 Plug the USB client connector into an available USB port on your computer.
4 Insert the USB thumb drive into USB host port of Cradle.
Removing an USB thumb drive - Connecting the Cradle
1 Remove the USB thumb drive from USB host port of Cradle.
2 You can keep device on the Cradle, or remove it from Cradle.

7 Using expansion features
Using an USB thumb drive
67
Inserting an USB thumb drive - Connecting the Sync
cable
1 Plug the sync cable into the 26-pin I/O connector on the bottom of your handheld.
2 Plug the AC adapter into any AC current outlet.
3 Plug the USB client connector into an available USB port on your computer.
4 Insert the USB thumb drive into USB host port of sync cable.
Removing an USB thumb drive - Connecting the Sync
cable
1 Remove the USB thumb drive from USB host port of sync cable.
2 You can keep sync cable attached to handheld, or remove it from handheld.

7 Using expansion features
Using an USB thumb drive
68

8 Exchanging and updating data using ActiveSync®.
Using ActiveSync®.
69
8Exchanging and
updating data using
ActiveSync®.
Using ActiveSync®, you can synchronise information in Microsoft Outlook or Microsoft
Exchange on your computer with your handheld. You can also synchronise this
information directly with a Microsoft Exchange server. Each time you synchronise,
ActiveSync compares the changes you made on your handheld and computer or server
and updates both locations with the latest information. For example:
• Keep Pocket Outlook data up-to-date by synchronising your handheld with
the Microsoft Outlook data on your computer.
• Synchronise Microsoft Word and Microsoft Excel files between your handheld
and computer. Your files are automatically converted to the correct format.
For information on using ActiveSync, see ActiveSync Help on the your computer.
NOTE: By default, ActiveSync does not automatically synchronise all types of information.
Use ActiveSync options to turn synchronisation on and off for specific information types.
With ActiveSync, you can also:
• Back up and restore your handheld data.
• Copy (rather than synchronise) files between your handheld and computer.
• Control when synchronisation occurs by selecting a synchronisation mode.
For example, you can synchronise continually while connected to your
computer or only when you choose the synchronise command.
• Select which information types are synchronised and control how much data
is synchronised.
For example, you can choose how many weeks of past appointments you
want synchronised.
Using ActiveSync®.
Before you begin synchronisation, install ActiveSync on your computer from the
Acer n50 Handheld Companion CD.
NOTE: ActiveSync is already installed on your handheld.
For more information on installing ActiveSync, see "Installing the Microsoft®
ActiveSync® software".
To open ActiveSync on your handheld, tap , and then tap ActiveSync.
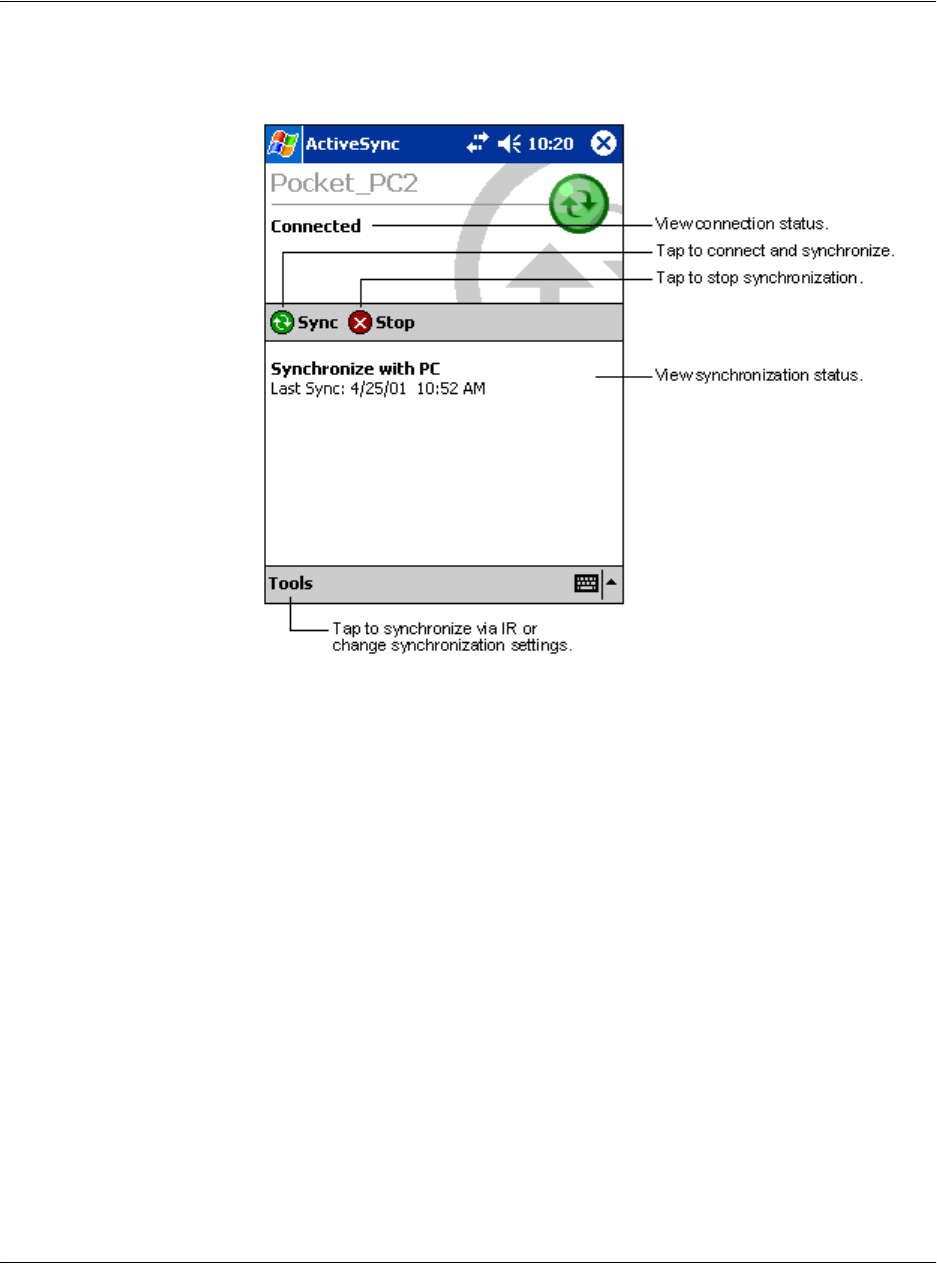
8 Exchanging and updating data using ActiveSync®.
Using ActiveSync®.
70
For information about using ActiveSync on your computer, start ActiveSync on your
computer, and then see ActiveSync Help.

9 Getting connected
Transferring items using infrared or Bluetooth®(optional)
71
9 Getting connected
You can use your handheld to exchange information with other mobile devices as well
as your computer, a network, or the Internet. You have the following connection
options:
• Use the infrared (IR) or Bluetooth® on your handheld to send and receive
data from another infrared-enabled or Bluetooth-enabled device.
• Connect to your Internet service provider (ISP). Once connected, you can send
and receive email messages by using Inbox and view Web or WAP pages by
using Microsoft® Pocket Internet Explorer.
The communication software for creating an ISP connection is already
installed on your handheld. Your service provider will provide software
needed to install other services, such as paging and fax services.
• Connect to the network at your company or organisation where you work.
Once connected, you can send and receive email messages by using Inbox,
view Web or WAP pages by using Microsoft® Pocket Internet Explorer, and
synchronise with your computer.
• Connect to your computer to synchronise remotely. Once connected, you can
synchronise information such as your Pocket Outlook information.
Transferring items using infrared or Bluetooth®(optional)
Using infrared (IR) or Bluetooth® , you can send and receive information, such as
contacts and appointments to/from other IR-enabled or Bluetooth-enabled devices.
Your n50 will receive all incoming InfraRed (IR) or Bluetooth beams and asks you after
the transmission has been established whether you wish to accept those beams.
To know wheather Bluetooth is on, check the Bluetooth LED. The falshing Bluetooth
LED indicates Bluetooth is on. The off Bluetooth LED indicates Bluetooth is off. There
are only two modes - flashing or off, for Bluetooth LED.
Refer to "Left view" on page 5 for the location of your handheld’s IR port.
To send information via infrared
1 Switch to the program where you created the item you want to send and locate the
item in the list.
2 Align the IR port of your handheld with that of the receiving IR-enabled device so that
they are unobstructed and within a close range.
3 Tap and hold the item, and then tap Beam Item on the pop-up menu.
-or-
Send items (but not folders) using File Explorer.
• Tap and hold the item you want to send and then tap Beam File on the
pop-up menu.
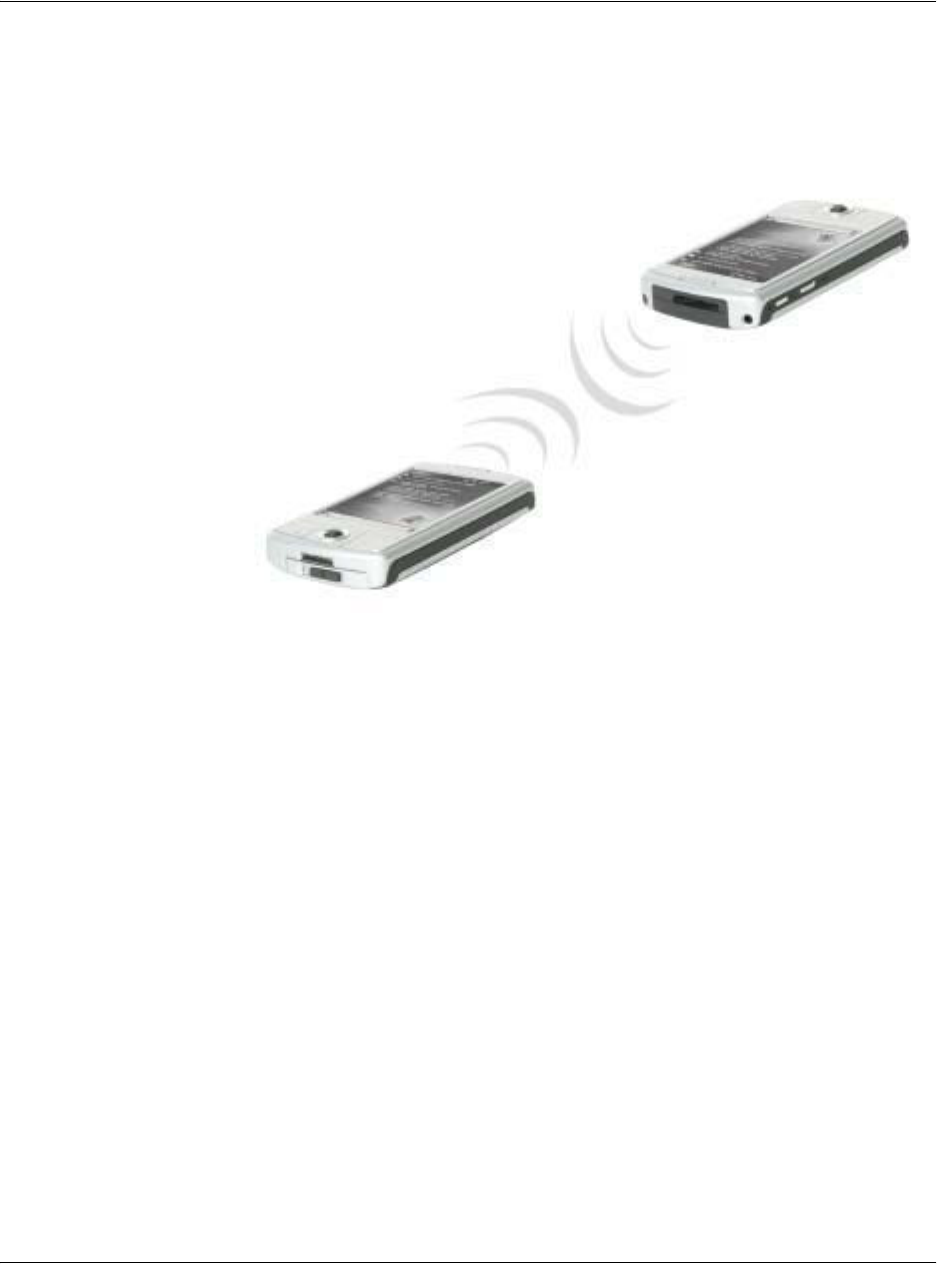
9 Getting connected
Connecting to the Internet
72
To receive information via infrared
1 Align the IR port of your handheld with that of the sending IR-enabled device so that
they are unobstructed and within a close range.
2 Have the owner of the sending device transmit the information to you. Your
handheld will automatically receive it.
To send information via Bluetooth®
1 Switch to the program where you created the item you want to send and locate the
item in the list.
2 Tap-and-hold on the item and from the pop-up menu, tap send via Bluetooth.
3 On the Select a Bluetooth device screen, tap the name of the destination device, and
then tap OK.
To receive information via Bluetooth®
1 Make sure that Bluetooth is enabled, and File Transfer service is also enabled.
2 Have the owner of the sending device transmit the information to you. Your
handheld will automatically receive it. Note that if Authorization required or
Authentication (Passkey) required is checked in the File Transfer service Tab, you will
be prompted to accept or enter passkey before allowing transmission.
Connecting to the Internet
To create a modem connection to an ISP
1 Obtain the following information from your ISP:

9 Getting connected
Connecting to the Internet
73
• ISP server telephone number
• User name and password
• TCP/IP settings
2 Insert a SD/CF Modem card (purchased seperately) into your handheld’s SD/CF slot.
NOTE: For instructions on inserting and using a SD/CF Modem card, see the documentation
that came with the card.
3 Tap and then Settings.
In the Connections tab, tap Connections. Under My ISP, select Add a new modem
connection.
4 Enter a name for the connection, such as "My Connection."
5 In the Select a modem list, select your modem type.
If your modem type does not appear, try re-inserting the modem card.
6 You should not need to change any settings in Advanced. Most ISPs now use a
dynamically-assigned address. If the ISP you are connecting to does not use a
dynamically-assigned address, tap Advanced and then the TCP/IP tab, and enter the
address. When finished, tap OK and then Next.
7 Enter the ISP phone number, and tap Next.
8 Enter your username, password and domain (if any), and tap Finish to complete the
process.
To connect to your ISP, open the Connections main window and tap Manage Existing
Connections. Tap and hold on the applicable dial-up settings and select Connect. Your
modem will dial-out and attempt to create the connection.
To create a connection to an ISP over Bluetooth®
If you have access to a cellular phone with Bluetooth support, you can connect to
online resources using your phone as a modem over a Bluetooth link. To configure
your handheld to do this, select Add a New Modem Connection from the My ISP after
tapping and then Settings then Connections icon in the Connections tab.
1 Notice the Bluetooth modem selection available in the Make New Connection wizard.
Choose an appropriate name for the connection so as to distinguish it from standard
modem connections.
2 You will be asked to select a Bluetooth phone or select New... to find a new phone.
Once a Bluetooth-enabled phone has been found, highlight its name and press Next.
3 Check your cellular phone's instruction manual to determine screen inputs for the
forthcoming Bluetooth bonding screens. On your n50, you will be asked to enter the
PIN selected on your cellular phone. Both PINs must match or bonding will fail.
4 Select a name for the Bluetooth bond. Select Finish to exit wizard.
5 Now you will be presented with a prompt to enter the dialing string to be used in
conjunction with your cellular phone. Consult your cellular phone provider to obtain
this string.

9 Getting connected
Connecting to the Internet
74
To connect using your new Bluetooth connection, tap the Connections icon in the
notification area and then click the link showing the dialing string you entered for the
Bluetooth connection. Your handheld will attempt to connect to your cellular phone .
Confirm that you are wanting to connect with the cellular phone, and momentarily
you will see the icon in the notification tray upon successful connection.
To create a wireless Ethernet connection to an ISP
1 Insert the wireless Ethernet card into your handheld. For instructions on inserting and
using the Ethernet card, see the documentation that came with the card.
2 The first time you insert the card, a notification will appear, asking you whether the
installed network card should be used to connect to The Internet or Work. Where
possible, the Service Set Identifier (SSID) will be determined automatically. Select The
Internet, then either accept all default settings by tapping OK (most home networks
will allow you to immediately get online without further configuration) or tap
Settings to configure the connection. Sometimes a network will require a WEP key. If
so, you will be prompted for one at this point.
3 Select the Advanced tab from the Connections Settings. Select the Network Card tab
to customize how each of your installed network card drivers connects. Highlight the
driver name of the card you wish to configure. Indicate whether My network card
connects to: The Internet. Tap on the name of the driver to receive advanced
options.
4 Configure the IP address settings in the IP Address tab.
5 Configure the DNS and WINS settings in the Name Servers tab.
You must remove then reinsert your network card for these settings to take effect.
6 Select the Network Card button from Connection Settings-Advanced to
configure your wireless networks. Networks that you have already configured are
preferred networks and are listed in the Wireless tab. You can select to connect to
only preferred networks or have your handheld search for and connect to any
available network whether it is preferred or not. Press Add New Settings... if you do
not see a network you'd like to connect to.
7In the General tab you can set the network name (also known as SSID); this is only
editable if you are creating a new wireless network profile else you are viewing a
preferred network and the SSID has already been established. Indicate whether this
network will connect you to The Internet. Finally, if this is a new network profile,
you can indicate whether this is a computer-to-computer network.
NOTE: To determine if authentication is needed, check your network administrator.
8 To view your wireless network connection after the preceding steps have been
followed, press the icon in the notification area. A green status indicator will
show how strong your signal is. Tapping Turn Wireless Off will turn off your network
card radio. Pressing the icon will then allow you to Turn Wireless on.
Once your network card has been configured, you will immediately be connected.

9 Getting connected
Connecting to a network
75
Connecting to a network
If you have access to a network at work, you can send email messages, view Intranet
pages, synchronise your handheld, and access the Internet. You can connect to a
network in one of three ways:
• Create a modem connection by using an RAS account.
• Use an wireless Ethernet card and a net tap to connect to the network.
If this is the method you want to use, see "To create an wireless Ethernet
connection to a network" on page 75.
Your n50 handheld supports a SD wireless Ethernet card or a SD Modem card.
• Create a Bluetooth connection to a cellular phone as a modem with
Bluetooth support.
To create a modem connection to a network
Follow the instructions stated in "To create a modem connection to an ISP" section,
but select Add a new modem connection under My Work Network to begin.
To create a wireless Ethernet connection to a network
Follow the instructions stated in "To create a wireless Ethernet connection to an ISP"
section, but connect to Work under notification bubble to begin.
To create a connection to a network over Bluetooth®
Follow the instructions stated in "To create a conection to an ISP over Blouetooth”
section, but Add a new modem connection from work under connection tab.
End a connection
To disconnect, do one of the following:
• When connected via Infrared, move your handheld away from the computer.
• When connected via a wireless (Ethernet) card, remove the card from your
handheld.
• When connected via Bluetooth, turn off Bluetooth to terminate connection.
Get help on connecting
More information on the procedures described here, as well as information on
additional procedures, can be found in the following locations:
• The section on "Messaging" on page 42.
• Online Help of your handheld. Tap and then Help. Tap View, All Installed
Help, and then Inbox or Connections.
• ActiveSync Help on the your computer. In ActiveSync, click Microsoft
ActiveSync Help on the Help menu.

9 Getting connected
Connecting to a network
76
• For troubleshooting information, see the Pocket PC Web site at
(http://www.microsoft.com/mobile/pocketpc/).

10 Using Microsoft® Pocket Internet Explorer
Mobile Favorites folder
77
10 Using Microsoft®
Pocket Internet
Explorer
Use Microsoft® Pocket Internet Explorer to view Web or WAP pages in either of these
ways:
• During synchronisation with your computer, download your favorite links
and mobile favorites that are stored in the Mobile Favorites subfolder of
Internet Explorer on your computer.
• Connect to an Internet service provider (ISP) or network and browse the Web.
To do this, you'll need to create the connection first, as described in "9
Getting connected" on page 71.
When connected to an ISP or network, you can also download files and programs
from the Internet or intranet.
Mobile Favorites folder
Only items stored in the Mobile Favorites subfolder in the Favorites folder of Internet
Explorer on your computer will be synchronised with your handheld. This folder was
created automatically when you installed ActiveSync.
Favorite links
During synchronisation, the list of favorite links in the Mobile Favorites folder on your
computer is synchronised with Pocket Internet Explorer on your handheld. Both
locations are updated with changes made to either list each time you synchronise.
Unless you mark the favorite link as a mobile favorite, only the link will be
downloaded to your handheld, and you will need to connect to your ISP or network to
view the content.
For more information on synchronisation, see ActiveSync Help on your computer.
Mobile favorites
If you are using Microsoft Internet Explorer 5.0 or later on your computer, you can
download mobile favorites to your handheld. Synchronising mobile favorites
downloads Web content to your handheld enable you to view pages while you are
disconnected from your ISP and computer.
Use the Internet Explorer plug-in installed with ActiveSync to create mobile favorites
quickly.

10 Using Microsoft® Pocket Internet Explorer
Using Pocket Internet Explorer
78
To create a mobile favorite
1 In Internet Explorer on your computer, click Tools and then Create Mobile Favorite.
2 To change the link name, enter a new name in the Name box.
3 Optionally, in Update, select a desired update schedule.
NOTE: If you did not specify an update schedule, you will need to manually download
content to keep the information updated on both your computer and handheld. Before
synchronising with your handheld, in Internet Explorer on your computer, click Tools and
then Synchronise. You will see the last time content was downloaded to the computer, and
you can manually download content if needed.
4 Click OK.
Internet Explorer downloads the latest version of the page to your computer.
TIP: You can add a button to the Internet Explorer toolbar for creating mobile favorites. In
Internet Explorer on your computer, click View, Toolbars, and then Customise.
To download a mobile favorite
1 Right-click the mobile favorite and then click Properties.
2 In the Download tab, specify the number of links deep you want to download.
To conserve handheld memory, go only one level deep.
3 Synchronise your handheld and computer.
Mobile favorites that are stored in the Mobile Favorites folder in Internet Explorer are
downloaded to your handheld.
To save handheld memory
Mobile favorites take up storage memory on your handheld. To minimise the amount
of memory used, observe the following:
• In the settings for the Favorites information type in ActiveSync options, turn
off pictures and sounds, or stop some mobile favorites from being
downloaded to your handheld.
• Limit the number of downloaded linked pages.
a In Internet Explorer on the computer, right-click the mobile favorite you want
to change and then click Properties.
b In the Download tab, specify 0 or 1 for the number of linked pages you want
to download.
Using Pocket Internet Explorer
You can use Pocket Internet Explorer to browse mobile favorites and channels that
have been downloaded to your handheld without connecting to the Internet. You can
also connect to the Internet through an ISP or a network connection and browse the
Web.

10 Using Microsoft® Pocket Internet Explorer
Using Pocket Internet Explorer
79
To view mobile favorites and channels
1 Tap the Favorites button to display your list of favorites.
2 Tap the page you want to view.
You'll see the page that was downloaded the last time you synchronised with your
computer. If the page is not on your handheld, the favorite will be dimmed. You will
need to synchronise with your computer again to download the page to your
handheld, or connect to the Internet to view the page.
To browse the Internet
1 Set up a connection to your ISP or corporate network, as described in"9 Getting
connected" on page 71.
2 To connect and start browsing, do one of the following:
• Tap the Favorites button, and then tap the favorite you want to view.
• Tap View and then Address Bar. In the address bar that appears at the top of
the screen, enter the Web address you want to visit and then tap Go. Tap the
arrow to choose from previously entered addresses.
• To add a favorite link while using the handheld:
a Go to the page you want to add.
b Tap and hold on the page.
c Tap Add to Favorites.

10 Using Microsoft® Pocket Internet Explorer
Using Pocket Internet Explorer
80

11 Customising your handheld
Adjusting handheld settings
81
11 Customising your
handheld
You can customise your handheld based on your personal requirements and
preferences as well as depending on your usual work modes. Customise your
handheld by doing either of the following:
• Adjust the handheld settings
• Add or remove programs
Adjusting handheld settings
You can adjust the settings of your handheld to suit the way you work.
To access Settings
• Tap , then Settings.
Tap an available Settings option to open the corresponding adjustment page.
The Settings window has three tabs—Personal, System, and Connections, each of
which has its own set of options.
The succeeding sections shows the configuration page of each the Settings options.
For detailed instructions on these pages, access the page then tap then, Help.
Adding and removing programs
Programs bundled with your handheld at the factory are stored in ROM (read-only
memory). You cannot remove these programs, and you'll never accidentally lose ROM
contents. ROM programs can be updated using special installation programs. All other
programs and data files installed to your handheld after factory installation can be
stored in RAM(random access memory) or ROM storage(a file folder in your handheld
which in fact is a ROM space specially reserved for user access). The ROM storage can
be accessed through File Explorer, too.
You can install any program created for your handheld, as long as it has enough
memory. The most popular place to find software for your handheld is on the Pocket
PC Web site (http://www.microsoft.com/mobile/pocketpc/).
Adding programs
You could add programs to your handheld either by using ActiveSync or by
downloading the program from the Internet.

11 Customising your handheld
Adding and removing programs
82
To add programs using ActiveSync
You'll need to install the appropriate software for your handheld on your computer
before installing it on your handheld.
1 Determine your handheld and processor type so that you know which version of the
software to install.
a Tap and then Settings.
b On the System tab, tap About.
c In the Version tab, make a note of the information in Processor.
2 Download the program to your computer (or insert the CD or disk that contains the
program into your computer).
You may see a single *.xip, *.exe, *.cab, or *.zip file, a Setup.exe file, or several
versions of files for different device types and processors. Be sure to select the
program designed for a Pocket PC and your handheld’s processor type.
NOTE: Read any installation instructions, Read Me files, or documentation that comes with
the program. Many programs provide special installation instructions.
3 Connect your handheld to your computer.
4 Double-click the *.exe file.
• If the file is an installer, the installation wizard will begin. Follow the
directions on the screen. Once the software has been installed on your
computer, the installer will automatically transfer the software to your
handheld.
• If the file is not an installer, you will see an error message stating that the
program is valid but it is designed for a different type of computer. You will
need to move this file to your handheld. If you cannot find any installation
instructions for the program in the Read Me file or documentation, use
ActiveSync Explore to copy the program file to the Program Files folder on
your handheld. For more information on copying files using ActiveSync, see
ActiveSync Help.
5 Once installation is complete, tap , Programs, and then the program icon to
launch it.
To add a program directly from the Internet
1 Determine your handheld and processor type so that you know which version of the
software to install.
a Tap and then Settings.
b On the System tab, tap About.
c In the Version tab, make a note of the information in Processor.
2 Download the program to your handheld straight from the Internet using Pocket
Internet Explorer.
You may see a single *.xip, *.exe, *.cab, or *.zip file, a Setup.exe file, or several
versions of files for different device types and processors. Be sure to select the
program designed for a Pocket PC and your handheld’s processor type.

11 Customising your handheld
Adding and removing programs
83
NOTE: Read any installation instructions, Read Me files, or documentation that comes with
the program. Many programs provide special installation instructions.
3 Tap the file, such as a *.xip or *.exe file.
The installation wizard will begin.
4 Follow the directions on the screen.
To add a program to the Start menu
• Tap , Settings, Menus, the Start Menu tab, and then the check box for the
program.
If you do not see the program listed, you can either use File Explorer on your
handheld to move the program to the Start Menu folder, or use ActiveSync
on your computer to create a shortcut to the program and place the shortcut
in the Start Menu folder.
– Using File Explorer on your handheld
a Tap , Programs, File Explorer, and locate the program (tap the folder
list, labeled My Documents by default, and then My Device to see a list of
all folders on your handheld).
b Tap and hold the program and tap Cut on the pop-up menu.
c Open the Start Menu folder located in the Windows folder, tap and hold
a blank area of the window.
d Tap Paste on the pop-up menu.
The program will now appear on the menu.
For more information on using File Explorer, see "To use File Explorer" on page
32.
– Using ActiveSync on your computer
a Use the Explorer in ActiveSync to explore your handheld files and locate
the program.
b Right-click the program, and then click Create Shortcut.
c Move the shortcut to the Start Menu folder in the Windows folder.
The shortcut now appears on the Start Menu.
For more information on using ActiveSync, see ActiveSync Help on your computer.
Removing programs
1 Tap and then Settings.
2 On the System tab, tap Remove Programs.
3 Tap the program you wish to remove, then tap the Remove button.
If the program does not appear in the list of installed programs, use File Explorer on
your handheld to locate the program:
1 Tap and hold the program.
2 Tap Delete on the pop-up menu.

11 Customising your handheld
Adding and removing programs
84

Appendix A: Exchanging and updating data using Bluetooth® Utility
(optional)
Bluetooth® Utility
85
Appendix A:
Exchanging and updating
data using Bluetooth®
Utility (optional)
This chapter provides overview description for using services provided by Bluetooth
Utility which includes Bluetooth Setting and Bluetooth Manager.
Bluetooth® Utility
Bluetooth utility is the solution for the seamless integration of Bluetooth technology
into devices that use the PocketPC operating system. It provides handheld with the
means to:
• Locate other Bluetooth devices in the immediate vicinity (inquiry)
• Discover the services that those devices offer (discovery)
• Connect to, use, and disconnect from those services
• Enable/disable individual services
• Security features, on a service-by-service basis, including:
– Authentication
– Authorization
– Encryption
Bluetooth® Icon
The Bluetooth icon in the lower-right corner of the Today screen provides quick access
to the Bluetooth Manager and Bluetooth Settings.
It also provides visual feedback about the state of Bluetooth:
• When Bluetooth utility is active (on) the Bluetooth icon is blue .
• If Bluetooth utility is disabled (off) the icon appears grayed with a red circle
around a white X - - in the lower-right corner .
• While the Bluetooth software loads (one to five seconds, depending on your
system), the icon is blue in the upper-left diagonal, gray in the lower-right
diagonal, and the red circle is in place .

Appendix A: Exchanging and updating data using Bluetooth® Utility
(optional)
Bluetooth® Settings
86
Apply Power To The Bluetooth® Hardware
The first screen Bluetooth Settings has ON/OFF buttons to apply/remove power to the
hardware.
Bluetooth® Settings
The Bluetooth Settings screen's tabs are :
•Gerneral
– User profile selection
– Bluetooth status (ON/OFF) indicator
– Hardware power control (ON/OFF)
– Shortcut to the Bluetooth Manager
• Accessibility
– Set the device name
– The handheld's Bluetooth Device Address (BDA)
– Determine which remote devices are allowed to connect
– Determine whether remote devices can "see" this handheld
• Service tabs-Bluetooth can provide four services. They are:
– File Transfer-set the highest-level directory on this handheld that remote
devices will be able to access.
– Information Exchange-Set the default business card (Pocket Outlook
contact entry)
– Serial Port-Bluetooth serial port information
– Dial-up Networking-configure the COM port, baud rate and flow control.
– Personal Network Server-configure the service availability
• About-there are no configurable options on this tab.
– Software version information
– Copyright information
– Website and Technical Support links.
Bluetooth® Manager
The Bluetooth Manager allows you to create, manage, and use Bluetooth connections
with remote devices.
To access Bluetooth Manager:
• From the Today screen, tap and then:
– tap > Programs > Bluetooth Manager.
or
• In the lower-right corner of the screen, tap the Bluetooth icon and then select
Bluetooth Manager.
Bluetooth Manager has :

Appendix A: Exchanging and updating data using Bluetooth® Utility
(optional)
Bluetooth® Browser
87
• Two tabs:
– My Shortcuts-displays a list of pre-configured connections and establishes
connections
– Active Connections-displays active incoming and outgoing connections.
• Three menus:
–New
Connect!-create a new connection
– Tools
Paired devices-pair/un-pair with other devices
Business Card Exchange-opens the Business Card Exchange.
– View-controls the on-screen display (icons or list).
Bluetooth® Browser
Various Bluetooth applications require you to select the device you want to connect
to.
The Bluetooth Browser appears and searches for other Bluetooth devices. As the
search progresses, the found devices are listed in the window. To select a device from
the list, tap it. You do not have to wait for the search to finish; as soon as the desired
device appears in the list, tap it to select it and return to the previous screen.
Remote Device Services
This section provides overview instructions for using services provided by other
devices.
Series Port
The use of a Bluetooth wireless serial port connection is identical to the use of a
physical cable serial port connection between two devices.
As with a physical connection, the application that will use the connection must be
configured to use the correct serial port.
To determine the communications port assigned to the Bluetooth serial port:
• In the lower-right corner of the Today Screen, tap the Bluetooth icon, and
then select Bluetooth Settings.
• Use the scroll arrows at the bottom-right of the screen to expose the Serial
Port tab, and then select the Serial Port tab.
The Outbound COM Port is listed in the lower portion of the screen.
Configure the application that will use the Bluetooth Serial Port to send data
to this port.
• From Bluetooth Manager's My Shortcuts screen open the Bluetooth serial
port connection to the remote device.
• Send/Receive data from the application.

Appendix A: Exchanging and updating data using Bluetooth® Utility
(optional)
Remote Device Services
88
Dial-up Networking: Connect To A Remote Computer
Dial-up Networking allows you to connect to a remote computer via a phone line.
Once connected, you can browse the Internet, check your email, etc.
The remote Bluetooth device that will provide the Dial-up Networking service must
have access to a telephone system (either a hard-wired or cellular connection).
Devices that might provide the Dial-up Networking service include:
• Bluetooth-enabled cellular telephones
• Bluetooth-enabled desktop computers that are attached to a telephone
system
• Bluetooth modems.
The remote computer to which you are connecting must also be attached to the
phone system and capable of answering a call.
Bluetooth® File Explorer
Bluetooth File Explorer appears automatically when a File Transfer connection is
established. It allows you to:
• Navigate the directory structure of the remote device
• View files and folders on the remote device
• Create new folders on the remote device
• Send files to, and get files from the remote device
• Delete files on the remote device.
NOTE: File operations on the remote device are limited to the remote device's configured
FTP root directory and its sub-directories.
Bluetooth File Explorer also allows you to set the folder on your handheld that will
receive inbound files. This folder is configurable on an individual basis for each
connection shortcut.
Send Via Bluetooth®
Pocket Outlook contacts, calendar items, and tasks can be sent individually or
collectively to a remote device.
To send data via Bluetooth transfer:
• From the Start menu, Programs, open Calendar, Contacts or Tasks
• Highlight the item(s) to be sent
• Tap-and-hold the item(s), and from the pop-up menu, tap Send via
Bluetooth.
• On the Select a Bluetooth device screen, tap the name of the destination
device, and then tap OK.
Dial Via Bluetooth®

Appendix A: Exchanging and updating data using Bluetooth® Utility
(optional)
Remote Device Services
89
Dial via Bluetooth lets you select a contact from the Pocket Outlook Contact list and
have your paired cell phone dial the contact's phone number. If a contact has more
than one phone number, you can select the number to be dialed. Phone numbers can
also be modified before they are dialed.
To use the Dial via Bluetooth feature :
• From Pocket Outlook's Contact screen, tap-and-hold a contact and select Dial
via Bluetooth.
• If this handheld is paired with more than one cell phone, or if a phone is not
already selected, tap the phone icon next to "Select a phone:" and choose
the phone to be used.
• Select the number to be dialed and tap "Dial Number."
• To modify the number to be dialed, tap "Edit Number," make the changes to
the number, tap OK to return to the previous screen, and then tap "Dial
Number."
After the number is sent to the cell phone, the handheld closes the connection. If the
phone number was modified, a dialog box appears with the option to save or discard
the modification.
After the cell phone completes the dialing process, the phone can be used in the
normal way.
Bluetooth® Personal Area Network
A Bluetooth personal area network is a private, temporary, ad-hoc network of up to
eight devices. A Bluetooth personal area network makes it easy to exchange
information that would normally require a TCP/IP network. For example, most chat
utilities, multi-player games, etc. are fully functional in a Bluetooth personal area
network environment.
Bluetooth private area networks are subject to the same security settings that govern
other Bluetooth communications (service availability, authorization, authentication
and encryption).
One Bluetooth device must be the host of the personal area network. Other Bluetooth
devices join the network as clients.
The host can accept and reject clients on an individual basis.

Appendix A: Exchanging and updating data using Bluetooth® Utility
(optional)
Remote Device Services
90

Appendix B: Regulation & safety notices
Energy Star Guidelines Compliance
91
Appendix B:
Regulation & safety notices
This appendix lists the general notices of your computer.
Energy Star Guidelines Compliance
As an Energy Star Partner, Acer Inc. has determined that this product meets the Energy
Star guidelines for energy efficiency.
FCC notice
This device has been tested and found to comply with the limits for a Class B digital
device pursuant to Part 15 of the FCC Rules. These limits are designed to provide
reasonable protection against harmful interference in a residential installation. This
device generates, uses, and can radiate radio frequency energy and, if not installed
and used in accordance with the instructions, may cause harmful interference to radio
communications.
However, there is no guarantee that interference will not occur in a particular
installation. If this device does cause harmful interference to radio or television
reception, which can be determined by turning the device off and on, the user is
encouraged to try to correct the interference by one or more of the following
measures:
•Reorient or relocate the receiving antenna.
•Increase the separation between the device and receiver.
•Connect the device into an outlet on a circuit different from that to which the
receiver is connected.
•Consult the dealer or an experienced radio/television technician for help.
Notice: Shielded cables
All connections to other computing devices must be made using shielded cables to
maintain compliance with FCC regulations.

Appendix B: Regulation & safety notices
Notice: Peripheral devices
92
Notice: Peripheral devices
Only peripherals (input/output devices, terminals, printers, etc.) certified to comply
with the Class B limits may be attached to this equipment. Operation with non-
certified peripherals is likely to result in interference to radio and TV reception.
Caution
Changes or modifications not expressly approved by the manufacturer could void the
user's authority, which is granted by the Federal Communications Commission, to
operate this computer.
Operation conditions
This device complies with Part 15 of the FCC Rules. Operation is subject to the
following two conditions: (1) this device may not cause harmful interference, and (2)
this device must accept any interference received, including interference that may
cause undesired operation.
Notice: Canadian users
This Class B digital apparatus complies with Canadian ICES-003.
Remarque à l’intention des utilisateurs canadiens
Cet appareil numérique de la classe B est conforme a la norme NMB-003 du Canada.
Declaration of Conformity for EU countries
Hereby, Acer, declares that this Acer PDA is in compliance with the essential
requirements and other relevant provisions of Directive 1999/5/EC. (Please visit
www.acer.com/about/certificates/nb for complete documents.)
Ɂɚɦɟɱɚɧɢɟ ɞɥɹ ɊɎ
ɋɨɨɬɜɟɬɫɬɜɭɟɬ ɫɟɪɬɢɮɢɤɚɬɚɦ,ɨɛɹɡɚɬɟɥɶɧɵɦ ɜ ɊɎ
ɋɬɟɧɧɚɹ ɪɨɡɟɬɤɚ ɞɨɥɠɧɚ ɛɵɬɶ ɩɪɚɜɢɥɶɧɨ ɡɚɡɟɦɥɟɧɚ

Appendix B: Regulation & safety notices
Important safety instructions
93
Important safety instructions
Read these instructions carefully. Save them for future reference.
1Follow all warnings and instructions marked on the product.
2Unplug this product from the wall outlet before cleaning. Do not use liquid
cleaners or aerosol cleaners. Use a damp cloth for cleaning.
3Do not use this product near water.
4Do not place this product on an unstable cart, stand, or table. The product may
fall, causing serious damage to the product.
5Slots and openings are provided for ventilation; to ensure reliable operation of
the product and to protect it from overheating. These openings must not be
blocked or covered. The openings should never be blocked by placing the product
on a bed, sofa, rug, or other similar surface. This product should never be placed
near or over a radiator or heat register, or in a built-in installation unless proper
ventilation is provided.
6This product should be operated from the type of power indicated on the
marking label. If you are not sure of the type of power available, consult your
dealer or local power company.
7Do not allow anything to rest on the power cord. Do not locate this product
where persons will walk on the cord.
8If an extension cord is used with this product, make sure that the total ampere
rating of the equipment plugged into the extension cord does not exceed the
extension cord ampere rating. Also, make sure that the total rating of all products
plugged into the wall outlet does not exceed the fuse rating.
9Never push objects of any kind into this product through cabinet slots as they may
touch dangerous voltage points or short out parts that could result in a fire or
electric shock. Never spill liquid of any kind on the product.
10 Do not attempt to service this product yourself, as opening or removing covers
may expose you to dangerous voltage points or other risks. Refer all servicing to
qualified service personnel.
11 Unplug this product from the wall outlet and refer servicing to qualified service
personnel under the following conditions:
aWhen the power cord or plug is damaged or frayed.
bIf liquid has been spilled into the product.
cIf the product has been exposed to rain or water.
dIf the product does not operate normally when the operating instructions are
followed. Adjust only those controls that are covered by the operating instructions
since improper adjustment of other controls may result in damage and will often
require extensive work by a qualified technician to restore the product to normal
condition.
eIf the product has been dropped or the case has been damaged.
fIf the product exhibits a distinct change in performance, indicating a need for service.
12 The Acer PDA uses the lithium battery.
Replace the battery with the same type as the product's battery we recommend in

Appendix B: Regulation & safety notices
LCD pixel statement
94
the product specification list. Use of another battery may present a risk of fire or
explosion.
13 Warning! Batteries may explode if not handled properly. Do not disassemble or
dispose of them in fire. Keep them away from children and dispose of used
batteries promptly.
14 To avoid hazard of unexpected electrical shock, use AC adapter only when the
wall AC socket is ensured to be properly grounded.
LCD pixel statement
The LCD unit is produced with high-precision manufacturing techniques. Nevertheless,
some pixels may occasionally misfire or appear as black or red dots. This has no effect
on the recorded image and does not constitute a malfunction.
Macrovision® copyright protection notice
This product incorporates copyright protection technology that is protected by
method claims of certain U.S. patents and other intellectual property rights owned by
Macrovision Corporation and other rights owners. Use of this copyright protection
technology must be authorized by Macrovision Corporation, and is intended for home
and other limited viewing uses only unless otherwise authorized by Macrovision
Corporation. Reverse engineering or disassembly is prohibited.
Apparatus Claims of U.S. Patent Nos. 4,631,603, 4,577,216, 4,819,098, 4,907,093, and
6,516,132 licensed for limited viewing uses only.
Radio Device Regulatory Notice
NOTE: Below regulatory information is for models with wireless LAN and/or Bluetooth®
only.
General
This product complies with the radio frequency and safety standards of any country or
region in which it has been approved for wireless use.
Depending on configurations, this product may or may not contain wireless radio
devices (such as wireless LAN and/or Bluetooth® modules). Below information is for
products with such devices.

Appendix B: Regulation & safety notices
European Union (EU)
95
European Union (EU)
This device complies with the essential requirements of the European Council
Directives listed below:
73/23/EEC Low Voltage Directive
•EN 60950
89/336/EEC Electromagnetic Compatibility (EMC) Directive
•EN 55022
•EN 55024
•EN 61000-3-2/-3
99/5/EC Radio & Telecommunications Terminal Equipment (R&TTE) Directive
•Art.3.1a) EN 60950
•Art.3.1b) EN 301 489 -1/-17
•Art.3.2) EN 300 328-2
List of Applicable Countries
EU member states as of May 2004 are: Belgium, Denmark, Germany, Greece, Spain,
France, Ireland, Italy, Luxembourg, the Netherlands, Austria, Portugal, Finland,
Sweden, United Kingdom Estonia, Latvia, Lithuania, Poland, Hungary, Czech Republic,
Slovak Republic, Slovenia, Cyprus and Malta. Usage allowed in the countries of
European Union, as well as Norway, Switzerland, Iceland and Liechtenstein. This
device must be used in strict accordance with the regulations and constraints in the
country of use. For further information, please contact local office in the country of
use.
The FCC RF safety requirement
The radiated output power of Wireless LAN Mini-PCI Card and Bluetooth® card is far
below the FCC radio frequency exposure limits. Nevertheless, the Acer PDA shall be
used in such a manner that the potential for human contact during normal operation
is minimized as follows:
• An improper installation or unauthorized use may cause harmful interference
to radio communications. Also any tampering of the internal antenna will
void the FCC certification and your warranty.
Canada - Low power license-exempt radio
communication devices (RSS-210)
aCommon information
Operation is subject to the following two conditions:
1. This device may not cause interference, and

Appendix B: Regulation & safety notices
Exposure of humans to RF fields (RSS-102)
96
2. this device must accept any interference, including
interference that may cause undesired operation of the
device.
bOperation in 2.4 GHz band
To prevent radio interference to the licensed service, this device is intended to
be operated indoors and installed outdoors is subject to licensing.
Exposure of humans to RF fields (RSS-102)
The Acer Acer PDA employs low gain integral antennas that do not emit RF field in
excess of Health Canada limits for the general population; consult Safety Code 6,
obtainable from Health Canada’s Web site at www.hc-sc.gc.ca/rpb.
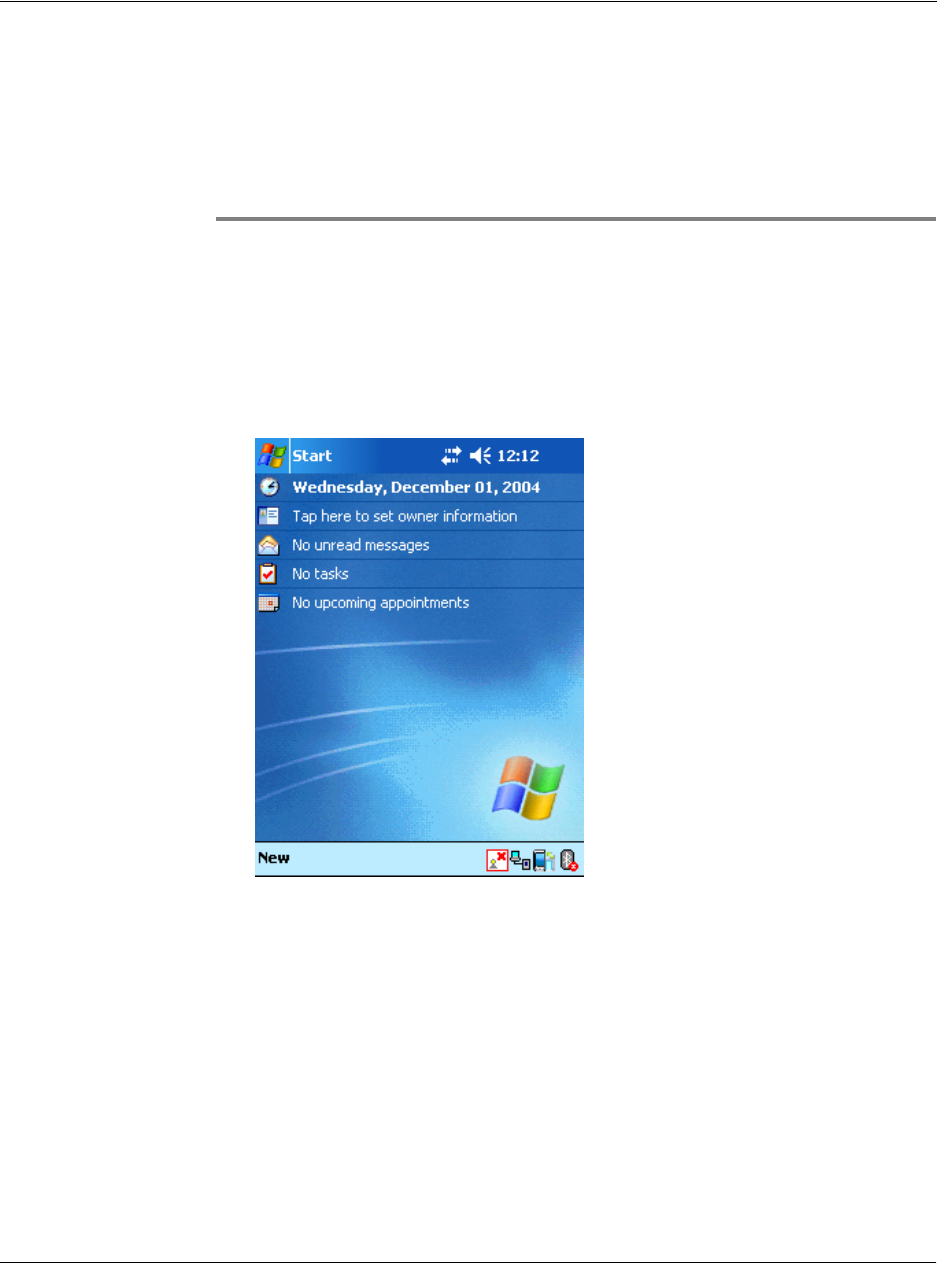
Appendix C: Wireless communication
97
Appendix C:
Wireless communication
Applicable only to the Acer Handheld device, this feature uses a built-in IEEE 802.11b
WLAN adapter to connect to an existing IEEE 802.11b wireless network. This feature
provides you with an Internet experience that is completely mobile to meet your fast
paced lifestyle, and with a high-speed transmission rate of up to 11 Mbps you're sure
to be always wired to the information highway.
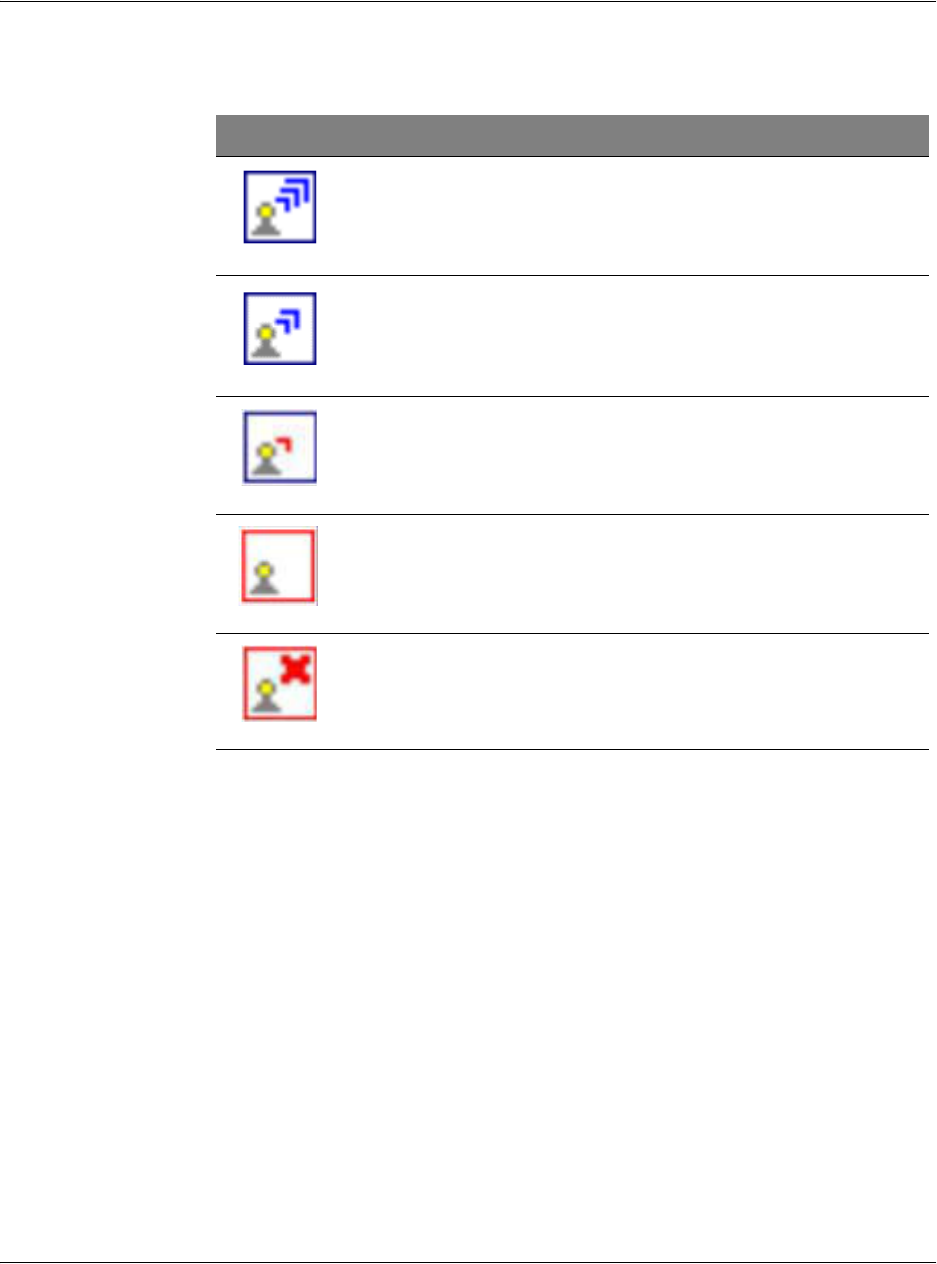
Appendix C: Wireless communication
Tray Icon
98
Tray Icon
Icon Wireless LAN Card Status
Excellent signal strength. (RSSI > -57dBm )
Good signal strength. (RSSI : -70~-57 dBm)
Bad signal strength. (RSSI < -70dBm )
Disconnect.
No operation.
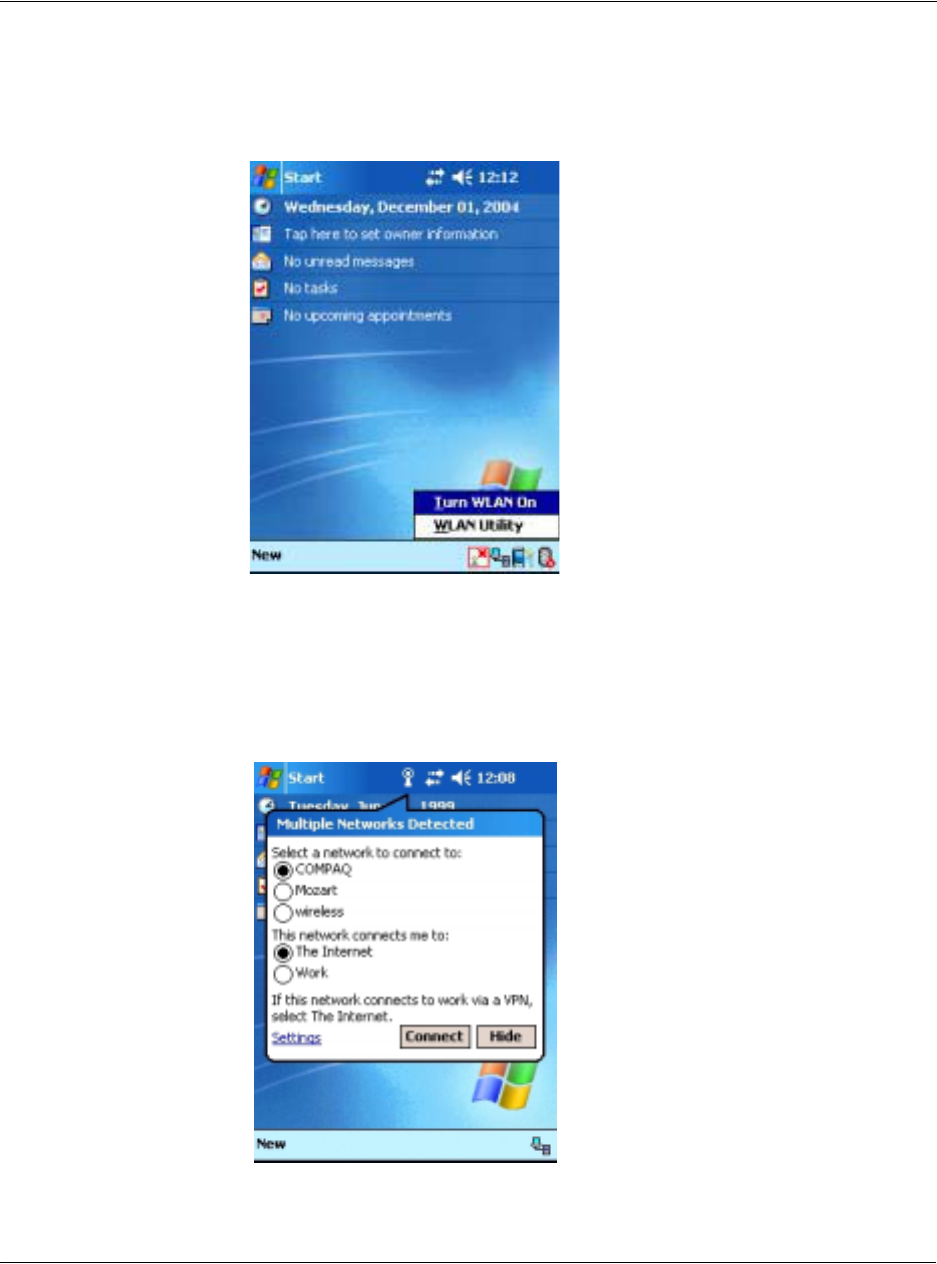
Appendix C: Wireless communication
Activating the wireless feature
99
Activating the wireless feature
1Tap the SWLUCE icon to activate the utility in the lower right corner of the Today
screen.
2Tap the option T
T
urn WLAN On. The system automatically scans for all the
available wireless networks.
3From the list of detected wireless networks, select a wireless network to which
you wish to connect your device.
4Select either The Internet or Work for the network to connect your device.
5Tap Connect.
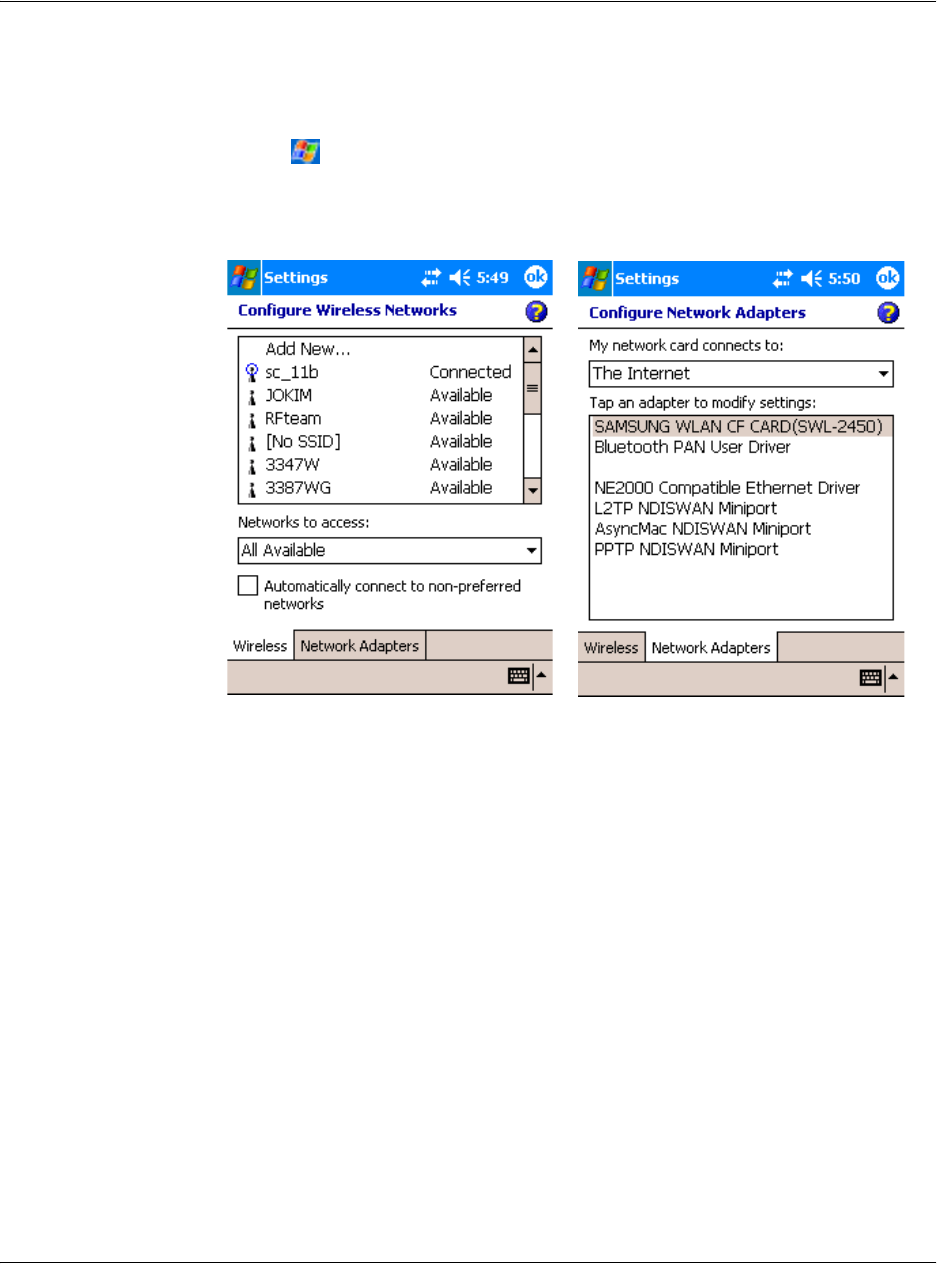
Appendix C: Wireless communication
Configuring the wireless settings
100
Configuring the wireless settings
To view and modify the IP address and server-related settings:
1Tap , Settings.
2Tap the Connections tab, then the Networks Adapter icon.
3Select your desired changes to the available adapter from the list, then tap the
OK.
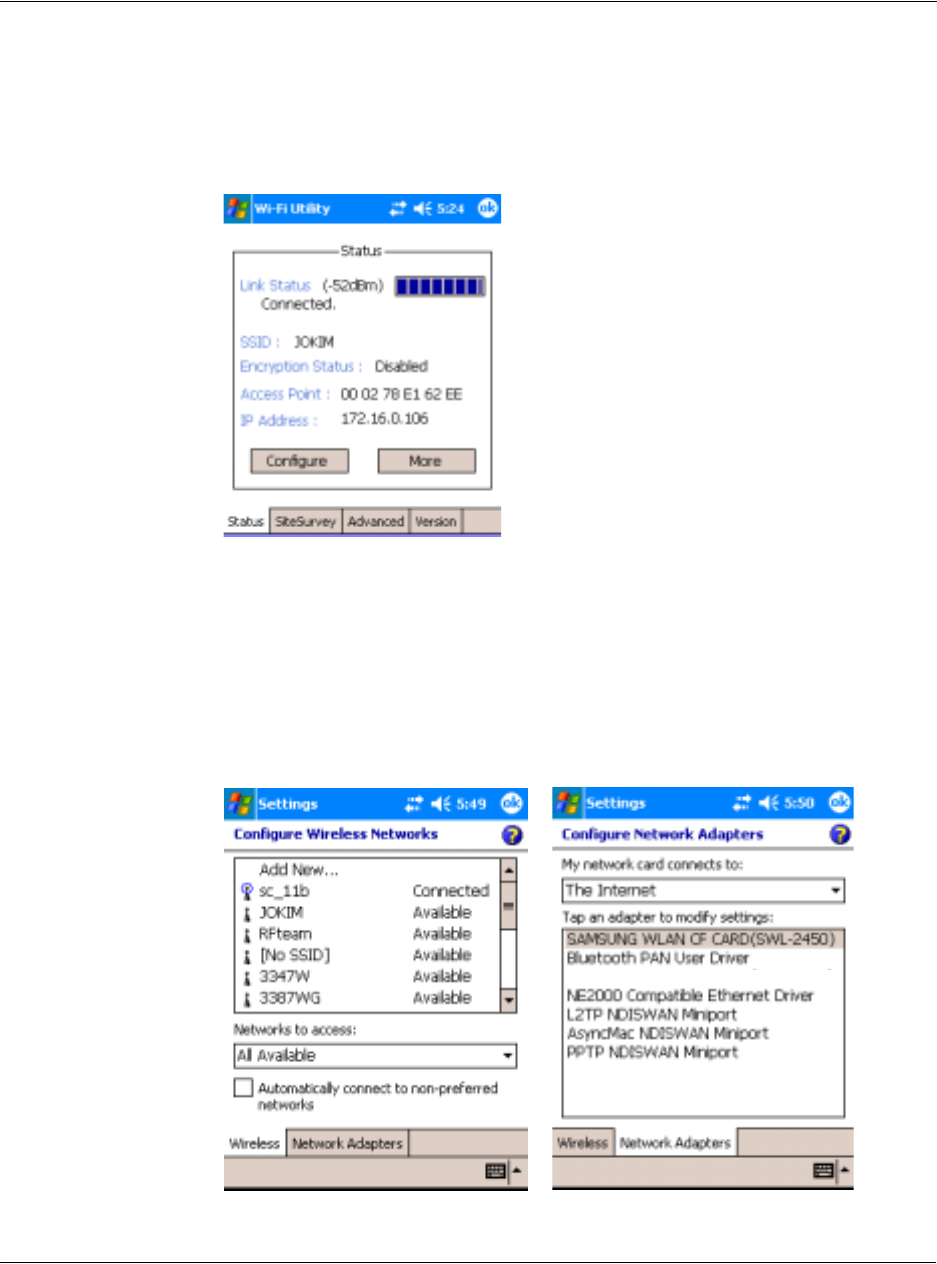
Appendix C: Wireless communication
Main configuration of utility
101
Main configuration of utility
Status Tab
Display current connection information in one sight (default screen).
• Link Status : displays the current link status.
• SSID : displays the connected SSID.
• Encryption Status : displays the encryption mode when successfully
connected.
• Access Point : displays the BSSID of AP when successfully connected.
• IP Address : displays the IP setting.
When use click a 'Configure' button
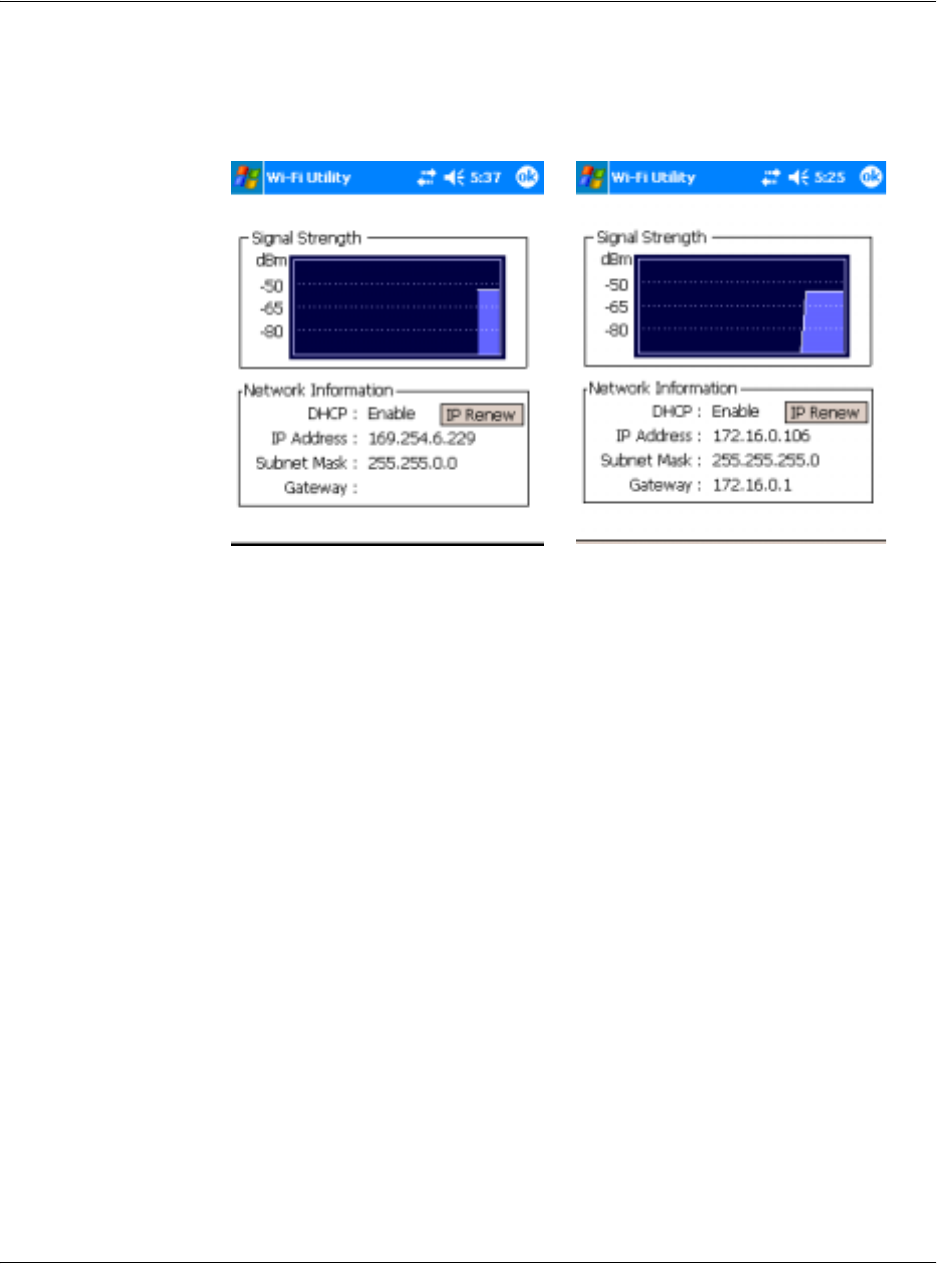
Appendix C: Wireless communication
Main configuration of utility
102
When use click a 'More' button (DHCP IP case)
More : Detailed information about signal strength and network information
Before clicking 'IP Renew' button After clicking 'IP Renew' button
• IP Address (Internet Protocol address) :
This is a numeric address that the domain name server translates into a
domain name. Each node on the IP network has a unique IP address.
• Subnet Mask :
A number used to identify a sub-network when multiple networks share
a common IP address.
• Gateway :
This is a device used to forward IP packets to and from a remote
destination.
IP Renew button appears when DHCP is enabled.
Configure Wireless Networks : Link to the Windows Zero Configuration
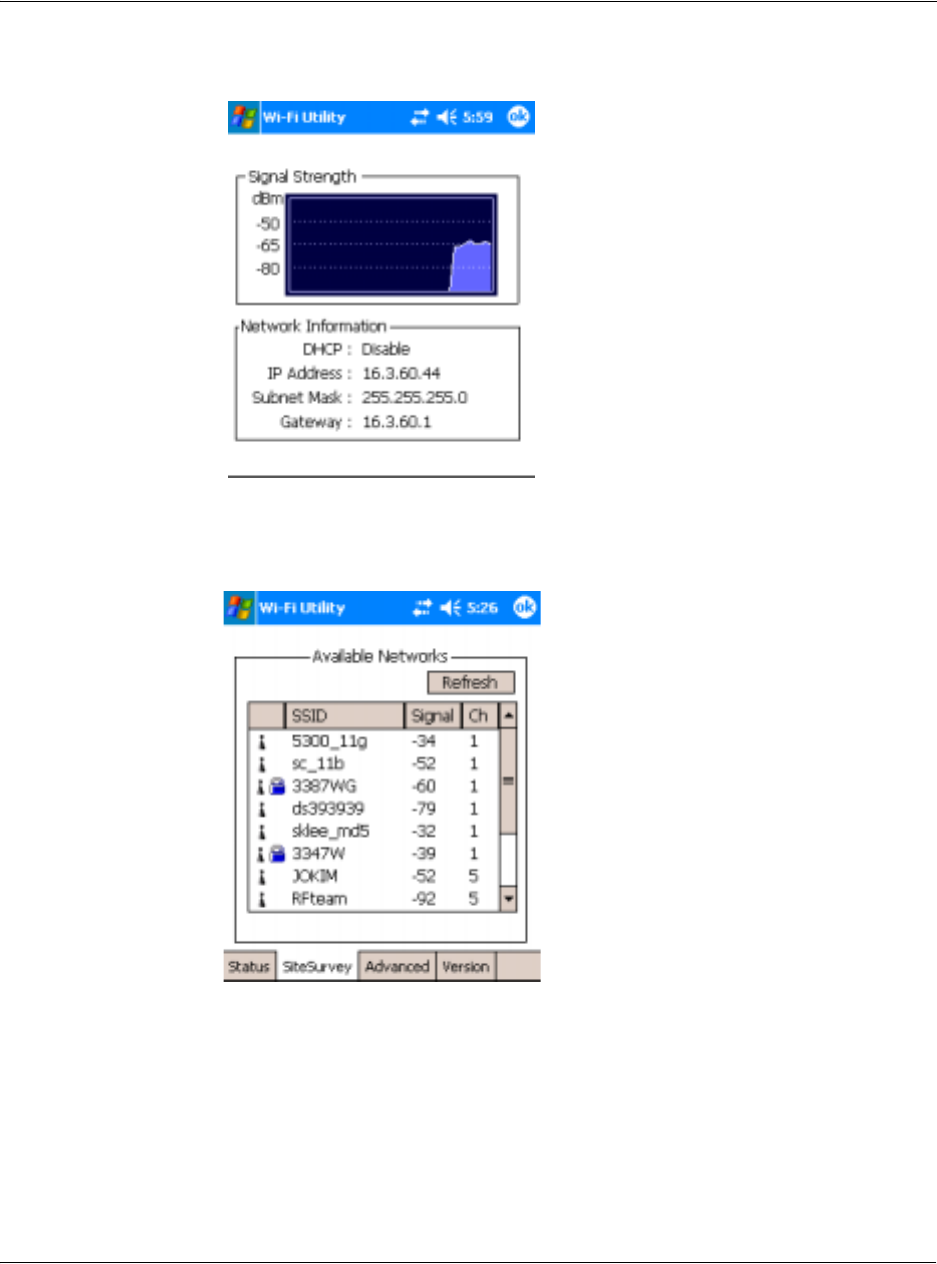
Appendix C: Wireless communication
Main configuration of utility
103
When use click a 'More' button (Static IP case)
SiteSurvey Tab
Search the available networks and shows the network information. (Network Mode,
WEP Information, SSID, Signal, Channel)
• SSID (Service Set Identifier)
This is a unique case-sensitive name of up to 32 characters shared among
all devices sharing a common wireless network. The name value is set in
Scan page with the default value being 'ANY'.
•Signal
Percentage values indicate the signal strength of AP.
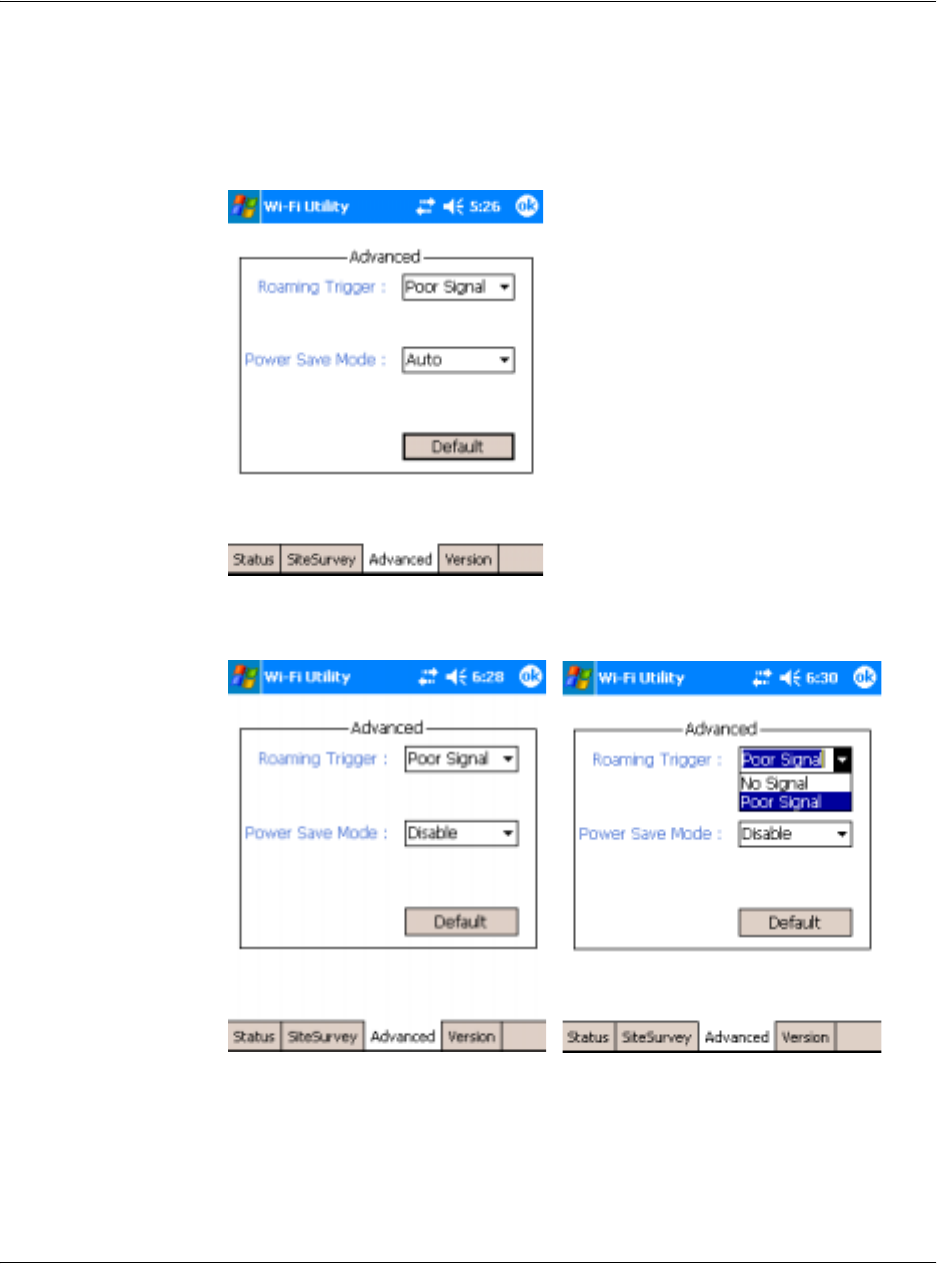
Appendix C: Wireless communication
Main configuration of utility
104
• Channel
Indicates which channel is set to be used by the network.
Advanced Tab
When user click a 'default' button
Advanced wireless setting
Roaming Trigger : Select Roaming trigger condition.
No Signal : The station starts to search for another AP only when it is disconnected
from the currently associated AP.
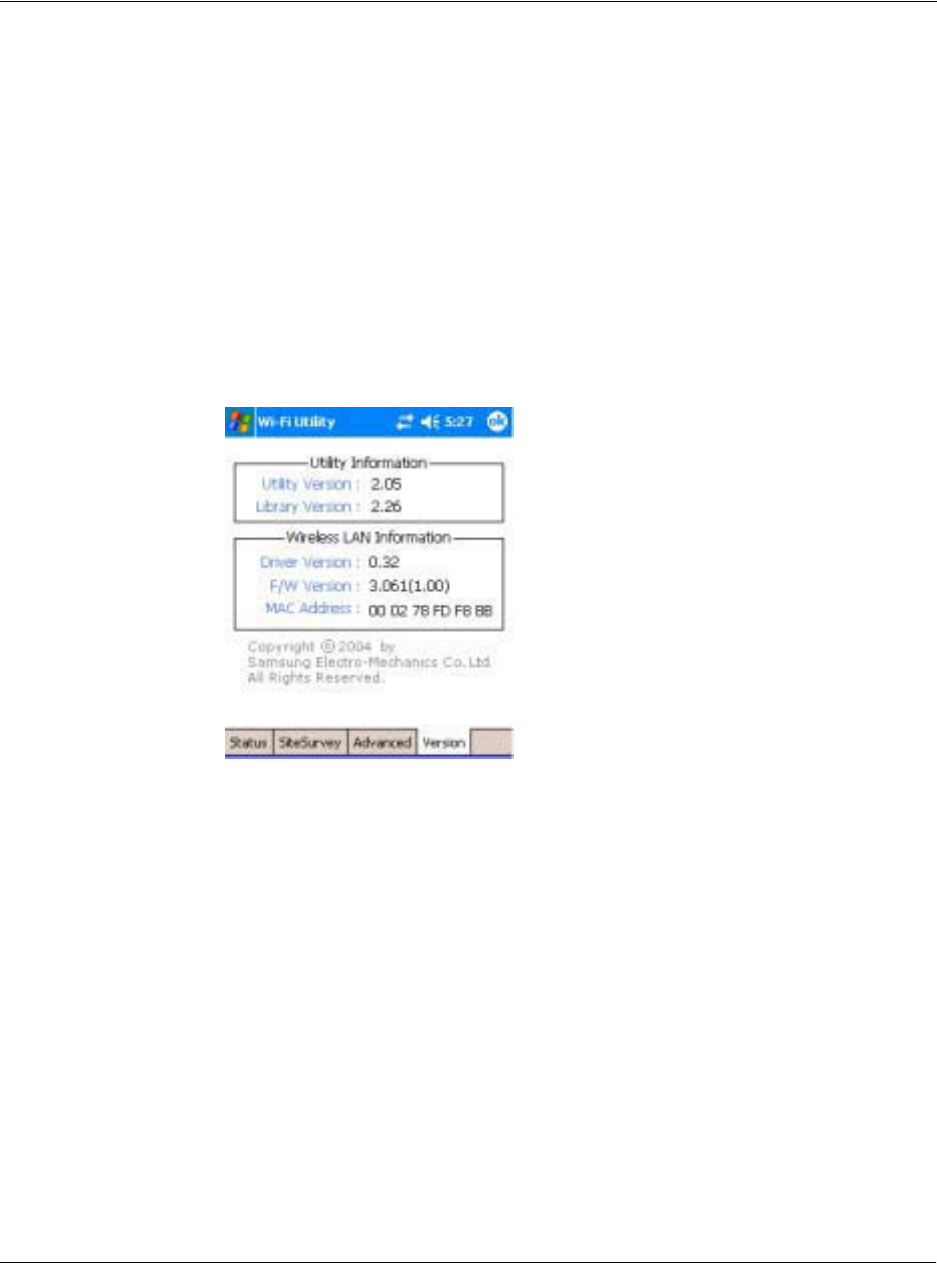
Appendix C: Wireless communication
Main configuration of utility
105
Poor Signal : The station starts to search for better AP when signal strength of
currently associated AP is lower than -70dBm °P Default : restores the menus to the
initial values.
Power Save Mode : Power Save mode decreases power consumption. Enabling Power
Save Mode trades off performance for battery life.
Disable - specifies continuous access mode (normal mode)
Enable - enable the power save mode
Automatic- enable a fast power saving mode that provides the best combination of
performance and power usage.
Version Tab
The Version menu provides following information.
Utility Information : The version of the driver, configuration utility, library(Semlib.dll)
Wireless LAN Information : The version of the driver, firmware, EEPROM. The MAC
Address of wireless adapter.
For updated product information, technical support, and downloads, visit the web site
at http://www.acer.com.

Appendix C: Wireless communication
Main configuration of utility
106

1
Index
A
ActiveSync® 69,85,91,97
add program 81
B
backlight 5,9
Backup
opening 59
Restore function 61
Block Recognizer 21
C
Calendar 33
command interface 15
device buttons 15
pop-up menus 17
Today screen 15,16
connectivity features 71
connect to Internet 72
connect to network 75
help 75
infrared 71
receive 72
send 71
wireless communication 72
Contacts 37
copyright ii
customise features 81
handheld settings 81
install/remove program
add 81
using ActiveSync 82
via Internet 82
remove 83
customise handheld 81
E
email
manage folders 44
synchronise 42
enter data 19
drawing on the screen 24
recording a message 26
using input panel 19
Block Recognizer 21
Letter Recognizer 20
soft keyboard 20
Transcriber 21
using My Text 27
writing on the screen 21
convert to text 23
expansion features 65
Acer versatile connector 65
attaching expansion sleeve
inserting CompactFlash card 65
removing CompactFlash card 66
H
handheld
guides v
maintenance vi
package contents vi
resetting vii
handheld features 1
audio 2
battery pack 2
install 9
connectivity 2
display 1
ergonomics 2
expansion 2
performance 1
handheld setup
connecting cradle 9
installing battery 10,12
installing Microsoft ActiveSync software 8
initial synchronisation 13
I
Inbox 42
infrared 71
input panel 19
Internet 72
L
Letter Recognizer 20
M
manage applications
finding information 31
opening 29
organising information 32
switching 29
Microsoft Pocket Internet Explorer 77
Mobile Favorites
create mobile favorite 78
fovorite links 77
using 78
view mobile favorites 79
Microsoft Pocket Outlook 33
07

Calendar 33
create meeting request 36
open 34
schedule appointment 35
summary screen 35
Contact 37
create contact 37
find contact 38
open 37
summary screen 38
Inbox
connect to email server 42
manage folders 44
Message list 43
open 42
synchronise email 42
Notes 41
create note 41
open 41
Tasks 39
create task 39
open 39
summary screen 40
Microsoft Pocket PC 2002
companion programs
Microsoft Reader
Reader features 56
book annotations 57
copy text 56
search text 56
remove book 57
use Guidebook 54
using Library 54
MSN Messenger 51,53
chat with contacts 52
requirements 51
set up 51
work with contacts 51
Pocket Excel 49
create new file 49
File list 49
protect workbook 50
Pocket Word 45
create new file 45
enter data 46
drawing mode 48
recording mode 48
typing mode 47
writing mode 47
File list 46
Windows Media Player for Pocket PC 53
Microsoft Pocket PC 2003 45
companion programs 45
Microsoft Reader
get book 54
read book 55
Microsoft Reader 54
Guidebook 54
Library 54
Reader 56
add drawing 57
bookmark 57
highlight 57
note 57
Mobile Favorites folder 77
MSN Messenger 51
My Text 27
N
Notes 41
notice
DVD copyright protection 94
P
Pocket Excel 49
protect workbook 50
Pocket Word 45
R
remove program 83
S
safety
FCC notice 91
system tour 4
bottom view 7
front view 4
left view 5
top view 6
T
Tasks 39
third-party applications
IA Album LE 63
Transcriber 21
W
Windows Media Player for Pocket PC 53
108
FCC RF Radiation Exposure Statement:
1. This Transmitter has been demonstrated co-location compliance requirements
with Bluetooth:ʳˠ̈̅˴̇˴ʳ˟˕ˠ˔ˇˊˊ˕˞˅ʳˁʳThis transmitter must not be co-located or
operating in conjunction with any other antenna or transmitter.
2. This equipment complies with FCC RF radiation exposure limits set forth for
an uncontrolled environment. To maintain compliance with FCC RF
exposure compliance requirements, avoid direct contact to the transmitting
antenna during transmitting.