Acer orporated A1412 Tablet Computer User Manual Manual
Acer Incorporated Tablet Computer Manual
Contents
- 1. Manual
- 2. Addendum
Manual
Product Name: Tablet Computer
Brand: Acer
Model: A1412
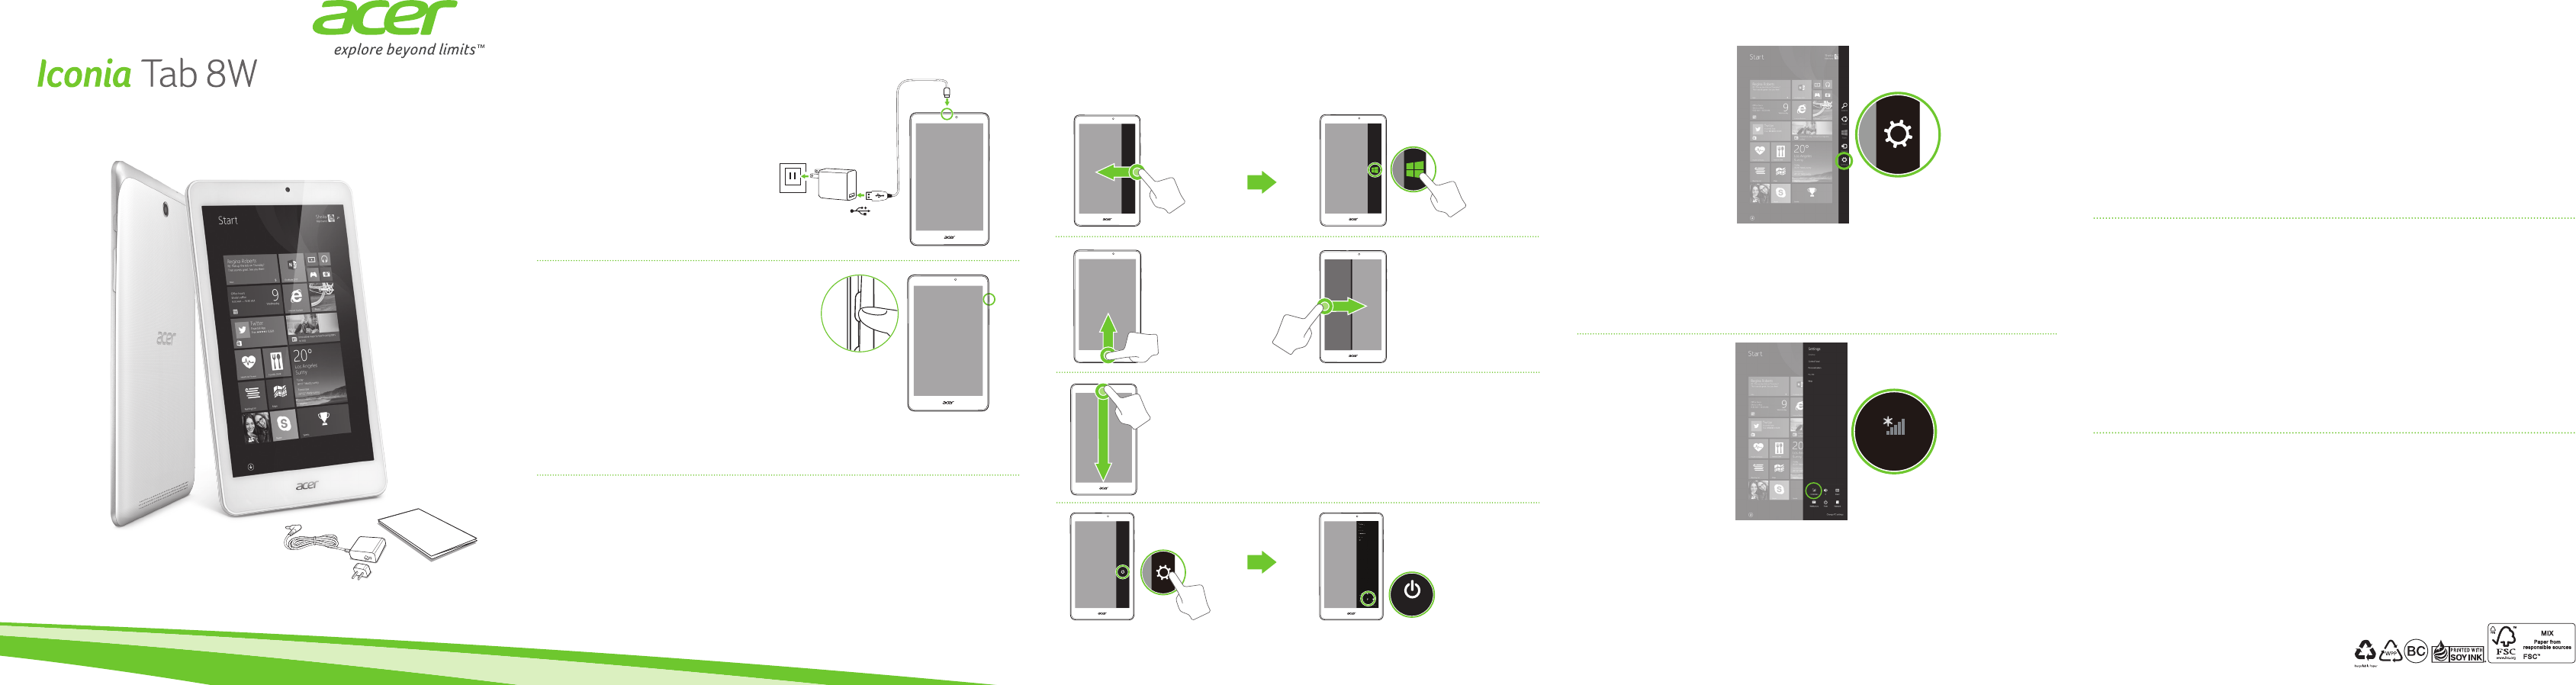
1
3
2
1
2
Power
Setup Guide
Settings
Available
Plug in before turning on for the first time.
Branchez avant d’allumer pour la première fois.
Eerste gebruik: eerst aansluiten dan inschakelen.
Using your computer for the first time
Utiliser votre ordinateur pour la première fois /
Uw computer voor het eerst gebruiken
Follow the instructions to complete setup.
Suivez les instructions pour terminer la configuration.
Volg de aanwijzingen om de set-up te voltooien.
Please make sure your tablet is plugged into an AC power supply (wall outlet) before you turn it on for the first time.
Veuillez vous assurer que votre tablette est bien branchée à une source d’alimentation secteur (prise murale) avant de
l’allumer pour la première fois.
Controleer, voordat u uw tablet-PC voor de eerste keer inschakelt, of deze is aangesloten op een netstroombron
(wandcontact).
Getting started with Windows 8.1
Pour commencer avec Windows 8.1 / Aan de slag met Windows 8.1
You can launch apps from the Start screen.
Vous pouvez lancer les applis depuis l’écran Démarrer.
U kunt apps openen vanaf het Startscherm.
Connecting to the internet
Se connecter à Internet / Verbinding maken met het Internet
Tap the Available icon to see a list of available wireless networks.
Tap a Wi-Fi network to connect and enter the network security key
if necessary.
Appuyez sur l’icône Disponible pour voir une liste des réseaux sans fil disponibles. Appuyez
sur un réseau Wi-Fi pour vous connecter et entrez la clé de sécurité réseau si nécessaire.
Tik op het pictogram Beschikbaar voor een lijst met beschikbare draadloze netwerken. Tik
op een Wi-Fi-netwerk om verbinding te maken en voer indien nodig de beveiligingssleutel
van het netwerk in.
Open the Charms by swiping the right-hand edge of the screen
inwards. Tap Settings.
Ouvrez la barre des Icônes en faisant glisser le bord droit de l’écran vers l’intérieur. Appuyez
sur Paramètres.
Open de Charms door vanaf de rechterzijde van het scherm naar binnen te vegen. Tik op
Instellingen.
Components may vary by model.
Les composants peuvent varier en fonction du modèle.
Onderdelen kunnen per model verschillen.
Acer Recovery Management
Acer Recovery Management allows you to create a backup on a USB drive, and to reinstall
applications and drivers. You can choose to restore the system from a factory default
image or reinstall applications and drivers. Follow the onscreen instructions to complete
the process.
• Type "Recovery" from Start and then click on Acer Recovery Management.
User's Manual
For more on how your computer can help you to be more productive, please refer to the
User’s Manual. The User’s Manual can be downloaded from the Acer support website by
going to:
• http://go.acer.com/?id=17883
For information on using Windows 8.1, please refer to:
• Windows 8/8.1 tutorials: www.acer.com/windows8-tutorial
• Support FAQs: www.acer.com/support
The User's Manual contains important regulatory information for your health and safety.
Please take the time to read it.
Acer Recovery Management
Acer Recovery Management permet de créer une sauvegarde sur un lecteur USB et de réinstaller les
applications et les pilotes. Vous pouvez choisir de restaurer le système depuis une image par défaut de
l’usine ou de réinstaller les applications et les pilotes. Suivez les instructions à l’écran pour terminer le
processus.
• Saisissez «Recovery» depuis Démarrer, puis cliquez sur Acer Recovery Management.
Manuel d’utilisation
Pour plus d’information sur l’aide que votre ordinateur peut vous apporter pour être plus productif,
veuillez vous reporter au Manuel d’utilisation. Le Manuel d’utilisation peut être téléchargé depuis le site
Web de support Acer en allant à:
• http://go.acer.com/?id=17883
Pour plus d’informations sur l’utilisation de Windows 8.1, veuillez consulter:
• Tutoriels de Windows 8/8.1 : www.acer.com/windows8-tutorial
• FAQ du support: www.acer.com/support
Le Manuel d’utilisation contient des informations réglementaires importantes concernant votre santé
et la sécurité.
Veuillez prendre le temps de le lire.
Acer Recovery Management
Met Acer Recovery Management kunt u een back-up op een usb-station maken en toepassingen en
stuurprogramma’s opnieuw installeren. U kunt het systeem herstellen via een standaard fabrieksimage
of toepassingen en stuurprogramma’s opnieuw installeren. Volg de aanwijzingen op het scherm om het
proces te voltooien.
• Voer “Recovery” in Start in en klik dan op Acer Recovery Management.
Gebruikershandleiding
Als u meer wilt weten over hoe u met de computer productiever kunt werken, raadpleeg dan de
Gebruikershandleiding. De Gebruikershandleiding downloadt u van de ondersteuningswebsite van Acer
via:
• http://go.acer.com/?id=17883
Voor informatie over het gebruik van Windows 8.1 kijkt u in:
• Windows 8/8.1 handleidingen: www.acer.com/windows8-tutorial
• FAQ’s ter ondersteuning: www.acer.com/support
De gebruikershandleiding bevat belangrijke regelgeving over gezondheidsrisico’s en veiligheid.
Neem de tijd deze te lezen.
*NC.L7G11.015*
NC.L7G11.015
Press the power button to turn
the computer on.
Appuyez sur le bouton d’alimentation pour
allumer l’ordinateur.
Druk op de aan/uit-knop om de computer in
te schakelen.
Close app
Fermer l’appli
App sluiten
Context menu
Menu contextuel
Contextmenu
Jumping between
apps
Passer d’une appli à
une autre
Springen tussen apps
Charms
Icônes
Charms
Start
Démarrer
Start
Turn off computer
Éteindre l’ordinateur / Computer uitschakelen

1
3
2
1
2
Power
Setup Guide
Settings
Available
Schließen Sie das Gerät vor dem ersten
Einschalten an eine Stromquelle an.
Collegare alla presa prima di accendere per la prima
volta.
Erstmalige Verwendung des Computers
Utilizzo del computer per la prima volta /
Folgen Sie den Anweisungen, um die Installation
durchzuführen.
Seguire le istruzioni per completare il processo di congurazione.
Bevor Sie das Tablet zum ersten Mal einschalten, stellen Sie bitte sicher, dass es mit einer Netzquelle (Steckdose)
verbunden ist.
Accertarsi che il tablet sia collegato all’alimentazione CA (presa a muro) prima di accenderlo per la prima volta.
Erste Schritte mit Windows 8.1
Guida introduttiva a Windows 8.1 /
Windows 8.1
Sie können Apps von der Startseite ausführen.
È possibile avviare le app dalla schermata Start.
Wechseln
zwischen Apps
Saltare da un’app
all’altra
Computer ausschalten
Spegni il computer /
Herstellung einer Internetverbindung
Connessione a Internet /
Tippen Sie auf das Symbol Verfügbar, um eine Liste mit
verfügbaren WLAN-Netzwerken anzuzeigen. Tippen Sie auf ein
WLAN-Netzwerk, um eine Verbindung herzustellen. Geben Sie
bei Bedarf den Netzwerk-Sicherheitsschlüssel ein.
Toccare l’icona Disponibili per visualizzare un elenco delle reti wireless disponibili. Toccare
una rete Wi-Fi a cui connettersi e inserire la chiave di sicurezza di rete se necessario.
Öffnen Sie die Charms-Leiste, indem Sie vom rechten Rand des
Bildschirms zur Mitte wischen. Tippen Sie auf Einstellungen.
Aprire la barra accessi scorrendo l’estremità destra dello schermo verso l’interno. Toccare
Impostazioni.
Charms
Komponenten können sich von Modell zu Modell
unterscheiden.
I componenti possono variare in relazione al modello.
Acer Recovery Management
Acer Recovery Management ermöglicht Ihnen die Erstellung einer Sicherungskopie auf
einem USB-Laufwerk sowie die Neuinstallation von Applikationen und Treibern. Sie können
das System wahlweise von einem Standardabbild wiederherstellen oder die Applikationen
und Treiber erneut installieren. Befolgen Sie die Anweisungen auf dem Bildschirm, um
diesen Vorgang fertigzustellen.
• Geben Sie bei Anzeige von Start „Recovery“ ein und klicken Sie anschließend auf Acer
Recovery Management.
Benutzerhandbuch
Für weitere Informationen dazu, wie Ihnen Ihr Computer helfen kann, noch produktiver
zu arbeiten, lesen Sie bitte das Benutzerhandbuch. Das Benutzerhandbuch kann von der
folgenden Acer Support Webseite heruntergeladen werden:
• http://go.acer.com/?id=17883
Weitere Informationen über die Nutzung von Windows 8.1 finden Sie unter:
• Windows 8/8.1 Anleitungen: www.acer.com/windows8-tutorial
• Support FAQs: www.acer.com/support
Das Benutzerhandbuch enthält wichtige behördliche Hinweise hinsichtlich Gesundheit und
Sicherheit.
Lesen Sie diese bitte sorgfältig durch.
Acer Recovery Management
Acer Recovery Management consente di creare un backup su un’unità USB e reinstallare le applicazioni
e i driver. È possibile scegliere di ripristinare il sistema da un’immagine predefinita di fabbrica o
reinstallare le applicazioni e i driver. Seguire le istruzioni su schermo per completare il processo.
• Digitare “Recovery” da Start quindi fare clic su Acer Recovery Management.
Manuale dell’utente
Per altre nozioni su come il vostro computer può aiutarvi a diventare ancora più produttivi, consultate il
Manuale dell’utente. Il Manuale dell’Utente può essere scaricato dal sito web di supporto Acer visitando:
• http://go.acer.com/?id=17883
Per ulteriori informazioni sull’uso di Windows 8.1, fare riferimento a:
• Tutorial di Windows 8/8.1: www.acer.com/windows8-tutorial
• FAQ di supporto: www.acer.com/support
Il Manuale per l’Utente contiene informazioni normative importanti per la tua salute e sicurezza.
Dedicare del tempo alla sua lettura.
USB
.
Acer
Drücken Sie die Ein/Aus-Taste,
um den Computer hochzufahren.
Premere il pulsante di accensione per
accendere il computer.
App schließen
Chiudi app
Kontextmenü
Menu contesto
Charms
Accessi
Start
Start

- 1
English
Iconia Tab 8 W
Quick Guide
Enjoy the benefits of having an Acer ID
With an Acer ID, you can:
• Build Your Own Cloud with Acer BYOC.
• Get the latest offers and product information.
• Register your device for warranty service.
How to sign up for an Acer ID
1. Ensure you are connected to the internet.
2. Open the Acer Portal app from the Start screen.
3. Install any required updates.
4. Sign up for an Acer ID or sign in if you already have an Acer ID.
Register your Acer product
You can register your product from Acer Portal directly by selecting
Also use this Acer ID to register this product.
After we receive your product registration, you will be sent a confirmation email with
important data. Keep this email in a safe place.

2 -
English
Manage your registered products
Once you have completed the registration process, you can log onto
account.acer.com using your Acer ID and password to see and manage all your
registered products.
Note: It may take a few days for your information to be updated to the database.
Obtaining Acer accessories
We are happy to inform you that Acer’s warranty extension program and notebook
accessories are available online. Come and visit our online shop and find what you
need at store.acer.com.
The Acer Store is being progressively rolled out, and may not yet be available in
some regions. Please check regularly to see when it will be available in your
country.

- 3
English
© 08/2014. All Rights Reserved.
Iconia Tab 8 W
Covers: W1-8101
This revision: 25 August 2014
Regulatory model number: A1412
ENVIRONMENT
Temperature:
- Operating: 5 °C to 35 °C
- Non-operating: -20 °C to 65 °C
Humidity (non-condensing):
- Operating: 20% to 80%
- Non-operating: 20% to 80%
Model number: _____________________________________________________________
Serial number: _____________________________________________________________
Date of purchase: ___________________________________________________________
Place of purchase: __________________________________________________________

4 -
English
First things first
We would like to thank you for making an Acer tablet your choice for meeting your
mobile computing needs.
Your guides
To help you use your Acer computer, we have designed a set of guides:
First off, the Setup Guide helps you get started with setting up your computer.
The Quick Guide introduces you to the basic features and functions of your new
computer.
For more on how your computer can help you to be more productive, please refer to
the Iconia Tab 8 W User’s Manual. The Iconia Tab 8 W User’s Manual contains
useful information applying to your new computer. It covers basic topics such as
using the keyboard and audio, etc.
This guide contains detailed information on such subjects as system utilities, data
recovery, expansion options and troubleshooting. In addition it contains warranty
information and the general regulations and safety notices for your computer.
The User’s Manual can be downloaded from the Acer support website by going to:
http://go.acer.com/?id=17883
Software installation
The first time you turn on your computer, it will automatically install software and set
up for use. This may take some time, please do not turn off your computer; wait
until the installation has finished.
Recovery
You should create recovery backups as soon as you can. The Acer Recovery
Management program allows you to create recovery backups and then to restore or
reinstall applications and drivers provided by Acer.

- 5
English
Having trouble?
Acer provides several options to support your purchase.
Acer support
Make sure you write down your computer serial number, date and place of
purchase and model name on the area provided in this guide; save your proof of
purchase. Before you call us, please write down any error message that
accompanies the problem, and have the computer in front of you and switched on if
possible. Having these items in hand when contacting us will ensure better and
quicker service.
Acer website
Remember to visit www.acer.com and refer to the support section for up-to-date
information, help, drivers and downloads.
Warranty and contact information
You can find information about the warranty for your computer and how to contact
technical support in your computer’s warranty.
6 -
English
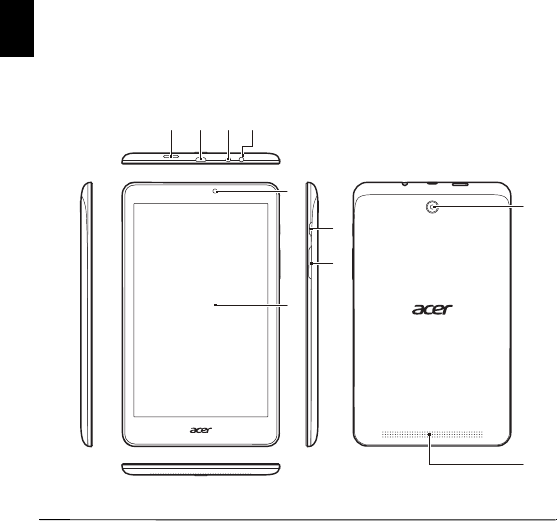
Your Acer tablet PC tour
After setting up your device as illustrated in the Setup Guide, let us show you
around your new Acer computer. You can enter information into your new computer
via the touchscreen.
Views
1234
5
7
8
6
10
9
- 7
English
No. Item Description
1 MicroSD card slot Insert a microSD card into this slot.
2 Micro USB connector Connects to USB devices. A micro USB to USB adapter is
needed to connect to USB devices.
3 Headset/speaker jack Connects to audio devices (e.g., speakers, headphones) or a
headset with microphone.
4 Microphone Internal microphone for sound recording.
5 Front-facing camera 2-megapixel camera for video communication.
6 Touchscreen 8-inch IPS HD 800 x 1280 resolution display
7 Power button
Press to turn the computer on; press again to place the
computer in Sleep mode. Press and hold to turn the computer
off.
8 Volume control key Adjusts the system volume.
9 Camera 2-megapixel camera for video communication.
10 Speaker Delivers stereo audio output.

Here is the CS-03 warning:
IC CS-03 Notice
The Industry Canada label identifies certified equipment. This certification means that the equipment meets certain telecommunications
network protective, operational and safety requirements as prescribed in the appropriate Terminal Equipment Technical Requirements
document(s). The Department does not guarantee the equipment will operate to the user's satisfaction.
Before installing this equipment, users should ensure that it is permissible to be connected to the facilities of the local telecommunications
company. The equipment must also be installed using an acceptable method of connection. The customer should be aware that compliance
with the above conditions may not prevent degradation of service in some situations.
Repairs to certified equipment should be coordinated by a representative designated by the supplier. Any repairs or alterations made by
the user to this equipment, or equipment malfunctions, may give the telecommunications company cause to request the user to disconnect
the equipment.
Users should ensure for their own protection that the electrical ground connections of the power utility, telephone lines and internal
metallic water pipe system, if present, are connected together. This precaution may be particularly important to rural areas.
Caution: Users should not attempt to make such connections themselves, but should contact the appropriate electric inspection
authority, or electrician, as appropriate.
Canadian Notice
Note: The Canadian Department of Communications label identifies certified equipment. This certification means that the equipment
meets certain telecommunications network protective, operational and safety requirements. The Department does not guarantee the
equipment will operate to the user's satisfaction.
Before installing this equipment, users should ensure that it is permissible to be connected to the facilities of the local telecommunications
company. The equipment must also be installed using an acceptable method of connection. In some cases, the company's inside wiring
associated with a single line individual service may be extended by means of a certified connector assembly (telephone extension cord).
The customer should be aware that compliance with the above conditions may not prevent degradation of service in some situation.
Repairs to certified equipment should be made by an authorized Canadian maintenance facility designated by the supplier. Any repairs or
alterations made by the user to this equipment, or equipment malfunctions, may give the telecommunications company cause to request
the user to disconnect the equipment.
Users should ensure for their own protection that the electrical ground connections of the power utility, telephone lines and internal
metallic water pipe system, if present, are connected together. This precaution may be particularly important in rural areas.
Caution: Users should not attempt to make such connections themselves, but should contact the appropriate electric inspection
authority, or electrician, as appropriate.

The Load Number (LN) assigned to each terminal device denotes the percentage of the total load to be connected to a telephone loop
which is used by the device, to prevent overloading. The termination on a loop may consist of any combination of devices subject only to
the requirement that the total of the Load Numbers of all the devices does not exceed 100.
This equipment does not support line loopbacks.
Warning: THE DIGITAL APPARATUS DOES NOT EXCEED THE CLASS A LIMITS FOR RADIO NOISE EMISSIONS
FROM DIGITAL APPARATUS SET OUT IN THE RADIO INTERFERENCE REGULATIONS OF THE CANADIAN DEPARTMENT
OF COMMUNICATIONS.
LE PRESENT APPAREIL NUMERIQUE N'EMET PAS DE BRUITS RADIOELECTRIQUES DEPASSANT LES LIMITES
APPLICABLES AUX APPAREILS NUMERIQUES DE LA CLASSE A PRESCRITES DANS LE REGLEMENT SUR LE
BROUILLAGE RADIOELECTRIQUE EDICTE PAR LE MINISTERE DES COMMUNICATIONS DU CANADA
FCC INFORMATION
This device complies with Part 15 of the FCC Rules. Operation is subject to the following two conditions:
1. This device may not cause harmful interference, and 2. This device must accept any interference received, including
interference that may cause undesired operation.
Note: This equipment has been tested and found to comply with the limits for a Class B digital device, pursuant to part 15 of
the FCC Rules. These limits are designed to provide reasonable protection against harmful interference in a residential
installation. This equipment generates, uses and can radiate radio frequency energy and, if not installed and used in
accordance with the instructions, may cause harmful interference to radio communications. However, there is no guarantee
that interference will not occur in a particular installation. If this equipment does cause harmful interference to radio or
television reception, which can be determined by turning the equipment off
and on, the user is encouraged to try to correct the interference by one or more of the following measures:
—Reorient or relocate the receiving antenna.
—Increase the separation between the equipment and receiver.
—Connect the equipment into an outlet on a circuit different from that to which the receiver is connected.
—Consult the dealer or an experienced radio/TV technician for help.
Caution: Any changes or modifications not expressly approved by the party responsible for compliance could void the user's
authority to operate this equipment.
FCC Radiation Exposure Statement
This equipment complies with FCC RF radiation exposure limits set forth for an uncontrolled environment. This equipment
should be installed and operated with a minimum distance of 20 centimeters between the radiator and your body.
Article 12
Without permission, any company, firm or user shall not alter the frequency, increase the power, or change the characteristics
and functions of the original design of the certified lower power frequency electric machinery.
Article 14
The application of low power frequency electric machineries shall not affect the navigation safety nor interfere a legal
communication, if an interference is found, the service will be suspended until improvement is made and the interference no
longer exists.