Abocom Systems CAS1040 IP Sharing Fast EtherSwitch For Cable/ xDSL Modem User Manual INTRODUCTION
Abocom Systems Inc IP Sharing Fast EtherSwitch For Cable/ xDSL Modem INTRODUCTION
Contents
- 1. users manual 1
- 2. users manual 2
- 3. users manual 3
- 4. users manual 4
- 5. users manual 5
users manual 5
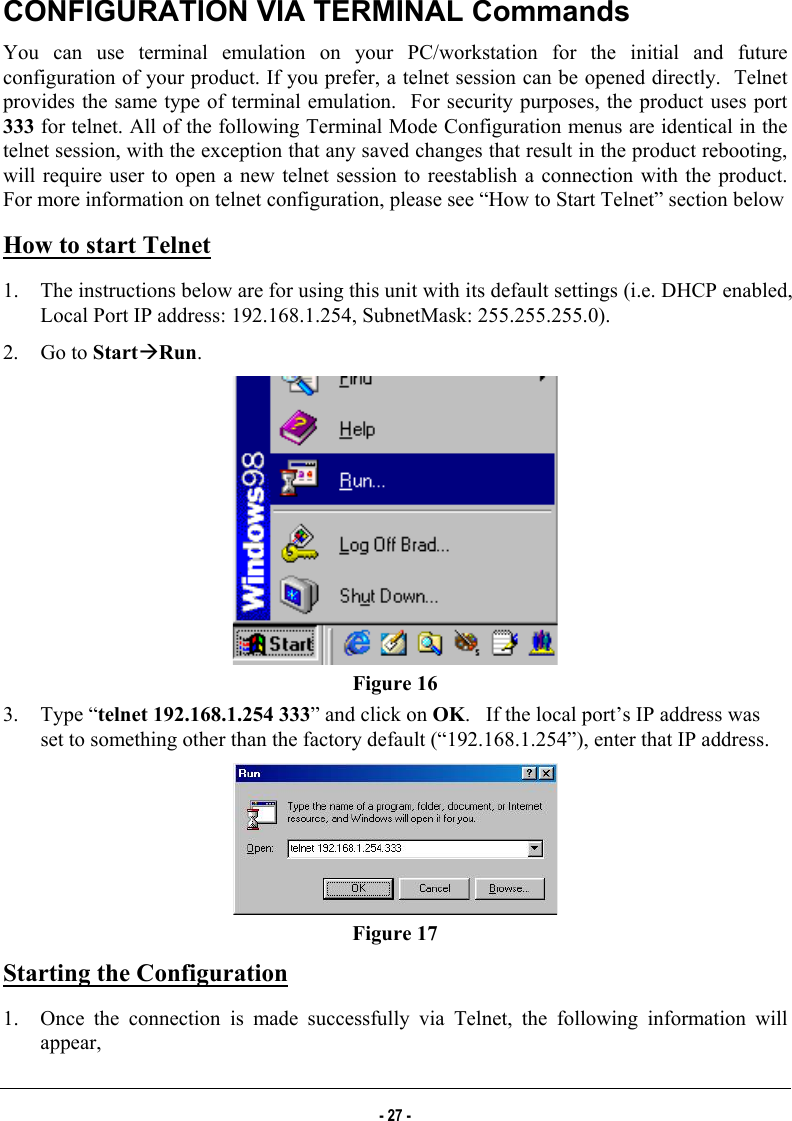
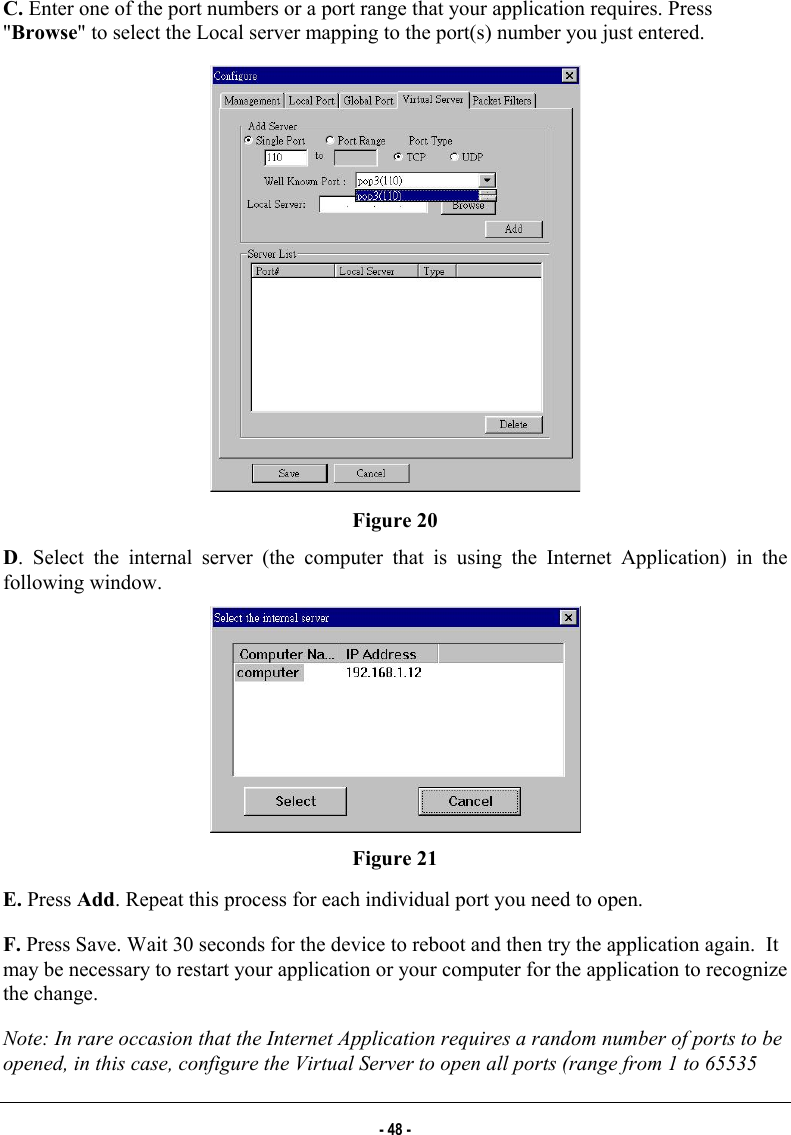
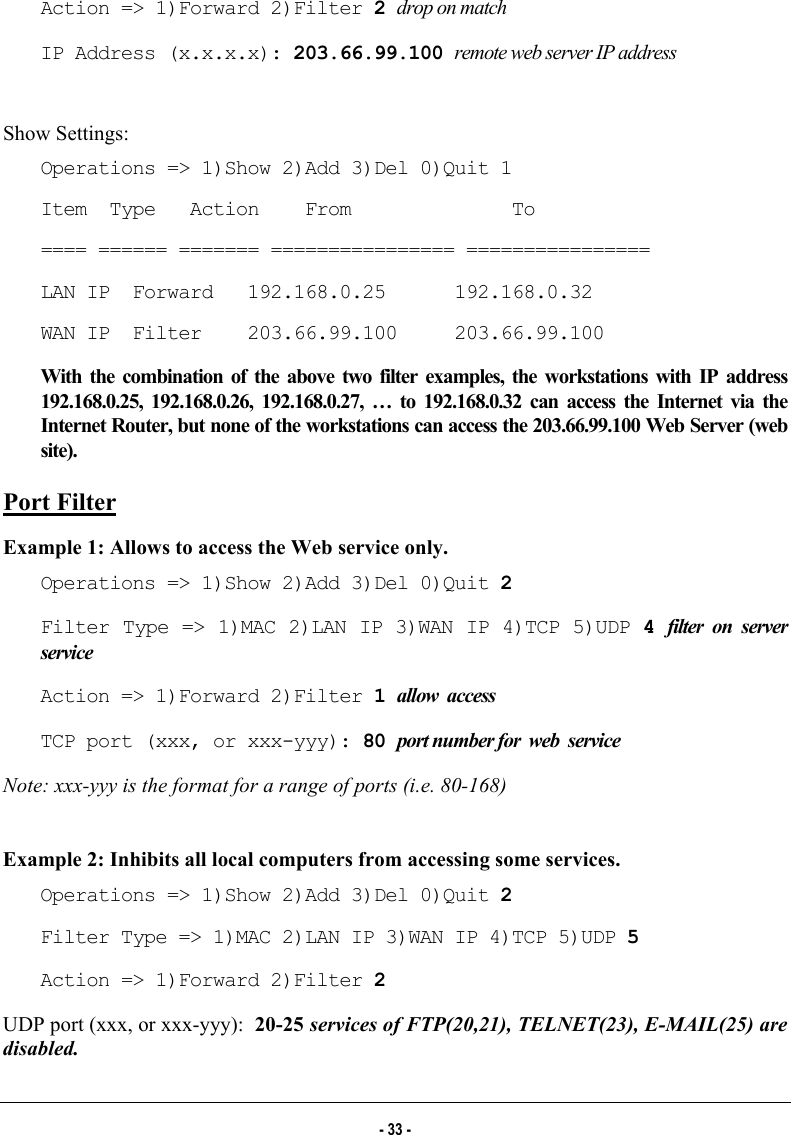
![session List active Internet sessions through this device. Example: command>session IP Port Port IP Port T/U Flag client client fake remote remote idle AP Type ---+-----+---------------+------+------+---------------+------+----+------ tcp 37 192.168.10.27 1062 4133 210.66.41.132 110 0 GENERAL tcp 7 192.168.10.31 1032 4136 211.75.84.154 80 0 GENERAL tcp 7 192.168.10.31 1033 4138 211.75.84.154 80 0 GENERAL tcp 7 192.168.10.32 1729 4139 140.113.39.195 110 0 GENERAL tcp 7 192.168.10.27 1063 4140 210.66.41.132 110 0 GENERAL udp 1 192.168.10.31 1028 16385 168.95.192.1 53 20 GENERAL udp 1 192.168.10.32 1726 16386 168.95.1.1 53 5 GENERAL udp 1 192.168.10.32 1728 16387 168.95.192.1 53 5 GENERAL Active >> TCP:5,UDP:3 (Maximum >> TCP:128,UDP:64) show Displays the current configuration. For first-time login, the current configuration is the factory default settings. Refer to section titled “Factory Default Setting” for detail. Example: command>show Wan Mac Address: AB CD 12 34 56 78 IP address of local port: [192.168.1.254] Subnet Mask of local port: [255.255.255.0] Distribute IP addresses to local computers: [Yes] Continuous IP address pool starts at: [192.168.1.1] Number of IP address in pool: [128] - 30 -](https://usermanual.wiki/Abocom-Systems/CAS1040.users-manual-5/User-Guide-164259-Page-4.png)
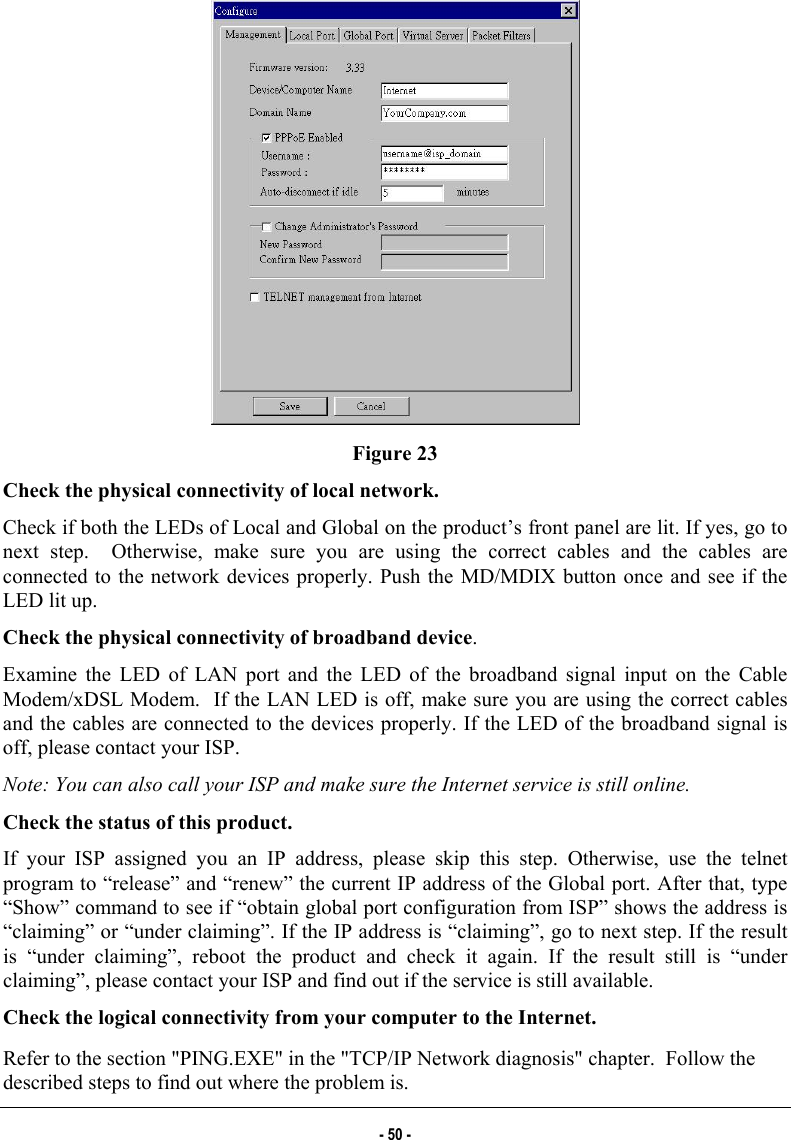
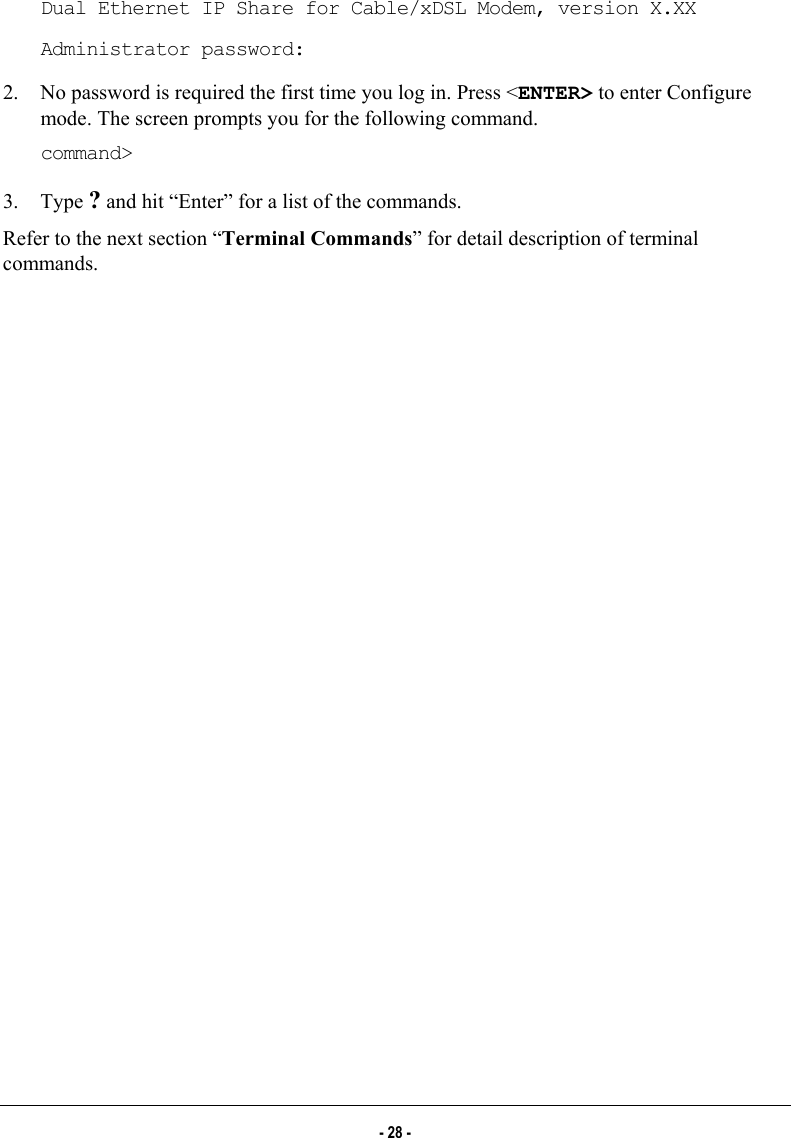
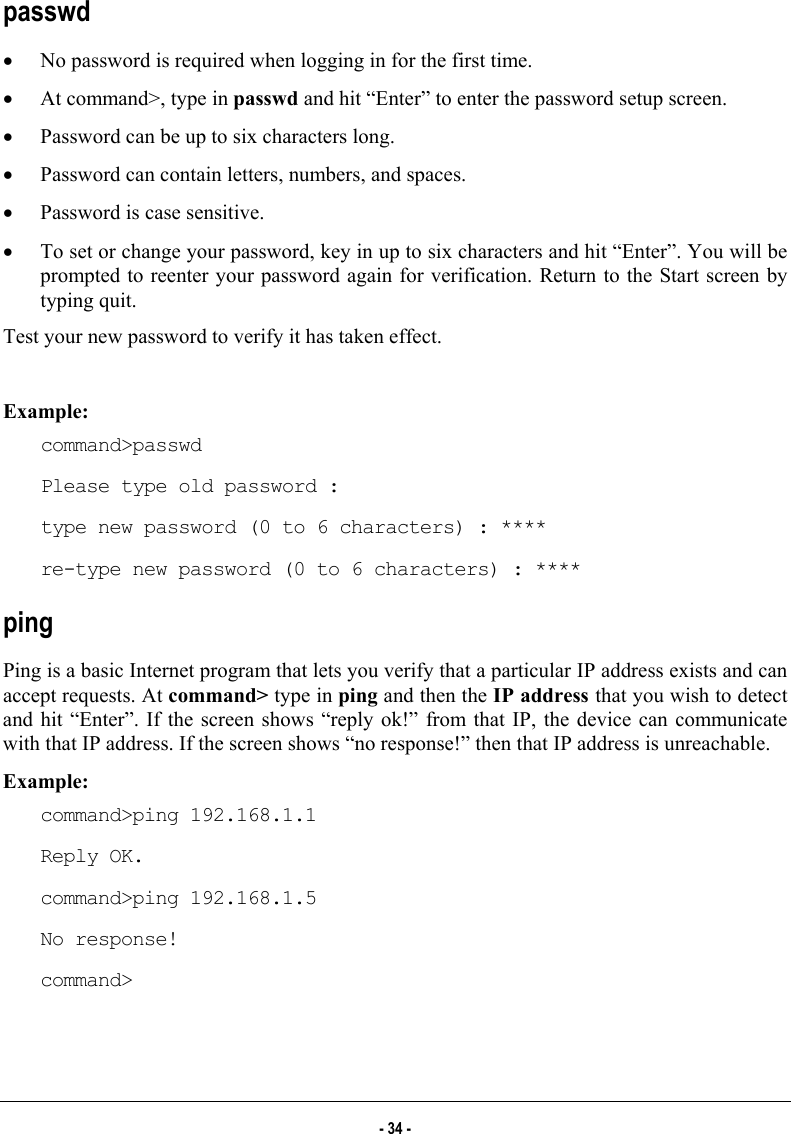
![Enable PPPoE: [No] Obtain global port configuration from ISP : [Yes] .. under claiming IP address of global port : [0.0.0.0] SubNetmask of global port : [0.0.0.0] Device name : [Untitled] Domain name : [Domain] Gateway : [0.0.0.0] Primary DNS server : [0.0.0.0] Secondary DNS server : [0.0.0.0] user Displays the current active users (up to 128 users). Example: command>user IP address Node address Remainder time Host name ----------------+---------------+---------------+--------- 192.168.10.1 0080-C8F8-8A64 5:47:17 Allen 192.168.10.2 0080-C8F8-8A64 expired Calvin 192.168.10.3 0080-C8F8-8A64 0:12:25 Edward 192.168.10.4 0080-C8F8-8A64 2:55:48 Victoria 192.168.10.5 0080-C8F8-8A64 expired SNL Total 5 users, 3 active leases. Elapsed 0:01:03 filter This device supports three types of filter. Each type of filter can be set to perform filter (drop) or forward (pass) function. User can input up to six sets of filter in this device. - 31 -](https://usermanual.wiki/Abocom-Systems/CAS1040.users-manual-5/User-Guide-164259-Page-5.png)
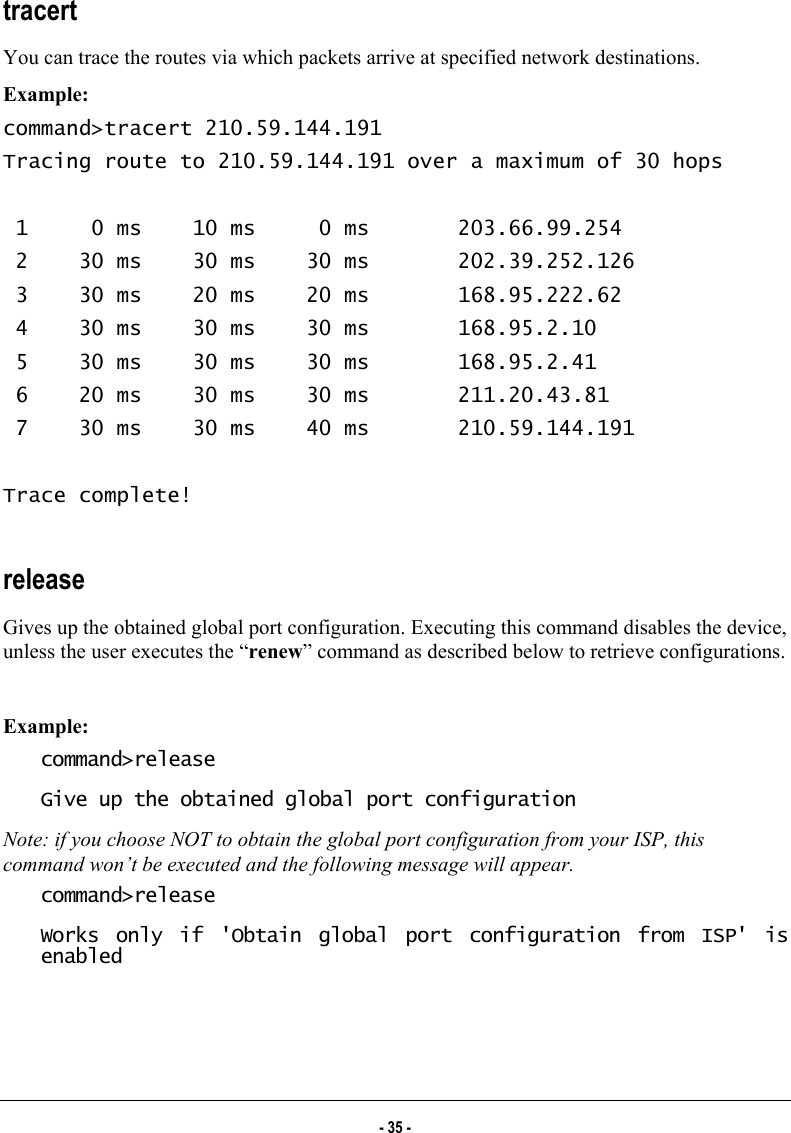
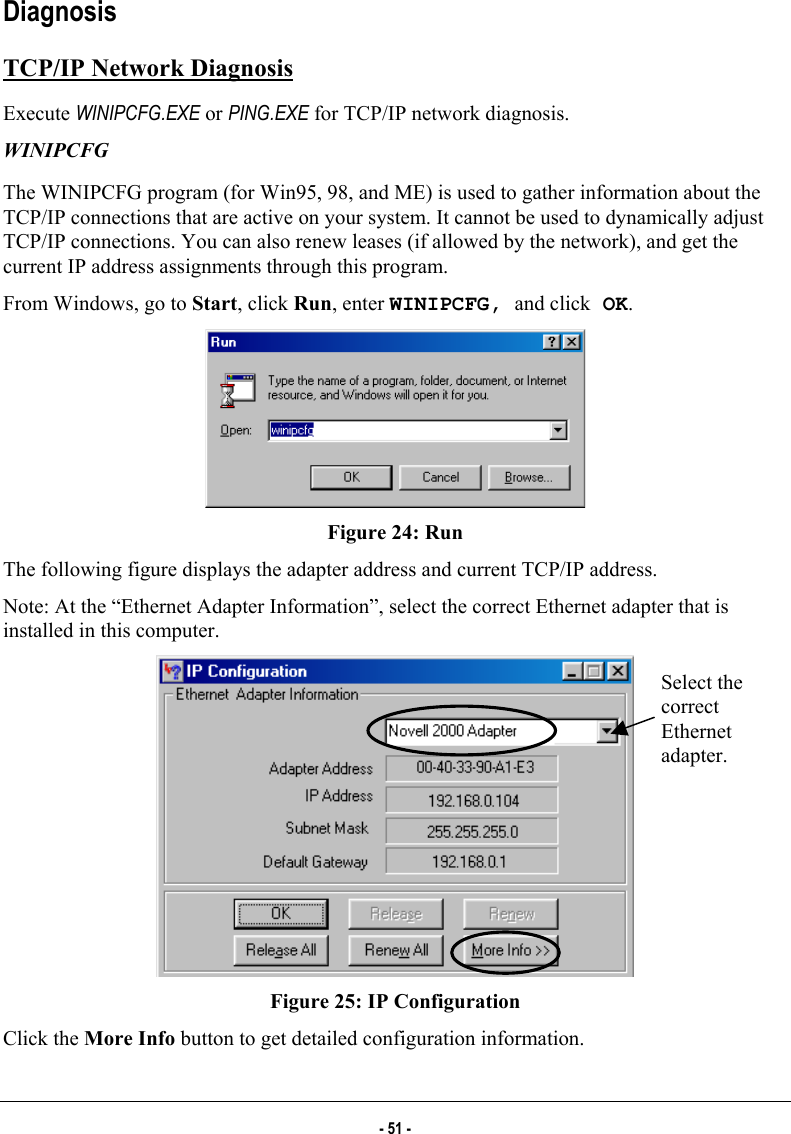
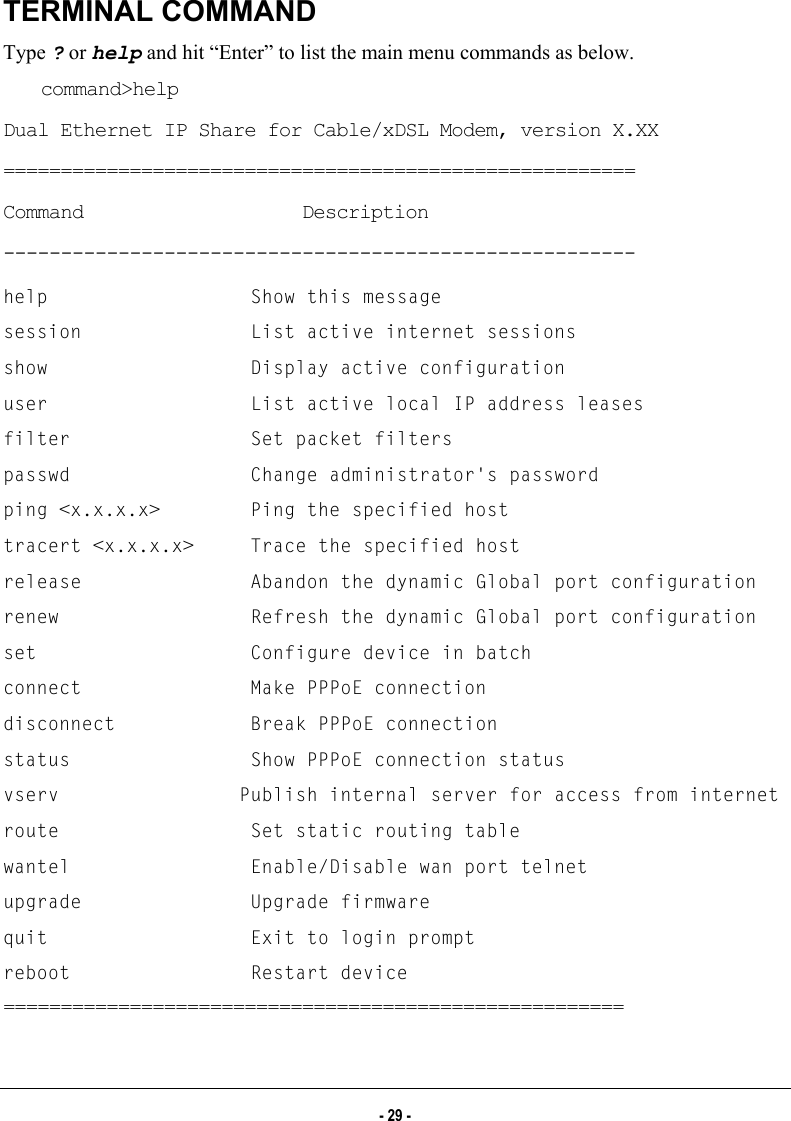
![renew You must renew the global port configuration after you have released it. Otherwise the device is disabled. The ‘Show’ command enables you to see the configuration. The device will not work until you renew the global port configurations. Example: command>renew Update global port configuration (You can type 'Show' command to view the new configuration) Note: If you choose NOT to obtain the global port configuration from your ISP, this command won’t be executed and the following message will appear. command>renew Works only if 'Obtain global port configuration from ISP' is enabled set After executing the set command, the current settings will appear on the screen one at a time. Press Enter to accept the current values in the brackets or input new values and then press Enter to change the value. Press <Esc> at any time to abort this command. Example: command>set Press <ENTER> if you agree with the default value, or <ESC> to escape. IP address of local port [192.168.1.254]: SubNetmask of local port [255.255.255.0]: Distribute IP address to local computers? (Yes/No) [Yes]: Continuous IP address pool start at [192.168.1.1]: Number of IP address in pool [128]: Enable PPPoE? (Yes/No) [No]: Obtain global port configuration from ISP? (Yes/No) [Yes]: - 36 -](https://usermanual.wiki/Abocom-Systems/CAS1040.users-manual-5/User-Guide-164259-Page-10.png)
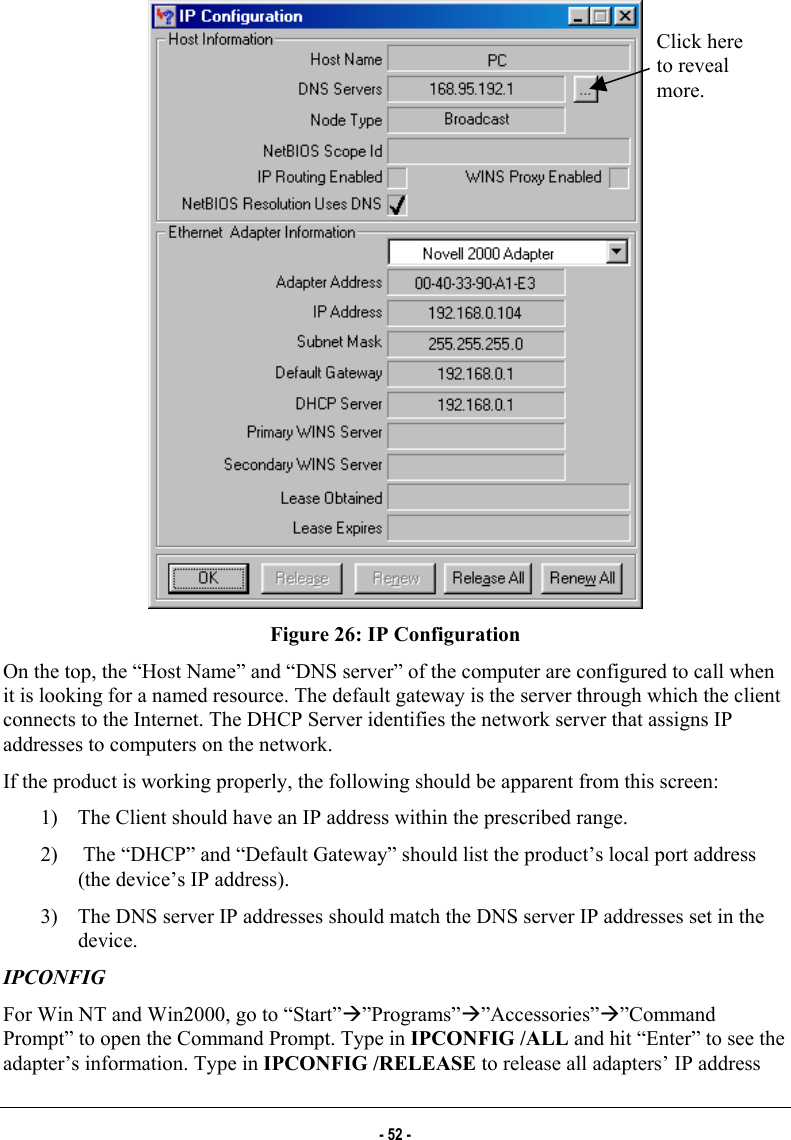
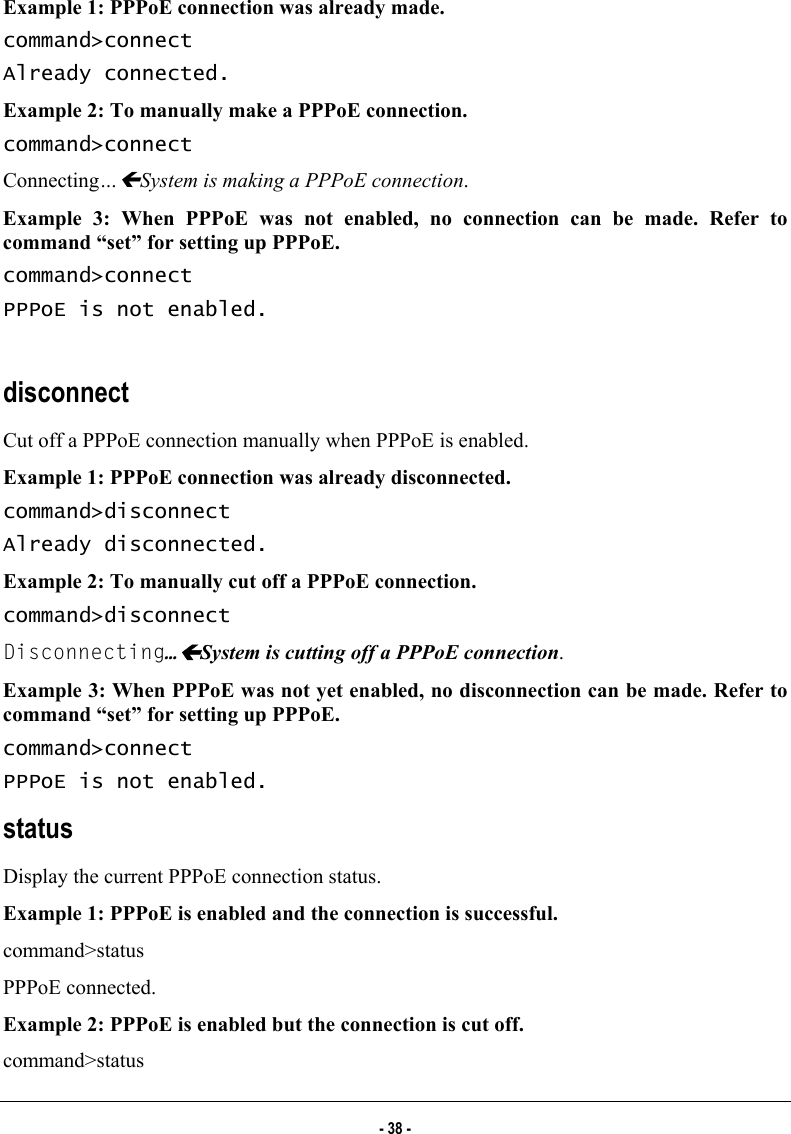
![IP address of global port [0.0.0.0]: Subnet Mask of global port [0.0.0.0]: Device name (0 to 20 characters) [Untitled]: Domain name (0 to 36 characters) [Domain]: Gateway [0.0.0.0]: Primary DNS server [0.0.0.0]: Secondary DNS server [0.0.0.0]: New configuration will be: IP address of local port: [192.168.1.254] Subnet Mask of local port: [255.255.255.0] Distribute IP addresses to local computers: [Yes] Continuous IP address pool starts at: [192.168.1.1] Number of IP address in pool: [128] Enable PPPoE: [No] Obtain global port configuration from ISP: [Yes] IP address of global port: [0.0.0.0] Subnet Mask of global port: [0.0.0.0] Device name: [Untitled] Domain name: [Domain] Gateway: [0.0.0.0] Primary DNS server: [0.0.0.0] Secondary DNS server: [0.0.0.0] Save and reboot? (Yes/No): [No] <type yes and hit “Enter” to save settings, Or type No to cancel the settings. connect Make a PPPoE connection manually when PPPoE is already enabled. - 37 -](https://usermanual.wiki/Abocom-Systems/CAS1040.users-manual-5/User-Guide-164259-Page-11.png)
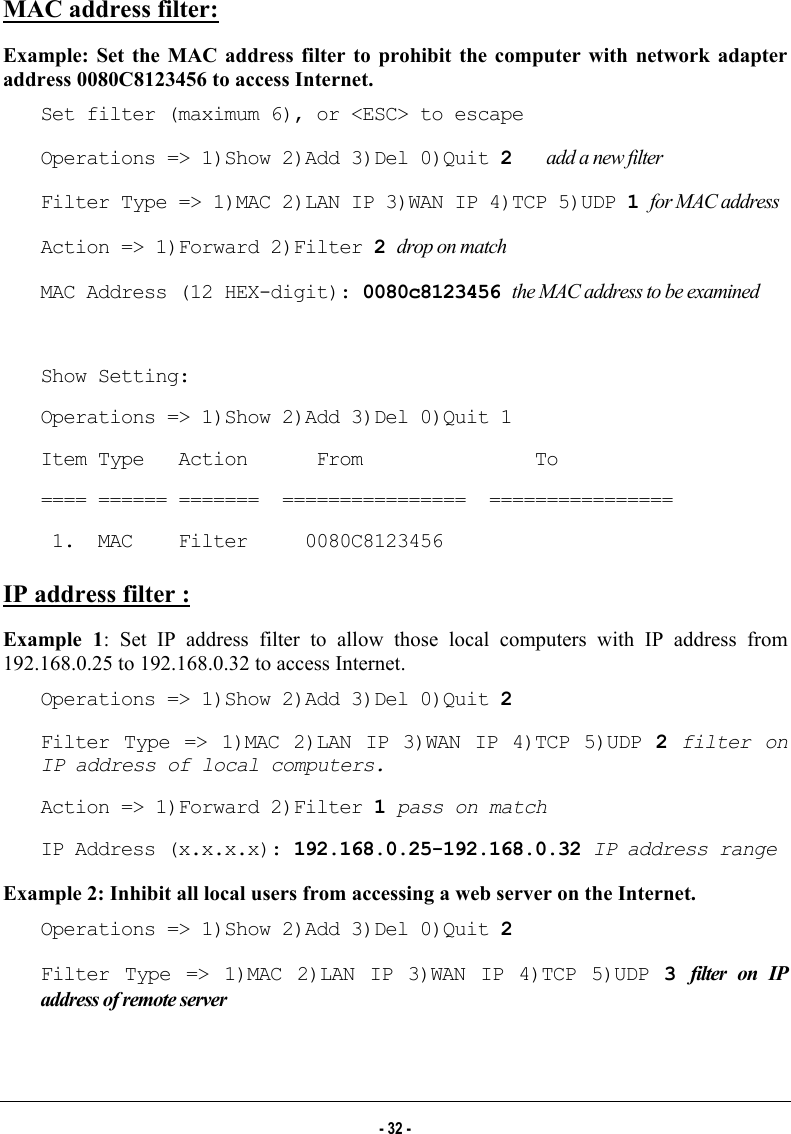
![Operations => 1)Show 2)Add 3)Del 0)Quit: 1 Ídisplay current established static route Item Network IP SubnetMask Gateway ==== ================ ================ ================ 1. 203.66.99.1 255.255.255.0 200.200.200.200 Operations => 1)Show 2)Add 3)Del 0)Quit: 3 ÍDelete a static router Item Network IP SubnetMask Gateway ==== ================ ================ ================ 1. 203.66.99.1 255.255.255.0 200.200.200.200 Which item will be deleted:1 wantel You may manage this device remotely from outside of the network through Telnet. command>wantel Enable(Disable) Wan Port Telnet?(Yes:enable/No:disable)[No] y You must know the Internet Station’s Global Port IP address to be able to perform Telnet configuration. For example, if the Global Port IP is 69.126.2.123, after enabling the wantel, from a computer that can access Internet, open a DOS prompt and the execute telnet 69.126.2.123 333, you should see the Internet Station’s login page. Note: If the Global Port is set to obtain IP automatically, the global port IP address can be different every time the Station login the ISP. Please find the global port IP address before performing remote Telnet configuration. upgrade You can upgrade this IP Sharing device by activating the TFTP Server on the net to acquire the latest software. Before you start the upgrade, make sure you have a TFTP server well installed on any kind of operating system and the new firmware image i.e.FIRMWARE.BIN copied onto it. Example: - 40 -](https://usermanual.wiki/Abocom-Systems/CAS1040.users-manual-5/User-Guide-164259-Page-14.png)